

Page 1
HanoverOutdoorFurniture
IMPORTANT
Ifyouhaveanyproblemswiththisproduct(missingordamagedparts,assemblyissues,etc.),
PLEASEDONOTRETURNTOTHERETAILER/STORE
fromwhereyoupurchasedtheproduct.
PleasecallourToll‐FreeCustomerServiceHotlineat:
Between9:00AMand5:00PMEasternTime,MondaythroughFriday
Orvisitourwebsiteat:
Toexpediteanyfuturewarrantyclaims,pleaseretaintheInstructionSheet,Warranty
Cardandreceiptforfutureuse.
For additionalon‐linesupportonassembly,troubleshootingandcare&maintenanceofyouroutdoor
furniture,pleasevisitourwebsiteat:www.hanover‐products.com.
www.hanover‐products.com
1‐866-988-3300
6/1/2015(b)
Page 2

6!
'
Outdoor'Furniture'
1-Year'Limited'Warranty'Program'
!
For!a!period!of!one!(1)!year!after!date!of!purchase,!the!Manufacturer!will!either!repair!or!replace!defective!components!in!accordance!with!this!
Limited!Warranty.!This!warranty!is!between!the!Manufacturer!and!the!original!purchaser!and!is!valid!only!when!accompanied!by!the!original!
purchaser’s!sales!receipt!showing!original!date!of!purchase!and!location!of!purchase.!!Replacements!under!this!warranty!revert!back!to!the!date!
of!original!purchase!for!future!warranty.!!
!
The!Manufacturer!or!its!authorized!dealer!can!accept!or!reject!warranty!claims!based!on!its!findings.!!This!warranty!applies!in!normal!residential!
use!only!and!is!not!intended!for!commercial!use.!!The!Manufacturer!can!make!substitutions!as!required!of!materials,!components,!and!subcomponents!of!comparable!value!and!utility.!!This!warranty!is!limited!to!product!repair!or!replacement!(to!be!determined!solely!by!the!
Manufacturer).!Warranty!return!is!limited!to!only!the!single!affected!component.!
!
This!limited!warranty!covers!only!manufacturing!defects!and!does!not!cover!normal!wear!and!tear,!damage!due!to!acts!of!nature!(such!as,!but!
not!limited!to!freezing!or!high!winds),!abuse!or!misuse,!including!chemical!damage!from!suntan!oil!or!other!chemicals,!exposure!to!extreme!heat!
or!cold,!abrasion!or!excessive!weight.!!This!product!is!intended!to!be!used!in!standard!installations!only.!!This!warranty!is!void!if!the!product!is!
not!used!for!its!intended!purpose.!!The!Manufacturer!disclaims!liability!for!any!aspect!of!installation!and!any!inconvenience!caused!by!a!defective!
part!of!a!component.!
!
Certain!items!are!not!covered!by!this!warranty.!!These!include,!but!are!not!limited!to!the!following:!!!
1. Components!subjected!to!abuse,!including!abuse!intended!to!simulate!failure.!!
2. Damages!caused!by!retailer,!shipper!or!installation!crew!(such!as!scratches,!dents,!tears,!chips,!etc.).!
3. Any!part!which!merely!exhibits!normal!wear!yet!functions!essentially!as!new,!including!chips,!scratches!or!stretching!of!materials!and!
stitching.!!
4. Tears,!punctures,!scratches!or!any!damage!caused!by!improper!installation!or!use.!
5. Damage!to!frames/welds!resulting!from!improper!assembly!or!exposure!to!water!and/or!sub-freezing!temperatures!is!not!covered.!!
General!frame!rusting!is!not!covered.!
6. Fading!and/or!discoloration!of!fabrics/cushions/straps/wicker!resulting!from!exposure!to!the!elements,!chemicals,!oils,!fluids!or!any!
other!cause!are!not!covered.!
7. Umbrella!bases!are!not!covered!under!any!circumstances.!!
8. Items!sold!“as!is”!or!floor!models.!
!
To!make!a!claim,!call!the!toll-free!number!below.!!Please!have!available!a!copy!of!the!original!sales!receipt!along!with!a!brief!description!of!th e!
problem.!!Please!also!provide!your!email!address!and!daytime!telephone!or!cell!phone!number.!!All!items!may!be!charged!actual!freight!costs!
plus!$15!for!handling.!!Repairs!or!replacement!will!be!made!at!the!Manufacturer’s!option.!!Sales&and&use&taxes,&plus&shipping&and&handling&
charges&are&the&responsibility&of&the&consumer.&
!
THIS'IS'THE'ENTIRE'EXCLUSIVE'EXPRESS'LIMITED'LIABILITY.'THE'MANUFACTURER'NEITHER'MAKES'NOR'IS'RESPONSIBLE'FOR'ANY'OTHER'WARRANTIES,'EITHER'
EXPRESS'OR'IMPLIED,'INCLUDING'THOSE'OF'RETAILING'DEALERS.'THIS'EXCLUSIVE'REMEDY'IS'LIMITED'TO'RECEIPT'OF'A'CREDIT'IN'CONNECTION'WITH'THE'
REPAIR'OR'REPLACEMENT'OF'ANY'PRODUCT'OR'COMPONENT'DEEMED'TO'BE'DEFECTIVE'UNDER'THE'TERMS'AND'CONDITIONS'AS'STATED'IN'THIS'WARRANTY.'
NEITHER'THE'PRODUCT'MANUFACTURER'NOR'ITS'AGENTS'SHALL'BE'LIABLE'IN'ANY'CASE'FOR'INCIDENTAL,'INDIRECT,'SPECIAL'OR'CONSEQUENTIAL'DAMAGES'
RESULTING'FROM'THE'USE'OF'THIS'PRODUCT'OR'ARISING'OUT'OF'ANY'BREACH'OF'THIS'WARRANTY'OR'NEGLIGENCE'EVEN'IF'IT'HAS'BEEN'ADVISED'OF'THE'
POSSIBILITY'OF'SUCH'DAMAGES.'EXCEPT'AS'OTHERWISE'MAY'BE'REQUIRED'BY'LAW,'THERE'ARE'NO'OTHER'EXPRESS'OR'IMPLIED'WARRANTIES'OTHER'THAN'
THE'WARRANTY'DESCRIBED'HEREIN,'AND'ALL'OTHER'WARRANTIES,'INCLUDING'ANY'IMPLIED'WARRANTY'OF'MERCHANTABILITY'OR'FITNESS'FOR'A'
PARTICULAR'PURPOSE'ARE'EXPRESSLY'DISCLAIMED.'
'
Contact'Customer'Service'at'1-866-988-3300'
'
'
6/1/2015!(a)!
Page 3
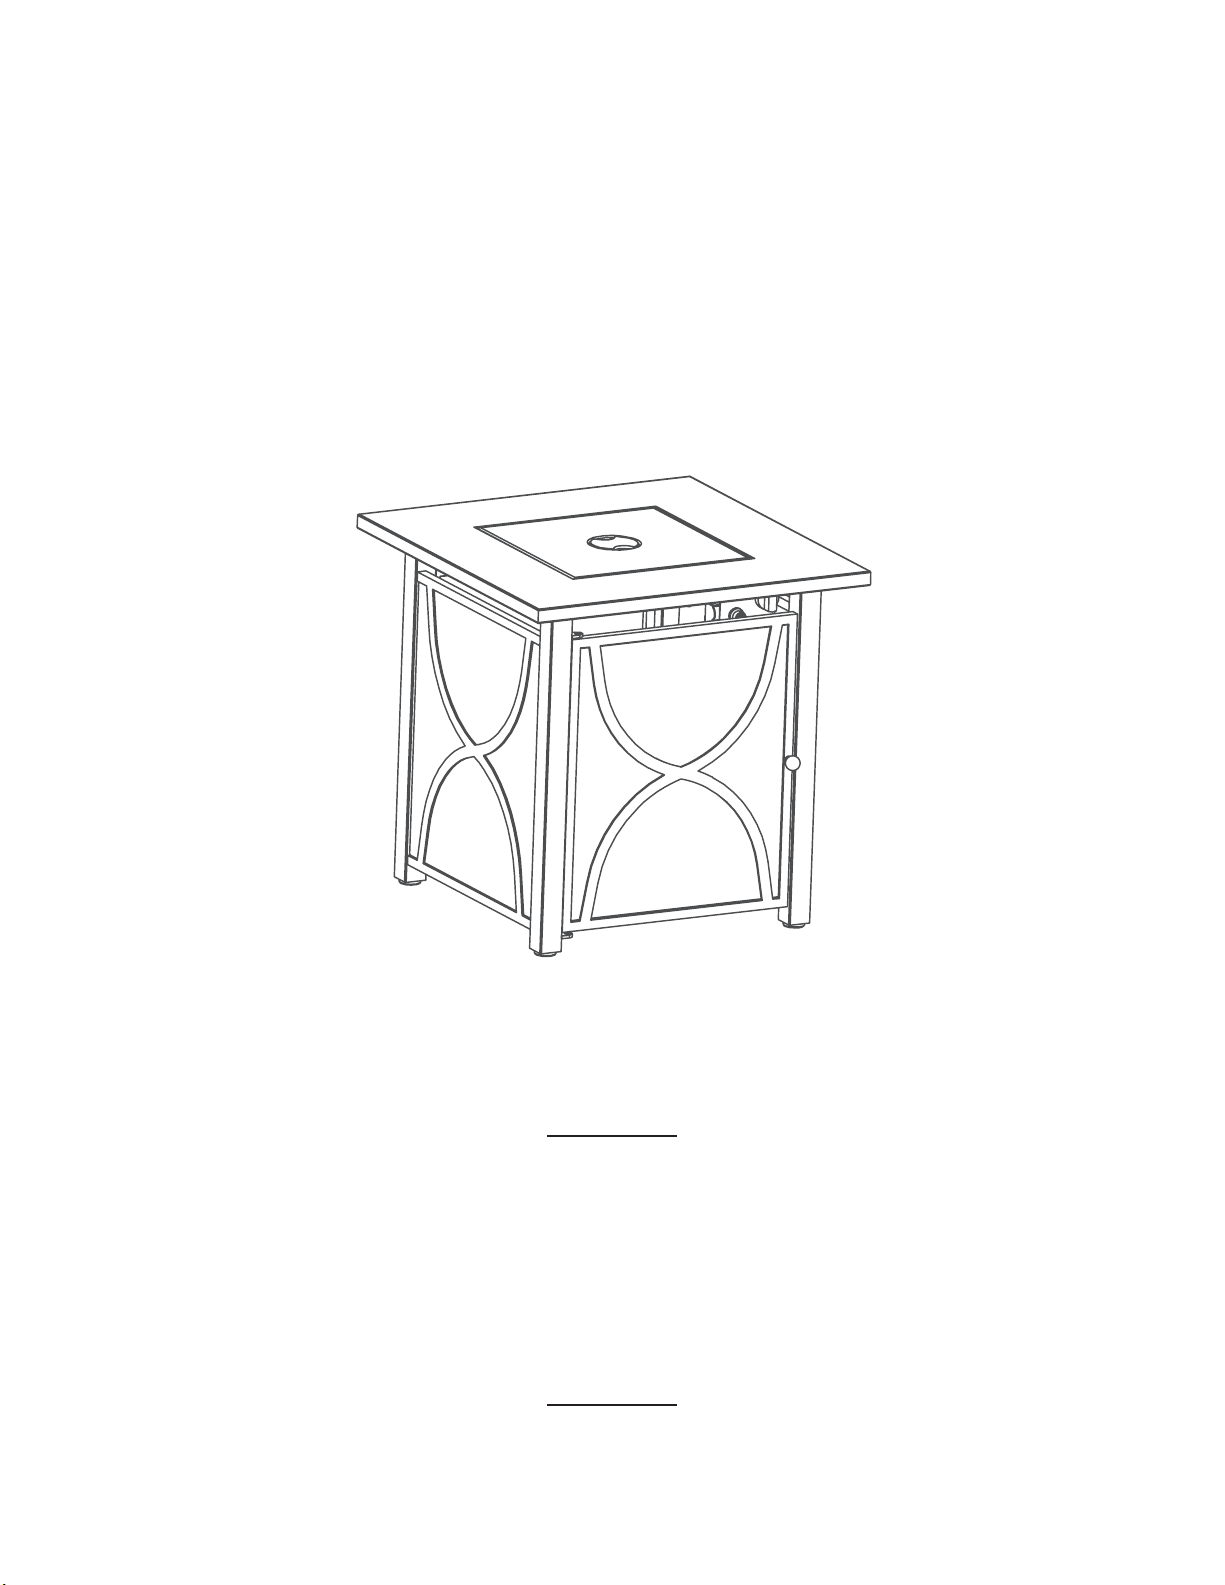
Assembly Instructions
FHTS80021D
Gas Fire Table
Questions, problems, or missing parts?
Before returning to the store, call Customer Service.
1-866-988-3300
8 a.m. - 5 p.m., PST Monday - Friday
Retain this manual for future use.
Page 4
Contents
Safety Instructions
Parts List
Assembly
Operation
Cleaning & Maintenance
Troubleshooting
Warranty
3
10
11
26
27
29
31
32
FHTS80021D
This appliance complies with “ANSI Z21.97-2017/CSA 2.41-2017,
Outdoor Decorative Gas Appliances.”
IMPORTANT: RETAIN FOR FUTURE REFERENCE, AND READ CAREFULLY.
Page 5
Safety Instructions
WARNING
For your safety: For outdoor use only (outside,
non-enclosed area). Do not use for cooking.
WARNING
If the information in this manual is not followed
property damage, personal injury or loss of life.
WARNING
Improper installation, adjustment, alteration,
service or maintenance can cause injury or
property damage.
Read the installation, operation and
maintenance instructions thoroughly before
installing or servicing this equipment.
WHAT TO DO IF YOU
SMELL GAS
• Do NOT try lighting any appliance.
• Do NOT touch any electrical switch.
• Do NOT use any phone in your building.
• Immediately call your gas supplier from
a neighbor’s phone.
• Follow the gas supplier’s instructions.
• If you cannot reach your gas supplier,
Installation and service must be
service agency or gas supplier.
INSTALLER: Leave this manual with
the appliance.
CONSUMER: Retain this manual for
future reference.
If you are assembling this unit for
someone else, give this manual to him or
her to read and save for future reference.
WARNING
For your safety:
1. Do NOT store or use gasoline or other
this or any other appliance.
2. An LP-cylinder not connected for use shall
not be stored in the vicinity of this or any
other appliance.
DANGER - CARBON
MONOXIDE HAZARD
• This appliance can produce carbon monoxide
which has no odor.
• Using it in an enclosed space can kill you.
• Never use this appliance in an enclosed space
such as camper, tent, car or home.
DANGER
If you smell gas:
1. Shut off gas to appliance.
3. If odor continues, keep away from the
appliance and immediately call your gas
Failure to follow these instructions could
cause property damage, personal injury,
or death.
DANGER
Do NOT leave this appliance unattended
while it is in operation.
FHTS80021D
Page 6
Safety Instructions
WARNING FIRE TABLE IS FOR OUTDOOR USE ONLY
WARNING
Failure to follow the dangers, warning and cautions in this manual may result in serious bodily
IMPORTANT NOTICE
table. Improper installation, adjustment, alteration, service or maintenance can cause injury or
property damage.
The installation of this unit must adhere to local codes or either the National Fuel Gas Code, ANSI
Z223. 1/NFPA54, or CAN/CGA-B149.1, Natural Gas and Propane Installation Code.
Minimum Clearance from Unit to Combustible Materials:
under any overhead enclosure.
IF YOU SMELL GAS
• Do not try lighting any appliance.
• Do not touch any electrical switch; do not use any phone in your building.
• Immediately call your gas supplier from a neighbor’s phone.
• Follow the gas supplier’s instructions.
• Keep these instructions for future reference. If you are assembling this unit for someone else,
give this manual to him or her to read and keep for future reference.
used inside a building, garage, or any other enclosed area.
accumulate and cause asphyxiation.
• This unit is to be used with propane gas only! (sold separately)
• Do not attach a remote gas supply to this unit.
FHTS80021D
Page 7
Safety Instructions
• Only use propane gas for this unit.
• Converting this unit to natural gas is dangerous. This conversion kit shall be installed by a
codes and requirements of the Authority having jurisdiction. The maximum inlet natural gas
any other appliance.
• Do not store any combustible materials in the base enclosure.
• The use of alcohol, prescription or non-prescription drugs may impair an individual’s ability to
combustible materials, such as gasoline.
• Always use in accordance with all applicable local, provincial and national codes. Contact your
• DO NOT burn solid fuels such as: wood, charcoal briquettes, lump charcoal, manufactured logs,
driftwood, trash, leaves, paper, cardboard, plywood, or painted, stained or pressure-treated
• DO NOT paint or colour any part of this heating unit.
fastened and tightened.
in operation.
combustible constructions.
• Avoid using near or under overhanging trees and shrubs.
rock or stone. An asphalt or blacktop surface may not be acceptable for this purpose.
control which has been under water.
• DO NOT set the protective cover over the unit until it is turned off and completely cooled down.
• DO NOT use in windy conditions.
hot surfaces until the unit has cooled unless you are wearing protective gear such as insulated
pot holders or heat-resistant gloves or mittens to avoid burns.
• Use only the regulator and hose assembly provided. The replacement regulator and hose
• Always shut off the supply at the tank valve and disconnect regulator from the tank when the
FHTS80021D
Page 8
Safety Instructions
• Lava rocks are very hot; please keep children or pets at a safe distance.
• Check for leaks after not using the unit for long periods of time.
looking through the visual check hole. If the hose is damaged, cracked or cut, it must be
• Before each use, remove the lava rocks. Examine the burner and its components. If dirty, clean
with a soft brush and soapy water solution. Also examine the area around the burner. Any dirt or
foreign material, such as spider webs or nests in this area should be removed. If it is evident that
replaced. Please contact the service centre at 1-877-483-6759 for technical support.
• Place the hose out of the pathways where people may trip over it (if using external tank). Do not
place the hose in areas where it may be subjected to accidental damage.
ATTENTION:
operations manual will void manufacturer warranty.
PROPANE (LP) DANGERS & WARNINGS
LP GAS
before using any LP gas product.
• Flammable, explosive under pressure, heavier than air and settles in pools in low areas.
• In its natural state, propane has no odor. For your safety, an odourant has been added.
• Contact with propane could burn your skin.
LP GAS WARNINGS:
• Cylinders must be stored outdoors in a well-ventilated area out of reach of children.
• Disconnected cylinders must have threaded valve plugs tightly installed and must not be stored
in a building, garage or any other enclosed area.
• Never use a propane cylinder with a damaged body, valve, collar or footing.
gas supplier.
• Be sure to use only one 20 lb (9.1 kg) LP gas cylinder with a Type 1 valve with this appliance
as required by the American National Standards Institute (ANSI) and the Canadian Standards
Steering Committee.
• Only tanks marked “propane” may be used.
• The installation of this unit must adhere to local codes or either the National Fuel Gas Code,
FHTS80021D
Page 9
Safety Instructions
ANSI Z223.1/NFPA54, or CAN/CGA-B149.1, Natural Gas and Propane Installation Code.
• LP gas tank must be arranged for vapour withdrawal.
(CGA810) LP gas tank connection.
• The LP gas tank must have a tank collar to protect the tank valve.
• Never use an LP gas tank with a damaged body, valve, collar, or footing. Dented or rusted LP gas
• The LP gas tank should not be dropped or handled roughly.
• Tanks must be stored outdoors out of the reach of children. Do NOT store in a building, garage,
or any other enclosed area.
• Never store your LP gas tank where temperatures can reach over 125°F (52°C).
• Do not store the LP gas cylinder in direct sunlight or near a source of heat or combustion.
increase, which may open the relief valve and allow gas to escape.
• Place dust cap on valve outlet whenever the LP gas tank is not in use. Only install the
recommended type of dust cap on the LP gas tank and the LP gas tank valve. Other types of
caps or plugs may result in leakage of propane.
a. Do not store a spare LP gas cylinder under or near this appliance.
injury may occur.
• Never attempt to attach this appliance to the self-contained LP gas system of a camper trailer,
motor home or house.
• Always use the pressure regulator and hose assembly provided with the appliance to connect to
a LP gas cylinder. Never connect to an unregulated LP gas supply. For technical support contact
the service center at 1-877-483-6759.
Before connecting, be sure that there is no debris caught in the head of the gas cylinder, head of
HOSE & REGULATOR ASSEMBLY & REPLACEMENT
appliance side connection for a CGA No 791 Cylinder Connection Device. The LP gas hose
manufacturer can be used for replacement.
FHTS80021D
Page 10
Safety Instructions
b. If the burner valve is open prior to the LP gas cylinder service valve being opened, the
a minimal level.
d. Be sure that the burner control valve is closed prior to opening the LP gas cylinder
mistakenly.
service valve and the burner valve, wait 10 seconds to allow the device to reset, open
lighting instructions.
2. Be sure to protect the hose from any hot surfaces. Serious danger may result if the hose
contacts any hot surface.
3. Regular maintenance of the hose and regulator:
abrasions, cuts or damage of any kind, do not operate the appliance. Fix or replace the
hose as required before using the appliance. For assistance with repair or replacement
of the hose, call the service center at 1-877-483-6759. Use only replacement parts from
the manufacturer.
b. Inspect the seal inside the CGA No 791 service valve on the LP gas cylinder when
replacing the cylinder or at least once per year. If there is any indication of damage, have
4. Do not use tools to tighten the CGA No 791 connection nut onto the LP gas cylinder service
5. Be careful to not cross the threads on the connection when tightening the CGA No 791
connection onto the LP gas cylinder service valve.
6. “Leak Test” should always be performed after attaching the connection to the LP gas cylinder
service valve. See “Checking for Leaks” section of this manual in Step 12, page 24.
7. Connection instructions are on pages 20–21 (Steps 9–10 in Assembly section).
FHTS80021D
Page 11
Safety Instructions
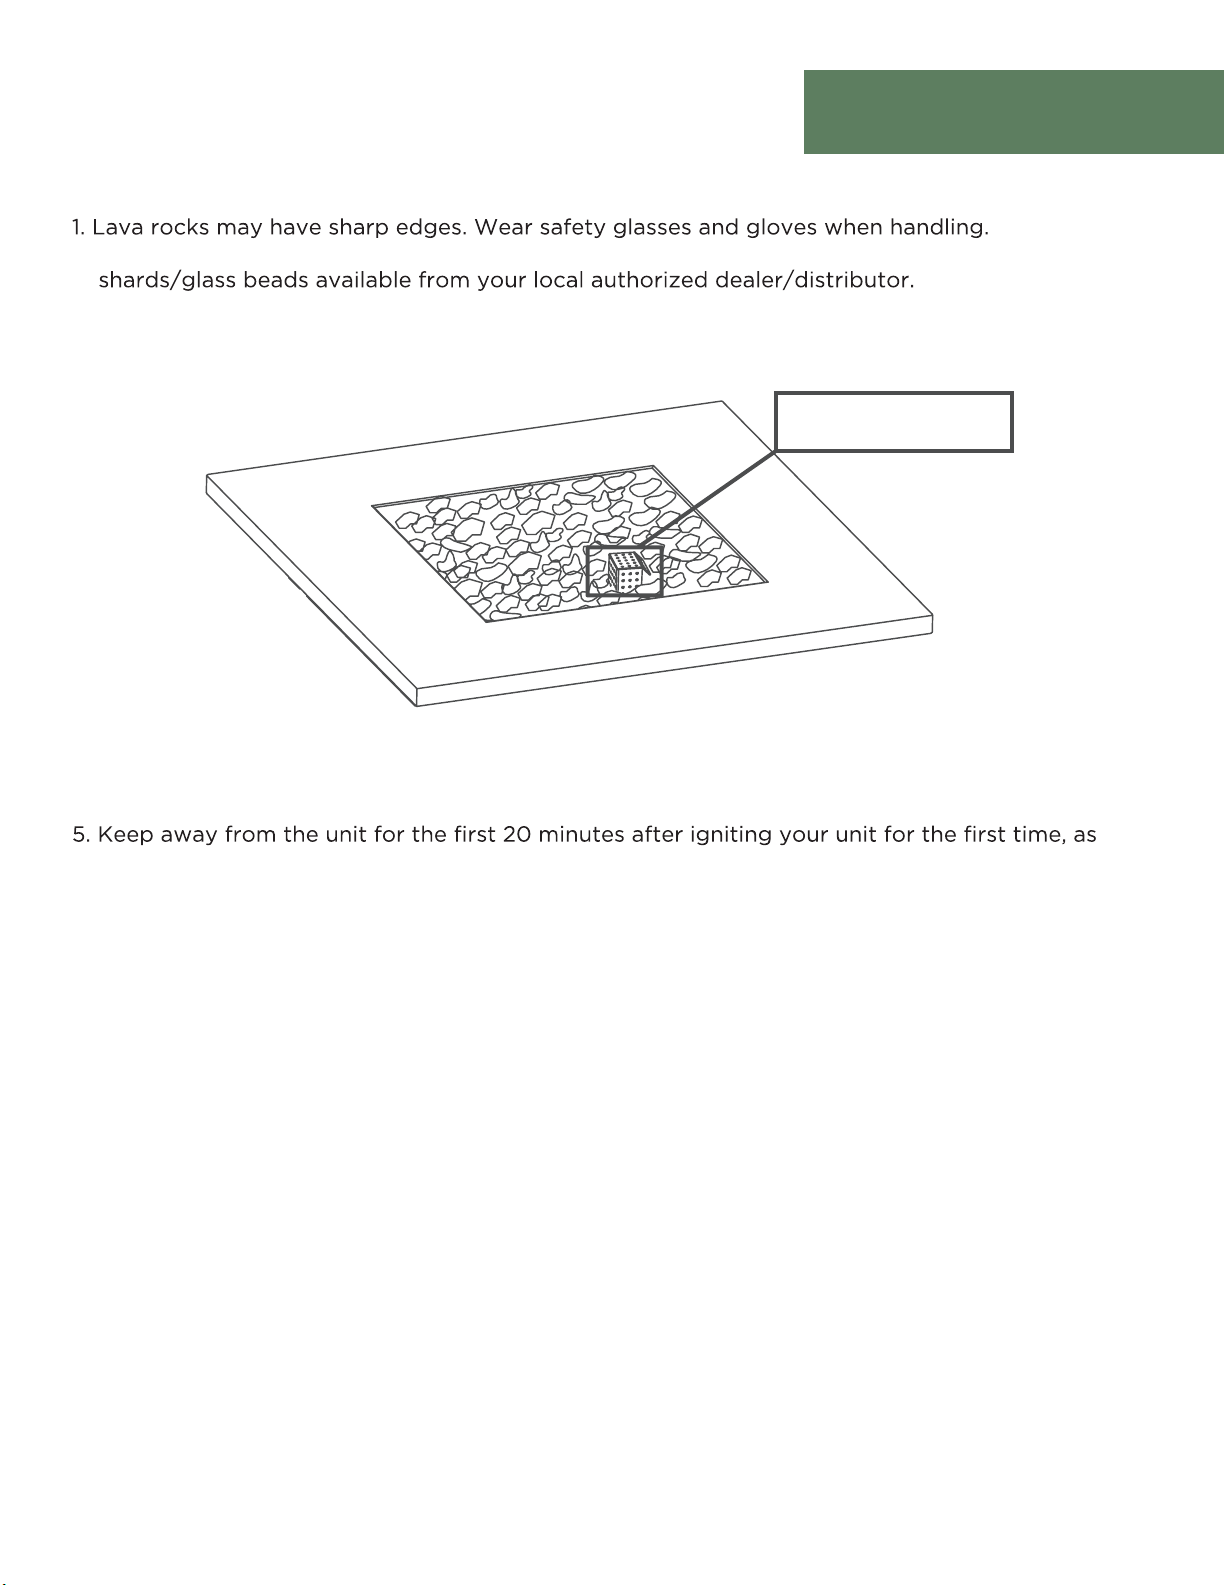
LAVA ROCKS WARNING:
2. If changing or substituting the lava rocks with other media, use lava rocks/pumice stones/glass
3. Pour the lava rocks evenly into the burner area (with the exception of the screen—if applicable).
The lava rocks should be 1/2 to 1” (1.2 to 2.5 cm) above the burner.
DO NOT PLACE ANY
MEDIA ON SCREEN
4. IMPORTANT: Do not exceed a height of 1” (2.5 cm) above the burner when placing lava rocks
or other media. Ensure no media covers the igniter screen. Store any excess lava rocks in a
safe location.
lava rocks/pumice stones/glass beads could pop out and cause injury. Should any rocks pop
out, discard them.
6. Always ensure that lava rocks/pumice stones/glass shards/glass beads are completely dry
before use. Failure to do so will cause them to crack or pop.
FHTS80021D
Page 12
Parts List
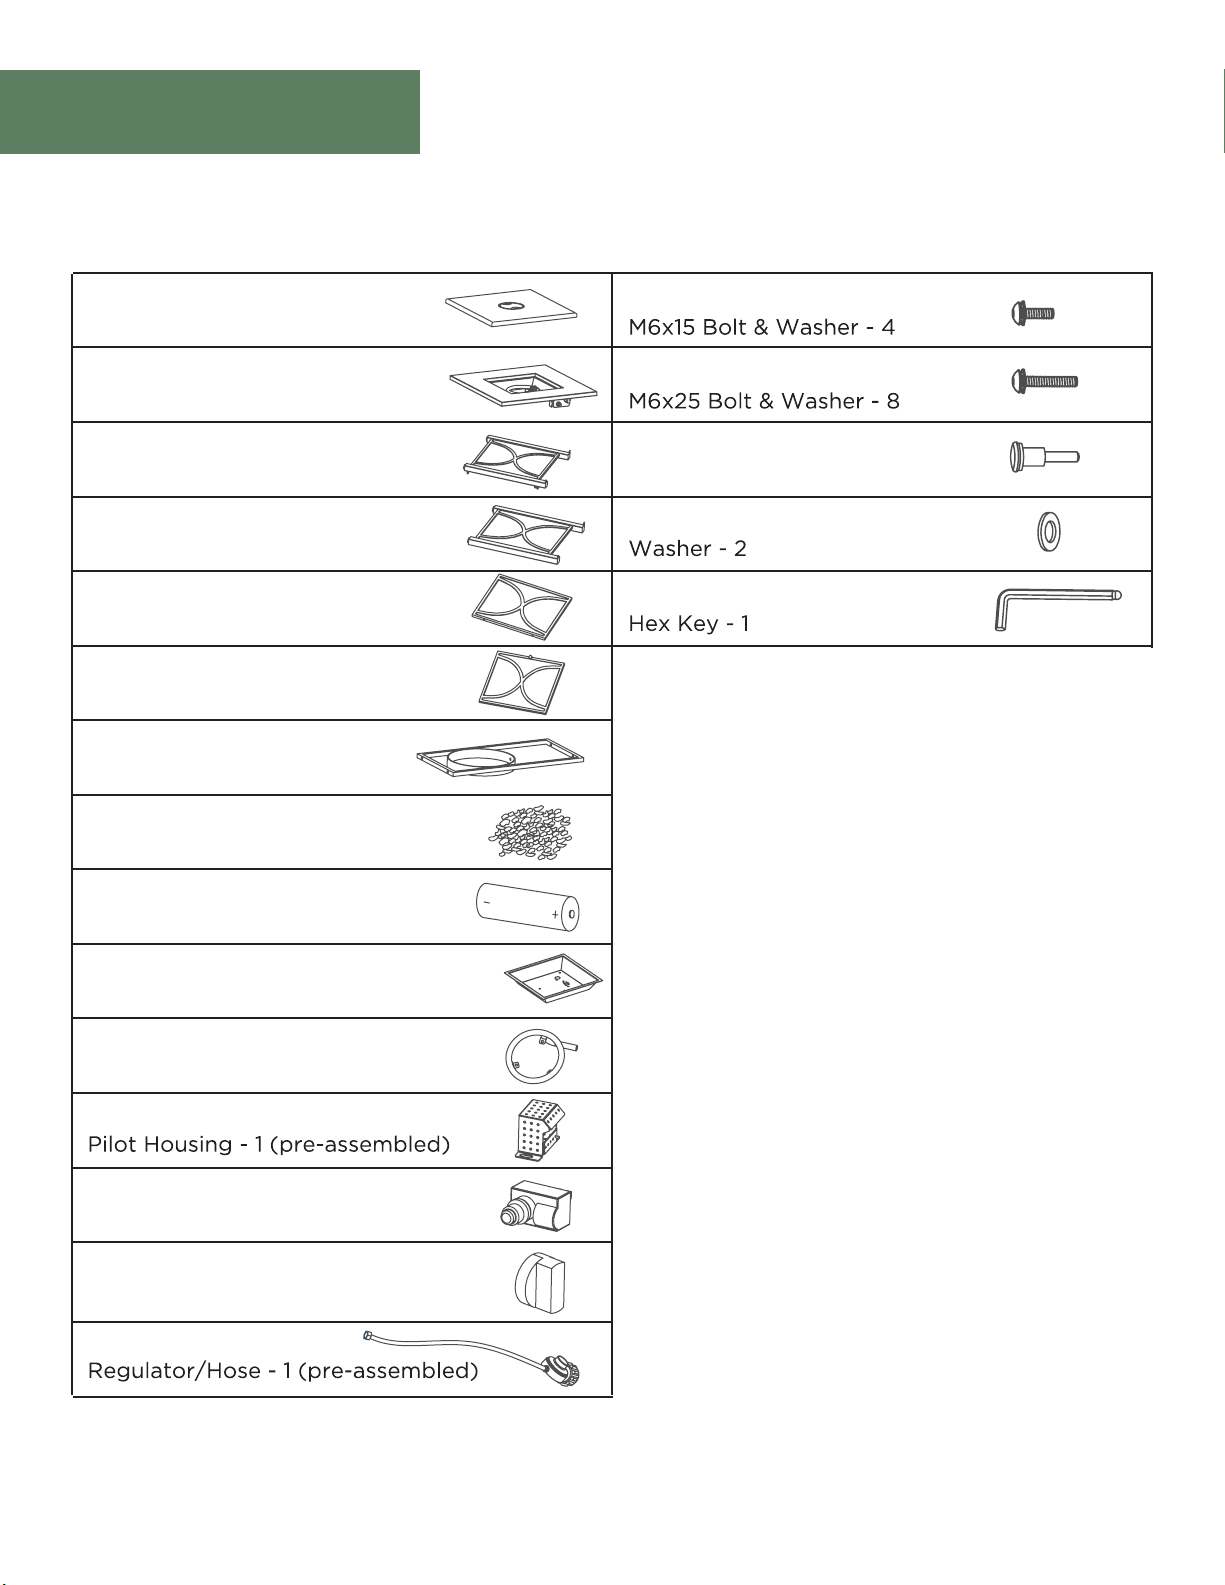
A
Burner Lid - 1
B
Table Top - 1
C
Left Side Panel - 1
D
Right Side Panel - 1
E
Back Panel - 1
F
Door - 1
G
Tank Support - 1
H
Lava Rocks - 1 bag
AA
BB
CC
Bolt - 1
DD
EE
I
AAA Battery - 1
J
Square Burner Bowl - 1 (pre-assembled)
K
Burner Ring - 1 (pre-assembled)
L
M
Flame Ignitor - 1 (pre-assembled)
N
Switch Knob - 1 (pre-assembled)
O
FHTS80021D
Page 13
Assembly
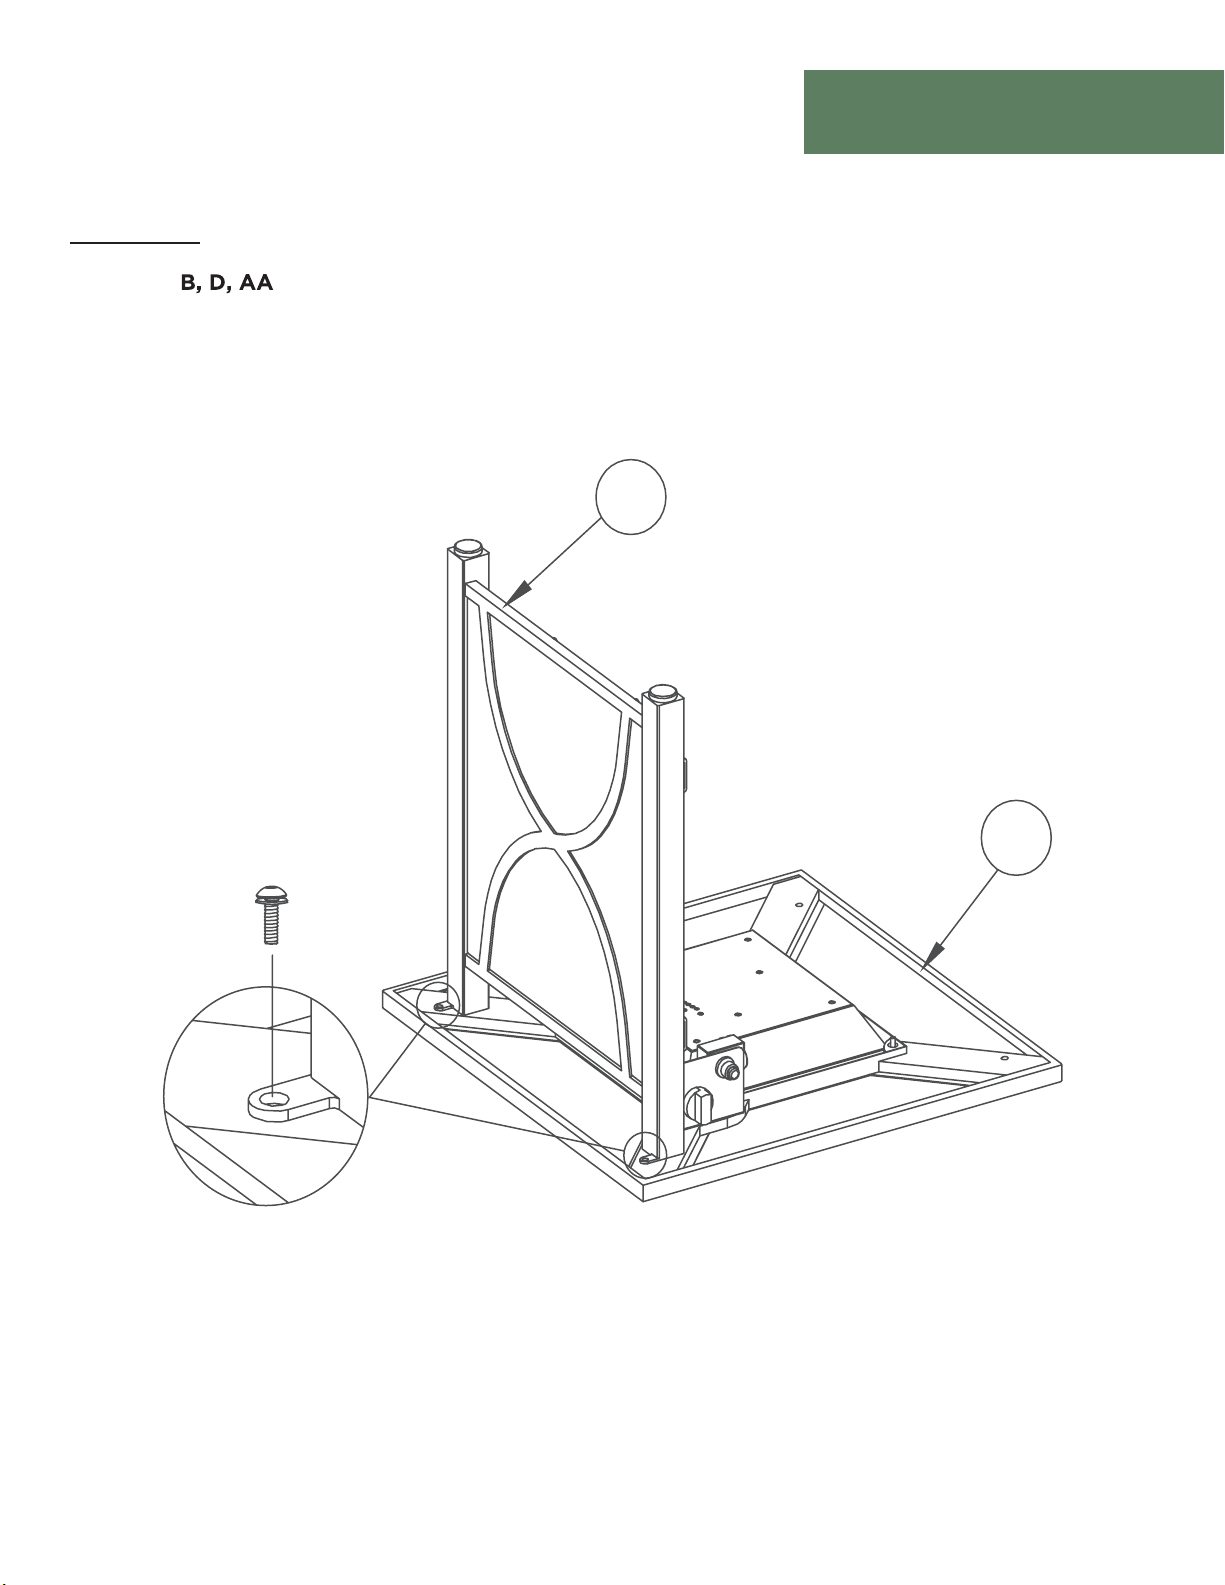
STEP 1
Requires:
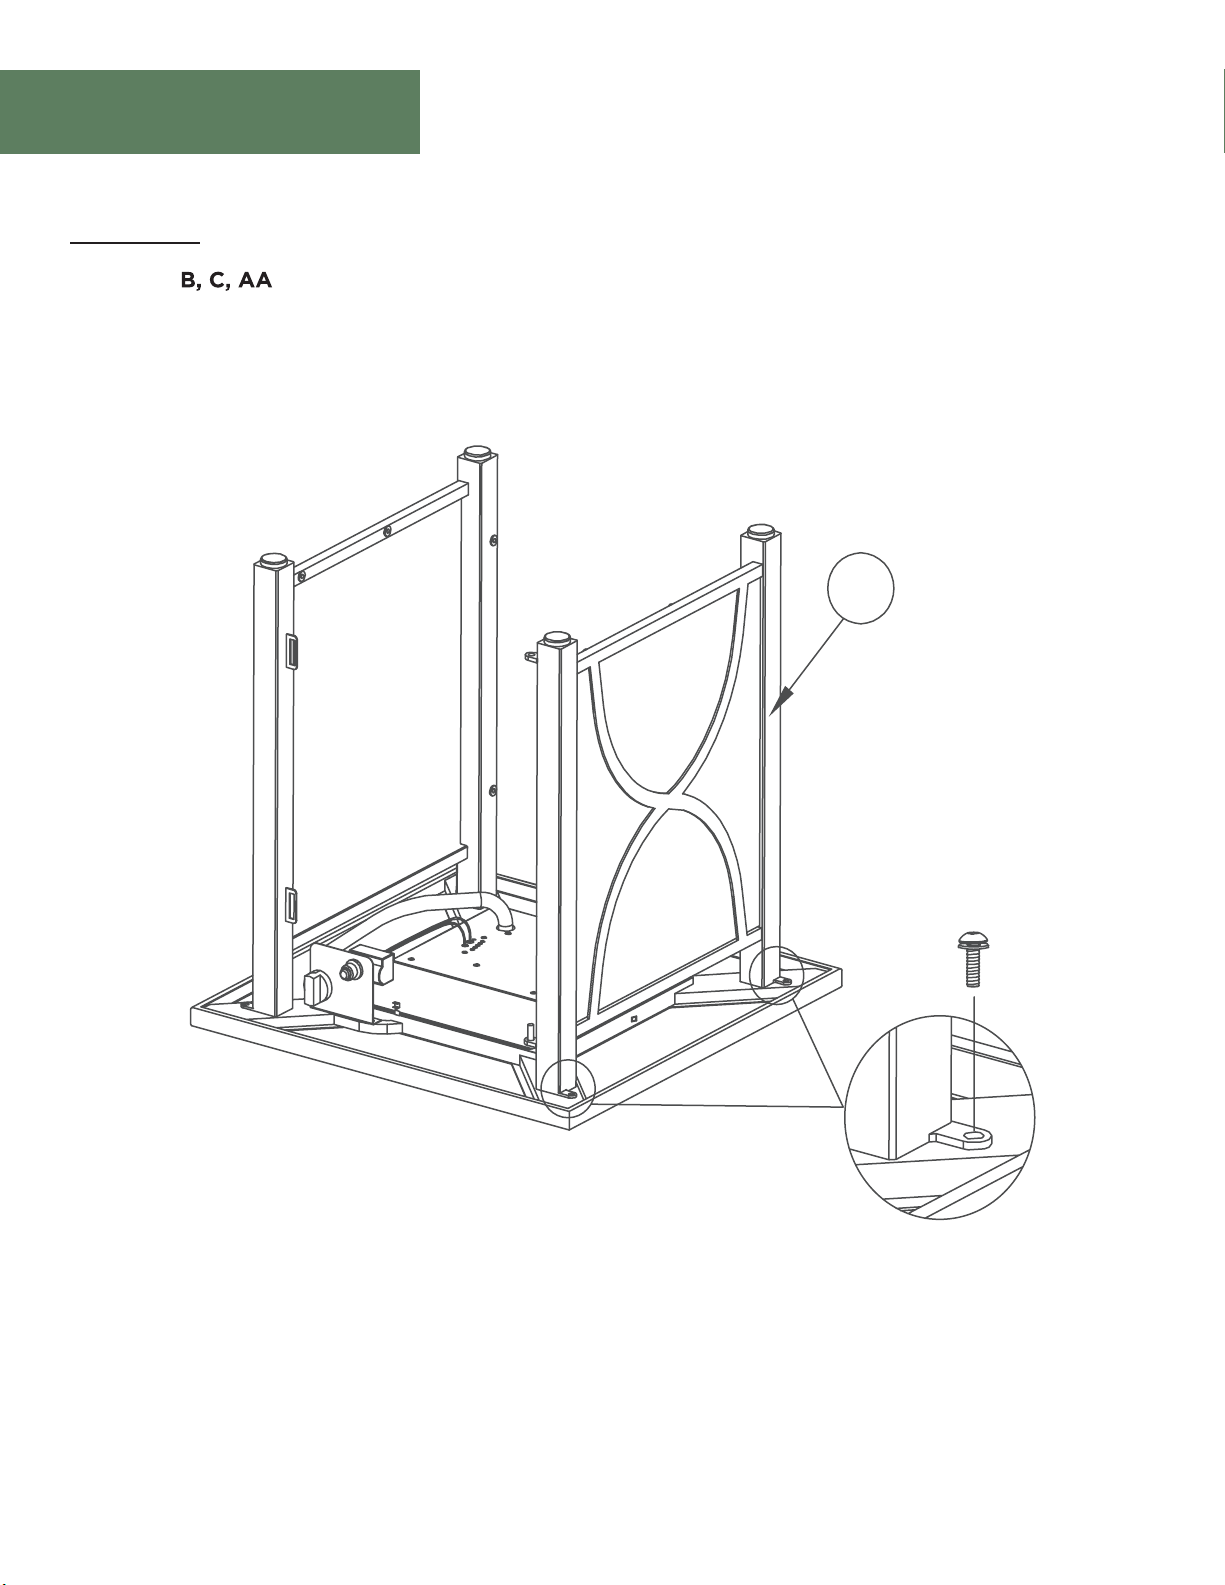
Place the table top (B) upside down on a soft surface. Line up the bolt holes on the table top (B)
with the corresponding bolt holes on right side panel (D). Insert M6x15 bolt and washer (AA) and
tighten by hand.
D
AA
B
FHTS80021D
Page 14
Assembly
STEP 2
Requires:
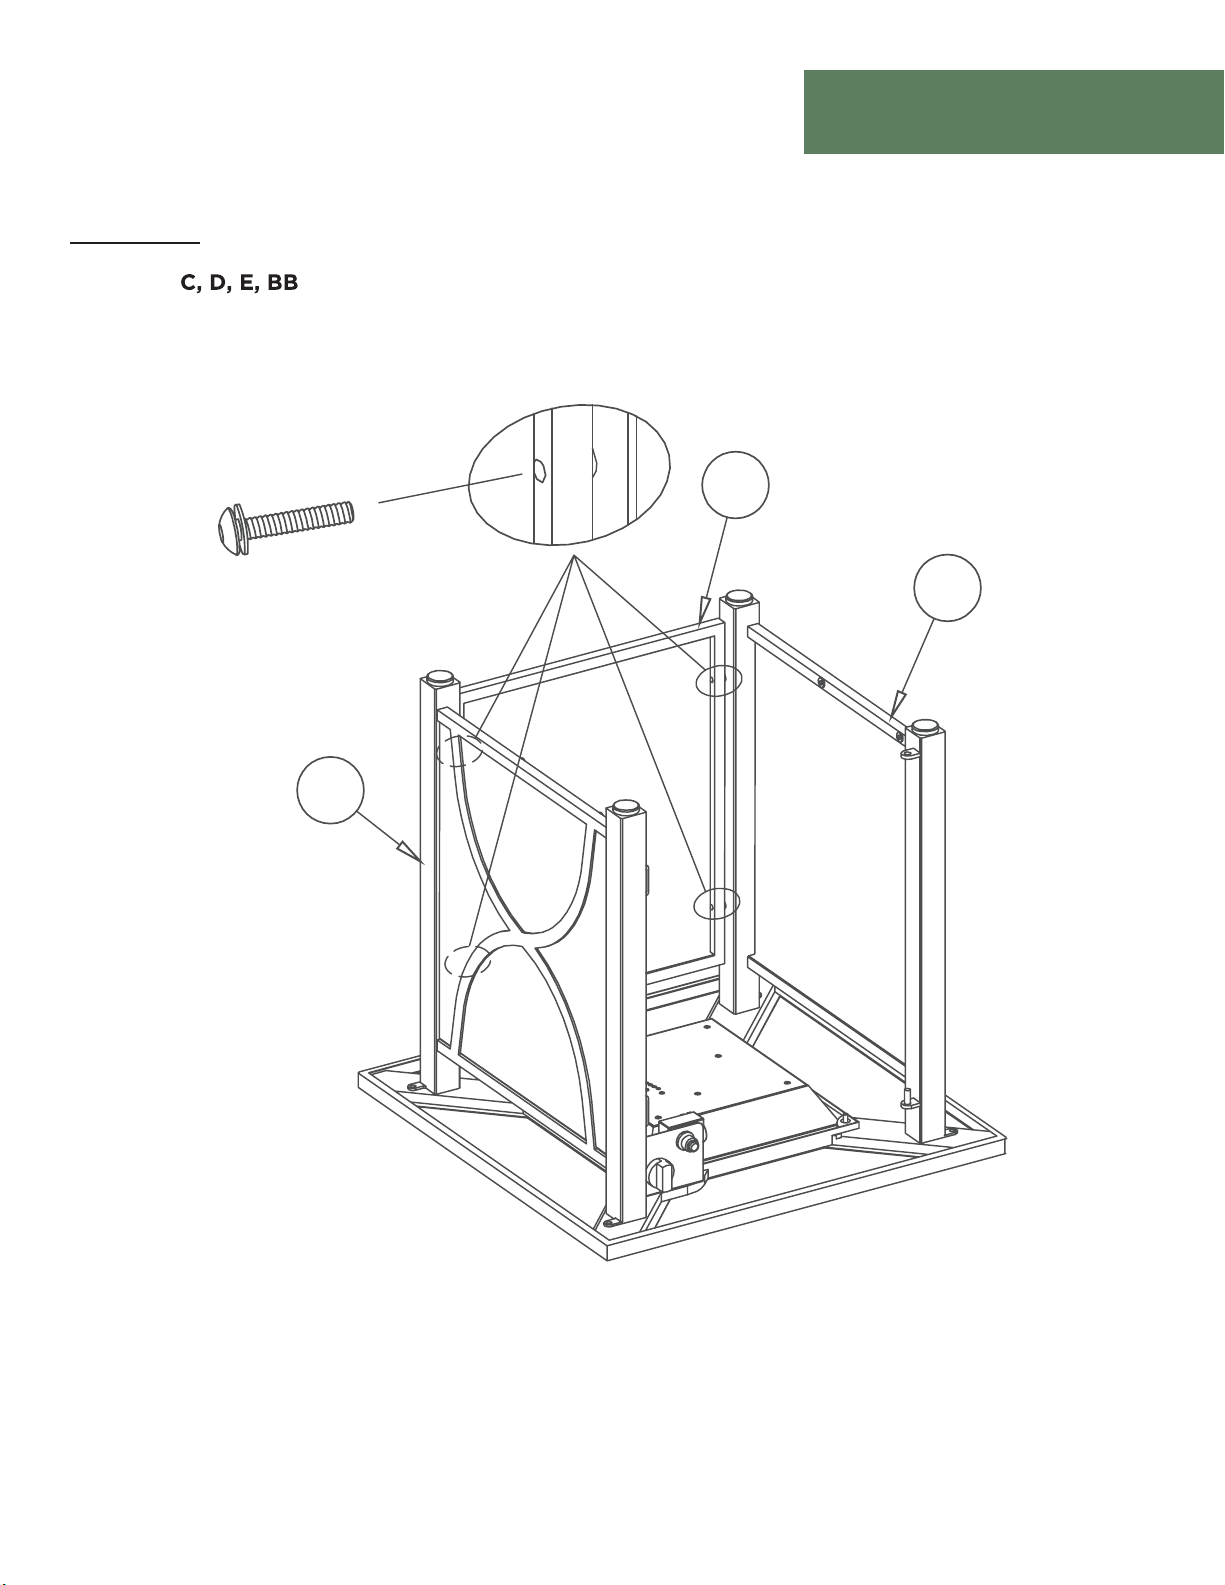
Repeat step 1 to assemble the left side panel (C).
C
FHTS80021D
AA
Page 15
Assembly
STEP 3
Requires:
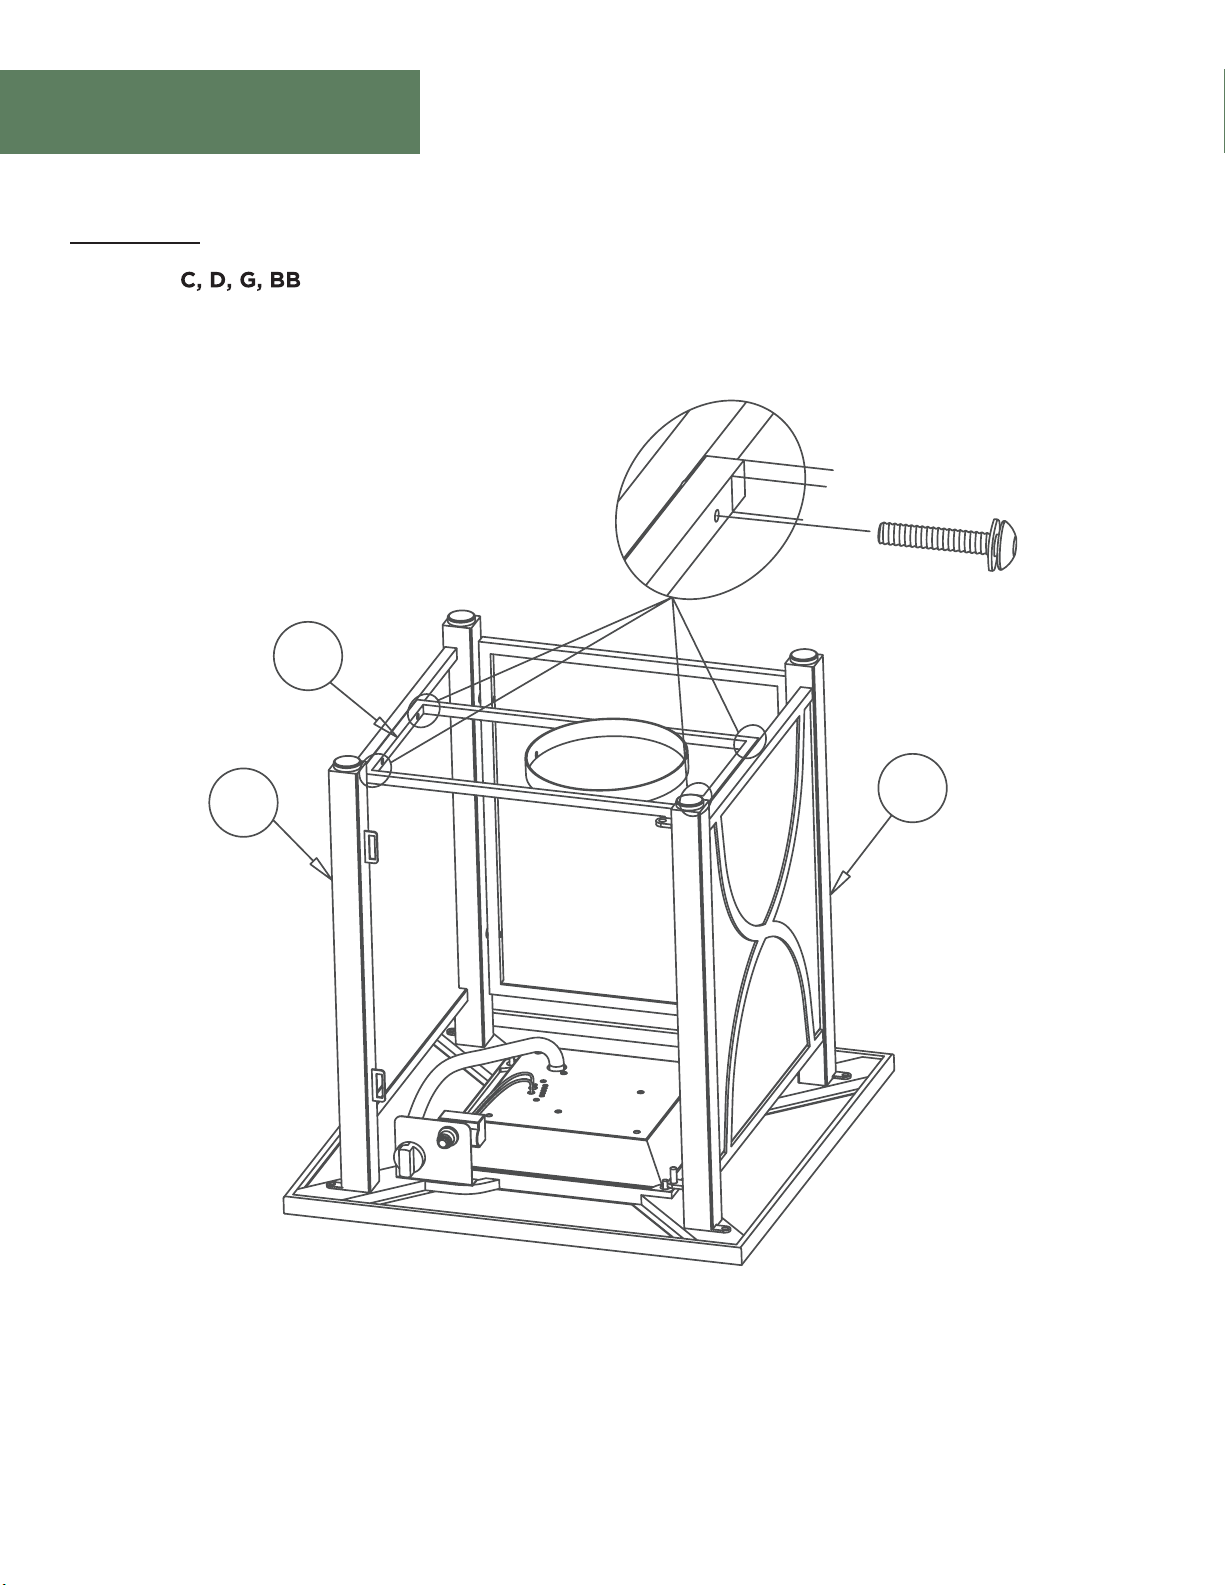
Line up the bolt holes on the back panel (E) with the corresponding bolt holes on the side panels
(C and D). Insert M6x25 bolt and washer (BB) tighten by hand.
BB
E
C
D
FHTS80021D
Page 16
Assembly
STEP 4
Requires:
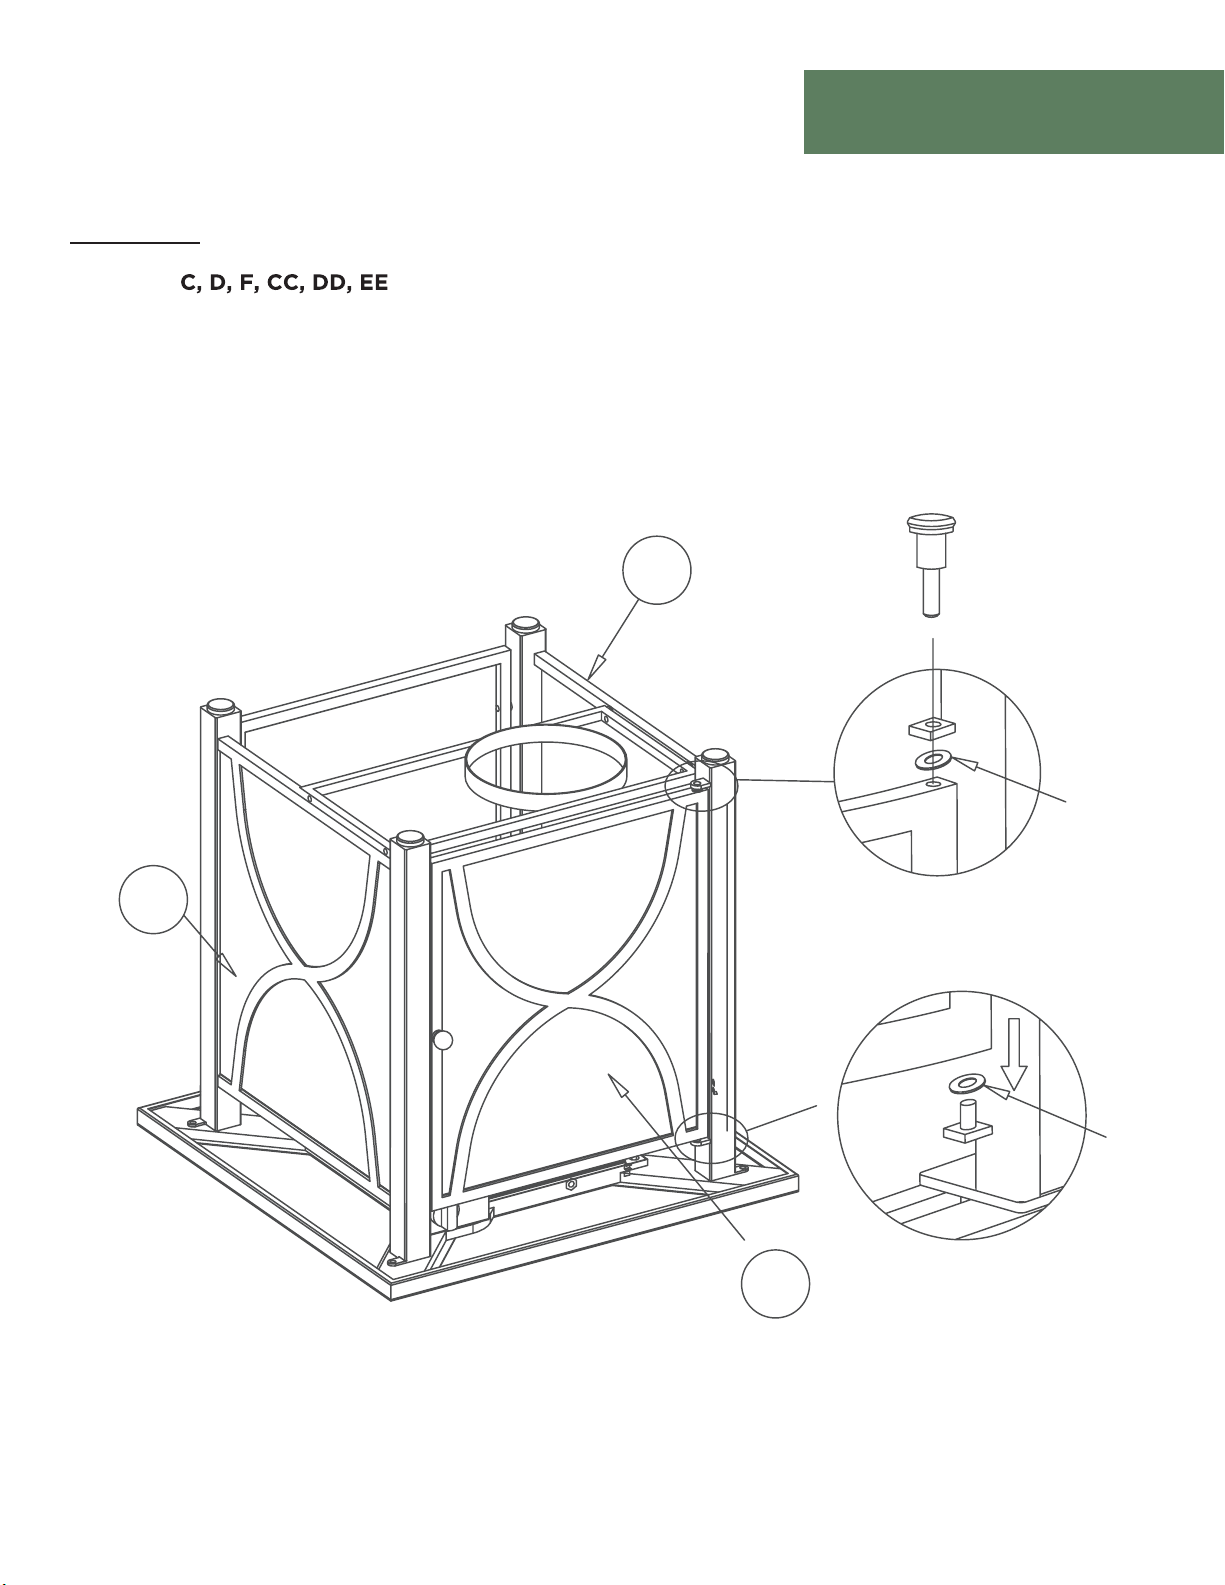
Line up the bolt holes of the tank holder (G) with the corresponding bolt holes on the side panels
(C and D). Insert M6x25 bolt and washer (BB) and tighten by hand.
BB
G
D
C
FHTS80021D
Page 17
Assembly
STEP 5
Requires:
Line up the bolt holes on the door panel (F) with the corresponding bolt holes on the side panels
(C and D). Insert bolt (CC) and washer (DD) and tighten using the hex key (EE). Ensure all bolts
are securely tightened.
D
C
CC
DD
DD
F
FHTS80021D
Page 18
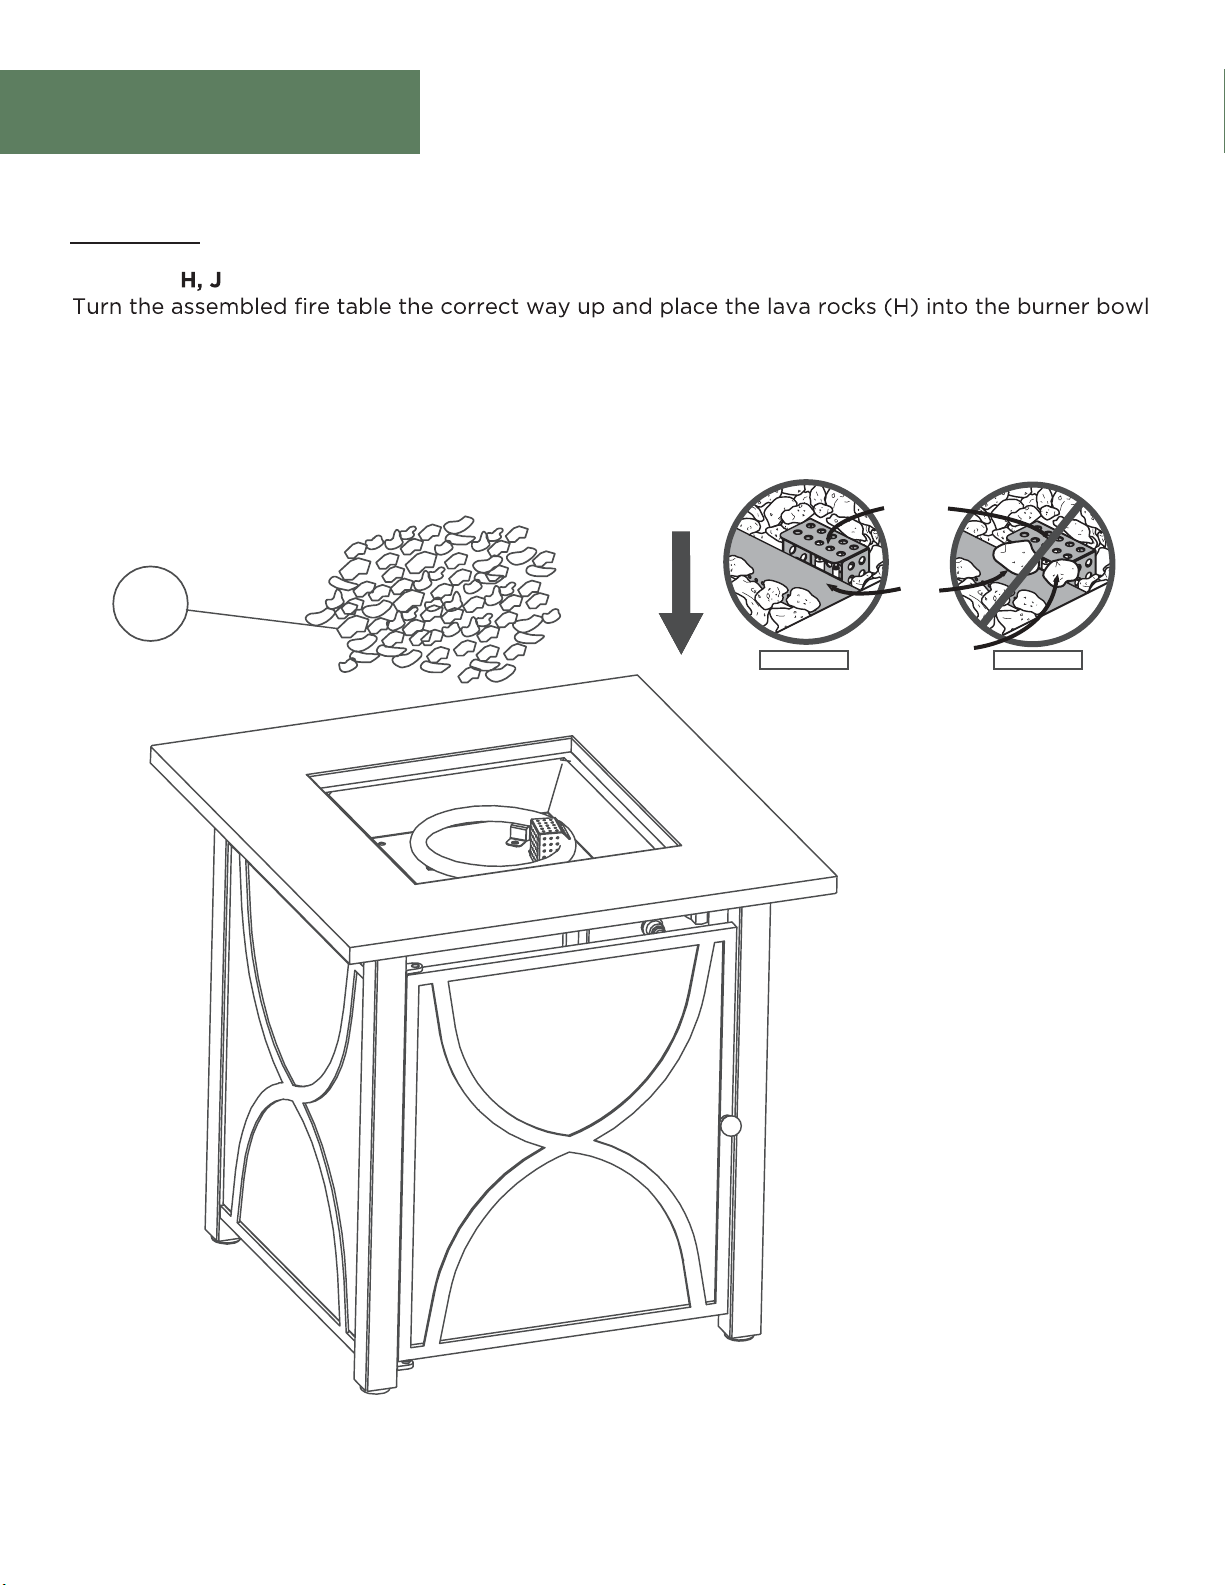
Assembly
STEP 6
Requires:
(J).
Caution: To ensure proper function, the screen on the pilot housing should not be
blocked with the lava rocks.
Ignitor
Box
Burner
H
Tube
Do not block
opening
INCORRECTCORRECT
FHTS80021D
Page 19
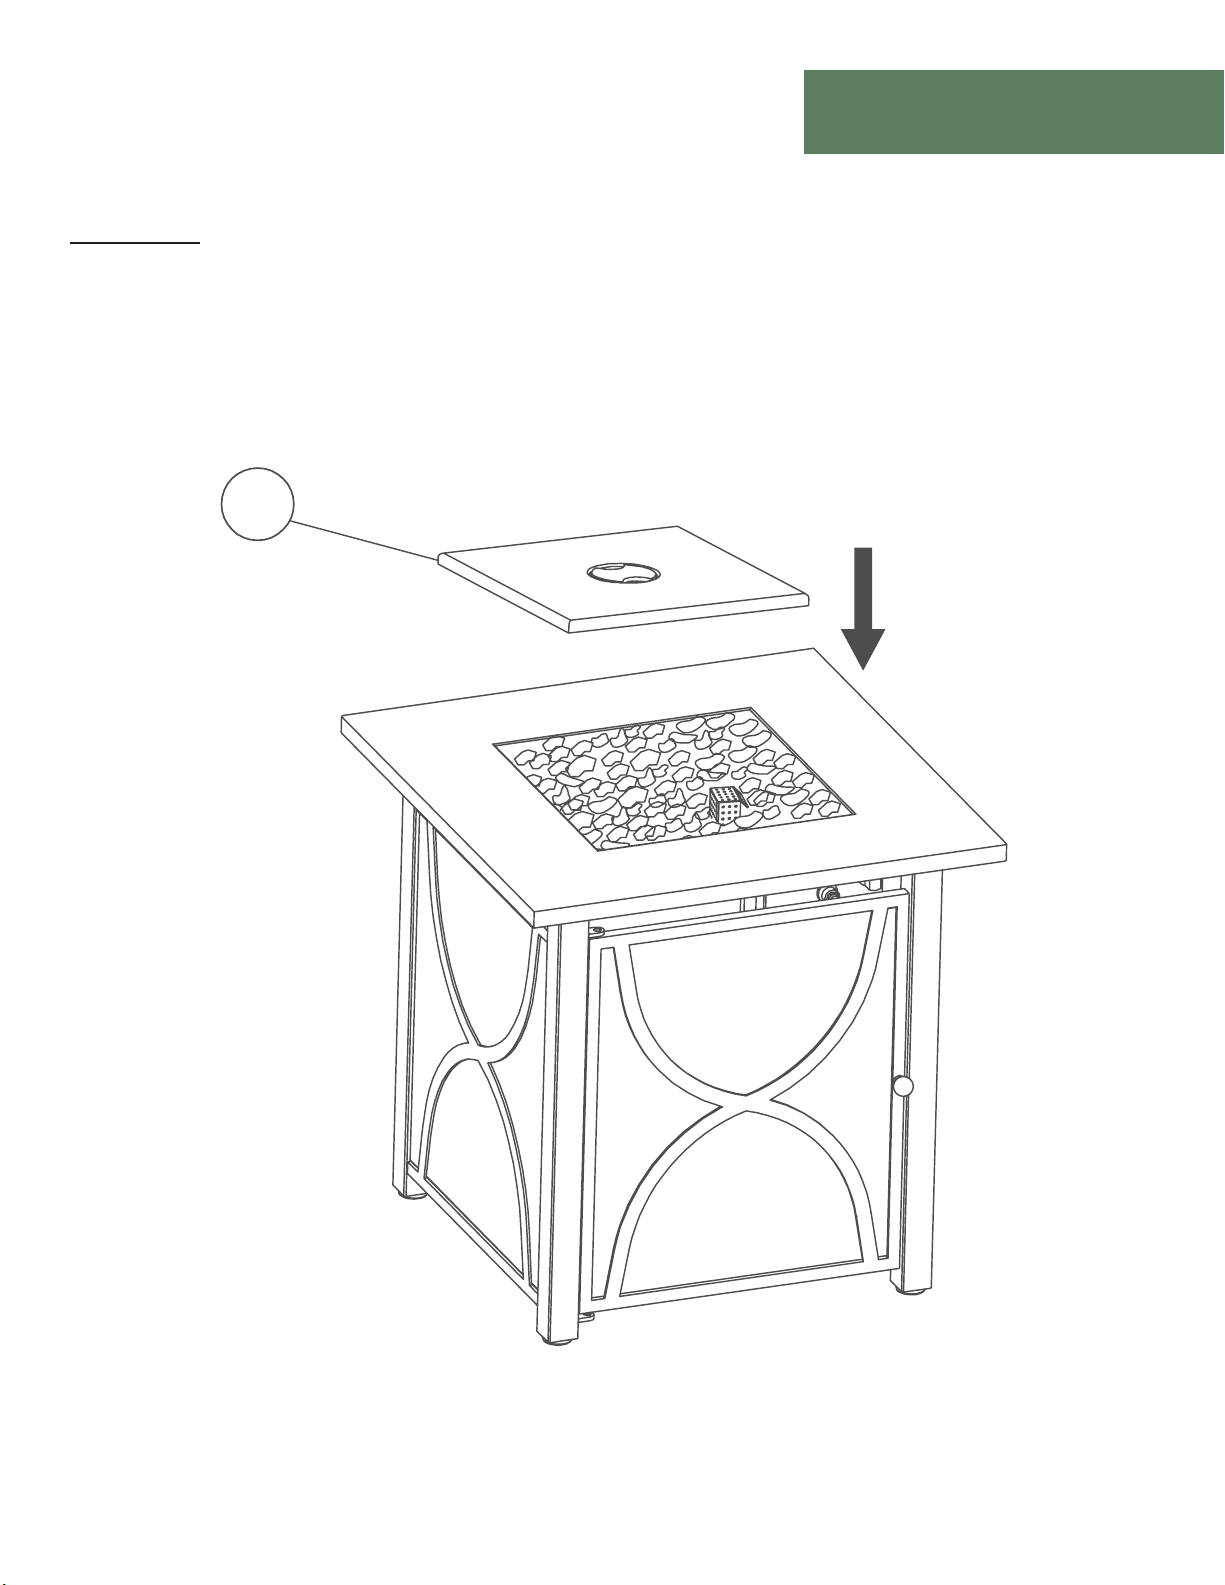
Assembly
STEP 7
Requires: A
Place the burner lid (A) over the burner bowl. Make sure to remove the burner lid (A) before
lighting. Do not place the lid back onto the burner bowl until it has cooled down.
A
FHTS80021D
Page 20
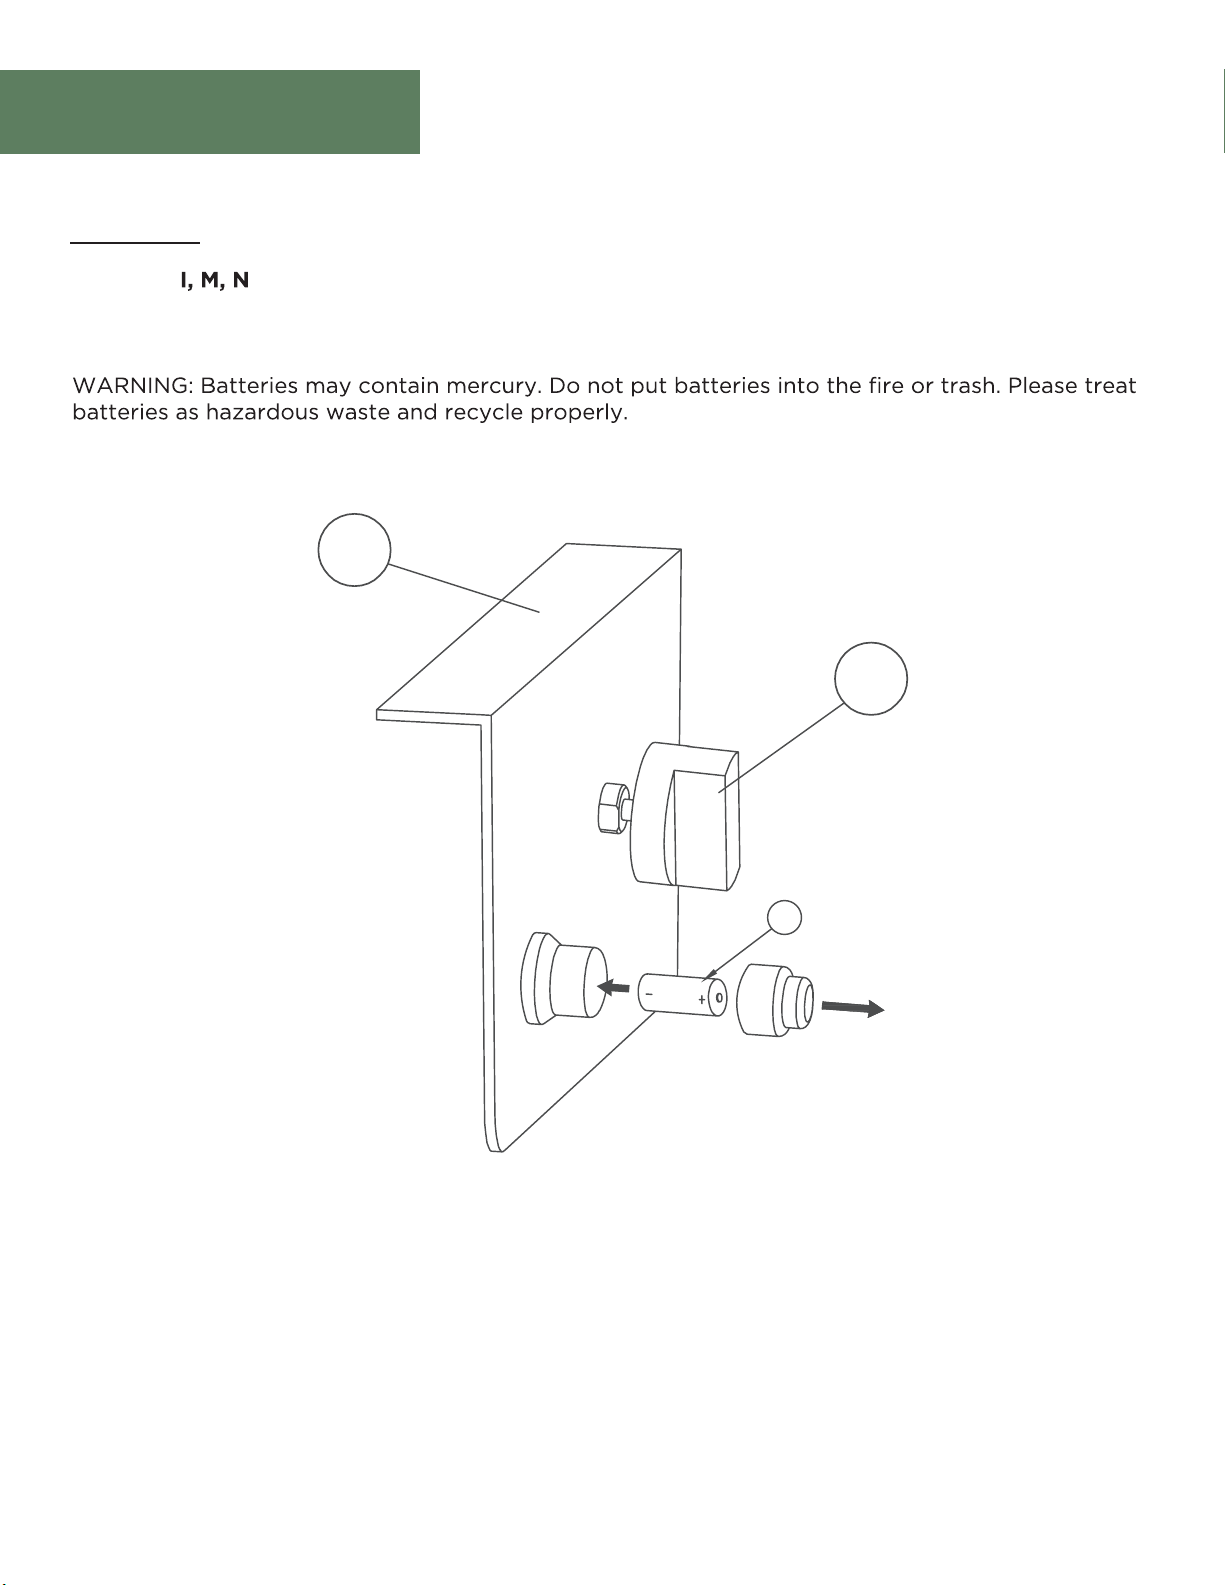
Assembly
STEP 8
Requires:
Insert the included battery (I) and knob (N) into the electric igniter (M) and twist the button cover
on to igniter housing. Do not over tighten.
M
N
I
_
+
FHTS80021D
Page 21
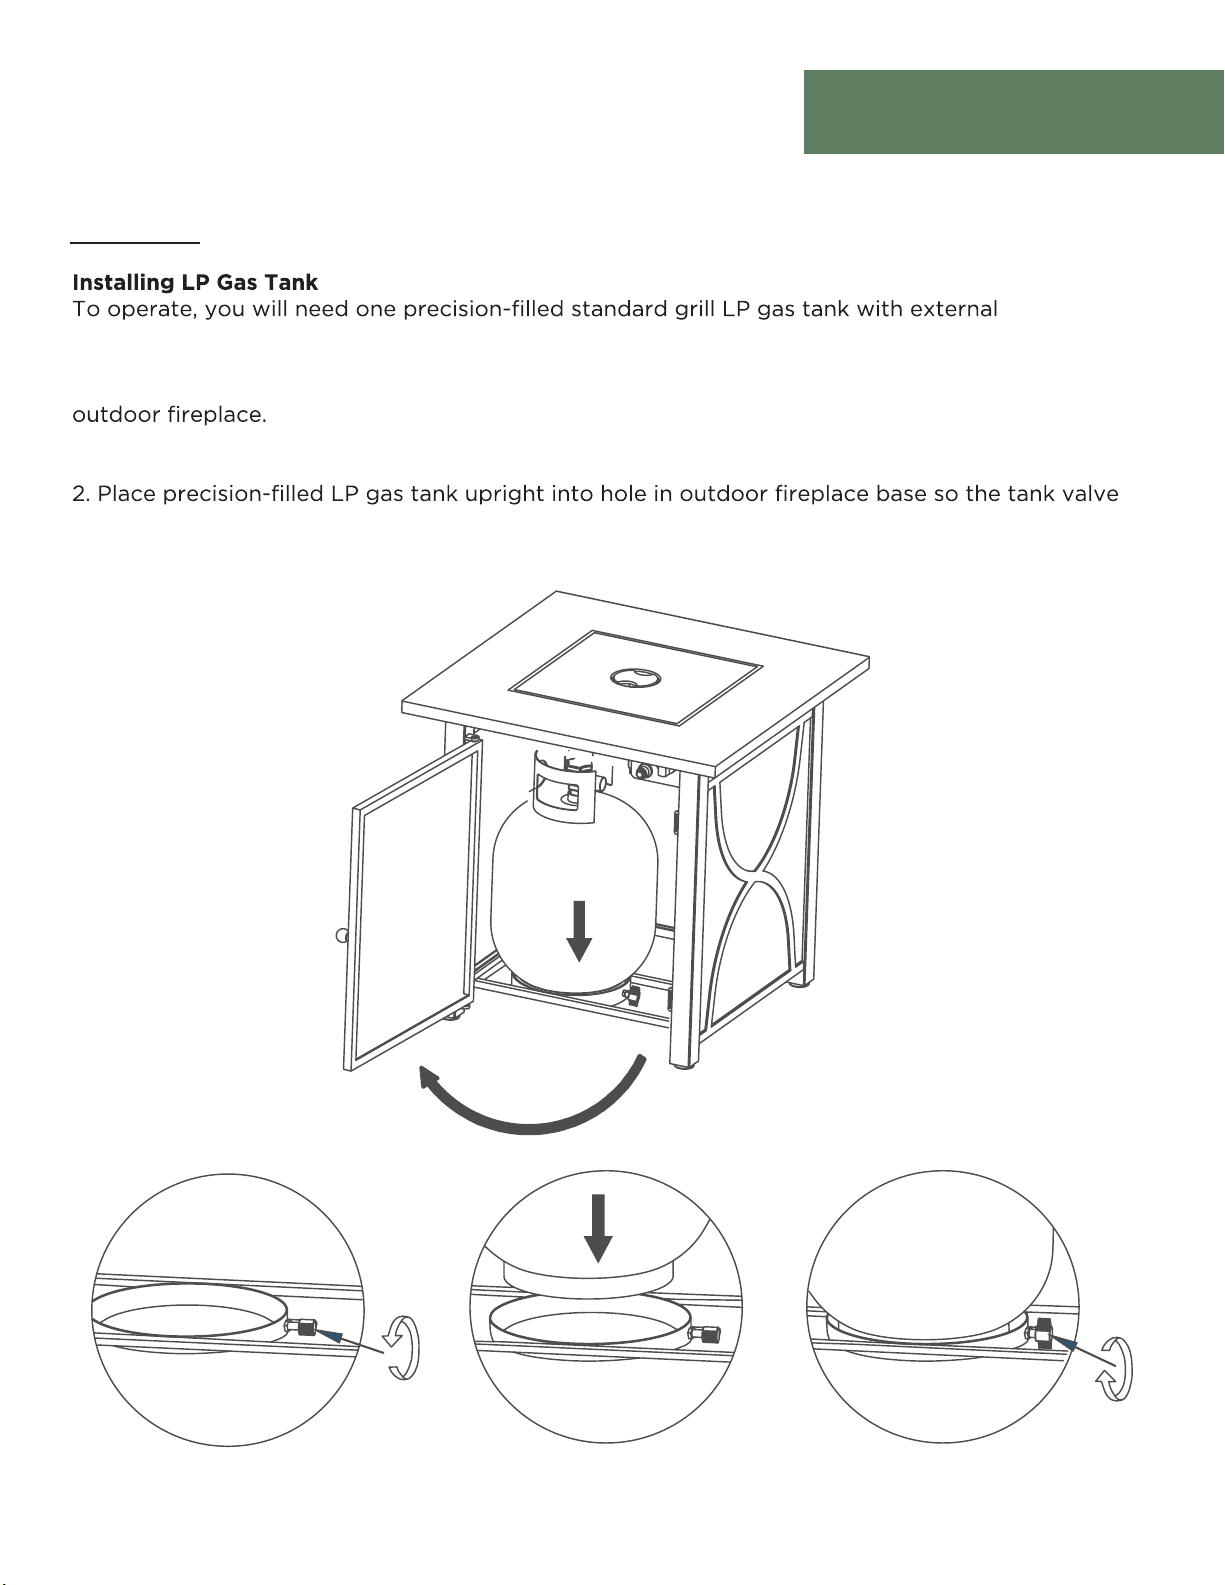
Assembly
STEP 9
valve threads.
CAUTION: LP gas tank must be properly disconnected and removed prior to moving this
1. Loosen LP gas tank retainer bolt by turning counter-clockwise.
is facing the gas line connection.
3. Secure tank by turning LP gas tank retainer bolt clockwise until tight.
FHTS80021D
Page 22
Assembly
STEP 10
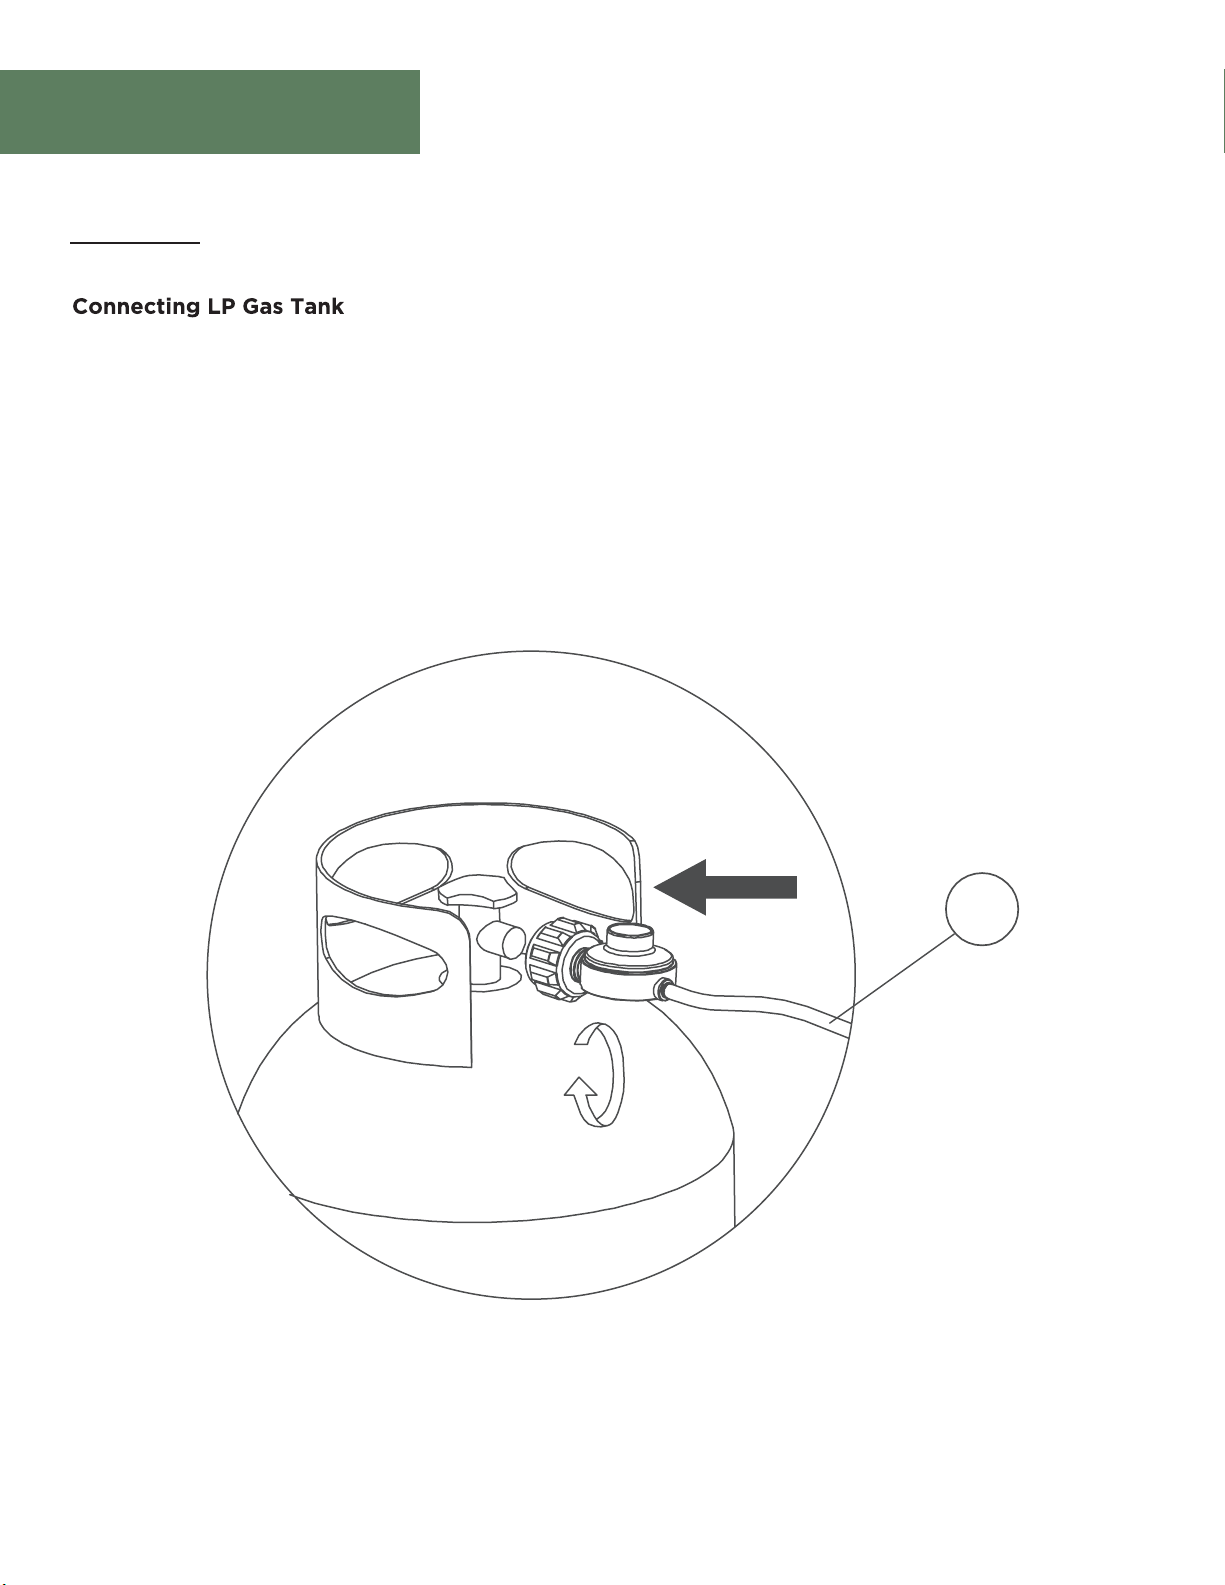
Requires: O
1. Before connecting, be sure there is no debris caught head of the LP gas tank, head of the
regulator valve or in the head of the burner or burner ports.
2. Connect the propane hose assembly to tank by turning knob clockwise until it stops. Repeat
step 1 to assemble the left side panel (C).
O
FHTS80021D
Page 23
Assembly
STEP 11
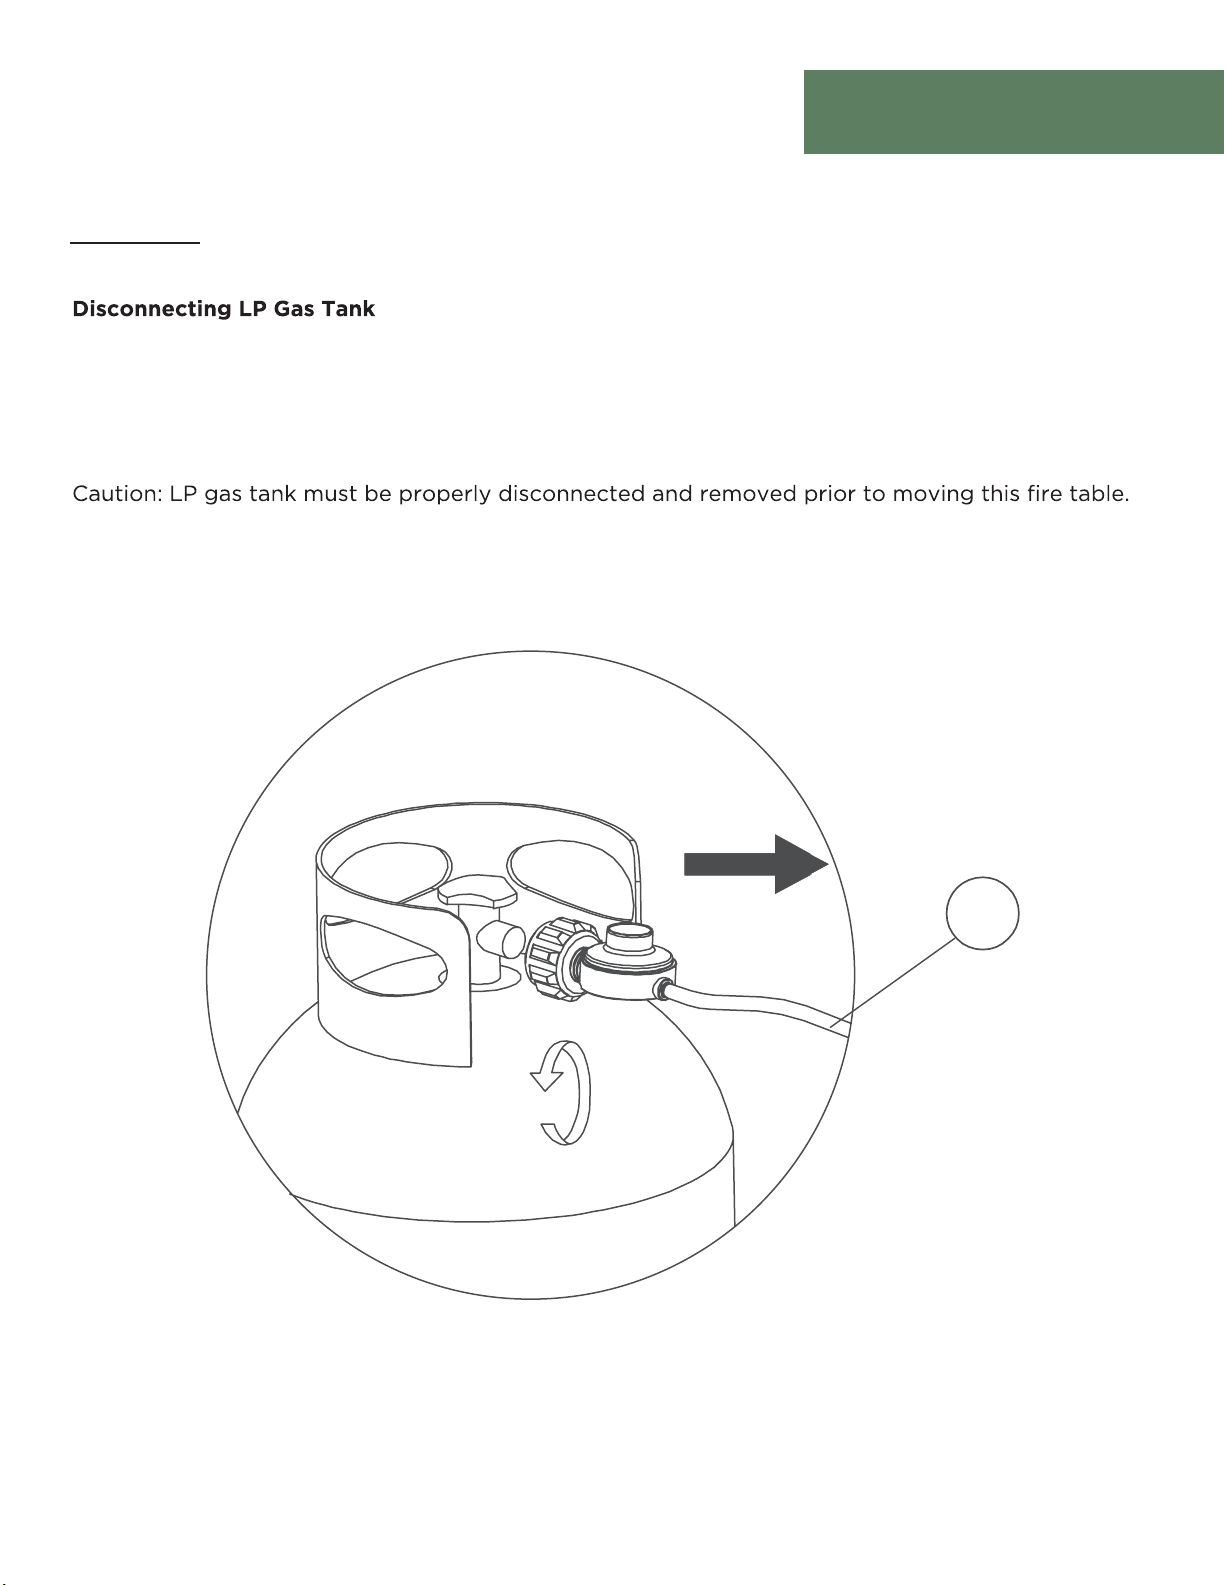
Requires: O
1. Before disconnecting make sure the LP gas tank valve is “CLOSED”.
2. Disconnect regulator/hose assembly from LP gas by turning knob counter-clockwise until it
is loose.
3. Place the protective cap cover on the LP tank and store the tank outdoors in a well-ventilated
area out of direct sunlight.
O
FHTS80021D
Page 24
Assembly
following all information provided in the “Important Safeguards” section. Failure to follow those
instructions can cause death, serious, injury or property damage.
Failure to inspect this connection or not follow these instructions could cause death, serious
bodily injury or damage to property.
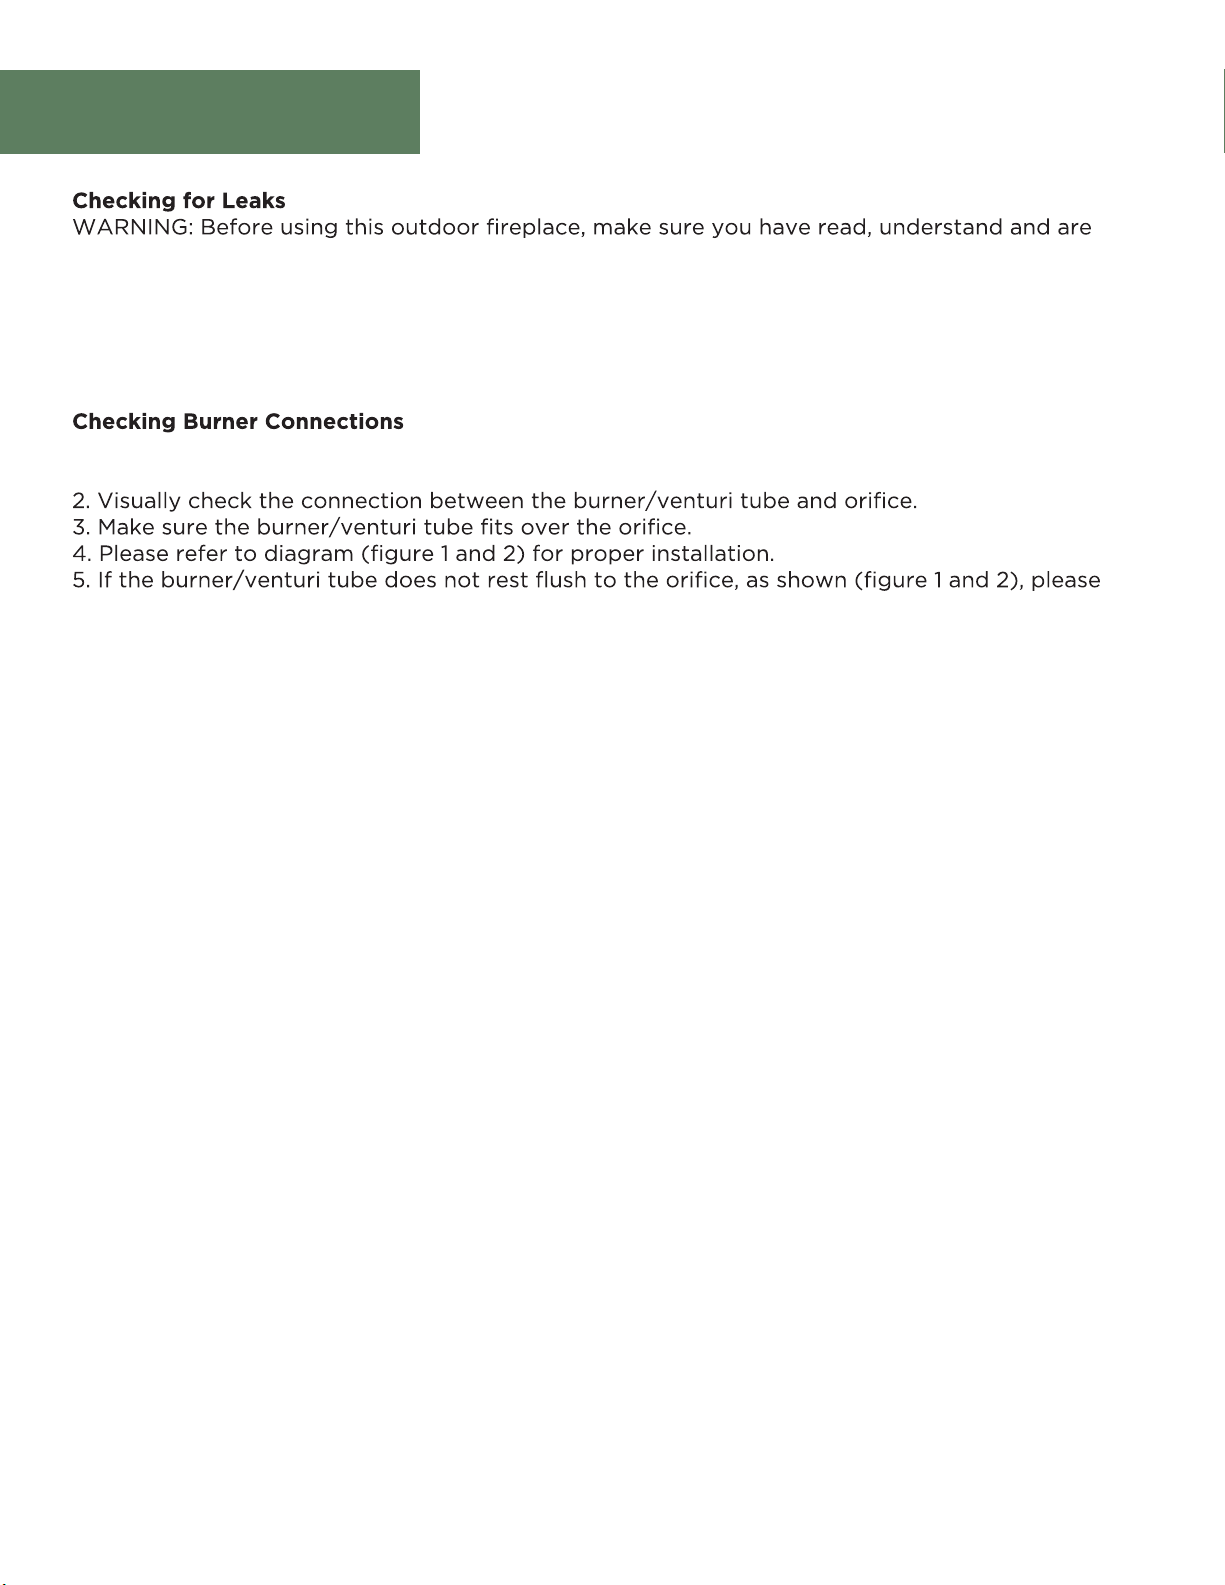
1. Make sure the regulator hose and valve connections are securely fastened to the burner and
the tank.
contact 1-877-483-6759 for assistance.
FHTS80021D
Page 25
Assembly
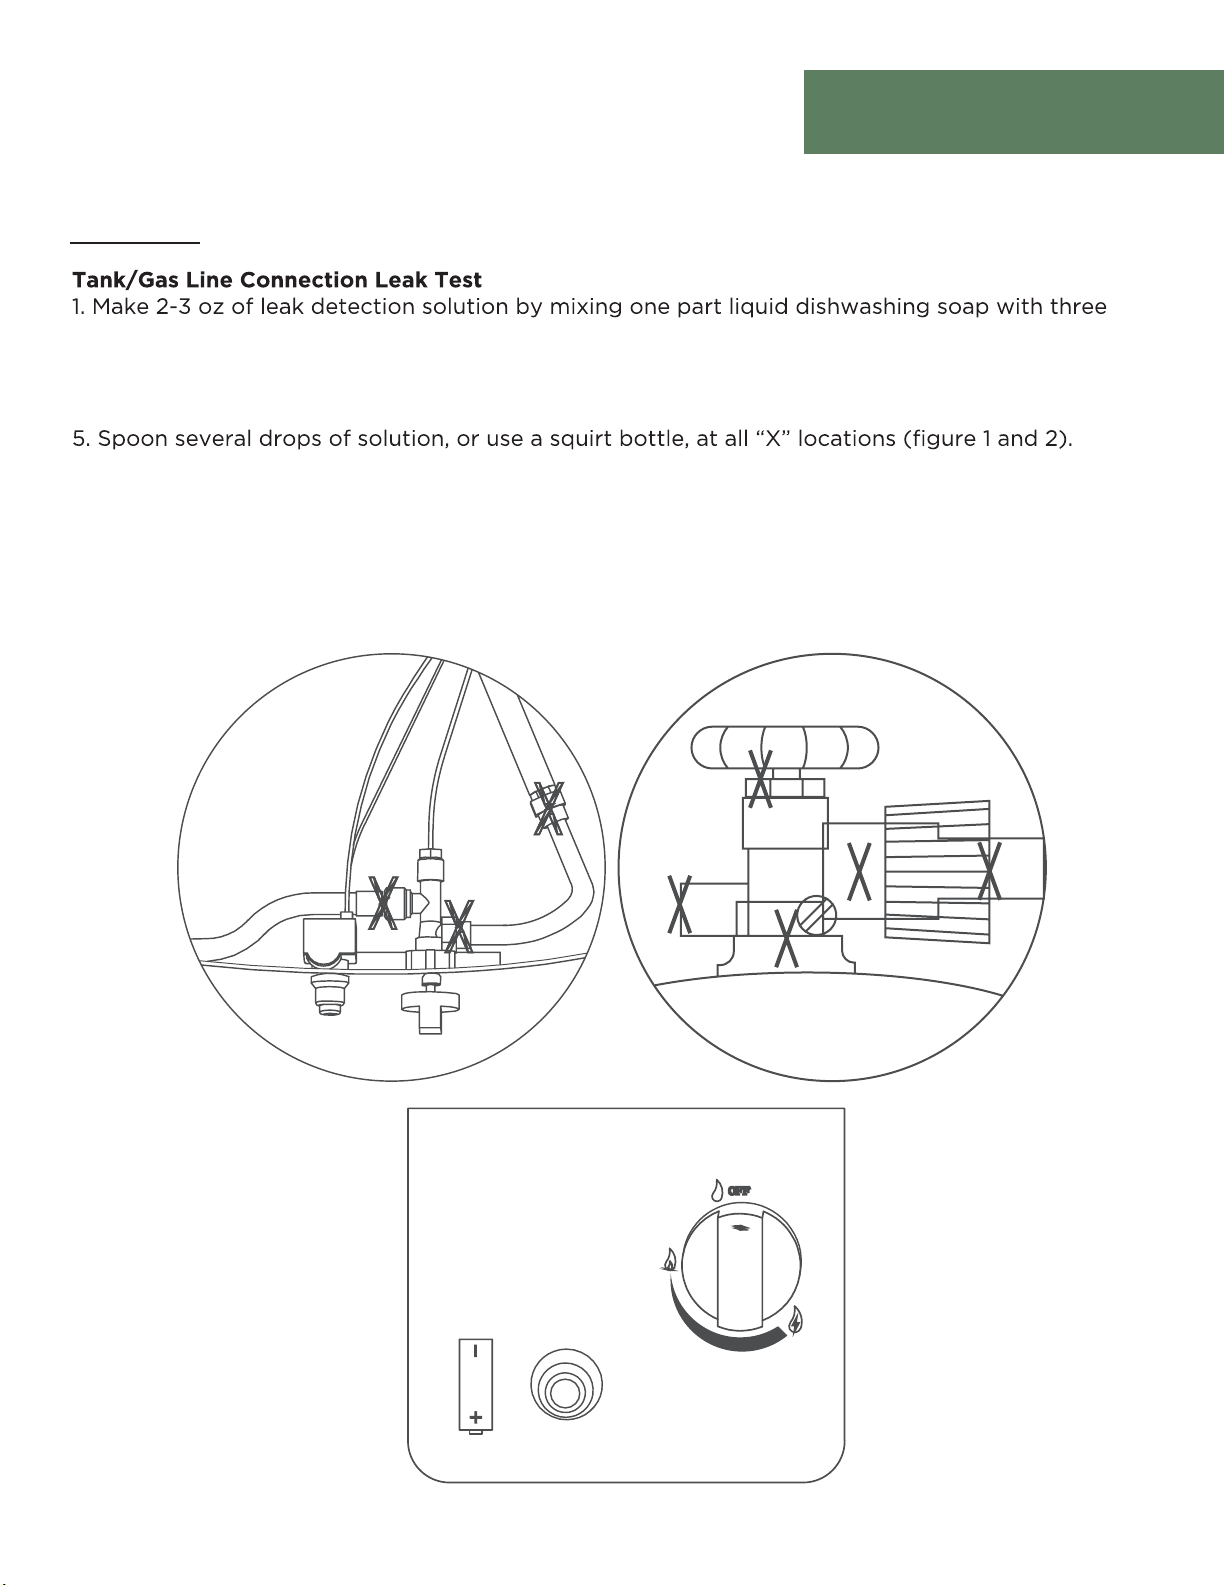
STEP 12
parts water.
2. Make sure control knob is in the “OFF” position.
3. Connect LP gas tank per “Installing LP Gas Tank” section.
4. Turn LP gas tank valve to “OPEN”.
a. If any bubbles appear, turn LP gas tank valve to “CLOSED”, reconnect and re-test.
b. If you continue to see bubbles after several attempts, turn LP gas tank valve to
“CLOSED” and disconnect LP gas tank, per “Disconnecting LP Gas Tank”. Contact
1-877-483-6759 for assistance.
c. If no bubbles appear after one minute, turn LP gas tank valve to “CLOSED”, wipe away
solution and proceed.
FHTS80021D
Page 26
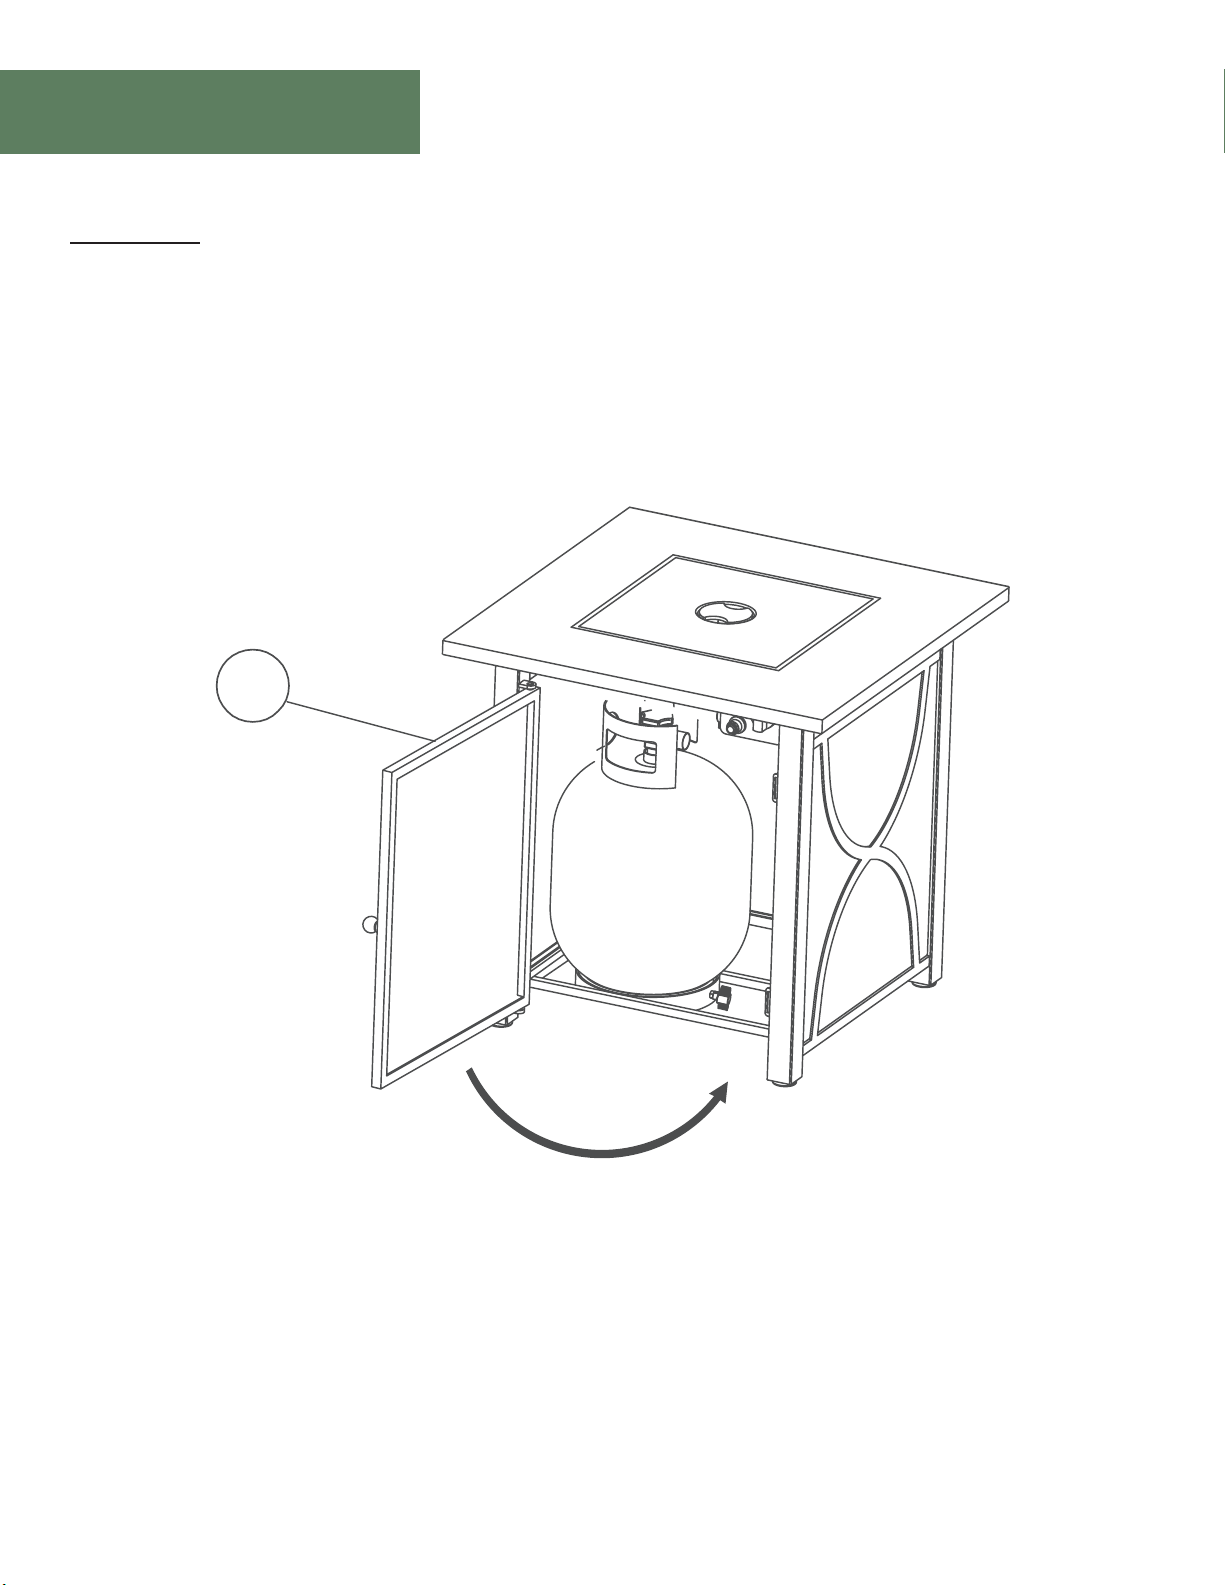
Assembly
STEP 13
Requires: F
Close the door (F).
F
FHTS80021D
Page 27
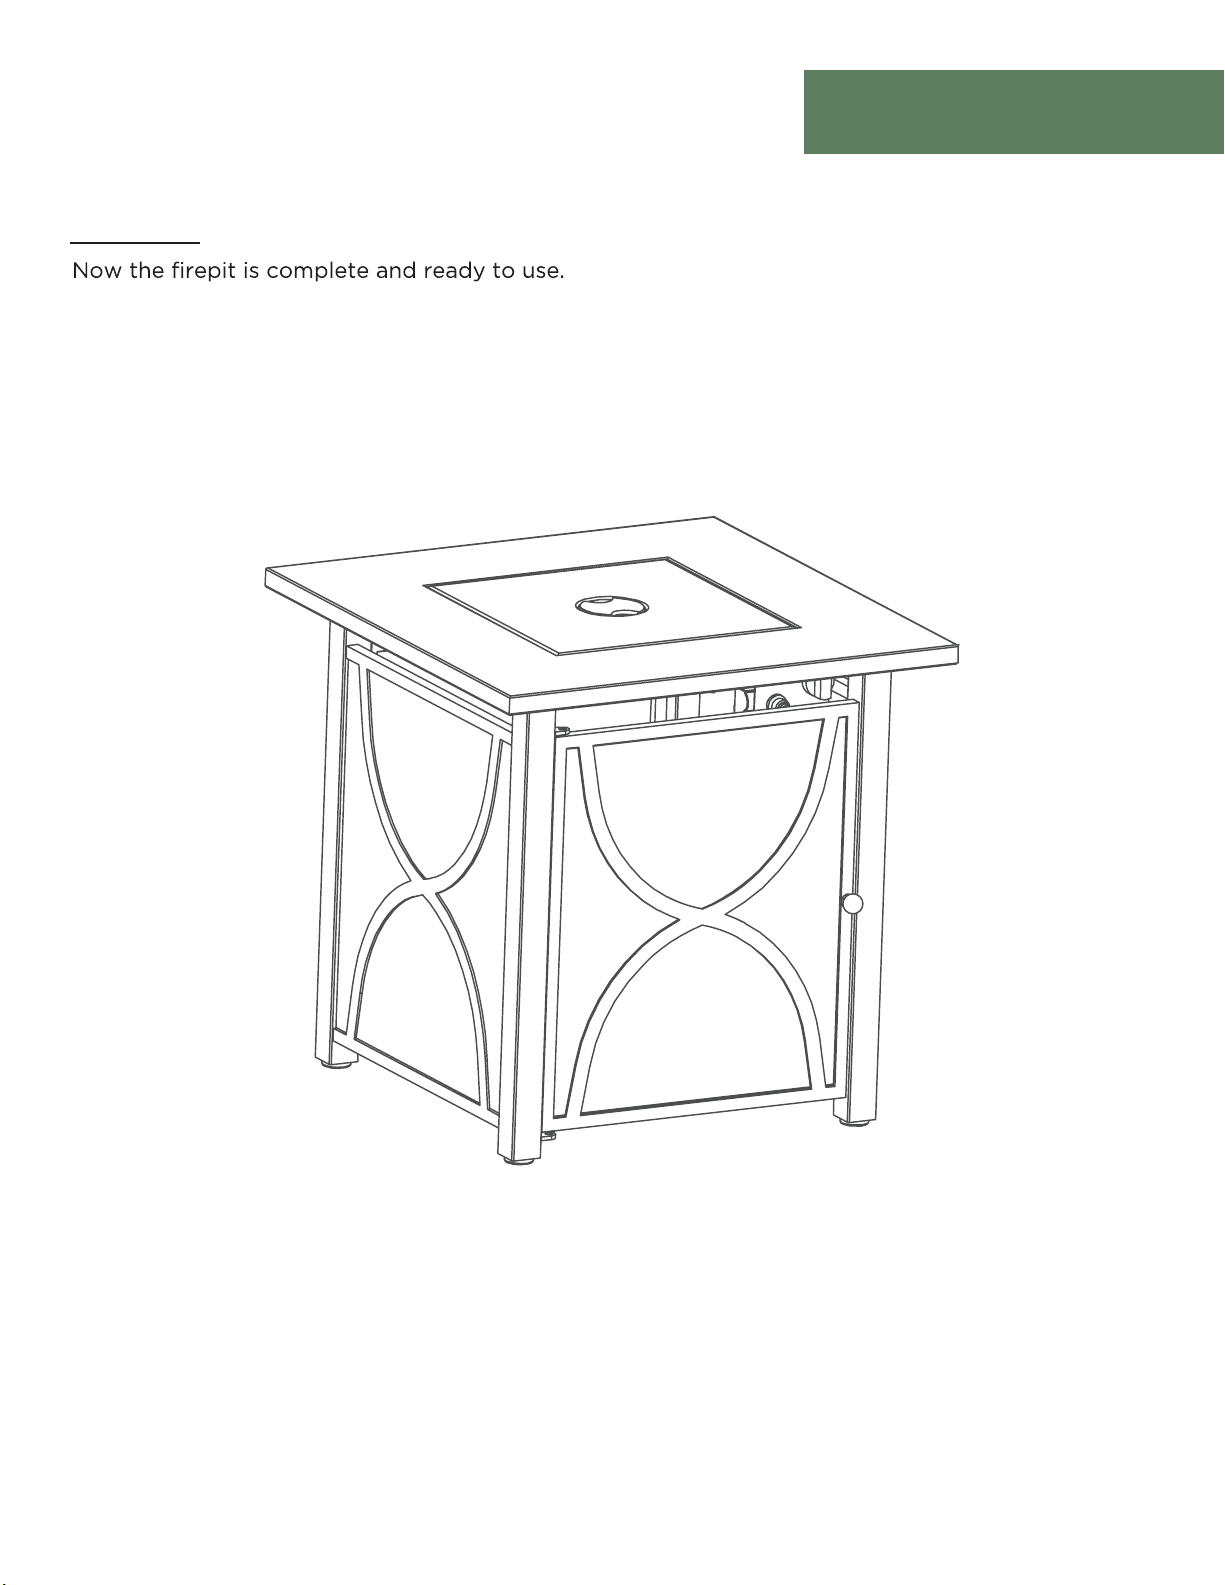
STEP 14
Assembly
FHTS80021D
Page 28
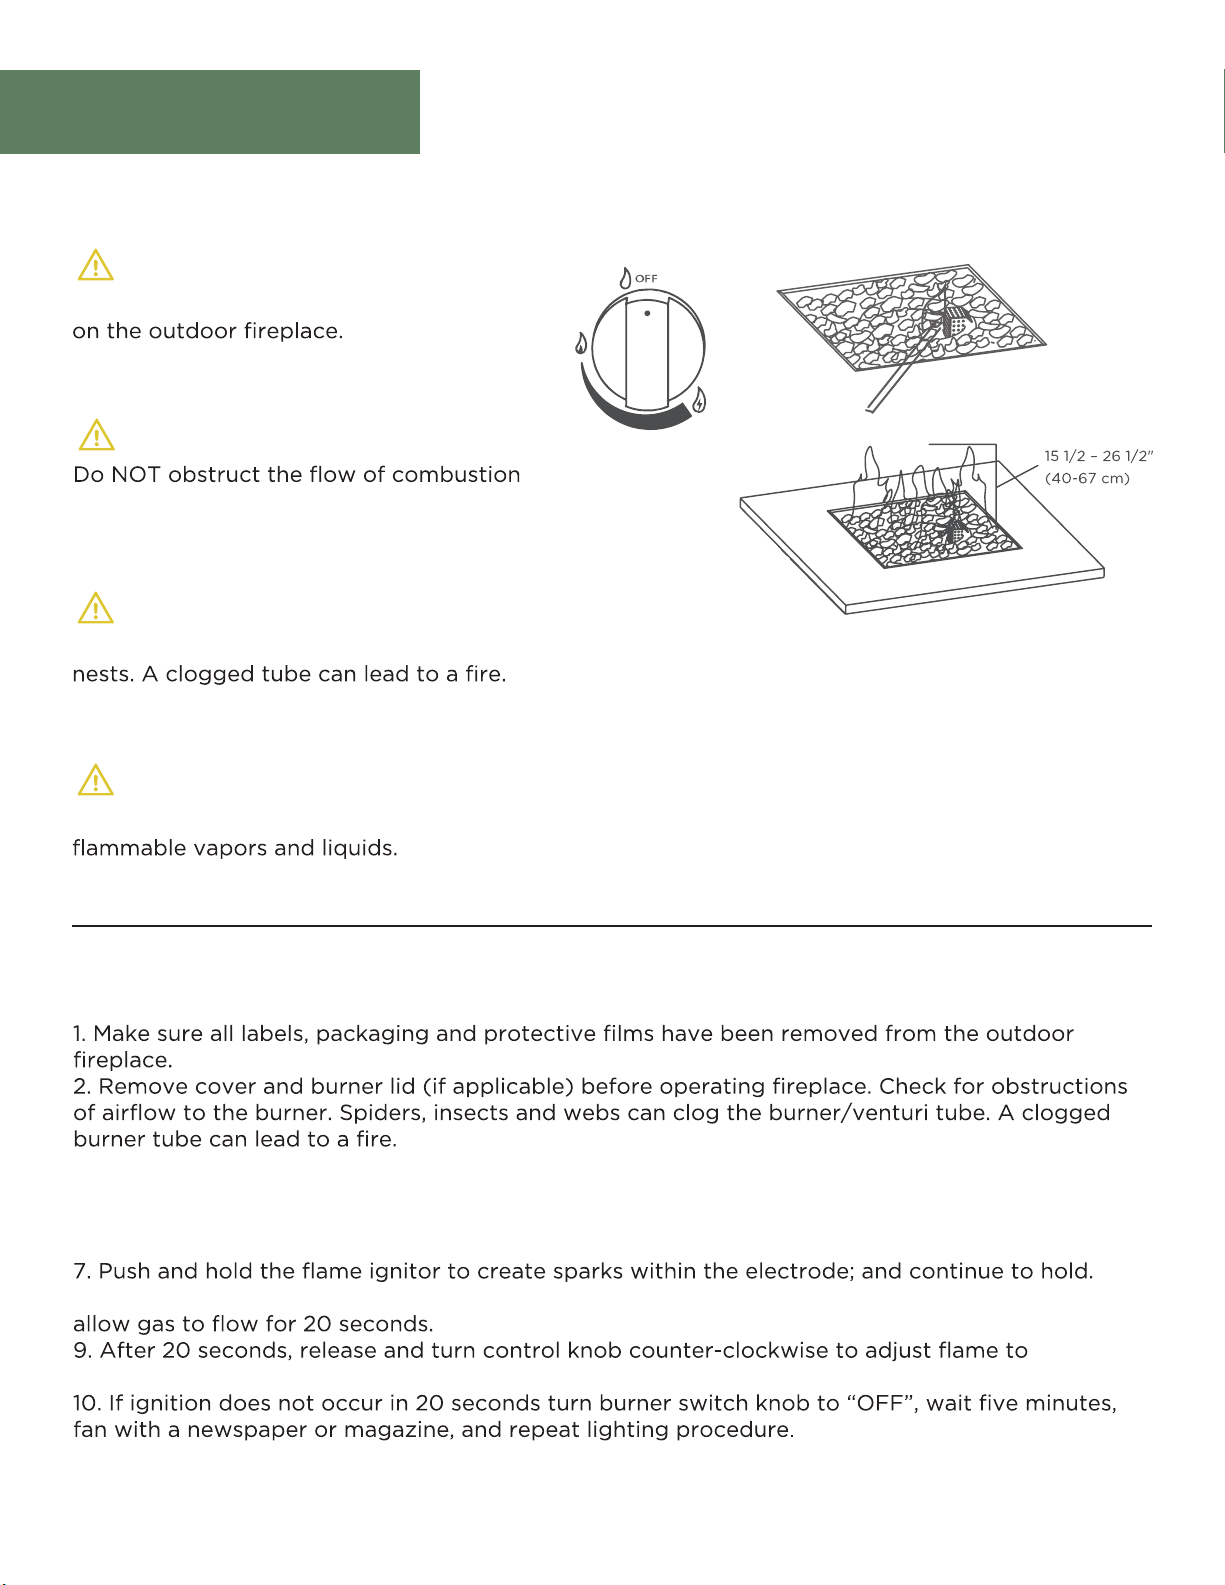
Operation
WARNING
NEVER light the burner with the cover
CAUTION
and ventilation air.
PROPER FLAME HEIGHT
CAUTION
Check and clean burner/venturi tubes for insects and insect
CAUTION
Keep outdoor gas appliance area clear and free from combustible materials, gasoline and other
LIGHTING
3. Control knob must be in the “OFF” position.
4. To ensure proper function, the screen on the pilot housing should not be covered by lava rocks.
5. Connect LP gas tank per Steps 9 and 10.
6. Turn LP gas tank valve to “OPEN”.
8. Push in the switch knob and turn to the “ON” position. Keep holding down the switch knob to
desired height.
FHTS80021D
Page 29
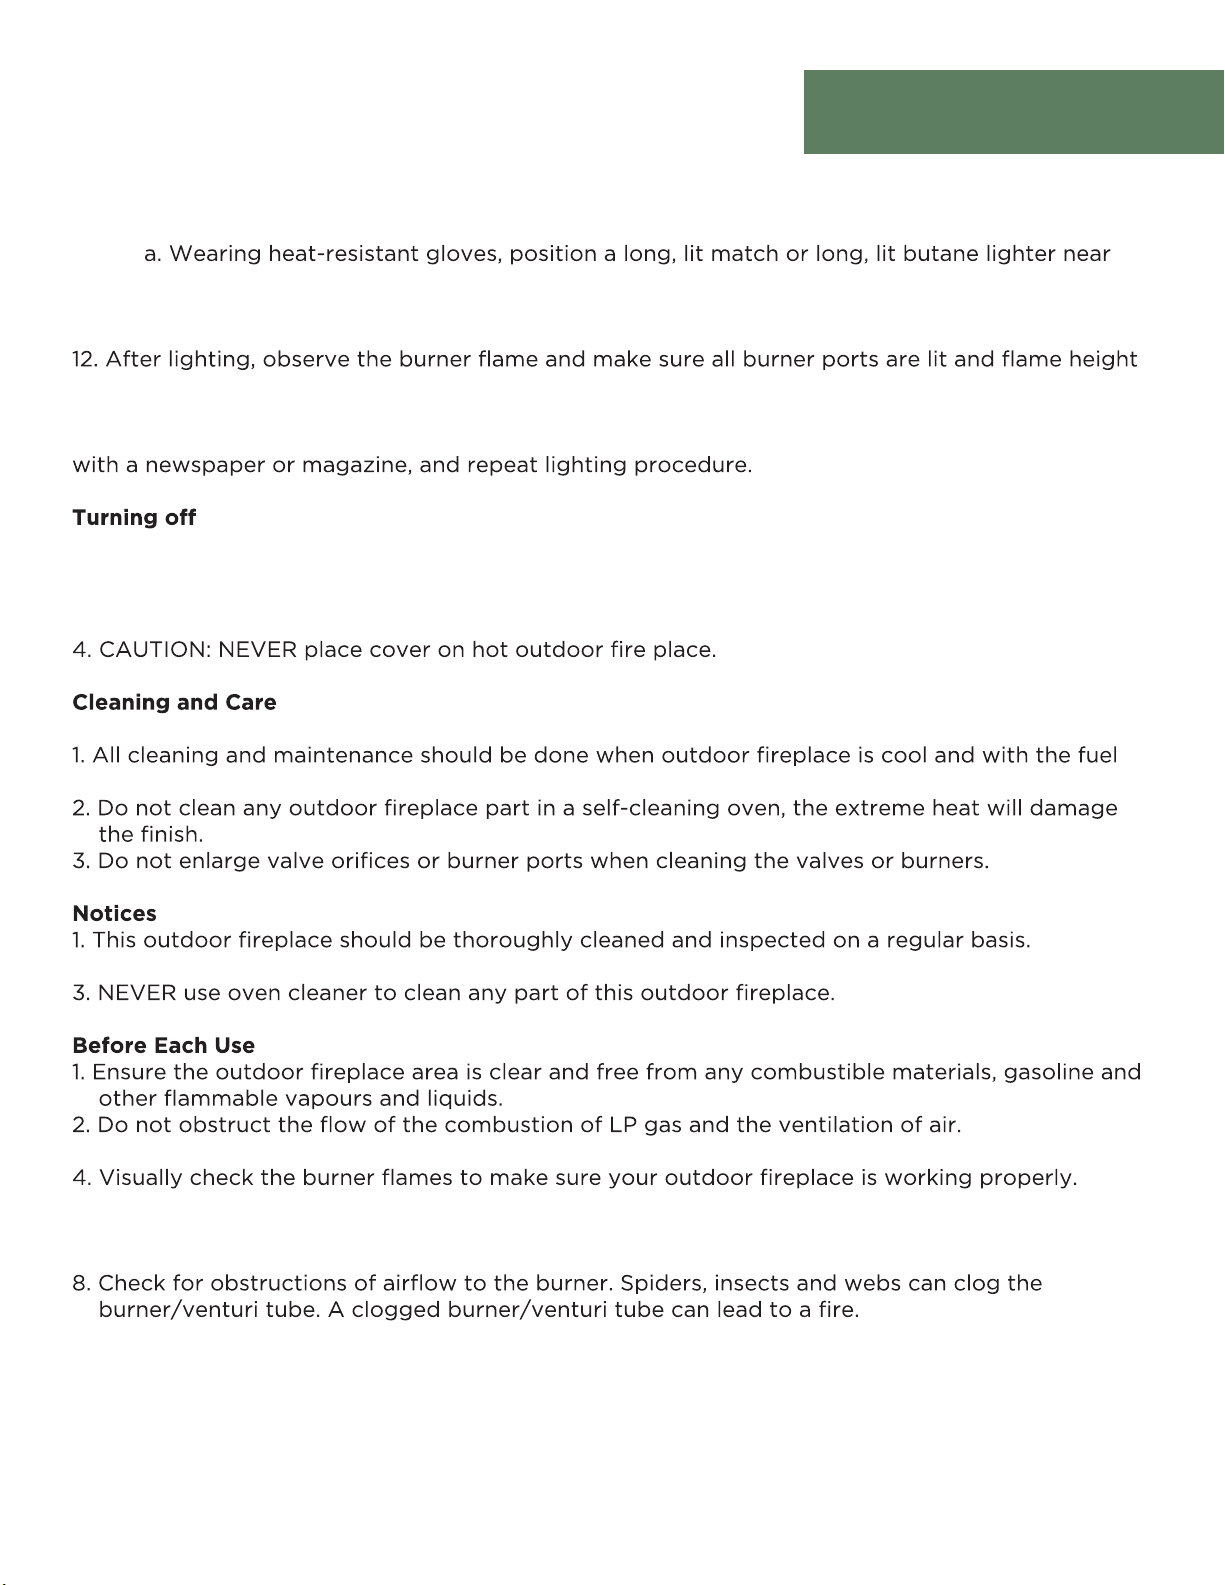
Operation
LIGHTING (CONTINUED)
11. If igniter does not light burner:
the pilot housing.
b. Push and turn control knob to “ON”.
c. Remove match/lighter once burner is lit.
matches illustration on page 24.
CAUTION: If ignition does not occur in 5 seconds, turn control knob to “OFF”, wait 5 minutes, fan
1. Turn LP gas tank valve to “CLOSED”.
2. Turn control knob to the “OFF” position. Note: A “poof” sound is normal as the last of the LP
gas is burned.
3. Disconnect LP gas tank per “Disconnecting LP Gas Tank” section.
CAUTION:
supply disconnected.
2. Abrasive cleaners will damage this product.
3. Keep the ventilation opening(s) of the LP gas tank area free and clear of debris.
5. See below for proper cleaning instructions.
6. Check all gas connections for leaks.
7. Check components for any signs of damage or rust.
9. If damage to any component is detected, do NOT operate until repairs are completed.
FHTS80021D
Page 30
Cleaning & Maintenance
2. For stubborn stains, use a citrus-based cleaner and a nylon scrubbing brush.
3. Rinse clean with water.
4. Allow to air dry.
1. Turn LP gas tank valve to “CLOSED”.
2. Turn control knob to the “OFF” position. Note: A “poof” sound is normal as the last of the gas
is burned.
3. Disconnect LP gas tank per “Disconnecting LP Gas Tank” section.
4. Clean all surfaces.
5. Lightly coat the burner with cooking oil to prevent excess rusting. NEVER place cover on hot
location away from children and pets.
for protection from the weather.
CAUTION:
from cracking in extreme cold.
For replacement parts, call our service center at 1-877-483-6759.
FHTS80021D
Page 31
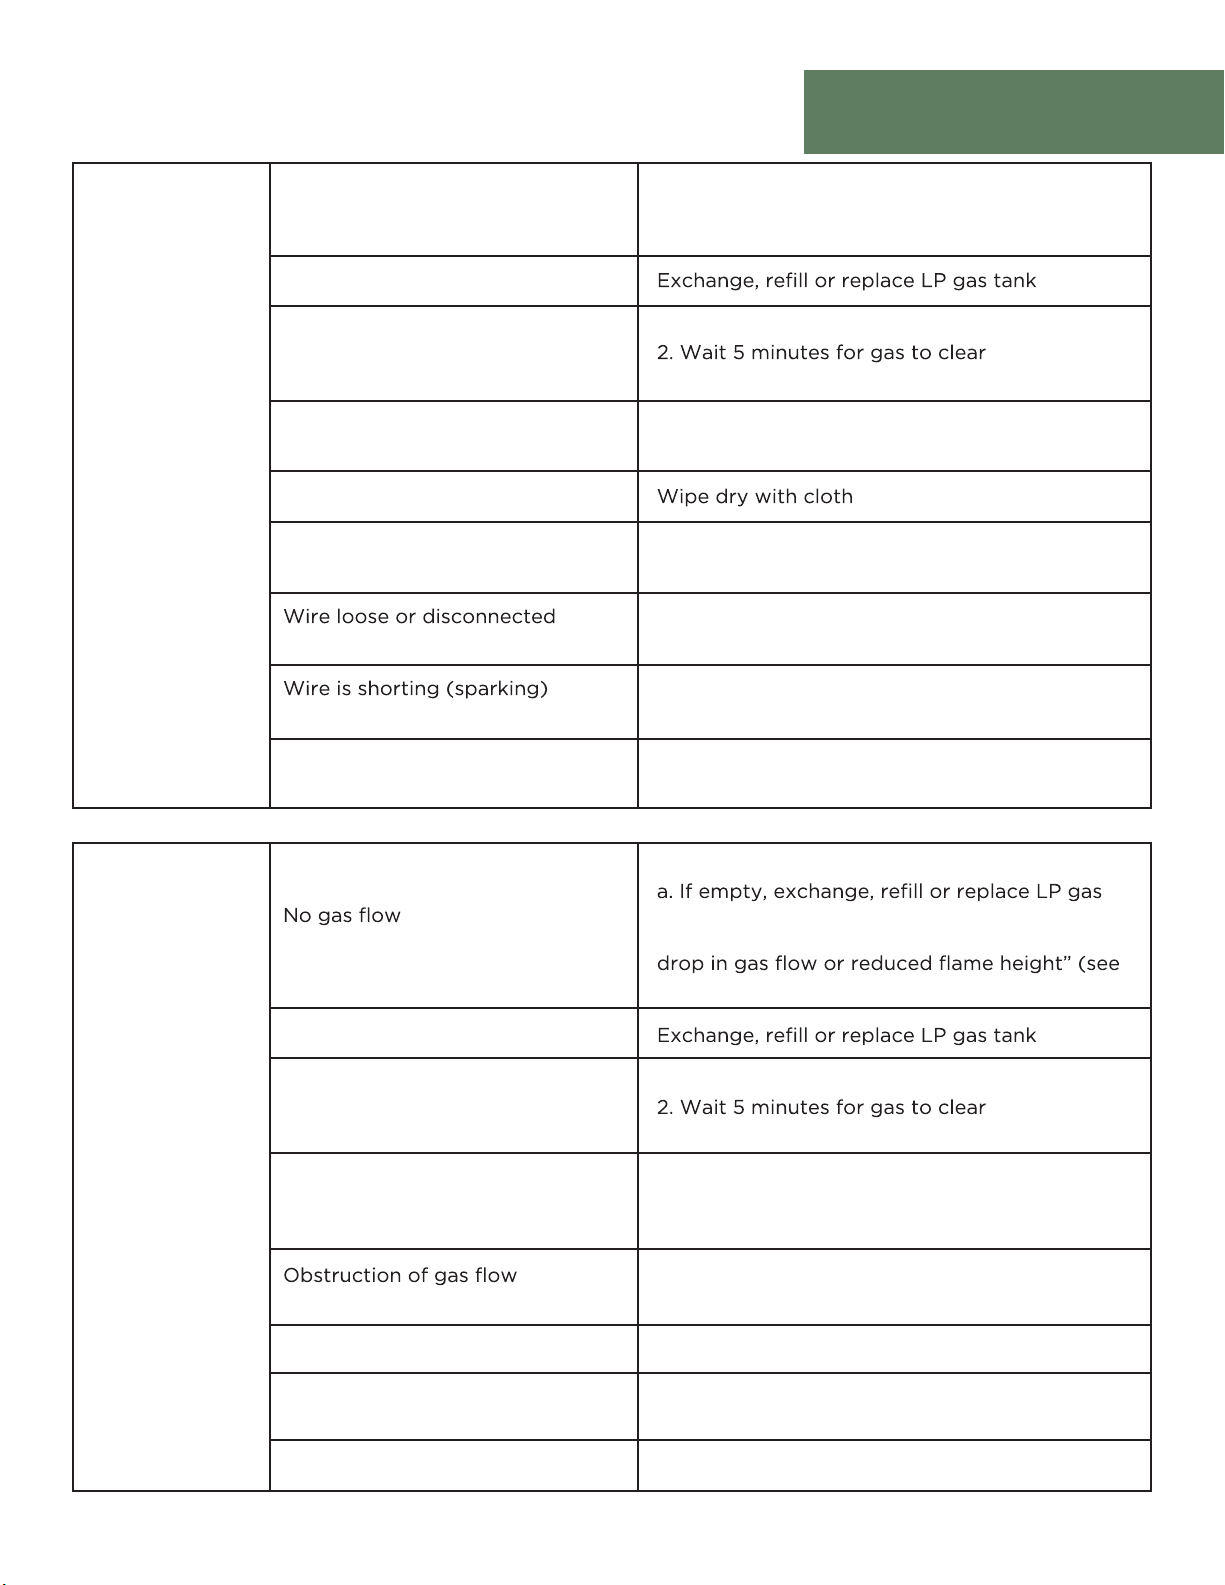
LP gas tank valve is closed
LP gas tank is low or empty
LP gas leak
Troubleshooting
Make sure regulator is securely attached to the
LP gas tank per “Installing LP Gas Tank,” then
turn LP gas tank valve to “OPEN”
1. Turn LP gas tank valve to “CLOSED”
3. Follow “Checking for Leaks” section
Burner will
not light
using igniter
Battery needs to be changed
Electrode and burners are wet
Electrode cracked or broken —
sparks at crack
between igniter and electrode
Bad igniter
Replace the “AA” battery (follow assembly step
for inserting battery)
Replacement part(s) may be needed —
contact Customer Care at 1-877-483-6759
Replacement part(s) may be needed —
contact Customer Care at 1-877-483-6759
Replacement part(s) may be needed —
contact Customer Care at 1-877-483-6759
Replacement part(s) may be needed —
contact Customer Care at 1-877-483-6759
Check if LP gas tank is empty
tank
b. If LP gas tank is not empty, refer to “Sudden
below)
Burner will
not light
with match
LP gas tank is low or empty
LP gas leak
Coupling nut and regulator not
fully connected
Disengagement of burner to valve
Spider webs or insect nest in
burner/venturi tube
Burner ports clogged or blocked
1. Turn LP gas tank valve to “CLOSED”
3. Follow “Checking for Leaks” section
Turn the coupling nut about one-half to
three-quarters additional turn until solid stop.
Tighten by hand only — do NOT use tools
1. Clear burner/venturi tube
2. Check for bent or kinked hose
Re-engage burner and valve
Clean burner/venturi tube
Clean burner ports
FHTS80021D
Page 32
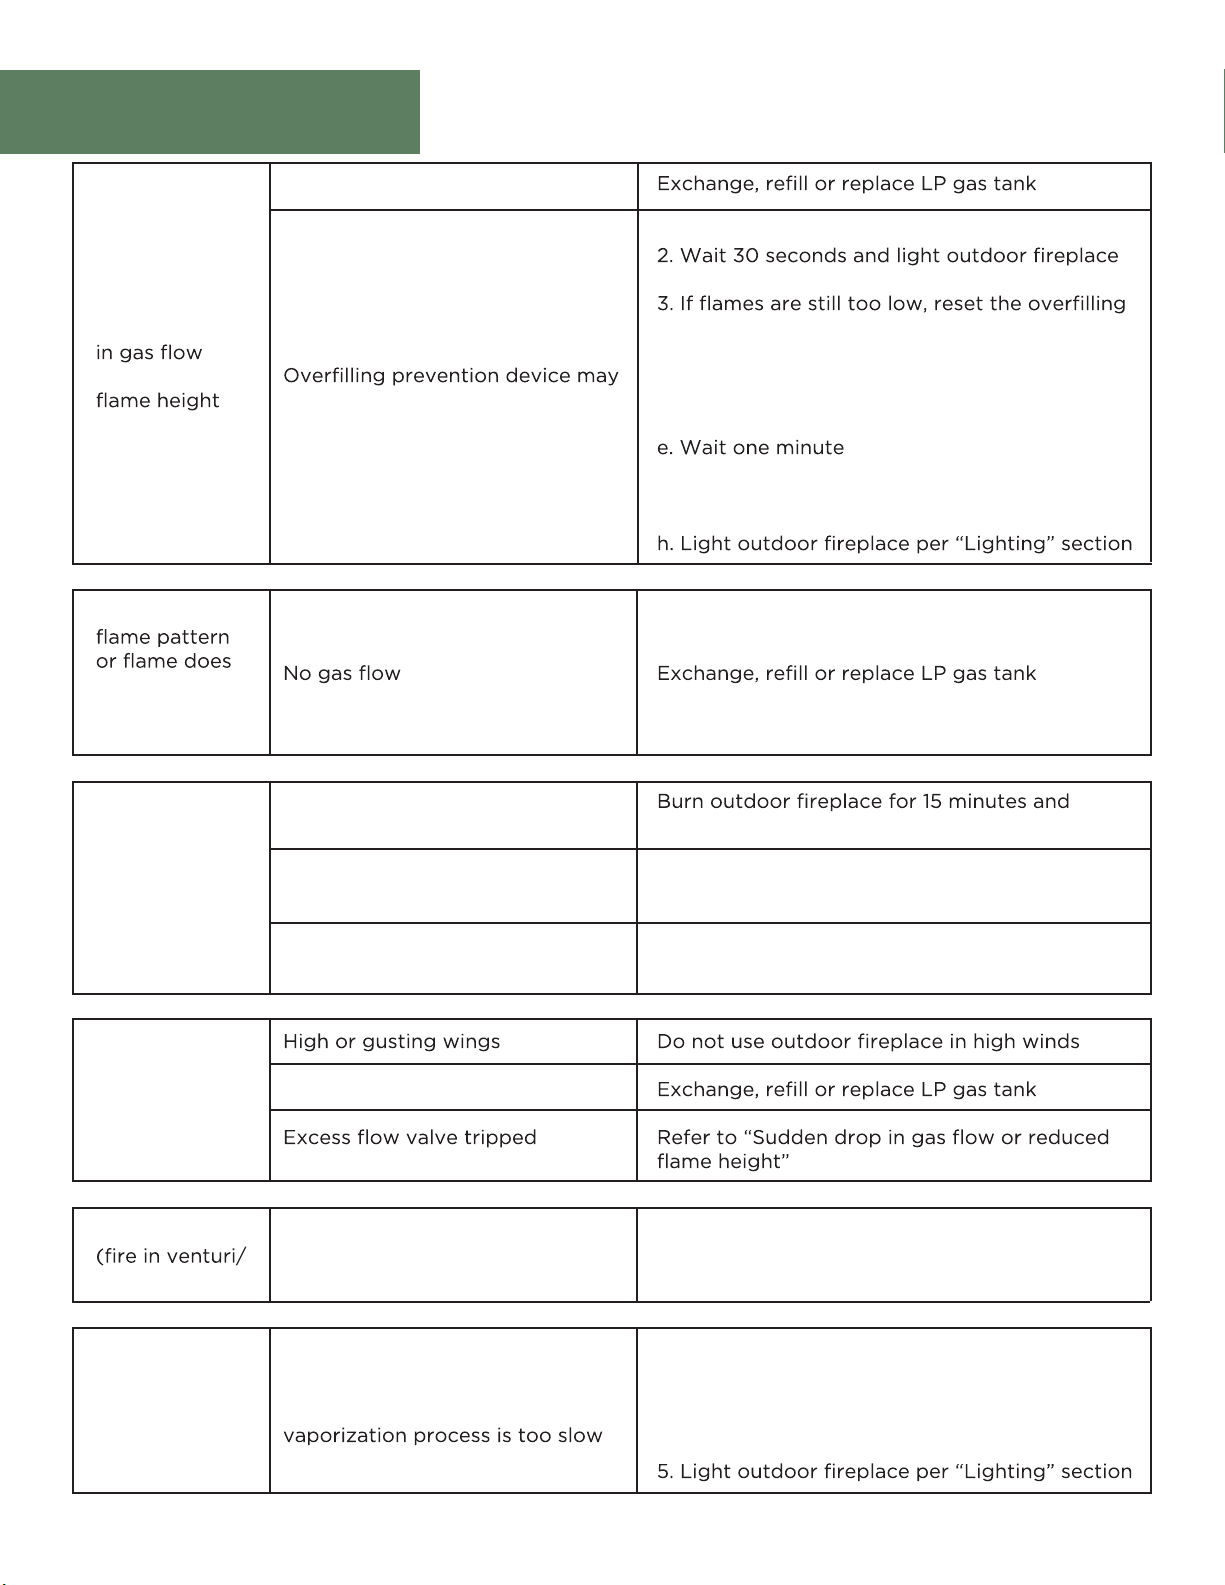
Troubleshooting
Out of gas
1. Turn control knob to “OFF”
per “Lighting” section
Sudden drop
or reduced
Irregular
not run the
full length of
the burner
Flame is yellow
or orange
have been activated
New burner may have residual
manufacturing oils
Spider webs or insect nest in
burner/venturi tube
prevention device:
a. Turn control knob to “OFF”
b. Turn LP gas tank valve to “CLOSED”
c. Disconnect regulator
d. Turn control knob to “ON”
f. Turn control knob to “OFF”
g. Reconnect regulator and leak check
connections, being careful not to fully open valve
reinspect
Clean burner/venturi tube
Flame
goes out
Flashback
burner tube(s))
Flame seems
to lose heat
when burning
in cold weather
- temperature
below
FHTS80021D
50°F (10°C)
Poor alignment of the valve to
burner/venturi tube
Low on LP gas
Burner and/or burner/venturi
tube is blocked
Ice has built up on the outside
of the LP gas tank because the
Ensure burner/venturi tube is properly engaged
with valve
Clean burner and/or burner/venturi tube
1. Turn off per “Turning Off” section
2. Replace with a spare LP gas tank
3. Reconnect LP gas tank per “Installing LP Gas
Tank” section
4. Follow “Checking for Leaks” section
Page 33
Warranty
Outdoor Furniture
IMPORTANT
If you have any problems with this product (missing or damaged parts, assembly issues, etc.),
from where you purchased the product.
1-866-988-3300
To expedite any future warranty claims, please retain the instruction sheet, warranty card and
receipt for future use.
Store furniture in an upright position. Be careful to never allow water to build up in frames as this
soap and water. Rinse with clean water and dry with a soft absorbent cloth towel. Frames can be
treated with a liquid wax for maximum protection against UV rays and/or salty, damp air. If your
set includes cushions, slings, and/or an umbrella they may be cleaned by hand with a solution of
soap and water with a clean water rinse. (Never machine wash cushions, slings or umbrella covers
as this will result in shrinkage or damage). After cleaning cushions tip on end and allow to drip
dry. (Never use a commercial or home dryer to tumble dry fabric goods). Do not use bleach or
solvents to clean any product! This will void the warranty.
FHTS80021D
Page 34
Warranty
Outdoor Furniture
1-YEAR LIMITED WARRANTY PROGRAM
For a period of one (1) year after date of purchase, the Manufacturer will either repair or replace defective
original purchaser and is valid only when accompanied by the original purchaser’s sales receipt showing
original date of purchase and location of purchase. Replacements under this warranty revert back to the
date of original purchase for future warranty.
warranty applies in normal residential use only and is not intended for commercial use. The Manufacturer
can make substitutions as required of materials, components, and sub-components of comparable value
and utility. This warranty is limited to product repair or replacement (to be determined solely by the
This limited warranty covers only manufacturing defects and does not cover normal wear and tear, damage
chemical damage from suntan oil or other chemicals, exposure to extreme heat or cold, abrasion or
excessive weight. This product is intended to be used in standard installations only. This warranty is void
if the product is not used for its intended purpose. The Manufacturer disclaims liability for any aspect of
installation and any inconvenience caused by a defective part of a component.
Certain items are not covered by this warranty. These include, but are not limited to the following:
1. Components subjected to abuse, including abuse intended to simulate failure.
2. Damages caused by retailer, shipper or installation crew (such as scratches, dents, tears, chips, etc.).
3. Any part which merely exhibits normal wear yet functions essentially as new, including chips, scratches or
stretching of materials and stitching.
4. Tears, punctures, scratches or any damage caused by improper installation or use.
temperatures is not covered. General frame rusting is not covered.
6. Fading and/or discoloration of fabrics/cushions/straps/wicker resulting from exposure to the elements,
7. Umbrella bases are not covered under any circumstances.
To make a claim, call the toll-free number below. Please have available a copy of the original sales receipt
along with a brief description of the problem. Please also provide your email address and daytime telephone
or cell phone number. All items may be charged actual freight costs plus $15 for handling. Repairs or
replacement will be made at the Manufacturer’s option. Sales and use taxes, plus shipping and handling
charges are the responsibility of the consumer.
CONNECTION WITH THE REPAIR OR REPLACEMENT OF ANY PRODUCT OR COMPONENT DEEMED
ARISING OUT OF ANY BREACH OF THIS WARRANTY OR NEGLIGENCE EVEN IF IT HAS BEEN ADVISED
ARE NO OTHER EXPRESS OR IMPLIED WARRANTIES OTHER THAN THE WARRANTY DESCRIBED
FHTS80021D
 Loading...