

Page 1
1
2
3
4
5
6
7
8
9
S
O
U
R
C
E
R
E
C
A
L
L
VOL
CH
CH
DIS
P
LA
Y
VOL
0
CA
P
T
I
O
N
R
E
S
E
T
MTS
MUTE
M
EN
U
EN
T
ER
NTSCRCTWEN1203
MAH-000027
遙 控 器
使用手冊
User's Manual
Remote Control
瀚斯寶麗股份有限公司
台市114 內湖區
瑞光 362 號 2
電話:886-2-87520000
傳真:886-2-87527092
www.hannspree.com
2F, No.362, Rueiguang Rd., Neihu District,
Ta ip ei C it y 11 4, Ta iw an , R. O. C.
TEL: 886-2-87520000
FAX: 886-2 -87 52 709 2
www.hannspree.com
YES-001003
YES-001005
YES-001016
YES-001004
YES-001001
YES-001006
Made in Taiwan
Page 2

Table of Contents
1. Warranty and Service .................................................... 2
2. Preface ......................................................................... 3
3. Introducing the Remote Control...................................... 4
4. Checking Package Contents .......................................... 5
5. Getting to Know Your Remote Control ............................ 6
Inserting the Remote Control Battery .......................... 9
6. Troubleshooting .......................................................... 10
1
Page 3
1
Warranty and Service
Thank you for purchasing our product. With this product, you will be
able to enjoy superior lifestyle with advanced technology.
Please refer to the Hannspree product warranty policy for datailed
warranty and service information. You may also obtain the information
from our customer service center. Our service representatives will be
very happy to serve to your satisfaction.
Hannspree e-mail address:
service@hannspree.com
2
Page 4
2
Preface
This manual is designed to assist users in using the Remote Control.
Information in this document has been carefully checked for accuracy;
however, no guarantee is given to the correctness of the contents. The
information in this document is subject to change without notice.
Copyright
© Copyright 2003 Hannspree, Inc.
All rights reserved. This product and related documentation are protected by copyright and are distributed under licenses restricting their
use, copying, and distribution. No part of this documentation may be
reproduced in any form by any means without prior written authorization
of Hannspree, Inc., and its licensors, if any.
3
Page 5
3
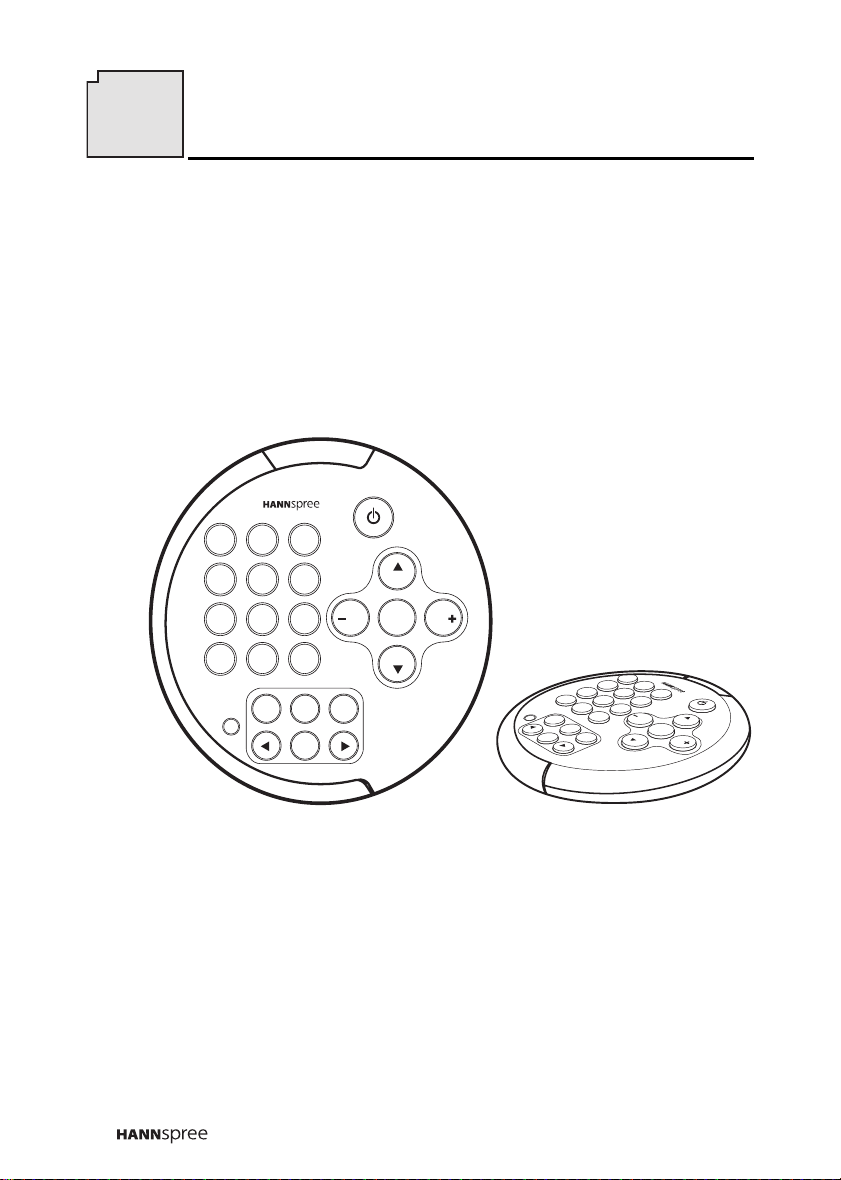
Introducing the Remote Control
Thank you for purchasing this Remote Control. Your remote control is
designed to be safe, versatile, and easy to use. The creative design
makes it a fun addition to your TV.
1 2 3
4 5 6
7 8 9
SOURCE RECALL
0
CAPTION
MTS
RESET
ENTER
MENU
CH
DISPLAY
VOL
MUTE
VOL
CH
S
O
S
O
U
R
R
E
C
S
E
E
T
M
E
E
N
N
T
U
E
R
1
4
2
7
5
U
R
C
E
0
R
E
C
M
T
S
M
U
T
E
3
8
6
9
A
L
L
V
O
C
L
H
D
I
S
P
L
A
Y
C
H
V
O
L
The control buttons located on the handy remote control let you
change channels, adjust the volume, and change the display settings
through an easy-to-use on-screen menu system.
4
Page 6
4
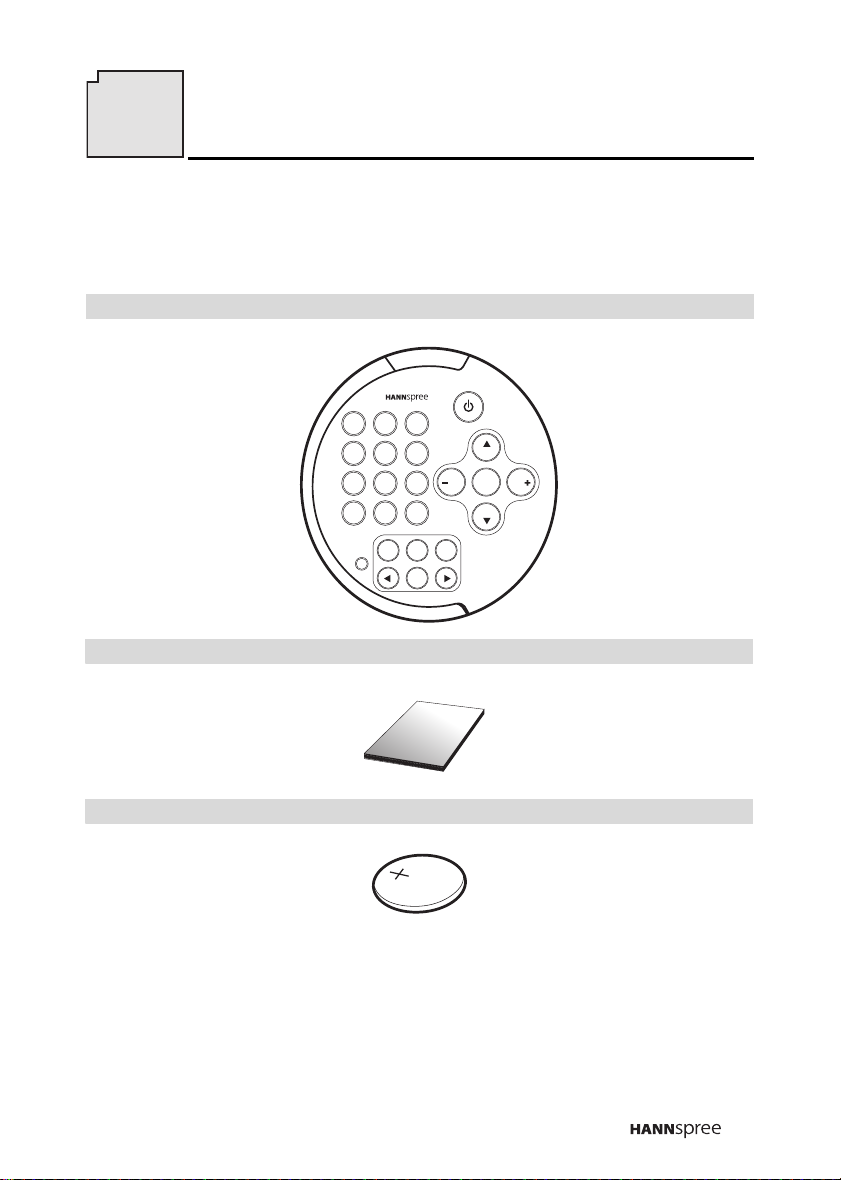
Checking Package Contents
Make sure the following components are included in the box. Contact
your vendor immediately if anything is missing or damaged.
Remote Control
1 2 3
4 5 6
7 8 9
SOURCE RECALL
0
CH
DISPLAY
VOL
VOL
CH
CAPTION
RESET
MUTE
MTS
MENU
ENTER
User’s Manual
U
ser's M
anual
Lithium Ion Battery
PRE
3V
CR2032
5
Page 7
5
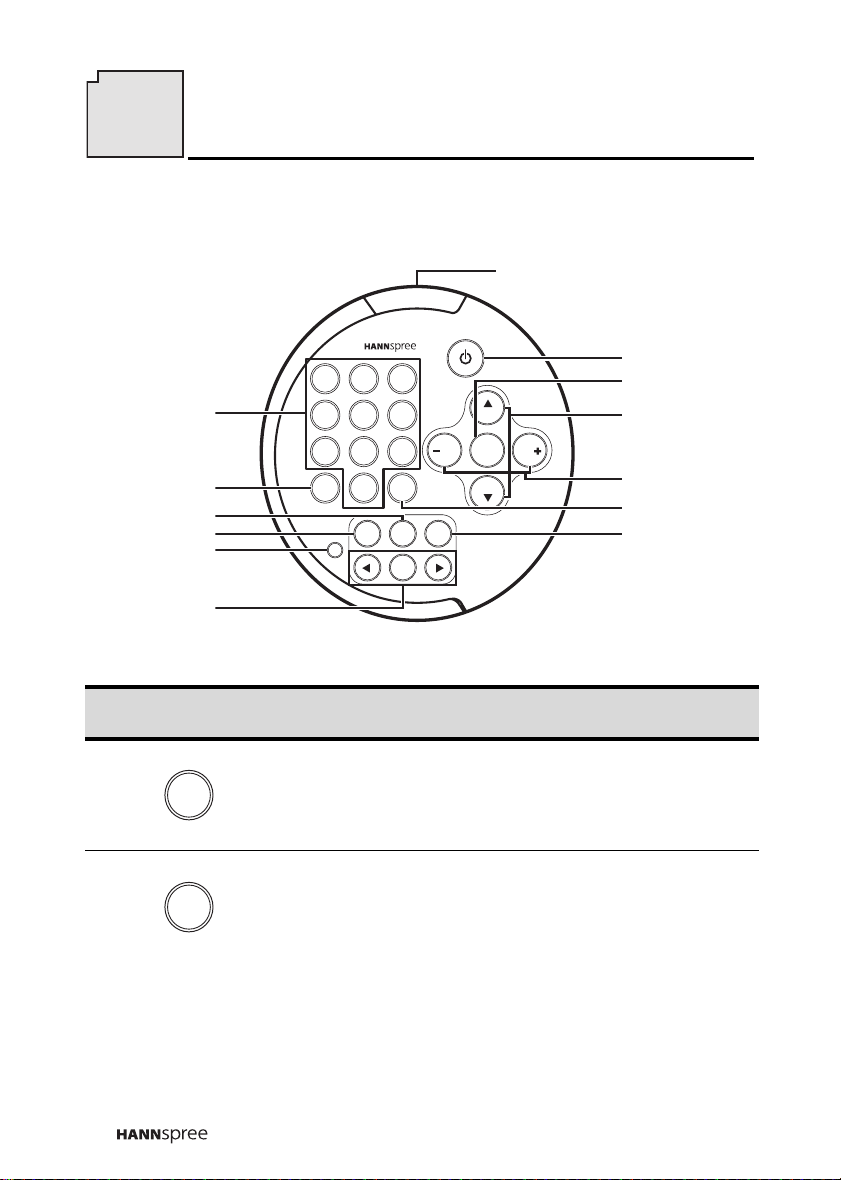
Getting to Know Your Remote Control
Signal transmitter
1 2 3
1
2
3
4
5
4 5 6
7 8 9
SOURCE RECALL
0
CAPTION
MTS
RESET
MENU
ENTER
CH
DISPLAY
VOL
CH
MUTE
6
Icon
Description Functions
Press these buttons to select a
1
1
Number
buttons
channel directly. Press 0-9 to enter
the channel number. Press the 1
and 0 buttons for channel 10.
Press this button to cycle the video
2Source button
SOURCE
input sources. The source is displayed on the bottom right corner of
the screen.
7
8
9
VOL
10
11
12
6
Page 8
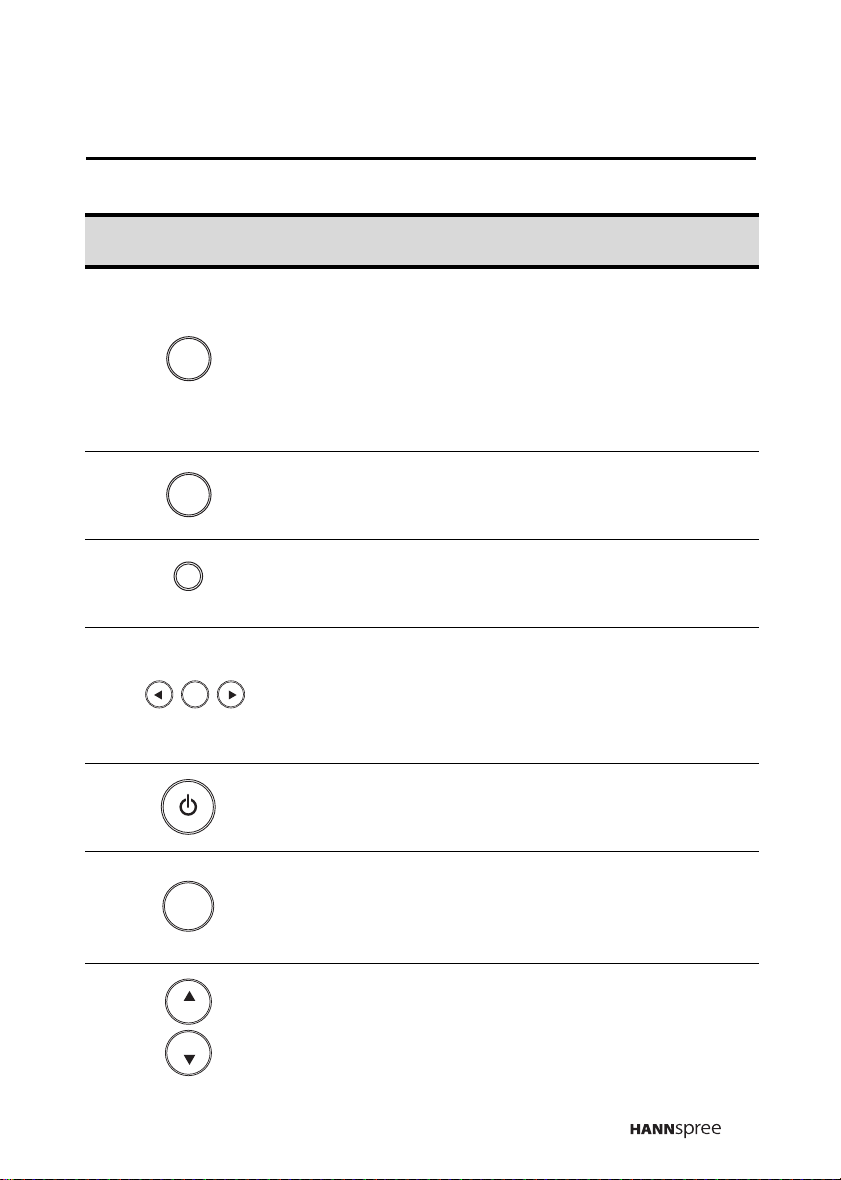
Icon
Description Functions
When you press MTS button, a setting screen will appear on the bottom left. The green mark indicates
3MTS button
MTS
the status that is supported by the
current channel sound system, such
as primary channel, secondary
channel, and bi-channel.
Press this button to view program
4Caption button
CAPTION
subtitles (American standard, only
available in 15”).
Press this button to return all set-
5Reset button
RESET
tings to their factory-set default values.
Press MENU to activate the OSD
MENU
6
ENTER
Menu and
Arrow buttons
menu system to adjust various settings and personal preferences.
Press or to scroll through the
on-screen display menus.
7Power buttonTurns TV power on or off.
Press this button to show messages
8Display button
DISPLAY
on the screen, such as the mode
and others.Press the button again
to close the displayed message.
CH
9
CH
Channel select
buttons
Press CH to incr ease the chann el
number. Press CH to decrease
the channel number.
7
Page 9

Icon
Description Functions
10
11 Recall button
VOL VOL
RECALL
Volume a djust
buttons
Press VOL+ to increase the volume;
press VOL- to decrease the volume.
The range is from 1 to 20.
Press this button to return to the last
channel selected.
Press this button to eliminate
sound. The word MUTE appears on
12 Mute button
MUTE
the top left corner of the screen.
Press the MUTE button again or
press the VOLUME button directly
to restore sound.
Notes:
•The operational distance is shortened when the signal sensor on
the TV is directly exposed to strong light.
•Protect the remote control from shock and vibration to avoid
damage.
•Do not place the remote control in hot or humid locations.
•Aim the transmitter on the remote control at the signal sensor on
the TV and ensure there are no obstacles between them.
8
Page 10

Inserting the Remote Control Battery
1. Insert a coin into the battery cover slot
at the back of the remote control (A),
and turn counter clockwise to open.
A
c
l
o
s
e
n
e
p
o
2. Remove the cover (B).
3. Insert the battery paying attention to
the polarity markings inside the bat
-
B
c
l
o
s
e
n
e
p
o
tery compartment (C).
4. Replace the battery cover (D).
C
S
T
32
K
0
2
R
V
C
Caution
•If the remote control is not used
for a long period, remove the batteries and store them properly.
•Handle damaged or leaking batteries carefully, and wash hands
with soap immediately if they
come in contact with leaked
chemical fluids.
•Refer to your local recycling or
waste disposal rules and contact
a local waste disposal vendor to
dispose of used batteries.
•
Danger of explosion if battery is incorrectly replaced. Replace
only with the same or equivalent type recommended by the
equipment manufacturer. Discard used batteries according to
manufacturer's instructions.
•Check the remote control batteries on a regular basis. Clean any
stains on the rear battery cover immediately and use new batteries if fluid is leaking from old batteries.
D
3
c
l
o
s
e
n
e
p
o
9
Page 11

6
Troubleshooting
Situation Solution
Remote control doesn’t work.
•Make sure the battery is inserted correctly.
•Replace the battery with a new one.
• Make sure the TV power cord is plugged in.
•Make sure the path between the remote control
and the sensor is clear.
•Try operating the remote control at a closer distance to the TV. Don’t exceed an angle of 30º from
the sensor.
10
Page 12

MEMO
Page 13

MEMO
Page 14

目錄
1. 產品保固與服務 .............................................................. 2
2. 序言 .............................................................................. 3
3. 遙控器簡介 .................................................................... 4
4. 包裝內容........................................................................ 5
5. 使用遙控器 .................................................................... 6
裝入遙控器電池 .......................................................... 9
6. 故障排除...................................................................... 10
1
Page 15

1
產品保固與服務
感謝您購買本公司的產品。 使用本產品,您能夠以先進的科技享受到優越
的生活品味。
有關產品的保固服務資訊,請參閱 Hannspree 產品保固條款,或直接聯絡
Hannspree 客戶服務中心。 我們的客服人員將十分樂意提供讓您滿意的服
務。
Hannspree 電子郵件地址:
service@hannspree.com
2
Page 16

2
序言
本手冊是設計來協助使用者使用本遙控器。本文件所含訊息業經審慎地檢
查以確保其準確度,然而,並不保證內容之正確性。且本文件內之訊息可
能未經通知而變更。
著作權
© Copyright 2003 Hannspree, Inc.
保留所有權利。 本產品與相關文件均受到著作權保護,而且產品與相關文
件的散佈,必須受到限制其使用、複製與散佈的授權規範。 未獲得
Hannspree, Inc. 和其授權人事先書面許可,不得以任何形式或方法複製本
文件的任何部份。
3
Page 17

3
遙控器簡介
感謝您購買這台遙控器。 您的遙控器設計得很安全、多用途且容易使
用。 除了您的電視之外,極具創意的設計使得它也非常地有趣。
1 2 3
4 5 6
7 8 9
SOURCE RECALL
0
CAPTION
MTS
RESET
MENU
ENTER
CH
DISPLAY
VOL
MUTE
VOL
CH
S
O
S
O
U
R
R
E
C
S
E
E
T
M
E
E
N
N
T
U
E
R
1
4
2
7
5
U
R
C
E
0
R
E
C
M
T
S
M
U
T
E
3
8
6
9
A
L
L
V
O
C
L
H
D
I
S
P
L
A
Y
C
H
V
O
L
位於精巧遙控器上面的控制按鈕可讓您透過易於使用的在屏顯示功能
表系統來改變頻道、調整音量和改變顯示的設定。
4
Page 18

4
包裝內容
請確認包裝內含有以下物品。 如果有任何物品遺漏或損壞,請立刻聯
絡您當地的廠商。
遙控器
1 2 3
4 5 6
7 8 9
SOURCE RECALL
0
CH
DISPLAY
VOL
VOL
CH
RESET
CAPTION
MTS
MENU
ENTER
使用手冊
U
ser's M
鋰電池
PRE
CR2032
MUTE
anual
3V
5
Page 19

5
使用遙控器
訊號傳送器
1 2 3
1
2
3
4
5
4 5 6
7 8 9
SOURCE RECALL
0
CAPTION
RESET
ENTER
MTS
MENU
CH
DISPLAY
VOL
MUTE
VOL
CH
7
8
9
10
11
12
6
圖示 說明 功能
按下數字按鈕可直接選擇頻道。 按下
1
1
數字按鈕
0-9 輸入頻道號碼。 按下 1 和 0 就可
以選擇頻道 10。
2
SOURCE
影音切換按鈕
按下此鈕可以循環選擇影像輸入來
源。 畫面右下方會顯示訊號來源。
6
按下 MTS 按鈕時,螢幕左下方會顯
3
MTS
立體聲 / 雙語設
定按鈕
示一設定畫面。 綠色標記指示出目前
頻道的音響系統支援的音響狀態,例
如主語聲道、副語聲道或雙語聲道。
Page 20

圖示 說明 功能
按下此鈕可以看見提供有字幕服務的
4
CAPTION
字幕按鈕
節目中的字幕 (僅適用於美國 15" 電
視 )。
5
6
7
8
9
10
11
RESET
MENU
ENTER
DISPLAY
CH
CH
VOL VOL
RECALL
重置按鈕
選單和方向按鈕
電源按鈕
顯示按鈕
頻道選擇按鈕
音量調整按鈕
頻道往返按鈕
按下這個按鈕可將所有設定值重新設
定成原預設值。
按下 MENU 按鈕啟動選單系統,並依
個人喜好調整各種設定。 按下 或
按鈕,捲動螢幕功能設定選單。
開啟 / 關閉電視的電源。
按下此按鈕一次以顯示訊息在螢幕
上,比方說模式和其它的資訊。再按
此按鈕一次去關閉顯示訊息。
按 CH 按鈕增加頻道號碼。 按 CH
按鈕減少頻道號碼。
按下 VOL + 按鈕提高音量,或按下
VOL - 按鈕降低音量。 調整範圍是 1
~ 20。
按下此按鈕可返回上一個選擇的頻
道。
7
Page 21

圖示 說明 功能
按下本按鈕消除播放的聲音。 畫面左
12
MUTE
靜音按鈕
上方會顯示出靜音字樣。 再次按下
MUTE 按鈕,或按下 VOLUME 按鈕
就可以再播放聲音。
附註:
• 電視的訊號感應器如果直接暴露在強光下,將會縮短有效的操作距
離。
• 請勿撞擊或震動遙控器以避免損壞遙控器。
• 請勿將遙控器放置於濕熱的環境中。
• 將遙控器的訊號傳送器對準電視的訊號感應器,並且確認兩者之間沒
有任何阻礙物品。
8
Page 22

裝入遙控器電池
A
1. 將硬幣置入遙控器背面電池外蓋的凹槽
中 (A),反時針旋轉即可開啟電池外
蓋。
2. 取下電池外蓋 (B)。
3. 注意電池匣內的極性標記,並依極性裝
入電池 (C)。
4. 回裝電池匣蓋 (D)。
注意
• 長時間不使用遙控器時,請取出電池
並妥為保存。
• 請小心處理損壞或漏液的電池,如果
雙手沾到流出的化學液體,則立刻以
肥皂清洗雙手。
• 請根據您當地的相關法規,並且聯絡
當地的廢電池回收業者處理廢棄的電
池。
• 若電池放置的位置不正確,則易產生
爆炸的危險。 產品製造商建議您,使
用相同或同型號的電池。 請依製造
商的建議丟棄用過的電池。
• 定期檢查遙控器電池。舊電池外流液
體時,請立即清除後電池蓋的污垢,並且更換新電池。
c
l
o
s
e
n
e
p
o
B
c
l
o
s
e
n
e
p
o
C
S
T
32
K
0
2
R
V
C
3
D
c
l
o
s
e
n
e
p
o
9
Page 23

6
故障排除
問題 解決方法
無法使用遙控器。
• 確認已正確裝入電池。
• 更換新電池。
• 確認已插好電視的電源線。
• 確認遙控器與電視訊號感應器之間沒有任何阻礙
物。
• 試著更靠近電視使用遙控器。 使用時,遙控器與訊
號感應器之間的範圍,請勿超過 30 度。
10
Page 24

MEMO
Page 25

MEMO
 Loading...