

Page 1

Contents of the Package
Installation and Removal
I/O Ports Connection
Control Buttons
Quick setup
快速安裝指南
快速安装指南
クイックセットアップ
Schnellanleitung
Instructions rapides
Instrucciones rápidas
Istruzioni veloci
Instalação rápida
Snelle installatie
빠른 설치
Быстрая настройка
1
2
3
8
10
11
12
13
14
15
16
17
18
19
20
21
LCD Monitor
Page 2

Contents of the Package
LCD Monitor
(Reference only, the real feature is depended on selected model)
Screen
Base
Accessory
Power Cord
Warranty Card
Quick Start Guide
User’s Manual
VGA Cable
Audio Cable
(optional)
DVI Cable
(optional)
HDMI to DVI Cable
(optional)
HDMI Cable
(optional)
- 1 -
Page 3
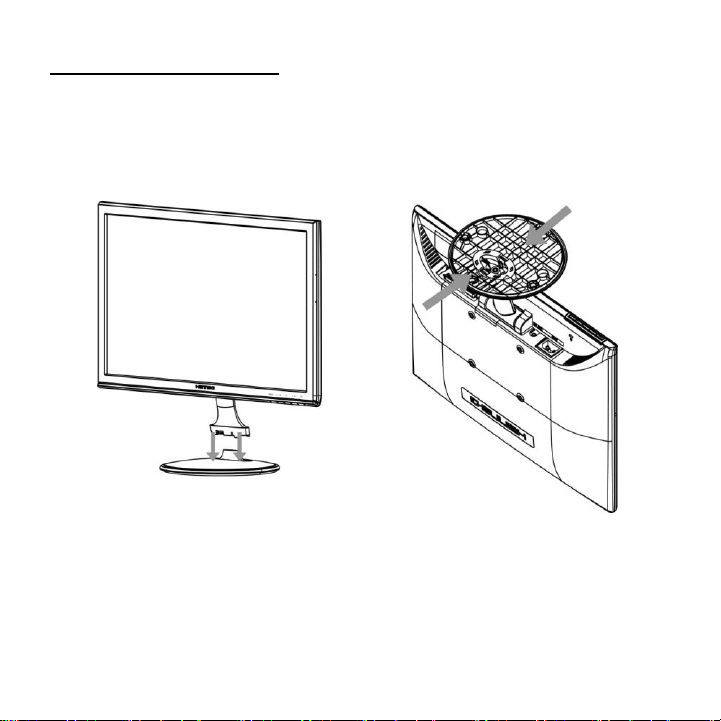
Installation and Removal
INSTALL REMOVE
- 2 -
Page 4
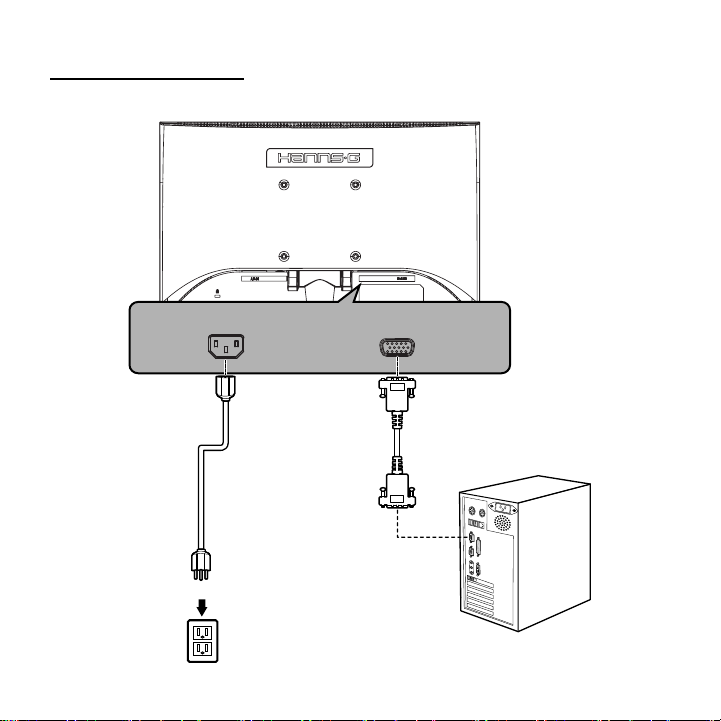
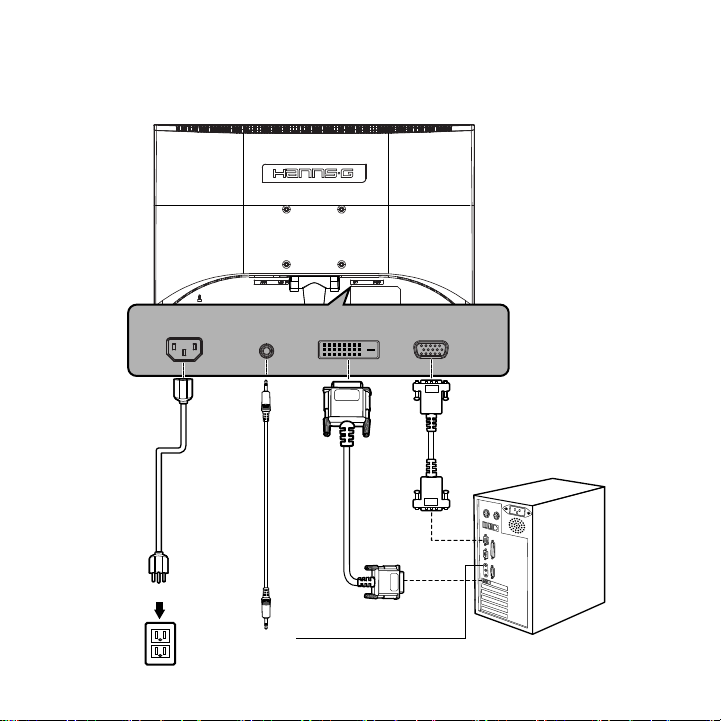
I/O Ports Connection
HL195A
Power Cord
D-SUBAC IN
VGA Cable
- 3 -
Page 5
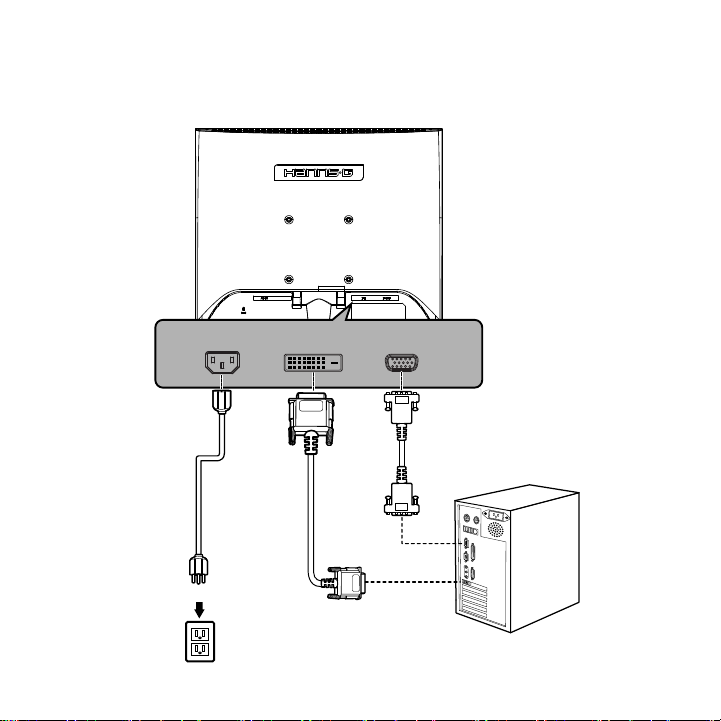
HL196D
Power Cord
DVI
D-SUBAC IN
DVI Cable
(optional)
VGA Cable
- 4 -
Page 6
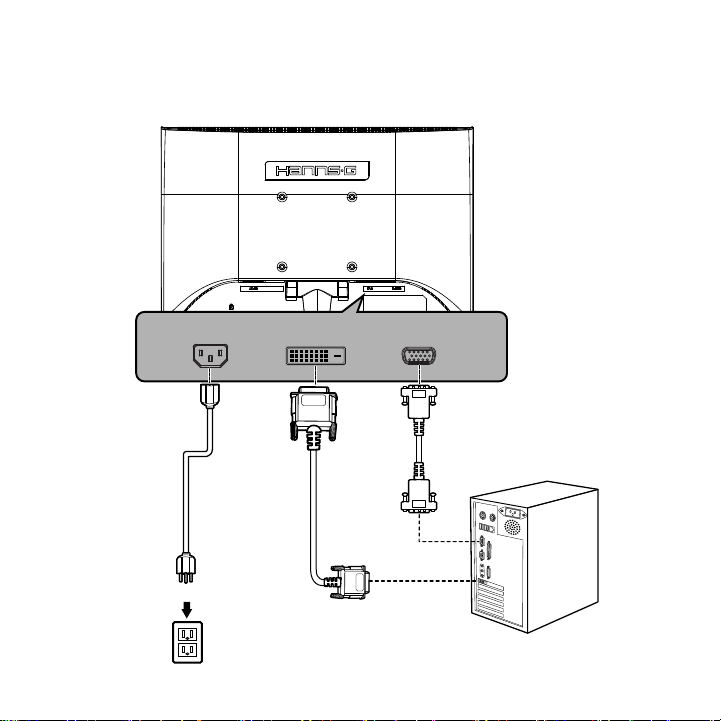
HL198D/HL225D
Power Cord
DVI Cable
(optional)
D-SUBAC IN
VGA Cable
DVI
- 5 -
Page 7
HL255D
AC IN
Power Cord
LINE IN
Audio Cable
(optional)
DVI
- 6 -
D-SUB
DVI Cable
(optional)
VGA Cable
Page 8

HL285H
Speakers
AC IN
Power Cord
HDMI
OR
HDMI Cable
(optional)
DVI
HDMI to DVI Cable
(optional)
(DVD/ VCD/ VCR/ HDVR/ SET-TOP BOX)
Player
HDMI
D-SUB
DVI Cable
(optional)
VGA Cable
HDMI
output
- 7 -
LINE IN
Audio Cable
(optional)
OR
Page 9

Control Buttons
HL195A/HL196D/HL198D/HL225D
LED
POWER
Menu/Return
Brightness adjustment button/▲ [-]
▼ [+]
Auto adjustment/Enter (Analog Input Models)
Input source change/Enter (Digital Input Models)
- 8 -
Page 10

HL255D/HL285H
Menu/Return
Brightness adjustment button/▲ [-]
Volume adjustment button/▼ [+]
LED
POWER
Auto adjustment/Enter (Analog Input Models)
Input source change/Enter (Digital Input Models)
- 9 -
Page 11

Quick setup
Problems
Check items
No video
The power LED didn’t lit
Check whether the power of screen is on or not.
Ensure the power cord is connected to screen properly.
Ensure the power supply is normally in the outlet by tester.
No video
The power LED is in the color
of orange
Ensure the computer is not in the power save mode.
(Move mouse or hit any key to wake up the computer)
Ensure the computer or the equipment of video source is on.
Ensure the video signal cable is connected properly.
1. Power on the computer and monitor.
2. Start the operating system.
3. Insert the CD-ROM into the CD drive on your computer. The CD-ROM will automatically
execute and display the Main Menu.
4. From the Main Menu, click on the options you would like to perform and follow the
directions on the screen.
Troubleshooting
Warning: To reduce the risk of electric shock or damage to your equipment:
1. Do not disable the power cord-grounding plug. The grounding plug is an important safety
feature.
2. Plug the power cord into a grounded (earthed) electrical outlet that is easily accessible at all
times.
3. Disconnect power from the monitor by unplugging the power cord from the electrical outlet.
- 10 -
Page 12

快速安裝指南
狀況
檢查項目
沒有畫面
LED 電源指示燈不亮
檢查螢幕電源是否開啟。
檢查電源線是否與螢幕適當連接。
使用另外的裝置來檢查電源插座是否正常供電。
沒有畫面
LED 電源指示燈呈現橘色
確定電腦不是處於省電模式下。
(移動滑鼠或在鍵盤上任意按下一個鍵來喚醒電腦)
檢查電腦或視訊來源設備的電源是否打開。
檢查視訊訊號線是否適當連接。
1. 啟動電腦和顯示器。
2. 啟動作業系統。
3. 放入光碟到電腦的光碟機。光碟片將自動執行並顯示主選單。
4. 在主選單中按下你要執行的選項,並依照螢幕所列的方法執行。
疑難排除
警告:為減少電擊或設備損壞的風險:
1. 不要使電源線的接地插頭失效,附加的接地是項重要的安全功能。
2. 電源線要插入隨時都可輕易使用的接地電源插座。
3. 要中斷顯示器的連接請從電源插座上拔下插頭。
- 11 -
Page 13

快速安装指南
状况
检查项目
没有画面
LED 电源指示灯不亮
检查屏幕电源是否开启。
检查电源线是否与屏幕适当连接。
使用另外的装置来检查电源插座是否正常供电。
没有画面
LED 电源指示灯呈现橘色
确定计算机不是处于省电模式下。(移动鼠标或在键盘上任意
按下一个键来唤醒计算机)
检查计算机或视讯来源设备的电源是否打开。
检查视讯讯号线是否适当连接。
1. 开启计算机和显示器。
2. 启动操作系统。
3. 将CD-ROM插入您计算机的光驱中。此CD-ROM将自动执行并显示主菜单。
4. 在主菜单中单击要执行的选项,然后遵照屏幕上的指示进行。
疑难排除
警告:为减少电击或产品损坏的风险:
1. 不要使电源线的接地插头失效。接地插头是一项重要的安全功能。
2. 将电源线插入一个随手可及的接地插座。
3. 要切断显示器的电源时,请从电源插座中拔出电源线。
- 12 -
Page 14

クイックセットアップ
問題
チェック項目
画像が表示されない
電源 LED が点灯しない
画面の電源がオンまたはオンになっているかチェックします。
電源コードがアダプタに適切に接続されているか確認します。
テスタでコンセントに電源が正常に供給されているか確認します。
画像が表示されない
電源 LED がオレンジ色
に点灯している
コンピュータが省電力モードに入っていないことを確認します。(マウスを動
かしたりキーを操作すると、コンピュータは活動状態になります)
コンピュータ、ビデオソース装置がオンになっているか確認します。
ビデオ信号ケーブルが適切に接続されているか確認します。
1. コンピュータとモニタの電源を入れます。
2. オペレーティングシステムを起動します。
3. 同梱の CD-ROM をコンピュータの CD ドライブに挿入します。CD-ROM が自動的に起動し、
[Main Menu](メイン メニュー)が表示されます。
4. [Main Menu] から、オプションを選択し、画面の指示に従って操作を続けます。
トラブルシューティング
警告:感電や装置の損傷を防止するため、次の点を守ってください。
1. 製品を安全に使用するため、必ずコードのアース端子を使用して接地してください。
2. 電源コードは、モニタの近くの抜き差しのしやすいACコンセントに接続してください。
3. モニタから完全に電源を切る必要があるときは、モニタ本体の電源スイッチを切った後、コ
ンセントからプラグを抜いてください。
- 13 -
Page 15

Schnellanleitung
Problem
Lösung
Kein Bildsignal
Die Betriebsleuchte brennt
nicht.
Prüfen Sie, ob der Monitor eingeschaltet ist
Prüfen Sie, ob das Netzteil korrekt angeschlossen ist.
Prüfen Sie, ob das Netzkabel in der Steckdose steckt.
Kein Bildsignal
Die Betriebsleuchte brennt
orange.
Stellen Sie sicher, dass der Computer nicht im Stromsparmodus ist.
Prüfen Sie, ob der Computer eingeschaltet ist.
Prüfen Sie, ob das VGA-Kabel korrekt angeschlossen ist.
1. Schalten Sie den Computer und den Monitor ein.
2. Legen Sie die CD-Rom in das CD-ROM Laufwerk ein. Das Programm startet automatisch.
Sollte diese Funktion abgeschaltet sein, öffnen Sie den Arbeitsplatz und doppelklicken Sie
auf das CD-Rom-Laufwerkssymbol.
3. Vom Hauptmenü ausgehend, klicken Sie auf die gewünschten Funktionen und folgen Sie
den Anweisungen am Bildschirm.
Problembehebung
Warnung: zur Vermeidung elektrischen Stromschläge
1. Nutzen Sie nur korrekt geerdete Steckdosen. Die Erdung stellt ein wichtiges
Sicherheitsmerkmal dar.
2. Verbinden Sie das Netzkabel mit einer geerdeten Steckdose, die jederzeit gut erreichbar ist.
3. Ziehen Sie den Netzstecker, wenn Sie den Monitor vom Computer trennen wollen.
- 14 -
Page 16

Instructions rapides
Probléme
Résolution
Pas de signal d’image.
Le voyant de fonctionnement
n‘est pas allumé.
Vérifiez si le moniteur a été mis sous tension ou pas.
Vérifiez que le cordon d'alimentation est bien correctement branché sur
l'écran.
A l'aide d'un testeur, vérifiez que la prise électrique est bien
normalement alimentée en électricité.
Pas de signal d’image.
Le voyant de fonctionnement
est orange.
Assurez-vous que l‘ordinateur n’est pas en mode d’économie de courant.
Vérifiez si l’ordinateur est mis en marche.
Vérifiez si le câble VGA est branché correctement.
1. Mettez en marche l‘ordinateur et le moniteur.
2. Insérez le CD-Rom dans le lecteur de CD-ROM. Le programme démarre automatiquement.
Si cette fonction est désactivée, ouvrez le poste de travail et double-cliquez sur l‘icône du
lecteur de CD-Rom.
3. Depuis le menu principal, cliquez sur les fonctions souhaitées et suivez les instructions à
l‘écran.
Suppression de problèmes
Avertissment: pour éviter des électrocutions:
1. Utilisez uniquement des prises de courant correctement reliées à la terre. La mise à la terre
constitue une caractéristique de sécurité importante.
2. Reliez le câble d‘alimentation à une prise de courant mise à la terre qui est facilement
accessible à tout moment.
3. Débranchez la fiche secteur lorsque vous souhaitez déconnecter le moniteur de l‘ordinateur.
- 15 -
Page 17

Instrucciones rápidas
Problemas
Cosas que comprobar
No hay señal de imagen
No se enciende la lámpara de
activado.
Compruebe si la alimentación de la pantalla está activada o desactivada.
Compruebe si el cable de alimentación está correctamente conectado a la
pantalla.
Compruebe si la fuente de alimentación está conectada a la toma de
corriente por un controlador de circuito.
No hay señal de imagen
Se enciende en color naranja
la lámpara de activado.
Cerciórese de que el ordenador no está en modo de ahorro de energía.
Compruebe si está activado el ordenador.
Compruebe si está conectado correctamente el cable VGA.
1. Active el ordenador y el monitor.
2. Introduzca la unidad de CD-Rom y la unidad de CD-ROM. El programa arranca
automáticamente. Si estuviera desactivada esta función, abra el puesto de trabajo y haga
doble clic en el símbolo de la unidad de CD-Rom.
3. Partiendo desde el menú principal, haga clic en las funciones deseadas y siga las
instrucciones que aparecen en la pantalla.
Solución de problemas
Advertencia: para evitar descargas de corriente eléctrica:
1. Utilice únicamente bases de enchufe con toma de tierra. La toma de tierra representa una
característica importante de seguridad.
2. Realice la unión del cable de la red con una base de enchufe provista de toma de tierra y a la
que se acceda fácilmente en todo momento.
3. Extraiga el enchufe de la red cuando quiera separar el monitor del ordenador.
- 16 -
Page 18

Istruzioni veloci
Problema
Soluzione
Nessun segnale video
La spia di funzionamento non
è accesa.
Verificare se il monitor è collegato.
Verificare se il cavo di alimentazione è collegato correttamente allo
schermo.
Verificare con l'ausilio di un tester che la tensione di alimentazione
presente nella presa di corrente sia corretta.
Nessun segnale video
La spia di funzionamento è
arancione.
Assicurarsi che il computer non si trovi nella modalità risparmio di
energia.
Verificare se il computer è acceso.
Verificare se il cavo VGA è collegato correttamente.
1. Accenedete il monitor ed il computer.
2. Inserite il CD-Rom. Il programma parte automaticamente. Se questa funzione non dovesse
esserci. Aprite la sessione di lavoro e fate un doppio click sul simbolo CD-Rom.
3. Partendo dal menù principale cliccate sulle funzioni desiderate e seguite le istruzioni che vi
appaiono sullo schermo.
Eliminazione dei problemi
Avvertenza: per evitare scosse elettriche
1. Utilizzate solo prese elettriche a terra correttamente. Il collegamento a terra costituisce un
importante requisito di sicurezza.
2. Attaccate il cavo di rete ad una presa a terra, accessibile in ogni momento.
3. Scollegate la presa della rete, quando volete scollegare il monitor dal computer.
- 17 -
Page 19

Instalação rápida
Problema
Verifique os seguintes itens
Sem entrada do sinal de
vídeo
O LED de alimentação não
acende
Verifique se a alimentação do monitor está ou não ligada.
Certifique-se de que o cabo de alimentação está devidamente ligado ao
monitor.
Certifique-se de que a fonte de alimentação está devidamente ligada à
tomada eléctrica.
Sem entrada do sinal de
vídeo
O LED de alimentação está
cor-de-laranja
Certifique-se de que o computador não se encontra no modo de
poupança de energia. (Mova o rato ou prima qualquer tecla para
reactivar o computador)
Certifique-se de que o computador ou o equipamento de vídeo está
ligado.
Certifique-se de que o cabo do sinal de vídeo está devidamente ligado.
1. Ligue o computador e o monitor.
2. Inicie o sistema operativo.
3. Introduza o CD na unidade de CD-ROM do seu computador. O CD-ROM é automaticamente
executado sendo apresentado o menu principal.
4. No menu principal, clique nas opções que pretende e siga as instruções apresentadas no ecrã.
Resolução de problemas
Aviso: Para reduzir o risco de choque eléctrico ou o risco de danos ao nível do equipamento:
1. Não desactive a ficha com ligação à terra do cabo de alimentação. A ficha com ligação à
terra constitui uma importante medida de segurança.
2. Ligue a ficha a uma tomada eléctrica com ligação à terra e de fácil acesso.
3. Desligue a alimentação do monitor retirando o cabo de alimentação da tomada eléctrica.
- 18 -
Page 20

Snelle installatie
Problemen
Controleer de onderdelen
Geen video
De stroom-LED ging niet
branden
Controleer of de stroom van het scherm aan of uit staat.
Controleer of de stroomkabel goed is aangesloten op het scherm.
Controleer de stroom in het stopcontact met een testapparaat.
Geen video
De stroom-LED brandt in
de kleur oranje
Controleer of de computer niet in de stroombesparingsmodus
staat.(Beweeg de muis of druk op een toets om de computer weer in te
schakelen)
Controleer of de computer of het apparaat van de videobron aan staat.
Controleer of de videosignaalkabel goed is aangesloten.
1. Zet de computer en de monitor aan.
2. Start het besturingssysteem.
3. Plaats de cd-rom in het cd-station van uw computer. De cd-rom wordt automatisch gestart en
geeft het hoofdmenu weer.
4. Klik in het hoofdmenu op de opties die u wilt uitvoeren en volg de instructies op het scherm.
Probleemoplossing
Waarschuwing: Om het risico van elektrische schokken of schade aan uw materiaal te
beperken:
1. De aardingsstekker van de stroomkabel niet onbruikbaar maken. De aarding is een
belangrijke veiligheidsmaatregel.
2. Steek de stroomkabel in een geaard elektrisch stopcontact dat altijd makkelijk te bereiken is.
3. Schakel de stroom van de monitor uit door de stroomkabel uit het elektrische stopcontact te
halen.
- 19 -
Page 21

빠른 설치
문제
점검 항목
비디오가 나오지 않습니다.
전원 LED 가 켜지지
않습니다.
모니터 전원이 켜져 있는지 확인합니다.
전원 코드가 모니터에 바르게 연결되어 있는지 확인합니다.
시험기로 콘센트의 전원 공급이 정상적인지 확인합니다.
비디오가 나오지 않습니다.
전원 LED 가 주황색입니다.
컴퓨터가 절전 모드에 있지 않은지 확인합니다. (마우스를
움직이거나 키를 눌러 컴퓨터를 깨우십시오.)
컴퓨터나 비디오 소스 기기가 켜져 있는지 확인합니다.
비디오 신호 케이블이 바르게 연결되어 있는지 확인합니다.
1. 컴퓨터와 모니터의 전원을 켭니다.
2. 운영 체제를 시작합니다.
3. CD-ROM 을 컴퓨터의 CD 드라이브에 넣습니다. CD-ROM 이 자동으로 실행되고
주 메뉴가 표시됩니다.
4. 주 메뉴에서 실행할 옵션을 클릭하고 화면의 지시를 따릅니다.
문제 해결
경고: 감전 위험이나 기기 손상을 줄이려면:
1. 전원 코드의 접지 플러그를 손상시키지 마십시오. 접지 플러그는 중요한 안전
기능입니다.
2. 전원 코드는 언제나 쉽게 접근할 수 있는 접지된 전기 콘센트에 꽂으십시오.
3. 전기 콘센트에서 전원 코드를 뽑아서 모니터의 전원을 끊으십시오.
- 20 -
Page 22

Быстрая настройка
Проблемы
Проверить позиции
Отсутствует видео
LED-индикатор питания не
светится.
Проверить включено ли питание экрана (on).
Проверить правильность присоединения шнура питания к
экрану.
Проверить тестером наличие напряжения в розетке.
Отсутствует видео
LED-индикатор питания светится
оранжевым цветом.
Проверить, что компьютер не находится в
энергосберегающем режиме.(Сдвинуть мышку или нажать
любую кнопку для пробуждения компьютера)
Проверить, что включены компьютер или источник видео.
Проверить правильность присоединения кабеля видео
сигнала.
1. Включить питание компьютера и монитора.
2. Запустить операционную систему.
3. Вставить CD-ROM в CD-привод на вашем компьютере. Диск CD-ROM будет
автоматически исполнять и выводить на дисплей главное меню (Main Menu).
4. Из Main Menu щелкнуть по опции, которую вы хотели бы выполнить, и следовать
указаниям на экране.
Устранение неисправностей
Предупреждение: Для снижения риска поражения электрическим током или
повреждения вашего оборудования:
1. Не отключайте клемму заземления шнура питания. Клемма заземления является
важным элементом безопасности.
2. Включайте шнур питания в заземленную электрическую розетку с удобным доступом
в любой момент времени.
3. Отключайте питание от монитора посредством отсоединения шнура питания от
электрической розетки.
H_LCD1_Q_All_V05-1
- 21 -
 Loading...