

Page 1
Instruction Manual
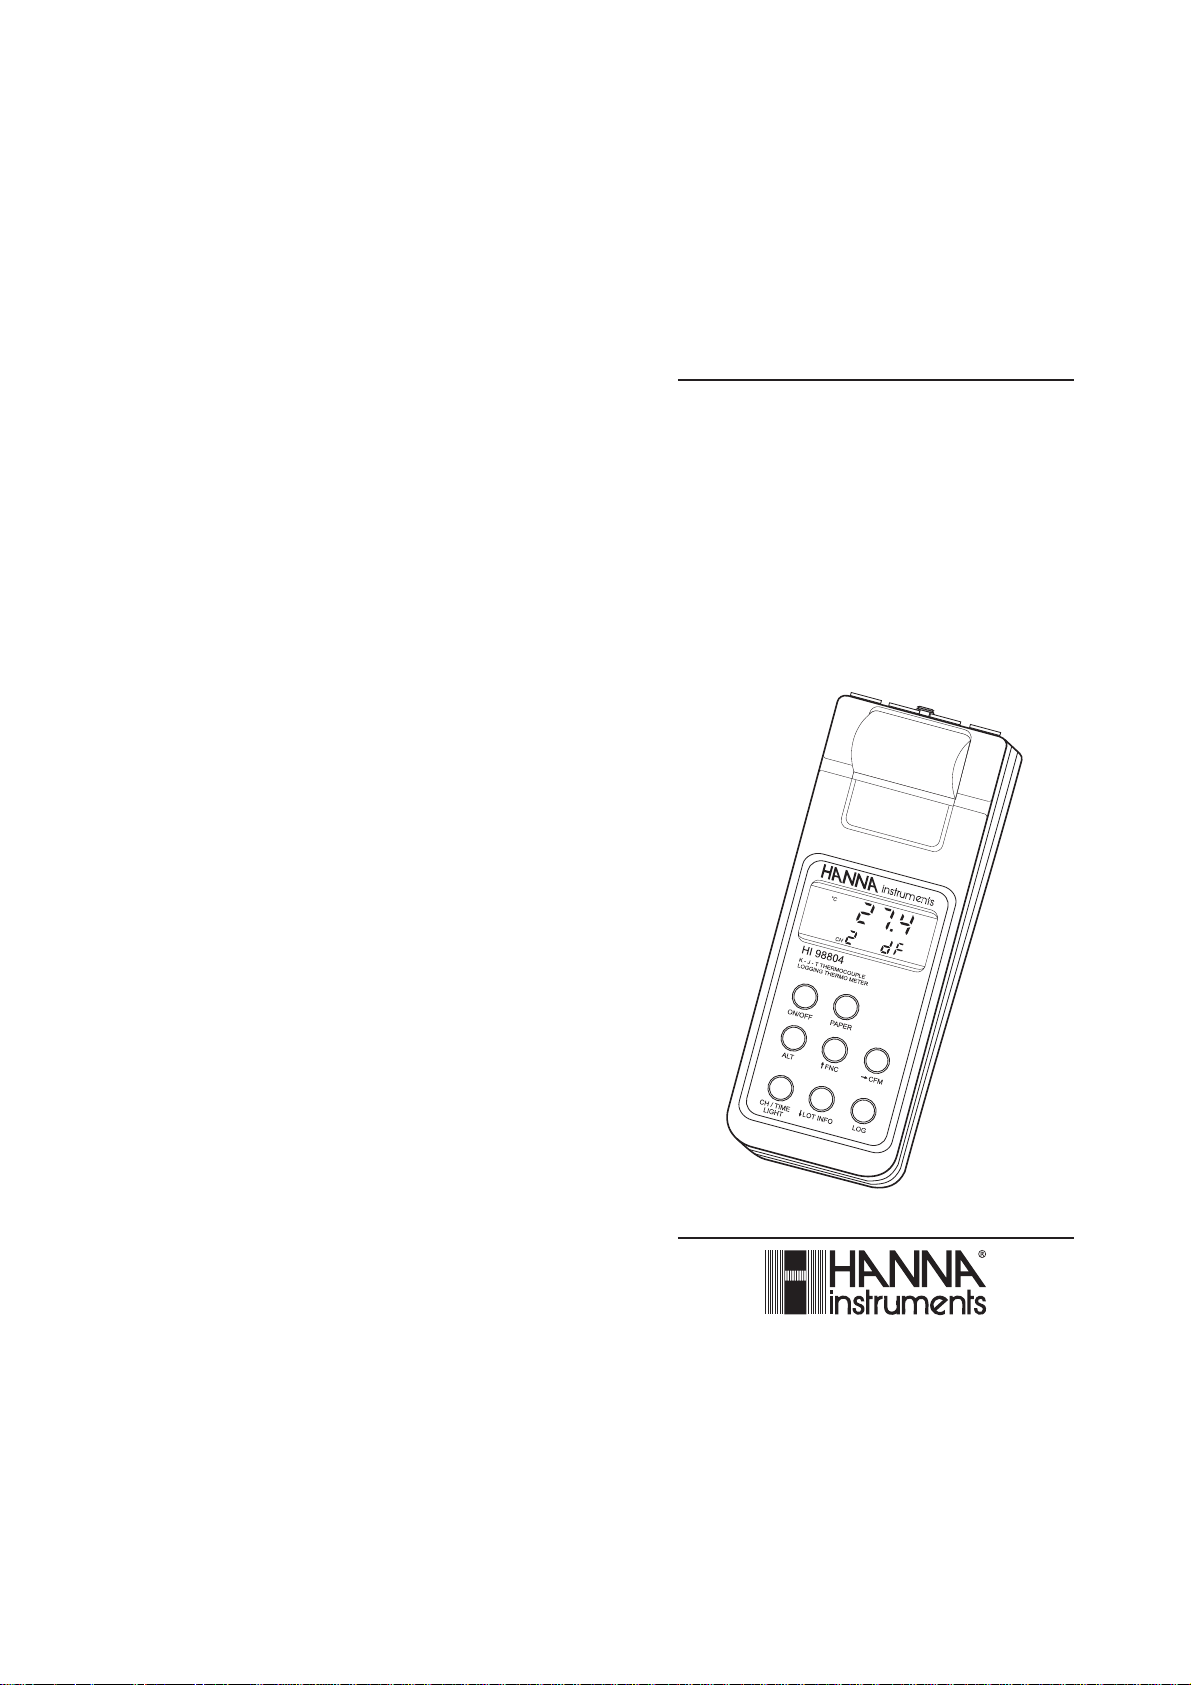
HI 98701 • HI 98801
HI 98704 • HI 98804
Printing and Logging
K-J-T Thermocouple
Thermometers
www.hannainst.com
Page 2

Dear Customer,
Thank you for choosing a HANNA instruments® product.
Please read this instruction manual carefully before using the instru-
ment.
This manual will provide you with all the necessary information for the
correct use of the instrument, as well as a precise idea of its versatility
in a wide range of applications.
If you need additional technical information, do not hesitate to e-mail
us at tech@hannainst.com.
These instruments are in compliance with directives.
TABLE OF CONTENTS
PRELIMINARY EXAMINATION ..................................................................3
GENERAL DESCRIPTION ...........................................................................3
FUNCTIONAL DESCRIPTION .......................................................................5
SPECIFICATIONS ..................................................................................6
INITIAL PREPARATION .............................................................................. 7
SETUP MODE ..................................................................................8
TAKING TEMPERATURE MEASUREMENTS ................................................ 14
TEMPERATURE CALIBRATION PROCEDURE .............................................. 15
HI98801 / HI98804 PRINTING / LOGGING FUNCTIONS .......................... 17
HI98701 / HI98704 PRINTING FUNCTIONS .......................................... 20
GOOD LABORATORY PRACTICE (GLP) ..................................................... 22
OTHER FEATURES 22
DATA TRANSFER TO PC ......................................................................... 23
MEMORY ORGANIZATION ...................................................................... 24
PRINTER MAINTENANCE ....................................................................... 25
FAULT CONDITIONS .............................................................................. 25
BATTERY REPLACEMENT ....................................................................... 26
K-TYPE THERMOCOUPLE PROBES .......................................................... 27
ACCESSORIES ...................................................................................... 3 0
WARRANTY ......................................................................................... 31
CE DECLARATION OF CONFORMITY ........................................................ 31
PRELIMINARY EXAMINATION
Remove the instrument from the packing material and examine it
carefully to make sure that no damage has occurred during shipping.
If there is any damage, notify your Dealer.
Each thermometer is supplied complete with:
• Paper rolls (5 pcs)
• Batteries (4 x 1.5V AA alkaline)
• Instruction manual
• Rugged carrying case
Note: Save all packing material until you are sure that the
instrument functions correctly. All defective items must be
returned in their original packaging together with the supplied accessories.
All rights are reserved. Reproduction in whole or in part is
prohibited without the written consent of the copyright owner.
32
Page 3
GENERAL DESCRIPTION
This series of HANNA instruments® portable thermocouple thermometers with built-in printer and microprocessor technology, provides
accurate temperature measurements and data record.
The meters can support K, J or T thermocouple probes, one for models
HI 98701 and HI 98801, up to four for HI 98704 and HI 98804.
The thermocouple type is user selectable.
The meters are equipped with an easy-to-read LCD with backlight
feature for comfortable reading even in dark environments.
The meters provide a controlled access to calibration and GLP settings
through a password protection method.
An alarm time-out is available to alert the user if too much time has
elapsed since the last calibration and that re-calibration may be
required.
To prolong battery life, the backlight and printing features are
disabled when the batteries are getting low; "LOBAT" indication is
displayed on LCD to warn the user of this condition. However, the
meter continues to measure correctly even when the low battery
indication is displayed. The Battery Error Preventing System (BEPS)
automatically switches the meter off when the batteries are too weak
to support proper function.
The meters are equipped with an internal lithium battery that
powers the clock circuit even in the absence of power supplies.
For long term field and lab applications, these instruments can be
connected to a 12 Vdc adapter.
HI 98801 and HI 98804 can store the measurements in memory at
a user selectable interval from 1 to 180 minutes. This information can
be retrieved at a later time and also printed.
HI 98801 and HI 98804 also allow the transfer of stored data to a
computer via the HI 9200 infrared transmitter connected to the
computer RS232 port.
Each meter can also be uniquely identified by the user by assigning
an ID code.
HANNA instruments® produces a wide range of K-type thermocouple
probes that can be used with these thermometers for many applications (HI 766 series, see "Accessories" section).
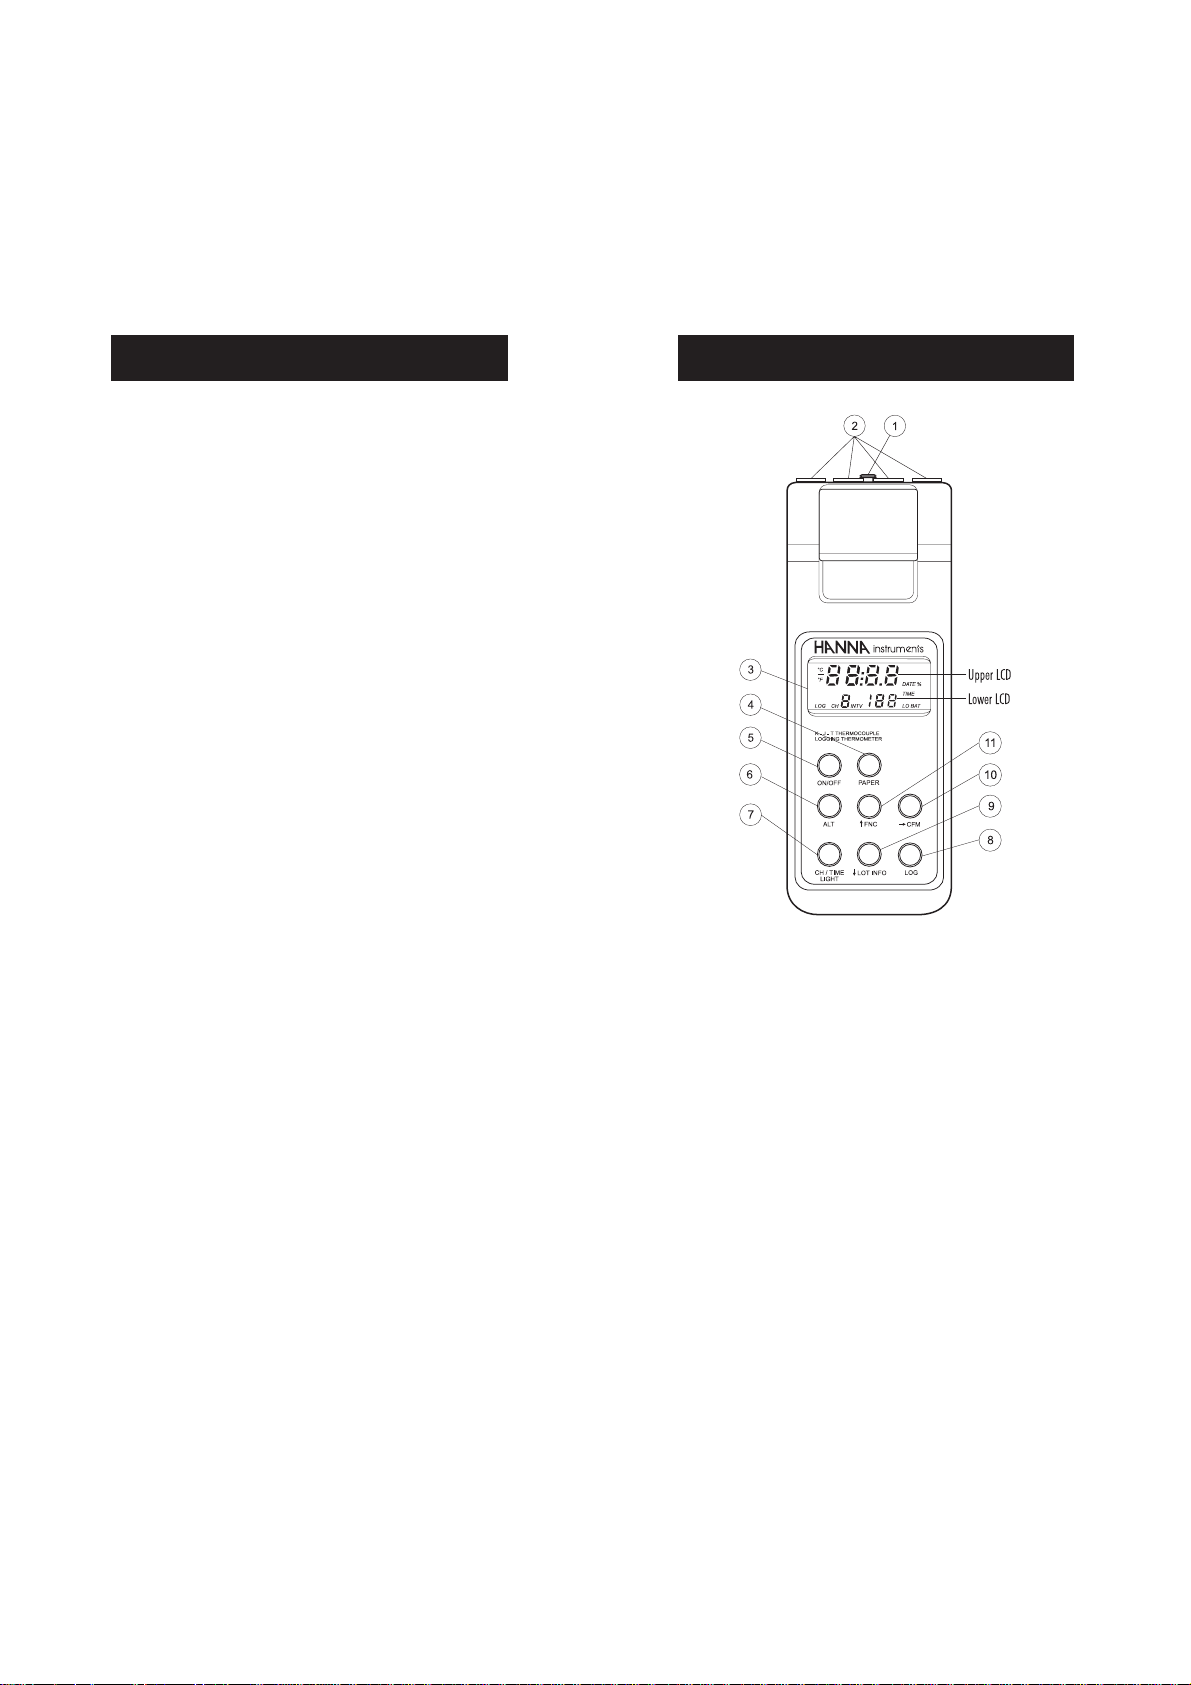
FUNCTIONAL DESCRIPTION
1) Power adapter plug
2) Temperature probe connectors (1 or 4, depending on model)
3) Liquid Crystal Display (LCD)
4) PAPER key, to move the paper up
5) ON/OFF key, to turn the meter on or off
6) ALT key, to alternate key function
7) CH/TIME key (HI 98704 and HI 98804), to select input chan-
nels, view date & time, and (with ALT) enable backlight
TEMP/TIME key (HI 98701 and HI 98801), to select tempera-
ture reading, view date & time, and (with ALT) enable backlight
8) LOG key, to store and/or print measurements
9) LOT INFO key (HI 98801 and HI 98804), to move down or
(with ALT) view logging information
key (HI 98701 and HI 98704), to move down
10) CFM key, to move right or (with ALT) confirm values
11) FNC key, to move up or (with ALT) select function codes
54
Page 4
SPECIFICATIONS
INITIAL PREPARATION
Range (*) K -200.0 to 999.9 °C ; 1000 to 1370 °C
-300.0 to 999.9 °F ; 1000 to 2500 °F
J -200.0 to 760.0 °C
-300.0 to 999.9 °F ; 1000 to 1400 °F
T -200.0 to 400.0 °C
-300.0 to 750.0 °F
Resolution K 0.1°C (-99.9 to 999.9 °C); 1°C (1000 to 1370 °C)
0.2 °C (-200.0 to -100.0 °C)
0.2°F (-199.9 to 999.9 °F); 1°F (1000 to 2500°F)
0.3 °F (-300.0 to -200.0 °F)
J 0.1 °C (-149.9 to 760.0 °C)
0.2 °C (-200.0 to -150.0 °C)
0.1 °F (32.0 to 999.9 °F); 1 °F (1000 to 1400 °F)
0.2 °F (-300.0 to 32.0 °F)
T 0.1 °C (-99.9 to 400.0 °C)
0.2 °C (-200.0 to -100.0 °C)
0.1°F (300.0 to 750.0°F);0.2°F (-149.9 to 300.0°F)
0.3 °F (-300.0 to -150.0 °F)
Accuracy ±0.5 °C (-200.0 to 999.9 °C); ±1°C outside
(@20°C/68°F) ±1°F
for one year (excluding probe error)
Typical EMC Dev. ±5 °C; ±9 °F
Channels HI 98701 / HI 98801: 1 channel
HI 98704 / HI98804: 4 channels
Probe K , J or T-type thermocouple
Cold Junction NTC 10K ; 0.1°C resolution ; ±0.3°C accuracy
Printer Low power impact, 14 characters per line using
38 mm plain paper (HI 710034)
Printing/Logging Selectable at
Interval 1, 2, 5, 10, 15, 30, 60, 120 or 180 minutes
Auto-off Selectable after 5, 10, 15, 30, 45 or 60 minutes
Power supply 4 x 1.5V AA batteries / approx. 350 hours of use
(without printing and backlight); or 12 Vdc input
Environment 0 to 50°C (32 to 122°F); RH max 95%
Dimensions 220 x 82 x 66 mm (8.7 x 3.2 x 2.6")
Weight 550 g (1.2 lb.)
Each meter is supplied complete with batteries. Remove the back
cover, unwrap the batteries and install them while paying attention
to the polarity.
Alternatively, connect a 12 Vdc voltage adapter to the power adapter
plug on the top of the instrument.
To prepare the instrument for use, choose the most appropriate
temperature probe(s) for your application (see "Accessories" section for
a complete list) and connect it (them) to the connector(s) on the top
of the instrument.
With the meter facing you, channel #1 is the first connector on the
top left hand side.
To switch the meter on, press the ON/OFF key.
The batteries charge status or "LINE" message
(if external power adapter is connected) will be
displayed on the LCD for a few seconds.
ON/OFF
The meter is now ready to operate.
To maximize battery life, the meter is automatically switched off after a
user selectable period of non-use (this feature is enabled and set to 5
minutes by default; it can be disabled or changed through setup
code #40).
If in logging mode, after the period of non-use, the meter will
continue to monitor the temperature periodically at the end of every
logging interval. Only the "LOG" indication will be displayed.
While storing data in memory, during the sleep mode, the reading
will appear briefly on the LCD.
To reactivate the display press the ON/OFF key.
Note: When the use of an alternate function (FNC, CFM and LOT
INFO) is requested, press and hold the ALT key first and then
the second key.
(*) Tables from NIST Monograph 175 revised to ITS-90 are used
76
Page 5
SETUP MODE
Setup can be used to view data regarding instrument status (e.g.
battery charge) or GLP data (e.g. calibration date) or to view or print
the logged data. It also allows the user to change the meter parameters (e.g. time) and to gain access to stored data.
• To enter this mode ensure the meter is
not logging and then press the ALT and
FNC keys.
• The scrolling message "Insert the function code or press "ALT" -
"FNC" to escape" in the upper LCD and the indication "F 00" with
the first digit blinking in the lower LCD will be displayed.
PASSWORD PROTECTION
Setting of the GLP parameters (calibration alarm time-out, instrument
ID code, time and date) can be password protected. If password is set
to a value different from 0000 (factory setting), the user will be asked
to enter the password.
• Select the desired GLP parameter code.
• Enter the password by the arrow keys.
• Press the ALT and CFM keys to
confirm.
• If password is wrong the meter will return to the function selection
mode without any warning message.
• If password is correct, the meter provides access to the parameter.
• Enter the first digit of the code of the parameter you want to set
using the or key and pass to the next digit with . The
second digit will start blinking.
• Enter the second digit using the or
key.
• Press ALT and CFM to confirm the code.
• If the entered code doesn't exist the "Err"
message will be displayed for a few seconds and then the message "Insert the
function code or press ALT - FNC to escape" will recommence scrolling in the
upper LCD.
PARAMETERS SETTING
• Once the parameter code has been entered, the appropriate message will scroll across the LCD for a few seconds.
• The current value of the selected parameter on the upper LCD and
the parameter code on the lower LCD will be displayed. The first
digit will blink if the parameter can assume continuous values. All
the digits will blink if the parameter can assume only a fixed set of
values.
• Enter the new value using the arrow keys.
• Press ALT and CFM to confirm the value.
The following table lists the setup codes along with the description of
the specific setup items, their valid values and the factory settings
(default):
Code Valid values Default
00 Lot data printing/scrolling100÷16 00
01 Print lots data summary
02 Printer enable
03 Logging interval 1,2,5,10,15,30,60,120,180 1
05 Log on demand delete1 or Reset sample number
06 Timed data delete
1
1
1
On(enabled); Off(disabled) On
2
98
Page 6
Code Valid values Default
10 Show GLP data
11 Calibration alarm time-out On(enabled); Off(disabled) On
20 Instrument ID code 0000÷9999 0000
30 Current time
31 Current day
32 Current month
33 Current year
3
3
3
3
hh:mm 00:00
dd 01
MM 01
YYYY 1998
40 Auto-Off/Power down time-out Off,5,10,15,30,45,60 5
41 Battery level test
50 RS232 baud rate
1
1200, 2400, 4800 4800
60 Firmware version
70 Thermocouple type selection "dEF"(K) ; "J"(J) ; "t"(T) "dEF"
71 Celsius/Fahrenheit selection °C ; °F °C
99 Password
4
0000÷9999 0000
Note: If a wrong code is entered the "Err" message is displayed on
LCD for a few seconds.
Note: Code 05 has a different function in HI9880x and HI9870x
series as explained in detail in the following.
1
In HI 98801 and HI 98804 only.
2
In HI 98701 and HI 98704 only.
3
The meter automatically checks for entered time/date accuracy as follows:
0≤hh≤23; 0≤mm≤59; 01≤dd≤28/29/30/31; 1≤MM≤12; 1998≤YYYY≤2097.
4
To change the password, the correct code must be entered first. If the password
has been forgotten, the password protected features are no longer accessible; in
this case contact your nearest Hanna Service Center.
SETUP MESSAGES LIST
cod. 00: Lot data Printing
cod. 01: Lot table Printing
cod. 02: Printer enable
cod. 03: Log Interval
cod. 05: Press "ALT CFM" to reset the sample number or "ALT FNC" to escape
or: Press "ALT CFM" to delete Lot00 or "ALT FNC" to escape
cod. 06: Press "ALT CFM" to delete Lot 01-16 or "ALT FNC" to escape
cod. 10: GLP
cod. 11: Calibration alarm time-out
cod. 20: Instrument ID Code
cod. 30: Hour - Minute
cod. 31: Day
cod. 32: Month
1
cod. 33: Year
cod. 40: Auto OFF
cod. 41: Battery test
cod. 50: Baud rate
cod. 60: Release code
cod. 70: Thermocouple type
cod. 71: Celsius or Fahrenheit
cod. 99: Pass Code
Some of the most important functions are explained below in a step by
step sequence.
TO SCAN LOGGED DATA (HI98801 and HI98804 only)
COD. 00 - Lot data Printing / Scrolling
• Select the code 00.
• The message "Lot data Printing" will scroll twice across LCD.
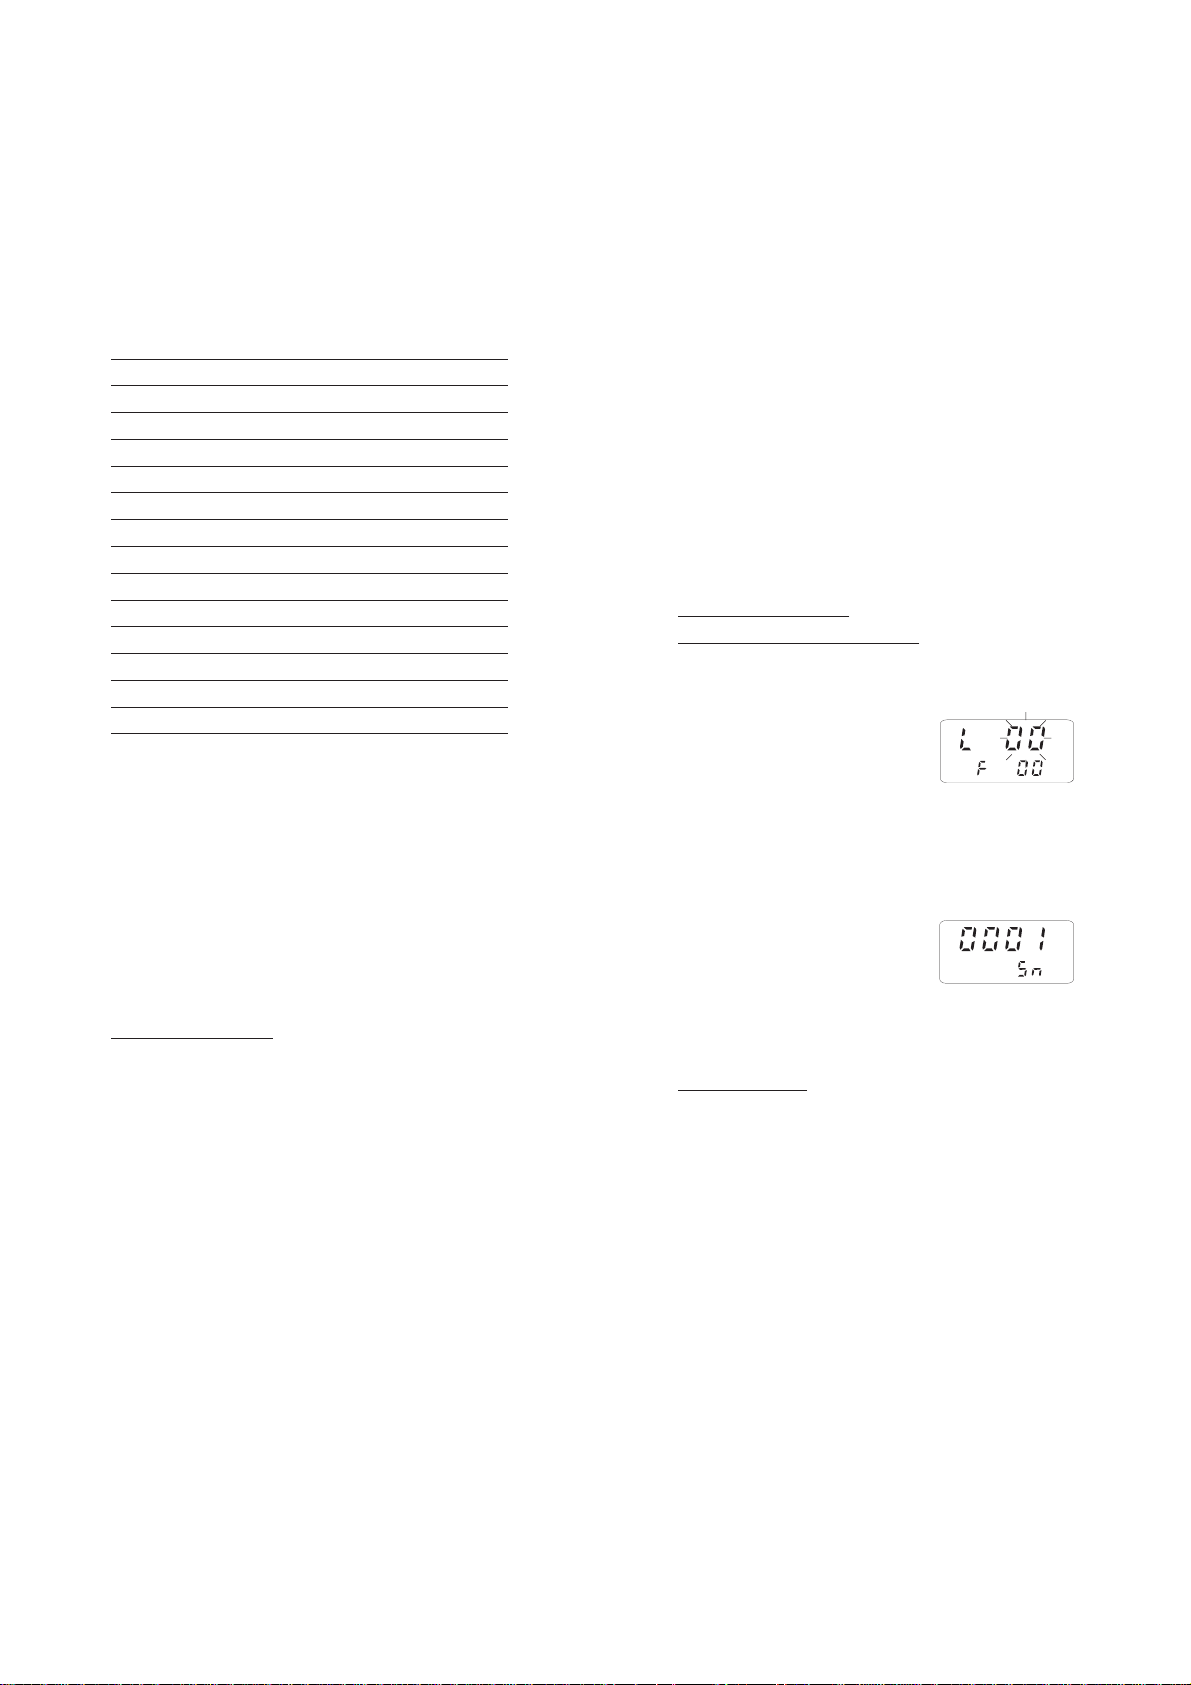
• The upper LCD will then display L 00
with the 00 blinking.
• Set the desired lot by the arrow keys. L00 is the lot of data of the
"log on demand" and L 01 to L 16 are the lots of the "timed log".
• Press the ALT and CFM keys to confirm the lot number.
• If the lot doesn't contain data, the "no data" message will scroll
across the LCD twice and the meter will return to setup mode.
• If the lot contains one or more data the
LCD will display the sample number in
its upper part and Sn in the lower part.
Note: In the L 00 lot (log on demand) the sample number will be
displayed with 3 digits (001).
• Select the sample number to scan by the arrow keys.
Printing logged data
• Press ALT and CFM to print logged data.
2
• If the selected sample number is invalid (equal to 0 or bigger than
the number of samples), the "Err" message will be displayed for a
few seconds.
• If the sample number is correct, the samples starting from the
selected one to the last sample of the lot will be printed. To stop
printing before the last sample is reached, press and hold the ALT
and PAPER keys until the printer stops.
• During printout the LCD will display the sample number being
printed at that moment. If printout is stopped the LCD will show
1110
Page 7

the last printed sample number. It is then possible to select
another sample.
• Press the ALT and FNC keys to return to setup mode.
Viewing logged data
• Press CH/TIME (HI98804 only) or TEMP/TIME (HI98801 only) to
view data of the selected sample. Data will be displayed in the
following order:
channel 1 temperature reading
channel 2 temperature reading (HI 98804 only)
channel 3 temperature reading (HI 98804 only)
channel 4 temperature reading (HI 98804 only)
date
time
• If CH/TIME or TEMP/TIME is pressed when the time is displayed,
the LCD will pass to the next Sample number.
• It is then possible to scroll the data of the next sample by pressing
CH/TIME or TEMP/TIME or select a different sample by the arrow
keys.
• to return to setup mode, press ALT and FNC when the meter
displays the sample number.
Cod. 02 - Lot summary printout
• Select the code 02.
• The message "Lot table Printing" will scroll twice across LCD.
• The meter will then print a complete set of information based on
the data stored in memory:
a - lot number
b - logging interval
c - starting date
d - number of samples
e - starting time
f - logged channels numbers.
Note For lot 00 the number of samples only will be printed.
DELETE LOGGED DATA (HI98801 and HI98804 only)
• Select code 05 to delete the Log on Demand data or code 06 to
delete the Timed Log Data.
• A scrolling message will be displayed.
• Press the ALT and CFM keys to confirm deletion.
• It is also possible to escape without data deletion pressing the ALT
and FNC keys.
TO RESET PRINTING SAMPLE NUMBER
(HI98701 and HI98704 only)
This feature resets the print on demand sample number to 001.
• Select the code 05
• A scrolling message will be displayed.
• Press the ALT and CFM keys to confirm reset or ALT and FNC to
escape.
GLP DATA
Cod. 10 - viewing GLP data
• Select the code 10
• A message will scroll twice across LCD.
• The LCD will then display the instrument identification (ID) code.
• Press to scan remaining data, in the following order:
channel 1 last calibration date (DD.MM)
channel 1 last calibration year
Note: Data can be viewed in reverse order pressing the key.
• Press ALT and FNC to return to function selection mode.
Code 20 - setting the identification (ID) code
When using several identical meters it may be useful to uniquely
identify them by assigning an ID code to each meter.
• Select code 20. A message will scroll across LCD.
• Enter a 4-digit value using the arrow keys.
• Press ALT and CFM to confirm the value.
TESTING BATTERY LEVEL
• Select code 41. The message "Battery test" will scroll across LCD.
• If the meter is connected to an external power adapter, the LCD
will display "LINE" otherwise it will display bAtt on the upper
display, and the remaining percentage of battery charge (100%
means fully charged battery and 0% corresponds to the minimum battery voltage
that allows the meter to operate).
SELECTING THE THERMOCOUPLE TYPE
Three types of thermocouple can be connected to the meter:K, J and T.
• Select code 70.
• The types are indicated with "dEF" for K-type, "J" for J-type and
"t" for T-type. Choose the desired type using the arrow keys.
• Press ALT and CFM to confirm the value.
1312
Page 8

TAKING TEMPERATURE MEASUREMENTS
To prepare the instrument for use, choose the most appropriate
temperature probe for your application (see "Accessories" section) and
connect it to the instrument.
The factory default thermocouple type is K, represented with the "dF"
indication. If needed, select a different type (J and T types also
available) through setup code #70.
With the meter facing you, channel #1 is the first connector on the
top left hand side.
Press the ON/OFF key to power on the instrument, and insert the
probe in the sample to be tested and allow the reading to stabilize.
The temperature is displayed on the upper
LCD. The lower LCD shows the selected channel number (HI 98704 and HI 98804 only).
The meter selects channel 1 as default. Press
CH/TIME (HI 98704 and HI 98804) or TEMP/
TIME (HI 98701 and HI 98801) to view the
reading of the other channels, the cold junction temperature, date and time in the
following order:
• channel 2 temperature reading (4-channel versions only)
• channel 3 temperature reading (4-channel versions only)
• channel 4 temperature reading (4-channel versions only)
• cold junction temperature reading ("C J" appears in the lower LCD)
• date
• time
Pressing CH/TIME or TEMP/TIME again, the meter returns to channel
1 temperature reading.
If the reading is out of range or the probe is
not connected to a channel, the LCD will
display dashes in place of the reading.
Note: To choose between "°C " and "°F" unit, enter the setup code 71.
Note: The meter is factory calibrated.
After 1 year since last thermocouple
calibration the "DATE" symbol starts
blinking on the LCD to warn the user
that a recalibration is suggested to
maintain the meter accuracy.
Contact the nearest HANNA service center for an accurate
recalibration of your thermometer.
TEMPERATURE CALIBRATION PROCEDURE
(for technical personnel only)
The meter is factory calibrated. However, as a general rule, it is
recommended to have all thermometers recalibrated at least once a
year. It is recommended that recalibration is performed by authorized
technical personnel only to assure the accuracy of the instrument.
Contact the nearest HANNA service center for an accurate annual
recalibration.
Both thermocouple inputs and cold junction can be calibrated.
A two-point calibration at 0.000 mV and 41.269 mV has to be
performed in order to store the new thermocouple calibration data in
memory. Cold junction calibration is at one point only, corresponding
to the environment temperature.
COLD JUNCTION CALIBRATION
1. Press CH/TIME or TEMP/TIME until the cold junction temperature
reading is displayed.
2. Press ALT, CFM and PAPER simultaneously while the meter is not
printing nor logging to enter calibration mode.
3. User is prompted to enter password if it has been set to a value
different from 0000, otherwise skip to step 6.
4. Enter the password using the arrow keys.
5. Press ALT and CFM to confirm the password or CH/TIME or TEMP/
TIME to exit.
6. If password is correct or not set, the meter
will display "25.0°C" (or "77.0°F"), with
the "2" (or "7") blinking, on the upper
LCD and "C CJ" on its lower part; if
wrong, it will return to measurement mode without any message.
7. Enter the actual cold junction temperature (the environment temperature measured with a reference thermometer) using the arrow
keys (temperature must be between 0 and 50 °C).
8. When the "S" symbol blinks in the lower
LCD, the reading is stable and calibration
can be confirmed pressing ALT and CFM.
9. The LCD will display CALC for a few seconds and then the meter
returns to normal operational mode.
1514
Page 9

THERMOCOUPLE CALIBRATION
1. With a mV simulator, input 0.000 mV at channel #1 of the meter.
2. Ensure the meter is not displaying the cold junction temperature
and press ALT, CFM and PAPER simultaneously while the meter is
not printing nor logging to enter calibration mode.
3. User is prompted to enter password if it has been set to a value
different from 0000, otherwise skip to step 6.
4. Enter the password using the arrow keys.
5. Press ALT and CFM to confirm or CH/TIME or TEMP/TIME to exit.
6. If password is correct or not set, the meter
will display "0°C" on the upper LCD and
"C 0" on its lower part; if wrong, it will
return to measurement mode without any
message.
7. When the "S" symbol blinks in the lower
LCD, the reading is stable and calibration
can be confirmed pressing ALT and CFM.
8. The LCD will display CALC for a few seconds.
9. The second calibration point "1000°C"
will be displayed on the upper LCD and
"C 0" on its lower part.
10. Input 41.269 mV at channel #1 of the meter.
11. When the "S" symbol blinks in the lower
LCD, the reading is stable and calibration
can be confirmed pressing ALT and CFM.
12. "CALC" is displayed on the upper LCD for a few seconds and then
the meter returns to normal operational mode.
Note: Even though only channel #1 is used during calibration, all
the channels and all the thermocouple types are calibrated.
Note: If a wrong input is connected or channel #1 is left open, when
confirming the calibration point the LCD will display "Err".
Note: To escape before ending the calibration procedure press CH/TIME
or TEMP/TIME.
Note: When connecting a mV simulator to the meter use two wires of the
same material of the simulator terminals to avoid undesired thermocouple junctions that could alter the mV input of the meter.
Note: Avoid touching the meter connectors if possible and wait about 15
minutes for temperature stabilization after connections before proceeding with the calibration steps.
HI 98801 - HI 98804
PRINTING / LOGGING FUNCTIONS
Two different modes to print / log data are available:
1. Timed logging; samples are stored and printed (if print function is
active) at fixed time intervals. Data are stored in the lots 01 to 16.
2. Log on demand; samples are stored and printed (if print function
is active) when the LOG key is pressed. Data are stored in the lot
00. It's possible to perform the Log on demand either in normal
mode or in Timed logging mode.
It is possible to switch from logging without printing to logging with
printing in two ways:
• set the function code 02 to "On" to enable printing, to "Off" to
disable printing
• press ALT and PAPER to toggle between printer enabled and
printer disabled while in Timed logging.
Note: In timed logging mode, channels with no probe connected are
not logged nor printed. If all the channels are disconnected,
the message "no connected probe" will scroll across the LCD.
Note: cold junction temperature is not logged nor printed.
TIMED LOGGING MODE
To start Timed logging, press ALT and LOG.
The lot number will be displayed for a few
seconds then the LOG symbol will appear on
LCD and if printer is enabled a first set of
data will be printed. The "LOG" symbol will
be fixed if printer is enabled and will blink if
printer is disabled.
The printout provides the following information:
a - Lot number
b - Logging interval
c - Date (only for the first printed
sample of the lot or of the day)
d - Sample number
e - Time
f - Readings ("----" means out of range).
Note: If no keys are pressed, the meter enters standby mode to
prolong the battery life and only the "LOG" indication will be
visible on LCD. While logging, during the sleep mode, the last
1716
Page 10

logged reading will appear briefly on the LCD. To reactivate the
LCD press ON/OFF.
TO STOP LOGGING
In order to stop the recording mode, press
ALT and LOG keys (press ON/OFF first, if
meter is in sleep mode).
A last printout reporting the number of logged
samples (e.g. S.00009) will be produced if
printer is enabled.
Notes:
• It is recommended to use the adapter during logging in printing
mode, especially when many printouts are going to be taken.
• Before proceeding with logging with printing, make sure there is
enough paper for your measurements. When the paper is finished
the meter will not advise the operator and the printouts could be
lost. If this happens, data will continue to be stored in memory,
and it is always possible to print the data at a later time through
setup code 00.
• It is possible to insert a new paper roll during logging session.
• Once in the logging mode, the interval cannot be changed. Exit
the logging mode first (pressing the ALT and LOG keys) to set a
new interval.
• If the LOG key is pressed while in logging with printing mode, a
printout is produced without affecting the running sample number
and the value is stored in Log on demand area.
LOW BATTERY CONDITION
Printout is automatically disabled when battery charge weakens. The
last message "Stop log" will be printed and data will continue to be
stored in memory with the LOG and LOBAT
symbols blinking on LCD. If the user attempts
to enable the printer while in low battery
condition the message "bAtt" will appear for
a few seconds on the LCD.
Note: When an external adapter or new batteries are connected, the
printing must be manually enabled in order to return to logging
with printing mode.
LOG ON DEMAND
In measuring or Timed log mode, press LOG to store
the current reading. The LCD will display "Stor" and
the value will be stored in the lot 00 (log on demand data area). If
the print function is enabled, a printout is also produced providing the
following information:
a - Date
b - Sample number
c - Time
d - Readings ("----" means out of
range or probe not connected)
Note: When the Log on demand data area is full and the LOG key is
pressed, the sample will not be stored and the LCD will display
"FULL". In this case it is necessary to delete the Log on demand
data to proceed.
TO VIEW LOGGING INFORMATION
If the ALT and LOT INFO keys are pressed during logging, the meter
displays for a few seconds the current lot and the number of logged
samples. The meter then returns to normal operational mode automatically.
If ALT and LOT INFO are pressed while the meter is not logging, the
last logged lot in the lower LCD and the number of logged samples in
the upper LCD are displayed. It is then possible to scroll through the
following lot information with the key:
• lot starting date (dd.mm)
• lot starting year
• lot starting time (hh.mm)
• lot logging interval
• logged channels (HI 98804 only)
By pressing the key again, the meter displays the number of
logged samples again.
When the number of logged samples is displayed, it possible to pass
to another lot with the and keys. Press to view the older
lots or to view the more recent ones.
If is pressed when the last lot is displayed, the meter displays the
lot 00 (log on demand). By pressing the key again, the meter will
pass to the oldest lot.
Note For lot 00, only the number of samples will be displayed.
To exit from the logging info viewing mode press ALT and LOT INFO
again or CH/TIME (HI98804 only) or TEMP/TIME (HI98801 only).
1918
Page 11

TO RETRIEVE LOGGED DATA
Logged data can be viewed on LCD or printed. To view or print logged
data see "TO SCAN LOGGED DATA" in the "SETUP MODE" paragraph.
The logging meters also allow the downloading of logged data to PC.
To download data to PC see "DATA TRANSFER TO PC" paragraph.
HI 98701 - HI 98704
PRINTING FUNCTIONS
Two different modes to print data are available:
1. Timed printing; samples are printed at fixed time intervals. Data
lots from 01 to 16 are available.
2. Print on demand; samples are printed when the LOG key is
pressed. It's possible to perform the print on demand either in
normal mode or in Timed printing mode.
Note: In timed printing mode, channels with no probe connected are
not printed. If all the channels are disconnected, the message
"no connected probe" will scroll across the LCD.
Note: cold junction temperature is not printed.
TIMED PRINTING MODE
To start Timed printing, press ALT and LOG.
The lot number will be displayed for a few
seconds then the LOG symbol will appear on
LCD and a first set of data will be printed.
The printout provides the following information:
a - Lot number
b - Logging interval
c - Date (only for the first printed
sample of the lot or of the day)
d - Sample number
e - Time
f - Readings ("----" means out of range).
Note: If no keys are pressed, the meter enters standby mode to
prolong the battery life and only the "LOG" indication will be
visible on LCD. While timed printing during the sleep mode, the
last printed reading will appear briefly on the LCD. To reacti-
vate the LCD press ON/OFF.
TO STOP PRINTING
In order to stop the recording mode, press
ALT and LOG keys (press ON/OFF first, if
meter is in sleep mode).
A last printout reporting the number of printed
samples (e.g. S.00009) will be produced.
Notes:
• It is recommended to use the adapter during printing mode,
especially when many printouts are going to be taken.
• Before proceeding with printing, make sure there is enough paper
for your measurements. When the paper is finished the meter will
not advise the operator and the printouts could be lost.
• It is possible to insert a new paper roll during printing session.
• Once in the timed printing mode, the interval cannot be changed.
Exit the timed printing mode first (pressing the ALT and LOG keys)
to set a new interval.
• If the LOG key is pressed while in timed printing mode, a printout
is produced without affecting the running sample number.
LOW BATTERY CONDITION
Printing is automatically interrupted when
battery charge weakens. The last message
"Stop log" will be printed and the LOBAT
symbol will blink on LCD.
Note: When an external adapter or new batteries are connected, a
new printing session must be manually restarted.
LOG ON DEMAND
In measuring or timed printing mode, press LOG to
print the current readings. The printout provides the
following information:
a - Date
b - Sample number
c - Time
d - Readings ("----" means out of
range or probe not connected)
Note: If the user attempts to print while in low battery condition the
message "bAtt" will appear for a few seconds on the LCD.
Note: It is possible to reset the sample number of the print on
demand to 001 (see "TO RESET PRINTING SAMPLE NUMBER"
in "SETUP MODE" paragraph).
2120
Page 12

GOOD LABORATORY PRACTICE (GLP)
GLP is a set of functions that allows the storage or retrieval (when
necessary) of data regarding the maintenance and status of the meter.
LAST CALIBRATION DATE
Last calibration date is stored automatically after a successful calibration. The last calibration date can be displayed through the setup
code #10 (see "Setup Mode" section for details).
CALIBRATION ALARM TIME-OUT
Every time it is turned on, the meter checks if the time-out, fixed at
1 year, has expired. It is possible to enable/disable this feature
through setup code #11. The default value is "0n".
If the time has expired, the message "Cal
date" scrolls across the LCD. The "DATE"
symbol will blink to remind to the user to
perform a new calibration soon.
Note: The alarm time-out is based on thermocouple calibration only.
GLP AND RS232 (HI 98801 and HI 98804 only)
GLP data (ID code and last calibration date) can be retrieved from a PC
through the RS232 communication feature (see "Data transfer to PC").
OTHER FEATURES
LCD BACKLIGHT
The backlit LCD allows an easy use of the instrument even in dark
environments. This feature can be enabled/disabled pressing the ALT
and LIGHT keys. The LCD backlight can be disabled in order to save
power, and it is automatically disabled when a low battery level is
detected.
Note: When an external power supply is applied to the instrument,
the backlight is not automatically enabled.
Note: When "LOBAT" appears on the LCD it is not possible to enable
backlight. If the user attempts to enable the LCD backlight in
low battery condition, the meter displays the "batt" message.
Real Time Clock (RTC)
The instrument has an internal Real Time Clock (RTC) circuit with a
backup lithium battery. This allows the meter to update time and date
even when both batteries and external power adapter are disconnected.
DATA TRANSFER TO PC
HI 98801 - HI 98804 only
HI 98801 and HI 98804 can transfer data to a computer, through
the HI 9200 infrared interface and a serial port on the PC.
Ensure there isn't any logging process active.
Press CH/TIME or TEMP/TIME to set the meter to time or date mode
and simply place the meter on a HI 9200 transmitter (ensuring that
the two infrared LEDs are placed on top of each other) and the
memory content can then be downloaded to your PC through a serial
port. Just ensure that baud rate on instrument (setup code #50)
and on PC downloading program are set to the same value.
During the data transfer the instrument displays the message "r 232".
To stop communication, press CH/TIME or TEMP/TIME to display the
temperature reading or take the meter out of the transmitter when
it's not displaying "r232".
Using the HI 9200 transmitter, all recorded data can be fed to your
PC for easy reproduction, storage or elaboration without the need of
cables between the meter and the transmitter.
Data transmission from the instrument to the PC is now much easier
with the HI 92000 Windows® compatible application software offered
by HANNA instruments®.
HI 92000 allows you to use the powerful capabilities of most spread
sheet programs (e.g. Excel©, Lotus 1-2-3©). Simply open your file
downloaded by HI 92000 from your spread sheet program and then
it is possible to make any elaboration available with your software
(e.g. graphics, statistic analysis). HI 92000 offers a variety of features
and has an on line help to support you throughout any situation.
To install HI 92000 you need a 3.5" drive and a few minutes to
follow the instructions conveniently printed on the disk label.
Windows® is registered Trademark of "Microsoft Co."
Excel© Copyright "Microsoft Co."
Lotus 1-2-3© Copyright "Lotus Co."
2322
Page 13

MEMORY ORGANIZATION
HI 98801 - HI 98804 only
Logged data are stored in the internal EEPROM and are retained even
if batteries and external power are disconnected.
MEMORY CAPACITY
• 14000 data samples divided into 16 lots (lots 01 to 16)
• 9999 data samples maximum for a single channel
• 300 data samples for the Log on demand (lot 00).
TIMED LOG (lots 01 to 16)
Each time a new logging period starts, it automatically starts from the
next available lot. If the last lot was the 16th, the new logging period
restarts from lot 01 overwriting previously logged data.
When Timed logging memory is full, the meter overwrites the oldest
lot data progressively reducing the old lots. In this case the starting
time, date and the dimension of the old lot are updated.
Note: The oldest lot data are erased without any warning message.
Note: Timed logging memory can be entirely erased through the
setup code 06.
If the meter is powered only by the external power supply and there is
a temporary power black out during logging, when power returns, the
logging continues normally if no samples have been lost, otherwise
the current lot is ended and a new lot starts. If printer is enabled, the
"...Stop..." message will be printed. In any case, during scrolling the
former lot will be preceded by the "Interrupted Lot" message and the
latter by "Continuation Lot" to indicate the interruption.
LOG ON DEMAND (Lot 00)
When Log on demand data area is full the meter shows the "FULL"
message to warn the user that the data are not stored in memory.
Erase the memory area through setup code 05 to continue logging
data on demand.
PRINTER MAINTENANCE
TO CHANGE THE INK CARTRIDGE
When printouts become faint, it might be necessary to change the ink
cartridge. Contact your Hanna authorized center.
TO INSERT THE PAPER ROLL
The meters use plain
paper rolls 38 mm
width. To insert a new
roll open the paper
cover pulling it gently
and take the cylinder
away.
Insert the paper edge in
the printer slot and feed
the printer by pressing the
PAPER key.
Allow about 5 cm (2") of paper to exit
from the printer and replace the paper
cover.
FAULT CONDITIONS
The printing/logging thermometers are factory programmed to automatically diagnose a fault and to display error codes on the LCD.
PRINTER ERROR
Whenever a printer fault condition is detected, the printer stops and
the message "Printer error" scrolls across the upper LCD with the error
code (see below) fixed on the secondary one.
1 = Motor locked
2 = Printer clutch jammed
3 = Selection lever fault
I2C BUS ERROR
In case of an I2C bus fatal error due for example to a defective
EEPROM or RTC, the message "Serial bus error" keeps scrolling across
LCD from right to left indefinitely. Meter should be returned for repair
(see warranty section).
2524
Page 14

+
-
BATTERY REPLACEMENT
m
7.8"
155mm
7.9"
K-TYPE THERMOCOUPLE PROBES
When the batteries are inserted and no power adapter is connected,
the meter can recognize different batteries charge levels.
1. Fully charged batteries. The backlight and printer can be
enabled.
2. Weakening batteries - "LOBAT" symbol blinks on LCD. The
backlight and printer are automatically disabled and it is not
possible to enable them until new batteries are inserted or an
external power adapter is connected.
3. Weak batteries - "LOBAT" symbol stays still on lower LCD.
Backlight and printer are disabled and meter can work for about
20 hours. If in Timed logging mode with the power down
function enabled this time can be longer.
4. Dead batteries - LCD shuts off. The instrument stops working to
avoid erroneous readings.
Note It is not possible to activate backlight and printer when the
instrument is in a low battery condition. If the user attempts to
enable these functions without replacing the batteries or connecting the
external power adapter, the meter will
show "batt" on LCD.
Battery replacement must only take place in a non hazardous area
using 1.5V alkaline AA type batteries.
In order to replace run down batteries, simply remove the two screws on the rear cover
of the instrument and replace the four 1.5V
AA batteries with new ones, paying attention to the correct polarity.
A 12VDC power adapter can also be used to
power the unit (see the accessories paragraph).
Note: The instrument uses the following configuration.
The HANNA HI 710005 or HI 710006 voltage adapters are recommended, because they use the proper polarity configuration.
However, the meters can be used with other adapters. In this case,
remember to check the correct polarity of the adapter before connecting it to the meter.
WITH DETACHABLE HANDLE & MINI-CONNECTOR
(to be plugged into HI 766HD probe handle)
HI 766PA Roller surface probe, max 320°C/600°F
100m
280mm
11"
HI 766PB Surface probe, max 650°C/1200°F
200mm
HI 766PC Penetration probe, max 900°C/1650°F
6.1"
HI 766PD Air probe, max 300°C/570°F
250mm
9.8"
3mm
0.12"
3mm
0.12"
4"
2726
Page 15

HI 766PE1 General use probe, max 900°C/1650°F
13.3"
m
400mm
10.2"
155mm
200mm
11.8"
m
"
5.1"
m
"
5.1"
m
"
260mm
385mm
260mm
HI 766B1 90° surface probe, max 450°C/840°F
6.1"
3mm
0.12"
HI 766PE2 General use probe, max 900°C/1650°F
7.8"
HI 766HD Rugged thermocouple probe handle with 1m (3.3' ) cable
fitted with a mini-connector
WITH INTEGRAL HANDLE, 1 m CABLE & MINI-CONNECTOR
HI 766A Roller surface probe, max 320°C/600°F
5mm
0.20"
30m
300mm
1.2
HI 766B2 Surface probe, max 900°C/1650°F
8m
0.3
130mm
HI 766B3 Small surface probe with insulated shaft, max 200°C/390°F
5m
0.2
130mm
HI 766C Penetration probe, max 900°C/1650°F
10.3"
120mm
4.8"
3mm
0.12"
HI 766B Surface probe, max 650°C/1200°F
420mm
16.5"
15.7"
280mm
11"
260mm
100m
4"
HI 766D Air probe, max 300°C/570°F
15.2"
245mm
9.6"
HI 766E1 General use probe, max 900°C/1650°F
10.2"
120mm
4.7"
2928
3mm
0.12"
3mm
0.12"
Page 16

m
"
255mm
3.3’
m
8"
x.
360mm
HI 766E2 General use probe, max 900°C/1650°F
13.8"
220mm
8.5"
5mm
0.2"
HI 766F High temperature wire probe without handle, max 1100°C/2000°F
10"
1.5m
0.06
HI 766F1 Flexible probe without handle, max 480°C/900°F
2m
1m
0.0
WARRANTY
All Hanna Instruments meters are warranted for two years against
defects in workmanship and materials when used for their intended
purpose and maintained according to instructions. The electrodes
and the probes are warranted for a period of six months. This
warranty is limited to repair or replacement free of charge.
Damages due to accident, misuse, tampering or lack of prescribed
maintenance are not covered.
If service is required, contact the dealer from whom you purchased the
instrument. If under warranty, report the model number, date of
purchase, serial number and the nature of the failure. If the repair is
not covered by the warranty, you will be notified of the charges
incurred. If the instrument is to be returned to Hanna Instruments, first
obtain a Returned Goods Authorization number from the Customer
Service department and then send it with shipping costs prepaid.
When shipping any instrument, make sure it is properly packaged for
complete protection.
HI 766TV1 Pipe clamp probe, max 200°C/390°F
35mm
Ma
1.4"
ACCESSORIES
HI 710005 115 Vac / 12 Vdc voltage adapter, US plug
HI 710006 230 Vac / 12 Vdc voltage adapter, European plug
HI 710031 Rugged carrying case
HI 710034 Paper Roll (10 pcs)
HI 710035 Ink cartridge
HI 9200 Infrared transmitter (for HI 98801 and HI 98804)
HI 92000 Windows® compatible software for data transfer to PC
(for HI 98801 and HI98804)
Windows® is registered Trademark of "Microsoft Co."
Hanna Instruments reserves the right to modify the design, construction and
appearance of its products without advance notice.
CE DECLARATION OF CONFORMITY
Recommendations for Users
Before using these products, make
sure that they are entirely suitable
for the environment in which they
are used. Operation of these instruments in residential area could
cause unacceptable interferences to
radio and TV equipments, requiring
the operator to take all necessary
steps to correct interferences.
Any variation introduced by the user
to the supplied equipment may
degrade the instrument's EMC performance. To avoid electrical shock,
do not use these instruments when
voltages at the measurement surface exceed 24 Vac or 60 Vdc.
To avoid damages or burns, do not
perform any measurement in microwave ovens.
3130
Page 17

SALES AND TECHNICAL SERVICE CONTACTS
Australia:
Tel. (03) 9769.0666 • Fax (03) 9769.0699
China:
Tel. (10) 88570068 • Fax (10) 88570060
Egypt:
Tel. & Fax (02) 2758.683
Germany:
Tel. (07851) 9129-0 • Fax (07851) 9129-99
Greece:
Tel. (210) 823.5192 • Fax (210) 884.0210
Indonesia:
Tel. (21) 4584.2941 • Fax (21) 4584.2942
Japan:
Tel. (03) 3258.9565 • Fax (03) 3258.9567
Korea:
Tel. (02) 2278.5147 • Fax (02) 2264.1729
Malaysia:
Tel. (603) 5638.9940 • Fax (603) 5638.9829
Singapore:
Tel. 6296.7118 • Fax 6291.6906
South Africa:
Tel. (011) 615.6076 • Fax (011) 615.8582
Taiwan:
Tel. 886.2.2739.3014 • Fax 886.2.2739.2983
Thailand:
Tel. 66.2619.0708 • Fax 66.2619.0061
United Kingdom:
Tel. (01525) 850.855 • Fax (01525) 853.668
USA:
Tel. (401) 765.7500 • Fax (401) 765.7575
For e-mail contacts and complete list of Sales and
Technical offices, please see www.hannainst.com
MAN98804R3 09/05
 Loading...