

Page 1
Instruction Manual
HI 93735
Hardness
ISM
http://www.hannainst.com
WARRANTYWARRANTY
WARRANTY
WARRANTYWARRANTY
HI 93735 is warranted for two years against defects in workmanship and materials when used for its intended purpose and maintained
according to instructions.
This warranty is limited to repair or replacement free of charge.
Damages due to accident, misuse, tampering or lack of prescribed
maintenance are not covered.
If service is required, contact the dealer from whom you purchased the
instrument. If under warranty, report the model number, date of purchase, serial number and the nature of the failure. If the repair is not
covered by the warranty, you will be notified of the charges incurred. If
the instrument is to be returned to Hanna Instruments, first obtain a
Returned Goods Authorization Number from the Customer Service department and then send it with shipment costs prepaid. When shipping
any instrument, make sure it is properly packaged for complete protection.
To validate your warranty, fill out and return the enclosed warranty card
within 14 days from the date of purchase.
All rights are reserved. Reproduction in whole or in part is prohibited
without the written consent of the copyright owner, Hanna Instruments Inc., Woonsocket, Rhode Island, 02895 , USA.
Hanna Instruments reserves the right to modify the design, construction
and appearance of its products without advance notice.
This Instrument is in
Compliance with the CE Directives
Dear Customer,
Thank you for choosing a Hanna product. This manual will
provide you with the necessary information for the correct
operation of the meter. Please read it carefully before using
the meter. If you need additional technical information, do
not hesitate to e-mail us at tech@hannainst.com.
This instrument is in compliance with directives
EN 50081-1 and EN 50082-1.
PRELIMINARY EXAMINATIONPRELIMINARY EXAMINATION
PRELIMINARY EXAMINATION
PRELIMINARY EXAMINATIONPRELIMINARY EXAMINATION
Remove the instrument from the packing material and
examine it carefully to make sure that no damage has
occurred during shipment. If there is any damage, notify
your Dealer.
Each Ion Specific Meter is supplied complete with
• 9V Battery
• Two Sample Cuvets and Caps
• One Transport Cap
• Instruction Manual
Note: Conserve all packing material until the instrument
has been observed to function correctly. Any defective
item must be returned in its original packing.
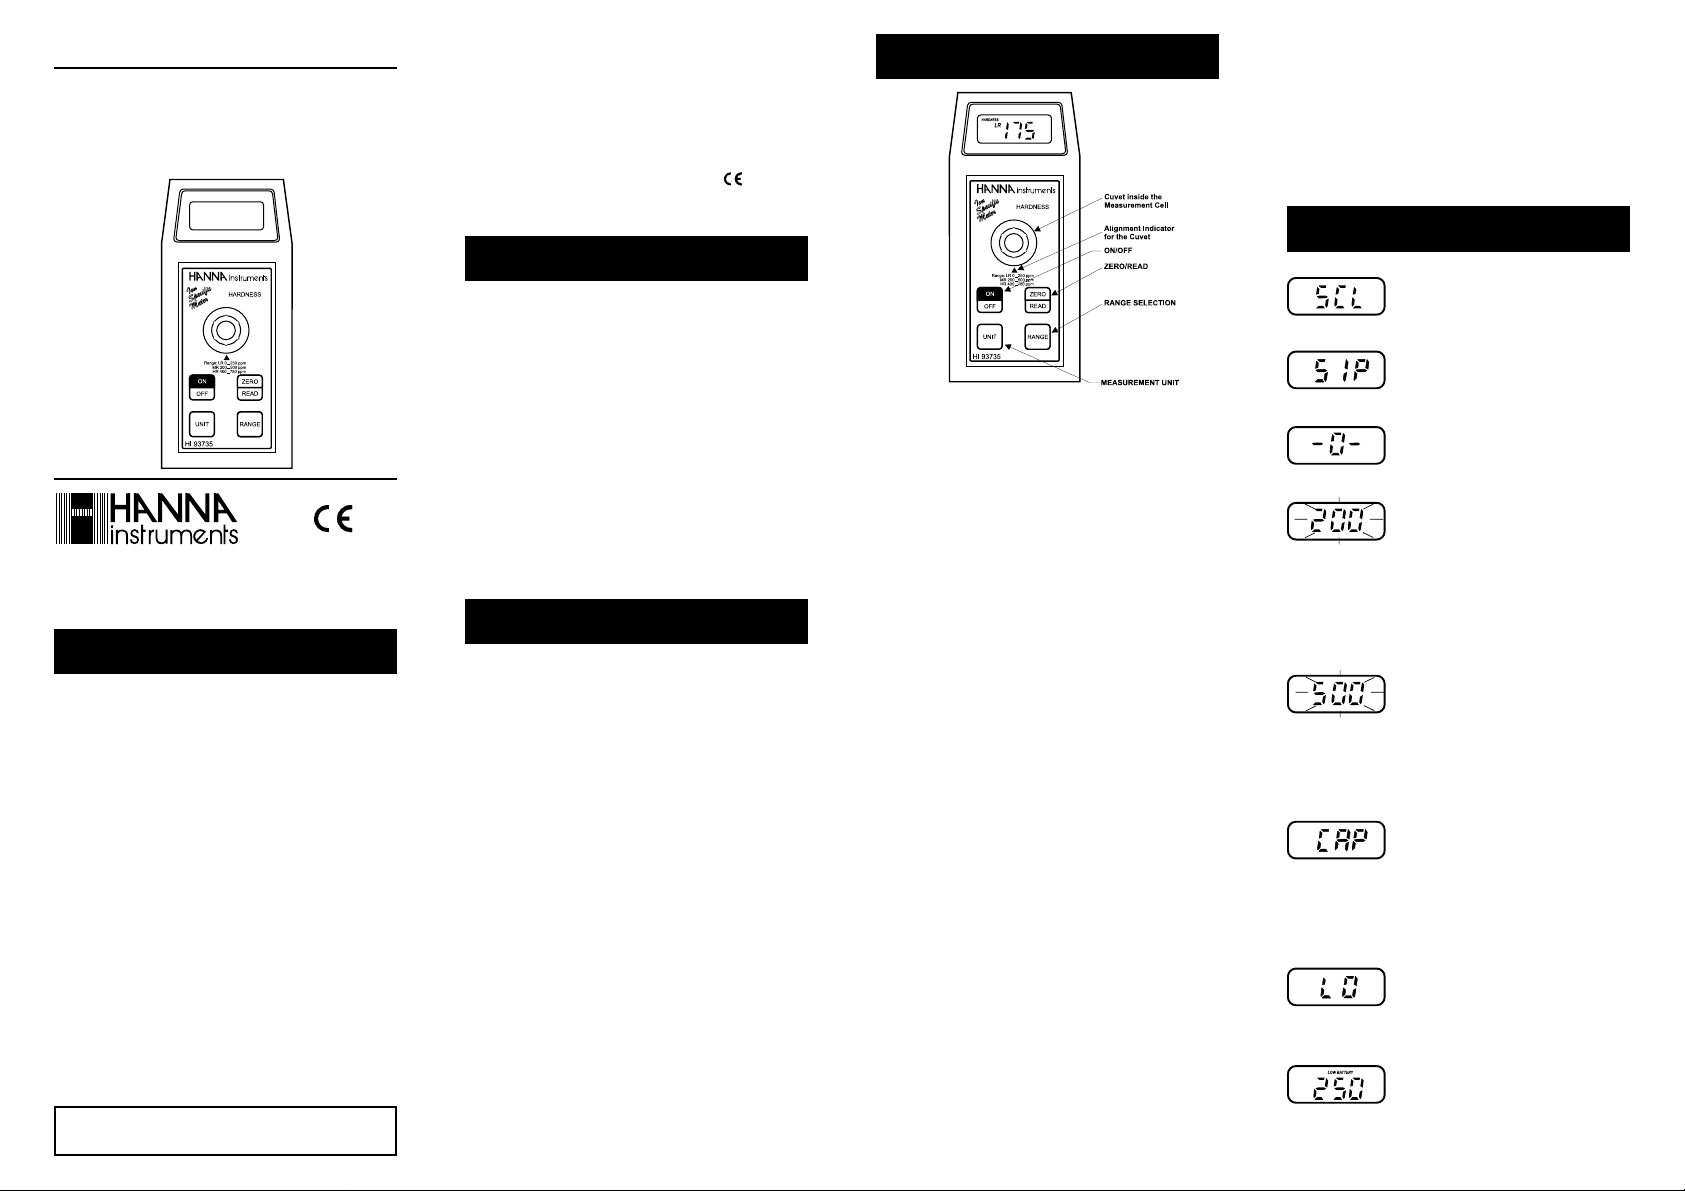
GENERAL DESCRIPTIONGENERAL DESCRIPTION
GENERAL DESCRIPTION
GENERAL DESCRIPTIONGENERAL DESCRIPTION
The HI 93735 meter measures the total hardness in drinking, surface and wastewater.
The meter uses an exclusive positive-locking system to ensure
that the cuvet is in the same place every time it is placed
into the measurement cell.
The reagents are in liquid and powder form and are
supplied in bottles and in packets. The amount of reagent
is precisely dosed to ensure maximum repeatability.
Display codes aid the user in routine operations.
The meters have an auto-shut off feature that will turn the
instrument off after 10 minutes of non-use.
SPECIFICATIONSSPECIFICATIONS
SPECIFICATIONS
SPECIFICATIONSSPECIFICATIONS
SPECIFICATIONS
Range LR 0 to 250 ppm
MR 200 to 500 ppm
HR 400 to 750 ppm
Resolution 1 ppm from 0 to 100 ppm
5 ppm from 100 to 750 ppm
Accuracy LR ±5 ppm or ±4% of reading,
whichever is greater
MR ±7 ppm or ±3% of reading,
whichever is greater
HR ±10 ppm or ±2% of reading,
whichever is greater
Typical EMC Deviation ±5 ppm
Light Source Light Emitting Diode @ 470 nm
Method Adaptation of the EPA recommended
method 130.1. The reaction between cal-
cium, magnesium and the reagents causes
a red-violet tint in the sample
Light Detector Silicon Photocell
Environment 0 to 50°C (32 to 122°F);
max 95% RH non-condensing
Battery Type/Life 1 x 9 volt/40 hours
Auto-Shut off After 10' of non-use
Dimensions 180 x 83 x 46 mm (7.1 x 3.3 x 1.8")
Weight 290 g (10 oz.).
REQUIRED REAGENTS:
Code Description Quantity
HI 93735A-LR Hardness Indicator reagent LR 9.5mL/test
HI 93735A-MR Hardness Indicator reagent MR 9.5mL/test
HI 93735A-HR Hardness Indicator reagent HR 9.5mL/test
HI93735B Hardness Buffer reagent 2 drops
HI93735C Fixing Reagent 1 packet
REAGENT SETS
HI 93735LR Reagents for 100 tests LR (0 to 250 ppm)
HI 93735MR Reagents for 100 tests MR (200 to 500 ppm)
HI 93735HR Reagents for 100 tests HR (400 to 750 ppm)
HI 93735-0 Reagents for 100 tests (0 to 750 ppm)
DISPLAY CODE GUIDEDISPLAY CODE GUIDE
DISPLAY CODE GUIDE
DISPLAY CODE GUIDEDISPLAY CODE GUIDE
This indicates that the meter is in a
ready state and zeroing can be performed.
Sampling in Progress. This prompt appears each time the meter is performing
a measurement.
This indicates that the meter is in a
zeroed state and measurement can be
performed.
Under range. A flashing value lower
than the minimum concentration readable (see specifications) indicates that the
sample absorbs less light than the zero
reference. Check the procedure and make
sure you use the same cuvet for reference
(zero) and measurement.
Over range. A flashing value higher than
the maximum concentration readable (see
specifications) indicates that the sample
absorbs too much light, meaning that
the concentration is too high. Dilute the
sample.
Light over range. The cuvet is not inserted correctly and an excess ambient
light is reaching the detector. If the cover
is properly installed, then contact your
dealer or the nearest Hanna Customer
Service Center.
Light under range. The zero sample is
too dark for proper zeroing. If this is not
the case, contact your dealer or the
nearest Hanna Customer Service Center.
The "LOW BATTERY" indicates that the
battery voltage is getting low and the
battery needs to be replaced.
Page 2
OPERATIONAL GUIDEOPERATIONAL GUIDE
E
OPERATIONAL GUIDE
OPERATIONAL GUIDEOPERATIONAL GUIDE
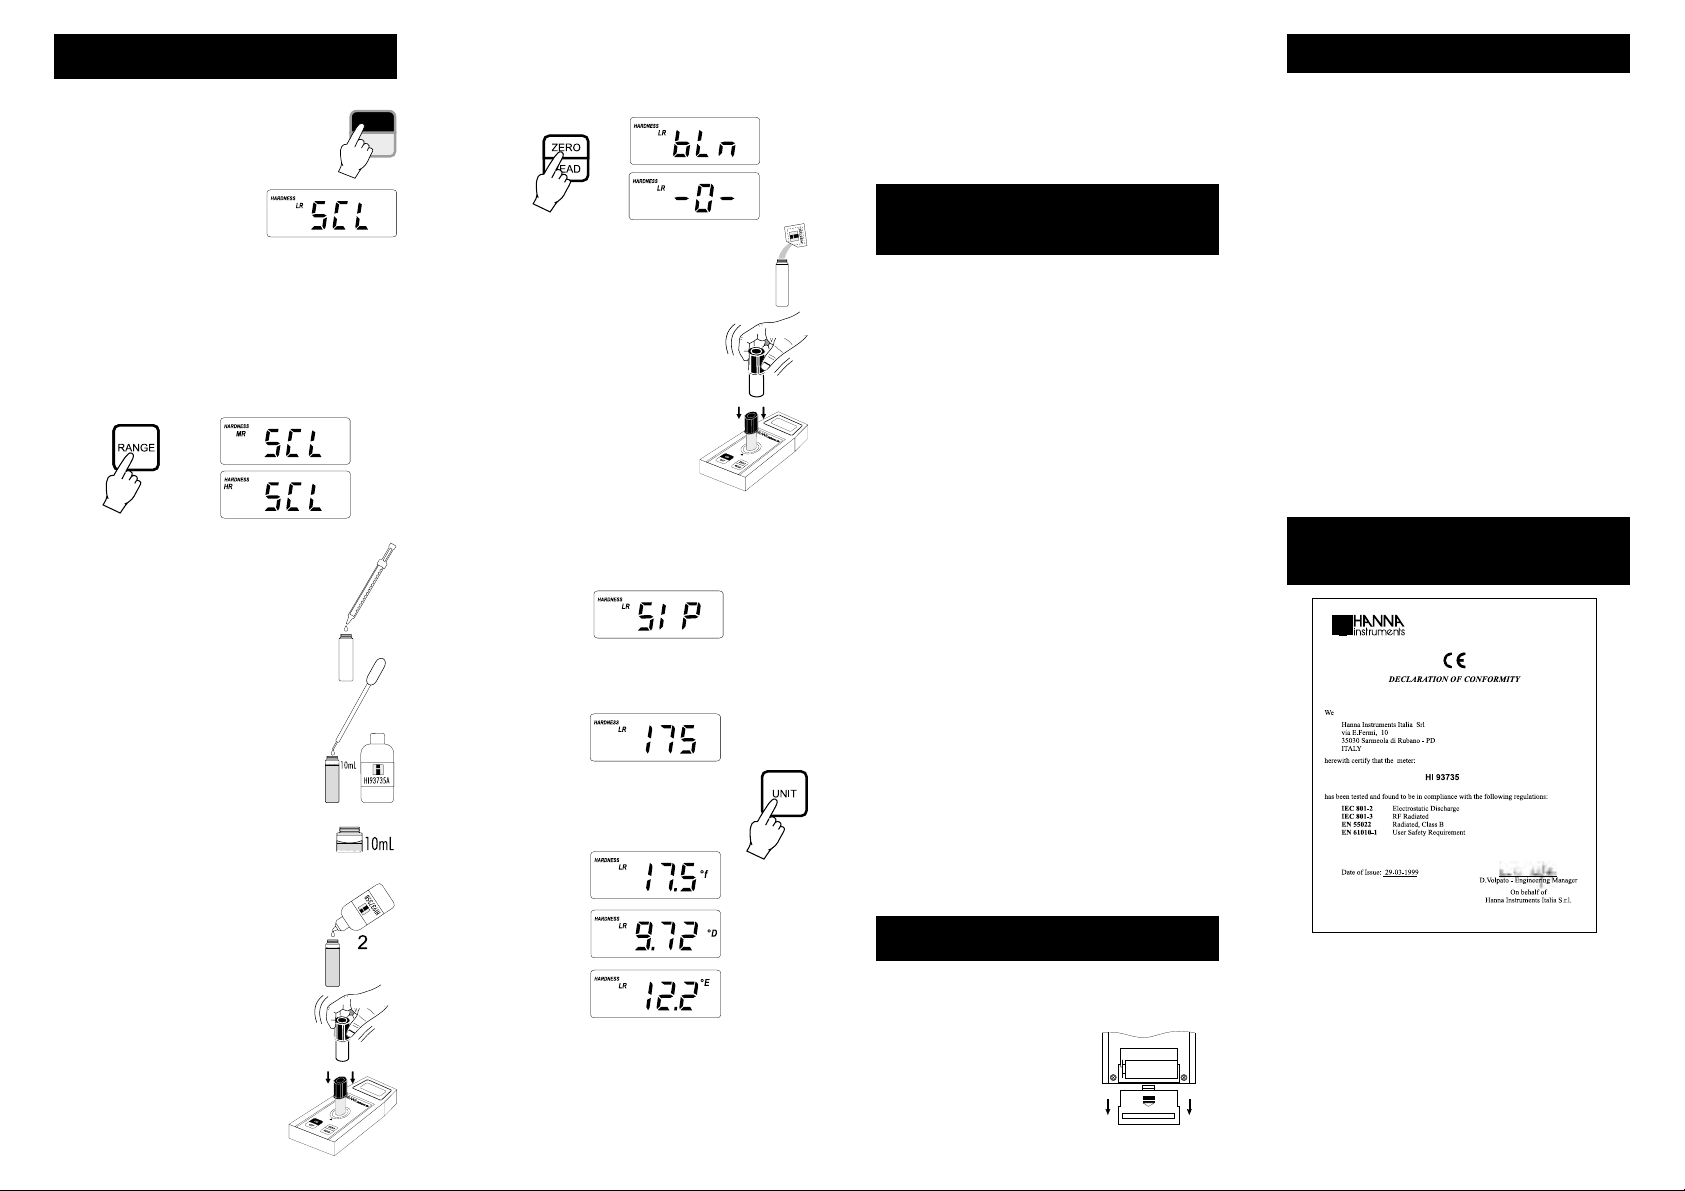
MEASUREMENT PROCEDURE
• Turn the meter on by pressing ON/OFF.
ON
OFF
• When the LCD displays "SCL",
it is ready.
• The meter automatically defaults to Hardness Low Range
(LR) measurement mode, with the “HARDNESS” and
“LR” indications appearing on the LCD. Press the “RANGE”
key to select the Medium Range (MR) or the High
Range (HR) if needed. If the “RANGE” key is pressed
while in HR mode, the meter returns to LR range.
• Using the syringe, add exactly 0.5mL of
unreacted sample to the cuvet.
Note: for accurate results, fill the syringe with
the sample up to the 1.0mL mark,
then transfer 0.5mL to the cuvet.
• With the plastic dropper fill the cuvet up
to the 10 mL mark adding the HI93735A
indicator reagent appropriate to the selected range (e.g. HI93735A-LR if the
range selected is LR).
Note: the liquid in the cuvet forms a convexity
on the top; the bottom of this convexity
must be at the same level of the 10mL mark.
• Press “ZERO/READ”. The display will show a countdown
prior to measurement. During measurement the “bLn”
indication will be shown, then “-0-” will appear.
• Remove the cuvet and add the content of 1
packet of HI93735C fixing reagent.
• Replace the cap and shake gently to
mix.
• Reinsert the cuvet into the holder
and ensure that the notch on the
cap is positioned securely into the
groove.
• Press “ZERO/READ”. The display will show a countdown
prior to measurement. During measurement the “SIP”
indication will be displayed.
• The instrument directly displays the hardness in ppm of
CaCO3 on the Liquid Crystal Display.
• Press the “UNIT” key repeatedly to have
the reading converted in °f, °D and °E
respectively.
INTERFERENCES
Interference may be caused by:
Excessive amounts of heavy metals
Note: if the sample is very acidic, some extra drops of
HI93735B buffer reagent may be added.
TIPS FOR AN ACCURATETIPS FOR AN ACCURATE
TIPS FOR AN ACCURATE
TIPS FOR AN ACCURATETIPS FOR AN ACCURATE
MEASUREMENTMEASUREMENT
MEASUREMENT
MEASUREMENTMEASUREMENT
The instruction listed below should be carefully followed
during testing to ensure best accuracy.
• Do not touch the cuvet walls with hands.
• In order to maintain the same conditions during the
zeroing and the measuring phases, it is necessary to
close the cuvet to prevent any contamination.
• Do not let the test sample stand too long after reagent
is added or accuracy will be lost.
• Whenever the cuvet is placed into the measurement cell,
it must be completely free of fingerprints, oil or dirt.
Wipe it thoroughly with HI 731318 or a lint-free cloth
prior to insertion.
• It is important that the sample does not contain any
debris. This would corrupt the readings.
• It is possible to take multiple readings in a row, but a
zero reading must be taken for each sample and it is
recommended that the same cuvet is used for zeroing
and measurement.
• It is important to discard the sample immediately after
the reading is taken because the glass might become
permanently stained.
• Shaking the cuvet can generate bubbles in the sample,
causing higher readings. To obtain accurate measurements, remove such bubbles by swirling or by gently
tapping the vial.
ACCESSORIESACCESSORIES
ACCESSORIES
ACCESSORIESACCESSORIES
REAGENT SETS
HI 93735LR Reagents for 100 tests LR (0 to 250 ppm)
HI 93735MR Reagents for 100 tests MR (200 to 500 ppm)
HI 93735HR Reagents for 100 tests HR (400 to 750 ppm)
HI 93735-0 Reagents for 100 tests (0 to 750 ppm)
OTHER ACCESSORIES
HI 710009 Blue rubber boot
HI 710010 Orange rubber boot
HI 721310 9V battery (10 pcs)
HI 731318 Tissue for wiping cuvets (4 pcs)
HI 731321 Glass cuvets (4 pcs)
HI 731325 Caps for cuvets (4 pcs)
HI 93703-50 Cuvets cleaning solution (230 mL).
CE DECLARATIONCE DECLARATION
CE DECLARATION
CE DECLARATIONCE DECLARATION
OF CONFORMITYOF CONFORMITY
OF CONFORMITY
OF CONFORMITYOF CONFORMITY
• Add 2 drops of HI93735B buffer reagent.
• Replace the cap and shake gently to
mix.
• Place the cuvet into the holder and
ensure that the notch on the cap is
positioned securely into the groove.
The conversion factors are as follows:
1 ppm = 0.1 °f = 0.05556 °D = 0.07 °E
• Press the “RANGE” key to have the meter ready for the
next measurement.
BATTERY REPLACEMENTBATTERY REPLACEMENT
BATTERY REPLACEMENT
BATTERY REPLACEMENTBATTERY REPLACEMENT
Battery replacement must only take place in a non-hazardous area using a 9V alkaline battery.
Simply slide off the battery cover on
the back of the meter. Detach the
battery from the terminals and attach a fresh 9V battery while paying
9V
SLID
OFF
attention to the correct polarity. Replace the battery and the cover.
Recommendations for Users
Before using these products, make sure that they are entirely suitable for the environment in which they are used. Operation of these instruments in residential area could
cause unacceptable interferences to radio and TV equipments, requiring the operator to
take all necessary steps to correct interferences. Any variation introduced by the user to
the supplied equipment may degrade the instruments' EMC performance.
To avoid damages or burns, do not perform any measurement in microwave ovens.
IST93735R1 03/99PRINTED IN PORTUGAL
 Loading...