

Page 1

UC804(P)
User Guide
www.hanlongtek.com86-25-84658050
Nanjing Hanlong Technology Co.,Ltd
Page 2

Notices Information
Notices Information
Copyright
Copyright © 2005 - 2013 Nanjing Hanlong Technology CO., LTD. All rights reserved.
Nanjing Hanlong Technology Co., LTD. owns all the right to revise and change this document at
any time. And all the illustrations and instructions in this paper are subject to the copyright
protection of legal law. No parts of this document may be used or reproduced, transmitted by the
third parties for any purposes without the express written permission of Nanjing Hanlong
Technology Co., LTD.
When this document is made available on Hanlong’s web page, hanlong Technology Co., LTD.
gives its right to download and print copies of this content only for private use as a user manual.
No parts shall have the right to alter, modify or use as commercial means without the express
written permission of Nanjing Hanlong Technology Co., LTD.
Safety cautions
To use the Phone follow the instructions in this manual.
To use the power adapter that delivered with the phone. Other power adapters may damage
the phone.
The phone is only for indoor use. And also avoid in high humidity, water and some other
liquids.
Do not use the phone during thunderstorms.
CE
FCC
Disposal of the phone
This sym
bol indicates that the product is classified as electrical orelectronic equipment
and should not be disposed of with other commercial or household waste at the end of
its working life.
1
Page 3

Notices Information
2
Cleaning
To clean the device, use an anti-static cloth. Please avoid cleaning liquids as they might damage
the surface or internal electronics of the phone.
Page 4

Table of Content
3
Table of Content
Notices Information........................................................................................................................1
Copyright ..................................................................................................................................
1
Safety cautions..........................................................................................................................1
Disposal of the phone................................................................................................................1
Cleaning....................................................................................................................................
2
Table of Content .............................................................................................................................3
Getting Started................................................................................................................................5
Packing List ..............................................................................................................................5
Phone Installation...................................................................................................................... 7
1. Attach the Foot stand.....................................................................................................7
2. Connect the Handset and optional Headset...................................................................8
3. Connect the Network and Power...................................................................................9
Initialization..............................................................................................................................9
Getting Familiar with Your Phone ..............................................................................................11
Hardware Components Preview..............................................................................................11
Icon Preview ...........................................................................................................................14
Line Key Function Overview..................................................................................................16
Basic Features Configuration.....................................................................................................18
Web Login...............................................................................................................................18
Administrator Password..........................................................................................................19
Language.................................................................................................................................
20
Time and Date.........................................................................................................................21
Ring Tone................................................................................................................................
24
Volume ....................................................................................................................................
25
Directory.................................................................................................................................
26
Basic Call Features......................................................................................................................29
Place a Call .............................................................................................................................29
End a Call................................................................................................................................
30
Redial a Call............................................................................................................................30
Receive a Call.........................................................................................................................30
Call Hold.................................................................................................................................
31
Call Transfer............................................................................................................................32
Call Conference.......................................................................................................................33
Call Forward ...........................................................................................................................34
Hide Caller ID.........................................................................................................................37
Reject Anonymous..................................................................................................................37
Call Waiting ............................................................................................................................38
Call Mute ................................................................................................................................
39
DND........................................................................................................................................
39
Page 5

Getting Started
4
Key as Send.............................................................................................................................39
Hot Line..................................................................................................................................
40
Advanced Features......................................................................................................................41
Voice Message.........................................................................................................................41
Intercom..................................................................................................................................
42
Speed Dial...............................................................................................................................43
Direct Pickup ..........................................................................................................................44
Group Pickup..........................................................................................................................45
BLF.........................................................................................................................................
45
Shared Line.............................................................................................................................47
Record.....................................................................................................................................
48
Call Return..............................................................................................................................49
Call Park..................................................................................................................................
49
Paging .....................................................................................................................................
50
DTMF .....................................................................................................................................
51
Prefix.......................................................................................................................................
51
Upgrade.........................................................................................................................................
53
Factory Reset ..........................................................................................................................53
Upgrade...................................................................................................................................
53
Troubleshooting............................................................................................................................56
Why is the phone LCD screen blank?.....................................................................................56
Why does the phone display "Network Unavailable"? ...........................................................56
Why can’t I get a dial tone?....................................................................................................56
Page 6
Getting Started
Getting Started
Packing List
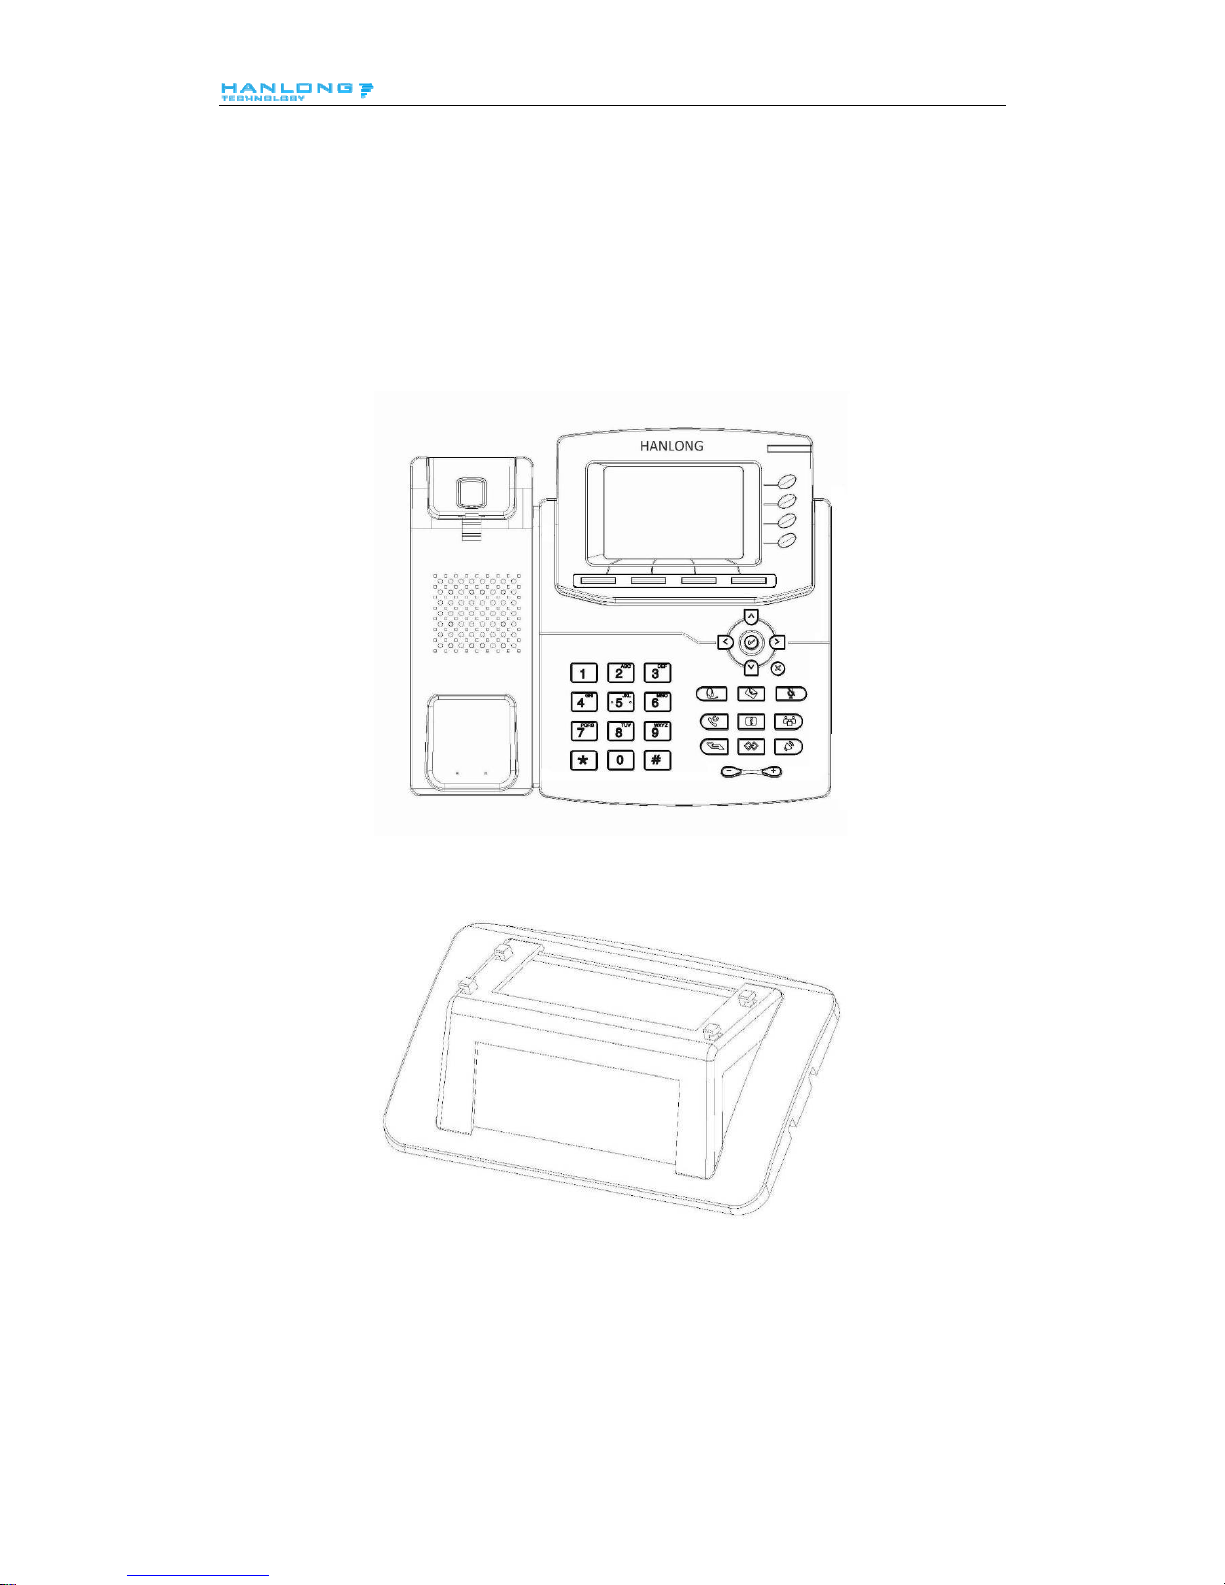
The package contains the following parts, please check if all the items are not missed:
1. The phone device
2. The footstand
3. Handset
5
Page 7
Getting Started
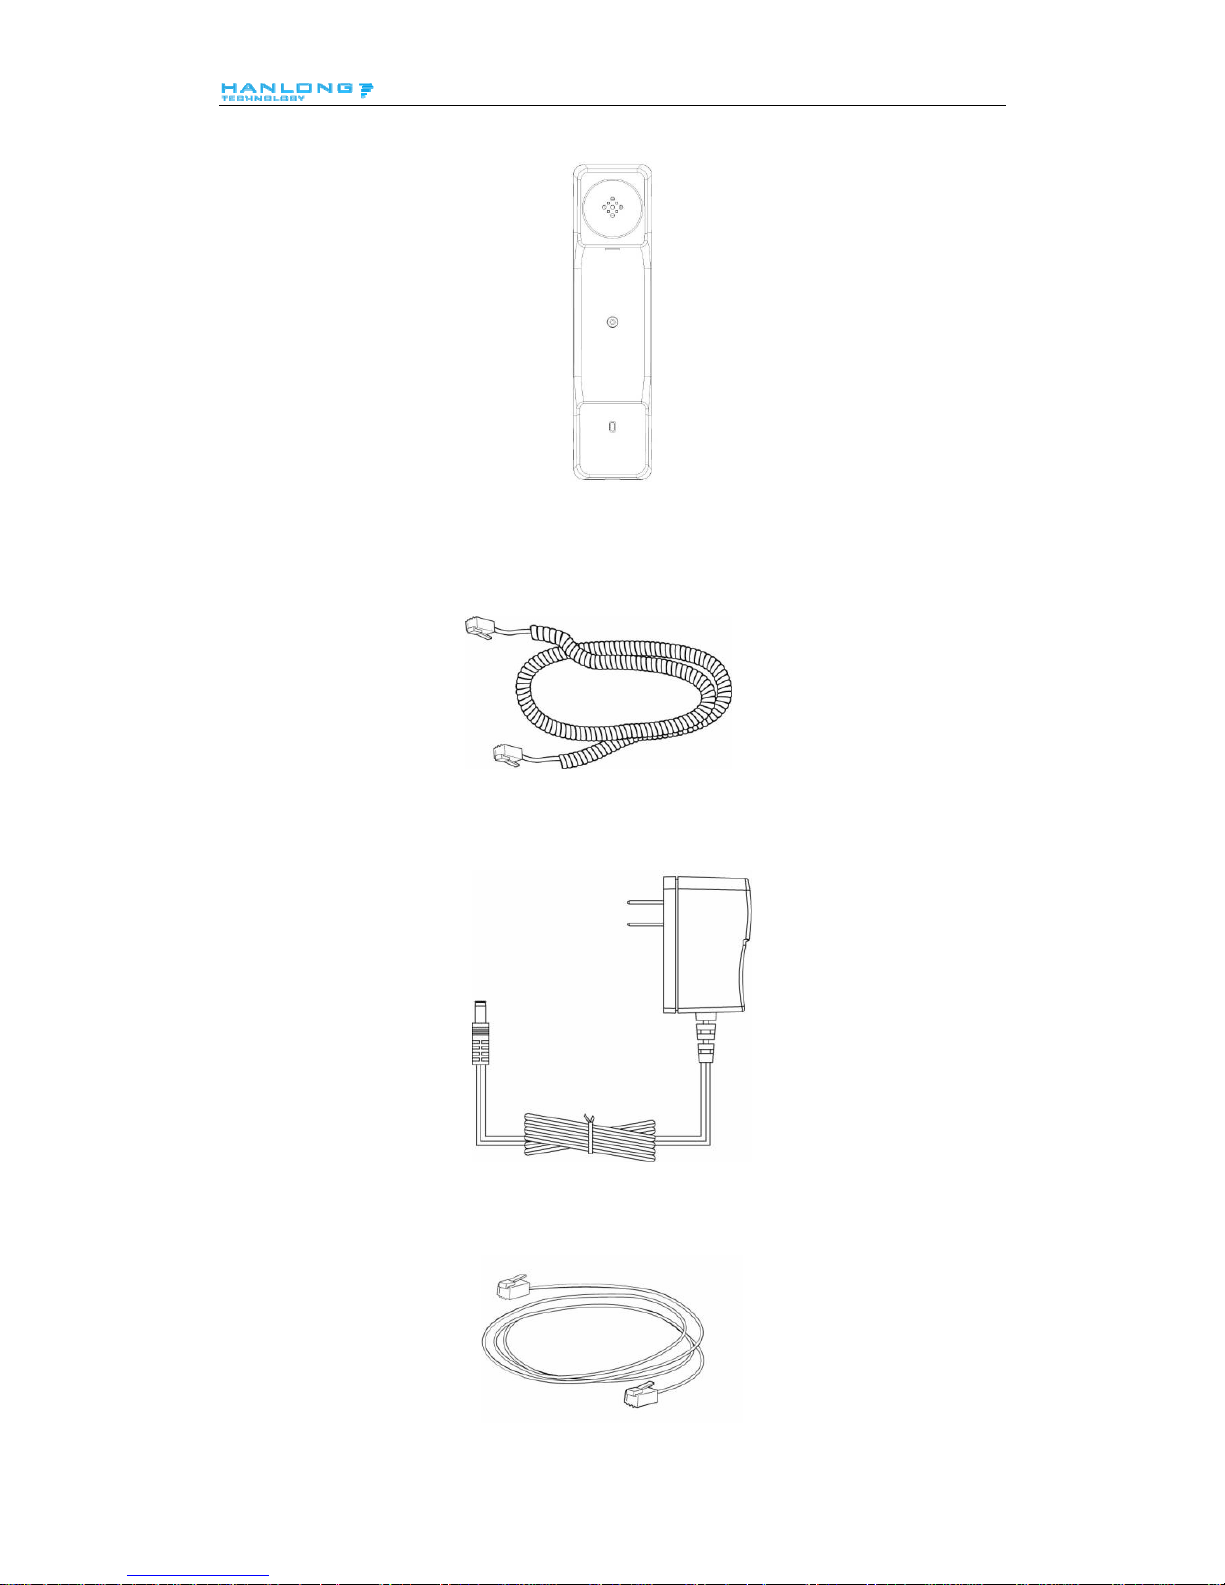
4. Headset cord
5. Power adapter
6. Ether
net cable
6
Page 8
Getting Started
7. Quick installation reference
Phone Installation
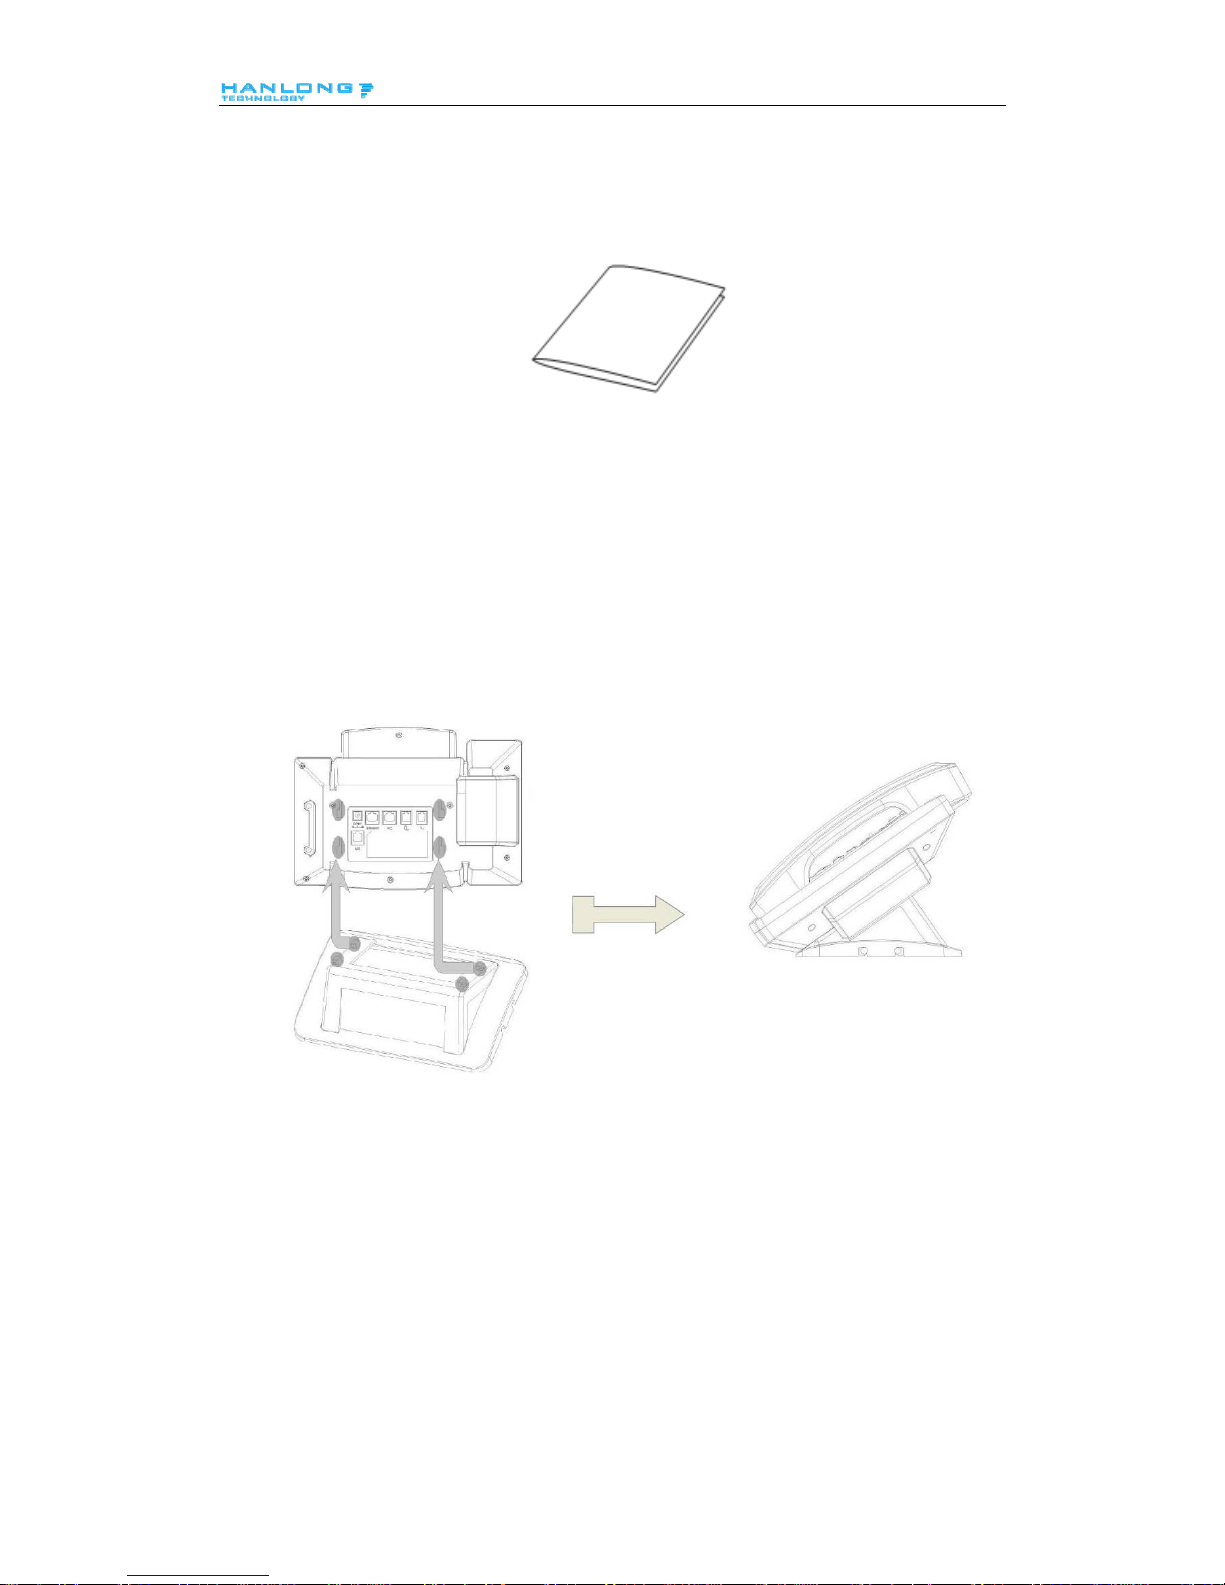
1. Attach the Foot stand
7
Page 9
Getting Started
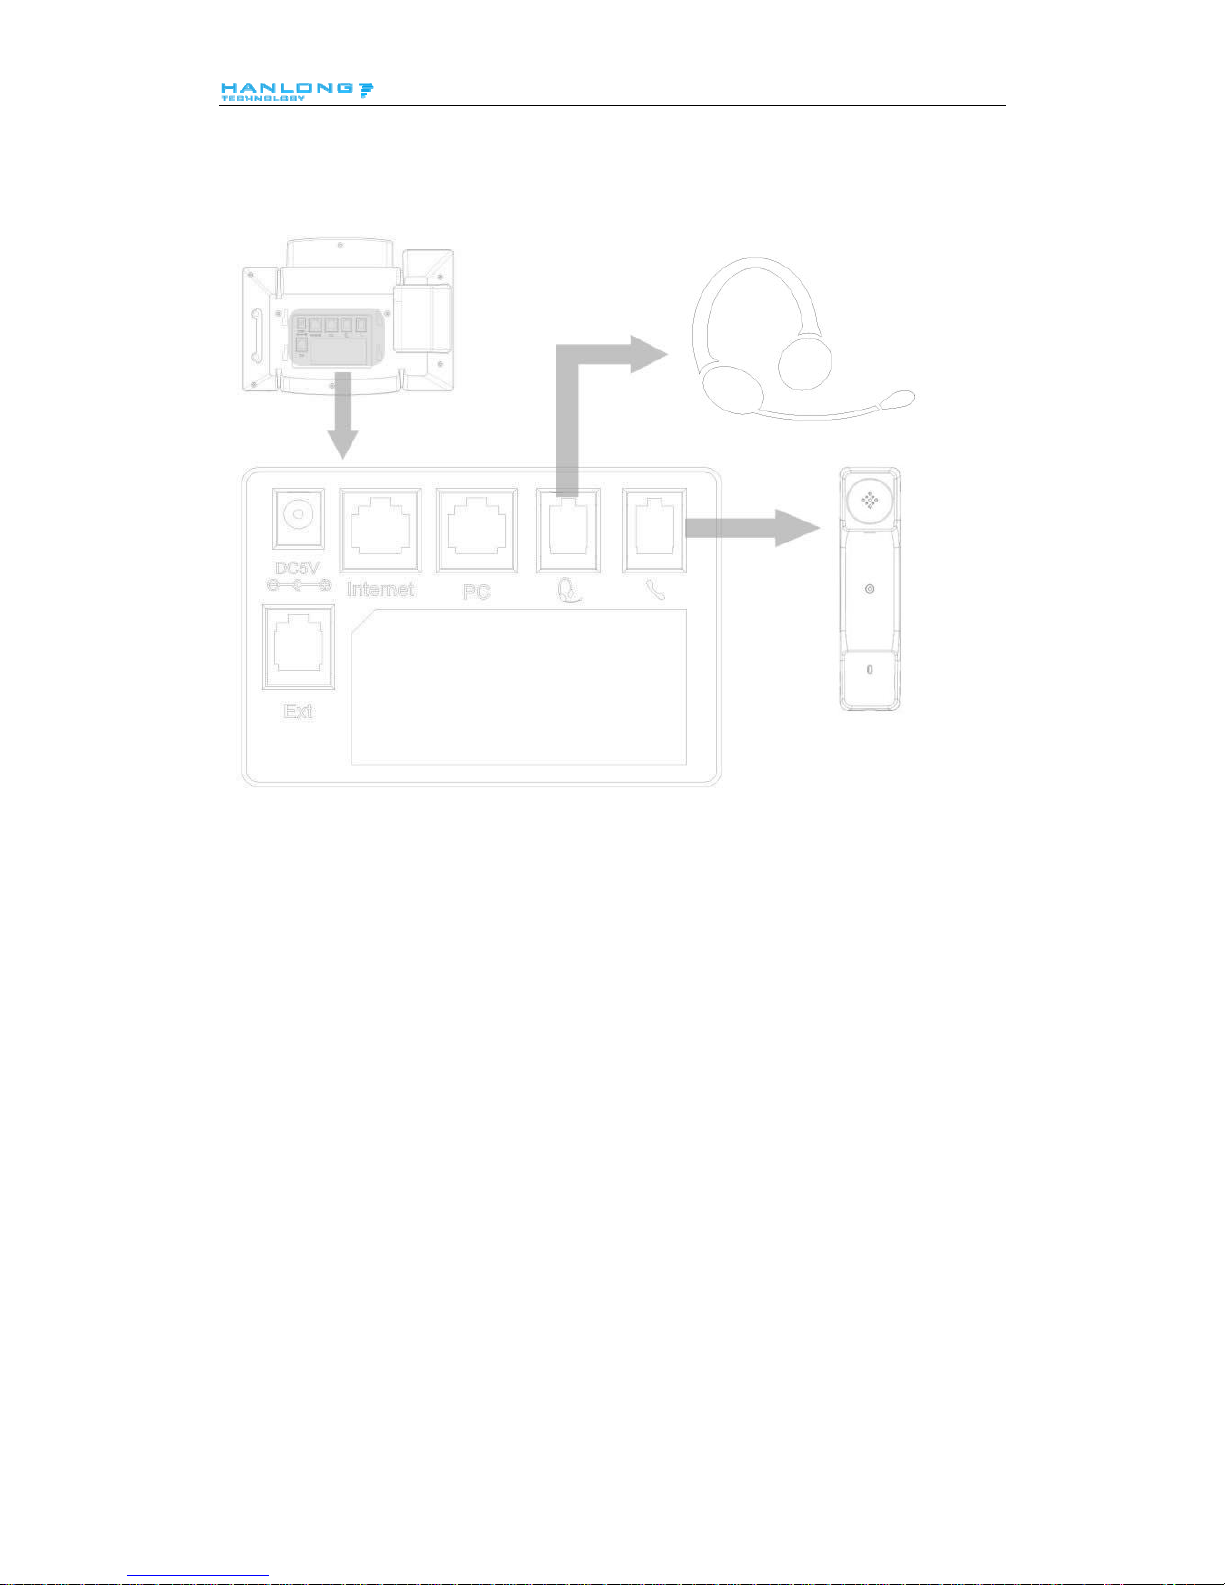
2. Connect the Handset and optional Headset
8
Page 10
Getting Started
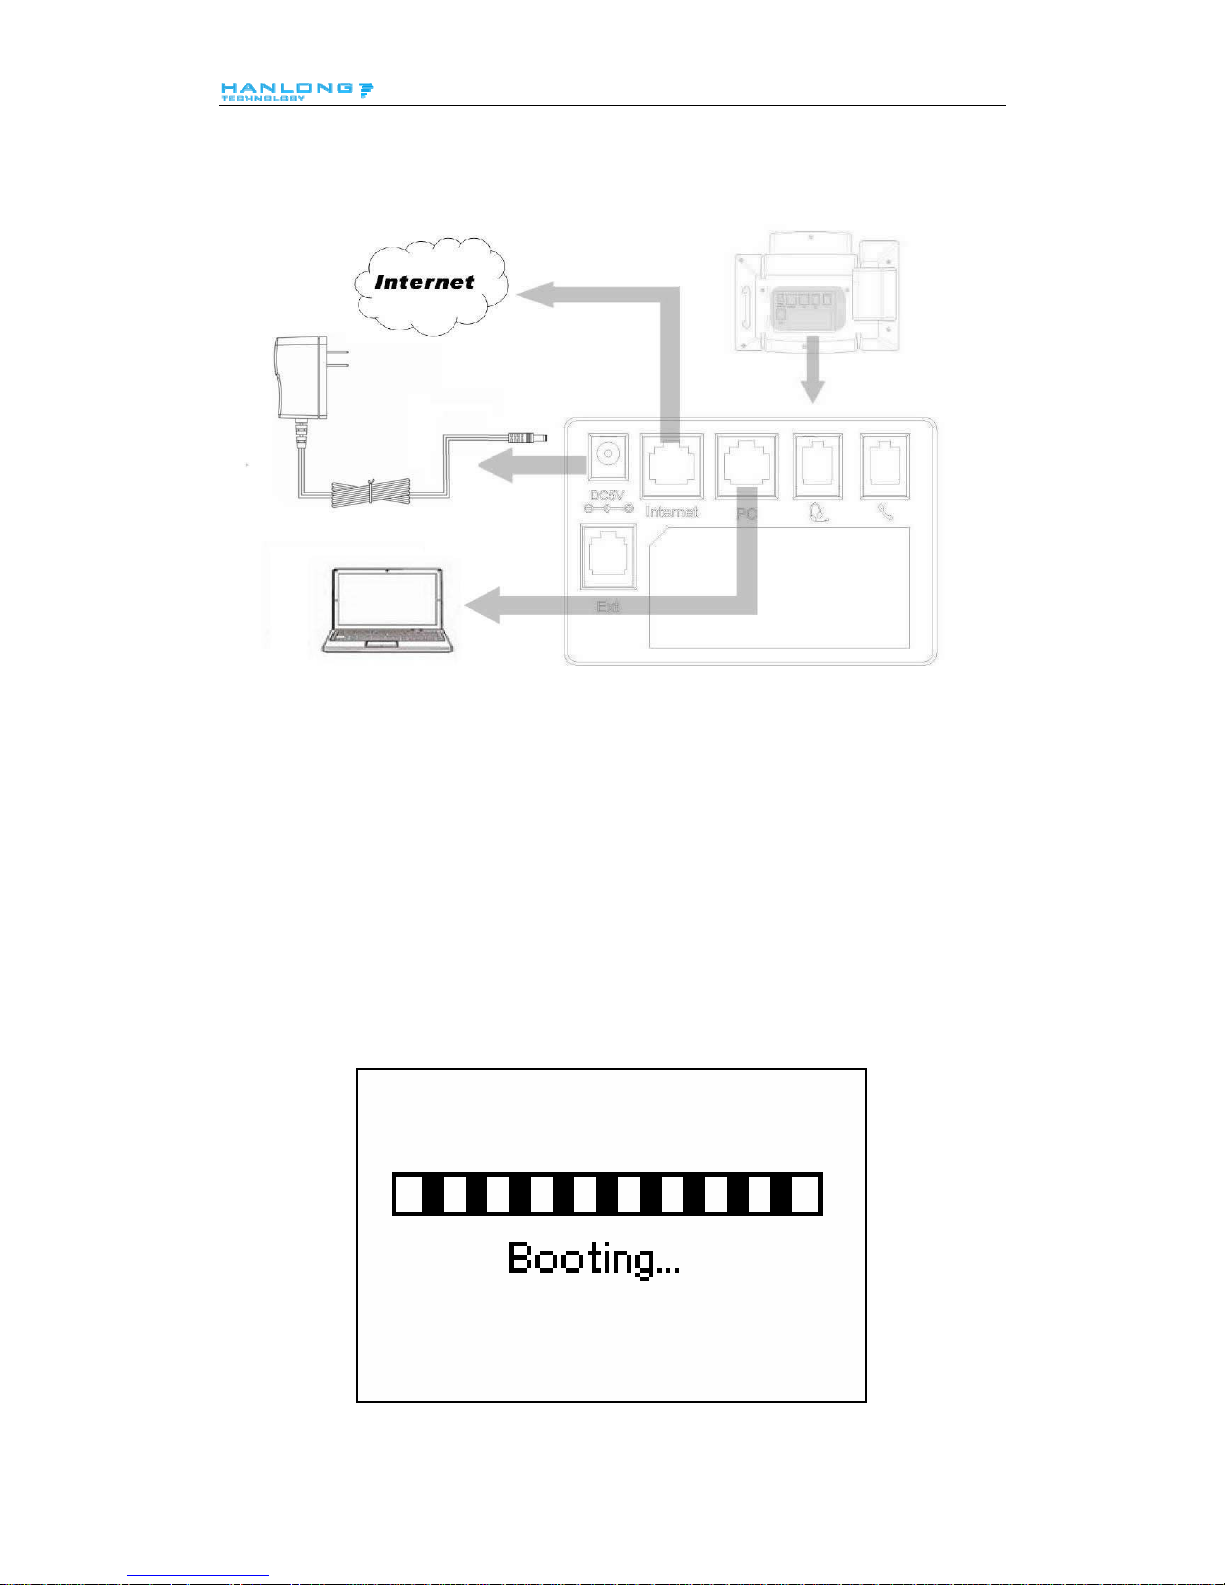
3. Connect the Network and Power
Initialization
After your phone has been powered up, the system boots up and performs the following steps:
Automatic Phone Initialization
The phone finishes the initialization process by loading th e saved configuration. The phone LCD
screen will display "Booting"
9
Page 11
Getting Started
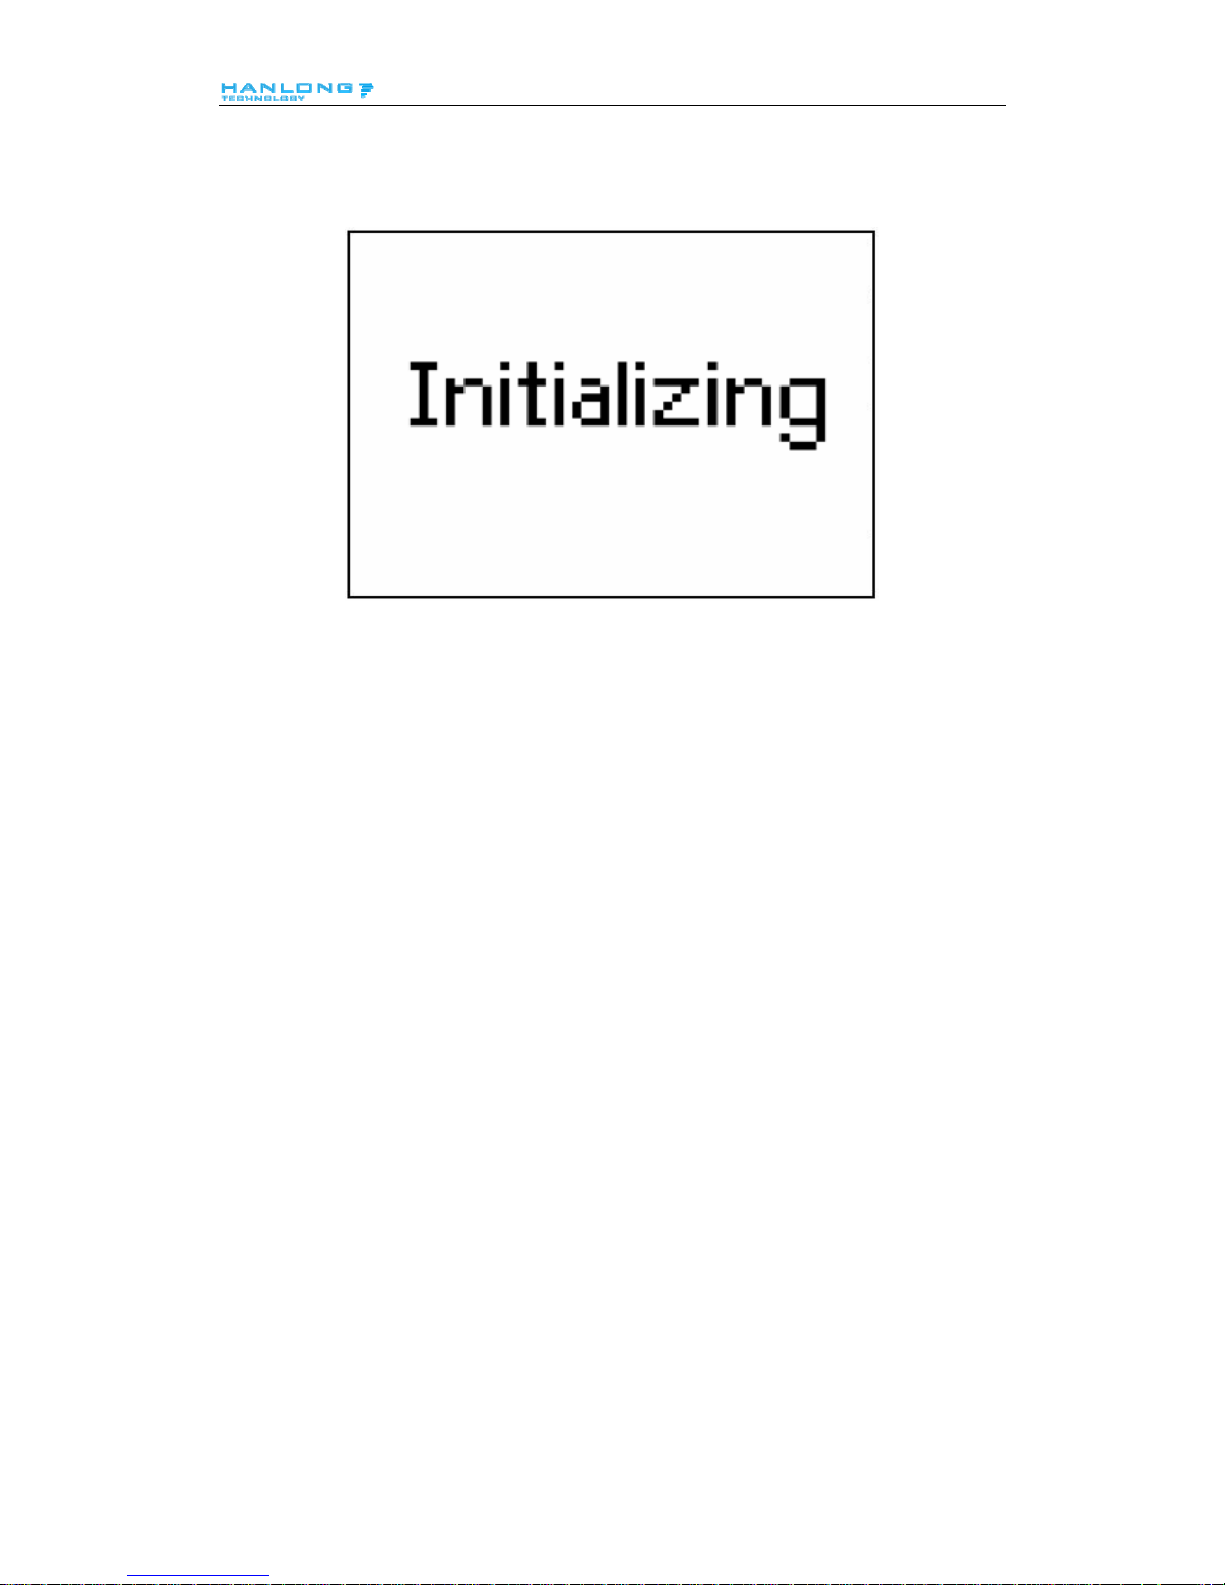
And then show “Initializing “during the initialization.
By default the phone attempts to contact a DHCP server in your network in order to obtain its
valid network settings, e.g. IP address, subnet mask, default gateway, DNS server.
1
0
Page 12
Getting Familiar with Your Phone
Getting Familiar with Your Phone
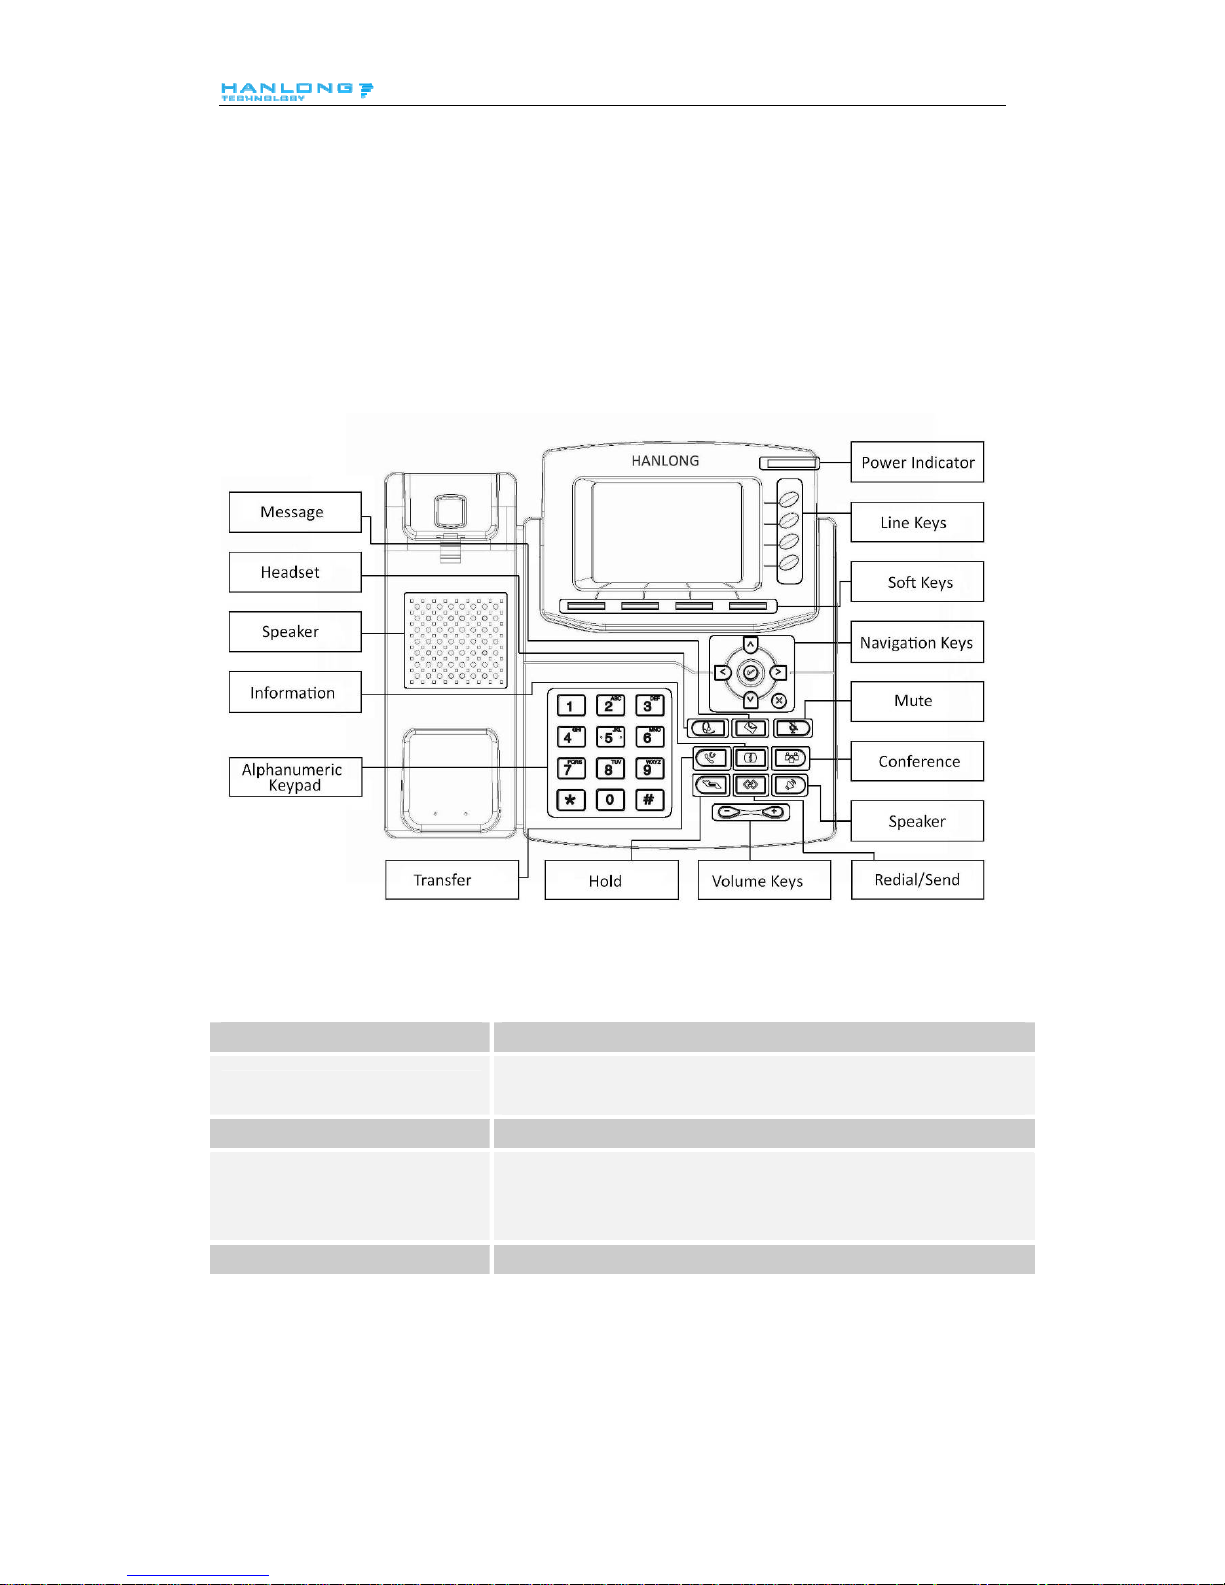
Hardware Components Preview
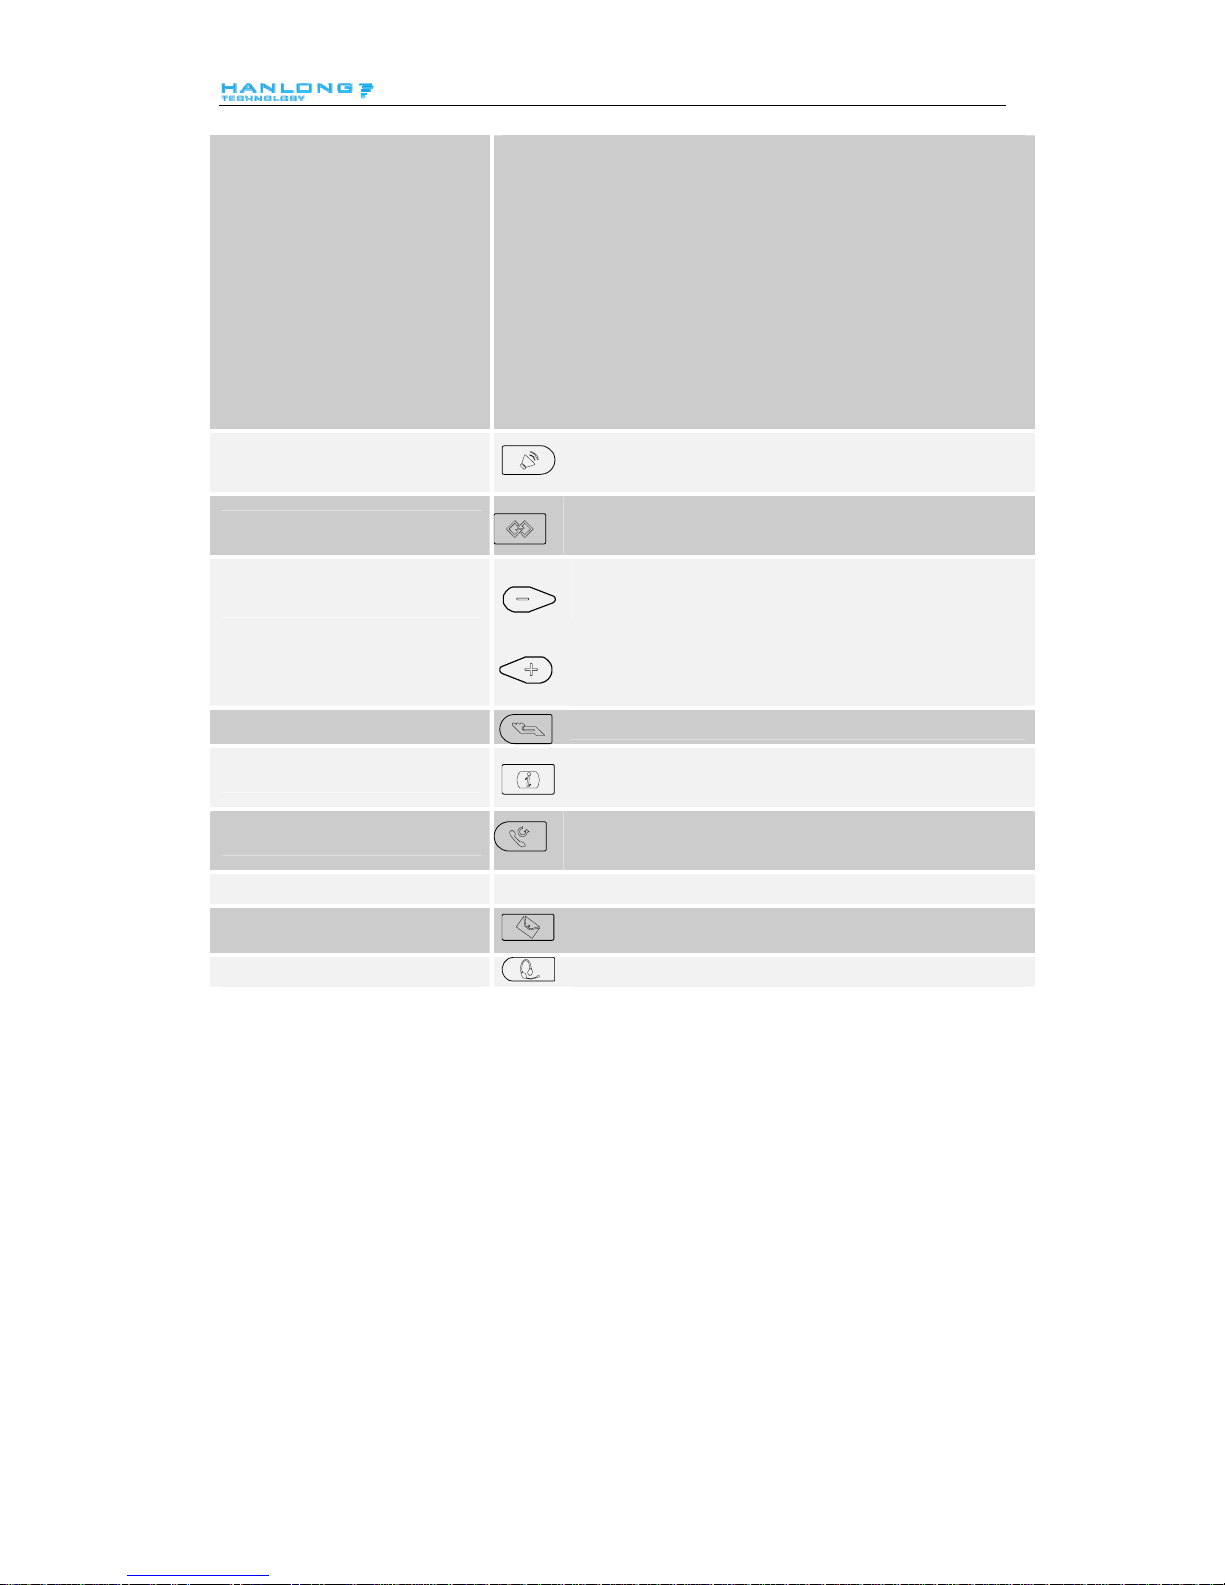
Item Description
LCD screen
To Presentation all information about the date& time, accounts,
soft keys, messages, calls and other some information.
Power Indicator LED To indicate the power status
Line keys
The phone supported up to 4 accounts
1. Steady green: idle interface, during a call..
2. Blink red: a call incoming
Soft keys Labels automatically to identity their context-sensitive features.
11
Page 13
Getting Familiar with Your Phone
12
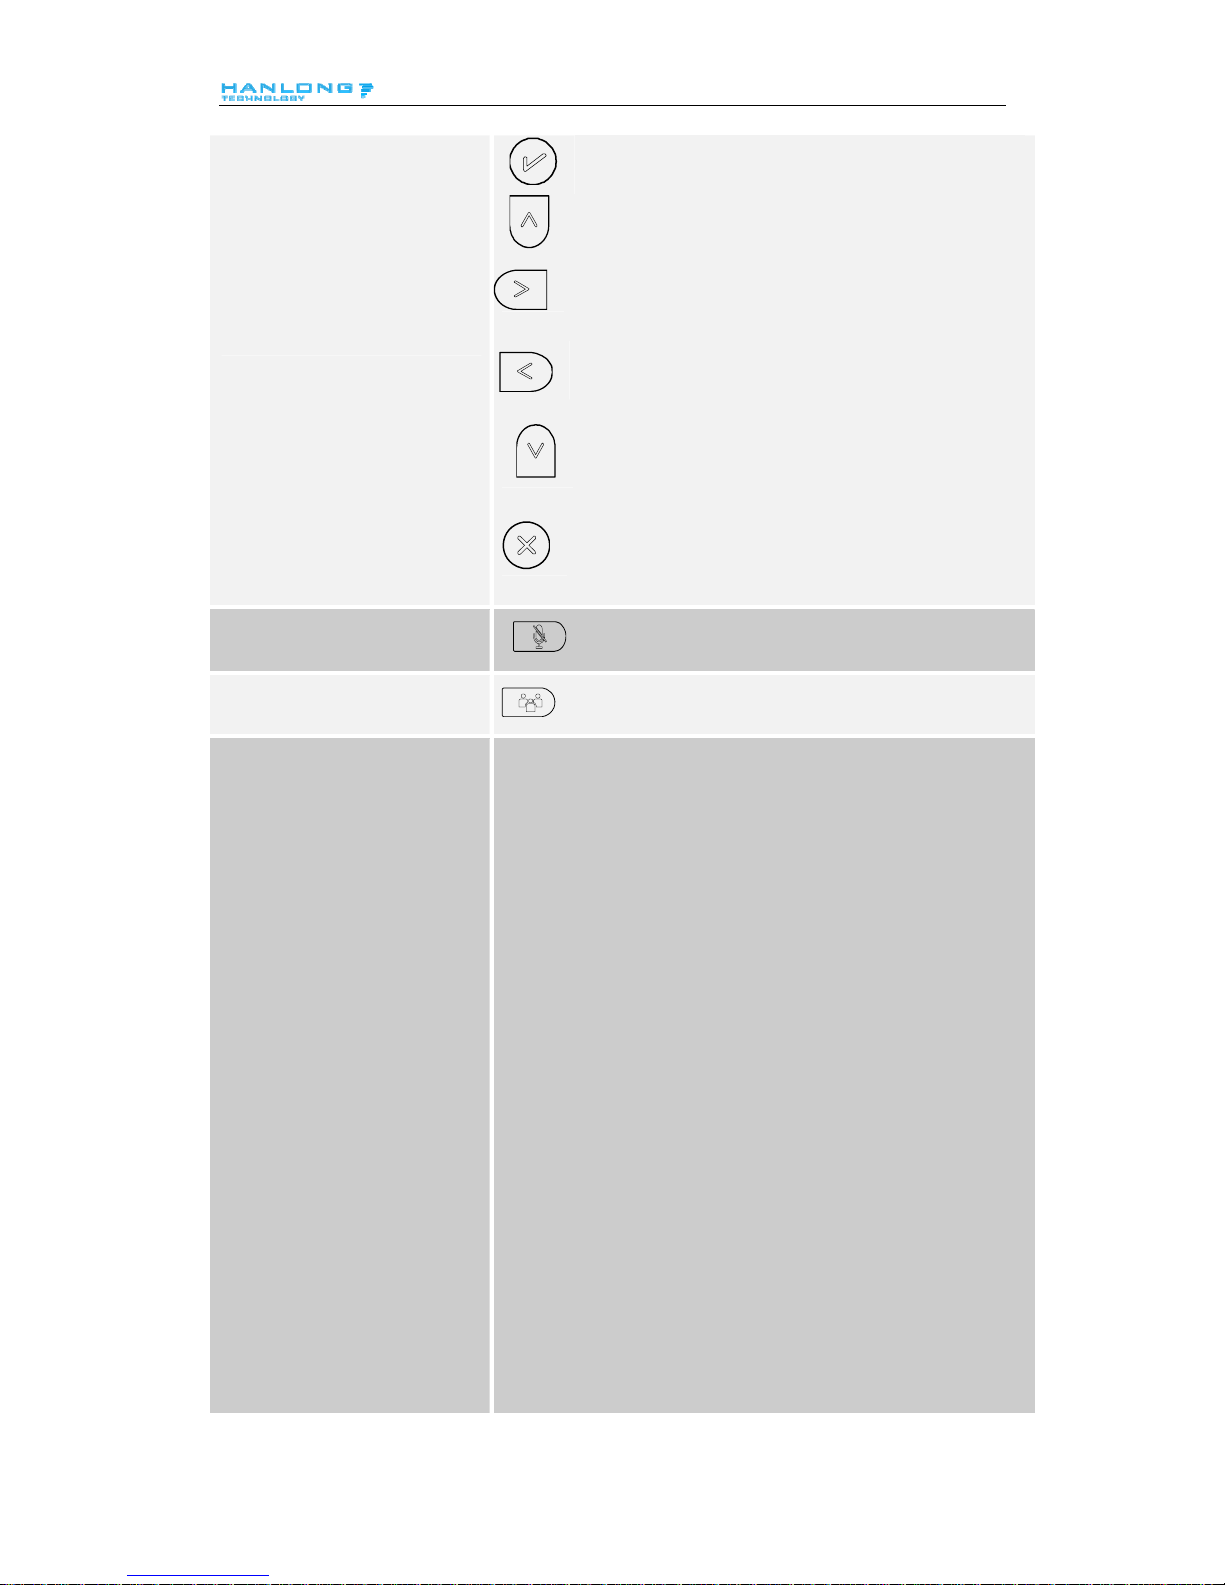
Navigation keys
1. OK.
Up arrow key: To move up of the selection shows on the
screen.
R ght arrow key: To move right of the selection i
shows on the screen.
Left arrow key: To move left of the selection shows on
the screen.
Down arrow key: To move down of the selection shows
on the screen.
1. To return to idle screen.
2. To cancel the information or call on the screen.
1. To mute the voice during the call (green light).
2. To un-mu
Mute key
te the call.
To place a
Conference
conference call
To be configured as different function as:
1. Line
2. Speed Dial
3. BLF
4. BLF List
5. Voice mail
6. Direct Pickup
7. Group Pickup
8. Call Park
9. Intercom
10. DTMF
11. Prefix
12. Hold
13. Conference
14. DND
15. Redial
16. Transfer
Line Keys
17. SMS
18. Hot-desking
19. Call Return
20. Paging
21. Record
22. Shared Line
Page 14
Getting Familiar with Your Phone
The Shared line:
1
3
LED lights status when set as
Stay green: Idle
Stay red: Busy
Blinked green: Ring Back
Blinked red: A call incoming
Steady orange: During a call
Blinked orange: Public Hold
Blinked green: Private Hold
L tered ight Drown: Unregis
Press this button to place a
Speaker
call in hands-free mode.
T o dia l the pre vio us dia led num ber.
T
Redial
o act as send key.
Vol u me
To decrease the volume.
To increase the volume.
Hold
To hold or to resume a call during a conversation.
I nformation
To show the accounts status and some other relevant
information.
Transfer
To transfer a call to a third party.
To enable or disable Forward feature during the idle page.
Alphanumeric keypad To enter the phone numbers, letters and so on.
Message
To indicator the New message, and press to read.
Headset To indicate that the phone is or not in Headset mode.
Page 15
Getting Familiar with Your Phone
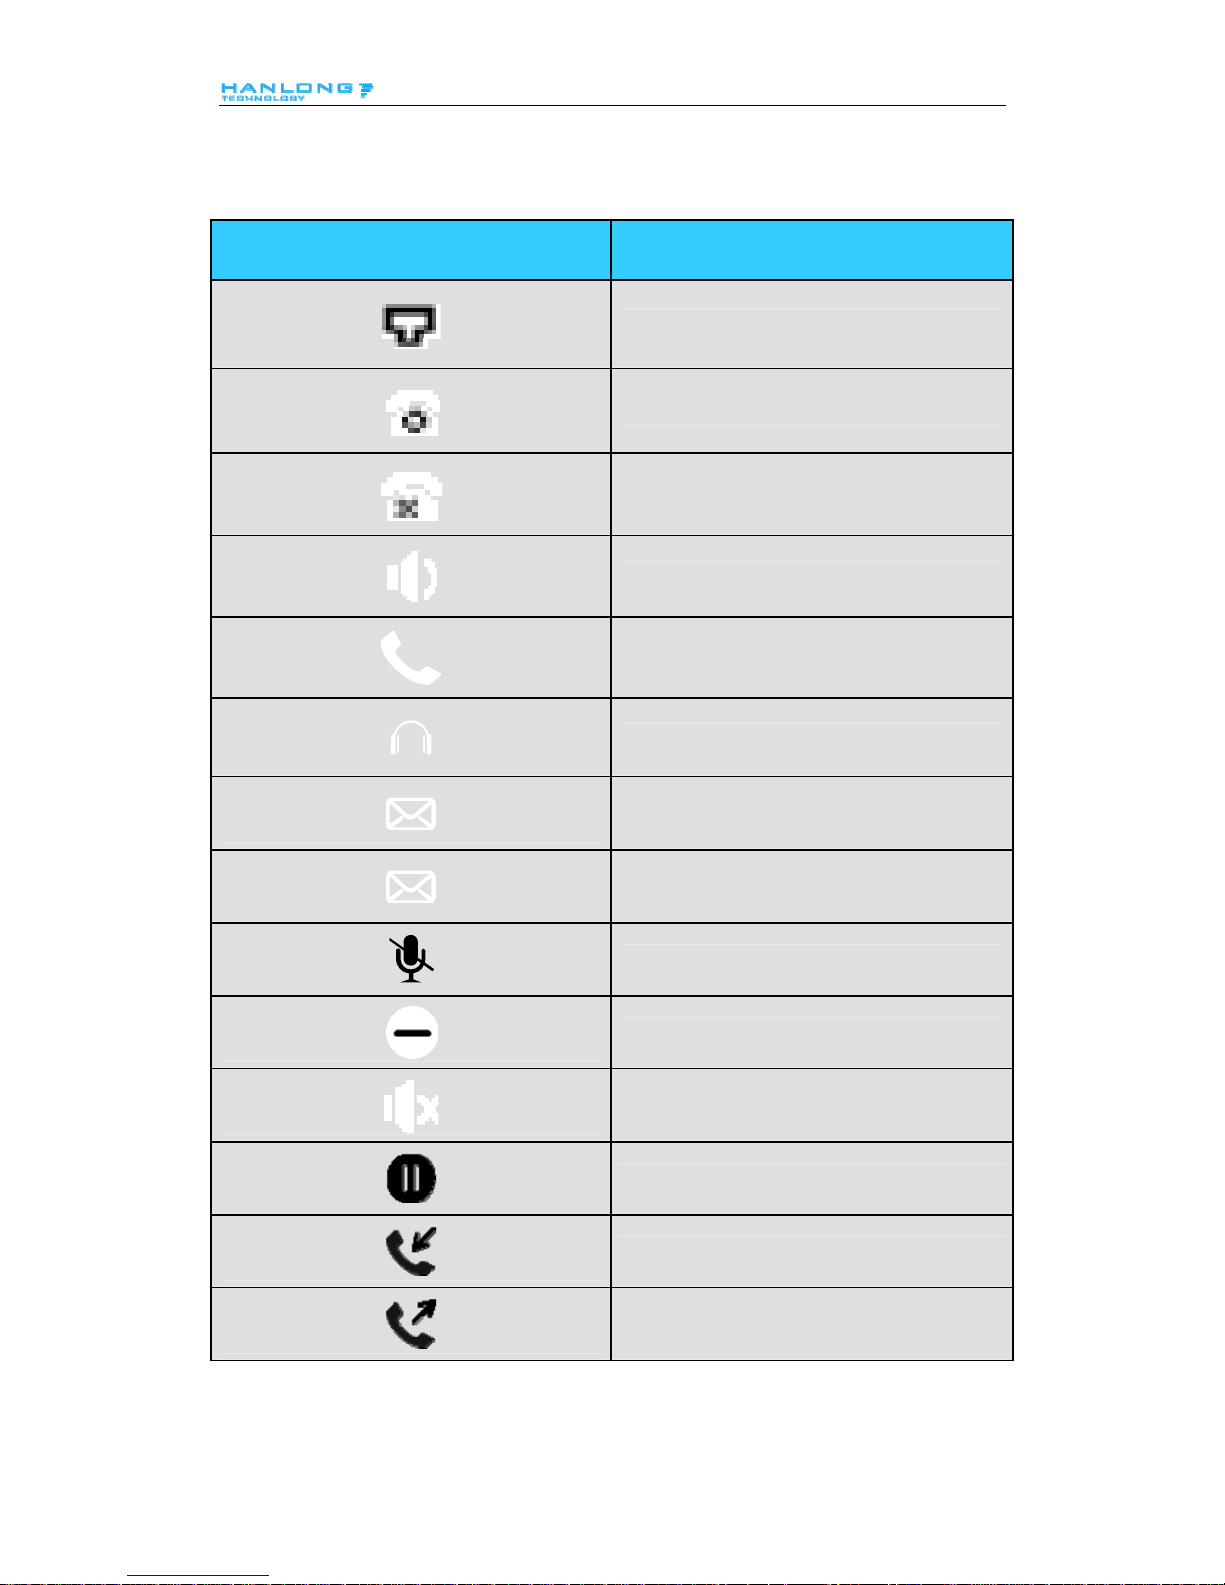
Icon Preview
Icon Description
Network down
Registered succeed
Unregistered
Speakerphone mode
Handset mode
Headset mode
Voice messages
Text message
Mute
Do Not Disturb
Volume is 0
Hold
Received calls
Dialed Calls
14
Page 16
Getting Familiar with Your Phone
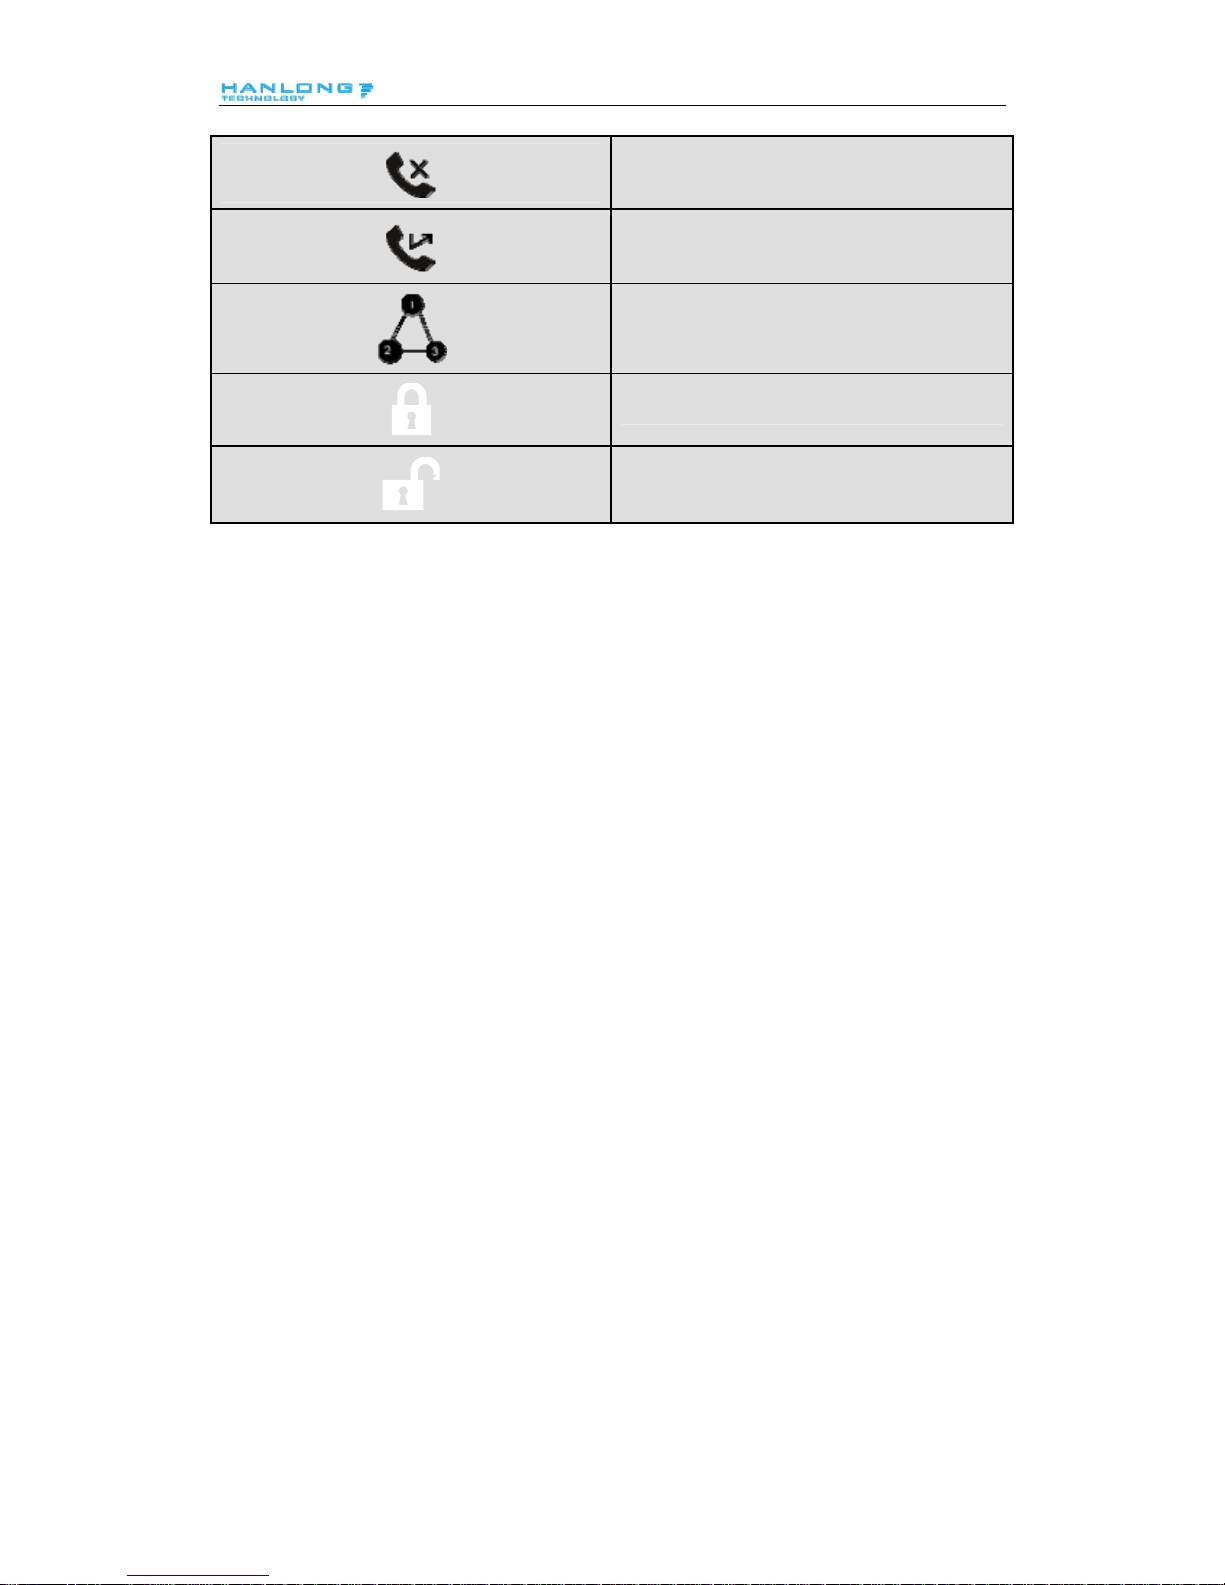
Missed calls
Forward calls
Conference
Keypad locked
Keypad unlocked
15
Page 17

Getting Familiar with Your Phone
16
Line Key Function Overview
Line
Speed Dial
BLF
BLF List
Voice Mail
Direct Pick Up
Group Pick Up
Call Park
Intercom
DTMF
Prefix
Conference
Forward
Transfer
Hold
DND
Redial
Page 18

Getting Familiar with Your Phone
17
Call Return
Record
URL Record
Paging
Group Listening
Public Hold
Private Hold
Shared Line
URL
Page 19
Basic Features Configuration
Basic Features Configuration
This part will mainly introduce the basic configuration as the Time, Language, and Volume…
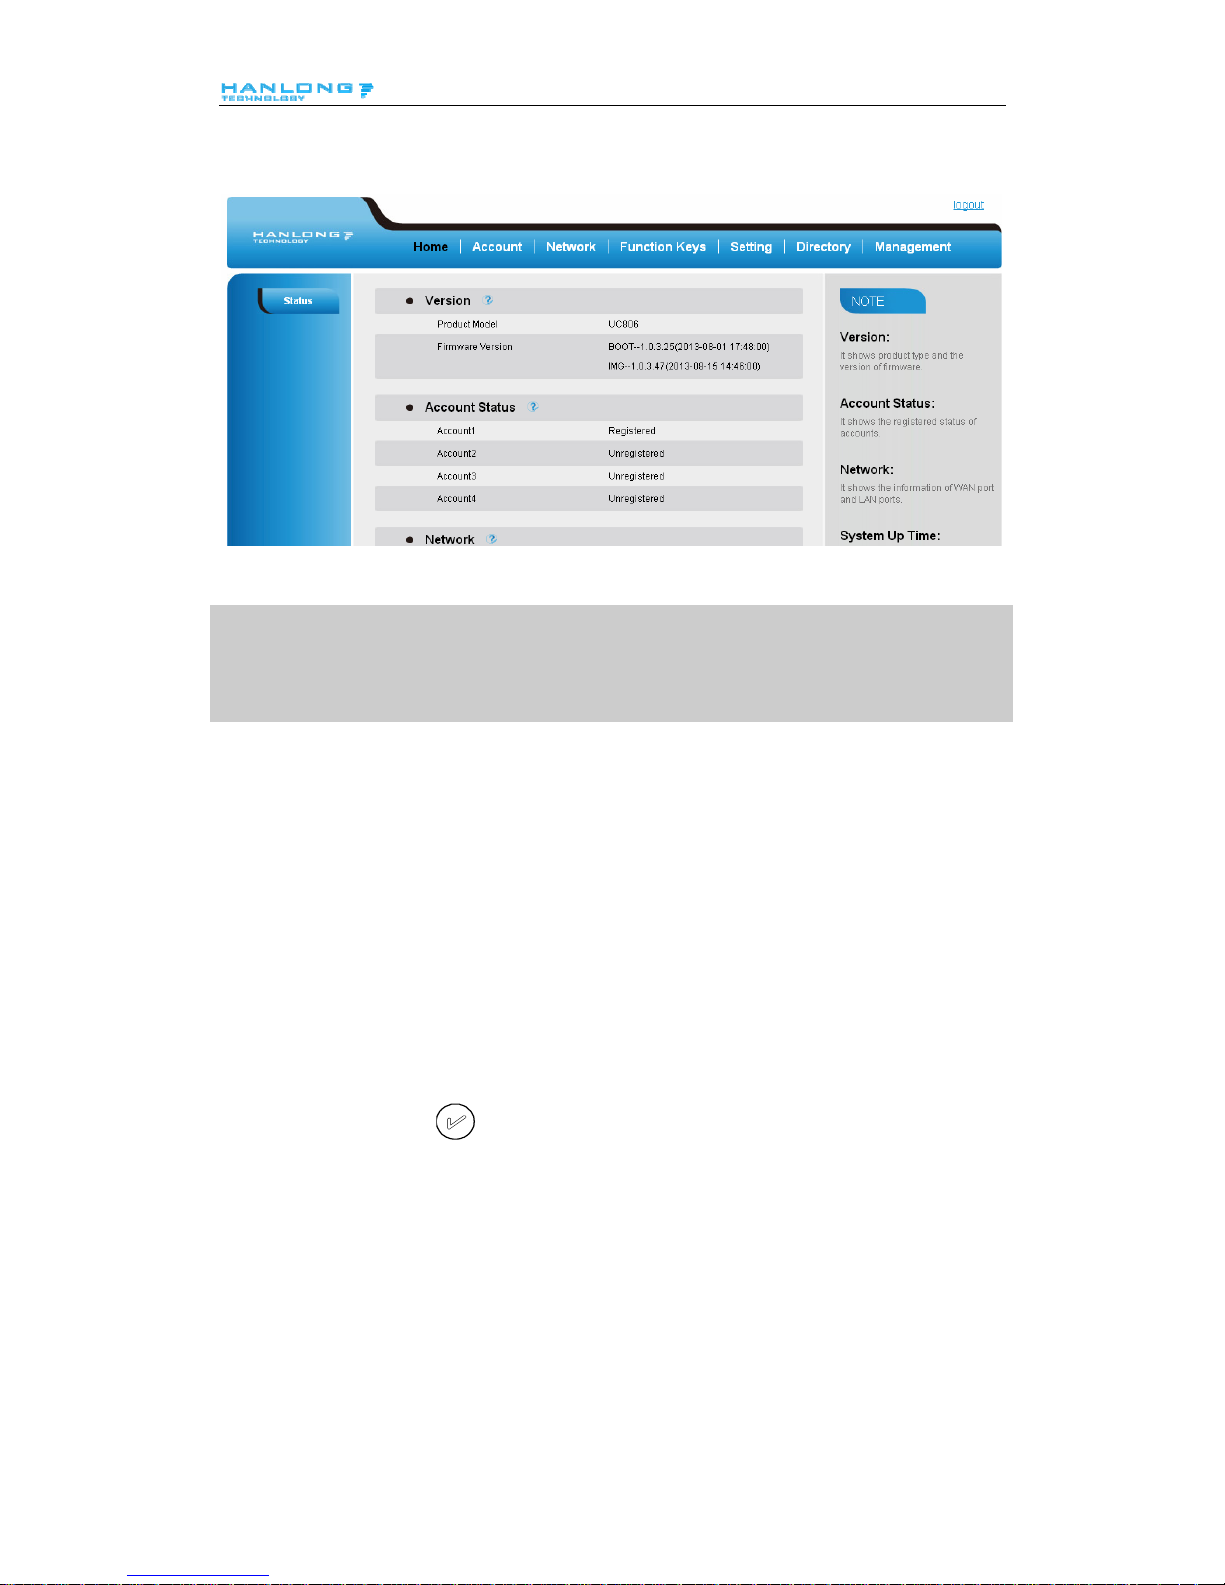
Web Login
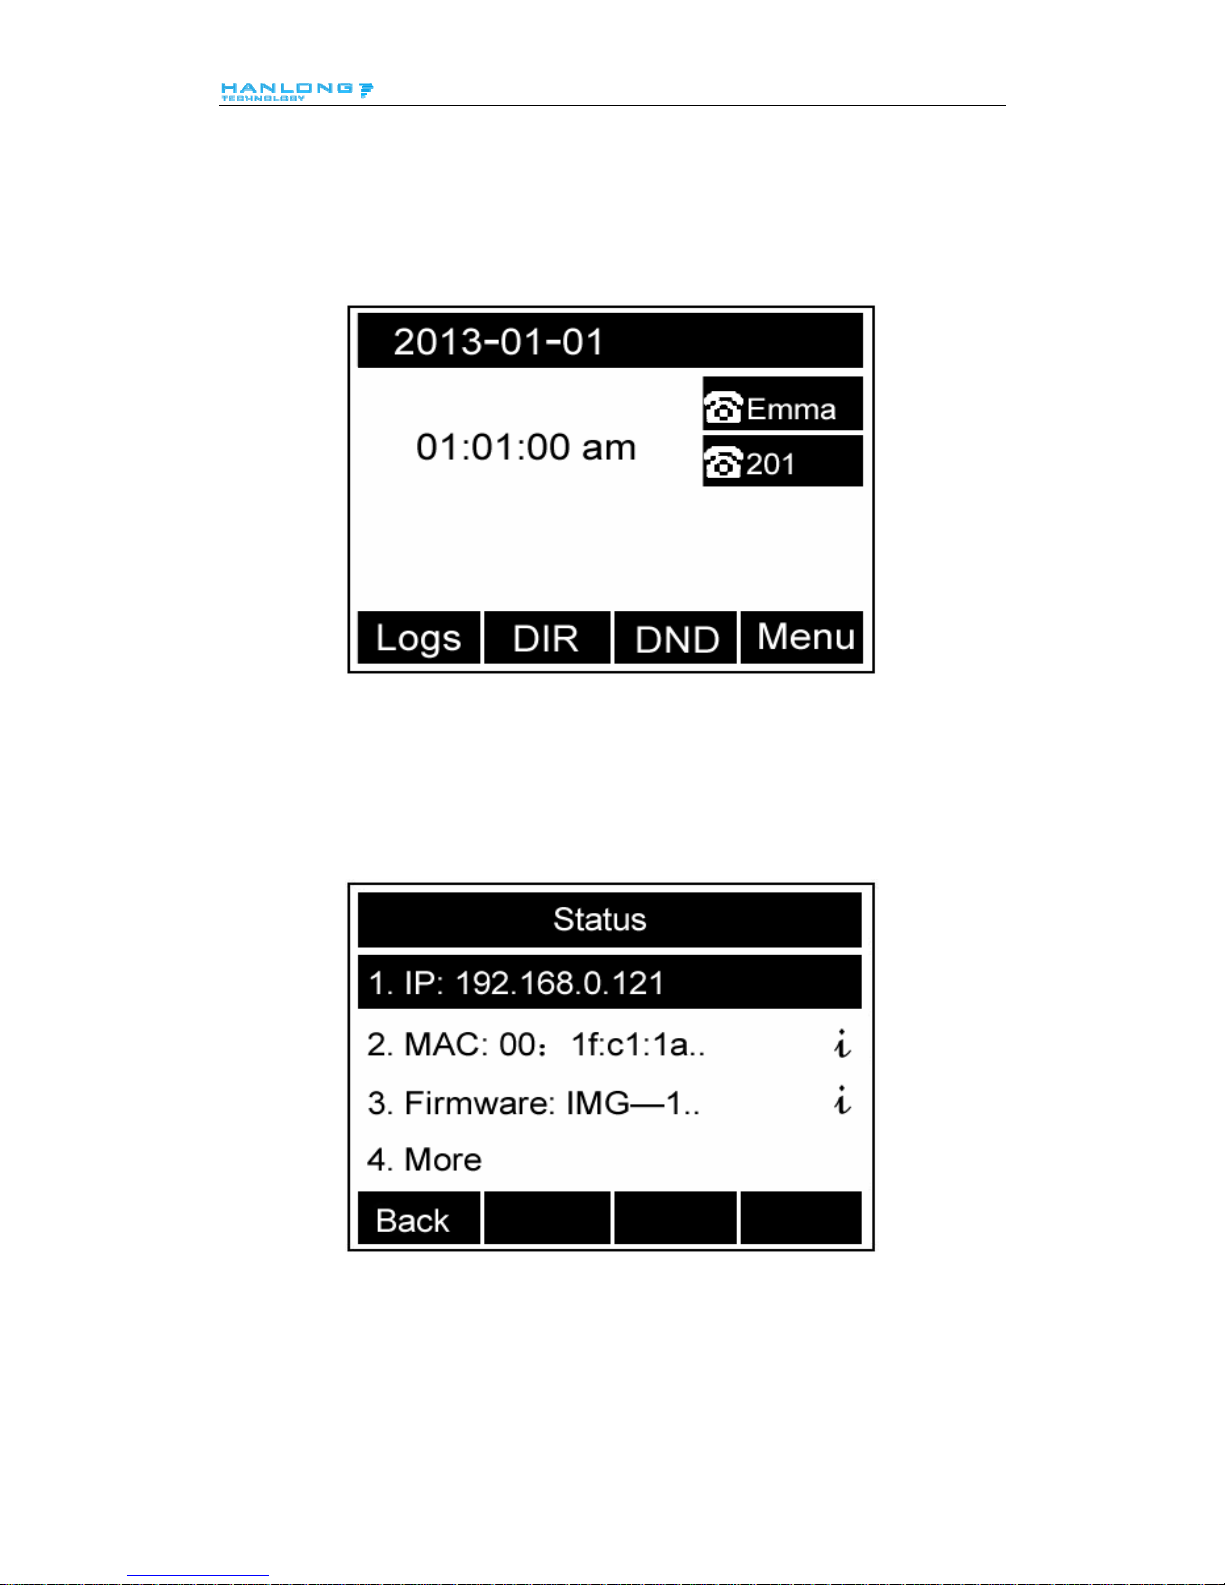
1. Get the IP address: Press Menu →Status.
2. Input the IP Address in the web browser.
3. Input the user name (default is admin), password (default is admin).
1
8
Page 20
Basic Features Configuration
4. Login successfully.
Note:
The PC and phone should be in the same segment.
When register the accounts in web and the server port is not “5060”, then “SIP Server” should be
set as “SIP Server’s IP address: server port.”, for example, “192.168.0.122: 5090”.
Administrator Password
The password is mainly used for login the web interface or set the advanced settings through
phone interface. And the default password of the administrator is: admin
To change to password via Phone Interface
1. Press Menu → setting → Advanced settings → password (default admin) → Set
Password
2. Enter the current PWD (password), new password and confirm the new password.
3. Press save soft key or
to save the new password.
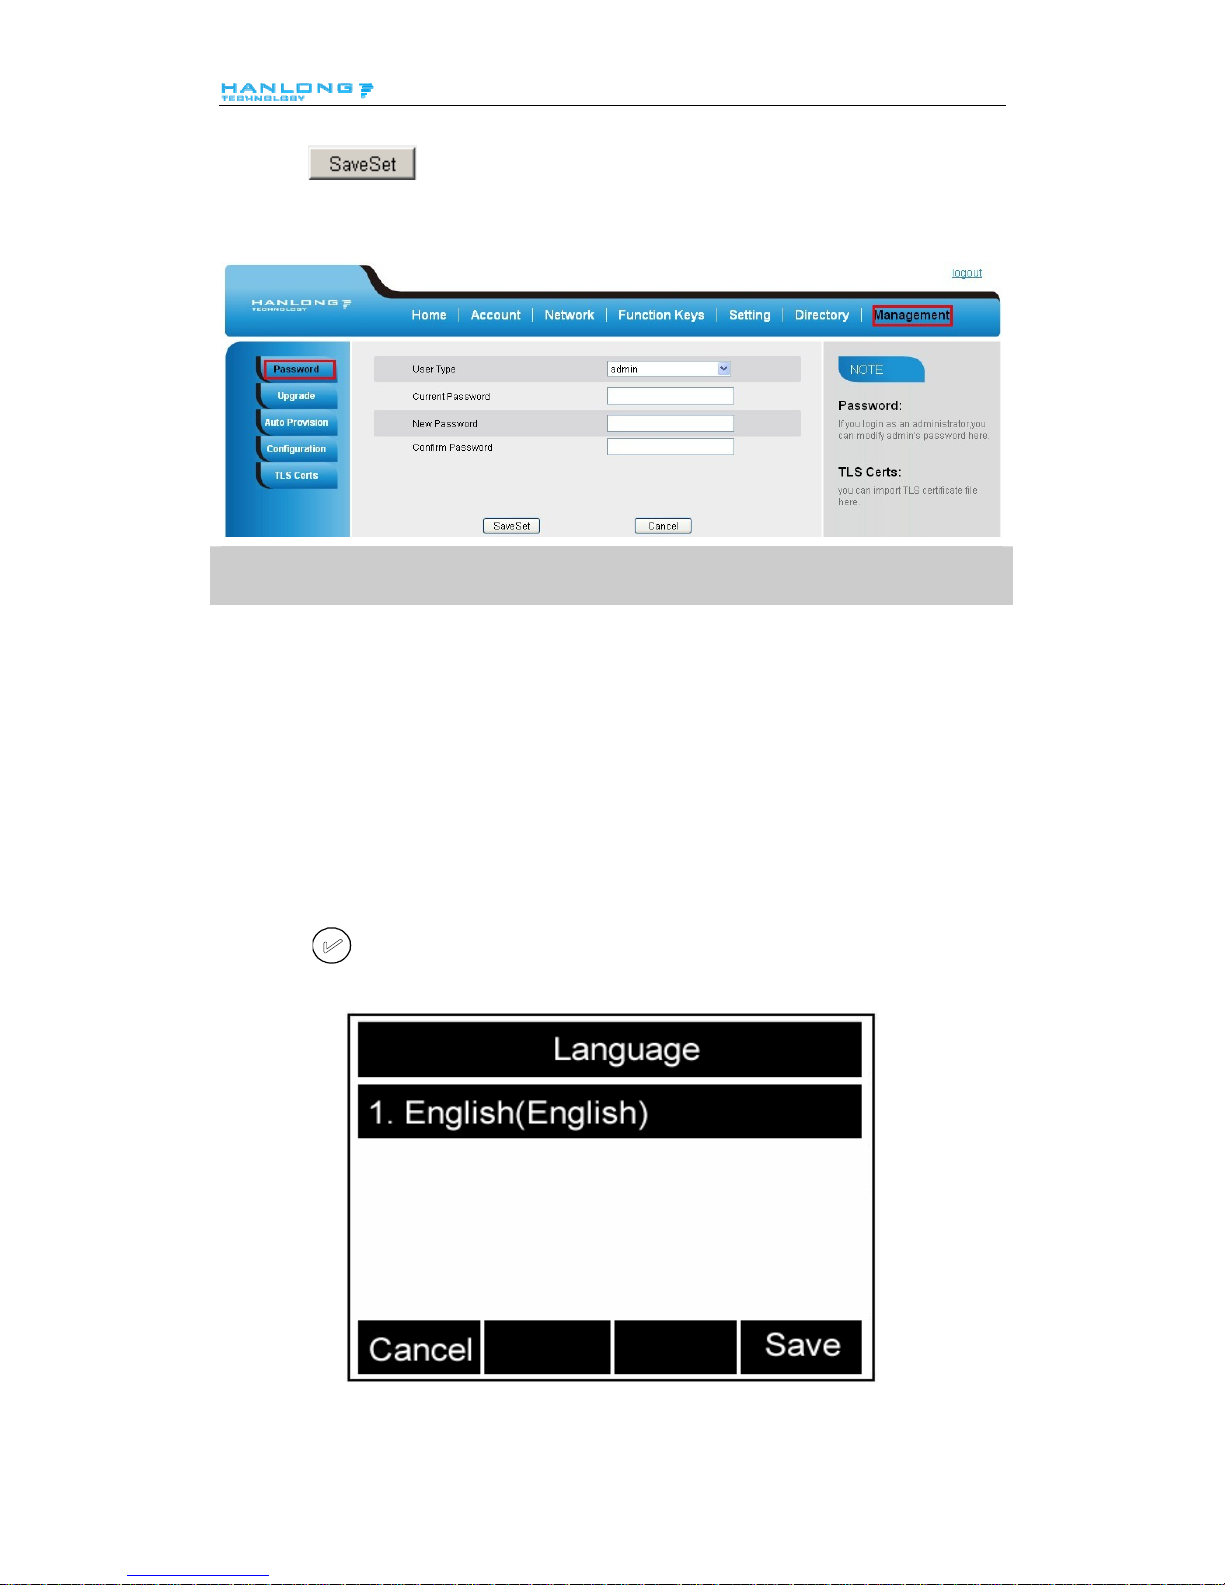
To change to password via Web Interface
1. Management → Password
2. Fill the value
1
9
Page 21
Basic Features Configuration
3. Click to save the configuration.
Note:
When you use the web interface: user name: admin password: admin(default)
Language
The default Phone interface language is English.
To change the language via Phone interface
1. Press Menu → Setting → Basic Settings → Language.
2. Press
or Save soft key to save the configuration.
2
0
Page 22
Basic Features Configuration
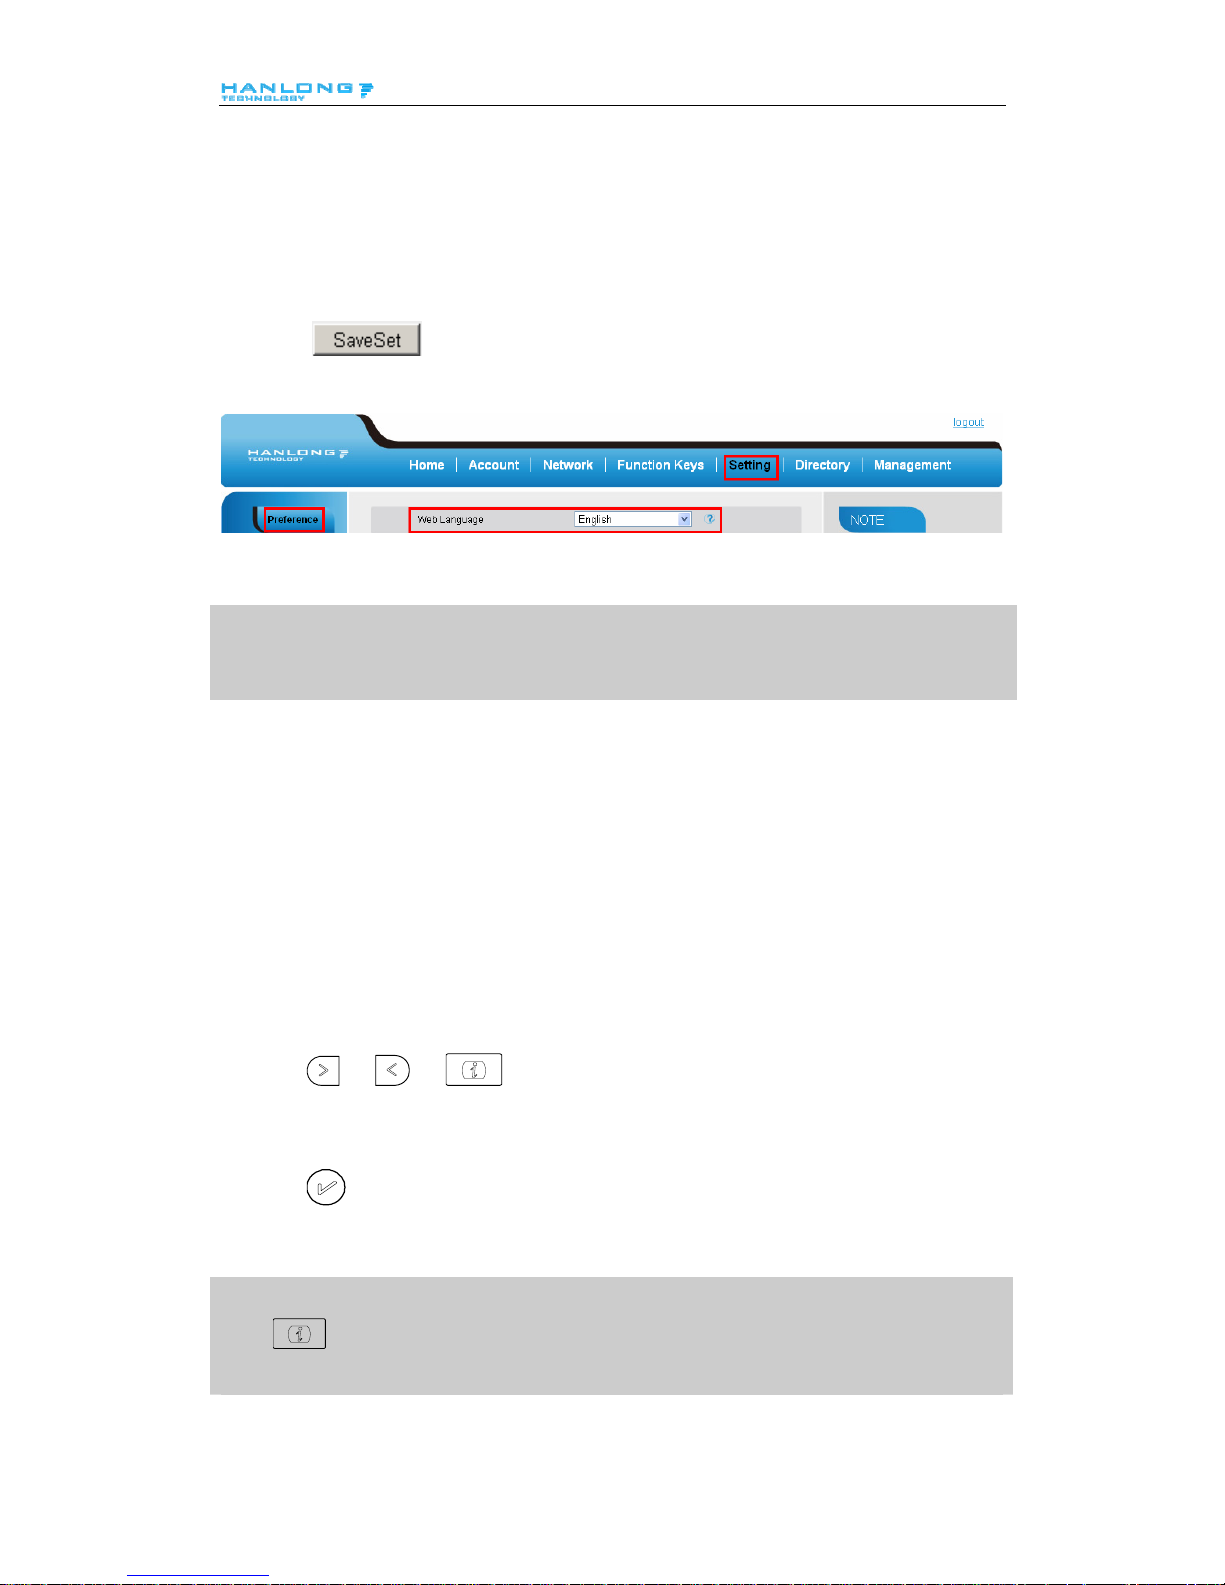
To change the language via Web Interface
1. Setting → Preference →Web Language
2. Select the necessary one.
3. Press
to save the configuration.
Note:
All languages may not be available for selection. The av ailable languages depend on the language
packs currently loaded to the IP phone.
Time and Date
The time and date show on the idle page, and it can be set and change by SNTP server
automatically or manual setting.
To configure the time and Date by SNTP setting
1. T o press Menu → Setting → Basic setting → Time & Date → SNTP Settings
2. Press
or , or to change the Time zone.
3. Fill the NTP server1, NTP Server2, and Daylight Saving.
4. Press
or Save soft key to save the configuration.
Note:
Press , all zone will show on the display, select the one you want and press save or confirm
key to save the configuration.
2
1
Page 23

Basic Features Configuration
To configure time and date manually
1. T o press Menu → Setting → Basic setting → Time & Date → Manual Settings
2. Press
and or change the right time, or you can input the right time.
3. Press
or Save soft key to save the configuration.
To configure the Time & Date Format
1. T o press Menu → Setting → Basic setting → Time & Date Format
2. Press
and or press to change between 12 Hour or 24 Hour.
3. Press
and or press to change among Y-M-D(year-month-day),
M-D-Y(month-day-year), D-M-Y(day-month-year).
4. Press
or Save soft key to save the configuration.
To configure the DHCP time
1. T o press Menu → Setting → Basic setting → DHCP time
2. Press
and or press to change between Disable and Enable.
3. Press or Save soft key to save the configuration.
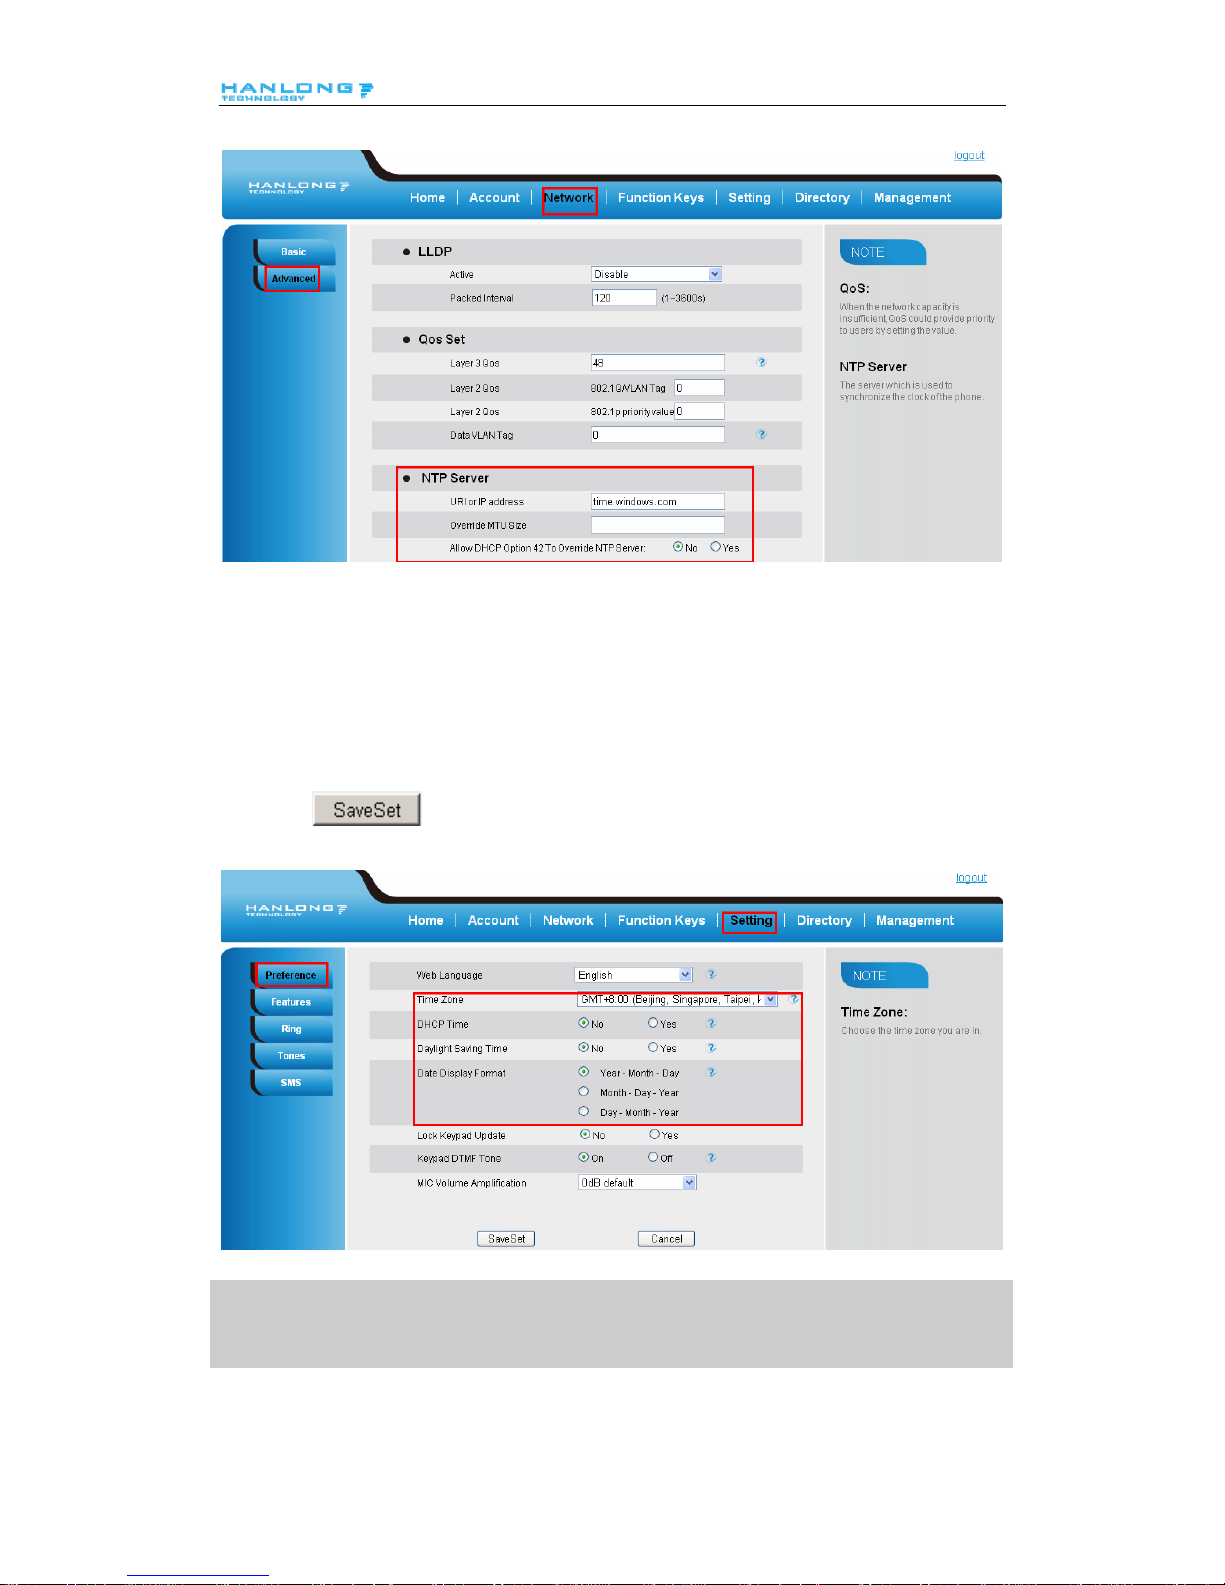
To configure the Time and Date by web interface
1. Login
Login name: admin, password: admin(default)
2. Network → Advanced →NTP Server
3. Fill the value in the blank.
2
2
Page 24
Basic Features Configuration
To change the Time Zone and Date Display Format via web interface
1. Setting → Preference →Time Zone
2. Select the necessary one.
3. Press
to save the configuration.
Note:
If the IP Phone cannot obtain the time and date from the Simple Network Time Protocol (SNTP)
server, please contact your system administrator for more information.
2
3
Page 25
Basic Features Configuration
Ring Tone
You can adjust the type and volume of the ring tone.
To adjust the Ring Tone Type via Phone interface
1. Press Menu → Setting → Basic Settings → Ring Tone.
2. Press
and to select the aimed one.
3. Press
or Save soft key to save the configuration.
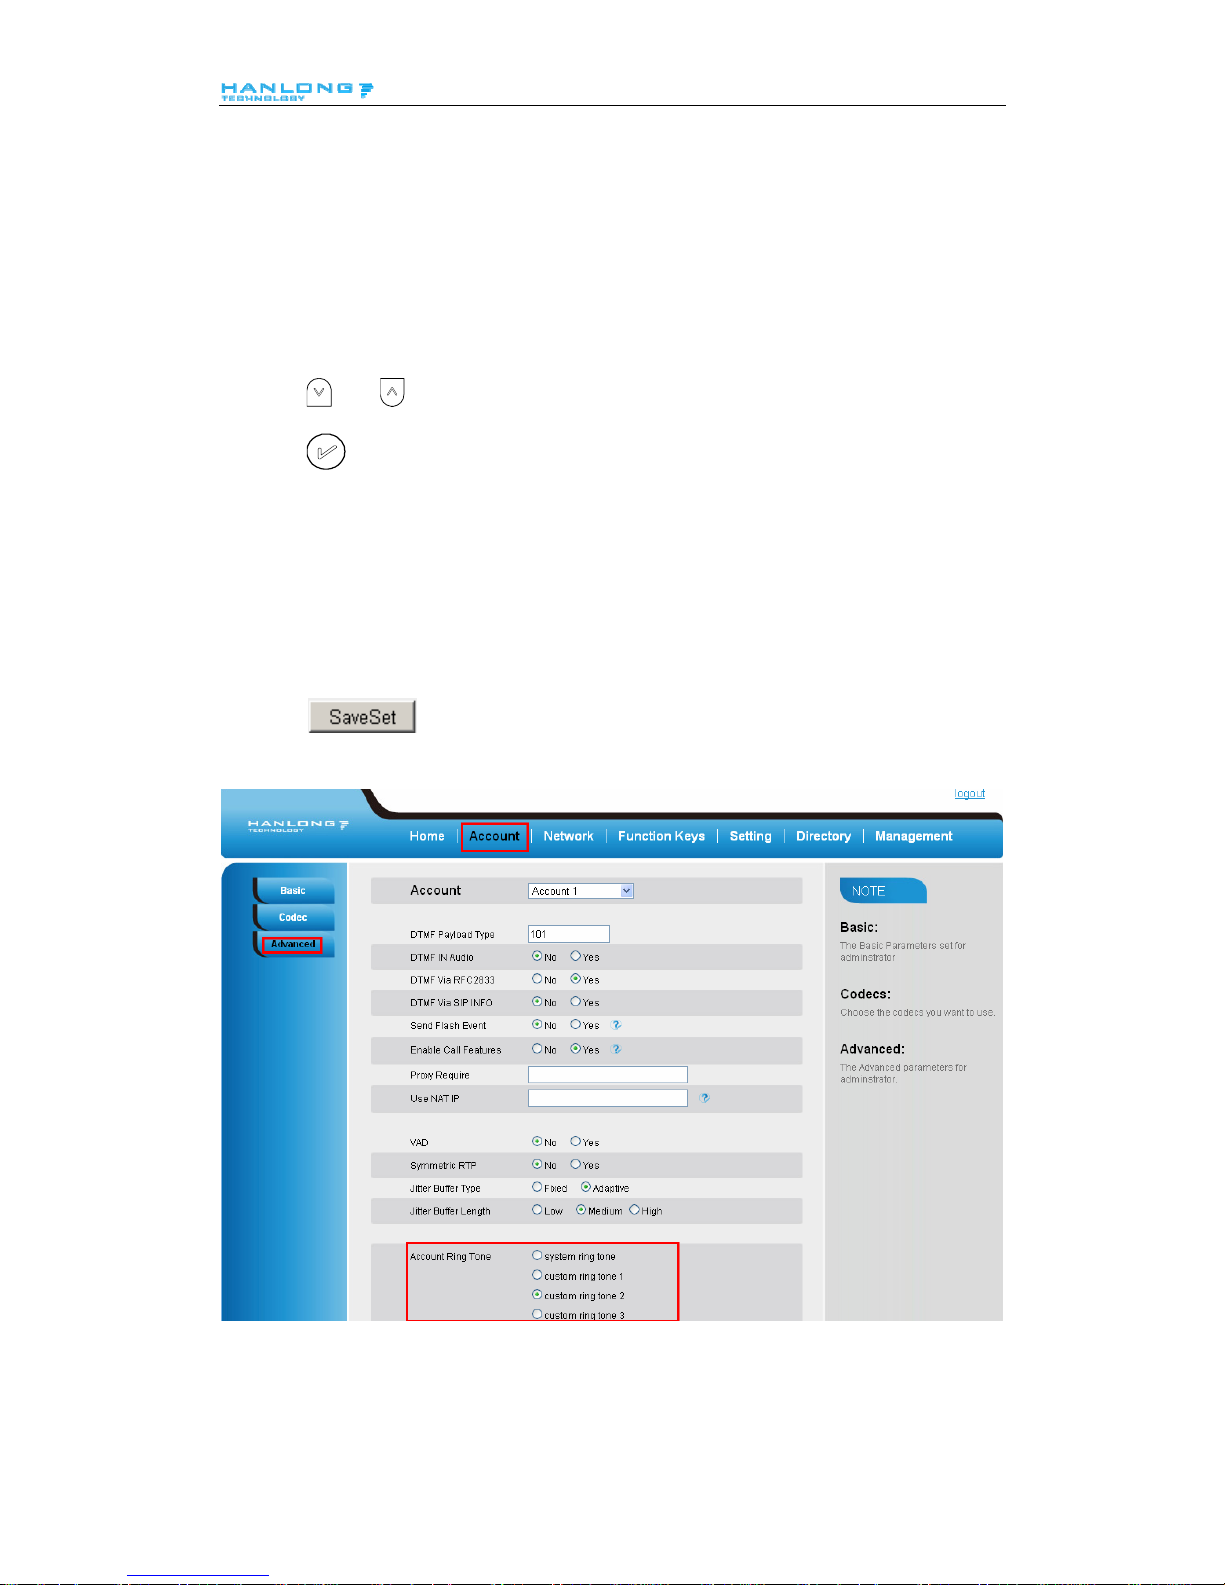
To adjust the Ring Tone Type via Web Interface
1. Account → Advanced → Account Ring Tone
2. Select the wanted one
3. Click
to save the configuration.
To configure Distinctive Ring Tone via Phone Interface
2
4
Page 26
Basic Features Configuration
1. Press Directory
2. Select the target contact
3. Press Detail soft key to edit the contact.
4. Press
and to select the wanted Ring Tone for the contact
5. Press Save soft key to save the contact.
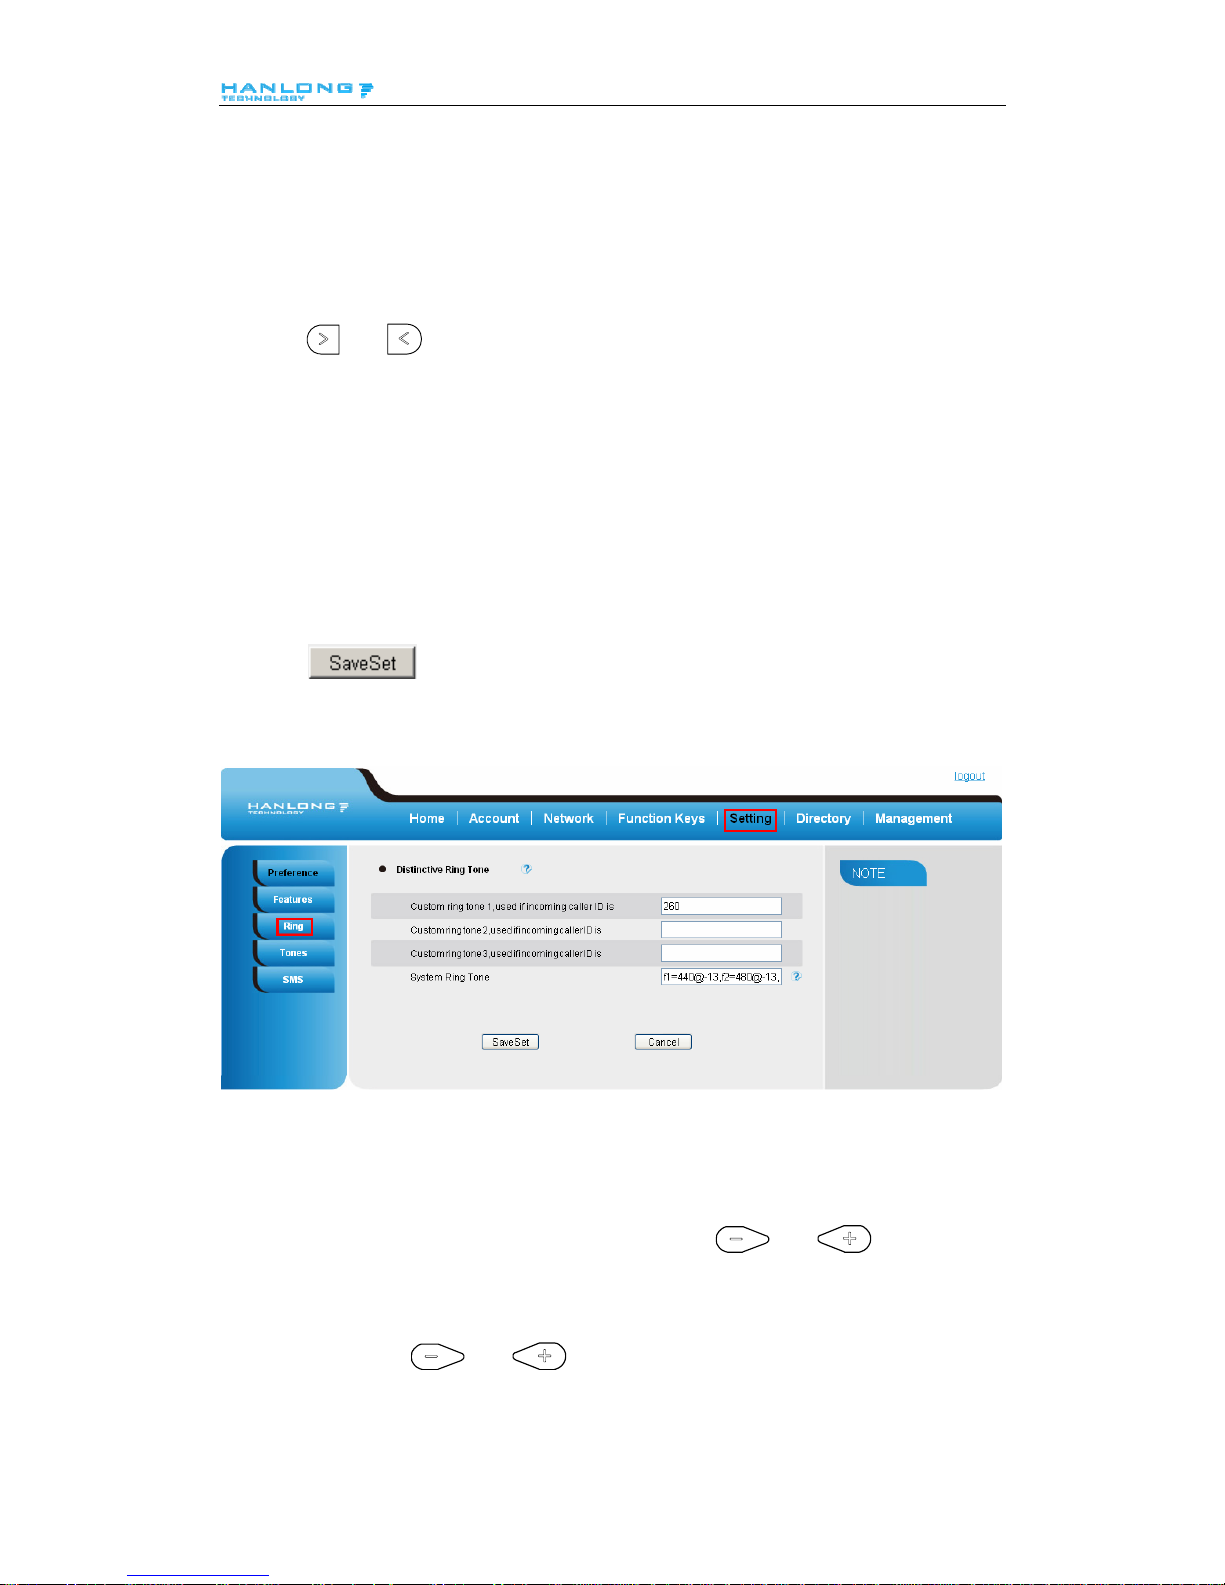
To configure Distinctive Ring Tone via Web Interface
1. Setting → Ring
2. Fill the Caller ID for each Ring Tone
3. Click
to save the configuration.
Volume
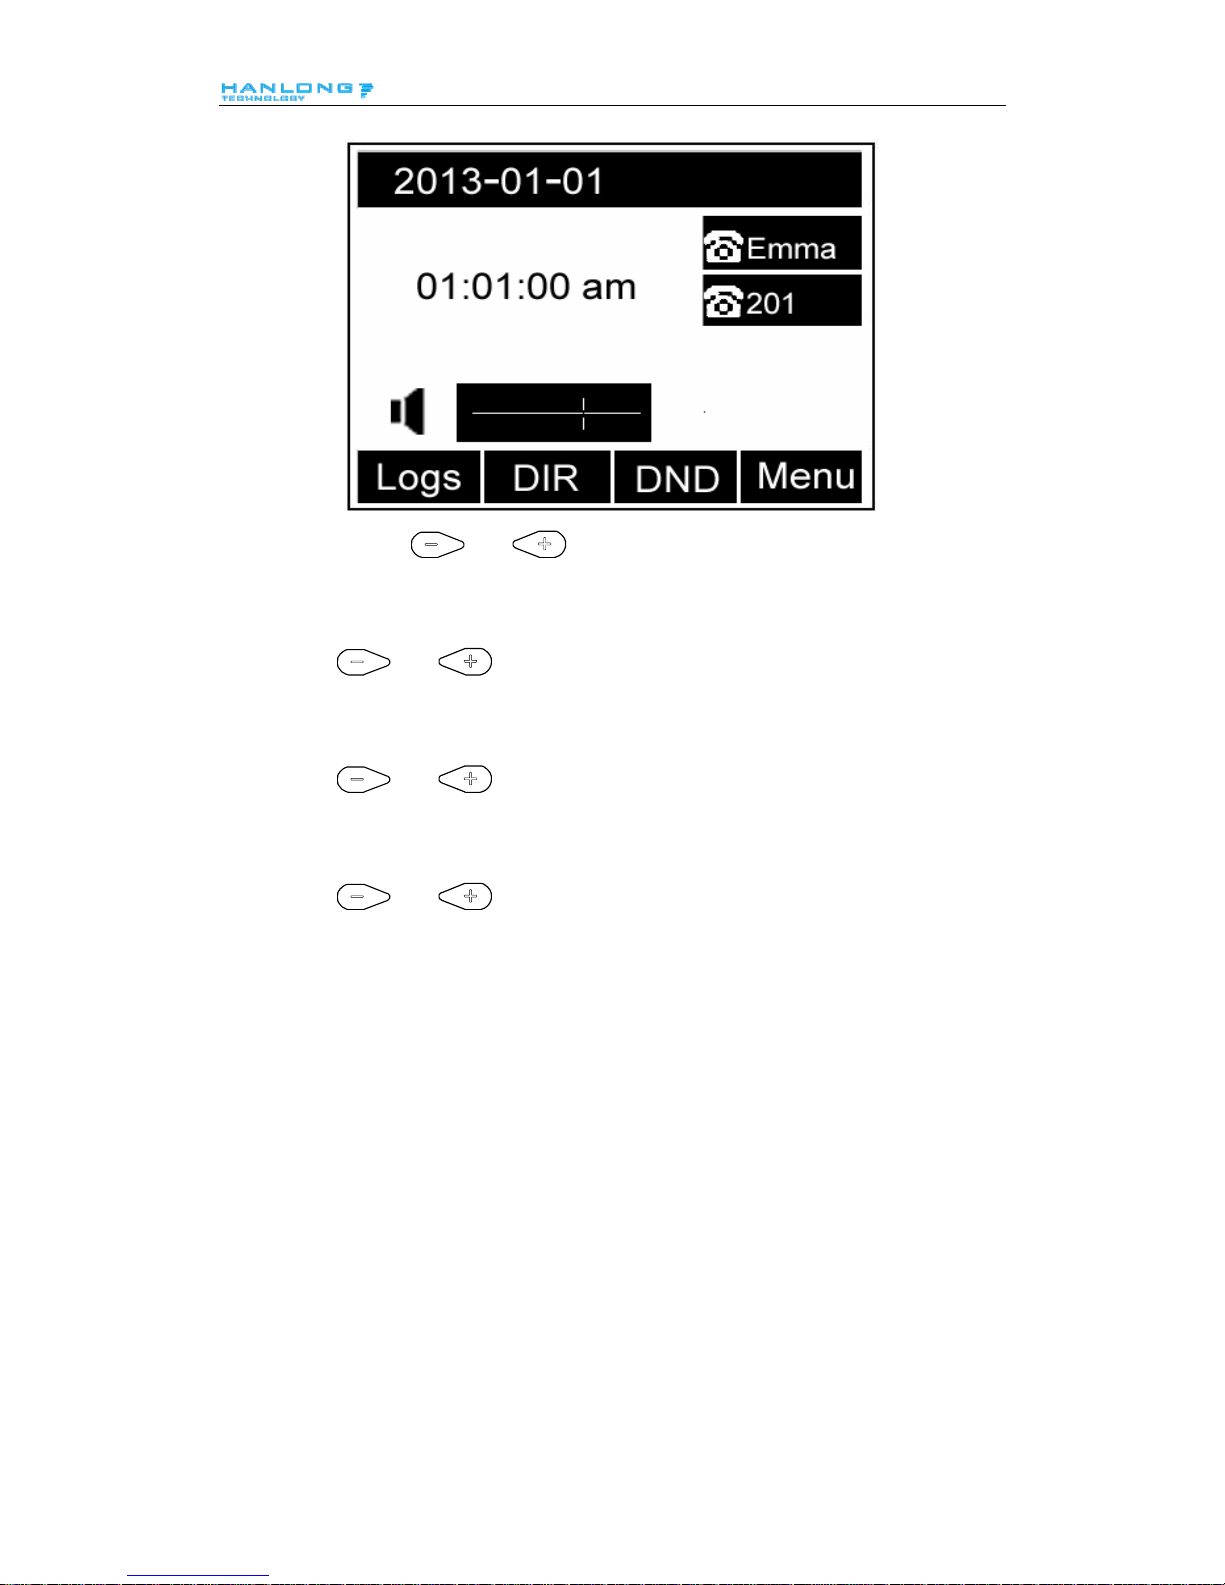
You can adjust the volume for the phone by the volume keys: and .
To adjust the Ring tone volume
1. Option 1: To press
and on the idle page
2
5
Page 27
Basic Features Configuration
2. Option 2: To press
and during the call is ringing.
To adjust the handset volume
T o press
and during a call in handset mode.
To adjust the headset volume
T o press
and during a call in headset mode.
To adjust the speaker Volume
T o press
and during a call in speaker mode.
Directory
In the directory, you can add or delete your friends, business partner or anyone others’ phone No.
so you will not forget their number. Or put some anonymous phone No. in the blacklist to prevent
from being disturbed.
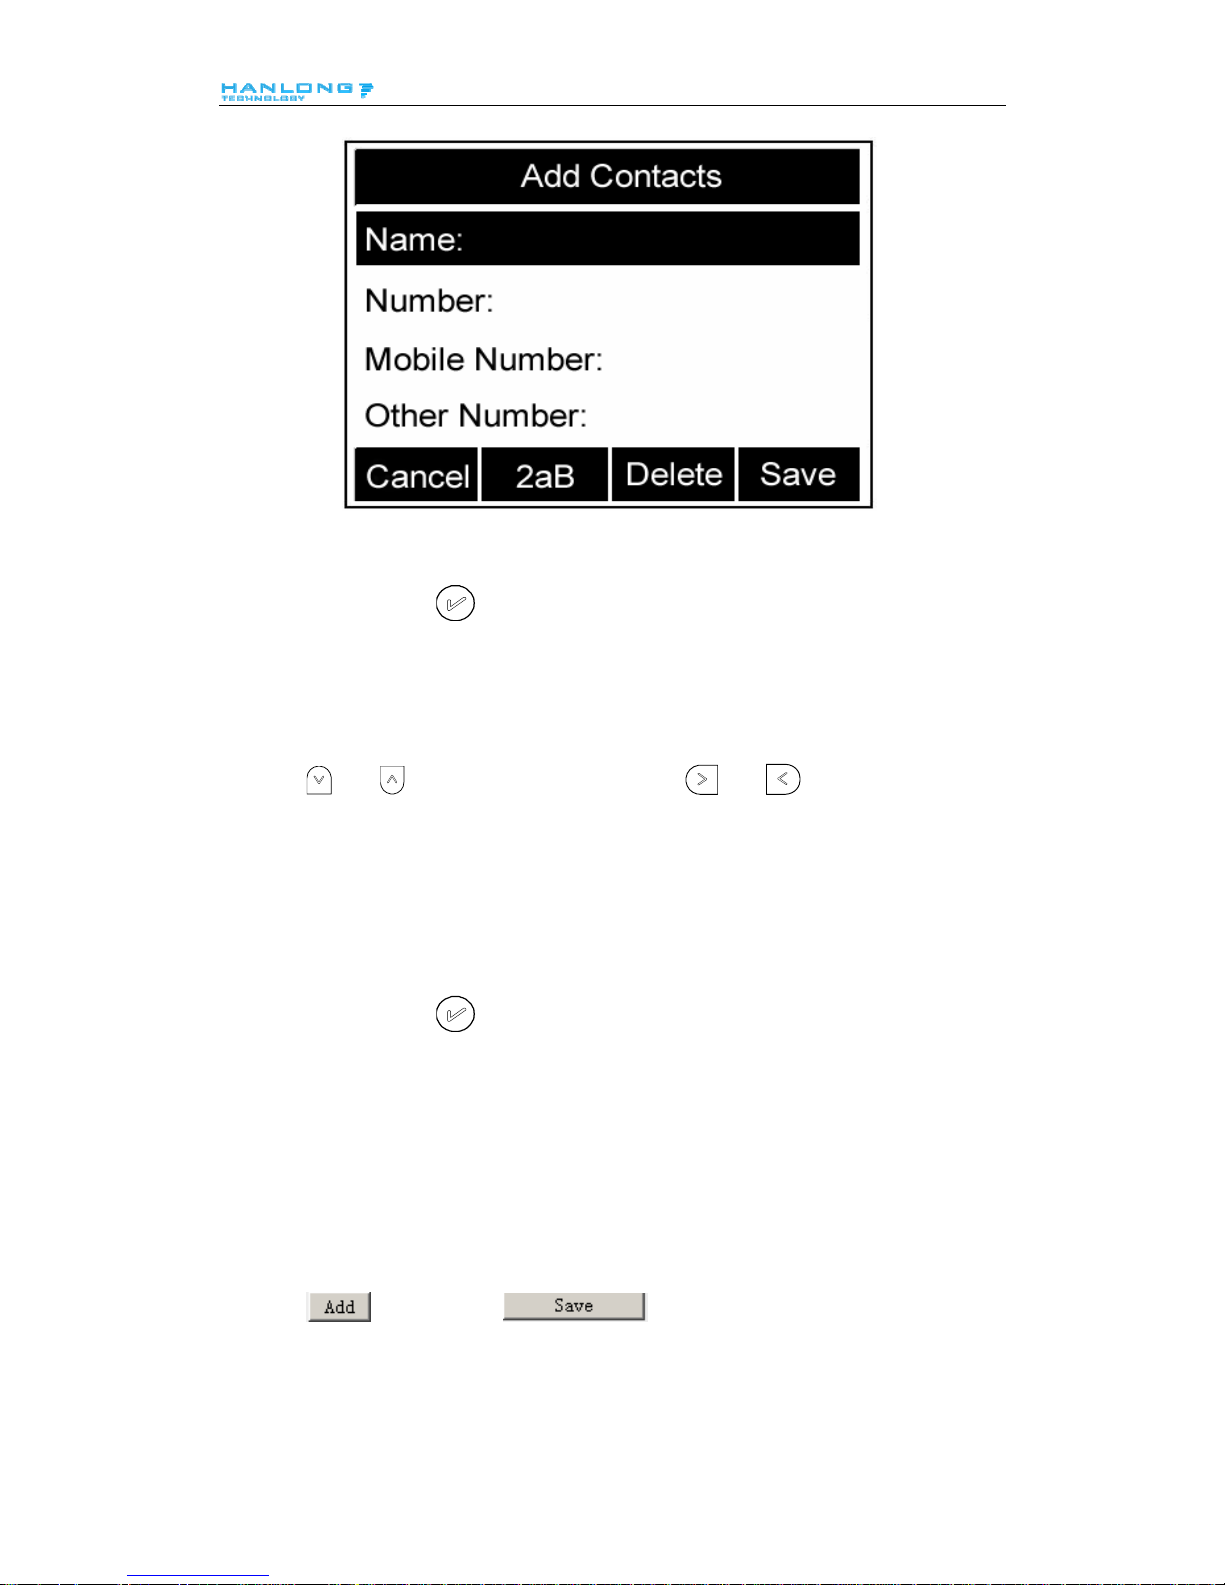
A. To add contacts list into local directory
To add contacts manually
1. Press Menu → DIR
2. Press Add soft key
2
6
Page 28
Basic Features Configuration
.
3. Enter the necessary information as Name, Phone number…
4. Press save soft key or
to add the contacts successfully.
To add contacts from Logs
1. Press History soft key or press Menu → Logs → Local history
2. Press
and to select the targeted one. (Press and switched among the All
calls, Dialed calls, Received calls, Missed Calls and Forward Calls).
3. Press Option soft key → Add to Contacts
4. Edit the necessary information as Name, Phone number…
5. Press save soft key or
to add the contacts successfully.
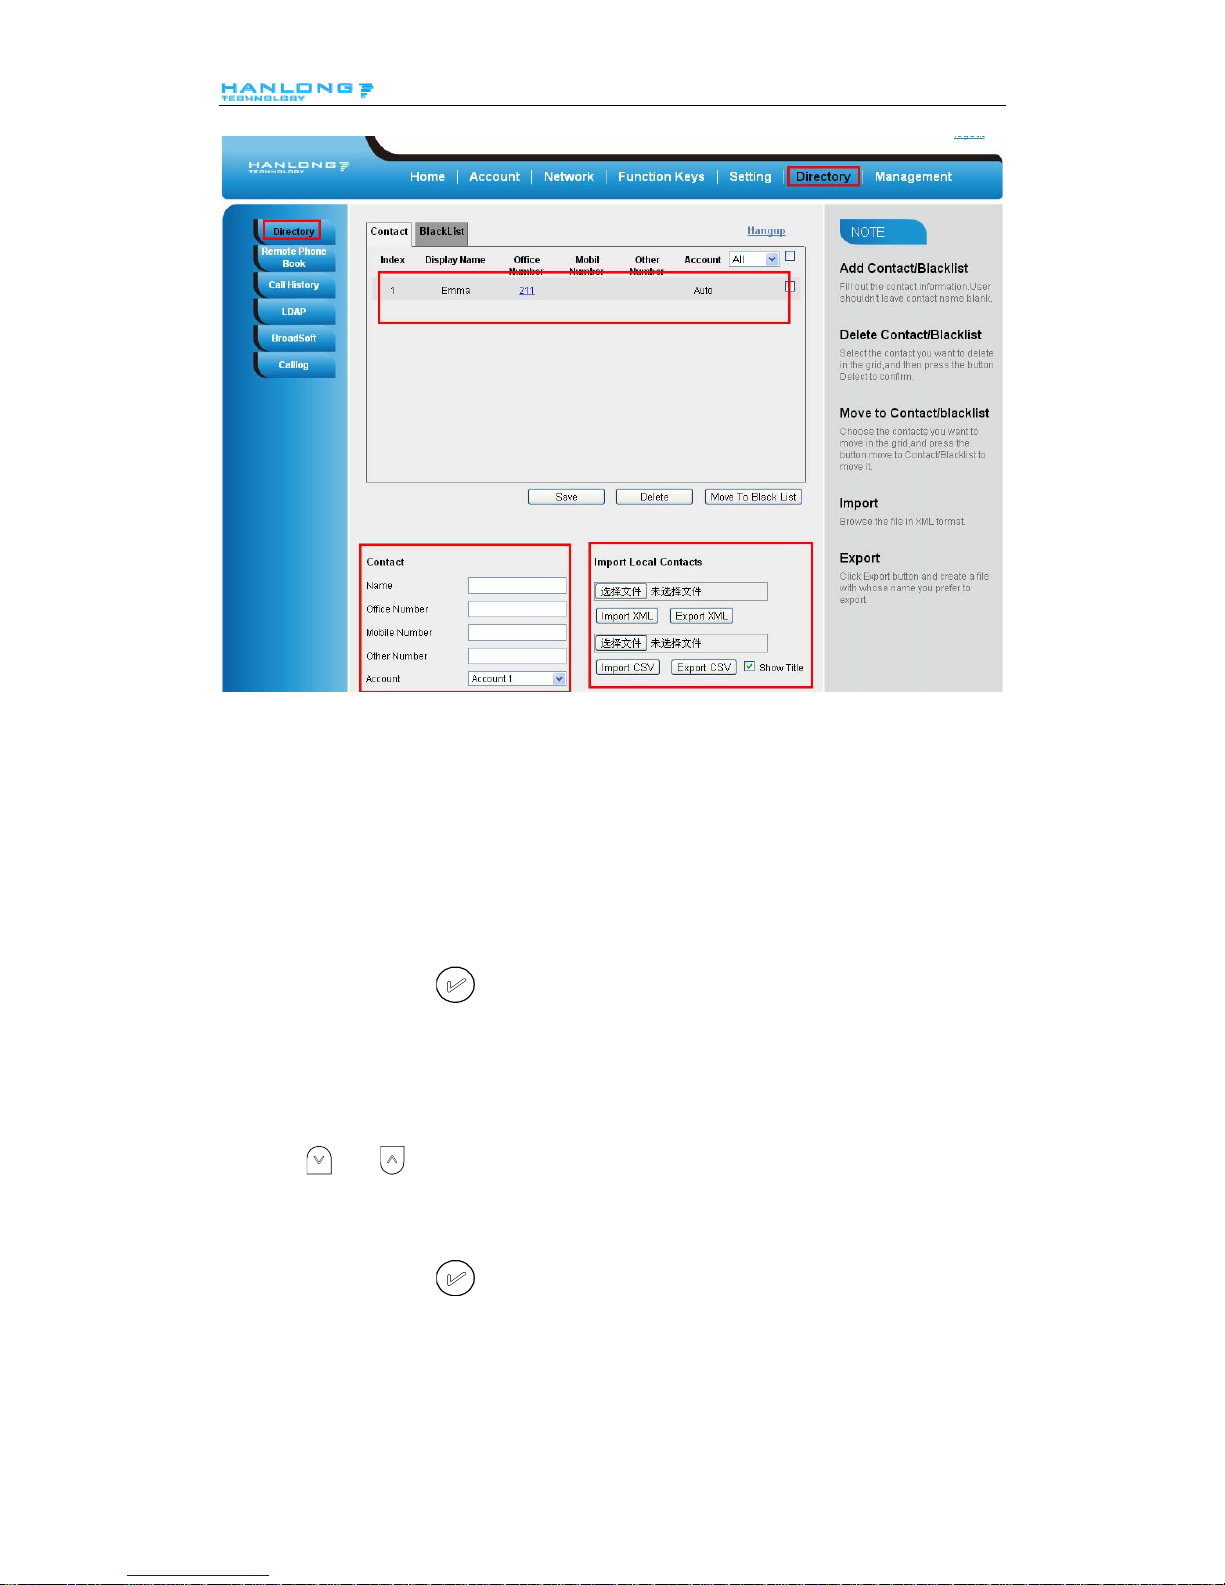
To add contacts via web interface
1. Click Directory
2. Enter the name, number and some other information.
3. Press
and then press button.
2
7
Page 29
Basic Features Configuration
B: To add contacts into blacklist
To add blacklist manually
1. Press Menu → Directory → Blacklist
2. Press Add soft key.
3. Enter the necessary information as Name, Phone number…
4. Press save soft key or
to add the contacts successfully.
To add blacklist from history
1. Press History soft key or press Menu → History → Local history
2. Press
and to select the targeted one.
3. Press Option soft key → Add to Blacklist
4. Edit the necessary information as Name, Phone number…
5. Press save soft key or
to add successfully.
2
8
Page 30

Basic Call Features
Basic Call Features
Place a Call
There are three ways to dialing a call: Handset, Headset and Hands-free speakerphone.
To place a call by Handset
1. Pick up the handset, or press a line key and dial the necessary number.
2. Press
or press the send softkey, then the call is sending.
To place a call by Headset:
1. Press the
( light is Green),
2. Enter the desired number.
3. Press
or press the Send softkey, then the call is sending.
Placing a call by hands-free speakerphone
1. Press the
, or press the Line key, then you can hear the dial tone.
2. Press the number.
3. Press
or press the Send soft key, then the call is sending.
To place a call by call history or Directory
1. Press the History soft key (On the idle page) or Menu → History /Directory
2. Press and to select the targeted one.
3. Press Send soft key to make the call.
Note:
1. The key is set to be a send key. You can set the * key as send key or set some other to
be as send keys. For more information, refer to the Key as Send on page
2. During the call, you can also change among Headset, Handset or Free-speaker mode.
2
9
Page 31

Basic Call Features
End a Call
Here shows to end a call during three mode:
To end a call by Handset
1. Press the Cancel soft key or hang up the handset.
To end a call under Headset Mode
1. Press the Cancel soft key or press
.
To end a call under hands-free speakerphone Mode
1. Press the Cancel soft key or press
.
Note:
1. During the conference, to end the call is same as mentioned above.
Redial a Call
To redial the last placed call from the IP Phone
Press
directly when LCD is on the idle interface.
Receive a Call
There are three ways to receive a call when the phone is ringing:
To receive a call by handset
Pick up the handset the conversation is built.
To receive a call by headset
Press
and now the conversation is built.
To receive a call by hands-free speaker
3
0
1. O
ption 1: Press
directly.
Page 32

Basic Call Features
2. Option 2: Press Answer soft key.
3. Option 3: Press the Line key (flashes red).
Moreover, some other action can be done by soft key when the call is coming.
1. To press the Reject soft key to reject the call. Or press
to reject the current call.
2. To press Forward to forward to another phone.
3. To press Silence soft key, and then the call will keep silent, no ring tone display.
Call Hold
When use hold feature, the Hold icon will show on the display.
To make a call on hold during three modes:
To hold a call under handset mode:
1. Press Hold soft key or
to hold the current call.
2. Press Resume soft key or
to resume the call on hold.
To hold a call under headset mode:
1. Press Hold soft key or
to hold the current call.
2. Press Resume soft key or
to resume the call on hold.
To hold a call during the speaker mode:
1. Press Hold soft key or
to hold the current call.
2. Press Resume soft key or
to resume the call on hold.
3
1
Page 33

Basic Call Features
Call Transfer
This phone supports blind, attended and Semi-Attended Transfer.
Blind T ransfer
When you use this feature, you can transfer
1. Press
or Transfer soft key during the conversation, the call is on hold now.
2. Enter the number that transfers to.
3. Press
, and now the blind transfer completed.
NOTE:
The “Enable Call Feature” must be configured to “Yes” to enable this feature.
Attended T ransfer
When you use this feature, you can
1. Press
or transfer soft key during the conversation, the call is on hold now.
2. Enter the number that transfer to, and press the send soft key or
.
3. Start the second conversation, press
or transfer soft key, then, transfer completed.
NOTE:
To transfer calls across SIP domains, SIP service providers must support transfer across SIP
domains. Blind transfer will usually use the primary account SIP profile. To use this function,
should at least one line key set as Auto.
Semi-Attended Transfer
1. Press
or transfer soft key during the conversation, the call is on hold now.
2. Enter the number transfer to, and then press
, then you can here the ring tone.
3. Press
or the Tran soft key, and now the Semi-attended transfer completed.
3
2
Page 34

Basic Call Features
NOTE: To use this function, should at least one line key set as Auto.
BLF Transfer
1. Set a Programmable Key or line key is set as BLF. For how to set BLF, please refer to BLF
2. Press
or transfer soft key during the conversation, the call is on hold now.
3. Press BLF key then realize blind, attended and Semi-Attended Transfer.
Call Conference
This IP Phone supports up to 5-way conference.
5-way conference
1. Assuming that call party A and B are in conversation. A wants to bring C, D and E in a
conference
2. A press line 2 key, the call is placed on hold.
3. A enter the number of C and then press send soft key or
.
4. C answering the call.
5. A press
or the conference soft key, then A, B and C are now in a conference.(and now
this is 3-way conference)
6. A press line 3 key, the current 3-way conference is placed on hold.
7. A enter the number of D and then press send soft key or
.
8. D answering the call.
9. A press
or the conference soft key, then A, B, C and D are now in a conference.(and
now this is 4-way conference)
10. A press line 4 key, the call is placed on hold.
11. A enter the number of E and then press send soft key or
.
12. E answering the call.
3
3
Page 35

Basic Call Features
13. A press or the conference soft key, then A, B, C, D and E are now the 5-way conference
is built.
14. A end the call, the conference i s finished.
Note:
1. If C does not answer the call, A can back to continue the conversation with B;
2. Once A hangs up the call, the conference is ended, while if B or C drops the call, A&C or A&B
conversation continues.
3. The conference feature is not available on all servers. For more information, contact your
system administrator.
4. To realize the 5 way conference, the line should be all available.
5. Press to get all parties information.
Call Forward
This phone supports static forward (always forward, busy forward and no answer forward) and
dynamic forward
To configure static forward
To configure always forward
With this feature, all incoming calls will forward immediately to configured number.
1. Press Menu → Features → Call forward →Always Forward.
2. Press
and or press to select the enable choice
3. Enter the forward to number and on code (optional), off code (optional).
4. Press
or Save soft key to save the configuration.
To configure busy forward
With this feature, the incoming calls are immediately forwarded if the phone is busy.
1. Press Menu →Features → Call forward →Busy forward.
3
4
Page 36

Basic Call Features
2. Press and or press to select the enable choice.
3. Enter the forward to number and on code (optional), off code (optional).
4. Press
or Save soft key to save the configuration.
To configure no answer forward
No Answer Forward: Incoming calls are forwarded if not answered after some time.
1. Press Menu →Features → Call forward →No answer forward.
2. Press
and or press to select the enable choice
3. Enter the forward to number and on code (optional), off code (optional).
4. Press
or Save soft key to save the configuration.
When the Forward feature is enabled, the Forward Icon will display on Top of the LCD.
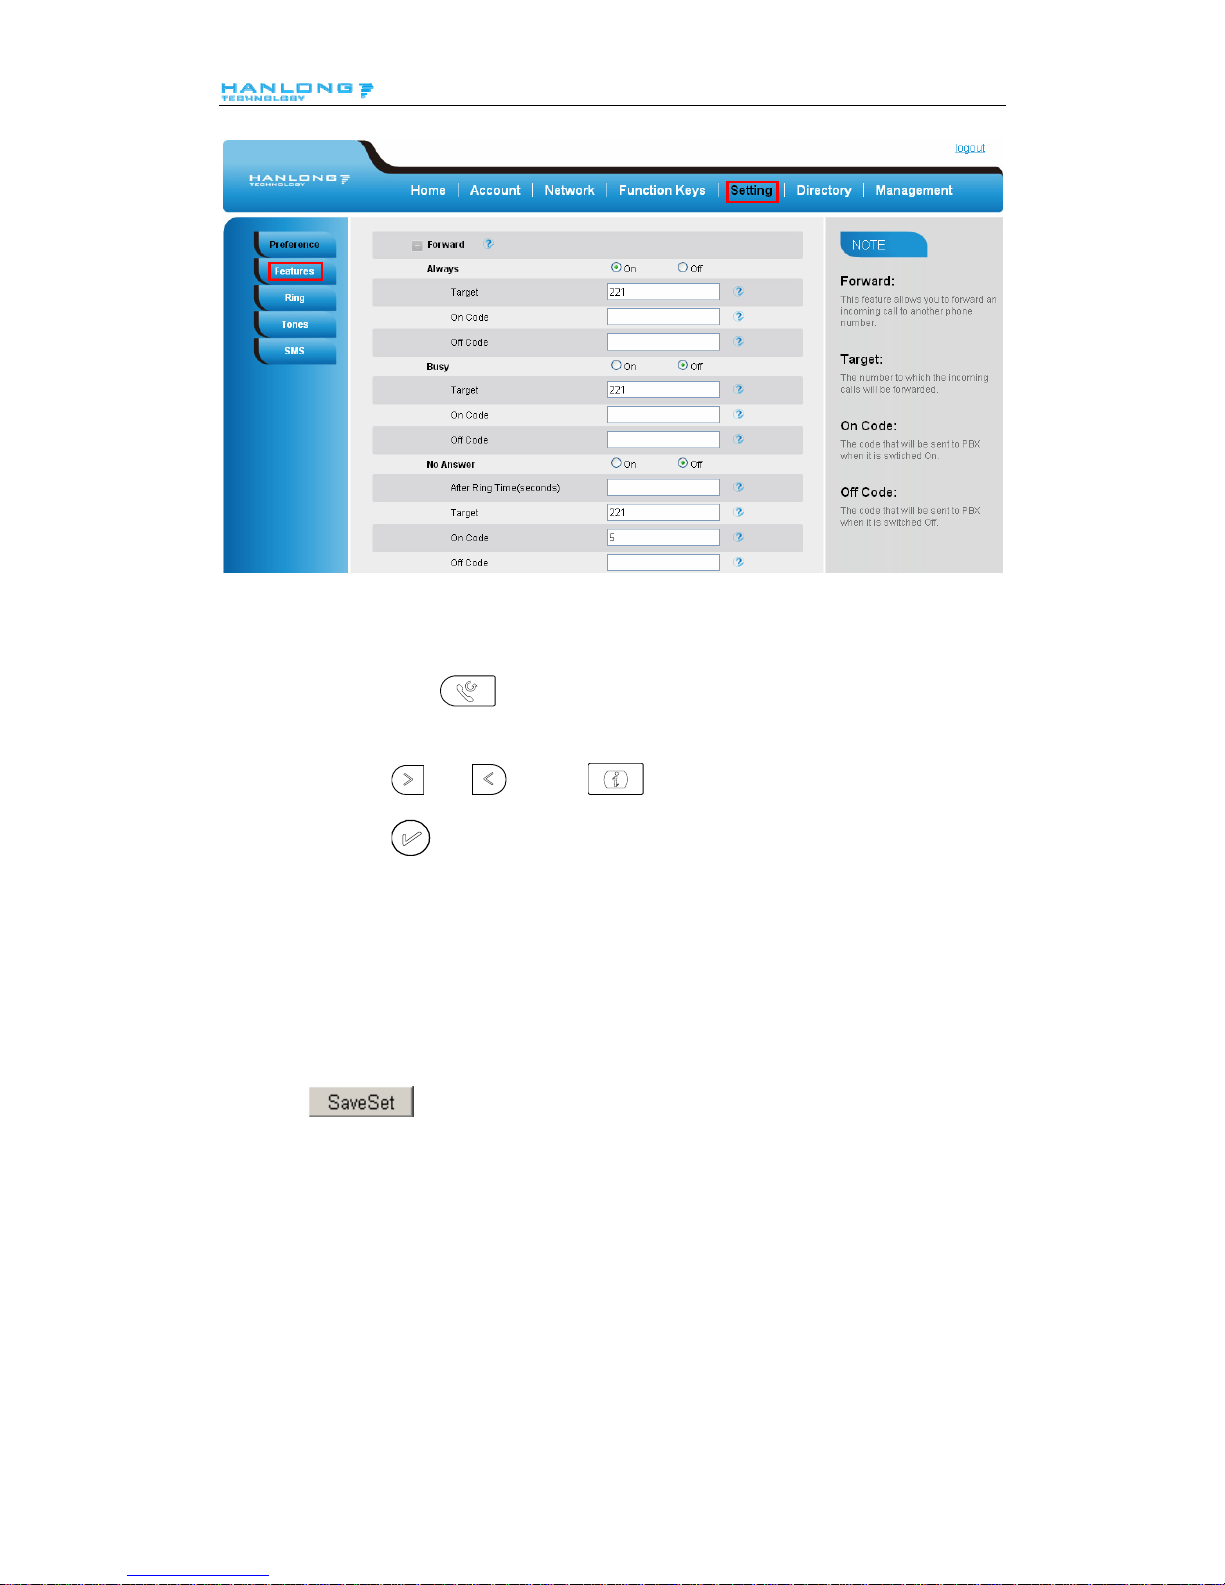
To configure Forward via Web Interface
1. Setting → Features
2. Click On for the Always/Busy/No Answer
3. Fill the Forward to Number
4. (Optional) fill the on/off code
5. Click
to save the configuration
3
5
Page 37
Basic Call Features
To cancel the forward feature via Phone Interface
1. Option 1: To press the
key to disable the forward feature.
2. Option 2: Press Menu →Features → Call forward→Always/Busy/No answer Forward
Press
and or press to select the disable choice
Press
or Save soft key to save the configuration.
To cancel the forward feature via Web Interface
1. Setting → Features
2. Click Off for the Always/Busy/No Answer
3. Click
to save the configuration
To configure dynamic forward
Forward an incoming call during the ringing.
1. When the phone is ringing, press Forward soft key.
2. Enter the forward number.
3
6
Page 38

Basic Call Features
3. Press or press the send soft key, then the call is forwarded.
Note:
If the Programmable Key or line key is set as BLF, when an incoming call ringing, press this BLF
key directly to realize the dynamic forward.
Hide Caller ID
Just enable the anonymous call feature, you can set your ID do not appear on the other phone that
you called.
To configure anonymous call
1. Press Menu →Features →Anonymous Call
2. Press
and or press to change the Line ID
3. Press
and or press to select the enable choice in Anonymous Call filed.
4. Enter the call on code (optional), call off code (optional) .
5. Press
or Save soft key to save the configuration.
To cancel anonymous call feature
1. Press Menu →Features →Anonymous Call
2. Press
and or press key to select the disable choice in Anonymous Call
filed.
3. Press
or Save soft key to save the configuration.
Reject Anonymous
If you do not want to be disturb by anonymous calls, you can set the reject anonymous call
features, so you will not hear the unknown calls
3
7
Page 39

Basic Call Features
To configure rejecting anonymous call
1. Press Menu →Features →Anonymous Call
2. Press
and or press key to change the Line ID
3. Press
and or press key to select the enable choice in Rejection filed.
4. Press
or Save soft key to save the configuration
To cancel rejecting anonymous call
1. Press Menu →Features →Anonymous Call
2. Press and or press key to select the disable choice in Rejection filed.
3. Press
or Save soft key to save the configuration.
Call Waiting
To configure call waiting
1. Press Menu →Features →.Call Waiting
2. Press
and or press key to select the enable choice.
3. Press
or Save soft key to save the configuration
To cancel call waiting
1. Press Menu →Features →.Call waiting
2. Press
and or press key to select the disable choice.
3
8
Page 40

Basic Call Features
3. Press or Save soft key to save the configuration
Call Mute
When you use the Mute feature, the other parties will not hear your voice while you can hear their
voice. Call mute applies to all modes (handset, headset, and speakerphone).
To mute the call during a call (including a conference call)
1. Press the mute key
, then the mute key glows green, and the LCD display Mute Icon.
2. To disable the mute function, press
again.
DND
When you use the DND feature, the phone is to reject all incoming calls automatically and you
can see the DND icon shown on the Top of the LCD on idle page.
To enable DND feature
1. Press the DND soft key when the phone is idle, and then DND iconshown on the LCD.
To disable DND feature
1. Press the DND soft key again, and then there is no DND icon on the LCD.
Key as Send
To configure Key as Send
1. Press Menu →Features → Key as Send
2. Press
and or press key to select the enable choice.
3
9
Page 41

Basic Call Features
3. Press or Save soft key to save the configuration
To cancel # Key as Send
1. Press Menu →Features → Key as Send
2. Press
and or press key to select the disable choice.
3. Press
or Save soft key to save the configuration
Hot Line
To configure Hot Line
1. Press Menu →Features → Hot Line
2. Enter the Number and delay time (as present, we support off hook auto dial).
3. Press
or Save soft key to save the configuration
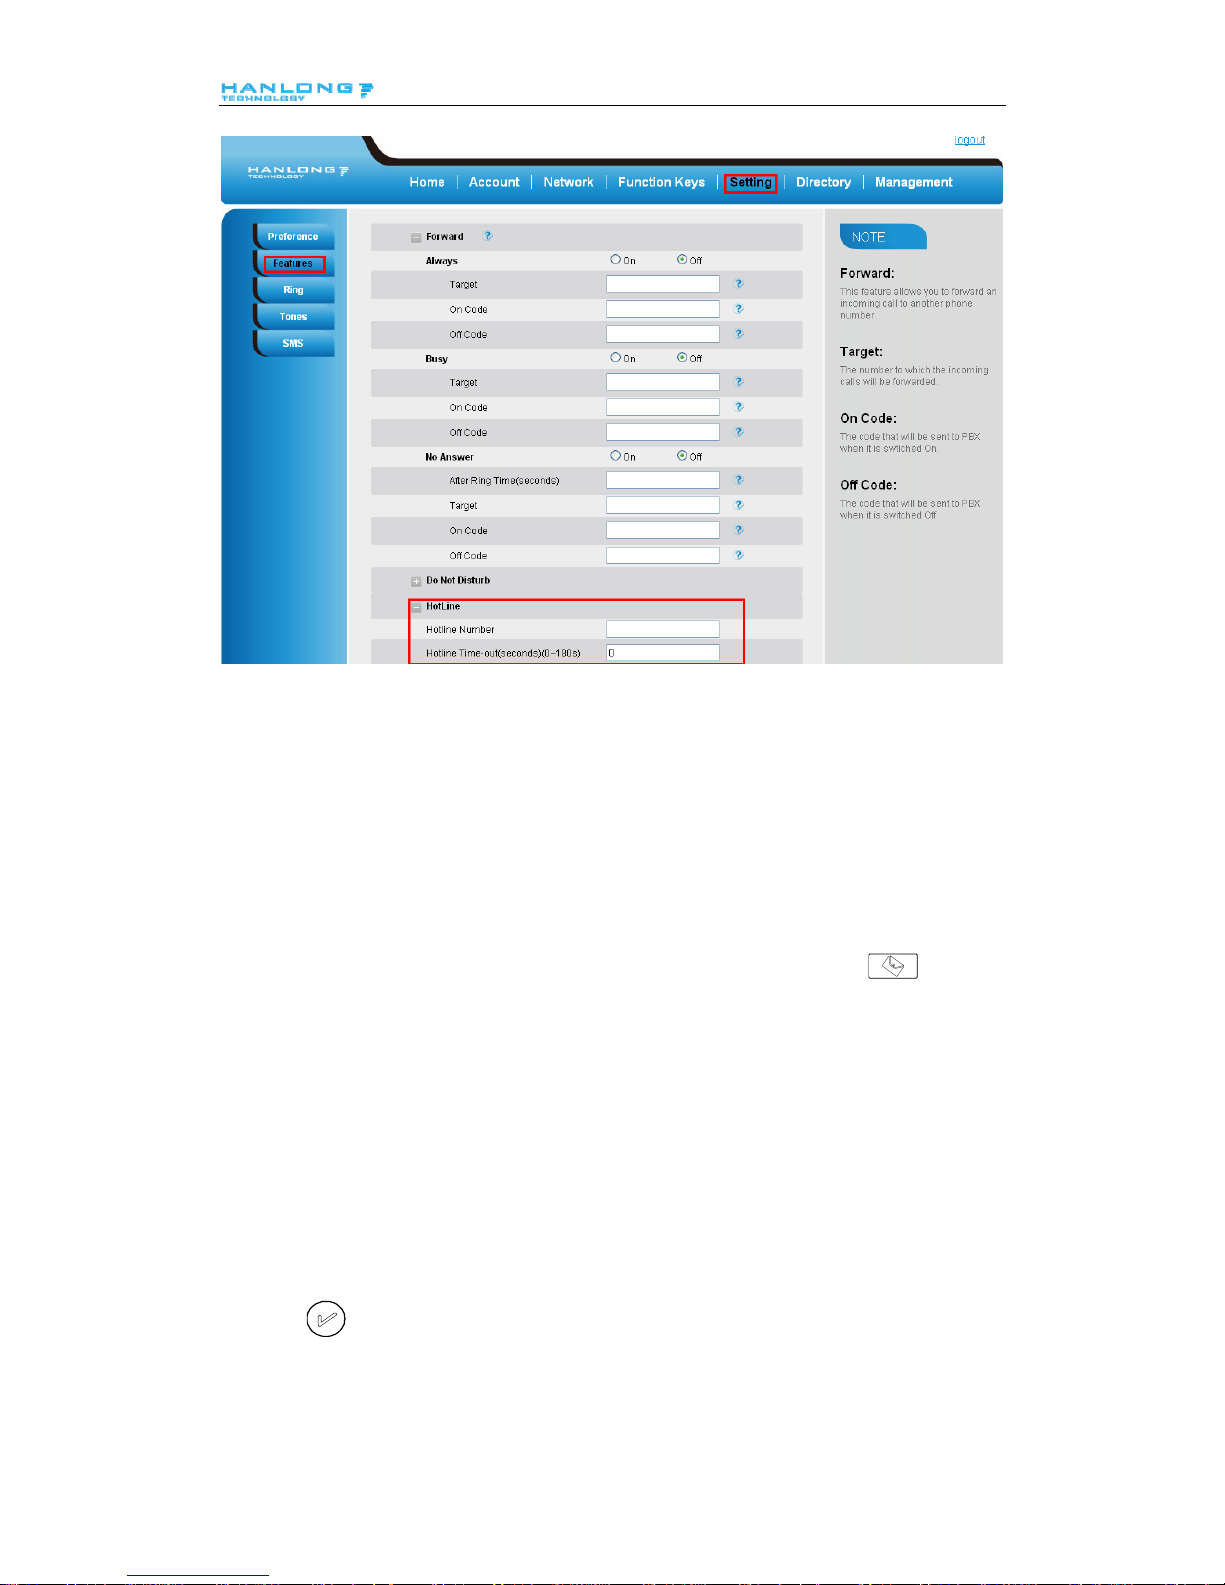
To configure Hotline auto dial via Web Interface
1. Setting → Features.
2. Fill the number in the Hotline Number and Hotline Time-out.
3. Click
to save the configuration.
4
0
Page 42
Advanced Features
Delete the number and save the configuration, and then now the Hotline auto dial is cancelled.
Advanced Features
Voice Message
This phone supports Voicemail, and when there is message, the message will will light
green. Moreover, when pick up the handset, or press speaker key, you will hear some quick busy
tone.
To configure the Voice mail feature
1. Press Menu→Messages→Voice Mail→Set Voice Mail.
2. Enter the Account1/2 /3 /4 N O .
3. Press
or Save soft key to save the configuration
4
1
Page 43

Advanced Features
Note:
This feature is not available on all servers. For more information, contact your system
administrator.
Intercom
When use the intercom feature, you can quickly get access connect to the configured one.
To configure intercom feature via phone interface
1. Press Menu →Features → Function Keys→Line or Memory keys as Function Keys →
Memory key1(for example)
2. Press
and or press key to select the intercom in the type field.
3. Enter the targeted Number.
4. Press
or Save soft key to save the configuration
Then the selected Line or Memory key will work as intercom.
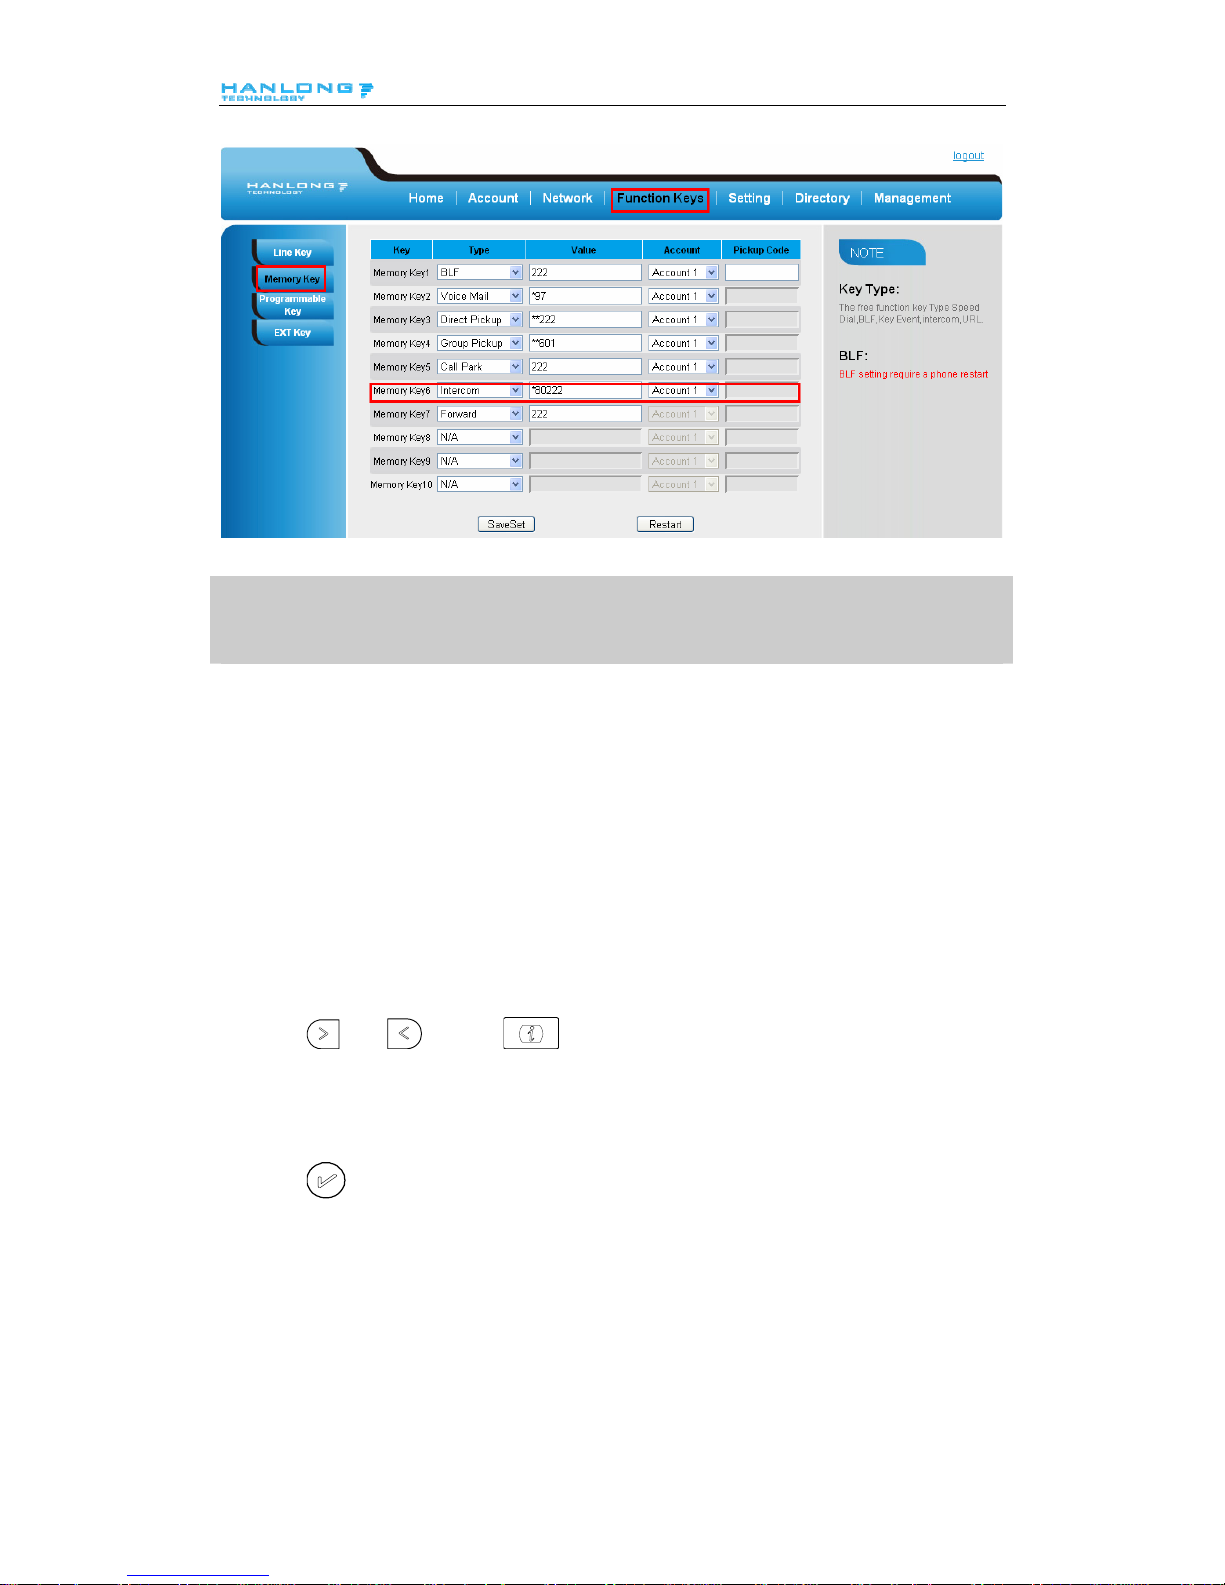
To configure Intercom feature via Web Interface
1. Click Function keys → Line or Memory key.
2. Select the wanted Line or Memory key.
3. Enter the desired phone number in the Value field.
4. Select the Account ID
5. Click the
to save the configuration.
4
2
Page 44
Advanced Features
Note:
This feature is not available on all servers. For more information, contact your system
administrator.
Speed Dial
With this feature, you can dial one directory by press the definite key.
To configure Speed Dial feature via phone interface
1. Press Menu →Features → Function Keys→Line or Memory keys as Function Keys →
Memory key1(for example)
2. Press
and or press key to select the Speed Dial in the type field.
3. Enter the targeted Number.
4. Press
or Save soft key to save the configuration
Then the selected Line or Memory key will work as Speed Dial.
To configure Speed Dial feature via Web Interface
1. Click Function keys → Line or Memory key.
4
3
Page 45

Advanced Features
2. Select the wanted Line or Memory key and set as Speed Dial.
3. Enter the desired phone number in the Value field.
4. Select the Account ID
5. Click the
to save the configuration.
Direct Pickup
With this feature, you can pick up the set line when it ringing.
To configure Direct Pickup feature via phone interface
1. Press Menu →Features → Function Keys→Line or Memory keys as Function Keys →
Memory key1(for example)
2. Press
and or press key to select the Speed Dial in the type field.
3. Enter the value.
4. Press
or Save soft key to save the configuration
Then the selected Line or Memory key will work as Direct Pickup.
To configure Direct Pickup feature via Web Interface
1. Click Function keys → Line or Memory key.
2. Select the wanted Line or Memory key and set as Direct Pickup.
3. Enter the pickup code and followed the desired phone number in the Value field.
4. Select the Account ID
5. Click the
to save the configuration.
4
4
Page 46

Advanced Features
Group Pickup
With this feature, you can pick up the specified group that you want incoming calls.
To configure the Pick up via phone interface
1. Press Menu →Features → Function Keys→Line or Memory keys as Function Keys →
Memory key1(for example)
2. Select the wanted Line or Memory key.
3. Press
and or press key to select the Group Pickup in the type field.
4. Enter pickup code and followed the desired group number
5. Press
or Save soft key to save the configuration
To configure the Group Pick up via Web interface
1. Click Function keys → Line or Memory key.
2. Select the desired Line or Memory key and select Group Pickup in the Type.
3. Enter the pickup code and followed the desired Group number in the Value field.
4. Click the
to save the configuration.
BLF
You can use the BLF (Busy Lamp Field) feature to monitor a specific one whether his phone is
busy or free.
1. When the monitored line is idle, the light is steady green.
2. When the monitored line is ringing, the light is blinking red, press the BLF key to pick the
phone up directly.
3. When the monitored line is calling or in a conversation, the light is steady red.
To configure a BLF key by phone
4
5
Page 47
Advanced Features
1. Press Menu →Features → Function Keys→Line or Memory keys as Function Keys →
Memory key1(for example).
2. Select the targeted Line or Memory key.
3. Press
and or press key to select the BLF in the type field.
4. Enter the targeted Value Number.
5. Press
and or press key to select the Account ID.
6. Enter the Pickup Code.
7. Press
or Save soft key to save the configuration
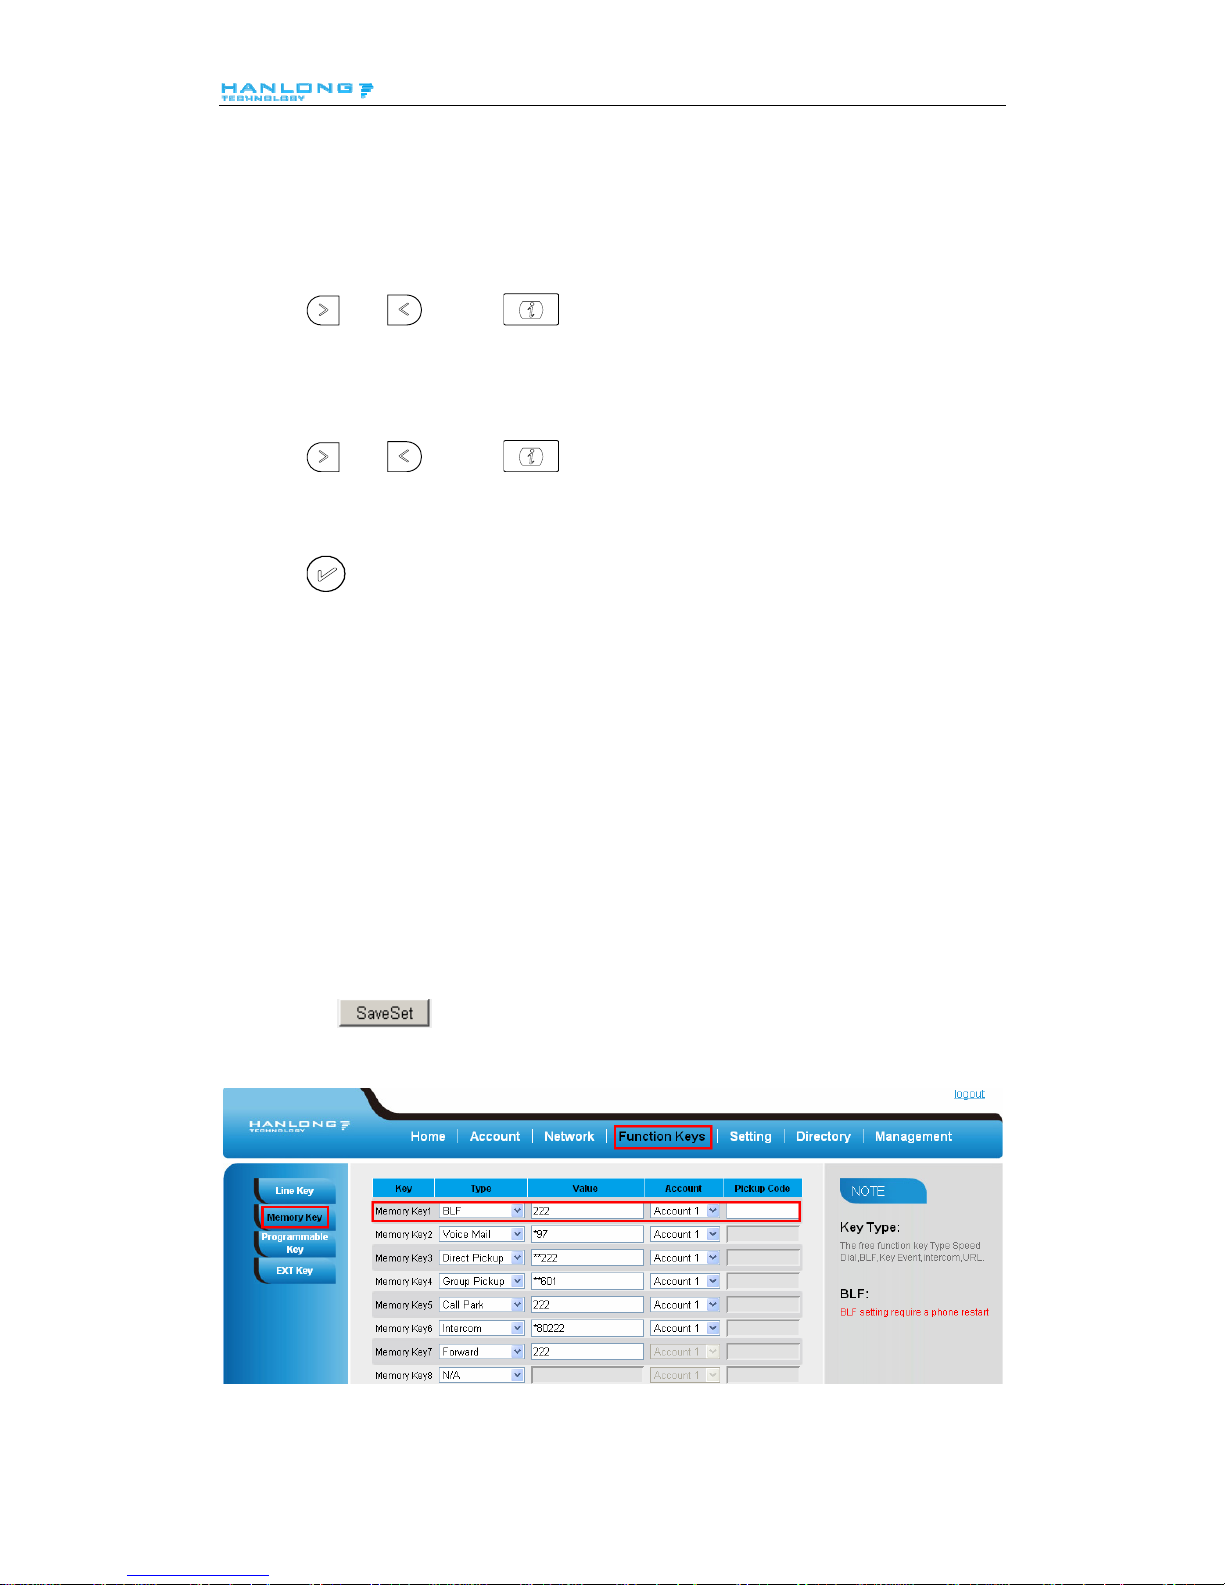
To configure a BLF key by web
1. Click Function keys → Line or Memory key.
2. Select the desired Line or Memory key and select BLF in the Type.
3. Enter the monitored phone number in the Value field.
4. Select the Account ID
5. Filled the Pickup code.
6. Click the
to save the configuration and then restart.
4
6
Page 48

Advanced Features
Note:
This feature is not available on all servers. For more information, contact your system
administrator.
Shared Line
This feature allows subscribers to share SIP lines. Moreover it also provides status monitoring of
the shared line.
To configure the line key as shared line via phone interface
1. Press Menu →Features → Function Keys→Line or Memory keys as Function Keys →
Memory key1(for example)
2. Select the wanted Line or Memory key.
3. Press
and or press key to select the Shared Line in the type field.
4. Press
and or press key to select the Account ID.
5. Enter the Label
6. Enter the Value
7. Press
or Save soft key to save the configuration
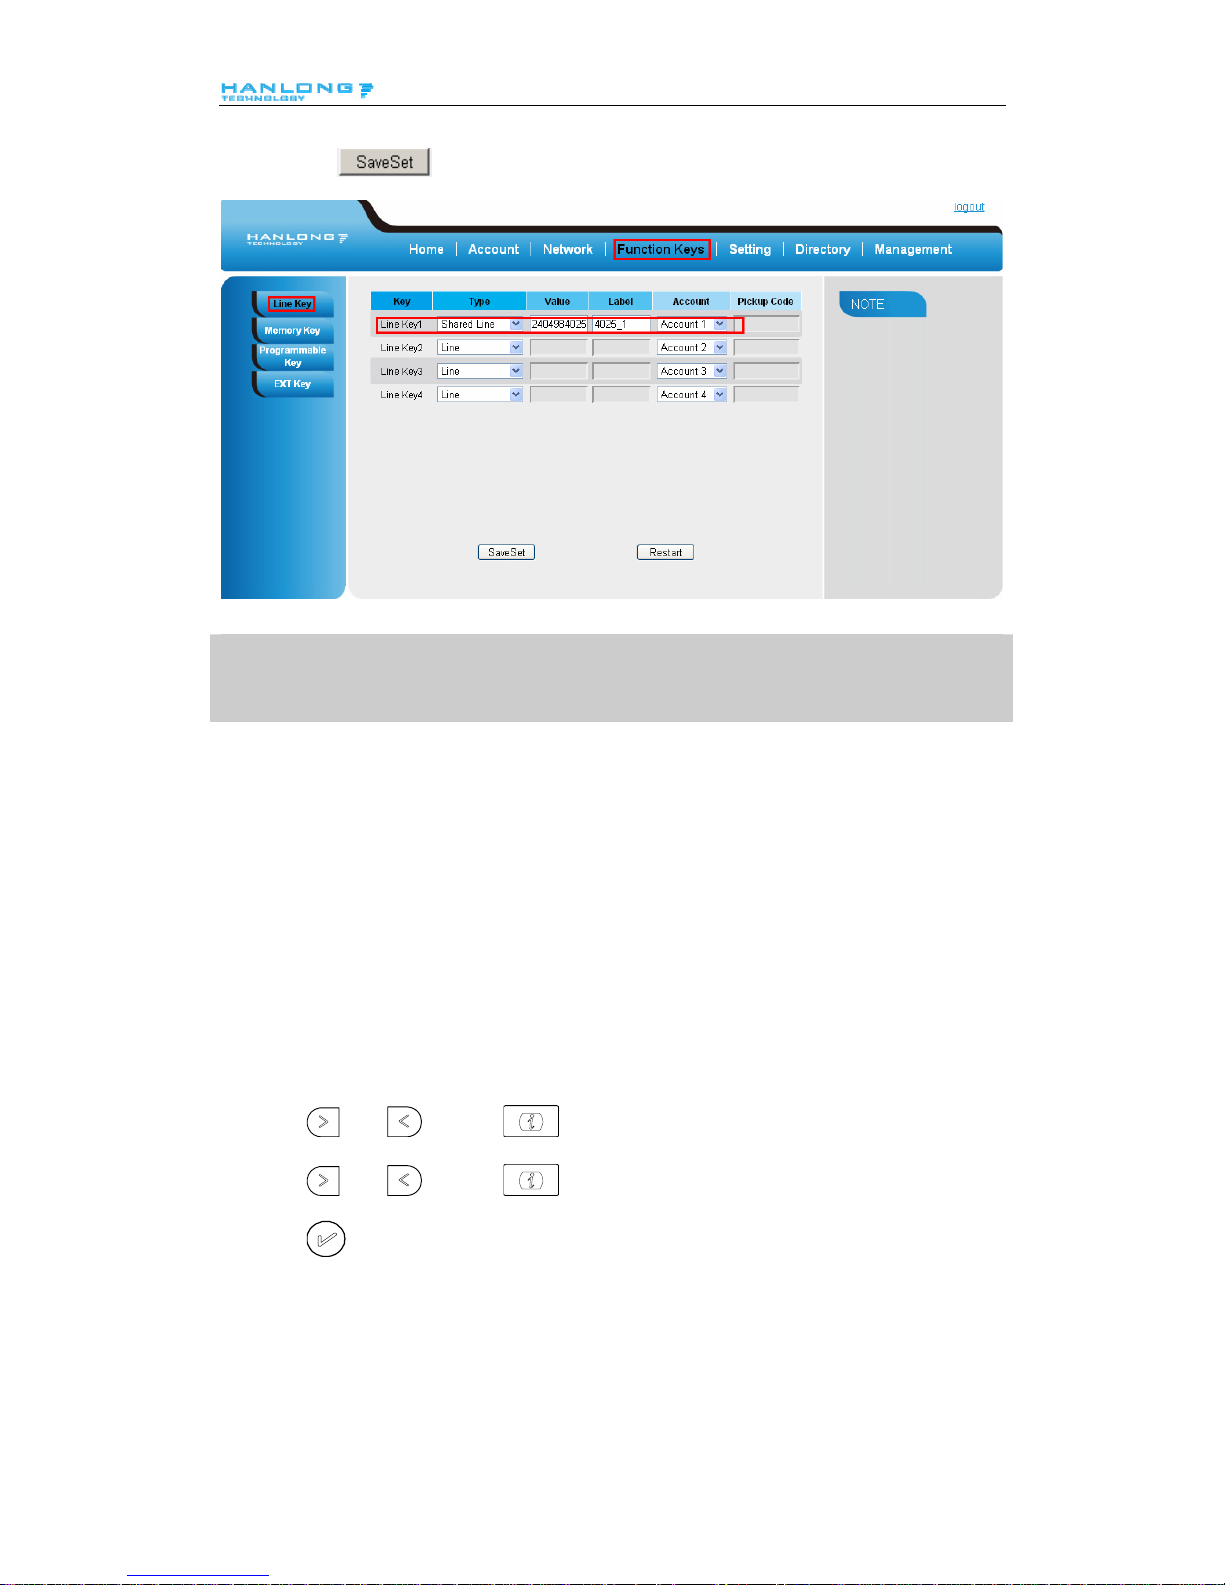
To configure the line key as shared line via Web Interface
1. Click Function keys → Line or Memory key.
2. Select the desired Line or Memory key and select Shared Line in the Type.
3. Enter the Value.
4. Enter the Label.
5. Select the Account ID
4
7
Page 49
Advanced Features
6. Click the to save the configuration and then restart.
Note:
This feature is not available on all servers. For more information, contact your system
administrator.
Record
With record feature, you can record calls by pressing a record key on the phone.
To configure the record via phone interface
1. Press Menu →Features → Function Keys→Line or Memory keys as Function Keys →
Memory key1(for example)
2. Select the wanted Line or Memory key.
3. Press
and or press key to select the Key Event in the type field.
4. Press
and or press key to select the Record.
5. Press
or Save soft key to save the configuration
To configure the record via Web Interface
1. Click Function keys → Line or Memory key.
4
8
Page 50
Advanced Features
2. Select the desired Line or Memory key and select Record in the Type.
3. Click the
to save the configuration.
Note:
Please contact the system administrator whether support this feature or not.
Call Return
This feature allows you to dial the last phone call you received.
To configure the Call Return via phone interface
1. Press Menu →Features → Function Keys→Line or Memory keys as Function Keys →
Memory key1(for example)
2. Select the wanted Line or Memory key.
3. Press
and or press key to select the Key Event in the type field.
4. Press
and or press key to select the Call Return.
5. Press
or Save soft key to save the configuration
To configure the Call Return via Web interface
1. Click Function keys → Line or Memory key.
2. Select the desired Line or Memory key and select Call Return in the Type.
3. Click the
to save the configuration.
Call Park
With this feature, you can put a call on hold and continue the conversation from another phone.
To configure the Call Park via phone interface
4
9
Page 51

Advanced Features
1. Press Menu →Features → Function Keys→Line or Memory keys as Function Keys →
Memory key1(for example)
2. Select the wanted Line or Memory key.
3. Press
and or press Switch soft key to select the Key Event in the type field.
4. Press
and or press Switch soft key to select the Call Park.
5. Press
or Save soft key to save the configuration
To configure the Call Park via Web interface
1. Click Function key → Line or Memory key.
2. Select the desired Line or Memory key and select Direct Pickup in the Type.
3. Click the
to save the configuration.
Paging
With this feature, you can call a phone directly.
To configure the paging via phone interface
1. Press Menu →Features → Function Keys→Line or Memory keys as Function Keys →
Memory key1(for example)
2. Select the wanted Line or Memory key.
3. Press
and or press key to select the Key Event in the type field.
4. Press
and or press key to select the Paging.
5. Press
or Save soft key to save the configuration
5
0
Page 52

Advanced Features
To configure the Paging via Web interface
1. Click Function keys → Line or Memory key.
2. Select the desired Line or Memory key and select Paging in the Type.
3. Click the
to save the configuration.
DTMF
To configure the DTMF via Phone Interface
1. Press Menu →Features → Function Keys→Line or Memory keys as Function Keys →
Memory key1(for example)
2. Select the wanted Line or Memory key.
3. Press
and or press key to select the DTMF in the type field.
4. Enter the value
5. Press
or Save soft key to save the configuration
To configure the DTMF via Web interface
1. Click Function keys → Line or Memory key.
2. Select the desired Line or Memory key and select DTMF in the Type.
3. Fill the value.
4. Click the
to save the configuration.
Prefix
To configure the Prefix via Phone Interface
5
1
Page 53

Advanced Features
1. Press Menu →Features → Function Keys→Line or Memory keys as Function Keys →
Memory key1(for example)
2. Select the wanted Line or Memory key.
3. Press
and or press key to select the Prefix in the type field.
4. Enter the value
5. Press
or Save soft key to save the configuration
To configure the Prefix via Web interface
1. Click Function key → Line or Memory key.
2. Select the desired Line or Memory key and select Prefix in the Type.
3. Fill the value.
4. Click the
to save the configuration.
Then when you press this key, the set value is input directly.
5
2
Page 54
Upgrade
Upgrade
Factory Reset
To set Factory Reset by phone interface
1. Press Menu → Setting → Advanced Setting( default password: admin)→ Factory Reset
2. Press OK soft key in the warning page.
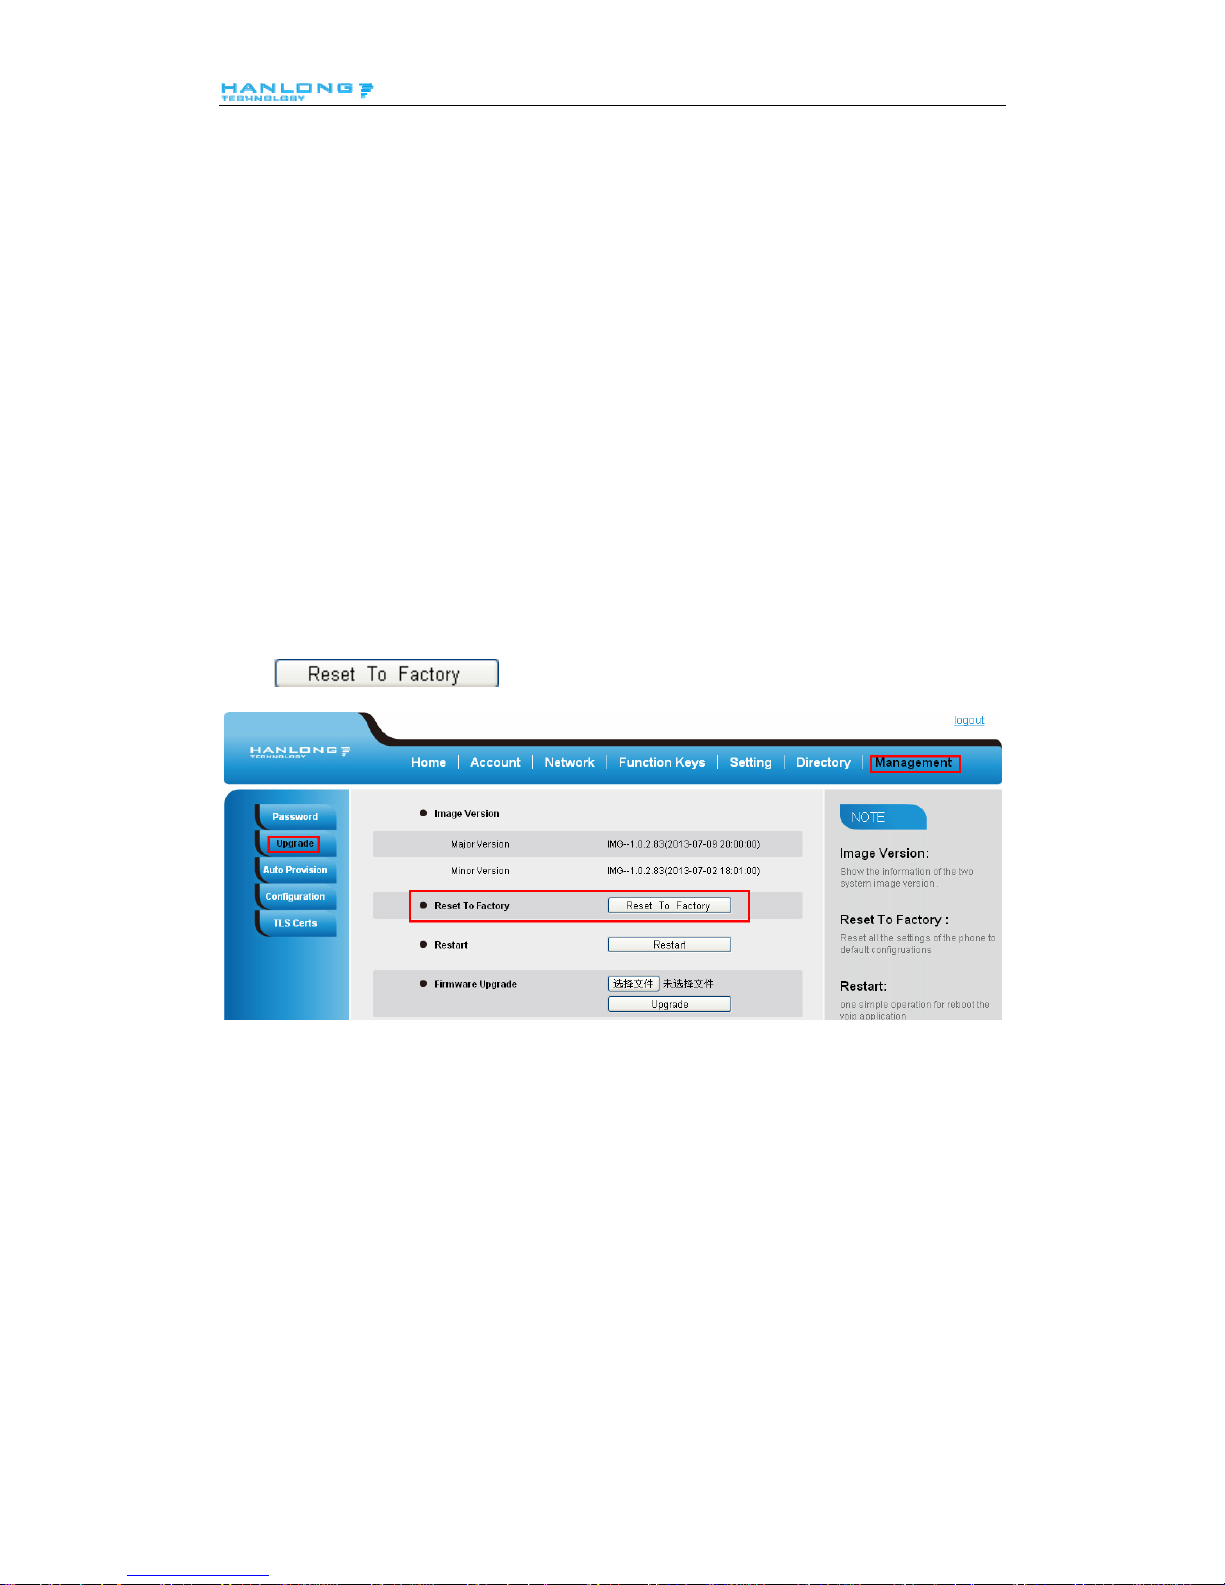
To set Factory Reset via web interface
Click Management → Upgrade
Click
and then confirm the setting.
Upgrade
To upgrade software, this phone can be configured with a TFTP server where the new code image
is located. The TFTP upgrade can work in either static IP or DHCP mode using private or public
IP address. It is recommended to set the TFTP server address in either a public IP address or on the
same LAN with the phone.
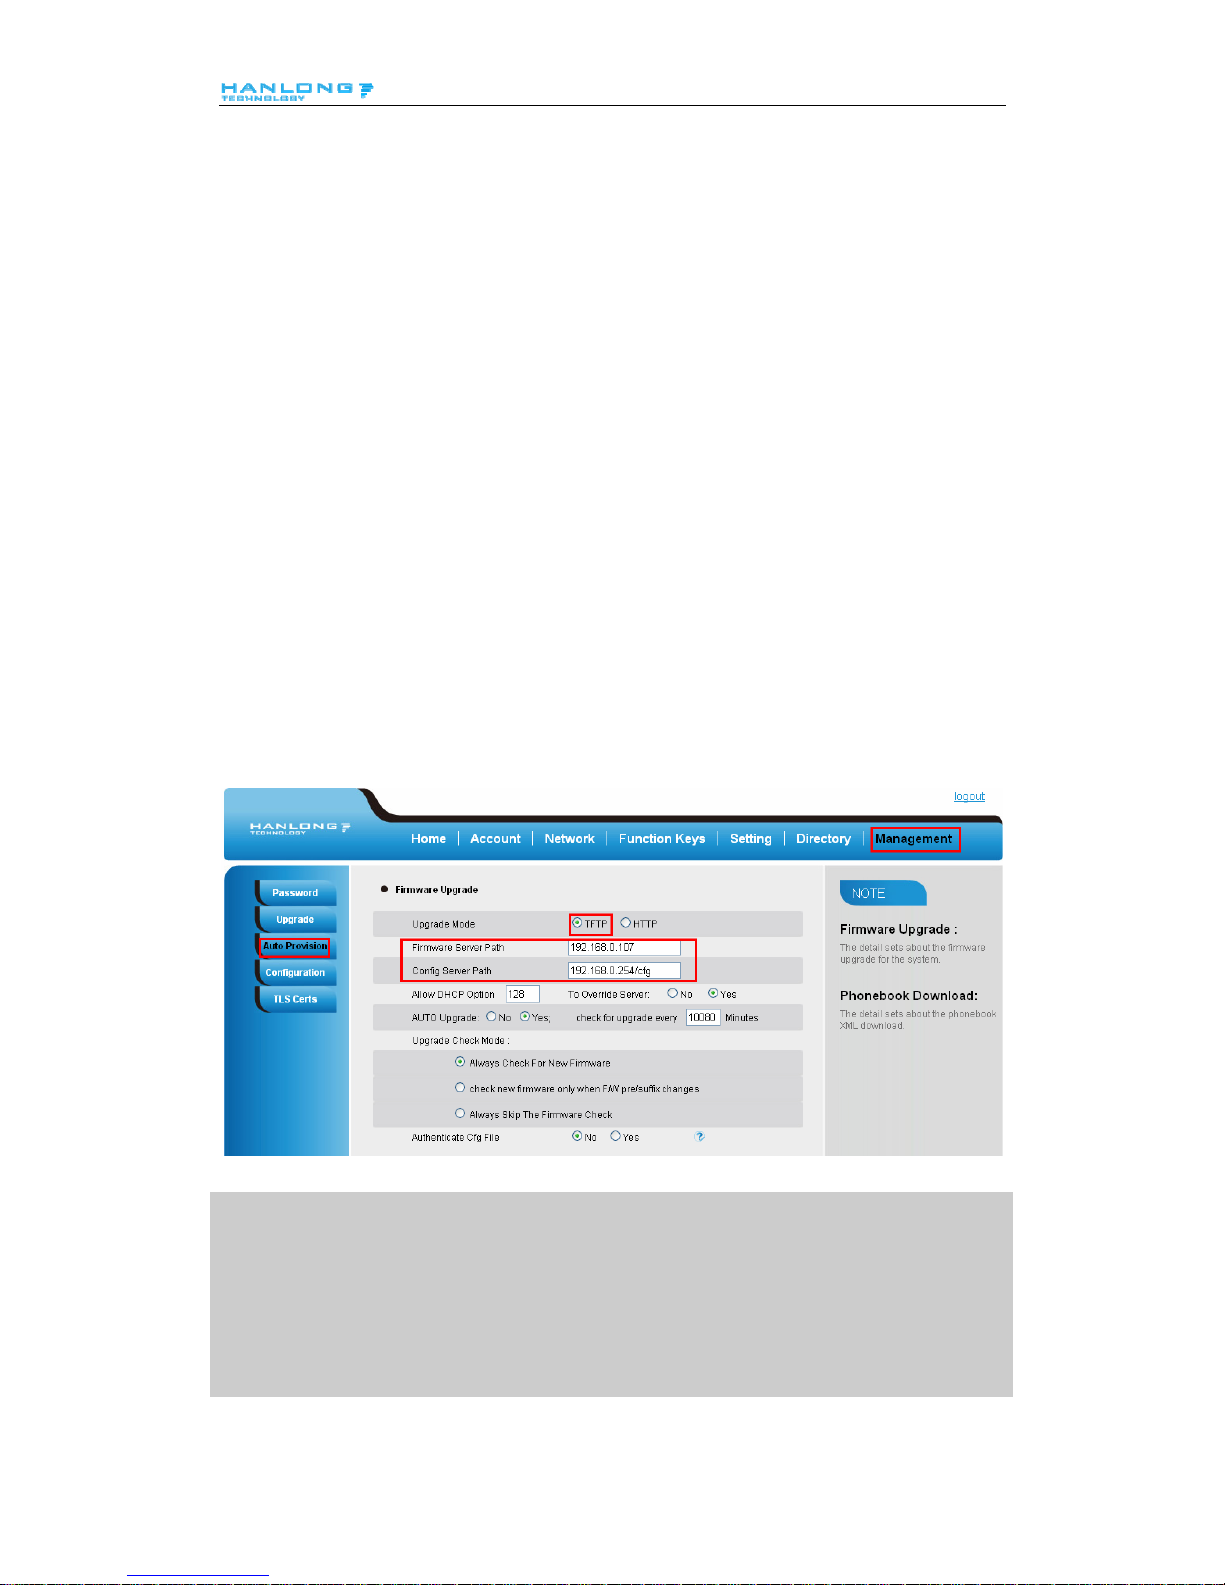
To configure the TFTP server via the Web configuration interface
Input the admin password to enter the configuration screen. From there, enter the TFTP server
address in the designated field towards the bottom of the configuration screen.
5
3
On
ce the TFTP server is configured, please power cycle the phone.
Page 55
Upgrade
TFTP process may take as long as 1 to 2 minutes over the Internet or just 20+ seconds if it is
performed on a LAN. Users are recommended to conduct TFTP upgrade in a controlled LAN
environment if possible. For those who do not have a local TFTP server, Hanlong provides a
NAT-friendly TFTP server on the public Internet for firmware upgrade. Please check the Service
section of Hanlong’s Web site to obtain this TFTP server’s IP address.
Directory to configure local TFTP
1. Unzip the file and put all of them under the root directory of the TFTP server.
2. The PC running the TFTP server and the UC IP PHONE should be in the same LAN segment.
3. Go to File -> Configure -> Security to change the TFTP server's default setting from "Receive
Only" to "Transmit Only" for the firmware upgrade.
4. Start the TFTP server, in the UC IP PHONE’s web configuration page.
5. Configure the Firmware Server Path with the IP address of the PC.
6. Update the change and reboot the unit.
NOTES:
When Hanlong IP Phone boot up, it will send TFTP or HTTP request to download configuration
files, there are two configuration files, one is “cfg.txt” and the other is “cfg001fc1xxxxxx”, where
“001fc1xxxxxx” is the MAC address of the phone. These two files are for initial automatically
provisioning purpose only, for normal TFTP or HTTP firmware upgrade, the following error
messages in a TFTP or HTTP server log can be ignored.
Download and install a free TFTP or HTTP server to the LAN to perform firmware upgrades. A
5
4
Page 56
Upgrade
free Windows version TFTP server is available:
http://www.solarwinds.com/products/freetools/free_tftp_server.aspx.
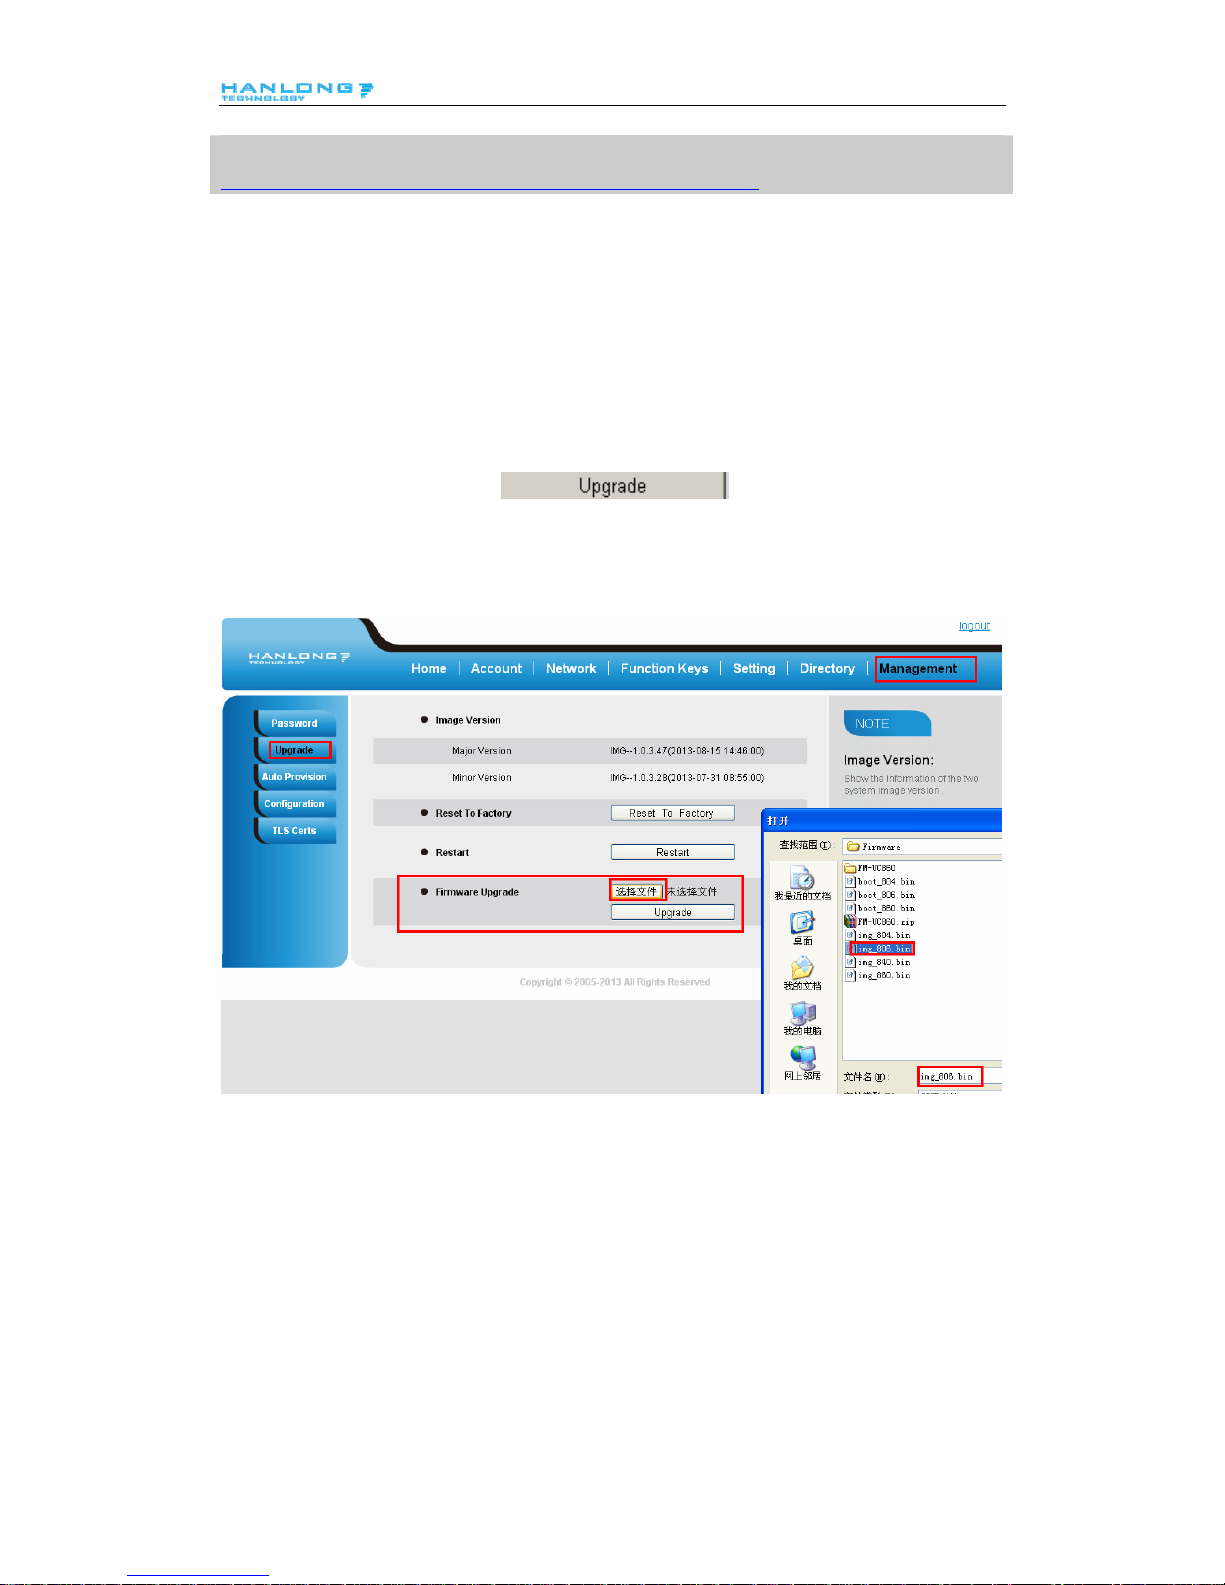
To upgrade manually via the Web configuration interface
Download the firmware.
Click Management → Upgrade
Click Brower or the blank.
Select the firmware and then click
.
Restart.
5
5
Page 57

Troubleshooting
56
Troubleshooting
Why is the phone LCD screen blank?
1. Ensure your phone is properly plugged into a functional AC outlet.
2. Ensure that the phone isn’t plugged into a plug controlled by a switc h that is off.
3. If the phone is plugged into a power strip, try plugging it directly into a wall outlet instead.
4. If your phone is powered from PoE, ensure you use a PoE compliant switch or hub, or contact
your system administrator for more information.
5. Check that the power LED is on to ensure the phone is powered on.
Why does the phone display "Network Unavailable"?
Ensure that the Ethernet cable is plugged into the Internet port on the phone and the Ethernet
cable is not loose.
Ensure that the switch or hub in your network is operational.
Contact your system administrator for more information.
Why can’t I get a dial tone?
Check for any loose connections and that the phone has been installed properly. For the
Installation instructions, refer to Phone Installation
.
Check whether dial tone is present on one of the audio modes.
Switch between the Handset, Headset (if present) or Hands-Free Speakerphone to check
whether dial tone is present for one of the audio modes.
If the dial tone exists on another audio mode, connect a different handset or headset to isolate
the problem.
 Loading...