

Page 1
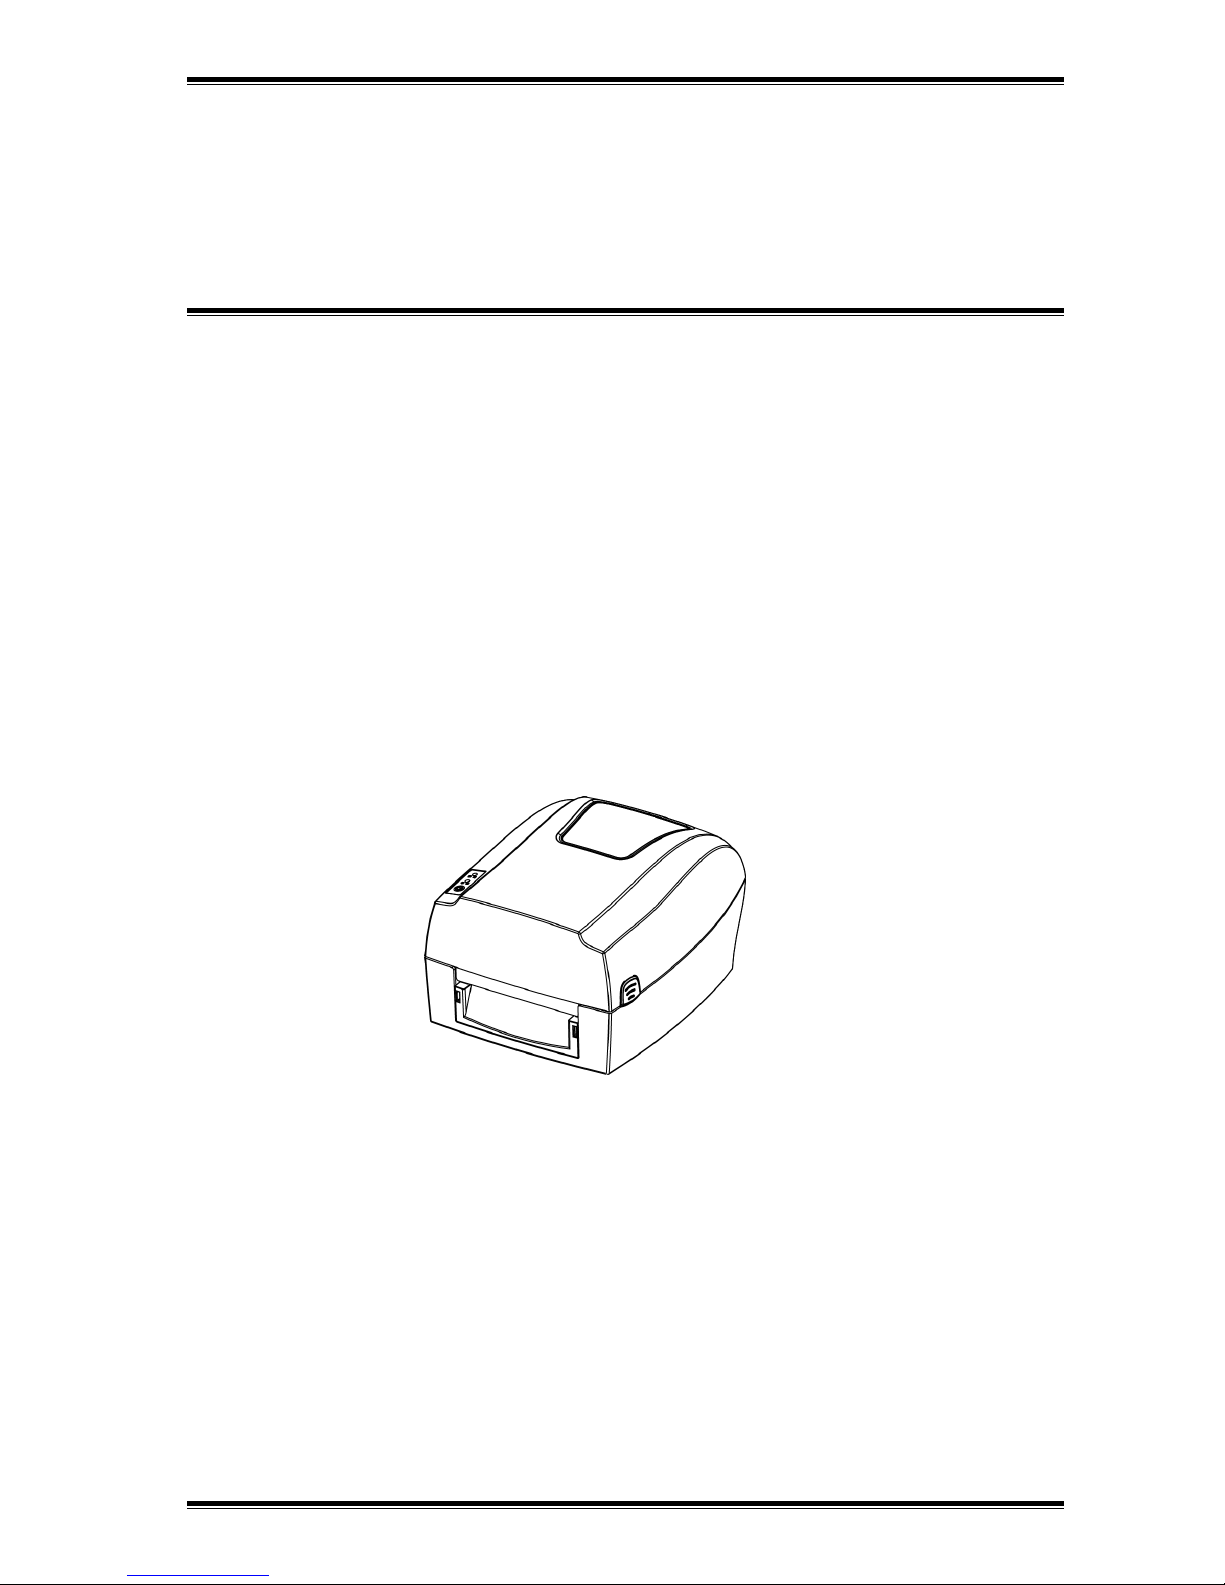
Label Printer
User Manual
HT300
HT330
Xiamen Hanin Electronic Technology Co.,Ltd
ADD:
Room 305A,Angye Building,Pioneering Park,
Torch High-tech Zone,Xiamen,China.
Tel.:
+86-(0)592-5885993
Fax:
+86-(0)592-5885992
Web:
www.hprt.com
Page 2

Contents
Manual Information
........................................................................................................................
1
Important Safety Instructions
.........................................................................................................
2
Chapter 1 Introduction
...................................................................................................................
5
1.1 Packing List
.........................................................................................................................
5
1.2 Appearance and Components
...........................................................................................
6
1.3 Dimension
..........................................................................................................................
8
Chapter 2 Specifications
.................................................................................................................
9
Chapter 3 Installation & Usage
.....................................................................................................
11
3.1 Media Loading
.................................................................................................................
11
3.2 Power Connection
............................................................................................................
16
3.3 Peripherals Connection
....................................................................................................
17
3.4 Detection
..........................................................................................................................
18
3.5 Operation Panel
...............................................................................................................
27
3.6 Basic Operation
................................................................................................................
29
Chapter 4 Interface
.......................................................................................................................
31
4.1 USB Interface
...................................................................................................................
31
4.2 Other Optional Interfaces
................................................................................................
32
Chapter 5 Maintenance & Adjustment
.........................................................................................
34
5.1 Cleaning Media Sensor
....................................................................................................
34
5.2 Cleaning Thermal Print Head
...........................................................................................
34
5.3 Cleaning Roller and/or Paper Path
...................................................................................
35
Chapter 6 Label Printer Utility Instructions
..................................................................................
36
6.1 Installation Preparation
...................................................................................................
36
6.2 Usage
................................................................................................................................
36
Chapter 7 Seagull Windows Driver Instructions
...........................................................................
46
7.1 Introduction
.....................................................................................................................
46
7.2 Installation Preparation
...................................................................................................
46
7.3 Installation
.......................................................................................................................
47
7.4 Usage
................................................................................................................................
52
7.5 Label’s Width
....................................................................................................................
68
Chapter 8 BarTender® Ultralite Instructions
.................................................................................
69
8.1 Introduction
.....................................................................................................................
69
8.2 Installation Preparation
...................................................................................................
69
8.3 Installation
.......................................................................................................................
70
8.4 Usage
................................................................................................................................
74
Page 3

HT300/HT330 User Manual
Statement
This manual content may be altered without permission, and our company reserves the rights
to make changes without notice in technology, spare parts, hardware and software of the
products. If more information is needed about the products, please contact our company.
Without any written permission from our company, any section of this manual is prohibited to
be copied or transferred in any form.
Copyright
This manual is printed in 2016, the copyright belongs to Xiamen Hanin Electronic Technology
Co. Ltd.
Printed in China
1.0 Version
Warnings
This must be complied with in order to avoid any damage to the human body and the
equipment.
This is showing the important information and tips for the printer operation.
Note: Due to continuous update of our product, the description of printer specification,
accessories, design in this manual may be slightly different. Please keep in kind prevail.
Page 4

1
Manual Information
This user manual contains basic information for product usage as well as for emergency
measures that may be required.
The installation and usage of printer driver, utility tool and HPRT BarTender® Ultralite are also
included in the manual.
Page 5

HT300/HT330 User Manual
2
Important Safety Instructions
Before using the present appliance, please carefully read the following safety regulations in
order to prevent any hazard or material damage.
1.Safety warning
Warnings: The print head will become very hot during printing; avoid contact with the
print head after printing has finished.
Warnings: Do not touch the printer head and connector in case static damage the
printer head.
2.Instructions
Warnings: Violating following instructions may cause serious injury or death.
1) Do not plug several products in one multiperture outlet.
• This can provoke over-heating and a fire.
• If the plug is wet or dirty, dry or wipe it before usage.
• If the plug does not fit perfectly with the outlet, do not plug in.
• Be sure to use only standardized multiperture outlet.
2) You must use the supplied adapter.
• It is dangerous to use other adapters.
3) Do not pull the cable to unplug.
• This may damage the cable, which is the origin of a fire or a breakdown of the printer.
4) Do not plug in or unplug with your wet hands .
• You may be electrocuted.
5) Do not bend the cable by force or leave it under any heavy object.
• A damaged cable may cause a fire.
Page 6

HT300/HT330 User Manual
3
Caution: Violating following instructions may cause slight damage of the appliance.
1) If you observe a strange smoke, odour or noise from the printer, unplug it before taking
following measures.
• Switch off the printer and unplug the set from the mains.
• After the disappearance of the smoke, call your dealer to repair it.
2) Install the printer on the stable surface.
• If the printer falls down, it may be broken and you may hurt yourself.
3) Use the approved accessories only and do not try to disassemble, repair or remodel it by
yourself.
• Call your dealer when you need these services.
• Do not touch the blade of auto cutter.
4) Do not let water or other foreign objects drop into the printer.
• If this happened, switch off and unplug the printer before calling your dealer.
5) Do not use the printer when it is out of order. This can cause a fire or an electrocution.
• Switch off and unplug the printer before calling your dealer.
6) Other considerations:
• Place the printer on a solid and even base so that it cannot fall.
• Leave enough space around printer for operation and maintenance.
• Keep all liquids away from the printer.
• Do not expose the printer to high temperatures, direct sunlight or dust.
• Ensure the printer is connected to a socket with the correct mains voltage.
• Switch off the printer POWER supply when it’s not in use for a long time.
• To ensure the printing quality and reliability, suggest use the same quality or recommend
paper supplier.
• Pls. switch off the POWER supply when connect/disconnect all the ports or it will cause
damage to the printer control circuit.
• Never carry out maintenance or repair work yourself. Always contact a qualified service
Technician.
Page 7

HT300/HT330 User Manual
4
• Keep this User Manual in a place which is easily accessible at all times.
3.Other Precautions
The copyright for this user manual and various other manuals is property of our company. Any
copying or conversion into electronic form and saving of this material without the express
written permission is strictly prohibited. Use of the information contained in this manual is not
subject to any patent liability. This manual has been prepared with utmost care and attention
to detail but may contain certain errors and/or omissions. Our company is not legally liable for
any damages resulting from the use of the information in this manual. Our company and its
affiliates are not legally liable (United States excluded) for any damages, loss, costs, and/or
expenses that result from the breakdown, malfunction, and/or misuse of the product due to
violation or neglect of the operation and maintenance information and instructions provided
by our company, as well as from the unauthorized alteration, repair, and/or modification of the
product by the user and/or third party. We are not legally liable for any damages and/or issues
resulting from the use of options and/or parts that are not authentic or authorized products.
4.WEEE (Waste Electrical and Electric Equipment)
This mark shown on the product or its literature indicates that the corresponding
item should not be discarded at the end of its working life with other household
waste. To prevent possible harm to the environment or human health from
uncontrolled waste disposal, please separate marked items from other types of
waste and recycle them responsibly to promote the sustained reuse of material resources.
Household users should contact either the retailer where they purchased this product, or their
local government office for details of where and how they can conduct environmentally safe
recycling of such items. Commercial users should contact their suppliers and check the terms
and conditions of purchase contracts. This product should not be combined with other
commercial waste for disposal.
Caution: This is a Class A product. In a domestic environment this product may cause
radio interference in which the user may be required to take adequate measures.
Page 8

HT300/HT330 User Manual
Rev.1.0
5
Chapter 1 Introduction
1.1 Packing List
Note:
1.Unpack the printer and keep the packing materials in case you need to ship the printer in the
future.
2.Any damages exist, please contact the local dealer.
Printer AC Adapter Power Cord
USB Cable Empty Ribbon Core Ribbon
Label Supply Spindle Label Supply Plates Ribbon Spindles
Label Roll CD Quick Start Guide
Note:The packing materials are actually based on the order.
Page 9
HT300/HT330 User Manual
Rev.1.0
6
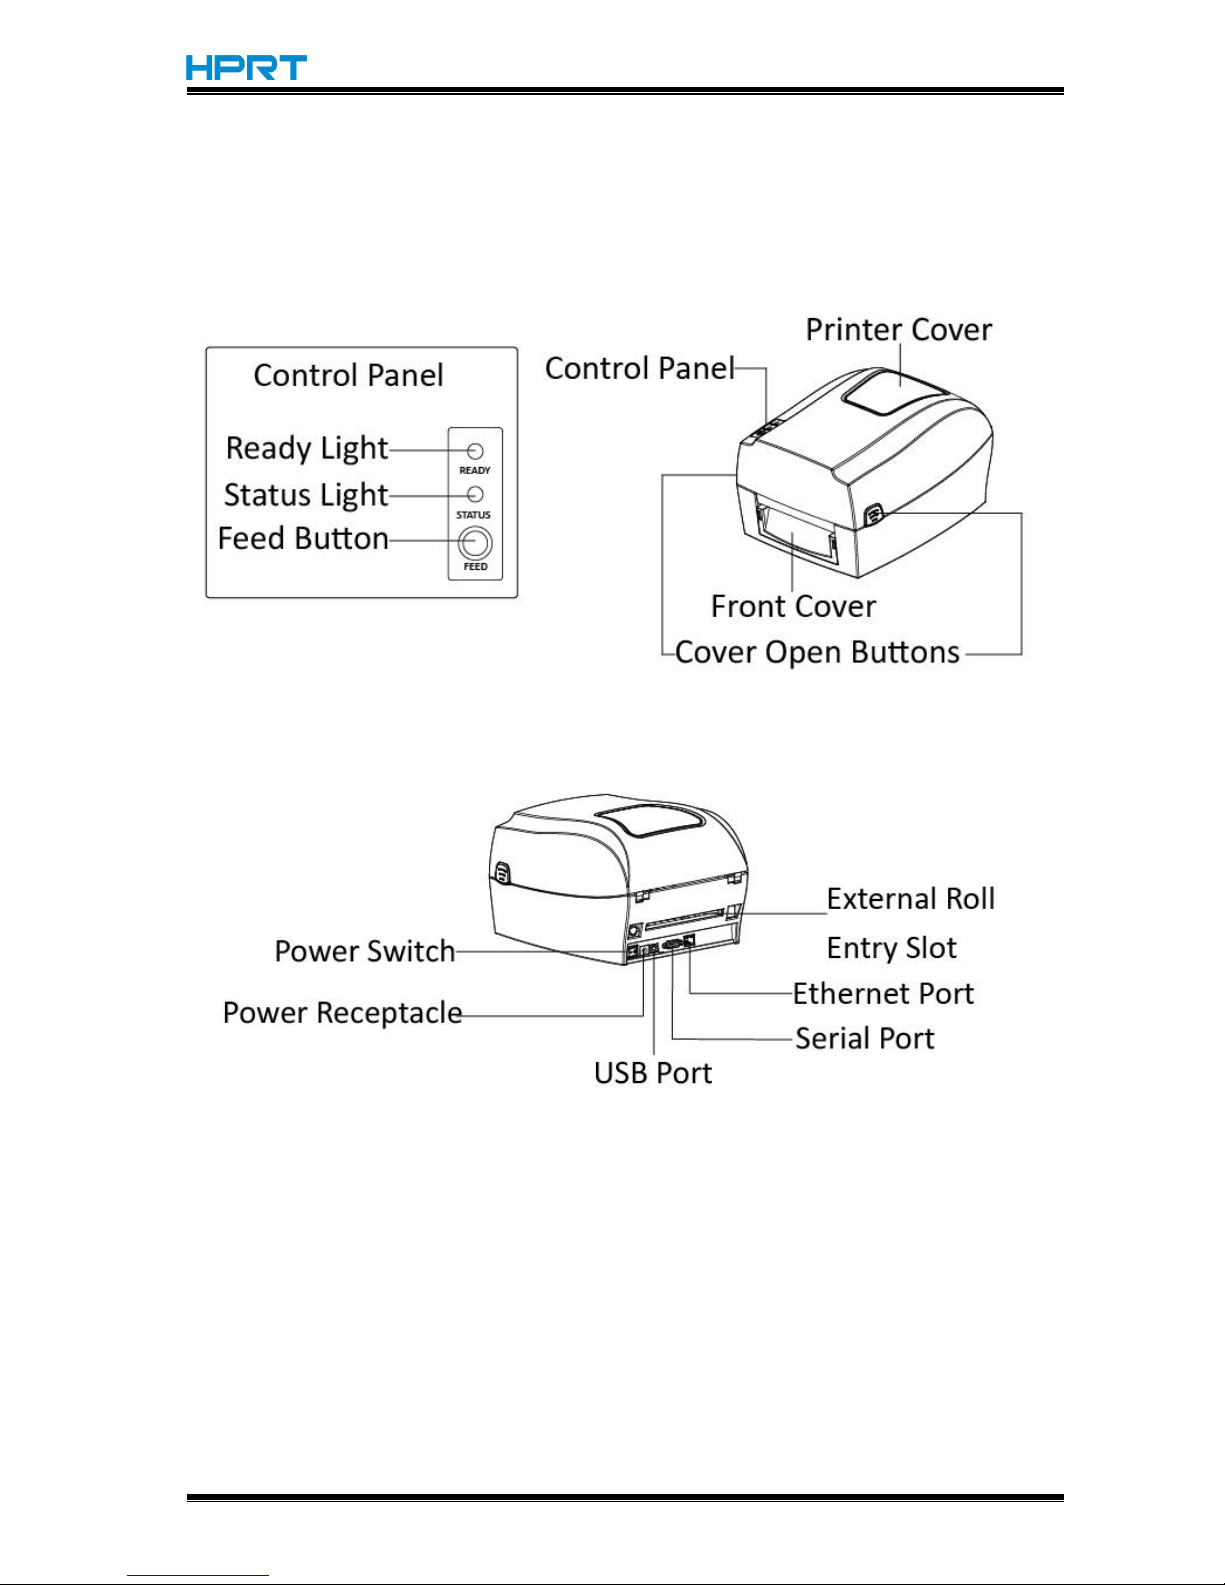
1.2 Appearance and Components
■
Front View
■
Rear View
Page 10
HT300/HT330 User Manual
Rev.1.0
7
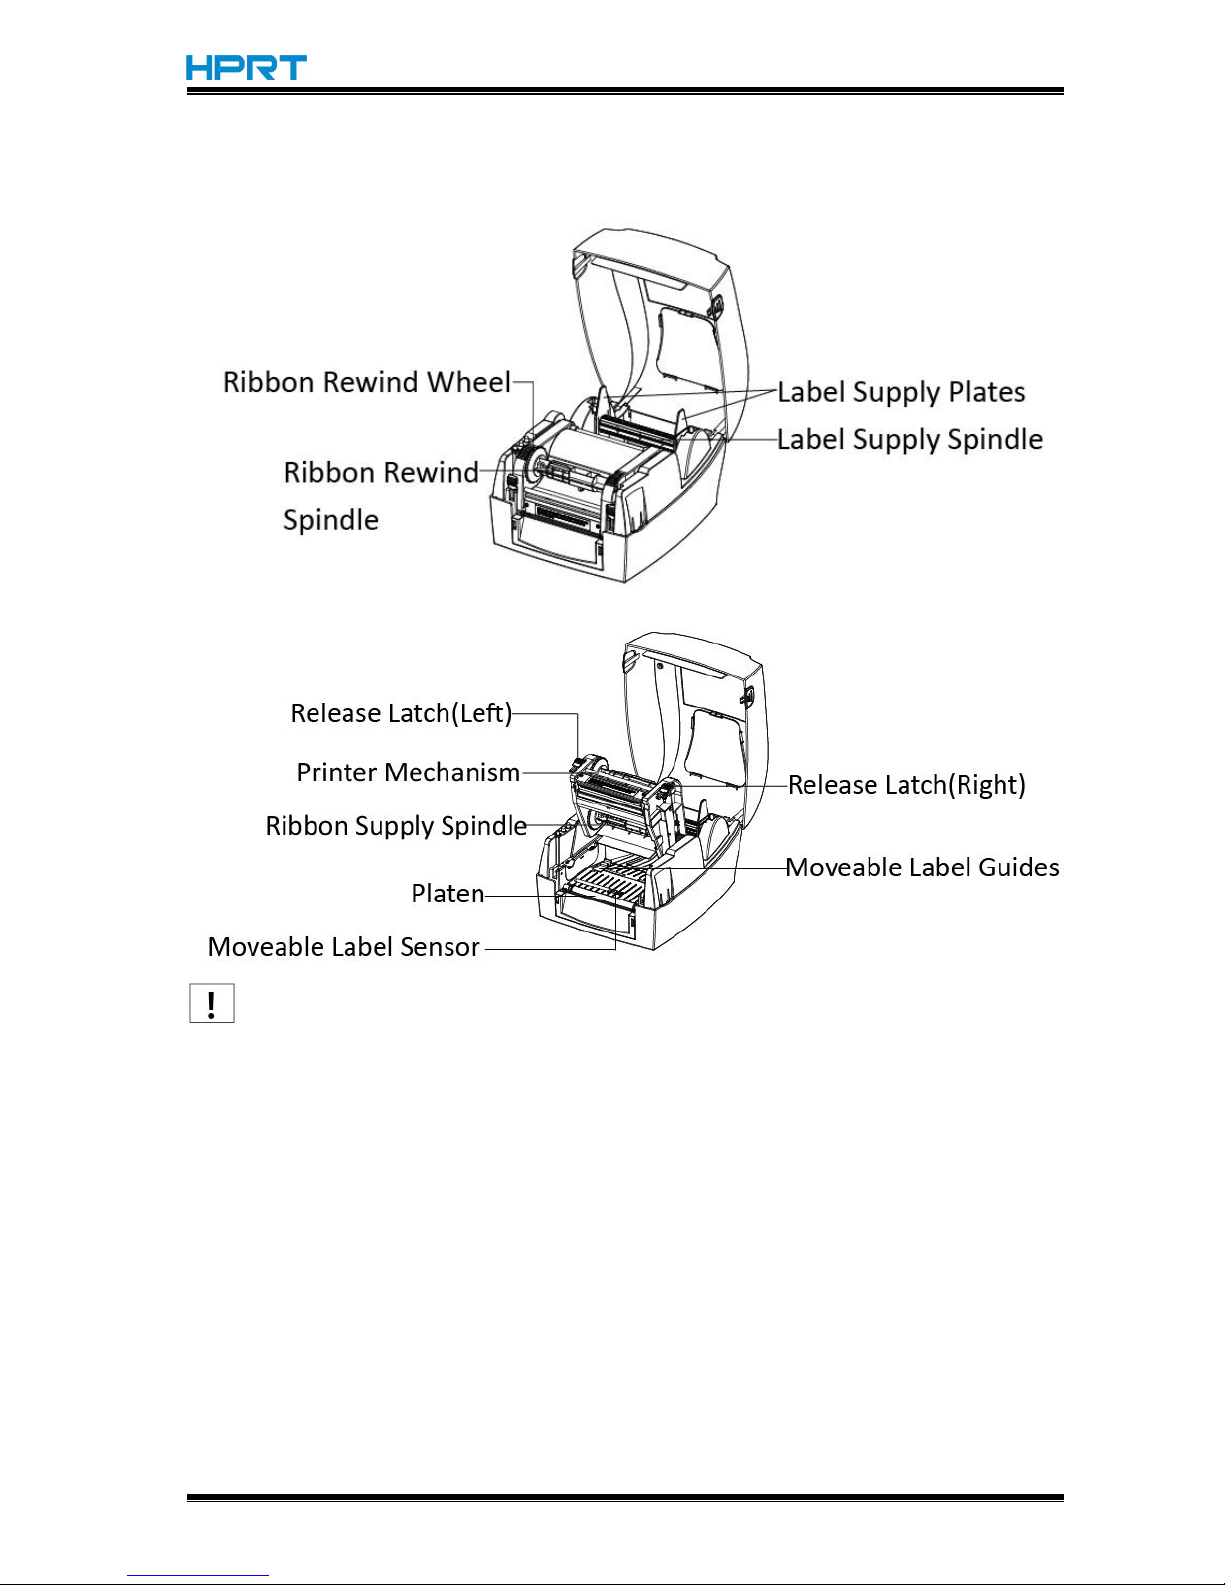
■ Inside View
Note:The views above are for your reference. Ports vary by your choice.
Page 11
HT300/HT330 User Manual
Rev.1.0
8
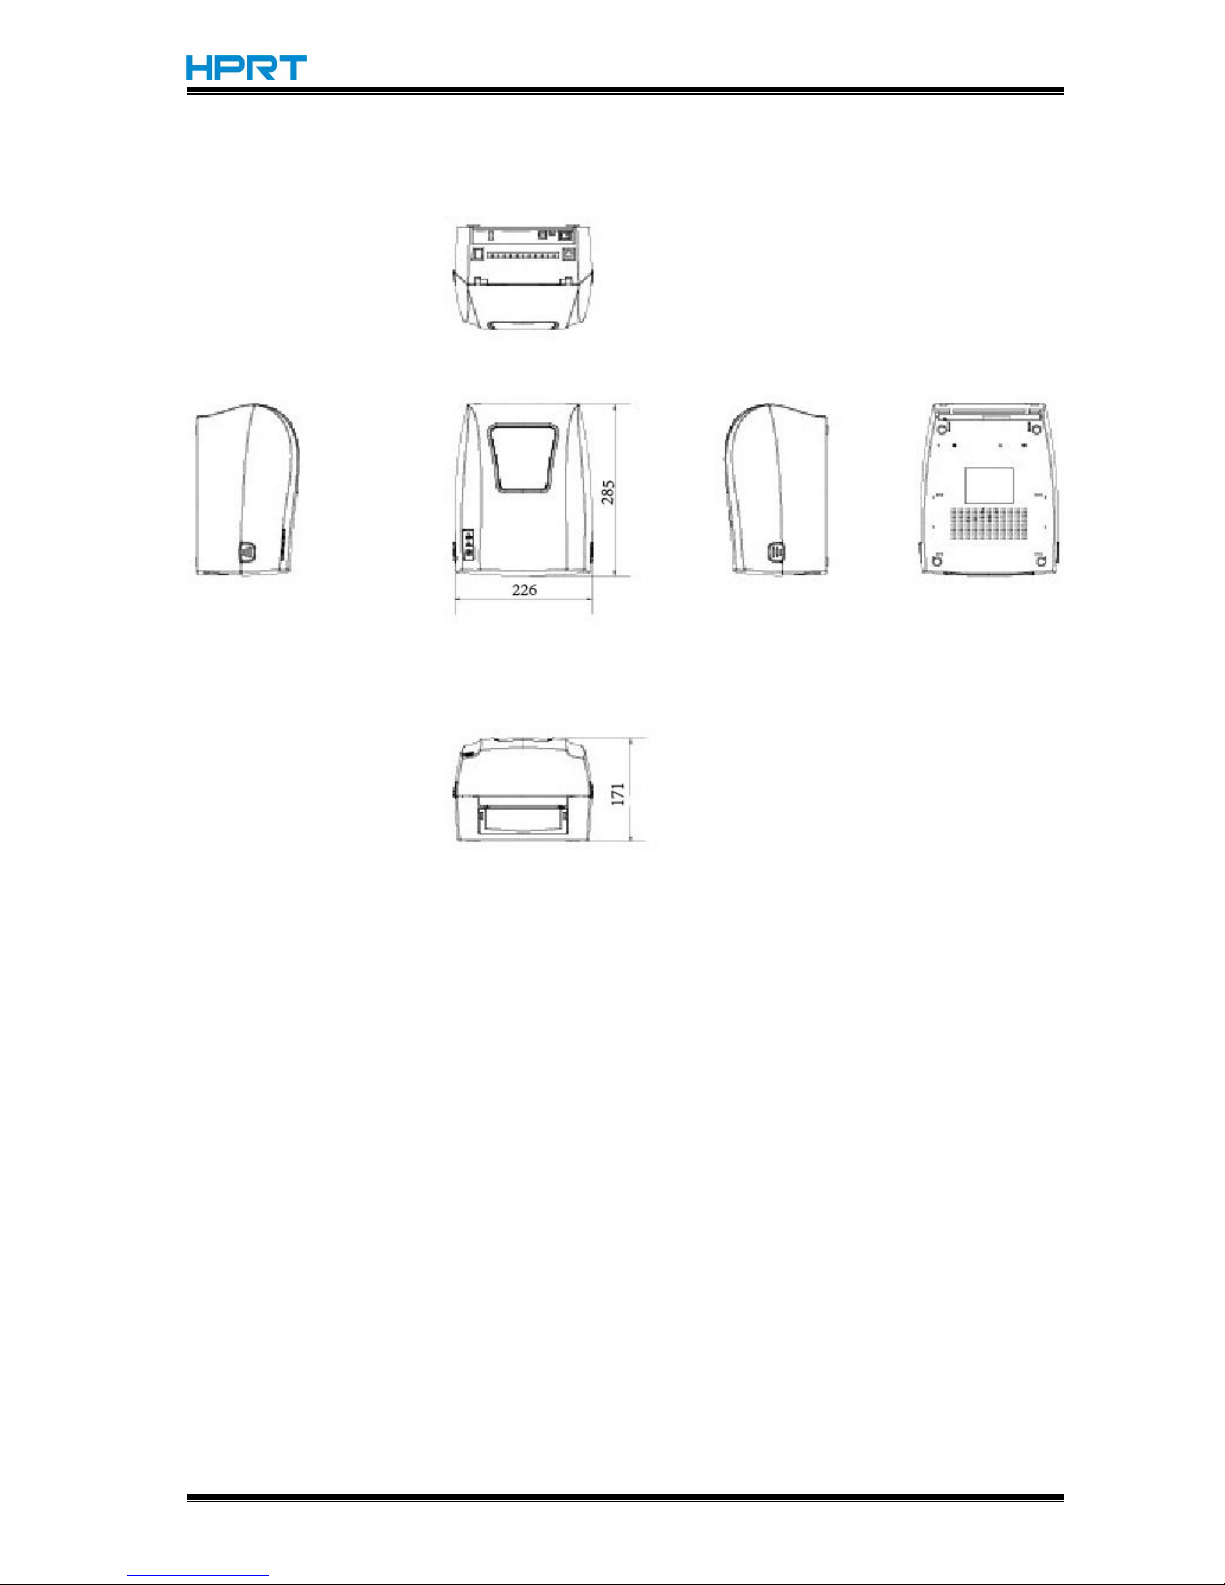
1.3 Dimension
Page 12
HT300/HT330 User Manual
Rev.1.0
9
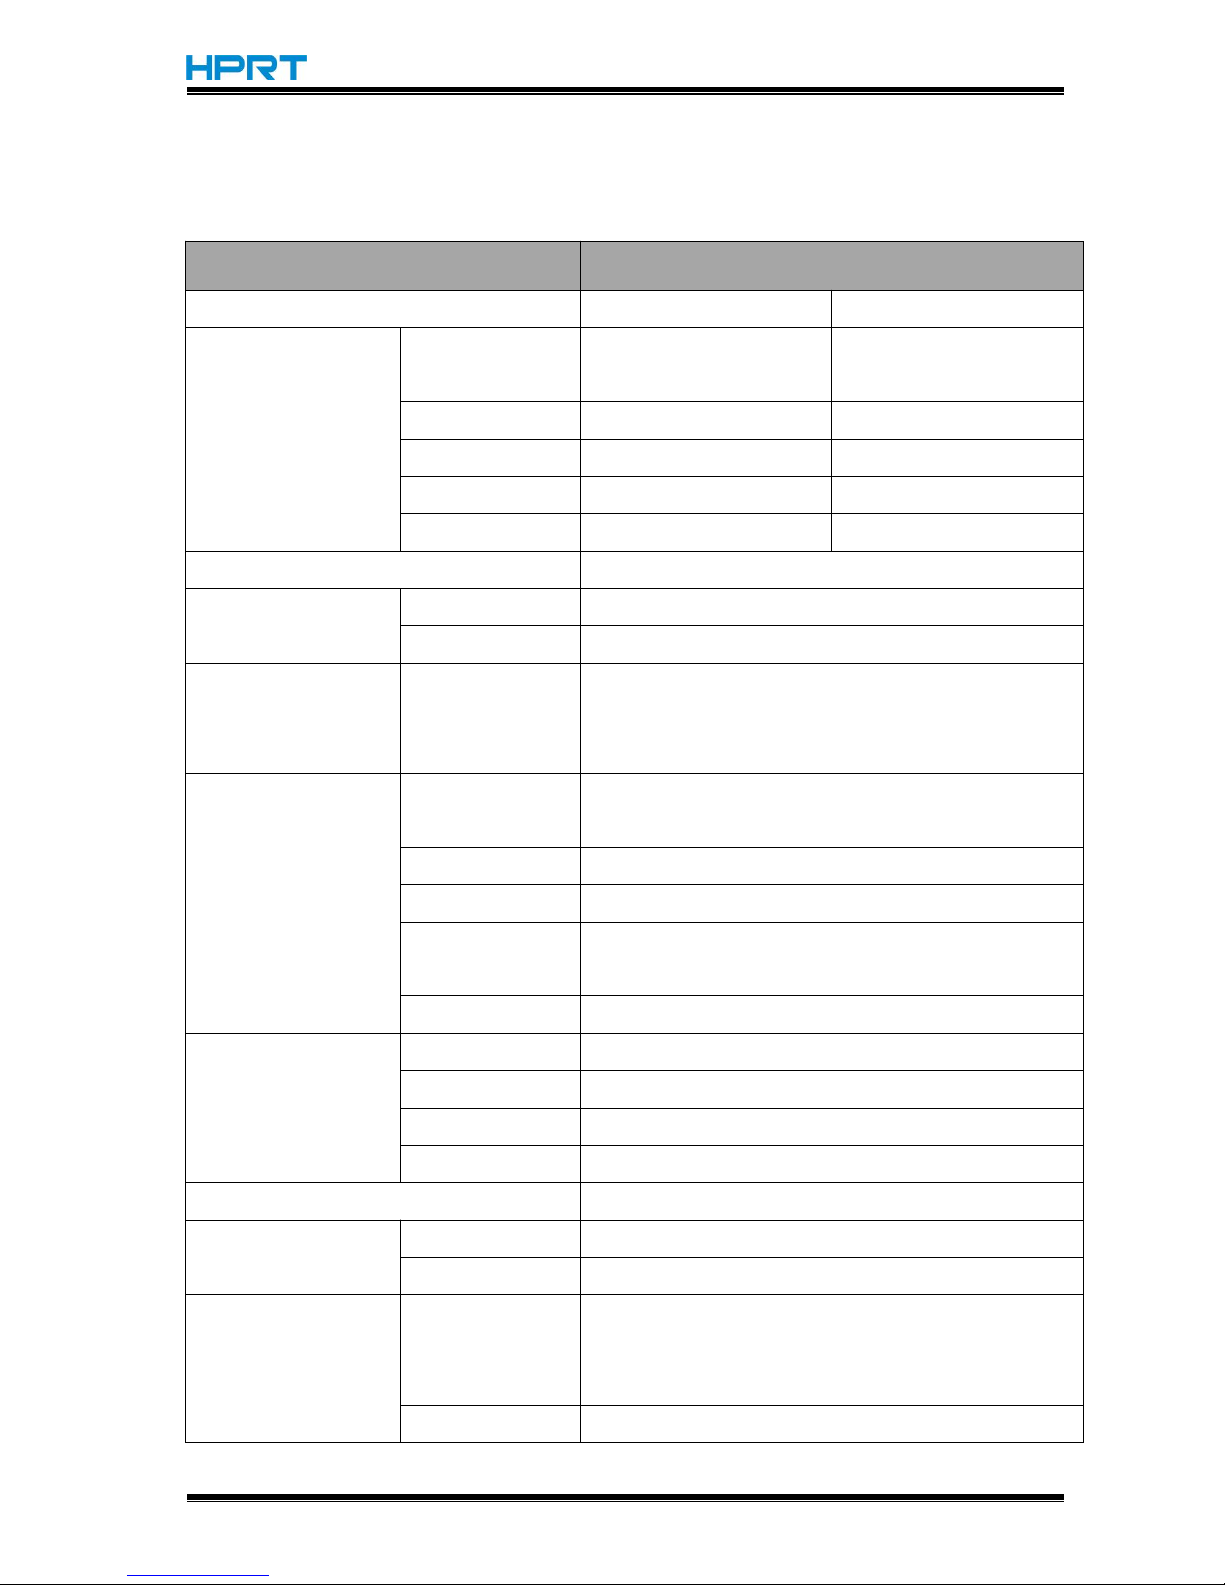
Chapter 2 Specifications
(2/1)
Items
Parameter
HT300
HT330
Printing
Printing method
Thermal transfer
/ Direct thermal
Thermal transfer
/Direct thermal
Resolution
203dpi(8dots/mm)
300dpi(11.8dots/mm)
Printing speed
127mm/s Max.
102mm/s Max.
Printing width
108mm Max.
106mm Max.
Printing length
15mm - 1200mm
15mm - 1200mm
Processor
NUC976
Memory
RAM
32MB
Flash
16MB
Detection
Sensors
Adjustable reflective sensor,Fixed transmissive
sensor(Central aligned), Head-up sensor, Ribbon
end sensor
Media
Types
Roll-fed or Fan-fed,Die-cut or Continuous label,Tag
stock,Continuous receipt paper
Width
0.79’’(20mm) – 4.65’’(118mm)
Thickness
0.003’’(80um) – 0.007’’(180um)
Label roll
diameter
5’’(127mm)
Core diameter
1’’(25.4mm),1.5’’(38mm),3’’(76.2mm)
Ribbon
Types
Wax,Wax/Resin,Resin
Width
1.33’’(33.8mm) – 4.33’’(110mm)
Length
984’(300m)
Core diameter
1’’(25.4mm)
Programming Language
TSPL, ZPL
Software
Label design
HPRT BarTender Ultralite
Seagull Driver
Windows 2000,XP,Vista,7,8,10
Resident Fonts
Bitmap fonts
Fonts 0-8 / Fonts A-H,0,GS,P-V 90 ° , 180 ° , 270 °
rotatable. 10 times maximun expandable in
horizontal and vertical directions.
TTF fonts
Monotype CG Triumvirate™ scalable true type font
Page 13
HT300/HT330 User Manual
Rev.1.0
10
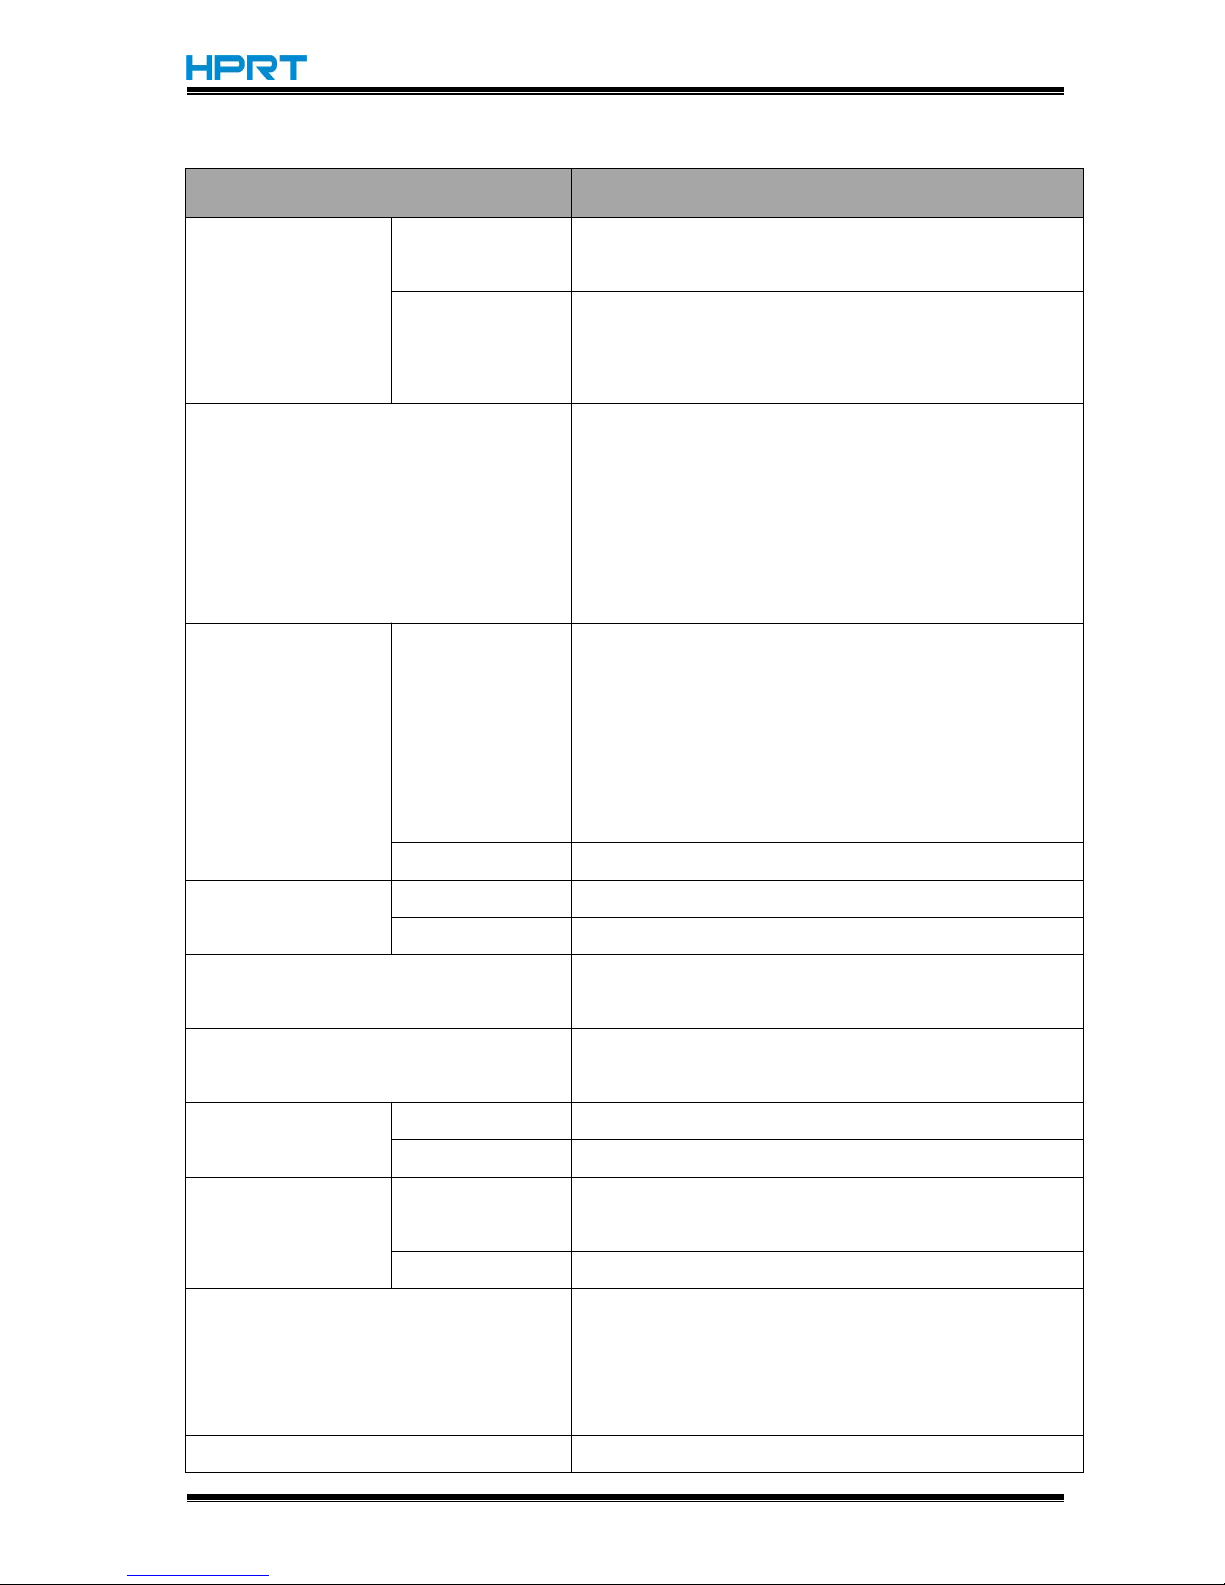
(2/2)
Items
Parameter
Download Fonts
Bitmap fonts
90°, 180°, 270° rotatable, single characters 90°, 180°,
270° rotatable
Asian fonts
16x16, 24x24. Traditional Chinese, Simplified
Chinese, Japanese , Korean
Code Pages
DOS437,720,737,755,775,850,852,855,856,857,858,8
60,862,863,864,865,866,
Windows
1250,1251,1252,1253,1254,1255,1256,1257,1258
ISO8859-1,-2,-3,-4,-5,-6,-8,-9,-15
DBCS 932 (JIS), 936(GBK), 949 (Koran), 950(BIG5)
Barcode
1D
Code 39, Code 93, Code 128UCC, Code 128 subset A,
B, C, Codabar, Interleave 2 of 5, EAN-8, EAN-13,
EAN-128,
UPC-A, UPC-E, EAN and UPC 2 (5) digits add-on, MSI,
PLESSEY, POSTNET, RSS-Stacked, GS1 DataBar, Code
11
2D
PDF417, Maxicode, DataMatrix, QR Code, Aztec
Interfaces
Standard
USB,RS232,Ethernet
Optional
Bluetooth,WiFi (user install)
Control Panel
Two bi-color status LEDs:Ready,Status
Control key:Feed
Power
AC/DC switching power adapter
I/P: AC100-240V, 50/60Hz, O/P: DC 24V/2.5A
Environment
Operation
41℉(5℃)-104℉(40℃),30%-85%,non-condensing
Storage
-4℉(-20℃)-122℉(50℃),10%-90%,non-condensing
Physical
Characteristics
Dimension(L*W*
H)
285*226*171mm
Weight
2.26kg,excluding consumables
Options & Accessories
External label roll holder for 8’’ (203mm) OD label
rolls
Cutter module
Peeler module
Agency Approvals
FCC,CE
Page 14
HT300/HT330 User Manual
Rev.1.0
11
Chapter 3 Installation & Usage
3.1 Media Loading
3.1.1 Paper Roll Loading
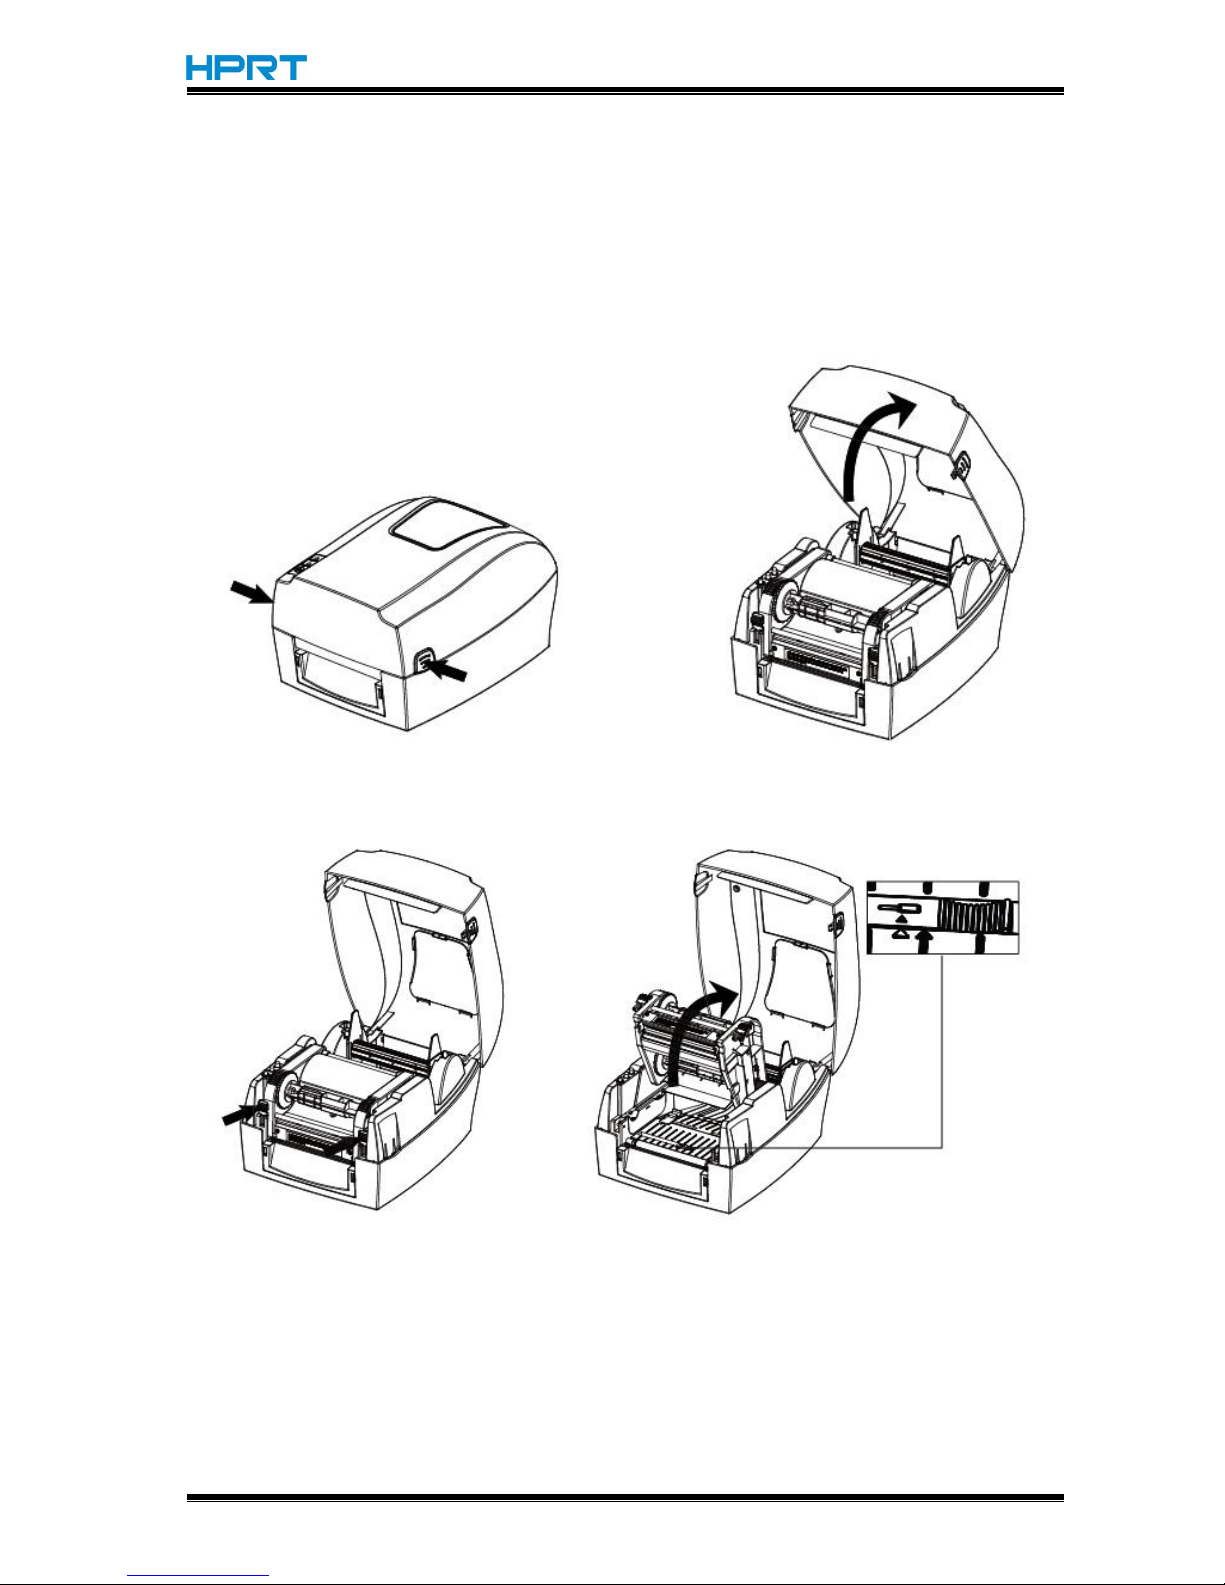
1.Press the cover open buttons and lift the printer cover.
2.
Release the latches and lift the printer mechanism.
Page 15
HT300/HT330 User Manual
Rev.1.0
12
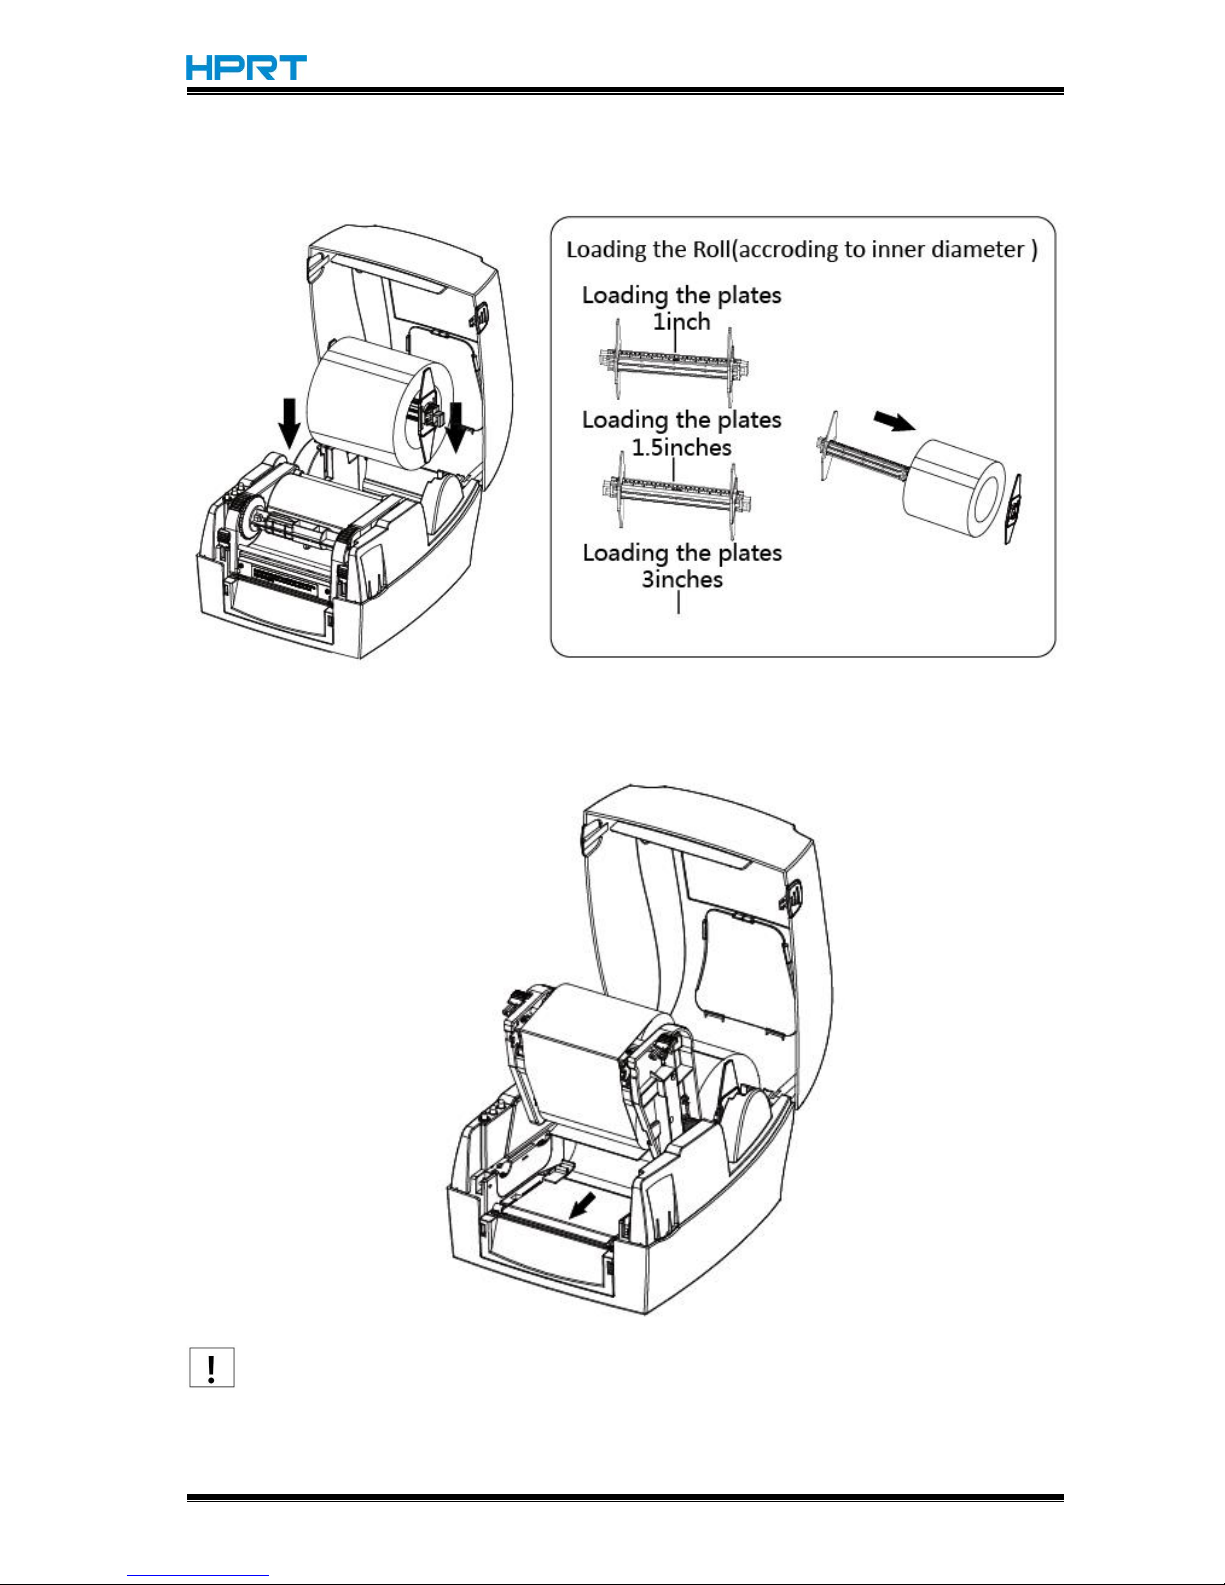
3.Put the roll into label supply spindle and then put the roll module into the printer.
4.Release and lift the printer mechanism. Then pass the labels through label guides and adjust
label guides to label’s width.
Note: If your printer is under Thermal Line Printing Method, press down the printer
cover until it snaps closed. Otherwise, continue the procedure in chapter 3.1.2.
Page 16
HT300/HT330 User Manual
Rev.1.0
13
3.1.2 Ribbon Loading
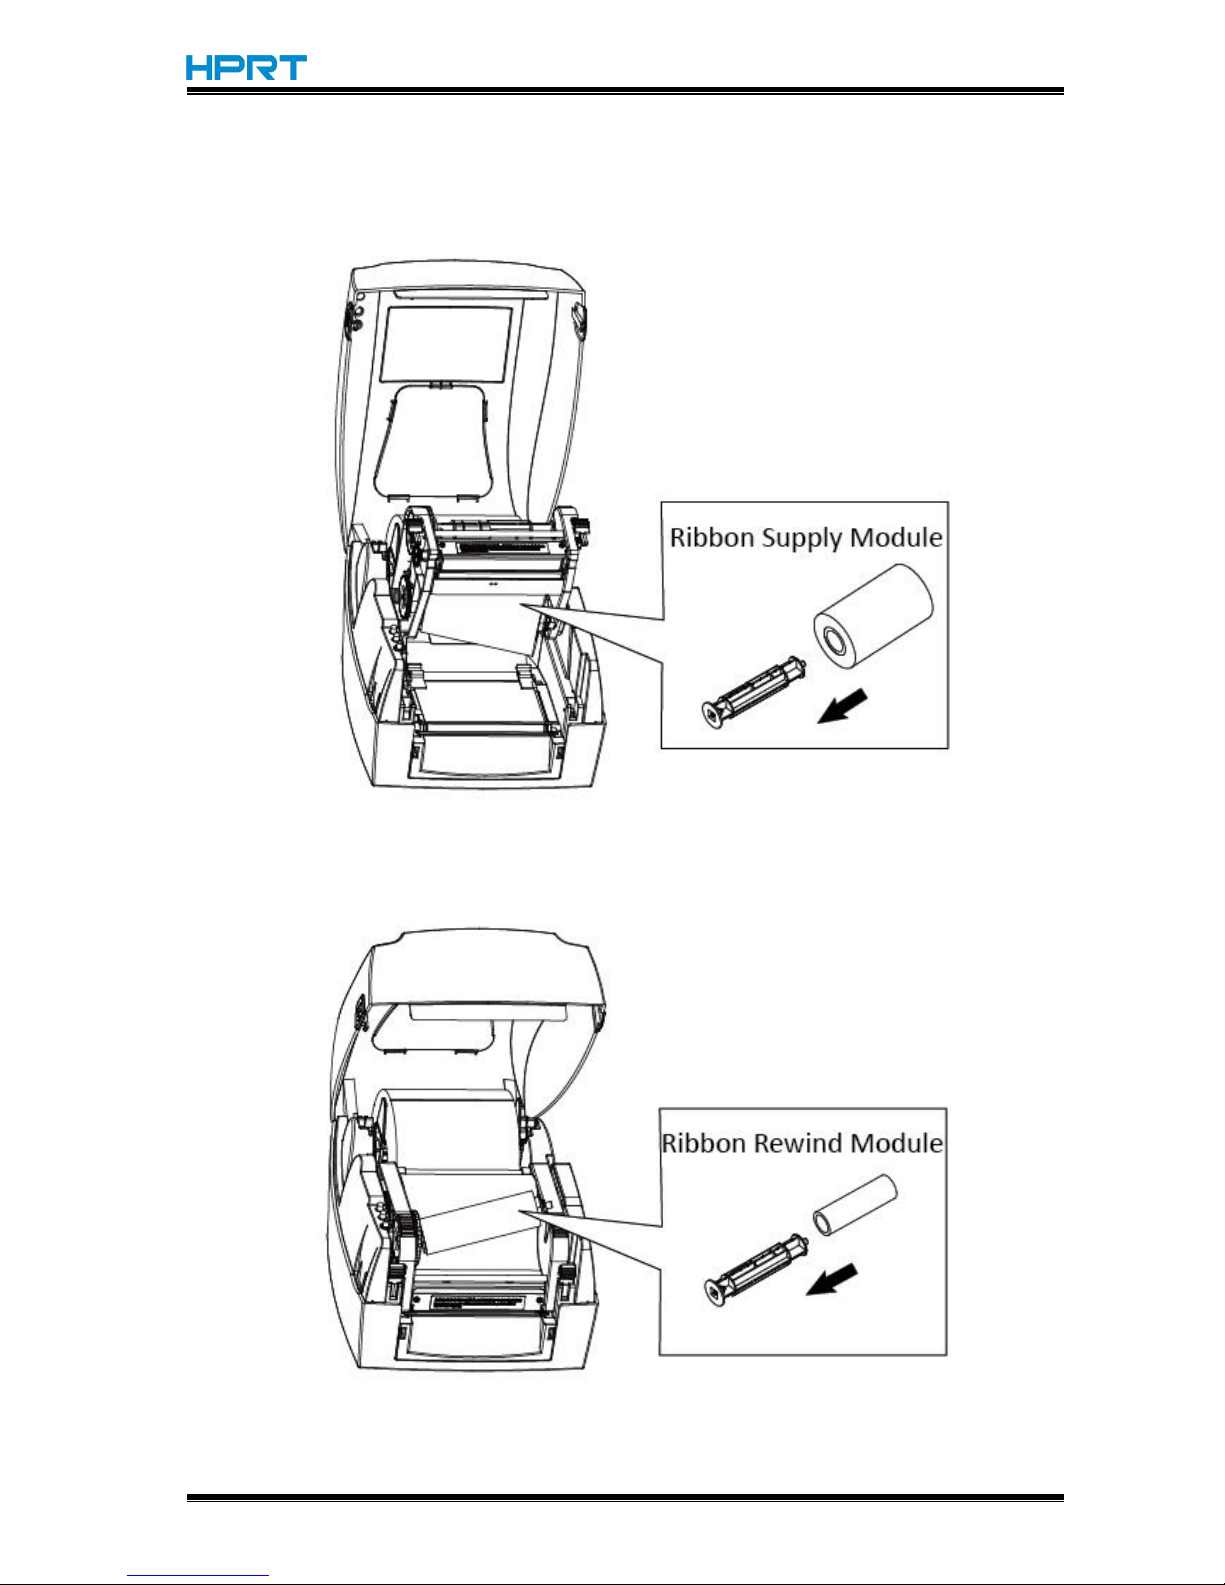
1.After putting the ribbon into spindle, insert the left side of supply module into supply wheel,
and then insert the right side into the groove below.
2.After putting empty ribbon core into spindle, insert the left side of rewind module into
rewind wheel, and then insert the right side into the groove above.
Page 17
HT300/HT330 User Manual
Rev.1.0
14
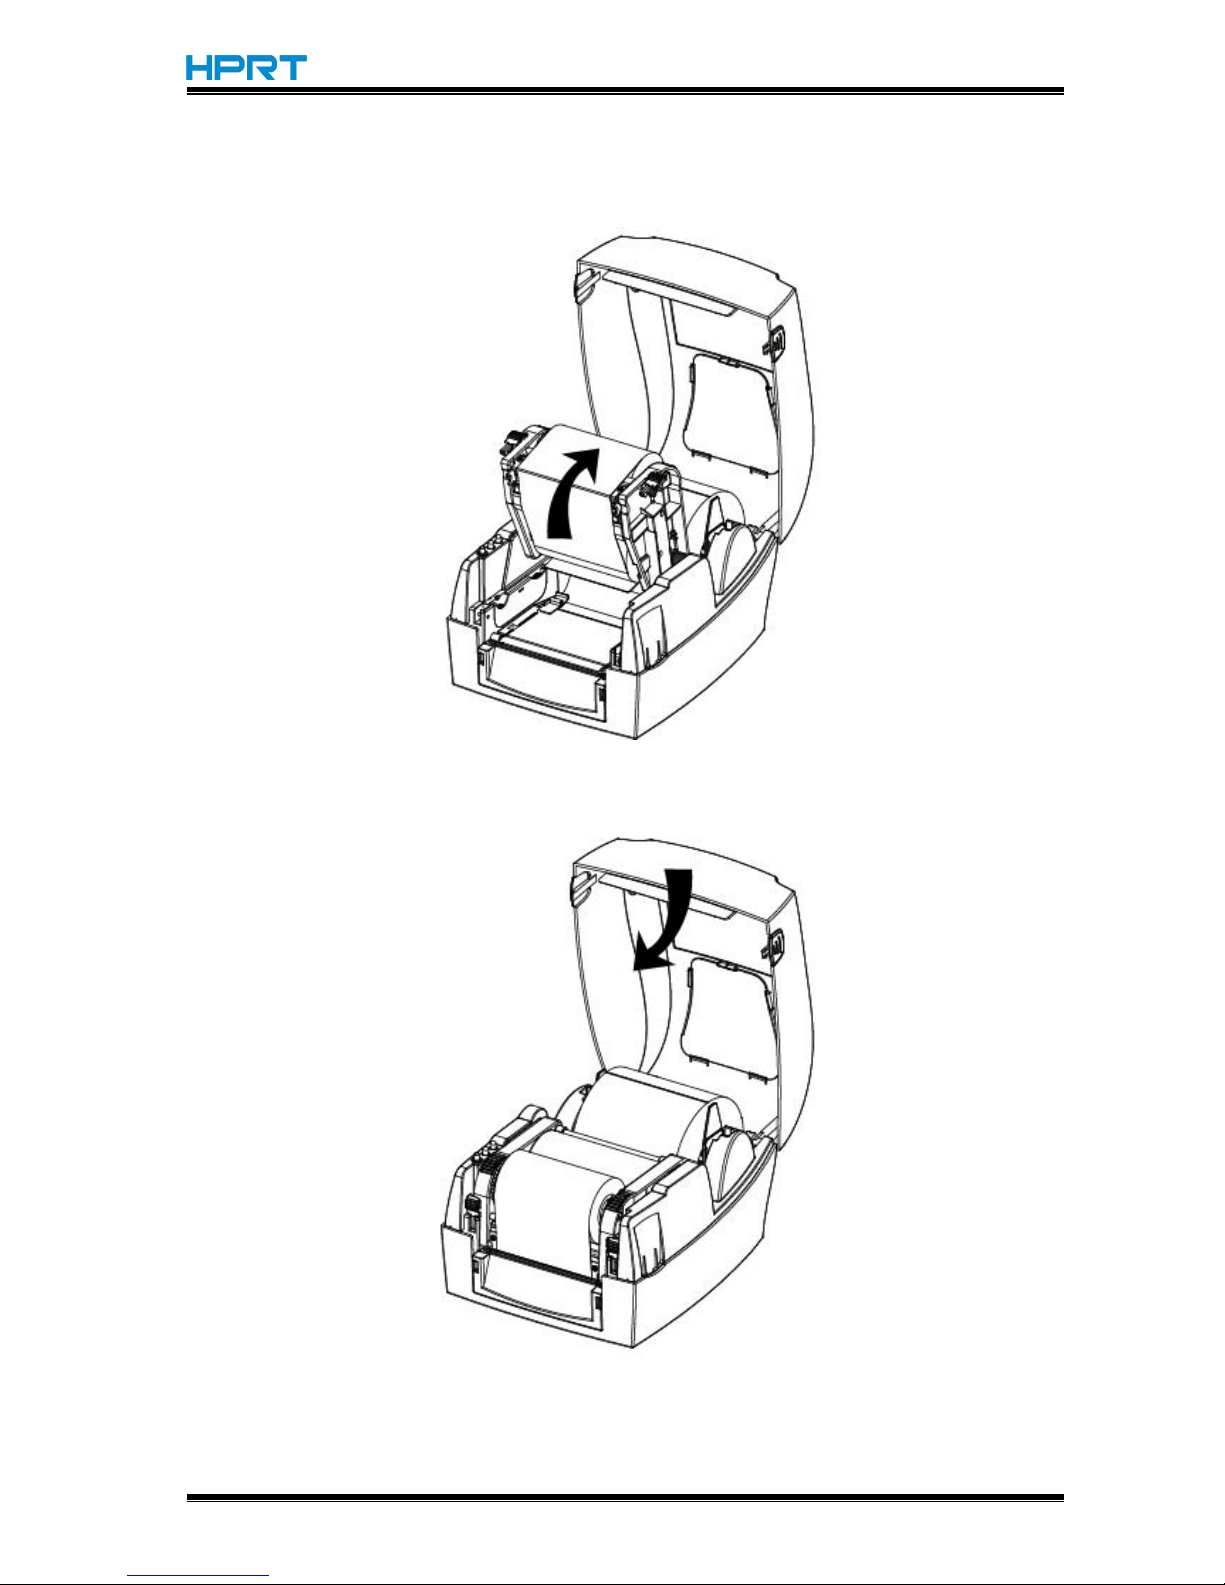
3.Pull up the ribbon and stick it to the empty ribbon core. Wind the core 2~3 circles until the
ribbon is pulled tightly.
4.Fix the mechanism and then close the cover.
Page 18
HT300/HT330 User Manual
Rev.1.0
15
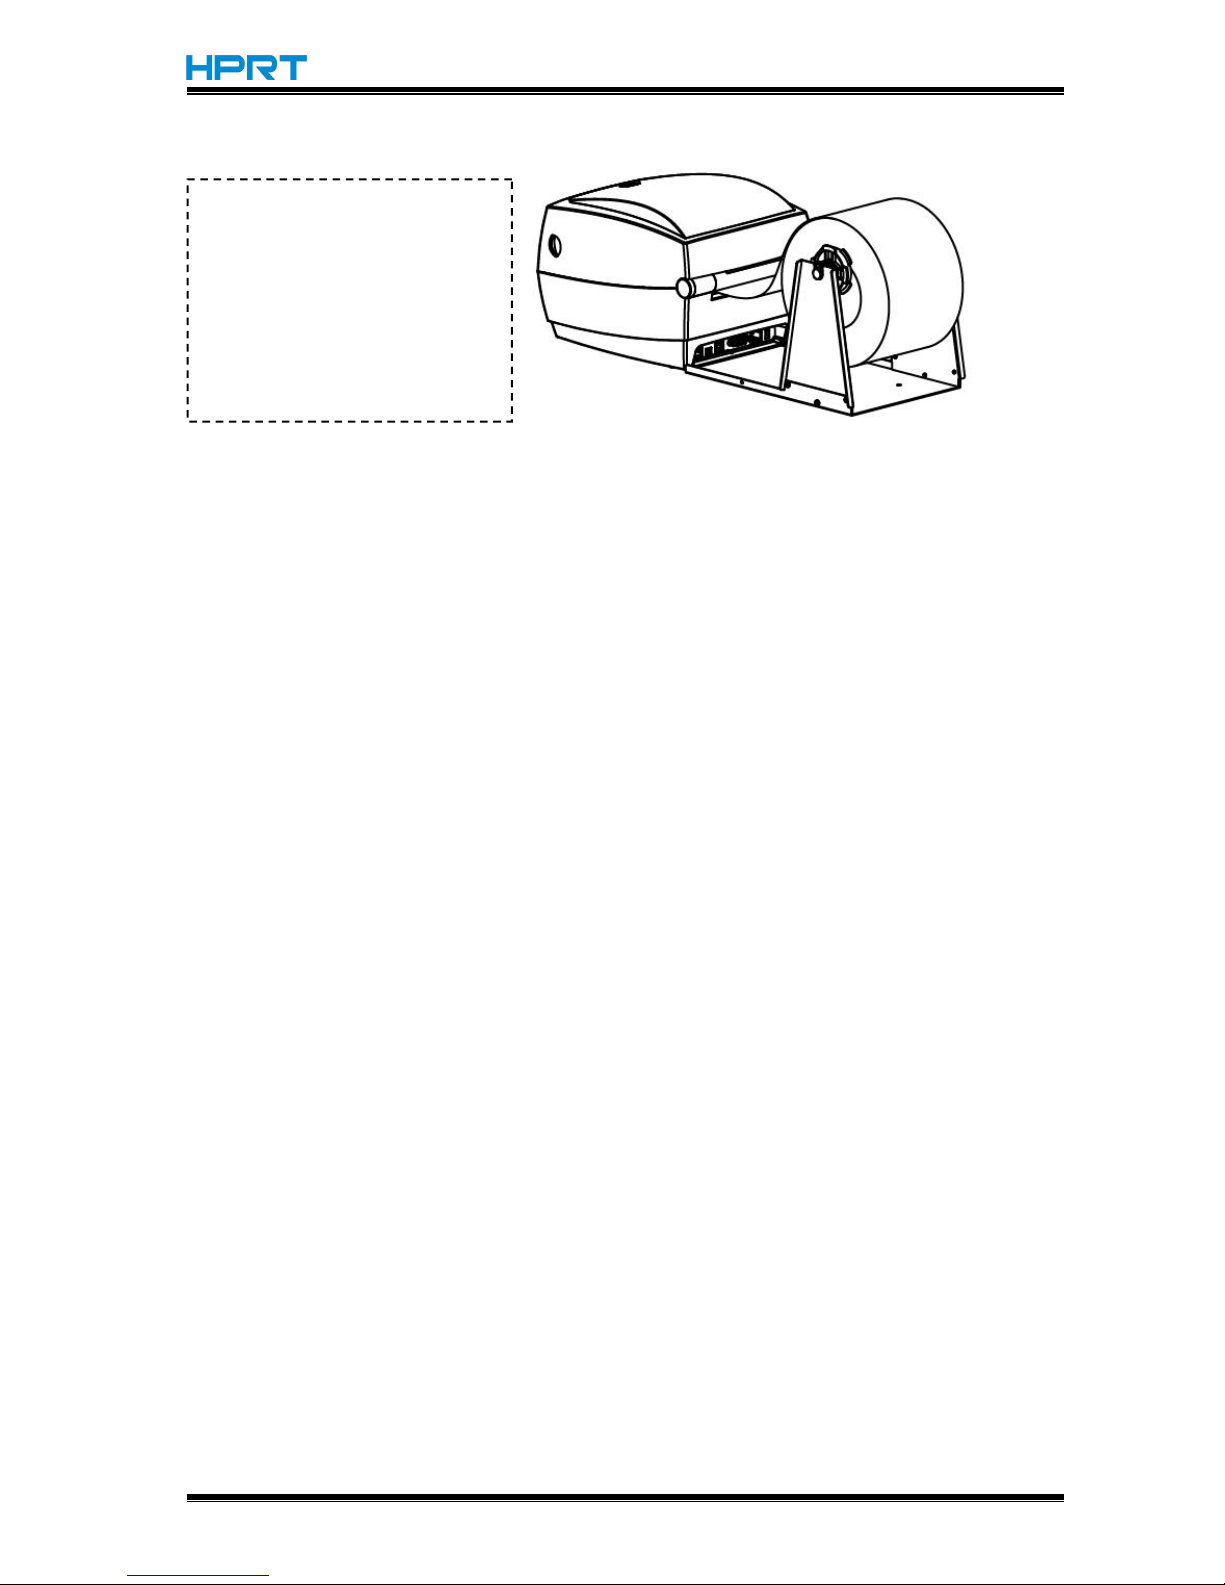
3.1.3 External Paper Roll Loading
If the paper roll is extremely
large, users can load the paper
roll outside(See the graph at
right). Pass the paper through
the external feed slot and then
through the paper guides.
Page 19
HT300/HT330 User Manual
Rev.1.0
16
3.2 Power Connection
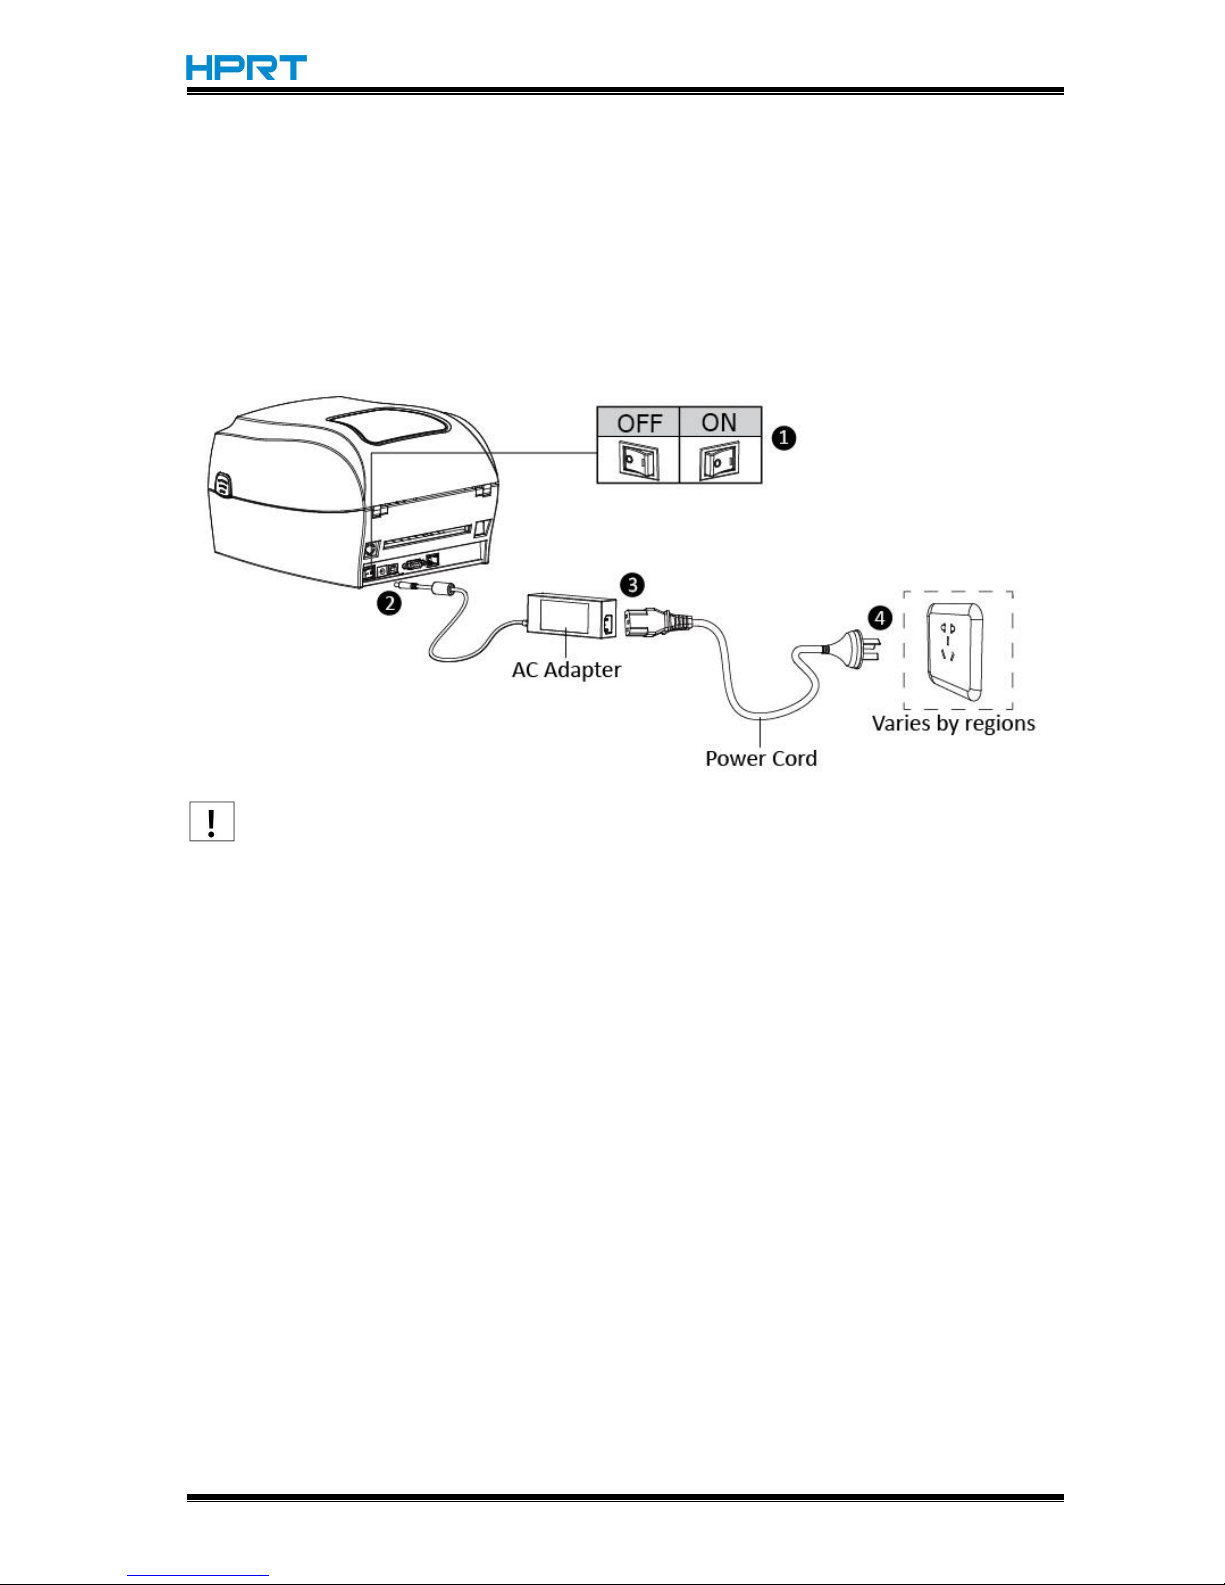
1. Make sure the printer’s power switch is in the off position.
2. Connect the AC adapter to power receptacle.
3. Connect the power cord to AC adapter.
4. Connect the other end of power cord to the outlet.
NOTE:
Use the original power adapter only. Avoid the damage caused by charging improperly.
Please unplug the printer power cord if it is not in use for a long time.
Page 20

HT300/HT330 User Manual
Rev.1.0
17
3.3 Peripherals Connection
3.3.1 Interface Cable Connection
The standard for the printer’s interface cable shows in the following.
-- USB B-Type Cable
-- RS-232C(Serial) Cable
-- RJ45 Cable
Please follow the instructions to connect the cable.
1) Turn off the power switch.
2) Connect the communication cable to the printer communication port to be used.
-- Connect USB B-Type cable to the USB port.
-- Connect the RS-232C(Serial) cable to the serial port.
-- Connect the RJ45 cable to the ethernet port.
3.3.2 Bluetooth Connection
PDA with Bluetooth interface, laptop and other information terminals can drive the mobile
thermal printer HT300 or HT330. Instructions as follows:
1. Power on printer.
2. Primary device search for outer Bluetooth devices.
3. If there are some outer Bluetooth devices, choose HT300 or HT330.
4. Finish pairing.
Detailed pairing methods, please refer to primary devices Bluetooth Names.
After pairing, primary devices with virtual Bluetooth interface (smart phone , pocket PC,
palm, notebook) can drive mobile thermal printer HT300 or HT330 to printer through such
virtual Bluetooth interface.
Note: The original code is 1234.
Page 21

HT300/HT330 User Manual
Rev.1.0
18
3.4 Detection
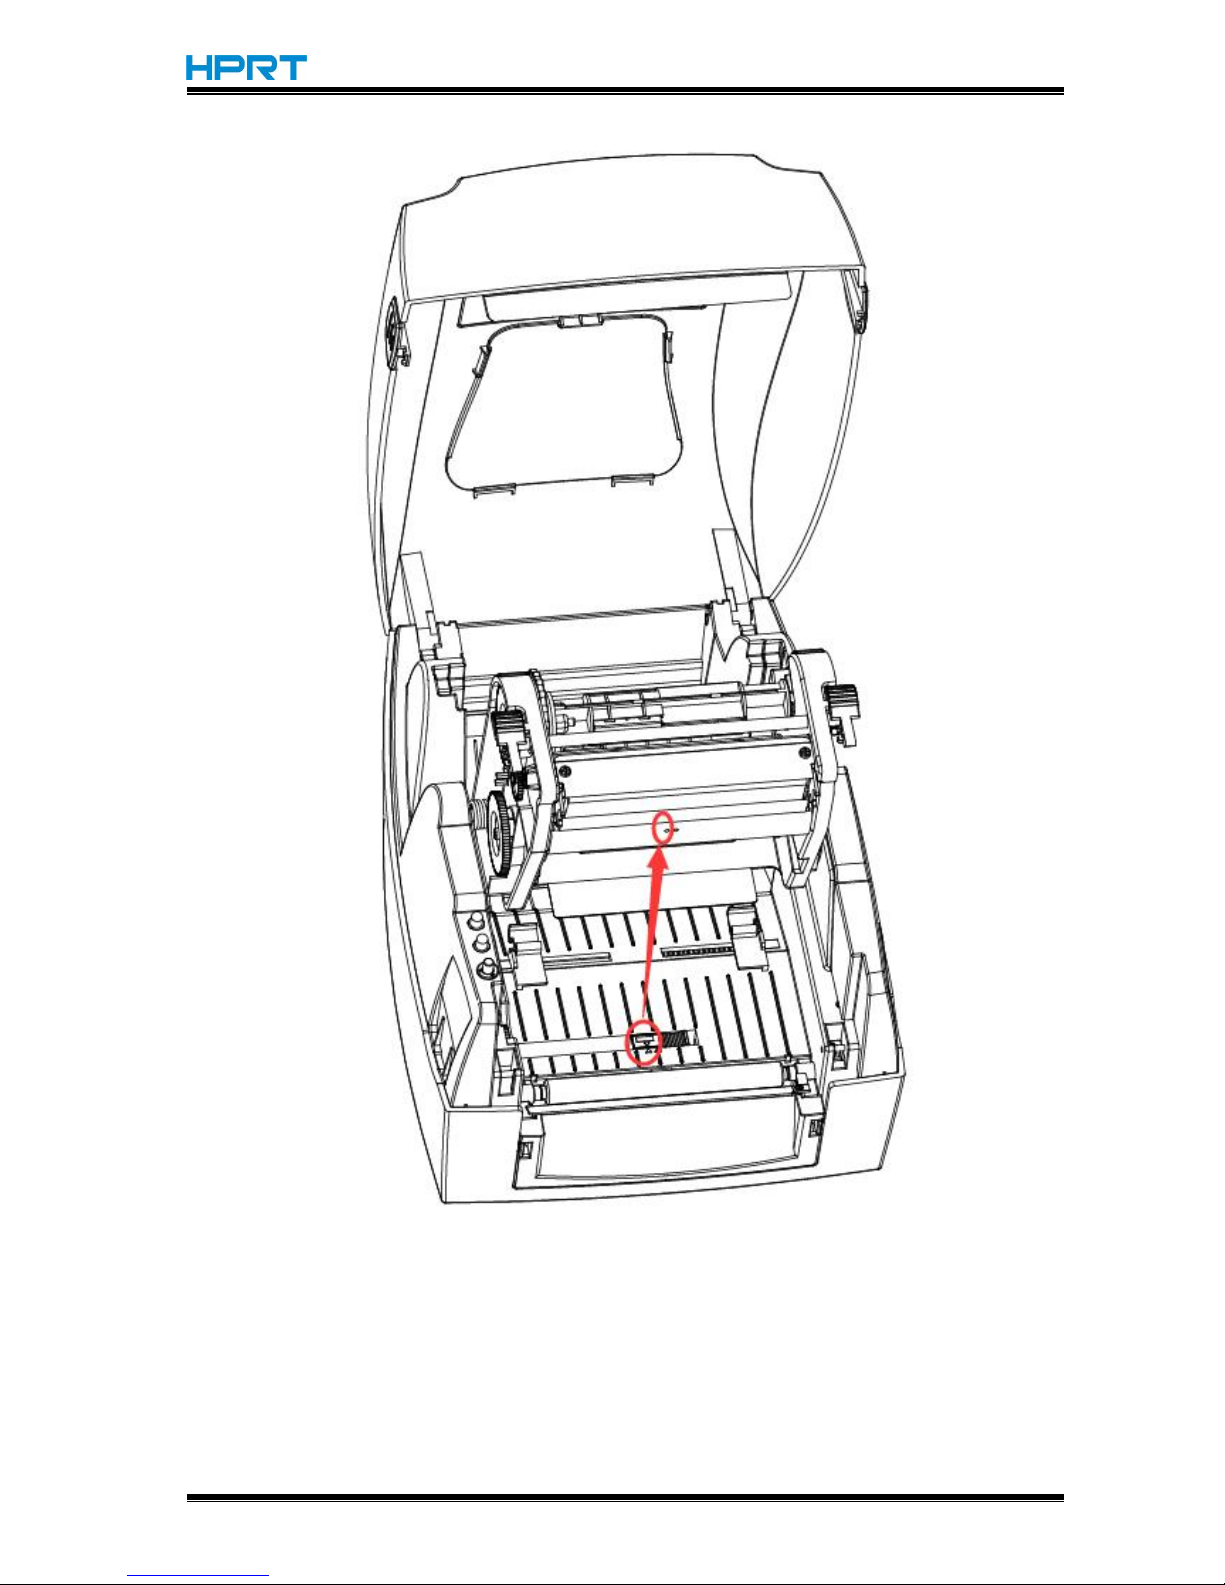
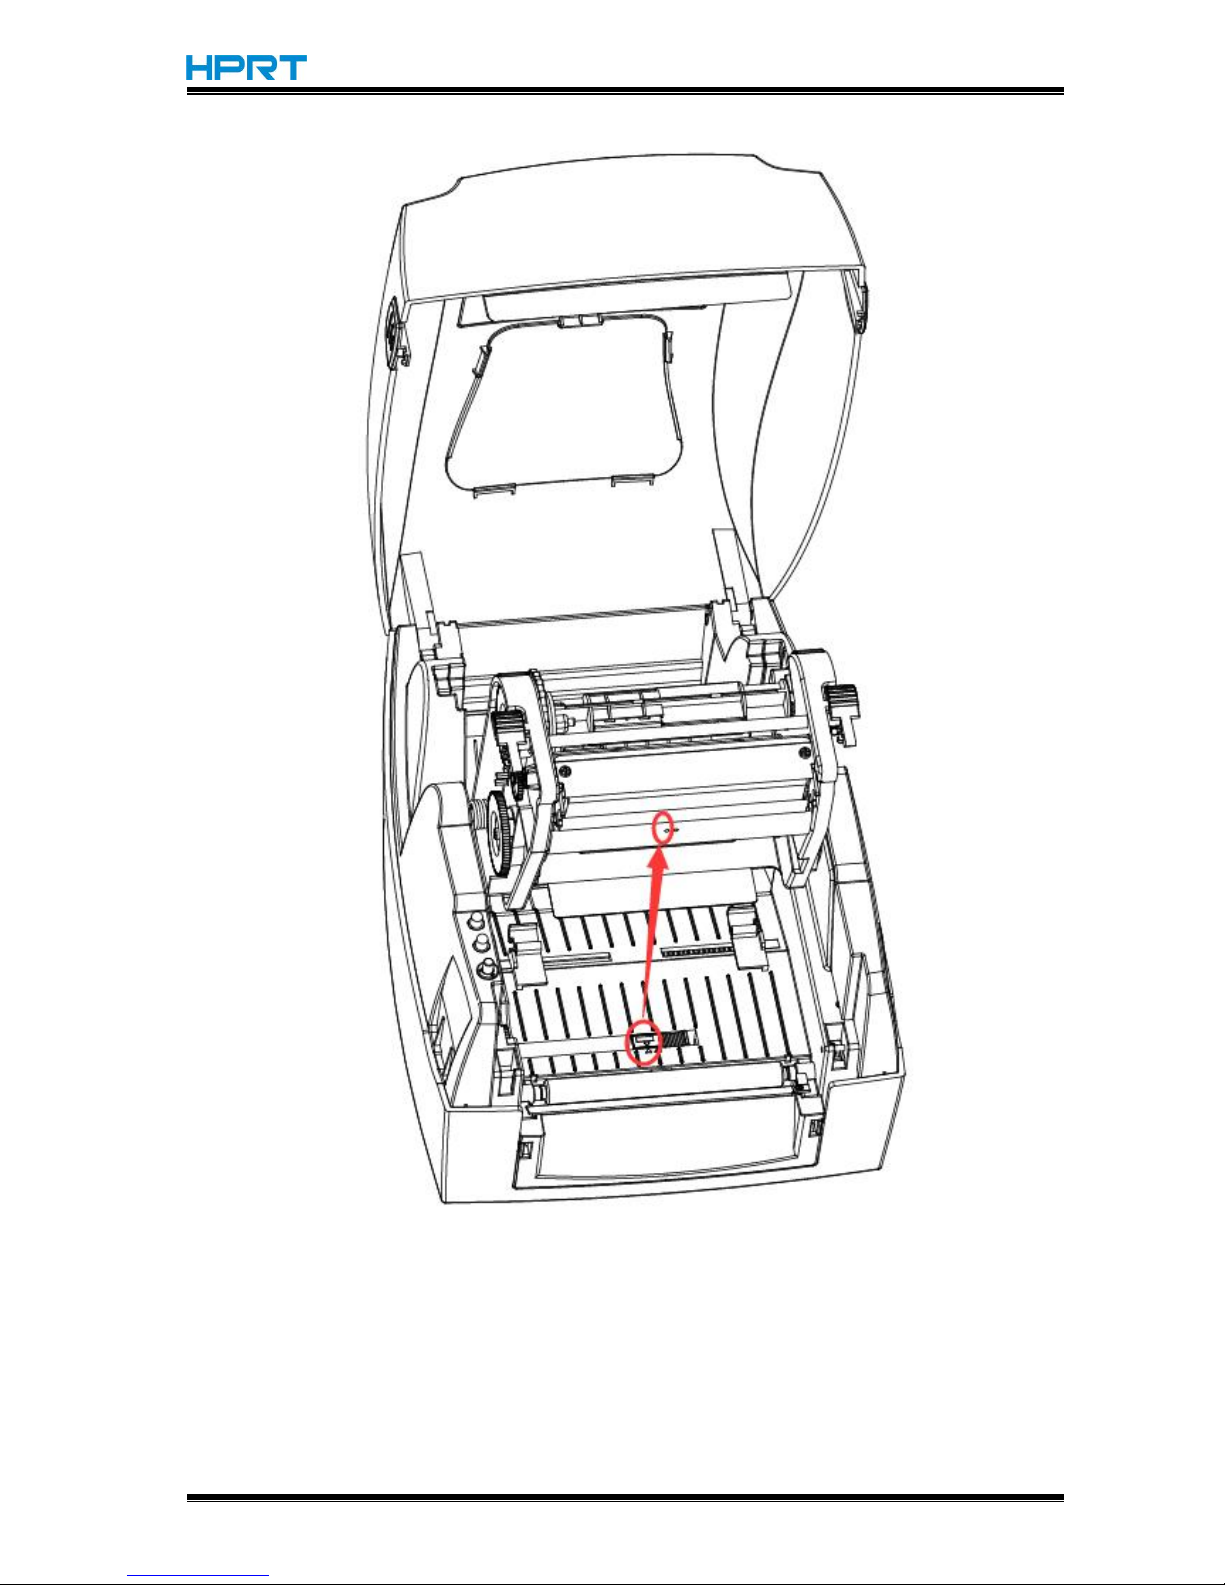
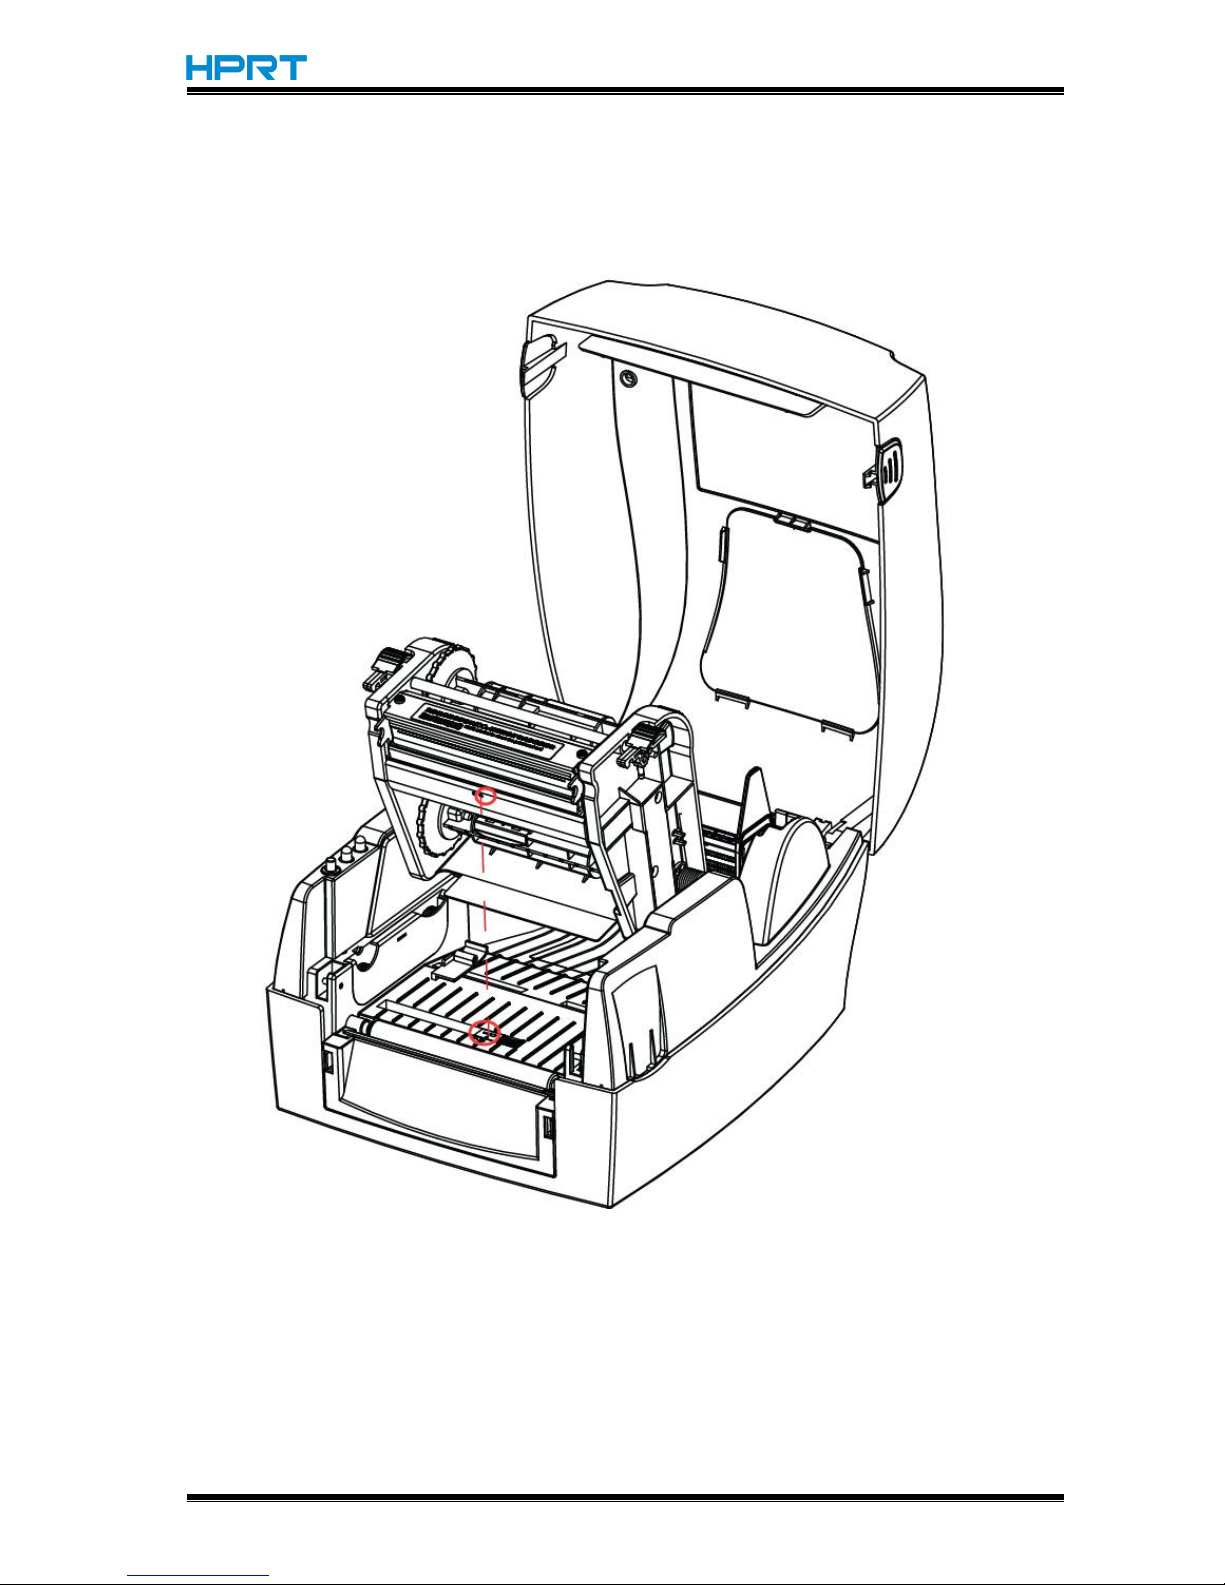
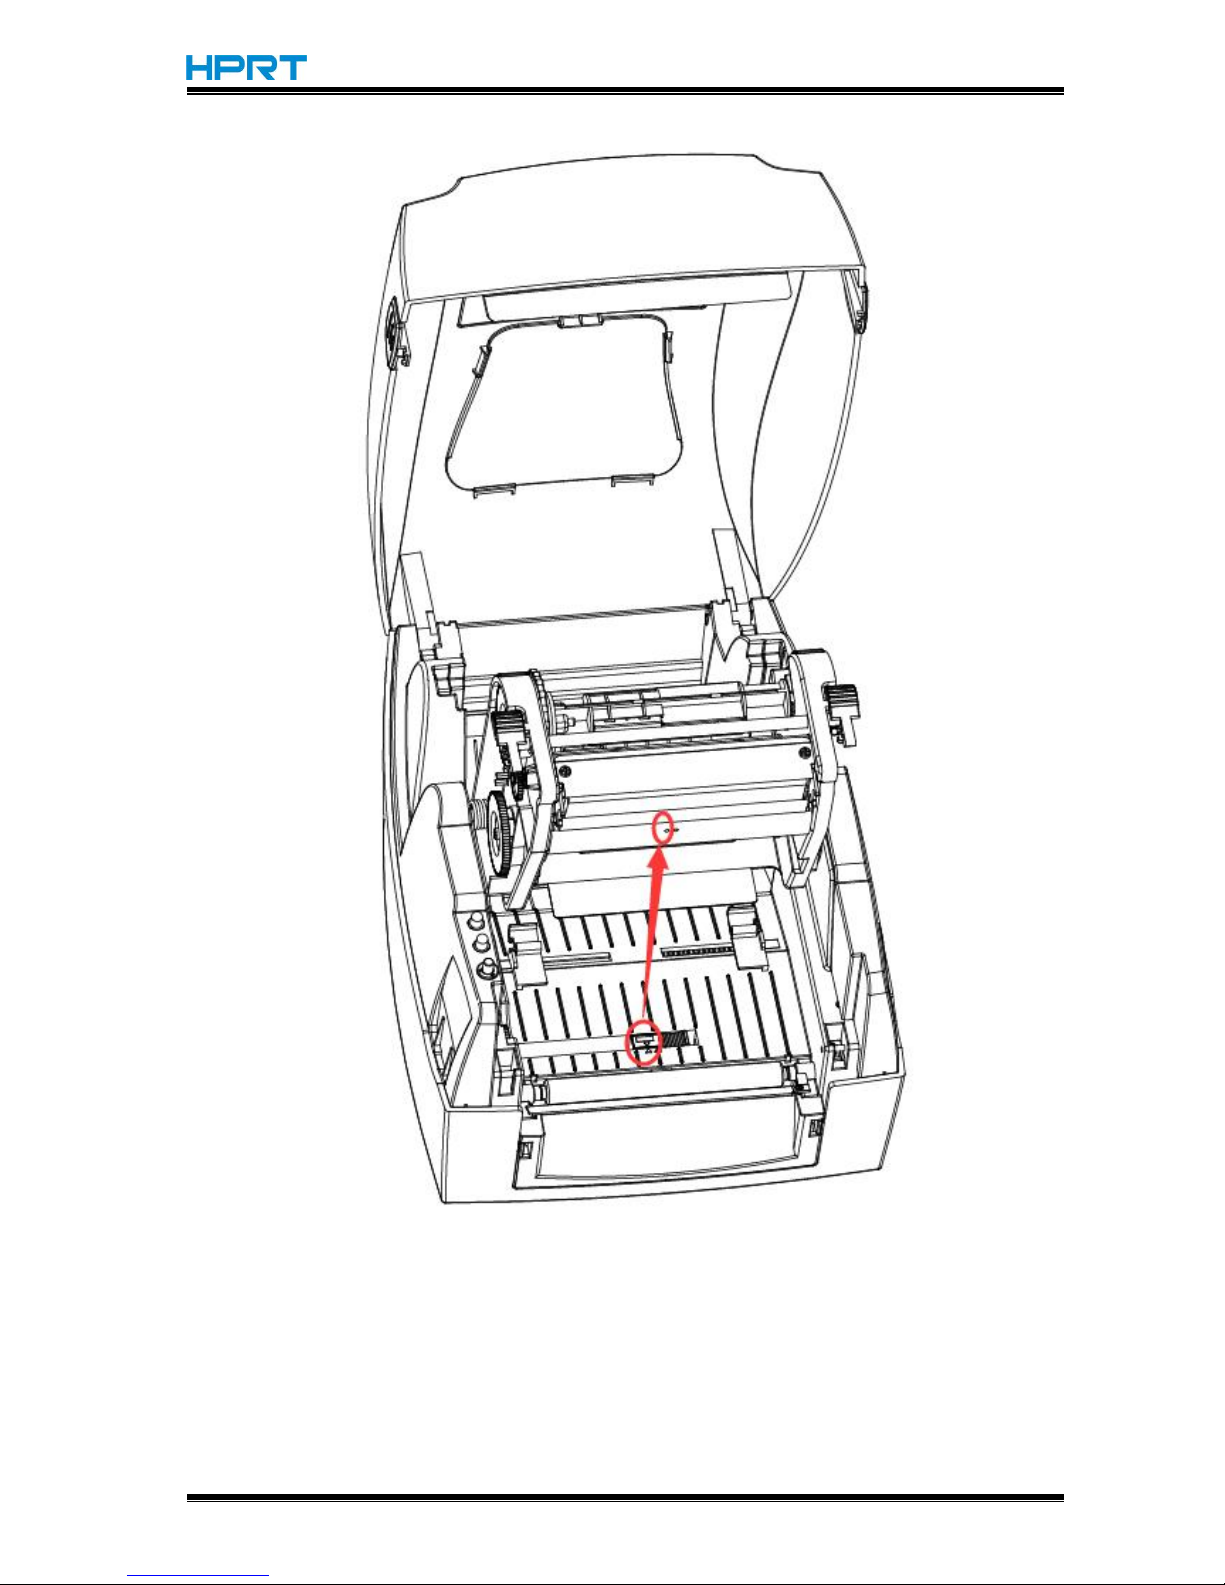
When printing paper, the moveable label sensor is used to detect paper. The label sensor
moves differently when using various kinds of paper. If user moves the sensor improperly,
paper may not be detected, therefore the printer could not print paper. The following
instructions tell users how to use label sensor correctly. Please read it carefully.
3.4.1 Continuous Paper
When printing continuous paper(Figure 1), the sensor shall be aimed at the left photoelectric
hole (Figure 2), which is the original position.
Figure 1 (Continuous Paper)
Page 22
HT300/HT330 User Manual
Rev.1.0
19
Figure 2 (Left)
Page 23

HT300/HT330 User Manual
Rev.1.0
20
3.4.2 Double-row Labels
When printing double-row labels(Figure 3), the sensor shall be aimed at the left photoelectric
hole (Figure 4), which is the original position.
Figure 3 (Double-row Labels)
Page 24
HT300/HT330 User Manual
Rev.1.0
21
Figure 4 (Left)
Page 25
HT300/HT330 User Manual
Rev.1.0
22
3.4.3 Punched Hole Label
When printing punched hole labels, move the sensor until it’s aimed at the right photoelectric
hole(Figure 5).
Figure 5 (Right)
Page 26
HT300/HT330 User Manual
Rev.1.0
23
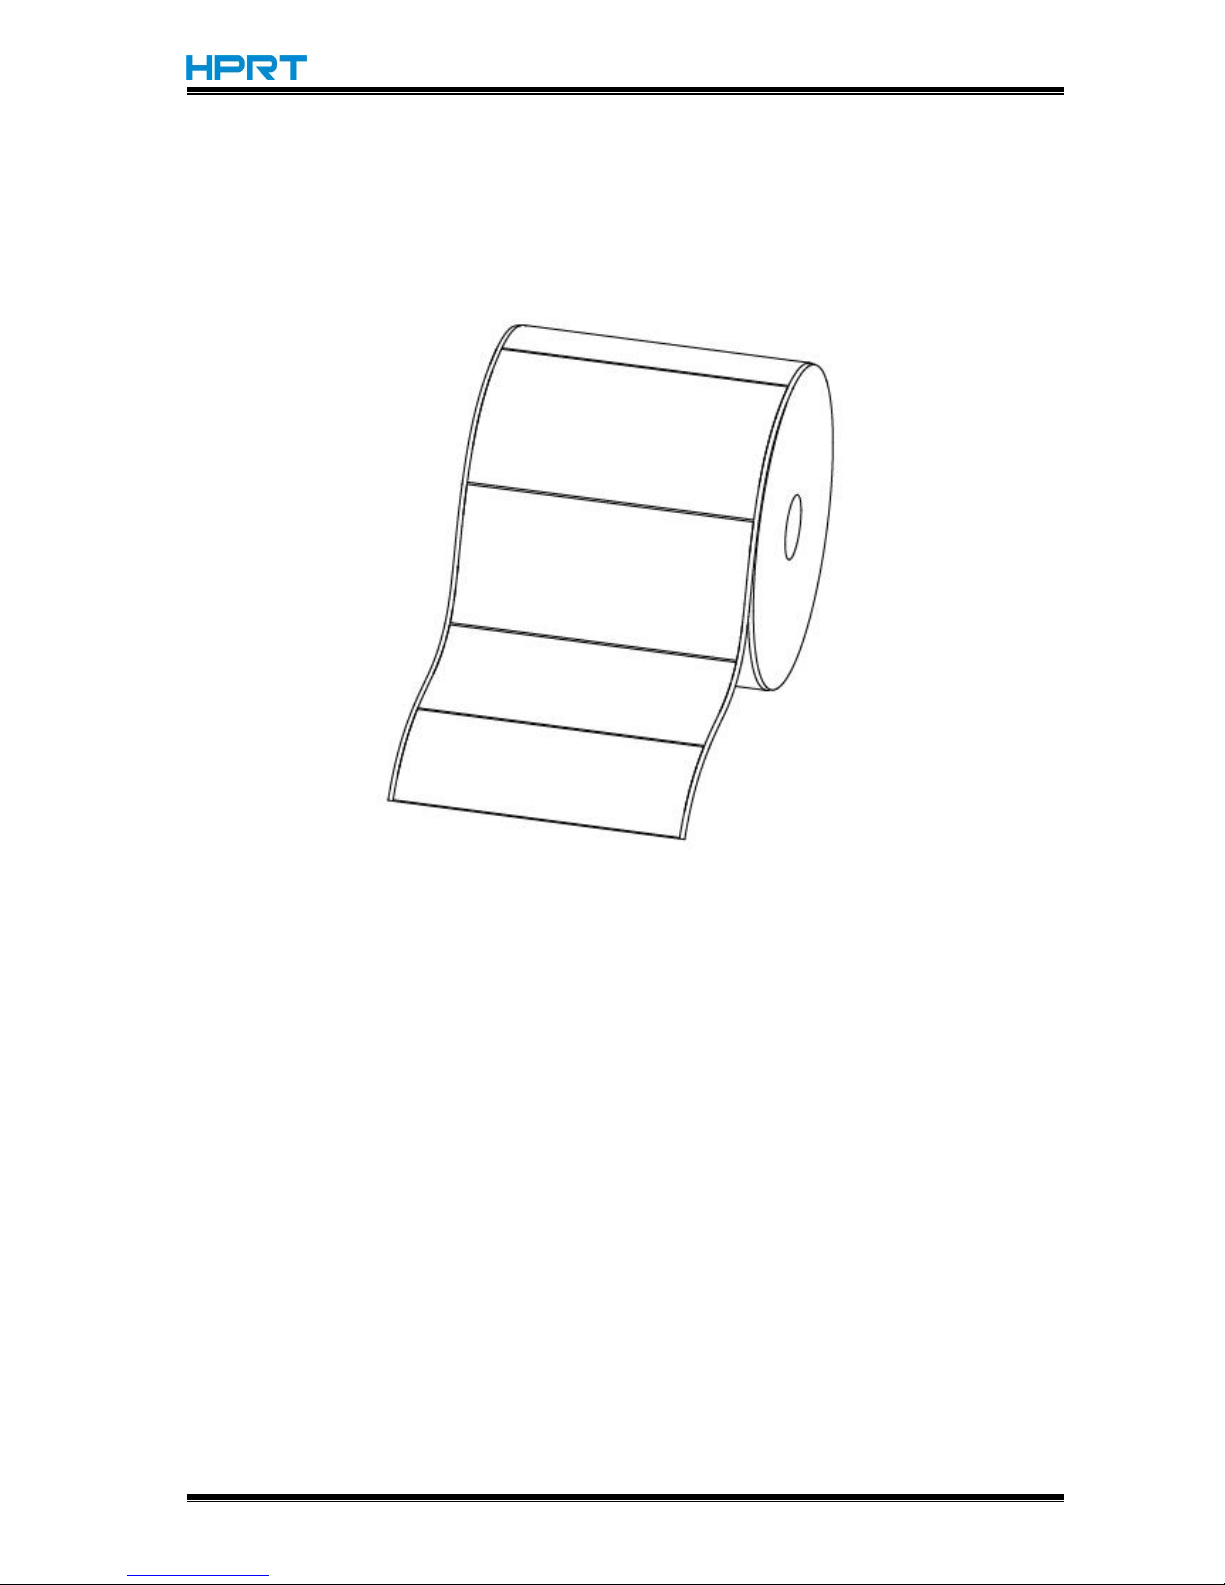
3.4.4 Label
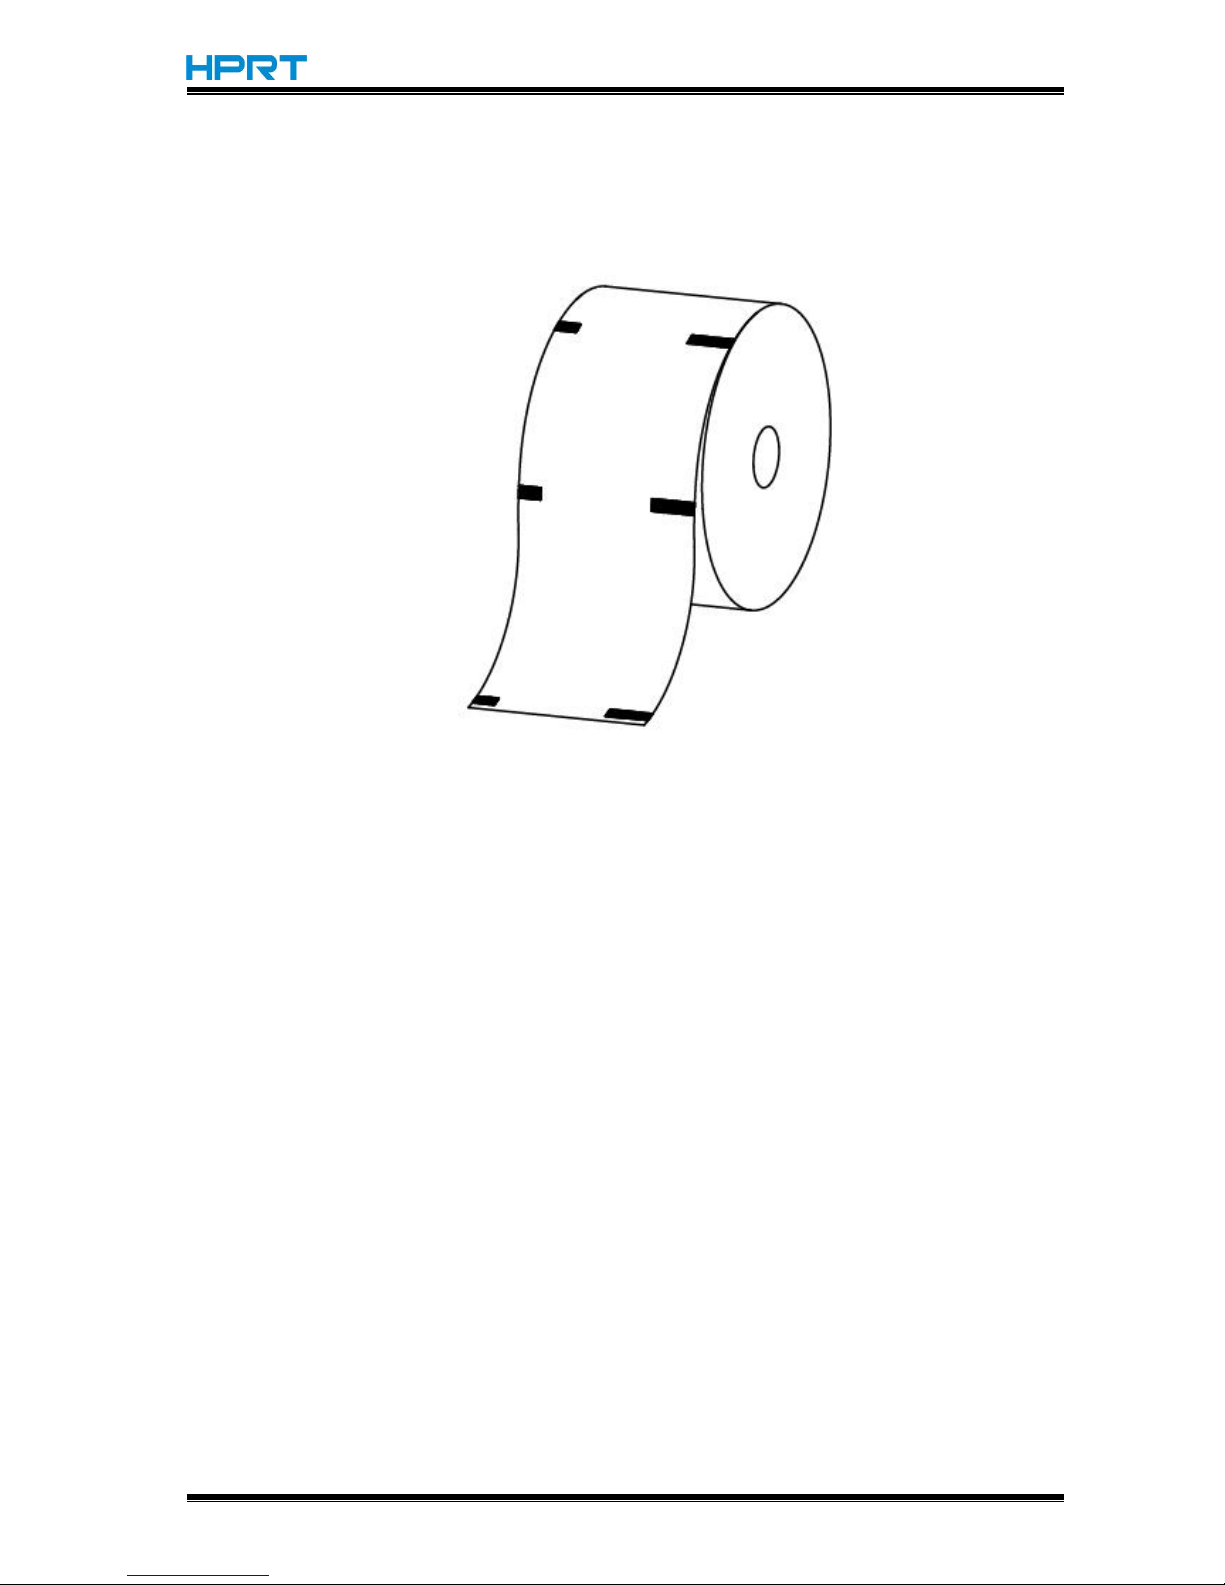
When printing labels (thermal label/label)(Figure 6), the sensor shall be aimed at the left
photoelectric hole (Figure 7), which is the original position.
Figure 6 (Labels)
Page 27
HT300/HT330 User Manual
Rev.1.0
24
Figure 7 (Left)
Page 28
HT300/HT330 User Manual
Rev.1.0
25
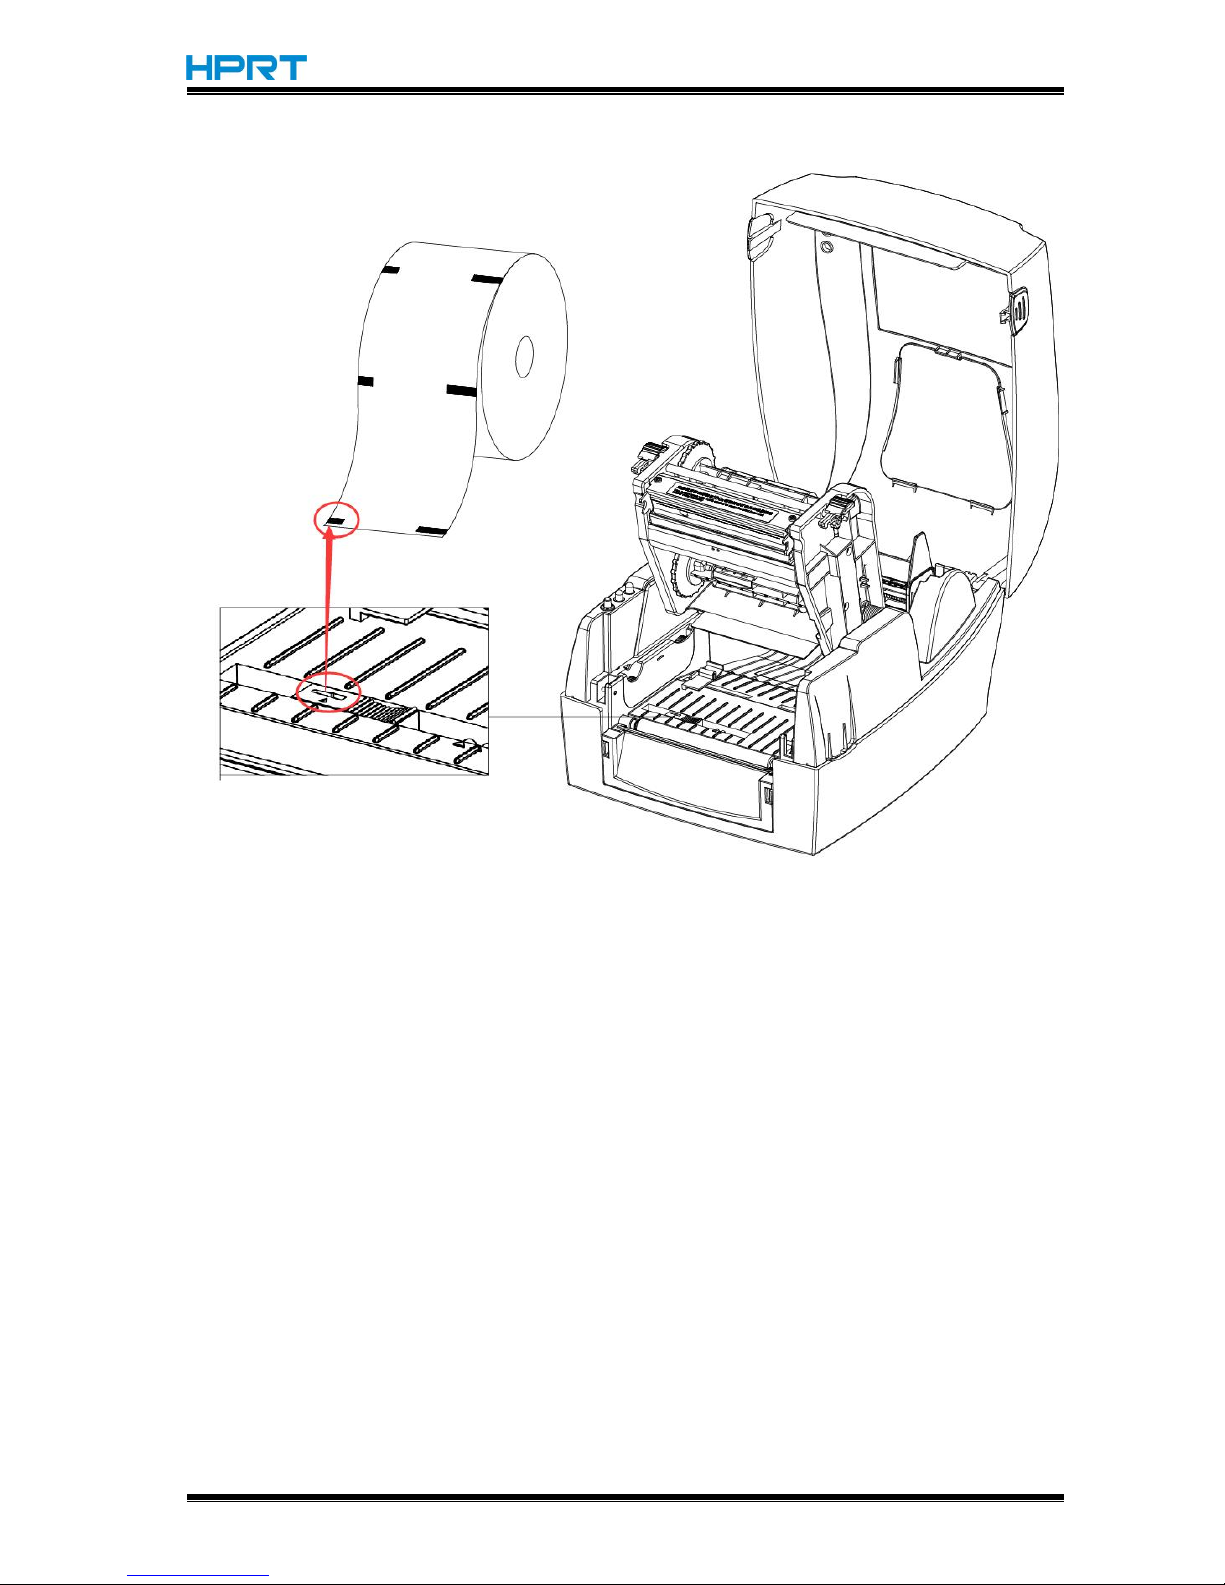
3.4.5 Blackmark Paper
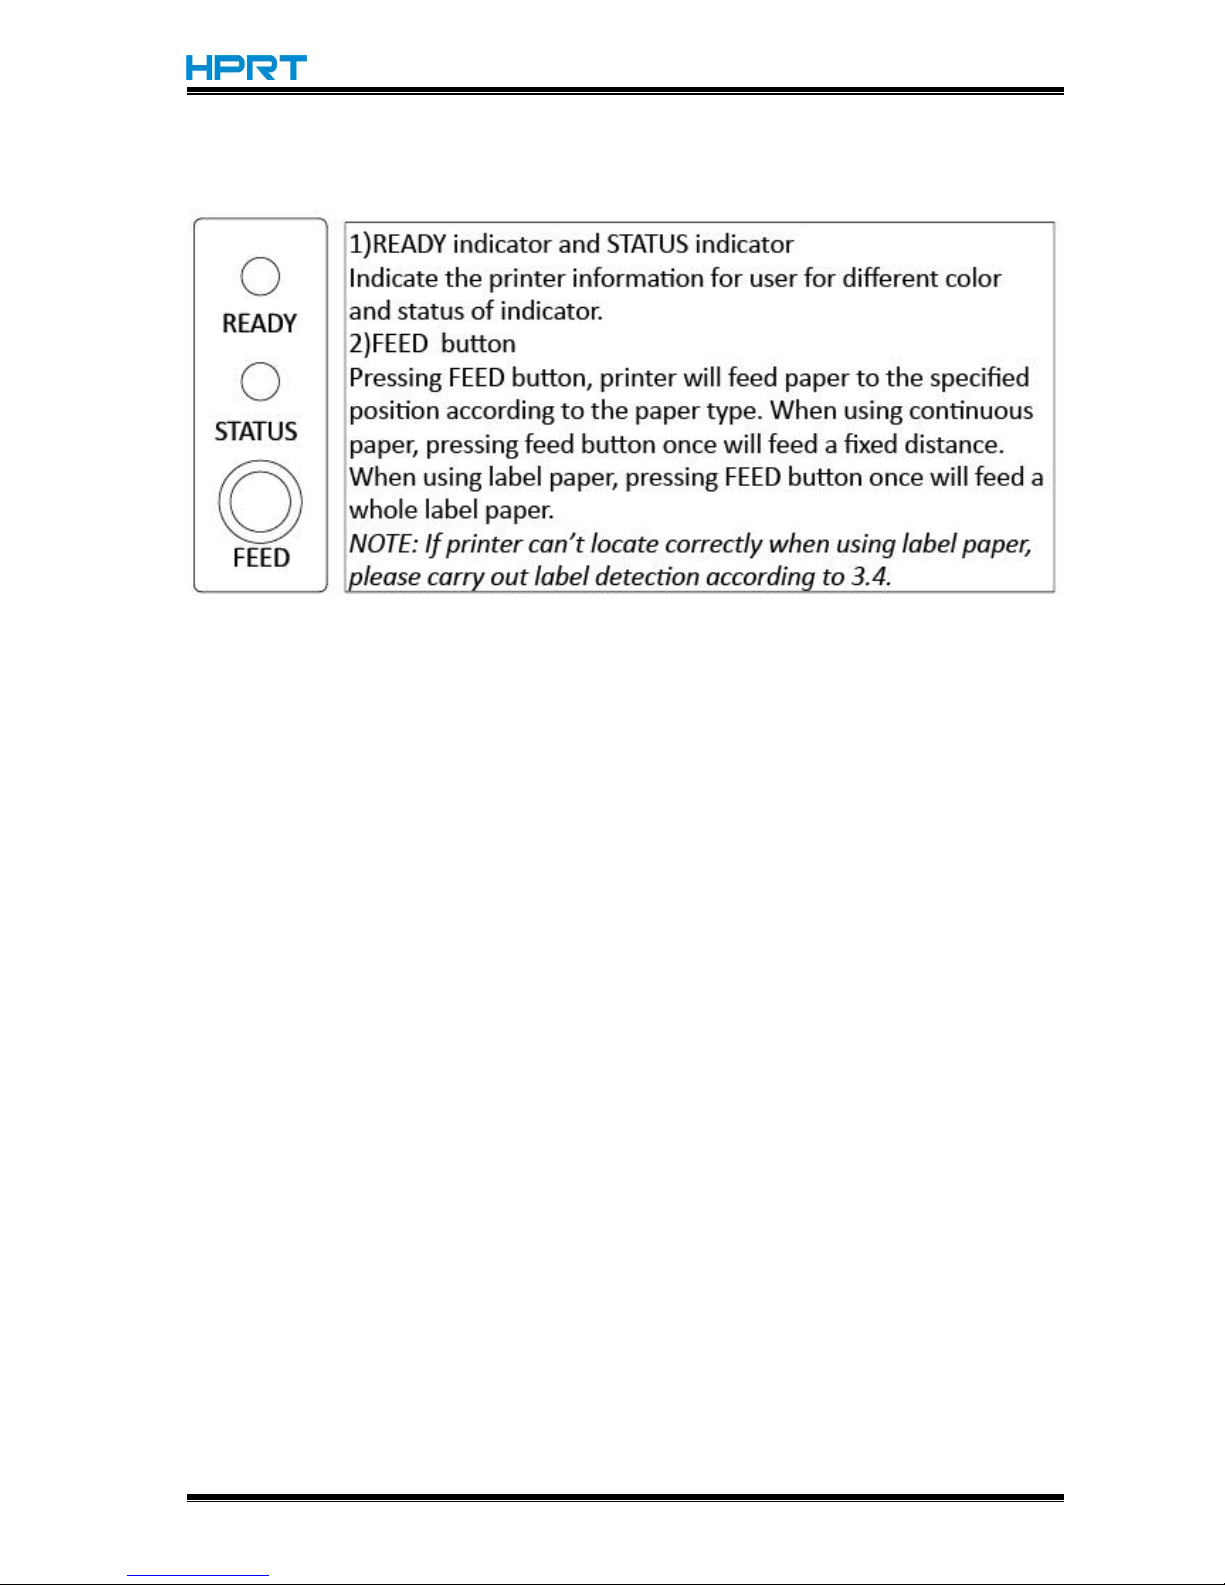
When printing blackmark paper(Figure 8), the sensor shall be aimed at the position of black
mark(Figure 9).
Figure 8 (Blackmark Paper)
Page 29
HT300/HT330 User Manual
Rev.1.0
26
Figure 9 (aimed at blackmark’s position)
Page 30
HT300/HT330 User Manual
Rev.1.0
27
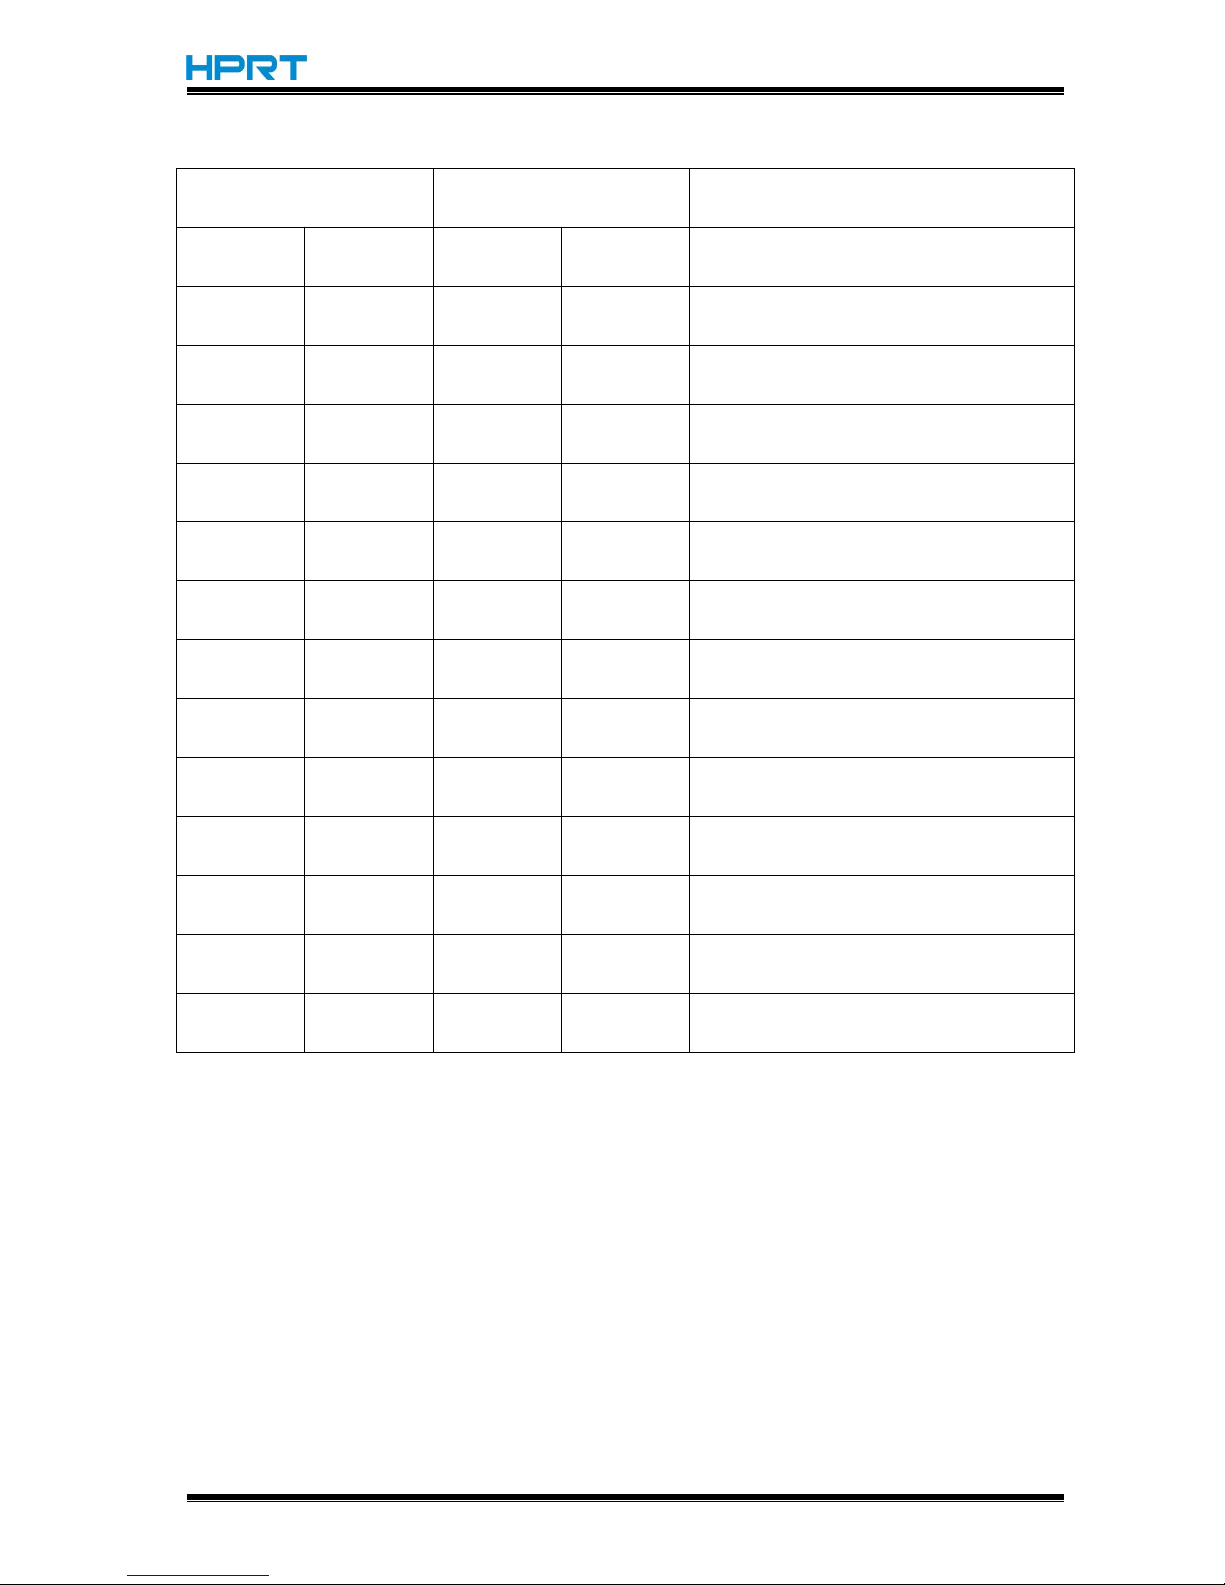
3.5 Operation Panel
Page 31
HT300/HT330 User Manual
Rev.1.0
28
Description of indicator status:
Ready
Status
Color
Action
Color
Action
Indicator Status
Green
Lit onXX
Ready
Green
Slow flash
X
X
Dump mode
Red
Lit onXX
Overheat of printhead
Red
Slow flash
X
X
Ribbon out
XXRed
Lit on
Head up
XXRed
Slow flash
Paper out
XXRed
Quick flash
Abnormal label calibration
Orange
Lit onXX
Out of ready
Orange
Quick flash
XXData is written on flash
XXOrange
Slow flash
Paper jam or label’s separation
XXGreen
Lit on
Printing
XXGreen
Slow flash
Pause of printing
XXGreen
Quick flash
Receiving data
Page 32

HT300/HT330 User Manual
Rev.1.0
29
3.6 Basic Operation
3.6.1 Power on/power off
Press “O” to power off the printer. Press “l”to power on the printer.
3.6.2 Feed Button
Pressing FEED button, printer will feed paper to the specified position according to the paper
type. When using continuous paper, pressing FEED button once will feed the fixed distance.
When using labels, pressing FEED button once will feed a whole label.
3.6.3 Quick Calibration
Note: Users must carry out the calibration under the conditions below:
The first time to use the printer since installation;
The first time to use the printer since sensor cleaning;
Reuse the printer when it has not been used for a long time;
Change a new type of media;
Printer cannot recognize the mark;
Huge change of the operating environment;
Calibration method:
1.Carry out the calibration manually.
When printer is ready, press the FEED button until the status indicator(Green) flashes twice.
Then release the button, and printer will start to do the calibration. When printer does the
calibration under Continuous Media Mode, the calibration is invalid.
2.Carry out the calibration by printer utility tool. Please refer to detailed information in
“Chapter 6 Label Printer Utility Instructions”.
Caution: After the calibration, users could open the printer cover to pull back the
learned paper in avoid of paper wasting.
Page 33

HT300/HT330 User Manual
Rev.1.0
30
3.6.4 Printing Self-test Page
The self-test checks the printer’s current settings, status and whether the printer has any
problems or not.
1.Printing Manually
1) Make sure the roll is loaded properly.
2) Make sure the top cover and mechanism of the printer are closed properly. Then turn on
the printer.
3) When the printer is ready, press the feed button continuously. As soon as the indicator
flashes (green) once, loosen the button. Then the printer starts to print the self-test page.
2.Printing by Windows Driver Program
1) Install the Windows Driver program.
2) Please set the “Interface” as the type you use.
3) Use the Windows Driver Program to print out the “Self-test page”.
4) Please refer to “Chapter 7 Seagull Windows Driver Instructions” for more detailed
information.
3.Printing by HPRT BarTender Ultralite Program
1) Install the HPRT BarTender Ultralite program.
2) Edit a new label and print it.
3) Please refer to “Chapter 8 BarTender® Ultralite Instructions” for more detailed information.
Page 34
HT300/HT330 User Manual
Rev.1.0
31
Chapter 4 Interface
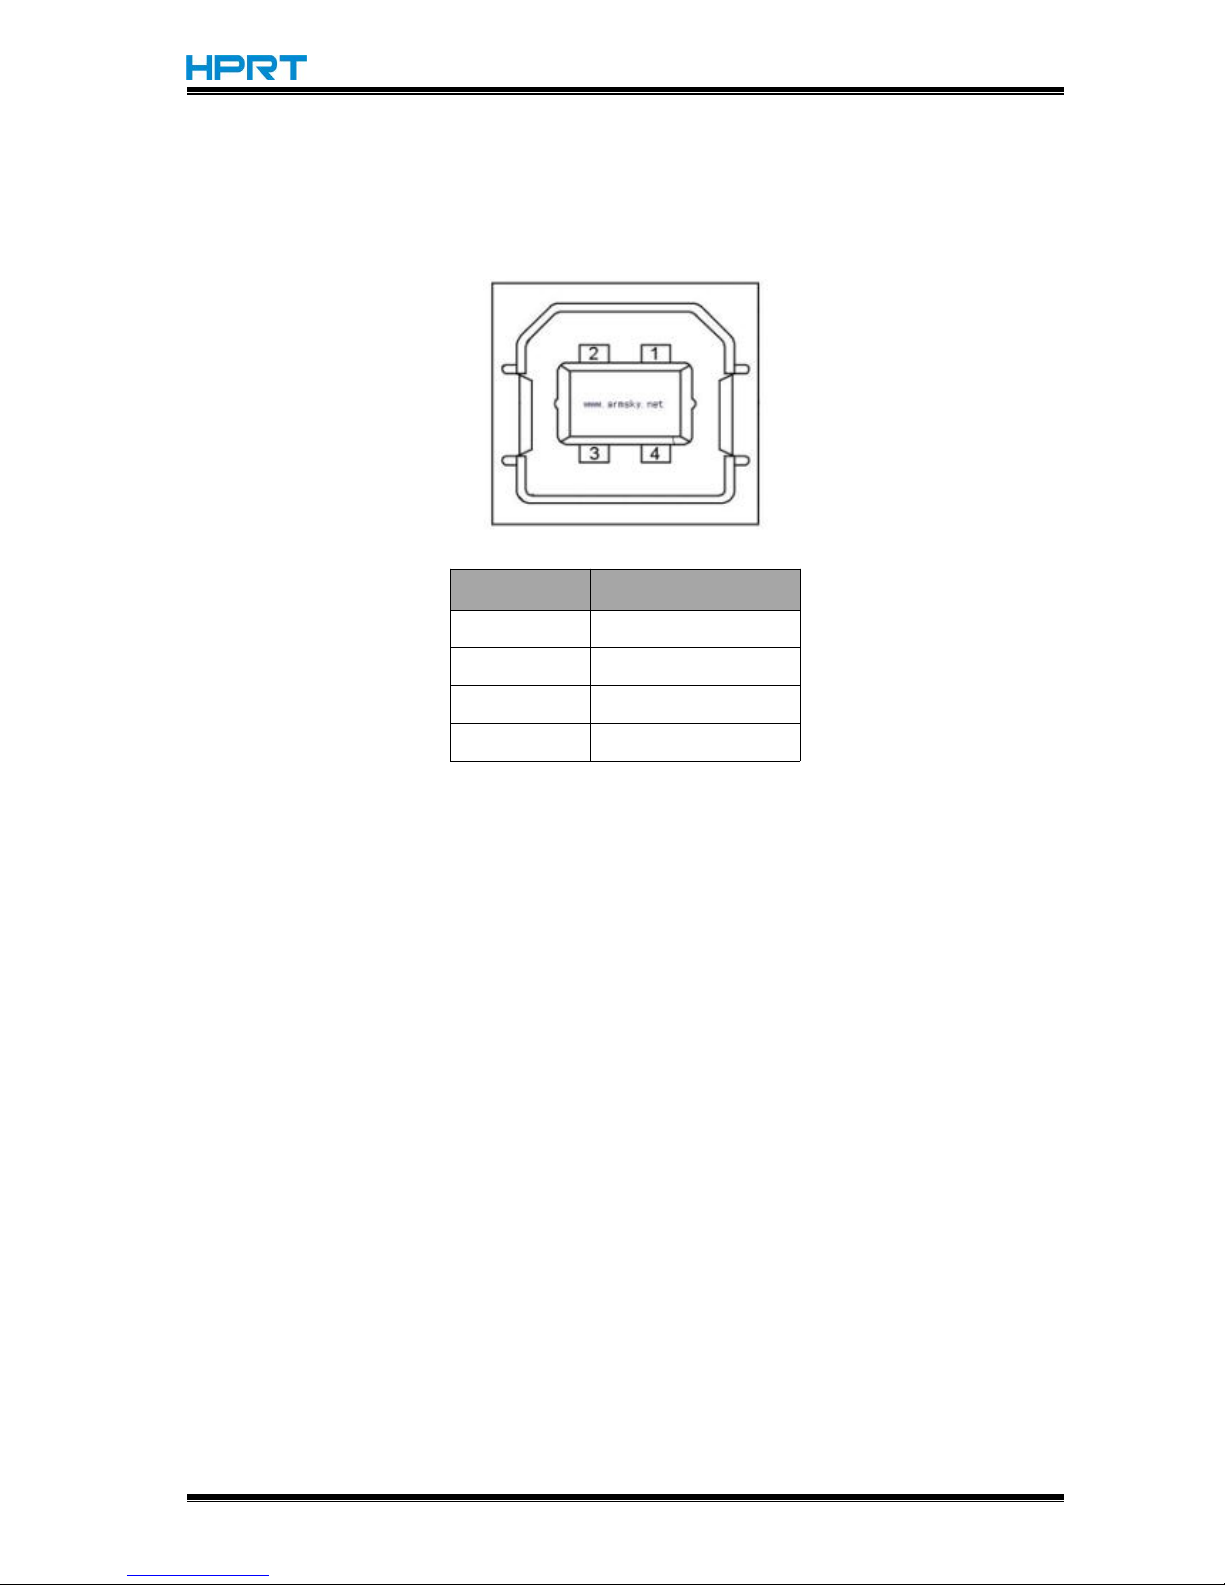
4.1 USB Interface
PIN
SIGNAL NAME
1
VBUS
2
D-
3
D+
4
GND
Page 35
HT300/HT330 User Manual
Rev.1.0
32
4.2 Other Optional Interfaces
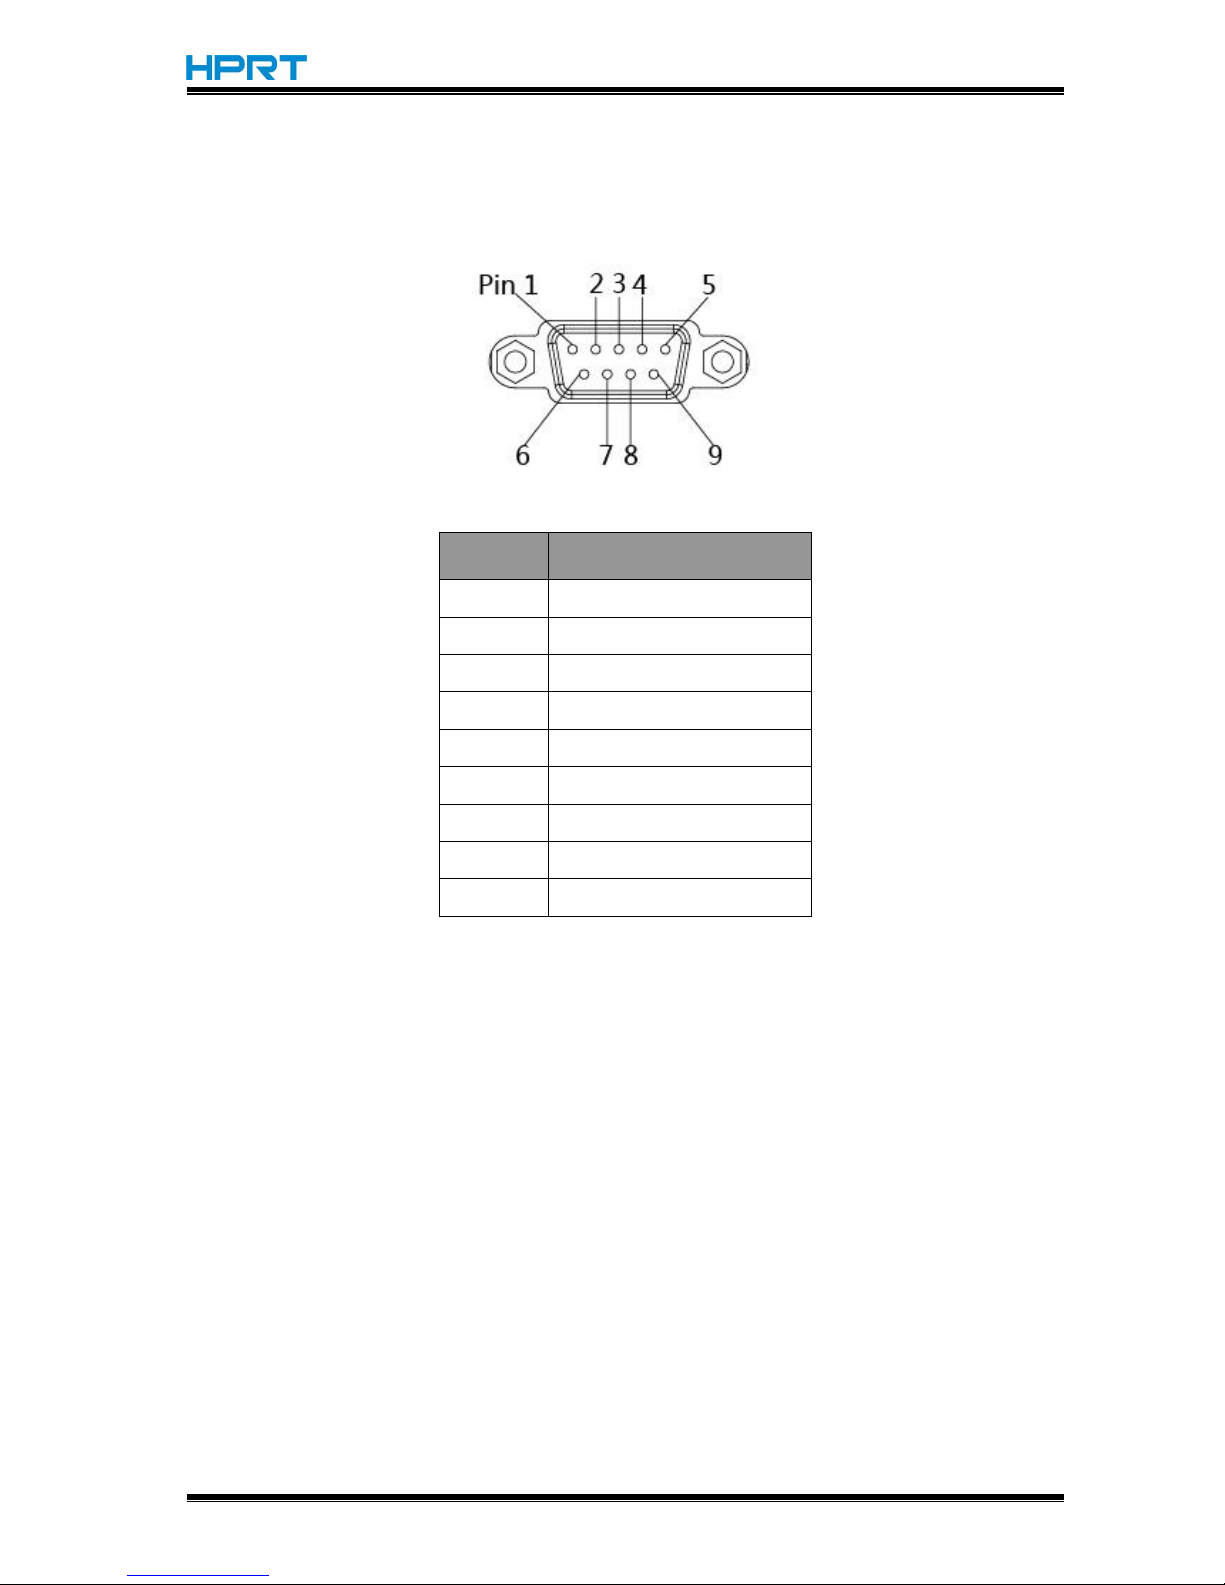
Serial Port
PIN
SIGNAL NAME
1
-
2
TXD3RXD
4
-
5
GND
6
RTS7CTS
8
RTS
9
-
Page 36
HT300/HT330 User Manual
Rev.1.0
33
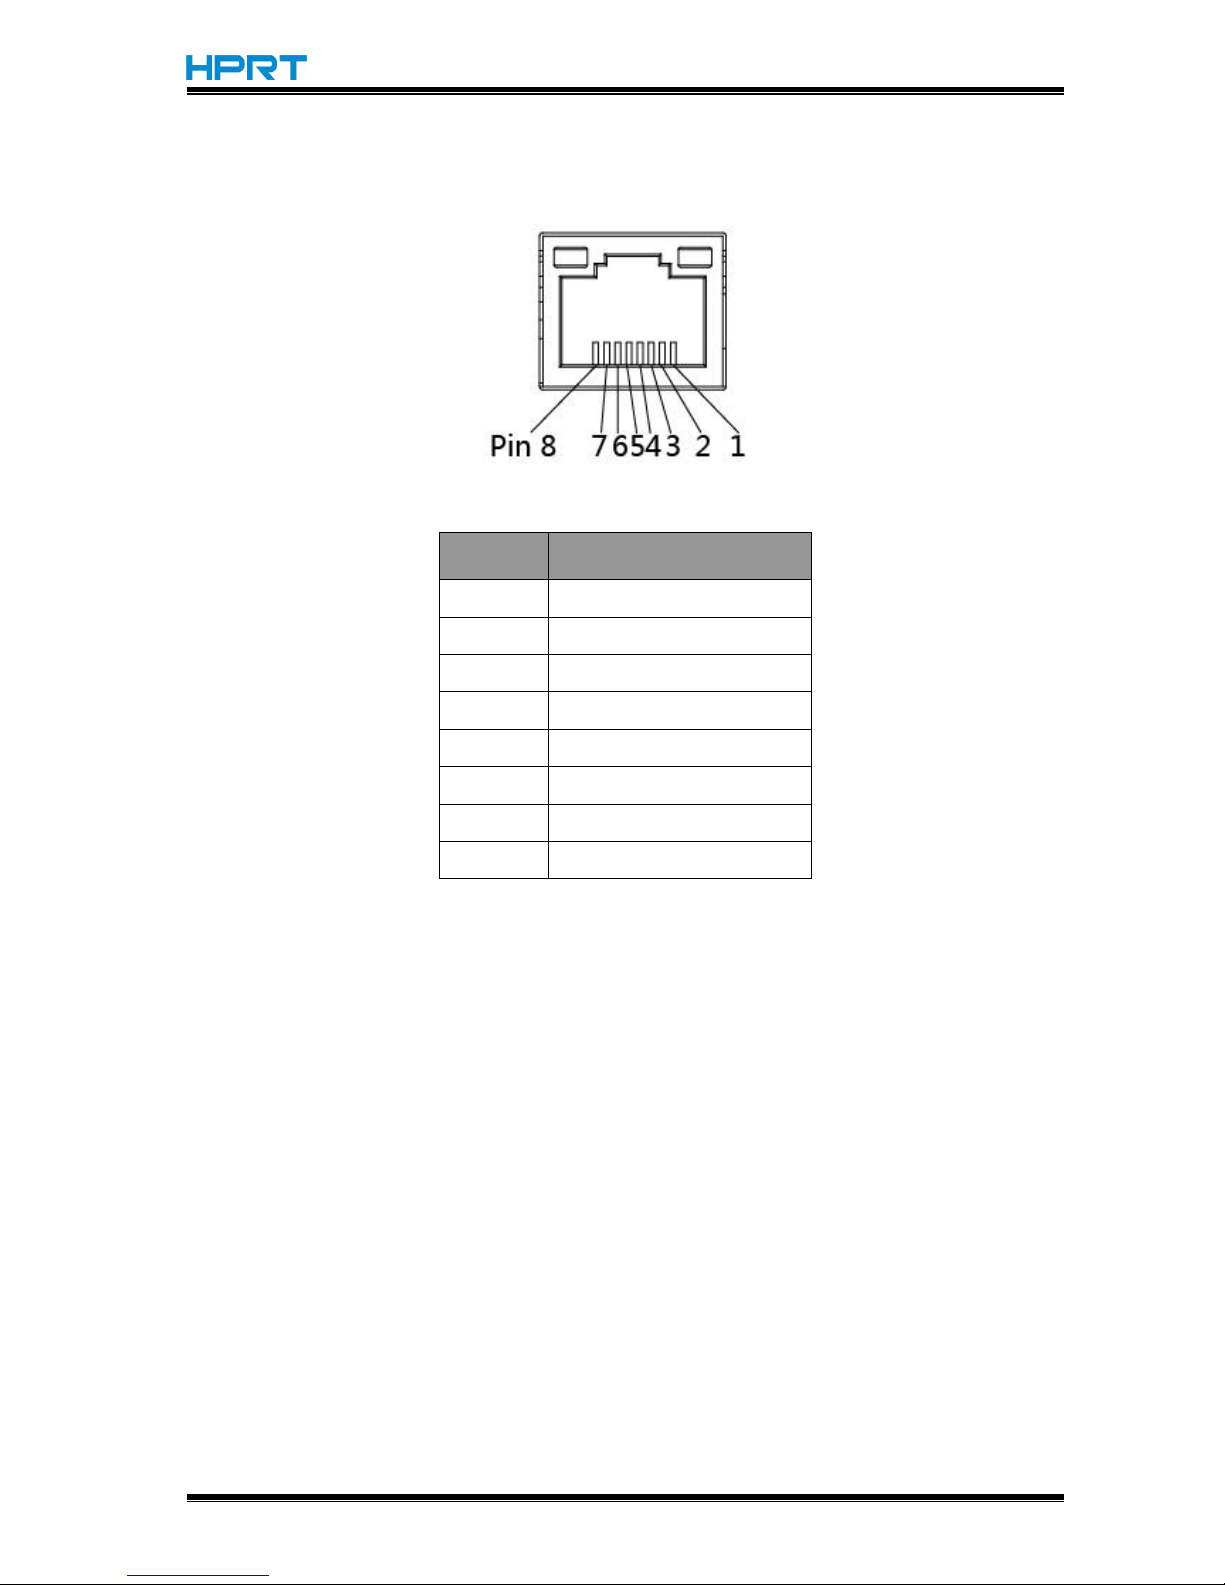
Ethernet Port
PIN
SIGNAL NAME
1
TX+
2
TX-3RX+
4
-
5
-
6
RX-7-
8
-
Page 37

HT300/HT330 User Manual
Rev.1.0
34
Chapter 5 Maintenance & Adjustment
Adhesives and coatings of the media can transfer to the printer parts over time along the
media path including the thermal print head and media sensor. This build-up can accumulate
dust and debris. Failure to clean the print head, media path, and media sensor could result in
inadvertent loss of labels, label jams and possible damage to the printer.
Caution
Make sure to turn off the printer prior to cleaning.
As the print head gets hot during printing, if intending to clean the print head, turn the
printer off and wait approximately 2~3 minute before commencement.
When cleaning the print head, take care not to touch the heated portion of the print head.
Print Head is susceptible to damage from static electricity, etc. So it is strongly
recommended to wear hand gloves during cleaning progress.
Take care not to allow the print head become scratched and/or damaged in any way.
5.1 Cleaning Media Sensor
Debris or dirt on the paper sensor can cause a miss-read or unstable detection of the label gap.
Clean with a cotton bud dampened with alcohol.
5.2 Cleaning Thermal Print Head
Thermal Paper stock on the print head, which degrades print quality. Clean the print head with
methanol or isopropyl alcohol and a cotton bud. Do not touch the heating elements with your
fingers.
1) Open the Printer Cover and then use the cleaning pen to clean the head in the direction
from the center of the head to two sides.
2) After cleaning the head, do not use the printer until the alcohol used for cleaning
evaporates completely (1~2 min) and the printer has completely dried.
3) Perform the cleaning process each time the paper roll is replaced to prevent print quality
deterioration.
Page 38

HT300/HT330 User Manual
Rev.1.0
35
5.3 Cleaning Roller and/or Paper Path
1) Open the printer cover and then remove the paper.
2) Remove any dust or foreign substance using dry cloth or cotton swab.
3) Soak the cloth or cotton swab in alcohol for medical use and use it to remove adhesive
foreign substances or other pollution materials.
4) After cleaning the parts, do not use the printer until the alcohol evaporates completely (1~2
min) and the printer has completely dried
Note: Clean the parts when print’s quality or label detection degrades.
Page 39
HT300/HT330 User Manual
Rev.1.0
36
Chapter 6 Label Printer Utility Instructions
6.1 Installation Preparation
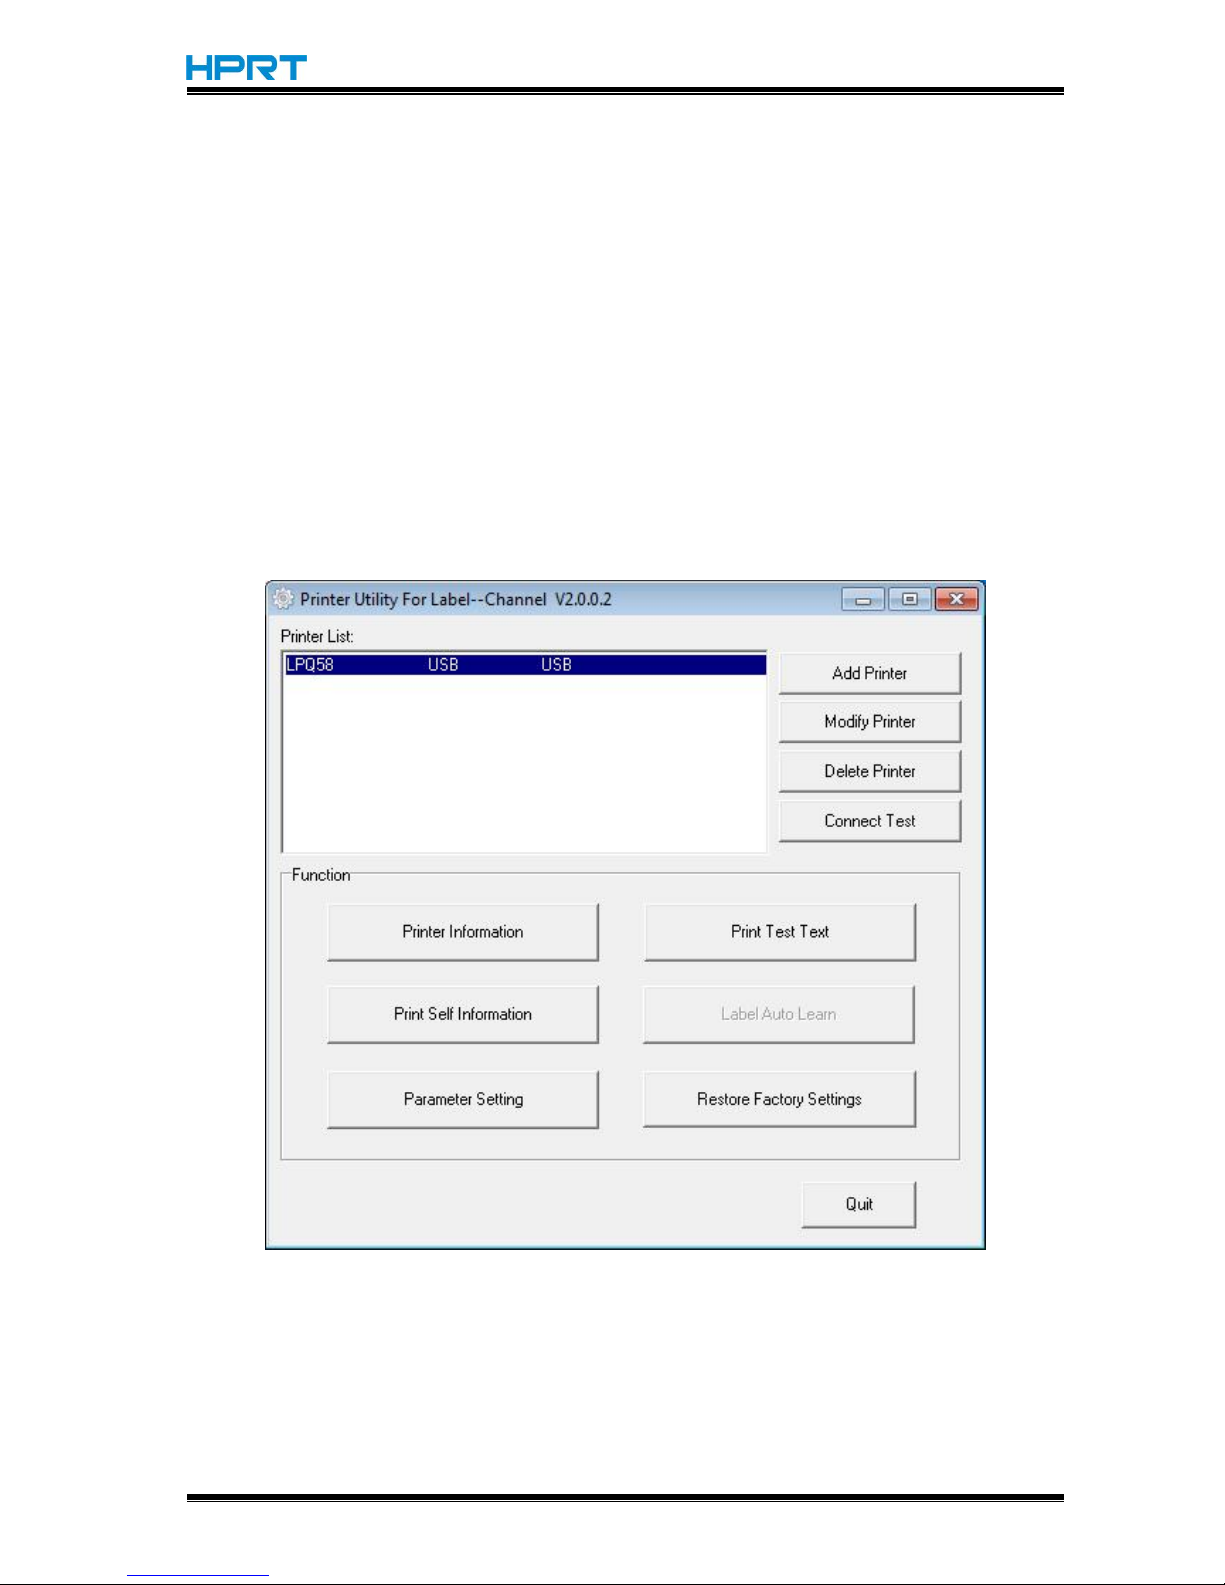
Download the application program in CD. eg: HPRTUtilityForLabel_Channel V2.0.0.2.
6.2 Usage
Note: The screen may vary slightly by different operating systems and models. Take HT300 as
example. Please refer to HT300 when using HT330.
(1)Install “HPRTUtilityForLabel_Channel V2.0.0.2.exe”, then open the “HPRTUtility”.
Page 40
HT300/HT330 User Manual
Rev.1.0
37
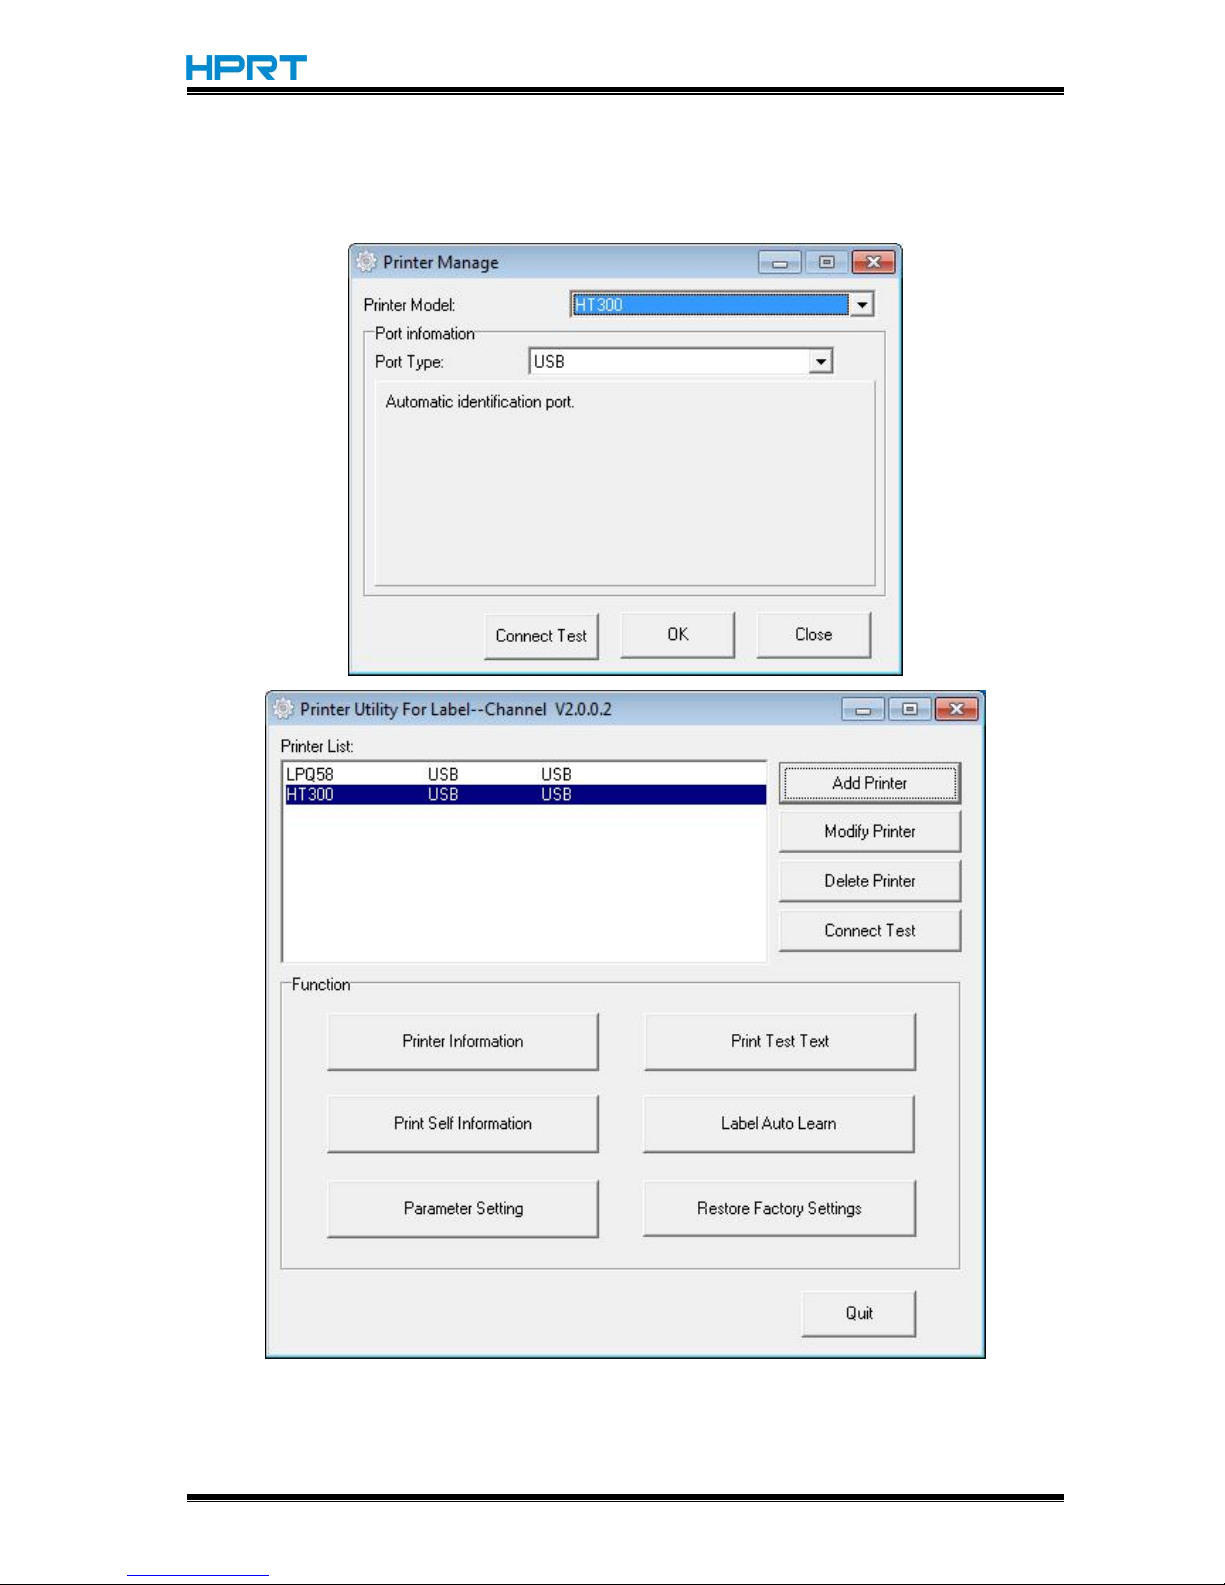
(2)Add/Modify/Delete Printer, Connect Test.
●Click “Add Printer”. Choose the printer and port(eg: USB), then click “OK”, showed in “Printer
List”.
Page 41
HT300/HT330 User Manual
Rev.1.0
38
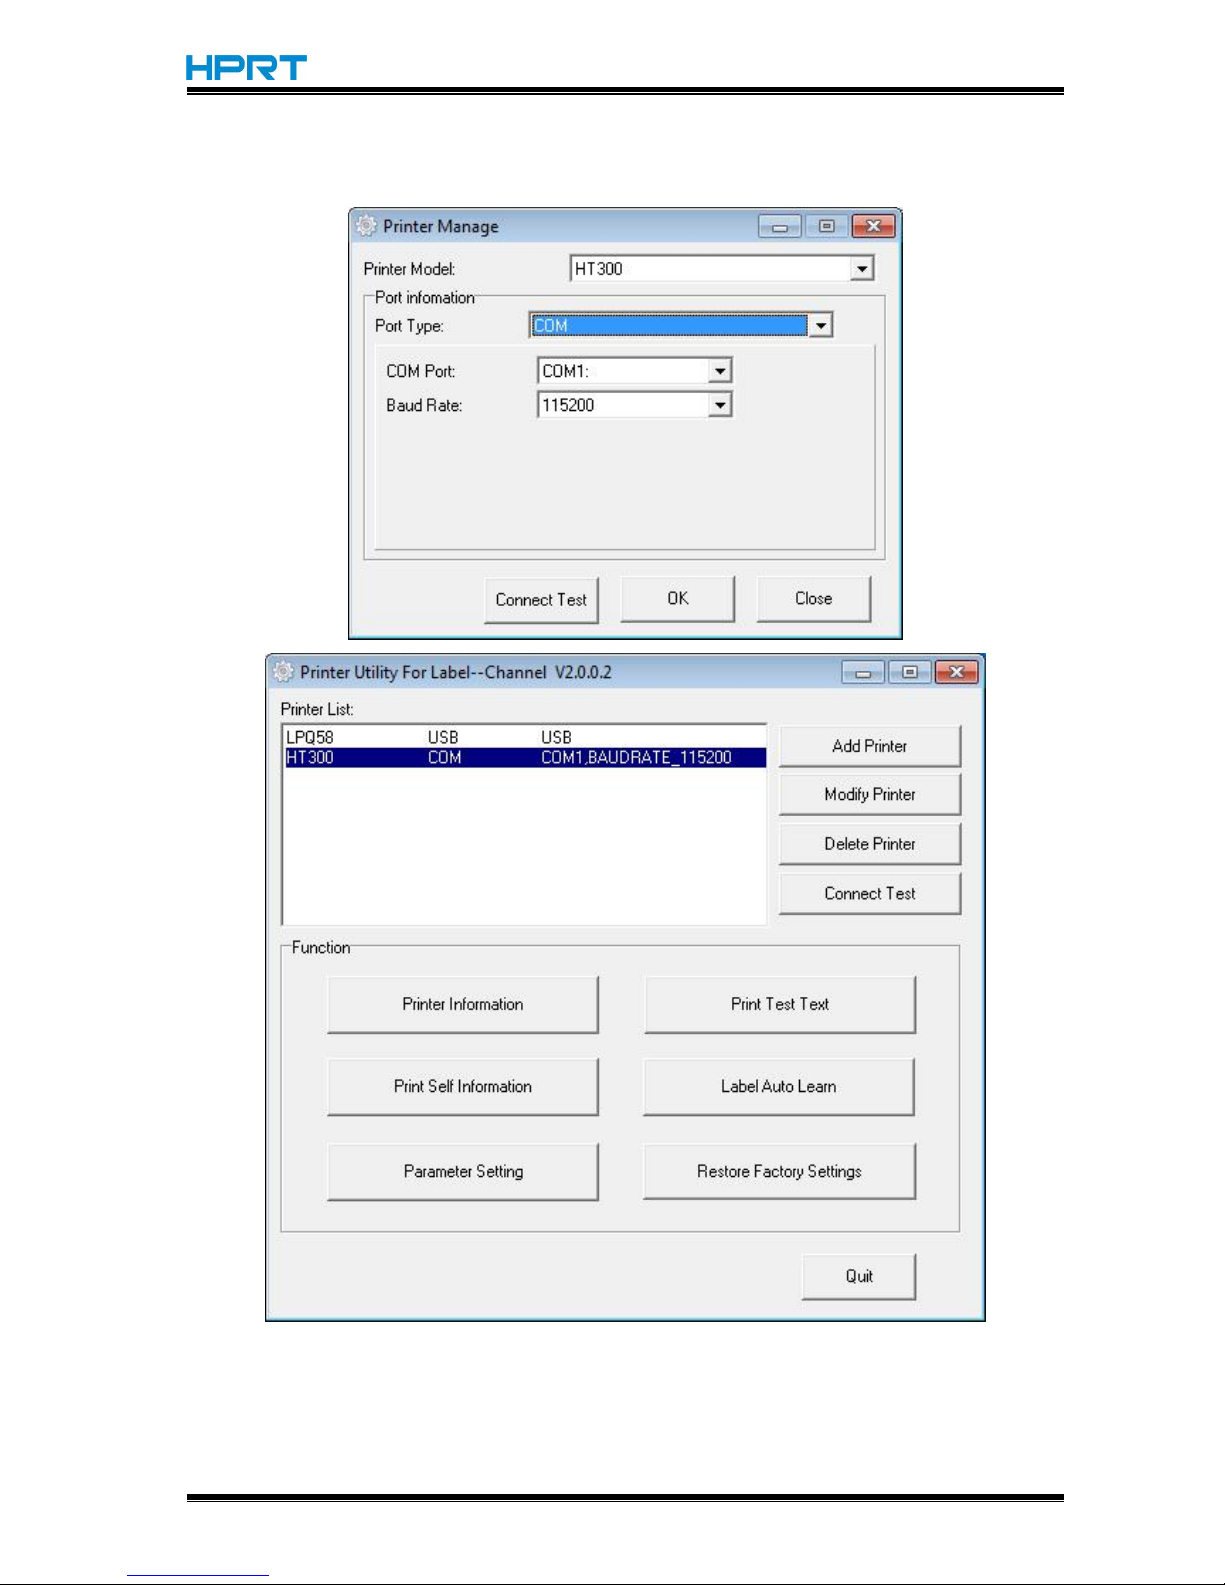
●Click “Modify Printer”. Choose the printer and port(eg: COM1), then click “OK”, showed in
“Printer List”.
Page 42
HT300/HT330 User Manual
Rev.1.0
39
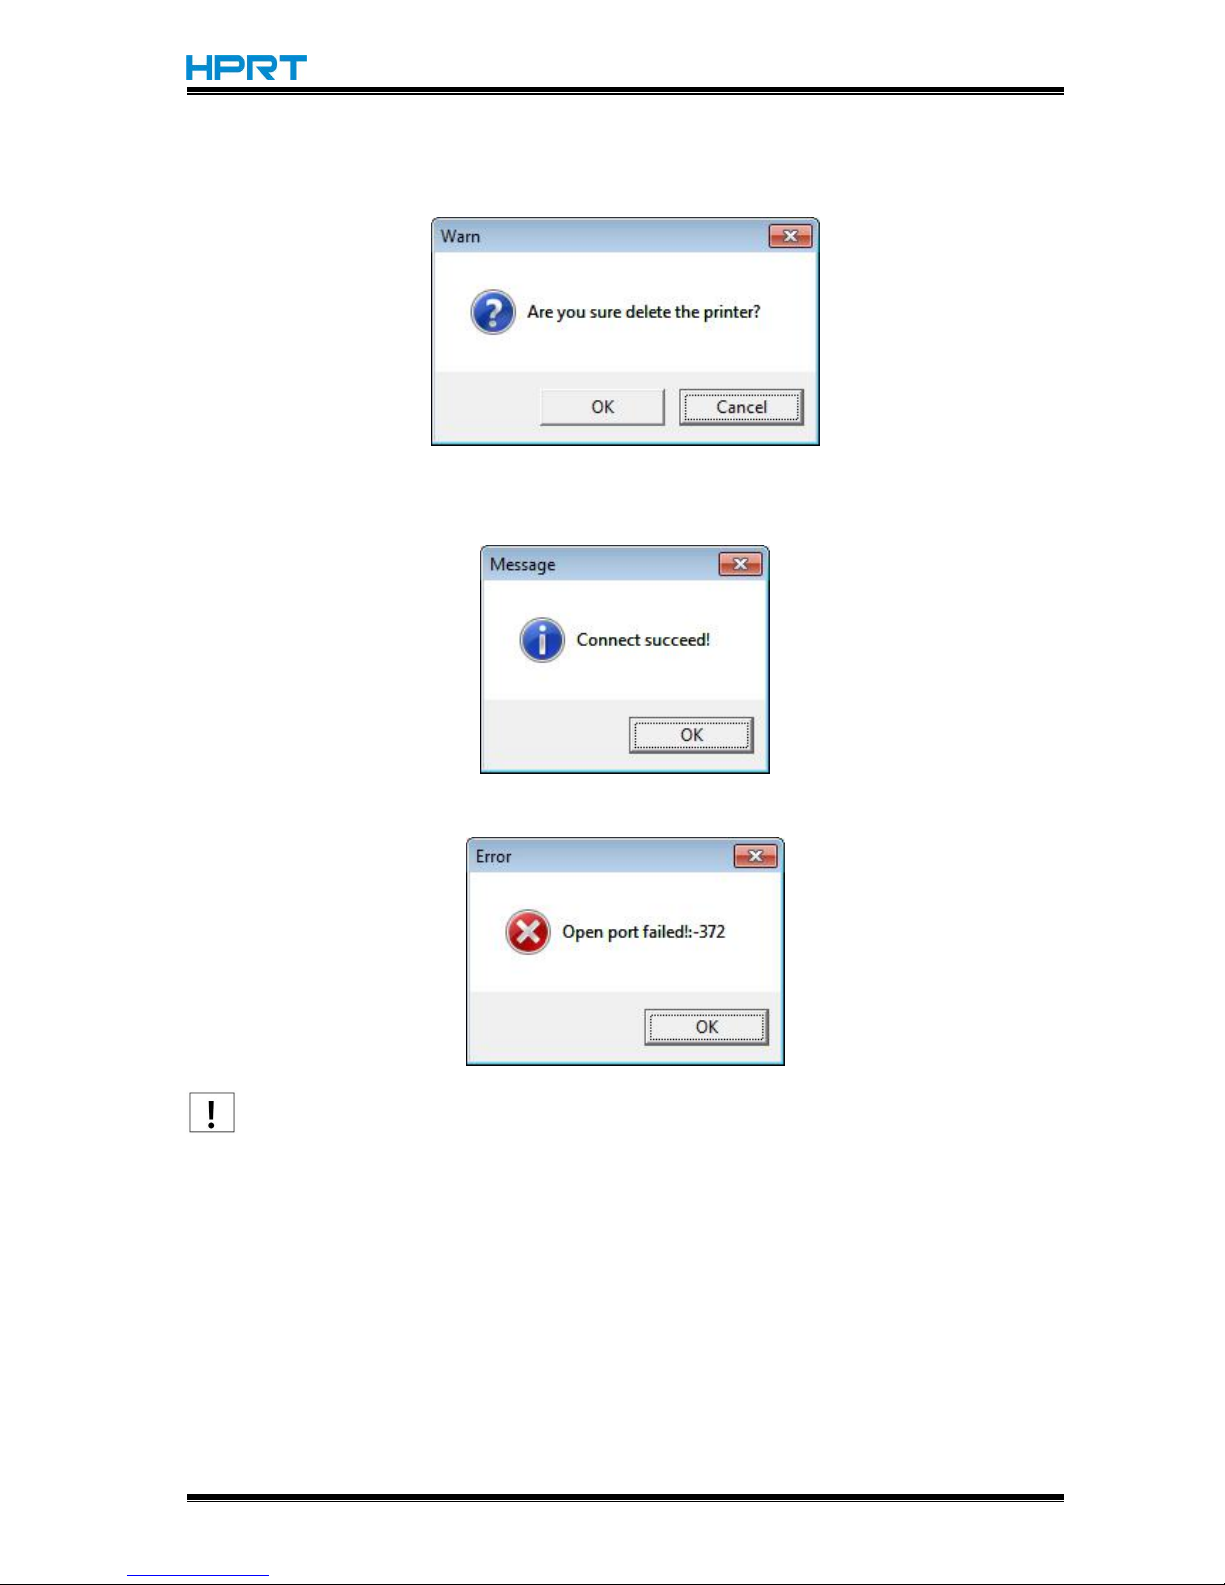
●Click “Delete Printer”. Click “OK” to delete the printer, and click “Cancel” to cancel the
command.
●Click “Connect Test” to test whether the connection is successful or not.
If connection succeeds, it shows as follows.
If connection fails, it shows as follows.
Note:
1.Connect printer to power first, then choose one port (depended on the printer you bought)
to connect to the PC. Much more information of connecting method is contained in “3.3
Peripherals Connection”.
2.When connection fails, please check the connection and whether it matches or not.(When
USB port is used, it is better to connect one printer only.)
Page 43
HT300/HT330 User Manual
Rev.1.0
40
(3)Function.
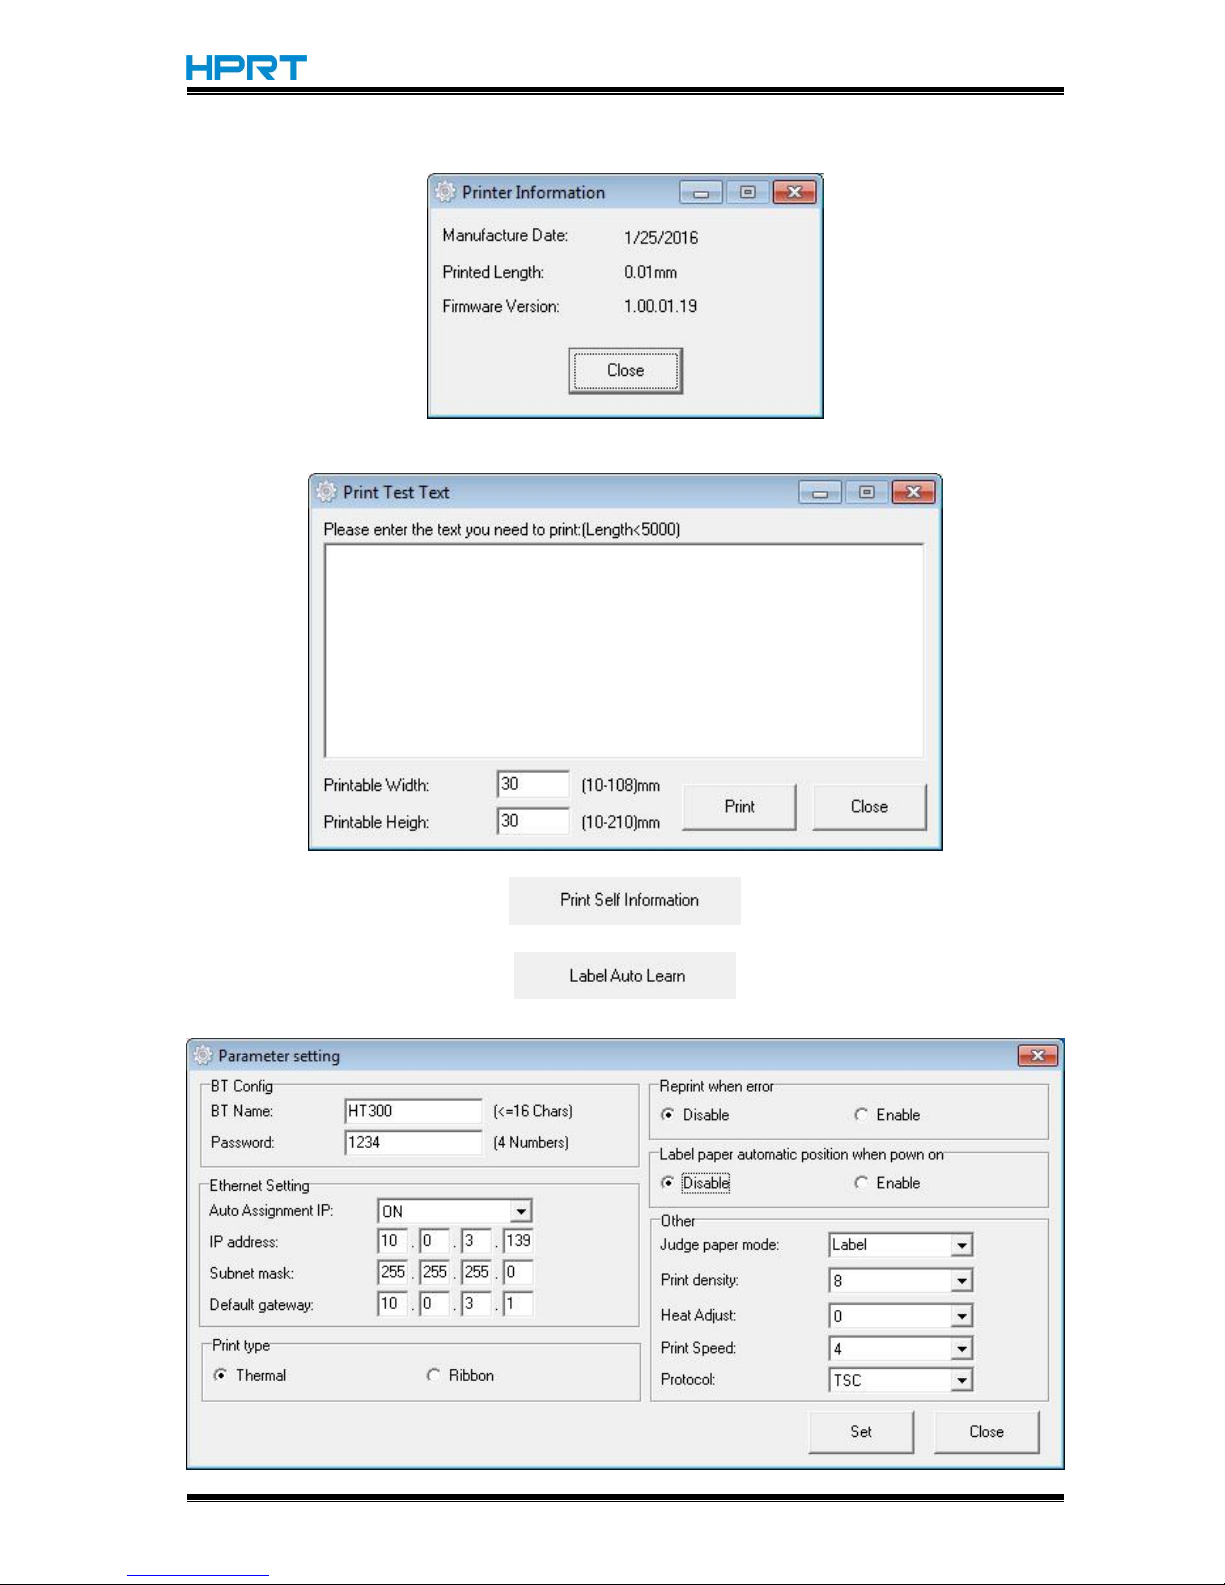
●Click “Printer Information”, showing printer information.(varies by different printers)
●Click “Print Test Text”. Type the text and set up the printing range. Click “Print”, then printer
starts to print the test text.
●Click “Print Self Information”, then printer starts to print self-test page.
●
Click “Label Auto Learn”, then printer will carry out the calibration.
●Click “Parameter Setting”.
Page 44
HT300/HT330 User Manual
Rev.1.0
41
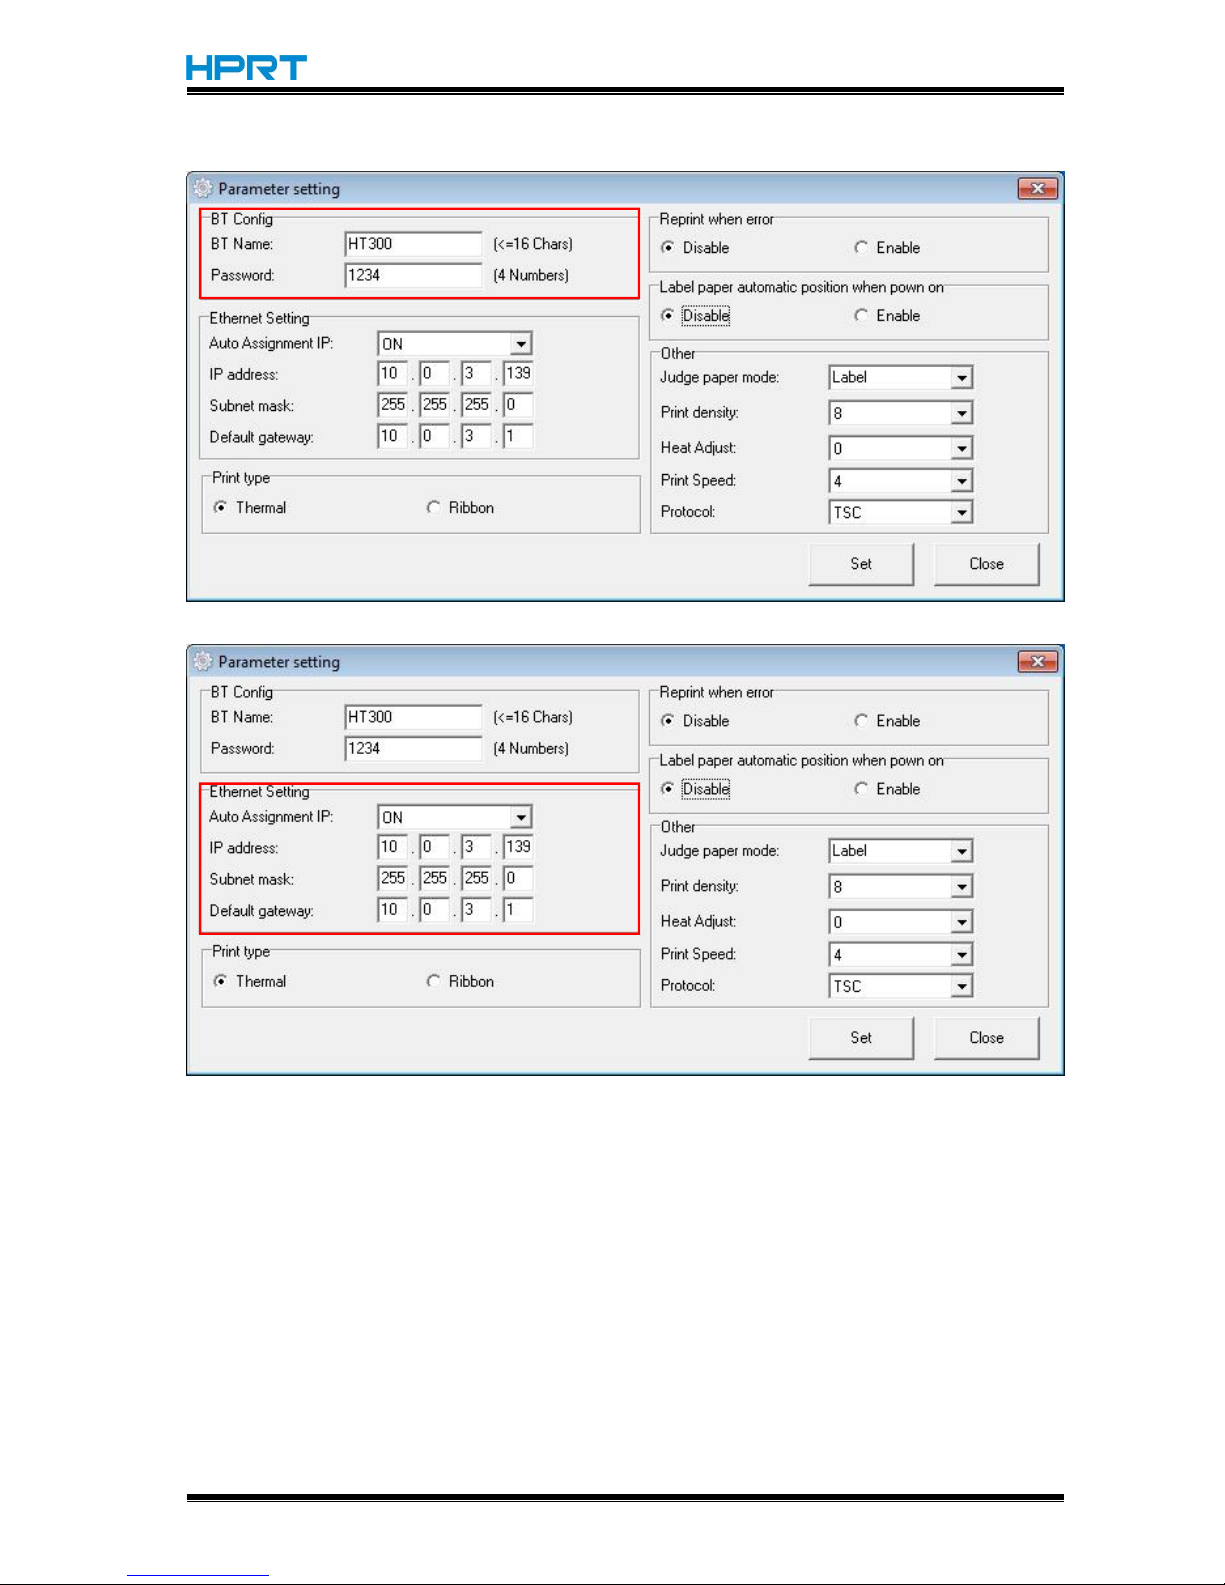
BT Config:
Ethernet Setting:
Page 45
HT300/HT330 User Manual
Rev.1.0
42
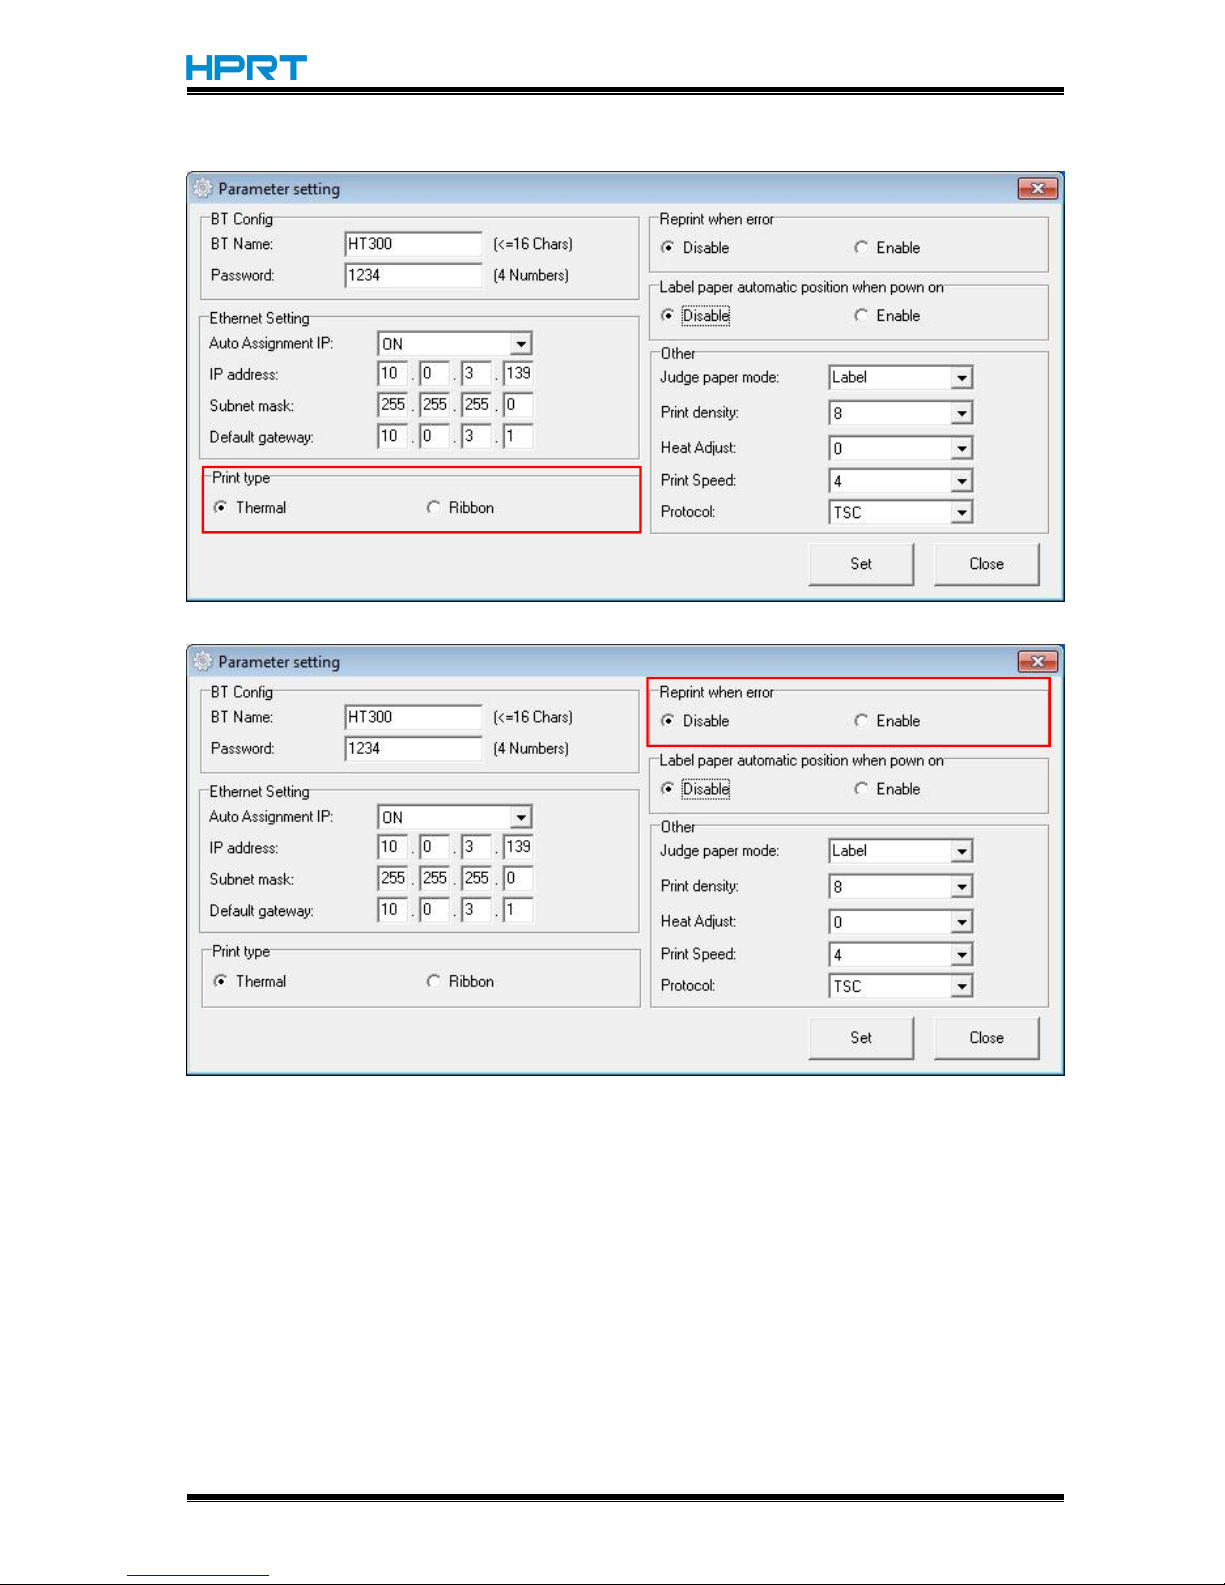
Print type:
Reprint when error:
Page 46
HT300/HT330 User Manual
Rev.1.0
43
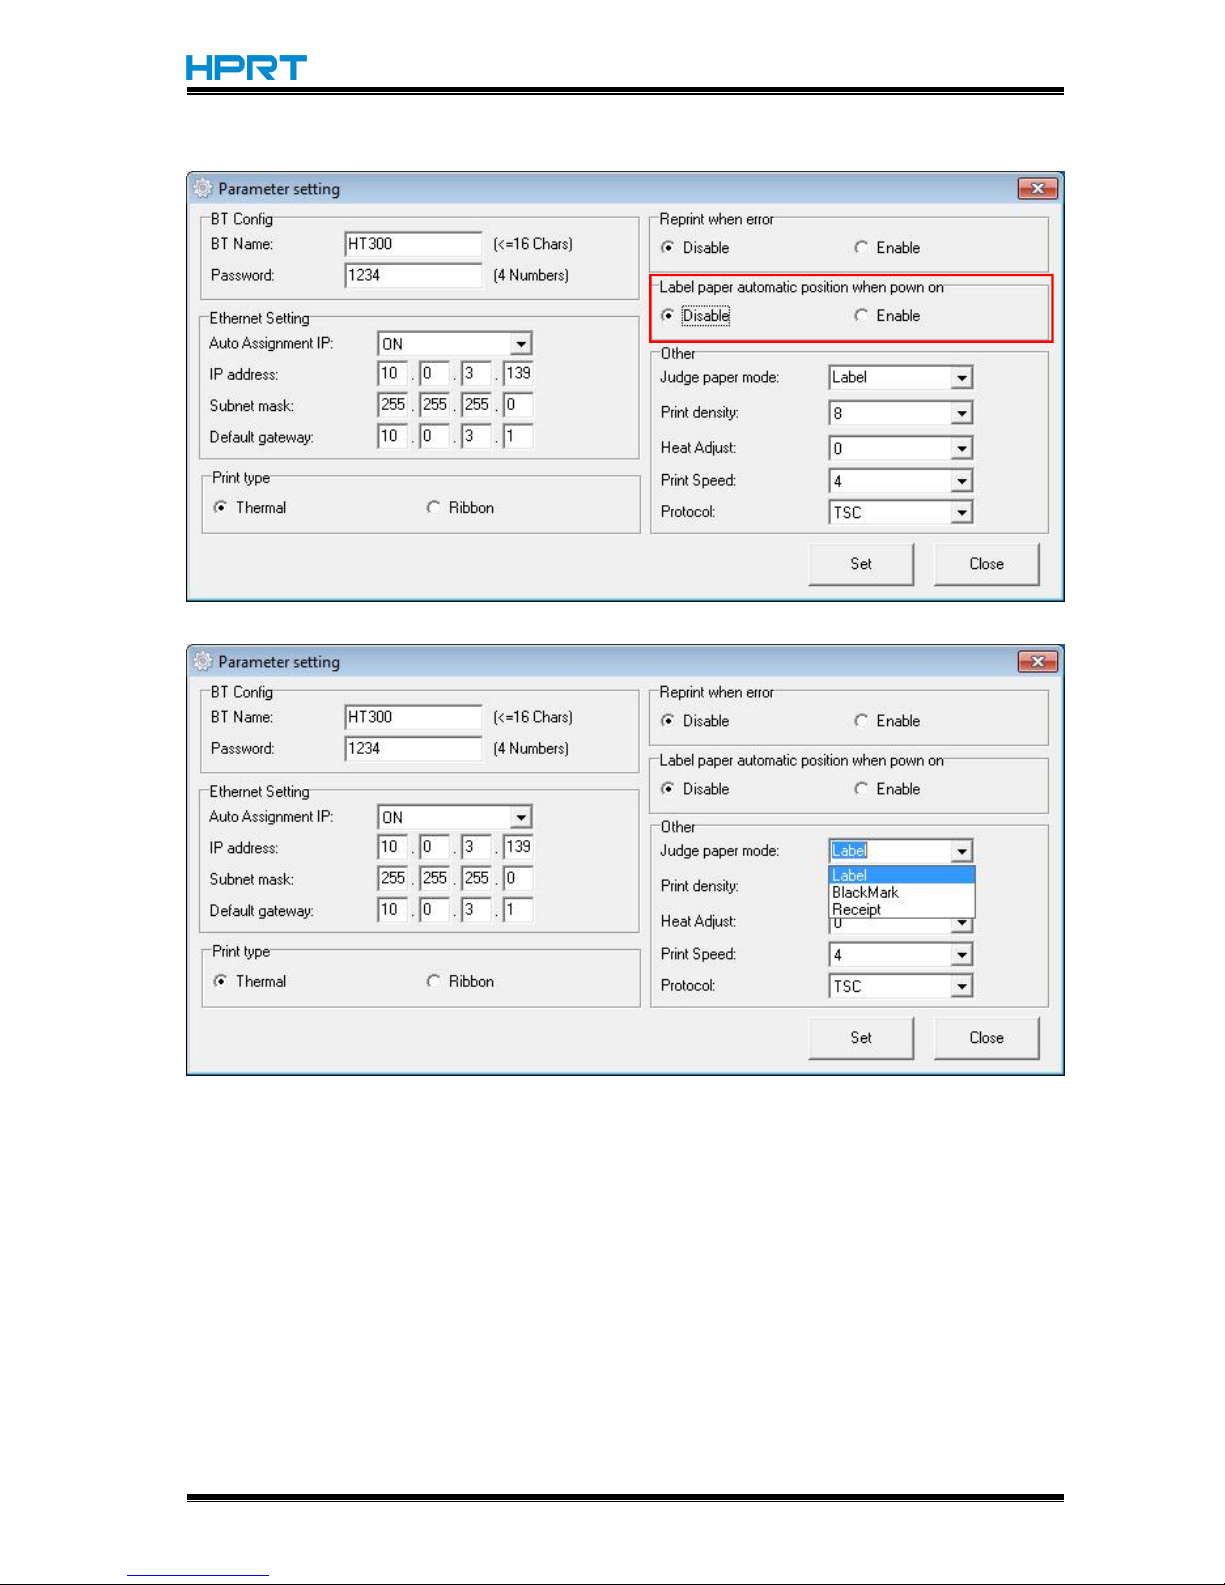
Label paper automatic position when power on:
Judge paper mode:
Page 47
HT300/HT330 User Manual
Rev.1.0
44
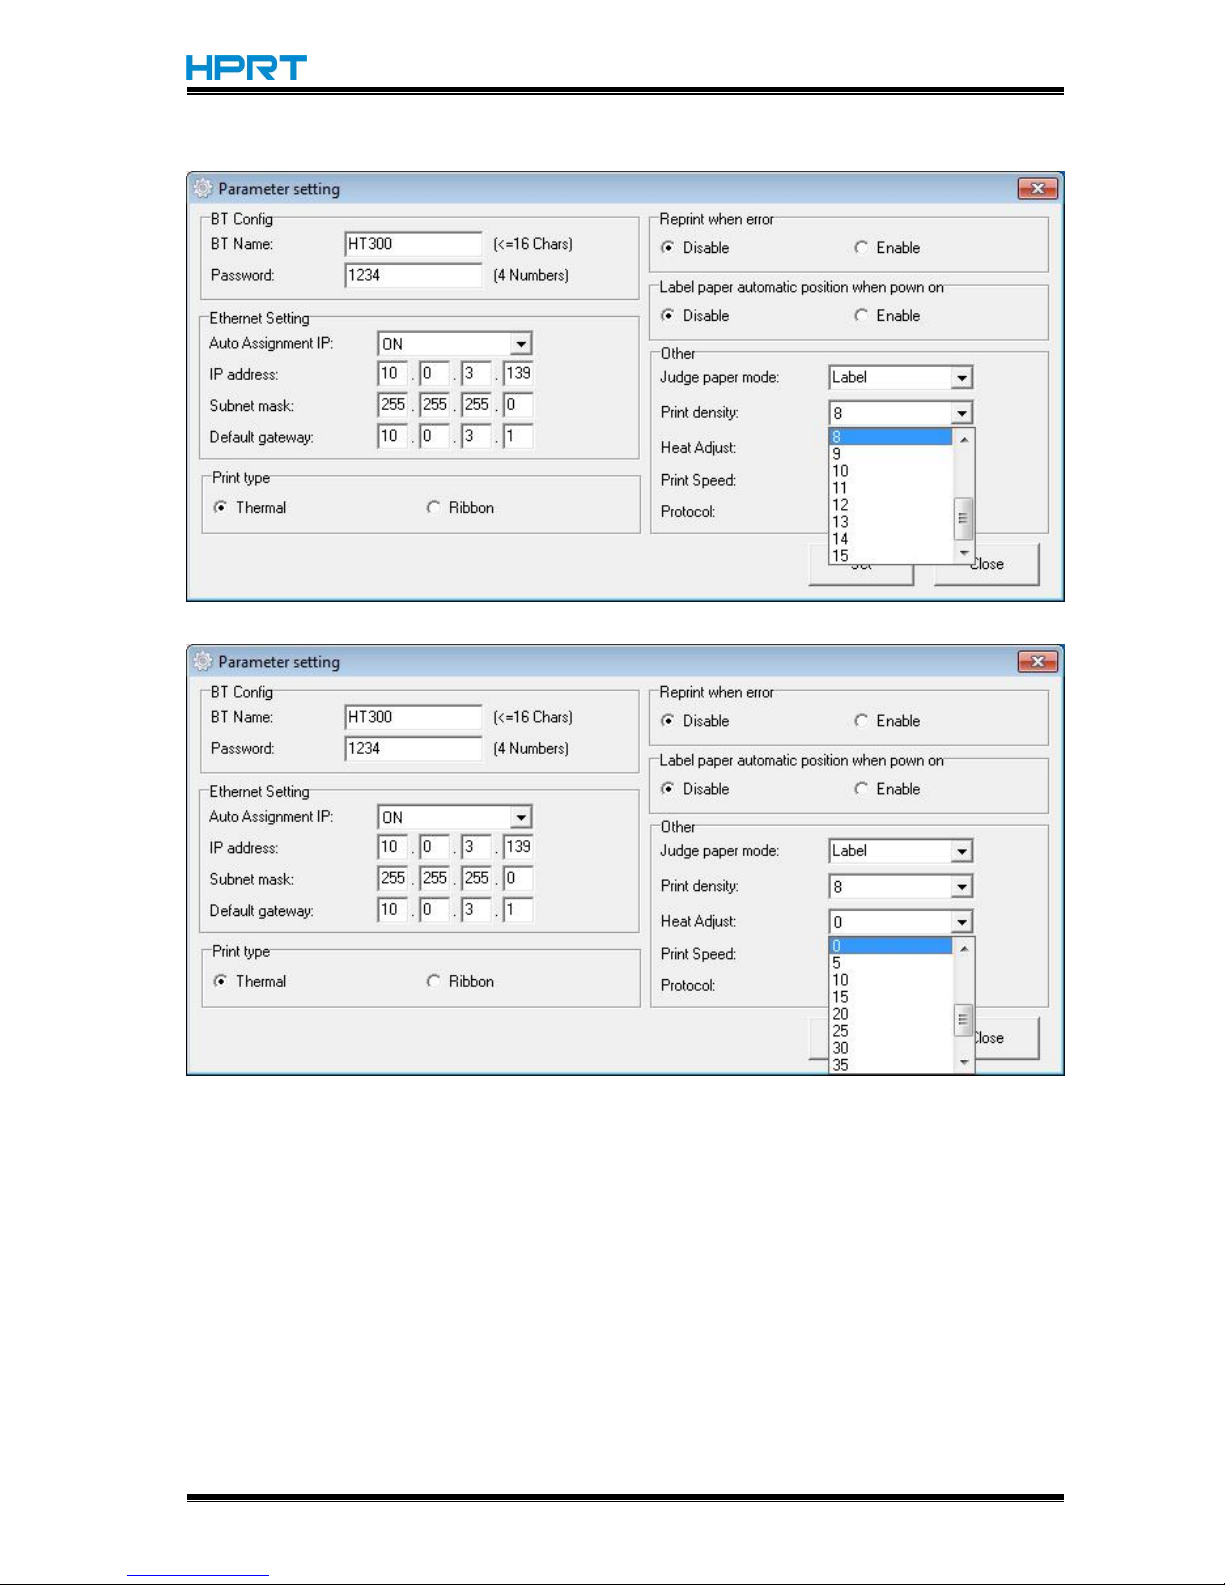
Print density(range:0-15):
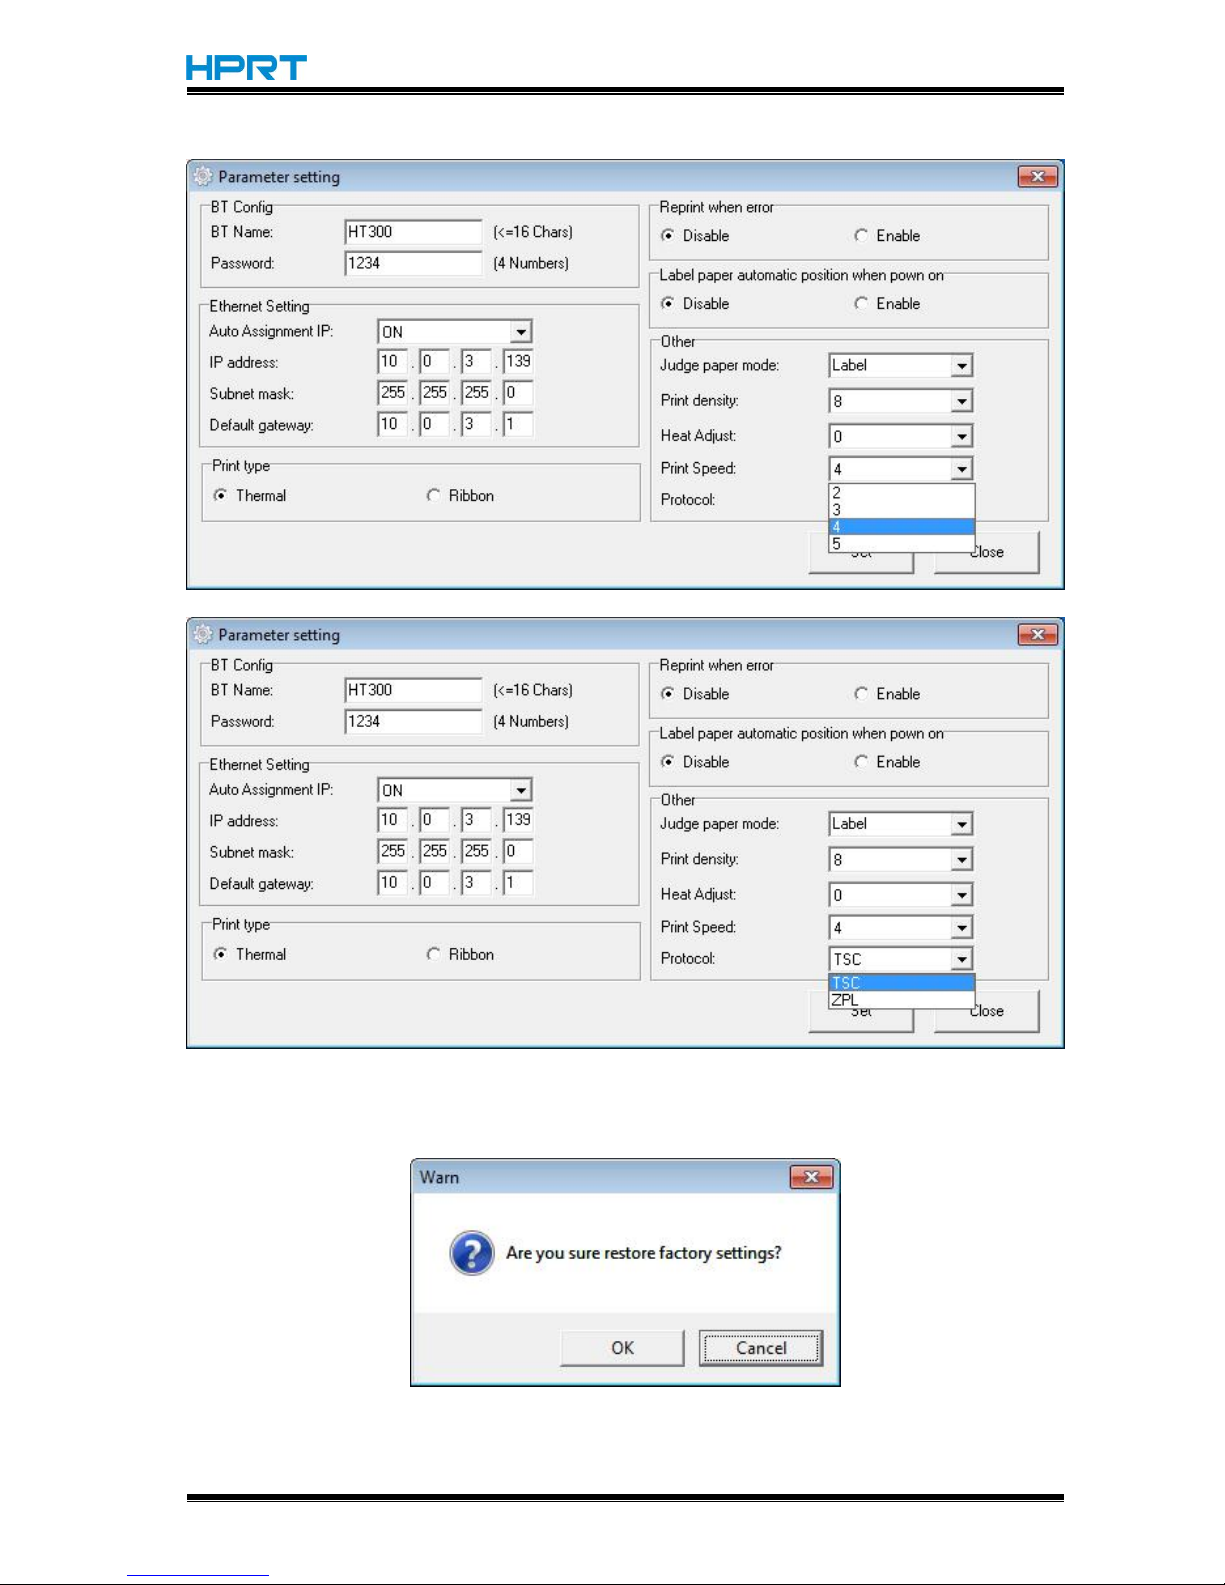
Heat Adjust(range:-50—50):
Page 48
HT300/HT330 User Manual
Rev.1.0
45
Print Speed(range:2345):
Protocol:
Click “Set”, and back to the main menu.
●Click “Restore Factory Settings”. Click “OK” to restore factory settings, and click “Cancel” to
cancel the command.
(4)Click “Quit”, and finish printer settings.
Page 49

HT300/HT330 User Manual
Rev.1.0
46
Chapter 7 Seagull Windows Driver Instructions
7.1 Introduction
The following operating systems are supported:
Microsoft Windows 10 (32 bit/64 bit)
Microsoft Windows 8 (32 bit/64 bit)
Microsoft Windows 7 SPI (32 bit/64 bit)
Microsoft Windows Vista SP2 (32 bit/64 bit)
Microsoft Windows XP Professional SP3 (32 bit)
Microsoft Windows Server 2012(64 bit)
Microsoft Windows Server 2008 R2
Microsoft Windows Server 2008 SP2(32 bit/64 bit)
Microsoft Windows Server 2003 R2 SP2(32 bit/64 bit)
7.2 Installation Preparation
Download Seagull Windows Driver application program in CD.
Page 50
HT300/HT330 User Manual
Rev.1.0
47
7.3 Installation
Note:
Under different operating systems, the screen may be slightly different. Take Windows 7
as example.
Take HPRT HT300 as example. Please refer to HPRT HT300 when using HPRT HT330.
To avoid the prevention, recommend to close the security software before installation.
1.Select one interface to connect your printer to computer.
2.Turn on the printer and check if it is connected to computer successfully.
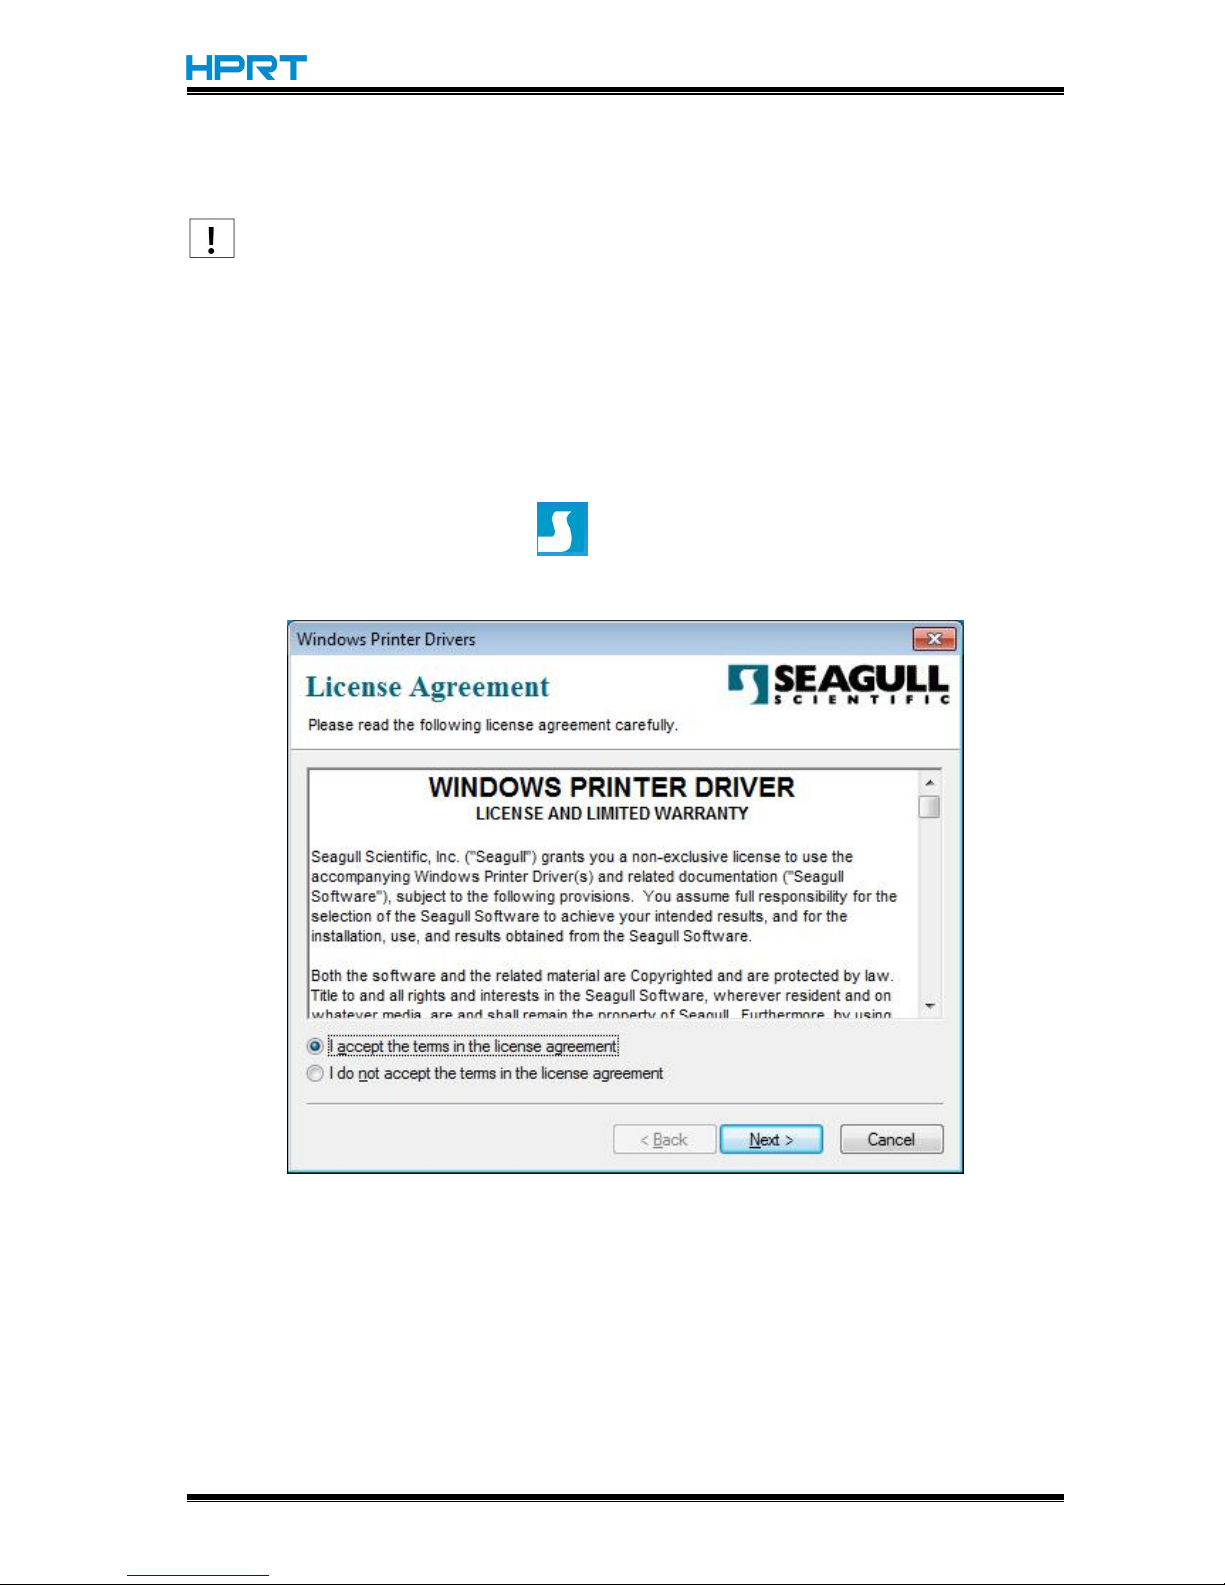
3.Double click Seagull Windows Driver .
4.Read and agree the license agreement. Then click “Next”.
Page 51
HT300/HT330 User Manual
Rev.1.0
48
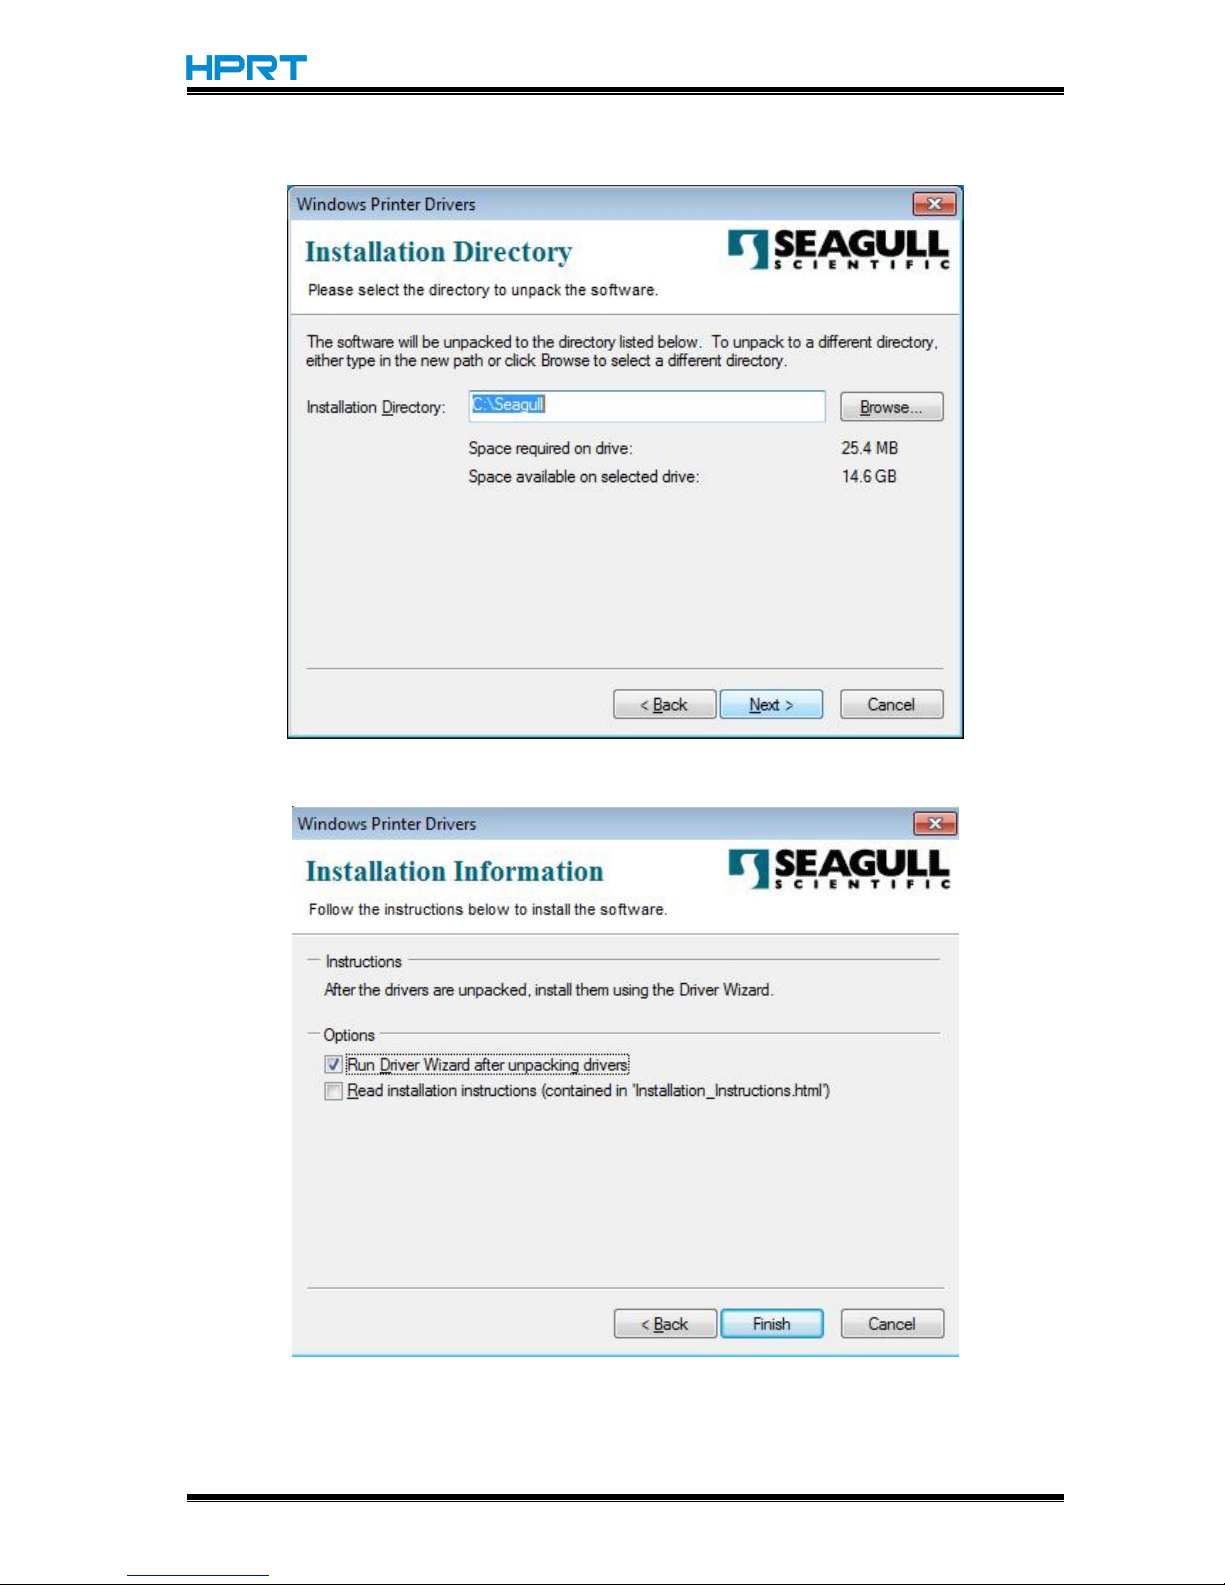
5.Choose the installation directory, then click “Next”.
6.Click"Finish".
Page 52
HT300/HT330 User Manual
Rev.1.0
49
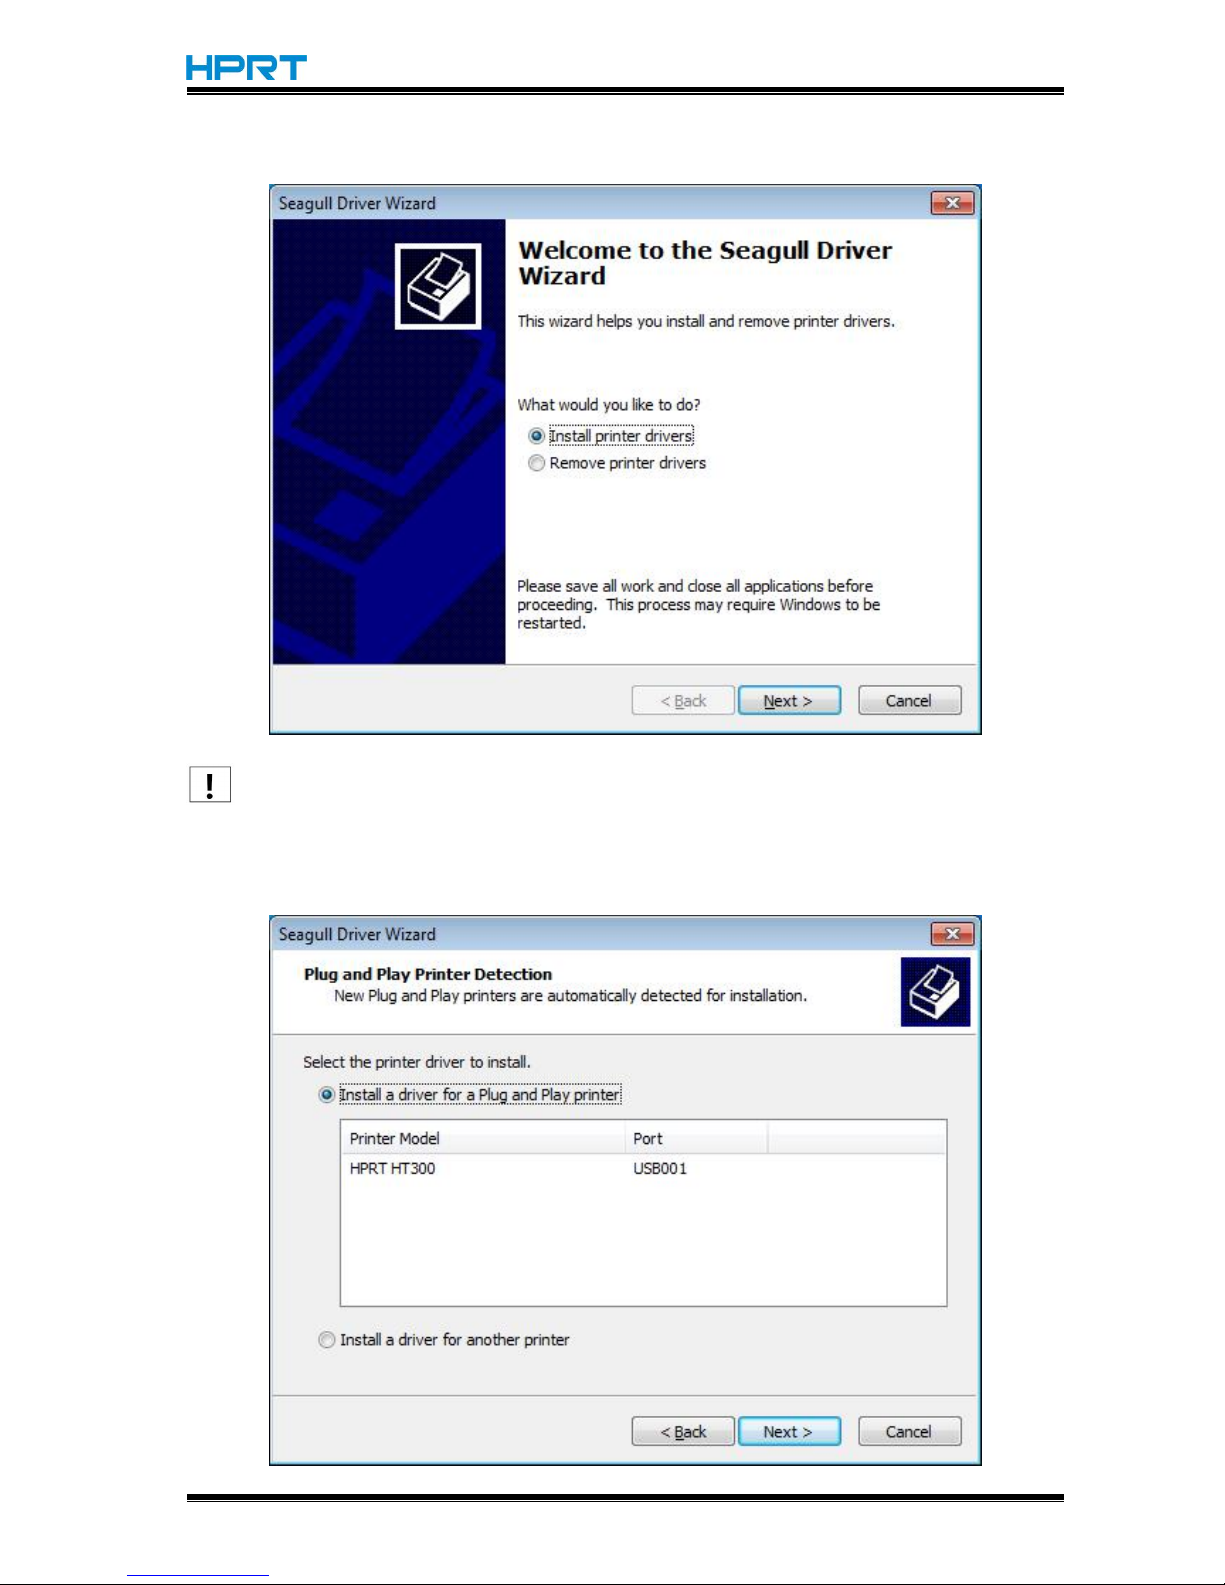
7.Select "Install printer drivers", then click "Next".
Note: If you have connected the printer to computer, it will detect and install the driver
automatically.(eg.: USB port)
8.Select "Install a driver for a Plug and Play printer”, then click "Next".
Page 53
HT300/HT330 User Manual
Rev.1.0
50
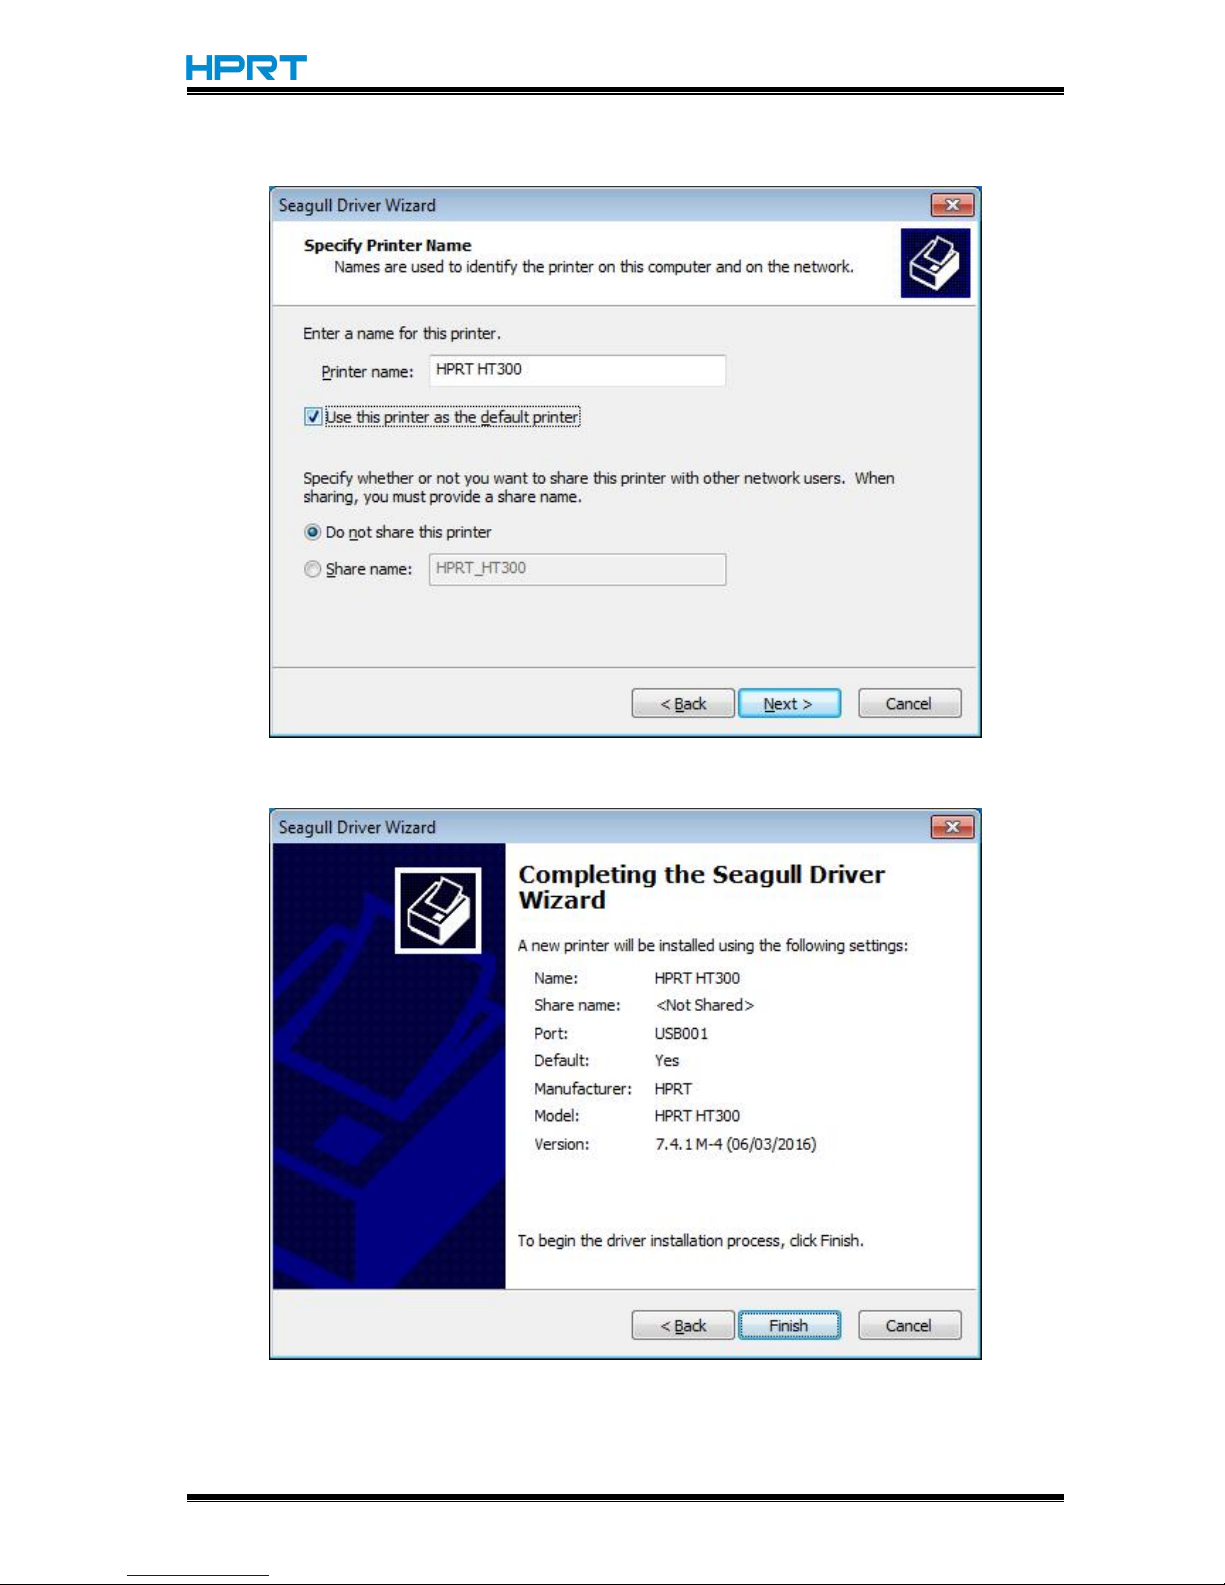
9.Enter a name for this printer, then click "Next".
10.Click"Finish".
Page 54
HT300/HT330 User Manual
Rev.1.0
51
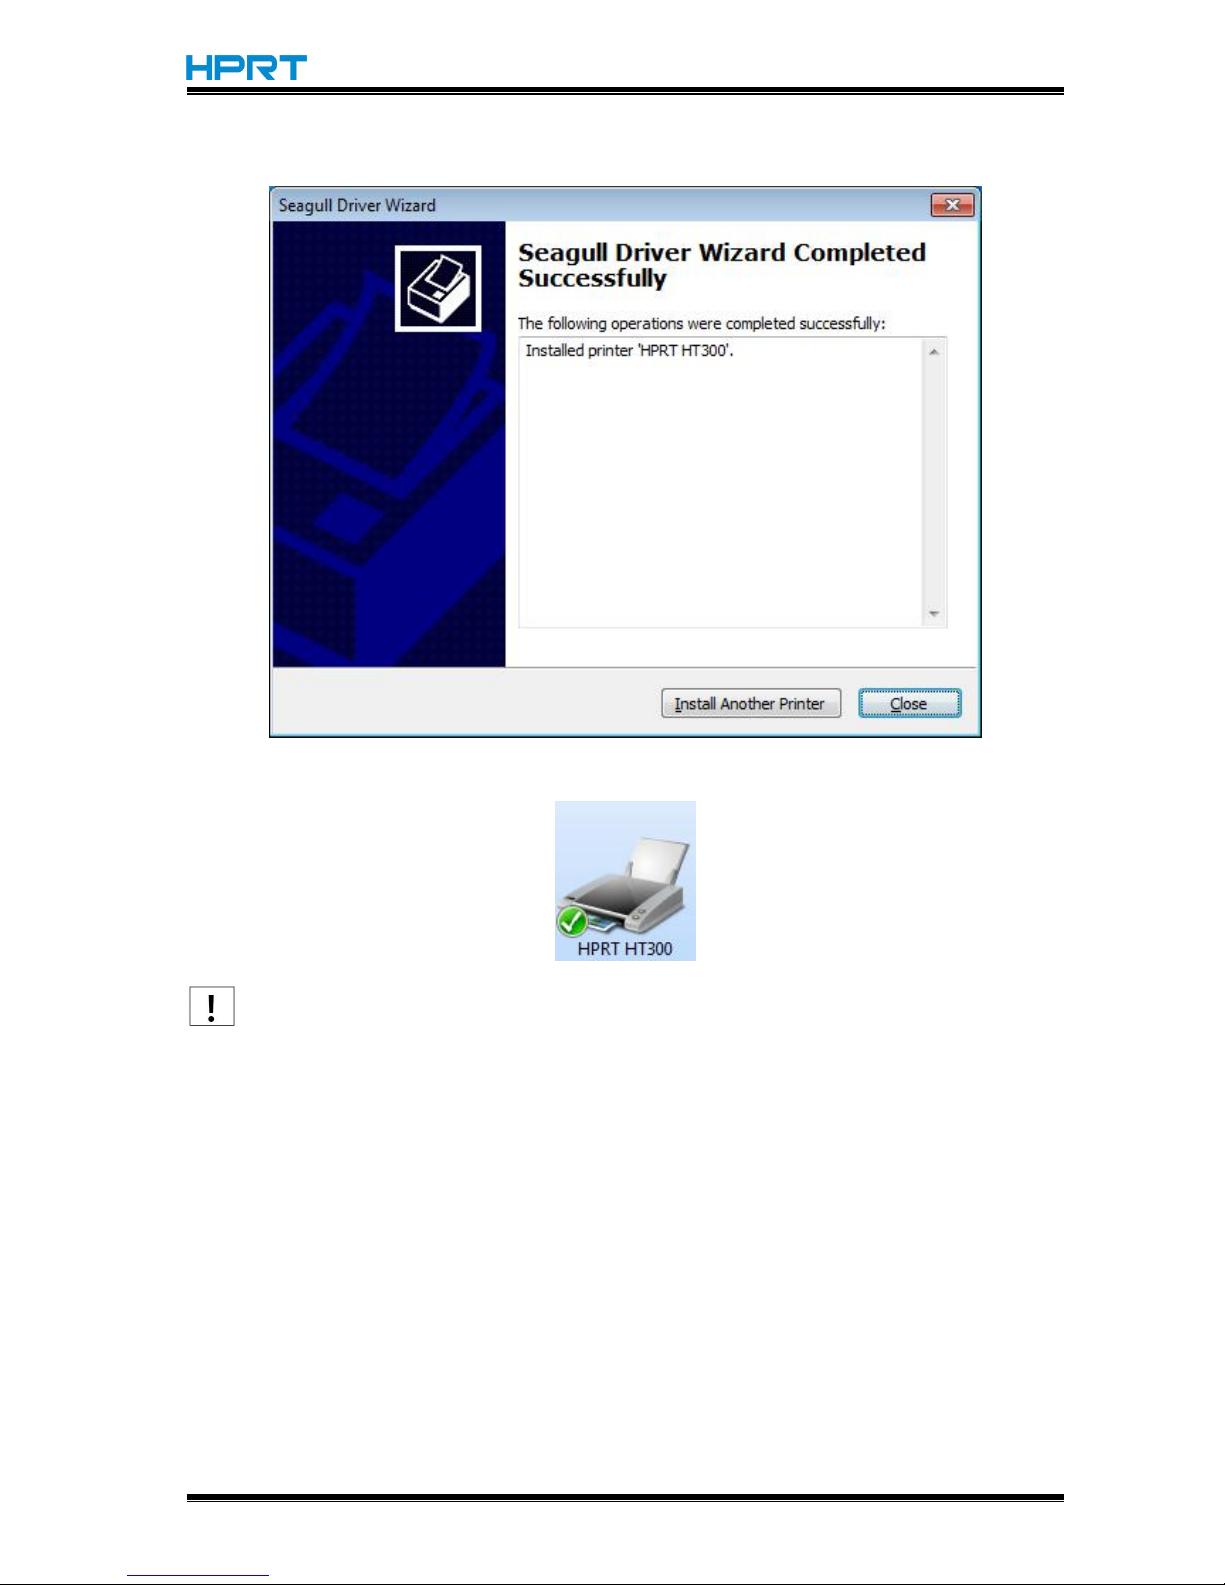
11.Click "Close", and the HPRT HT300 Label printer driver is installed successfully.
12.After installation, the icon will be found in ”Start”→“Devices and Printers”.
Note:
1.If you have already installed the driver (No matter what kind of ports), it will generate a
USB port automatically when connecting the printer to computer.
2.Any problems exist, please use our utility tool in CD.
Page 55
HT300/HT330 User Manual
Rev.1.0
52
7.4 Usage
7.4.1 Printing Preferences
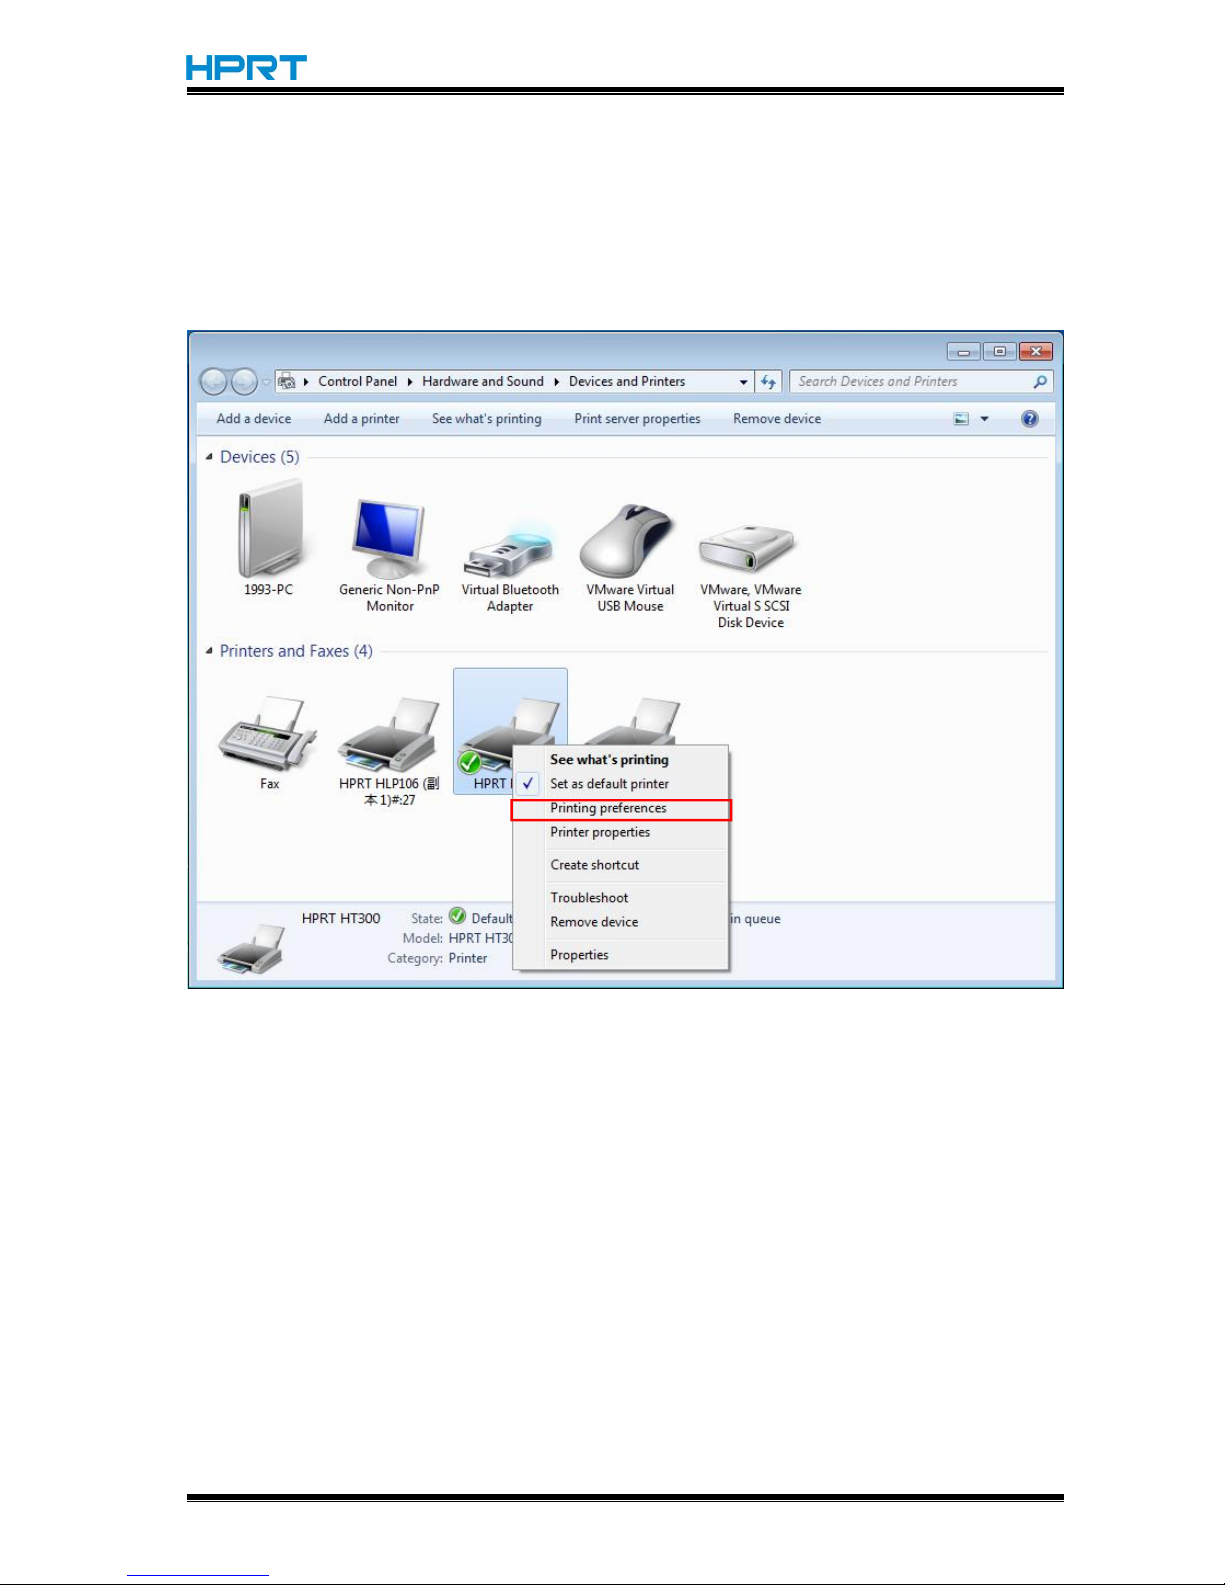
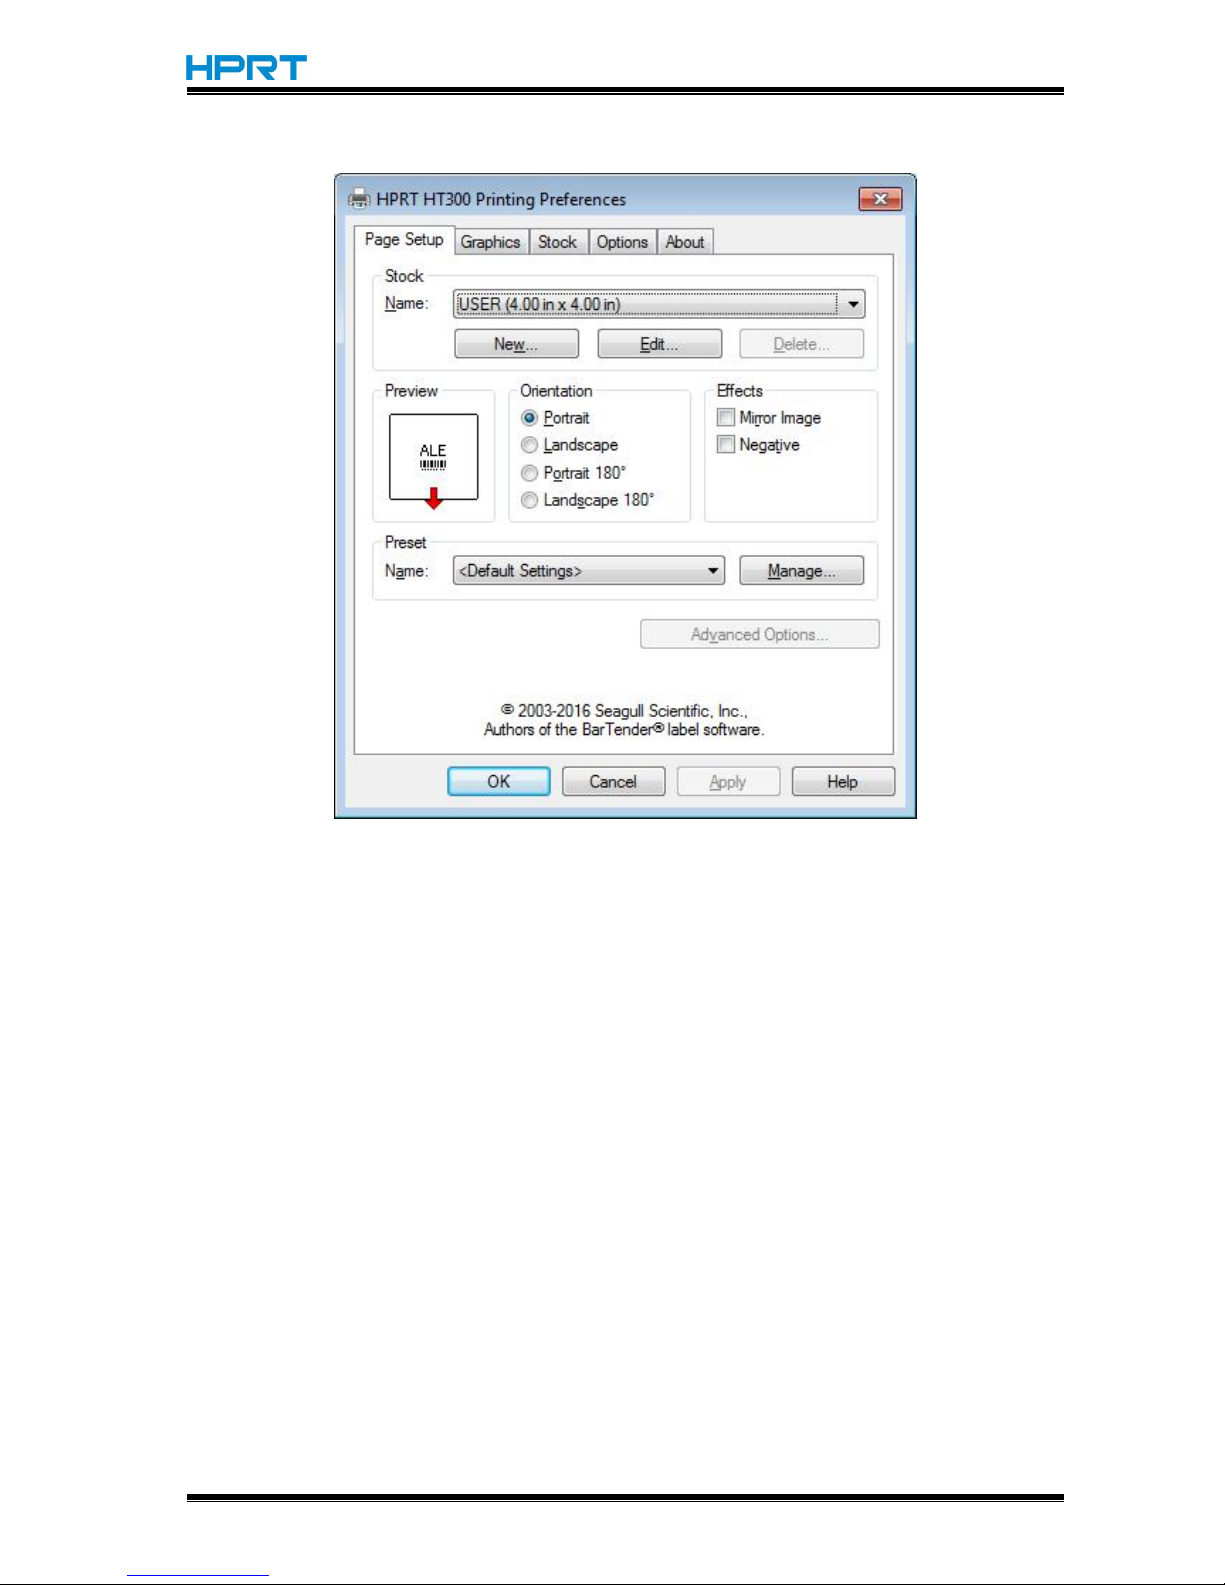
1.Click “Start”→“Devices and Printers”. Right click “HPRT HT300” and choose “Printing
preferences”.
Page 56
HT300/HT330 User Manual
Rev.1.0
53
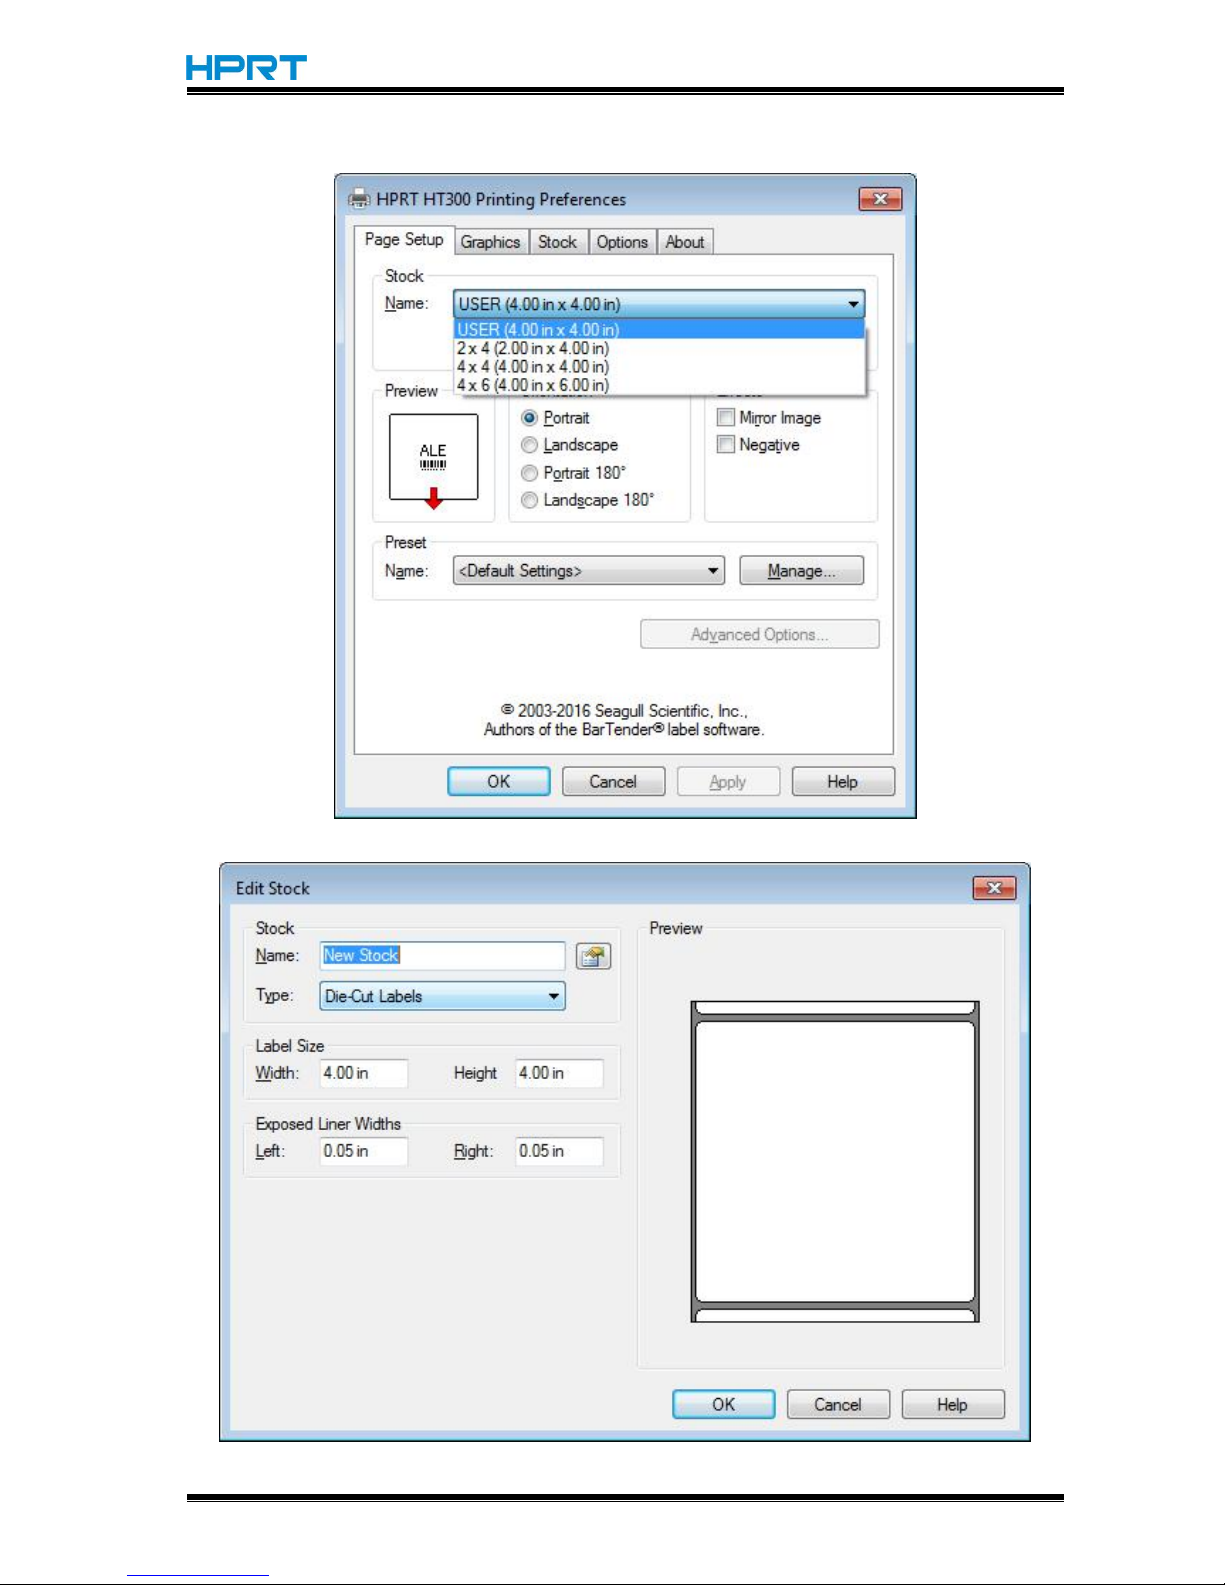
2.According to different needs, set up the page.
Page 57
HT300/HT330 User Manual
Rev.1.0
54
●Click “Stock”→”Name”, and choose the paper type.
●Click “New Stock”, and set up a new stock.
Page 58
HT300/HT330 User Manual
Rev.1.0
55
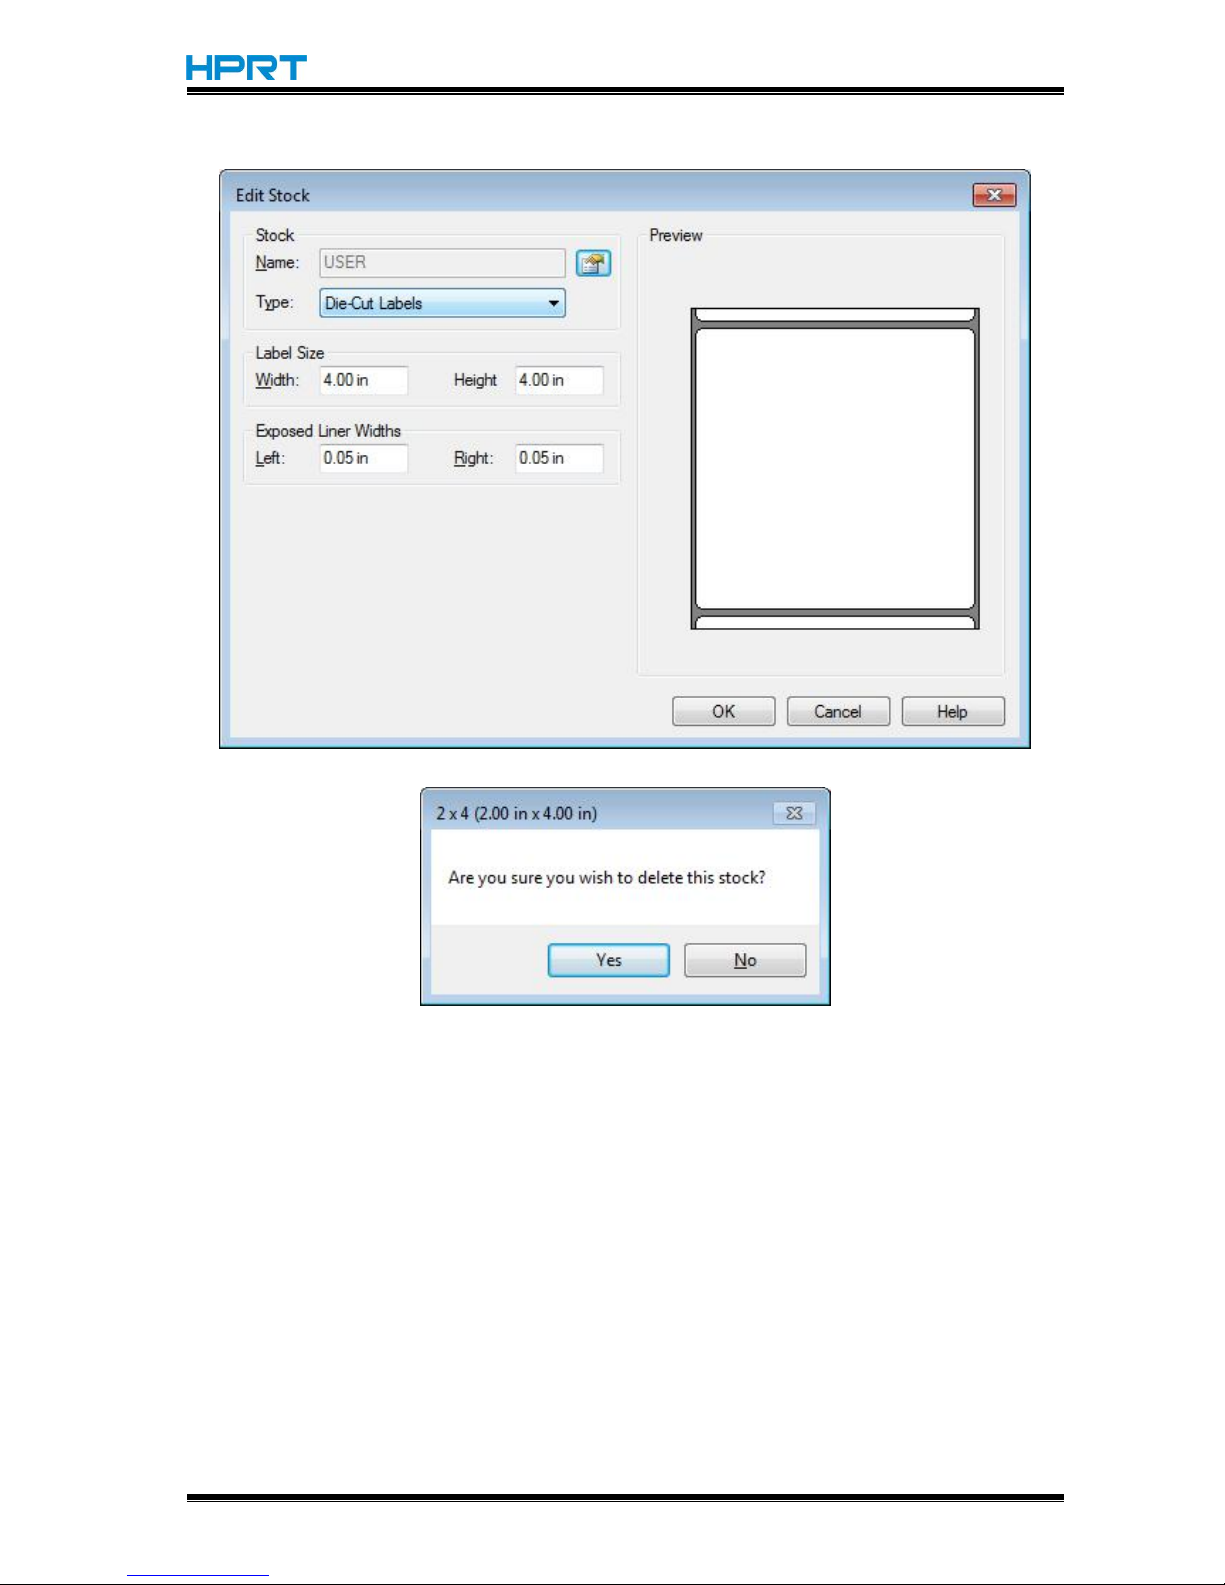
●Click “Edit Stock”, and edit the stock.
●Click “Delete Stock”, and delete the stock.
Page 59
HT300/HT330 User Manual
Rev.1.0
56
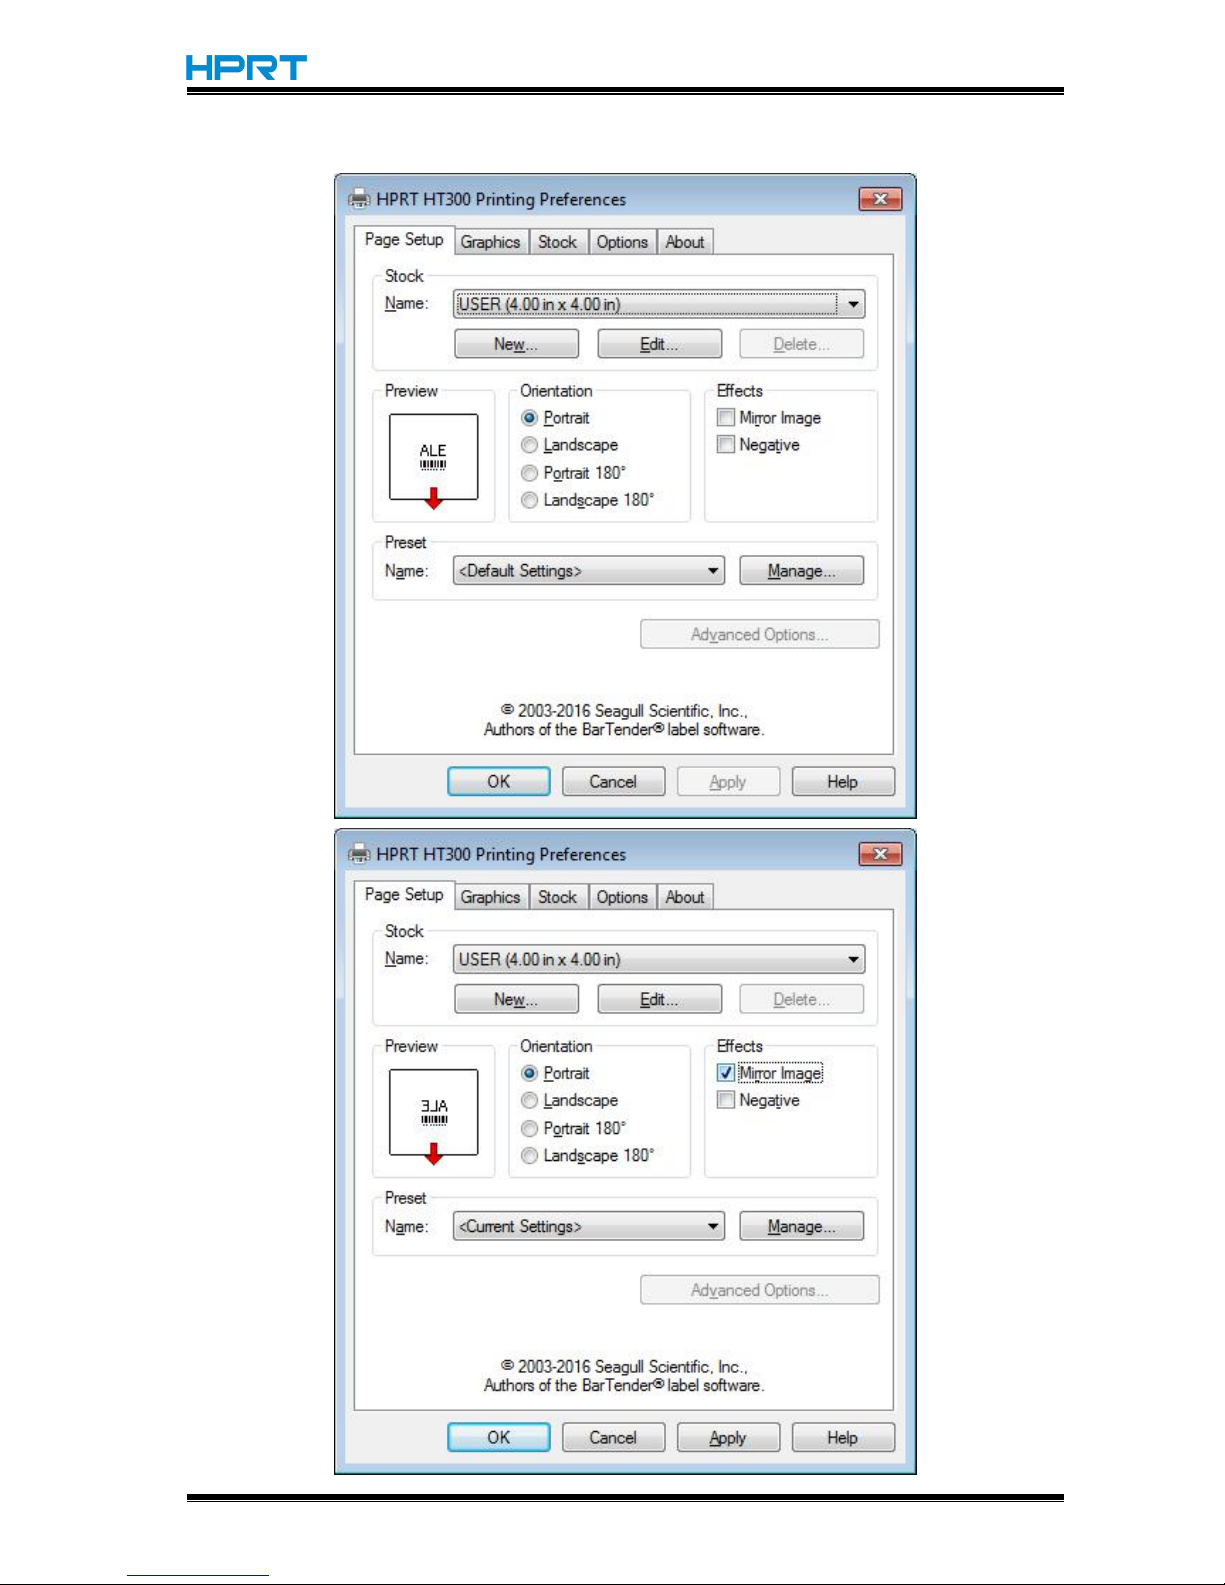
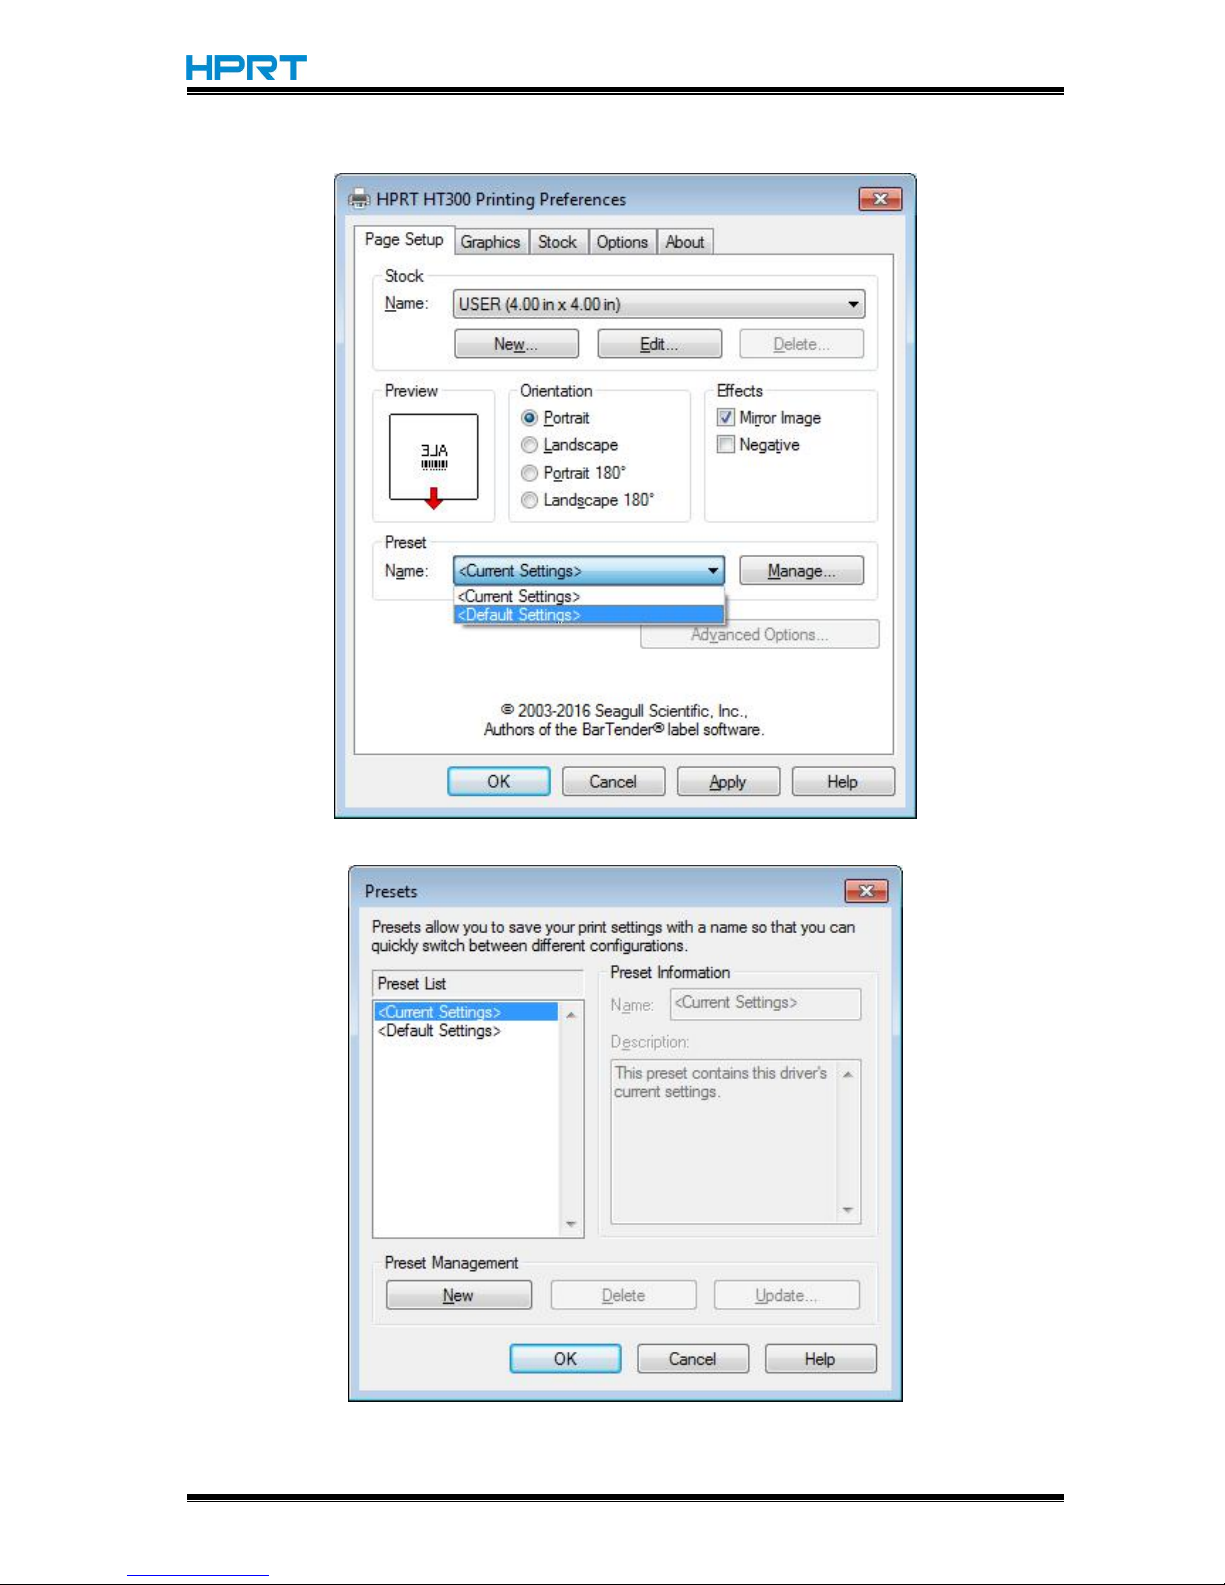
●Choose “Orientation” or “Effects”, showed in the “Preview”.
Page 60
HT300/HT330 User Manual
Rev.1.0
57
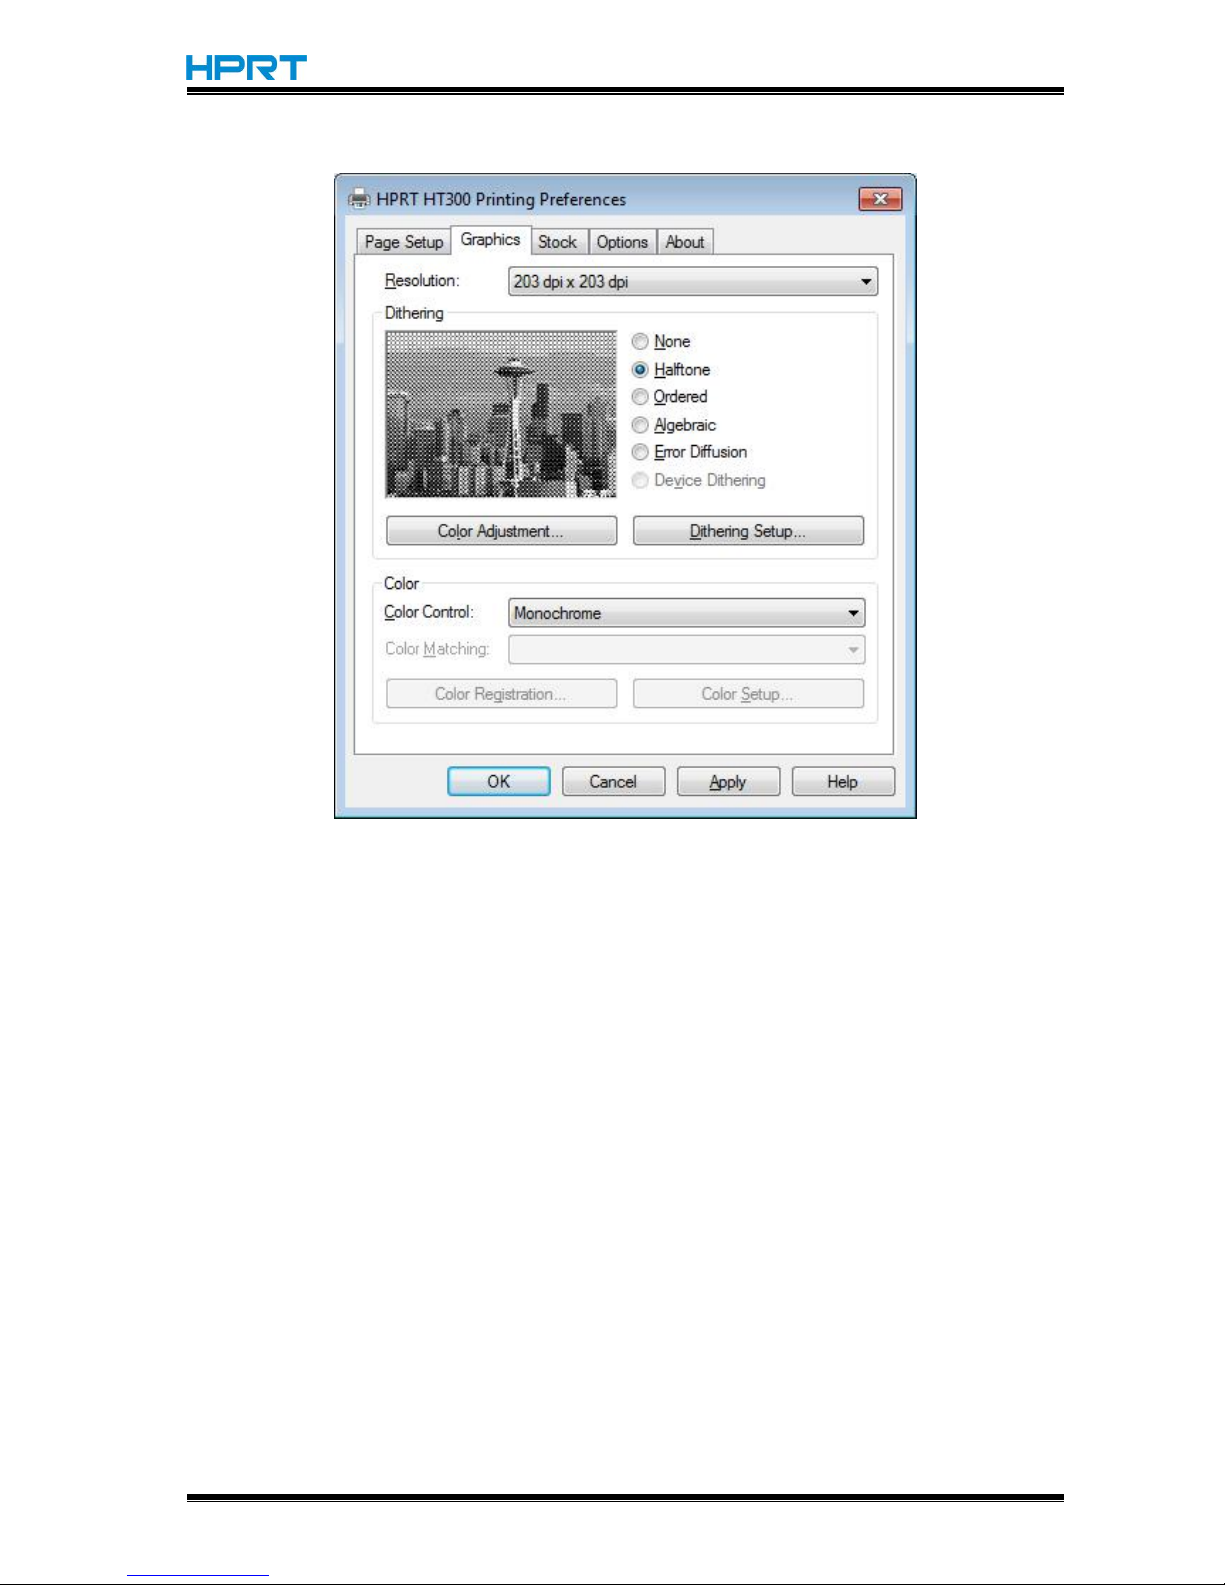
●Click “Preset”→“Name”, and back to the default settings.
●Click “Manage”, and change the settings.
Page 61
HT300/HT330 User Manual
Rev.1.0
58
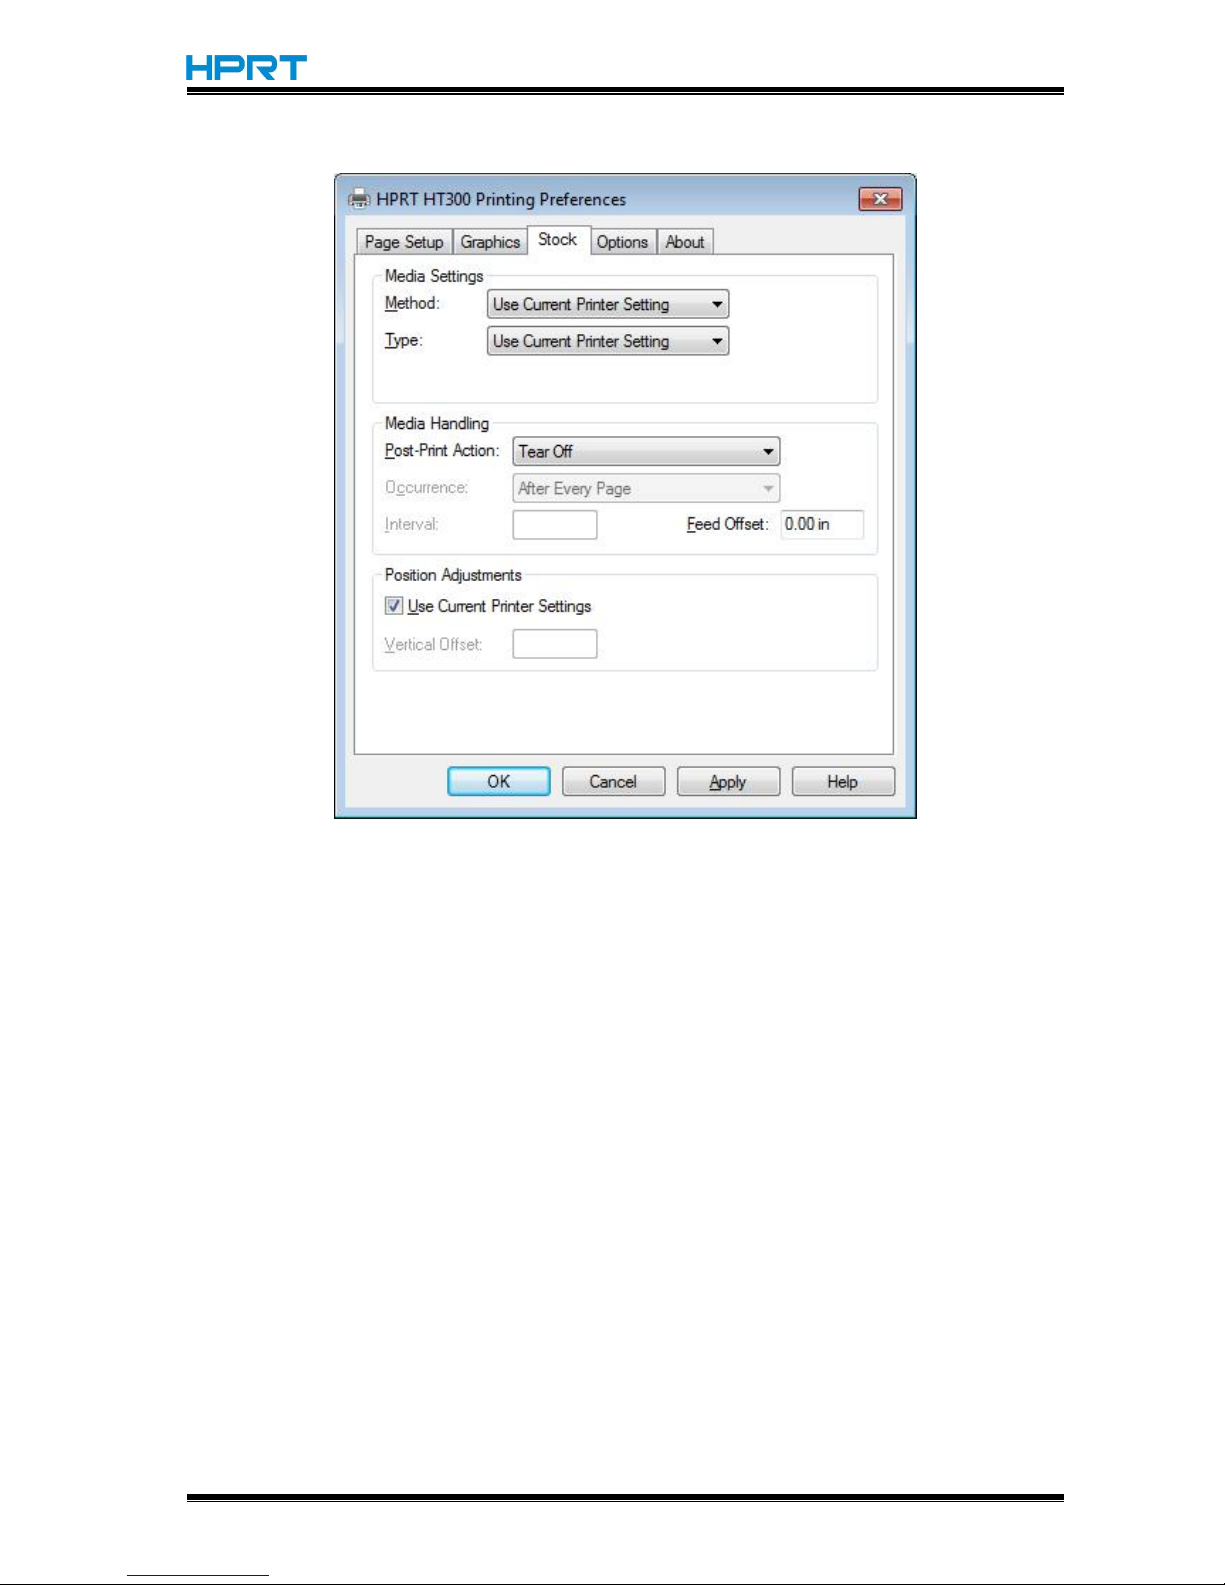
3.Click “Graphics”, and edit the pictures.
Page 62
HT300/HT330 User Manual
Rev.1.0
59
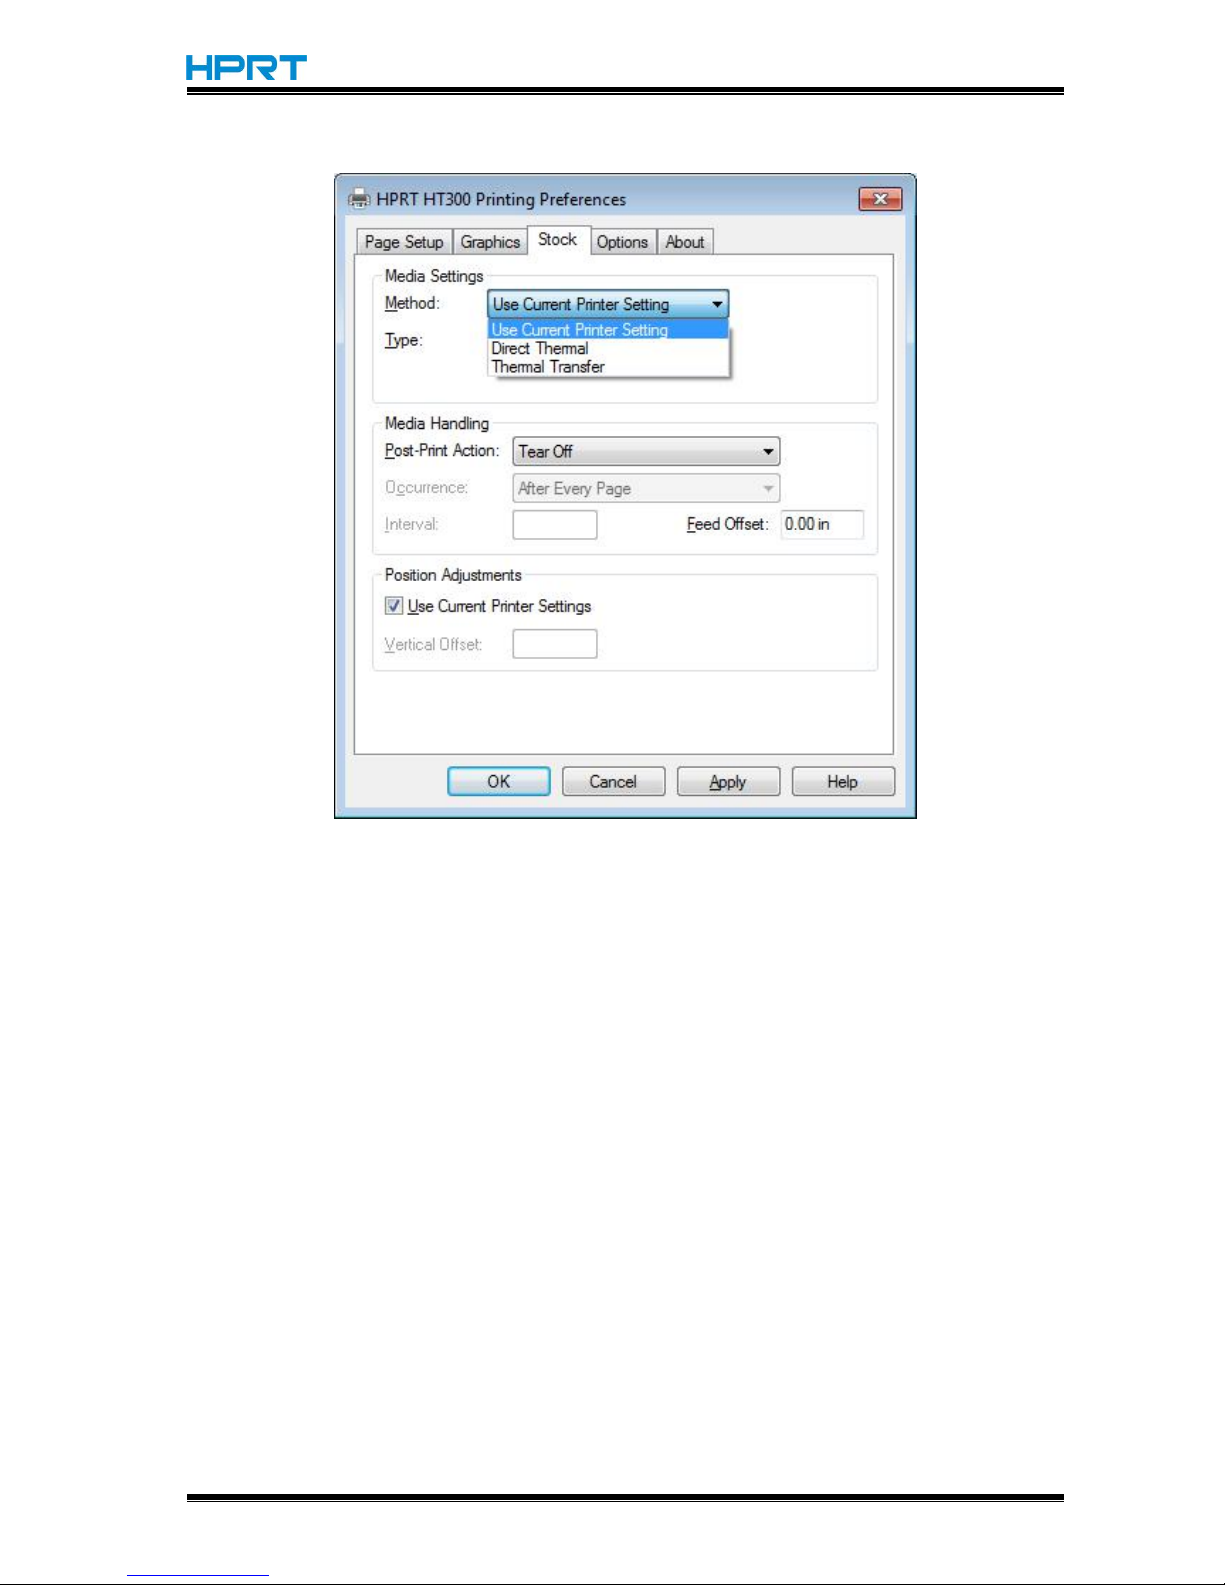
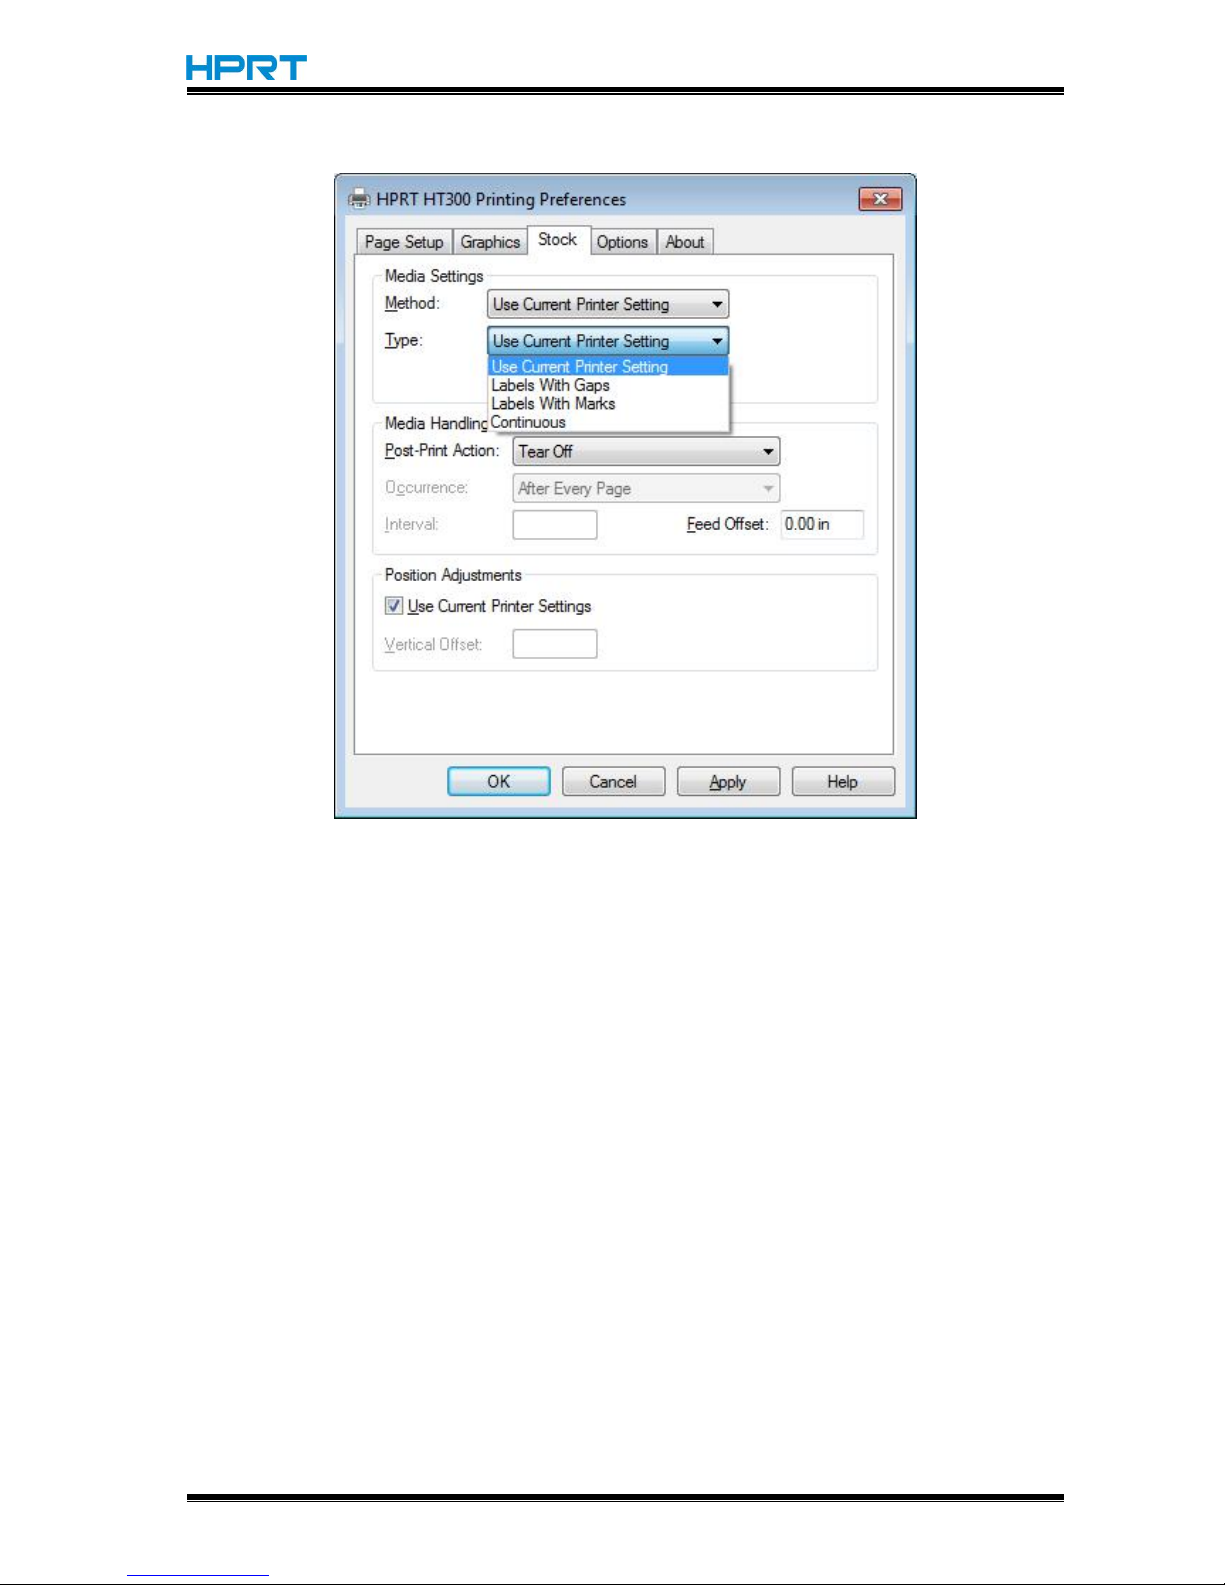
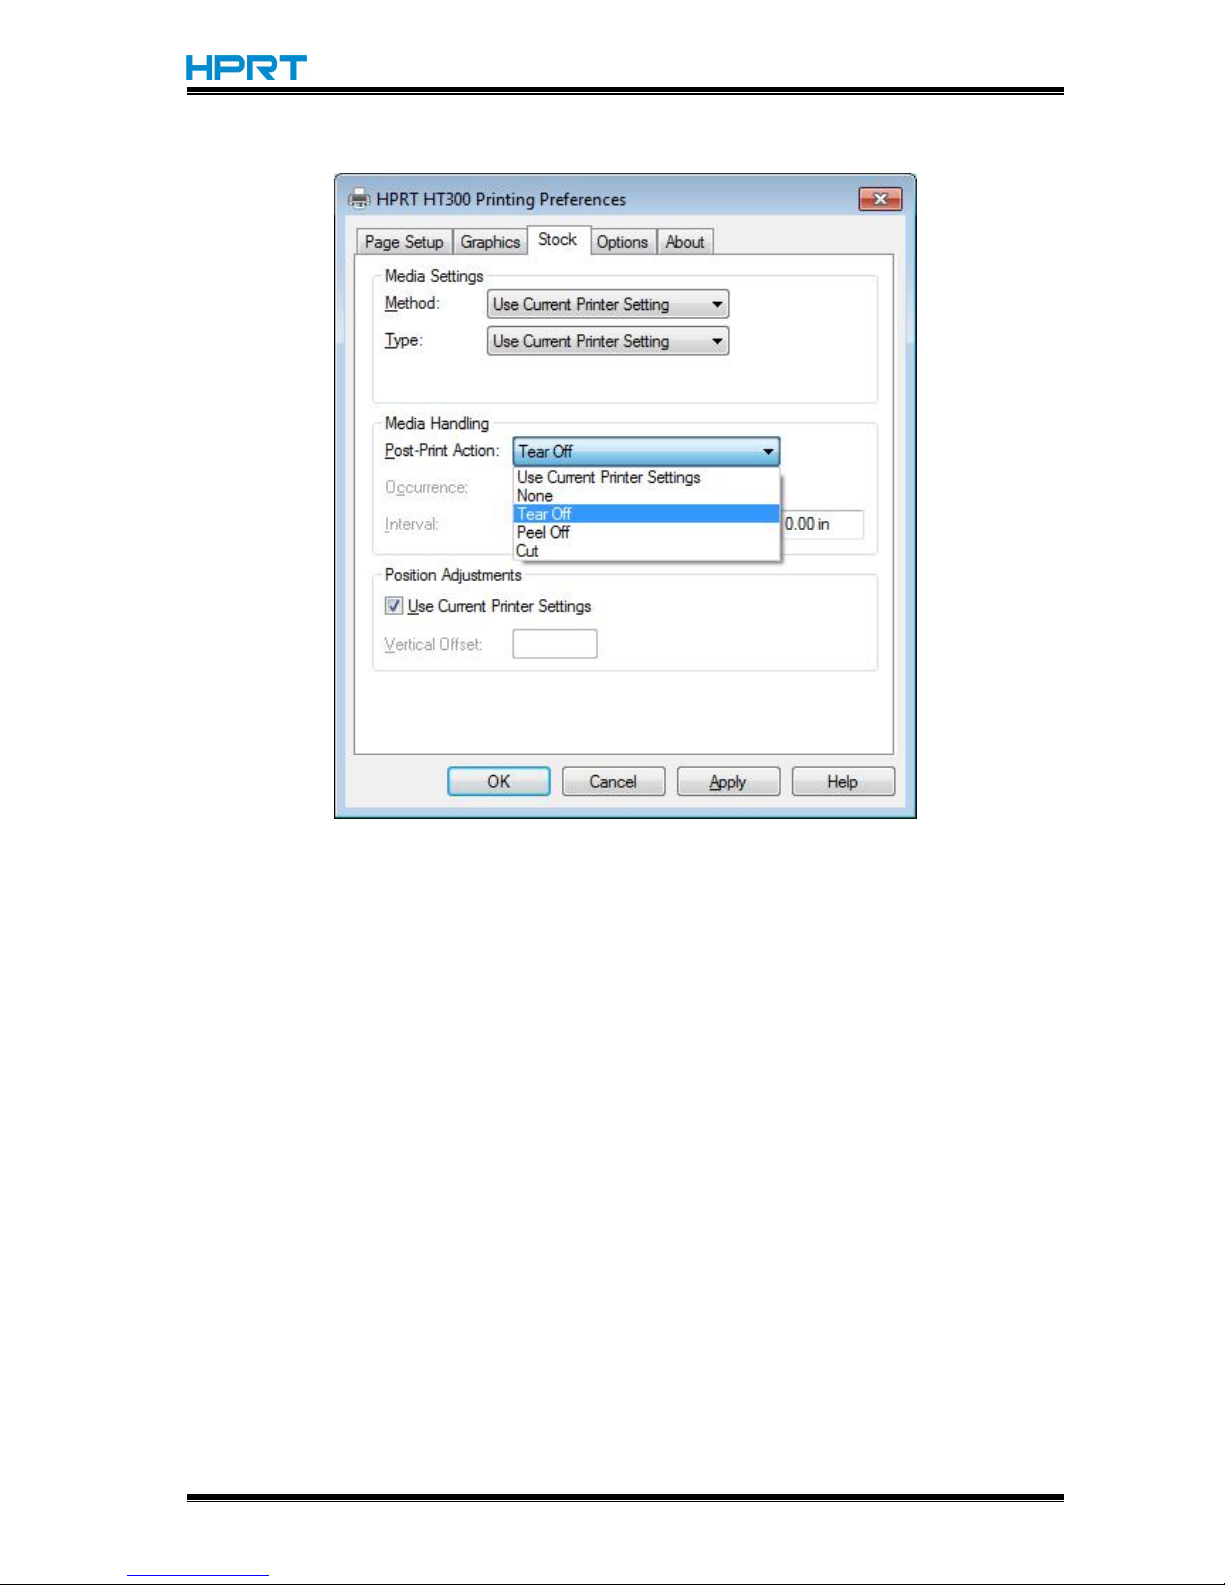
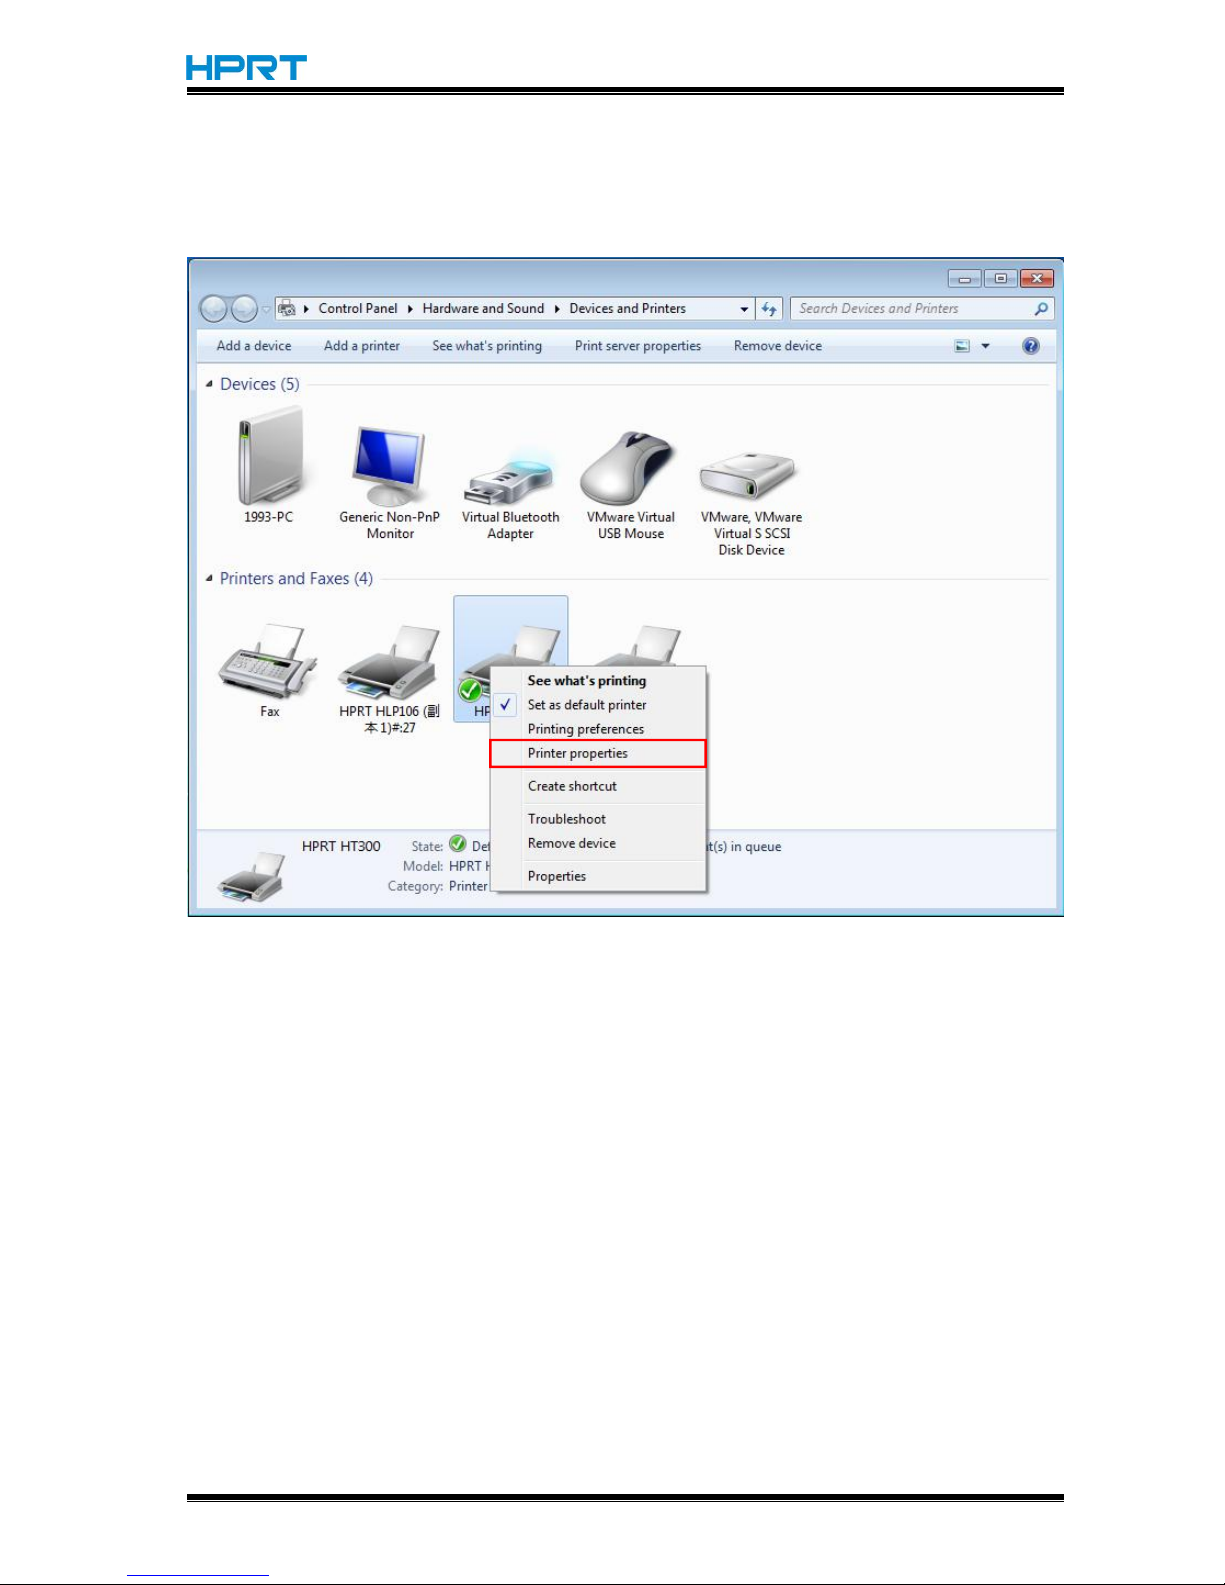
4.Click “Stock”.
Page 63
HT300/HT330 User Manual
Rev.1.0
60
●Click “Method”, and choose the printing method.
Page 64
HT300/HT330 User Manual
Rev.1.0
61
●Click “Type”, and choose the printing type.
Page 65
HT300/HT330 User Manual
Rev.1.0
62
●Click “Post-Print Action”, and choose the method of media handing.
Page 66
HT300/HT330 User Manual
Rev.1.0
63
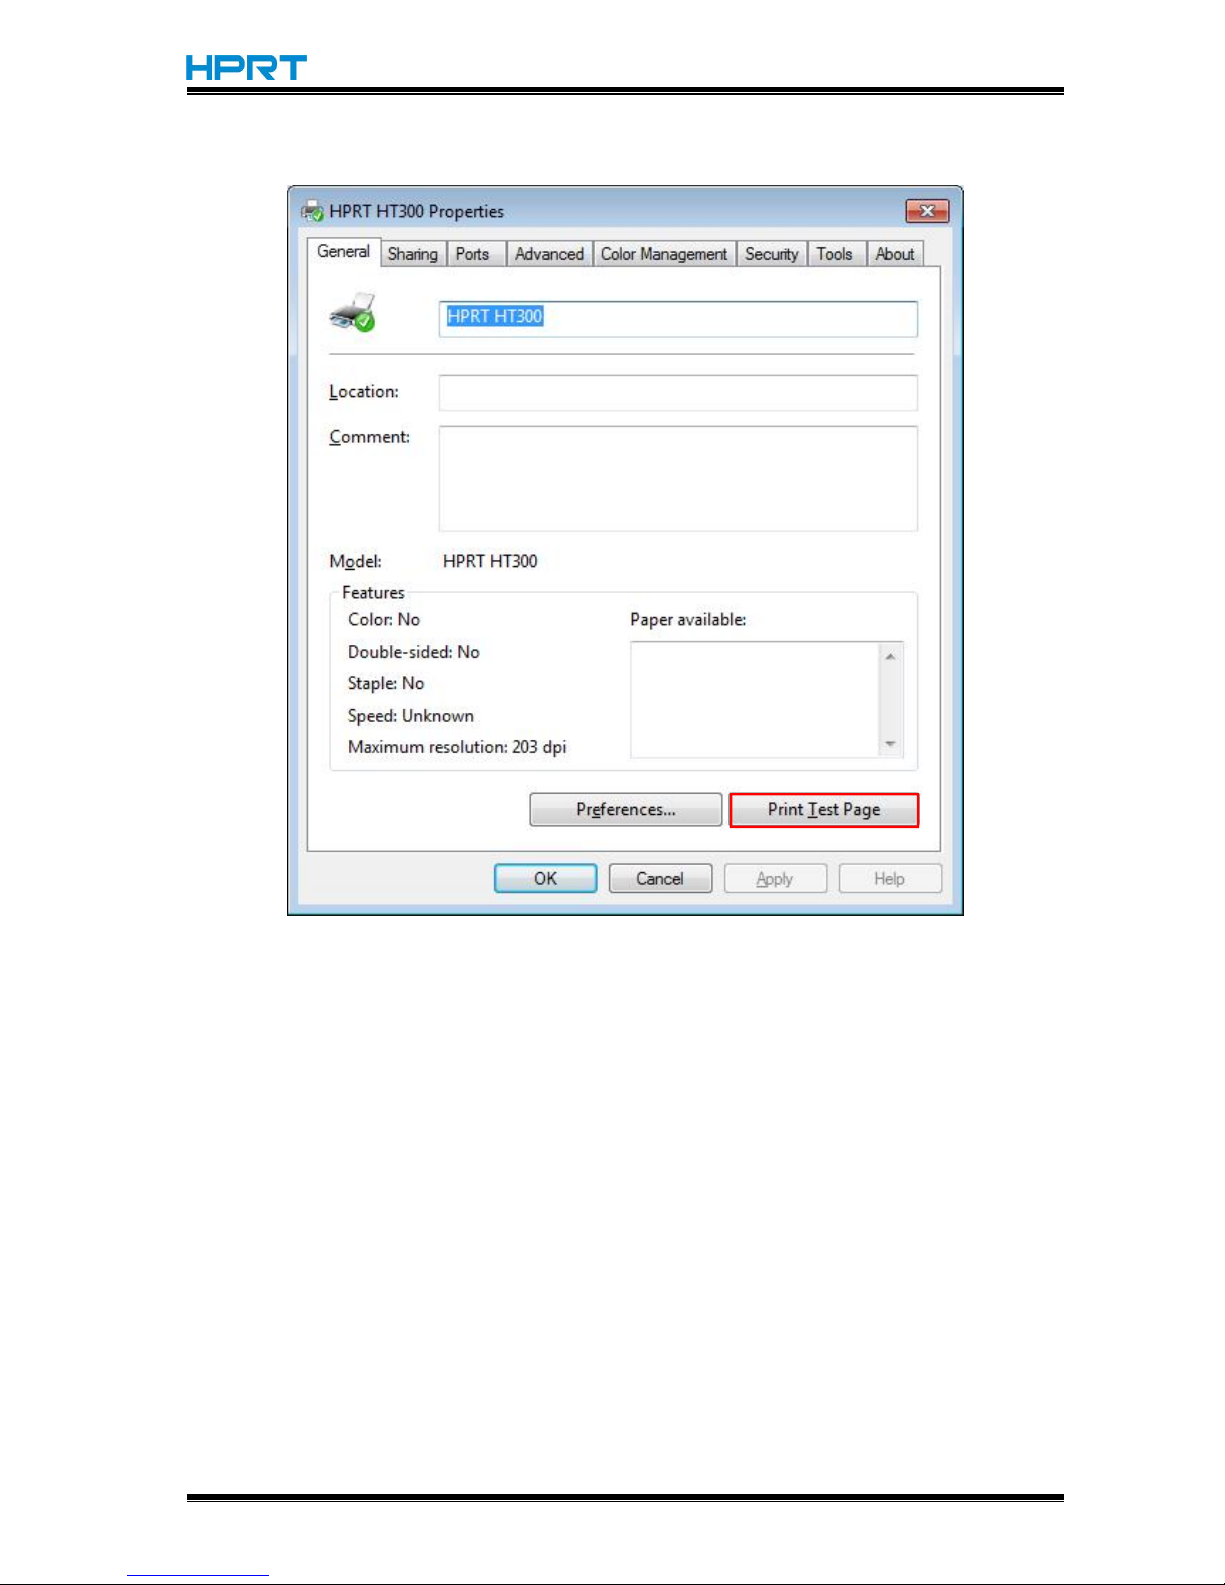
7.4.2 Printer Properties
1.Click “Start”→“Devices and Printers”. Right click “HPRT HT300” and choose “Printer
properties”.
Page 67
HT300/HT330 User Manual
Rev.1.0
64
2.Click “General”→“Print Test Page”, and printer will print labels with current settings.
Page 68
HT300/HT330 User Manual
Rev.1.0
65
7.4.3 Print Server Properties
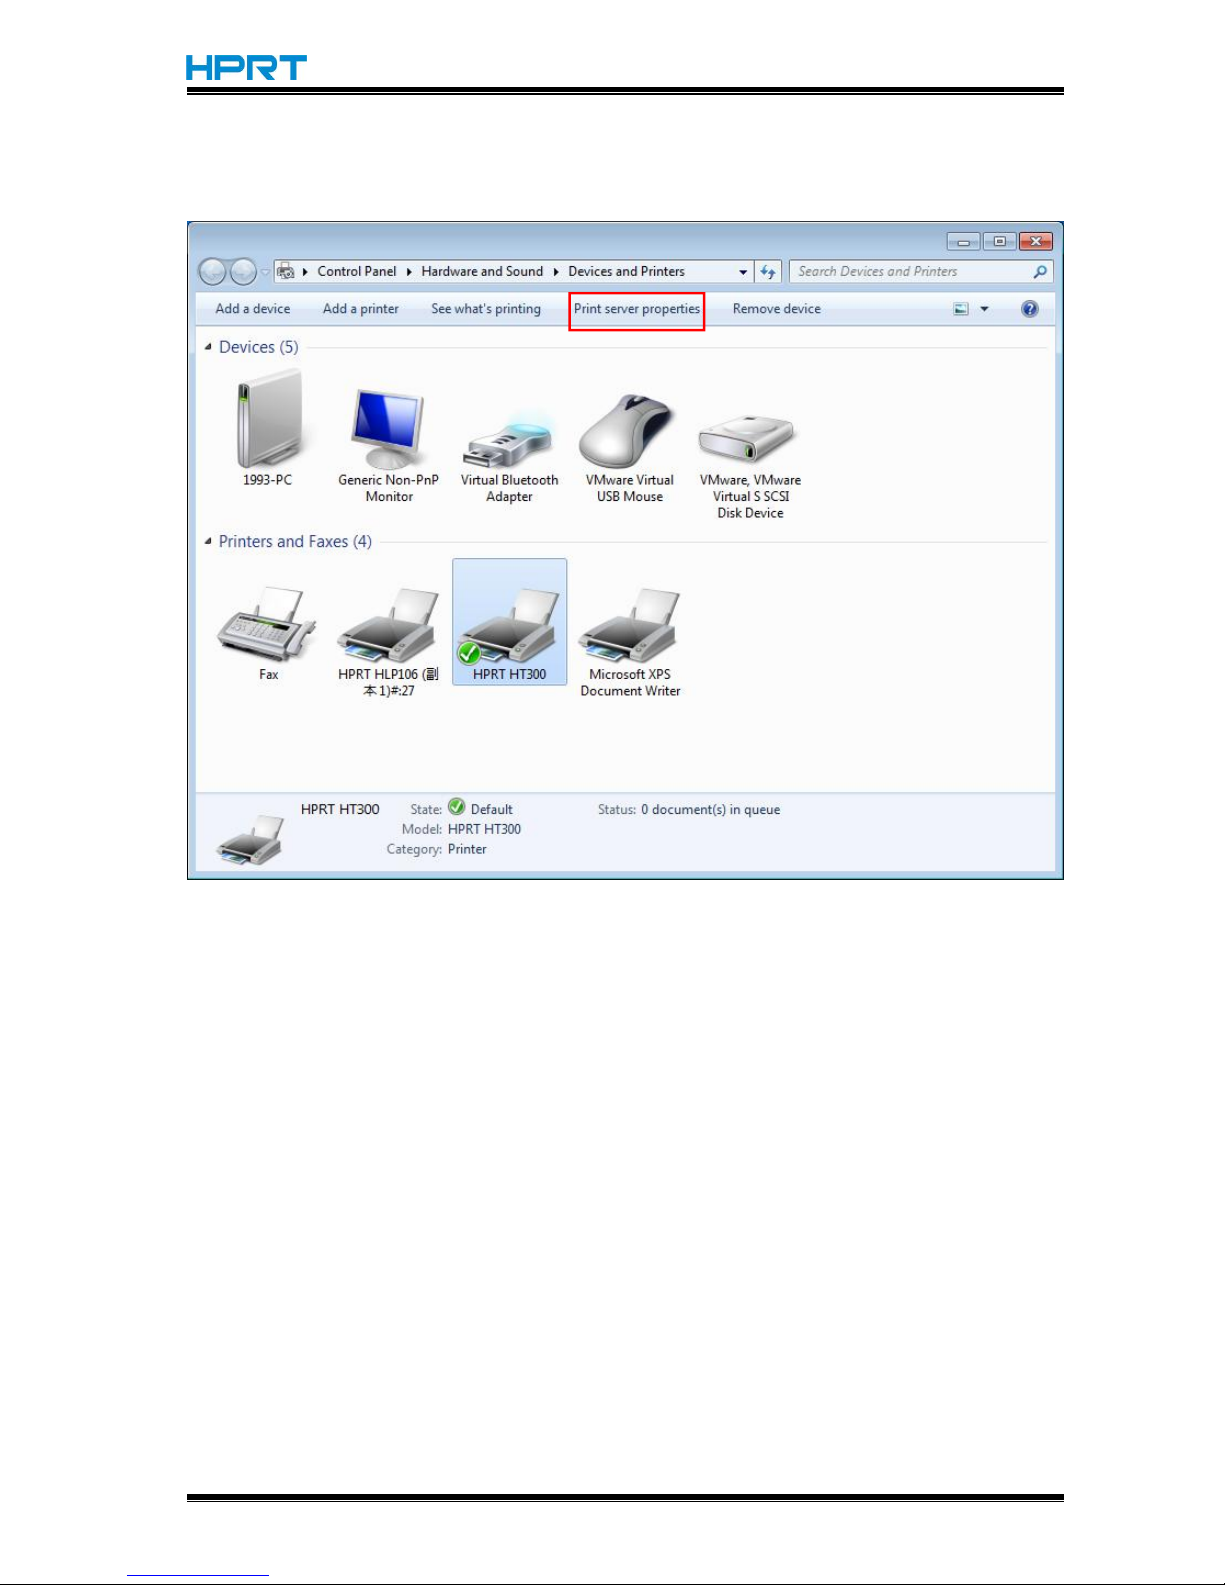
1.Click “Start”→“Devices and Printers”. Then click “Print server properties”.
Page 69
HT300/HT330 User Manual
Rev.1.0
66
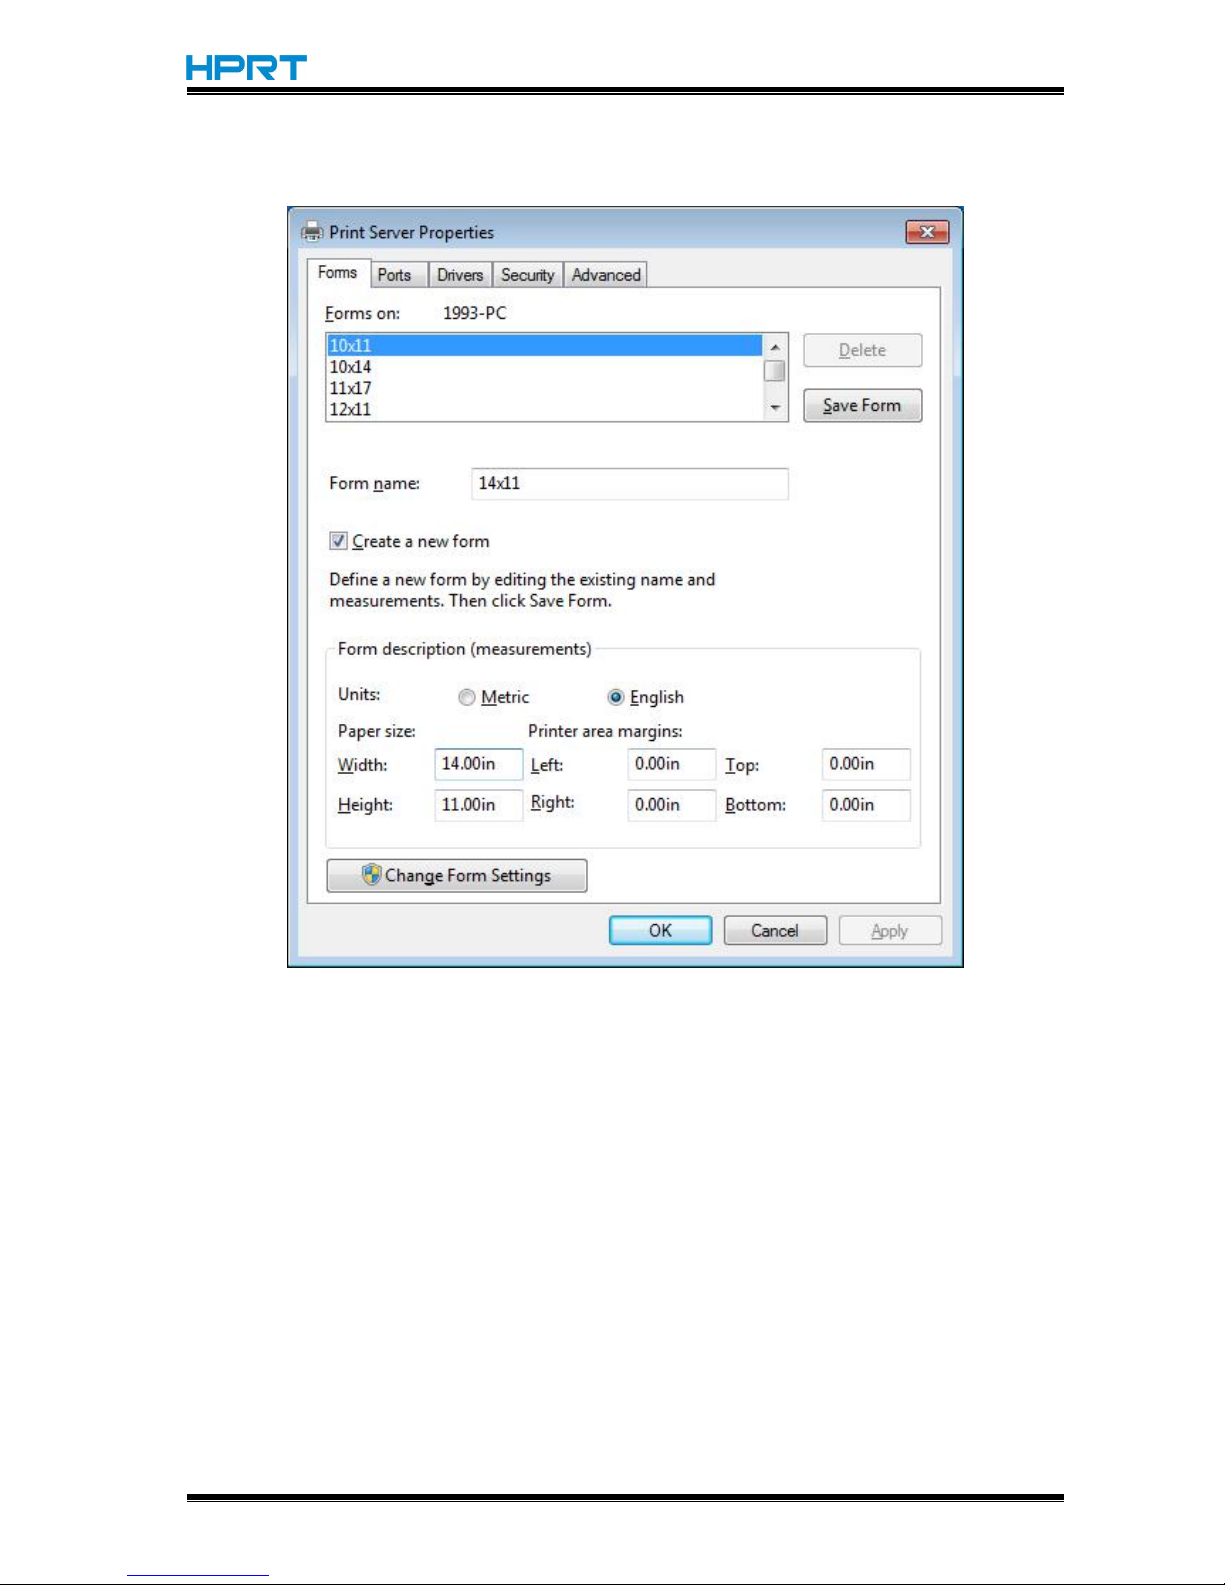
2.Click “Create a new form”, write in “Form name” and edit width and height in “Paper size”.
Finally, click “Save Form”.
Page 70
HT300/HT330 User Manual
Rev.1.0
67
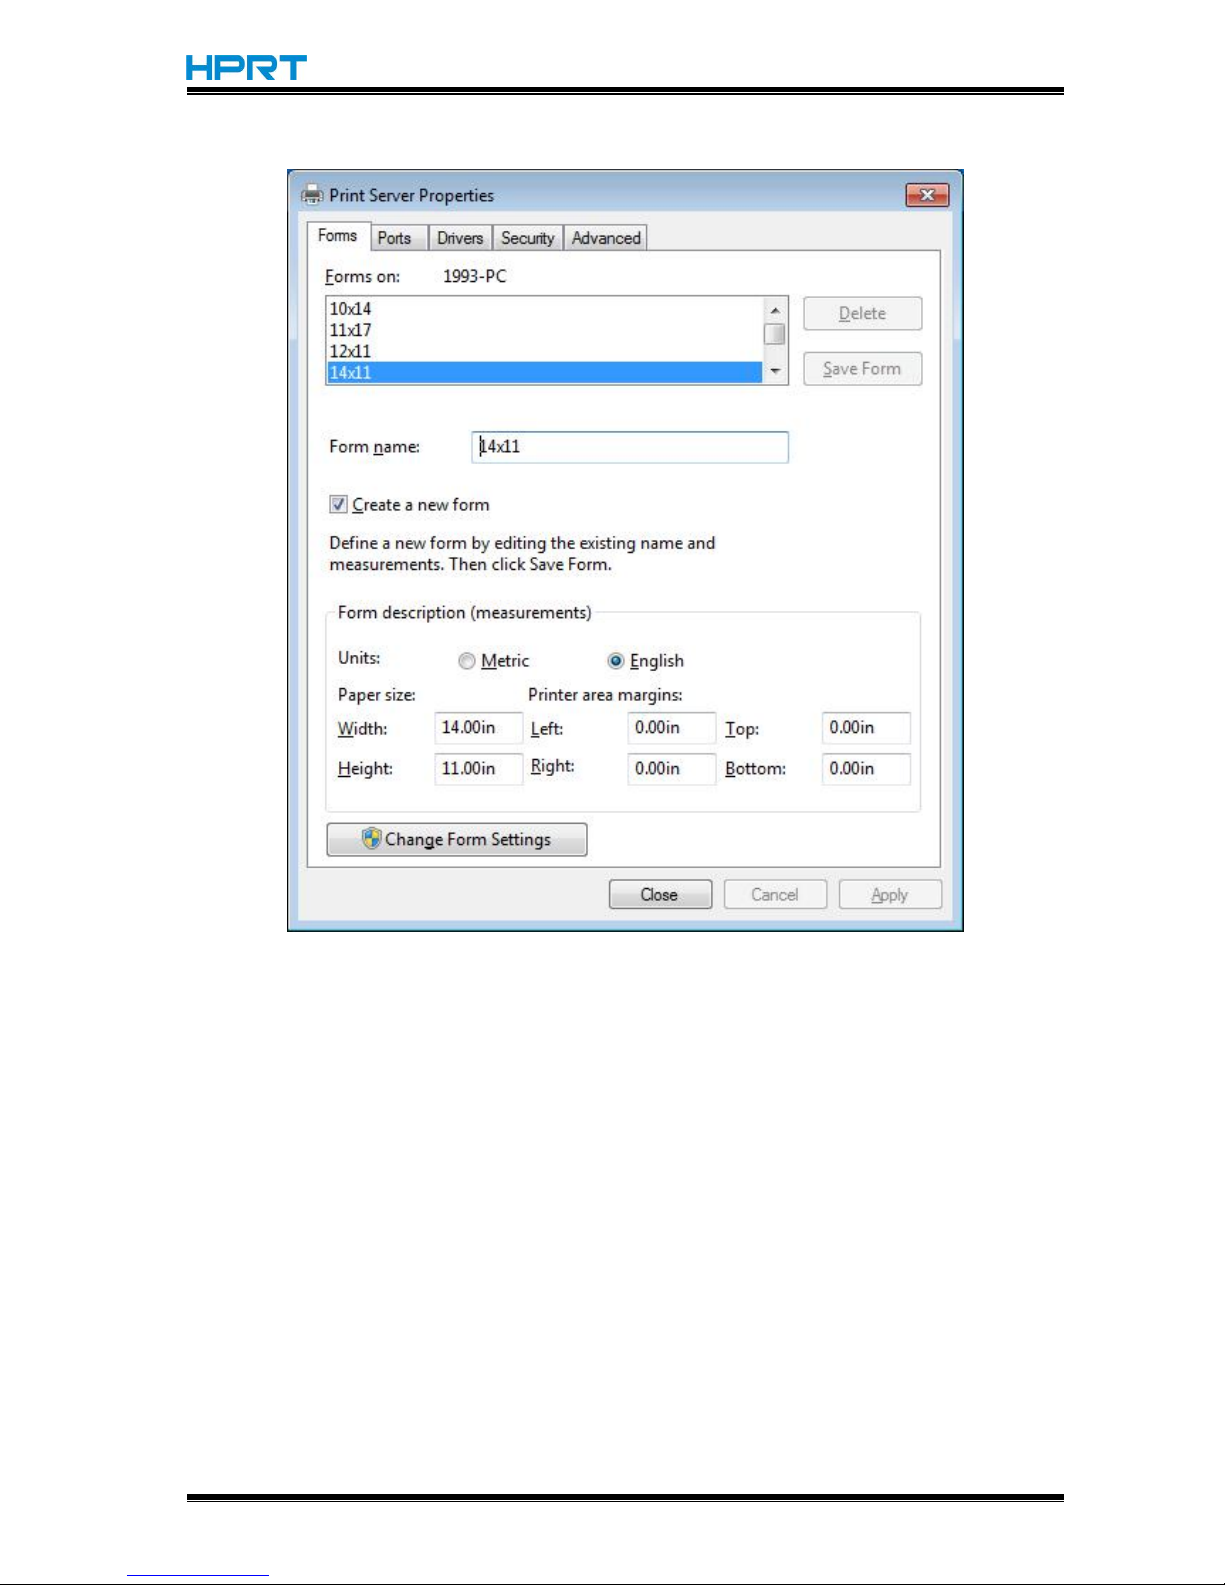
3.The new label form is showed in “Forms on”.
Page 71

HT300/HT330 User Manual
Rev.1.0
68
7.5 Label’s Width
USER(4.00 in×4.00 in)
2×4(2.00 in×4.00 in)
4×4(4.00 in×4.00 in)
4×6(4.00 in×6.00 in)
Page 72

HT300/HT330 User Manual
Rev.1.0
69
Chapter 8 BarTender® Ultralite Instructions
8.1 Introduction
This chapter provides instructions on BarTender® Ultralite program according to PC operating
systems(OS).
The followings are supported.
Microsoft Windows 10 (32 bit/64 bit)
Microsoft Windows 8 (32 bit/64 bit)
Microsoft Windows 7 SPI (32 bit/64 bit)
Microsoft Windows Vista SP2 (32 bit/64 bit)
Microsoft Windows XP Professional SP3 (32 bit)
Microsoft Windows Server 2012(64 bit)
Microsoft Windows Server 2008 R2
Microsoft Windows Server 2008 SP2(32 bit/64 bit)
Microsoft Windows Server 2003 R2 SP2(32 bit/64 bit)
8.2 Installation Preparation
Download BarTender® Ultralite application program in CD.
Page 73
HT300/HT330 User Manual
Rev.1.0
70
8.3 Installation
Note:
Under different operating systems, the screen may be slightly different. Take Windows 7
as example.
Take HPRT HT300 as example. Please refer to HPRT HT300 when using HPRT HT330.
To avoid the prevention, recommend to close the security software before installation.
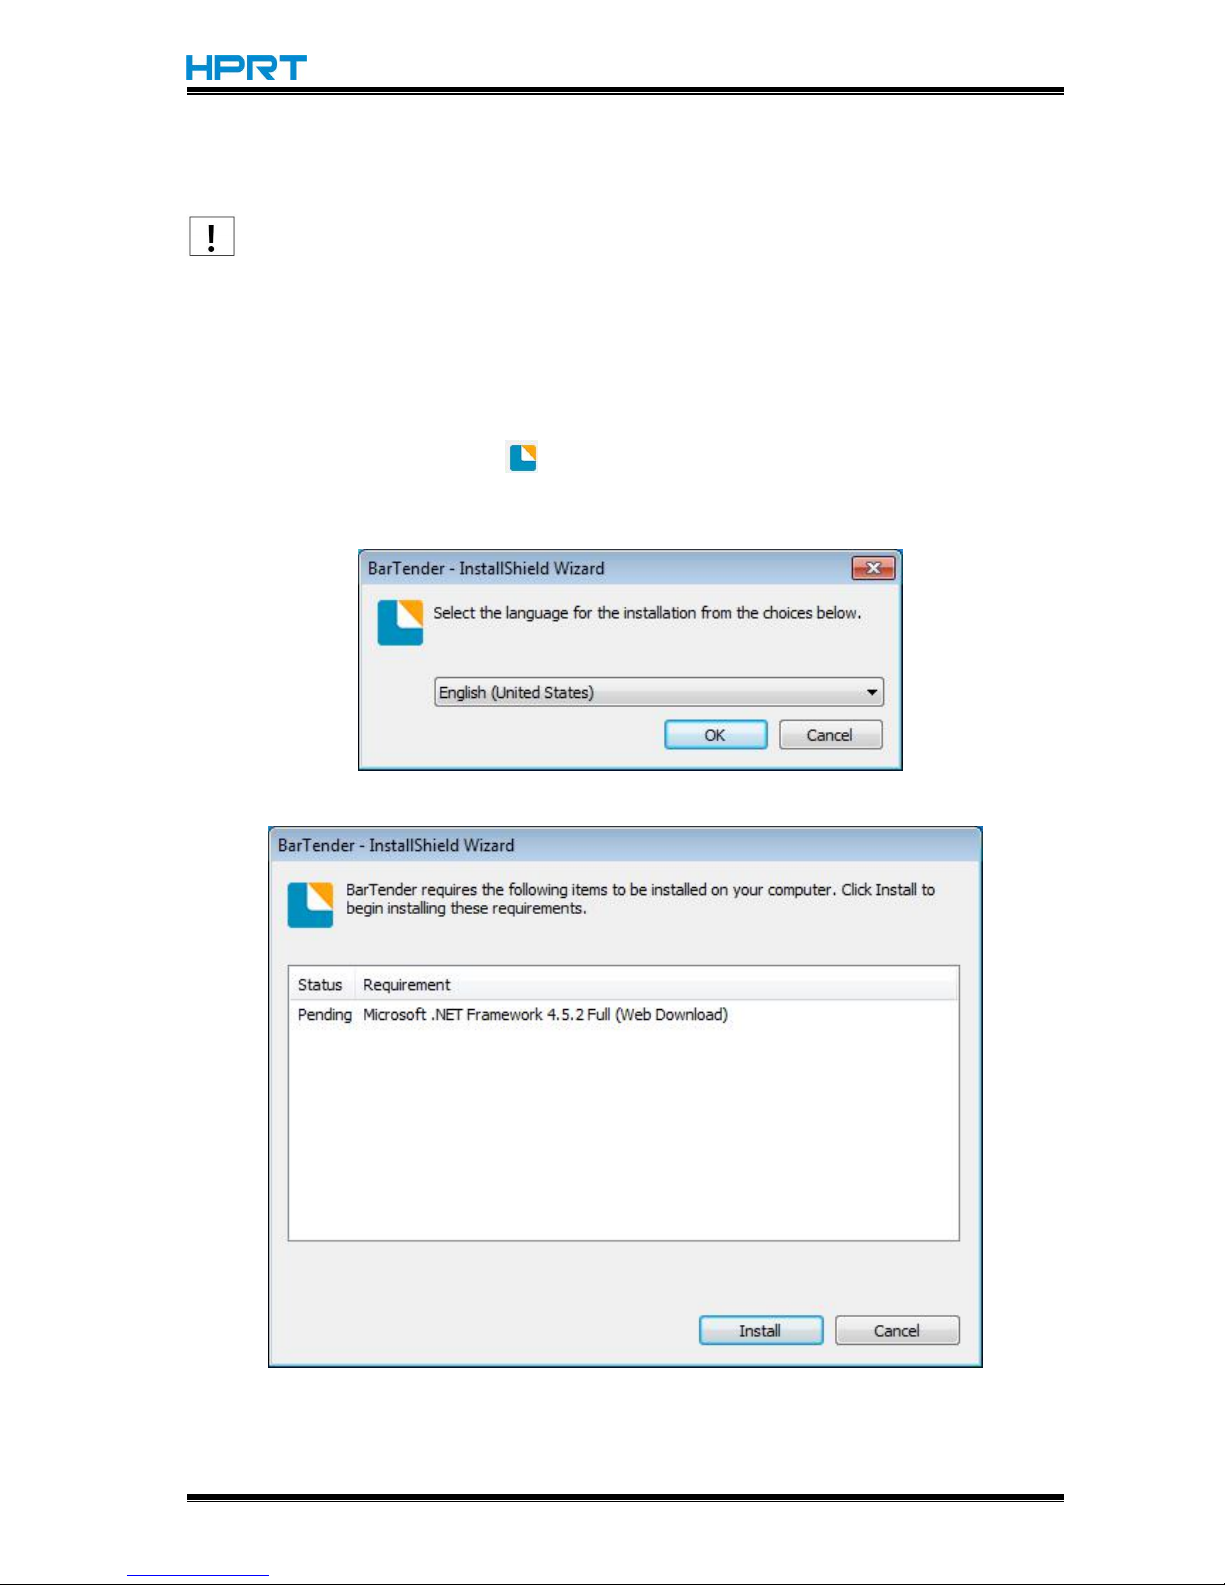
1.Double click application program .
2.Select language, then click "OK".
3.Click "Install".
Page 74
HT300/HT330 User Manual
Rev.1.0
71
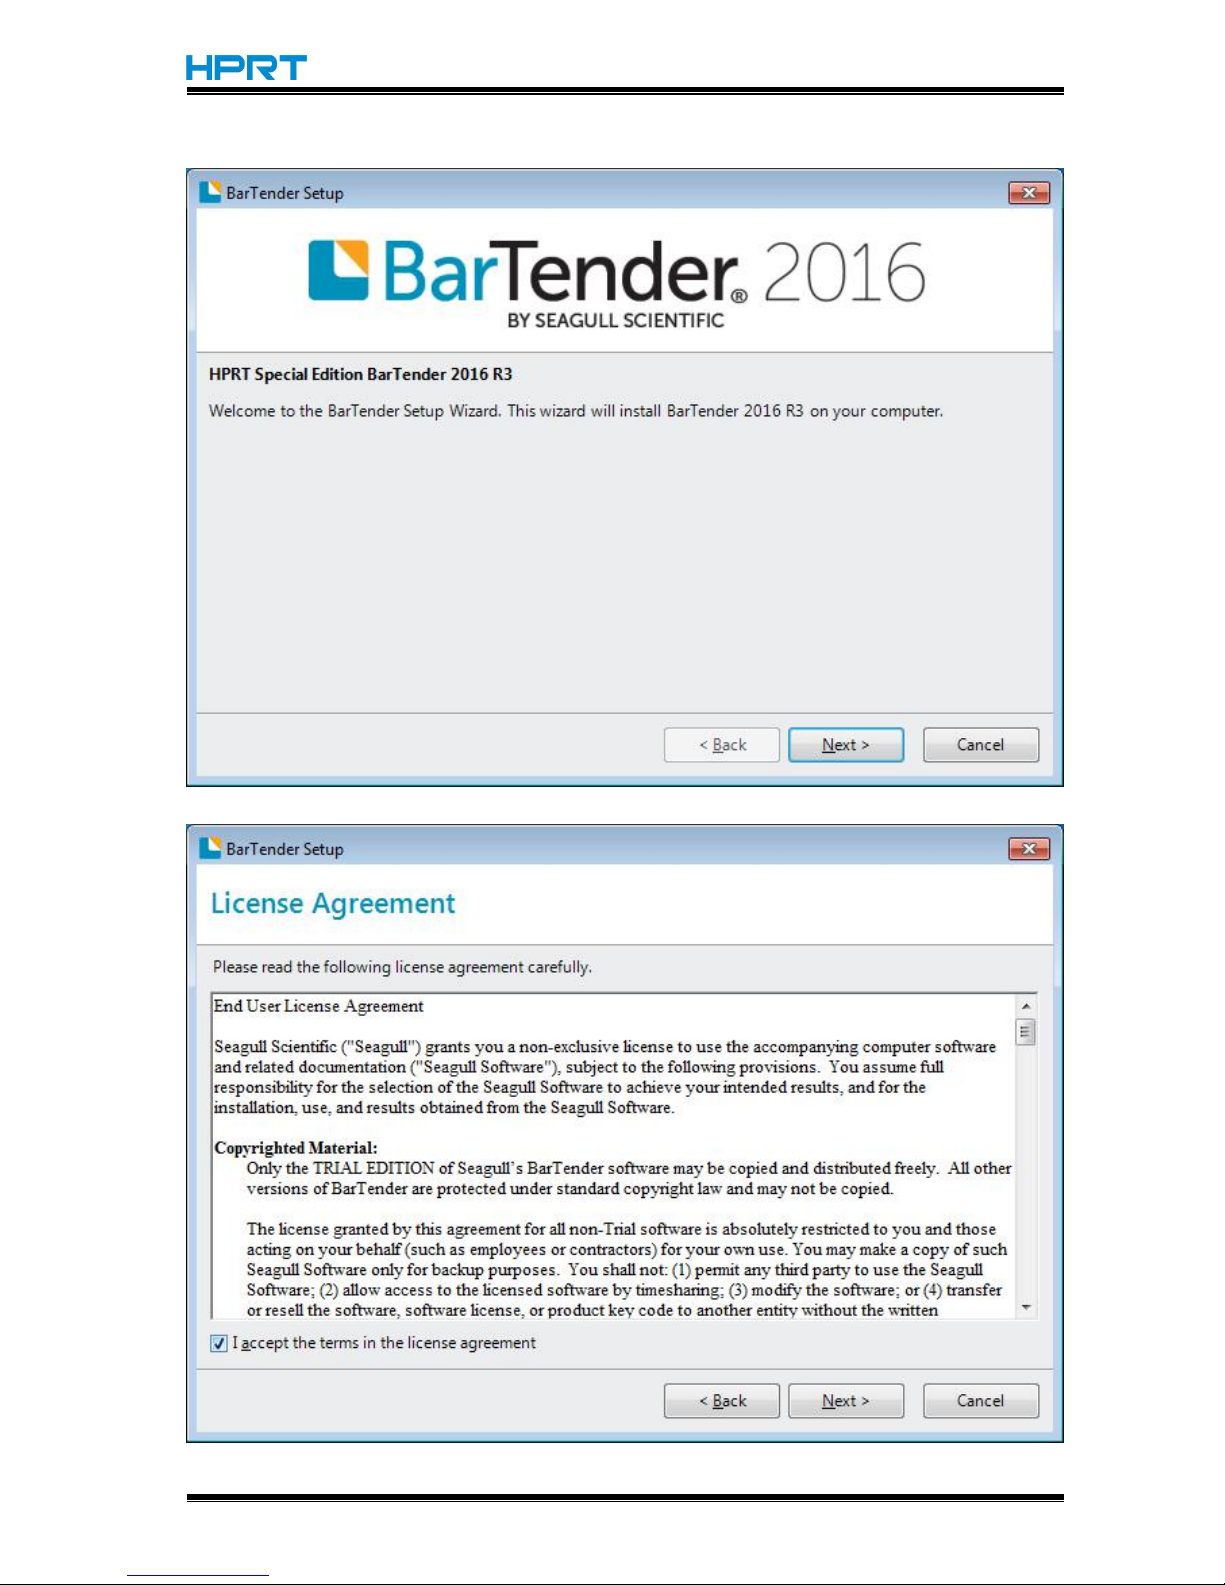
4.Click " Next".
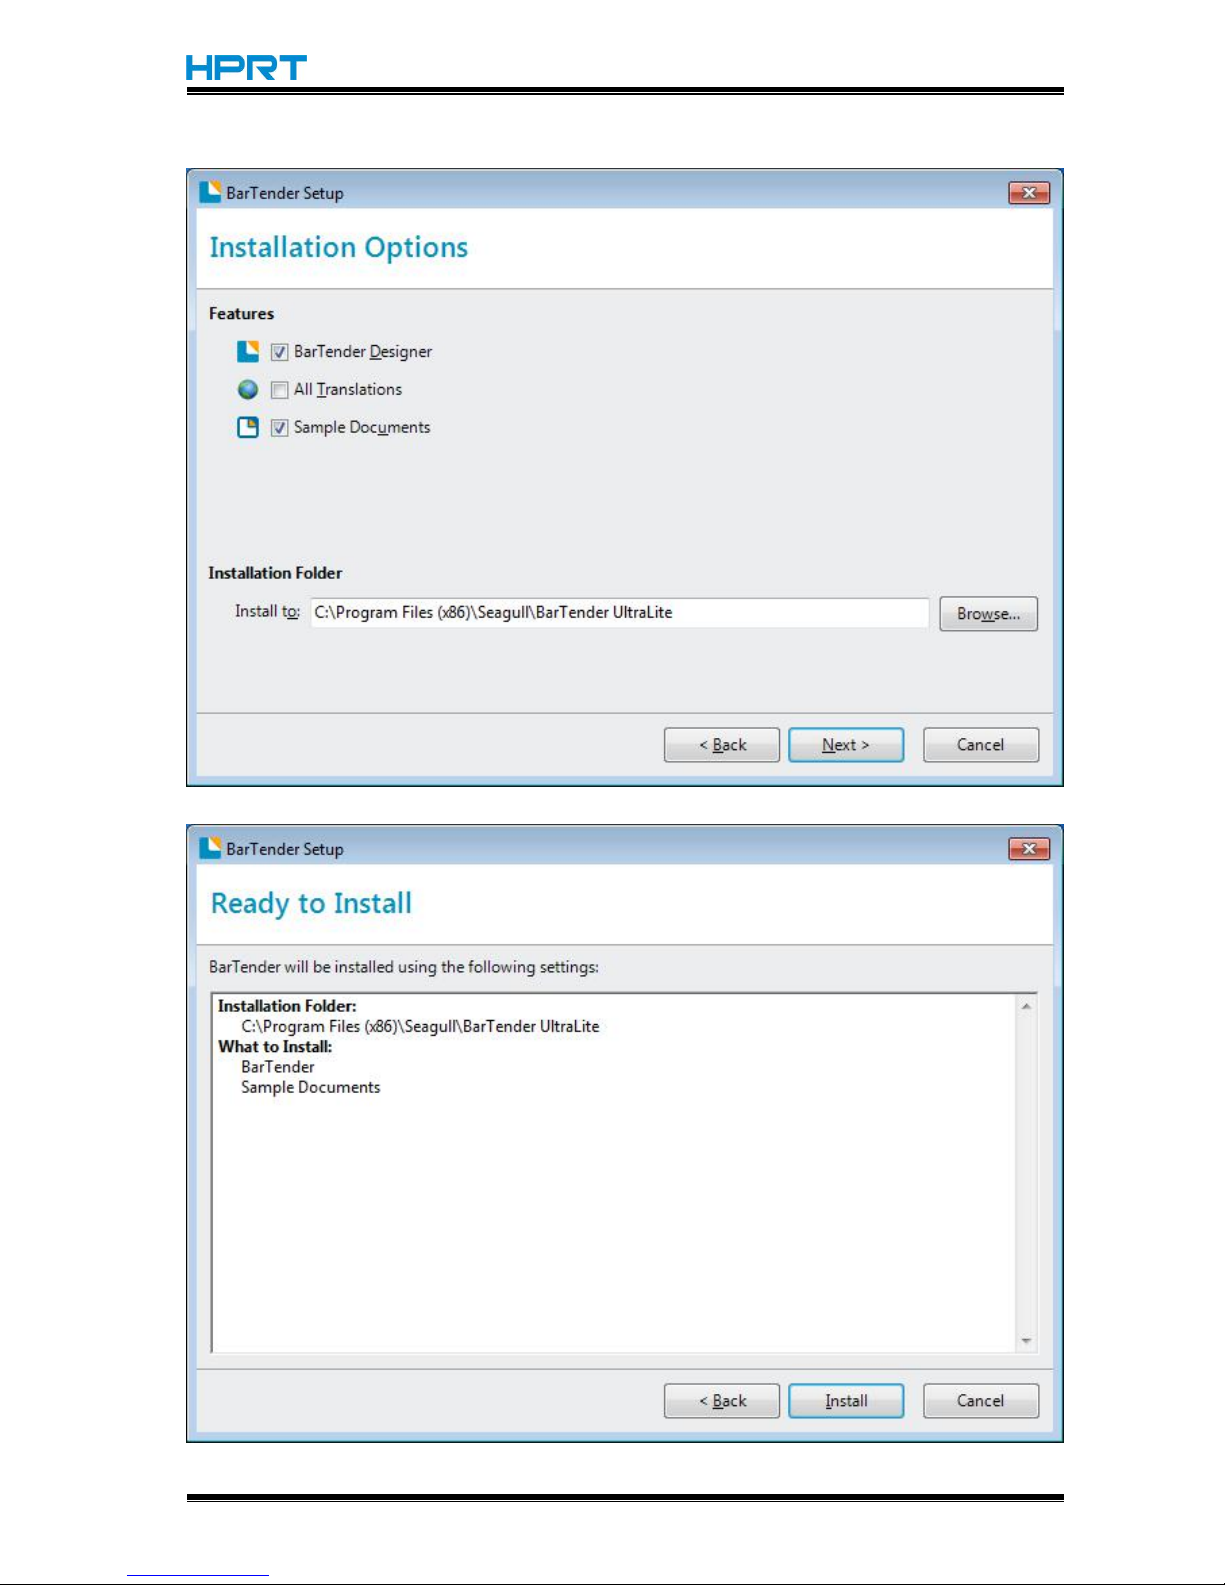
5.Read and accept the license agreement, then click "Next".
Page 75
HT300/HT330 User Manual
Rev.1.0
72
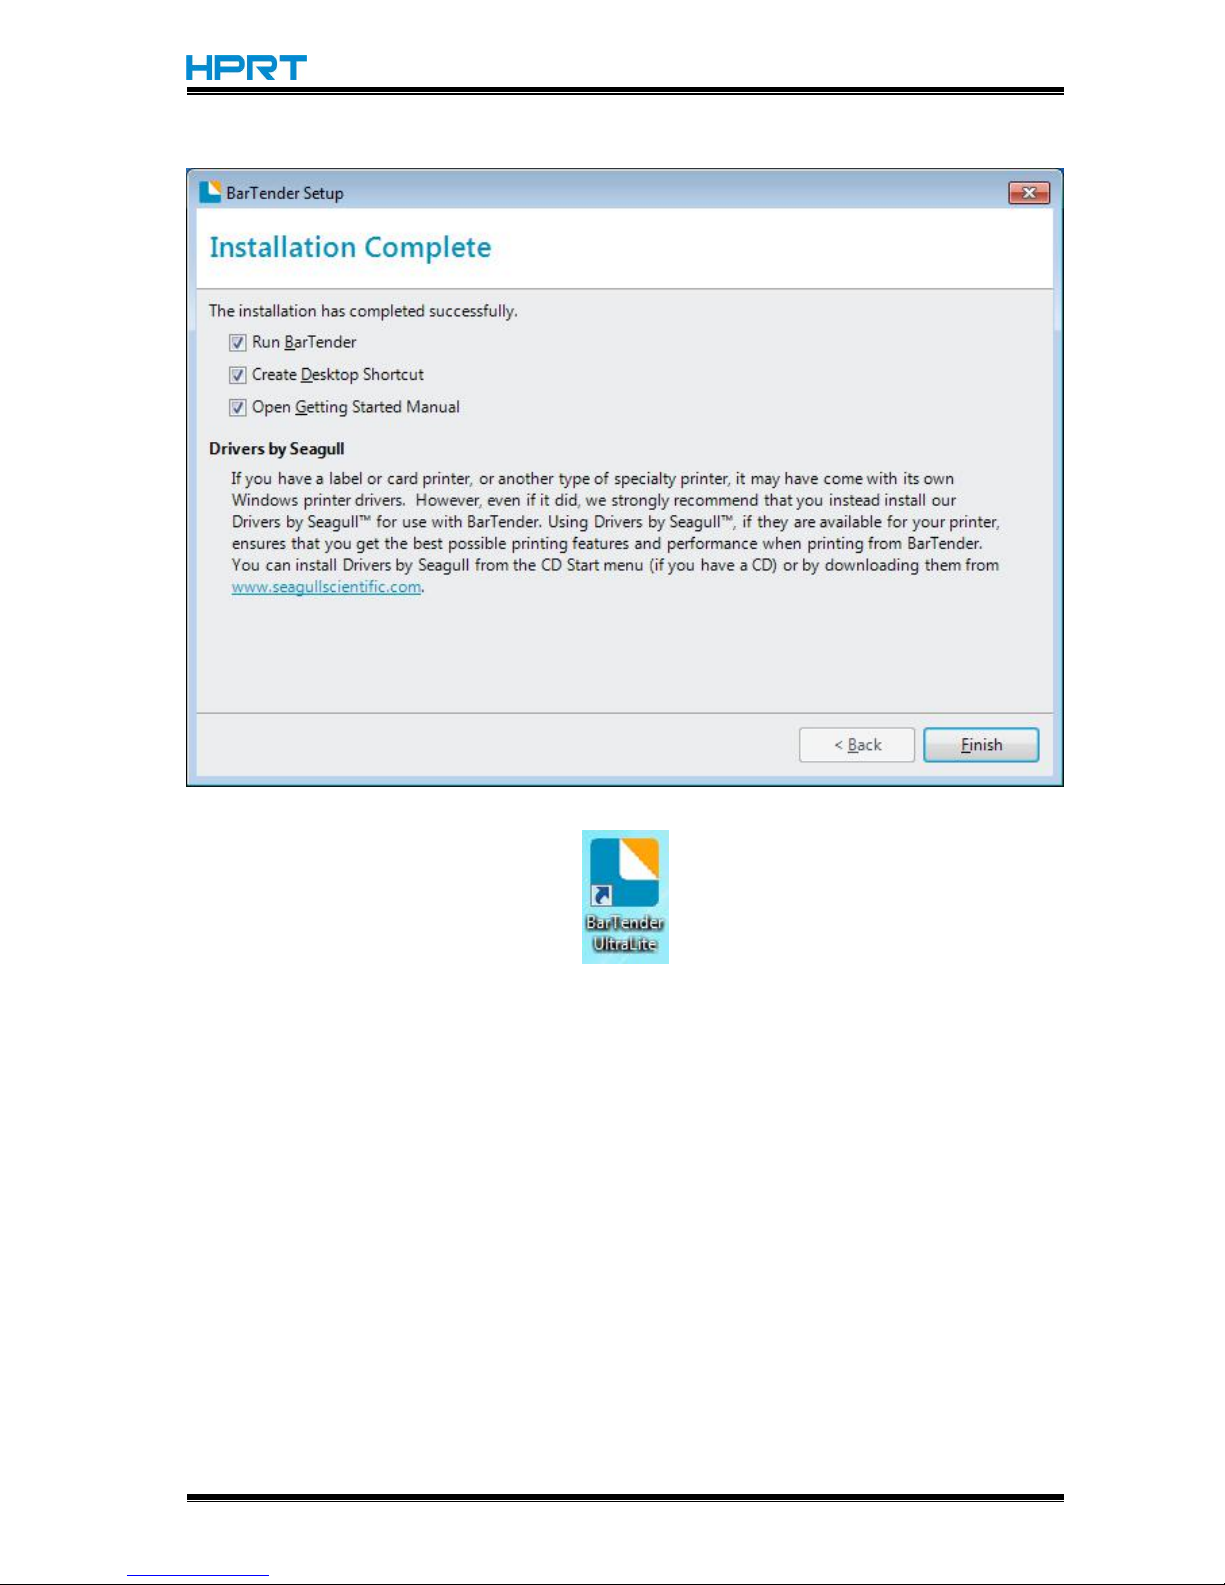
6.Select "Features" and Installation Location, then click "Next".
7.Click "Install".
Page 76
HT300/HT330 User Manual
Rev.1.0
73
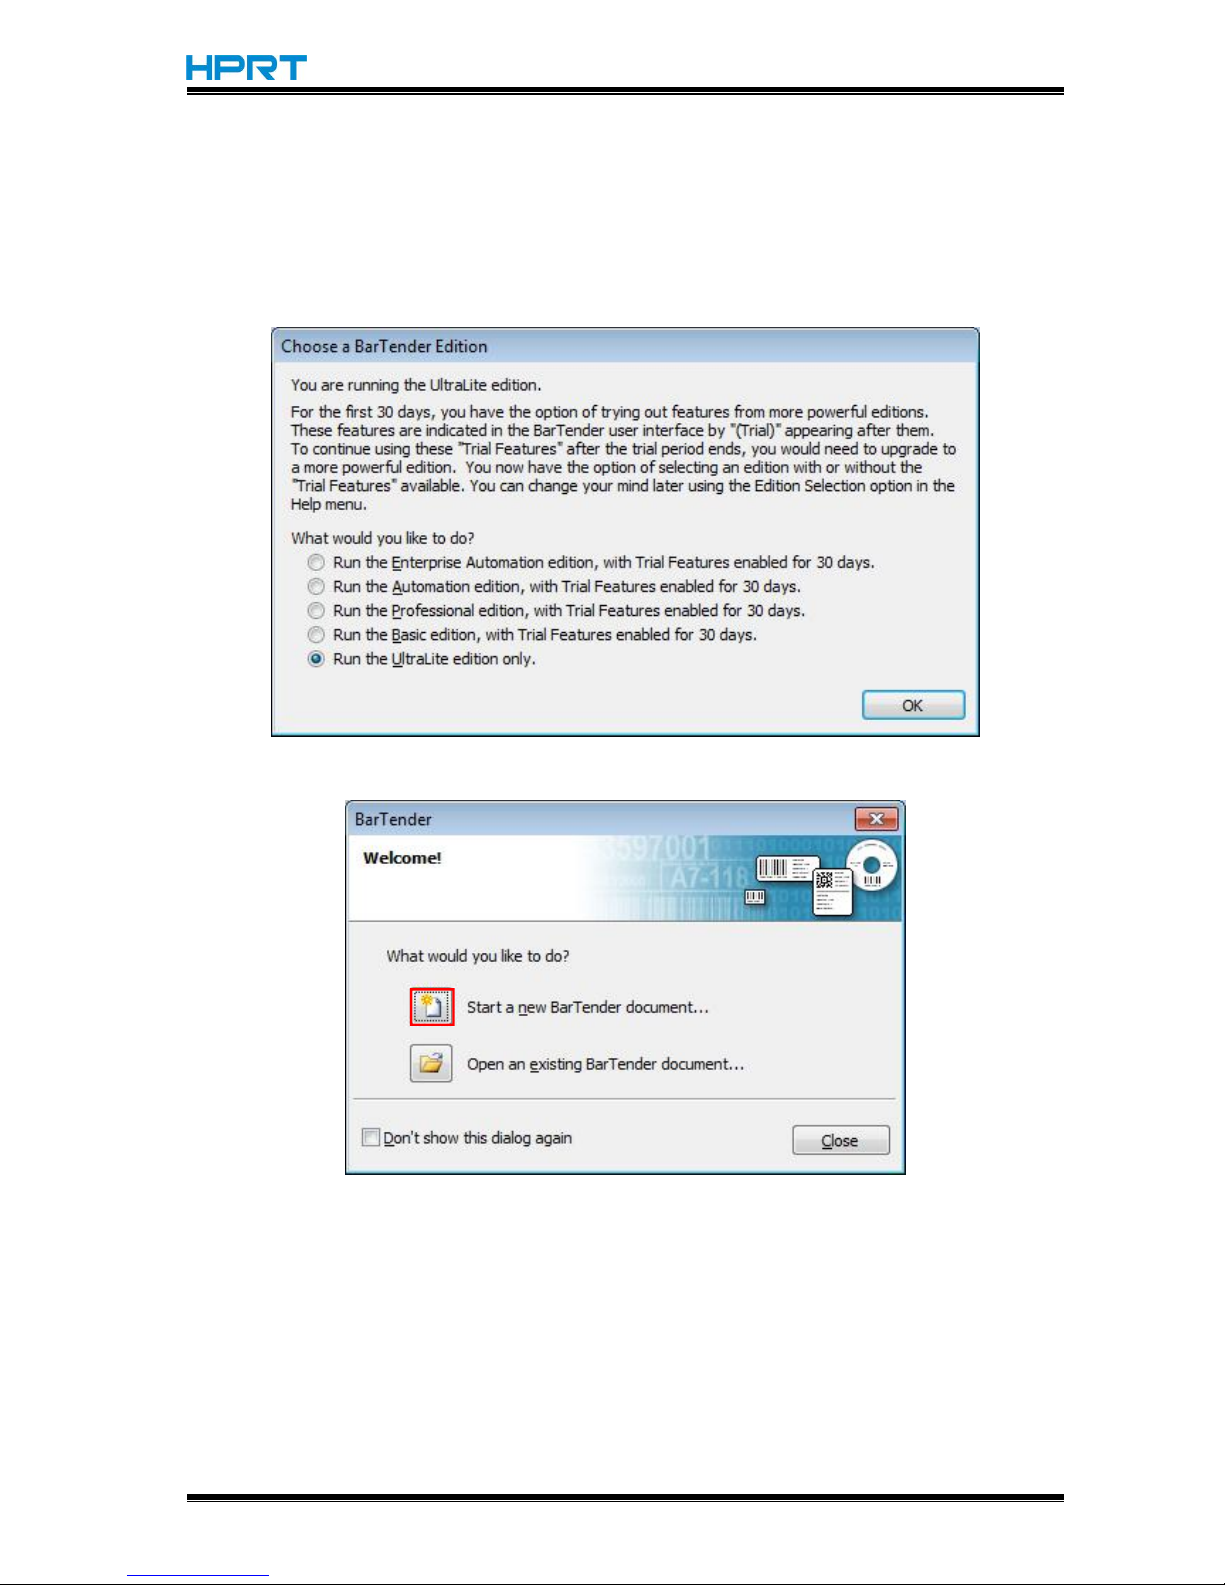
8.Click “Finish”.
9.Back to desktop, and you will see the icon of BarTender®. Dobule click it, and start to use.
Page 77
HT300/HT330 User Manual
Rev.1.0
74
8.4 Usage
8.4.1 Page Settings
1.Double click the icon, then choose the edition. Click “OK”. (The edition may be changed
according to different needs.)
2.Click “Start a new BarTender document”.
Page 78
HT300/HT330 User Manual
Rev.1.0
75
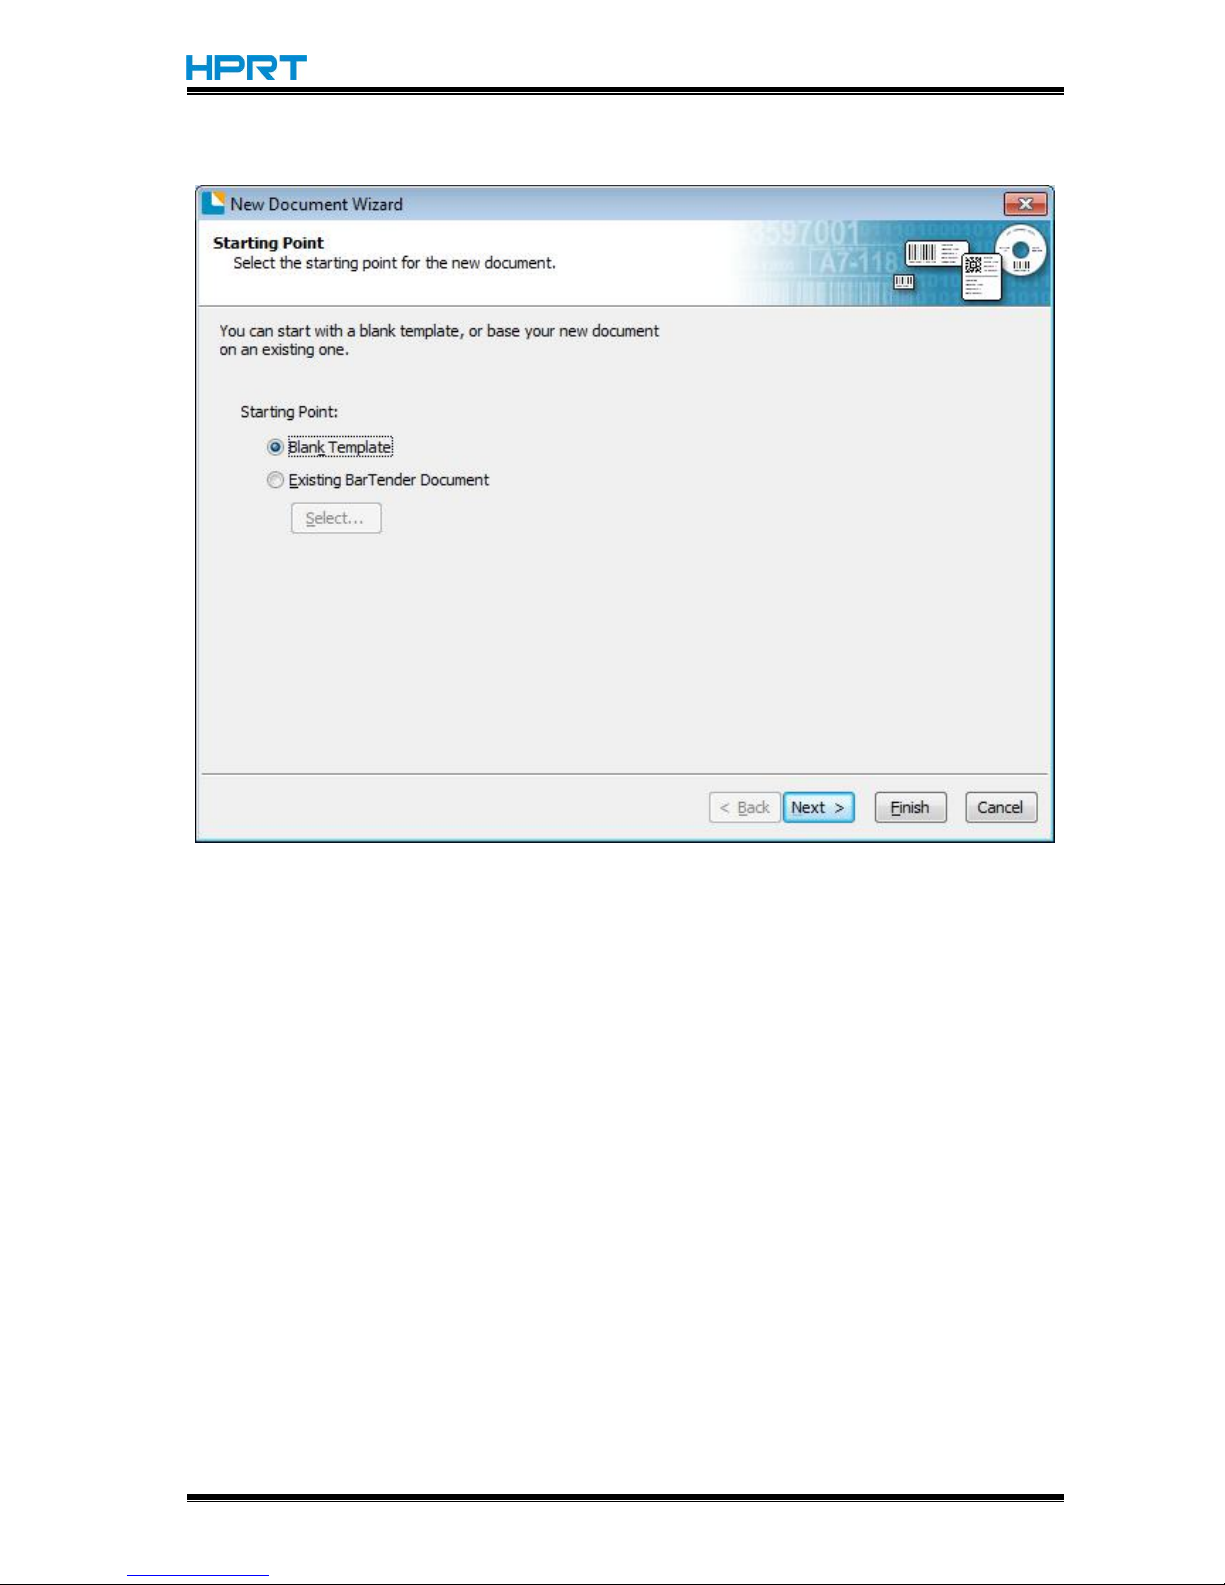
3.Choose “Blank Template”, then click “Next”.
Page 79
HT300/HT330 User Manual
Rev.1.0
76
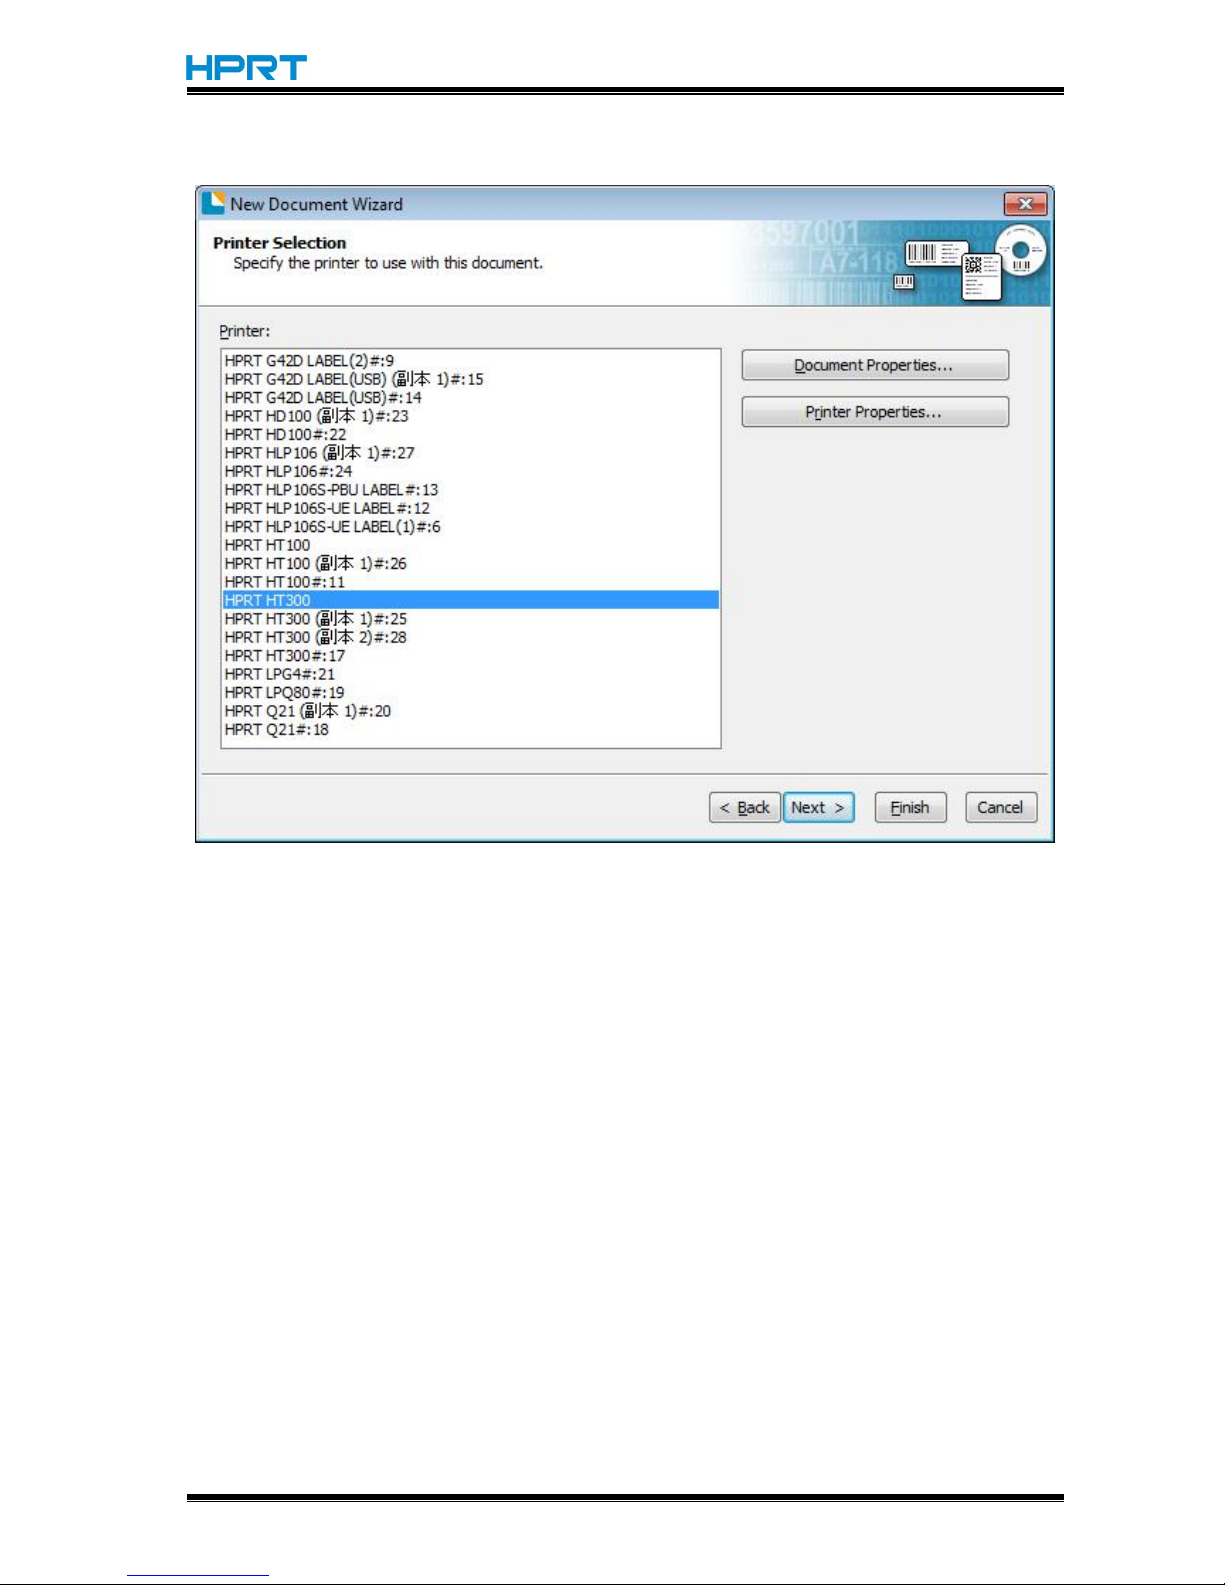
4.Choose the printer type, then click “Next”.
Page 80
HT300/HT330 User Manual
Rev.1.0
77
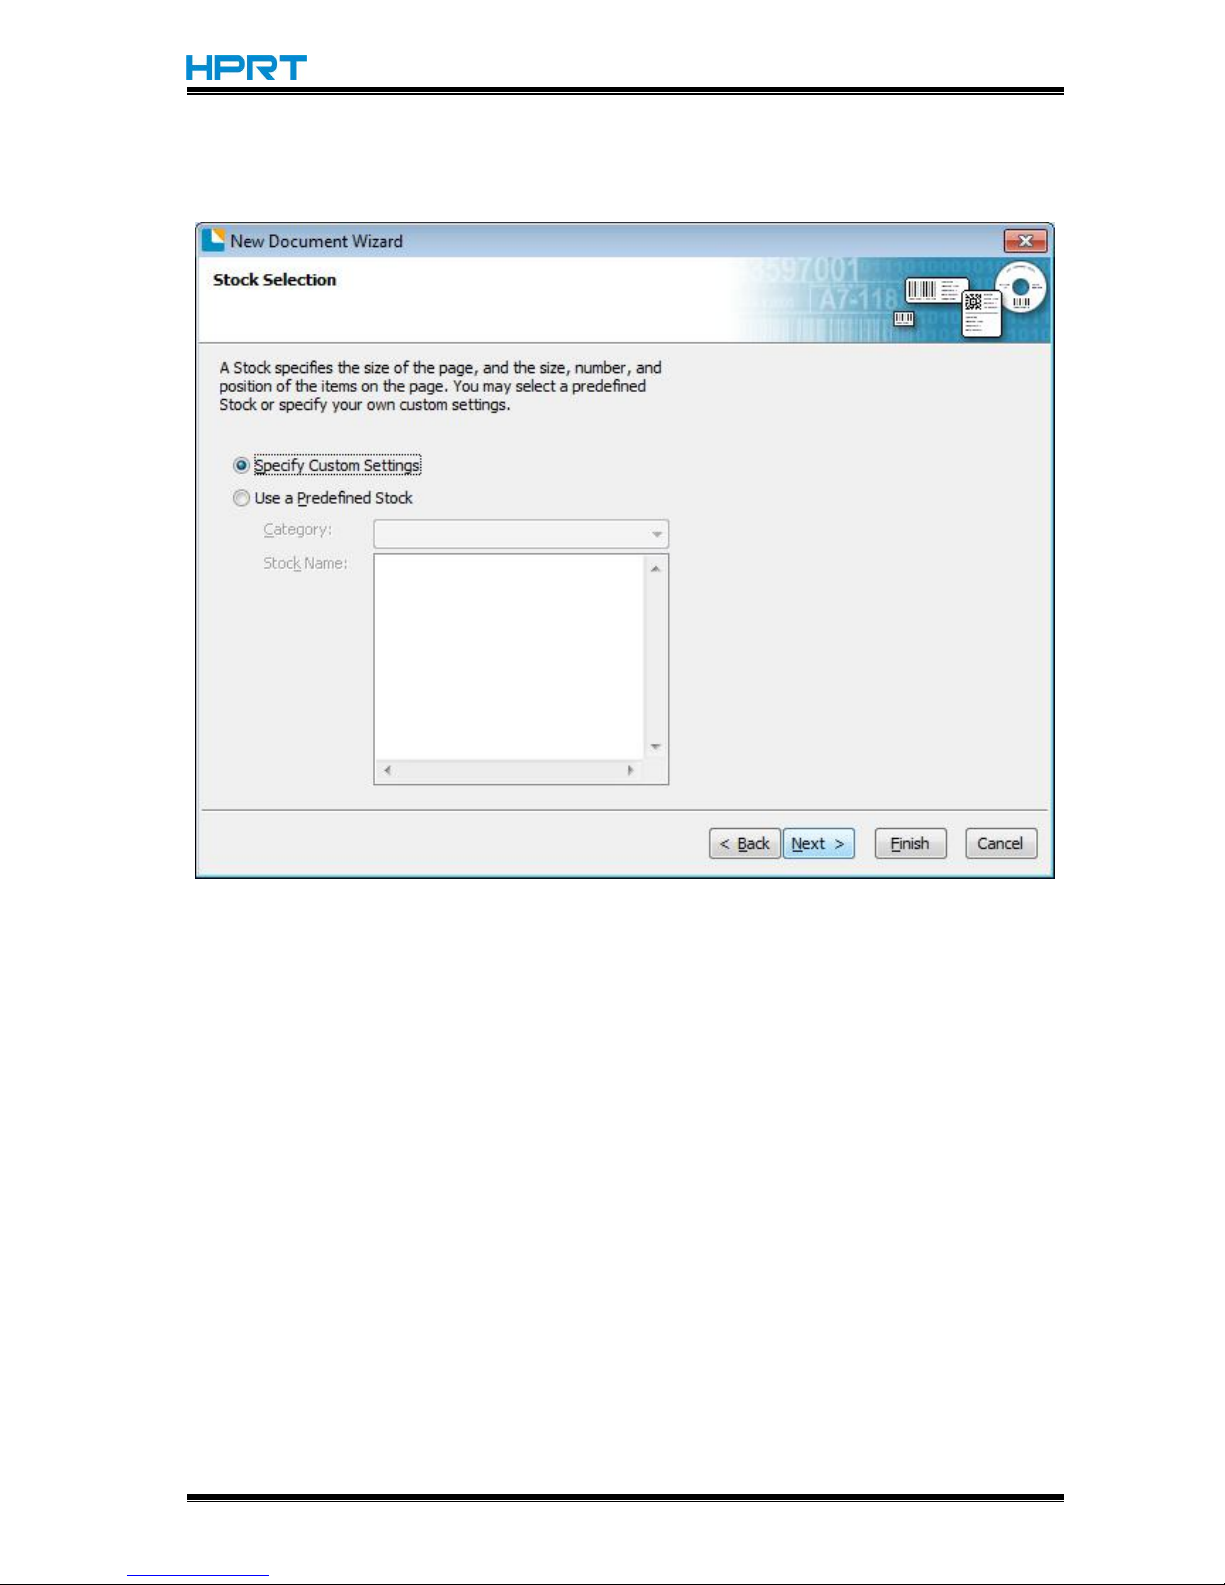
5.If the predefined stocks don’t meet your need, tick “Specify Custom Settings”. Then
click”Next”.
Page 81
HT300/HT330 User Manual
Rev.1.0
78
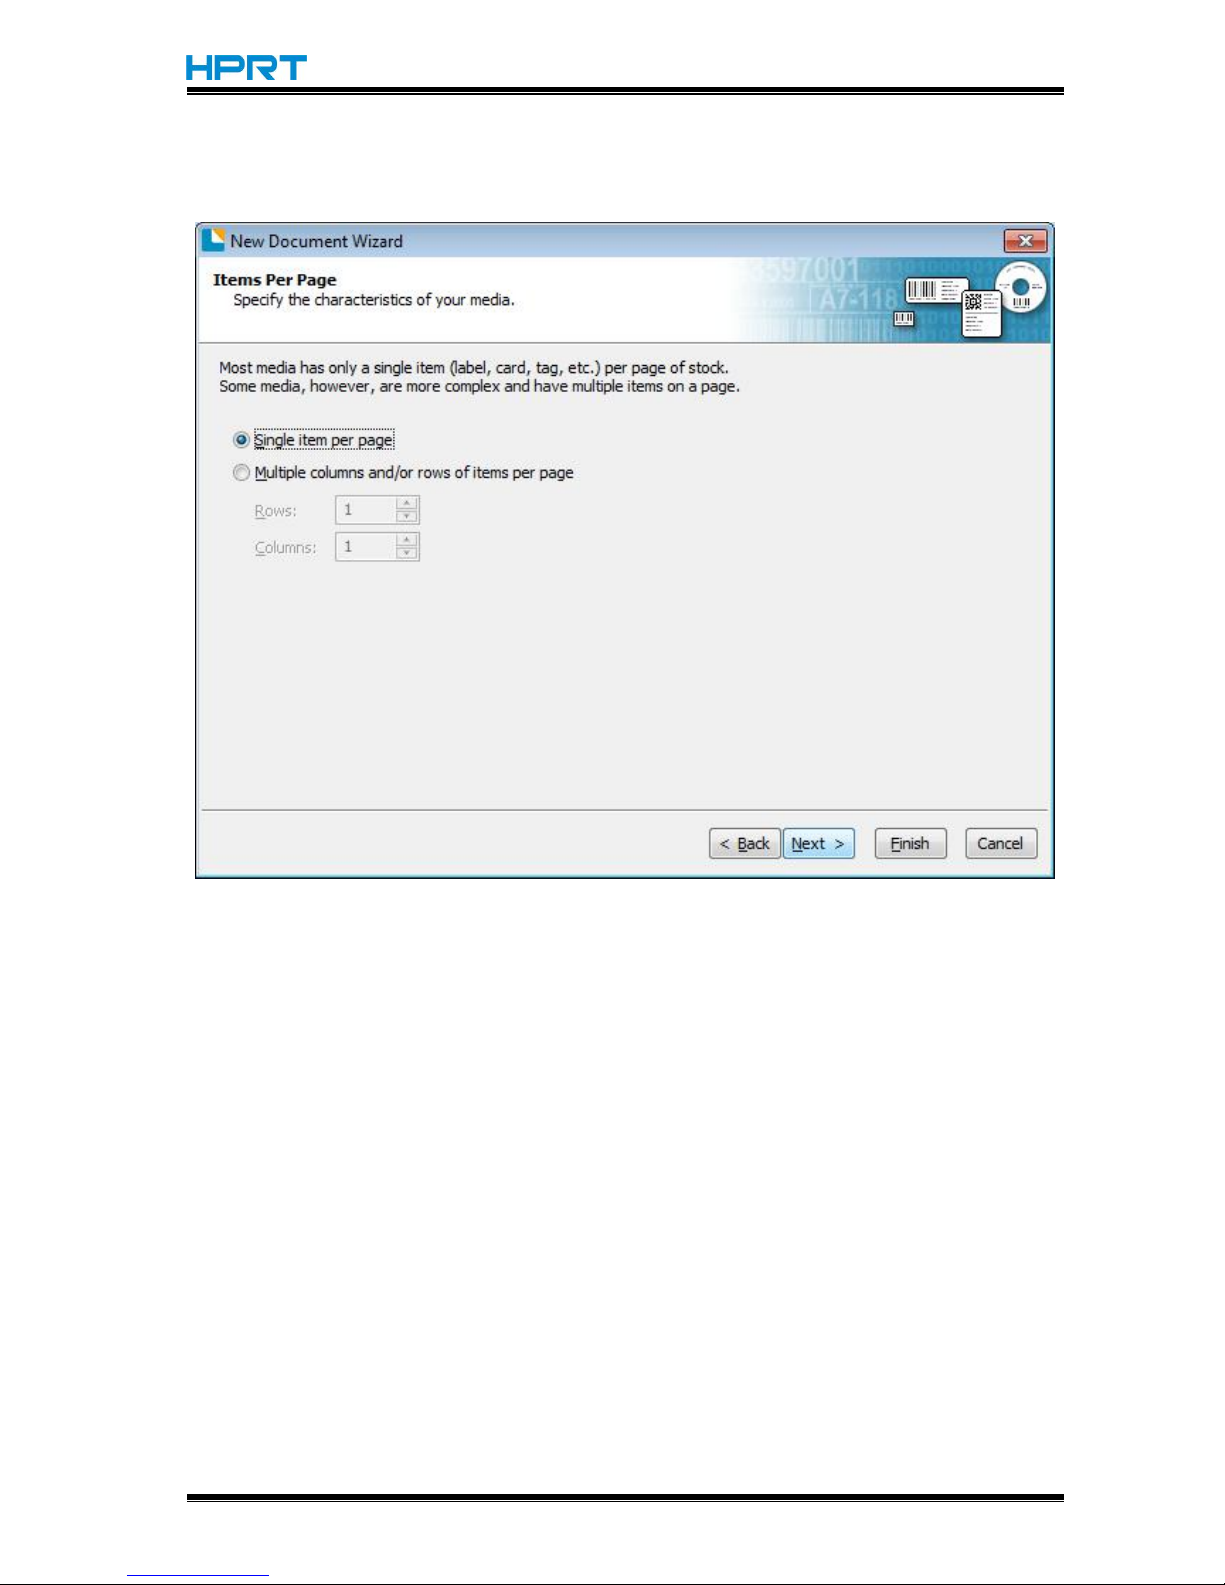
6.Tick “Single item per page”, then click “Next”. (If you print multiple labels, tick “Multiple
columns and/or rows of items per page ”.)
Page 82
HT300/HT330 User Manual
Rev.1.0
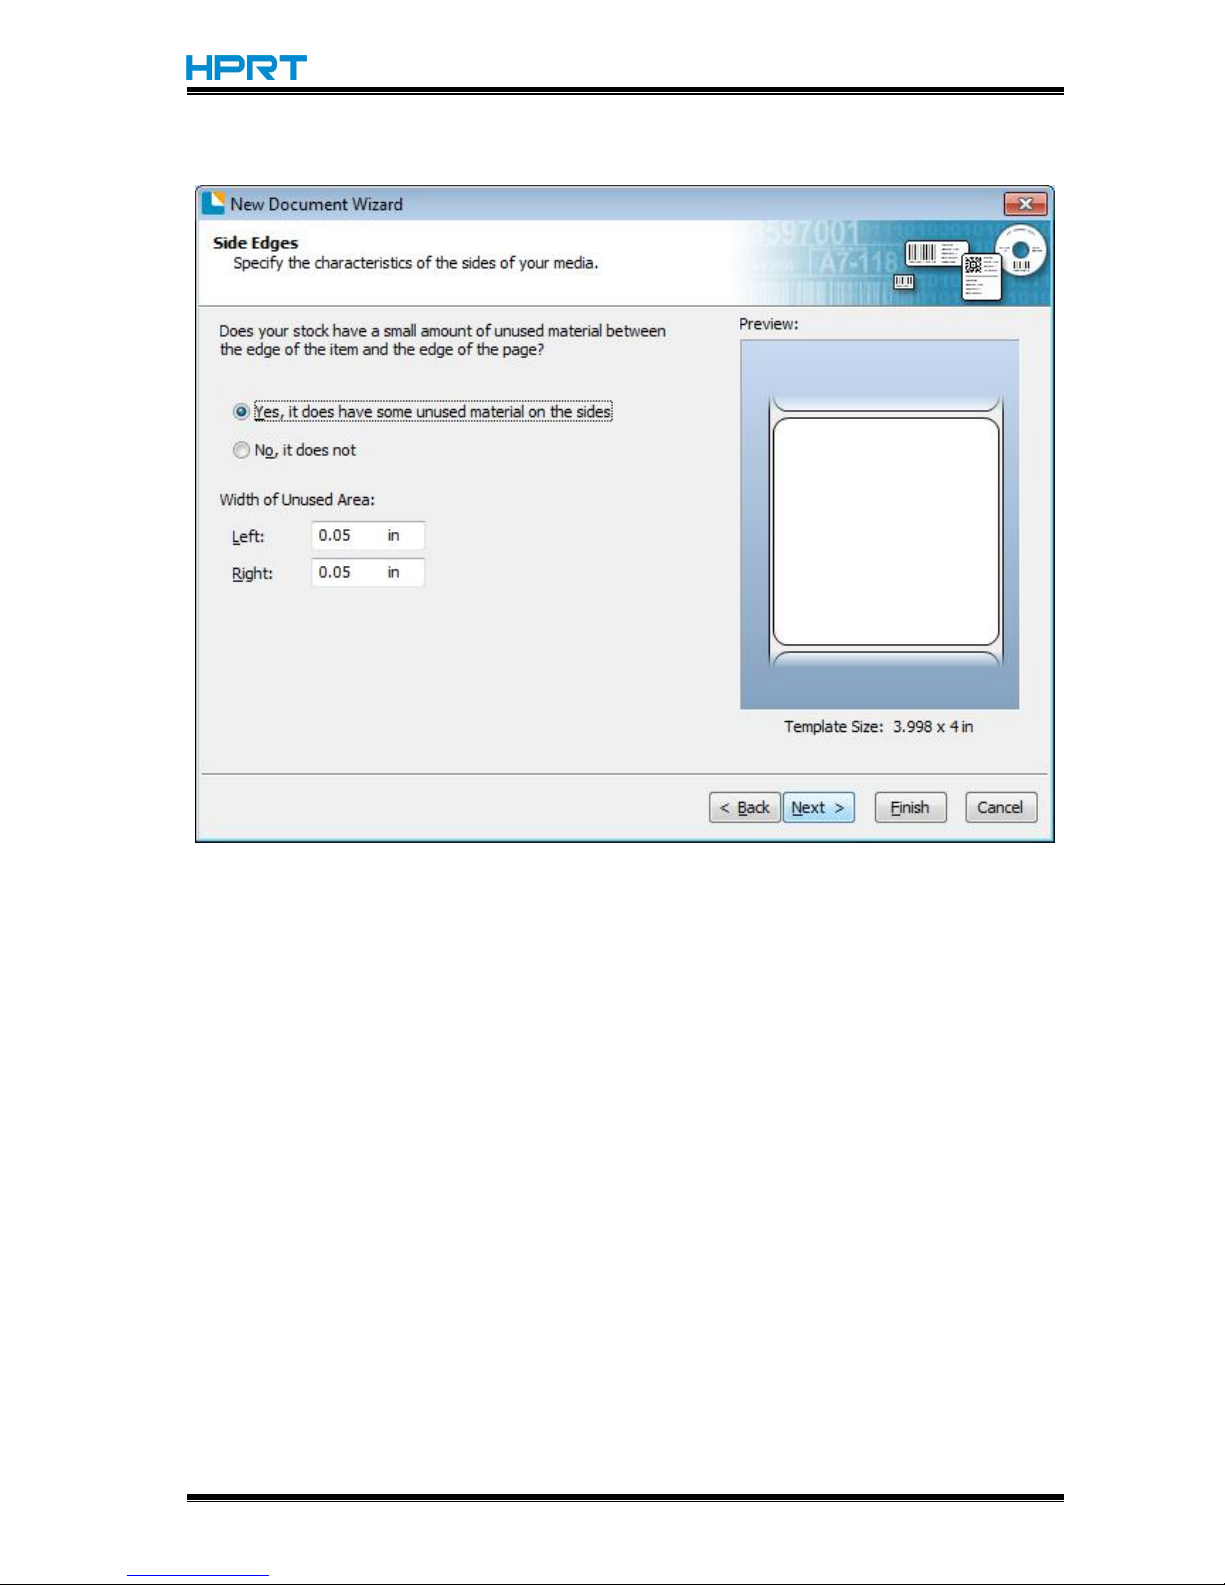
79
7.Edit the side edges, then click “Next”.
Page 83
HT300/HT330 User Manual
Rev.1.0
80
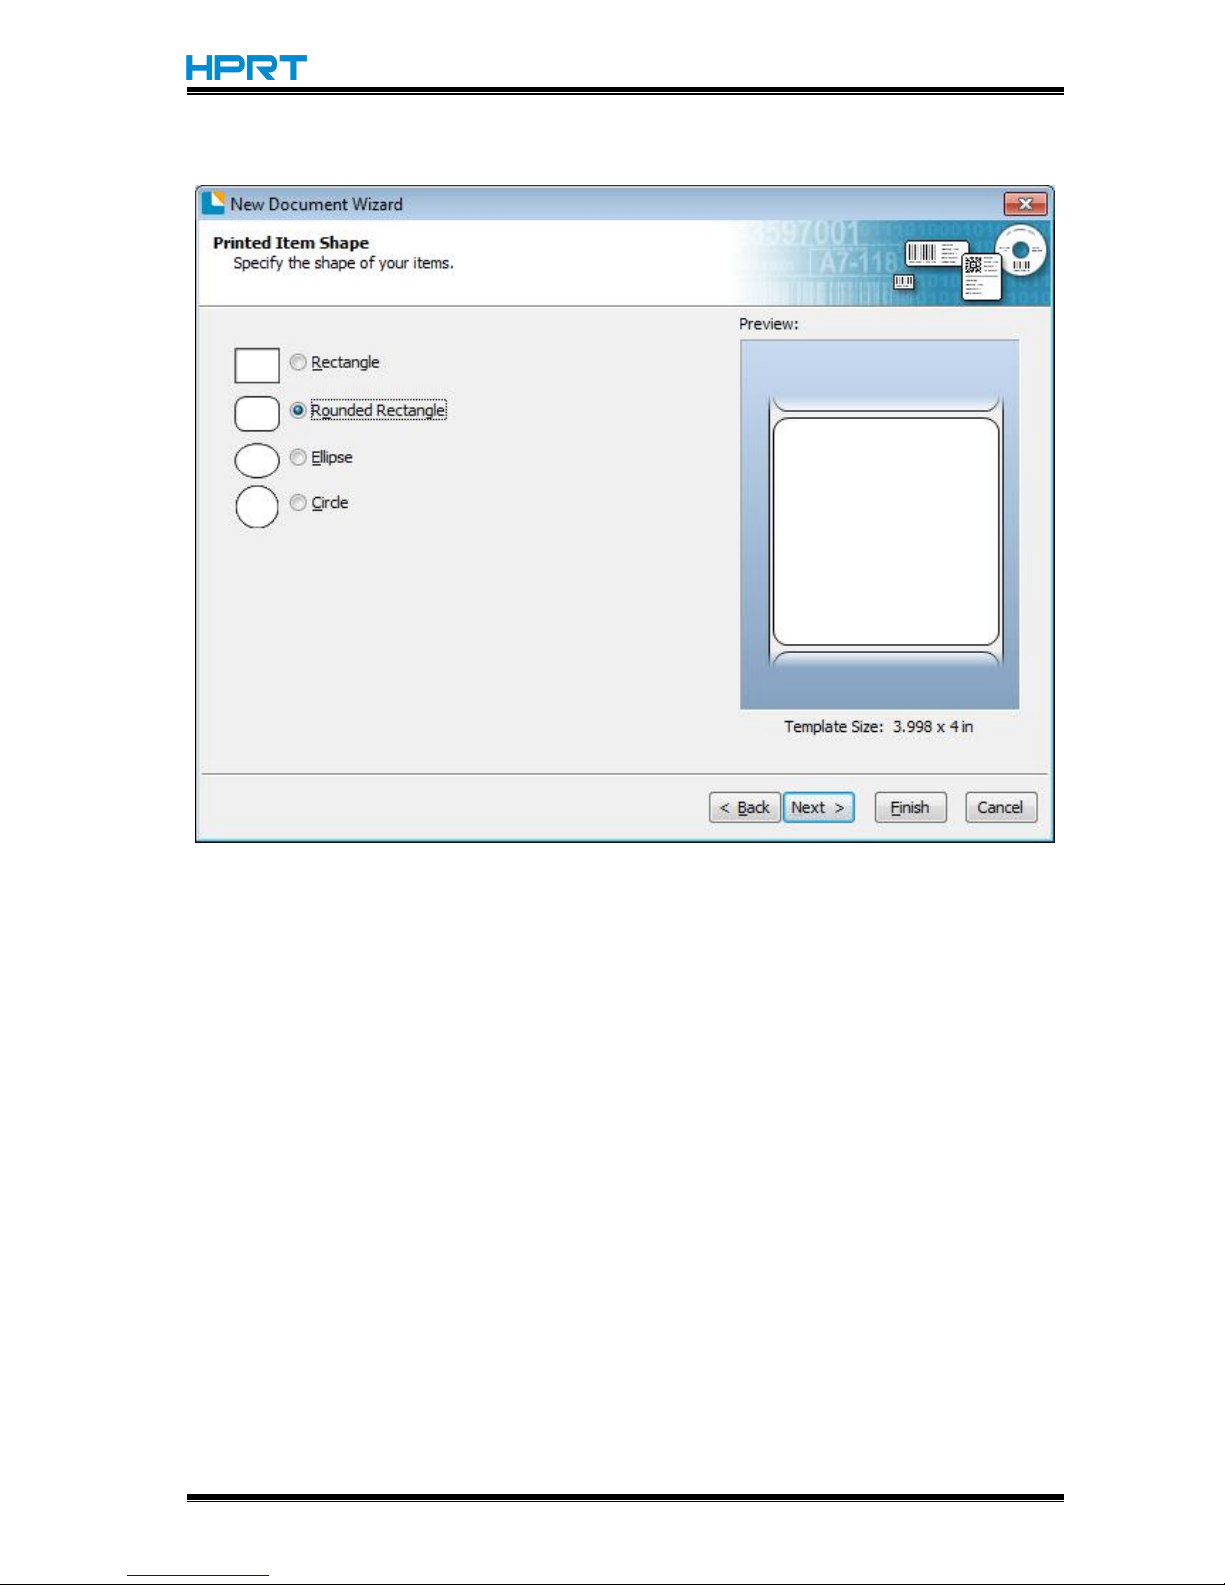
8.Choose the item shape, then click “Next”.
Page 84
HT300/HT330 User Manual
Rev.1.0
81
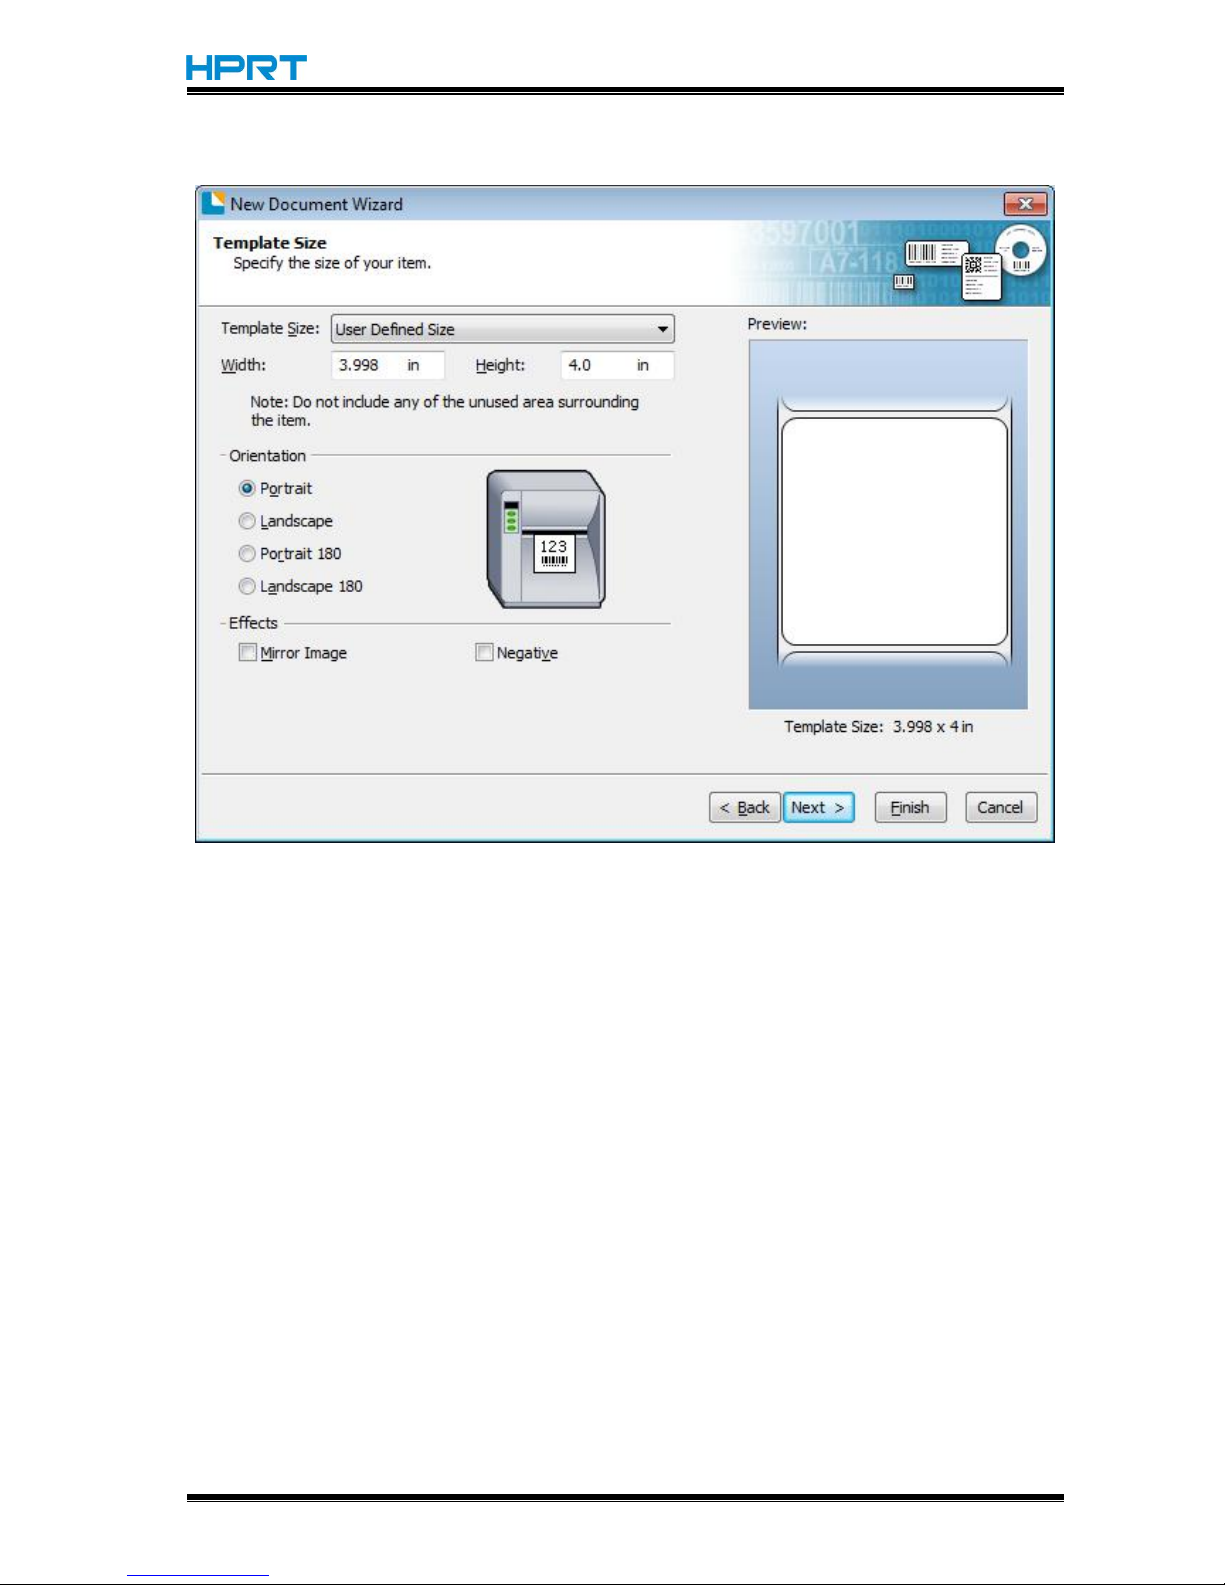
9.Edit the template size, then click “Next”.
Page 85
HT300/HT330 User Manual
Rev.1.0
82
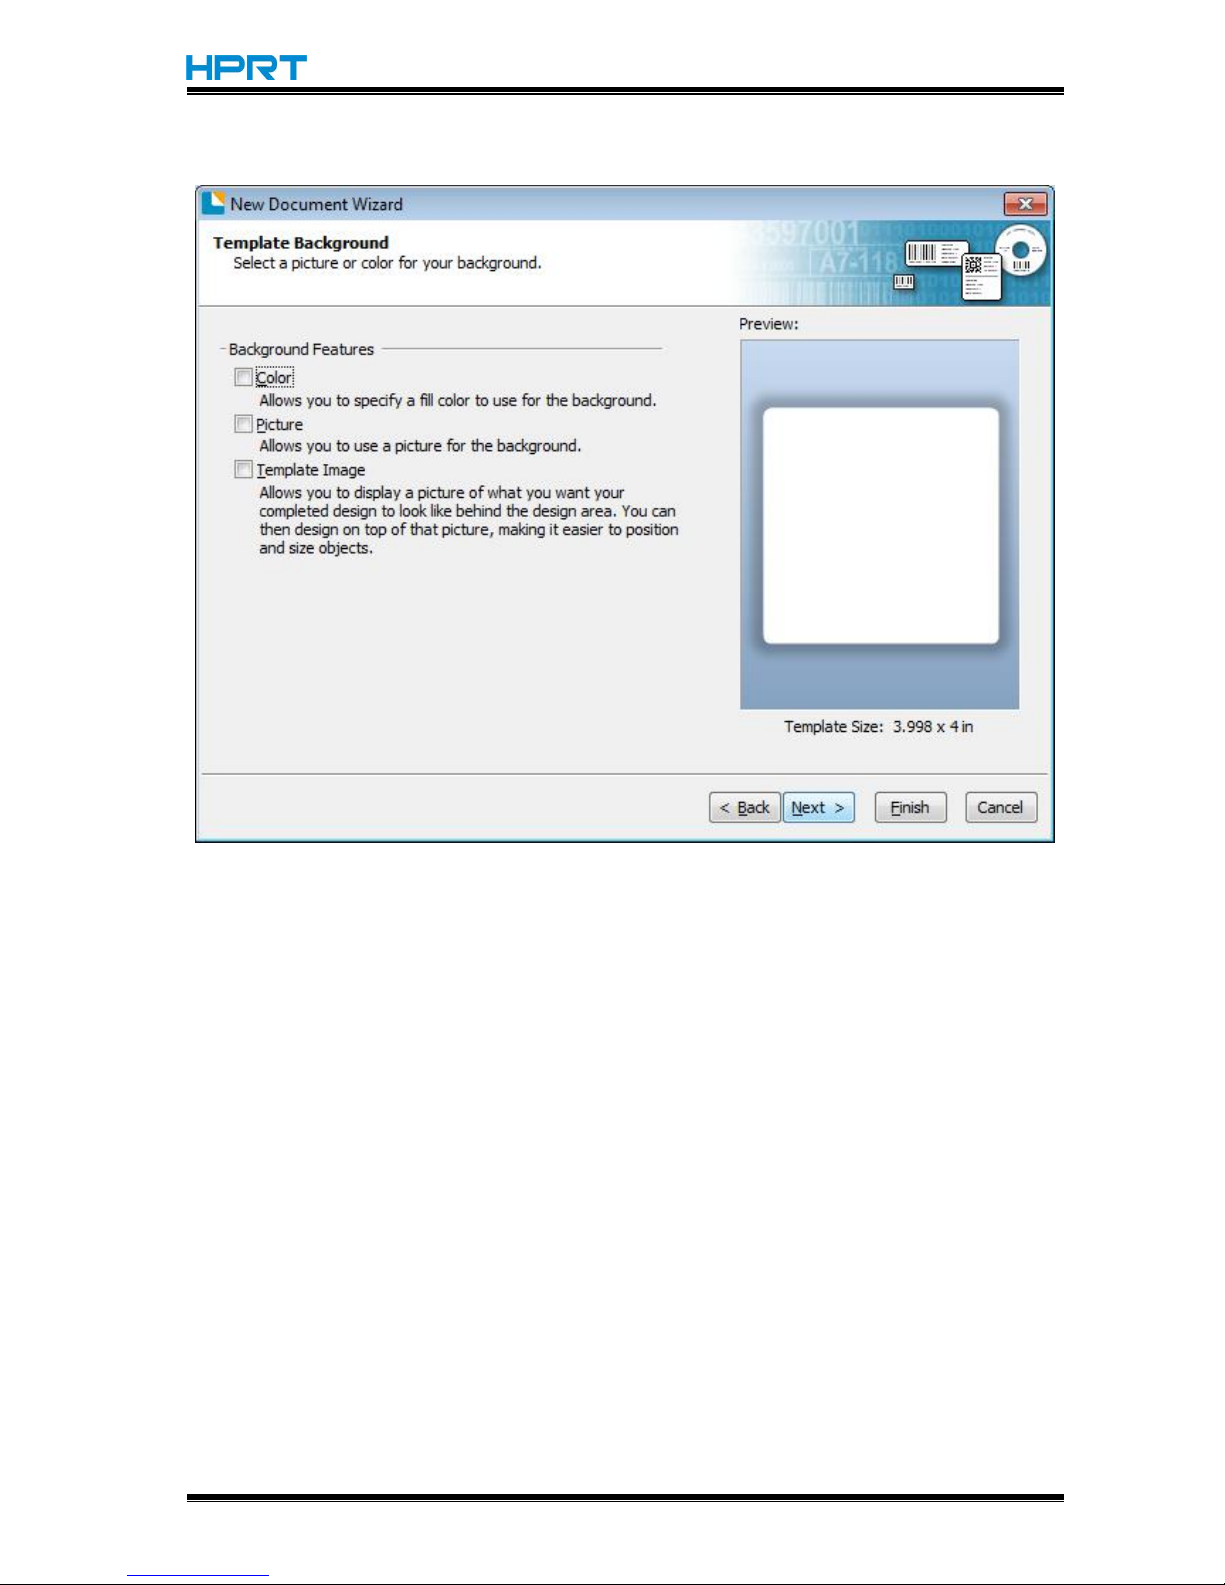
10.Based on your need, edit the template background. Then click ”Next”.
Page 86
HT300/HT330 User Manual
Rev.1.0
83
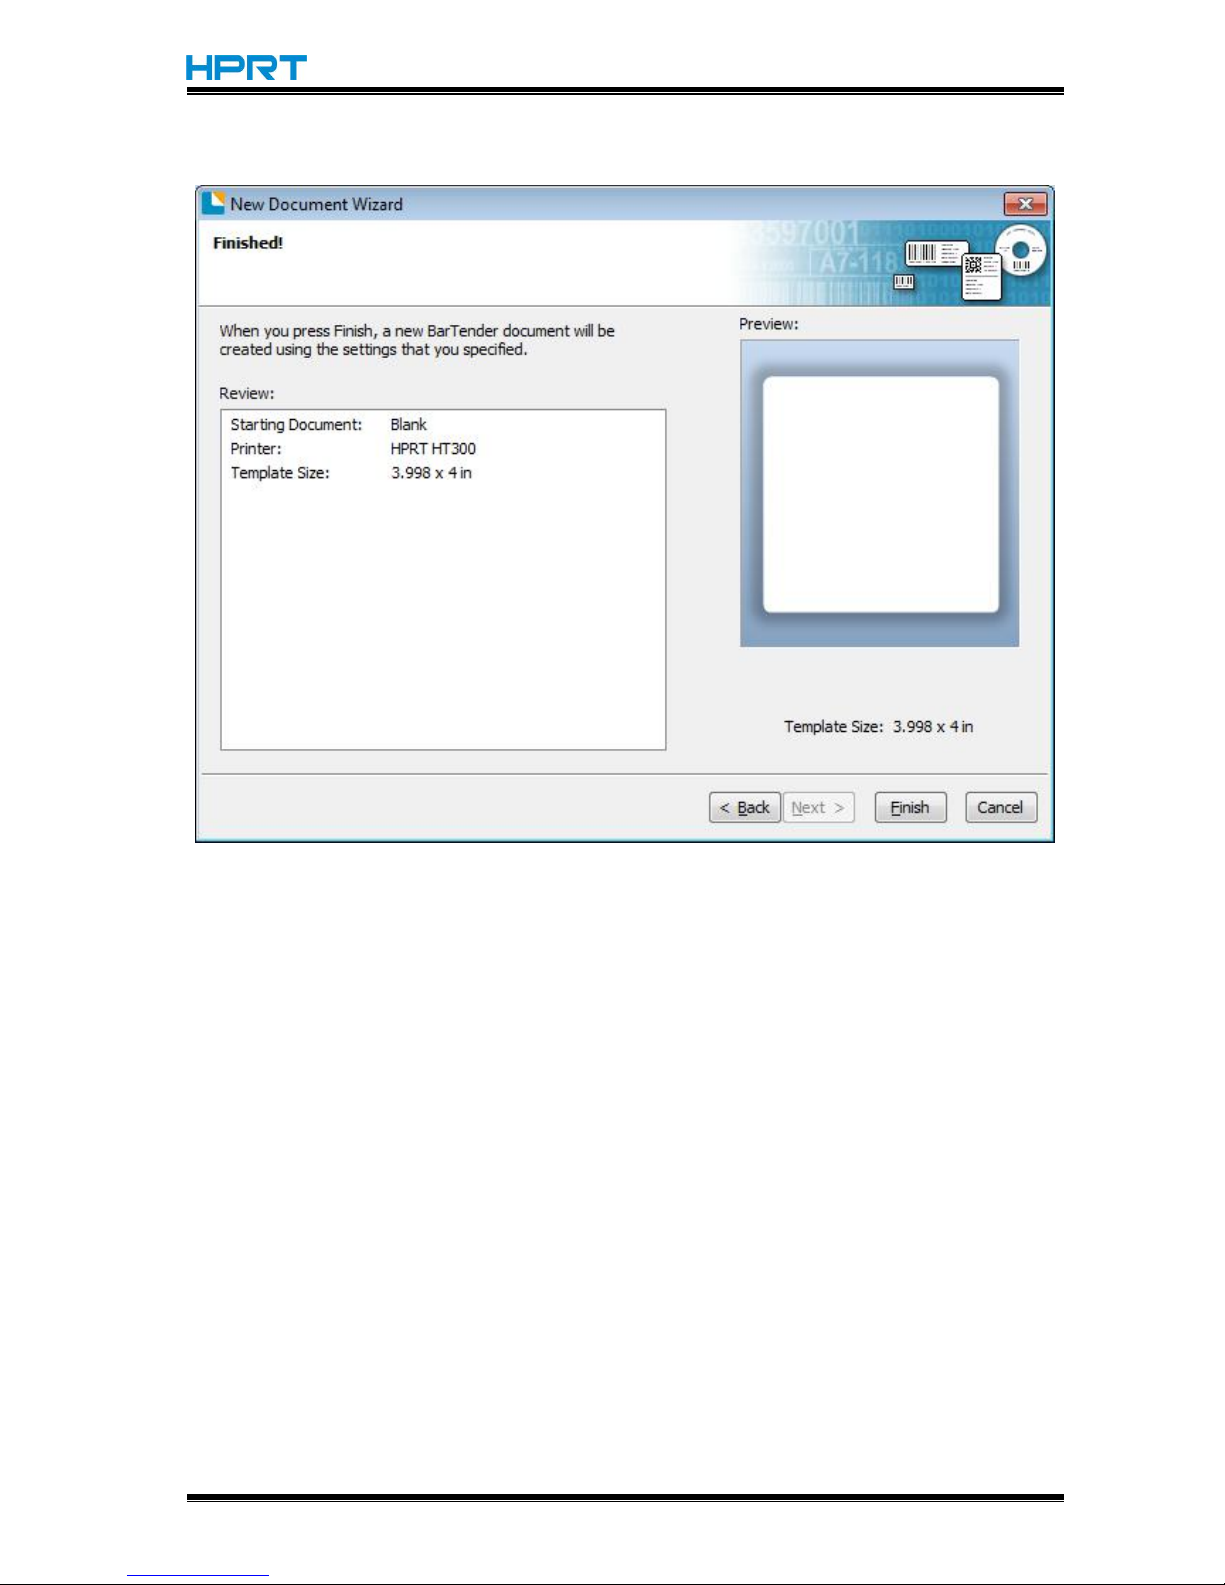
11.Finish the settings, showed in the “Review” and “Preview”. Then click “Finish”.
Page 87
HT300/HT330 User Manual
Rev.1.0
84
8.4.2 label Edit
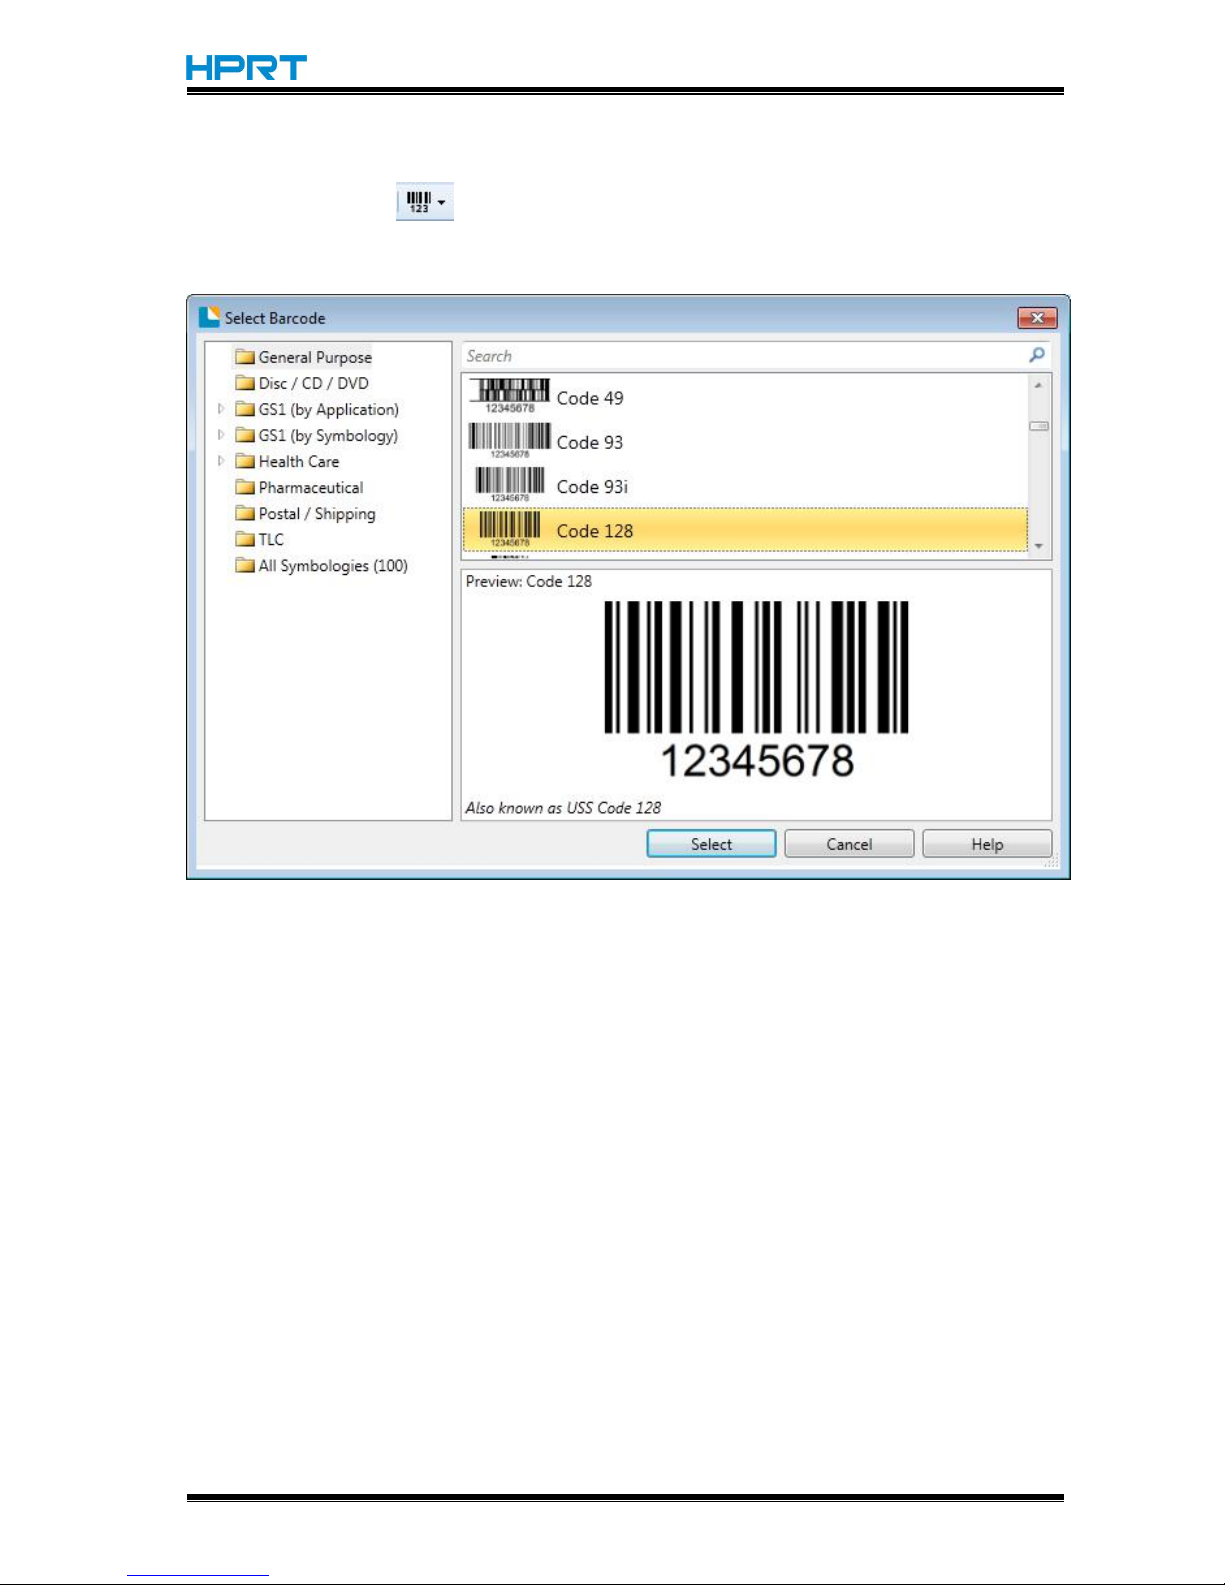
1.Click the icon of code .
2.Choose the code, then click “Select”.
Page 88
HT300/HT330 User Manual
Rev.1.0
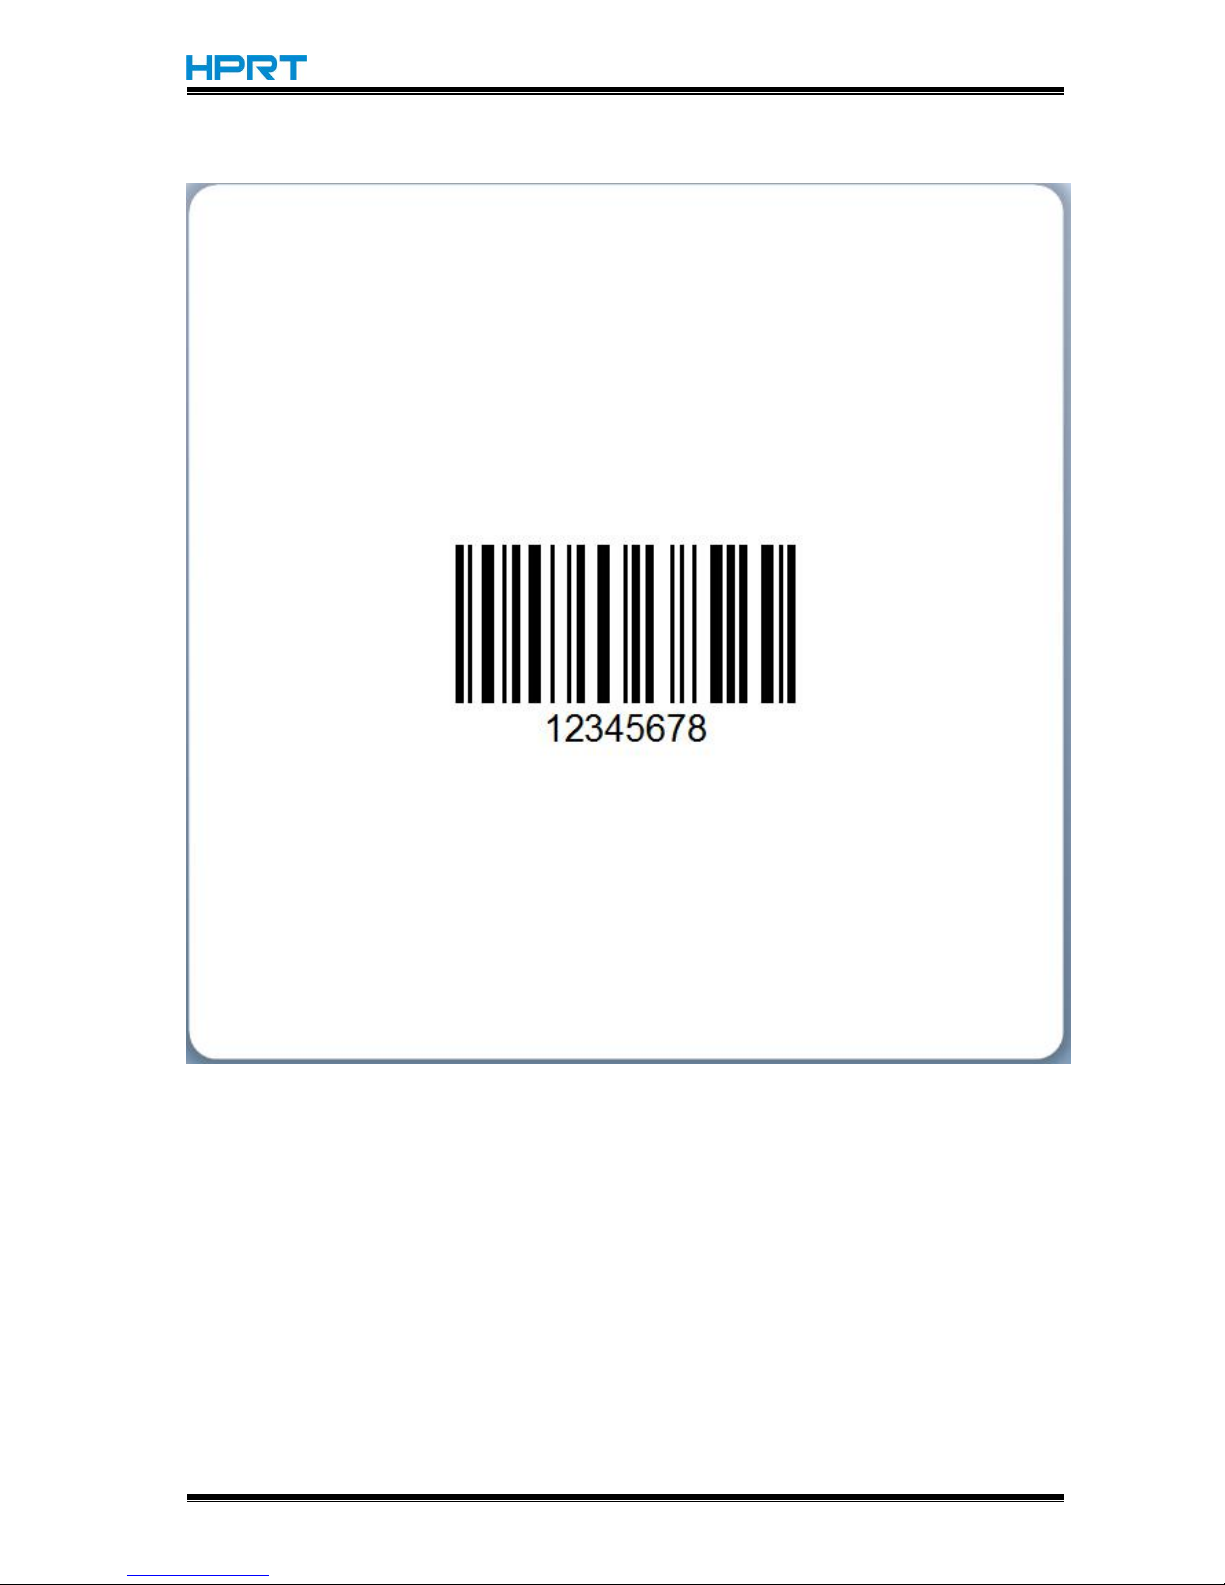
85
3.Click the blank, showing the code.
Page 89
HT300/HT330 User Manual
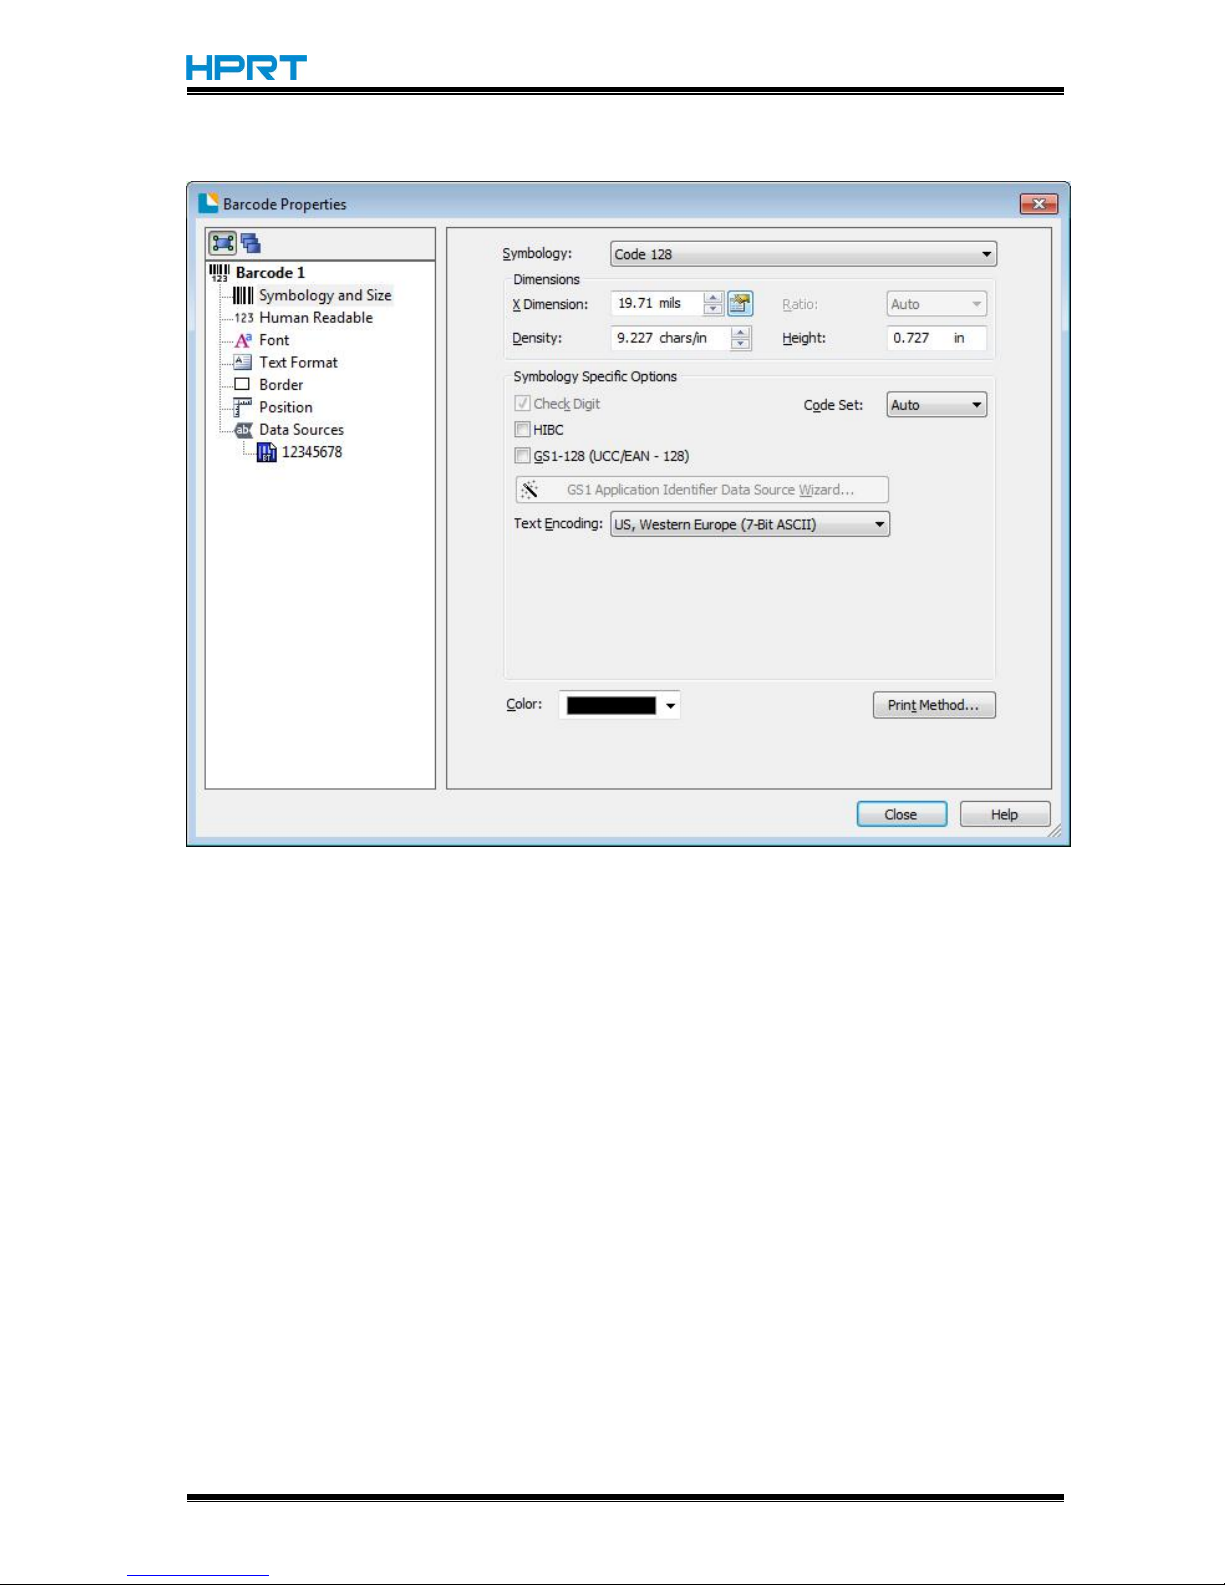
Rev.1.0
86
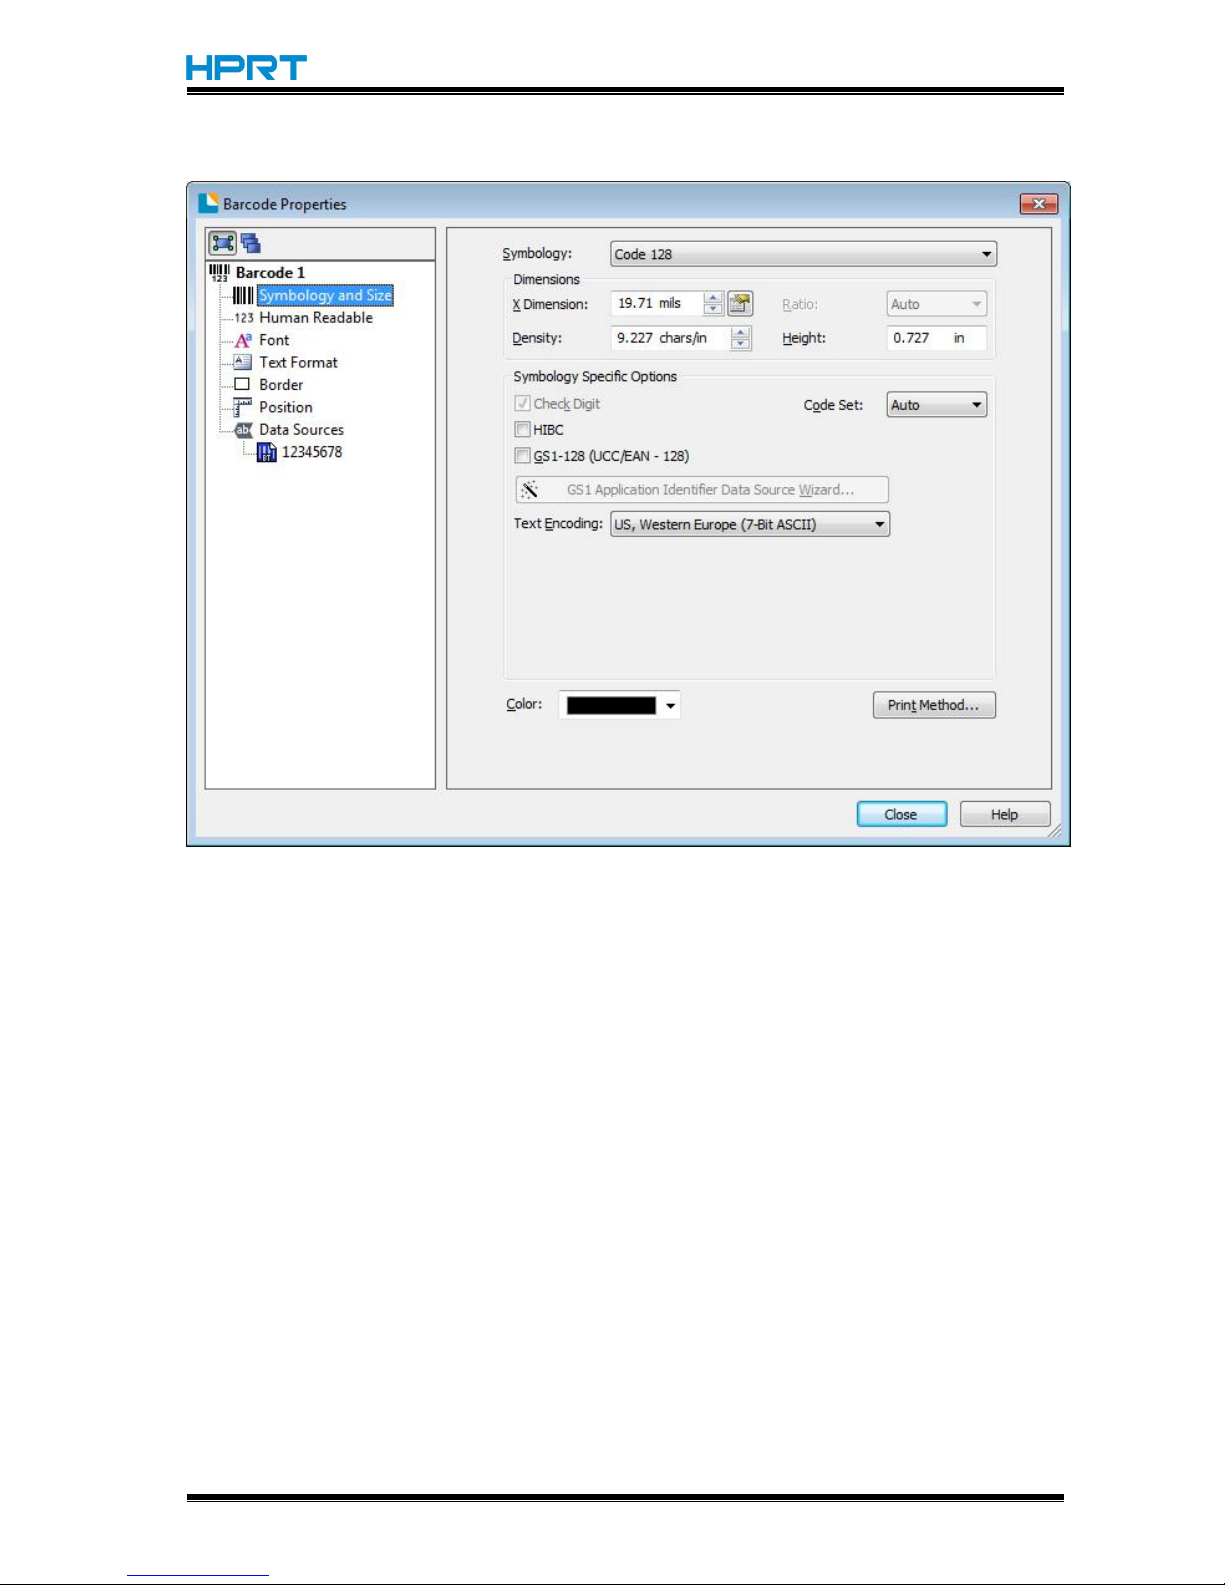
4.Double click the code and edit it.
Page 90
HT300/HT330 User Manual
Rev.1.0
87
●Click “Symbology and Size”, then edit the size.
Page 91
HT300/HT330 User Manual
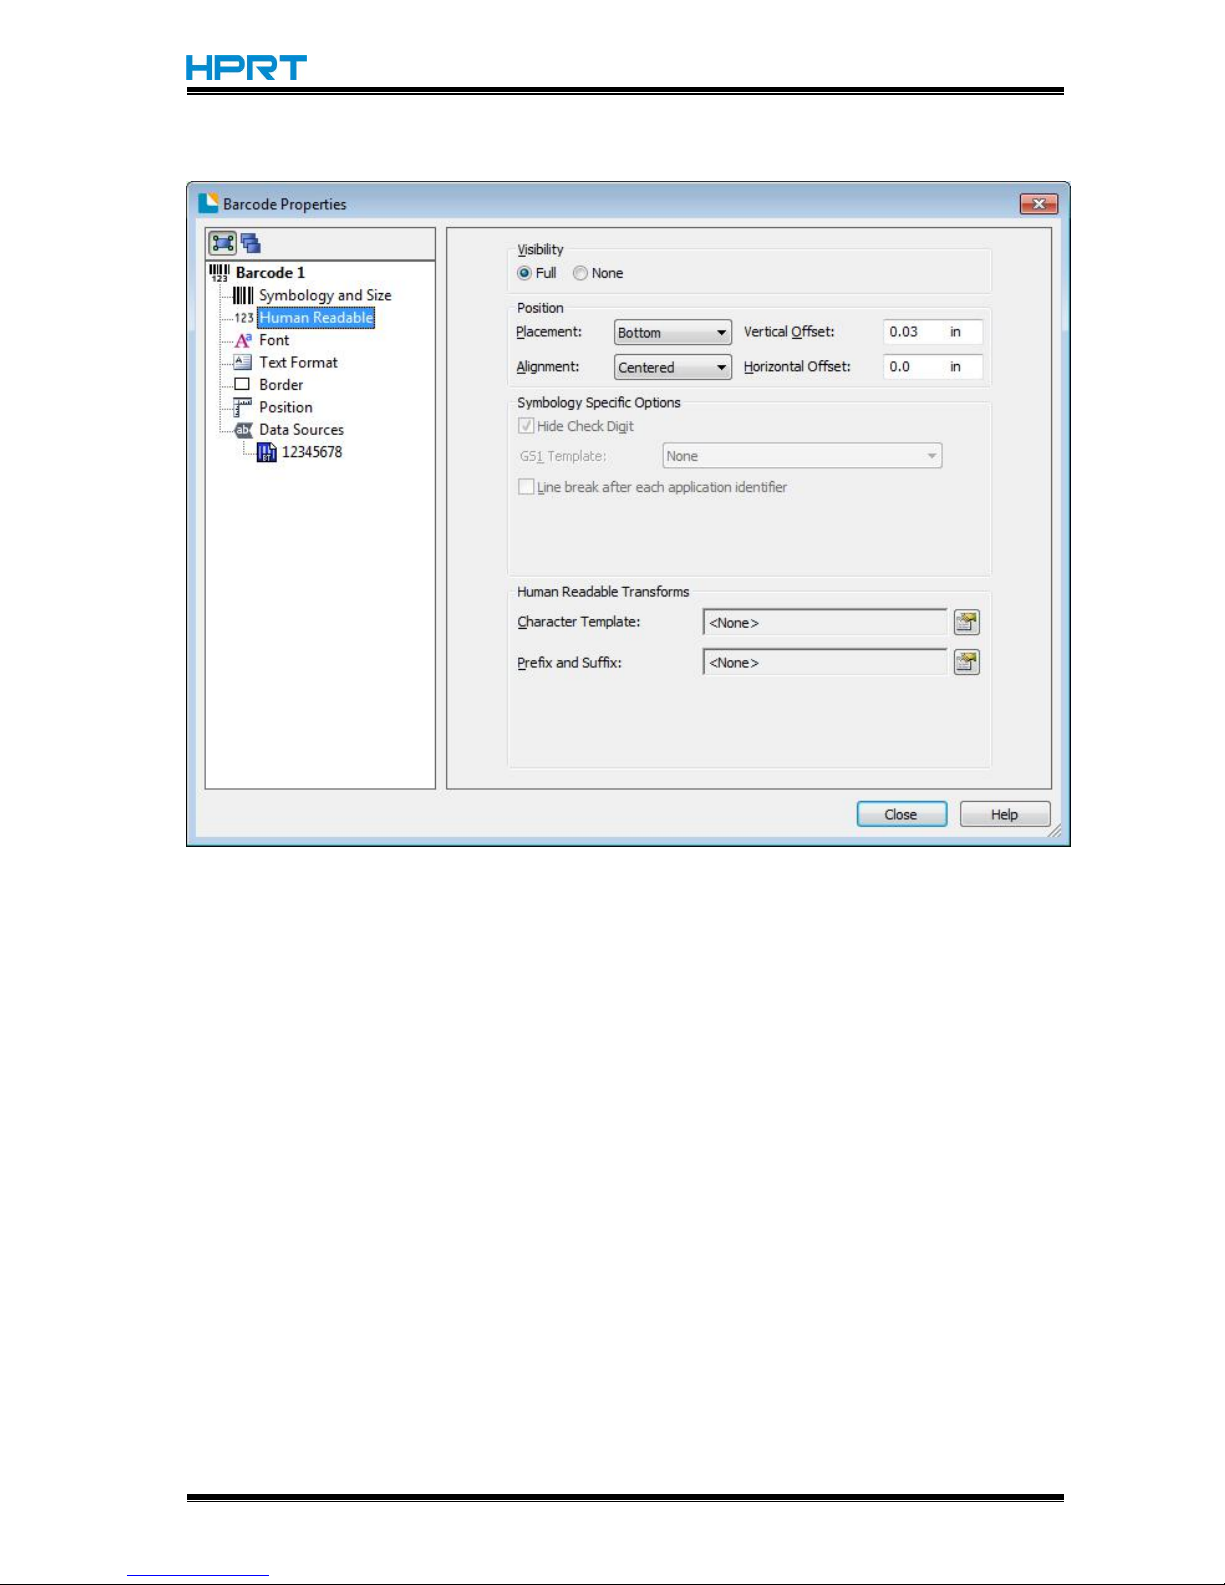
Rev.1.0
88
●Click “Human Readable”, then edit the position.
Page 92
HT300/HT330 User Manual
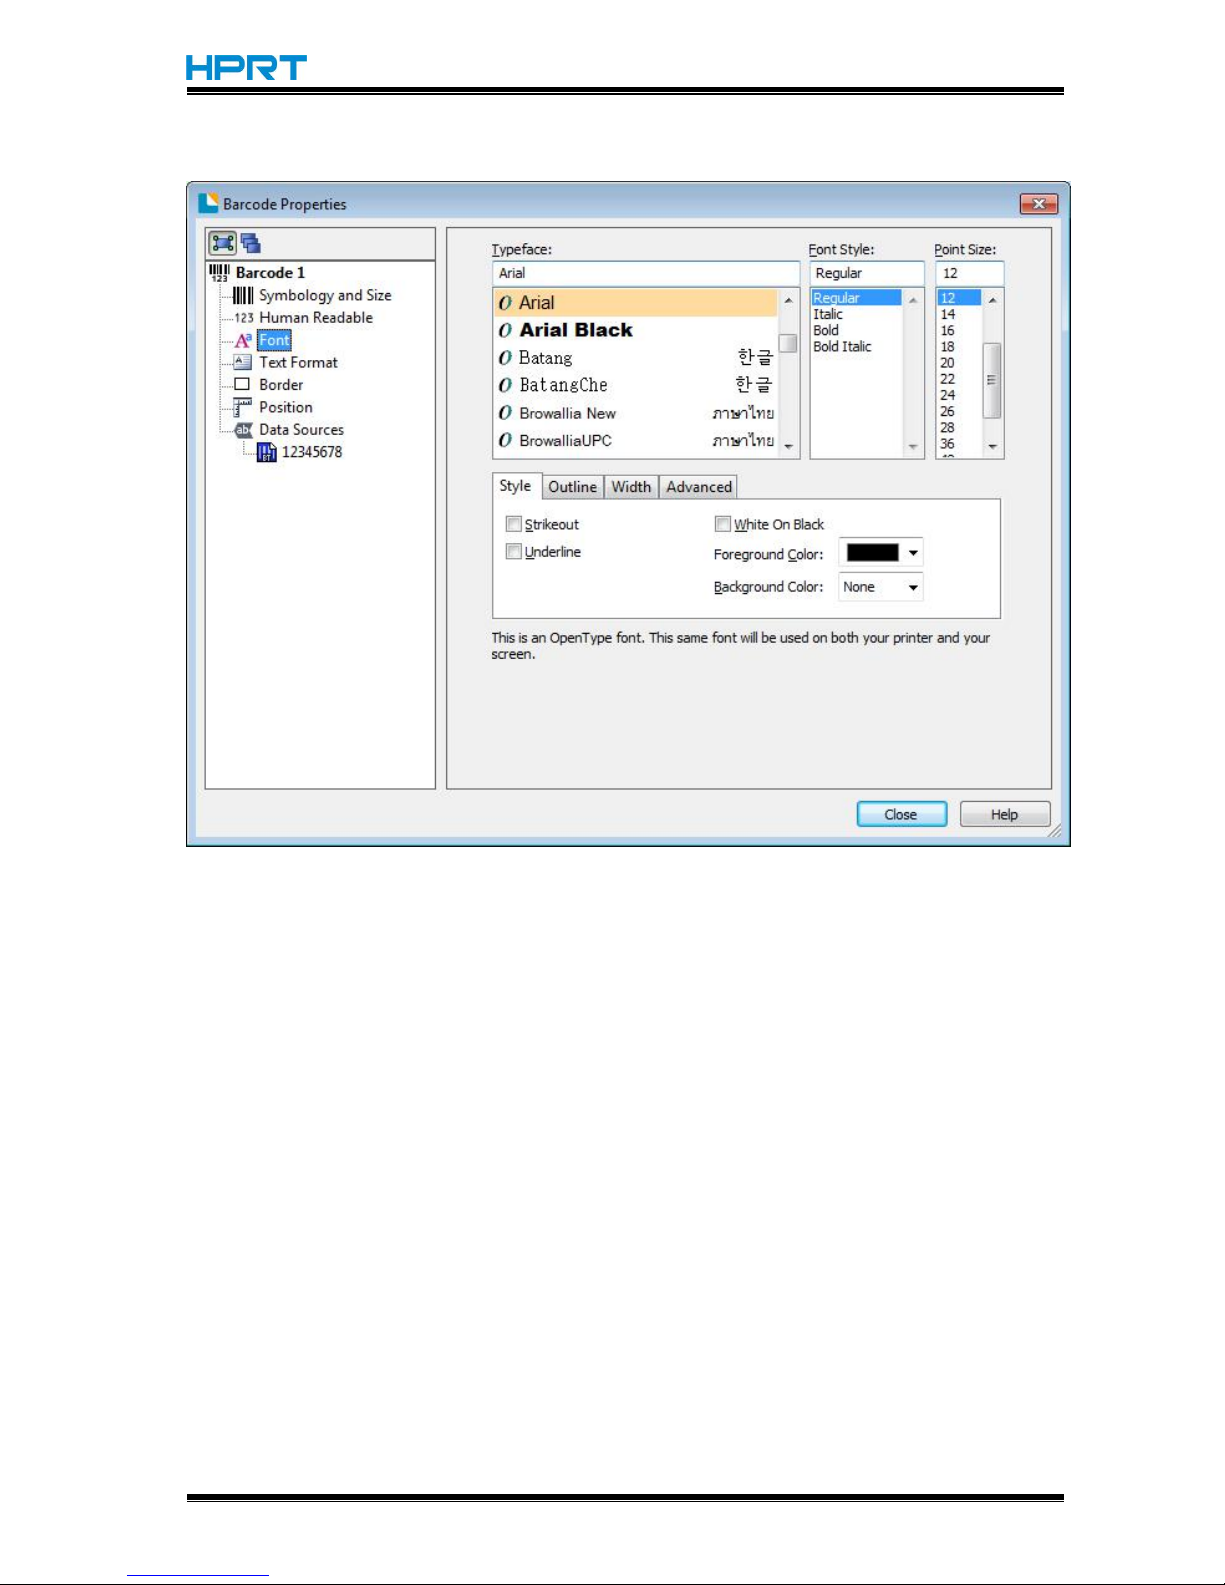
Rev.1.0
89
●Click “Font”, then edit the character.
Page 93
HT300/HT330 User Manual
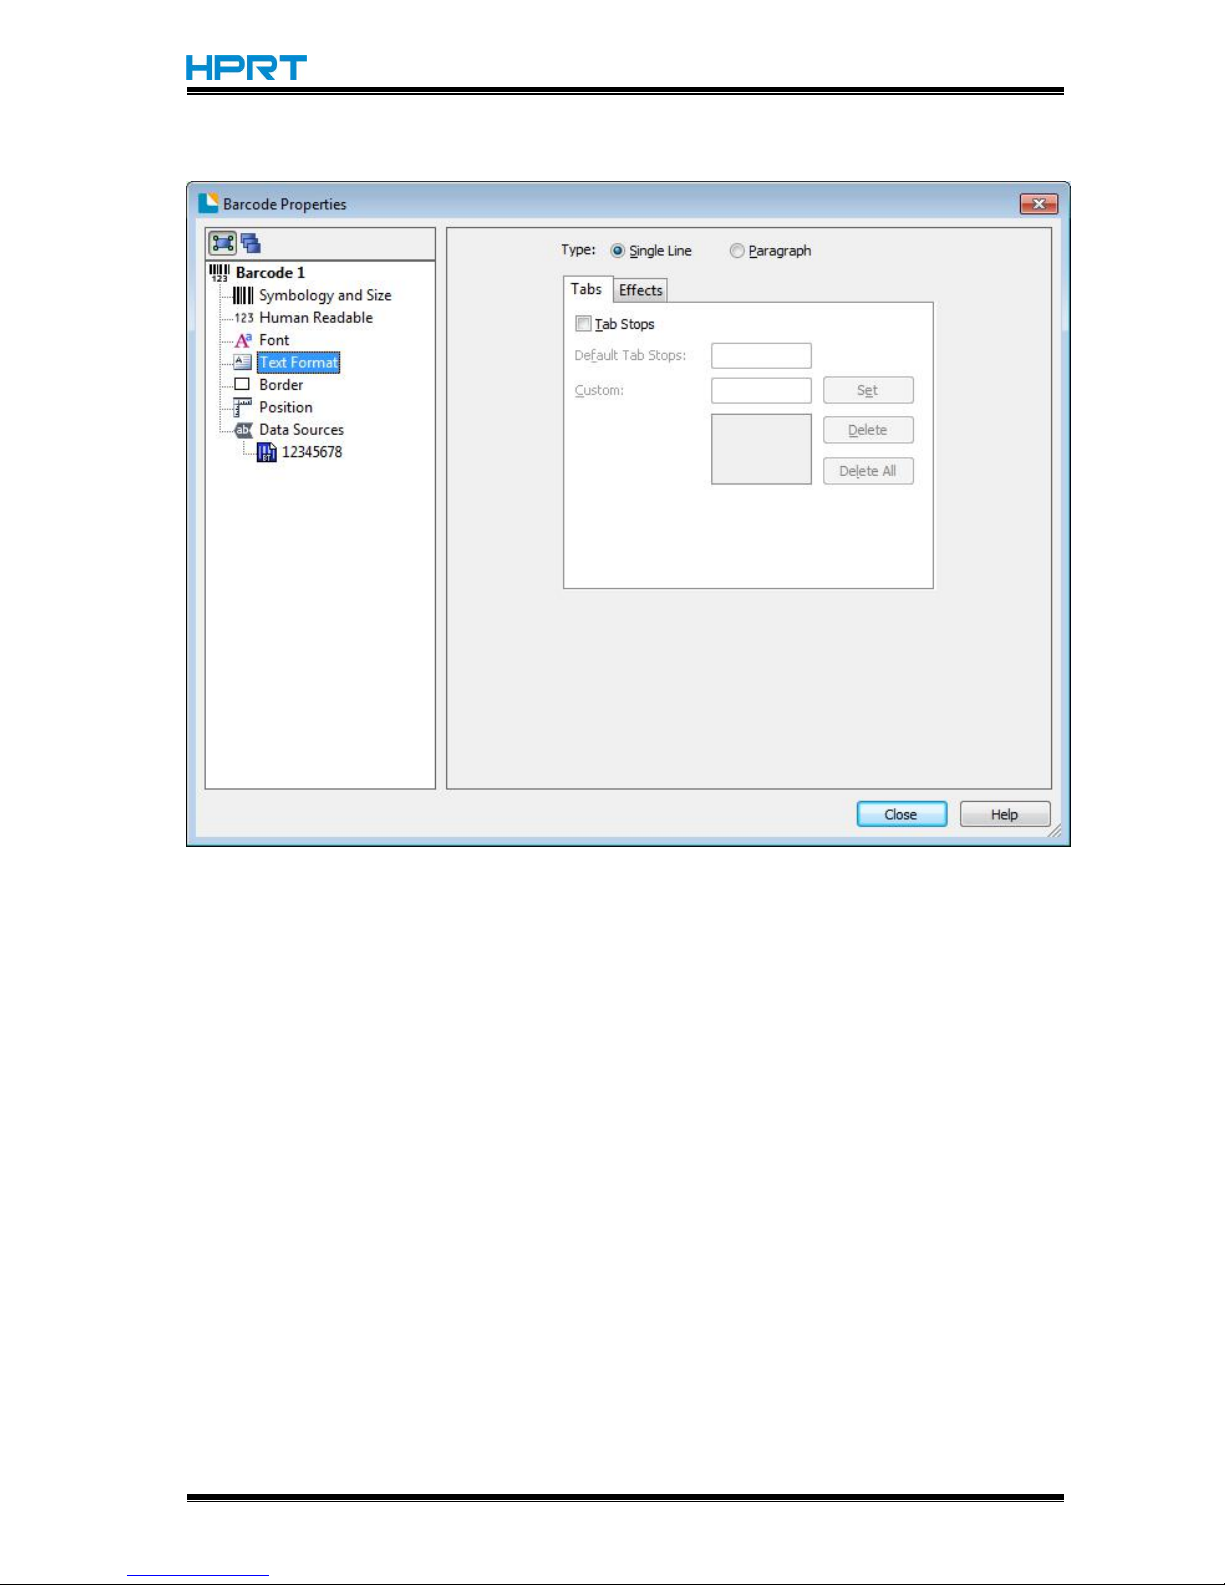
Rev.1.0
90
●Click “Text Format”, then edit the paragraph.
Page 94
HT300/HT330 User Manual
Rev.1.0
91
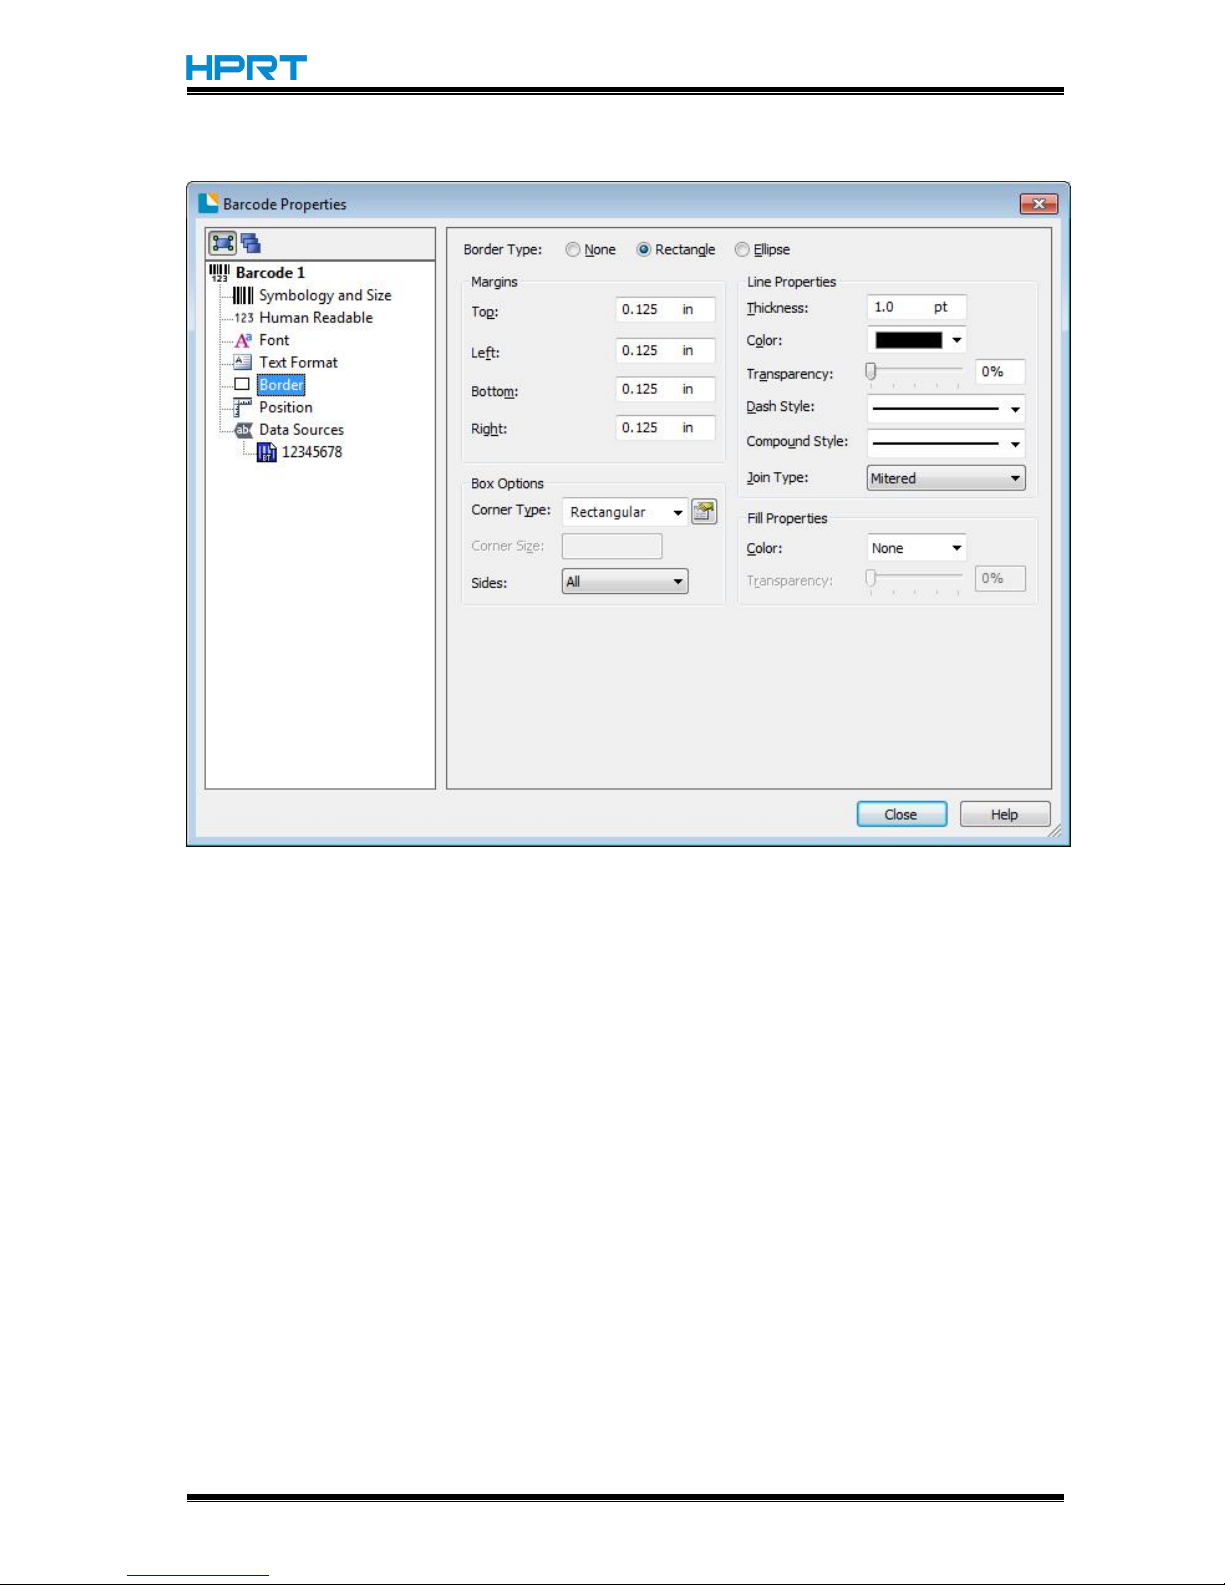
●Click “Border”, then edit the border.
Page 95
HT300/HT330 User Manual
Rev.1.0
92
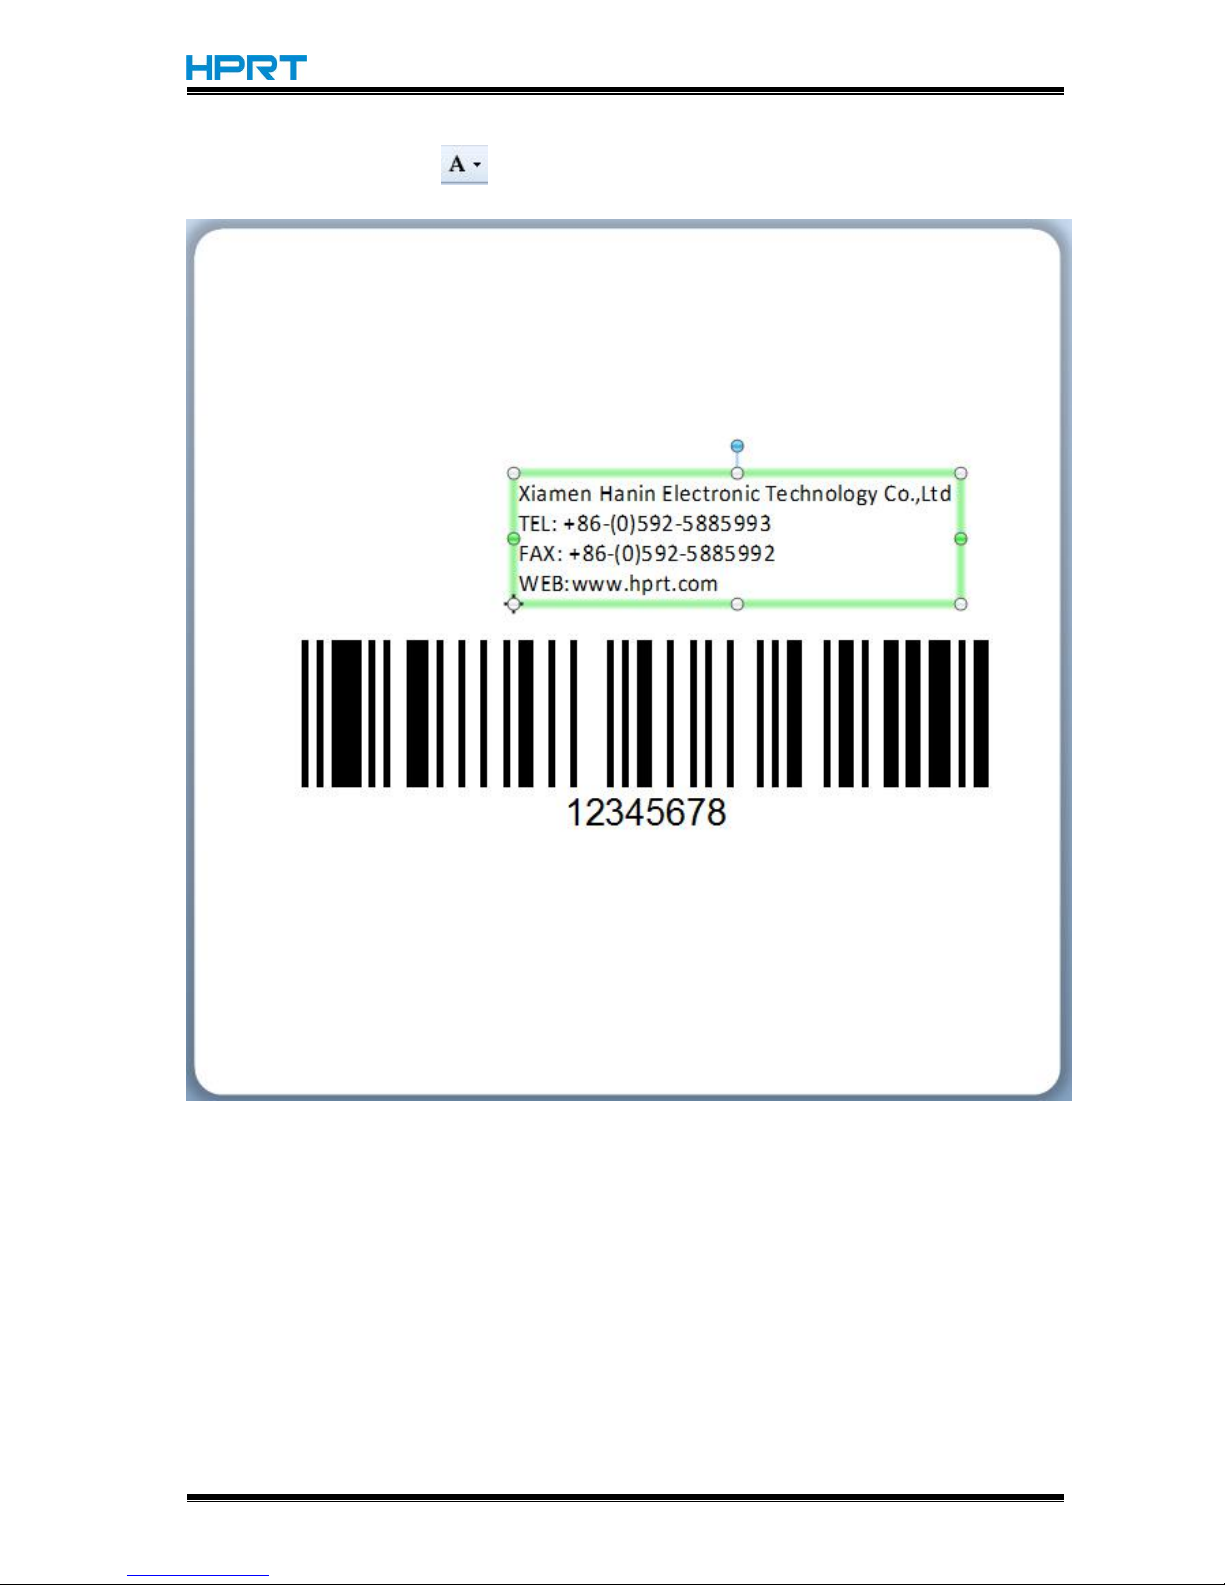
5.Click the icon of character , then enter the text.
Page 96
HT300/HT330 User Manual
Rev.1.0
93
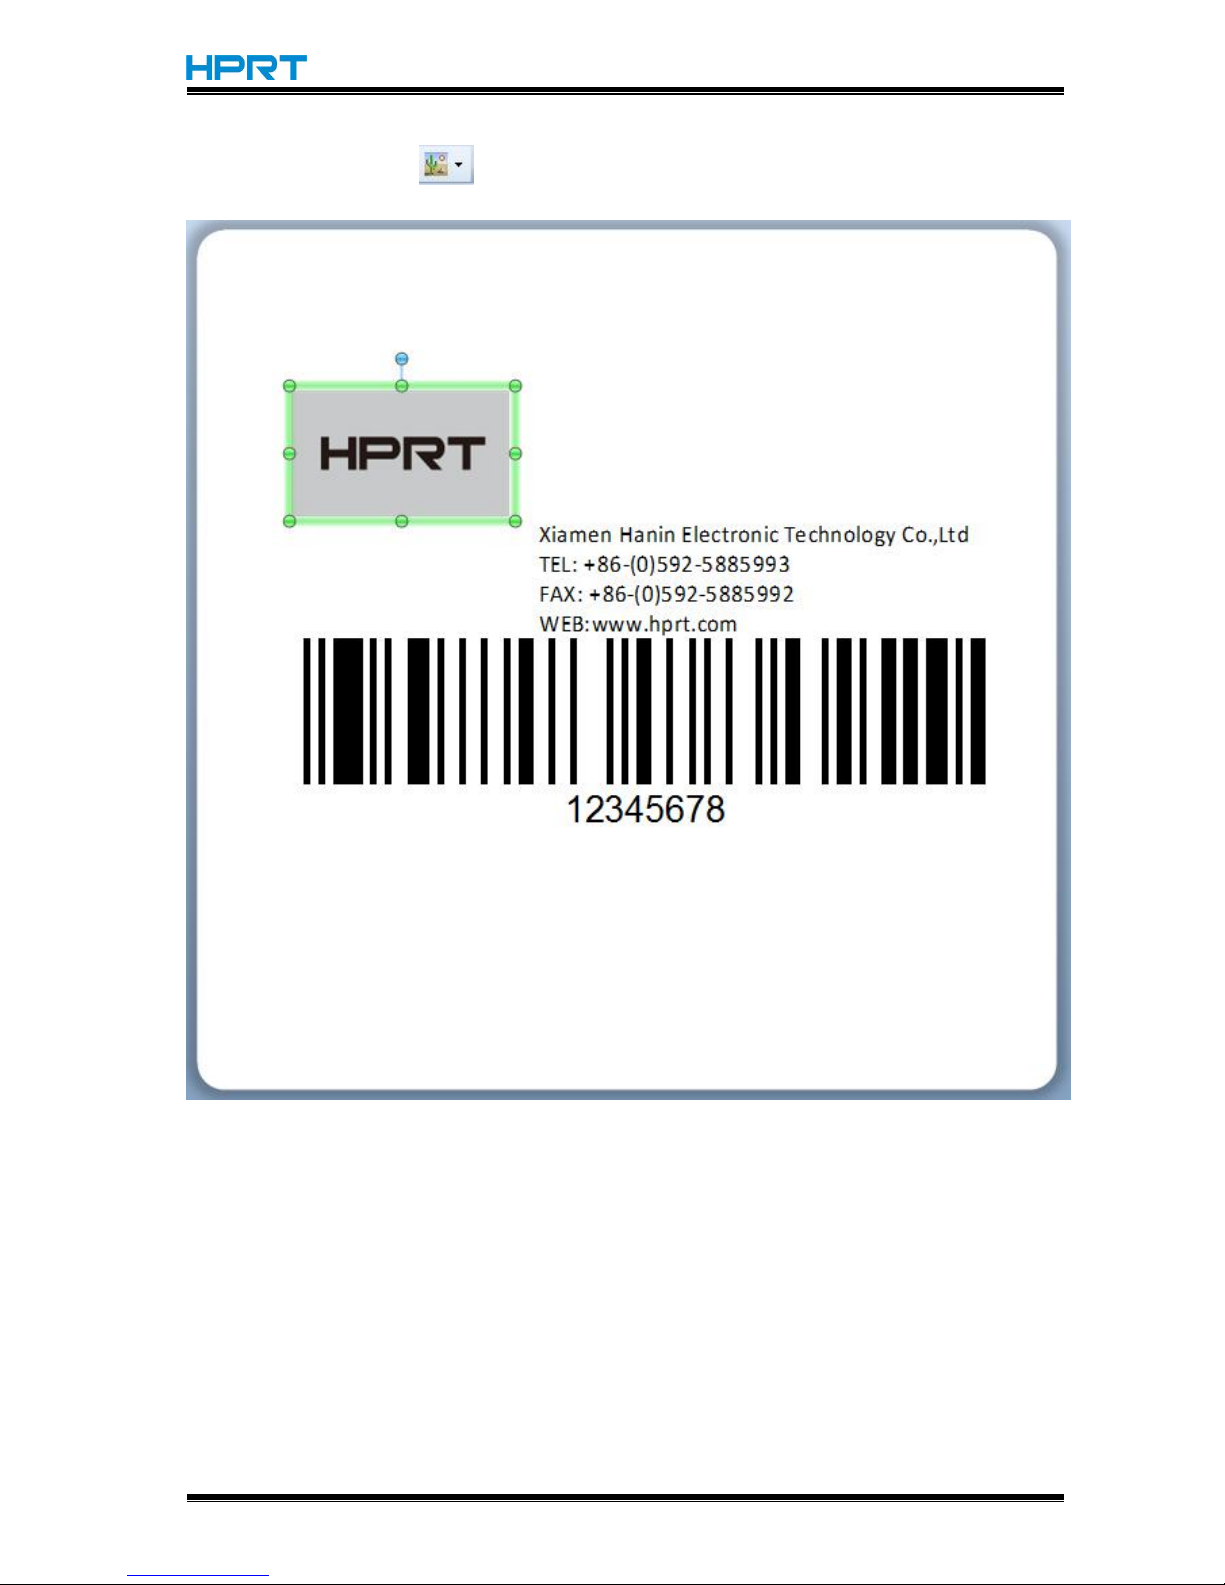
6.Click the icon of picture , then edit the pictures.
Page 97
HT300/HT330 User Manual
Rev.1.0
94
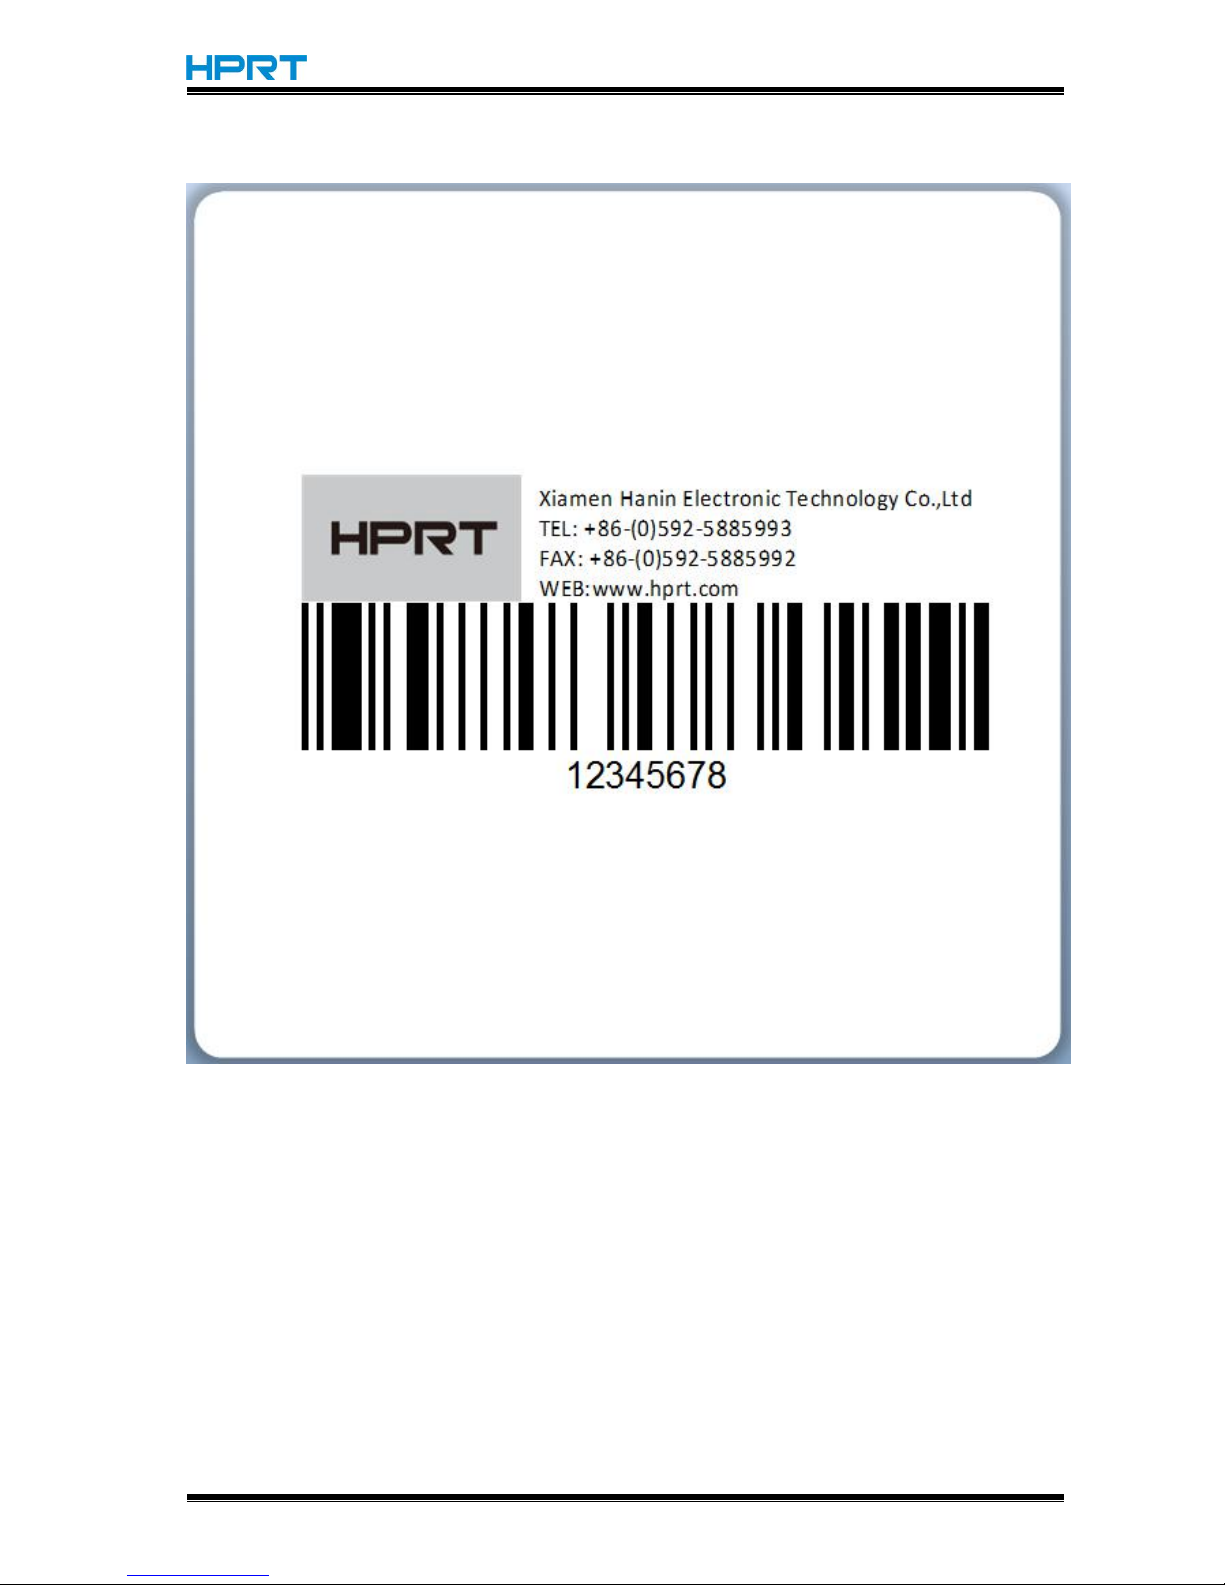
7.Compose the text.
8.Finish all the settings. Click “Print” and a new label has been printed.
 Loading...