

Page 1

Operation Manual
Smart 15 Plus
Micro Centifuge
Where Purchased :
Date of Purchase :
Page 2

Smart 15 Plus
Research Use Only
© 2018 Hanil Scientic Inc.
If you have any questions, contact our Technical Support Center.
+82-2-3452-8966 / [email protected]
www.ihanil.com
The appearance or specications of the device is subject to partial change for improvement.
Doc.No. : OMM5PDEN1801
Page 3

INDEX
1. General Considerations ----------------------------------------------------- 4
1.1 Safety -4
1.2 Transport & Storage - 5
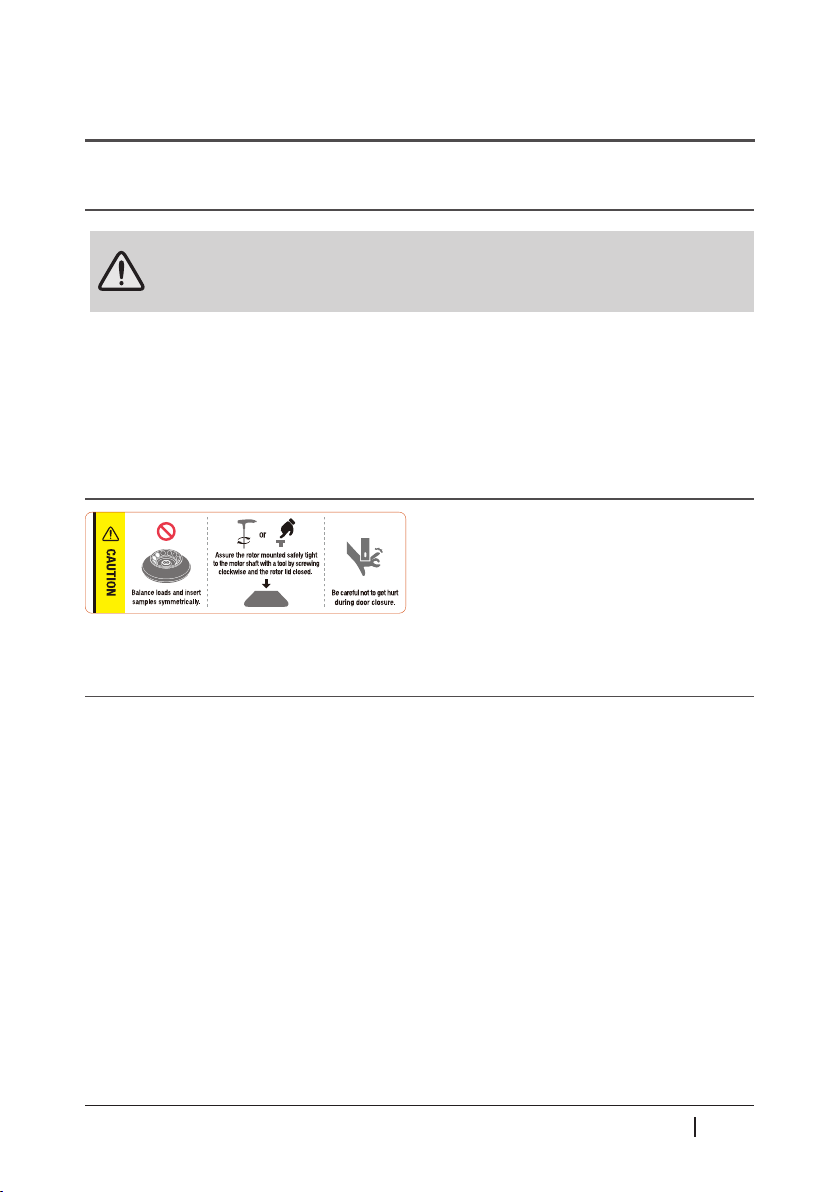
1.3 Safety label on the Device - 5
1.4 Electric safety - 5
2. Product Description ---------------------------------------------------------- 6
2.1 Structure - 6
2.2 Delivery package - 6
2.3 Technical Specications - 7
3. Installation ---------------------------------------------------------------------- 8
3.1 Packing Inspection- 8
3.2 Installation - 8
3.3 Power Connection - 9
3.4 Opening/Closing the Door - 9
3.5 Installing/Removing the Rotor - 10
3.6 Rotor ID. - 11
3.7 Loading Tubes - 12
4. Operation ----------------------------------------------------------------------- 13
4.1 Control Panel - 13
4.2 Setting RPM/RCF - 14
4.3 Setting Run Time - 14
4.4 Setting Acceleration/Deceleration - 15
4.5 Start/Stop a centrifugation - 15
4.6 Pulse Run - 16
4.7 Saving/Calling up a Program - 16
5. Maintenance ------------------------------------------------------------------- 17
5.1 Care Instructions - 17
5.2 Cleaning - 17
6. Troubleshooting -------------------------------------------------------------- 18
6.1 Possible Problems - 18
6.2 Error Codes - 19
6.3 Emergency Door Open - 20
7. Rotor ----------------------------------------------------------------------------- 21
Page 4

1. General Considerations
1.1 Safety
Follow precautions and all the safety requirements described on this user manual
to prevent any damage and failure of device and loss of lives.
1. The device should be installed on at surface to maintain level.
2. Check the voltage to be used, before connecting the device to the power source.
3. Only use rotors, parts, and accessories provided by Hanil Scientic Inc.
Hanil Scientic Inc. is not responsible for damages of the device and accidents caused by
using parts and accessories not recommended.
4. Do not exceed the maximum rated speed of the rotor or buckets in use.
5. Make sure to prepare necessary safety measures before using samples that are toxic or
radioactive samples or pathogenic or samples or infectious blood.
6. Substances that may generate volatile or explosive vapor can not be deviced.
7. The balancing work of samples should done in advance before operation.
8. To ensure safe use of the device, do not expose the device to strong acids, strong bases,
cesium, salt, or alkaline detergents.
9. If the device is contaminated by toxic or radioactive samples or infectious blood
samples, remove contaminants completely and take needful actions such as ventilation
or isolation of device.
10. Before operation, rotor and chamber should be dry.
11. Do not attempt to slow or stop the spinning rotor by hand.
12. Only device with rotor and rotor door rmly tightened.
13. Do not block vents.
14. When serving the device, be sure to remove contaminants in advance.
15. Please contact the place of purchase or Hanil Scientic Inc. for product repairs.
16. According to IEC61010-2-020 maintain a 30cm “clearance envelope” around the
device while the rotor is spinning.
17. Turn the power switch o after using the device.
18. Unplug the power plug before cleaning or left unused for a long period of time.
19. Don't lean against the device
4/21
www.ihanil.com
Page 5
1. General Considerations
1.2 Transport & Storage
- The device and the accessories must only be stored in dry rooms.
- Only lift and transport the device with sucient number of helpers.
-Storage- -Transport-
Ambient temperature 2℃~40℃
Maximum relative humidity 30%~85%
Air pressure 500~1060hpa
1.3 Safety label on the Device
1.4 Electric safety
Ambient temperature -10℃~40℃
Maximum relative humidity 10%~90%
Air pressure 500~1060hpa
Insert tube symmetrically.
Firmly tighten the rotor door.
Watch your gers when close the door.
1. It is recommended that switchgear or circuit breakers and overcurrent protection devices
be installed near the device.
2. Use a power cord only provided with the device.
3. Use sockets with a protective earth conductor and suitable power cord.
4. Do not use an extension cord.
5. Do not place anything on the powercable.
6. If you have the following emergencies, shut o the power supply and unplug the
powercord from outlet and contact your place of purchase.
- Unusual noises or smell from the equipment.
- Damage or wear of a power cord.
- Breakdown of circuit breaker, fuse or safety device.
- If you spill liquid on the equipment.
- If the equipment has been damaged.
Technical Support : +82-3452-8966 / [email protected]
5/21
Page 6
2. Product Description
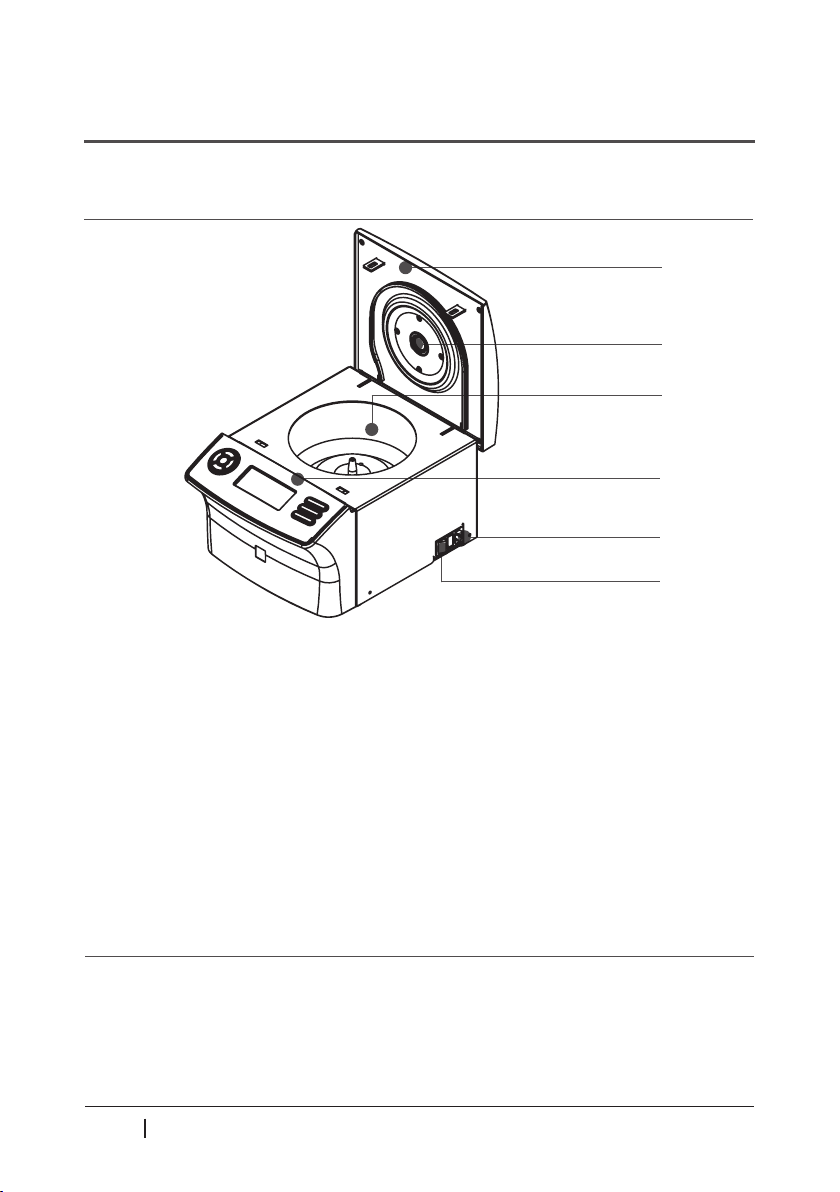
2.1 Structure
① Door
② RPM measuring window
③ Chamber
④ Display & control panel
⑤ Power Soket
⑥ Power Swithch
①
②
③
④
⑤
⑥
2.2 Delivery package
- Device
- Power cable
- Operating manual
- T-wrench
6/21
www.ihanil.com
Page 7

2. Product Description
2.3 Technical Specications
Max. RPM 15,000 RPM
Max. RCF 21,055 xg
Time < 100 min, pulse, continuous
Max. Capacity 24 x 1.5/2.0 mL, 4 PCR strips
ACC/DEC steps 9/10 steps
Acc. time to max. speed ≤15 sec
Dec. time from max. speed ≤15 sec
Program memory
Noise level < 60 dB
Imbalance cuto / tracking
Rotor identication manual
Dimension (W x D x H, mm) 293 x 380 x 242
Weight without rotor 15 kg
Power requirement (VA) 500 VA
Power input (V, Hz) 210V~240V, 50/60 Hz (110V optional)
Cat. No. SM-15PL
10
Yes
Technical Support : +82-3452-8966 / [email protected]
7/21
Page 8
3. Installation
3.1 Packing Inspection
• Check packing conditions carefully, before unpacking.
• Contact Hanil Scientic Inc. immediately if damages found.
• Check the delivery for completeness.
▶ You can get contact details on the packing box or manual.
3.2 Installation
Installation on hard and at ground.
• Centrifuge should be installed on a hard and at place.
• If the centrifuge is installed in an inclined place, the shaft may be bent
due to the weight of the rotor.
Good ventailation.
• For air circulation and safety, maintain a 30cm“clearance envelope”
around the centrifuge while the rotor is spinning.
8/21
Constant temperature/humidity
• Centrifuge equipped with the sensitive electronic software which is
fragile with humidity and temperature.
• Must avoid direct ray or heater and be put in the ambience of controlled
temp.and air.
Avoid the corrosive gas
• Install the centrifuge in a place where corrosive gas is not generated.
• Sulfur dioxide gas and chlorine gas may cause corrosion.
Leveling
• The shaft should be put exactly vertical on the hotizontaliy at ground by
the leveling tool.
www.ihanil.com
Page 9
3. Installation
3.3 Power Connection
• Connect the device to voltage sources which correspond to the
electrical requirements on the label attached to the device.
• Use sockets with a protective earth conductor and provided power cord.
1. Connect the power cable to the power socket on the right side of the device
and plug the cord into the outlet.
2. Switch the centrifuge on using the power switch on the right side of the device.
3.4 Opening/Closing the Door
• If the door is not closed, the device does not operate.
Opening the door
1. Press the Door button
Closing the door
1. Put both hands on the lid and close it with a light force.
Technical Support : +82-3452-8966 / [email protected]
9/21
Page 10
3. Installation
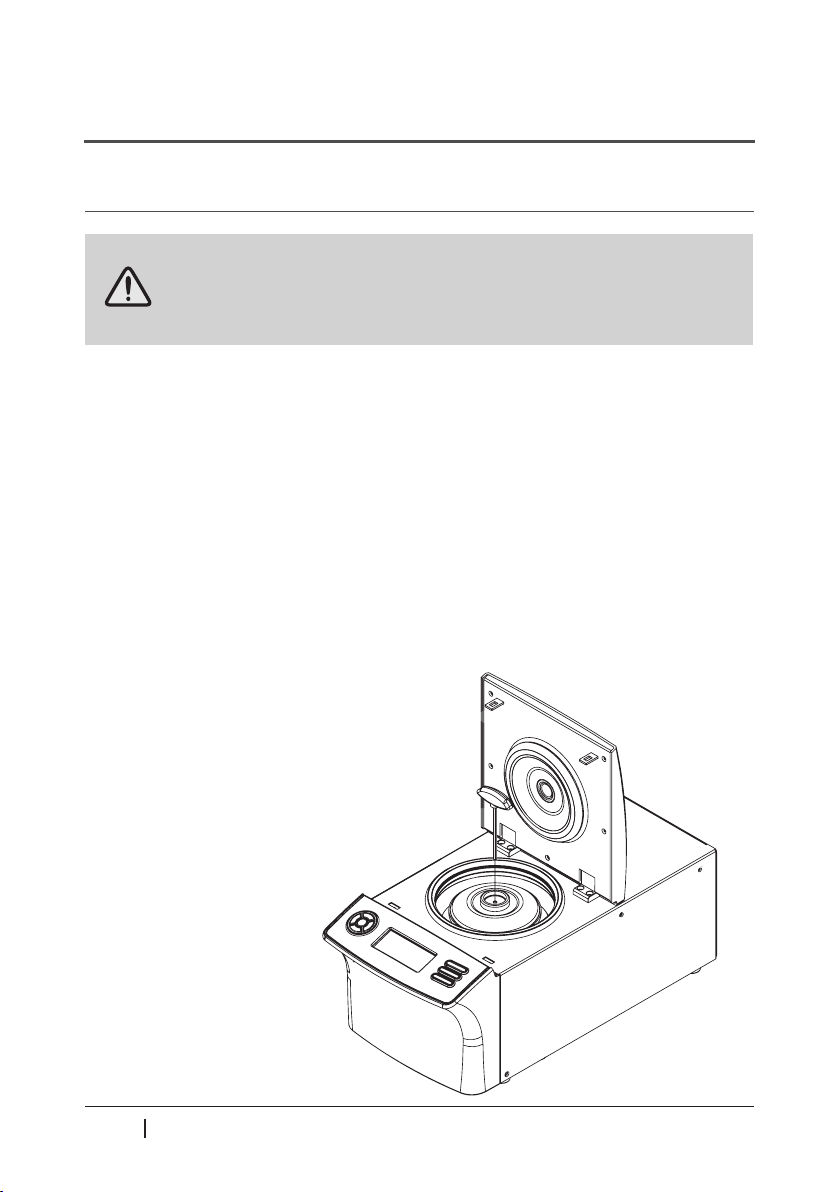
3.5 Installing/Removing the Rotor
• Only use rotors , parts , and accessories provided by Hanil Science Inc.
• Do not use scatched or cracked rotor in use.
1. Before installing the rotor remove any foreign object or moisture.
2. Load the rotor vertically onto the motor shaft.
3. Insert the T-wrench into the center hole of the rotor lid and turn it clockwise.
▶ Installing : Turn the T-wrench clockwise
▶ Removing : Turn the T-wrench counterclockwise
10/21
www.ihanil.com
Page 11
3. Installation
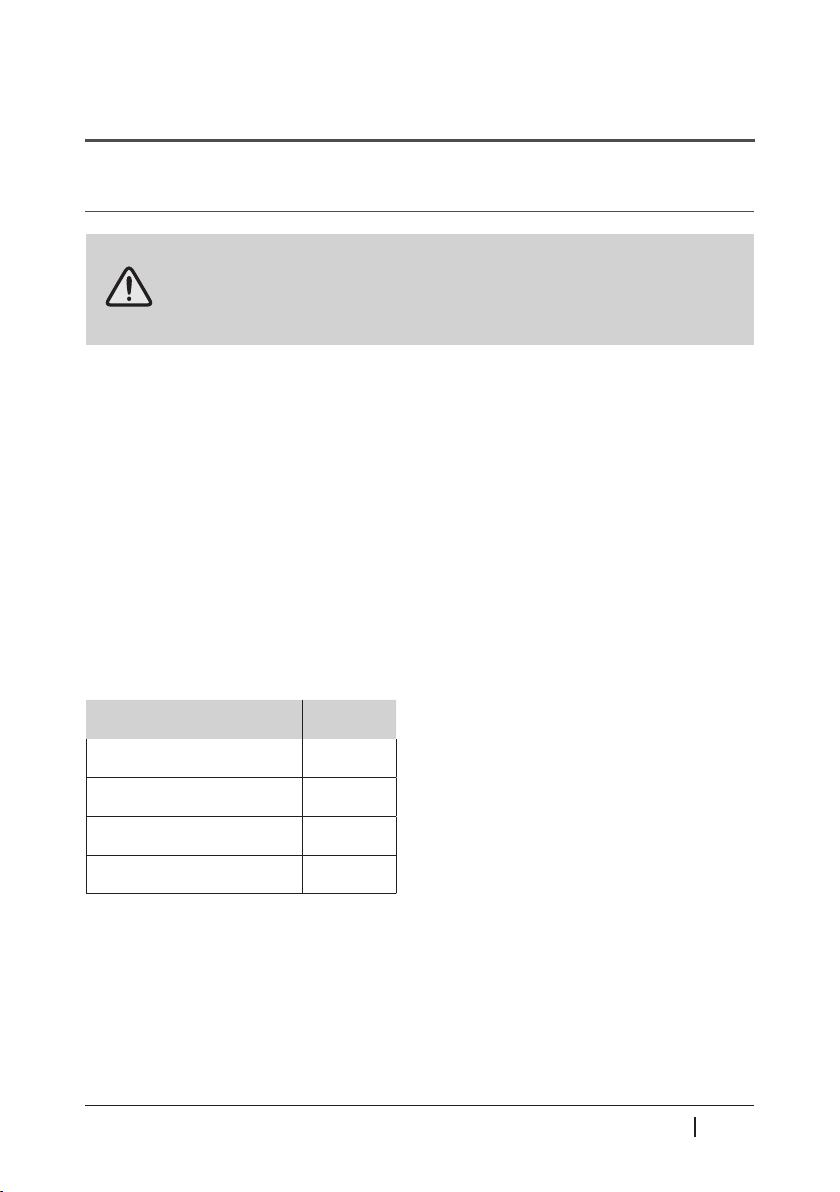
3.6 Rotor ID.
• Input rotor Id. manually after installing the rotor.
1.Press the Setup/Enter button.
2. Press the Left or Right button to move the cursor for the Rotor ID. setting .
▶Rotor Id. Setting mode : Rotor ashes on the display.
3. Press the Up or Down button until the desired rotor id. is displayed.
4. Press the Setup/Enter button.
Rotor ID.
Rotor Rotor ID
A0.2M-32 2
A2.0M-18 3
A2.0M-24/A2.0MP-24 1
A5.0M-12 4
Technical Support : +82-3452-8966 / [email protected]
11/21
Page 12
3. Installation
3.7 Loading Tubes
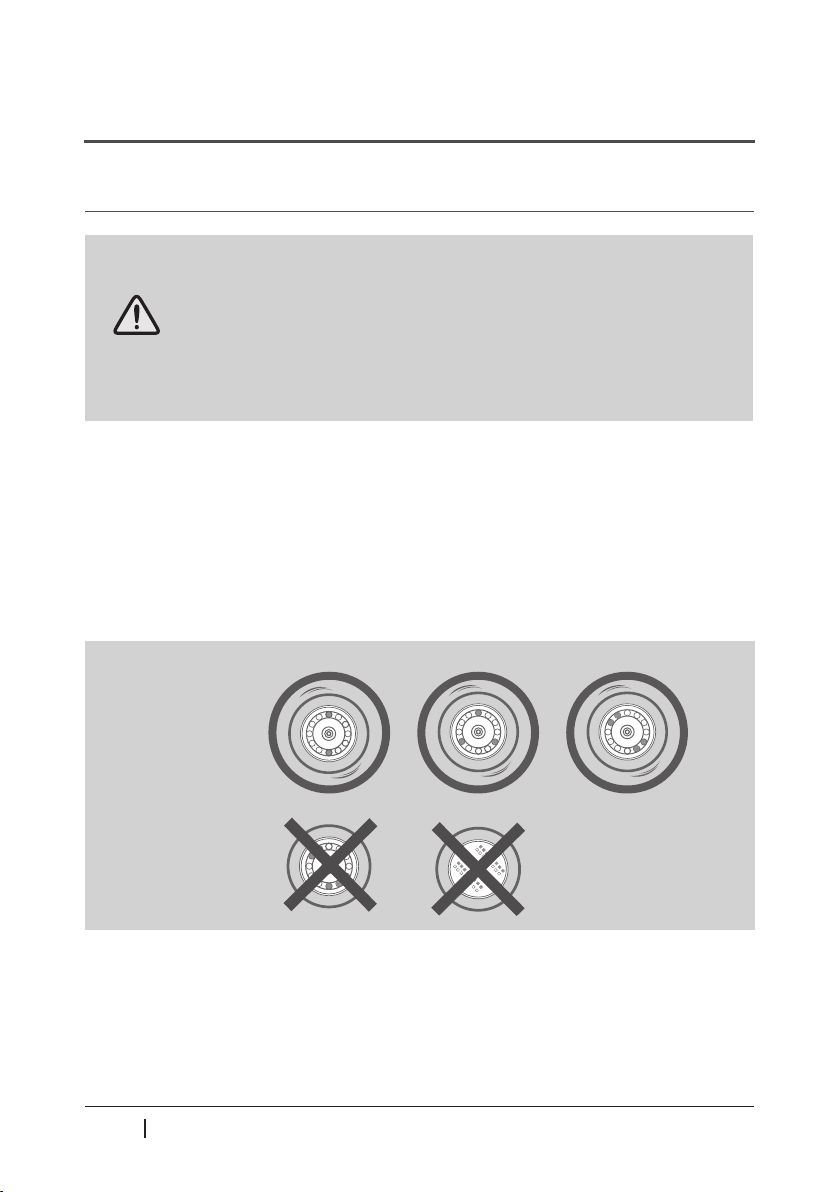
• Only use tubes provided or approved by Hanil Scientic Inc.
• Always use the same type of tube.
• Tubes should be loaded symmetrically.
• Do not exceed the maximum rated speed of the tube.
• Same volume of sample should be put on tubes.
• Check symmetric loading by balncing tubes with scales.
1. Check the maximum load for each tube.
2. Put tubes into rotor holes.
3. Tubes located opposite each other must be the same type and contain the same quantity.
Correct Arrangement
Wrong Arrangement
12/21
www.ihanil.com
Page 13
4. Operation
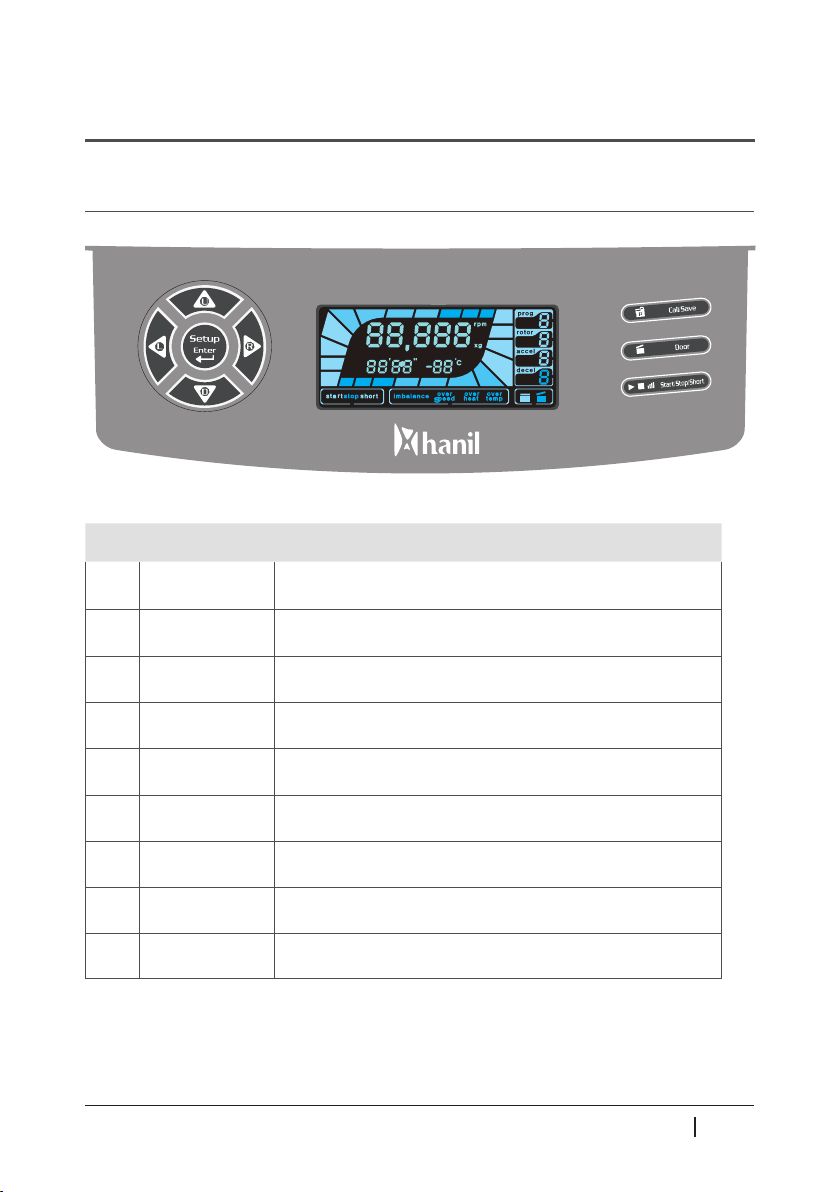
4.1 Control Panel
①
⑤
③ ④
②
No.
Button
⑥
Description
⑦
⑧
⑨
① Up
②
Down Down the values when setting parameters
③
Left Left button is used to select parameter
④
Right Right button is used to select parameter
⑤
Setup/Enter
⑥ Display
⑦ Call/Save
⑧
Door
⑨ Start/Stop/Pulse Start/Stop/Pulse centrifugation
Setup/Enter button can be pressed to go into setup mode or
Up the values when setting parameters
complete the setting parameters
State of RPM/RCF/Program/Time
Call or save a program
When the door button is pressed, the door opens
Technical Support : +82-3452-8966 / [email protected]
13/21
Page 14

4. Operation
4.2 Setting RPM/RCF
1. Press the Setup/Enter button.
2. Press the Left or Right button until the RPM/RCF display(rpm) ashes.
▶ RPM setting mode: RPM(rpm) display ashes.
▶ RCF setting mode: RCF(xg) display ashes.
3. Press Up or Down button until the required RPM/RCF is displayed.
4. Press the Setup/Enter button.
4.3 Setting Run Time
1. Press the Setup/Enter button.
2. Press the Left or Right button until the Time display(0' 00'') ashes.
▶ Setting run time in hours: 00' ashes
▶ Setting run time in minutes: 00'' ashes
3. Press Up or Down button until the required run time is displayed.
4. Press the Setup/Enter button.
14/21
www.ihanil.com
Page 15

4. Operation
4.4 Setting Acceleration/Deceleration
1. Press the Setup/Enter button.
2. Press the Left or Right button until the Accel/Decel display(0) ashes.
▶ Accel rate setting mode: Accel display ashes(0).
▶ Decel rate setting mode: Decel display ashes(0).
3. Press the Setup/Enter button.
4.5 Start/Stop a centrifugation
[Start]
1. Check all parameters are correct.
2. Press the Start/Stop/Pulse button.
[Stop]
1. Press the Start/Stop/Pulse button to stop centrifugation.
▶ The centrifugation stops when the set run time has been reached.
Technical Support : +82-3452-8966 / [email protected]
15/21
Page 16

4. Operation
4.6 Short Run
This funcion is used for short run centrifugation.
1. Set the desired run speed. [ Refer to. 4.2 Setting RPM/RCF]
2. Press the Start/Stop/Pulse button more than 3sec.
▶ The rotor accelerates at maximum rate to the set speed and stops automatically.
4.7 Saving/Calling up a Program
[Saving]
1. Set the RPM(or RCF) / Run time / Accel, Decel rate
2. Press the Left of Right button until Prog display ashes(0).
▶ You can save 10(0~9) programs.
3. Press Up or Down button until the required program number is displayed.
4. Press the Enter button.
[Calling up]
1. Press the Setup/Enter button.
2. Press the Left of Right button until Prog display ashes(0).
3. Press Up or Down button until the required program number is displayed.
4. Press the Enter button.
16/21
www.ihanil.com
Page 17

5. Maintenance
5.1 Care Instructions
1. Regularly inspect the rotor chamber for check the motor shaft is normal.
2. Regularly check the rotor and accessories to be sure there is no damage.
3. Rotate the motor shaft with your hand to make sure it turns smoothly.
4. To prevent the rotor from sticking, lubicate the rotor drive hole which contacts motor
shaft regularly.
5.2 Cleaning
• Before cleaning the centrifuge, be sure to switch o the device and
disconnect the power cord.
[Oustside of the device]
1 Clean the outside of deivice with a soft and dry cloth.
▶ If the device is contaminated, use a mild cleaning uid to clean.
2. Do not use aggressive chemicals on the device such as alchol, benzene, acetone or
phenol.
3. Make sure do not scratch the surface of deivice when cleaning it.
▶ Do not use a metal sponge.
▶ If the device is rusted, remove it with a mild detergent and wipe it with a dry cloth.
[Chamber]
1. If the rotor chamber is not dry, wipe moisture from the chamber with a dry cloth.
2. If the rotor chamber is dirty, clean it with a mild uid to clean.
[Rotor]
1. After centrifugation, remove the rotor from the chamber and keep it upside down.
2. If any sample is spilt inside the rotor, clean it and dry well.
[Disposal]
1. In case of product is to be disposed of, the local wastes laws and regulations are to be
observed.
Technical Support : +82-3452-8966 / [email protected]
17/21
Page 18

6. Troubleshooting
6.1 Possible Problems
Problems
Power failure
Centrifugation
cannot be started
Door cannot be
opened
Door cannot be
closed
Unusual noise
and vibration
Recommended Action
- Check the power cord connection.
- Check the power fuse of the device.
- Check the lid is closed completely.
- Press the ‘Door' button.
- Check the power connection.
- Remove the dirt at the door latch and close the lid.
- Check the lid latch is not damaged.
- Check the device is installed on the hard and at place
- Reinstall the rotor symmetrically.
- Reinstall the tubes symmetrically.
- Tighten the rotor lid rmly by turning the rotor lid handle clockwise.
18/21
www.ihanil.com
Page 19

6. Troubleshooting
6.2 Error Codes
Error Message Cause Recommended Action
E1
E2
E3
E4
E5
E7
E11
E12
E13
Imbalance
error
Over
speed
error
Motor
over-heat
Motor
operation
error
Door open
(Operating)
System
error
Motor
tempterature
sensor error !
HI voltage
Error
Low voltage
Error
•Asymmetrical arrangement of
tubes.
•Dierent volume of sample .
•2% over the set RPM.
•Incorrect tuning of motor and
controller.
•Temp. hike inside of motor.
•Motor operation error
•Lid open during operation • Switch the device o and contact
•System error
•
Motor temperature sensor
error
•
High voltage
•
Low voltage
• Check the tightness of rotor loading.
• Check the proper loading of tubes.
• Check the stable ground or worktable.
• Check controller and motor.
• Switch power on/o and re-start.
• Check the stator of motor.
• Switch power o, restart after 1 hour.
• Check that the rotor is rotating through
the RPM measuring window
• Switch power on/o and re-start.
the Technical support team.
• Switch the device o and contact
the Technical support team.
• Switch power on/o and re-start.
• Switch power on/o and re-start.
• Switch power on/o and re-start.
E15
E17
RPM
sensing
error
Communication error
•
RPM Sensor error
•
Rotor identication error
•
Occurs when Main and IO
board are disconnected
• Switch power on/o and re-start.
• Switch the device o and contact
the Technical support team.
Technical Support : +82-3452-8966 / [email protected]
19/21
Page 20
6. Troubleshooting
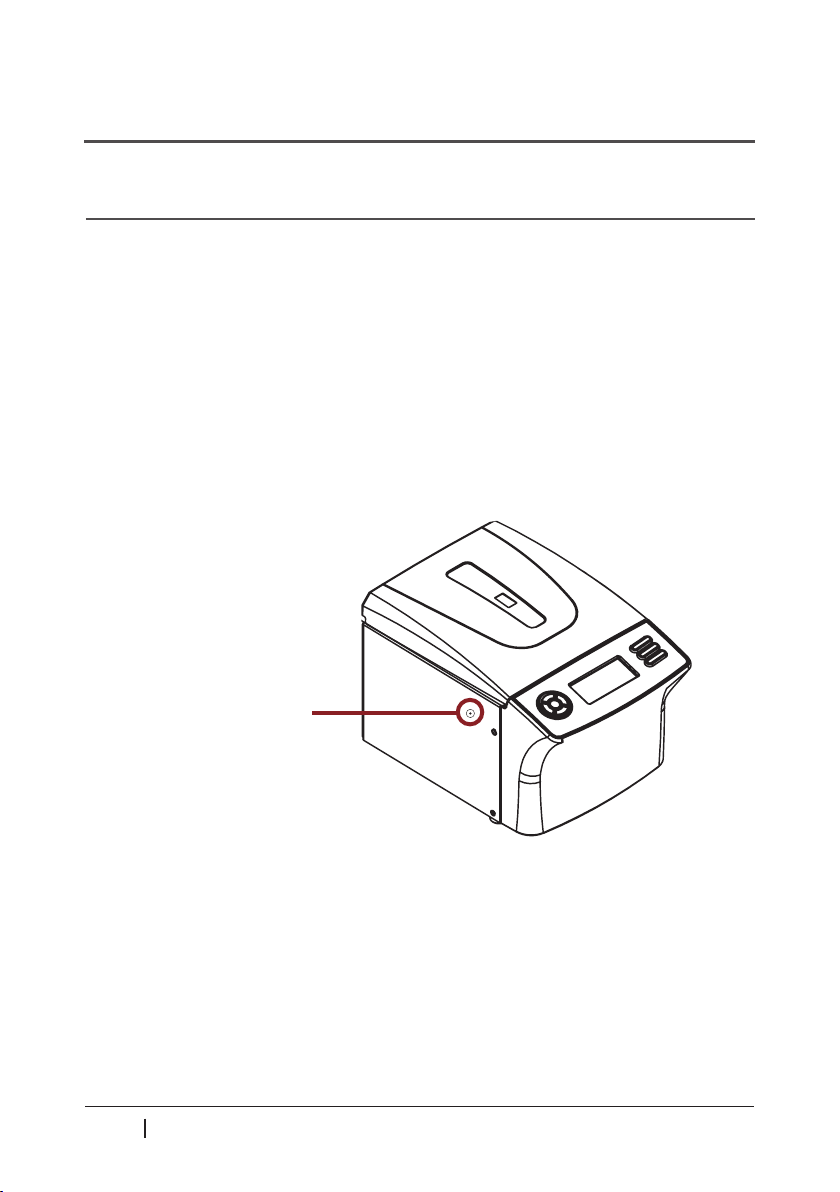
6.3 Emergency Door Open
If the device door cannot be opened, you can activte the emergency open manually.
1. Wait for rotor to stop before activating the emergency open.
2. Insert the T-wrench into the emergency open hole and turn it clockwise
until the door is opened.
Emergency open hole
20/21
www.ihanil.com
Page 21
7. Rotor
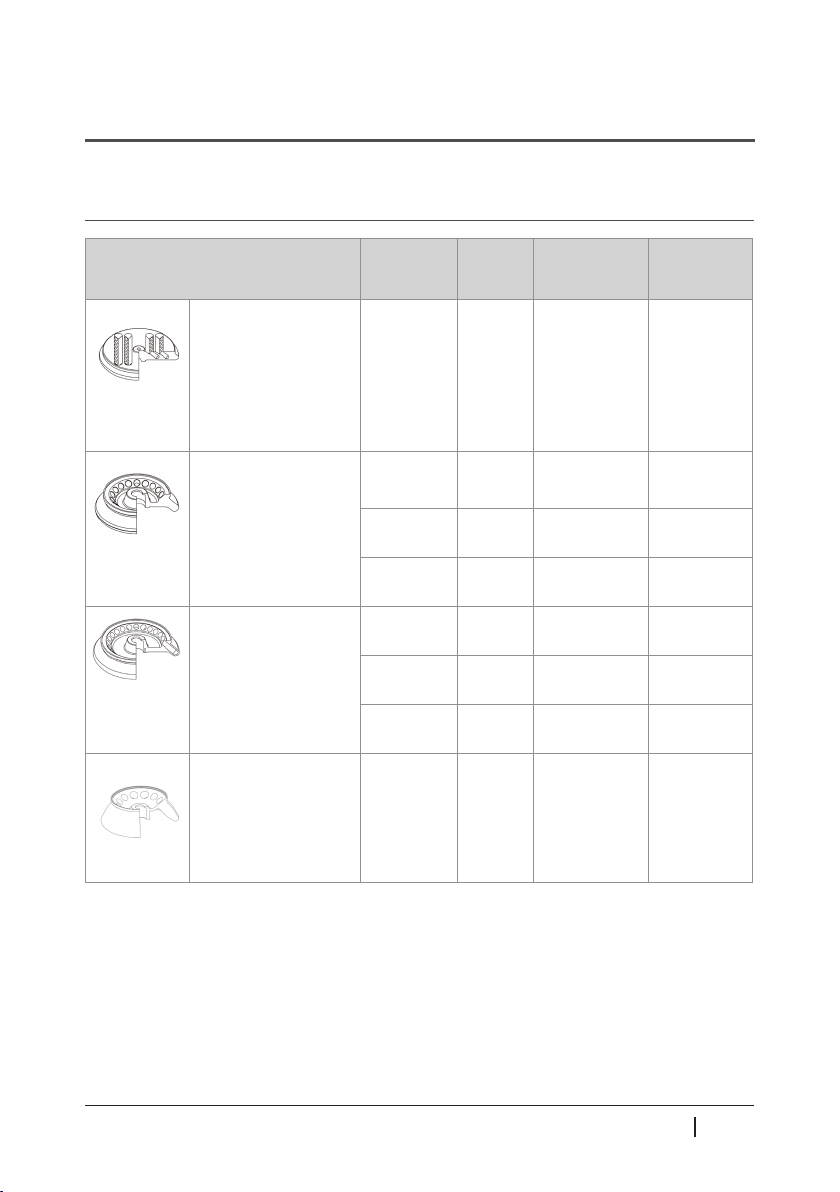
7.1 Rotor
Rotor Tube
Capacity
A0.2M-32
(PCR Strip Rotor)
A2.0M-18
A2.0M-24
A2.0MP-24
A5.0M-12
Hole angle : ∠45°
Max. Capacity : 32 x 0.2 mL
Size (ø x H) : ø172 x 38.5 mm
Hole angle : ∠45°
Max. Capacity : 18 x 1.5/2.0 mL
Size (ø x H) : ø147 x 38.5 mm
Max. height for tube fit : 53.5 mm
Incl. a lid
Hole angle : ∠45°
Max. Capacity : 24 x 1.5/2.0 mL
Size (ø x H) : ø172 x 38.5 mm
Max. height for tube t : 56 mm
Incl. a lid
A2.0MP-24 incl. plastic lid
Hole angle : ∠50°
Max. Capacity : 5 x 5.0 mL
Size (ø x H) : ø167.2 x 57.4 mm
Incl. a lid
0.2mL
0.2mL strips
1.5/2.0 mL
Micro-lter tube
0.5mL TR0.5
0.2mL TR0.2
1.5/2.0 mL -
0.5mL TR0.5
0.2mL TR0.2
5.0mL
Required
Adaptor
-
-
-
Bore Ø x L (mm)
Radius (mm)
6.5 x 17
55.5
11 x 38
71.2
8 x 37
66
6 x 21
56
11 x 38
83.7
8 x 37
78.5
6 x 21
68.5
17 x 53.8
83.6
Max. RPM(rpm)
Max. RCF (xg)
12,500
9,695
15,000
17,910
15,000
16,602
15,000
14,087
15,000
21,055
15,000
19,747
15,000
17,231
15,000
20,376
Technical Support : +82-3452-8966 / [email protected]
21/21
Page 22

Page 23

Page 24

RECYCLABLE
16 Arayukro, Gimpo 10136, Rep.of Korea
Service Inquiries:
+82-2-3452-8966
[email protected]
www.ihanil.com
 Loading...