

Page 1

Operating Manual
FLETA 5
Clinical Centrifuge
Date of Purchase
Serial No.
Place of purchase
Page 2

Page 3

CONTENTS
1. General Considerations-------------------------------------------------
1.1 Safety -3
1.2 Transport & Storage -4
1.3 Safety label -4
2. Product description-------------------------------------------------------
2.1 Structure -5
2.2 Delivery package -6
2.3 Technical specifications -7
3. Installation ----------------------------------------------------------------
3.1 Packing Inspection -8
3.2 Installation -8
3.2.1 Selecting the location -8
4. Operation ----------------------------------------------------------------
4.1 Operation panel -10
4.2 Opening and closing the lid -11
4.3 Loading and removal of the rotor -11
4.4 Loading tubes -12
4.5 Setting RPM/RCF -13
4.6 Setting run time -13
1.4 Electric safety information -4
5. Maintenance------------------------------------------------------------
6. Troubleshooting---------------------------------------------------------
6.1 General errors -17
6.2 Error messages -18
7. Rotor ----------------------------------------------------------------------
3
5
8
10
3.2.2 Power connetion -9
4.7 Acc/Dec setting-14
4.8 Radius input-14
4.9 Start the centrifugation run-14
4.10 End the centrifugation run-14
16
5.1 Care instructions -16
5.2 Cleaning -16
17
20
6.3 Emergency release -19
4.11 Saving / Recall a program -15
Page 4

Follow precautions and all the safety requirements described on this user manual
to prevent any damage and failure of equipment and loss of lives.
1. The centrifuge should be installed on flat surface to maintain level.
Abnormal vibration is caused when the device is installed on an inclined surface.
2. Check the voltage to be used, before connecting the centrifuge to the power source.
3. Only use rotors, parts, and accessories provided by Hanil Science Inc.
Hanil Scientific Inc. is not responsible for damages of the device and accidents caused by
using parts and accessories not recommended.
4. Do not exceed the maximum rated speed of the rotor or buckets in use.
5. Make sure to prepare necessary safety measures before using samples that are toxic or
radioactive samples or pathogenic or samples or infectious blood.
7. Substances that may generate volatile or explosive vapor can not be centrifuged.
8. The balancing work of samples shoud be done in advance before operation.
6. If the centrifuge is contaminated by toxic or radioactive samples or infectious blood samples,
remove contaminants completely and take needful actions such as ventilation or isolation
of centrifuge.
9. Before operation, rotor and chamber should be dry.
10. Do not attempt to slow or stop the spinning rotor by hand.
11. Only centrifuge with rotor and rotor lid firmly tightened.
12. Do not block vents.
13. When serving the centrifuge, be sure to remove contaminants in advance.
16. Please contact the place of purchase or Hanil Scientific Inc. for product repairs.
15. According to IEC61010-2-020 maintain a 30cm “clearance envelope” around the
centrifuge while the rotor is spinning.
14. Repairs must be carried out by a technologist authorized byHanil scientific Inc.
1. General Considerations
1.1 Safety
Page 5
1. General Considerations
1.2 Transport & Storage
• The device and the accessories
may only be stored in dry rooms
• Only lift and transport the
device with sufficient number of
helpers.
-StorageAmbient temperature 5℃~35℃
Maximum relative humidity 30%~85%
Air pressure 500~1060hpa
-TransportAmbient temperature -10℃~40℃
Maximum relative humidity 10%~90%
Air pressure 500~1060hpa
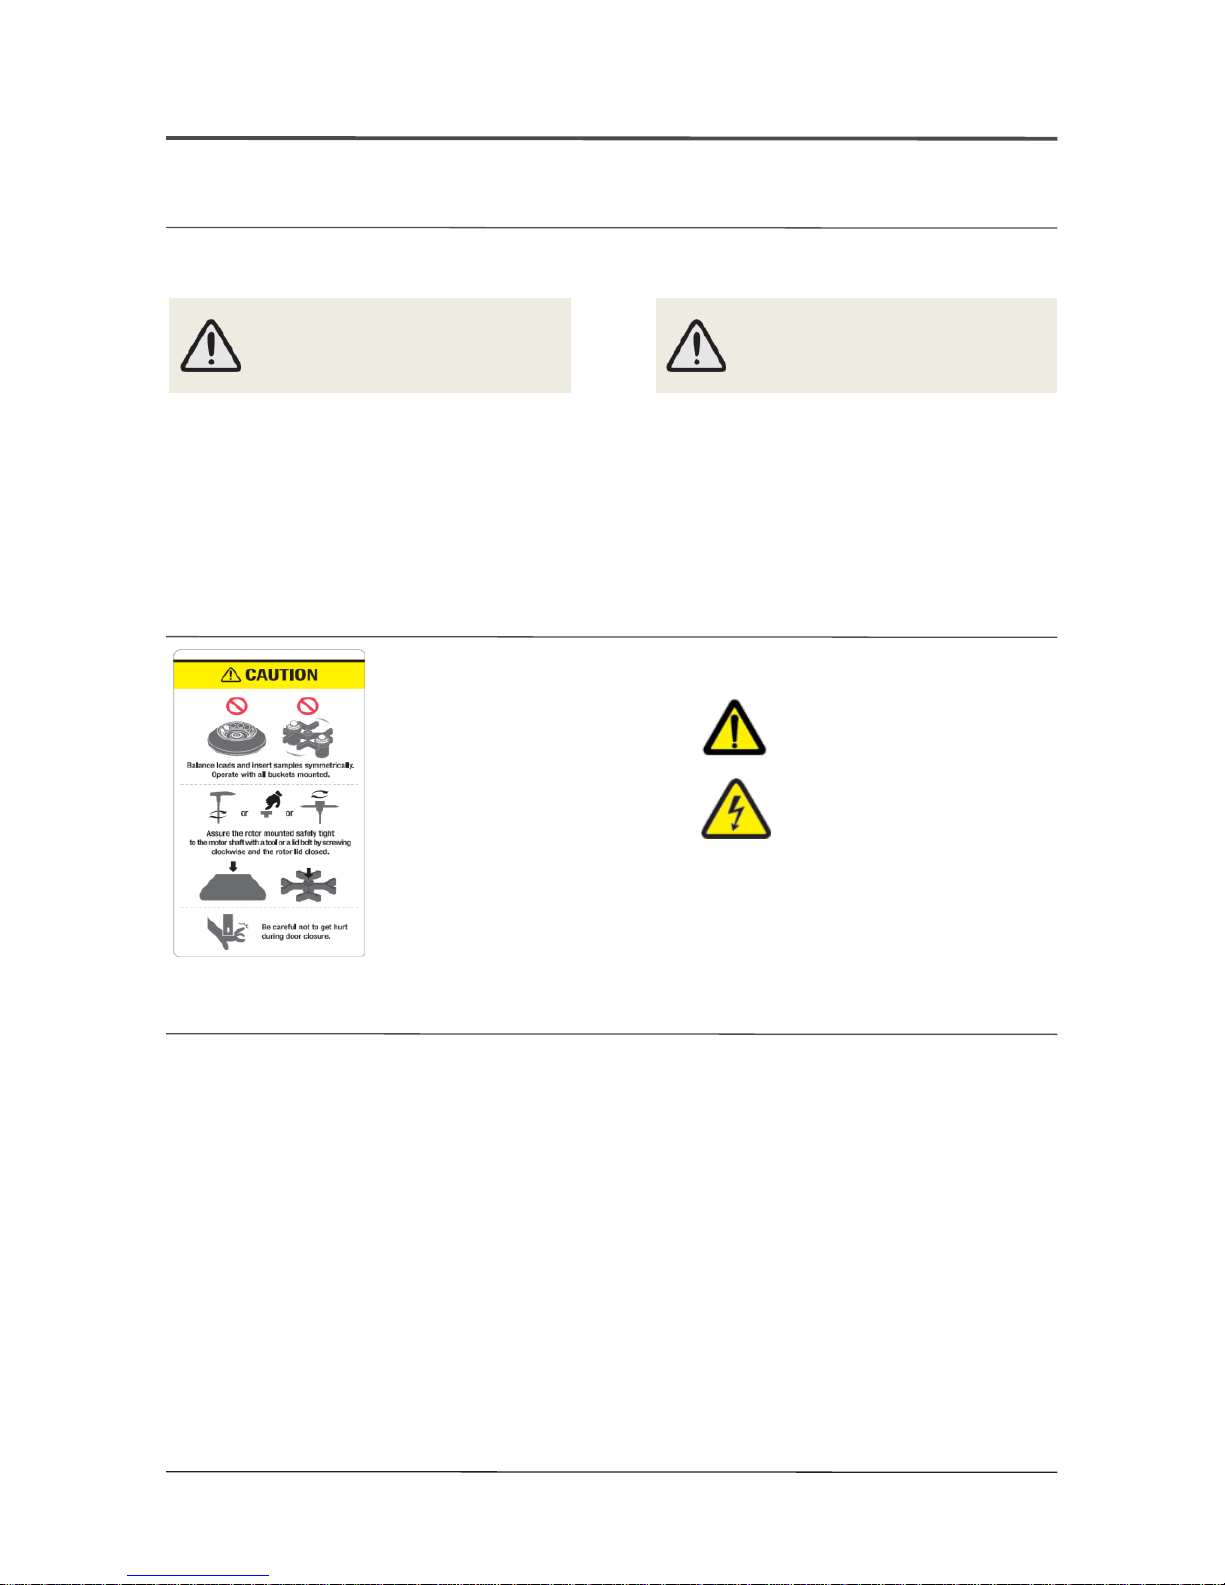
1.3 Safety label attached to a product
Insert tube
symmetrically.
Firmly tighten
the rotor lid.
Watch your figers
when close the lid.
Mark indicating danger
and warning.
Mark indicating a place in
danger of electric shock.
1.4 Electric safety information
1.Use a power cord only provided with equipment.
2.Use sockets with a protective earth conductor and suitable power cord.
3.Do not use an extension cord.
4.Do not place anything on the powercable
5.Do not block vents.
6.If you have the following emergencies, shut off the power supply and unplug the
powercord from outlet and contact your place of purchase.
-Unusual noises or smell from the equipment.
-Damage or wear of a power cord.
-Breakdown of circuit breaker, fuse or safety device.
-If you spill liquid on the equipment.
-If theequipment has been damaged.
4 l
www.ihanil.com
Page 6
①
②
③
④
⑤
⑥
⑦
⑧
⑨
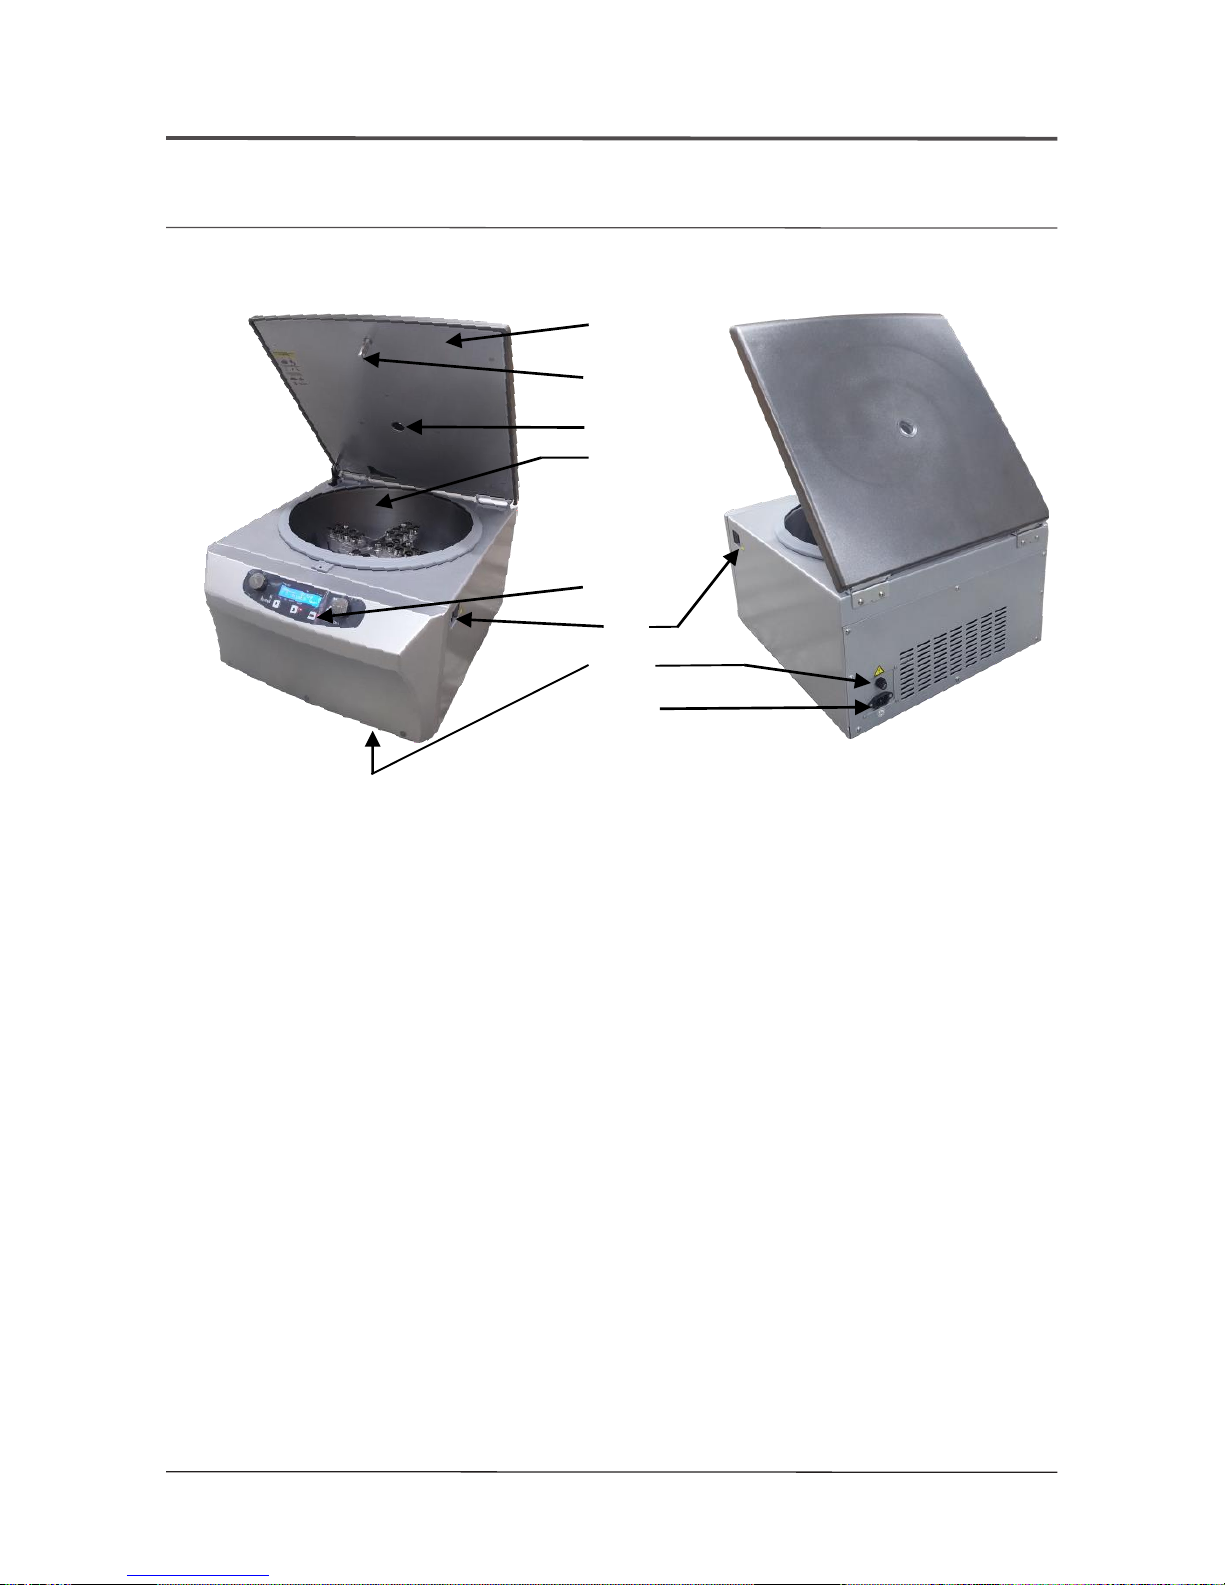
①Door:
Door protects the inside of the chamber.
②Door latch:
Fix the door.
③RPM measuring window:
Visual inspection for rotor stop or for a speed check using a stroboscope.
④Chamber:
Where the rotor is loaded.
⑤ Operating panel
Set desired run conditions.
⑥Power switch
On/off the centrifuge
⑦Emergency door open tool
Active the emergency release
⑧Fuse case
If the wiring is short-circuited, overloaded, or short-circuited, turn off the power.
⑨ Power connector
The power cord is connected.
2. Product description
2.1 Structure
Page 7

2. Product description
2.2 Delivery package
①Fleta5 Mainbody(incl. HBT15-8)
②Power Cable
③Operating manual
④Twrench, for rotor locking
⑤Optional items
6 l
www.ihanil.com
Page 8

2. Product description
2.3 Technical Specifications
Max. RPM 5,500 rpm
Max. RCF 6,230 xg
Max. Capacity 32 x 15 mL
ACC/DEC
ACC/DEC
ramps
10/10 steps
Acc. time to
max. speed
20/80 sec
Dec. time
from max.
speed
26/82 sec
Time control < 10 hr, continuous
Program memory 100
Noise level ≤ 65 dB
Imbalance cutoff Yes
Dimension (W x D x H, mm) 570 x 475 x 325
Weight without rotor 37 kg
Power requirement (VA)
700 VA(Usual)
1079VA(Max.)
Power input (V, Hz) 210~240 V, 50/60 Hz (110V optional)
Cat. No. FL-5
Page 9

3. Installation
3.1 Packing Inspection
•Check packing conditions carefully, before unpacking.
•Contact Hani lScientific Inc. immediately if damages found.
•Check the delivery for completeness.
•You can get contact details on packing boxes and the back of the manual.
3.2 Installation
3.2.1 Selecting the location
Installation on hard and flat ground.
• Centrifuge should be installed on hard and flat place.
• If the centrifuge is installed in an inclined place, the shaft may be bent due to the
weight of the rotor.
Goodventailation.
• For air circulation and safety, maintain a 30cm“clearance envelope”around the
centrifuge while the rotor is spinning.
Constant temperature/humidity
• Centrifuge equipped with the sensitive electronic software which is fragile with
humidity and temperature.
•Must avoid direct ray or heater and be put in the ambience of controlled temp.and air.
Avoid the corrosive gas
• Install the centrifuge in a place where corrosive gas is not generated.
• Sulfur dioxide gas and chlorine gas may cause corrosion.
Leveling
• The shaft should be put exactly vertical on the hotizontaliy flat ground by
the leveling tool
8 l
www.ihanil.com
Page 10

3. Installation
3.1 Packing Inspection
3.2.2 Power Connection
• Connect the device to voltage sources which correspond to the electrical
requirements on the label attached to the device.
• Use sockets with a protective earth conductor and provided powercord.
1. Connect the power cable to the power socket on the right side of the product and plug
the cord into the outlet.
2. Switch the centrifuge on using the power switch on the right side of the device.
Page 11
4. Operation
4.1 Operation Panel
①
③
④
⑤
②
⑥
⑦
⑧ ⑨
⑩
⑪ ⑫
⑬
10
www.ihanil.com
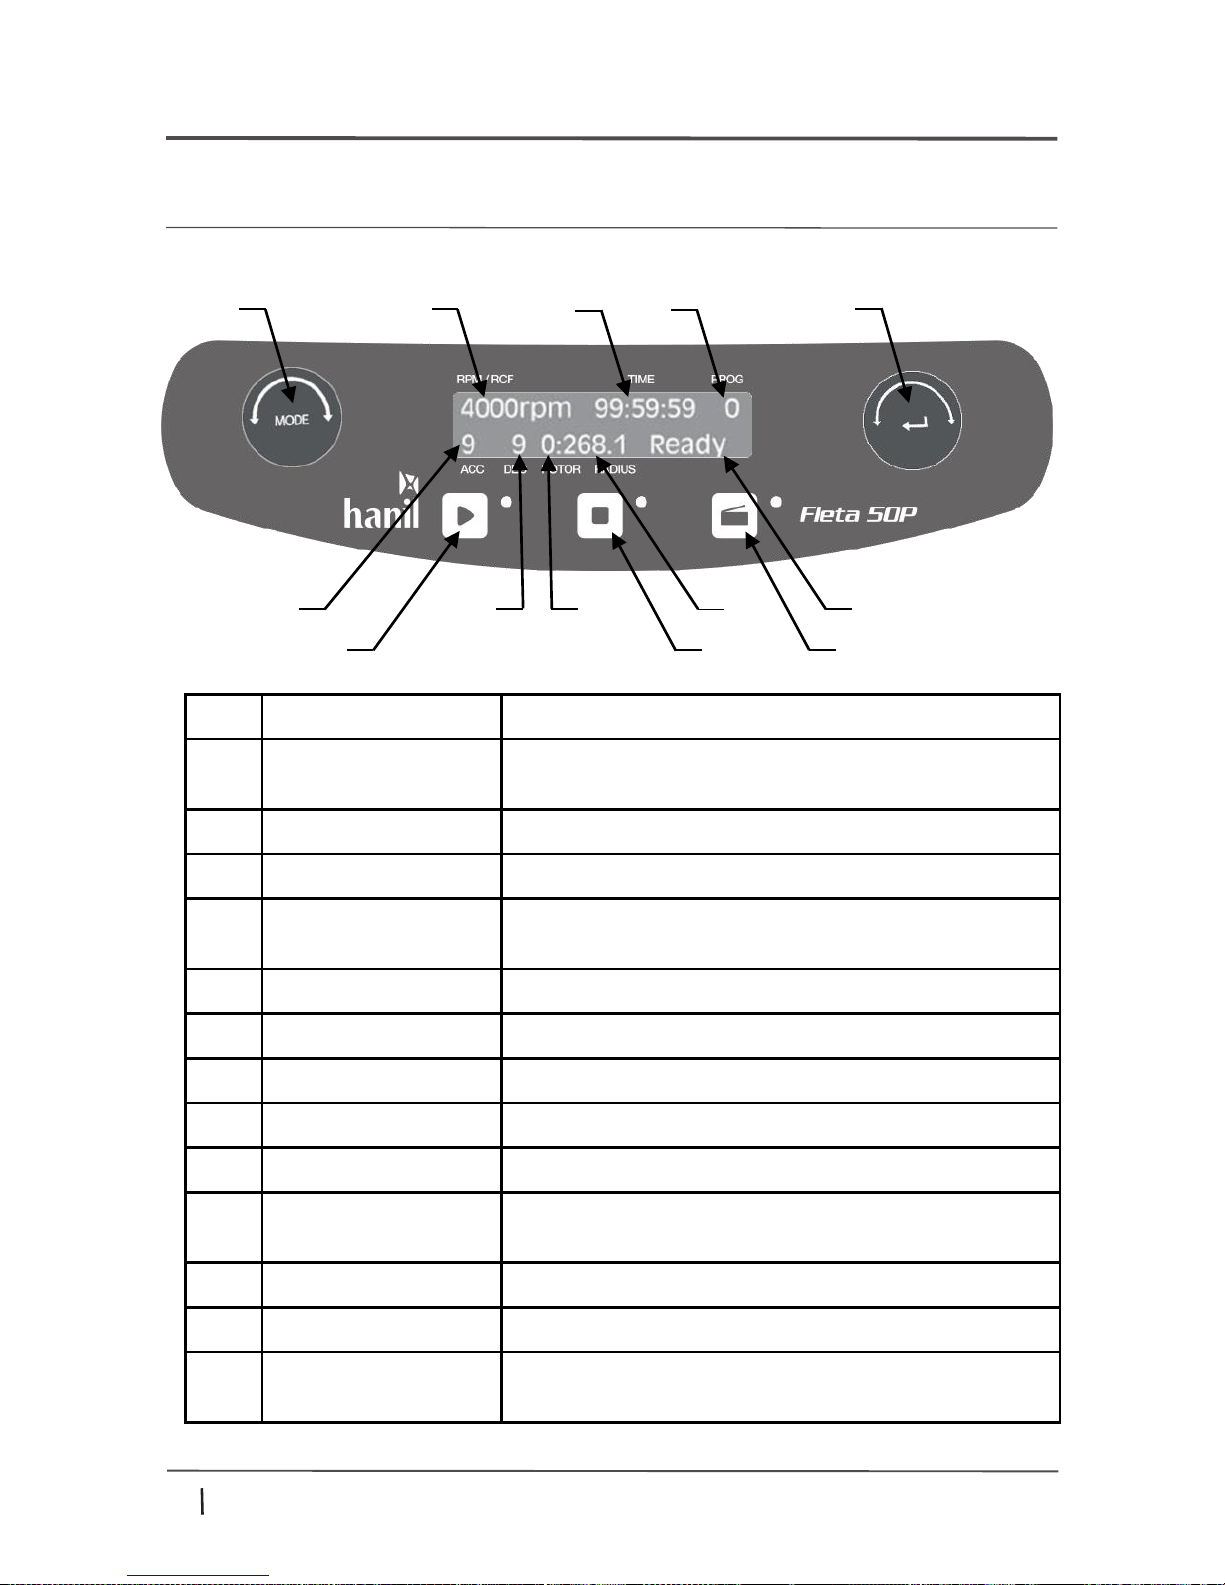
No. Button Function
①
‘MODE’ dial
Turn the dial in the setting mode
to move cursor to set the RPM / RCF / Time / Prog./Acc/Dec.
②
‘Enter’ dial Set the value.
③
Display-‘RPM’ ‘RCF’ RPM/ RCF value is displayed.
④
Display-‘Time’
Centrifugation time is displayed.
(Set to 0:0:0 , for continuous centrifugation
⑤
Display-‘Prog’ Program No. is displayed.
⑥
Display-‘Acc’ Acceleration rate is displayed.
⑦
Display-‘Dec’ Deceleraterate is displayed.
⑧
Display-‘Rotor’ Rotor Id. is displayed.
⑨
Display-‘Radius’ Radius is displayed.
⑩
Display-
‘Ready’ ‘Check’ ‘Set’
Current status of the device is displayed.
⑪
‘Start’ Start the centrifugation.
⑫
‘Stop’ Abort the centrifugation.
⑬
‘Door’ Open the lid.
Page 12
4. Operation
4.2 Opening and closing the lid
•The lid can only be opened if the centrifuge is switched on.
•Do not reach with your fingers between the housing and lid.
•Close the lid completely before operation.
•Opening the lid
Press the ( ) door key.
•Closing the lid
Put the lid on and press the edge of the lid.
4.3 Loading and removal of the rotor
•Only use rotors, parts, and accessories provided by Hanil Scientific Inc.
•Do not use scatched or cracked rotor in use.
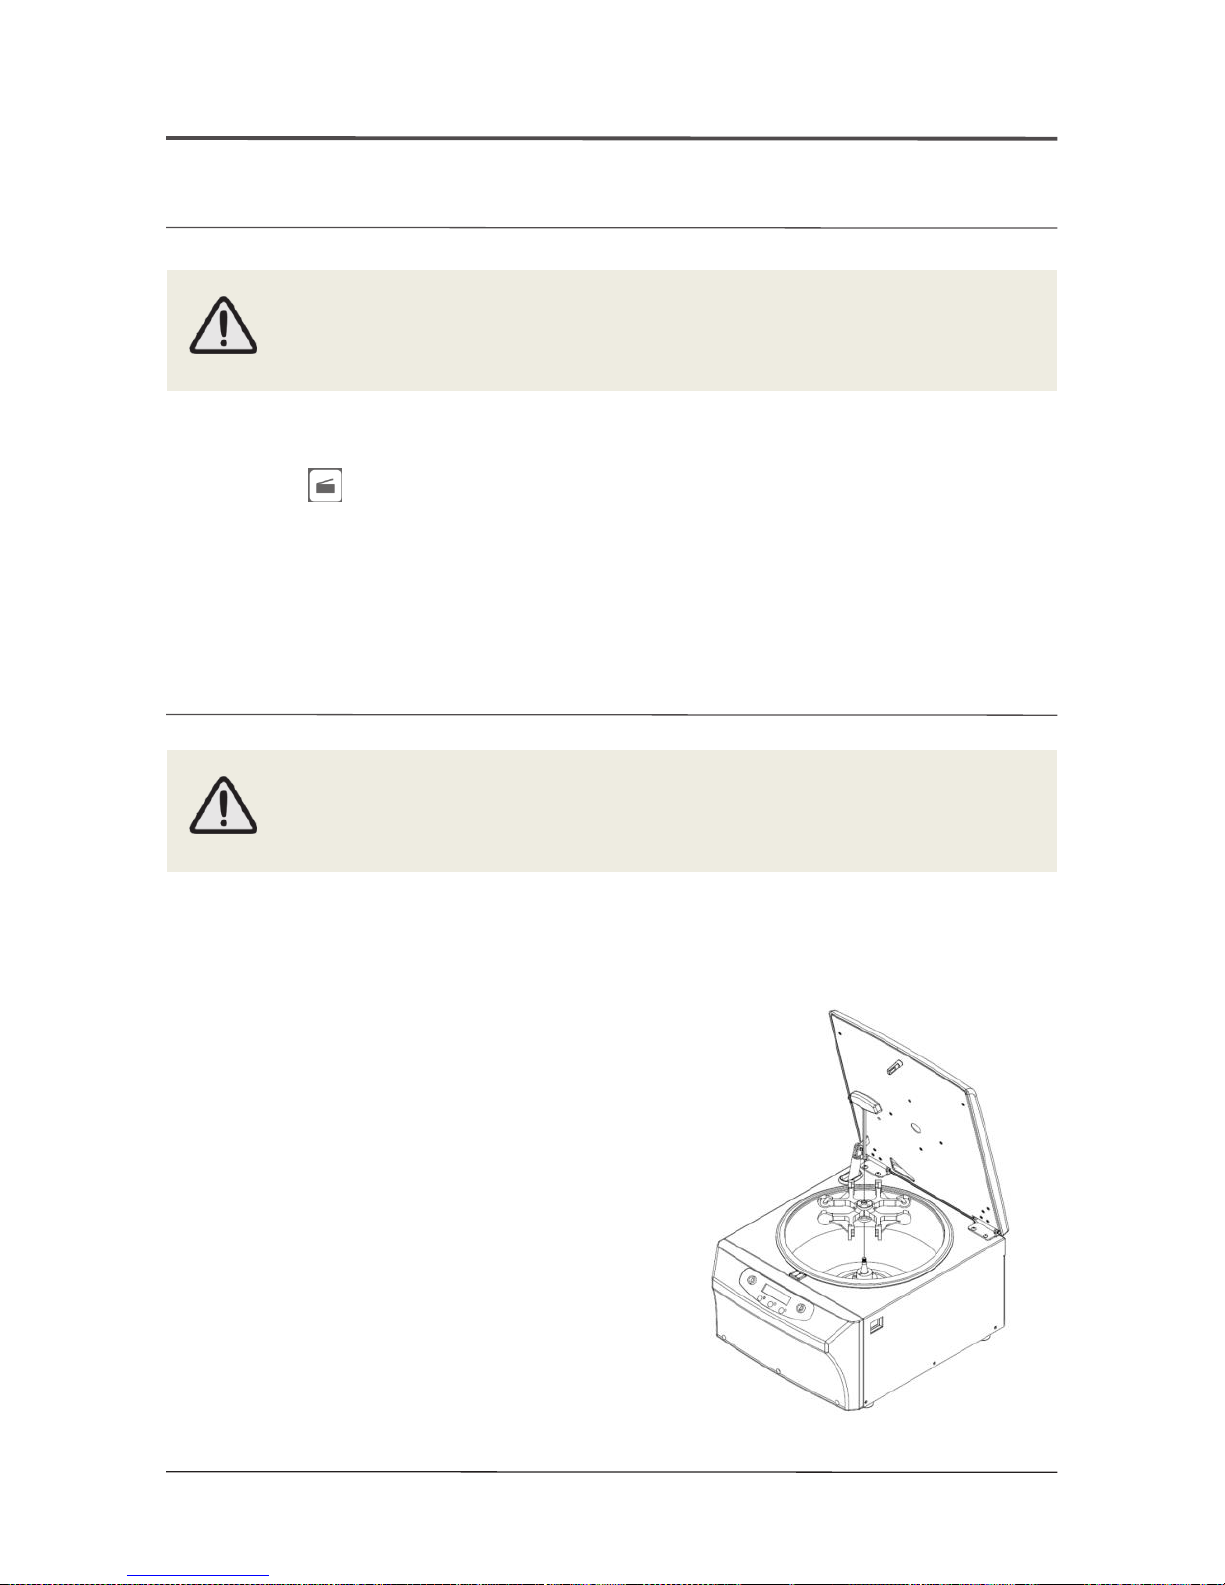
Loading
① Clean the motor shaft and the chamber.
- When loading the rotor, the temperature should be 10 to 30 degrees.
② Load the rotor vertically onto the motor shaft.
③ Insert the wrench into the center hole of the rotor
and turn it clockwise.
④ Check the rotor to make sure it loaded firmly.
Unloading
① To remove the rotor
insert the wrench into the center hole of the rotor
and turn it counterclockwise.
Page 13
4. Operation
4.4 Loading tubes
• Only use tubes provided or approved by Hanil Scientific Inc.
• Always use the same type of tube.
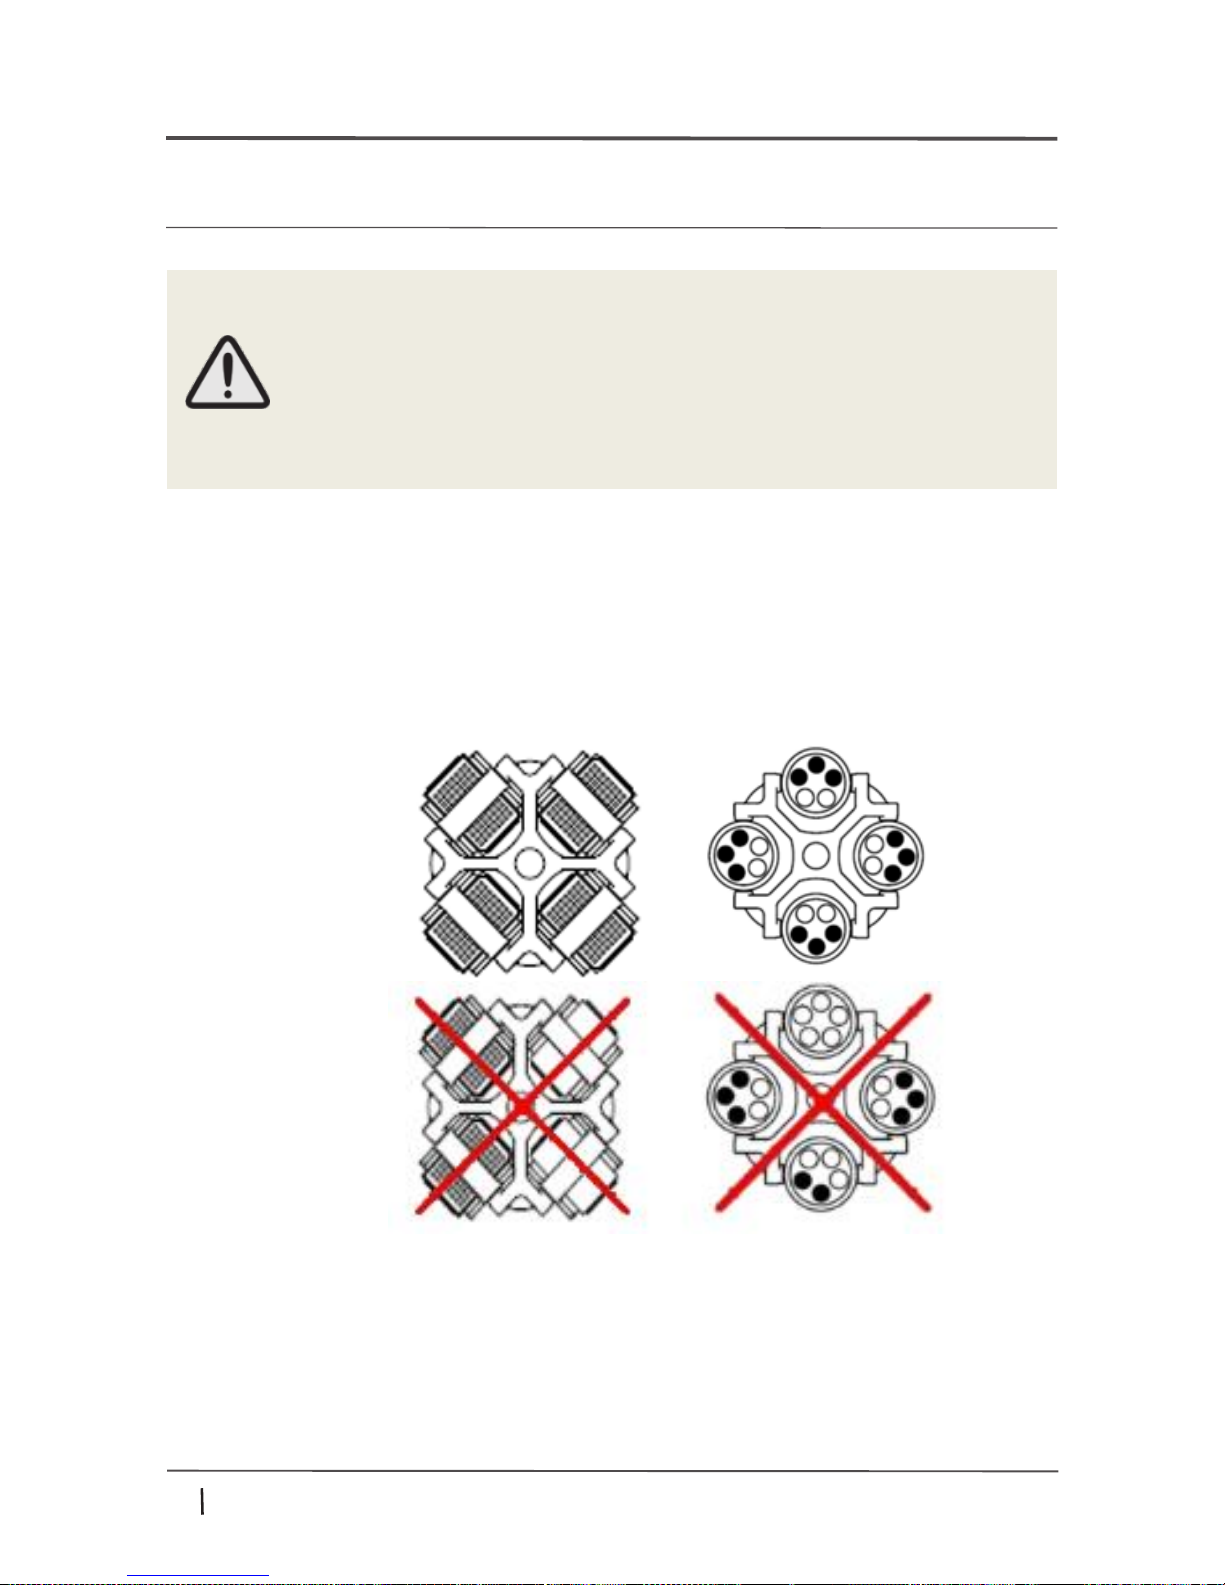
• Tubes should be loaded symmetrically.
• Do not exceed the maximum rated speed of the tube.
• Same volume of sample should be put on tubes.
• Check symmetric loading by balncing tubes with scales.
① Check the maximum load for each tube.
② Put tubes into rotor holes.
③ Tubes located opposite each other must be the same type and contain the same quantity.
Correct arrangement
Wrong arrangement
12
www.ihanil.com
Page 14

4. Operation
4.5 Setting RPM/RCF
① Press the Mode ( ) button in stand-by mode.
②Press the Enter ( ) button to set RPM.
▶ Press the Enter button once more to set RCF.
- RPM mode: RPM flickering
- RCFmode: RCF flickering
③ Turn the Enter ( ) button to the left or right to input the value.
④ Press the Enter ( ) button to save the value.
⑤ Do you save? [Yes] [No]
▶ Turn Mode button to select Yes or No
⑥ Press the Enter ( ) button to finish setting.
4.6 Setting run time
① Press the Enter ( ) button in stand-by mode.
② Turn the Mode ( ) button to move the cursor to ‘Time’.
③ Turn the Enter ( ) button to the left or right to input the value.
④ Press the Enter ( ) button to finish setting.
Page 15

③ Press the Enter ( ) button in stand-by mode.
4. Operation
4.7 Acc/Dec setting
① Press the Enter ( ) button in stand-by mode.
② Turn the Mode ( ) button to move the cursor to ‘ACC’ or ‘DEC’.
③ Turn the Enter ( ) button to the left or right to input the value.
④ Press the Enter ( ) button to finish setting.
▶ 0~9 Steps, 0 step is the lowest step, 9 step is the fastest step.
▶ Recommend accel/decal 5 step.
4.8 Radius input
① When the lid is closed, the rotor is recognized automatically.
② After recognizing the rotor, the radius is automatically set.
④ Turn the Enter ( ) button to the left or right to input the value.
⑤ Press the Enter ( ) button to finish setting.
4.9 Start the centrifugation run
4.10 End the centrifugation
① Check the all parameters are correct and the lid is closed.
② Press Start ( ) button.
① Press Stop( ) button to abort centrifugation.
14
www.ihanil.com
Page 16

4. Operation
4.11 Saving / Recall a program
① Set the centrifugation time/speed/Accel/Decel values.
② Press Enter ( ) button.
③ Turn Enter ( ) button to set Program No.
④ Turn Move ( ) button to select [YES]
⑤ Press Enter ( ) button to save a program.
Saving a program
Recall a programs
① Turn Enter ( ) button to select Program No.
Page 17

5. Maintenance
5.1 Care instructions
• The following procedures should be performed regularly.
①Regularly inspect the rotor chamber for check the motor shaft is nomal.
②Rotate the shaft with your hand to make sure it turns smoothly
③Use the stopwatch to check that the time setting is correct
• Oustside of the device
①Clean the outside of equipment with a soft and dry cloth.
②Do not use aggressive chemicals on the device such as alchol, benzene, acetone
or phenol.
③Use the stopwatch to check that the time setting is correct
▶If the device is contaminated, use a mild cleaning fluid to clean.
④Make sure do not scratch the surface of equipment when cleaning it.
▶Do not use a metal sponge.
▶If the device is rusted, remove it with a mild detergent and wipe it with a dry cloth.
• Chamber
①If the rotor chamber is not dry, wipe moisture from the chamber with a dry cloth.
②If the rotor chamber is dirty, wipe moisture from the chamber with a dry cloth.
• Rotor
①To prevent corrosion, take out the rotor from the rotor chamber.
②If any sample is spilt inside the rotor, wash and dry the rotor well.
• Disposal
In case of product is to be disposed of, the local wastes laws and regulations are
to be observed.
5.2 Cleaning
• Before cleaning the centrifuge, be sure to switch off the device and
disconnect the power cord.
16
www.ihanil.com
Page 18

6. Troubleshooting
6.1 General errors
Problem Recommended Action
Power failure
Check the power cord connection.
Check the power fuse of the device.
Device cannot be started Check the lid is closed completely.
Lid cannot be opened Press the ‘Lid open button’.
Lid cannot be closed
Remove the dirt at the door latch and
close the lid.
Checkthe lid latch is not damaged.
Unusual noise and vibration
Check the device whether it is installed
on the hard and flat place
Reload the rotor symmetrically.
Reload the tubes symmetrically.
Tighten the clamping of the rotor with
wrench by turning clockwise
Page 19

* If none of these solutions work, please send an email to [email protected].
Error
Not open lid
No display
None
- No power connection.
- Check the power cable.
- Check the main fuse
in laboratory and device
Display
- Failure of power supply
Cause
Solution
Unknow Rotor ID!
- No rotor
- Load a rotor.
- Turn off the main power and
turn on again.
- Remove foreign matter from
the rotor or sensor.
- Errors in drive or rotor
recognition function.
- Foreign substances in
the rotor or sensor.
No running
None -Fauiure of power supply
- Stop the running and open
the lid by emergency key.
Not close the lid
perfectly.
To close the door
- No working lid pin
- Lid is not closed tightly.
- Press the Door button to open
the lid and then close it again.
- Turn off the main power and
turn on again.
** Imbalance
Error! **
During
Acceleration,
the device
vibrates and
switch off.
- Not load symmetrically
- Not tighten the rotor with shaft
- The device is placed uneven place
- Check the rotor and samples
- Tighten the rotor properly.
- Place the device on flat place
Failure of power ** Power
Failure! **
- Failure of power supply - Check a outlet
** Motor
Overheat! **
- Motor over heat - Stop the centrifugation and
lower the temperature
** Over Speed! **
- Run above 105% of the set spped - Stop and run again
Etc.
18
www.ihanil.com
6. Troubleshooting
6.2 Error code
Page 20
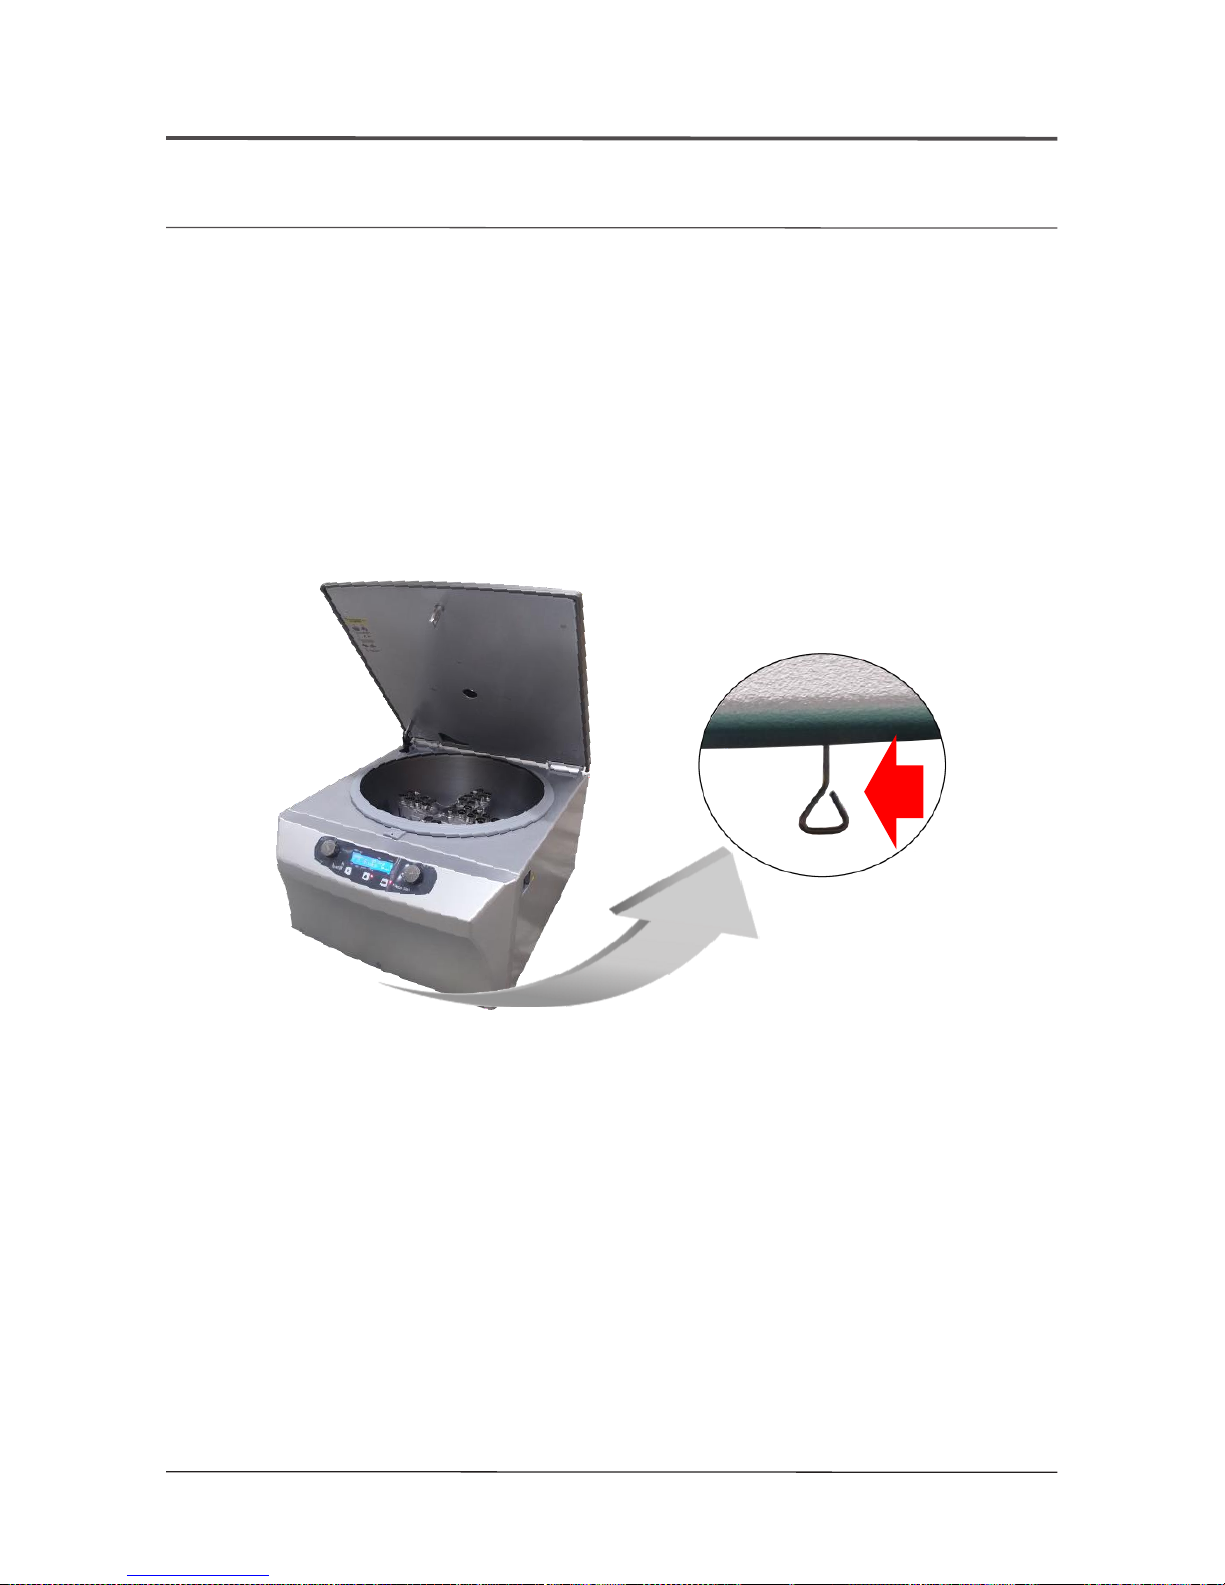
In the event of a power failure or the centrifuge lid cannot be opened,
active the emergency release.
6. Troubleshooting
6.3 Emergency lid release
① Turn off the power switch.
② Wait for the rotor to stop completely.
③ Find the “emergency release key” at the bottom the decvice.
④ Pull down the “emergency release key” and the door will open.
Page 21
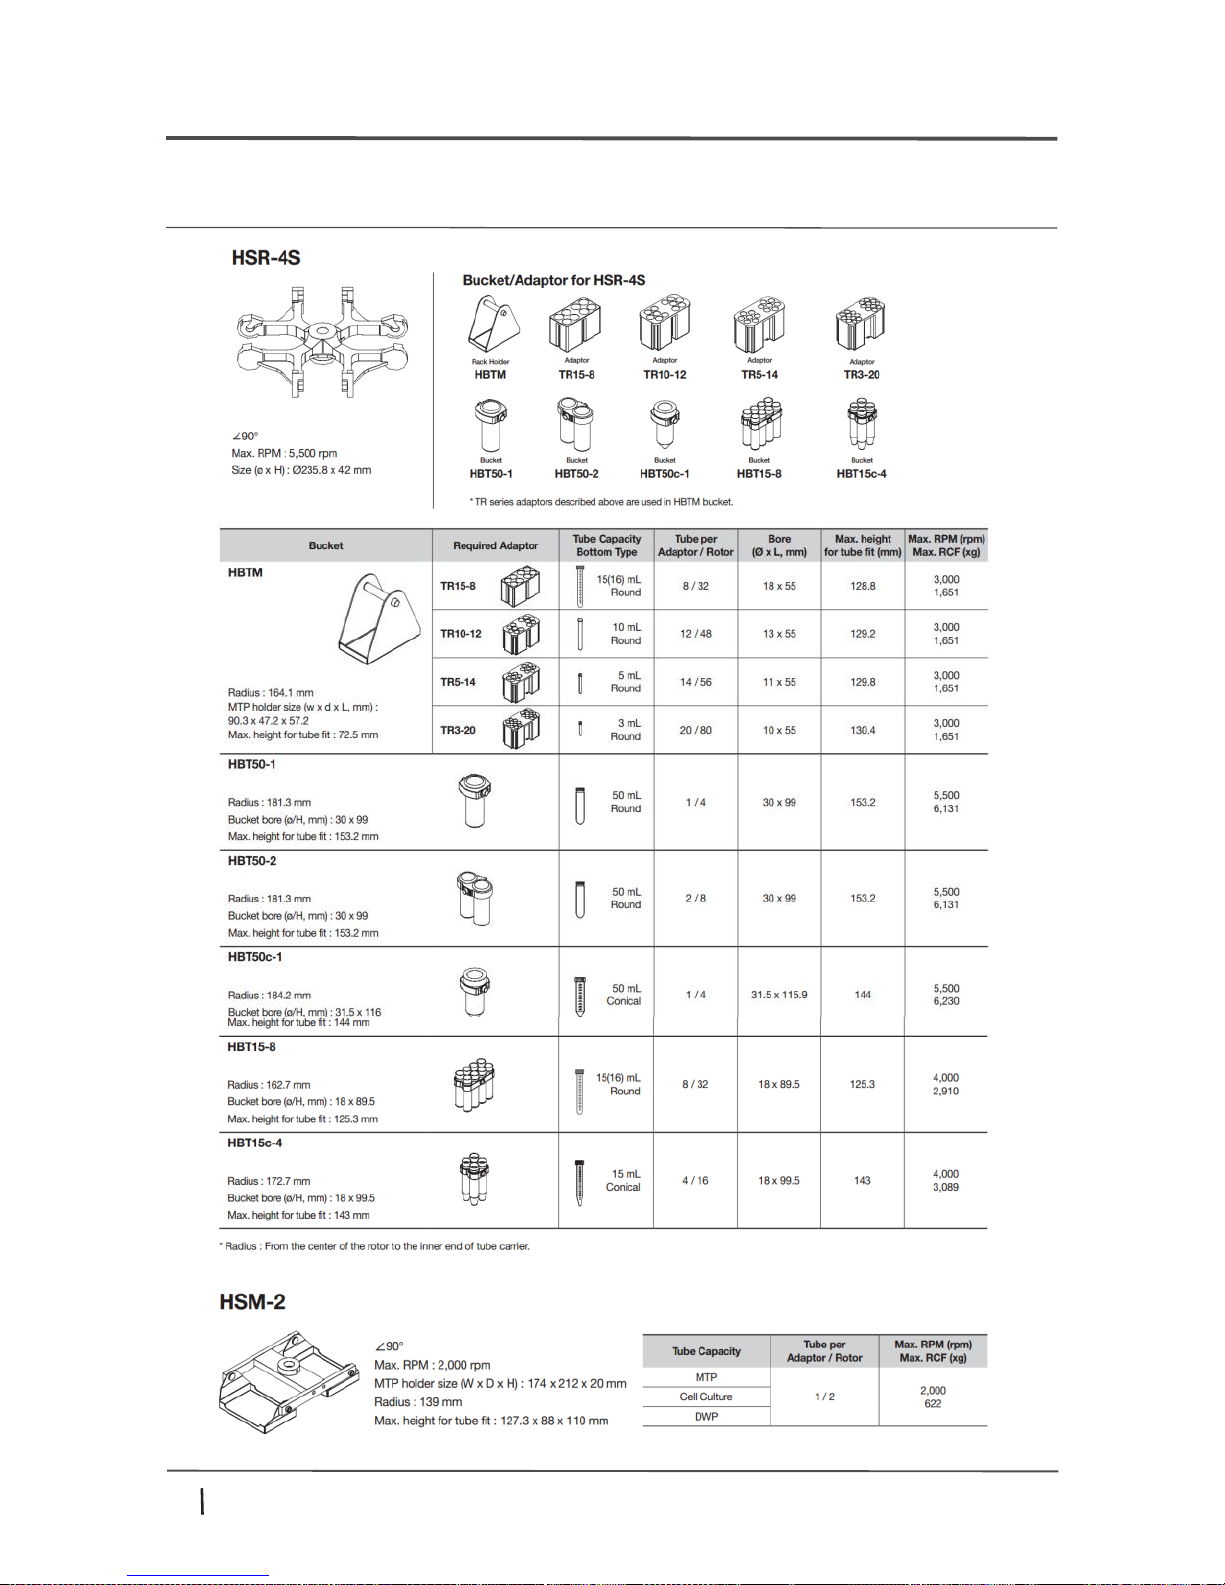
7. Rotor
7.1 Rotors and adaptors
20
www.ihanil.com
Page 22

Hanil Scientific Inc.
16 Arayukro, Gimpo 10136, Rep. of KOREA
T. 02-3452-8965
www.ihanil.com
 Loading...