

Page 1

INSTRUCTION BOOK & GUARANTEE
DELTA E 200
SPECTRON
Page 2

BEDIENUNGSANLEITUNG & GARANTIE 1
Elektronische Stoppuhren
DELTA E 200, SPECTRON
INSTRUCTION BOOK & GUARANTEE 11
Electronical stopwatches
DELTA E 200, SPECTRON
MODE D‘EMPLOI & GARANTIE 21
Chronomètre compteur
DELTA E 200, SPECTRON
ISTRUZIONI PER L'USO E GARANZIA 31
Orologio contaminuti
DELTA E 200, SPECTRON
Hanhart-Garantie: 3 (drei) Jahre
Sollten sich innerhalb dieser Zeit Mängel ergeben, die auf Fabrikationsfehler oder schlechtes Material zurückzuführen sind, so wird unter Vorlage dieses Garantie scheines kostenlose Instandsetzung oder Umtausch
vorgenommen. Fehler infolge falscher Behandlung sowie Schäden,
die durch ausgelaufene Batterien entstanden sind, sowie die Batterien
selbst, fallen nicht unter die Garantie.
Hanhart-guarantee: 3 (three) years
If this stopwatch should become defective within this period you are
entitled to get it repaired or exchanged free of charge.Defects resulting
from abuse of the stop watch are not covered by this guarantee: for
instance, if contact springs are corroded by batteries which have leaked.
Batter ies are not covered by this guarantee.
Hanhart-garantie: 3 (trois) ans
Si un défaut apparaissait durant cette période, nous échangerions ou
réparerions ce compteur gratuitement. Cette promesse de garantie ne
couvre pas les dégradations causées par un emploi abusif: par exemple,
si les ressorts de contact sont corrodés par des piles ayant coulé. Les
piles ne sont pas couvertes par cette garantie.
Hanhart-garanzia: 3 (tre) anni
Se entro tale periodo dovessero verificarsi difetti di tal genere ci
caricheremo dell‘o nere di riparare o sostituire gratuitamente il contasecondi ad eccezione delle spese di tras porto. La presente garanzia
non copre i guasti causati da manomissione o da uso non corretto dello
strumento. La presente garanzia non riguarda lo pile.
Datum / Date / Date / Data:
Verkäufer / Vendor / Vendeur / Venditore:
Page 3
Technische Daten
Temperaturbereich
im Einsatz: -15° C bis +55° C
bei Lagerung: -25° C bis +65° C
Batterie
Typ: Micro-Zelle AAA
Kapazität: ca. 5 - 6 Jahre
Indiktor: im Display als Batteriesymbol, danach ist noch für 3
Monate Gangreserve vorhanden
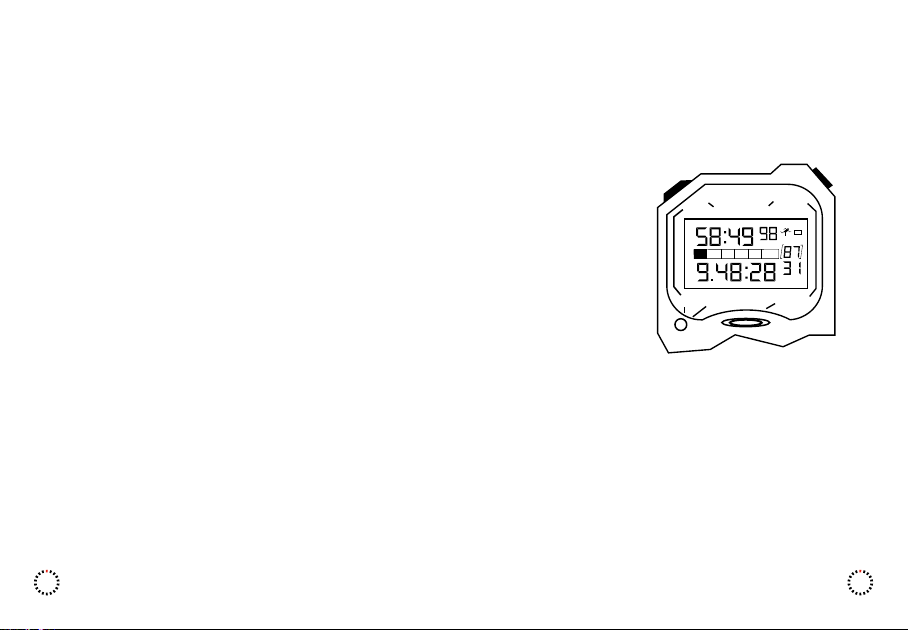
Display
15 Digit, 7mm Ziffernhöhe
Fenster für Funktionsanzeige und Batteriesymbol
Split 9 h, 59 min, 59 sek, 99/100 = 7 Digit untere Reihe
Lap 59 min, 59 sek, 99/100 = 6 Digit obere Reihe
Event-Count max. 99 = 2 Digit mittlere Reihe
Zusätzlich bei DELTA E 200:
Pacer 1 bis 300 Signale/min = 3 Digit obere Reihe
Count-Down 59 min, 59 sek, 9/10 = 5 Digit obere Reihe
Zusätzlich bei SPECTRON:
Count-Down 59 min, 59 sek, 9/10 = 5 Digit obere Reihe
oder 9999 min, 99/100 min = 5 Digit obere Reihe
Gehäuse hochwertiges ABS, wasserdicht nach DIN 8310
Gewicht 85g
Genauigkeit +/- 7 sek / Monat
Zeitauflösung DELTA E 200 1/100 sek
SPECTRON 1/100 sek + 1/100 min
1
Speicher: 65
Funktionen
Start/Stop, Split/Lap, Short/Lap, Time, Memoryabruf
mit Schnelllauf und Auswertung der kürzesten und
längsten LAP-Zeit, CD (Count-Down),
Zusätzlich bei DELTA E200: Pacer
Zusätzlich bei SPECTRON: umschaltbare Zeitauflösung
Tasten 4
START/STOP,
SPLIT/LAP,
MEM/SET/DISP,
MODE
Batterie einlegen bzw. wechseln
Rückwand öffnen (7 Schrauben)
Neue Batterie einsetzen, dabei auf Polung achten! Nach einem Batteriewechsel muss das Datum und die Uhrzeit neu gesetzt werden.
Legende zu verschiedenen Fachausdrücken
SPLIT: Ist die fortschreitende Zeit nach jedem Messpunkt.
Die letzte Splitzeit ist gleichzeitig auch die Gesamtzeit.
LAP: Sind Differenzzeiten vom vorhergehenden zum aktuel len Messpunkt, auch Rundenzeiten genannt.
SHORT: Ist die kleinste gemessene Lapzeit.
CD: Count-Down (Abwärtslaufende Zeit)
PACER: Schrittgeber (Akustische Signale pro Minute)
Memory: Zeiten im Speicher
SPLIT
LAP
SPLIT - SET
PAC CD DAT TIME S-LAP
SET FAS T MODE RESET
DISP
MEM
SHORT
START
STOP
M-OUT
SPLIT
2
Page 4

Mögliche Funktionen mit Suchindex (a-i)
a) Reset der Stoppuhr
b) Mode (Funktion) wechseln
c) Zeiten messen
d) Event-Counter
e) Vorsetzen der Splitzeit
f) Speicherabruf mit Schnelllauf und Auswertung
g) Count-Down
h) Pacer E 200
i) Setzen von Uhrzeit , Datum, CD, Pacer und Zeitauflösung
a) RESET der Uhr
Durch gemeinsames Drücken der Tasten START/STOP und MODE.
Dabei werden alle Zeiten und der Memory-Speicher gelöscht. Uhrzeit
und Datum bleiben erhalten.
Die Anzeige im Funktionsfenster steht danach auf LAP.
b) MODE (Wechsel der Funktionen):
Das Drücken der MODE-Taste bewirkt ein Funktionswechsel mit der
Bestätigung im Funktionsfenster z. B. von
E 200 LAP ➤ S-LAP ➤ TIME ➤ DATE ➤ CD ➤ PACER
und wieder zurück nach LAP
Spectron LAP ➤ S-LAP ➤ TIME ➤ DATE ➤ CD ➤ leer
und wieder zurück nach LAP
Entsprechende Zeiten/Daten werden in der oberen Displayreihe
angezeigt:
LAP: Lapzeit 6 Digit
S-LAP: Lap oder Shortzeit 6 Digit
TIME: Uhrzeit: 23:45,59
DATE: Datum (Europa) 01.01.08 (01. Jan. 2008)
(USA) 01.01.08 (01. Jan. 2008)
3
zusätzlich bei DELTA E 200
PACER: Signale/min 3 Digit
50 ms Auflösung
CD: Count-Down 5 Digit
1/10 sek-Auflösung
zusätzlich bei SPECTRON:
CD: Count-Down 5 Digit
1/10 sek-Auflösung
LEER: Umschalten min/sek
In der unteren Displayreihe wird prinzipiell die Splitzeit angezeigt.
Speziell zu LAP, S-LAP und TIME
Ist die Uhr einmal gestartet worden, kann während der Zeitnahme
nur noch innerhalb dieser drei Funktionen gewählt werden.
Speziell zu CD
Nach einem Start ist kein Mode-Wechsel mehr möglich.
Eine vollwertige Zeitmessung mit START/STOP und SPLIT/LAP ist
aber trotzdem möglich (siehe Funktion CD).
Speziell zu PACER
Nach einem Start ist kein Mode-Wechsel mehr möglich.
Die Gesamtzeit wird erfasst und die Start/Stop-Funktion bleibt
erhalten (siehe Funktion PACER).
c) Zeit messen
- Die MODE-Taste selektiert die Funktionen LAP, S-LAP und TIME.
- Mit Hilfe der Taste START/STOP wird die Uhr gestartet. Die Messzeit
läuft sichtbar an. Das Symbol XXX bestätigt diesen Zustand. Bei
einem nochmaligen Drücken von START/STOP wird die Uhr wieder
angehalten. Dieser Rhythmus kann beliebig oft wiederholt werden.
- Die Taste SPLIT/LAP veranlasst die Speicherung der momentanen
Split- und Lapzeit. Die Zeitanzeige bleibt scheinbar stehen. Dies dient
zur besseren Erkennung und Ablesung der gemessenen Zeit.
Wünschen Sie nach SPLIT/ LAP wieder eine sichtbar laufende
Anzeige, tippen Sie kurz die Taste DISP/MEM.
4
Page 5

- S-LAP als Zusatzfunktion:
Nach einer Zeitnahme mit der Taste SPLIT/LAP steht in der oberen
Anzeige abwechselnd im 2Hz-Rhythmus die aktuelle Lapzeit oder die
bisher kürzeste Lapzeit mit dem Zusatz SHORT in der Anzeige.
d) Event-Counter (zweistellig in Klammer):
- Zeigt die Anzahl der Betätigungen von Taste SPLIT/LAP (max 99).
- Beim Speicherabruf wird die entsprechende Speicher nummer
angezeigt.
e) Vorsetzen von Splitzeit
Gleichzeitiges Drücken von START/STOP und SPLIT/LAP: bei dieser
Funktion wird die momentane Uhrzeit, aufgerundet zur nächsten
vollen Minute, in den Splitcounter übertragen. Nach Betätigen von
START/STOP beginnt die Messzeit mit der vorgesetzten Uhrzeit. Sinn
dieser Eigenschaft ist die Synchronisation der Splitzeit mit einer
Hauptuhr. Ein Abstoppen der Stoppuhr ist in dieser Situation aus
Gründen einer Desynchronisation nicht mehr möglich. Es bleibt nur
noch die SPLIT/LAP-Taste wirksam. Das Vorsetzen ist auf die
Funktionen LAP, S-LAP und TIME beschränkt.
f) Speicherabruf
- Es kann jederzeit während einer Zeitmessung mit Hilfe der Taste
DISP/MEM ein Speicherabruf erfolgen.
Die ersten 64 Speicherplätze sind den ersten 64 Zeiten zugeordnet.
Im letzten (65.) Speicherplatz befindet sich immer die zuletzt
gemessene Zeit, sofern mehr Zeiten gestoppt wurden, als Speicher
vorhanden sind.
- Ablauf:
Taste DISP/MEM drücken und festhalten. Die Speicherzeit wird so
lange angezeigt, wie die Taste gedrückt ist. Während dieser Phase
steht im Display der Zusatz M-OUT und direkt darunter die Speicher nummer. Beim zweiten Drücken von DISP/MEM erfolgt die Ausgabe
der nächsten Speicherzeit, usw. Entspricht die angezeigte Lapzeit der
kürzesten Lap zeit erscheint im Display außerden das Symbol SHORT.
Zusätzlich hören Sie ein akustisches Signal für die kürzeste Lapzeit
mit der Folge: 100 ms Signalton 400 ms Pause.
Entspricht die angezeigte Lapzeit der längsten Lapzeit, hören Sie ein
akustisches Signal mit der Folge: 400 ms Signalton 100 ms Pause
- Schnellsuchlauf (gilt für alle Versionen):
Zuerst drücken und festhalten der Taste DISP/MEM mit zusätz licher Betätigung der MODE-Taste veranlasst einen Schnelllauf der
gemessenen Zeiten durch den Speicher. Beim Auffinden der
kürzesten oder der längsten Lapzeit wird der Suchlauf für einen
kurzen Moment unterbrochen.
Bei Wiedererreichen des 1. Memoryspeichers ist der Schnell suchlauf
zu Ende. Ein kurzes Loslassen und wieder Betätigen der MODE-Taste
veranlasst einen weiteren Suchlauf.
g) Count-Down (Count-Down mit Auto-Repeat)
- Die CD-Funktion mittels der MODE-Taste selektieren.
- Vor dem Erststart muß eine CD-Zeit vorgesetzt werden.
- Obwohl im Display nur die CD-Funktion bestätigt wird, stehen Ihnen
auch die Split- und Lapzeitmessung zur Verfügung.
- Mittels der Taste START/STOP wird die Uhr gestartet. Die Splitzeit
und der Count-Down laufen sichtbar an. Das Symbol XXX bestätigt
diesen Zustand. Bei nochmaligem Drücken von START/STOP wird die
Split- und Count-Down-Zeit angehalten. Diese Funktion kann beliebig
oft wiederholt werden.
- Mit der Taste SPLIT/LAP wird die Speicherung der momentanen Split
und Lapzeit veranlasst. Die Splitzeitanzeige bleibt scheinbar stehen.
Dies dient zur besseren Erkennung und Ablesung. Der Count-Down
(obere Anzeige) ist immer im laufenden Zustand (außer nach
STOP-Taste).
- Ist der CD auf den Wert 0 abgelaufen, ertönt für 2 Sek. ein akusti sches Signal. Der Ablauf beginnt sofort und automatisch wieder beim
ursprünglich gesetzten Wert (Auto Repeat).
- Die Lap- mit der zugehörigen Splitzeit kann über den Speicherabruf
(siehe unten) ausgelesen werden.
5
6
Page 6

h) Pacer (nur bei DELTA E200):
1-300 Signale/min (Zeitgeber mit 50 ms-Genauigkeit)
- Die Pacer-Funktion mittels der MODE-Taste selektieren
- Vor dem Erststart muss eine Schlagzahl vorgegeben werden (1 - 300).
- Mit der Taste START/STOP wird die Uhr gestartet. Die Splitzeit läuft
sichtbar an. Das Symbol XXX bestätigt diesen Zustand. Bei noch maligem Drücken von START/STOP wird die Splitzeit wieder an gehalten. Dieser Rhythmus kann beliebig oft wiederholt werden.
- Eine Erhöhung zur nächst möglichen Schlagzahl während der
Zeitmessung geschieht mit Hilfe der SPLIT/LAP-Taste.
- Der Begriff „nächst mögliche Schlagzahl" ist weiter unten unter der
Rubrik Setzen von Pacer, näher erläutert.
i) Setzen von Uhrzeit , Datum, CD, Pacer und Zeitauflösung
Prinzipiell ist das Setzen nur nach einem Reset möglich
- Reset der Uhr
- Uhrzeit und Datum können (müssen aber nicht) gesetzt werden. Das
Symbol SET erscheint deshalb nur auf besonderen Befehl zum
Setzen (SET-Taste).
- CD und PACER müssen vor Startbeginn gesetzt werden. Das Symbol
SET ist als Hinweis zum Setzen sofort aktiviert.
Uhrzeit einstellen 4 Digit: hh:mm
- Mit MODE-Taste auf TIME-Funktion gehen.
- Taste SET aktiviert den Set-Vorgang mit dem Symbol SET im Display.
- Weiteres Betätigen von Taste SET selektiert das zu setzende Digit,
welches blinkend dargestellt wird.
- Taste SPLIT/LAP erhöht das blinkende Digit (0 - 5 oder 0 – 9).
- Sekunden können nicht gesetzt werden. Zum Synchronisieren die
Minuten beim Setzen aufrunden und anschließend warten, bis die
Vergleichsuhr die vorgegebene Minute erreicht hat.
- Taste MODE verlässt den Set-Zustand, ohne Weiterschalten zum
nächsten MODE
7
Datum einstellen
6 Digit: Europa Version: tt, mm, jj
USA Version: mm, dd, yy
- Mit MODE-Taste auf DATE-Funktion
- Taste SET aktiviert den Set-Vorgang mit dem Symbol SET im Display
- Weiteres Betätigen von Taste SET selektiert das zu setzende Digit,
welches blinkend dargestellt wird.
- Taste SPLIT erhöht das blinkende Digit (0 - 5 oder 0 – 9).
- Taste MODE verlässt den Set-Zustand ohne Weiterschalten zum
nächsten MODE.
Zusätzlicher Setzvorgang
CD einstellen 5 Digit: mm, ss, 1/10 sek
- Mit MODE-Taste auf CD-Funktion.
- Das Symbol SET ist bereits aktiviert.
- Betätigen von Taste SET selektiert das zu setzende Digit, welches
blinkend dargestellt wird.
- Taste SPLIT erhöht das blinkende Digit (0 - 5 oder 0 – 9).
- Taste MODE verlässt den Set-Zustand, ohne Weiterschalten zum
nächsten MODE.
PACER einstellen 3 Digit: 1-300 Schläge/min
(50 ms Genauigkeit)
- Mit MODE-Taste auf PACER-Funktion.
- Das Symbol SET ist bereits aktiviert.
- Betätigen von Taste SET selektiert das zu setzende Digit, welches
blinkend dargestellt wird.
- Taste SPLIT erhöht das blinkende Digit (0 - 5 oder 0 - 9).
- Interpolation: Ist bei der Eingabe ein Wert verwendet worden,
welcher mathematisch nicht auflösbar ist, so wird der angezeigte
Wert nach Beenden mit der MODE-Taste zum nächstmöglichen Wert
auf- oder abgerundet.
Beispiel: Sie haben 72 Schläge/min eingegeben. Dies würde eine
Signalfolge von 0,8333 sek bedeuten. Leider lässt sich diese Folge in
der gewünschten Genauigkeit nicht realisieren. Die Automatik findet
den nächst machbaren Wert bei 0,85 sek. Dies entspricht dann 70
Schläge/min.
- Taste MODE verlässt den Set-Zustand, ohne Weiterschalten zum
nächsten MODE. In der Anzeige ist der reell machbare Wert sichtbar.
8
Page 7
Anbei eine Umbelegungstabelle, welche darstellt, wie der Eingabe wert zu einem machbaren Wert interpoliert wird. Die Genauigkeit
liegt bei +/- 25 ms.
Eingabe Ist Eingabe Ist Eingabe Ist
1-36 1:1 54, 55 54 97-104 100
37 38 56-58 57 105-115 110
38-41 1:1 59-61 60 116-127 120
42, 43 42 62-64 63 128-139 135
44, 45 44 65-68 66 140-159 150
46, 47 46 69-73 70 160-190 175
48, 49 48 74-78 75 191-219 200
50, 51 50 83-88 85 220-268 240
52, 53 52 89-96 92 269-300 300
Exakt richtige Zeiten ohne Toleranzen liefern die Werte:
1, 2, 3, 4, 5, 6, 8
10, 12, 15, 16
20, 24, 25
30, 40, 50, 60, 75, 80
100, 120, 150
200, 240, 300
SPECTRON
Auflösung 1/100 min oder 1/100 sek
- Mit der MODE-Taste, bis das Funktionsfeld leer ist
- Das Symbol SET ist aktiviert
- Mit der Taste SET wird die Zeiteinheit umgeschaltet, siehe
nachfolgende Kontrollanzeige im oberen Display:
59:59 = Sek-Auflösung (mit Trennpunkte)
9999 = Min-Auflösung (ohne Trennpunkte]
- Ein kurzer Druck auf die Taste MODE bewirkt ein Verlassen des
Set-Zustandes
Verbraucher sind gesetzlich verpflichtet Altbatterien zu
einer geeigneten Sammelstelle/ Verkaufsstelle/ Versandlager zu bringen. Die durchgestrichene Mülltonne bedeutet: Batterien und Akkus dürfen nicht in den Hausmüll.
Pb, Cd und Hg bezeichnet Inhaltsstoffe die oberhalb der
gesetzlichen Werte liegen.
9
10
Page 8

Technical Data
Temperature range
In use: -15° C to +55° C
In storage: -25° C to +65° C
Battery
Type: Micro cell AAA
Capacity: About 5 - 6 years
Indicator: When the battery symbol appears in the display, there
is sufficient power for approximately another 3 months
Display
15 digits, 7mm digit-height
A window for functions indicator and battery indicator
Split 9 h, 59 min, 59 sec, 99/100 = 7 digits lower row
Lap 59 min, 59 sec, 99/100 = 6 digits upper row
Event-Count max. 99 = 2 digits middle row
Additionally on DELTA E 200:
Pacer 1 to 300 tones/min = 3 digits upper row
Count-Down 59 min, 59 sec, 9/10 = 5 digits upper row
Additionally on SPECTRON:
Count-Down 59 min, 59 sec, 9/10 = 5 digits upper row
or 9999 min, 99/100 min = 5 digits upper row
Case made of ABS, water resistant ace. to DIN 8310
Weight 85g
Accuracy +/- 7 sec / month
Measuring units
DELTA E 200 1/100 sec
SPECTRON 1/100 sec + 1/100 min
11
Memories 65
Functions
Start/Stop, Split/Lap, Short/Lap, Time, Memory-Recall
with evaluation of the shortest and longest LAP Time,
CD (Count-Down),
Additionally for DELTA E200: Pacer
Additionally for SPECTRON: Selectable time measuring
units
SHORT
START
STOP
M-OUT
SPLIT
12
Keys 4
START/STOP,
SPLIT/LAP,
MEM/SET/DISP,
MODE
Changing the battery
Remove the back of the case (7 screws).
Install the new battery, observing the correct polarity! After changing a
battery, the date and time must be inserted again.
Legend explaining the various technical terms
SPLIT: Is the time accumulated after each point in time.
The last Split Time is also the total time.
LAP: Is the difference in time between the previous point in
time measured and the current time.
SHORT: Is the shortest Lap Time measured.
CD: Count-Down (counting down from the highest value)
PACER: Pace-setter (the number of tones per minute)
Memory: The time values in the memory.
SPLIT
LAP
SPLIT - SET
PAC CD DAT TIME S-LAP
SET FAS T MODE RESET
DISP
MEM
Page 9

Available functions with search-index (a-i)
a) Resetting of the stop watch
b) Changing the MODE (function)
c) Measurement of time periods
d) Event-Counter
e) Pre-setting of the Split-Time
f) Memory Recall with Quick Recall and evaluation
g) Countdown
h) Pacer E 200
i) Setting of the time, date, CD, Pacer and measuring units
a) Resetting the watch
By pressing the START/STOP and MODE keys at the same time, all
times and values are erased from the memory. Date and Time of Day
remain in memory. The display in the function window then shows
LAP.
b) MODE (Changing functions):
By pressing the MODE key, the functions will be changed in the
versions indicated in the following sequences:
E 200 LAP ➤ S-LAP ➤ TIME ➤ DATE ➤ CD ➤ PACER
and back to LAP
Spectron LAP ➤ S-LAP ➤ TIME ➤ DATE ➤ CD ➤ empty
and back to LAP
The active function is indicated in the function window. The times and
values corresponding to these functions are shown in the upper row
of the display, as follows:
LAP: Lap Time 6 digits
S-LAP: Lap or Short Time 6 digits
TIME: Time of day: 23:45,59
DATE: Date (Europe) 01.01.08 (01. Jan. 2008)
(USA) 01.01.08 (01. Jan. 2008)
13
Additionally for DELTA E 200
PACER: signals/min 3 digits
50 ms accuracy
CD: Countdown 5 digits
1/10 sec-accuracy
Additionally for SPECTRON:
CD: Countdown 5 digits
1/10 sec-accuracy
LEER: Switch min/sec
Normally, the Split Time is shown in the lower row of the display.
A note on LAP, S-LAP und TIME
Once the watch has been started and the time is being measured, a
selection can be made only from among these three functions.
A note on Countdown
After a start, it is not possible to change the Mode. However, virtually
the same time measurement can be completed with START/STOP and
SPLIT/LAP (see CD function).
A note on PACER
After a start, it is not possible to change the Mode. However, the total
time is measured and the START/STOP function remains operative
(see Pacer function).
c) Measuring times
- Select the one of the function LAP, S-LAP or TIME by means of the
MODE key.
- The stopwatch starts by means of the START/STOP key. Time measu rement begins and is visible while in operation. The figure
(a running man) indicates this condition.
By pressing the START/STOP key again, Split Time and Countdown
stop. This sequence can be repeated as often as desired.
- By pressing the SPLIT/LAP key, the Split Time and Lap Time values
will be stored in memory at that moment.
14
Page 10

- The Split Time indicator seems to have stopped. This, however, is only
to facilitate reading the time measured. If a current and visible
reading is desired, quickly press the DISP/MEM key after pressing
SPLIT/LAP.
- S-LAP as an additional function:
After recalling the time with the SPLIT/LAP key, the current Lap Time
will appear in the upper area of the display, alternating at the rate of
2 cycles with the shortest Lap Time up to that point, which is indi cated in the display by the symbol SHORT.
d) Event-Counter (2 digits in brackets):
- Shows the number of times the SPLIT/LAP key has been activated
(maximum is 99).
- In memory recall, it indicates which memory has been accessed.
e) Advance of Split Time
By pressing the START/STOP and SPLIT/LAP keys at the same time,
the current time of day, rounded off to the next full minute, will be
entered into the Split counter. After pressing the START/STOP key,
the measurement proceeds, beginning with the time just entered. The
purpose of this feature is to synchronize the Split Time with an official
clock. After activating this feature, it is no longer possible to stop the
watch; to do so would desynchronize it. Only the SPLIT/LAP key
remains active. Time advance is limited to the functions LAP, S-LAP
and TIME.
f) Memory Recall
- At any time while time is being measured, a memory may be
accessed by pressing the DISP/MEM key. The first 64 values recorded
are stored in the first 64 memories. The last, 65th memory always
holds the last time measured if more time values were stopped than
there were memories to store them.
- Procedure:
Press and hold the DISP/MEM key. The time stored will be displayed
as long as the key is pressed. During this phase, the symbol M-OUT
is displayed, and directly under it the memory which is recalled.
15
By pressing the DISP/MEM key again, the time stored in the next
memory will be displayed, and so forth. If the time displayed is the
shortest Lap Time recorded, the symbol SHORT is also displayed.
You will hear a tone following the shortest Lap Time with the sound
sequence: 100 milliseconds TONE followed by 400 milliseconds of
silence
If the time indicated corresponds to the longest Lap Time, you will
hear a tone with the sound sequence: 400 milliseconds TONE
followed by 100 milliseconds of silence.
- Quick Recall (for all versions):
First press the DISP/MEM key and then the MODE key together, which
will initiate a Quick Recall of the times measured which are stored in
the memory. When the shortest or longest Lap Time is found, the
search will be interrupted for a moment. After comparing all the
memories, Quick Recall will return to the first memory, and the
search will be terminated.
g) Countdown (Countdown with Auto-Repeat)
- Selection of the CD function by means of the MODE key
- Before the first start, a CD time must be entered.
- Although the only CD function is displayed, the Split Time and Lap
Time can also be measured.
- The watch starts by means of the START/STOP key. Split Time and
Countdown are visible during operation. The figure of a running man
indicates this condition. By pressing the START/STOP key again, Split
Time and Countdown will be stopped. This sequence can be repeated
as often as desired.
- By means of the SPLIT/LAP key, the Split Time and Lap Time values
are stored in memory at that moment. The Split Time appears to
have stopped. This, however, is only to facilitate reading. The Count down (upper display) continues in operation (except after the START/
STOP key has been pressed).
- When the CD function reaches the value of 0 (zero), a tone will sound
for 2 seconds. The sequence of operations begins immediately and
automatically, using the value originally entered (Auto-Repeat).
- The Lap Time with the associated Split Time can be read out by using
the Memory Recall (see below).
16
Page 11

h) Pacer (only DELTA E200):
1-300 tones/min (Time with an accuracy of 50 milliseconds)
- Selection of the Pacer function by means of the MODE key.
Before the first start, a time interval must be entered (1-300).
- The watch is started by means of the START/STOP key.
The continuing Split Time function is indicated by the figure of a small
running man XXX. By pressing the START/STOP key again, the Split
Time function can be stopped. This sequence can be repeated as
often as desired.
- By pressing the SPLIT/LAP key while the time measurement function
is in operation, the time interval may be raised to the next possible
level.
- The concept of “next possible level" is explained below under the
heading of “Setting the Pacer".
i) Setting of the time, date, CD, Pacer and measuring units
Is only possible after a Reset.
- Resetting the watch.
- Time of Day and Date may, but need not to be set.
For this reason, the symbol SET appears only after the Set command
(SET key).
CD and PACER must be set before Start. The symbol SET appears
immediately as a warning to set the watch.
Setting the Time of Day 4 digits: hh:mm
- Press the MODE key until TIME appears. Then press the SET key, the
symbol SET appears in the display; this prepares the watch for the
Set procedure.
- Continue to press the SET key until the digit which is to be set begins
to flash. Press the SPLIT key to advance the flashing digit (0-5 or 0-9).
- Seconds cannot be set. To synchronize them, round off the minutes
while setting the watch, and wait until the clock with which the watch
is to be coordinated reaches the minute and seconds desired.
- To terminate the Set procedure, press the MODE key; this
immediately advances the display to the next MODE.
17
Setting the date
6 digits: Europe version: dd, mm, yy
US version: mm, dd, yy
- Press MODE until the symbol DATE appears in the display. Then press
MEMO until the symbol SET appears in the display.
- Continue to press the SET key until the digit to be set begins to flash.
Press the SPLIT key to advance the flashing digit (0-5 or 0-9).
- To terminate the Set procedure, press the MODE key; this
immediately advances the display to the next MODE.
Additional setting
Setting CD 5 digits: mm, ss, 1/10 sec
- Press the MODE key until the CD function is displayed.
- The Set function is already activated.
- Continue to press the SET key until the digit which should be set
begins to flash. Press the SPLIT key to advance the flashing digit (0-5
or 0-9).
- To terminate the Set procedure, press the MODE key; this
immediately advances the display to the next MODE.
Setting PACER 3 digits: 1-300 tones/min
(50 ms accuracy)
- Press the MODE key until the PACER function is displayed.
- The Set function is already activated.
- Continue to press the SET key until the digit which is to be set begins
to flash. Press the SPLIT key to advance the flashing digit (0-5 or 0-9).
- Interpolation: If, during input, a value has been entered which is
mathematically not capable of solution, then the value displayed
will be rounded off after the MODE key has been pressed to the
nearest higher or lower value.
For example: you entered 72 tones per minute; this would imply a
sequence of tones at an interval of 0.8333 seconds; unfortunately,
such a sequence cannot be produced with the accuracy desired; the
next feasible value will automatically be selected, i. e., 0.85 seconds,
which corresponds to the rate of 70 pulses per minute.
18
Page 12

Below is a conversion table which shows how the value entered is
interpolated to a feasible value.
The table is accurate to+/- 25 milliseconds.
Entered Becomes Entered Becomes Entered Becomes
1-36 1:1 54, 55 54 97-104 100
37 38 56-58 57 105-115 110
38-41 1:1 59-61 60 116-127 120
42, 43 42 62-64 63 128-139 135
44, 45 44 65-68 66 140-159 150
46, 47 46 69-73 70 160-190 175
48, 49 48 74-78 75 191-219 200
50, 51 50 83-88 85 220-268 240
52, 53 52 89-96 92 269-300 300
The following values reflect exact times without adjustments:
1, 2, 3, 4, 5, 6, 8
10, 12, 15, 16
20, 24, 25
30, 40, 50, 60, 75, 80
100, 120, 150
200, 240, 300
SPECTRON
Measurement Units 1/100 min or 1/100 sec
- Press the MODE key until the function field of the display is empty.
The symbol SET is activated.
- The time unit is toggled by means of the SET key.
The following symbols will appear in the upper display 59:59 (with
semicolon) = measuring unit is seconds 9999 (without semicolon) =
measuring unit is minutes
- To terminate the Set procedure, press the MODE key.
Consumers are legally required to dispose of batteries
at suitable collection points, vending points or dispatch
bays. The crossed-out wheeled bin means that batteries
must not be disposed of in the household waste.
Pb, Cd and Hg designate substances that exceed the
legal limits.
19
20
Page 13

Caractéristiques techniques
Température
En utilisation: -15° C à +55° C
Hors service: -25° C à +65° C
Pile
Type: Micron cell AAA
Durée: env. 5-6 ans
Indicateur: L'affichage du symbole batterie à l’écran indique une
réserve de durée d’utilisation d’environ 3 mois.
Affichage
15 chiffres, taille des chiffres 7 mm
Fenêtre pour indication des fonctions et indicateur de batterie
Split 9 h, 59 min, 59 sec, 99/100 = 7 chiffres ligne du bas
Lap 59 min, 59 sec, 99/100 = 6 chiffres ligne du haut
Event-Count max. 99 = 2 chiffres ligne centrale
Fonctions supplémentaires DELTA E 200:
Pacer 1 à 300 coups/min = 3 chiffres ligne du haut
Count-Down 59 min, 59 sec, 9/10 = 5 chiffres ligne du haut
Fonctions supplémentaires SPECTRON:
Count-Down 59 min, 59 sec, 9/10 = 5 chiffres ligne du haut
ou 9999 min, 99/100 min = 5 chiffres ligne du haut
Boîtier (ABS) étanche selon DIN 8310
Poids 85g
Précision +/- 7 sec / mois
Unités de mesure
DELTA E 200 1/100 sec
SPECTRON 1/100 sec + 1/100 min
21
Mémoires 65
Fonctions
Start/Stop, Split/Lap, Short/Lap, heure, date, rappel
mémoire et évaluation du temps LAP plus court et plus
long, CD (Count-Down)
Fonctions supplémentaires DELTA E200: Pacer
Fonctions supplémentaires SPECTRON: sélection des
unités de mesure
Commandes 4
START/STOP,
SPLIT/LAP,
MEM/SET/DISP,
MODE
Installation et remplacement de la pile
Retirer l'arrière du boitier (7 vis). Installer la nouvelle pile en respectant
les polarités. Après remplacement de la pile l'heure et la date doivent
être à nouveau introduites.
Légende explicative des différents termes techniques
SPLIT: Temps cumule à chaque prise de temps.
Le dernier temps pris est aussi le temps total.
LAP: Différence de temps entre le temps précédent et le
nouveau pris, aussi nomme temps pris par tous.
SHORT: Temps le plus court mesure du mode lap.
CD: Count down (décompte le temps à partir d'une valeur
haute introduite).
PACER: Nombre de coups par minute (acoustique).
Memory: Temps enregistres dans la mémoire.
SPLIT
LAP
SPLIT - SET
PAC CD DAT TIME S-LAP
SET FAS T MODE RESET
DISP
MEM
SHORT
START
STOP
M-OUT
SPLIT
22
Page 14

Fonctions disponibles avec index de recherche (a-i)
a) Remise à zéro du compteur
b) Changement mode de chronométrage (fonction)
c) Mésure des temps
d) Mesure des temps Lap
e) Compteur nombre de temps
f) Commande du mode split
g) Possibilité rappel de mémoire avec fonction rapide et information
(temps plus court et temps plus long)
h) Count down
i) Pacer compteur de coups par minute sur DELTA E 200
j) Introduction de l'heure, date, CD, Pacer, unités de mesure
a) Remise à zéro du compteur
Par pression simultanée sur le START/STOP et la touche MODE, les
temps et mémoires sont effaces. La date et l'heure restent en
mémoire. L’affichage central indique LAP.
b) MODE (changement des fonctions):
Par pression sur la touche MODE, les fonctions changent suivant les
séquences suivantes
E 200 LAP ➤ S-LAP ➤ TIME ➤ DATE ➤ CD ➤ PACER
et retour à LAP
Spectron LAP ➤ S-LAP ➤ TIME ➤ DATE ➤ CD ➤ empty
et retour à LAP
La fonction active est indiquée sur la ligne centrale dans la fenêtre
Fonction. Les temps et valeurs correspondant à ces fonctions sont
visibles sur la ligne du haut de l'écran comme suit:
LAP: Temps LAP 6 chiffres
S-LAP: LAP ou temps court 6 chiffres
TIME: Temps de l'heure: 23:45,59
DATE: Date (Europe) 01.01.08 (01. Jan. 2008)
Date (USA) 01.01.08 (01. Jan. 2008)
Fonctions supplémentaires DELTA E 200
PACER: coups/min 3 chiffres
50 ms unités de mesure
CD: Count down 5 chiffres
1/10 sec-accuracy
Additionally for SPECTRON:
CD: Count down 5 chiffres
1/10 unités de mesure
VIDE: changement min/sec
Le temps Split est toujours visible sur la ligne du bas de l'écran.
Note concernant LAP, S-LAP und TIME
Une fois le compteur démarré et le temps mesure la sélection de ses
mode ne s’effectue seulement qu’à partir de ces 3 fonctions.
Note concernant Countdown
Apres Le déclenchement, il n’est pas possible de changer de mode.
Toutefois pour ce temps introduit, vous pouvez utiliser les touches
START/STOP et SPLIT/LAP (voir CD fonction).
Note concernant PACER
Apres le départ il n’est pas possible de changer de Mode. Toutefois le
temps total est mesure et la fonction Start/Stop reste active (voir
PACER fonction).
c) Mesure des temps
- Sélectionner une des fonctions LAP, S-LAP ou TIME au moyen de la
touche MODE.
- Le compteur démarré au moyen de la touche START/ STOP. Le temps
mesure commence à défiler. Le symbole XXX du coureur indique
cette action. Par nouvelle pression sur la touche START/STOP les
temps sont stoppés. Cette séquence peut être répétée aussi souvent
que nécessaire.
23
24
Page 15

- Par pression sur la touche SPLIT/LAP les valeurs des temps Split et
Lap sont enregistrés et mémorisés. Le temps Split indiqué est seule ment figé. Ceci uniquement pour faciliter la lecture du temps
mesure. Si après cette pression sur Le bouton SPLIT/LAP vous voulez
rendre visible le temps qui défile, presser le bouton DISP/MEM.
- S-LAP est une fonction supplémentaire:
Après chaque rappel avec le bouton SPLIT/LAP le temps courant
apparaîtra sur la ligne haute de l’affichage, en alternance avec
affichage du temps le plus court (S-LAP) avec indication du symbole
SHORT.
d) Compteur du nombre de temps pris (2 chiffres en parenthèses):
- Nombre de fois ou la touche SPLIT/LAP a été activée (maximum 99).
- Pendant rappel de mémoire le no. de mémoire respective est indiqué.
e) Commande du mode Split
Par pression simultanée sur la touche START/STOP et SPLIT/LAP,
l’heure et la date apparaissent. Le compteur Split affiche la minute
arrondie à la valeur suivante. Après pression du bouton START/STOP,
la mesure commence avec le temps correct. Le but de cette cara ctéristique est la synchronisation du temps Split avec l’heure
officielle. Après activation de cette fonction, il n'est pas possible
d’arrêter le chronomètre. Vous devez pour cela le désynchroniser.
Seulement si la touche SPLIT/LAP reste active. La fonction de
pré-ajuster le temps est limitée aux fonctions LAP, S-LAP et TIME.
f) Possibilité rappel de mémoire
- Pendant que le temps défile, il est possible d'accéder à la mémoire
par pression de la touche DISPL/MEM. Les 64 premières valeurs
enregistrées sont stockées dans les 64 premières mémoires. La
dernière 65ième mémoire conserve toujours la plus grande valeur de
temps mesurée et en registrée dans les mémoires.
- Procédure:
Presser la touche DISP/MEM. Le temps enregistré est affiche tant
que la touche reste pressée. Pendant cette phase le symbole M-OUT
est affiché. Dessous apparaît la mémoire appelée.
25
Par nouvelle pression de la touche DISP/MEM, la mémoire suivante
est affichée et ainsi de suite. Si le temps affiché est le plus court
enregistre, le symbole SHORT apparaît.
Une séquence de sons de 100 millisecondes se fait entendre à
l'affichage du temps le plus court suivi par une durée de 400 milli secondes de silence.
Si le temps indiqué correspond au temps le plus long, la séquence
sera d’un son de 400 millisecondes suivi par 100 millisecondes de
silence.
- Rappel rapide de mémoire (pour tous les modèles):
Par pression sur la touche DISPL/MEM et ensuite sur la touche
MODE (maintenir les 2 pressées) le rappel rapide des temps de la
mémoire est initialisée. Lorsque le temps le plus court et plus long
sont trouvés la recherche s'interrompt un court moment. Après
retourner à la première mémoire, le rappel rapide est terminé. Par
pression nouvelle de la touche MODE un nouveau rappel de mémoire
commence.
g) Possibilité rappel de mémoire avec fonction rapide et information
- Sélectionner la fonction Count-down au moyen de touche MODE
- Avant le départ le temps à décompter doit être introduit
- En touchant le bouton MODE le signal peut être active ou désactivé;
alternativement un signal active est confirmé dans le display par un
signal CD clignote.
- Lorsque la fonction Count-down est affiché, les fonctions Split et Lap
restent actives.
- Le départ du compteur se fait au moyen de touche START/STOP. Le
temps Split et Count-down restent visibles pendant cette opération.
Le symbole XXX du coureur apparait dans cette phase.
- Par pression sur la touche START/STOP, la fonction Split et Count down est arrêtée. Cette séquence peut être répétée aussi longtemps
que nécessaire.
- Par pression sur la touche SPLIT/LAP les valeurs du temps Split et
Lap sont enregistrés et mémorisés. Le temps Split indiqué est seule ment figé. Ceci uniquement pour faciliter la lecture du temps
mesuré.
26
Page 16

Le Count-down (affichage ligne du haut) continue sa fonction
(seulement si la touche START/STOP n’a pas été pressée).
- Quand la fonction Count-down a atteint la valeur 0 (zéro). une
sonnerie se déclenche pendant 2 secondes. Le compte à rebours
termine, l'opération compte à rebours se répète immédiatement
et automatiquement avec la même valeur de temps entrée à l'origine
(fonction Auto-repeat)
- La fonction Lap et Split associée peuvent être lues avec le rappel
mémoires (voir ci-dessous).
h) Pacer (seulement DELTA E200):
1-300 coups/min (Chronométrage précision 50 millisecondes)
- Sélectionner la fonction PACER au moyen de la touche MODE avant le
premier départ. Rentrer le nombre de coups par minute (1 à 300).
- Le chrono démarré au moyen de la touche START/STOP. La continuité
de la fonction est indiquée par le symbole XXX coureur. Par nouvelle
pression de la touche START/STOP, cette fonction est stoppée. Cette
séquence peut être répétée aussi souvent que nécessaire.
- Par pression de la touche SPLIT/LAP le temps mesure défile, la
cadence (coups par minute) peut être augmentés au prochain niveau
possible.
- Le concept du prochain niveau possible est expliqué au-dessous (voir
réglage du PACER).
i) Introduction de l'heure, date, CD, Pacer, unités de mesure
Ces réglages sont possibles seulement après remise à zéro.
- Réglage de l’heure
- L’heure et la date sont introduites seulement si nécessaire. Pour
cette raison le symbole SET apparait seulement si cette opération est
nécessaire.
- CD et PACER doivent être introduits avant départ. Le symbole SET est
active immédiatement pour introduction.
Introduction de l'heure 4 chiffres: hh:mm -
- Presser la touche MODE jusqu'à l'apparition de la fonction TIME
- Ensuite presser la touche SET. Le symbole SET apparaît à l'affichage
et le chronomètre est prêt pour cette fonction.
- Continuer à presser la touche SET jusqu’au clignotement du chiffre
sélectionne
- Presser la touche SPLIT/LAP pour avancer ce chiffre à la valeur
désirée (0-5 ou 0-9).
- Les secondes ne peuvent pas être ajustées. Pour les synchroniser
augmenter d'une minute l'heure que vous devez afficher, et attendre
que l'heure officielle atteigne cette valeur.
- Presser la touche MODE. Heure officielle est alors introduite dans le
compteur, et les secondes synchronisées.
Mise à jour de la date
6 chiffres: version européenne: jj, mm, aa
version USA: mm, jj, aa
- Presser la touche MODE jusqu'à l'affichage du symbole DAT, ensuite
presser la touche SET jusqu'à ce que le symbole SET apparaisse.
- Continuer à presser la touche SET jusqu'au clignotement du chiffre
désiré.
- Presser la touche SPLIT pour faire avancer ce chiffre à la valeur
désirée.
- Pour terminer presser la touche MODE. La fonction suivante
s'affiche.
Paramètres additionelle
Valeur CD
5 chiffres: mm, ss, 1/10 sec
- Presser la touche MODE jusqu'à l'affichage de la fonction Count down
- Le symbole SET est déjà actif
- Presser la touche SET jusqu'au clignotement du chiffre à introduire
- Presser la touche SPLIT pour avancer ce chiffre à la valeur désirée
(0 - 5 ou 0-9)
- Pour terminer, presser la touche MODE, la fonction suivante apparait
dans la fenêtre.
27
28
Page 17

PACER
3 chiffres: 1-300 coups/min (Précision 50 millisecondes)
- Presser la touche MODE jusqu'à l'affichage de la fonction PACER, la
fonction introduction de la valeur est aussitôt activée.
- Presser la touche SET jusqu'au clignotement du chiffre à introduire.
- Presser le bouton SPLIT pour avancer ce chiffre à la valeur désirée
(0 - 5 ou 0-9).
- Interpolation: Si durant l’introduction une valeur a été entrée qui
mathématiquement ne correspond pas, la valeur affichée sera
arrondie après pression de la touche MODE au plus proche (+ ou -)
de cette valeur. Par exemple: Vous entrez 72 coups par minute qui
correspond à un intervalle de 0,8333 sec. Une séquence aussi précise
ne peut être atteinte. La précision la plus proche sera automatique ment sélectionnée à 0,85 sec qui correspondant à une cadence de 70
coups par minute.
- La touche MODE quitte la condition SET.
Ci-dessous table de conversion ou apparaissent face aux valeurs
entrées les valeurs arrondies. La certitude est +/- 25 ms.
Entered Becomes Entered Becomes Entered Becomes
1-36 1:1 54, 55 54 97-104 100
37 38 56-58 57 105-115 110
38-41 1:1 59-61 60 116-127 120
42, 43 42 62-64 63 128-139 135
44, 45 44 65-68 66 140-159 150
46, 47 46 69-73 70 160-190 175
48, 49 48 74-78 75 191-219 200
50, 51 50 83-88 85 220-268 240
52, 53 52 89-96 92 269-300 300
29
Les valeurs suivantes ne nécessitent pas d’ajustement:
1, 2, 3, 4, 5, 6, 8
10, 12, 15, 16
20, 24, 25
30, 40, 50, 60, 75, 80
100, 120, 150
200, 240, 300
SPECTRON
Unité de mesure 1/100 min ou 1/100 sec
- Presser la touche MODE lorsque la fenêtre est vide. Le symbole SET
apparaît
- Les unités de mesure apparaissent au moyen de la touche MODE
- Les symboles suivants apparaîtront dans la ligne haute de l’affichage:
59:59 Avec point-virgule = unités de mesure en secondes
9999 Sans point-virgule = unités de mesure en minutes
- Pour terminer cette procédure presser le bouton MODE
La législation exige des consommateurs le dépôt de piles
usagées dans un lieu de collecte approprie; un point de
vente ou un entrepôt d’expédition. La poubelle barrée
signifie qu’il est interdit de jeter les piles et les batteries
avec les ordures ménagères. Pb, Cd et Hg désignent
les substances dont les valeurs dépassent les limites
légales.
30
Page 18

Dati Tecnici
Intervallo di temperatura
In uso: Da -15° C a +55° C
In magazzino: Da -25° C a +65° C
Batteria
Tipo: Tipo mini batteria AAA
Durata: 5 - 6 anni circa
Indicazione: Sul display appare il simbolo della batteria: da questo
momento in poi rimango no circa 3 mesi prima del
completo esauriment
Display
15 cifre, altezza cifre 7 mm
Finestra per indicazione funzioni e simbolo batteria
Split 9 h, 59 min, 59 sec, 99/100 = 7 cifre - fila inferiore
Lap 59 min, 59 sec, 99/100 = 6 cifre - fila superiore
Event-Count max. 99 = 2 cifre - fila centrale
In aggiunta per DELTA E 200:
Pacer 1 bis 300 segnali/min = 3 cifre - fila superiore
Count-Down 59 min, 59 sec, 9/10 = 5 cifre - fila superiore
In aggiunta per SPECTRON:
Count-Down 59 min, 59 sec, 9/10 = 5 cifre - fila superiore
oder 9999 min, 99/100 min = 5 cifre - fila superiore
Cassa (ABS) impermeabile conforme a DIN 8310
Peso 85g
Precisione +/- 7 sec / Monat
Risoluzione temporale
DELTA E 200 1/100 sec
SPECTRON 1/100 sec + 1/100 min
31
Memorie: 65
Funzioni
Start/Stop, Split/Lap, Short/Lap, Time, Richiamo
memorie con il tempo LAP maggiore e minore, CD
(Count-Down),
Suppletivo a DELTA E200: Pacer
Suppletivo a SPECTRON: Commutazione del conteggio
Tasti 4
START/STOP,
SPLIT/LAP,
MEM/SET/DISP,
MODE
Inserzione della batteria
Aprire lo sportello posteriore (7 viti).
Inserire la nuova batteria facendo attenzione che i poli coincidano con
i corrispondenti simboli. Dopo il cambio della batteria è necessario
reimpostare la data ed il tempo.
Legenda dei diversi termini tecnici
SPLIT: è il tempo progressivo indicato dopo ogni rilevazione.
L’ultimo tempo split è contemporaneamente anche il
tempo totale.
LAP: Sono i tempi differenziali riferiti ad un punto di misura
fissato. Detto anche tempo al giro.
SHORT: È il più breve tempo lap misurato.
CD: (Tempo a ritroso) Count-down
PACER: Cadenza (Segnali acustici in un minuto)
Memory: Memoria dei tempi rilevati
SPLIT
LAP
SPLIT - SET
PAC CD DAT TIME S-LAP
SET FAS T MODE RESET
DISP
MEM
SHORT
START
STOP
M-OUT
SPLIT
32
Page 19

Funzioni possibile con indice de ricerca (a-i)
a) Reset (azzeramento)
b) Mode (Cambio delle funzioni)
c) Misura dei tempi
d) Event-Counter (Contatore)
e) Tempo Split
f) Richiamo Memorie
g) Count-Down
h) Pacer E 200
i) Inserimento del tempo reale, data, CD, Pacer e scomposizione
a) Reset (azzeramento)
Si premano contemporaneamente i pulsanti START/STOP e MODE.
I tempi memorizzati vengono cancellati. Tempo reale e data
rimangono memorizzati. Sul display appare la scritta LAP.
b) MODE (Cambio delle funzioni):
Si prema il pulsante MODE: il cambio delle funzioni selezionate
appare sull'apposita finestra del display
E 200 LAP ➤ S-LAP ➤ TIME ➤ DATE ➤ CD ➤ PACER
poi nuovamente al contrario sino a LAP
Spectron LAP ➤ S-LAP ➤ TIME ➤ DATE ➤ CD ➤ leer
poi nuovamente al contrario sino a LAP
I valori dei tempi e della data sono visibili nella fascia superiore del
display:
LAP: tempo Lap 6 cifre
S-LAP: Lap o tempo breve 6 cifre
TIME: tempo reale 23:45,59
DATE: data (Europa) 01.01.08 (01. Gen. 2008)
(USA) 01.01.08 (01. Gen. 2008)
in aggiunta per DELTA E 200
PACER: colpi/min 3 cifre
scomposizione 50 ms
CD: Count-Down 5 cifre
scomposizione 1/10 sec
in aggiunta per SPECTRON:
CD: Count-Down 5 cifre
scomposizione 1/10 sec
VUOTO: commutazione min/sek
Nelle fila inferiore dei display è compreso principalmente il tempo
Split.
Particolarità di LAP, S-LAP und TIME
Quando il tempo inizia a scorrere, e possibile scegliere il rilevamento
dei tempi solamente all'interno di queste 3 funzioni.
Particolarità di CD
Dopo la partenza non è possibile nessuna variazione con Mode. E’
sempre possibile la misurazione complessiva con START/STOP e
SPLIT/LAP (vedere funzione CD).
Particolarità di PACER
Dopo la partenza non e possibile nessuna variazione con Mode. Viene
rilevato il tempo complessivo e rimane fissata la funzione START/
STOP (vedere funzione PACER).
c) Misura dei tempi
- Per selezionare le funzioni LAP, S-LAP e TIME, premere il pulsante
MODE.
- La partenza avviene premendo il pulsante START/STOP.
I tempi misurati scorrono in maniera visibile. Sul display appare il
simbolo XXX Premendo nuovamente il pulsante START/STOP viene
fissata la misura corrispondente. Questa procedura può essere
seguita quanto lo si desideri.
33
34
Page 20

- Per fissare la memoria dei valori di Split e Lap si prema il pulsante
SPLIT/LAP. Il conteggio rimane visibile sul display: ciò consente una
migliore conoscenza e lettura del tempo misurato. Dopo lo SPLIT/
LAP è possibile vedere scorrere il tempo, premendo brevemente il
pulsante DISPL/MEM.
- S-LAP come funzione addizionale: Dopo avere rilevato i tempi con
il pulsante SPLIT/LAP, è possibile leggere nella fascia superiore del
display alternativamente (al ritmo di 2 Hz) i valori del tempo Lap e dei
tempo Lap più breve con l’apparire della scritta SHORT nel contatore.
d) Event-Counter (numero a due cifre tra parentesi)
- Mostra quante volte si sia premuto il pulsante SPLIT/LAP (max. 99).
- Richiamando le memorie si può rilevare il numero delle stesse.
e) Tempo Split
Premendo contemporaneamente il pulsante START/STOP e SPLIT/
LAP nel contatore split appare il tempo corrispondente, basato sul
minuto pieno contiguo. Premendo START/ STOP inizia la misura zione dei tempi basata sul tempo reale inserito nello strumento.
Questa caratteristica consente la sincronizzazione del tempo split
con il tempo reale. Non e possibile, in questa situazione, fermare lo
strumenta: rima ne attivo solamente il pulsante SPLIT/LAP. Si
possono cioè utilizzare solamente le funzioni LAP e S-LAP e TIME.
f) Richiamo Memorie
- Premendo il pulsante DISPL/MEM si può richiamare in ogni momento
le memorie immagazzinate. I primi 64 posti riguardano le prime
64 rilevazioni. Nell’ultimo (65) posto viene evidenziato l’ultimo tempo,
indipendentemente dal numero delle rilevazioni precedenti.
- Partenza:
Tenere premuto il pulsante DISPL/MEM. La memorizzazione del
tempo continua sino a quando il pulsante viene premuto. In questa
fase e leggibile sul display la sigla M-OUT e, sotto questa, il numero
della memoria. Premendo una seconda volta il pulsante DISPL/MEM
continua il conteggio degli altri tempi da memorizzare.
35
E così via. Il valore del tempo Lap, evidenziato dal simbolo SHORT,
corrisponde al più breve tempo Lap rilevato.
Il maggiore tempo Lap viene indicato da un segnale acustico con le
seguenti caratteristiche: 100 ms per il suono, 400 ms per l'intervallo
Il maggiore tempo Lap viene anch'esso indicato con un segnale
acustico con le seguenti caratteristiche:400 ms per il suono, 100 ms
per l'intervallo.
- Ricerca veloce (per tutte le versioni):
Sì prema e si tenga premuto il pulsante DISPL/MEM, contempora neamente si prema il pulsante MODE. Ciò consente un richiamo ve loce dei tempi immagazzinati in memoria. Per rintracciare il più breve
oppure il maggiore tempo Lap, si interrompa brevemente. Un breve
rilascio con susseguente ripetizione della pressione sul pulsante
MODE consente di proseguire La ricerca quante volte si desideri.
g) Count-Down (Count-Down con ripitizione automatica)
- La funzione CD per mezzo di viene selezionata dal pulsante MODE.
- Prima della partenza iniziale è necessario fissare il tempo CD
- Premendo il pulsante MODE si attiva o si disattiva il segnale caden zato. L'apparire sul display di un segnale CD pulsante significa che il
segnale cadenzato è stato attivato.
- Sebbene nel display appaia solamente la scritta CD, sono ancora
utilizzabili le funzioni split e Lap.
- Per mezzo del pulsante START/STOP. Il valore split e quello Count
down scorrono sul display. Questo viene evidenziato dal simbolo
XXX Premendo nuovamente il pulsante START/ STOP, il Count-down e
il valore Split vengono fissati. Questo procedimento può essere
ripetuto a piacere.
- Premendo il pulsante SPLIT/LAP si provoca la memorizzazione dei
valori Split e Lap. Il contatore delle rilevazioni split rimando visibile. Il
Count-down (fila superiore) continua a funzionare (Per fermarlo
premere il pulsante STOP).
- Il raggiungimento del valore zero è segnalato da un avvisatore
acustico con un suono della durata di 2 secondi. Il conteggio riprende
automaticamente (Auto Repeat) dal valore precedentemente fissato.
- Il tempo Lap con il corrispondente split, possono essere letti
richiamando le memorie.
36
Page 21

h) Pacer (solo per DELTA E200):
1-300 colpi/minuto (segnali acustici di 50 ms)
- La funzione PACER viene selezionata mediante il pulsante MODE
- E’ necessario impostare il valore (in colpi al minuto) desiderato.
- Lo strumento è messo in moto dal pulsante START/STOP; il valore
split scorre visibile sul display. Il simbolo XXX indica questa funzione.
Premendo nuovamente il pulsante START/ STOP il valore split viene
fissato. Questa procedura può essere ripetuta a piacere.
- Premendo il pulsante SPLIT/LAP si può ottenere accrescimento del
conteggio del colpi durante la misurazione del tempo.
i) Inserimento del tempo reale, data, CD, Pacer e scomposizione
Dopo l'azzeramento è possibile
- Mettere a zero il tempo reale
- Il tempo reale e la data possono (ma non obbligatoriamente) essere
impostati. Il simbolo SET appare solamente dopo essere stato
appositamente richiamato
- CD e PACER devono essere impostati alla partenza. Il simbolo SET
viene attivato su richiamo specifico.
Inserimento tempo reale 4 cifre: hh:mm
- Attivare la funzione agendo sul pulsante TIME con MODE
- Il pulsante SET attiva la funzione SET, mentre appare sul display il
simbolo corrispondente
- Premendo ulteriormente il pulsante SET si selezionano le cifre da
impostare. Le varie cifre prendono a pulsare e possono quindi essere
fissate.
- Le cifre pulsanti sono fatte progredire agendo sul pulsante SPLIT/
LAP (0-5 o 0-9).
- I secondi non possono essere fissati direttamente, è necessario
fare scorrere le varie cifre sino al raggiungimento del valore intero
del minuto fissato.
- Agendo sul pulsante MODE si cambia funzione
Inserimento data
6 cifre: Versione Europa: gg, mm, aa
Versione USA: mm, dd, yy
- Premere il pulsante MODE sino alla funzione DATE
- Il pulsante SET attiva lo svolgimento di SET facendone apparire il
simbolo corrispondente
- Premendo ulteriormente il pulsante SET si selezionano le cifre da
impostare. Le varie cifre possono essere fissate quando iniziano a
pulsare.
- Le cifre pulsanti sono fatte progredire agendo sul pulsante SPLIT
(0-5 o 0-9).
- Agendo sul pulsante MODE si cambia funzione.
Impostazione suppletiva
Inseimento CD 5 cifre: mm, ss, 1/10 sek
- Agire sul pulsante MODE
- Appare il simbolo SET
- Premendo il pulsante SET si selezionano le cifre da impostare: le
varie cifre possono essere fissate quando iniziano a pulsare.
- Il pulsante SPLIT consente di aumentare le cifre pulsanti (0-5 o 0-9).
- Il pulsante MODE consente di passare alla prossima funzione.
PACER 3 cifre: 1-300 colpi/min
- Premendo il pulsante MODE appare la funzione PACER
- Appare il simbolo SET
- Con il pulsante SET si seleziona la cifra pulsante prescelta
- Il pulsante SPLIT consente di aumentare le cifre pulsanti (0-5 o 0-9).
- Interpolazione: quando si desidera inserire valori che presentano
problemi matematici non risolvibili con questo tipo di strumento, il
numero prescelto sarà (salvo i casi indicati più avanti) approssimato.
Esempio: se si vogliono inserire 72 colpi al minuto, significa che si
devono potere ottenere dei segnali con cadenza di 0,8333 secondi
cadauno. Purtroppo, questo strumento non consente questa
divisione: automaticamente viene raggiunto un valore di 0,85 secondi
ere corrisponde a 70 battute al minuto.
- Il pulsante MODE consente di passare alla funzione successiva.
Nel contatore è leggibile il valore più prossimo a quello prescelto.
37
38
Page 22

Qui sotto si espone una tabella dove sono rappresentati i valori
prossimi interpolati. La precisione es+/- 25 ms.
Cor-
Inserìmento
1-36 1:1 54, 55 54 97-104 100
37 38 56-58 57 105-115 110
38-41 1:1 59-61 60 116-127 120
42, 43 42 62-64 63 128-139 135
44, 45 44 65-68 66 140-159 150
46, 47 46 69-73 70 160-190 175
48, 49 48 74-78 75 191-219 200
50, 51 50 83-88 85 220-268 240
52, 53 52 89-96 92 269-300 300
Il valori realizzabili senza dovere ricorrere ad approssimazioni, soni i
seguenti:
1, 2, 3, 4, 5, 6, 8
10, 12, 15, 16
20, 24, 25
30, 40, 50, 60, 75, 80
100, 120, 150
200, 240, 300
rispondenza
Inserìmento
Corrispondenza
Inserìmento
Corrispondenza
SPECTRON
Scomposizione 1/100 min. oppure 1/100 sec
- Agire sul pulsante MODE sino a quando il campo delle funzioni risulti
vuoto.
- Appare il simbolo SET
- Con il pulsante SET si commuta l'ingresso dei tempi Contatore di
controllo nel display superiore:
59:59 = divisione in secondi
(Con punti di separazione fra le cifre)
9999 = divisione in minuti
(Senza punti di separazione fra le cifre)
- Una breve pressione dei pulsante MODE consente di uscire dalla
situazione SET.
Per legge, i consumatori sono obbligati a depositare
le batterie esaurite presso i punti di raccolta, i punti di
vendita o immagazzini di spedizioni. Il simbolo del contenitore dei rifiuti sbarrato indica che e vietato smaltire le
batterie con i rifiuti i domestici. Pb, Cd e Hg indicano le
sostanze presenti con valori superiori alla norma.
39
40
Page 23

Hanhart 1882 GmbH
Uhrenmanufaktur
Hauptstraße 33
78148 Gütenbach
Germany
www.hanhart.com
 Loading...