

Page 1

FocSign Client
User Manual
Page 2

FocSign Client • User Manual
TABLE OF CONTENTS
Chapter 1 Product Introduction ...................................................................................................... 6
Introduction ........................................................................................................................ 6
Operation Flowchart ............................................................................................................ 6
Chapter 2 Server Installation .......................................................................................................... 8
Chapter 3 Login............................................................................................................................. 10
Log in to the Client............................................................................................................. 10
Home Page Introduction .................................................................................................... 12
Chapter 4 Organization Creation .................................................................................................. 14
Create an Organization ...................................................................................................... 14
Add a User ......................................................................................................................... 15
Chapter 5 Terminal Management ................................................................................................. 17
Add a Terminal................................................................................................................... 17
5.1.1 Add a Terminal on the Same Network Segment ........................................................ 17
5.1.2 Add a Terminal on the Different Network Segment ................................................... 19
5.1.3 Edit/Delete a Terminal .............................................................................................. 19
5.1.4 View Terminal Details ................................................................................................ 20
Terminal Control ................................................................................................................ 20
5.2.1 Startup and Shutdown .............................................................................................. 21
5.2.2 Play Control .............................................................................................................. 21
5.2.3 Adjust Volume .......................................................................................................... 22
Terminal Configuration ...................................................................................................... 22
5.3.2 Configure Backlight ................................................................................................... 23
5.3.3 Configure Resolution................................................................................................. 23
5.3.4 Configure a Logo ....................................................................................................... 24
5.3.5 Configure a Default Schedule .................................................................................... 24
5.3.6 Configure the Time Zone ........................................................................................... 24
5.3.7 NTP Time Sync .......................................................................................................... 24
5.3.8 Change Terminal Passwords ...................................................................................... 25
5.3.9 Check Additional Component Information ................................................................ 25
5.3.10 Configure IPC Channel Linkage ................................................................................ 25
Terminal Maintenance ....................................................................................................... 26
5.4.1 Upgrade .................................................................................................................... 26
5.4.2 Reset Password ......................................................................................................... 27
5.4.3 Security ..................................................................................................................... 28
5.4.4 Debug a Terminal ...................................................................................................... 28
5.4.5 Modify Network Parameters ..................................................................................... 28
5.4.6 Restore Defaults........................................................................................................ 28
Chapter 6 Program Creation and Release ..................................................................................... 29
Upload Materials ............................................................................................................... 29
6.1.2 Upload Local Materials.............................................................................................. 30
1
Page 3

FocSign Client • User Manual
6.1.3 Upload Dynamic Materials ........................................................................................ 31
6.1.4 Replace Materials ..................................................................................................... 32
Create Programs ................................................................................................................ 34
Configure Basic Program Settings .............................................................................. 36
6.2.3 Configure Page .......................................................................................................... 38
6.2.4 Add a Window .......................................................................................................... 39
6.2.5 Edit Page ................................................................................................................... 48
6.2.6 Hyperlink .................................................................................................................. 48
Create a Program Schedule ................................................................................................ 49
6.3.1 Create a Schedule ..................................................................................................... 49
6.3.2 Create Loop Schedule ............................................................................................... 50
6.3.3 Create a Default Schedule ......................................................................................... 51
Approve ............................................................................................................................. 52
Release .............................................................................................................................. 53
6.5.1 Release a Program Schedule ..................................................................................... 53
6.5.2 Cut-in Release ........................................................................................................... 55
Chapter 7 Maintenance Management .......................................................................................... 57
7.1.1 Export Log Query ...................................................................................................... 57
7.1.2 Restore Default Settings ............................................................................................ 57
7.1.3 Weather Web Manufacturer Configuration ............................................................... 57
2
Page 4

FocSign Client • User Manual
© 2019 Hangzhou Hikvision Digital Technology Co., Ltd. All rights reserved.
This Manual is the property of Hangzhou Hikvision Digital Technology Co., Ltd. or its affiliates (hereinafter referred to as
“Hikvision”), and it cannot be reproduced, changed, translated, or distributed, partially or wholly, by any means, without
the prior written permission of Hikvision. Unless otherwise expressly stated herein, Hikvision does not make any
warranties, guarantees or representations, express or implied, regarding to the Manual, any information contained
herein.
About this Manual
The Manual includes instructions for using and managing the Product. Pictures, charts, images and all other information
hereinafter are for description and explanation only. The information contained in the Manual is subject to change,
without notice, due to firmware updates or other reasons. Please find the latest version of this Manual at the Hikvision
website (http://www.hikvision.com/en/).
Please use this Manual with the guidance and assistance of professionals trained in supporting the Product.
Trademarks Acknowledgement
and other Hikvision’s trademarks and logos are the properties of Hikvision in various jurisdictions.
Other trademarks and logos mentioned are the properties of their respective owners.
LEGAL DISCLAIMER
TO THE MAXIMUM EXTENT PERMITTED BY APPLICABLE LAW, THIS MANUAL AND THE PRODUCT DESCRIBED, WITH ITS
HARDWARE, SOFTWARE AND FIRMWARE, ARE PROVIDED “AS IS” AND “WITH ALL FAULTS AND ERRORS”. HIKVISION
MAKES NO WARRANTIES, EXPRESS OR IMPLIED, INCLUDING WITHOUT LIMITATION, MERCHANTABILITY, SATISFACTORY
QUALITY, OR FITNESS FOR A PARTICULAR PURPOSE. THE USE OF THE PRODUCT BY YOU IS AT YOUR OWN RISK. IN NO
EVENT WILL HIKVISION BE LIABLE TO YOU FOR ANY SPECIAL, CONSEQUENTIAL, INCIDENTAL, OR INDIRECT DAMAGES,
INCLUDING, AMONG OTHERS, DAMAGES FOR LOSS OF BUSINESS PROFITS, BUSINESS INTERRUPTION, OR LOSS OF DATA,
CORRUPTION OF SYSTEMS, OR LOSS OF DOCUMENTATION, WHETHER BASED ON BREACH OF CONTRACT, TORT
(INCLUDING NEGLIGENCE), PRODUCT LIABILITY, OR OTHERWISE, IN CONNECTION WITH THE USE OF THE PRODUCT,
EVEN IF HIKVISION HAS BEEN ADVISED OF THE POSSIBILITY OF SUCH DAMAGES OR LOSS.
YOU ACKNOWLEDGE THAT THE NATURE OF INTERNET PROVIDES FOR INHERENT SECURITY RISKS, AND HIKVISION SHALL
NOT TAKE ANY RESPONSIBILITIES FOR ABNORMAL OPERATION, PRIVACY LEAKAGE OR OTHER DAMAGES RESULTING
FROM CYBER-ATTACK, HACKER ATTACK, VIRUS INSPECTION, OR OTHER INTERNET SECURITY RISKS; HOWEVER,
HIKVISION WILL PROVIDE TIMELY TECHNICAL SUPPORT IF REQUIRED.
YOU AGREE TO USE THIS PRODUCT IN COMPLIANCE WITH ALL APPLICABLE LAWS, AND YOU ARE SOLELY RESPONSIBLE
FOR ENSURING THAT YOUR USE CONFORMS TO THE APPLICABLE LAW. ESPECIALLY, YOU ARE RESPONSIBLE, FOR USING
THIS PRODUCT IN A MANNER THAT DOES NOT INFRINGE ON THE RIGHTS OF THIRD PARTIES, INCLUDING WITHOUT
LIMITATION, RIGHTS OF PUBLICITY, INTELLECTUAL PROPERTY RIGHTS, OR DATA PROTECTION AND OTHER PRIVACY
RIGHTS. YOU SHALL NOT USE THIS PRODUCT FOR ANY PROHIBITED END-USES, INCLUDING THE DEVELOPMENT OR
PRODUCTION OF WEAPONS OF MASS DESTRUCTION, THE DEVELOPMENT OR PRODUCTION OF CHEMICAL OR
BIOLOGICAL WEAPONS, ANY ACTIVITIES IN THE CONTEXT RELATED TO ANY NUCLEAR EXPLOSIVE OR UNSAFE NUCLEAR
FUEL-CYCLE, OR IN SUPPORT OF HUMAN RIGHTS ABUSES.
IN THE EVENT OF ANY CONFLICTS BETWEEN THIS MANUAL AND THE APPLICABLE LAW, THE LATER PREVAILS.
3
Page 5
FocSign Client • User Manual
Regulatory Information
FCC Information
Please take attention that changes or modification not expressly approved by the party responsible
for compliance could void the user’s authority to operate the equipment.
This equipment complies with FCC radiation exposure limits set forth for an uncontrolled environment.
This equipment should be installed and operated with minimum distance 20cm between the radiator &
your body.
FCC compliance:
This product has been tested and found to comply with the limits for a Class B digital device, pursuant to
Part 15 of the FCC Rules. These limits are designed to provide reasonable protection against harmful
interference in a residential installation. This product generates, uses, and can radiate radio frequency
energy and, if not installed and used in accordance with the instructions, may cause harmful
interference to radio communications. However, there is no guarantee that interference will not occur in
a particular installation. If this product does cause harmful interference to radio or television reception,
which can be determined by turning the equipment off and on, the user is encouraged to try to correct
the interference by one or more of the following measures:
—Reorient or relocate the receiving antenna.
—Increase the separation between the equipment and receiver.
—Connect the equipment into an outlet on a circuit different from that to which the receiver is
connected.
—Consult the dealer or an experienced radio/TV technician for help.
FCC Conditions
This device complies with part 15 of the FCC Rules. Operation is subject to the following two
conditions:
1. This device may not cause harmful interference.
2. This device must accept any interference received, including interference that may cause
undesired operation.
EU Conformity Statement
This product and - if applicable - the supplied accessories too are marked with "CE" and
comply therefore with the applicable harmonized European standards listed under the
EMC Directive 2014/30/EU, the LVD Directive 2014/35/EU, the RoHS Directive 2011/65/EU.
2012/19/EU (WEEE directive): Products marked with this symbol cannot be disposed of as
unsorted municipal waste in the European Union. For proper recycling, return this product
to your local supplier upon the purchase of equivalent new equipment, or dispose of it at
designated collection points. For more information see: www.recyclethis.info
2006/66/EC (battery directive): This product contains a battery that cannot be disposed
of as unsorted municipal waste in the European Union. See the product documentation
for specific battery information. The battery is marked with this symbol, which may include
lettering to indicate cadmium (Cd), lead (Pb), or mercury (Hg). For proper recycling, return the
battery to your supplier or to a designated collection point. For more information see:
www.recyclethis.info
Industry Canada ICES-003 Compliance
This device meets the CAN ICES-3 (B)/NMB-3(B) standards requirements.
4
Page 6
FocSign Client • User Manual
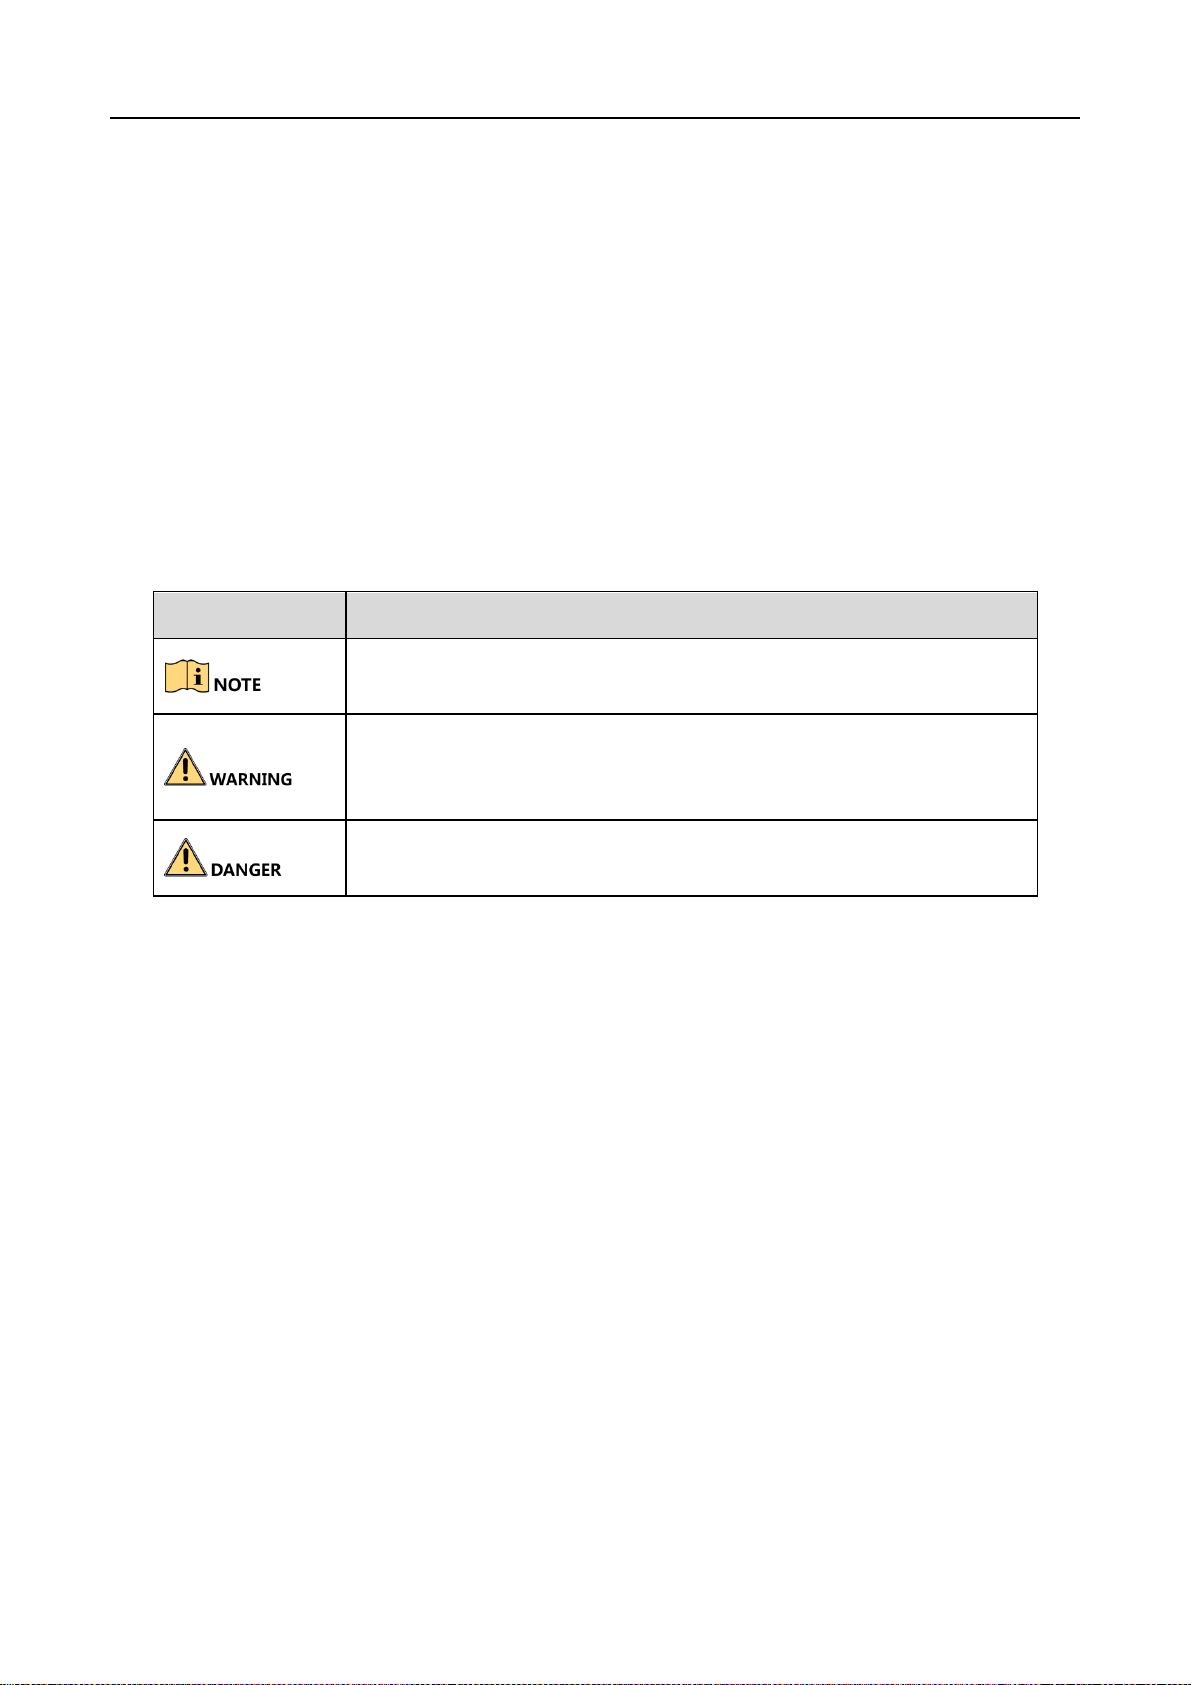
Symbol
Description
Provides additional information to emphadimension or supplement
important points of the main text.
Indicates a potentially hazardous situation, which if not avoided,
could result in equipment damage, data loss, performance
degradation, or unexpected results.
Indicates a hazard with a high level of risk, which if not avoided, will
result in death or serious injury.
Applicable Products
This manual is applicable to FocSign Client and guides you to complete the configuration and
operation of FocSign Client.
About the Default
Default administrator account: admin.
Symbol Conventions
The symbols that may be found in this document are defined as follows.
Safety Instructions
This is a class B product and may cause radio interference in which case the user may be
required to take adequate measures.
5
Page 7

FocSign Client • User Manual
6
Chapter 1 Product Introduction
Introduction
FocSign consists of FocSign Server (hereinafter referred to as the server), FocSign Player
(hereinafter referred to as the terminal) and FocSign Client (or FocSign Web). It is widely applied to
information release in the industry of entertainment, finance, traffic, etc.
FocSign Client (hereinafter referred to as the client) is used to create programs and release them to
digital signage. The client supports material management, program creation, release management,
schedule management, cut-in, terminal management, etc.
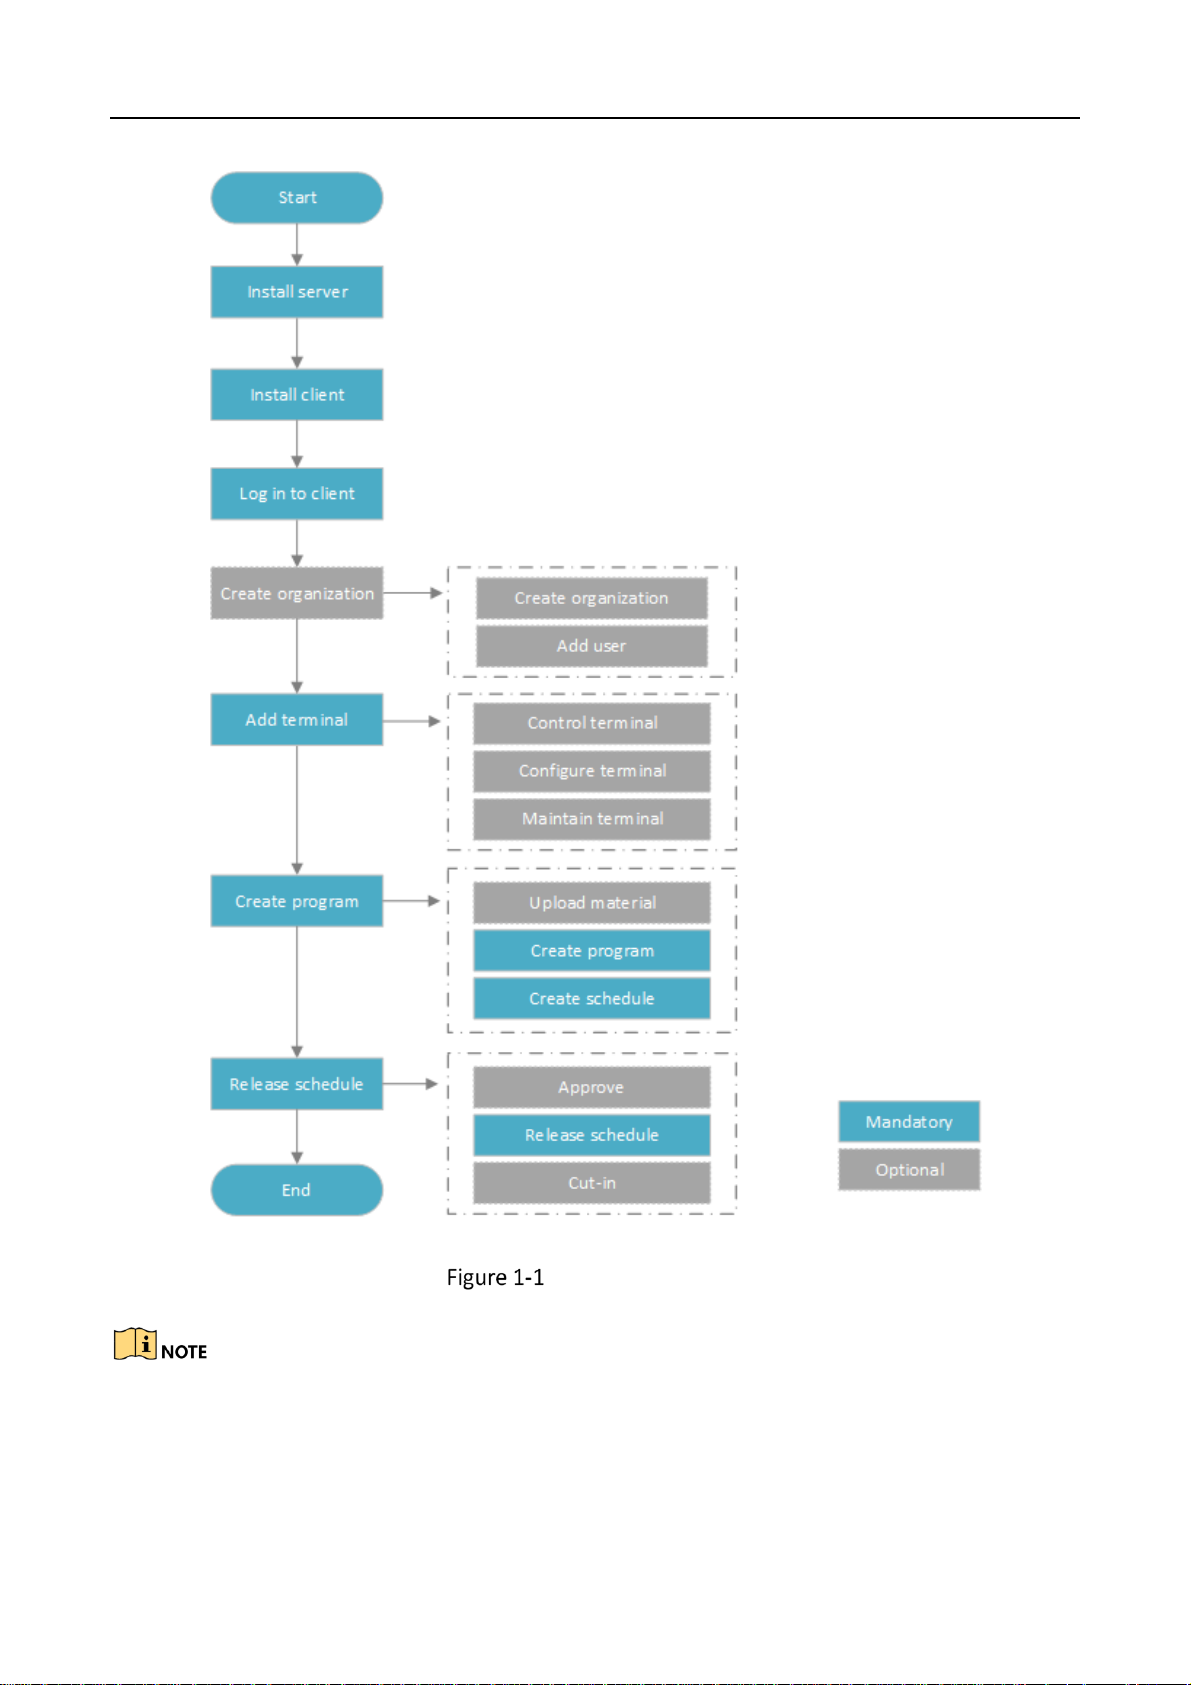
Operation Flowchart
The operation flowchart shows the overall process to create programs on the client and release
them to terminals. Some of the steps may vary with user permissions.
The actual operation process is based on specific scenarios.
Page 8
FocSign Client • User Manual
7
Operation Flowchart
Only the admin user need to install the server, and initialize the password to ensure that
the server works well. Non-admin users can choose to install the server according to their
actual needs.
Only non-admin users need to do the operations: Approval and Upload Material.
Page 9
FocSign Client • User Manual
8
Chapter 2 Server Installation
Before using the client, you must install the server and make it work well. The admin user must
install the server, and the other users must get the IP address of the server and the port number.
Before you start:
The server is running.
It is recommended that the server is installed in the following environment:
Operating System:
Windows 7/Windows 10/Windows Server 2012 (32/64 bit), Windows 7 (64 bit)
CPU: Core i5-7500 3.4 GHz
Memory: 8 GB
Double-click FocSign Server.exe in the CD and install it according to the wizard. You can
customize the user name and company name.
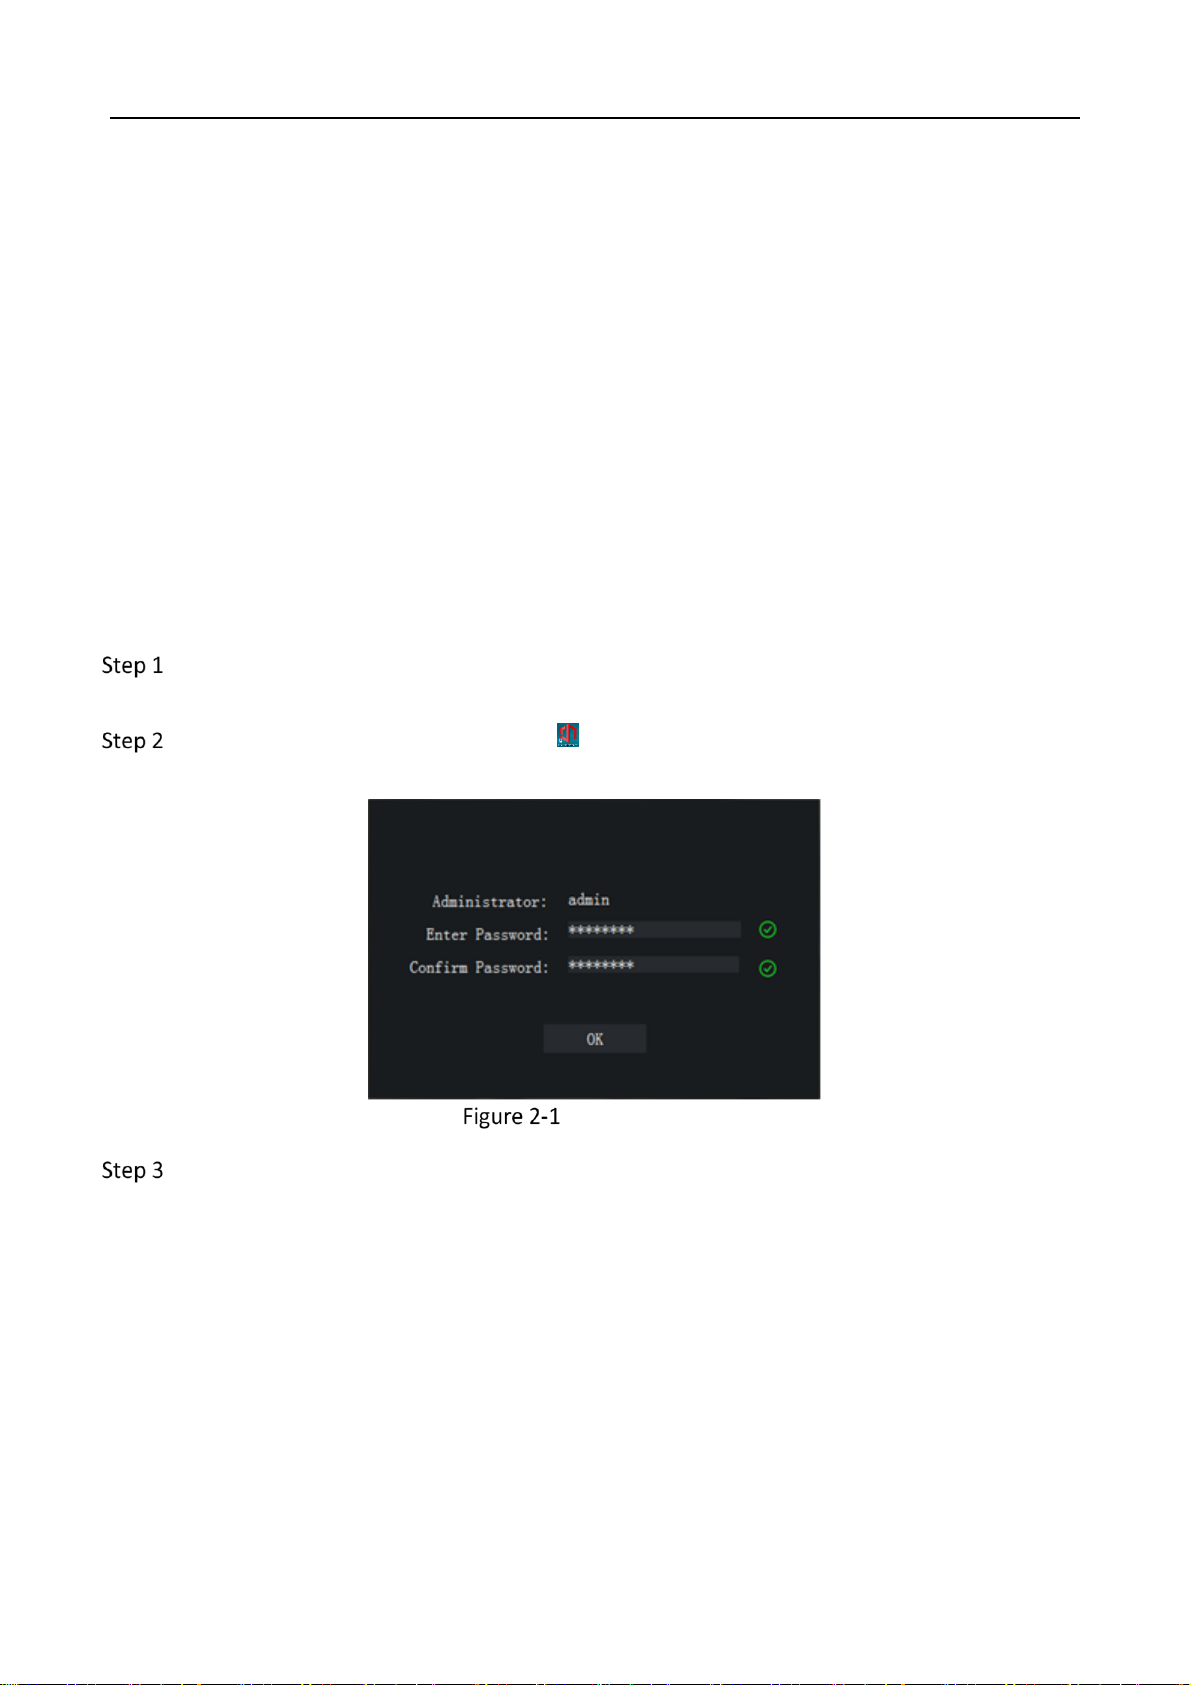
After installing the server, double-click to open the server, and set the password and
confirm it.
Set the Password
Configure the port and data storage path as needed, change the conflicting ports and check
Auto Start (as recommended).
Page 10

FocSign Client • User Manual
9
Server Configuration Interface
Click Save.
Restart the server according to the prompt message.
(Optional) You can click the server icon in the system tray to do the following operations:
Operation Description
Operation
Description
Configuration
Go to the server configuration interface
Language
Switch the language of the server
License
Check the license of the server
Restart
Restart the server
About
View such the information as the name and the
version of the server
Exit
Exit the server
Page 11

FocSign Client • User Manual
10
Chapter 3 Login
Log in to the Client
Before logging in to the client, you must set the password and configure the server. You can
manage the terminals and release programs to the terminals after logging in.
Before you start:
The server is running.
It is recommended that the client is installed in the following environment:
Operating System:
Windows XP/Windows 7/Windows 10 (32/64 bit), Windows 7 (64 bit)
CPU:
Intel Pentium 4.3.0@3.0 GHz and higher, Core i3-2100 3.1 GHz is recommended.
Memory:
2 GB and higher, 4 GB is recommended
GPU
RADEON X700 and higher, NVDIA GeForce GT730 is recommended.
Video Memory:
256 MB and greater, 512 MB is recommended.
Double-click FocSign Client.exe in the CD and install it according to the wizard.
Go to the login interface, and enter the user name and password.
Page 12

FocSign Client • User Manual
11
Login Interface
The admin user needs to enter the user name and password of the server.
Click Server Configuration, and enter the IP address and port number of the server.
Server Configuration
The port number of the server is 8000 by default.
Page 13

FocSign Client • User Manual
12
Click Log In.
(Optional) Check Remember Password and Auto Login as needed.
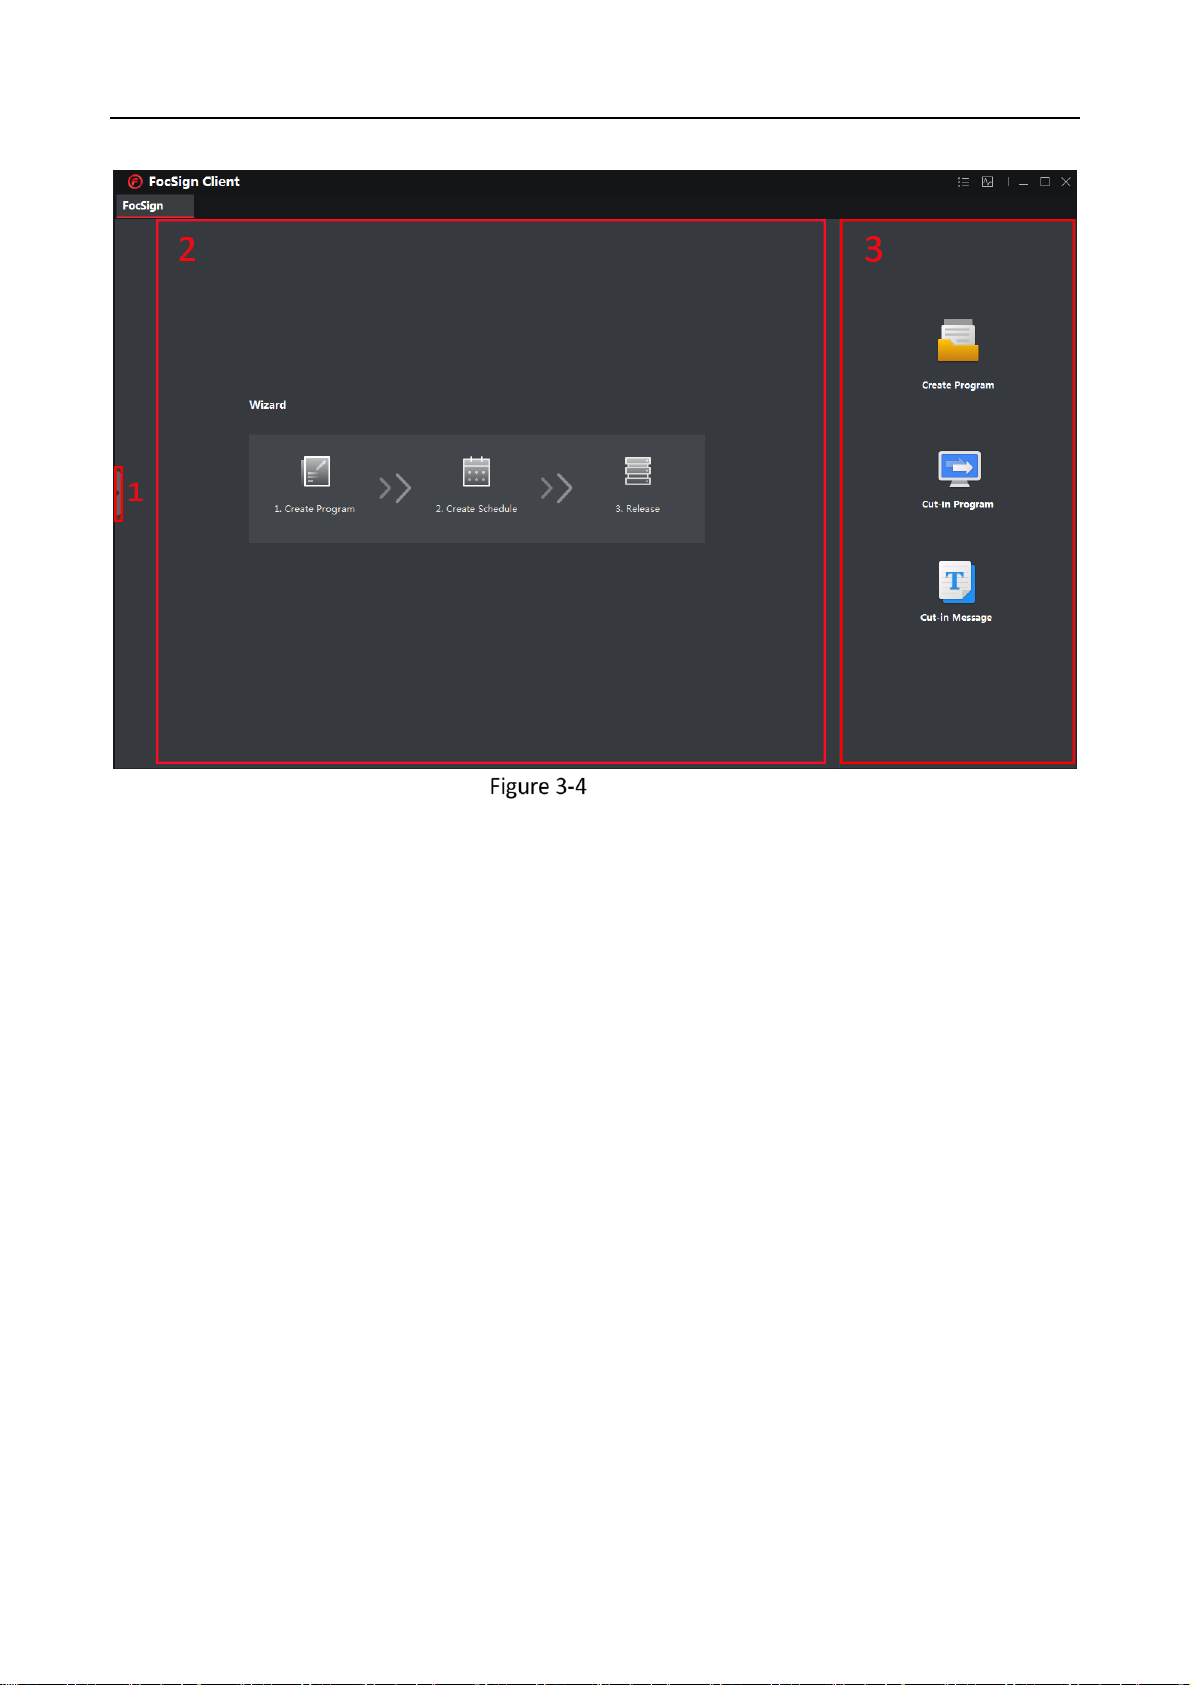
Home Page Introduction
After logging in to the client, the wizard including uploading material, creating programs, creating
schedules, and releasing schedules is displayed by default. You can close the wizard or click Next
according to the wizard. You can also select Wizard in the menu bar to open the wizard interface.
Wizard
After the wizard, the home page is as follows.
Page 14
FocSign Client • User Manual
13
Home Page
1. Menu Bar
You can hide or open the menu bar. In the menu bar, you can upload materials, create programs
and schedules, release and approve programs, manage terminals, manage logs, manage
organizations and maintain the server.
2. Main Interface
When you log in to the client first, the wizard is displayed; after you create programs, all programs
are displayed.
3. Quick Operation Bar
You can create programs, cut in programs and messages.
Page 15
FocSign Client • User Manual
14
Chapter 4 Organization Creation
You can create organizations, and assign different permissions to different organizations.
The admin user belongs to the center level (the first level) by default.
Only the admin user can add, edit and delete all organizations and users.
Other users can only add, edit and delete their subordinate organizations and users.
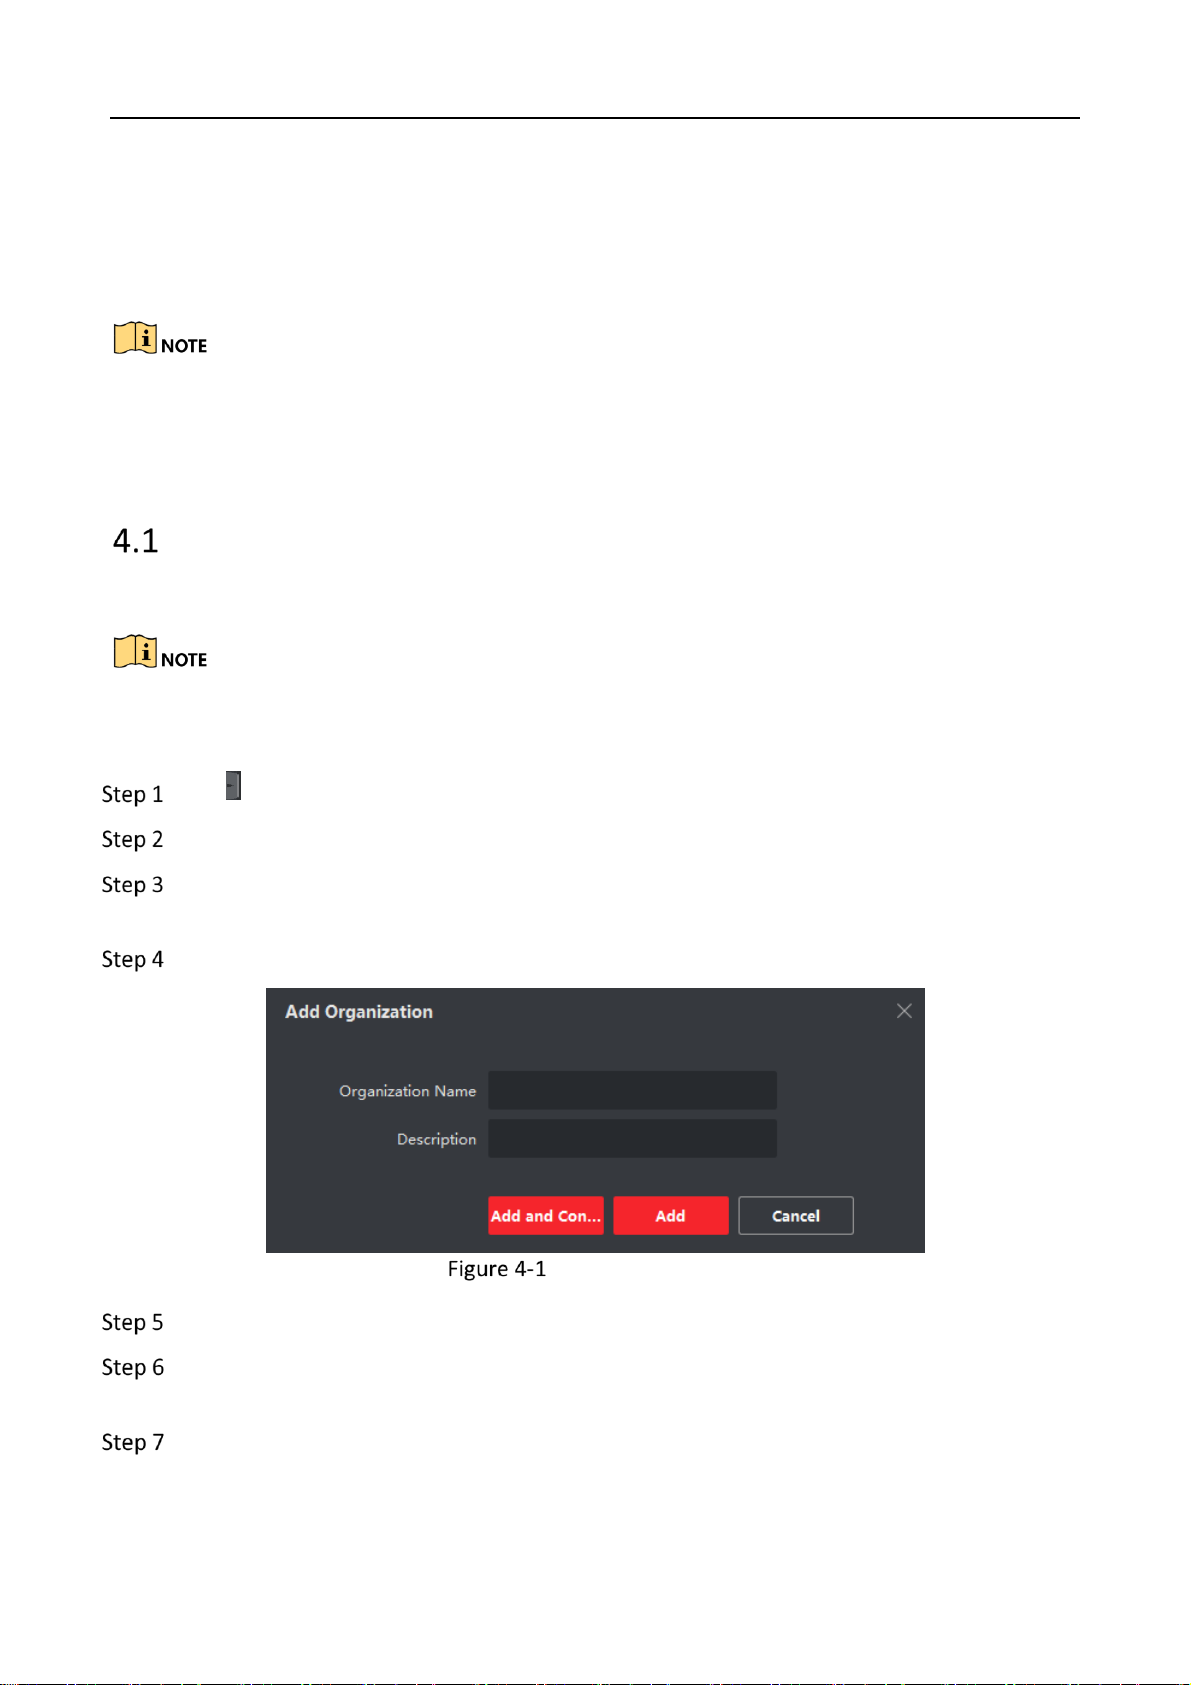
Create an Organization
Create organizations to realize organization management.
You can create up to 5 organization levels including center.
Up to 1024 organizations can be created.
Click , and the menu bar pops up.
Select Organization.
Select an organization as the parent organization, and the organizations to be added will
become its child organizations.
Click +Add in the first column to add an organization.
Add an Organization
Set the organization name and description.
Click Add to complete the operation or click Add and Continue to continue to add other
organizations.
Repeat the preceding steps to add the subordinate organizations.
Page 16
FocSign Client • User Manual
15
Add a User
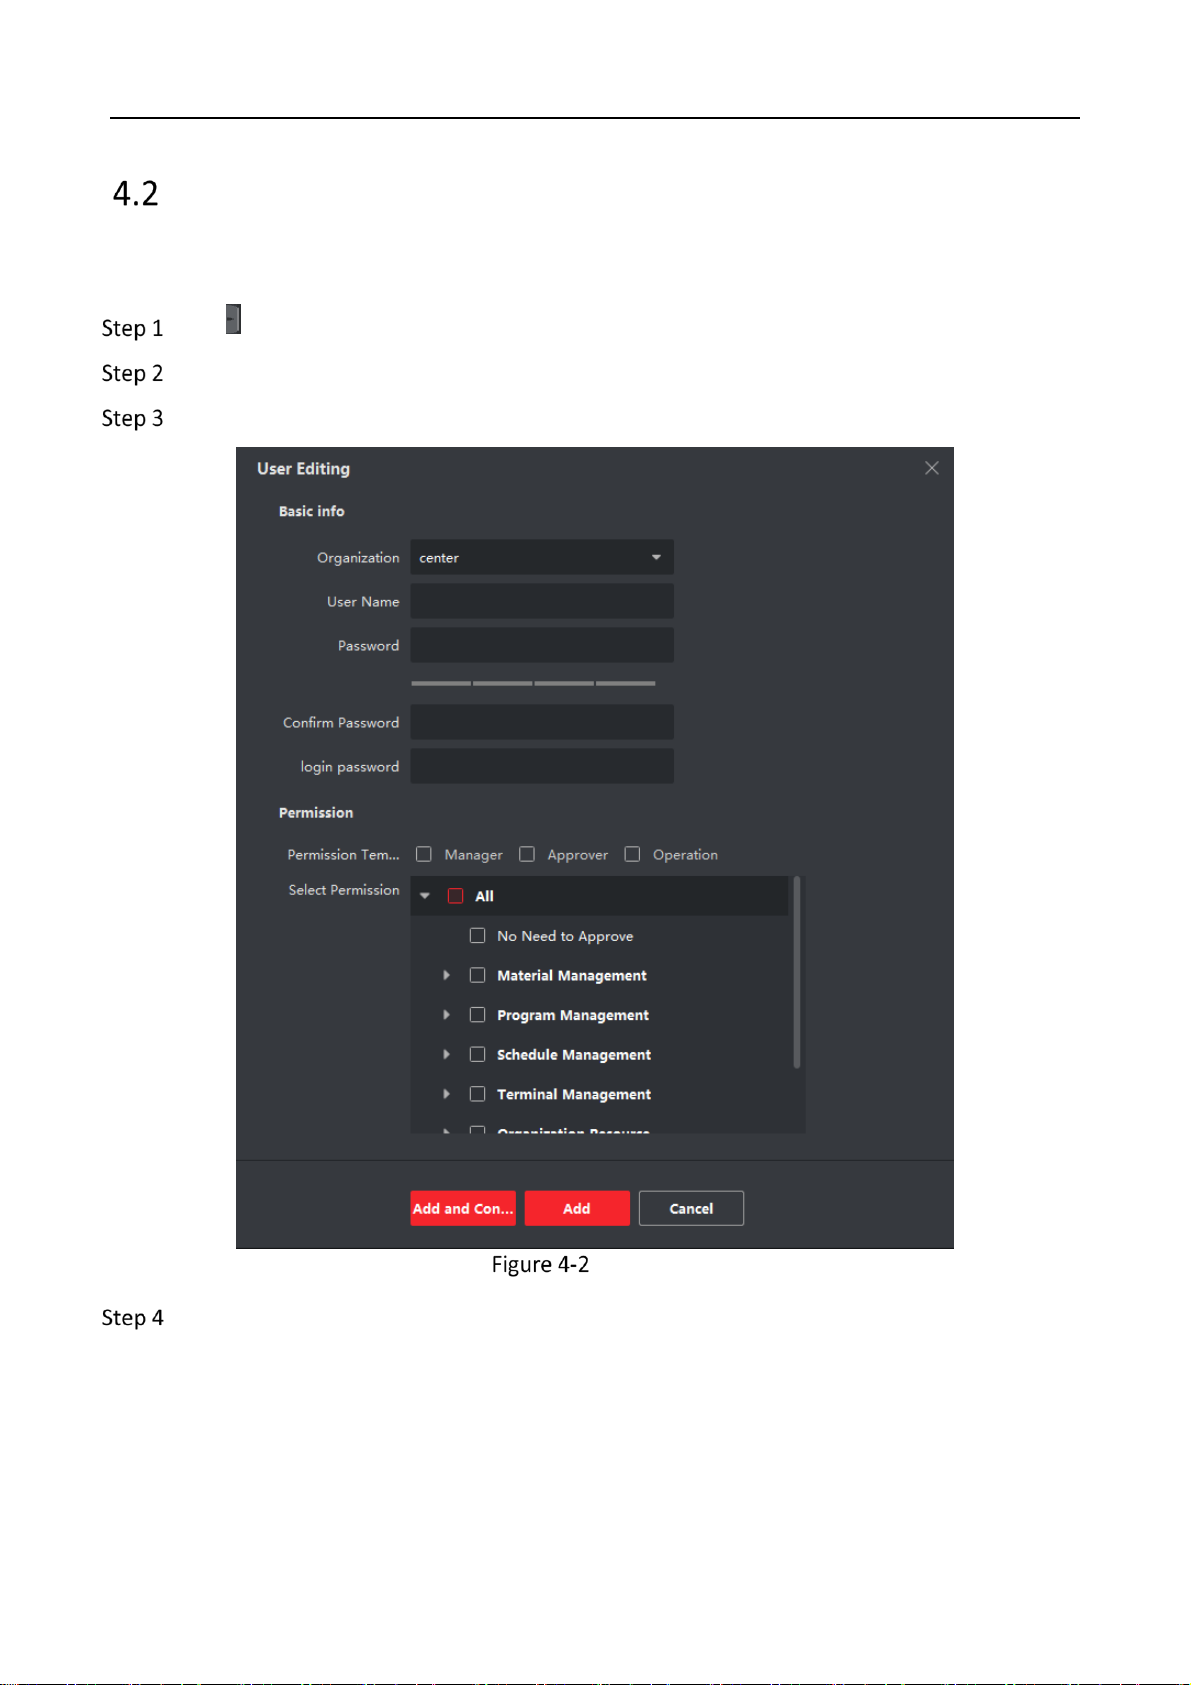
You can add users in different organizations and assign permissions to the users. For security, the
admin user should assign different roles to different users and delete the useless users.
Click , and the menu bar pops up.
Select Organization.
Click +Add in the second column to add a user.
Add a User
Edit user information and select permissions.
Page 17
FocSign Client • User Manual
16
Parameter Description
Parameter
Description
Organization
The organization which the user to be added belongs to
User Name
Up to 32 characters allowed, including letters and digits.
Password
8 to 16 characters allowed, including at least 2 of the following types:
digits, lower-case letters, upper-case letters and special characters.
The password is divided into three grades: weak, medium, strong. You
are required to set the strong password.
Login Password
To confirm the identify, you are required to enter the login password.
Permission
User templates are divided into manager, approver and operator.
Different user templates has different default rights. You can also
customize the user permission.
Click Add to complete the operation or click Add and Continue to continue to add other
users.
(Optional) You can do the following operations after adding users.
Operation Description
Operation
Description
Edit
Edit the user type, user name, password and
permissions. The admin user can only edit the
password.
Delete
Delete one user or delete multiple users in
batches. The admin user cannot be deleted.
Sort
Click to sort by No., User Name,
Organization, or Permission.
Page 18
FocSign Client • User Manual
17
Chapter 5 Terminal Management
Only after adding terminals to the server, you can release programs to the terminals and manage
the added terminals, including start up/shut down terminal startup/shutdown, adjust terminal
volume adjustment and brightness adjustment, etc.
Add a Terminal
You can add terminals via the following methods:
If the client and the terminals are in the same network segment, activate terminals from the
Online Device and do the CMS registration.
If the client and the terminals are not in the same network segment and you have obtained
the IP addresses of the terminals, do the CMS registration directly.
Activate a Terminal
If the client and the terminal are in the same network segment, you can activate the terminal via
the client. If the client and the terminal are not in the same network segment, you can only
activate the terminal on the terminal. For details, please see the quick start guide.
Before you start:
The terminal is on and is in the same network segment with the client.
Click Terminal in the menu bar.
Click in Online Device to view online terminals.
Select the terminal to be activated.
Click Activate.
Page 19

FocSign Client • User Manual
18
Activate Terminal
Set the terminal password and confirm password.
Click OK.
You can edit network parameters and reset passwords in Online Device.
Register a Terminal
You can register the activated terminal to the client.
Before you start:
The terminal and the client are in the same network segment and the terminal is activated.
After activating the terminal, click OK in the dialog box to go to the registration interface.
Enter the Terminal IP Address, Terminal Password and Terminal Name.
Page 20

FocSign Client • User Manual
19
CMS Registration
Click OK.
(Optional) Click Acquire Registration Status to view terminal registration status.
Before you start:
You have acquired the terminal IP address, terminal password and terminal name, and the
terminal is activated.
Click Terminal in the menu bar.
Click CMS Registration in Online Device.
Enter the Terminal IP address, Terminal Password and Terminal Name.
Click OK.
The status of the terminal registered is online.
You can edit information of the added terminal or delete the added terminal.
Page 21

FocSign Client • User Manual
20
Click of a terminal to edit its name, serial No. or description.
Check a terminal and click Delete Terminal to delete it.
Edit/Delete Terminal
To manage the deleted terminal, you need add the terminal to the client again.
Click of a terminal to view its information such as the name, resolution and version and the
current program image.
Terminal Control
You can start up/shut down a terminal, adjust the volume, and control programs via the terminal
operation menu.
Page 22

FocSign Client • User Manual
21
Terminal Operation
You can manually start up and shut down a terminal or multiple terminals, and configure the
startup/shutdown schedule for a terminal or multiple terminals.
: Start up the selected terminal.
: Shut down the selected terminal.
: Restart the selected terminal.
Timed Power On/Off: Select a terminal, enable Timed Power On/Off and click Settings to set
the startup/shutdown schedule. The terminal automatically starts up and shuts down
according to the schedule.
You can control program play, and cut-in for one or more terminals.
Play/Stop
If a program is playing in the terminal, click Play to start playing the program from the beginning,
and click Stop to stop playing.
Page 23

FocSign Client • User Manual
22
Cut-in
The terminal plays cut-in programs in priority order after receiving them. Click Stop to stop playing
cut-in programs.
Play Content
Click Clear to clear the programs which are being played in the terminal.
Message Play
Click Stop to stop the playing text messages.
You can adjust the volume for one or more terminals.
Output Volume
Drag the slider to adjust the terminal output volume.
Timed Volume
Select a terminal, enable Timed Volume and click Settings to set the volume schedule. The
terminal volume varies with the schedule.
Terminal Configuration
You can configure terminals remotely.
Page 24

FocSign Client • User Manual
23
Terminal Configuration
You can adjust the brightness for one or more terminals.
Auto-Brightness
Enable Auto-Brightness and select a backlight value. The terminal will automatically adjust screen
backlight according to the environment.
Brightness
Enable Brightness and drag the slider to adjust the brightness value. The brightness value ranges
from 0 to 100.
You can adjust the resolution for the terminal added or more terminals added.
The terminal(s) added must be digital signage, and support the resolution adjustment.
Auto
Enable Auto to automatically select the closest resolution.
Page 25

FocSign Client • User Manual
24
Custom
Enable Custom. The resolution supported ranges from 480 × 320 to 3840 × 2160.
Enable Logo, and the terminal will display the default logo when powering on.
Select Terminal and the terminal to be configured in the terminal list.
Select Terminal Configuration -> Device Operation -> Logo.
Enable Logo.
Select the desired terminal and click OK.
If no program or cut-in is played in the terminal, you can enable the default schedule.
Before you start:
You have created default schedules and released the schedules to the terminal. Please see 6.3.3
Create a Default Schedule.
Select Terminal and the terminal to be configured in the terminal list.
Select Terminal Configuration -> Device Operation -> Default.
Enable Default Schedule.
Select the desired terminal and click OK.
According to the selected time zone, the terminal will automatically adjust the time of time zone.
Select Terminal and the terminal to be configured in the terminal list.
Select Terminal Configuration -> Device Operation -> Time Zone.
Select the time zone and the desired terminals, and click OK.
Enable NTP Time Sync to sync the time between terminals and the NTP server. Disable NTP Time Sync, and the server registered synchronizes the time of the terminals, after that, you need to
synchronize the time of the terminals manually.
Select Terminal -> Terminal Configuration -> NTP Time Sync.
Page 26

FocSign Client • User Manual
25
Enable NTP Time Sync by using either of the following methods:
Select IP Address Mode Settings, enter the IP address providing with the time sync function
and select the time sync frequency.
Select Domain Mode Settings, enter the domain of the server providing with the time sync
function and select the time sync frequency.
Select the desired terminal and click OK.
To increase terminal security, you are recommended to change the passwords of your terminals
regularly.
Select Terminal and the terminal to be configured in the terminal list.
Select Terminal Configuration -> Device Operation -> Password.
Enter Old Password, set New Password and confirm it.
8 to 16 characters allowed, including at least 2 of the following types: digits, lower-case letters,
upper-case letters and special characters. You are required to set a strong password.
Select Terminal -> Terminal Configuration -> Additional Component Information.
On Additional Component Information interface, you can check the version of the additional
component and whether it can be upgraded.
Link terminals with network cameras (IPCs) to receive information from network cameras.
Up to 8 conventional network cameras can be added.
Select Terminal and the terminal to be configured in the terminal list.
Select Terminal Configuration -> Terminal Linkage -> Channel Linkage.
Page 27

FocSign Client • User Manual
26
Configure IPC Channel
Select a channel and click .
Enter network camera parameters.
Click OK to link the terminal with network cameras.
(Optional) Click or to change the channel for the network camera.
Terminal Maintenance
You are recommended to acquire the package to upgrade your terminals with the help of
professional technical support. You can upgrade FocSign Player.exe or the whole terminal system.
Before you start
Save the upgrade package in the local path of your computer.
Select Terminal and the terminal to be upgraded.
Click Upgrade.
Click and select the upgrade package.
Page 28

FocSign Client • User Manual
27
Click OK to start upgrade.
It takes 1 to 10 minutes to upgrade the terminal. Do not turn off the terminal during upgrade. The
terminal will automatically restart after upgrade.
Before you start
Ensure the terminal and your computer are in the same network segment and the terminal is
activated.
Click Terminal in the menu bar.
Click in Online Device to view online terminals.
Select the desired terminal and click Reset Password.
Reset Password
Click Export to export the terminal configuration file.
Click Import to import a configuration file.
You are recommended to import configuration file with the help of professional technical support.
Enter Password and Confirm Password.
Click OK.
Page 29

FocSign Client • User Manual
28
To increase security, you are recommended to turn off SADP after server configuration. This
function is only for the professional technical support to debug the device.
Select Terminal -> Terminal Configuration -> Security. Check/uncheck Enable SADP as needed. Select the desired terminal and click OK.
The function is only for the professional technical support to debug terminals.
Select Terminal -> Terminal Configuration -> Terminal Debugging.
Enable Terminal Debugging.
Enter the debugging command and select the desired terminal(s).
Click OK.
Select Terminal -> Terminal Configuration -> Terminal Network.
Enter and edit network parameters such as IP Address, Subnet Mask and Gateway.
Click OK.
If the terminal is abnormal, you can restore it to default settings.
Select Terminal and the terminal to be configured in the terminal list.
Click Restore in Terminal Operation.
Restore defaults, and only the schedules or default programs played in the terminals, the cut-in
programs, materials and messages, the information of the linked IPCs, the registered server
information, the terminal activation status and resolution can be kept.
Page 30

FocSign Client • User Manual
29
Chapter 6 Program Creation and Release
You can create and edit programs, create schedules and release them to different terminals.
1. Quick Release:
Click Create Program in the quick operation bar and click Next to quickly release the programs.
2. Normal Release:
Select Material Management in the menu bar on the home page to upload the materials.
Select Program Management in the menu bar on the home page to create programs.
Select Schedule Management in the menu bar on the home page to create schedules and
release them to the terminals.
You are recommended to use the quick release method. The following uses the quick release
method as an example.
Upload Materials
The admin user and the user who has the right to approve the materials can upload materials in
the process of creating programs. Please see 6.2 Create Programs.
You can also upload, preview, edit, delete, download, refresh, search materials in Material
Management interface.
Page 31

FocSign Client • User Manual
30
Upload Materials
Local materials include pictures, videos, audios, TXT files, PDF files, static webpages and APPs.
Up to 10,000 materials including built-in materials can be stored, and up to 1000 materials can
be uploaded in batches.
The dimension of one material cannot exceed 4 GB.
The names of any two materials cannot be the same.
Page 32

FocSign Client • User Manual
31
Local Material Description
Material Type
Format Requirement
Picture
BMP, JPG, PNG, GIF (The maximum resolution of one material is 4K, including
2160 × 3840 and 3840 × 2160)
Video
ASF, AVI, MPG, 3GP, MOV, MKV, WMV, FLV, MP4, RM, RMVB
Audio
MP3, WAV, WMA
File
TXT, PDF
Webpage
HTML, HTM
APP
APK
Select Material -> Upload Material -> Select Local File.
Select the material(s) to be uploaded and click Open.
You can select one or more materials to upload.
Click to edit the material.
Click Upload.
The dynamic materials include the pop-up images, captured images, stream media servers,
network cameras, URL webpages, URL pictures and call.
Page 33

FocSign Client • User Manual
32
Dynamic Material Description
Material Type
Description
Pop-up Image
Upload images and other materials through a
third-party interface.
Capture
Get snapshots of the third-party IPCs.
Stream Media
Receive streams from a streaming media
server.
Network Camera (IPC)
Get videos from IPCs.
URL Web
Dynamic URLs.
URL Picture
The dynamic website of the picture.
Call
Upload images, texts and other materials
through a third-party interface.
Select Material -> Upload Material -> Add Dynamic Material.
Select the material(s) to be uploaded and enter the corresponding attributes.
For Capture and Network Camera, you need to enter such information as IP address, port, and
channel No.
For Stream Media, URL Web and URL Picture, you need to enter a URL.
Click OK.
Click Upload.
Quickly replace a static material with the same-name material. If a material has been used by
multiple programs, it will be replaced synchronously.
Before you start:
The type and name of the material to be uploaded are exactly the same as that of the material to
be replaced.
Only static materials can be replaced.
Select Material -> Upload Material.
Page 34

FocSign Client • User Manual
33
Click Upload Local File and select a new material with the same name.
Upload Material
Click Upload, the prompt message pops up and Upload becomes Replace the Original
Material.
Page 35

FocSign Client • User Manual
34
Replace the Original Material
Click Replace the Original Material.
(Optional) You can check Sync Material Replacement to Terminal, and the materials with
the same name in the terminal programs will be replaced automatically.
Click Replace.
Create Programs
Create and configure the programs according to the terminal type. Customize the program layout.
The layout is same with the final release effect.
Click Create Program in the quick operation bar.
Page 36

FocSign Client • User Manual
35
You can also select Program in the menu bar and click + Add to create program.
You can edit, delete, copy, cut-in, release, search programs in Program interface.
Enter the basic information of the program to edit the program. For detailed steps, please see
6.2.2 Configure Basic Program Settings.
Create Program
Enter the page property in Area 1. For detailed steps, please see 6.2.3 Configure Page.
Page 37

FocSign Client • User Manual
36
Basic Program Settings
(Optional) Select the existing landscape and portrait template in Area 2 to adjust the page
layout.
Select window type in Area 2. For detailed steps, please see 6.2.4 Add a Window.
Edit page layout with the tools listed in Area 3 and window list in Area 4. For detailed steps,
see 6.2.5 Edit Page.
Click Save to save the program or click Next to configure a program schedule.
Configure Basic Program Settings
Configure the program name, display dimension and description.
Click Create Program in the quick operation bar.
Page 38

FocSign Client • User Manual
37
Basic Information of a Program
Enter the basic information of the program.
Program Name
You need to define a program name that is easy to identify. The maximum length of the characters
is 64.
Display Dimension
According to the terminal types, select the display dimension. 1080 × 1920 is for portrait,1920
× 1080 is for landscape. Display dimension is set as landscape by default. You can customize the
resolution.
Organization
Set the organization which the program belongs to. The organization is set as the organization
which the user belongs to currently by default.
Property
Public: The program can be seen and used by all users in the organization tree where the users
who create the program belongs.
Private: The program can be seen and used by all users in the organizations where the users who
create the program and their superiors (including non-direct superiors).
Description
You can enter the description of the program, such as usage, applicable scenarios, overview of
program content, etc. The maximum length of the characters is 64.
Page 39

FocSign Client • User Manual
38
Edit Page Property.
Page Attributes
Background Picture
Select the image in the local file or in the server as the background picture. GIF format is not
supported.
Play Type
Select Custom, Auto, or Auto-Switch.
Play Duration
Play duration is the current page play time. The unit is sec.
When Play Type is Custom, you can set the play duration accordingly.
The window play duration in the page cannot exceed the page play duration, and the excess
part will not be played.
When Play Type is Auto, you need to set the play times. If you enter N, the page plays N
time(s).
When Play Type is Auto-Switch, the page plays in a continuous loop.
(Optional) Click to add a page.
Page 40

FocSign Client • User Manual
39
Up to 32 pages can be added.
You can adjust the program order. Programs will be played according to the page order.
You can add pictures, videos, audios, documents, PDF files, applications, web pages, clocks,
countdowns, weather reports, pop-up images, captured images, stream media, call, button and
text input etc.
After configuring the page, select an existing window on the program creating interface or upload
materials to a window and then add the window to the page.
Users without the permission to approve materials can only select the existing materials on
the server.
For more details, please see 6.1 Upload Materials.
Window Type
Page 41

FocSign Client • User Manual
40
Up to 16 windows can be added for one single page.
Up to 512 different materials or total 1024 materials can be linked to one single program.
Audio windows cannot be added with video window, stream media windows or IPC
windows at the same time.
If different types of windows are added to one page, such as video windows, stream media
windows and IPC windows, only one video can be played in non-mute mode. Check Close
Auto for the other windows.
Pop-up, Call and Capture can be realized by getting data such as pictures and texts from
third-party interfaces.
Button window is available for touchscreen terminals only.
Add a Picture Window
A total of up to 16 picture windows and picture URL windows can be added for one single page.
Select Multi-Media Library -> on the program editing interface.
Select an existing picture on the server or the uploaded picture to be added.
Drag the picture window to the canvas and adjust the location and dimension by dragging
and scaling.
Edit the attributes on the right window to set location, dimension, play type, play time and
redirect method.
(Optional) You can set to jump to a new window or page for touchscreen terminals. For
more details, see 6.2.6 Hyperlink.
Add a Video Window
A total of up to 4 video windows, Stream Media windows and IPC windows can be added for one
single page, and no other audio window can be added.
Select Multi-Media Library ->
on the program editing interface.
Select an existing video on the server or the uploaded video to be added.
Drag the video window to the canvas and adjust the location and dimension by dragging and
scaling.
Edit the attributes on the right window to set location, dimension and play type.
Page 42

FocSign Client • User Manual
41
Play type
Material Time: Play the entire material for one time.
Custom: Play the material for the time you set.
(Optional) Check Close Auto to play the video in mute.
If multiple video windows are added to one page, only one video can be played in non-mute mode.
Check Close Auto for the other windows.
(Optional) You can set to jump to a new window or page for touchscreen terminals. For
details, see 6.2.6 Hyperlink.
Add an Audio Window
Only one audio window can be added for one single page.
Audio window cannot be added with video window, Stream Media window and IPC window at the
same time.
Select Multi-Media Library -> on the program editing interface.
Select an existing audio on the server or the uploaded audio to be added.
Drag the audio to the canvas and adjust location and dimension by dragging and scaling.
Edit the attributes on the right window to set location, dimension and play type.
Play type
Material Time: Play the material for one entire time.
Custom: Play the material for the time you set.
Add a TXT Window
Select Multi-Media Library -> on the program editing interface.
Select an existing TXT file on the server or the uploaded TXT file to be added.
Drag the TXT file to the canvas and adjust location and dimension by dragging and scaling.
Edit the attributes on the right window to set location, dimension, play and property of the
TXT file.
Add a PDF Window
Select Multi-Media Library -> on the program editing interface.
Page 43

FocSign Client • User Manual
42
Select an existing PDF file on the server or the uploaded PDF to be added.
Drag the PDF to the canvas, and set location and dimension.
Edit the attributes on the right window to set play time and dwell time.
Add an APP Window
● Only one APP window can be added for one single page, and no other window can be added.
● The resolution of the APP window is the resolution of the page, which cannot be changed.
Select Multi-Media Library -> on the program editing interface.
Select an existing APP on the server or the uploaded APK to be added.
Drag the APP to the page.
Add a Web Window
A total of up to 2 picture windows and picture URL windows can be added for one single page.
Select Multi-Media Library -> on the program editing interface.
Select an existing Web page on the server or the uploaded Web page to be added.
Drag the Web window to the canvas and adjust location and dimension by dragging and
scaling.
Edit the attributes on the right window to set location, dimension, play type and play time.
(Optional) You can set to jump to a new window or page for touchscreen terminals. For
details, see 6.2.6 Hyperlink.
Add a Clock Window
Only 1 clock window can be added for one single page.
Select on the program editing interface.
Drag the clock icon to the canvas and adjust location and dimension by dragging and scaling.
Edit the attributes on the right window to set location, dimension and layout. You can save
the layout as a template, or set a background picture for the window.
(Optional) Check to show the sub-windows, including time, YY/MM/DD, week, HH:MM:SS.
Page 44

FocSign Client • User Manual
43
(Optional) Set the sub-window property:
Click the sub-window.
Edit the attributes on the right window to set type or font.
Add a Countdown Window
Select Widget on the program editing interface.
Drag a countdown icon to the canvas and adjust location and dimension by dragging and
scaling.
Edit the attributes on the right window to set location, dimension and layout. You can save
the layout as a template, or set a background picture for the window.
Set the stop time and unit.
Set the countdown format, such as font dimension, font color, location and dimension of the
countdown.
Add a Weather Window
Before you start:
Weather web manufacturer information has been configured on the server maintenance interface.
Only 1 weather window can be added for one single page.
Select Widget on the program editing interface.
Drag a weather icon to the canvas and adjust location and dimension by dragging and
scaling.
Edit the attributes on the right window to set location, dimension and layout. You can save
the layout as a template, or set a background picture for the window.
(Optional) Check to show the sub-windows, including weather icon, city, update time, date,
temp., weather, wind, air quality, humidity.
Sub-window city must be checked.
(Optional) Set the sub-window property:
Click the sub-window.
Edit the attributes on the right window to set property.
Page 45

FocSign Client • User Manual
44
The city sub-window property must be set to the third-level administrative district from the combo
list.
Add a Pop-up Window
Pop-up can be realized with pictures uploaded through third-party interfaces.
Select External Data -> on the program editing interface.
Click , and set Material Name, Organization and Property.
Click OK.
Drag the pop-up window to the canvas and adjust location and dimension by dragging and
scaling.
Edit the attributes on the right window to set location, dimension and background picture.
GIF picture cannot be set as background.
Select External Data -> on the program editing interface.
Click , set material name, organization, property and IP address, port and channel No..
Click OK.
Drag the capture window to the canvas and adjust location and dimension by dragging and
scaling.
Edit the attributes on the right window to set location, dimension and background picture.
Add a Capture Window
Capture can be realized through third-party IPC interface.
GIF picture cannot be set as background.
Set cancel type and cancel time.
Cancel Type
Choose Auto or Manual to cancel capture.
Cancel Time
Duration showed in the terminal of the captured picture.
Page 46

FocSign Client • User Manual
45
Cancel Time cannot be set in Manual type. Captured picture will disappear only after the
system receives a command.
Add a Stream Media Window
A total of up to 4 stream media windows, IPC windows and video windows can be added for one
single page, and no other audio windows can be added.
Select External Data -> on the program editing interface.
Click , set material name, organization, property and stream media player.
Click Confirm.
Drag the stream media window to the canvas and adjust location and dimension by dragging
and scaling.
Edit the attributes on the right window to set location and dimension.
Set play type and play time.
(Optional) Check Close Audio to play it in mute.
If multiple video windows are added to one page, only one video can be played in non-mute mode.
Check Close Auto for the other windows.
Add an IPC Material Window
A total of up to 4 stream IPC windows, media windows and video windows can be added for one
single page, and no other audio windows can be added.
Select External Data -> on the program editing interface.
Click , set material name, organization, property and IP address, port and channel No. of
the IPC.
Click Confirm.
Drag the IPC window to the canvas and adjust location and dimension by dragging and
scaling.
Edit the attributes on the right window to set location, dimension.
Set play type and play time.
Page 47

FocSign Client • User Manual
46
(Optional) Check Close Audio to play it in mute.
If multiple video windows are added to one page, only one video can be played in non-mute mode.
Check Close Auto for the other windows.
Add a Web URL Window
A total of up to 2 Web windows and Web URL windows can be added for one single page.
Select External Data -> on the program editing interface.
Click , set material name, organization, property and Web URL.
Click Confirm.
Drag the new Web URL window to the canvas and adjust location and dimension by dragging
and scaling.
Edit the attributes on the right window to set location and dimension.
(Optional) You can set to jump to a new window or page for touchscreen terminals. For
details, see 6.2.6 Hyperlink.
Add a Picture URL Window
A total of up to 16 picture URL windows and picture windows can be added for one single page.
Select External Data -> on the program editing interface.
Click , set material name, organization, property and picture URL.
Click Confirm.
Drag the new picture URL window to the canvas and adjust location and dimension by
dragging and scaling.
Edit the attributes on the right window to set location and dimension.
Set play type, play time and redirect method.
(Optional) You can set to jump to a new window or page for touchscreen terminals. For
details, see 6.2.6 Hyperlink.
Page 48

FocSign Client • User Manual
47
Add a Call Window
Call can be realized with pictures and texts uploaded through third-party interfaces.
Select External Data -> on the program editing interface.
Click , set material name, organization and property.
Click Confirm.
Drag the new call window to the canvas and adjust location and dimension by dragging and
scaling.
Edit the attributes on the right window to set location and dimension.
Set layout, type, background picture, table direction, data direction, row and column, etc.
The layout can be saved as a template.
Add a Text Input Window
Click and click the page to create a text input window.
Edit the attributes on the right window to set location and dimension and other property.
(Optional) You can set to jump to a new window or page for touchscreen terminals. For
details, see 6.2.6 Hyperlink.
Add a Button Window
You can only add a button window for programs on touchscreen terminals.
Button window only takes effect on touchscreen terminals.
Up to 16 button windows can be added to one page.
Click and click the page to create a button window.
Edit the attributes on the right window to set location and dimension.
Set window type:
Pop-up window: click the button to pop-up the window.
Normal: You need to set the connect method in the Event Type.
Select event type and link:
New Pop-up Window: click the button to pop-up a new window.
New Page: click the button to open a new page.
Page 49

FocSign Client • User Manual
48
Click the Function Bar and Window List to edit the program.
Function Bar
Function Bar Description
Operation
Description
/ /
Adjust window alignment: left, middle, and right.
/ /
Adjust window alignment: top alignment, middle alignment, and
bottom alignment.
Display the page on the real resolution.
Self-adaptive resolution.
Auto Snap
Once enabled, two windows connected when they are near enough.
Window List
Window List Description
Operation
Description
/ / /
Move the window layer: up/down/stick on Top/stick at Bottom.
Click to display/hide window.
Click to lock/unlock window.
Click to delete window.
Hyperlink can be configured in the Client for Android touchscreen terminals. You can open the
specified content by linking to a window or page.
Page 50

FocSign Client • User Manual
49
New Pop-up Window
When Window A is played in the terminal, click the touchscreen to jump to play Window B. Click the
touchscreen again, and the Window B will be hidden.
Click Window B and select the window type as pop-up window.
Click Window A and select the window type as normal.
Select redirect method as New Pop-up Window, and the link as window B.
New Page
Click the button to open a new page.
Before you start:
Multiple pages have been created for a program.
Click Window A and select the window type as normal.
Select redirect method as New Page.
Select redirect link as page X.
Create a Program Schedule
After creating the programs, click Next to create a program schedule so that the program can be
played according to the scheduled time or way.
● You can also click Schedule -> Create Schedule to create program schedule on the home page.
● In the Schedule Management interface, operations including editing, deletion, release,
refresh, advanced search can be realized.
Create program schedule with the time way as example.
Click Next
to create a schedule.
Page 51

FocSign Client • User Manual
50
Create Schedule
Select Play Mode: Day, Week, Custom.
Day/Week
Day/Week mode supports to play the program on a specific period in a day/week.
Custom
Custom mode supports to play the program on a specific period in the whole year. A custom
schedule can only cover 90 days at most.
Select the program and move the timeline.
Adjust the program schedule.
Move the cursor to the program bar of the timeline and drag the upper and lower edges to
adjust the beginning time and end time of the program.
Select the program bar on the timeline, and adjust the beginning time and end time of the
program in the input box.
Click to copy the program to other time periods.
Click to delete the program at this specific time period.
Click Release to enter the release interface. See more details in the Release Chapter about
how to release the program.
Page 52

FocSign Client • User Manual
51
Select play mode as loop.
Create Loop Schedule
Drag the program into the play list.
Click Create Playlist to add a new list.
Up to 8 programs can be added to one play list.
Up to 8 loop play lists can be created.
Play List 1 is no time-limited loop by default. Select time for the other loop play list.
No Time- Limited Loop:
The programs are played by order.
Time- Limited Loop:
Play the programs at specific period. The priority of Time- Limited Loop is higher than the No
Time- Limited Loop.
Click Release to enter the release interface. See more details in the Release Chapter about
how to release the program.
Page 53

FocSign Client • User Manual
52
With default schedule enabled, the terminal will play default video automatically if there is no
program or cut-in.
Before you start:
Default schedule has been initiated in Terminal -> Remote Configuration -> Device Operation ->
Default.
Select play mode as default.
Create Default Schedule
Drag the program into the play list.
Click Release to enter the release interface and release the program. For details about how
to release the program, see 6.5 Release.
Approve
Materials, programs and schedules must be approved to be used.
The admin users and users with permission get approved by default.
Select Approval Management.
Select the types that need approval: material, program and schedule.
Page 54

FocSign Client • User Manual
53
Click the materials to be approved (multiple choices supported)
Select the result and give suggestions.
Click Pass or to approve.
Click Deny or not to approve.
Click Save.
Release
You can release the program schedules or cut in programs and message to terminals. The terminals
will play the released programs according to user settings.
Click Release and you can check release details, delete release records, release programs again, do
advanced search, etc.
You can release a program schedule to the terminals after editing the program schedule.
Before you start:
You have finished the program creating process, and got approved.
Click Release on the creating schedule interface, after editing the program schedule.
Page 55

FocSign Client • User Manual
54
Schedule Release
Enter Task Name, check Effective Time and Method to Take Effect.
Select Applicable Terminal.
You can select release the schedule to multiple terminals or to an organization, or release to both
the organization and terminals at the same time.
Click Release.
Page 56

FocSign Client • User Manual
55
In the release progress interface, you can click to cancel the program release, click
to release again the canceled release schedule.
Functions including window jump, page jump and button window only take effect on the
touchscreen terminal.
The cut-in programs or messages will be played once the terminal receives cut-in release
instruction.
Cut in a Program
Click Cut-in Program on the program editing interface to create a cut-in program. For details
about how to create a new cut-in program, see 6.2 Create Programs.
Program Cut-in
Page 57

FocSign Client • User Manual
56
Select the program to be cut in, and click on the play list interface to create new cut-in
program.
Enter the release task name.
Select Play Mode, and set Time Duration or end time.
Select the terminal for the cut-in program.
Click Release and release the cut-in program to the terminal.
Programs can only be cut in after approved.
Cut-in a Text Message
Click Cut-in Text Message.
Enter the task name.
Select Applicable Terminal.
Click Add Content.
Input the text messages.
Click Add to add multiple text messages. Up to 5 messages can be added.
Select Time.
Set the play effect of the text message, including the location, font, background, display
mode, etc.
(Optional) Click Preview to check the message play effect, and press ESC to quit.
Click Release to cut in the text messages to the terminal.
Cut-in text messages do not need to be approved.
Page 58

FocSign Client • User Manual
57
Chapter 7 Maintenance Management
You can query and export logs, restore default settings of the server, edit saving paths for
materials, or configure weather manufacturer information for maintenance purposes.
Functions including Log Record, Category, Query and Log Backup are supported. As an important
method of monitoring devices, log information records the running status, exceptions,
configuration information and operation information, etc. You are recommended to collect and
back up the device logs regularly.
Click Log Management.
Set the beginning and end time, search mode, etc.
Click Search.
Check the log information on the Result interface. Up to 2000 pieces of log information can
be displayed.
Click Export Log to export all the log information.
If device parameters go exceptional, you can restore all parameters to default settings.
Select Server Maintenance.
Click Restore.
Restoring Default Settings will not delete any materials, programs or schedules.
Weather Web Manufacturer Configuration can be purchased, and only ali_xiupai is supported.
Select Server Maintenance -> Weather Web Manufacturer Configuration. Click Enable. Input Authorization Code.
Page 59

FocSign Client • User Manual
58
Users can purchase the Weather Web Manufacturer Authorization Code by visiting the following
website:
https://market.aliyun.com/products/57096001/cmapi010812.html?spm=5176.8216963.522267.1.
xJmmRQ#sku=yuncode481200004
After purchase, select Management Control -> Cloud Market -> purchased service, and find
AppCode, which is Authorization Code.
Click Save.
Page 60

FocSign Client • User Manual
1
UD16104B
 Loading...