

Page 1
Mini Plus
Quick Start Guide
EN
ES
FR
Page 2

Page 3
Setup
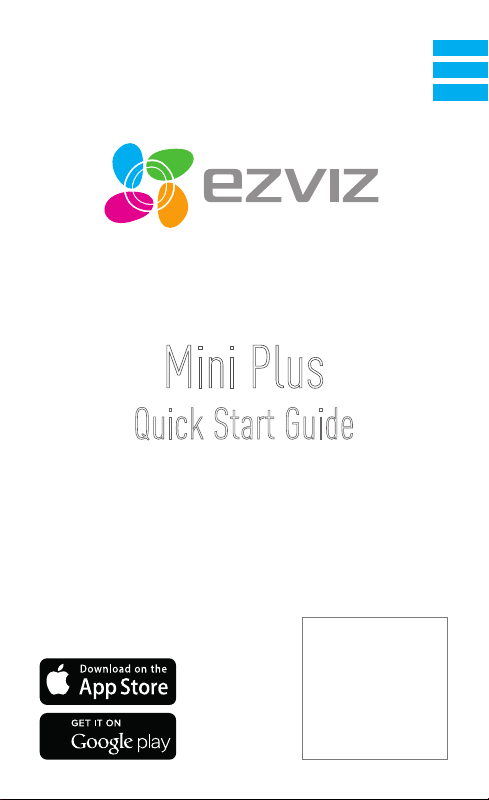
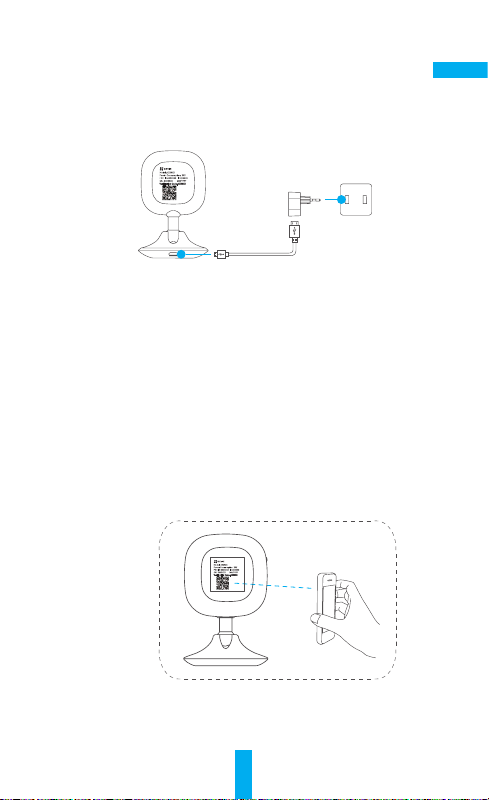
Step 1 Power-on
Plug the power cable into the camera and to the power adapter and then
into a power outlet. When the indicator flickers red and blue, the power is
ready for setup.
EN
Power Cable
Power Outlet
Step 2 Quick Settings
1. Connect your mobile phone to Wi-Fi.
2. Download and install the EZVIZ app by searching “EZVIZ” in App Store (iOS
7.0 or later) and Google Play
TM
(Android 4.0 or later).
3. Launch the app and register for an EZVIZ user account following the startup wizard.
4. Log in the app and in the Home screen, tap "+" on the upper-right corner
to enter the adding device interface.
5. Scan the QR code of the device with your mobile phone. Or you can
manually input the 9-digit serial number to add the camera. The QR code
and the serial number are located on the label on the back of the camera.
6. Follow the procedure to set the Wi-Fi connection of the camera.
7. Set the correct time zone, DST information and Date Format to finish
setup.
1
Page 4
Installation
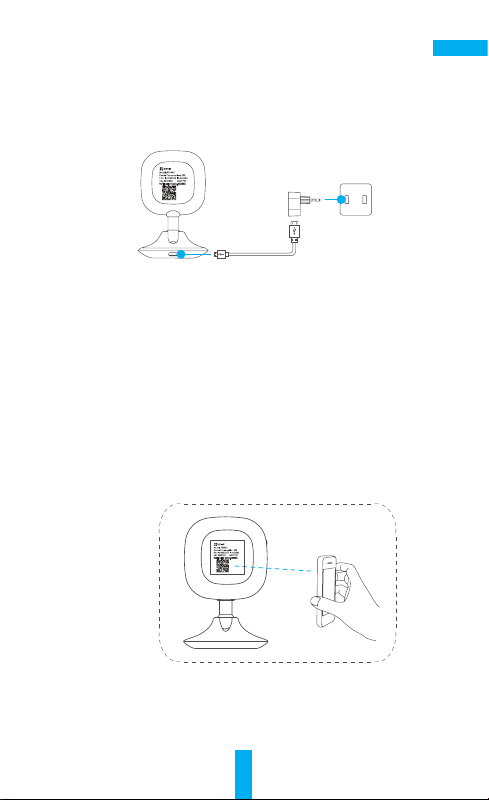
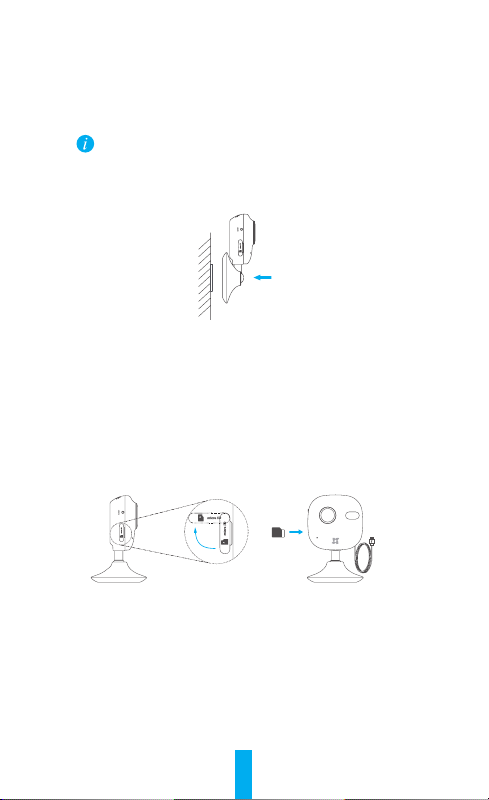
Step 1 Installing the Metal Plate (Optional)
Pick a clean and flat surface and secure the metal plate to the desired
position with the foam stickers or screws.
There’s a magnet piece inside the camera. You can skip this step if
the surface is made of metal.
Step 2 Installing the Camera
Secure the camera magnetically to the metal plate or metal surface.
Step 3 Completing Installation
Adjust the camera angle as required.
Recording on the Memory Card
Step 1 Installing the Memory Card
1. Flip the memory card slot cover clockwise to open it, see the following
left figure.
2. Insert a microSD card into the slot until a click, see the following right
figure.
3. Replace the cover.
Step 2 Initializing the Memory Card
1. From the EZVIZ app, check the memory card status by tapping on the
Storage Status in the Device Settings.
2. If the memory card status displays as Not Initialized, tap the Initialize
button to initialize it. You can then record event triggered video in the
camera after the initialization completed.
2
Page 5
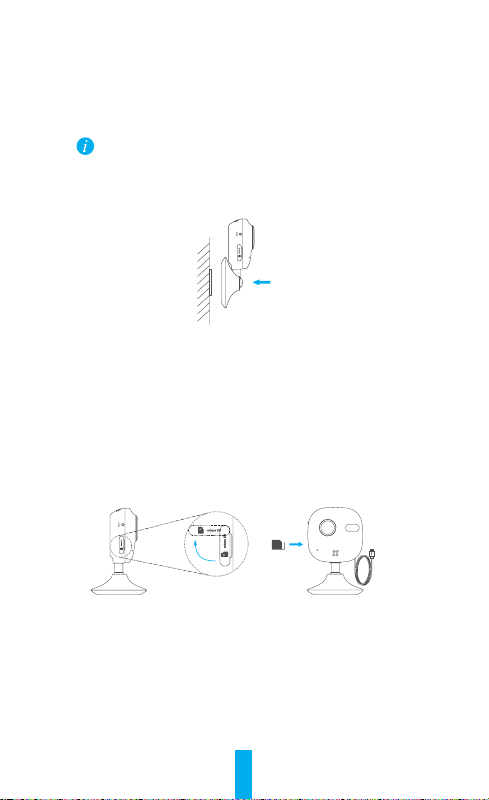
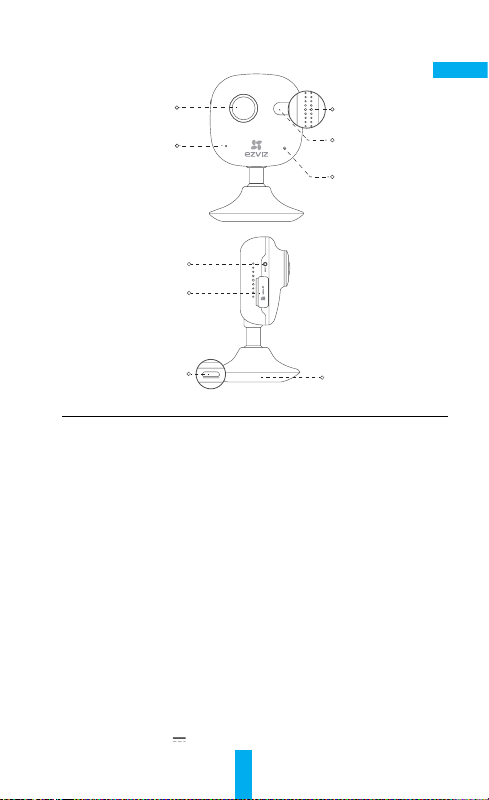
Basics
EN
Lens
Microphone
RESET
Memory Card Slot
Power Input
Speaker
IR Light
LED Indicator
Magnetic Base
Name Description
IR Light Auto light source for dark environment. The camera video has two
modes: color (for daylight recording) and black and white with IR
illuminator (for night condition).
LED Indicator •Blinking Red and Blue: The camera is on; you can configure the
Wi-Fi connection.
•Steady Blue: The camera is being connected and operated by
user(s).
•Slow Blue Flicker: The camera is running properly.
•Steady Red: The camera is starting up.
•Slow Red Flicker: The Wi-Fi connection has failed.
•Fast Red Flicker: MicroSD card error.
Memory Card
Slot
For microSD card (not included with this product). You can purchase
separately. Recommended compatibility: Class 10, maximum space
128GB. After inserting the card, you can record the event inside the
camera. You need to initialize it on the EZVIZ App.
RESET
Hold down the RESET button for 10 seconds while the camera is
running, the camera restarts and all parameters are reset to default.
Power Input
5V±10%
3
Page 6

Troubleshooting
“The device is offline.” or “The device is not registered.” prompts appear
Q:
when adding the camera using the EZVIZ App.
1. Make sure the network, which the camera is connected to, is working
A:
properly and the router’s DHCP is enabled.
2. Hold down the RESET button for 10 seconds to reset the settings if you
change the network parameters.
The mobile phone cannot receive alarm prompts when the camera is online.
Q:
1. Make sure the EZVIZ app is running on your mobile phone.
A:
2. For Android OS mobile phone, make sure the app is running in the
background; and for iOS mobile phones, enable the message push
function in “Settings > Notification”.
Does the camera support power via USB devices or a portable battery.
Q:
It’s advised to use the EZVIZ standard power adapter to provide a stable
A:
voltage supply.
For more information, please visit www.ezvizlife.com.
4
Page 7
Configuración
Paso 1 Encendido
Conecte el cable de alimentación a la cámara y al adaptador de alimentación y
luego a una toma de corriente. Cuando el indicador parpadee en rojo y azul, la
conexión está lista para la configuración.
ES
Cable de
alimentación
Paso 2 Configuración rápida
1. Conecte su teléfono móvil al Wi-Fi.
2. Descargue e instale la aplicación EZVIZ buscando "EZVIZ" en App Store (iOS
7.0 o versión posterior) y en Google PlayTM (Android 4.0 o versión posterior).
3. Inicie la aplicación y regístrese para obtener una cuenta de usuario de
EZVIZ siguiendo el asistente de inicio.
4. Inicie sesión en la aplicación y en la pantalla de Inicio, presione "+" en el
extremo superior derecho para ingresar a la interfaz de agregado de dispositivo.
5. Escanee el código QR del dispositivo con su teléfono móvil. También puede
ingresar manualmente el número de serie de 9 dígitos para agregar la
cámara. El código QR y el número de serie están ubicados en la etiqueta en
la parte posterior de la cámara.
6. Siga el procedimiento para configurar la conexión Wi-Fi de la cámara.
7. Configure la zona horaria correcta, la información de DST y el Formato de
fecha (Date Format) para terminar la configuración.
5
Toma de corriente
Page 8
Instalación
Paso 1 Instalación de la placa de metal (Opcional)
Elija una superficie limpia y plana y asegure la placa de metal en la posición
deseada con las pegatinas de espuma o los tornillos.
Dentro de la cámara hay una pieza imantada. Puede saltar este paso
si la superficie es de metal.
Paso 2 Instalación de la cámara
Asegure la cámara magnéticamente a la placa o superficie de metal.
Paso 3 Finalización de la instalación
Ajuste el ángulo de la cámara según sea necesario.
Grabación en la tarjeta de memoria
Paso 1 Instalación de la tarjeta de memoria
1. Gire la cubierta de la ranura de la tarjeta de memoria en el sentido de las
agujas del reloj para abrirla, como se muestra en la figura de la izquierda.
2. Inserte una tarjeta microSD en la ranura hasta escuchar un clic, como
se muestra en la figura de la derecha.
3. Vuelva a colocar la cubierta.
Paso 2 Inicialización de la tarjeta de memoria
1. Desde la aplicación EZVIZ, verifique el estado de la tarjeta de memoria,
presionando en Estado de almacenamiento (Storage Status) en
Configuración del dispositivo (Device Settings).
2. Si el estado de la tarjeta de memoria es No inicializado (Not Initialized),
presione el botón Inicializar (Initialize) para inicializarla. Una vez que se
completa la inicialización puede grabar un video activado por evento.
6
Page 9
Partes básicas
ES
Lente
Micrófono
REINICIAR
Ranura para
tarjeta de memoria
Entrada de
alimentación
Altavoz
Luz IR
Indicador LED
Base magnética
Nombre Descripción
Luz IR Fuente de iluminación automática para entornos oscuros. El
Indicador LED •Rojo y azul parpadeante: La cámara está encendida; puede
Ranura para tarjeta
dememoria
REINICIAR
Entrada de alimentación
video de la cámara tiene dos modos: color (para grabación
con luz diurna) y blanco y negro con iluminador IR (para
condiciones nocturnas).
configurar la conexión Wi-Fi.
• Azul estable: El usuario está conectando y operando la cámara.
•Parpadeo lento azul: La cámara funciona correctamente.
•Rojo estable: La cámara se está iniciando.
•Parpadeo lento rojo: Error de conexión de Wi-Fi.
•Parpadeo rojo rápido: Error de tarjeta microSD.
Para tarjeta microSD (no incluida con este producto). Puede
comprarla por separado. Compatibilidad recomendada: Clase
10, espacio máximo 128 GB. Después de insertar la tarjeta,
puede grabar el evento dentro de la cámara. Debe inicializarla
en la aplicación EZVIZ.
Mantenga presionado el botón REINICIAR durante 10segundos
mientras la cámara está en funcionamiento. La cámara
se reiniciará y todos los parámetros volverán a su valor
predeterminado.
5V±10%
7
Page 10

Solución de fallas
Aparece el mensaje "El dispositivo está fuera de línea" (The device is
P:
offline.) o "El dispositivo no está registrado" (The device is not registered.)
cuando agrego la cámara utilizando la aplicación EZVIZ.
1. Asegúrese de que la red a la cual está conectada la cámara funcione
R:
correctamente y que el DHCP del enrutador esté activado.
2. Mantenga presionado el botón REINICIAR durante 10 segundos para
reiniciar la configuración si cambia los parámetros de red.
El teléfono móvil no puede recibir avisos de alarma cuando la cámara está
P:
en línea.
1. Asegúrese de que la aplicación EZVIZ esté activa en su dispositivo móvil.
R:
2. Para los teléfonos móviles con sistema operativo Android, asegúrese de
que la aplicación esté activa en segundo plano; y para los dispositivos
móviles con iOS, active la función del botón de comando de mensajes en
"Configuración (Settings)> "Notificación" (Notification).
¿La cámara es compatible con la alimentación a través de dispositivos USB
P:
o de una batería portátil?
Se recomienda utilizar el adaptador eléctrico estándar EZVIZ para
R:
proporcionar una alimentación de tensión estable.
Para obtener más información, visite www.ezvizlife.com.
8
Page 11

Installation
Étape 1 Mise en marche
Connectez le câble d’alimentation dans la caméra et à l’adaptateur électrique,
puis dans une prise électrique. Lorsque le témoin clignote en rouge et bleu,
l’alimentation est établie et vous pouvez procéder à la configuration.
FR
Câble
d’alimentation
Étape 2 Réglages rapides
1. Connectez votre mobile à votre réseau Wi-Fi.
2. Téléchargez et installez l’application EZVIZ en cherchant «EZVIZ» dans
l’App Store (iOS 7.0 ou version ultérieure) ou sur Google PlayTM (Android
4.0 ou version ultérieure).
3. Lancez l’application et inscrivez-vous pour obtenir un compte utilisateur
EZVIZ en suivant l’assistant de configuration.
4. Connectez-vous à l’application et depuis l’écran d’accueil de
l’application, tapez sur le «+» dans le coin supérieur droit pour accéder
à l’interface d’ajout de dispositif.
5. Scannez le code QR du dispositif avec votre mobile. Alternativement,
entrez manuellement le numéro de série de 9 chiffres pour ajouter la
caméra. Le code QR et le numéro de série se trouvent sur l’étiquette au
dos de la caméra.
6. Suivez la procédure pour configurer la connexion Wi-Fi de la caméra.
7. Définissez le bon fuseau horaire, les informations d’heure avancée (DST)
et le format de la date (Date Format) pour terminer la configuration.
9
Prise électrique
Page 12

Installation
Étape 1 Installer la plaque métallique (facultatif)
Choisissez une surface propre et plate et fixez la plaque métallique à
l’emplacement souhaité à l’aide des autocollants en mousse ou de vis.
Un aimant se trouve à l’intérieur de la caméra. Vous pouvez sauter
cette étape si la surface est métallique.
Étape 2 Installer la caméra
Fixez la caméra magnétiquement à la plaque métallique ou à une surface
métallique.
Étape 3 Terminer l’installation
Ajustez l’angle de la caméra au besoin.
Enregistrement sur la carte mémoire
Étape 1 Installation de la carte mémoire
1. Basculez le couvercle de l’emplacement pour carte mémoire dans le
sens horaire pour l’ouvrir (voir la figure ci-dessous à gauche).
2. Insérez une carte microSD dans le logement jusqu’à entendre un clic
(voir la figure ci-dessous à droite).
3. Replacer le couvercle.
Étape 2 Initialisation de la carte mémoire
1. À partir de l’application EZVIZ, vérifiez l’état de la carte mémoire en
appuyant sur État du stockage (Storage Status) dans Paramètres de
l’appareil (Device Settings).
2. Si l’état de la carte mémoire affiché est Non initialisé (Not Initialized),
appuyez sur le bouton Initialiser (Initialize) pour l’initialiser. Une fois
l’initialisation terminée, vous pouvez enregistrer une vidéo déclenchée
par un événement.
10
Page 13

Notions de base
Objectif
Microphone
RÉINITIALISATION
Emplacement pour
carte mémoire
Entrée
d’alimentation
Haut-parleur
Lumière infrarouge
Voyant DEL
Base magnétique
Nom Description
Lumière infrarouge Source de lumière automatique pour les environnements
Voyant DEL •Clignotement rouge et bleu: La caméra est activée; vous
Emplacement pour
carte mémoire
RÉINITIALISATION
Entrée d’alimentation
sombres. La caméra comporte deux modes: couleur (pour filmer
de jour) et noir et blanc avec illuminateur infrarouge (pour les
conditions nocturnes).
pouvez configurer la connexion Wi-Fi.
•Bleu continu: La caméra est connectée et opérée par un ou
des utilisateur(s).
• Clignotement bleu lent: La caméra fonctionne correctement.
•Rouge continu: La caméra est en démarrage.
•Clignotement rouge lent: La connexion Wi-Fi a échoué.
•Clignotement rouge rapide: Erreur de la carte microSD.
Pour carte microSD (non incluse avec ce produit). Vous pouvez
l’acheter séparément. Type de carte recommandé: Classe 10,
espace maximal 128Go. Après avoir inséré la carte, vous pouvez
enregistrer les événements sur la caméra. Vous devez l’initialiser
depuis l’application EZVIZ.
Maintenez le bouton RÉINITIALISATION enfoncé pendant
10secondes alors que la caméra est sous tension; celle-ci
redémarrera et tous les réglages par défaut seront rétablis.
5V ± 10%
11
FR
Page 14

Dépannage
Le message «L’appareil est hors ligne.» (The device is offline.) ou
Q:
«L’appareil n’est pas enregistré.» (The device is not registered.) apparait
lorsque vous ajoutez la caméra en utilisant l’application EZVIZ.
1. Assurez-vous que le réseau auquel la caméra est connectée fonctionne
R:
correctement et que le serveur DHCP du routeur est activé.
2. Maintenez le bouton RÉINITIALISATION enfoncé pendant 10secondes pour
réinitialiser les réglages si vous changez les paramètres réseau.
Le mobile ne peut pas recevoir les messages d’alerte lorsque la caméra est
Q:
en ligne.
1. Assurez-vous que l’application EZVIZ est en cours d’exécution sur votre
R:
téléphone mobile.
2. Pour les mobiles Android, assurez-vous que l’application s’exécute
en arrière-plan; et pour les téléphones mobiles sous iOS, autorisez
les notifications Push sous «Réglages > Notifications» (Settings >
Notification).
La caméra peut-elle être alimentée via un périphérique USB ou une batterie
Q:
portable?
Il est conseillé d’utiliser l’adaptateur électrique standard d’EZVIZ afin d’avoir
R:
une tension d’alimentation stable.
Pour plus d’informations, veuillez consulter le site www.ezvizlife.com.
12
Page 15

UD01512B
Page 16

Thank you for purchasing EZVIZ products. This limited warranty gives you, the original
purchaser of the EZVIZ product, specific legal rights. You may also have other legal
rights that vary by state, province or jurisdiction. The disclaimers, exclusions, and
limitations of liability under this limited warranty will not apply to the extent prohibited
by applicable law. No distributor, reseller, agent, or employee is authorized to make any
medication, extension, or addition to this limited warranty.
Your EZVIZ product is warranted for a period of one (1) year from the date of purchase
against defects in materials and workmanship, or such longer period as may be
required by law in the country or state where this product is sold, when used normally in
accordance with EZVIZ’s user manual.
You can request warranty service by calling us at 1-855-MYEZVIZ (693-9849) or email us
at service@ezvizlife.com.
For any defective EZVIZ products under warranty, EZVIZ, Inc. will, at its option, (i) repair
or replace your product free of charge; (ii) exchange your product with a functional
equivalent product; (iii) or refund the original purchase price, provided you provide the
original purchase receipt or copy, brief explanation of the defect, and return the product
in its original packaging. At EZVIZ’s sole discretion, repair or replacement may be made
with a new or refurbished product or components. This warranty does not cover the
postal cost, insurance and any other incidental charges incurred by you in returning the
product.
Except where prohibited by applicable law, this is your sole and exclusive remedy for
breach of this limited warranty. Any product that has either been repaired or replaced
under this limited warranty will be covered by the terms of this limited warranty for the
longer of ninety (90) days from the date of delivery or the remaining original warranty
period.
This warranty does not apply and is void:
• If the warranty claim is made outside the warranty period or if the proof of purchase is
not provided.
• For any malfunction, defect or failure caused by or resulting from the evidence of
impact, mishandling, tampering, use contrary to the applicable instruction manual,
incorrect power line voltage, accident, loss, theft, fire, flood or other Acts of God,
shipping damage or damage resulting from repairs performed by unauthorized
personnel.
• For any consumable parts, such as batteries, where the malfunction is due to the
normal aging of the product.
• Cosmetic damage, including but not limited to scratches, dents and broken plastic on
ports.
• Any software, even if packaged or sold with EZVIZ hardware.
• For any other damages free from defects in material or workmanship.
• Routine cleaning, normal cosmetic and mechanical wear and tear.
DISCLAIMER OF WARRANTIES
EXCEPT AS STATED ABOVE IN THIS LIMITED WARRANTY, AND TO THE MAXIMUM
EXTENT PERMITTED BY APPLICABLE LAW, EZVIZ DISCLAIMS ALL EXPRESS, IMPLIED,
AND STATUTORY WARRANTIES AND CONDITIONS WITH RESPECT TO THE PRODUCT,
INCLUDING THE IMPLIED WARRANTIES OF MERCHANTABILITY AND FITNESS FOR A
PARTICULAR PURPOSE, THE DURATION OF ANY APPLICABLE IMPLIED WARRANTIES
OR CONDITIONS TO THE DURATION OF THIS LIMITED WARRANTY, THE SECURITY OF
THE PRODUCT, OR AVAILABILITY AND RELIABILITY OF PRODUCT INFORMATION OR
DATA.
LIMITATION OF DAMAGES
IN NO EVENT WILL EZVIZ BE LIABLE FOR ANY CONSEQUENTIAL, INCIDENTAL,
EXEMPLARY, OR SPECIAL DAMAGES, INCLUDING ANY DAMAGES FOR LOST DATA
OR LOST PROFITS, ARISING FROM OR RELATING TO THIS LIMITED WARRANTY OR
THE PRODUCT, AND EZVIZ’S TOTAL CUMULATIVE LIABILITY ARISING FROM OR
RELATED TO THIS LIMITED WARRANTY OR THE PRODUCT WILL NOT EXCEED THE
AMOUNT ACTUALLY PAID FOR THE PRODUCT BY THE ORIGINAL PURCHASER.
SOME STATES DO NOT ALLOW THE EXCLUSION OR LIMITATION OF INCIDENTAL OR
CONSEQUENTIAL DAMAGES, SO THE ABOVE LIMITATION OR EXCLUSION MAY NOT
APPLY TO YOU.
LIMITED WARRANTY
Page 17

LIMITATION OF LIABILITY
ALL PRODUCT INFORMATION AND DATA IS PROVIDED FOR YOUR CONVENIENCE, “AS
IS”, AND “AS AVAILABLE”. EZVIZ DOES NOT REPRESENT, WARRANT, OR GUARANTEE
THAT PRODUCT INFORMATION AND DATA WILL BE AVAILABLE, ACCURATE, OR
RELIABLE OR THAT PRODUCT INFORMATION AND DATA OR USE OF THE PRODUCT
WILL PROVIDE SAFETY IN YOUR HOME. YOU USE ALL PRODUCT INFORMATION, DATA,
AND THE PRODUCT AT YOUR OWN DISCRETION AND RISK. YOU WILL BE SOLELY
RESPONSIBLE FOR (AND EZVIZ DISCLAIMS) ANY AND ALL LOSS, LIABILITY, OR
DAMAGES, INCLUDING TO YOUR WIRING, FIXTURES, ELECTRICITY, HOME, PRODUCT,
PRODUCT PERIPHERALS, COMPUTER, MOBILE DEVICE, AND ALL OTHER ITEMS
AND PETS, RESULTING FROM YOUR USE OF THE PRODUCT INFORMATION, DATA,
OR PRODUCT. PRODUCT INFORMATION AND DATA PROVIDED BY EZVIZ IS NOT
INTENDED AS A SUBSTITUTE FOR DIRECT MEANS OF OBTAINING THE INFORMATION.
FOR EXAMPLE, A NOTIFICATION PROVIDED THROUGH THE PRODUCT IS NOT
INTENDED AS A SUBSTITUTE FOR AUDIBLE AND VISIBLE INDICATIONS IN THE HOME
AND ON THE PRODUCT, NOR FOR A THIRD PARTY MONITORING SERVICE.
Please do not hesitate to contact your seller, or send e-mails to us service@ezvizlife.
com, with any questions.
COPYRIGHT ©2016 EZVIZ Inc. ALL RIGHTS RESERVED.
UD01513B
Page 18

About the Documents
The documents include instructions for using and managing the product. Pictures,
charts, images and all other information hereinafter are for description and explanation
only. The information contained in the documents is subject to change, without notice,
due to firmware updates or other reasons. Please find the latest version in the website
(http://www.ezvizlife.com).
Any and all information, including, among others, wordings, pictures, graphs are the
properties of EZVIZ Inc. or its subsidiaries (hereinafter referred to be “EZVIZ”). The
documents cannot be reproduced, changed, translated, or distributed, partially or
wholly, by any means, without the prior written permission of EZVIZ. Unless otherwise
stipulated, EZVIZ does not make any warranties, guarantees or representations, express
or implied, regarding to the documents.
Trademarks Acknowledgement
™, ™, and other EZVIZ’s trademarks and logos are the properties of EZVIZ
in various jurisdictions. Other trademarks and logos mentioned in the documents are
the properties of their respective owners.
Legal Disclaimer
TO THE MAXIMUM EXTENT PERMITTED BY APPLICABLE LAW, THE PRODUCT
DESCRIBED, WITH ITS HARDWARE, SOFTWARE AND FIRMWARE, IS PROVIDED “AS
IS”, WITH ALL FAULTS AND ERRORS, AND EZVIZ MAKES NO WARRANTIES, EXPRESS
OR IMPLIED, INCLUDING WITHOUT LIMITATION, MERCHANTABILITY, SATISFACTORY
QUALITY, FITNESS FOR A PARTICULAR PURPOSE, AND NON-INFRINGEMENT OF
THIRD PARTY. IN NO EVENT WILL EZVIZ, ITS DIRECTORS, OFFICERS, EMPLOYEES,
OR AGENTS BE LIABLE TO YOU FOR ANY SPECIAL, CONSEQUENTIAL, INCIDENTAL,
OR INDIRECT DAMAGES, INCLUDING, AMONG OTHERS, DAMAGES FOR LOSS
OF BUSINESS PROFITS, BUSINESS INTERRUPTION, OR LOSS OF DATA OR
DOCUMENTATION, IN CONNECTION WITH THE USE OF THIS PRODUCT, EVEN IF EZVIZ
HAS BEEN ADVISED OF THE POSSIBILITY OF SUCH DAMAGES.
TO THE MAXIMUM EXTENT PERMITTED BY APPLICABLE LAW, IN NO EVENT SHALL
EZVIZ’S TOTAL LIABILITY FOR ALL DAMAGES EXCEED THE PURCHASE PRICE THE
PRODUCT.
EZVIZ does not undertake any liability for personal injury or property damage, as the
result of product interruption or service termination cause by: a) improper installation or
usage other than as requested; b) the protection of national or public interests; c) Force
Majeure; d) yourself or the third party, including not limitation, using any third party’s
products, software, applications, and among others.
REGARDING TO THE PRODUCT WITH INTERNET ACCESS, THE USE OF PRODUCT
SHALL BE WHOLLY AT YOUR OWN RISKS. EZVIZ SHALL NOT TAKE ANY
RESPONSIBILITES FOR ABNORMAL OPERATION, PRIVACY LEAKAGE OR OTHER
DAMAGES RESULTING FROM CYBER ATTACK, HACKER ATTACK, VIRUS INSPECTION,
OR OTHER INTERNET SECURITY RISKS; HOWEVER, EZVIZ WILL PROVIDE TIMELY
TECHNICAL SUPPORT IF REQUIRED.
The purpose of the Products is to provide an adequate warning in the event of illegal
encroachment in certain area; however, the proper installation of the Products will not
eliminate, but only reduce, that accidents will not occur or that there will be no personal
injury or property loss as a result. You are highly recommended to raise your vigilance
and strengthen the safety awareness in the daily life.
SURVEILLANCE LAWS VARY BY JURISDICTION. PLEASE CHECK ALL RELEVANT LAWS
IN YOUR JURISDICTION BEFORE USING THIS PRODUCT IN ORDER TO ENSURE THAT
YOUR USE CONFORMS TO THE APPLICABLE LAW. YOU FUTHER AGREE THAT THIS
PRODUCT IS ONLY FOR CIVIL USE, AND EZVIZ SHALL NOT BE LIABLE IN THE EVENT
THAT THIS PRODUCT IS USED WITH ILLEGITIMATE PURPOSES, SUCH AS THIRD PARTY
RIGHTS INFRINGEMENT, MEDICAL TREATMENT, SAFETY EQUIPMENT OR OTHER
SITUATIONS WHERE THE PRODUCT FAILURE COULD LEAD TO DEATH OR PERSONAL
INJURY, OR WEAPON OF MASS DESTRUCTION, CHEMINCAL AND BIOLOGICAL
WEAPON, NUCLEAR EXPLOSION, AND ANY UNSAFE NUCLEAR ENERGY USES OR
ANTI-HUMANITY USAGES. YOU SHOULD UNDERTAKE ALL RESPONSIBILITIES FOR
LOSSES OR DAMAGES RESULTING FROM THE ABOVE USAGES WHATSOEVER. IN THE
EVENT OF ANY CONFLICTS BETWEEN THE ABOVE AND THE APPLICABLE LAW, THE
Page 19
LATER PREVAILS.
Regulatory Information
FCC Information
FCC compliance: This device complies with Part 15 of the FCC Rules. Operation is
subject to the following two conditions:
(1) This device may not cause harmful interference, and
(2) This device must accept any interference received, including interference that may
cause undesired operation.
Note: This product has been tested and found to comply with the limits for a Class B
digital device, pursuant to Part 15 of the FCC Rules. These limits are designed to provide
reasonable protection against harmful interference in a residential installation. This
product generates, uses, and can radiate radio frequency energy and, if not installed
and used in accordance with the instructions, may cause harmful interference to radio
communications. However, there is no guarantee that interference will not occur in
a particular installation. If this product does cause harmful interference to radio or
television reception, which can be determined by turning the equipment off and on, the
user is encouraged to try to correct the interference by one or more of the following
measures:
—Reorient or relocate the receiving antenna.
—Increase the separation between the equipment and receiver.
—Connect the equipment into an outlet on a circuit different from that to which the
receiver is connected.
—Consult the dealer or an experienced radio/TV technician for help.
Please take attention that changes or modification not expressly approved by the party
responsible for compliance could void the user’s authority to operate the equipment.
This equipment should be installed and operated with a minimum distance 20cm
between the radiator and your body
This device complies with Industry Canada licence-exempt RSS standard(s). Operation is
subject to the following two conditions:
(1) this device may not cause interference, and
(2) this device must accept any interference, including interference that may cause
undesired operation of the device.
Under Industry Canada regulations, this radio transmitter may only operate using an
antenna of a type and maximum (or lesser) gain approved for the transmitter by Industry
Canada. To reduce potential radio interference to other users, the antenna type and its
gain should be so chosen that the equivalent isotropically radiated power (e.i.r.p.) is not
more than that necessary for successful communication.
EU Conformity Statement
This product and - if applicable - the supplied accessories too are marked
with "CE" and comply therefore with the applicable harmonized European
standards listed under the EMC Directive 2014/30/EU, the RE Directive
2014/53/EU, the RoHS Directive 2011/65/EU.
2012/19/EU (WEEE directive): Products marked with this symbol cannot be
disposed of as unsorted municipal waste in the European Union. For proper
recycling, return this product to your local supplier upon the purchase of
equivalent new equipment, or dispose of it at designated collection points.
For more information see: www.recyclethis.info.
2006/66/EC (battery directive): This product contains a battery that cannot
be disposed of as unsorted municipal waste in the European Union. See
the product documentation for specific battery information. The battery is
marked with this symbol, which may include lettering to indicate cadmium
(Cd), lead (Pb), or mercury (Hg). For proper recycling, return the battery to
your supplier or to a designated collection point. For more information see:
www.recyclethis.info.
Industry Canada ICES-003 Compliance
This device meets the CAN ICES-3 (B)/NMB-3(B) standards requirements.
Page 20

Gracias por comprar los productos EZVIZ. Esta garantía limitada le brinda al comprador
original del producto EZVIZ derechos legales específicos. Además, puede tener otros
derechos legales que varían según el estado, la provincia o la jurisdicción. Las renuncias,
exclusiones y limitaciones de responsabilidad bajo esta garantía limitada no se aplicarán
en la medida que lo prohibida la ley aplicable. Ningún distribuidor, revendedor, agente
o empleado está autorizado a realizar modificaciones, extensiones o adiciones a ésta
garantía limitada.
Su producto EZVIZ está garantizado por un (1) año a partir de la fecha de compra contra
defectos en los materiales o la mano de obra, o por un plazo mayor según lo requiera
la ley del país o el estado donde se vendió este producto, siempre que sea utilizado de
manera normal, de acuerdo con el manual del usuario de EZVIZ.
Puede solicitar el servicio de garantía comunicándose con nosotros al 1-855-MYEZVIZ
(693-9849) o por correo electrónico a service@ezvizlife.com.
Para cualquier producto EZVIZ fallado cubierto por la garantía, EZVIZ, Inc. podrá, a su
criterio (i) reparar o reemplazar el producto sin cargo; (ii) cambiar el producto por otro de
igual funcionalidad; (iii) o reembolsar el precio de compra original, siempre que presente
el recibo de compra original o una copia del mismo, una breve explicación del defecto
y devuelva el producto en su envoltorio original. La reparación o reemplazo pueden
hacerse con productos o componentes nuevos o restaurados, a criterio de EZVIZ. Esta
garantía no cubre el gasto de correo, el seguro ni otros cargos adicionales en los que
incurra para devolver el producto.
Excepto en los casos prohibidos por la ley aplicable, éste será el único y exclusivo recurso
en caso de incumplimiento de esta garantía limitada. Cualquier producto que se haya
reparado o reemplazado bajo ésta garantía limitada estará cubierto por los términos de
ésta garantía limitada por el plazo de noventa (90) días a partir de la fecha de entrega o
del período original restante de la garantía.
Esta garantía no se aplica y es inválida en los siguientes casos:
• Si el reclamo de garantía se realiza fuera del período de garantía o si no se proporciona
prueba de la compra.
• Para cualquier disfuncionalidad, defecto o falla causada o resultante de la evidencia
del impacto, maltrato, manipulación, uso contrario a lo dispuesto en el manual de
instrucciones aplicable, voltaje de cable incorrecto, accidente, pérdida, robo, incendio,
inundación u otros casos fortuitos, daño de envío o daño resultante de las reparaciones
realizadas por personal no autorizado.
• Para partes consumibles, como baterías, donde el mal funcionamiento se deba al
envejecimiento normal del producto.
• Daños estéticos, incluidos rayones, marcas y plástico roto en los puertos, entre otros.
• Software de terceras marcas, aunque esté incluido o se venda con el hardware de
EZVIZ.
• Para otros tipos de daños libre de defectos en los materiales o la mano de obra.
• Limpieza de rutina, estética normal y desgaste mecánico.
RENUNCIA DE GARANTÍAS
SALVO LO DISPUESTO ANTERIORMENTE EN ESTA GARANTÍA LIMITADA, Y HASTA
EL GRADO MÁXIMO QUE PERMITA LA LEY APLICABLE, EZVIZ RENUNCIA A TODAS
LAS GARANTÍAS Y CONDICIONES EXPRESAS, IMPLÍCITAS Y REGLAMENTARIAS
RELACIONADAS CON EL PRODUCTO, INCLUIDAS LAS GARANTÍAS IMPLÍCITAS
DE COMERCIABILIDAD E IDONEIDAD PARA UN PROPÓSITO EN PARTICULAR, LA
DURACIÓN DE CUALQUIER GARANTÍA IMPLÍCITA APLICABLE O CONDICIONES DE
DURACIÓN DE ESTA GARANTÍA LIMITADA, LA SEGURIDAD DEL PRODUCTO O LA
DISPONIBILIDAD Y CONFIABILIDAD DE LOS DATOS O INFORMACIÓN DEL PRODUCTO.
LIMITACIÓN DE LOS DAÑOS
EN NINGÚN CASO SE RESPONSABILIZARÁ A EZVIZ POR DAÑOS CONSECUENTES,
SECUNDARIOS, EJEMPLARES O ESPECIALES, INCLUIDOS DAÑOS DE PÉRDIDA
DE DATOS O PÉRDIDA DE GANANCIAS, QUE DERIVEN O ESTÉN RELACIONADOS
CON ESTA GARANTÍA LIMITADA O EL PRODUCTO, Y LA RESPONSABILIDAD TOTAL
ACUMULADA DE EZVIZ QUE SURJA O SE RELACIONE CON ESTA GARANTÍA LIMITADA
O EL PRODUCTO NO EXCEDERÁ EL MONTO PAGADO REAL DEL PRODUCTO PAGADO
POR EL COMPRADOR ORIGINAL. ALGUNOS ESTADOS NO PERMITEN LA EXCLUSIÓN
O LIMITACIÓN DE DAÑOS SECUNDARIOS O CONSECUENTES, POR LO QUE LA
LIMITACIÓN ANTERIOR PODRÍA NO APLICARSE EN SU CASO.
GARANTÍA LIMITADA
Page 21

LIMITACIÓN DE RESPONSABILIDAD
TODA LA INFORMACIÓN Y DATOS DEL PRODUCTO SE PROPORCIONAN PARA
SU CONVENIENCIA "TAL COMO SON" Y "SUJETOS A SU DISPONIBILIDAD." EZVIZ
NO DECLARA, GARANTIZA NI ASEGURA LA DISPONIBILIDAD, PRECISIÓN, NI
CONFIABILIDAD DE LA INFORMACIÓN Y LOS DATOS DEL PRODUCTO, O QUE DICHA
INFORMACIÓN Y DATOS O EL USO DEL PRODUCTO BRIDEN SEGURIDAD A SU HOGAR.
USTED UTILIZA TODA LA INFORMACIÓN Y DATOS DEL PRODUCTO Y EL PRODUCTO A
SU PROPIO CRITERIO Y RIESGO. USTED SERÁ EL ÚNICO RESPONSABLE POR (Y EZVIZ
RENUNCIA A) CUALQUIER PÉRDIDA, RESPONSABILIDAD O DAÑOS AL CABLEADO,
ACCESORIOS, ELECTRICIDAD, HOGAR, PRODUCTO, ACCESORIOS DEL PRODUCTO,
COMPUTADORA, DISPOSITIVO MÓVIL Y CUALQUIER OTRO ARTÍCULO O ANIMALES
DOMÉSTICOS, QUE RESULTEN DEL USO DE LA INFORMACIÓN O DATOS DEL
PRODUCTO O DEL PRODUCTO. LA INFORMACIÓN Y LOS DATOS DEL PRODUCTO QUE
PROPORCIONA EZVIZ NO PRETENDEN REEMPLAZAR A LOS MEDIOS DE OBTENCIÓN
DE INFORMACIÓN DIRECTOS. POR EJEMPLO, UNA NOTIFICACIÓN PROVISTA CON EL
PRODUCTO NO PRETENDE REEMPLAZAR A LAS INDICACIONES AUDIBLES Y VISIBLES
EN EL HOGAR Y EN EL PRODUCTO, NI A UN SERVICIO DE MONITOREO DE TERCERAS
PARTES.
No dude en contactar a su vendedor o enviarnos sus dudas por correo electrónico a
service@ezvizlife.com
COPYRIGHT ©2016 EZVIZ Inc. TODOS LOS DERECHOS RESERVADOS.
Page 22

Acerca de los documentos
Los documentos incluyen instrucciones para el uso y el manejo del producto. Las
fotografías, cuadros, imágenes y cualquier otra información provista a continuación tienen
fines descriptivos y explicativos únicamente. La información incluida en los documentos
está sujeta a cambios sin previo aviso, por motivos de actualización de firmware u otros
motivos. Encuentre la última versión en el sitio web (http://www.ezvizlife.com).
Toda la información, incluidos los términos, fotografías y gráficos, entre otros, pertenecen
a EZVIZ Inc. o sus subsidiarias (en adelante denominados "EZVIZ"). Los documentos
no pueden reproducirse, cambiarse, traducirse ni distribuirse total o parcialmente por
ningún medio sin el permiso escrito previo de EZVIZ. Salvo disposición en contrario,
EZVIZ no realiza ninguna declaración garantía, ya sea expresa o implícita, en relación con
los documentos.
Reconocimiento de las marcas registradas
™, ™ y otras marcas registradas y logos de EZVIZ son propiedad de EZVIZ
en diferentes jurisdicciones. Otras marcas y logos mencionados en los documentos
pertenecen a sus respectivos dueños.
Renuncia legal
HASTA EL GRADO MÁXIMO QUE PERMITA LA LEY APLICABLE, EL PRODUCTO
DESCRIPTO, CON SU HARDWARE, SOFTWARE Y FIRMWARE SE PROPORCIONA
"TAL COMO ES", CON TODAS LAS FALLAS Y ERRORES Y EZVIZ NO GARANTIZA, DE
MANERA EXPRESA O IMPLÍCITA, LA COMERCIABILIDAD, LA CALIDAD SATISFACTORIA,
LA IDONEIDAD PARA UN PROPÓSITO EN PARTICULAR Y LA NO VIOLACIÓN POR
PARTE DE TERCEROS, ENTRE OTRAS. EN NINGÚN CASO EZVIZ, SUS DIRECTORES,
FUNCIONARIOS, EMPLEADOS O REPRESENTANTES SERÁN RESPONSABLES ANTE
USTED POR DAÑOS ESPECIALES, CONSECUENTES, SECUNDARIOS O INDIRECTOS,
ENTRE OTROS, DAÑOS POR PÉRDIDA DE GANANCIAS DEL NEGOCIO, INTERRUPCIÓN
DEL NEGOCIO O PÉRDIDA DE DATOS O DOCUMENTACIÓN, RELACIONADA CON EL USO
DE ESTE PRODUCTO, AUNQUE SE HUBIERA NOTIFICADO A EZVIZ DE LA POSIBILIDAD
DE DICHOS DAÑOS.
HASTA EL GRADO MÁXIMO QUE PERMITA LA LEY APLICABLE, EN NINGÚN CASO LA
RESPONSABILIDAD TOTAL DE EZVIZ POR TODOS LOS DAÑOS EXCEDERÁ EL PRECIO
DE COMPRA DEL PRODUCTO.
EZVIZ no asume ninguna responsabilidad por los daños a las personas o a la propiedad
que resulten de la interrupción del producto o la finalización del servicio causada por: a)
la instalación o el uso inadecuado diferente al estipulado; b) la protección de los intereses
nacionales o públicos; c) Fuerza mayo; d) el uso, por parte suya o de un tercero, de
productos de terceras marcas, software y aplicaciones, entre otras.
EN RELACIÓN AL PRODUCTO CON ACCESO A INTERNET, EL USO DEL PRODUCTO
CORRERÁ COMPLETAMENTE POR SU CUENTA Y RIESGO. EZVIZ NO ASUMIRÁ
NINGUNA RESPONSABILIDAD POR EL FUNCIONAMIENTO ANORMAL, ATENTADOS
CONTRA LA PRIVACIDAD U OTROS DAÑOS QUE DERIVEN DE ATAQUES CIBERNÉTICOS,
ATAQUES DE HACKERS, INSPECCIÓN DE VIRUS U OTROS RIESGOS DE SEGURIDAD DE
INTERNET; SIN EMBARGO, EZVIZ PROPORCIONARÁ APOYO TÉCNICO OPORTUNO SI ES
NECESARIO.
El objetivo de los productos es proporcionar una advertencia adecuada en casos de
usurpación ilegal en alguna área. No obstante, la correcta instalación de los productos
no eliminará sino que solo reducirá la ocurrencia de esos accidentes, los daños a las
personas o la pérdida de propiedad resultantes. Es muy recomendable que incremente
el nivel de vigilancia y consciencia sobre la seguridad en la vida diaria.
LAS LEYES DE VIGILANCIA VARÍAN EN CADA JURISDICCIÓN. REVISE TODAS LAS
LEYES PERTINENTES EN SU JURISDICCIÓN ANTES DE USAR ESTE PRODUCTO
PARA GARANTIZAR QUE EL USO CUMPLA CON LA LEGISLACIÓN APLICABLE.
ADEMÁS, ACEPTA QUE ESTE PRODUCTO ES SOLO PARA USO CIVIL Y EZVIZ NO SERÁ
RESPONSABLE SI FUERA UTILIZADO CON UN PROPÓSITO ILEGÍTIMO, TALES COMO LA
VIOLACIÓN DE DERECHOS DE TERCERAS PARTES, TRATAMIENTO MÉDICO, EQUIPOS
DE SEGURIDAD U OTRAS SITUACIONES DONDE LA FALLA DEL PRODUCTO PODRÍA
PRODUCIR LA MUERTE O LESIONES PERSONALES O ARMA DE DESTRUCCIÓN MASIVA,
ARMA QUÍMICA Y BIOLÓGICA, EXPLOSIÓN NUCLEAR Y CUALQUIER USO DE ENERGÍA
NUCLEAR NO SEGURA O USOS CONTRA LA HUMANIDAD. USTED DEBE ASUMIR TODA
LA RESPONSABILIDAD POR LAS PÉRDIDAS O DAÑOS QUE RESULTEN DE CUALQUIERA
DE LOS USOS MENCIONADOS ANTERIORMENTE. EN CASO DE CONFLICTOS ENTRE LO
Page 23
DISPUESTO ANTERIORMENTE Y LA LEY APLICABLE, PREVALECERÁ ÉSTA ÚLTIMA.
Información regulatoria
Información de FCC
Cumplimiento con FCC: Este dispositivo cumple con la Parte 15 de la Normativa FCC. La
operación está sujeta a las siguientes dos condiciones:
(1) Que el dispositivo no cause interferencias nocivas, y
(2) Que el dispositivo acepte cualquier interferencia recibida, incluida aquella que puede
causar una funcionamiento indeseado.
Nota: Este producto fue probado y cumple con los límites para los dispositivos digitales
de Clase B, según la parte 15 de la Normativa FCC. Estos límites están diseñados para
proporcionar una protección razonable contra la interferencia nociva en una instalación
residencial. Este producto genera, utiliza y puede irradiar energía de radiofrecuencia y
si no está instalado y se utiliza de acuerdo con el manual de instrucciones puede causar
interferencias nocivas a las radiocomunicaciones. Sin embargo, no hay garantía de
que no ocurran interferencias en una instalación en particular. Si este producto causa
interferencias nocivas en la recepción de televisión que puede determinarse apagando
y encendiendo el equipo, se recomienda al usuario que intente corregir la interferencia
tomando una o varias de las siguientes medidas:
- Reoriente o reubique la antena receptora.
- Aumente la separación entre el equipo y el receptor.
- Conecte el equipo a un enchufe en un circuito diferente al que está conectado el
receptor.
- Consulte al comerciante o a un técnico de radio/TV experto para recibir ayuda.
Tenga en cuenta que los cambios o modificaciones no estén expresamente aprobados
por la parte responsable del cumplimiento puede anular la autorización del usuario para
operar el equipo.
Este equipo debe estar instalado y funcionar a una distancia mínima de 20 cm entre el
radiador y su cuerpo.
El dispositivo cumple con la normativa RSS exenta de licencia de Industry Canada. La
operación está sujeta a las siguientes dos condiciones:
(1) que el dispositivo no cause interferencias, y
(2) que el dispositivo acepte cualquier interferencia, incluso la interferencia que pueda
causar un funcionamiento no deseado del dispositivo.
De acuerdo con la normativa de Industry Canada, este transmisor de radio solo puede
funcionar con una antena de un tipo y ganancia máxima (o menor a ella) aprobada para
el transmisor por Industry Canada. Para reducir la posible interferencia de radio con
otros usuarios, se debe elegir un tipo de antena y ganancia cuya potencia isotrópica
radiada equivalente (e.i.r.p., por sus siglas en inglés) no supere lo necesario para una
comunicación exitosa.
Declaración de conformidad de la UE
Este producto y los accesorios suministrados, si corresponde, llevan la
marca "CE" y por lo tanto, cumplen con las normas europeas armonizadas,
incluidas en la Directiva EMC 2004/108/EC, la RE Directiva 2014/53/EU, la
Directiva RoHS 2011/65/EU.
2012/19/EU (directiva WEEE): Los productos que llevan este símbolo no
pueden desecharse como residuos municipales no clasificados en la Unión
Europea. Para un reciclado adecuado, devuelva el producto a su proveedor
local cuando adquiera un nuevo equipo de igual funcionalidad o deséchelo
en los puntos de recolección designados. Para obtener más información
consulte: www.recyclethis.info.
2006/66/EC (directiva de batería): Este producto contiene una batería que
no puede desecharse como un residuo municipal no clasificado en la Unión
Europea Consulte la documentación del producto para obtener información
específica de la batería. La batería lleva este símbolo, que puede incluir una
letra que indica cadmio (Cd), plomo (Pb) o mercurio (Hg). Para un reciclado
adecuado, devuelva la batería a su proveedor o al centro de recolección
designado. Para obtener más información consulte: www.recyclethis.info.
Cumplimiento con Industry Canada ICES-003
Este dispositivo cumple con los requerimientos de las normas CAN ICES-3 (B)/NMB-3(B).
Page 24

GARANTIE LIMITÉE
Merci d’avoir acheté un produit EZVIZ. Cette garantie vous accorde des droits spécifiques
en tant qu’acheteur d’origine du produit EZVIZ. Vous pouvez également bénéficier d’autres
droits qui varient selon l’état, la province ou la juridiction. Les exonérations, exclusions et
limitations de responsabilité établies au titre de la présente garantie limitée s’appliqueront
dans les limites du droit en vigueur. Aucun distributeur, revendeur, agent ou employé n’est
autorisé à modifier, prolonger ou étendre la présente garantie limitée.
Votre produit EZVIZ est garanti contre tout défaut matériel ou vice de fabrication pour
une période d’un (1) an à compter de la date d’achat, ou toute autre période plus longue
pouvant être exigée par le droit du pays ou de l’état dans lequel ce produit est vendu, du
moment qu’il est utilisé normalement et conformément au manuel de l’utilisateur d’EZVIZ.
Pour toute demande de réparation sous garantie, appelez-nous au 1-855-MYEZVIZ (693-
9849) ou écrivez-nous à l’adresse service@ezvizlife.com.
En cas de produit EZVIZ défectueux sous garantie, EZVIZ, Inc. pourra, à sa discrétion,
(i) réparer ou remplacer votre produit gratuitement ; (ii) échanger votre produit contre
un produit équivalent fonctionnel ; (iii) ou vous rembourser le prix d’achat d’origine, à
condition que vous fournissiez la preuve d’achat originale ou une copie de celle-ci, une
brève explication du défaut, et que vous renvoyiez le produit dans son emballage d’origine.
À l’entière discrétion d’EZVIZ, le produit ou les composants pourront être réparés ou
remplacés par un produit ou des composants neufs ou remis à neuf. Cette garantie ne
couvre pas les frais de port, l’assurance et tous les frais accessoires que vous pourriez
engager en renvoyant le produit.
Il s’agit de votre seul et unique recours en cas de violation de la présente garantie limitée,
sauf disposition contraire dans le droit en vigueur. Tout produit qui a été réparé ou
remplacé en vertu de la présente garantie limitée sera couvert par les modalités de cette
garantie limitée pendant quatre-vingt-dix (90) jours à compter de la date de livraison, ou
pendant le reste de la période de garantie d’origine si elle s’avère plus longue.
Cette garantie est nulle est non avenue :
• Si la réclamation au titre de la garantie est formulée hors garantie ou si aucune preuve
d’achat n’est fournie.
• En cas de dysfonctionnement, de défaut ou de panne résultant manifestement d’un
impact, d’une mauvaise manipulation, d’une altération, d’un usage contraire au mode
d’emploi applicable, d’une tension secteur incorrecte, d’un accident, d’une perte, d’un vol,
d’un incendie, d’une inondation ou d’une autre catastrophe naturelle, de dommages liés à
l’expédition ou à des réparations effectuées par un personnel non autorisé.
• Pour tous les consommables, comme les piles, lorsque le dysfonctionnement est dû au
vieillissement normal du produit.
• Pour les dommages esthétiques, notamment les rayures, les bosses et le plastique
cassé sur les ports.
• Pour tout logiciel, même s’il est emballé ou vendu avec du matériel EZVIZ.
• Pour tout dommage ne résultant pas d’un défaut matériel ni d’un vice de fabrication.
• Pour le nettoyage de routine ainsi que l’usure esthétique et mécanique normale.
EXCLUSION DE GARANTIES
SAUF INDICATION CONTRAIRE DANS CETTE GARANTIE LIMITÉE, ET DANS
LES LIMITES AUTORISÉES PAR LE DROIT EN VIGUEUR, EZVIZ EXCLUT TOUTES
GARANTIES ET CONDITIONS EXPLICITES, IMPLICITES OU LÉGALES RELATIVES AU
PRODUIT (NOTAMMENT LES GARANTIES IMPLICITES DE QUALITÉ MARCHANDE ET
D’ADÉQUATION À UN USAGE PARTICULIER), À LA SÉCURITÉ DU PRODUIT, OU À LA
DISPONIBILITÉ ET À LA FIABILITÉ DES RENSEIGNEMENTS OU DES DONNÉES DU
PRODUIT. LA DURÉE DES GARANTIES OU CONDITIONS IMPLICITES APPLICABLES SE
LIMITERA À LA DURÉE DE LA PRÉSENTE GARANTIE LIMITÉE.
LIMITATION DES DOMMAGES
EN AUCUN CAS EZVIZ NE SAURAIT ÊTRE TENU RESPONSABLE DE DOMMAGES
CONSÉCUTIFS, ACCESSOIRES, EXEMPLAIRES OU SPÉCIAUX, Y COMPRIS LES
DOMMAGES POUR PERTE DE DONNÉES OU DE BÉNÉFICES, RÉSULTANT DE OU LIÉS
À LA PRÉSENTE GARANTIE LIMITÉE OU AU PRODUIT, ET LA RESPONSABILITÉ TOTALE
CUMULÉE D’EZVIZ RÉSULTANT DE OU LIÉE À CETTE GARANTIE LIMITÉE OU AU
PRODUIT NE SAURA EXCÉDER LE MONTANT EFFECTIVEMENT PAYÉ POUR LE PRODUIT
PAR L’ACHETEUR D’ORIGINE. CERTAINS ÉTATS N’AUTORISENT PAS L’EXCLUSION OU
LA LIMITATION DES DOMMAGES ACCESSOIRES OU CONSÉCUTIFS, SI BIEN QUE LA
Page 25

LIMITATION OU L’EXCLUSION STIPULÉE CI-DESSUS PEUT NE PAS S’APPLIQUER DANS
VOTRE CAS.
LIMITATION DE RESPONSABILITÉ
LES RENSEIGNEMENTS ET LES DONNÉES DU PRODUIT SONT FOURNIS « TELS QUELS
» ET « EN L’ÉTAT ». EZVIZ NE DÉCLARE, NE GARANTIT NI NE PROMET D’AUCUNE
MANIÈRE QUE LES RENSEIGNEMENTS ET LES DONNÉES DU PRODUIT SERONT
DISPONIBLES, PRÉCIS OU FIABLES, NI QUE LES RENSEIGNEMENTS ET LES DONNÉES
DU PRODUIT OU L’USAGE DU PRODUIT GARANTIRONT LA SÉCURITÉ DE VOTRE
DOMICILE. LES RENSEIGNEMENTS, LES DONNÉES ET LE PRODUIT LUI-MÊME SONT
UTILISÉS À VOTRE SEULE DISCRÉTION ET À VOS PROPRES RISQUES. VOUS SEREZ
L’UNIQUE RESPONSABLE (ET EZVIZ DÉCLINE TOUTE RESPONSABILITÉ) POUR TOUTES
LES PERTES, RESPONSABILITÉS OU DOMMAGES, NOTAMMENT RELATIFS À VOTRE
CÂBLAGE, VOTRE ÉCLAIRAGE, VOTRE ÉLECTRIQUE, VOTRE DOMICILE, VOTRE PRODUIT,
LES PÉRIPHÉRIQUES DE VOTRE PRODUIT, VOTRE ORDINATEUR, VOTRE APPAREIL
MOBILE ET TOUT AUTRE OBJET OU ANIMAL DE COMPAGNIE, RÉSULTANT DE VOTRE
USAGE DES RENSEIGNEMENTS, DES DONNÉES OU DU PRODUIT LUI-MÊME. LES
RENSEIGNEMENTS ET LES DONNÉES DU PRODUIT FOURNIS PAR EZVIZ NE SAURAIENT
REMPLACER UN MOYEN DIRECT D’OBTENIR CES RENSEIGNEMENTS. PAR EXEMPLE,
UNE NOTIFICATION FOURNIE À TRAVERS LE PRODUIT NE SAURAIT REMPLACER
DES INDICATIONS AUDIBLES ET VISIBLES AU DOMICILE ET SUR LE PRODUIT, NI UN
SERVICE DE SURVEILLANCE TIERS.
N’hésitez pas à contacter votre revendeur, ou à nous écrire à l’adresse service@ezvizlife.
com si vous avez des questions.
COPYRIGHT ©2016 EZVIZ Inc. TOUS DROITS RÉSERVÉS.
Page 26

À propos des documents
Les documents comprennent des instructions pour utiliser et gérer le produit. Les
illustrations, les graphiques, les images et toutes les autres informations figurant ciaprès sont fournis à titre de description et d’explication uniquement. Les informations
figurant dans les documents sont sujettes à modification sans préavis, en raison de
mises à jour du micrologiciel ou pour d’autres raisons. Veuillez consulter le site web pour
obtenir la dernière version (http://www.ezvizlife.com).
Toutes les informations, notamment les textes, les images et les graphiques sont la
propriété d’EZVIZ Inc. ou de ses filiales (ci-après « EZVIZ »). Les documents ne peuvent
pas être reproduits, modifiés, traduits ou distribués, en partie ou en totalité, sans le
consentement écrit préalable d’EZVIZ. Sauf mention contraire, EZVIZ n’offre aucune
garantie, explicite ou implicite, en ce qui concerne les documents.
Informations sur les marques déposées
™, ™, et les autres marques déposées et logos d’EZVIZ sont la propriété
d’EZVIZ dans diverses juridictions. Les autres marques déposées et logos mentionnés
dans les documents appartiennent à leurs propriétaires respectifs.
Mentions légales
DANS LES LIMITES AUTORISÉES PAR LE DROIT EN VIGUEUR, LE PRODUIT DÉCRIT,
AVEC SON MATÉRIEL, SON LOGICIEL ET SON MICROLOGICIEL, EST FOURNI « TEL
QUEL », AVEC TOUS SES DÉFAUTS ET SES ERREURS, ET EZVIZ N’OFFRE AUCUNE
GARANTIE, EXPLICITE OU IMPLICITE, NOTAMMENT DE QUALITÉ MARCHANDE, DE
QUALITÉ SATISFAISANTE, D’ADÉQUATION À UN USAGE PARTICULIER, ET DE NONVIOLATION DES DROITS D’UN TIERS. EN AUCUN CAS EZVIZ, SES DIRECTEURS,
CADRES, EMPLOYÉS OU AGENTS NE SAURONT ÊTRE TENUS RESPONSABLES
ENVERS VOUS POUR TOUS DOMMAGES SPÉCIAUX, CONSÉCUTIFS, ACCESSOIRES OU
INDIRECTS, Y COMPRIS LES DOMMAGES POUR PERTE DE BÉNÉFICES COMMERCIAUX,
INTERRUPTION DU TRAVAIL, PERTE DE DONNÉES OU DE DOCUMENTATION EN LIEN
AVEC L’USAGE DE CE PRODUIT, MÊME SI EZVIZ A ÉTÉ AVERTI DE L’ÉVENTUALITÉ DE
CES DOMMAGES.
DANS LES LIMITES AUTORISÉES PAR LE DROIT EN VIGUEUR, EN AUCUN CAS LA
RESPONSABILITÉ TOTALE D’EZVIZ POUR LES DOMMAGES NE SAURA EXCÉDER LE
PRIX D’ACHAT DU PRODUIT.
EZVIZ n’endossera aucune responsabilité en cas de dommages corporels ou de dégâts
matériels résultant d’une interruption du produit ou d’une résiliation de service causée
par : a) une installation ou un usage incorrect ; b) la protection des intérêts nationaux
ou publics ; c) un cas de force majeure ; d) vous-même ou un tiers, y compris l’usage de
produits, logiciels ou applications d’un tiers.
EN CE QUI CONCERNE LE PRODUIT DISPOSANT D’UN ACCÈS À INTERNET, L’USAGE
DU PRODUIT SE FERA ENTIÈREMENT À VOS PROPRES RISQUES. EZVIZ DÉCLINE
TOUTE RESPONSABILITÉ EN CAS DE FONCTIONNEMENT ANORMAL, DE FUITE
D’INFORMATIONS CONFIDENTIELLES OU D’AUTRES DOMMAGES RÉSULTANT
D’UNE CYBER-ATTAQUE, D’UN PIRATAGE, D’UN VIRUS OU DE TOUT AUTRE RISQUE
DE SÉCURITÉ SUR INTERNET ; CEPENDANT, EZVIZ OFFRIRA UNE ASSISTANCE
TECHNIQUE RAPIDE EN CAS DE BESOIN.
Le but du produit est de donner un avertissement adéquat en cas d’intrusion dans un
endroit particulier ; cependant, la bonne installation des produits n’éliminera pas, mais
réduira seulement le risque que des accidents se produisent et qu’ils occasionnent des
dommages corporels et des dégâts matériels. Nous vous conseillons d’accroître votre
vigilance et de renforcer votre prise de conscience de la sécurité au quotidien.
LES LOIS SUR LA SURVEILLANCE VARIENT PAR JURIDICTION. VEUILLEZ VÉRIFIER
TOUTES LES LOIS PERTINENTES DANS VOTRE JURIDICTION AVANT D’UTILISER CE
PRODUIT AFIN DE VOUS ASSURER QUE VOTRE USAGE EST CONFORME AU DROIT EN
VIGUEUR. VOUS RECONNAISSEZ PAR AILLEURS QUE CE PRODUIT EST UNIQUEMENT
DESTINÉ À UN USAGE CIVIL, ET EZVIZ NE POURRA ÊTRE TENU RESPONSABLE
SI CE PRODUIT EST UTILISÉ À DES FINS ILLÉGITIMES, PAR EXEMPLE POUR
PORTER ATTEINTE AUX DROITS D’UN TIERS, POUR UN TRAITEMENT MÉDICAL, UN
ÉQUIPEMENT DE SÉCURITÉ OU DANS D’AUTRES SITUATIONS DANS LESQUELLES UN
DYSFONCTIONNEMENT DU PRODUIT POURRAIT ENTRAÎNER DES BLESSURES OU LA
MORT, POUR DES ARMES DE DESTRUCTION MASSIVE, DES ARMES CHIMIQUES ET
BIOLOGIQUES, DES ARMES NUCLÉAIRES ET DES USAGES DANGEREUX DE MATIÈRES
RADIOACTIVES OU DES USAGES ALLANT À L’ENCONTRE DE L’HUMANITÉ. VOUS
ENDOSSEREZ TOUTES LES RESPONSABILITÉS EN CAS DE PERTES OU DE DOMMAGES
Page 27

RÉSULTANT DES USAGES DÉCRITS CI-DESSUS. EN CAS DE CONFLIT ENTRE CE QUI
PRÉCÈDE ET LE DROIT EN VIGUEUR, CE DERNIER PRÉVAUDRA.
Informations réglementaires
Informations FCC
Conformité FCC : Cet appareil est conforme à la section 15 du règlement de la FCC. Son
fonctionnement est soumis aux deux conditions suivantes :
(1) Cet appareil ne doit pas causer d’interférences nuisibles, et
(2) Cet appareil doit accepter toute interférence reçue, notamment les interférences
susceptibles d’occasionner un fonctionnement indésirable.
Remarque : Ce produit a été testé et reconnu conforme aux limites imposées pour un
appareil numérique de classe B, conformément à la section 15 du règlement de la FCC.
Ces limites visent à fournir une protection raisonnable contre les interférences nocives
dans un environnement domestique. Ce produit génère, utilise et peut émettre des
fréquences radio et, s’il n’est pas installé et utilisé conformément aux instructions, peut
causer des interférences nuisibles aux communications radio. Cependant, rien ne permet
de garantir l’absence d’interférences dans une installation particulière. Si ce produit
occasionne des interférences nuisibles à la réception de la radio ou du téléviseur, ce qui
peut être déterminé en éteignant et en rallumant l’appareil, il est conseillé à l’utilisateur
d’essayer de corriger les interférences en prenant une ou plusieurs des mesures
suivantes :
- Réorienter ou déplacer l’antenne de réception.
- Augmenter la distance entre l’appareil et le récepteur.
- Brancher l’appareil sur un circuit différent de celui auquel le récepteur est branché.
- Consulter le revendeur ou un technicien radio/TV expérimenté pour obtenir de l’aide.
Notez que les changements ou modifications non expressément autorisés par la partie
responsable de la mise en conformité sont susceptibles d’annuler le droit de l’utilisateur
à se servir de l’appareil.
Cet appareil doit être installé et utilisé en conservant une distance minimale de 20 cm
entre le radiateur et le corps.
Cet appareil est conformé aux normes RSS sans licence d’Industrie Canada. Son
fonctionnement est soumis aux deux conditions suivantes :
(1) cet appareil ne doit pas causer d’interférences, et
(2) cet appareil doit accepter toute interférence reçue, notamment les interférences
susceptibles d’occasionner un fonctionnement indésirable de l’appareil.
Conformément aux réglementations d’Industrie Canada, ce radio-émetteur peut
uniquement être utilisé avec une antenne d’un type et d’un gain maximal (ou minimal)
approuvé pour l’émetteur par Industrie Canada. Pour réduire les interférences radio
potentielles avec d’autres utilisateurs, le type d’antenne et son gain doivent être choisis
de sorte que la puissance isotrope rayonnée équivalente (PIRE) ne soit pas supérieure à
ce qui est nécessaire pour le bon déroulement des communications.
Déclaration de conformité UE
Ce produit et (le cas échéant) les accessoires fournis portent le marquage
« CE » et sont donc conformes aux normes européennes harmonisées en
vigueur listées dans la directive CEM 2014/30/CE, la directive LVD 2014/35/EU
et la directive LdSD 2011/65/UE.
2012/19/UE (directive WEEE) : Les produits portant ce symbole ne peuvent
pas être éliminés comme des déchets ménagers non triés dans l’Union
européenne. Pour un recyclage adéquat, renvoyez ce produit à votre
fournisseur local après avoir acheté un nouvel équipement équivalent, ou
jetez-le dans un point de collecte officiel. Pour plus d’informations, voir : www.
recyclethis.info.
2006/66/CE (directive relative aux piles et accumulateurs) : Ce produit contient
une batterie qui ne peut-pas être mise au rebut avec les déchets ménagers
non triés dans l’Union européenne. Consultez la documentation du produit
pour plus d’informations sur la batterie. La batterie porte le symbole suivant,
qui peut inclure des inscriptions indiquant la présence de cadmium (Cd),
de plomb (Pb) ou de mercure (Hg). Pour un recyclage adéquat, renvoyez
la batterie à votre fournisseur ou à un point de collecte officiel. Pour plus
d’informations, voir : www.recyclethis.info.
Conformité Industrie Canada ICES-003
Cet appareil répond aux exigences des normes CAN ICES-3 (B)/NMB-3(B).
 Loading...