

Hangcha 1-3.5t R Maintenance Manual

1-3.5t R Series Internal Combustion
Counterbalanced Forklift Truck
OPERATION AND MAINTENANCE MANUAL
Original Instruction
ZHEJIANG HANGCHA ENGINEERING MACHINERY CO., LTD.
DEC.2009 4th EDITION

FOREWORD
This operation manual is the explanations that how to use 1-3.5t R series forklift truck
correctly. It will instruct you how to operate safety and precautionary maintenance. To
ensure safety and exert the truck’s potential, all the personnel that in charge of
operation, maintenance and management must read this manual thoroughly before
starting work with the forklift.
Compared with 1-3.5t N series internal combustion forklift truck, 1-3.5t R series
forklift truck has the following strengths: enhancing the power, improving the outline,
using buffer steering axle, in addition, besides the TCM and NISSAN main
transmission are configured in our trucks, we also configure Okamura main
transmission in our trucks. And there is different between masts of import and export
trucks, N series masts are used in the import trucks, R series masts are used in export
trucks.
This manual also applies to container forklift truck and forklift truck assembled
attachments.
Our product design will update and perform better, so the content in this manual may
be not the same as the forklift you owned.
If you have any questions please keep touches with ZHEJIANG HANGCHA
ENGINEERING MACHINERY CO., LTD. sales department or let the agents know.
CDEC.2009 4
○
th
EDITION

Content
Foreword
1. GENERAL RULES.....................................................................................................................1
2. NAME OF MAIN PARTS OR COMPONENT........................................................................3
Instruments..............................................................................................................................3
Switches....................................................................................................................................5
Controls....................................................................................................................................6
Body and others.......................................................................................................................9
3. SAFETY INSTRUCTIONS......................................................................................................13
4. MAINTENANCE......................................................................................................................19
8 hour (daily or every shift) check.......................................................................................19
Weekly maintenance (40 hours)...........................................................................................22
Maintain monthly (180-200 hours)......................................................................................25
Maintain semiannually (1000 hours)...................................................................................27
Maintain annually (2000 hours)........................................................................................... 29
5. STRUCTURE AND STABILITY OF TRUCK.......................................................................33
6. OPERATION.............................................................................................................................35
Star-up....................................................................................................................................35
Traveling ................................................................................................................................36
Pick up....................................................................................................................................37
Stacking load..........................................................................................................................37
Remove load ..........................................................................................................................38
7. DEPOSIT...................................................................................................................................39
8. MAINTENANCE......................................................................................................................41
Preventive maintenance schedule........................................................................................41
Maintenance of chassis and body.........................................................................................43
Periodic replacement of key safe parts................................................................................45
Table for the oil used in the truck ........................................................................................46
Lubrication system drawing.................................................................................................48
Environment protection........................................................................................................49
Scutcheons .............................................................................................................................50
9. TRUCK’S CONVEY , LIFTING, TOWING...........................................................................58
10. TYPE SIGNIFICATION........................................................................................................59
11. PERFORMANCE PARAMETERS OF R SERIES IC FORKLIFT..................................62
12. OPERATION, DISASSEMBLY AND INSTALLATION OF CAB.....................................81

13. OPERATION AND NOTICE ABOUT LPG FORKLIFT...................................................83
14. OPERATIONAL METHOD OF MAINTENANCE FREE LEAD ACID BATTERY......95
15. USE, INSTALLATION AND SAFETY RULES OF ATTACHMENT...............................97
16. RELATED SAFETY INSTRUCTION AND STANDARD (FOR TRUCKS EXPORTING
TO EUROPE OR OPTION)........................................................................................................
17. MAINTAIN RECORD..........................................................................................................103
99

1. GENERAL RULES
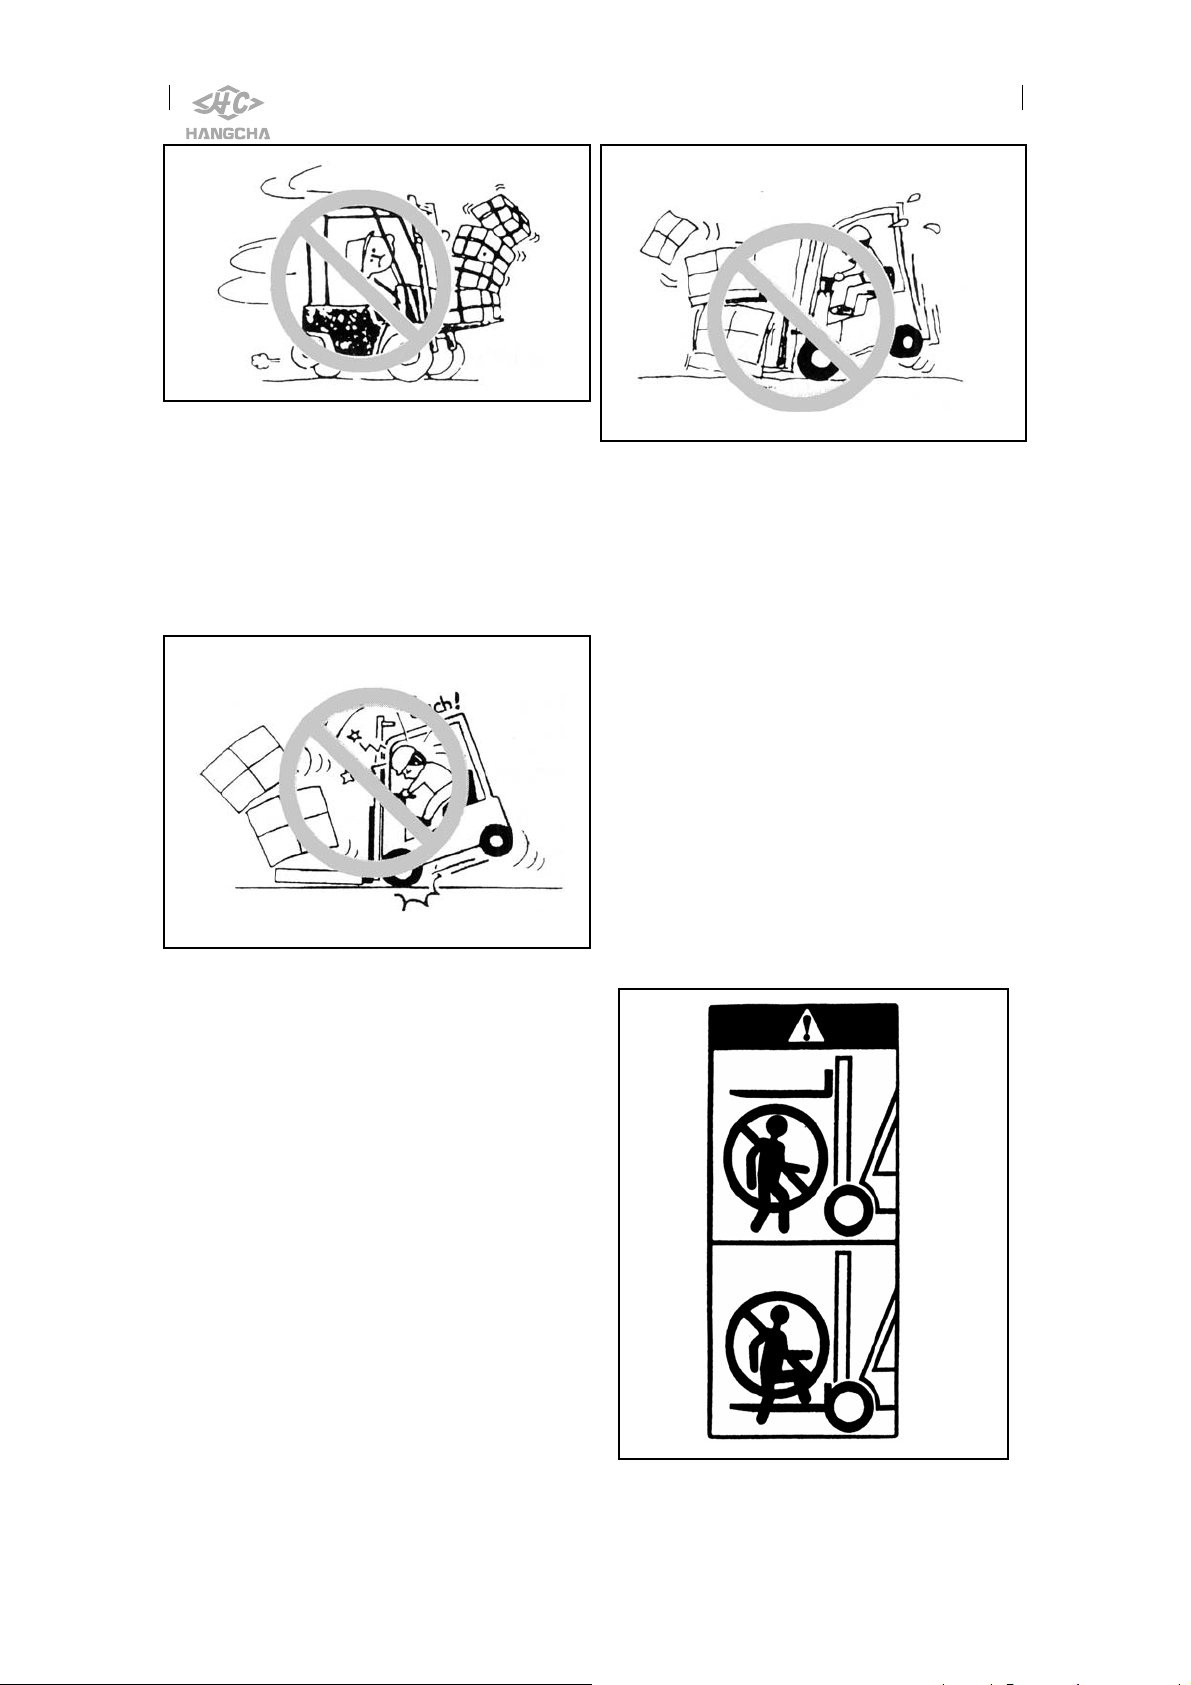
To make the truck and you safety, operator should obey these rules below:
1. Only trained and authorized operator shall be permitted to operate the truck.
2. Before start truck you should check all control and alarm device, if there are
any damaged or objection, you could not operate it until repaired it.
3. When carry the load, the weight should not much overload. The fork shall
insert in the load entirely and well proportioned. It is not permitted use only
one fork to load.
4. You should operate the truck smoothly when start, turning, travel, brake and
parking. On a slick or wet road, you should decrease speed when turning.
5. Load travel should lower the goods down and tilt the mast backwards.
6. Be carefully when traveled on a grade. If the slope angle is bigger than 10%,
travel forward up slope and backward down slope. Never turn sideways and
stack load on an incline.
7. Notice the foot passenger, barrier, pothole and the clearance upside.
8. It is prohibit picking up a man or standing on the fork.
9. No permitted to stand or walk under the fork.
10. No permitted to operate the truck or attachment on other position except the
operator’s seats.
11. Do not carry the load unpackaged. Be carefully to carry these goods with large
size.
12. Notice the load not drop from the load bracket for those trucks that overall
maximum lift height is higher than 3 meters. If necessary, make some
protective measure.
13. Travel with load as low as possible and tilt back the mast.
14. Before driving over a dock-board or bridge-plate, be sure that it is properly
secured and strong enough to sustain the weight.
15. Make sure that there is no naked flame near the area, never smoke. The driver
should not remain seated when adding fuel.
16. The truck with attachments should be treated as a loaded truck.
17. When leave the truck, you should let the fork down, make the shift lever neutral
shut down the engine and cut the power. Parking on a grade, make sure to
tighten the brake lever. If necessary, use a block when parking on a grade for a
long time.
18. If the truck suddenly get out of order, or for leakage of electrolyte,hydraulic oil
or brake oil, when lifting goods or grade climbing, it needs to rush to repair and
let the truck be in safe state, then connect with maintainer or sales
representative.
19. In the process of install and assemble, it will be noise and libration. Please
1

choose the right tool and assembly method. Depress the noise and libration as
soon as possible to reduce the noise pollute to circumstance.
20. The work road surface for forklift should be stability and unknit, cement,
blacktop or beton. If there are snows, ice, water or other eyewinker, bar.
Eliminate all, and then work. Otherwise the truck will be out of control and
lead the safety accident.
21. Move the truck to the place which respects traffic when it anchors. If the reason
is brake or turn system, move it by a suitable truck (Reference the part of truck
move); Other reasons, use a suitable truck to traipse, tie the cord outside of
truck. Please abide by the traffic regulations when traipse the truck on calzada.
22. After take-down the hood, water tank cover board, overhead, backrest of mast,
unallowed to operate the truck or load cargo.
23. There are enough light at truck work ground. At night, open the head lamp to
collocate enough lamp-house.
24. Only in the event that the truck manufacturer is no longer in business and there
is no successor in the interest to the business, the user may arrange for a
modification or alteration to a powered industrial truck provided, however, that
the user shall:
a) Arrange for the modification or alteration to be designed, tested and
implemented by an engineer(s) expert in industrial trucks and their safety;
b) Maintain a permanent record of the design, test(s) and implementation of the
modification or alteration;
c) Approve and make appropriate changes to the capacity plate(s),decals, tags and
instruction handbook;
d) Affix a permanent and readily visible label to the truck stating the manner in
which the truck has been modified or altered together with the date of the
modification or alteration, and the name and address of the organisation that
accomplished the tasks.
2
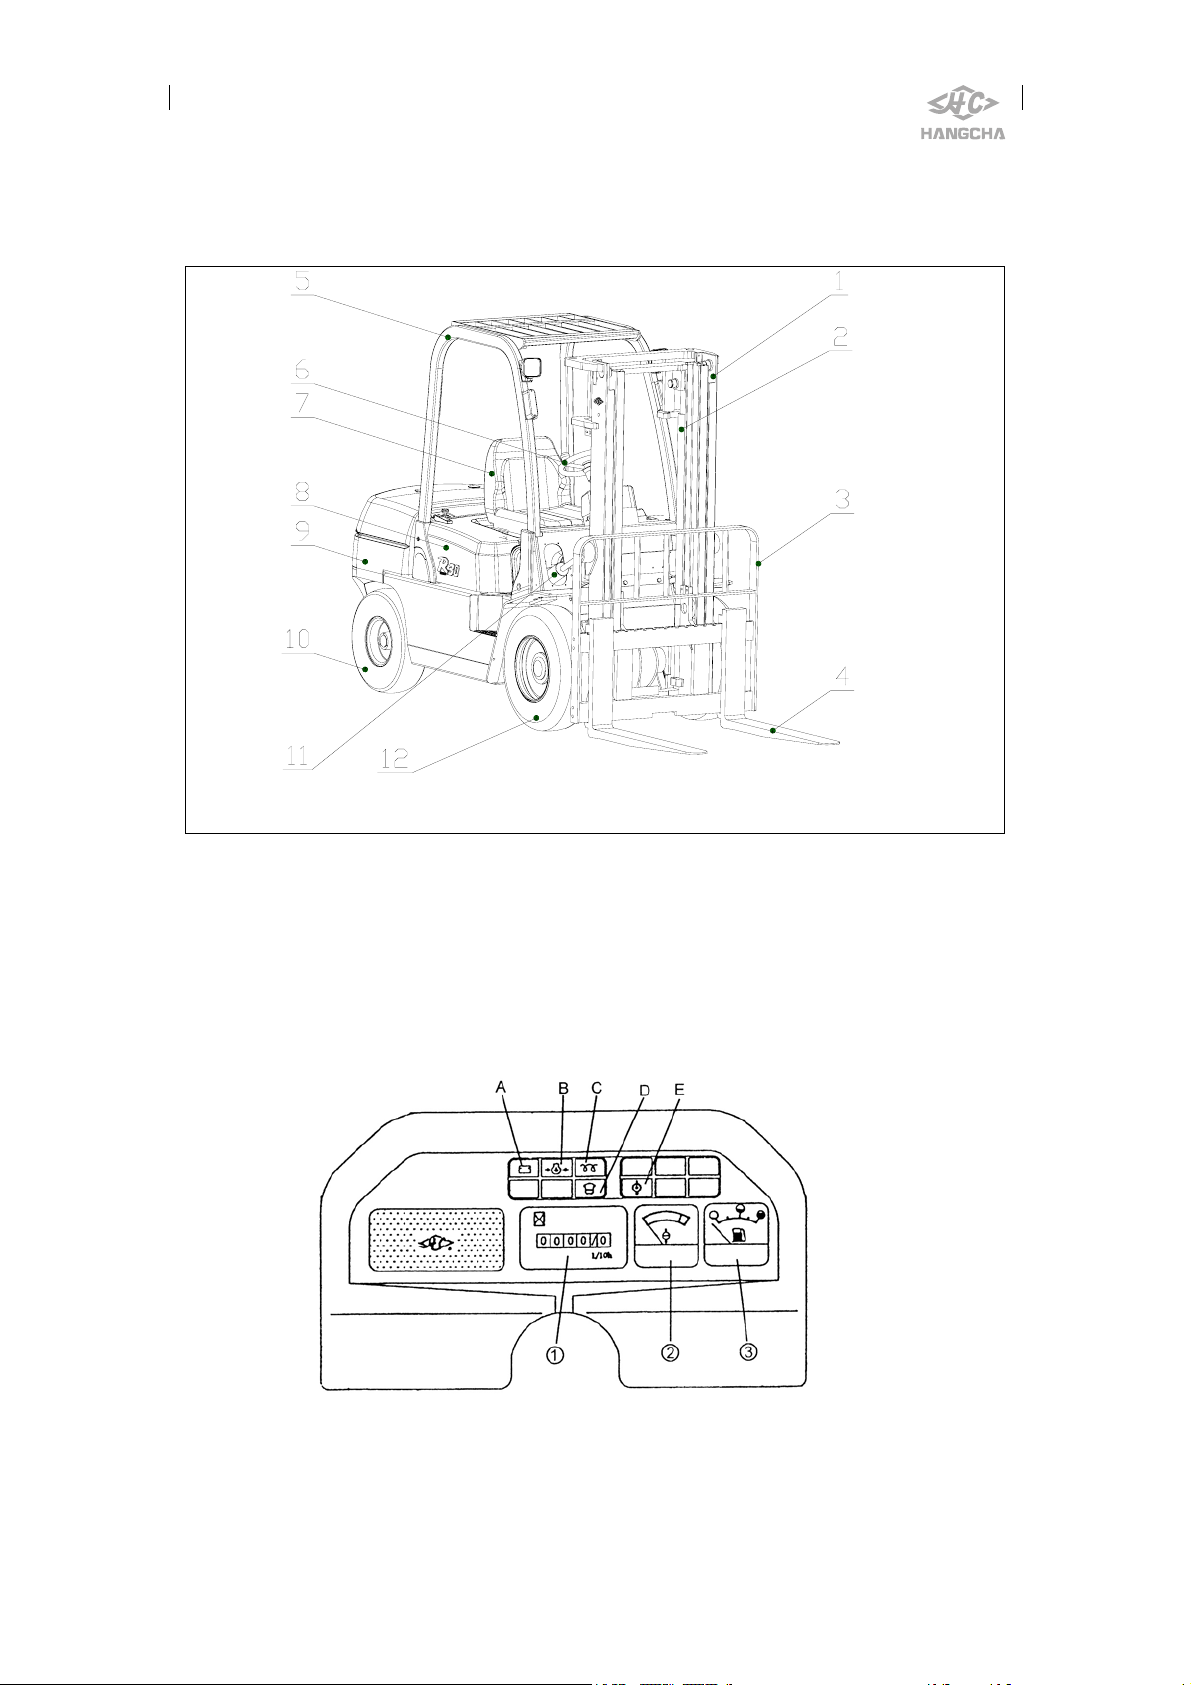
2. NAME OF MAIN PARTS OR COMPONENT
1. Mast 2. Lifting cylinder 3. Backrest 4. Fork 5. Overhead guard
6. Steering wheel 7. Seat 8. Cover hood 9. Counterbalance weight
Rear wheel 11. Tilting cylinder 12. Front wheel
10.
Instruments
3

Hour meter [1]
This meter measures working time
of engine. Use meter to schedule
lubrication and maintenance periods.
Water temperature gauge [2]
This gauge indicates the oil
temperature in the torque converter
transmission box. In normal status, the
pointer is in green zone. (60~115℃)
Caution
If the pointer points red zone, please stop
the truck at once. Decrease the engine speed
to make the engine cool. Check the cooling
fluid if enough and the fan belt ’s elasticity i f
fit.
Fuel gauge [3]
The gauge indicates the fuel level in the
tank when the key is at (ON) position.┃
Charge (A)
This lamp indicates the battery
condition of charge. The lamp comes on
when the ignition switch is set at “ON”,
but it goes out as the engine starts and
accelerator pedal is pressed.
Caution
If the light continues to stay lit or
lights up during operation, the charging
rate is low and should be checked
immediately.
Oil pressure alert lamp (B)
This lamp indicates the pressure
condition of engine lube oil. Although it
lights up when the engine switch is set at
“ON”, once the engine starts up and the
accelerator pedal is pressed, this lamp
goes out.
Caution
If this light continues to stay lit or
lights up during operation, the pressure
is lower than 0.05Mpa and should be
checked immediately.
Glow indicator (C) [Diesel truck]
Turn the key to “ON” position and
the indicator lights up for a moment.
After the indicator goes out, turn the key
to . “Start” position
Sedimentor indicator (D) [Use in W9、
W13、W15A diesel truck]
In normal state, once the starter is
set to “ON” position, this lamp
lights up. After the engine is started up,
it goes out.
This lamp lights up when water in
sedimentor reaches to a certain level,
while the engine is running.
If this lamp continues to stay lit or
lights up during the engine running,
stopping the engine and discharge water
immediately.
Caution
Fuel injection pump will be damaged
if continue working when the light is up.
Engine coolant temperature [E]
In normal state, once the starter is
set to “ON” position, this lamp
lights up. After the engine is started up,
it goes out.
During work time if the oil
temperature exceed the normal
rang(60~120℃) the indicator light on.
Caution
If the pointer enters the red range,
stop the operation instantly and slow
down engine speed to cool the coolant
and wait until the pointer goes into the
green range, and have a check then.
4
Switches
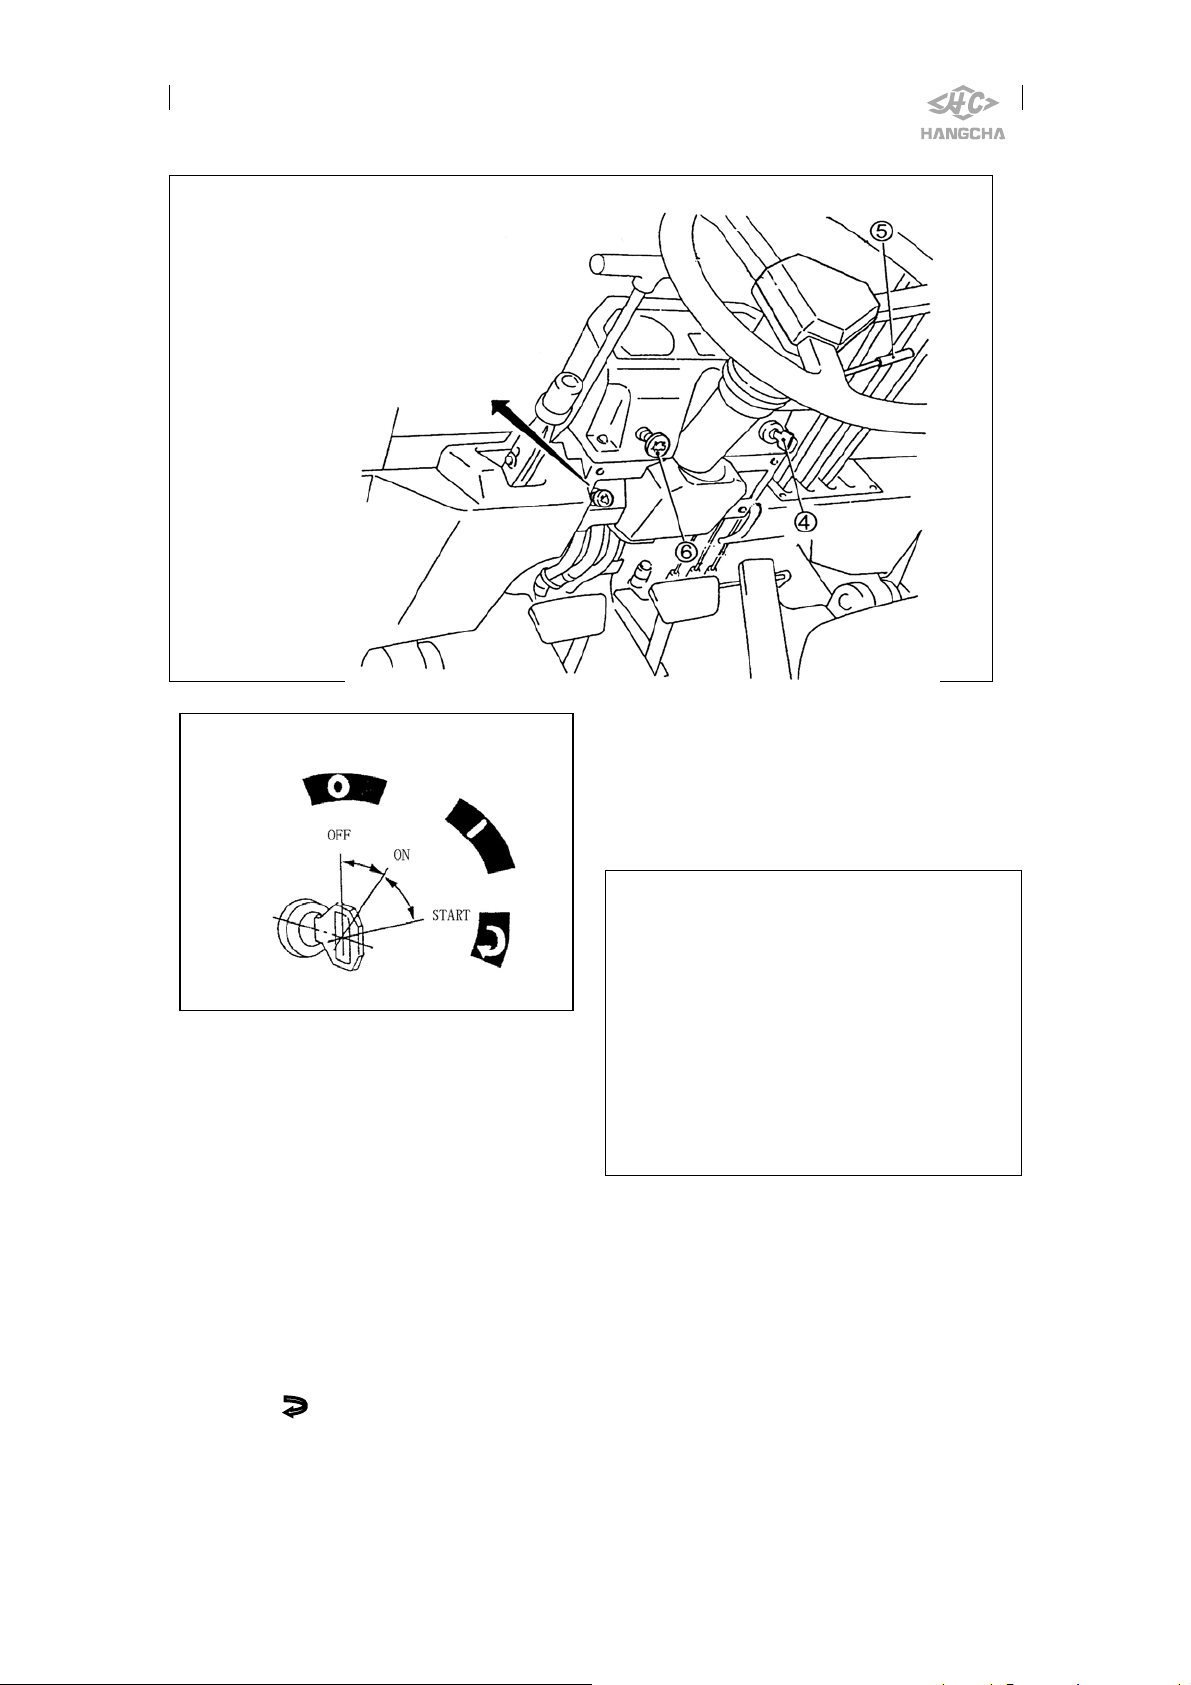
Key [4]
OFF (O)
This is the position at which the
key inserted or drawn out.
Gasoline engine and diesel engine
stop at this position.
ON ( )┃
The electric circuit is closed with
the starter switch at “”┃ (ON). After the
engine is started, the key is at this
position.
START ( )
As the key is placed in the
“START” position, the starter motor is
engaged. When removing hand off key,
it is automatically returned to the “ON”
position by spring force.
Diesel engine
Turn the key to “ON” position and
the indicator lights up for a moment.
After the indicator goes out, turn the key
to “Start” position.
Caution
1.Do not keep the starter switch in the
“ ”(ON) ┃ position while engine is shut
down. This result in a discharge
battery.
2.With the engine running, do not turn
the starter switch into the (START)
position, since there is a danger of the
starter motor being damaged.
3.Do not keep the starter engaged for
more than 5 seconds at a time. Wait
about 120 seconds before trying again.
Turn signal lever [5]
Use this lever which is at the right
side of turning rod to indicate the
turning direction of the truck. R-turn
right, N-neutral, L-turn left.
The turn signal level does not
automatically return to the neutral
position unlike general passenger cars.
Reset it by hand.
5
Light switch [6]
This light switch can be pulled out
at two steps.
Light
Stage
Power
Near
light
Far
light
0 ×
1st × × ×
2nd × × ×
(×) means connected
Clear
-ance
Horn button [7]
Press the rubber cover at the center
of steering wheel to sound horn.
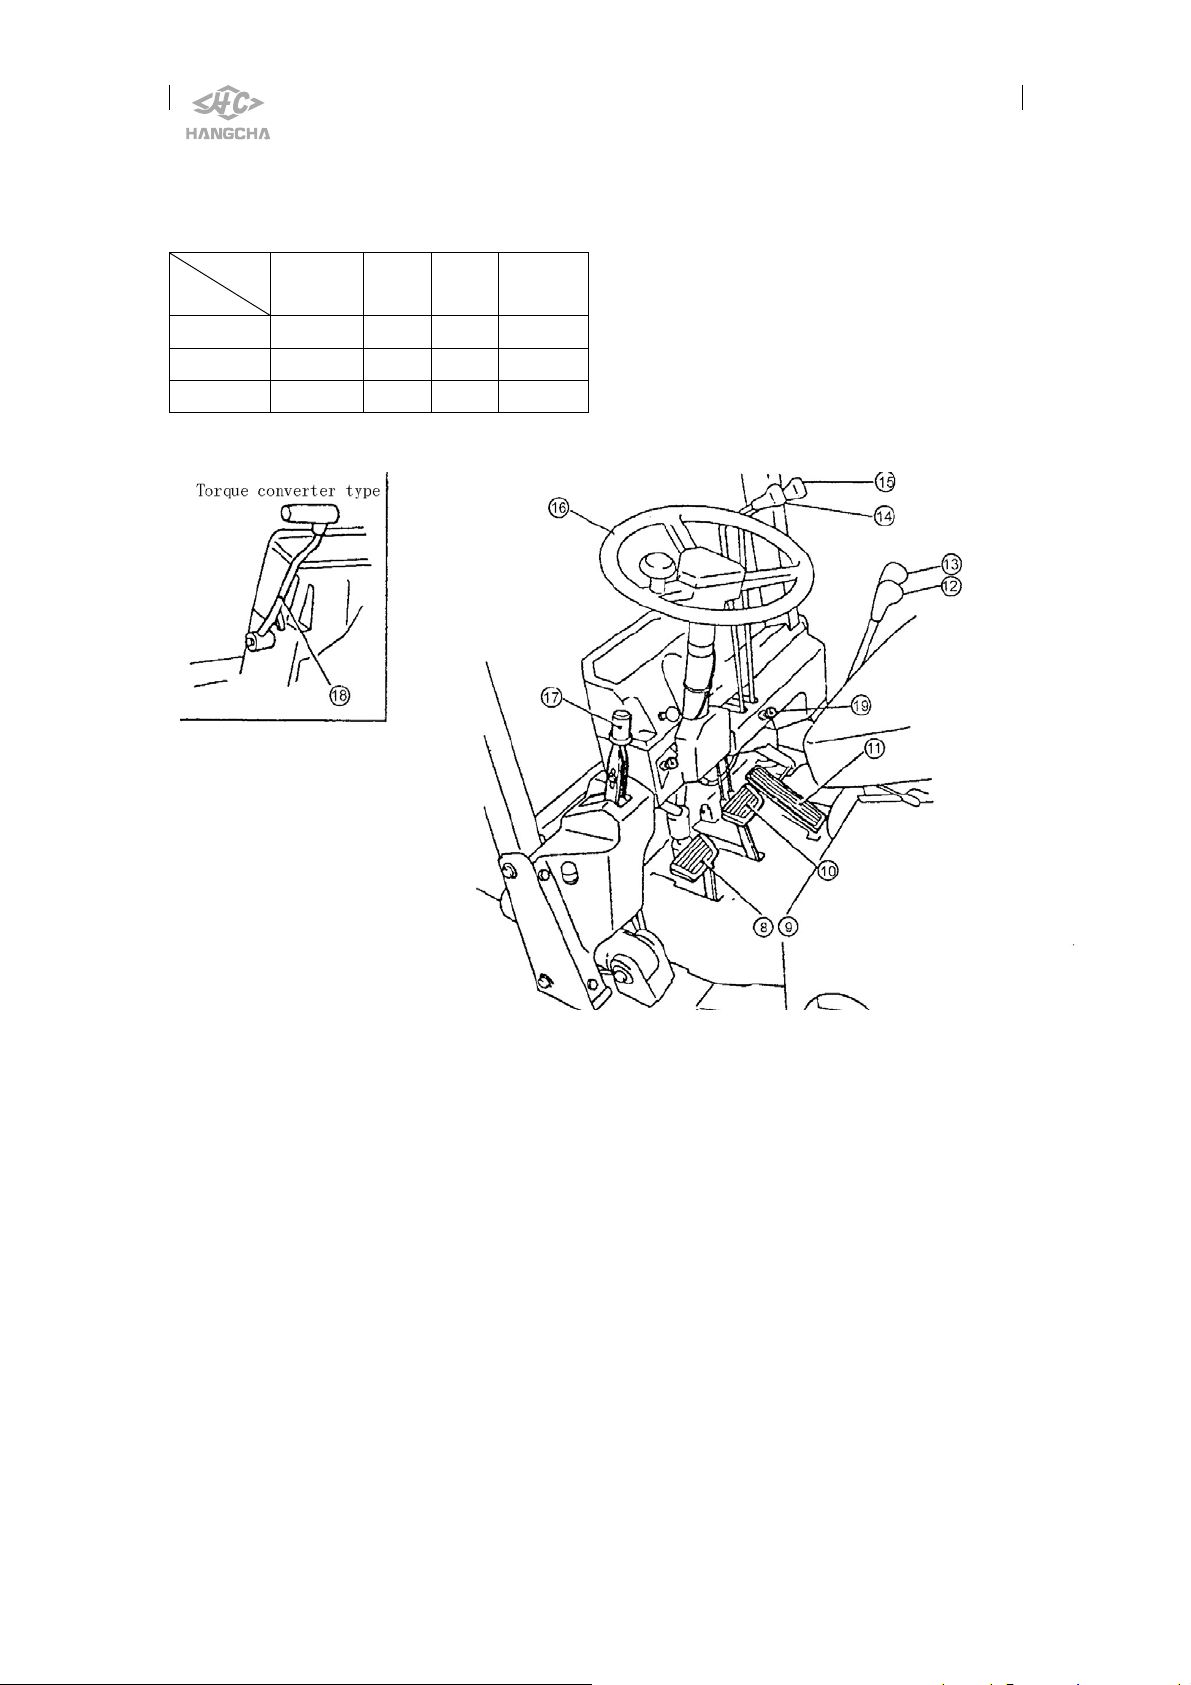
Controls
8. Clutch pedal (frictional clutch type) 9. Inching pedal (torque converter type)
10. Brake pedal 11. Accelerator pedal 12. Forward reverseand Speed slect lever (frictional
clutch type) 13. Shift lever 14. Tilt lever 15. Lift lever 16. Steering hand wheel
17. Parking brake lever 18. Forward reverse lever (Torque converter type
Non-electric-switch) 19. Choke line 20. Forward reverse lever(Torque converter type
Switch)
6
Clutch pedal [8] (frictional clutch type)
Press the clutch pedal fully, the
operator can uncouple the engine and
transmission.
When the clutch pedal released, it
allows power to flow through the clutch
from the engine to transmission.
Caution:
Do not run the lift truck with the
clutch in a half-clutch condition as much
as possible.
Inching pedal [9] (Torque converter type)
As the inching pedal is pressed, the
oil pressure in the hydraulic clutch drops
accordingly (the needle of the oil
pressure gauge swings to the left)
allowing the operator to perform inching
operation. Use this pedal to inch the
truck while operating the hoist system at
a high speed.
When pressed to the full, this
inching pedal serves as a brake pedal
also.
Caution:
Do not use the inching pedal too
much. Long time use or use as rest would
cause high temperature of transmission
oil, or result in slipping of clutch.
Accelerator pedal [11]
Press down the accelerator pedal,
engine rotating speed increase, traveling
speed of truck increased. On the contrary,
when loosen the pedal, engine rotating
speed and truck traveling speed will
decrease.
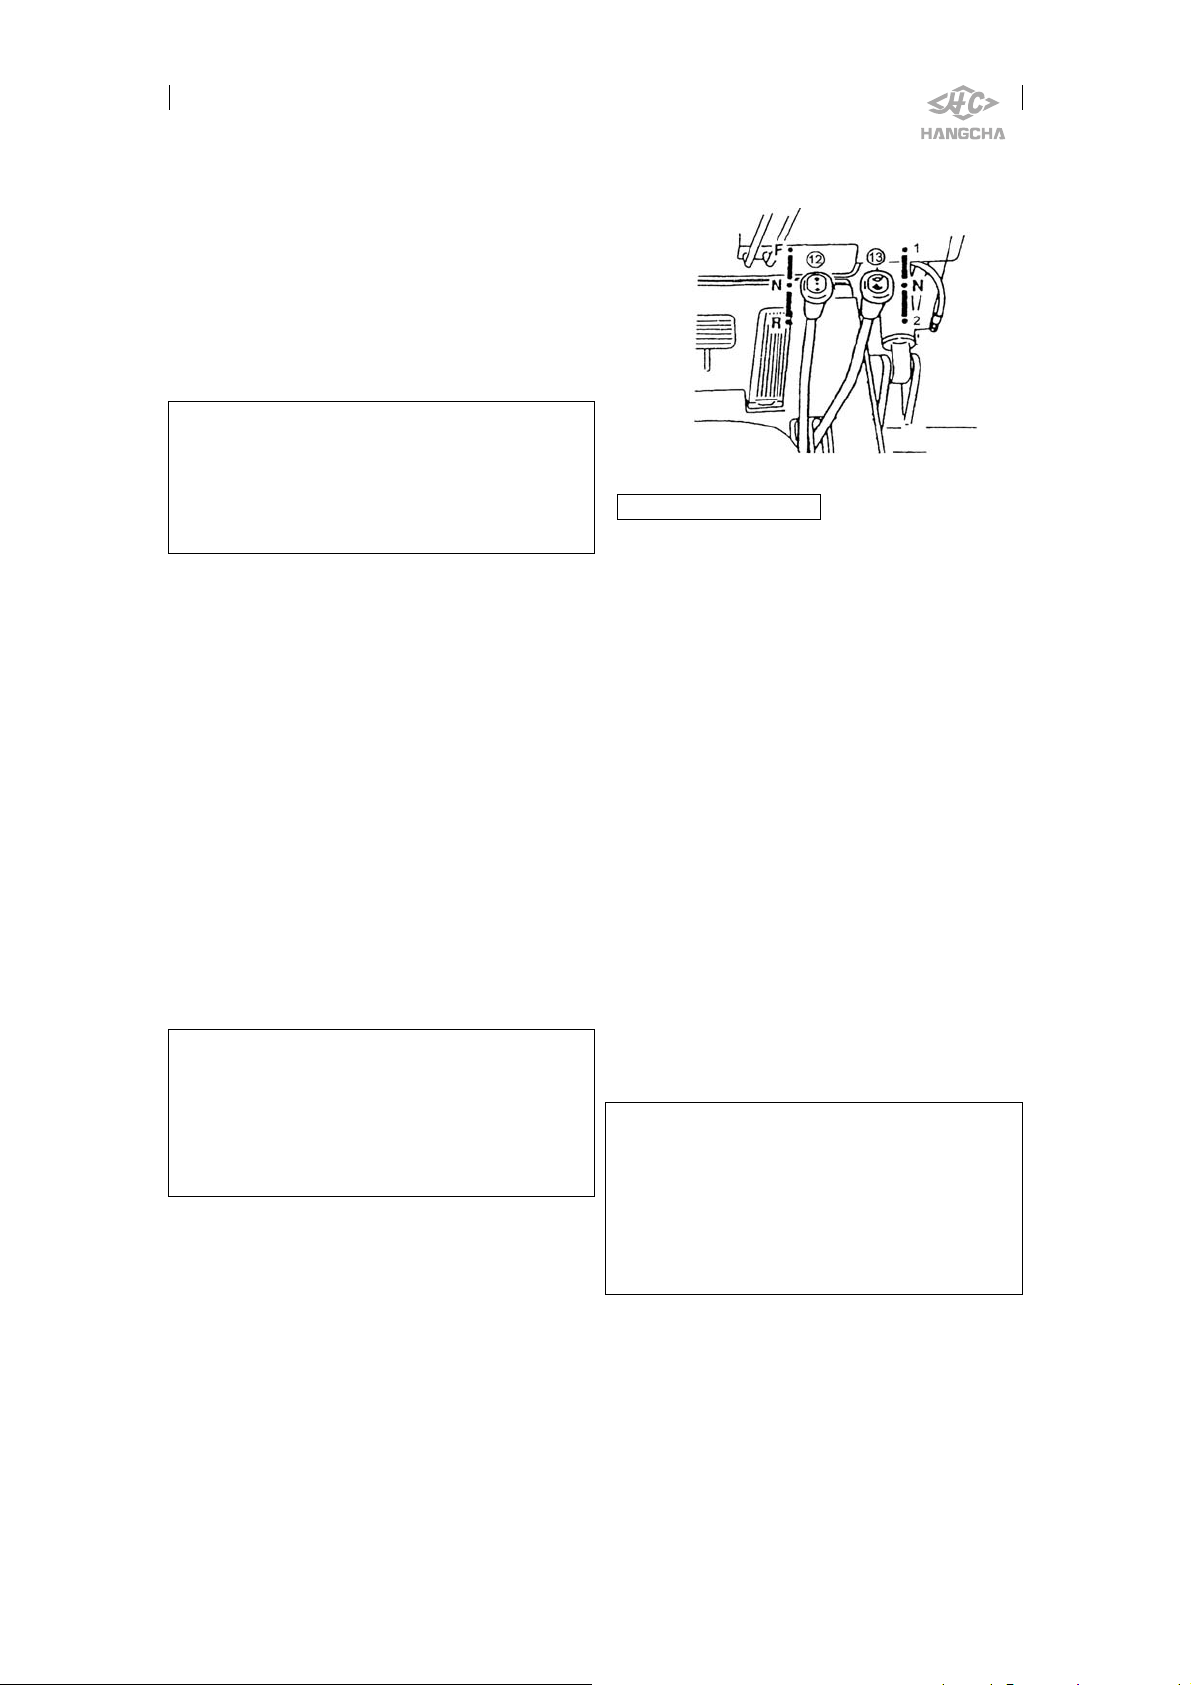
Forward-reverse [12]
Speed-select lever [13]
Machinery transmission
[12]F-front N-neutral R-backward
[13]1-low N-neutral 2-high
Machinery gear box have four shifts, tow
are frontward and tow are backward.
Before gear-shifting, be sure to
press the clutch pedal to the full. Always
brake to a full stop before reversing the
direction of travel. Shifting the level in
reverse the back-up lights turn on.
Tilt level [14]
The mast can be tilted by operation
of this tilt lever: pulling on this lever
backwards will tilt the mast backwards,
and pushing it forwards will tilt the mast
forwards.
The tilt speed can be controlled by
tilt angle of the lever and accelerator
pedal effort.
Caution
The tilt lock mechanism built in the
hydraulic control valve does not allow
the mast to tilt forwards while the engine
is being shut down even if the tilt level
is pushed forwards.
7
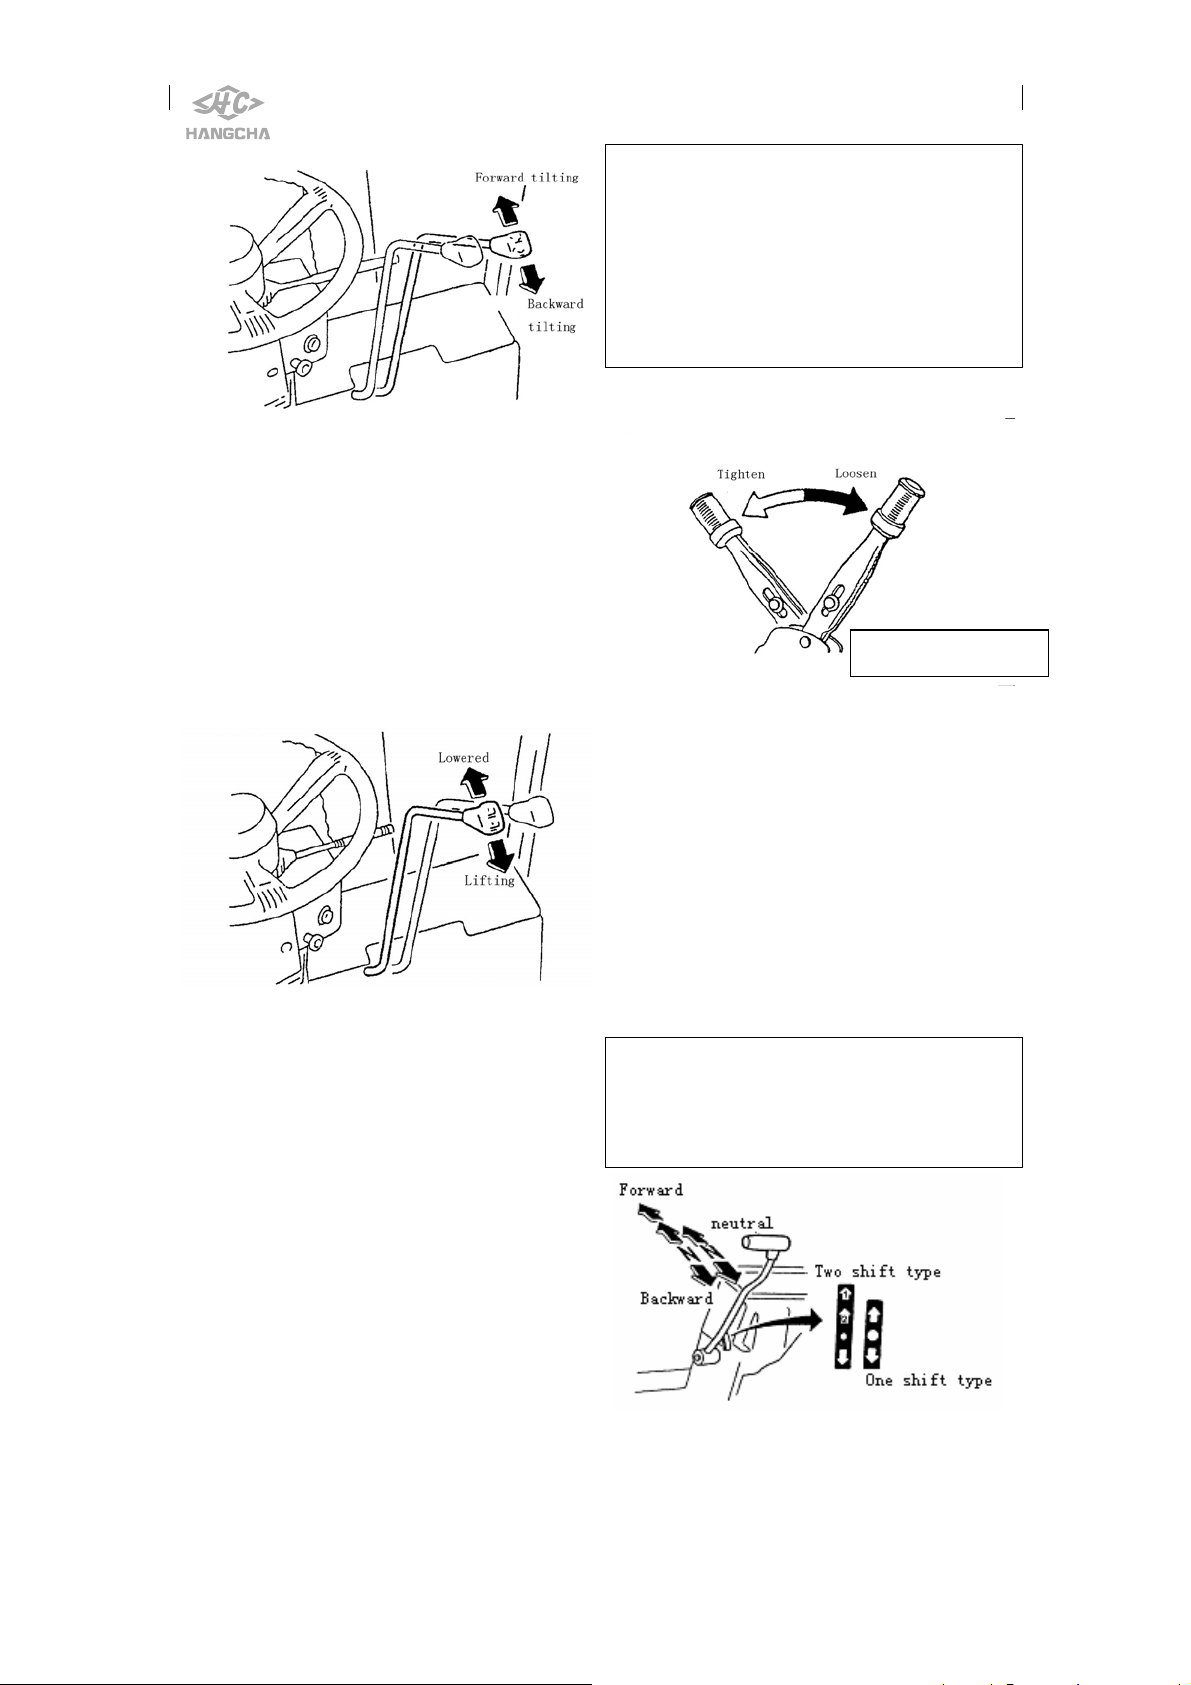
Lift lever [15]
Control the forks’ up or down.
Pulling: up, Pushing-down.
Lifting speed can be controlled by
tilt backwards angle of lever and
accelerator pedal, the lowering speed
can be controlled by tilt forwards angle
of the lever.
Steering wheel [16]
The steering hand-wheel is
operated in the conventional manner,
that is, when the wheel is turn right, the
truck will turn to the right; when the
wheel is turned left, the truck will turn
the left. The steer wheels are located at
the rear of the truck. These cause the
rear of truck to swing out when a turn is
made.
Warning
This truck is provided with the
power steering, so heavy hand-wheel
operation is caused when the engine
comes to a stall. To put the power
steering in operation again, restart the
engine without delay.
Parking brake lever [17]
Direction to driver
Pull the parking brake lever
backward to park, push it forward to
release, must pull the parking brake
lever backward before driver leaving
truck.
Forward reverse lever [18]
[Non-electric-switch]
F-forward N-neutral R-backward
Torque converter type truck have a
forward shift and a backward shift.
When shift must stop the truck first.
Caution
Do not fail to place the forward-reverse
lever in the neutral position before
starting the engine.
8
Choke line [19]
To pull out the choke line, the
engine will stop. Some of the model
forklift has no choke line. When turn off
the key switch, the engine will stop.
Forward-reverse lever [20]
[Electrical Switch]
The forward reverse lever of truck
installed with electronic reserving is set
on the left of turning rod。
Forward—Forward N—neutral
allocation
—backward
After
Caution:
Do not forget to place the forward-reverse
lever in the neutral position before starting
the engine.
Body and others
Load bracket
Load bracket can ensure stabilization
when loading the goods. It’s forbidden
to use the forklift truck without the load
bracket.
Seat and seat adjusting lever
Adjust operator’s seat to position,
which is comfortable for you and
provides easy access to all hand and foot
controls. The seat is unlocked by
moving the adjusting lever to the right.
Before proceeding with work, adjust
operator’s seat and make sure that it is
securely locked.
Warning!
a. Before adjusting the lever, you’d
better turn off the key switch.
b. Must stop the truck to adjust the
seat .
Seat weight support adjusting
Use spanner to adjust the bolt
which is at the back of seat, or adjust the
knob for supporting the weight on seat at
the lift side of seat, adjust the hanging’s
weight basing on person’s weight.
It’s better to sit on the seat when
adjusting.
Seat switch
While you are on the vehicle and
wearing the Safety belt, at the same time,
your back and waist should close to the
seat as much as possible.
Check whether the bolts which fixed
seat belt were loose frequently. It is
forbidden to use the Safety belt when
the belt was tie a knot. Do not let the
belt press on the hard or fragile objects.
And also do not make friction with the
sharp edge to avoid damaging the belt.
Do not let the seat back tilted too much;
otherwise the safety belt will not be able
to correctly elongation.
The components which are on the
safety belt can not be removed randomly.
If the safety belt used frequently, you
9
should always do exterior inspection,
when found something abnormal, please
immediately replace new belt. The belt
can be used for 3 to 5 years, when found
something abnormal, it should be
scrapped early.
Overhead guard
The overhead guard used is strong
enough to meet safety standard, and
protects the operator from falling
materials. It’s forbidden to use forklift
without overhead guard.
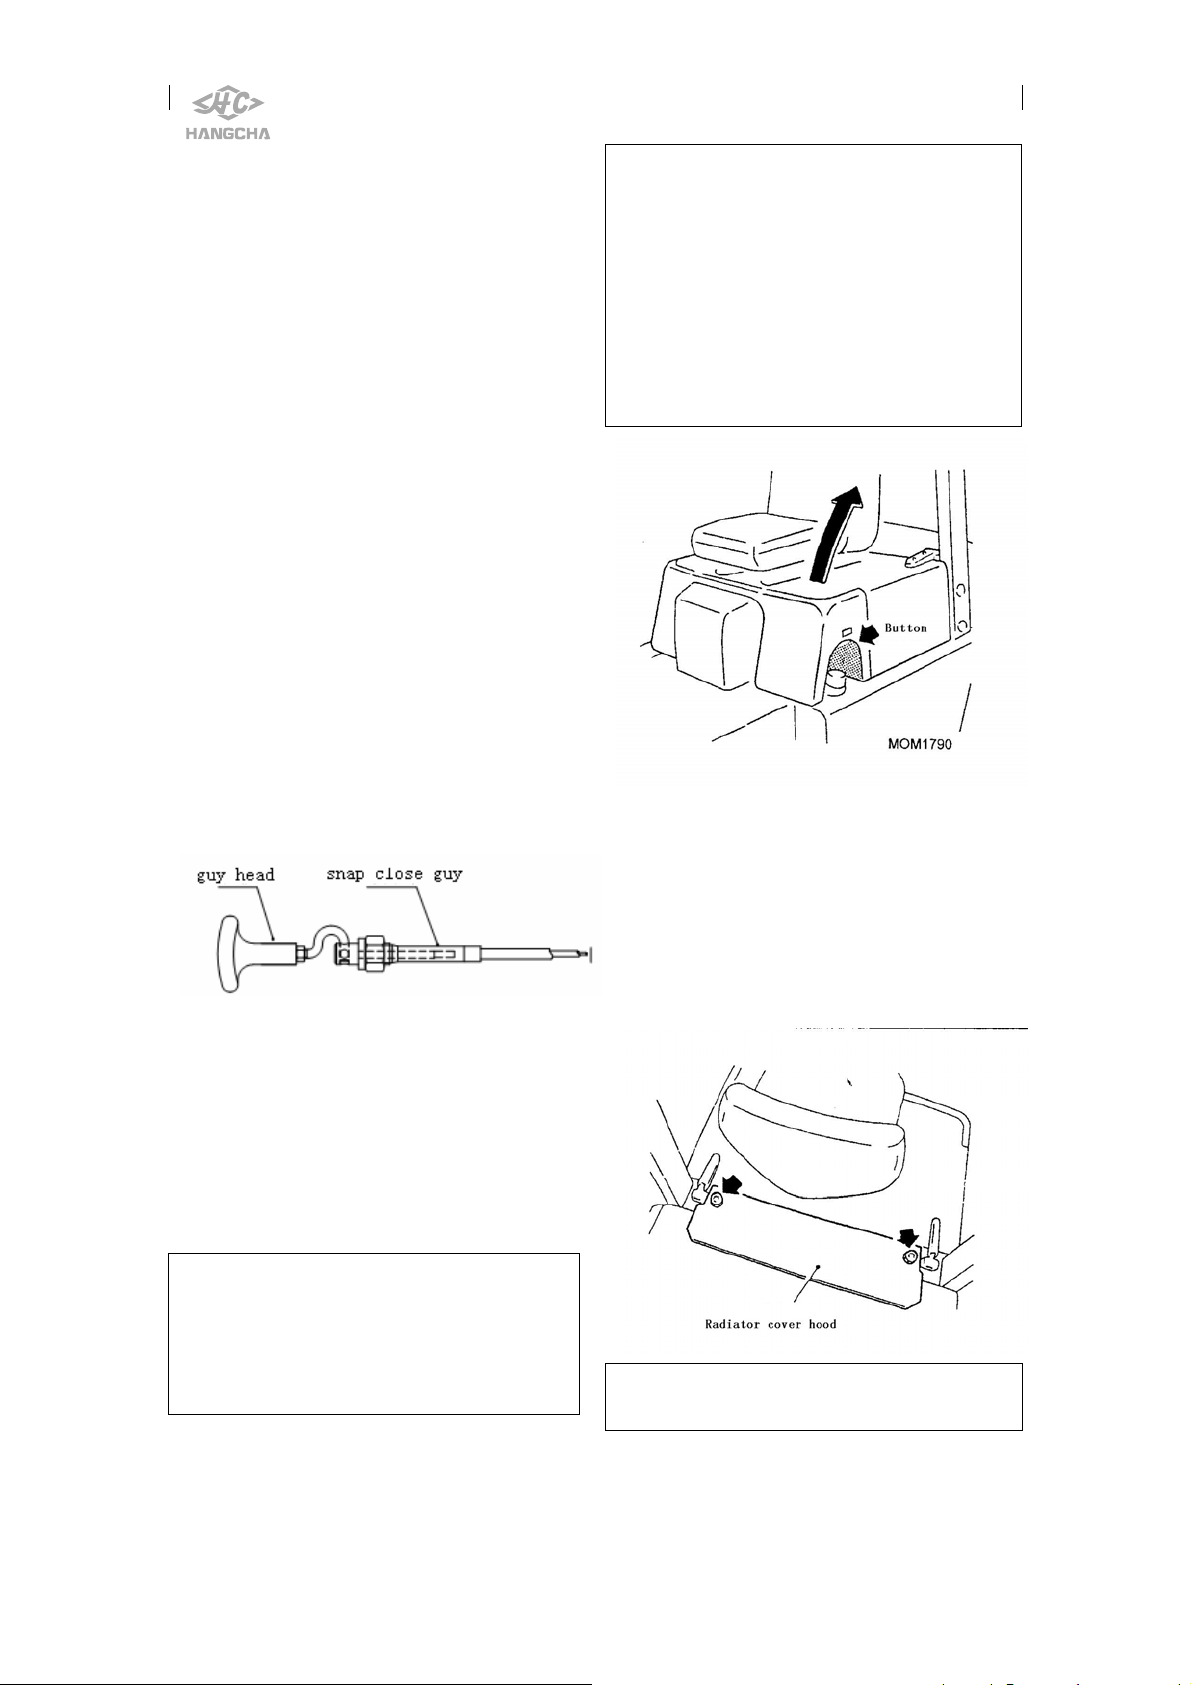
Hood and snap close
To avoid opening the hood at
discretion, a snap close is set here. Open
the snap close first then the hood can be
open.
Guy head
To avoid opening the hood at
discretion, the hood only can be opened
by specified tools. The guy head is the
specified tool.
Hood
The hood can be swung up fully to
provide easy maintenance service. You
can lift up the hood with little effort with
an aid of hood damper. To lock the hood,
push down on the front of hood until it
covers.
! Caution
△
While maintaining under the cover hood, the
engine must be flameout to avoid hands or
other parts of the body being clamped by
running assembly. The engine can be
no-flameout only when human body does not
touch parts under cover hood, and to examin e
where the fault is by hearing.
Radiator cover hood
Must use special tools (socket spanner)
to open radiator cover hood.
You can open the radiator cover hood
even close the engine hood, so to inspect
the coolant fluid.
Caution
Before open the hood, the handle of
the snap close should be pulled out first.
Use caution not to catch your
fingers in the hood when closing it.
10
Caution:
Retighten the bolt on the cover hood.
Radiator cap and coolant reservoir
The reservoir is located inside the
hood.
The radiator is located under the
cover plate at the rear of the hood.
Warning!
Do not open the radiator cap
abruptly while water’s temperature is
higher than 70℃. Turn the cap a little to
the left to relieve the pressure in the
pressure in the radiator, and then remove
the cap.
Do not wear glove when removing
radiator cap.
The antifreeze fluid is dangerous
for your health, if touched to skin, please
wash clean by water. Do not allow
children access to antifreeze.
Fork stopper
It’s used to adjust fork spacing and
to lock the forks in position. Pull up fork
stoppers, turn 90°, according to loads
to handle the forks spacing.
Warning!
The forks should be set symmetrically
to machine centerline and fork stoppers
should always be set.
The lower beams of fork have a hatch
to load or unload forks.
The fork is forbidden to fix on the
location where the hatch locates. Check
the bolt at the middle of the fork bracket
which is used to prevent load fork at the
hatch.
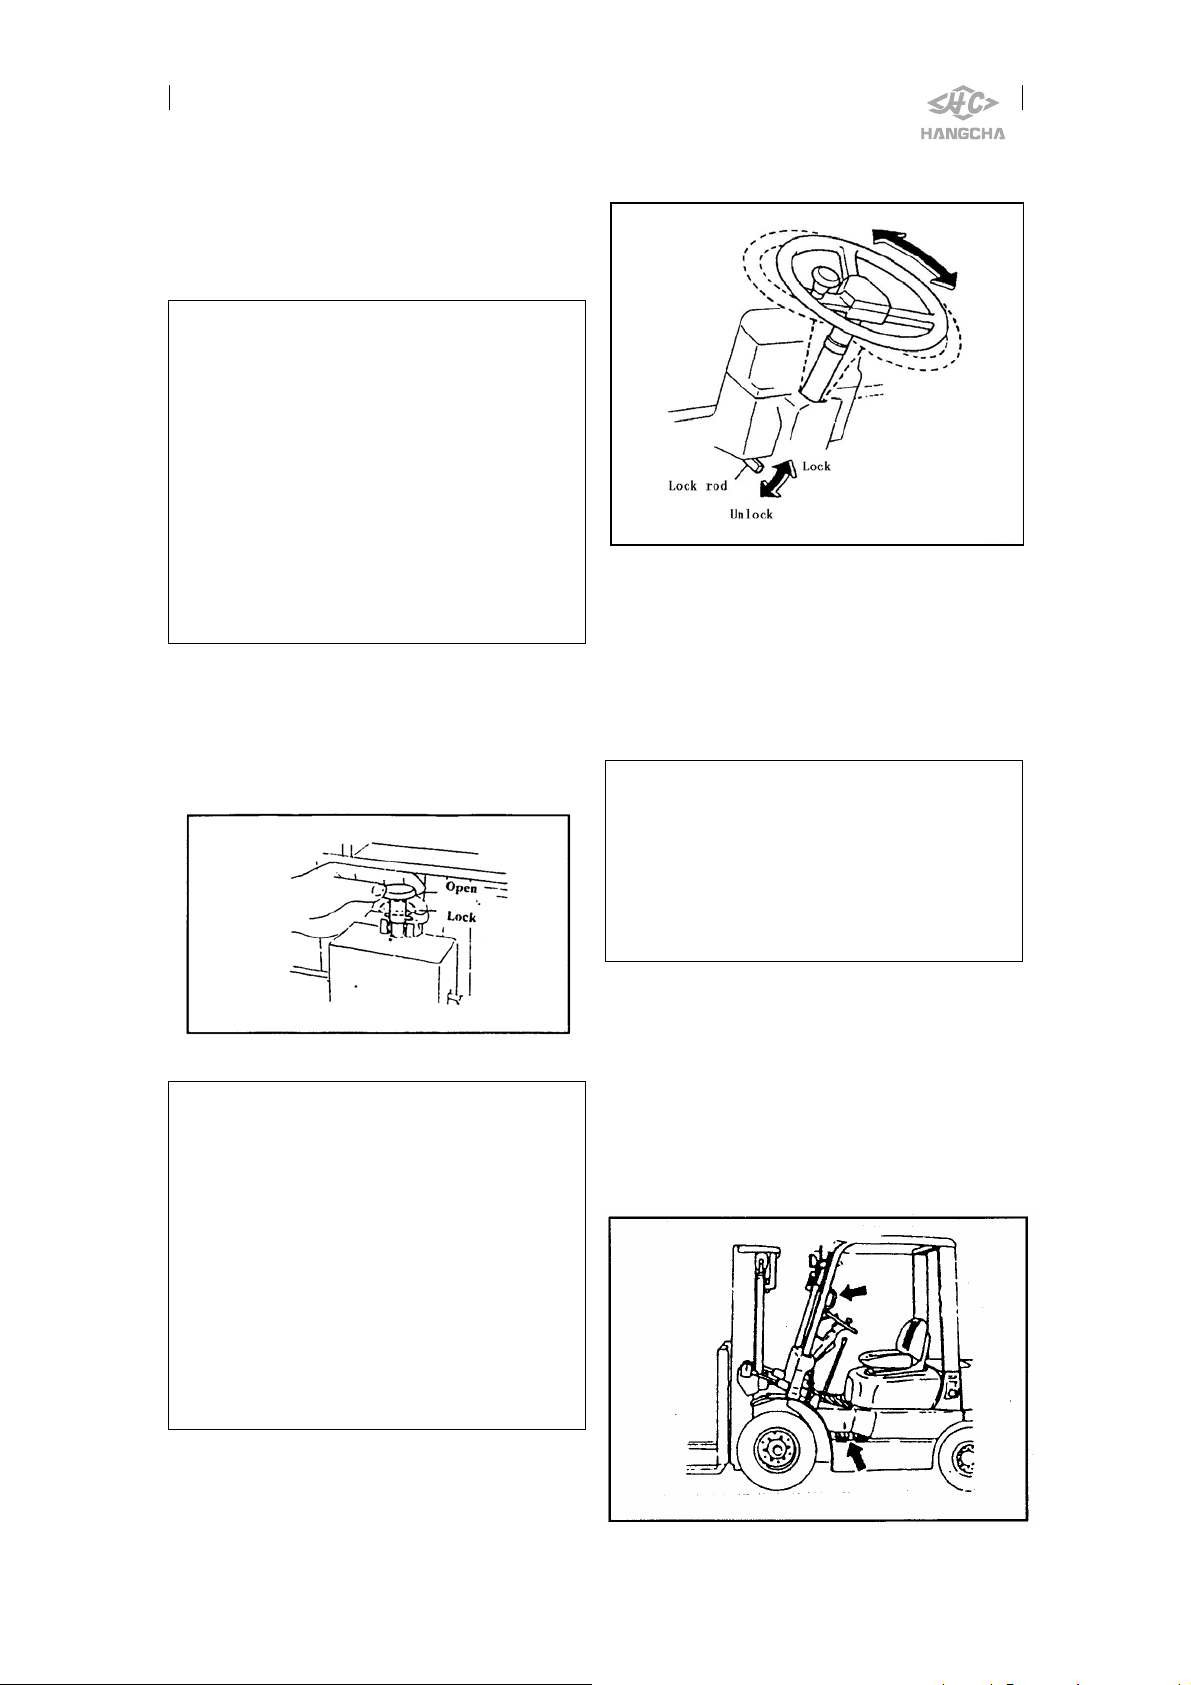
Steering column tilting angle
adjustment
The tilting angle of the steering wheel is
adjustable to suit individual operators.
The steering column is unlocked by
pushing down the lever at the left side of
turning rod, then adjust the angle suit to
the driver, and pull up the lever to lock.
Caution:
a. After stop the truck and pull on the
parking brake lever then to adjust the
tilting angle of steering column.
b. After adjust the angle and pull the
steering wheel to make sure tighten the
lock rod.
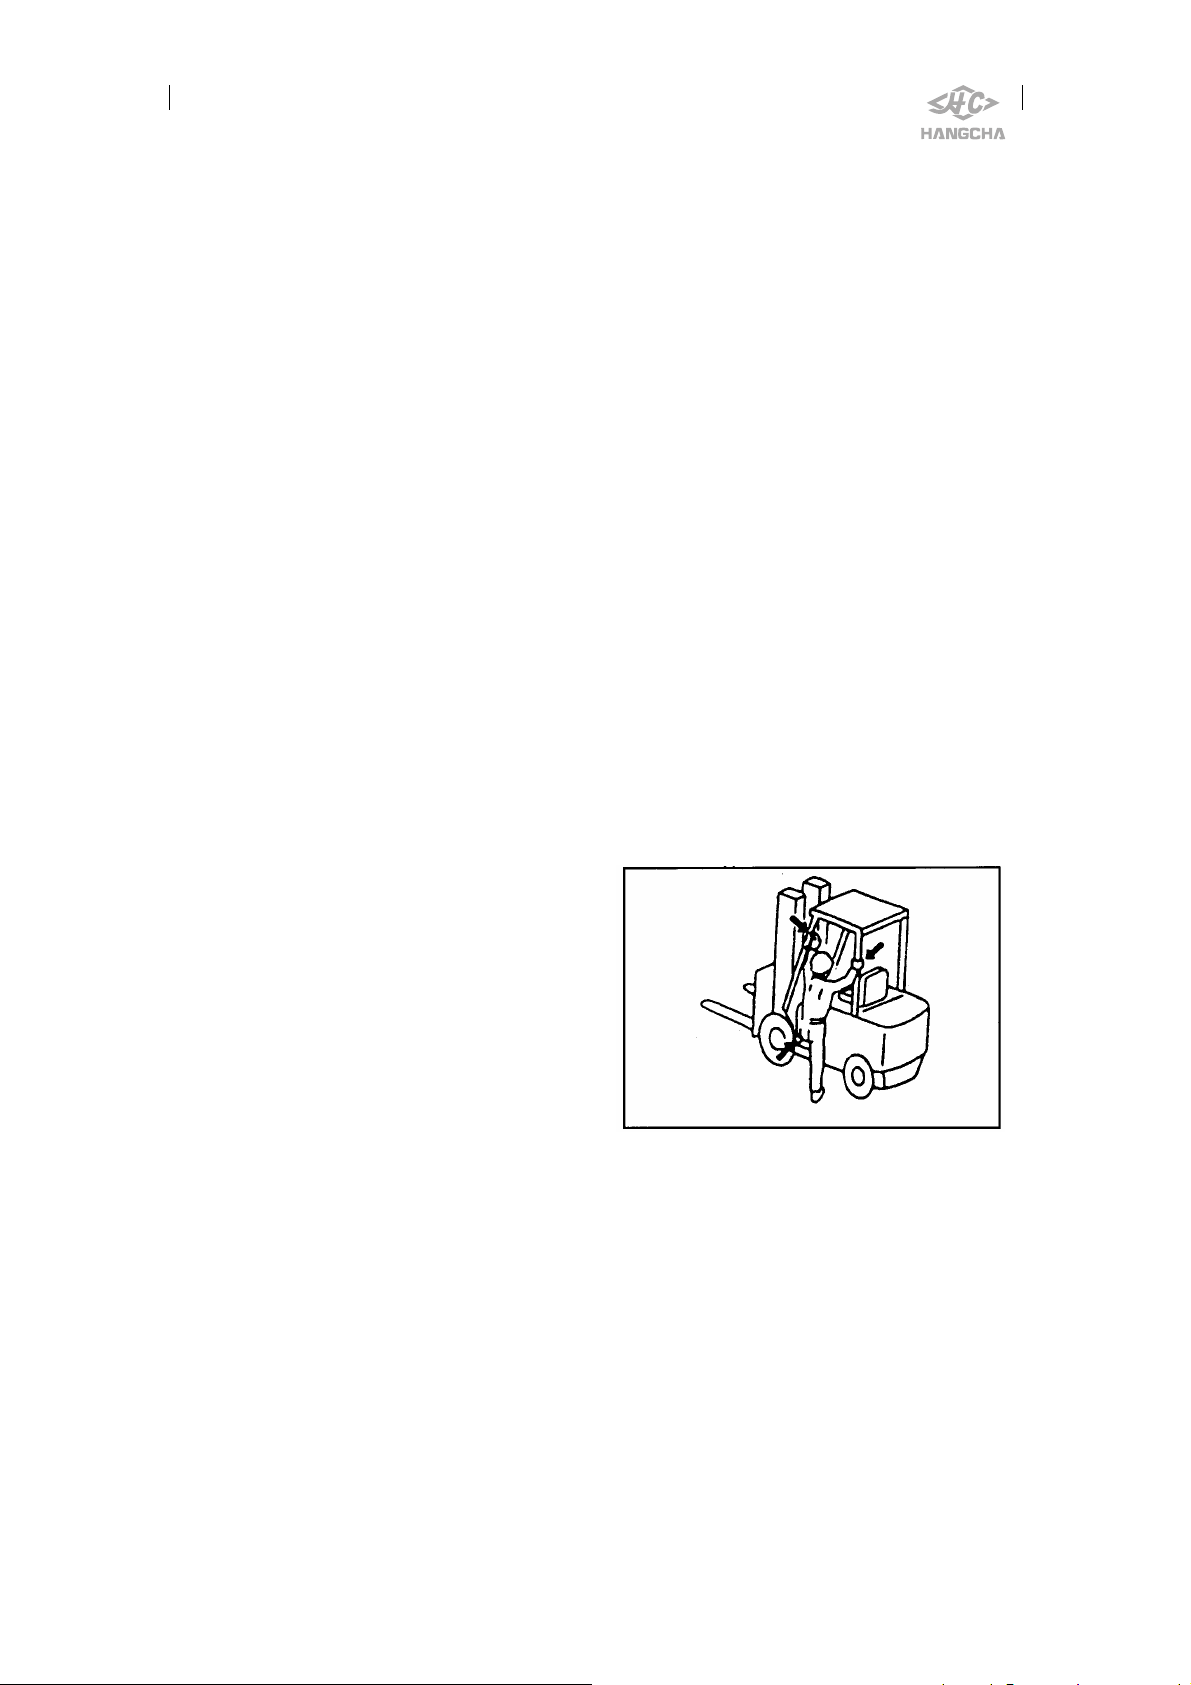
Safety step and safety grip
The safety steps are provided on
both sides of the truck body. The safety
grip is provided on the front left pillar of
the overhead guard. Use the safety step
and safety grip facing the truck when get
on and get off the truck.
11
Brake fluid reservoir
The brake fluid reservoir is
provided at the left of the cabinet.
Hydraulic fluid reservoir cap
The hydraulic fluid reservoir cap is
located at the right side in the hood. Fill
hydraulic fluid through this filler port.
The cap is provided with the dipstick.
After fill in clean hydraulic fluid, lock
the cap.
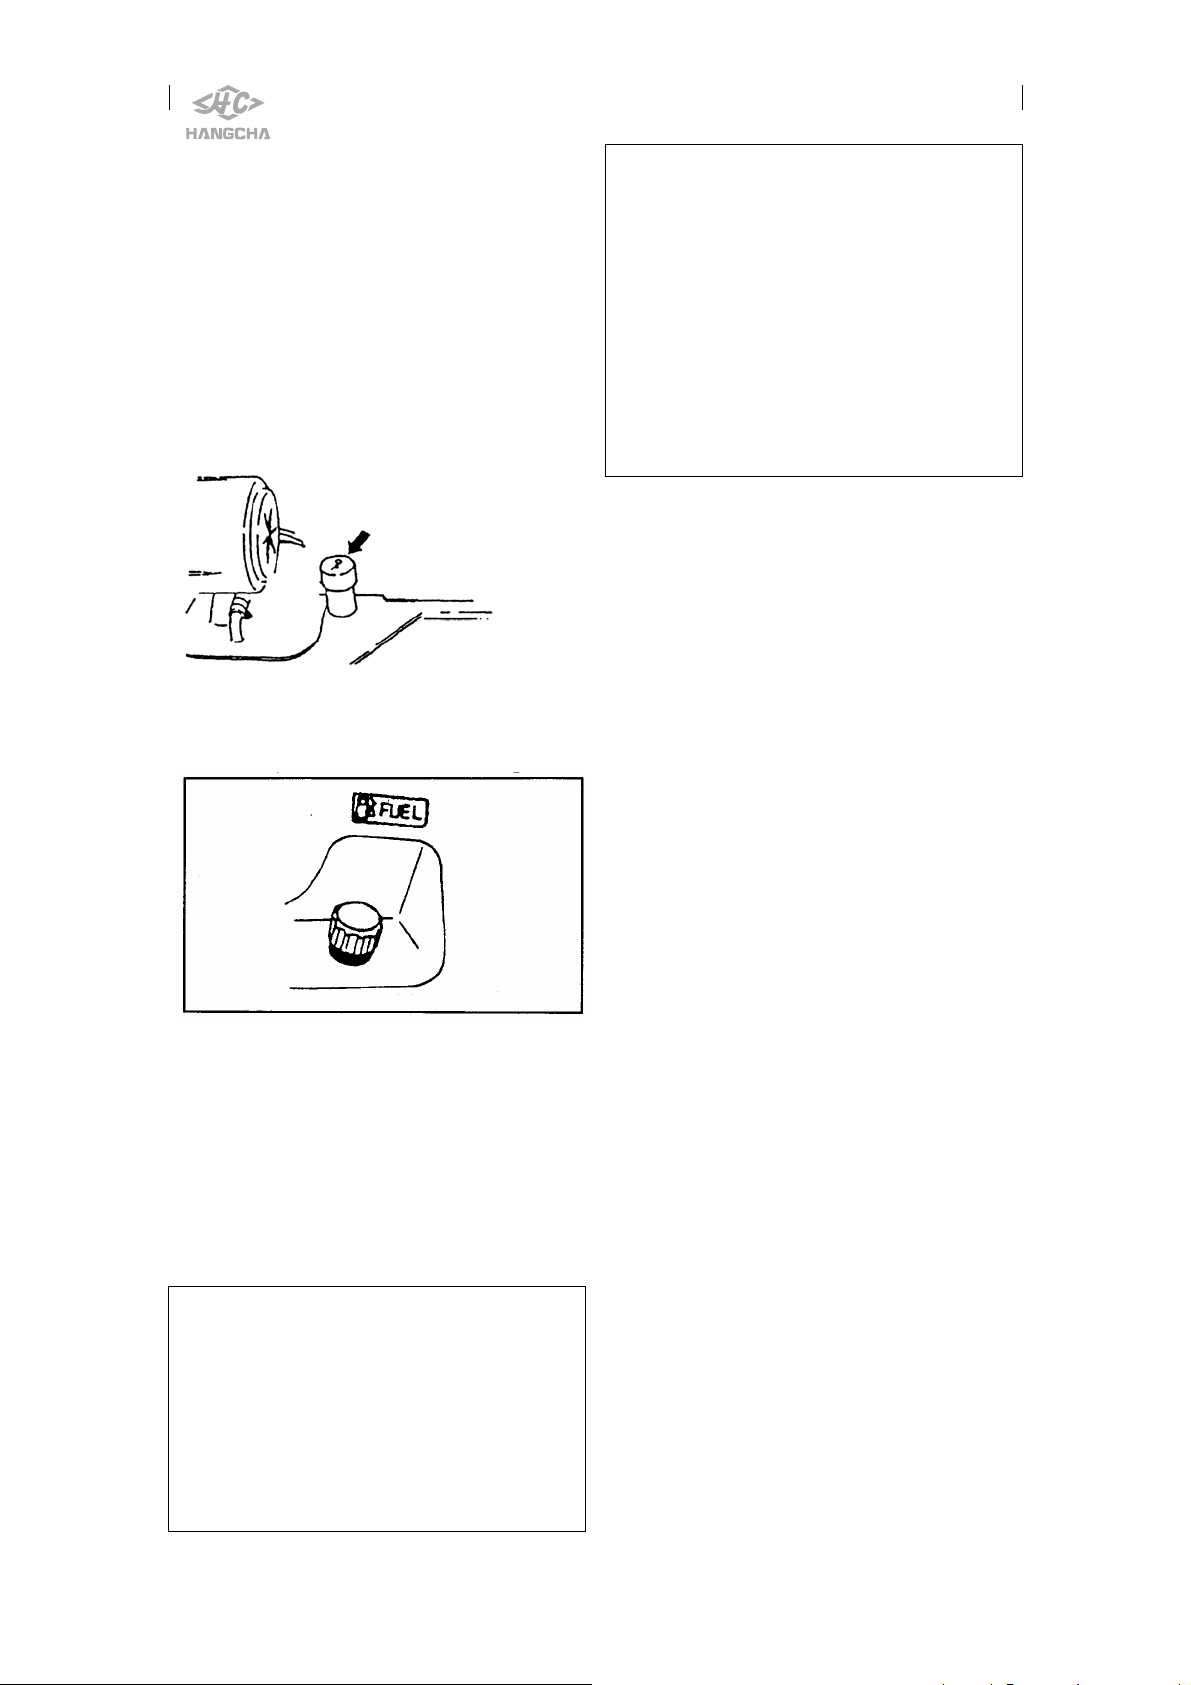
Fuel reservoir cap
The fuel reservoir cap is located at
the rear left side of the truck body. The
fuel reservoir cap has the breather inside
it to allow air to enter the reservoir.
Check to see that the breather is in good
condition every time addition of fuel is
made.
Warning!
--- Fuel handling---
1.Stop the truck, shut down the engine
and apply the parking brake securely.
Make sure that there is no naked flame
near the area. Never smoke. The driver
should not remain seated when adding
fuel.
2.After addition of fuel is finished,
securely close the reservoir cap. A
loose cap could cause fuel leak or fire
hazard in the worst case.
3.Before attempting to start the engine,
make certain that the fuel reservoir cap
is securely tightened and that no fuel is
split on or around the truck.
4.For the purpose of fuel level
inspection, never use naked flame such
as a match or lighter.
Rearview mirror
There are two rearview mirrors on
the safeguard for operator to see rear
accident.
12
3. Safety instructions
1. Only trained and authorized
operator shall be permitted to operate
the truck.
2. Inspect the truck at periodic
intervals for oil or water leak,
deformation, lousiness, etc. If neglected,
the life of the truck will be shortened
and in the worst case a fatal accident
would occur.
Make sure to replace the “key safe
parts” at periodical inspection.
Wipe off oil, grease or water from
the floor board and foot and hand
controls, if any.
Shut down the engine before
inspecting the engine and its allied
components. Especially use caution to
the engine fan.
When inspecting the radiator or
muffler, exercise caution not to get
burnt.
3. Any time you find that the trucks
are not functioning properly, operation
of the truck should be halted and the
condition reported to the supervisor.
should be prepared.
Never fill the fuel tank with the
engine running.
5. Warm up the temperature of water
to 70℃ before operation; and cool down
the temperature of water to lower than
70℃ after work.
If the temperature of the water tank
is higher than 70℃ , never open the tank
cap.
6. When using your tr uc k in an enclosed
space, make sure there is enough
ventilation. If needed, use a ventilation fan.
Don’t work in a closed working space
because of the tail gas of truck is
dangerous to health.
It’s forbidden to use truck under a
circumstance of flammability and easy
to blast.
7. Never mount or dismount the
moving truck. Use the safety step(s) and
safety grip facing the truck when
mounting or dismounting the truck.
When doing maintenance in the
high place (such as mast, front and rear
lights) should be care of slide and
clamped.
If any warning lamp comes on,
move to a safe place and check or repair
the trouble.
When doing maintenance, take care
of edges and corners to lacerate hands,
head and other parts of body.
The sign of defect should be put on
the defecting forklift truck.
4. Don’t use an open flame to check
level, or for leakage, of fuel, electrolyte
or cooling water.
Never smoke while inspecting the
battery, handling fuel or working on the
fuel system. There is a danger of
explosion.
At working place fire extinguisher
8. Never attempt to work the controls
unless properly seated.
Before staring, adjusting the seat so
you can get easy access to all hands and
foot controls.
9. Before staring, make sure no one is
under, on and close to the truck.
The forward-reverse lever is in
neutral.
10. Park the truck on a level surface
and apply the parking brake securely. If
13
parking on a grade is unavoidable, be
sure to block the wheel.
Put the forks on the ground or floor
and tilt a little forwards. Shut down the
engine and remove the key.
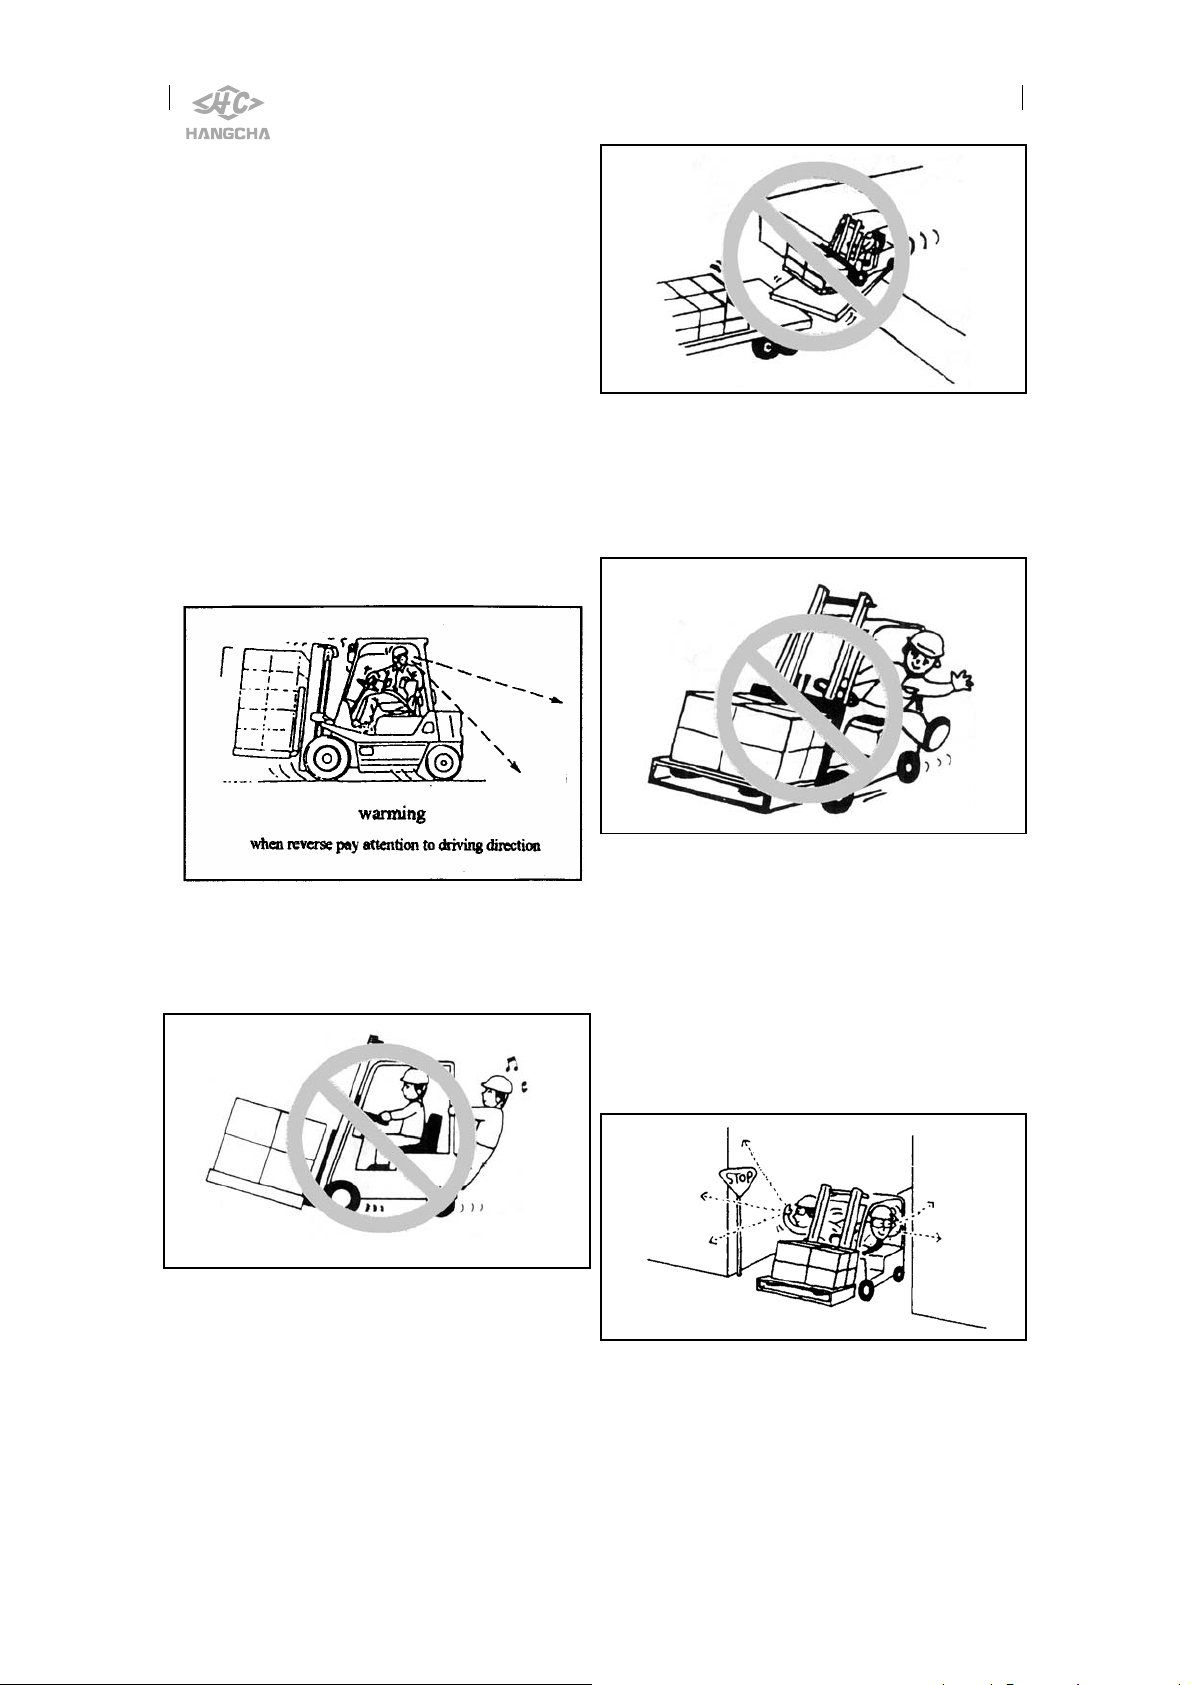
11. Operate the controls smoothly-don’t
jerk the steering wheel. Avoid sudden
stops, starts or turns.
12. Control speed and observe traffic
signs.
When traveling on public roads or
streets, obey all local traffic regulations
13. Pay attention to the route of the
truck , be sure to make a wide sight.
14. Never allow other person(s) to ride
14.Does not allow other people sitting
on the forks, pallets or on the truck.
16. Keep your mind on your work.
17. Keep your head, hands, arms, feet
and legs within the cab. Never let them
out of cab for any reason.
18. When handling bulky loads, which
restrict your vision, operate the truck in
reverse or have a guide.
19. Slow down and sound horn at
cross aisles and other locations where
vision is restricted. The speed should be
keep slower than 1/3 of max speed.
15. Before driving over a dock-board
or bridge-plate, be sure that it is properly
secured and strong enough to sustain the
weigh. Check the ground or floor
condition of working area in advance.
14
20. Keep fluid cans, row cotton, paper
or chemicals away from the truck during
operation since there is a danger of their
firing or exploding due to exhaust gas
from the muffler.
21. Use head lights and required work
light and clearance lights at night. And
travel at a low speed.
22. The work surface should be
solidity and flatness such as cement road
surface, bituminous macadam and beton
road surface.
The climatic conditions that the
trucks designed for are: temperature is
–20℃—50 ; wind speed is lower than ℃
5m/s; air relative humidity is less than
90%(20 ).℃
Inspect the surface over which you
will run. Look for holes, drop-offs,
obstacles, and look for rough spots.
Look for anything that might cause you
to lose control, bog down or upset.
Clear away trash and debris. Pick
up anything that might puncture a tire or
let the load lose balance.
Slow down for wet and slippery
roads. Stay away from the edge of the
road. If unavoidable, use extreme
caution.
Rugged surface would cause
vibration of truck and noise. The high
air pressure of tyres will cause vibration
and noise, too.
Do not operate the truck when the
weather is execrable, such as windy,
thunder storm, snow and etc.
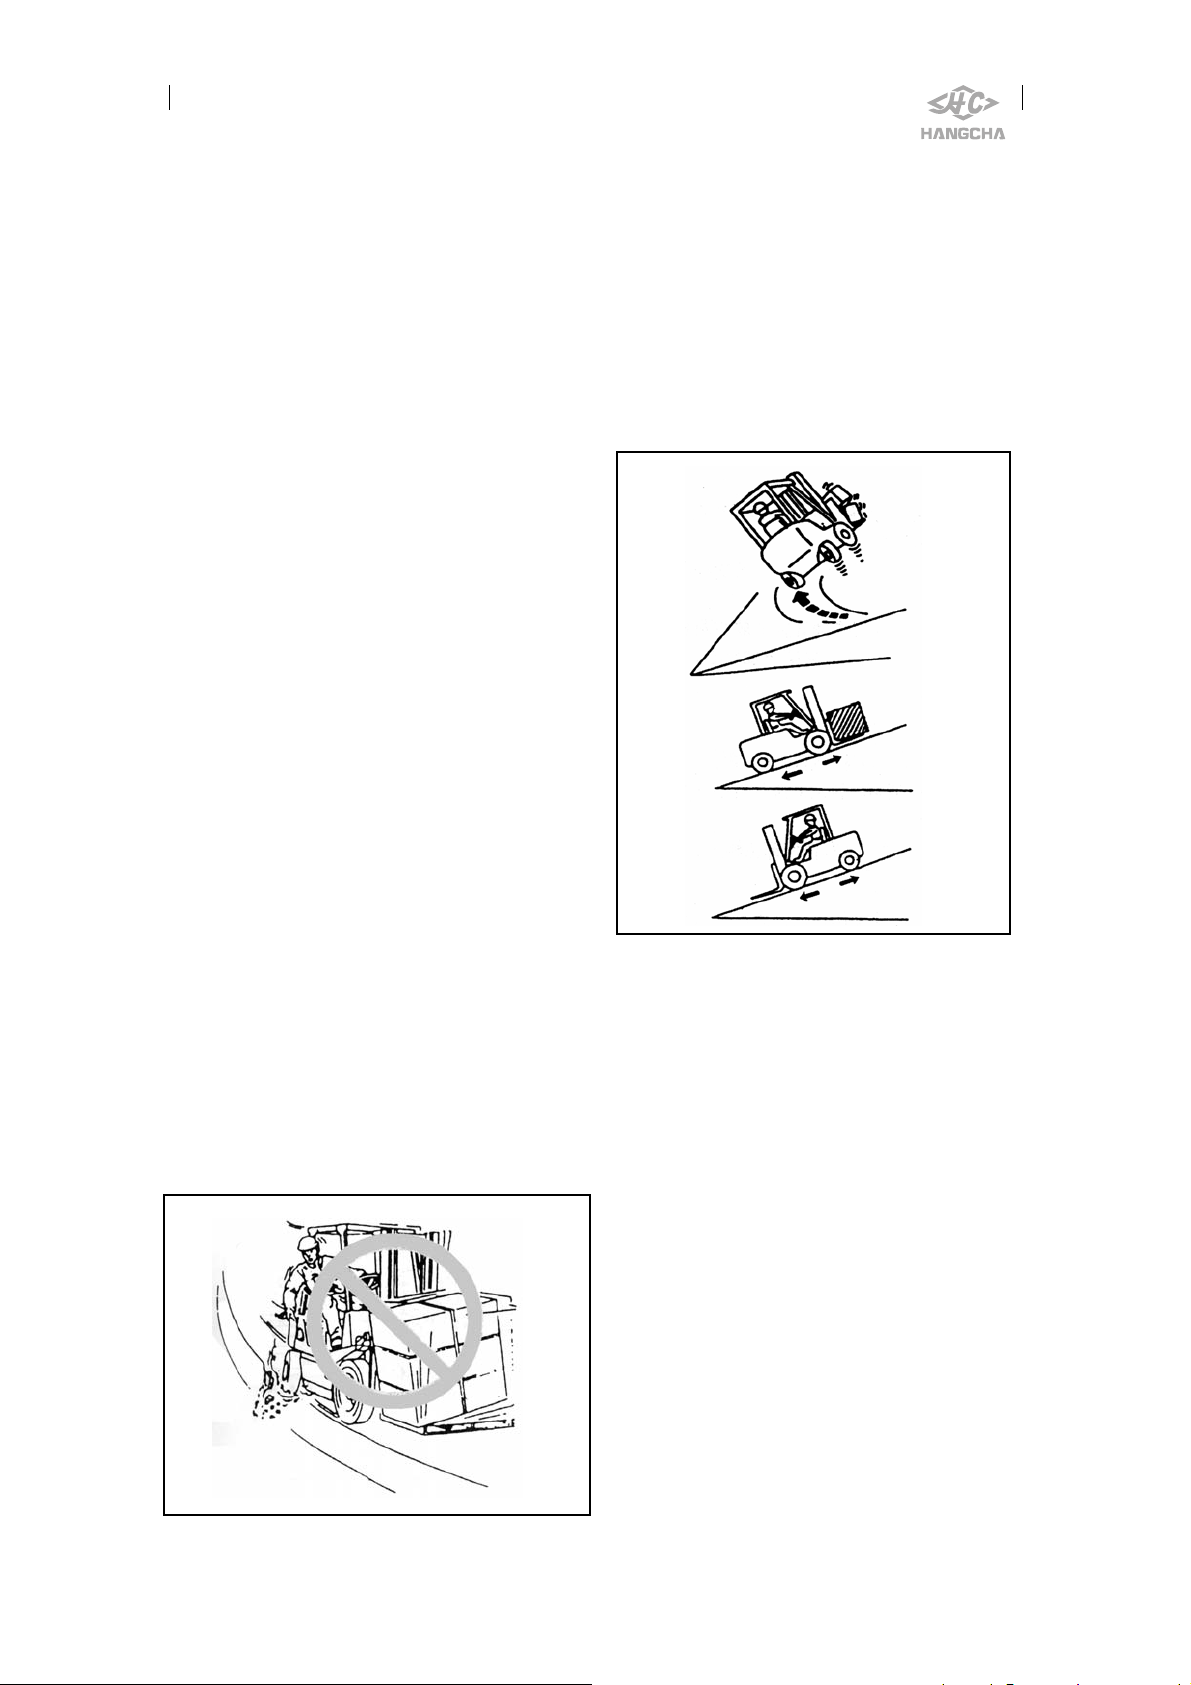
23. When operating loaded truck, have
the rear end of your machine pointed
downhill. When operating unloaded
truck, have the rear end of your machine
pointed upgrade.
Never turn sideways on an incline.
There is danger of the truck turning
over.
24. When running down on a grade,
use engine idle speed. At the same time
use the brake pedal intermittently.
25. It is dangerous to travel with forks
higher than appropriate position
regardless of whether loaded or not.
Keep the good traveling posture. (When
traveling, the forks should be 15 to 30
cm above the ground or floor.)
Do not operate the side shift
mechanism, if equipped, when the forks
are raised and loaded, since this will
cause the truck to be unbalanced.
A truck with attachments should be
considered as with loads.
15
26. Travel with load as low as possible
and tilted back.
27. Avoid braking too sharply or
descending on a grade at a high speed.
There is danger of loads falling down or
the truck turning over.
28. Always brake to full stop before
reversing direction of travel.
29. Taking account of the shape and
material of loads to be handled, use a
proper attachment and tools.
Avoid hoisting the load, with wire
rope hung on the forks or attachment,
since the wire rope may slide off. If
needed, a qualified personnel for
slinging operation should perform,
making use of a hook or crane arm
attachment.
Take care not to protrude the forks
out of the load. The protruded fork tips
may damage or turn over the adjacent
load.
Do not use a man as an additional
counterweight. It’s quite dangerous.
31. ZHEJIANG HANGCHA
ENGINEERING MACHINEARY CO.,
LTD. offers a variety of attachments,
such as forks, bucket, rotating roll clamp,
load grab or hinged forks. Don’t use
such attachments and special equipment
for applications other than specified.
32. Safeguard is used to prevent us
from hitting of the higher goods. Load
bracket is used to ensure loading stable.
The forklift truck without two items is
forbidden to be used.
33. Never permit anyone to stand or
walk under upraised forks or other
attachments if machine is so equipped.
30. Know the rated capacity of your
lift truck and its attachment, if any, and
never exceed it.
16
Never permit anyone to stand on
the forks.
34. Don’t put your head or body into
the interspace of mast and safeguard,
what may cause life risk
Don’t put your hand into the
interspace of inner mast and outer mast
35. When load is to be retrieved from
a pile, enter the area squarely. Engage
forks into the pallet carefully.
36. Don’t enter into loads at a high
speed. Always make certain that your
load is stable before lifting the forks.
Be sure to once stop in front of the
load to be lifted, and make certain that
there is no obstacle, then engage the
load by driving forwards.
37. Make certain that your load is well
stacked and evenly positioned across
both forks. Don’t attempt to lift a load
with only one fork.
On the truck with an attachment
such as a load grab, make certain that
the load is securely and correctly
grabbed, and pull the loading control
level to the full (increase to relief
pressure).
38. Never lift loads with the truck
inclined. Avoid loading work on a grade.
39. Don’t stack loads on forks in such
a way that the top of loads exceeds the
load backrest height. If unavoidable,
make the load stable securely. When
handling bulky loads that restrict your
vision, operate the truck in reverse or
have a guide.
17

40. Use minimum forward and reverse
tilt when stacking and unloading loads.
Never tilt forward unless load is over
stack or at low lift height.
When stacking loads on a high
place, once make the mast vertical at a
height of 15 to 20 cm above the ground
and then lift the load farther. Never
attempt to tilt the mast beyond vertical
when the load is raised high.
To unloading loads from a high
place, insert forks into the pallet and
drive backwards, then lower the load.
Tilt the mast back after lowering. Never
attempt to tilt the mast with the load
raised high.
41. Don’t tow the truck that its engine
is in trouble, or steering system doesn’t
work correctly or its braking system has
been disabled.
Obey the communication rules on
the road when towing the truck.
42. Dress the overalls or other
protective uniforms, suck as safety
helmet, safety shoes etc. Don’t dress
necktie or other accouterments.
43. The workplace should be equipped
fire extinguisher. In order to get the
with
fire extinguisher easily, it’s usually
installed on the safety frame rear
supporting leg. The operator should be
familiar with position of the fire
extinguisher and its application.
44.
Not allowed to carry small goods with
fork, should carry small goods with pallet.
45. Markings on the machine describe
warning and methods to operate the lift
truck. When operating the machine,
observe and follow all markings on the
machine in addition to this operator’s
manual.
Replace damaged or missing decals
and name plate.
18

4. Maintenance
More details for maintenance see
《Preventive maintenance schedule》.
8 hour (daily or every shift) check
1). Check leaks: electrolyte, hydraulic
oil, brake fluid, coolant, oil in hydraulic
transmission gear box.
Check if the engine, connector of
hydraulic pipe, radiator and driving
system are leakage or not. Do not use an
open flame to check level, or for leakage,
of fuel, electrolyte or cooling water.
! Warning!
△
Don’t attempt to operate the truck if
leaked fuel is found through
pre-operational check. Correct the leak
before starting engine
2) Check appearance
Check the lamps and meters are normal
or not.
Check the tires, air pressure and bolts
are loose or not.
Check whether tires are damaged or
pressure of tires is normal or not.
3) Check fuel mass
4) Engine oil level check Caution
When checking the engine oil,
should let the forklift truck on the level
ground.
When check the engine oil, it is exact
when the engine is cool.
Remove the dipstick, clean the rod
and reinstall. Pull it out again and check
the oil level. The level should be within
the mark on the dipstick.
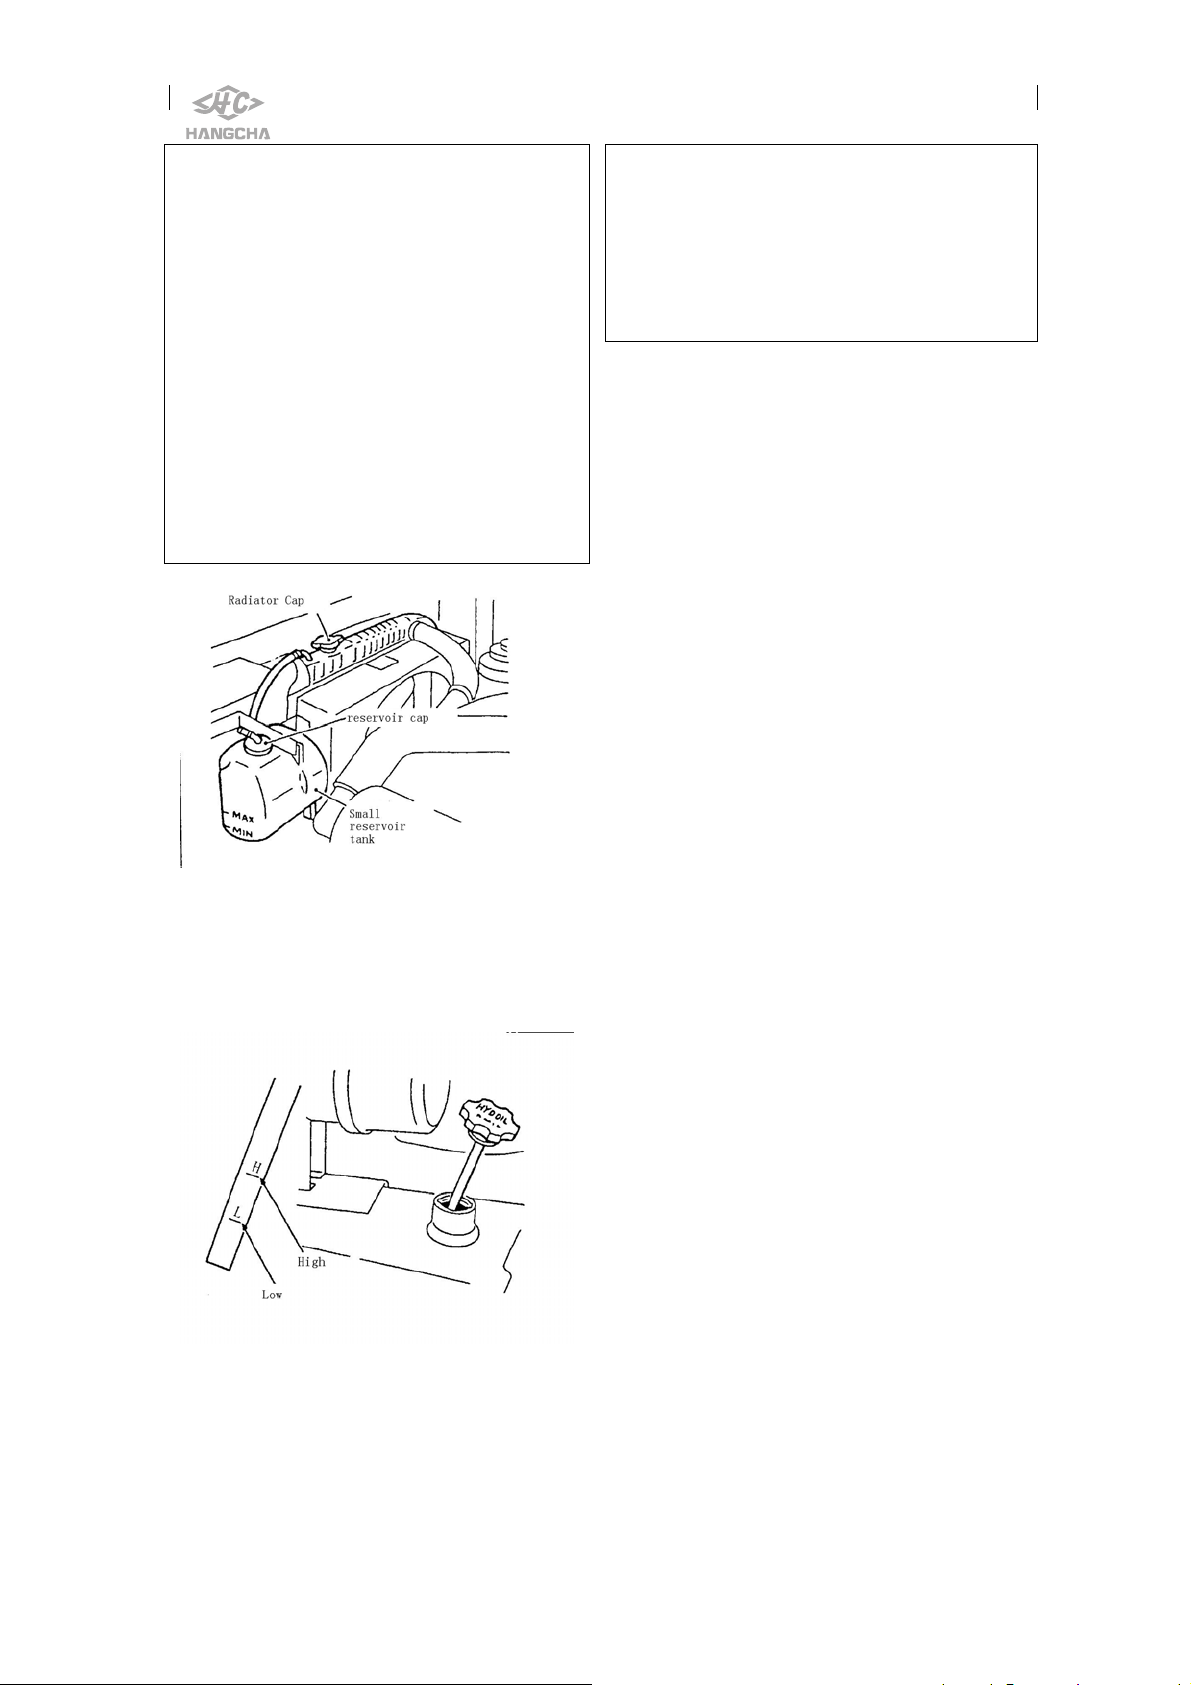
5) Check water level in the radiator
Inspect the small reservoir tank to
see the coolant level is between Min and
Max position when the engine is cool. If
there is no coolant any more in the
reservoir tank, please add some coolant to
radiator, its freezing point is -35℃,and
add sub-radiator to MAX position.
! Warning!
△
When the water temperature of the
engine is higher than 70 degree, please do
not open the pressure cap of the radiator.
Loosen cap slowly to allow steam to
The fuel level gauge is provided on
the indicator panel. Check that fuel level
is sufficient for the day’s work. The fuel
filler port is provided at the rear left
pillar of the overhead guard.
19
escape. After that, tighten cap securely. It
is good practice to use thick waste cloth
or the like when removing the cap. Avoid
putting on gloves, since you may get
burnt at your hand if hot water splashes
on it.
Caution
Adding clean water to radiator. If
you use antifreeze, use the same brand of
antifreeze.
Pay attention to water reservoir and
cooling system in the hot season..
! warning
△
·antifreeze is harmful to person, if
swallow, disgorge at once and go to
hospital.
·do not let children add antifreeze.
6) Hydraulic oil level
Check the oil level in the hydraulic
oil tank.
The oil level should be in the place
between two slots,
7) Brake fluid level check
Check the fluid level in the brake
fluid reservoir. The level should be
between the two seams of the reservoir.
When adding fluid, due care should be
taken prevent air entering the brake tube.
Caution
When adding fluid, due should be
taken to prevent dirt or water from
entering the reservoir.
Brake fluid is dangerous to health,
you should avoid touching it by skin.
Replacing of brake oil
A. Lay forklift truck at designated
ground, and lay it on level ground,
fall down fork to ground, loosen park
brake, put transmission gear neutral
position, cut off engine.
B. Remove rubber dustproof cap of
oil-drain port, insert tube into
oil-drain port and wasted oil
collection bottle, and loosen oil-drain
screw, at the same time, the other
person on truck press brake pedal
again and again. So the brake oil
flows out from oil-drain port, watch
the liquid level of brake fluid
reservoir, add new oil as the fallen
liquid level until the oil from oil-drain
port is clean, and then screw down
screw of oil-drain port.
C. The person on truck press down brake
pedal to the end and keep it, at the
same time, the person at the oil-drain
port loosen oil-drain port screw, tell
the person on truck to release brake
pedal when the brake oil flows out
and screw down oil-drain port screw.
Repeat above operation several times
till there is no bubble in the brake oil.
Watch the liquid level in brake oil
reservoir; add new brake oil as the
liquid level is falling.
Notice :
The truck of Korea transmission system:
The brake oil(in the brake oil can) is
Mobil Delvac hydraulic oil SAE10W。
Other types: choice HZY3 brake oil (add
20
when leaving the factory) or DOT3
brake oil.
8) Head lamp check
Make sure that the head lamp is
lighting when the key is at “ON”
position.
9) Turn signal check
Make sure that the turn signal operates
properly by moving the turn signal lever.
10) Hand brake check
drive truck slowly.①
loosen hand brake lever, stop the ②
truck, and truck has no deviation.
11) Back-up lamp and buzzer check
The back-up lamp comes on and
buzzer sounds when the shift lever or
directional control lever is placed in
reverse position.
12) Turning
Operate the truck running slowly.
Turn the steering wheel to left and
right 3 round respectively.
Check that the steering forces are
equal in right and left.
13) Horn
Press the horn button to make
certain the horn sounds is normal or not.
14) Drivers seat adjustment
Make sure the driver’s seat is
properly located. If not properly, shift
the adjusting lever to back and move the
driver’s seat to a position which
provides easy access to all foot and hand
controls.
15) Shift lever(s) check
Check the shift lever(s) for
looseness and operation for smooth.
16) Lifting lever, tilting lever and
attachment lever check
Check the loading levers (for lift,
tilt and optional attachment) for
looseness and smooth operation.
Increase the rotate speed of engine ,
make certain that the lifting lever, tilting
lever and attachment lever in good work
condition.
17) Instruments and sensors
Make sure that hour meter, water
temperature indicator, oil temperature
indicator, transmission fluid sensor and
fuel sensor etc., properly.
18) Brake pedal, inching pedal and
clutch pedal check
Drive truck slowly, press down brake
pedal, and brake lamp lights.
Drive truck slowly, press down
inching pedal, the speed of truck
becoming decrease, and press downward
more ,truck will be braked and stop
Check function of clutch pedal, see
page 5《clutch pedal》。
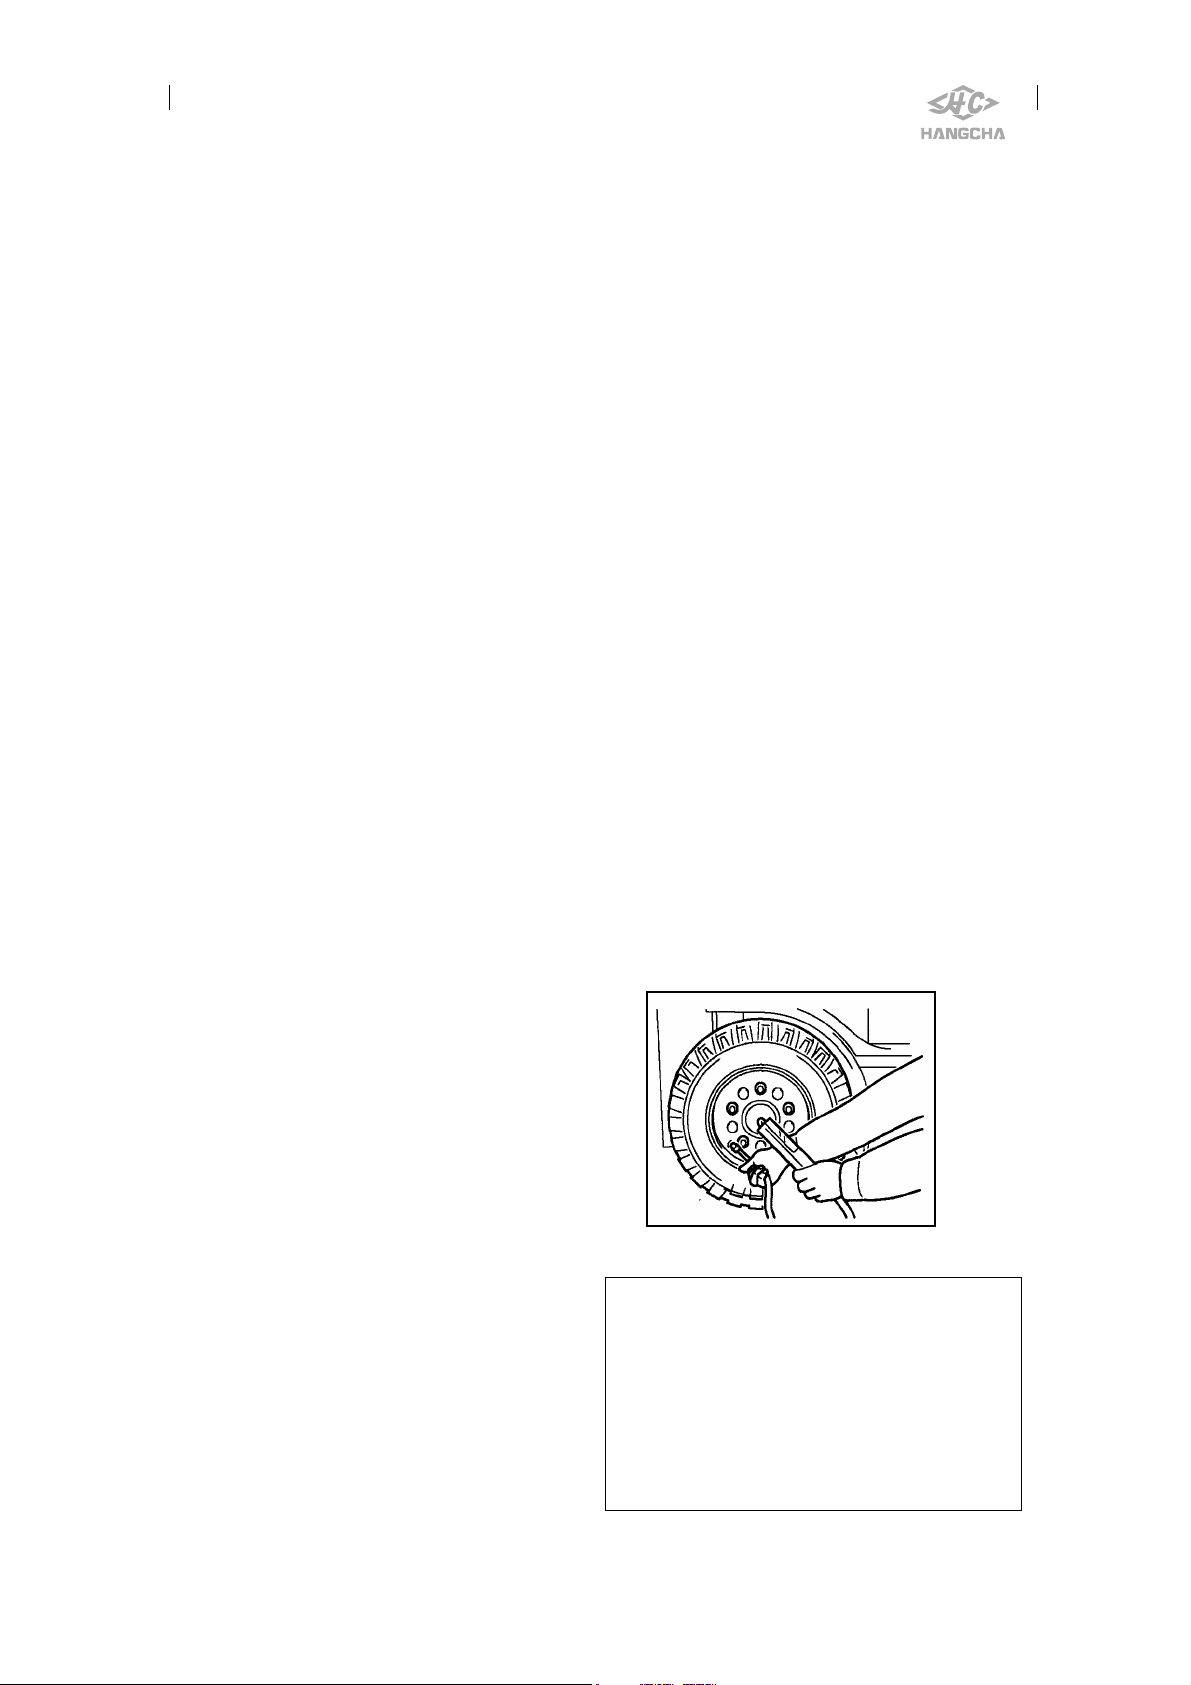
19) Tire pressure
Turn the tire valve cap counter
clock-wise and move it. Using a tire
pressure gauge, measure the inflation
pressure, and adjusting it to the specified
pressure, if needed. After making sure
there is no sir leakage from the tire valve,
reinstall the cap. Check that each tire does
not get damaged at the tread surface or
side face or bending at the rim.
! Warning!
△
Since the forklift truck needs tires
that have a high inflation pressure to
carry heavy loads, even a small bending
of rims or damage at the tread surface
could cause an accident.
21
! Warning!
△
When using an air compressor, first
adjust the air pressure of the
compress-or. Failure to do so will cause
a serious accident, since the compressor
delivers the maximum pressure.
! Warning
△
Please maintain the air cleaner when truck
works 50-250 hours.
After six times, please change air cleaner.
Note:If the working condition is bad,
the cycle of maintain and change air
cleaner need more frequency.
The badly work condition with dust,
the cycle of maintain and change air
cleaner will be short. Advice maintains
one time between 8-50 hours; change it
between 100-300 hours.
Maintain method:
1. Take apart the cover of air cleaner.
2. Take out air cleaner.
3. Clean the inside or outside of dust
by compress air.
All nuts and bolts should be
properly installed and tighten before
inflating tire and rim assembly. An
inflated tire contains potentially
explosive energy. Don’t over inflate.
Tire pressure GB/T2982-2001:
Driving
Truck type
1-1.8t 790KPa 1000KPa
2-2.5t 860KPa 860KPa
3-3.5t 830KPa 790KPa
Weekly maintenance (40 hours)
Increase the below content base on
maintain daily.
1) Air cleaner
wheels
(Front
wheel)
Turning
wheels
(Rear
wheel)
! Caution:
△
1、Please wear defend glass to avoid the
dust fly up into your eyes.
2、 It will damage the engine if not
maintain and change air cleaner on time.
2) Fan belt tension check
Stop the engine.
Use finger to press the belts at the
midway between the water pump pulley
and the generator pulley by 10kg press,
and check the drop distance if is up to
standard.
22
Engine
A498BT1-1
Drop distance
(mm)
10-15
K21,K25 11-13
WF491GP 汽油机 New 5-7,old 7-9
4TNE92
4TNE98
ISUZU
C240PKJ-30
TD27
New 8-12,old
10-14
8-12
New 9-11,old
11-13
Warning!
If the belt has already been pulled
long, cut out or has no surplus, it should
be changed.
If the engine is still running, it’s not
permitted to carry on this check avoiding
fingers or sleeves being caught up in.
Check if there have leakage of oil ②
cylinder and tubing.
Check the rollers’ rotation.③
Check the mast if there have crack ④
and bend.
Operate the lever of ⑤ lifting, tilting
and attachment, check the mast if it’s in
good condition, and pay attention to
system operating sound.
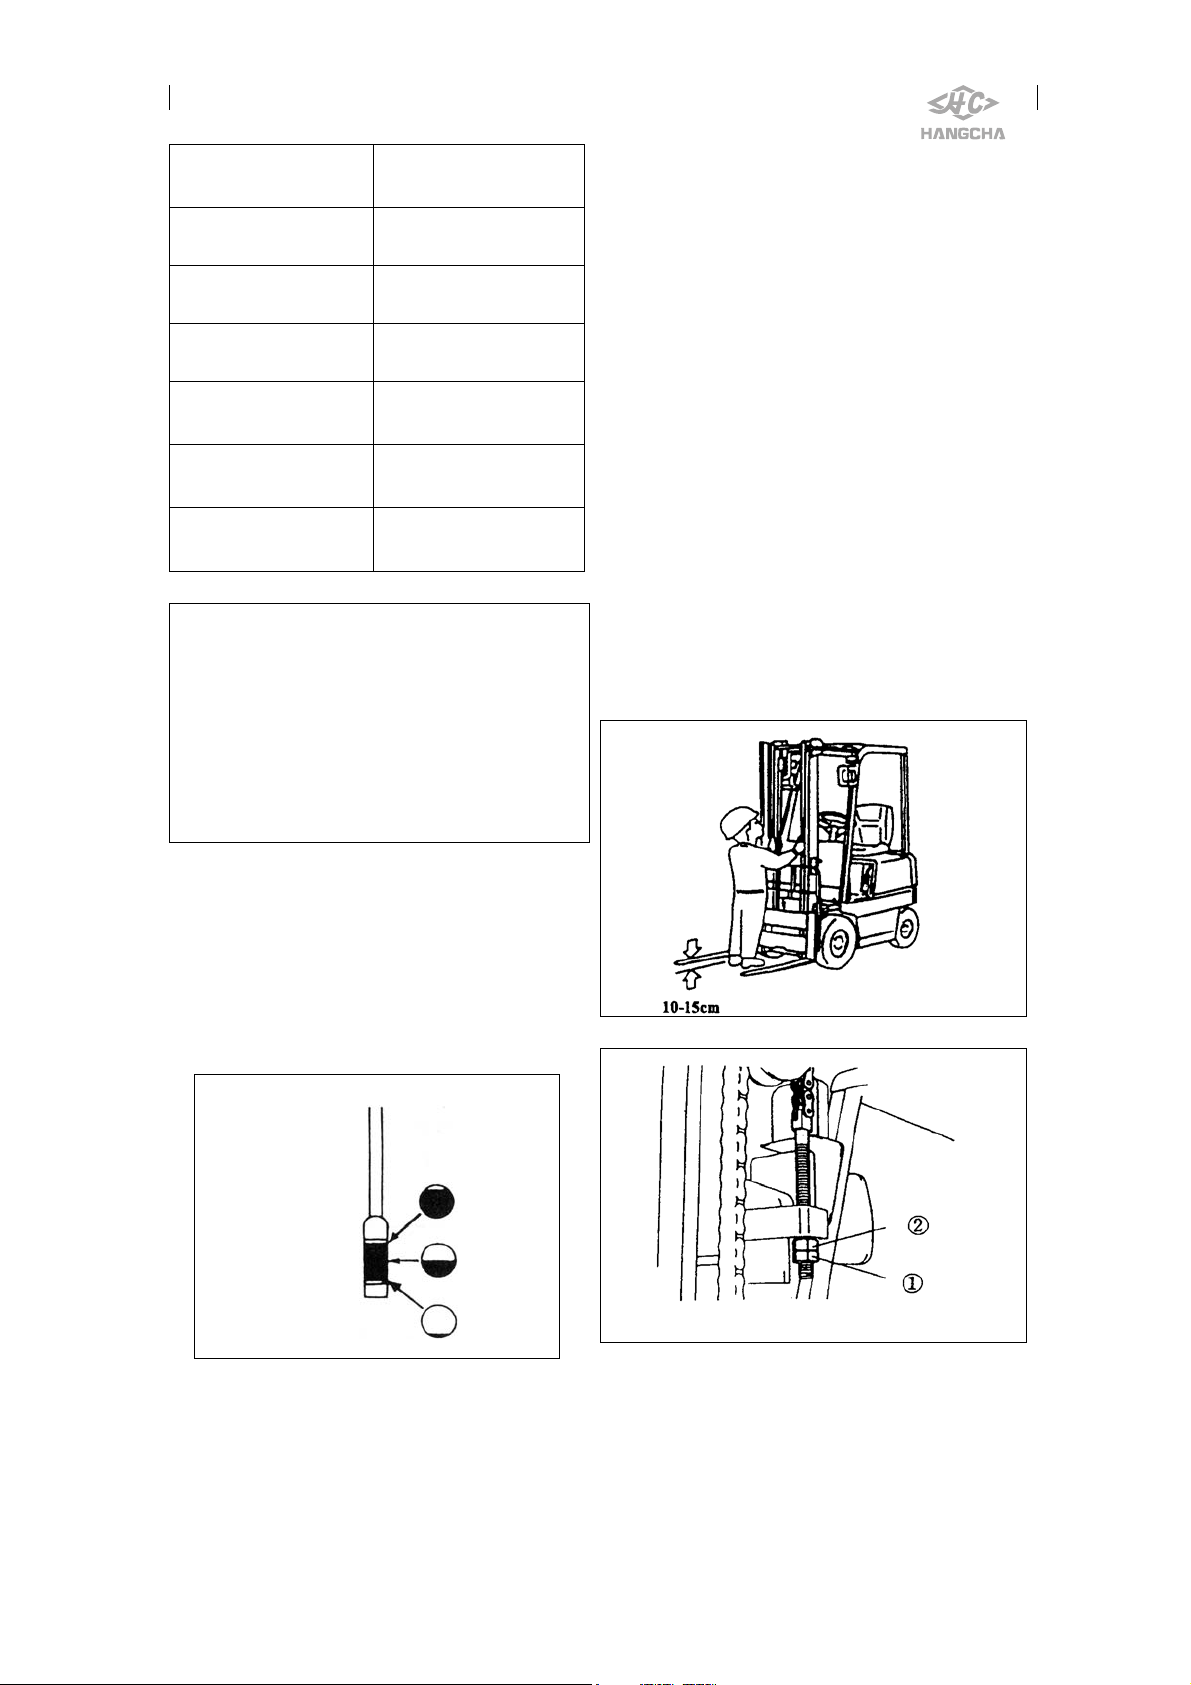
5) Lift chain tension check ①Raise the fork about 10-15 cm above
the ground and make it vertical.
②Press middle of the chain by thumb.
Make certain the tension for the right and
left chains are even.
③Adjust the tension: Loosen the lock nut
1, screw the nut 2 and adjust the chain to
make the equal tension, turning the
adjusting nut 1 of the chain anchor pin.
3) Power shift transmission fluid level
Open the inspections cover and
remove the filler cap. Inspect the lever
gauge to make sure that the fluid level is
on the upper mark of the gauge.
4) Mast and forks
Check the mast and forks to make
sure:
①There is no crack and bend on
the forks, and the forks are installed on
the fork bracket strongly.
6) Lubrication of mast
Lubrication here on schedule, refers
to figure as below:
23
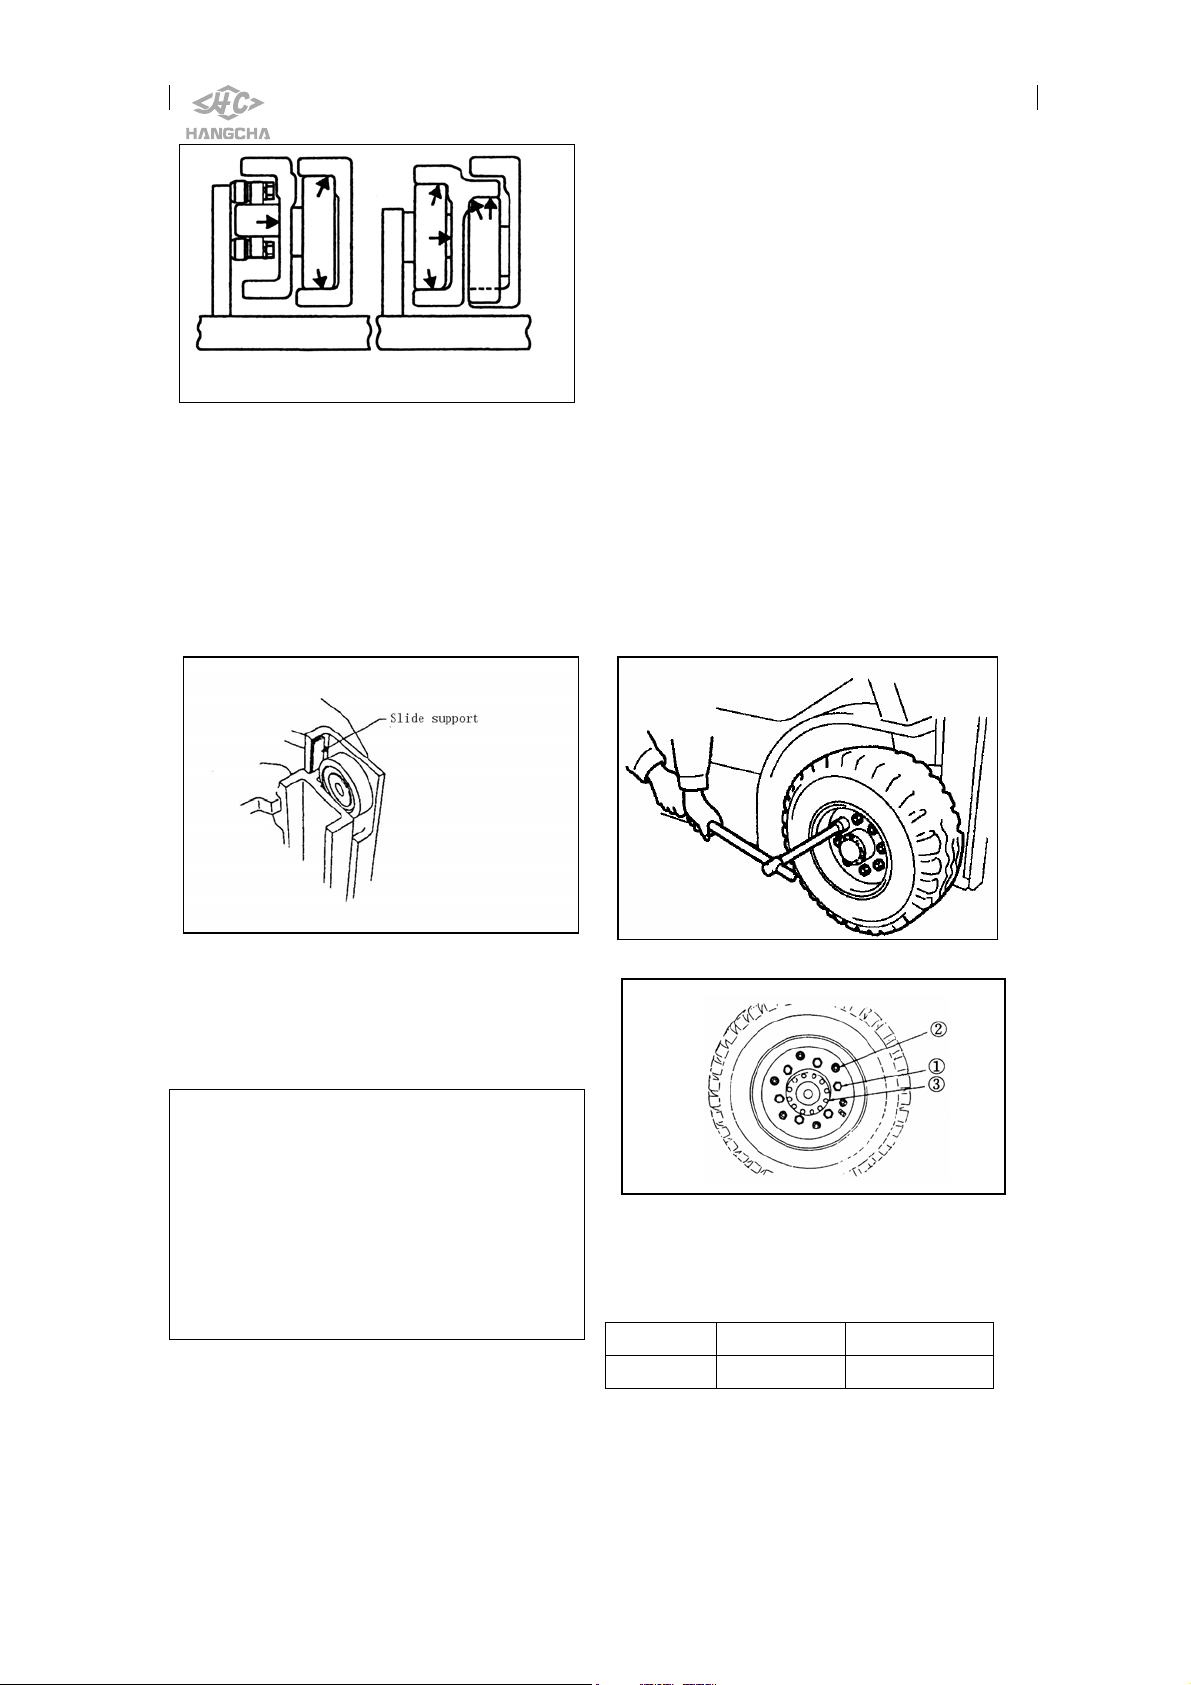
Mast
Paint lubrication grease on the slide
support.
Note:
a). The periods of paint lubrication
grease depend on the truck’s work
condition. If works heavy, please paint
much more grease on mast.
b). To assort with the truck’s operation,
paint some lubrication grease on the
surface where the idler pulley and inside
and outside masts touchs.
8) Lubrication grease to below parts,
the detail please see <<Lubrication
system drawing >>
(1) mast bear lubricate
(2) Brake pedal(clutch type) lubricate
(3) Inching pedal(tor-con type) lubricate
(4) Steering axle shaft lubricate
(5) Steering knuckle main bearing
lubricate
(6) Steering rod bar pin lubricate
(7) Steering cylinder pin lubricate
9) Bolt, nut tighten
Referrence the <<Maintain cycle chart>>
10) Hub nut torque check
Check hub nuts should be tightened
to the specified torque securely.
Driving wheel (front wheel)
! Caution
△
Paint some lubrication grease; put
the truck stop on a smooth road, engine
flameout and tight hand brake. Prevent
hand or body is clamped, and prevents
falling off from high place. Keep safe.
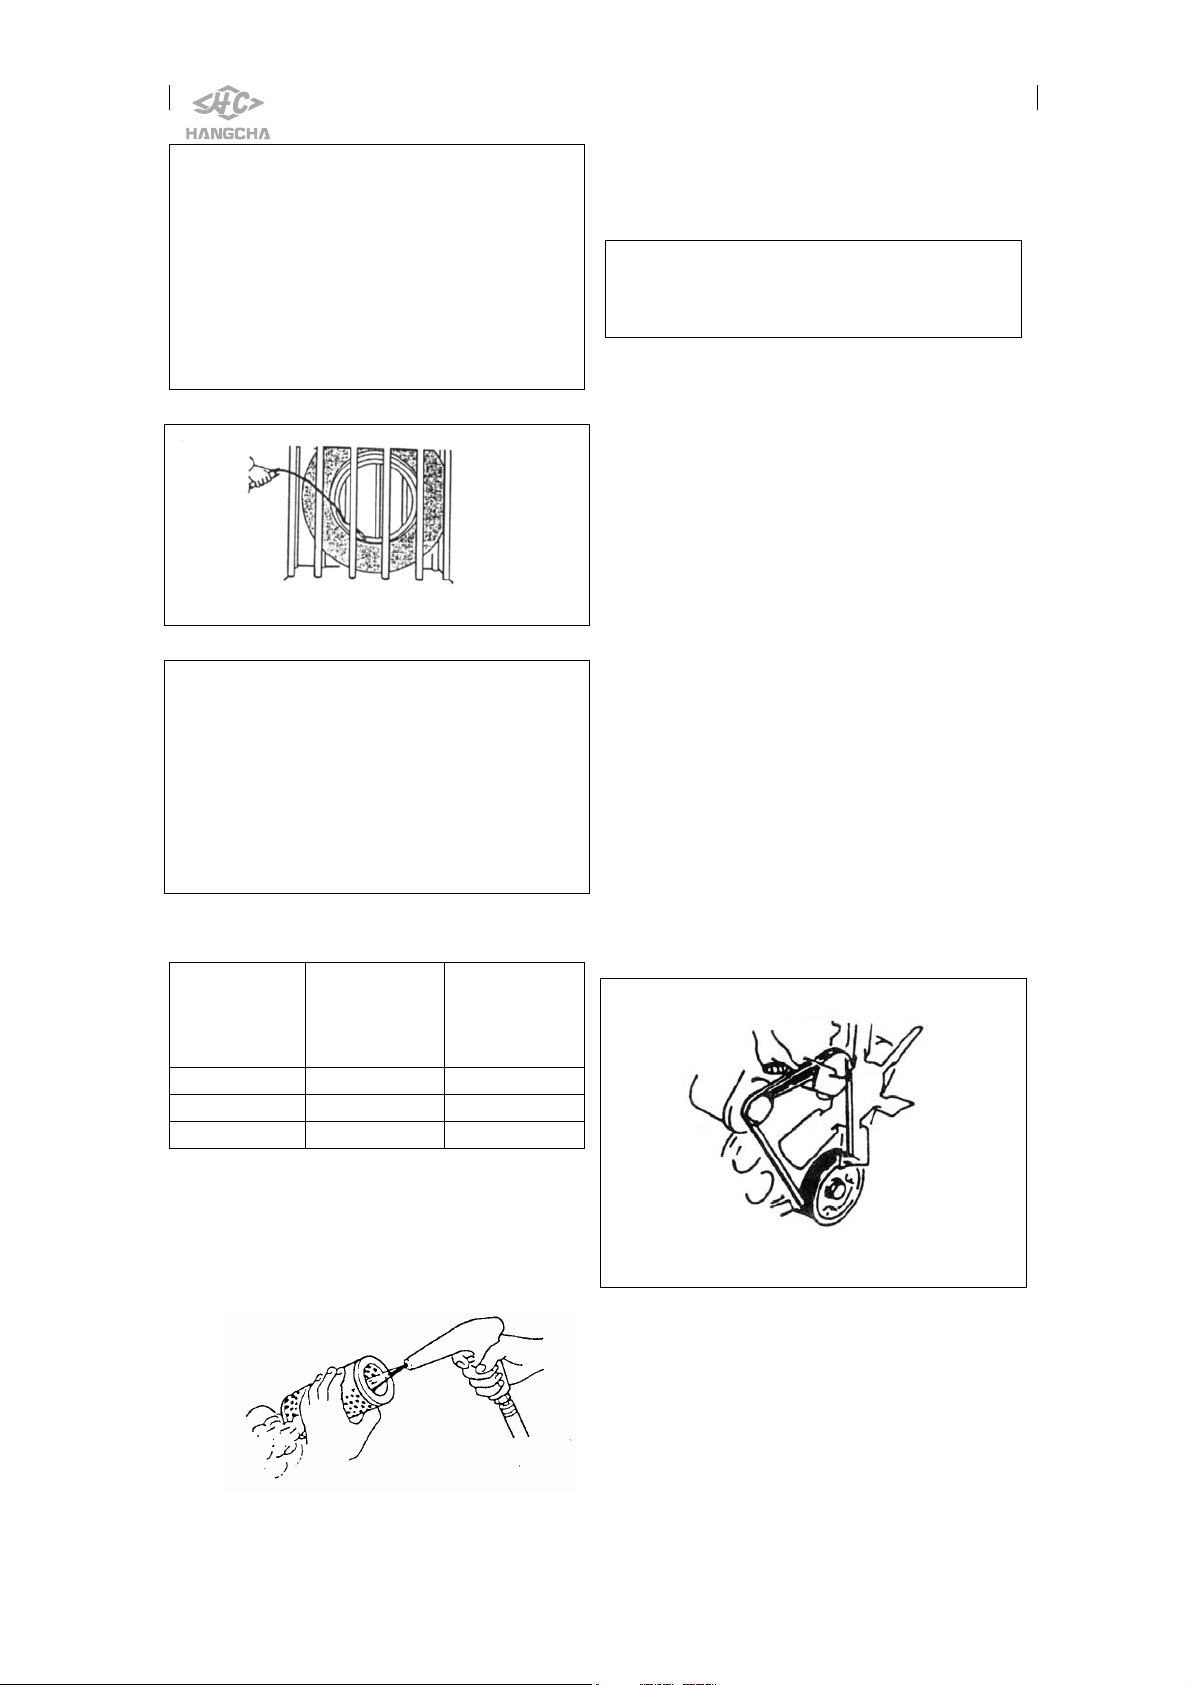
7) Chain Lubrication
Take one brush with engine oil paint
two sides on chain.
24
A. Hub nut
B. Divided rim bolt (only for 1-1.8 ton)
C. Drive shaft bolt
Specified torque N.m
1-1.8t 2-3.5t
Hub nut 157-176 441-588
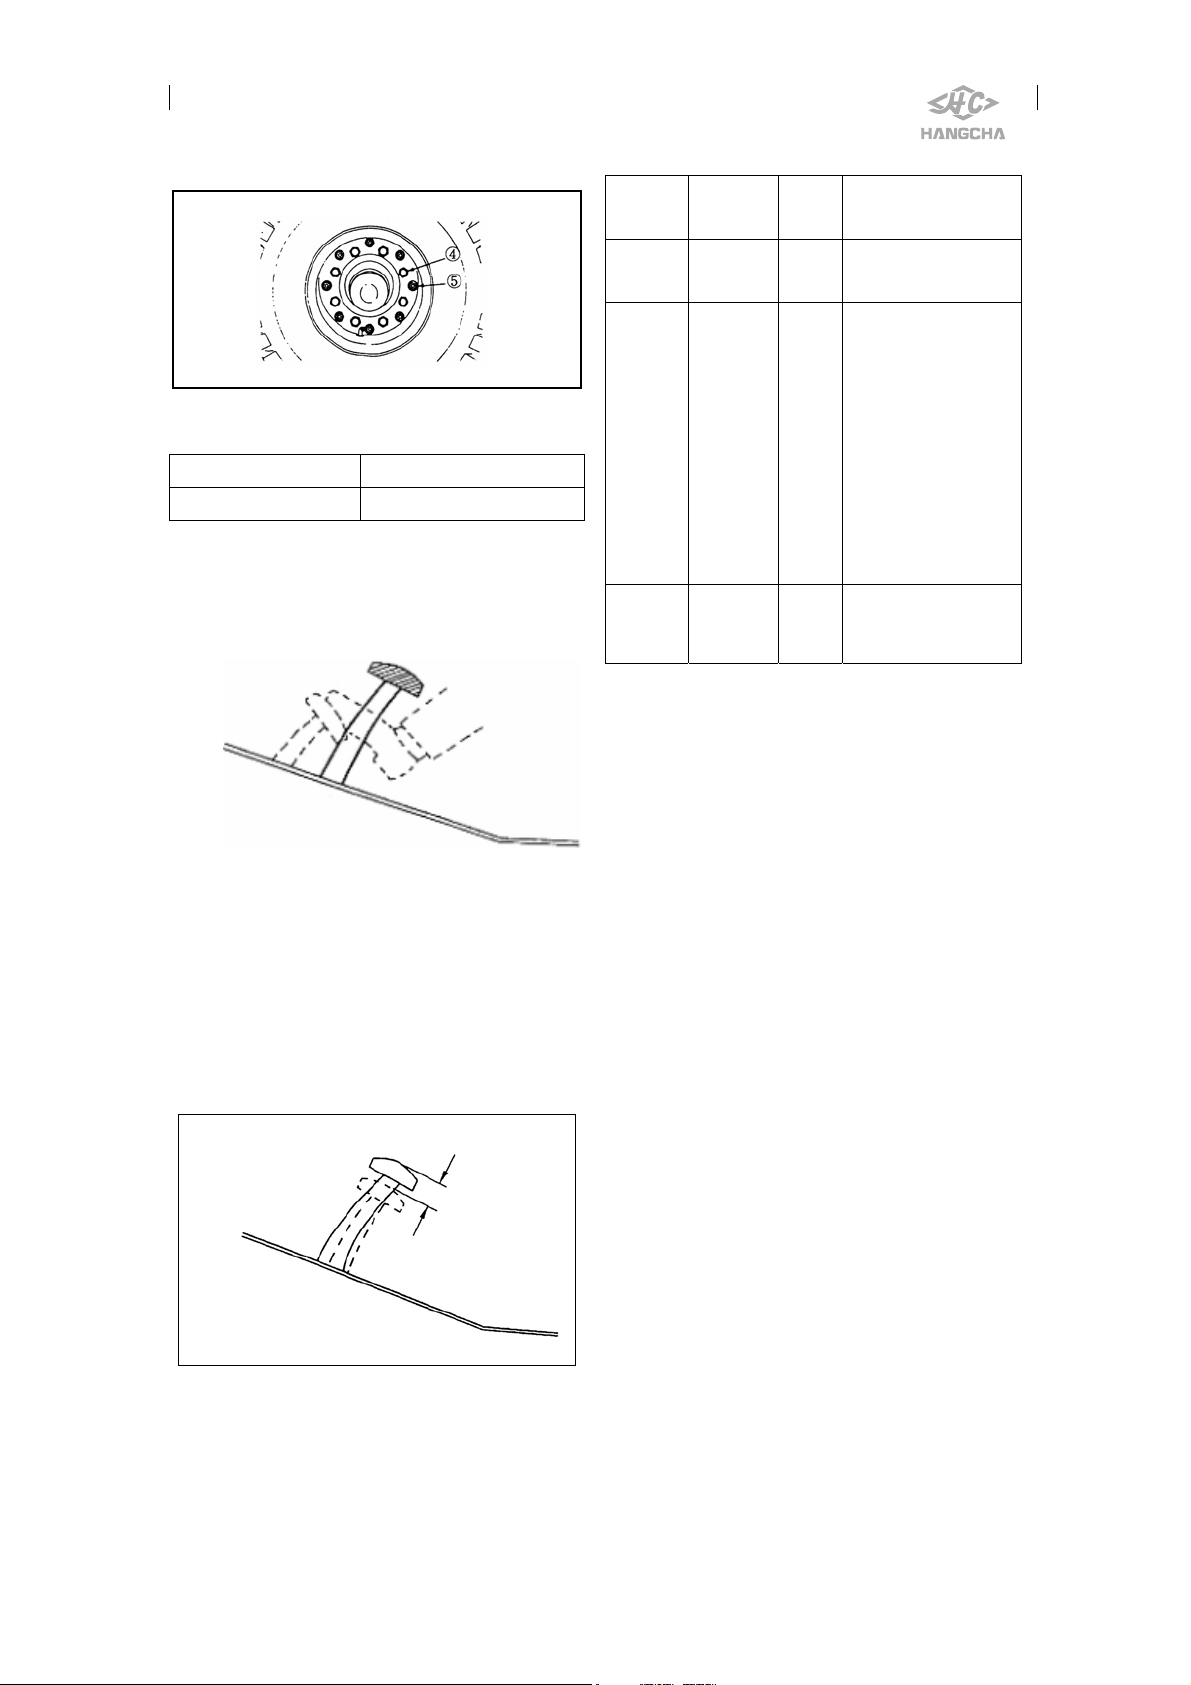
–
Turning wheel(rear wheel)
D. Rear hub nut
Specified torque N.m
1-3.5t
Hub nut 157-176
E. Divided rim bolt
11) Brake pedal, inching pedal and
clutch pedal check
Press the brake pedal fully when the
engine is running, the distance between
brake pedal and front soleplate should
be more than 60 mm.
Check the inching pedal and clutch
pedal through the same method.
Height and the free clearance H:
Brake
pedal
Inching
pedal
Clutch
pedal
Notice :QN-RW22A is the shortening of
CPQD20/25/30/35N-RW22A、RW15A is
shorteningCPCD20/25/30/35N-RW15A.
Maintain monthly (180-200 hours)
maintain per week.
1. Change engine oil and oil filter
1) Start the engine, warm-up enough, then
flameout.
2) Take out the oil cover and bottom shell
to plug, release the oil.
△
cooling fluid in it, find out the reason and
revise.
contains gasoline.
3) Wipe up and fit tuck and gasket.
Screws down moment of oil tuck:
29~39 N·m
Free
height
120-130 ≥60 1-3
120-130 ≥60
120-130 ≥60 2-5
Increase the below content base on
! Caution
Be careful about the hot oil.
·Milky oil shows there is some
·Oil is very rare show that the oil
Press
height
free clearance
touching bolt of
inching pedal
brake pedal:
①0.9-3.4mm
(NRW15A,QNR
W22A)
②0 mm(besides
NRW15A,QNR
W22A)
25
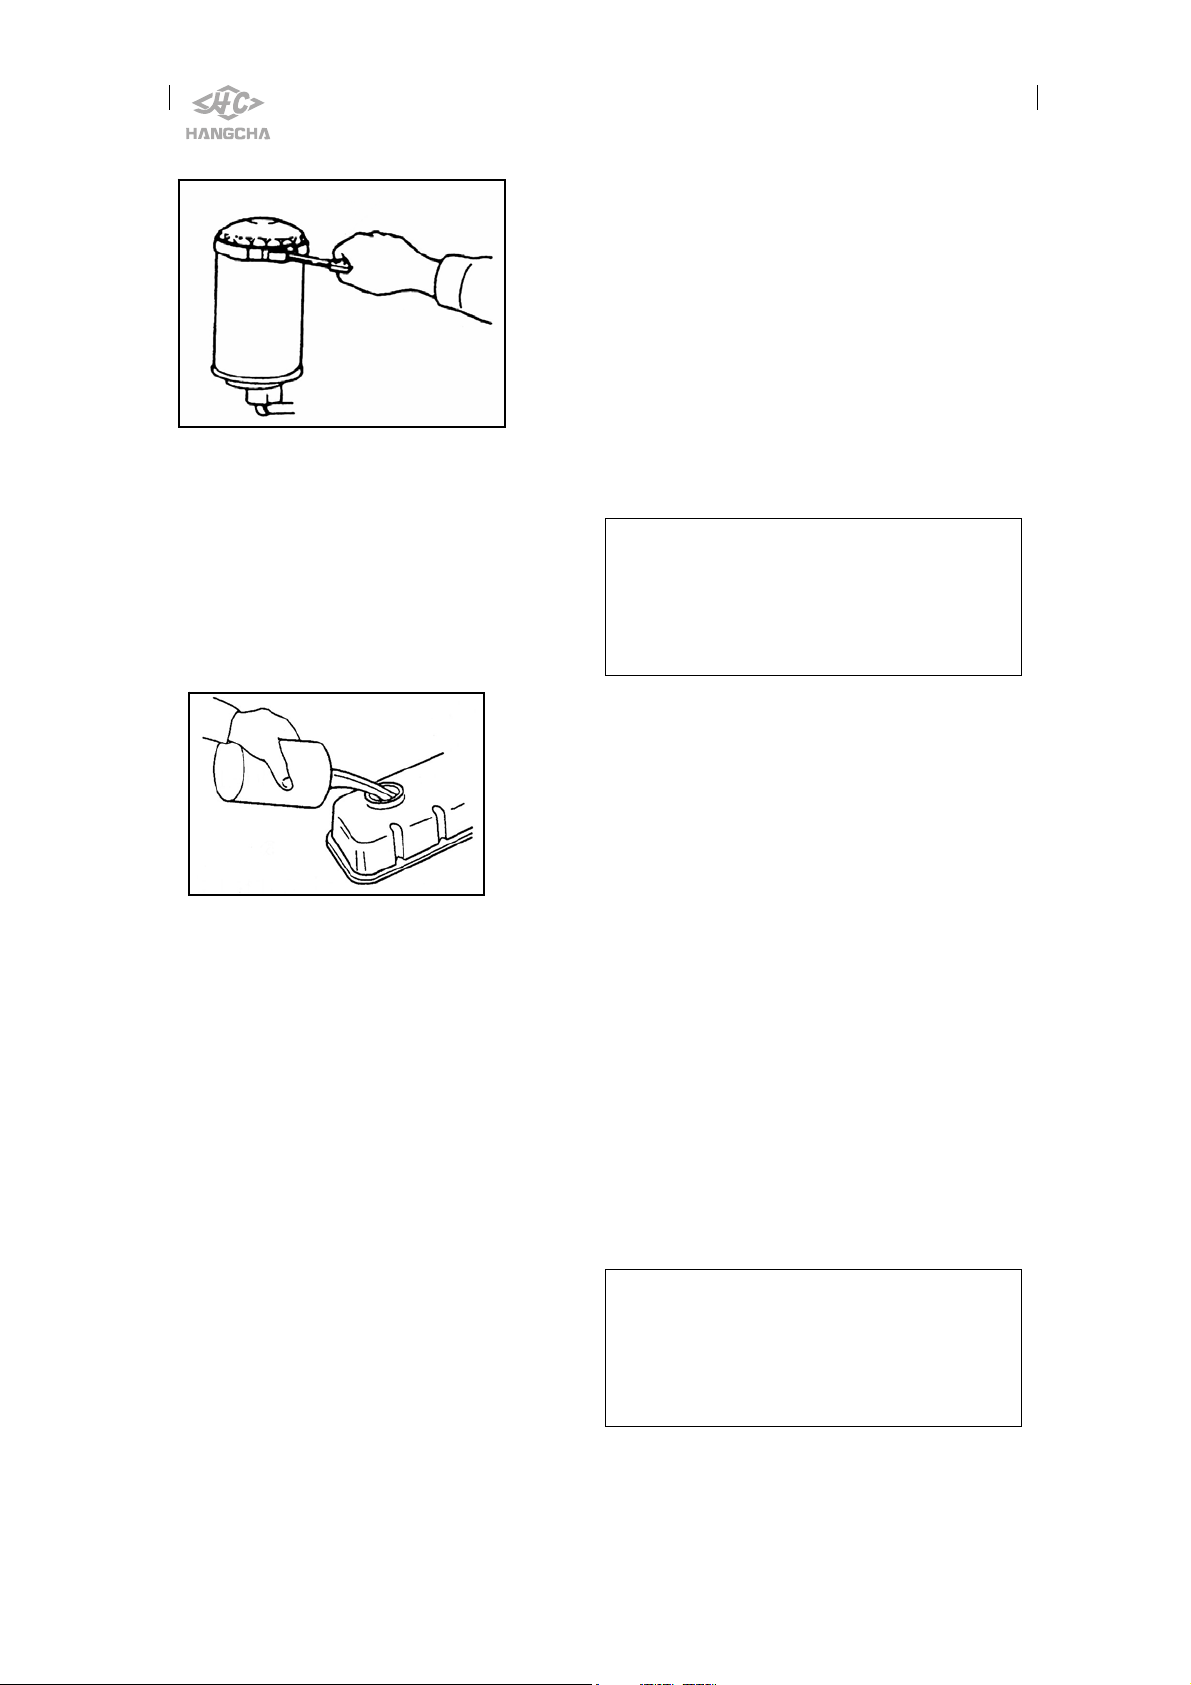
4) Dismantle the oil filter by tool.
5) Use cloth clean the surface of oil
filter.
6) Lay on little oil on the rubber ring of
new oil filter.
7) Install new oil filter by hand,not
spanner.
8)Referrence <<Table for the oil used in
the truck>>,oil preferred.
9)Start the engine,check leak oil around
oil tuck and filter.
If leak obviously,this part is wrong
install.
10) Warm-up engine enough,then
flameout,check oil level later.fill if
need.
Check the oil fluid surface,put the truck
at ground flatly.
2.Plus lubricate to front and rear of
pin roll of Tilt cylinder
Clean the plus place,pile out the past oil.
3.Check the gear oil of drive Axle
housing
If there is more dust at work place, after
200 hours use, it need consider that
change the gear oil of drive axle
housing.
4. Change transmission oil filter
Check the hydraulic transmission oil
fluid, if more dust, change the
hydraulic oil of transmission. It is first
time.
Let the truck at level ground,
play-down the fork to floor, inclined back
the mast, strain brake handle, when
transmission is at neutral position, engine
is cut off.
! Caution
△
Hot hydraulic oil and part will hurt
Body. Do not touch the hot hydraulic
oil and part.
1) Dismantle rubber mat and front
soleplate.
2) Dismantle filter, deal with
located statute.
3) Clean pedestal of filter, confirm
that the old gasket of pedestal have
be cleaned.
4) Plus less hydraulic oil on the new
filter gasket.
5) Install filter by hand. When the
filter get to pedestal, screw down
1/2-3/4 laps.
6)
5.Change hydraulic transmission
oil(first time, then semiannually)
Let the truck at level ground, play-down
the fork to floor, inclined back the mast,
strain brake handle. When transmission is
at neutral position, engine is cutoff.
! Caution
△
Hot hydraulic oil and part will hurt
Body. Do not touch the hot hydraulic
oil and part.
1) Put one case(cubage is over 20 litre)
under the transmission.
2) Dismantle oil tuck,put oil in it.
26
 Loading...