

Page 1

Visor™ Handheld
User Guide
Macintosh Edition
Page 2

Copyright
Copyright © 2000 Handspring, Inc. All rights reserved. Portions copyright © 1998-2000
Palm, Inc. or its subsidiaries. All rights reserved. Handspring, Springboard, Visor, the
Handspring logo, and the Springboard logo are trademarks of Handspring, Inc., and
may be registered in some jurisdictions. Palm Computing, Palm OS, Graffiti, and
HotSync are registered trademarks, and the HotSync logo, Palm, and the Palm Computing Platform logo, are trademarks of Palm, Inc., or its subsidiaries. All other trademarks
are the property of their respective owners.
Disclaimer and limitation of liability
Handspring, Inc. and its suppliers assume no responsibility for any damage or loss resulting from the use of this handbook.
Handspring, Inc. and its suppliers assume no responsibility for any loss or claims by
third parties which may arise through the use of this software. Handspring, Inc. and its
suppliers assume no responsibility for any damage or loss caused by deletion of data as
a result of malfunction, dead battery, or repairs. Be sure to make backup copies of all
important data on other media to protect against data loss.
Important: Please read the Handspring End User Software License Agreement before
using the accompanying software program(s). Using any part of the software indicates
that you accept the terms of the Handspring End User Software License Agreement.
Software download available
Palm™ Desktop software is supplied on a CD-ROM disc. If you do not have access to a
CD-ROM drive for your computer, you can download the Palm Desktop software from
www.handspring.com.
Page ii Visor Handheld User Guide
Page 3

Contents
About This Guide ....................................................................................1
Chapter 1: Introduction to Your Visor Handheld.................................3
Getting to know your Visor handheld ...............................................3
What is a Visor handheld? ...............................................................3
System requirements ........................................................................4
Upgrade information ........................................................................4
Visor components .............................................................................6
Installing the batteries ........................................................................10
Tapping and typing ............................................................................11
Tap with the stylus to get things done .........................................11
Elements of the handheld interface ..............................................12
Opening applications .....................................................................13
Using menus ....................................................................................14
Four ways to enter data ..................................................................17
Customizing your handheld..............................................................20
Palm Desktop software ..................................................................22
Connecting the cradle .....................................................................22
Using your handheld with another PIM .....................................24
Installing a Springboard module ..................................................24
Chapter 2: Entering Data in Your Visor Handheld .............................25
Using Graffiti writing to enter data ..................................................25
Writing Graffiti characters .............................................................25
Graffiti tips .......................................................................................27
The Graffiti alphabet .......................................................................28
Writing capital letters .....................................................................29
Writing numbers .............................................................................29
Graffiti numbers ..............................................................................30
Writing punctuation marks ...........................................................30
Writing symbols and extended characters ..................................31
Writing accented characters ..........................................................32
Accent strokes ..................................................................................32
Additional non-English characters ...............................................32
Navigation strokes ..........................................................................33
Graffiti ShortCuts ............................................................................33
Using the onscreen keyboard ...........................................................34
Using your computer keyboard ........................................................35
Importing data .....................................................................................35
Using an external keyboard ...............................................................36
Contents Page iii
Page 4

Chapter 3: Managing Your Applications.............................................37
Using the Applications Launcher..................................................... 37
Selecting applications ..................................................................... 37
Switching between applications ................................................... 37
Categorizing applications .............................................................. 37
Changing the Applications Launcher display ............................38
Choosing preferences.........................................................................39
Installing and removing applications .............................................. 40
Installing add-on applications ...................................................... 40
Installing games ..............................................................................42
Removing applications .................................................................. 42
Removing Palm Desktop software ............................................... 43
Security................................................................................................. 44
Assigning a password .................................................................... 44
Changing or deleting a password ................................................ 45
Locking your handheld .................................................................46
Recovering from a forgotten password ....................................... 47
Chapter 4: Overview of Basic Applications.........................................49
Date Book ............................................................................................. 50
Date Book Plus ....................................................................................51
Address ................................................................................................ 52
To Do List............................................................................................. 53
Memo Pad ............................................................................................54
Calculator ............................................................................................. 55
CityTime............................................................................................... 56
Expense................................................................................................. 57
Chapter 5: Common Tasks ....................................................................59
Creating records.................................................................................. 59
Editing records ....................................................................................60
Entering text .................................................................................... 60
Edit menu ......................................................................................... 60
Deleting records .................................................................................. 62
Other ways to delete records ........................................................ 62
Purging records................................................................................... 63
Exchanging and updating data: HotSync operations.................... 64
Performing a HotSync operation for the first time .................... 64
Categorizing records .......................................................................... 66
System-defined and user-defined categories .............................66
Finding records ................................................................................... 69
Looking up Address records ........................................................ 70
Using Find ....................................................................................... 71
Using Phone Lookup ...................................................................... 72
Page iv Visor Handheld User Guide
Page 5

Sorting lists of records ........................................................................74
Making records private ......................................................................75
Hiding and masking private records ...........................................75
Attaching notes ....................................................................................77
Choosing fonts .....................................................................................78
Chapter 6: Application Specific Tasks.................................................79
Date Book .............................................................................................80
Scheduling an event ........................................................................80
Rescheduling an event ...................................................................84
Setting an alarm for an event ........................................................84
Scheduling repeating or continuous events ................................85
Changing the Date Book view .......................................................88
Working in Week View ..................................................................88
Working in Month View ................................................................90
Working in Agenda view ...............................................................90
Spotting event conflicts ..................................................................91
Date Book menus ............................................................................92
Date Book Plus.....................................................................................95
Working in Week View with Text ................................................95
Working in Year View ....................................................................96
Working in List View .....................................................................97
Working with floating events ........................................................97
Working with To Do items ............................................................99
Using the Daily Journal ................................................................100
Using templates .............................................................................101
Using snooze alarms .....................................................................102
Selecting the default Date Book ..................................................102
Date Book Plus menus ..................................................................102
Address ...............................................................................................111
Creating an Address entry ...........................................................111
Duplicating an entry .....................................................................112
Selecting types of phone numbers ..............................................113
Changing Address Entry details .................................................113
Address menus ..............................................................................114
To Do List ...........................................................................................116
Setting priority ...............................................................................116
Checking off a To Do item ...........................................................117
Changing To Do item details .......................................................117
Setting a due date ..........................................................................118
To Do Show Options .....................................................................119
To Do List menus ..........................................................................120
Memo Pad...........................................................................................121
Reviewing memos .........................................................................121
Page v
Page 6

Memo Pad menus ......................................................................... 122
Calculator ........................................................................................... 123
Selecting the Calculator mode .................................................... 123
Using the Basic Calculator buttons ............................................ 123
Displaying Recent Calculations .................................................. 124
Using the Advanced Calculator mode ......................................124
Using the Advanced Calculator buttons ................................... 125
Creating a custom view ...............................................................134
Calculator menus .......................................................................... 135
CityTime............................................................................................. 136
Setting your home city .................................................................136
Selecting remote cities .................................................................. 137
Adding cities ................................................................................. 137
CityTime menus ............................................................................ 138
Expense............................................................................................... 139
Changing the date of an Expense item ...................................... 140
Entering receipt details ................................................................ 140
Customizing the Currency pick list ........................................... 142
Show Options ................................................................................143
Expense menus ............................................................................. 144
Chapter 7: Communicating Using Your Handheld............................145
Managing desktop E-Mail away from your desk ........................ 145
Setting up Mail on the desktop ................................................... 146
Synchronizing Mail with your E-Mail application .................. 146
Opening the Mail application on your handheld .................... 146
Viewing e-mail items ................................................................... 146
Creating e-mail items ................................................................... 148
Looking up an address ................................................................ 150
Adding details to e-mail items ................................................... 151
Storing e-mail to be sent later ..................................................... 154
Editing unsent e-mail ................................................................... 154
Draft e-mail .................................................................................... 155
Filing e-mail ...................................................................................156
Deleting e-mail .............................................................................. 157
Removing e-mail from the Deleted folder ................................ 157
Purging deleted e-mail ................................................................. 158
Message list options ..................................................................... 158
HotSync options ............................................................................ 160
Creating special filters ................................................................. 161
Truncating e-mail items ............................................................... 165
Mail menus .................................................................................... 166
Beaming information........................................................................ 167
Page vi Visor Handheld User Guide
Page 7

Chapter 8: Advanced HotSync® Operations ....................................171
Selecting HotSync setup options.....................................................171
Customizing HotSync application settings ...................................174
IR HotSync operations......................................................................175
Preparing your computer for infrared communication ..........175
Configuring HotSync Manager for infrared communication .176
Performing an IR HotSync operation .........................................177
Returning to cradle HotSync operations ...................................177
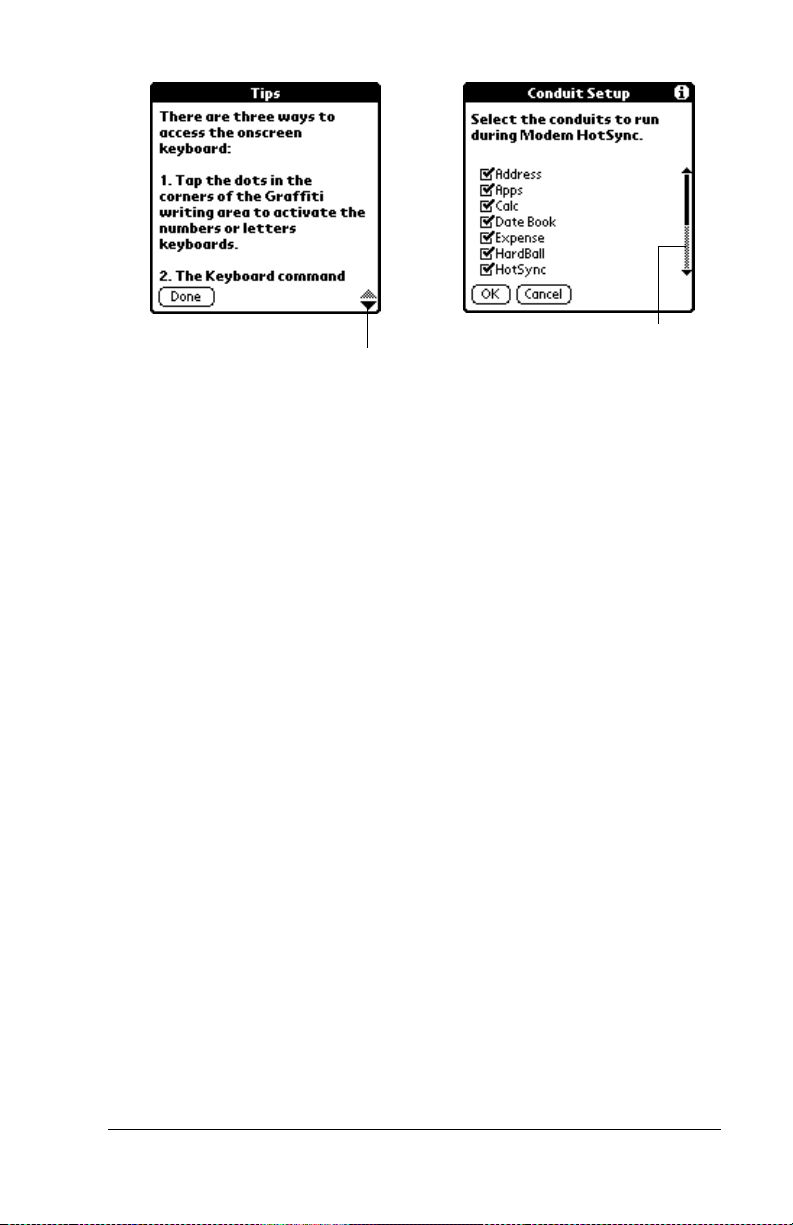
Conducting a HotSync operation via modem...............................178
Preparing your computer ............................................................178
Preparing your handheld .............................................................180
Selecting the conduits for a modem HotSync operation .........181
Performing a HotSync operation via a modem ........................182
Creating a user profile ......................................................................182
Chapter 9: Setting Preferences for Your Handheld.........................185
Viewing preferences .........................................................................185
Buttons preferences...........................................................................186
Pen preferences ..............................................................................186
HotSync buttons preferences .......................................................188
Connection preferences ....................................................................188
Connection Types ..........................................................................189
Setting modem configurations ....................................................189
Digitizer preferences.........................................................................192
Formats preferences ..........................................................................192
Country default .............................................................................192
Time, date, week start, and numbers formats ...........................193
General preferences...........................................................................193
Auto-off delay ................................................................................194
System, alarm, and game sounds ...............................................194
Network preferences and TCP/IP software..................................195
Selecting a service .........................................................................195
Entering a user name ....................................................................196
Entering a password .....................................................................197
Selecting a connection ..................................................................198
Adding telephone settings ...........................................................198
Connecting to your service ..........................................................201
Creating additional service templates .......................................202
Adding detailed information to a service template .................202
Creating a login script ..................................................................205
Deleting a service template ..........................................................207
Network preferences menu commands .....................................208
TCP/IP troubleshooting ...............................................................208
Owner preferences ............................................................................209
Page vii
Page 8

ShortCuts preferences ...................................................................... 210
Creating a ShortCut ......................................................................210
Editing a ShortCut ........................................................................ 211
Deleting a ShortCut ......................................................................211
Appendix A: Maintaining Your Handheld .........................................213
Caring for your handheld................................................................ 213
Battery considerations...................................................................... 214
Resetting your handheld ................................................................. 215
Performing a soft reset .................................................................215
Performing a warm reset ............................................................. 216
Performing a hard reset ...............................................................216
Appendix B: Troubleshooting Tips.....................................................219
Operating problems.......................................................................... 220
Tapping and writing problems.......................................................221
Application problems....................................................................... 222
HotSync problems ............................................................................ 223
Beaming problems ............................................................................ 227
Password problems .......................................................................... 228
Technical support ............................................................................. 229
Appendix C: Non-ASCII Characters for Login Scripts.......................231
Use of ^char ....................................................................................... 231
Carriage return and line feed ..........................................................231
Literal characters............................................................................... 232
Warranty and Other Product Information .......................................233
Handspring, Inc. Limited Warranty .............................................. 233
Handspring, Inc. End User Software License Agreement.......... 236
GNU Library General Public License ........................................ 238
FCC Statement................................................................................... 245
Canadian RFI Statement .................................................................. 245
Acknowledgments............................................................................246
Index ....................................................................................................247
Page viii Visor Handheld User Guide
Page 9

About This Guide
Welcome to the Visor™ handheld computer. This guide is designed to
help you get up and running quickly on your handheld. It describes
all you need to know about how to use your Visor handheld and the
applications that come with it.
It walks you through:
■ Locating all the parts of your handheld
■ Viewing and entering data
■ Using your handheld with your computer
■ Personalizing your handheld with your own preference settings
After you become familiar with the basic functionality of your Visor
handheld, you can use the rest of this guide as a reference for less
common tasks, for maintaining your Visor handheld, and also as a
source of information if you have problems operating it.
About This Guide Page 1
Page 10

Page 2
Page 11

Chapter 1
Introduction to Your Visor Handheld
This chapter explains the physical buttons and controls on your Visor
handheld computer, how to use your Visor handheld for the first time,
and how to use HotSync
handheld and Palm™ Desktop software.
Getting to know your Visor handheld
What is a Visor handheld?
With your Visor handheld, you will no longer have trouble getting to
meetings and appointments on time, remembering people’s names
and personal details, or keeping track of all the items on your to do list.
The Visor handheld can help you improve your track record in all
these areas, both at work and at home.
You can enter all your schedule details in Date Book Plus so you can
view them by the day, week, month, year, or in list format; you can
even set an alarm to remind you of important meetings. Keep all your
contact names, addresses, phone numbers, and other details in
Address, so you can find them as soon as you need them. Add your
tasks to To Do list, prioritize them so you don’t overlook them, and
assign them a due date.
®
technology to synchronize your Visor
To make sure you don’t lose any of this important information, you
can synchronize your data with Palm Desktop software on your
computer so you always have a backup copy. You can set different
levels of security for your Visor handheld so unauthorized eyes
cannot view your data.
When you are out of the office, track your expenses for your expense
reports. You can write, edit, and view your e-mail, and then
synchronize your e-mail with your desktop E-Mail application when
you return to your office.
Chapter 1 Page 3
Page 12

System requirements
To install and operate Palm Desktop software, your computer system
must meet the following requirements:
Minimum requirements
■ MacOS 8.1 or later (for USB cradle)
--or-MacOS 7.53 or later (for serial cradle)
■ Apple Macintosh or compatible computer
with a PowerPC processor
■ 8 MB RAM (memory) minimum, 16 MB recommended
■ 25 MB available hard disk space
■ VGA monitor or better
■ CD-ROM drive
■ Mouse
■ USB port (for USB cradle)
Serial port (for serial cradle)
Optional equipment
■ Modem
■ Springboard expansion modules
(such as a Springboard™ modem)
Upgrade information
If you already own a Palm OS® handheld, Handspring recommends
that you install the version of Palm Desktop software that comes with
your Visor handheld into the same folder as your current Palm
Desktop software. When you install the new version in the same
folder as the previous version, all your data is preserved. If you use
another personal information manager (PIM), you still need to install
Palm Desktop software in order to update the HotSync Manager on
your computer.
You perform HotSync operations in exactly the same way, so you can
quickly synchronize your old data with your new handheld.
To upgrade:
1. Synchronize your old handheld with your old Palm Desktop
software. This ensures that the latest information from your
handheld is on your desktop computer.
Page 4 Introduction to Your Visor Handheld
Page 13

2. (Optional) To ensure against any data loss, go to the folder that
stores Palm Desktop software, copy your user name folder, and
store the copy outside the Palm Desktop software folder.
3. Follow the installation instructions in “Installing Palm Desktop
software” later in this chapter. Be sure to install the new software
in the same folder as the old software.
4. To prepare for the first HotSync operation that synchronizes your
new handheld with your new Palm Desktop software, open Palm
Desktop software, open the HotSync menu, and then choose
Conduit Settings.
Note: Be sure your user name appears in the box at the top of the
Conduit Settings dialog box. If not, select your user name.
5. For all conduits, click Conduit Settings and select the option
Macintosh overwrites handheld. Then click OK. See “Customizing
HotSync application settings” in Chapter 8 for more information.
6. Place your new handheld in the cradle and press the HotSync
button. If the User dialog box appears, select your user name.
7. Compare the applications on your old and new handhelds.
8. Beam any third party applications that did not transfer from your
old handheld to your Visor handheld, or install them from the
original files.
Each handheld must have a unique name
After you complete the upgrade process described above, you have
two handhelds with the same name. This is an undesirable situation.
Each handheld must have a unique name in order to prevent
unexpected results during HotSync operations and other
complications.
We strongly recommend that you perform a hard reset on your old
handheld. See “Performing a hard reset” in Appendix A for details.
A hard reset not only erases all data from the old handheld; it also
erases the name and makes that handheld a clean slate, ready to
receive a new name. The next time you perform a HotSync operation
with this old handheld, you are asked to give it a name. Be sure to give
it a unique name.
Chapter 1 Page 5
Page 14
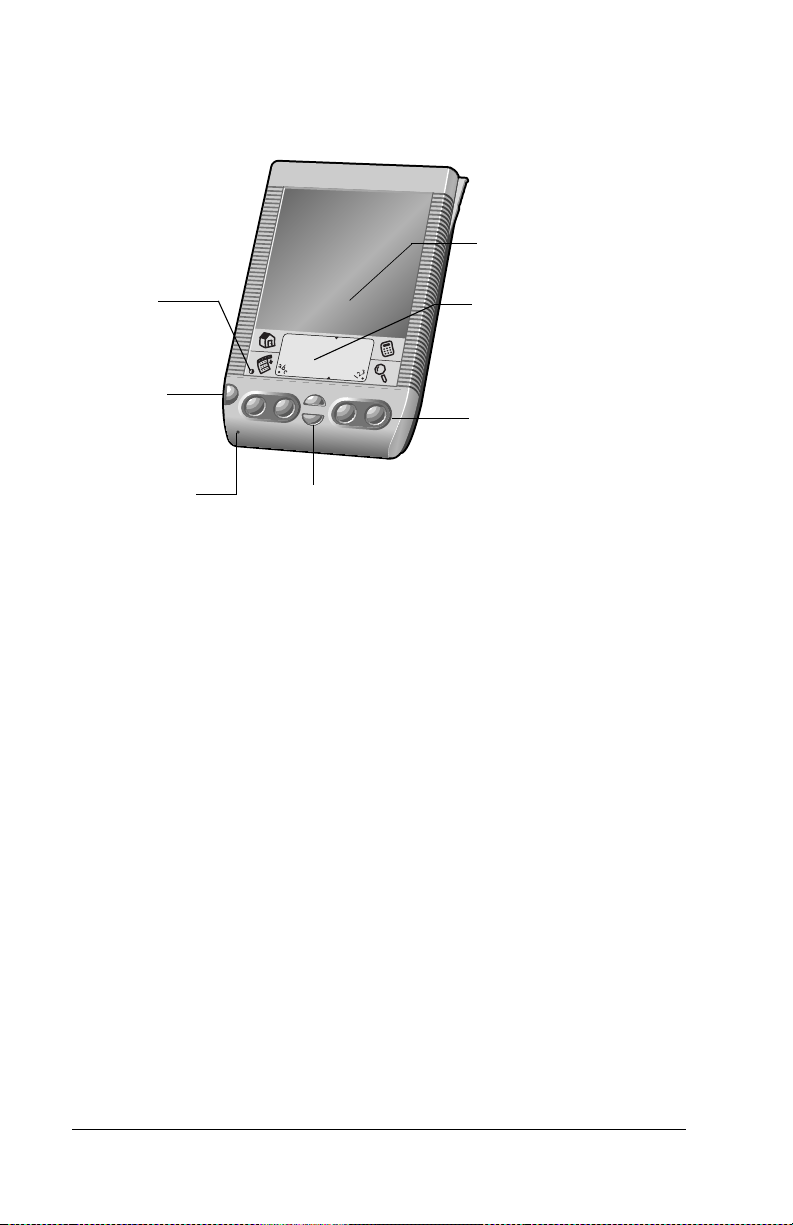
Visor components
Locating front panel controls
Screen
Contras t
control
Power button,
Back light
contro l
Microphone
Visor
handheld
screen
Graffiti
®
writing
area
Application
buttons
Graffiti writing area
Application buttons
Scroll buttons
Displays the applications and information stored in
your Visor handheld. It is touch-sensitive and
responds to the stylus.
The area where you write letters and numbers using
®
the Graffiti
alphabet. See Chapter 2 to learn how to
write Graffiti characters.
Activates the individual applications that correspond
to the icons on the buttons: Date Book Plus, Address,
To Do List, and Memo Pad. See “Buttons preferences”
in Chapter 9 for details on reassigning these buttons
to activate any application on your Visor handheld.
Tip: If your Visor handheld is turned off, pressing
any application button activates the handheld
and opens the corresponding application.
Scroll
buttons
Displays text and other information that extends
beyond the area of the Visor handheld screen.
Pressing the bottom scroll button scrolls down to
view information below the viewing area, and
pressing the top scroll button scrolls up to view the
information above the viewing area.
Page 6 Introduction to Your Visor Handheld
Page 15

Contrast
Control
Displays the contrast control screen where you can
adjust the appearance of the screen for the clearest
screen display. Depending on the lighting conditions
or temperature of the environment where you use
your handheld, you may need to adjust the contrast.
To adjust the contrast, drag the slider or tap the
arrows to increase or decrease the contrast. To fine
tune the contrast, press the scroll buttons on the front
panel of your handheld.
Power
button/
backlight
control
Turns your Visor handheld on or off and controls the
backlight feature. If your Visor handheld is turned
off, pressing the power button turns the unit on and
returns you to the last screen you viewed.
If your Visor handheld is turned on, pressing the
power button turns the unit off. Holding the power
button down for about two seconds turns the
backlight on or off.
Microphone
Records sounds for use with Springboard expansion
modules that support this feature.
Using the backlight
If you have difficulty seeing the information on your Visor handheld,
you can use the backlight to illuminate your screen.
To activate the backlight:
■ Press the power button and hold it down for about two seconds.
Release the button when the backlight turns on.
Tip: In addition, you can assign the full-screen pen stroke to
activate the backlight. See “Pen preferences” in Chapter 9 for
more information.
To turn off the backlight:
■ Press and hold the power button for about two seconds. The
backlight also turns off automatically (after a period of inactivity)
with the Auto-off feature. See “General preferences” in Chapter 9
for more information.
Chapter 1 Page 7
Page 16
Protective cover
The cover protects the Visor handheld screen when it is not in use.
To remove the cover:
1. Unclip the top of the cover from your handheld.
2. Lift the cover off your handheld.
To reattach the cover:
1. Insert the pegs on the bottom of the cover into the holes on the
bottom of your handheld.
2. Gently press the top of the cover onto your handheld until it clicks
into place.
Unclip top edge to
remove cover
Align pegs to
replace cover
Page 8 Introduction to Your Visor Handheld
Page 17

Locating back panel components
Springboard
expansion slot
protector
IR port
Stylus
Springboard
expansion slot
protector
Stylus
IR port
Reset button
Battery door
USB and serial
connector
Slides in and out of the Springboard expansion
slot. You can replace the slot protector with a
Springboard expansion module to add features to
your handheld.
Slides in and out of the slot in the back panel of
the handheld. To use the stylus, remove it from
the slot and hold it as you would a pen or pencil.
Uses infrared technology to transmit data to and
receive data from other Palm OS
®
handhelds. See
“Beaming information” in Chapter 7 for more
information. You can also use the IR port to
update the information between your handheld
and computer using HotSync technology. See “IR
HotSync operations” in Chapter 8 for details.
Reset button
Under normal use, you should not have to use the
reset button. See Appendix A for information
about when and how to use the reset button.
Battery door
USB and serial
connector
Covers the batteries that power your handheld.
The connector that connects your handheld to the
cradle, which in turn connects to a USB port or
serial port on your computer. This allows you to
update the information between your handheld
and computer using HotSync technology.
Chapter 1 Page 9
Page 18
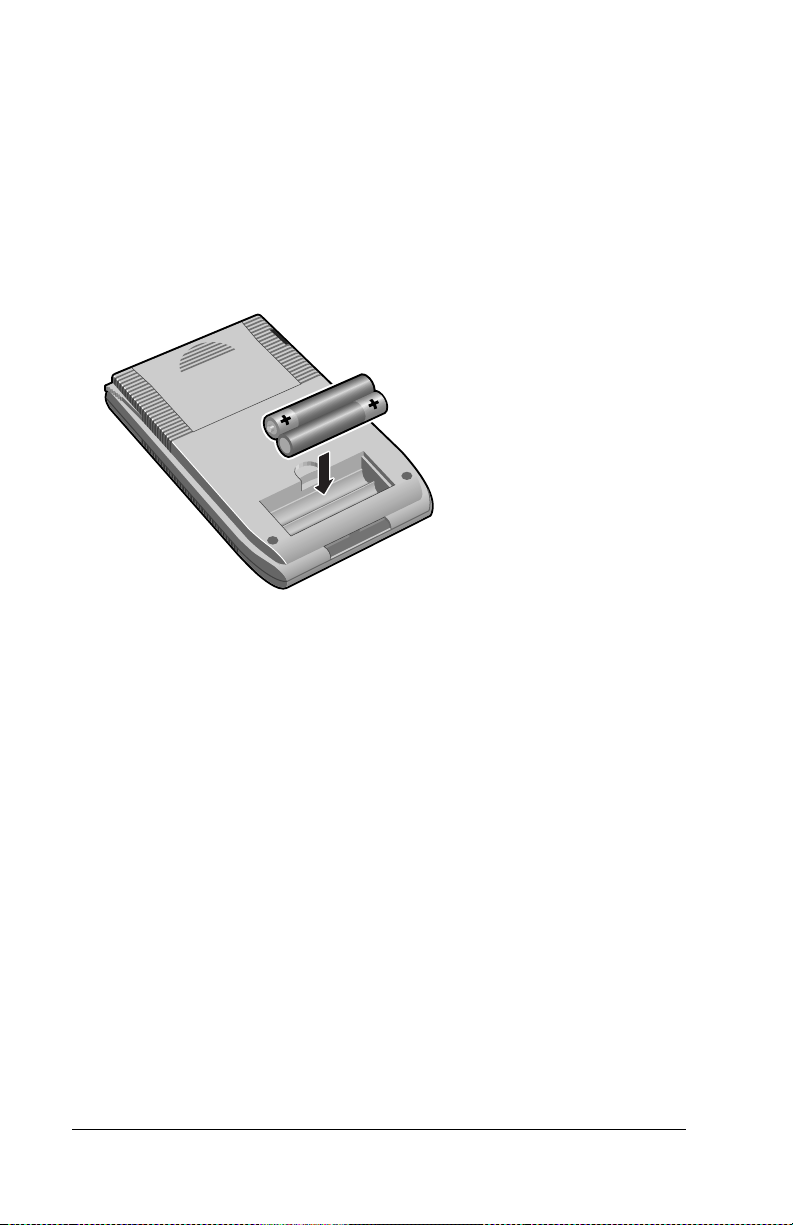
Installing the batteries
To use your Visor handheld, you must install two AAA alkaline
batteries. The batteries fit behind the battery door on the back of the
handheld. See “Battery considerations” in Appendix A for more
information.
To install the batteries:
1. Press the latch on the battery door and lift the battery door away
from your handheld.
2. Install the two AAA alkaline batteries supplied with your
handheld into the battery compartment.
Note: A diagram in the interior of the battery compartment
shows + and - ends of the batteries. When correctly
installed, the clips in the battery compartment secure the
batteries in place.
3. Insert the battery door back into place so that it is flush with the
back of your handheld and “clicks” into position.
Important: Do not force the battery door. When the batteries are
correctly installed, the battery door clips smoothly into
place. If you feel resistance when replacing the door,
make sure the door is aligned with the slots on the back of
your handheld, and that the batteries are firmly seated in
the battery compartment.
Page 10 Introduction to Your Visor Handheld
Page 19

Tapping and typing
Tap with the stylus to get things done
Like using a mouse to click elements on a computer screen, using the
stylus to tap elements on your handheld screen is the basic action that
gets things done on your handheld.
The first time you start your Visor handheld, setup instructions
appear on the screen. These instructions include a calibration screen,
or digitizer. Calibration aligns the internal circuitry of your handheld
with its touch-sensitive screen so that when you tap an element on the
screen, the handheld can detect exactly which task you want to
perform.
Important: Always use the point of the stylus for tapping or making
strokes on the handheld screen. Never use an actual pen,
pencil, or other sharp object to write on the handheld
screen.
With your handheld turned on, you can tap the handheld screen to
perform many operations, such as the following:
■ Open applications
■ Choose menu commands
■ Initiate a global Find operation
■ Select options in dialog boxes
■ Open the onscreen keyboards
Just as you can drag the mouse to select text or move objects on your
computer, you can also drag the stylus to select text. You can also use
the stylus to drag the slider of any scroll bar.
Chapter 1 Page 11
Page 20
Elements of the handheld interface
Menu bar
Command
buttons
Icons
Menu
bar
Check
box
Icons
Pick list
Command
buttons
A set of commands that are specific to the application.
Not all applications have a menu bar.
Tap a button to perform a command. Command
buttons appear in dialog boxes and at the bottom of
application screens.
Tap the icons to open applications , menus ,
Calculator , and to find text anywhere in your data
.
abc
With the cursor in an input field, tap the dot to
activate the alphabetic keyboard.
123
With the cursor in an input field, tap the dot to
activate the numeric keyboard.
Check box
When a check mark appears in a check box, the
corresponding option is active. If a check box is
empty, tapping it inserts a check mark. If a check box
is checked, tapping it removes the check mark.
Pick list
Tap the arrow to display a list of choices, and then tap
an item in the list to select it.
Page 12 Introduction to Your Visor Handheld
Page 21
Previous/next
arrows
Scroll
bar
Next/
previous
arrows
Scroll bar
Tap the up and down arrows to display the previous
and next page of information; tap the left and right
arrows to display the previous and next record.
Drag the slider, or tap the top or bottom arrow, to
scroll the display one line at a time. To scroll to the
previous page, tap the scroll bar just above the slider.
To scroll to the next page, tap the scroll bar just below
the slider.
You can also scroll to the previous and next pages by
pressing the scroll buttons on the front panel of your
handheld.
Opening applications
You can use the Applications Launcher to open any application
installed on your handheld. You can also open the four main
applications — Date Book Plus, Address, To Do List, and Memo Pad
— with the application buttons on the front panel of your handheld.
Tip: When you press an application button on the front panel, you
have instant access to the selected application. You don’t even
need to turn on your handheld first.
In addition to providing a way for you to open applications, the
Applications Launcher displays the current time, battery level, and
application category.
Chapter 1 Page 13
Page 22
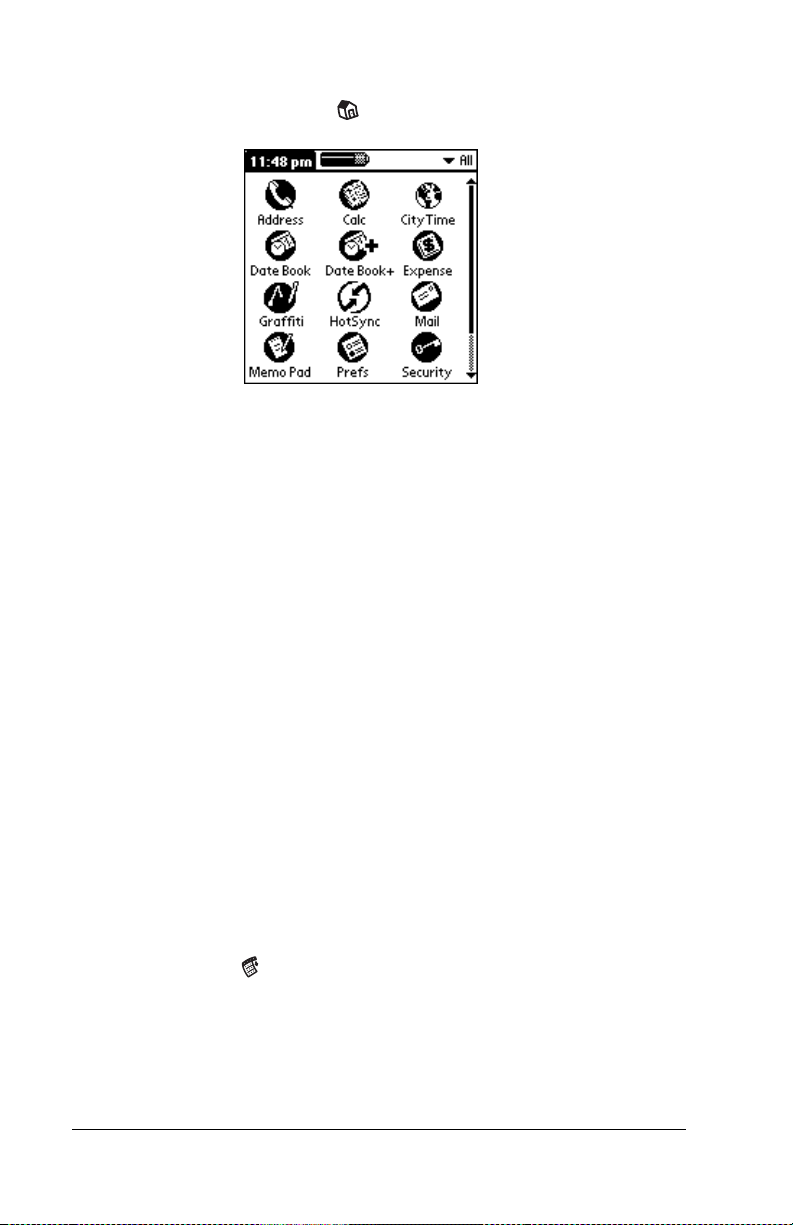
To open an application:
1. Tap the Applications icon .
2. Tap the icon of the application that you want to open. If you have
many applications installed on your Visor handheld, tap the scroll
bar to see all of your applications.
Tip: To find an application quickly, you can write the Graffiti
character for the first letter of its name. The Applications
Launcher scrolls to the first application with a name that
begins with that letter. You can also assign application icons to
different categories. See “Categorizing applications” in
Chapter 3.
Using menus
Menus on your handheld are easy to use. Once you have mastered
them in one application, you can use them the same way in all other
applications.
The menus of each application are illustrated in the section on that
application in Chapter 4. The Edit menu is described in “Editing
records” in Chapter 4.
To open the menu bar:
1. Do one of the following:
■ Open an application (such as Memo Pad) and then tap the
Menu icon .
■ Tap the inverted tab at the top of any application’s screen
(except Calculator).
Page 14 Introduction to Your Visor Handheld
Page 23
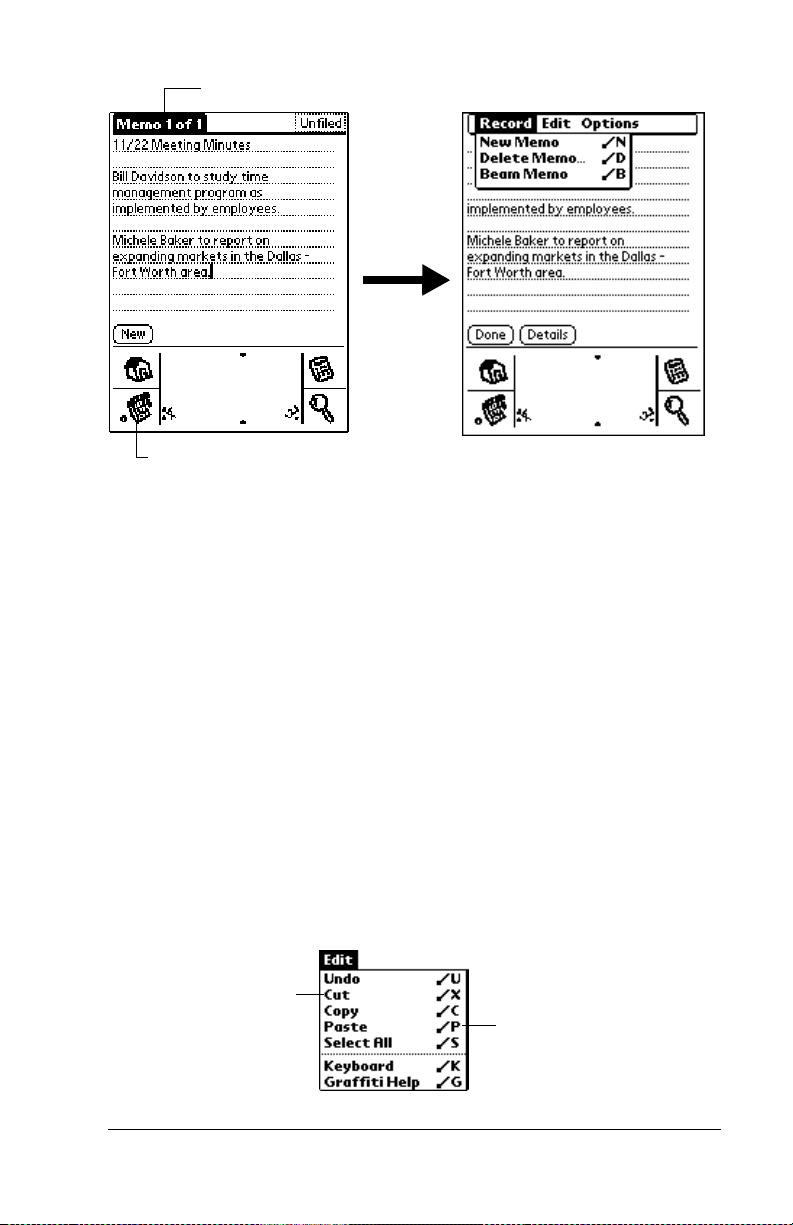
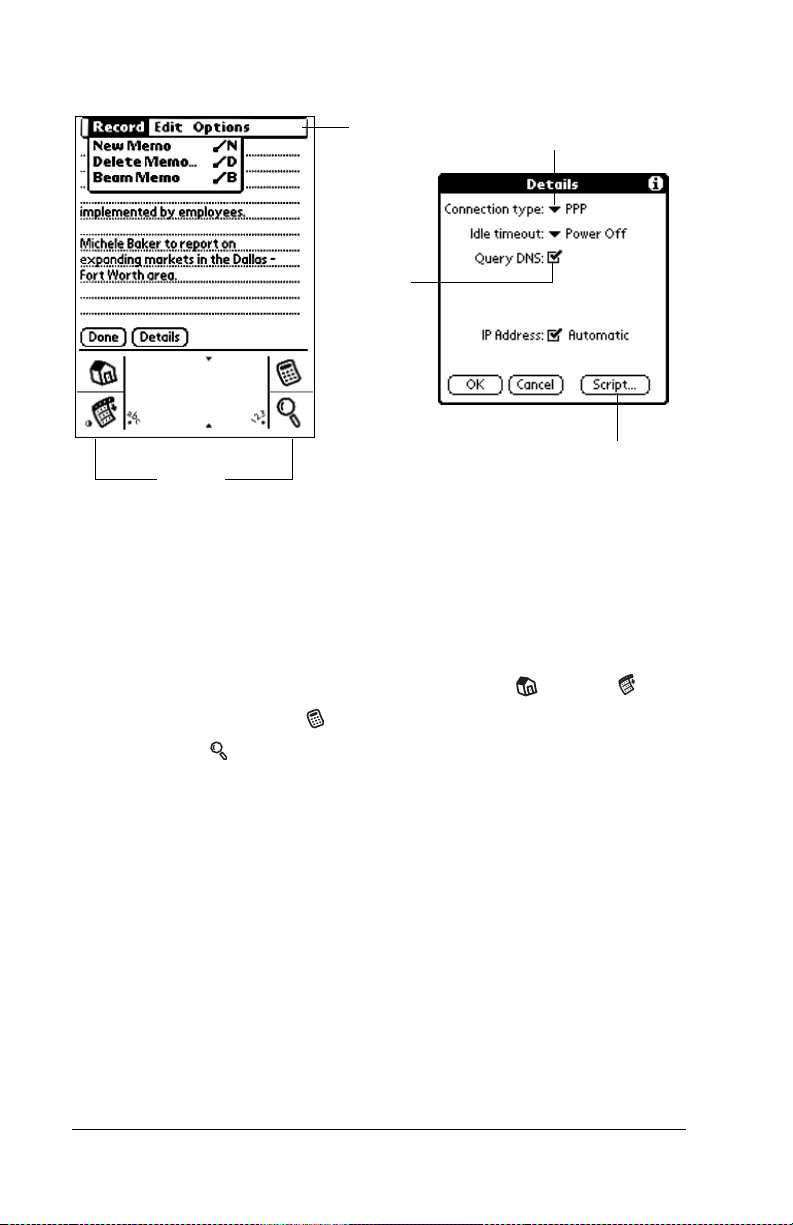
Tap inverted tab
Tap the Menu icon
In this example, three menus are available: Record, Edit, and Options.
The Record menu is selected and contains the commands New Memo,
Delete Memo, and Beam Memo.
Choosing a menu
After you open the menu bar for an application, tap the menu that
contains the command you want to use.
The menus and menu commands that are available depend on the
application. Also, the menus and menu commands vary depending on
which part of the application you’re using. For example, in Memo Pad,
the menus are different for the Memo list screen and the Memo screen.
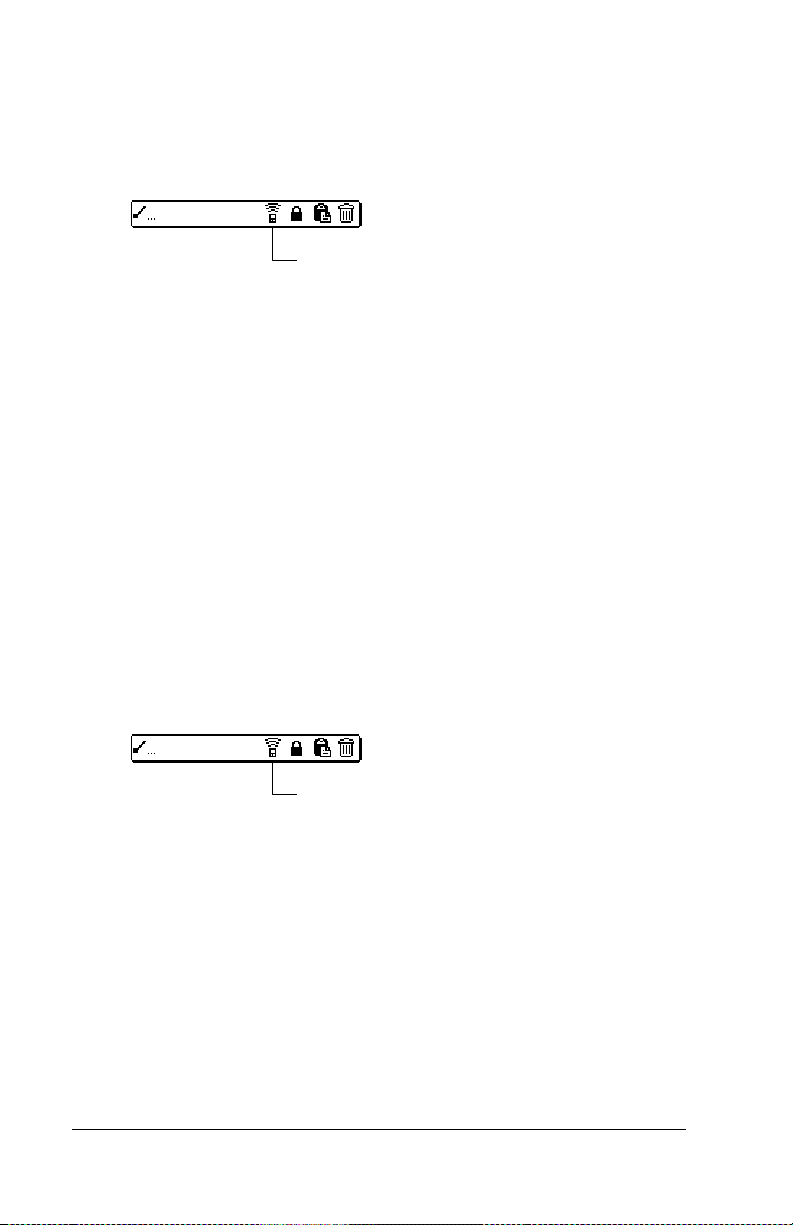
Graffiti menu commands
Most menu commands have an equivalent Graffiti Command stroke,
which is similar to the keyboard shortcuts used to execute commands
on computers. The command letters appear to the right of the
command names. To use the Graffiti menu commands, the menu bar
must be closed.
Menu commands
Command letters
Chapter 1 Page 15
Page 24
To use the Graffiti menu commands:
1. In the Graffiti text area, draw a diagonal line from the lower left to
upper right.
The Command toolbar appears for about four seconds.
Command toolbar
2. Immediately write the corresponding command letter in the
Graffiti letter area.
For example, to choose Select All in the Edit menu, draw the
Command stroke, followed by the letter “s.”
Tip: If you wait more than three seconds to write the menu
command, you need to redraw the Graffiti Command
stroke to redisplay the Command toolbar.
Command toolbar
The Command toolbar provides quick access to frequently used menu
commands. The commands available vary based on the active screen.
To use the command toolbar:
1. In the Graffiti text area, draw a diagonal line from the lower left to
upper right.
The Command toolbar appears for about four seconds.
Command toolbar
2. Tap the icon for the command you want.
Tip: If you wait more than three seconds to tap the icon, you
need to redraw the Graffiti Command stroke to redisplay
the Command toolbar.
Displaying online tips
Many of the dialog boxes that appear on your handheld contain an
online Tips icon in the upper-right corner. Online tips anticipate
questions you have in a dialog box, provide shortcuts for using the
dialog box, or give you other useful information.
Page 16 Introduction to Your Visor Handheld
Page 25
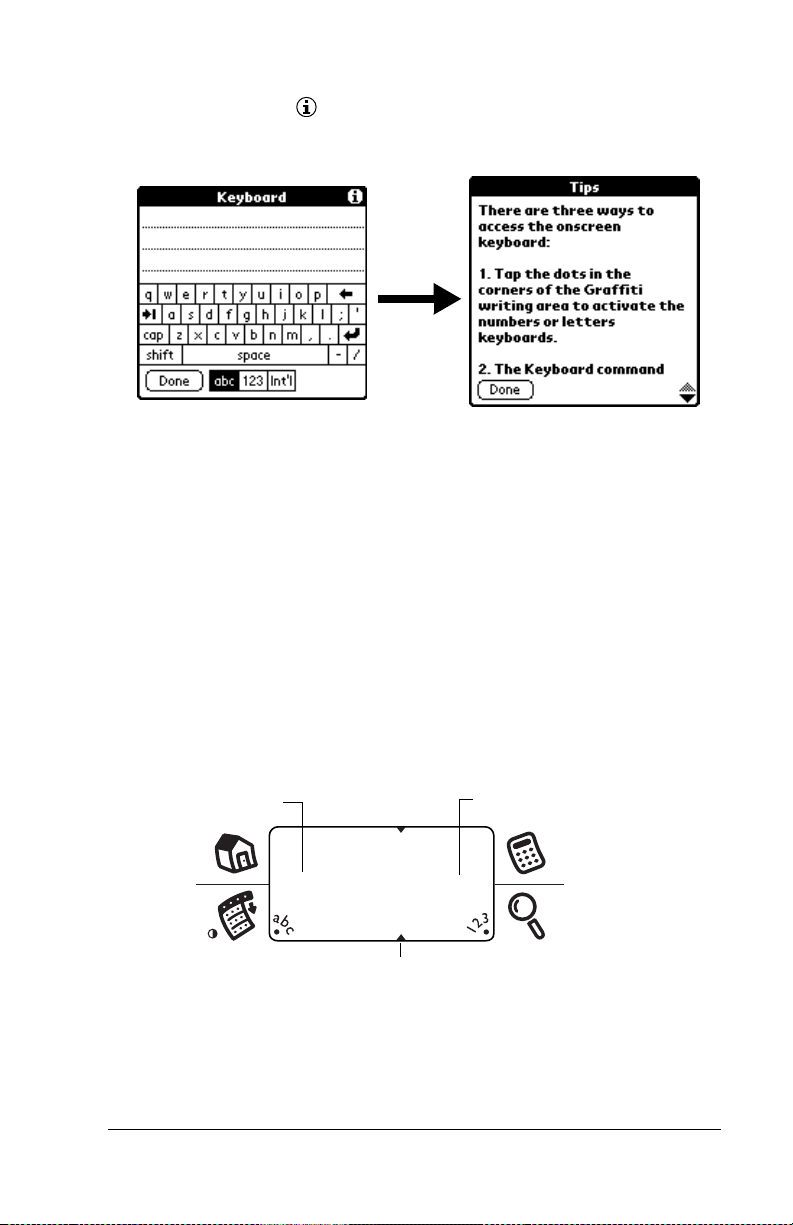
To display an online tip:
1. Tap the Tips icon .
2. After you review the tip, tap Done.
Four ways to enter data
There are four ways to enter data into your Visor handheld:
■ Using Graffiti writing
■ Using the onscreen keyboard
■ Entering or importing data in Palm Desktop software and then
synchronizing with your handheld
■ Using an external keyboard
Graffiti writing
Your Visor handheld includes Graffiti writing software as the primary
system for entering text and numbers. With Graffiti writing, you write
simple strokes with the stylus and they are instantly recognized as
letters or numbers.
Write letters here Write numbers here
Division marks
Your Visor handheld also includes Giraffe, a game you can use to
practice Graffiti writing. See “Installing and removing applications”
in Chapter 3 for installation instructions. The Memo Pad application
is ideal for practicing Graffiti writing. This section explains how to
open Memo Pad and use it to practice Graffiti writing.
Chapter 1 Page 17
Page 26
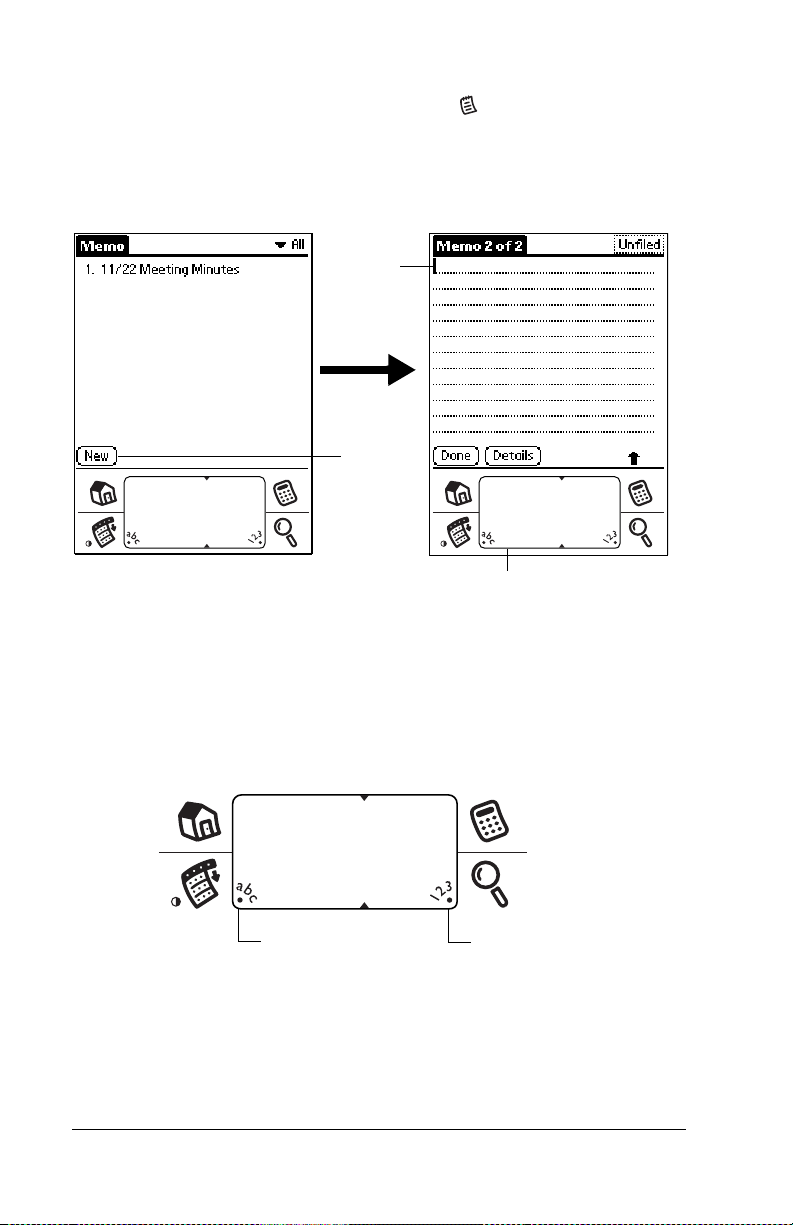
To open Memo Pad:
1. Press the Memo Pad application button .
2. Tap New.
Note: A blinking cursor appears on the first line of the new memo to
indicate where new text will appear.
New
memo
cursor
Tap
New
Write in Graffiti area
See “Using Graffiti writing to enter data” in Chapter 2 for more
information.
Onscreen keyboard
When you create or edit a record in an application such as Address,
you can open the onscreen alphabetic and numeric keyboards to enter
data.
Tap here for
alphabetic keyboard
Tap here for
numeric keyboard
After a keyboard is open, you can tap to open any of the other
keyboards, including the international keyboard. See “Using the
onscreen keyboard” in Chapter 2 for more information.
Note: You cannot enter Graffiti characters while using the onscreen
keyboard.
Page 18 Introduction to Your Visor Handheld
Page 27
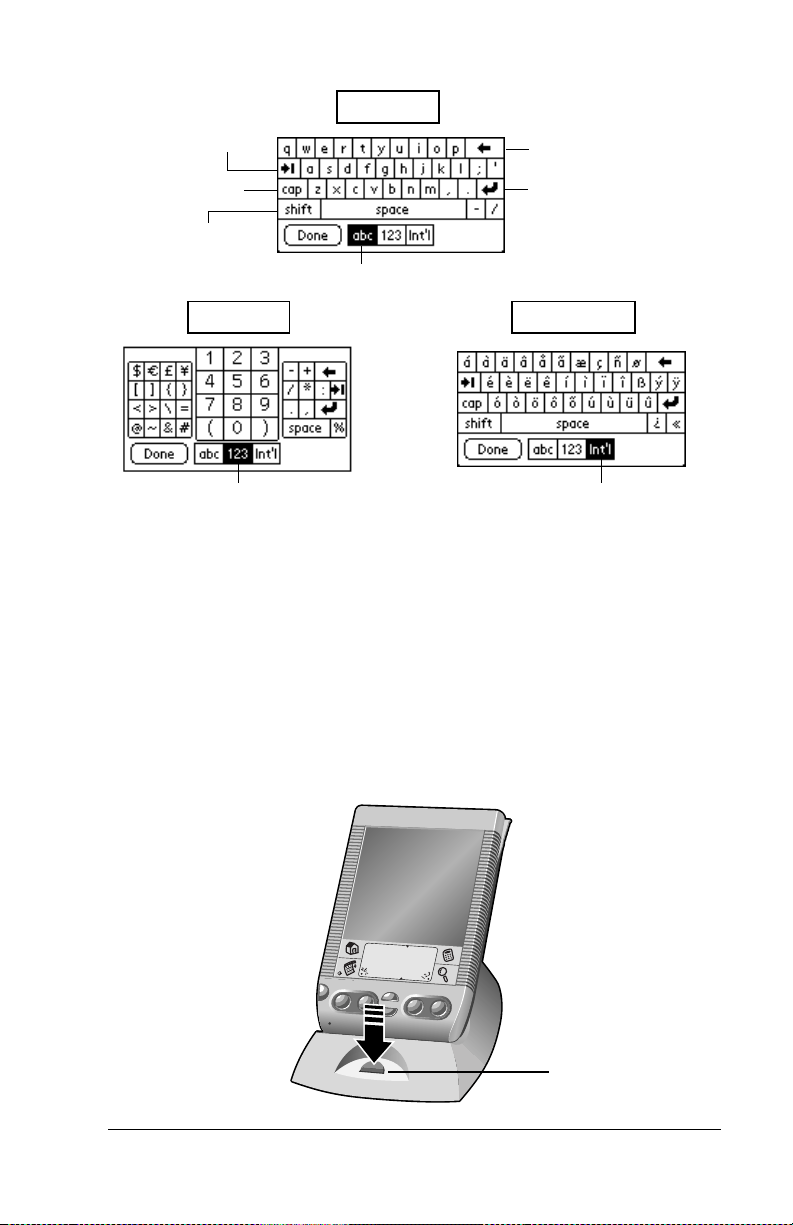
Alpha
Tab
Caps lock
Caps shift
Tap here to display
alphabetic keyboard
Numeric
Tap here to display
numeric keyboard
Backspace
Carriage return
International
Tap here to display
international keyboard
Using Palm Desktop software
If you have new records you want to add to your Visor handheld and
prefer to use the computer keyboard rather than the onscreen
keyboard, enter the data in Palm Desktop software or the PIM you
have installed to use with your handheld.
After the information is in Palm Desktop software, perform a HotSync
operation to synchronize your handheld with your computer. See
“Exchanging and updating data: HotSync operations” in Chapter 5 for
more information.
HotSync
button
Chapter 1 Page 19
Page 28

Importing data
If you already have data in a database on your computer, you can
import it into Palm Desktop software. You can import data stored in
computer applications such as spreadsheets and databases, or data
from another Palm OS handheld. When you import data, you transfer
the records to your Visor handheld without having to enter them
manually. See “Importing data” in Chapter 2 for more information.
Using an external keyboard
You can connect an optional keyboard accessory to the connector on
your handheld so you can type data directly into your handheld.
External keyboards are very helpful when you need to enter large
amounts of data quickly and accurately while you are away from your
computer. For more information about external keyboard accessories,
go to the web site: www.handspring.com.
Customizing your handheld
You can customize your handheld by using the Preferences
application. You can enter personal information such as your name
and address; change the time and date; view different date and time
formats when you travel; turn off sounds; and configure your
handheld to work with a modem or network. See Chapter 9 for more
information on customizing your handheld.
To open the Preferences screens:
1. Tap the Applications icon .
2. Tap the Preferences icon .
3. Tap the category pick list in the upper-right corner of the screen.
4. Tap the Preferences category you want to view.
The following procedures for setting the time and date give you an
example of how to customize your handheld. You make changes to
the time and date in General preferences.
Page 20 Introduction to Your Visor Handheld
Page 29
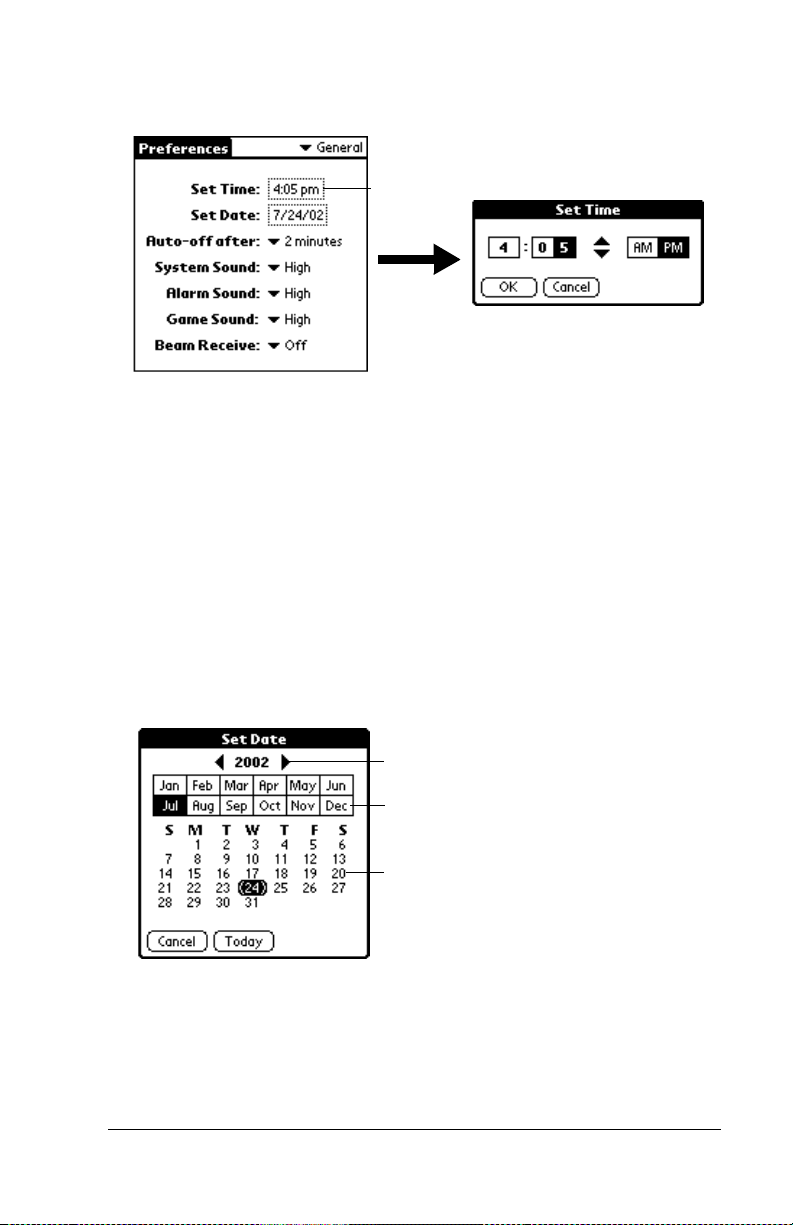
To set the current time:
1. Tap the Set Time box.
Tap here
2. Tap the up or down arrows to change the hour.
3. Tap each minute number, and then tap the arrows to change them.
4. Tap AM or PM.
Note: Your handheld can also display time based on a 24-hour
clock. See “Formats preferences” in Chapter 9 for more
information.
5. Tap OK.
To set the current date:
1. Tap the Set Date box.
2. Tap the arrows to select the current year.
Tap arrows to select year
Tap to select month
Tap to select date
3. Tap a month.
4. Tap the current date.
Chapter 1 Page 21
Page 30

Palm Desktop software
Palm Desktop software includes the same main applications as your
Visor handheld: Daily Calendar (Date Book), Contact List (Address),
Task (To Do List), and Note (Memo Pad). You can use the HotSync
feature of this software to back up and exchange data between your
handheld and your computer.
It is a good idea to back up your data in case something happens to the
data on your Visor handheld. Changes you make on your Visor
handheld or Palm Desktop software appear in both places after you
synchronize.
With Palm Desktop software, you can do the following:
■ Work with your Visor handheld applications on your computer.
Palm Desktop software duplicates the Daily Calendar (Date
Book), Contact List (Address), Task (To Do List), and Note (Memo
Pad) applications on your handheld, so you can view, enter, and
modify any data stored on your handheld.
■ Back up the data stored on your handheld with HotSync
technology and synchronize the data on your Palm Desktop
software. Synchronization is a one-step procedure that ensures
your data is always safe and up-to-date. See “Exchanging and
updating data: HotSync operations” in Chapter 5 for more
information.
■ Import and export data, so you can easily transfer data from other
desktop applications into any of your main applications. See
“Importing data” in Chapter 2 for more information.
■ Print your Palm Desktop information on any printer.
Connecting the cradle
The cradle that comes with your Visor handheld enables you to
synchronize the information on your Visor handheld with your Palm
Desktop software using HotSync technology.
Note: If your computer does not have a USB port, or it uses MacOS
8.0 or earlier, you need a serial cradle to connect to your
computer. You can purchase a serial cradle from
www.handspring.com.
Page 22 Introduction to Your Visor Handheld
Page 31

To connect the cradle:
1. Plug the cable from the Visor handheld cradle into the USB port or
serial port on your computer.
Shown with
USB port
Note: If you are unsure about the exact location of the USB port or
serial port on your computer, refer to the manual supplied
with the computer.
Installing Palm Desktop software
The following instructions guide you through installing Palm
Desktop software. After installation, refer to the online Help in Palm
Desktop software for information about how to use the software.
Note: You must install the software that comes with your Visor
handheld even if you already installed Palm Desktop software
for a previous Palm organizer.
To ensure a safe and uninterrupted installation of Palm Desktop
software, please do not simply copy the Palm Desktop software files
to your computer’s hard disk. You must use the installer to place the
files in their proper locations and to decompress the files.
To install Palm Desktop software:
1. Exit any open programs, including those that run at startup, and
disable any virus-scanning software.
2. Insert the Palm Desktop software CD-ROM into the computer’s
CD-ROM drive.
3. Double-click the Palm Desktop CD icon on the desktop.
4. Double-click the Installer icon to begin the installation process.
5. Follow the onscreen instructions to complete the installation.
Chapter 1 Page 23
Page 32

Using your handheld with another PIM
If you prefer to use another personal information manager (PIM), you
can use it if third-party connection software, called a conduit, is
available for your PIM. You must install the software that came with
your Visor handheld along with the conduit for your PIM to
synchronize the data between your handheld and your PIM. For
information on conduit software, go to this web site:
www.handspring.com.
Installing a Springboard module
Springboard expansion modules enable you to extend the functions of
your handheld. To install a Springboard module, simply remove the
slot protector and insert the module in the Springboard expansion slot
until the connectors are secure.
Page 24 Introduction to Your Visor Handheld
Page 33

Chapter 2
Entering Data in Your Visor Handheld
This chapter explains how to enter data into your Visor handheld
computer, by writing with the stylus in the Graffiti
using the onscreen keyboard, by using the computer keyboard, by
using an external keyboard, or by importing data from another
application.
®
writing area, by
Using Graffiti writing to enter data
Chapter 1 introduced Graffiti writing and briefly described how to use
it to enter text in your applications. In this section, you learn the
procedures for creating letters, numbers, punctuation, and symbols as
well as some Graffiti tips and tricks.
Writing Graffiti characters
Most people find they can enter text quickly and accurately with only
minutes of practice. Graffiti writing includes any character you can
type on a standard keyboard. The Graffiti strokes closely resemble the
uppercase letters of the regular alphabet, which makes Graffiti writing
easy to learn.
There are four basic concepts for success with Graffiti writing:
■ If you draw the character shape exactly as shown in the tables later
in this chapter (like the shapes shown in the following diagram),
you achieve 100% accuracy.
■ The heavy dot on each shape shows where to begin the stroke.
Certain characters have similar shapes, but different beginning
and end points. Always begin the stroke at the heavy dot (you
should not create the heavy dot; it is only there to show you where
to begin the stroke).
Chapter 2 Page 25
Page 34

■ Most characters require only a single stroke. When you lift the
stylus from the Graffiti writing area, your handheld recognizes
and displays the text character immediately. To accomplish single
strokes, some Graffiti strokes are portions of the regular alphabet
equivalents.
■ The Graffiti writing area is divided into two parts: one for writing
the letters of the alphabet and one for writing numbers. The small
marks at the top and bottom of the Graffiti writing area indicate
the two areas.
Write letters here Write numbers here
Division marks
To write Graffiti letters:
1. Tap the screen where you want your text to go.
Note: You need to tap above the Graffiti writing area, and must
see a blinking cursor before you write the text.
2. Use the tables on the following pages to find the stroke shape for
the letter you want to create. For example, the stroke shown below
creates the letter “n.”
Note: There are two different stroke shapes available for some
letters. For these letters, choose the one that’s easiest for
you.
Lift stylus
here
Start stroke
at heavy dot
As you’ll see later, you use the same shape to create both the
uppercase and lowercase version of a letter.
Page 26 Entering Data in Your Visor Handheld
Page 35

3. Position the stylus in the left-hand side of the Graffiti writing area.
4. Start your stroke at the heavy dot and draw the stroke shape as it
appears in the tables.
5. Lift the stylus from the screen at the end of the stroke shape.
That’s all there is to it! When you lift the stylus from the screen, your
handheld recognizes your stroke immediately and prints the letter at
the insertion point on the screen.
As soon as you lift the stylus from the screen, you can begin the stroke
for the next character you want to write.
Important: You must begin the character strokes in the Graffiti
writing area. If you do not make Graffiti strokes in the
Graffiti writing area, your handheld does not recognize
them as text characters.
Graffiti tips
When using Graffiti writing, keep these tips in mind:
■ Accuracy improves when you write large characters. You should
draw strokes that nearly fill the Graffiti writing area.
■ To delete characters, simply set the insertion point to the right of
the character you want to delete and make the backspace stroke
(a line from right to left) in the Graffiti writing area.
■ Write at natural speed. Writing too slowly can generate
recognition errors.
■ Do not write on a slant. Vertical strokes should be parallel to the
sides of the Graffiti writing area.
■ Press firmly.
Chapter 2 Page 27
Page 36

The Graffiti alphabet
Letter Strokes Letter Strokes
AN
B
O
CP
D
Q
ER
F
G
S
T
HU
IV
JW
KX
LY
M
Z
Space Back Space
Carriage
Period
tap twice
Return
Page 28 Entering Data in Your Visor Handheld
Page 37

Writing capital letters
You make capital letters with the same stroke shapes as the basic
alphabet characters. To make capital letters, you must first “shift” to
caps — just as you press the Shift key on a keyboard — and then write
the character strokes.
Note: Graffiti writing includes a feature that automatically
capitalizes the first letter when you create a new sentence or a
new record (by tapping New or a blank line).
To draw the first letter of a word as a capital letter:
■ Use the Caps Shift stroke:
Caps
Shift
Tip: When Caps Shift is active, an “up arrow” symbol appears in
the lower-right corner of the handheld screen. If you
accidentally activate Caps Shift, backspace will cancel it.
Caps Shift
To enter only capital letters (Caps Lock):
■ Use the Caps Lock stroke:
Caps
Lock
Tip: When Caps Lock is active, an underlined “up arrow” symbol
appears in the lower-right corner of the handheld screen. To
return to lowercase, make the Caps Shift stroke.
Caps Lock
Writing numbers
Writing numbers with Graffiti writing is similar to writing letters of
the alphabet, except that you make the character strokes on the righthand side (numbers side) of the Graffiti writing area.
Chapter 2 Page 29
Page 38

Graffiti numbers
Number Strokes Number Strokes
0
5
1
27
38
4
6
9
Writing punctuation marks
Graffiti writing can create any punctuation symbol that you can enter
from a standard keyboard. All punctuation marks begin with a single
tap on the Graffiti writing area. When you make this tap, you activate
Punctuation Shift and a dot appears to show it is active. The next
stroke you make with the stylus creates a punctuation mark.
Punctuation Shift
Note: When Punctuation Shift is active, you can make a symbol
stroke anywhere in the Graffiti writing area (the letters or
numbers side).
Page 30 Entering Data in Your Visor Handheld
Page 39

Symbol Stroke Symbol Stroke
Period
.
Dash
—
Comma
,
Apostrophe
'
Question
?
Exclamation
!
Left Paren
(
Right Paren
)
Slash
/
Dollar
$
Additional Graffiti punctuation
@ # % ^ & * < > – + = |
\ { } [ ] ~ ` ; : " tab
Writing symbols and extended characters
All symbols and extended characters begin with the stroke in the
Graffiti writing area of your handheld:
Symbol
Shift
When the Symbol Shift is active, a slanted shift symbol appears in the
lower-right corner of the screen. The next stroke that you make creates
the symbol or extended character.
Symbol Shift
Chapter 2 Page 31
Page 40

Writing accented characters
To create accented characters, draw the stroke normally used to create
the letter, followed by an accent stroke. Graffiti writing then adds the
accent to the letter.
For example, the following diagram shows the strokes required to
draw an accented “e.”
= e
Accent strokes
a a a a a a
Using these accent strokes, you can write the following accented
letters:
à á â ã ä å è é ê ì í î ï ò ó ô õ ö ù ú û ü ÿ ý ñ
Additional non-English characters
You can write the following characters in the lowercase alphabet
mode without any special punctuation or shifting:
c
a
e
Note: You must write these non-English characters in the left side of
the Graffiti writing area.
Page 32 Entering Data in Your Visor Handheld
Page 41

Navigation strokes
In addition to character symbols, Graffiti writing includes special
strokes that you can use to navigate within text or fields in your
applications.
Command Stroke
Move cursor right
Move cursor left
Previous field
(Address only)
Next Field
(Address only)
Open Address Record
(Address only)
Graffiti ShortCuts
Graffiti ShortCuts make entering commonly used words or phrases
quick and easy. ShortCuts are similar to the Glossary or Autotext
features of some word processors.
Graffiti writing comes with several predefined ShortCuts, and you can
also create your own. Each ShortCut can represent up to 45 characters.
For example, you might create a ShortCut for your name, or for the
header of a memo. See “ShortCuts preferences” in Chapter 9 to learn
about creating your own ShortCuts.
To use a ShortCut, draw the ShortCut stroke followed by the ShortCut
characters. When you draw the ShortCut stroke, the ShortCut symbol
appears at the insertion point to show that you are in ShortCut mode.
ShortCut
Chapter 2 Page 33
Page 42

Your handheld includes the following predefined Graffiti ShortCuts:
Entry ShortCut
Date stamp ds
Time stamp ts
Date / time stamp dts
Meeting me
Breakfast br
Lunch lu
Dinner di
Using the onscreen keyboard
You can open the onscreen keyboard anytime you need to enter text
or numbers on your handheld. Note that you cannot enter Graffiti
characters while using the onscreen keyboard.
To use the onscreen keyboard:
1. Open any application (such as Memo Pad).
2. Tap any record, or tap New.
3. Tap “abc” to open the alphabetic keyboard, or tap “123” to open
the numeric keyboard.
Tap here for alpha keyboard Tap here for numeric keyboard
4. Tap the characters to enter text and numbers.
Note: The onscreen keyboard also includes a dialog box for
international characters. You can switch among the three
dialogs at any time to enter the exact text you need.
5. After you finish, tap Done to close the onscreen keyboard and
place the text in the record.
Page 34 Entering Data in Your Visor Handheld
Page 43

Using your computer keyboard
If you have a lot of data to enter, or prefer to use the computer
keyboard, you can use Palm™ Desktop software, or any supported
PIM, to enter information. You can then perform a HotSync
®
operation
to synchronize the information on your computer with the
information on your handheld. All the main applications on your
handheld are available in Palm Desktop software and in most PIMs.
Refer to Palm Desktop online Help for more information on entering
data on your computer.
Importing data
If you have data stored in computer applications such as spreadsheets
and databases, you can transfer the data to your Visor handheld
without having to key it in manually. Save the data in one of the file
formats listed below, import it into Palm Desktop software, and then
perform a HotSync operation to transfer the data to your handheld.
You can import data from any of the following PIM (personal
information manager) products.
■ Address Book Plus
■ DateBook Pro
■ DayMaker
■ Dynodex
■ Meeting Maker
■ Now Contact
■ Now Up-to-Date
■ QuickDex
■ TouchBase Pro
Palm Desktop software can open Claris Organizer files directly; you
do not need to import them. To import data from PIM product files,
you must export and save the entire file in text format first. You can
import fields from TouchBase Pro, DateBook Pro, DayMaker, and
QuickDex files in the proper order. You might have to adjust the field
order of other PIM product files you import.
You can also import data from a FileMaker Pro database or a
ClarisWorks database. In FileMaker Pro, be sure to export the
database to the Tab-Separated Text file type. In ClarisWorks, be sure
to save the database in ASCII text format and give it a different name
so you don't overwrite the original file.
Chapter 2 Page 35
Page 44

You can import data from a Newton that uses Newton Operating
System 1.0. Simply use the Newton Connection Kit to export data
from the Newton Names file, Date Book Calendar file, and Notepad,
and then import the resulting files into Palm™ Desktop software. The
Newton Connection Kit does not work with Newton Operating
System 2.0.
To import data:
1. Export a text file from the other product.
2. Open Palm Desktop software.
3. From the File menu, choose Import.
4. Select the file you want to import.
5. Click Open.
6. In the Import dialog box, check each field name to be sure the
correct data moves into the correct fields.
To change the order of a field in the file you're importing into,
move the pointer over a field name in the Fields In list. When
the pointer changes to double arrow, drag the name to a new location.
To prevent information from importing into a field, click the arrow between field names. The arrow changes to a dotted line.
To view the information in the file you're importing from, click
the Scan Data arrows to see the information in each record.
7. From the Fields pop-up menu, choose the appropriate field.
8. From the Delimiters pop-up menu, choose the appropriate
delimiter.
The field and delimiter are set automatically if you are
importing a Claris Organizer, TouchBase Pro, DateBook Pro,
DayMaker, or QuickDex file.
9. Click OK.
Using an external keyboard
You can connect an optional keyboard accessory to the connector on
your handheld so you can type data directly into your handheld.
External keyboards are very helpful when you need to enter large
amounts of data quickly and accurately while you are away from your
computer.
Page 36 Entering Data in Your Visor Handheld
Page 45

Chapter 3
Managing Your Applications
This chapter explains how to switch between applications on your
Visor handheld computer, how to change application settings so they
are personalized to your work methods, and how to categorize
applications so you view them in related groups.
Using the Applications Launcher
To open the Applications Launcher, tap the Applications icon .
Selecting applications
Your Visor handheld is equipped with a variety of applications. All
the applications installed on your handheld appear in the
Applications Launcher. See “Opening applications” in Chapter 1 for
details.
Switching between applications
When working in any application, tap the Applications icon or
press an application button on the front panel of your handheld to
switch to another application. Your handheld automatically saves
your work in the current application and displays it when you return
to that application.
Categorizing applications
The category feature enables you to manage the number of application
icons that appear onscreen in the Applications Launcher. You can
assign an application to a category and then display a single category
or all your applications.
Chapter 3 Page 37
Page 46

To categorize an application:
1. Tap the Applications icon .
2. Tap the Menu icon .
3. Tap App, and then tap Category.
4. Tap the pick list next to each application to select a category.
Tip: To create a new category, tap Edit Categories from the
pick list. Tap New, enter the category name, and then tap
OK to add the category. Tap OK.
5. Tap Done.
To display applications by category:
1. Tap the Applications icon .
2. Do one of the following:
Tap the Applications icon repeatedly to cycle through all your
categories.
Tap the pick list in the upper-right corner of the screen and select the category you want to display.
Changing the Applications Launcher display
By default, the Applications Launcher displays each application as an
icon. As an alternative, you can choose to show a list of applications.
You can also choose to view the same category of applications each
time you open the Applications Launcher.
Page 38 Managing Your Applications
Page 47

To change the Applications Launcher display:
1. Tap the Applications icon .
2. Tap the Menu icon .
3. Tap Options, and then tap Preferences.
4. Tap the View By pick list and select List.
5. Tap OK.
To open the Applications Launcher to the last opened category:
1. Tap the Applications icon .
2. Tap the Menu icon .
3. Tap Options, and then tap Preferences.
4. Tap the Remember Last Category check box to select it.
5. Tap OK.
Choosing preferences
You can set options that affect an entire application in the
application’s Preferences dialog box.
To change preferences for an application:
1. Open an application.
2. Tap the Menu icon .
3. Tap Options, and then tap Preferences.
Note: Not all applications have a Preferences command.
4. Make changes to the settings.
5. Tap OK.
Chapter 3 Page 39
Page 48

Installing and removing applications
This section explains how to install and remove applications on your
Visor handheld and how to remove Palm™ Desktop software from
your computer.
Installing add-on applications
Your Visor handheld comes with the Date Book, Date Book Plus,
Address, To Do List, Memo Pad, Expense, Calculator, City Time, and
Mail applications installed and ready to use.
You can also install additional applications on your handheld, such as
games and other software. The Install Handheld Files dialog box
makes it easy to install software on your Visor handheld during a
HotSync
available for your Visor handheld. To learn more about these
applications, go to the web site: www.handspring.com.
Note: Any game or application that you install on your handheld
To install add-on software on your handheld:
1. Copy or download the application you want to install into the add-
®
operation. There are a variety of third-party applications
resides in RAM memory; you can delete them at any time.
on folder in your Palm folder on your computer.
Note: If the software you download is compressed, you need to
decompress it into this folder. If you prefer to place the
application into another folder, you need to navigate to
that folder before you complete step 5.
2. Double-click the Palm Desktop icon on your desktop.
3. From the HotSync menu, choose Install Handheld Files.
Tip: You can also access the Install Handheld Files dialog box
by double-clicking any file with a PRC file extension.
Page 40 Managing Your Applications
Page 49

4. From the User pop-menu, select the name that corresponds to your
Visor handheld.
5. Click Add to List.
6. Select the application(s) you want to install on your handheld.
7. Click Add File.
Chapter 3 Page 41
Page 50

Note: Review the list of applications you selected in the Install
Handheld Files dialog box. If you do not want to install an
application, select it, and then click Remove From List.
(This does not remove the application from your
computer; it simply removes it from the list of
applications to install.)
8. Close the Install Handheld Files dialog box.
9. Perform a HotSync operation to install the application(s) you
selected in step 6. See “Exchanging and updating data: HotSync
operations” in Chapter 5 for details.
Installing games
The CD-ROM also includes several games that you can install with the
Install Tool:
■ Giraffe
■ HardBall
■ MineHunt
■ Puzzle
■ SubHunt
Note: Giraffe is a fun, easy way for you to practice Graffiti
After you install and start a game, the instructions appear in the Game
menu. Depending on the game, the Game menu may also contain
commands to show high scores, to start a new game, or to set
preferences for the game.
®
writing.
Removing applications
In the event that you run out of memory or decide that you no longer
need an application you installed, you can remove applications from
your handheld. You can remove only add-on applications, patches,
and extensions that you install; you cannot remove the applications
that reside in the ROM portion of your handheld.
To remove an add-on application:
1. Tap the Applications icon .
2. Tap the Menu icon .
3. Tap App, and then tap Delete.
4. Tap the application that you want to remove.
Page 42 Managing Your Applications
Page 51

5. Tap Delete.
6. Tap Yes.
7. Tap Done.
8. Check the User folder in the Palm folder on your computer. If you
find a PRC file for the application you just removed, delete the PRC
file from the User folder.
Removing Palm Desktop software
If you no longer want to use Palm Desktop software, you can remove
it from your computer.
To remove Palm Desktop software:
1. Insert the Palm Desktop software CD-ROM into your computer’s
CD-ROM drive.
2. Double-click the Palm Desktop CD icon on the desktop.
3. Double-click the Installer icon.
4. Click Continue on the splash screen and on the Palm Computing
Readme file screen.
5. Click Agree on the End User Software License Agreement screen.
6. In the Palm Desktop Installer window, select Uninstall from the
pop-up menu in the upper-left corner.
The Palm Desktop Installer shows the items you can uninstall.
7. Select all the items on the uninstall list by clicking the check box to
the left of each selection.
8. Click Uninstall.
9. When prompted to select the files where your Palm files are
installed, click the Palm folder.
Chapter 3 Page 43
Page 52

Tip: If you installed the Palm Desktop software in a different
folder, use the file selector to find the folder that contains
these files.
10. Click Remove Palm and then click OK.
11. Restart your Macintosh.
Security
Your handheld comes with a Security application so that
unauthorized users cannot view the entries you wish to protect.
In Security, you can do the following:
■ Mask or hide entries you define as private. The Mask option
displays a gray bar over private records, and the Hide option
completely removes (hides) private records. See “Making records
private” in Chapter 5 for more information.
■ Assign a password to the Security viewing options. Assigning a
password requires you to enter a password to view masked or
hidden private entries; not assigning a password enables you (or
anyone else) to view individual masked private entries by tapping
them, and to view all hidden or masked private entries by
selecting Show Records in the Security dialog box.
■ Lock and turn off your handheld so that it does not operate until
you enter the correct password.
Assigning a password
You can assign a password to protect your private records and to lock
your handheld.
To assign a password:
1. Tap the Applications icon .
2. Tap the Security icon .
3. Tap the Password box.
4. Enter a password, and tap OK.
Page 44 Managing Your Applications
Page 53

Tap here
5. Enter the same password a second time, and tap OK.
Changing or deleting a password
Once you define a password for your handheld, you can change or
delete it at any time. You must enter the current password before you
can change or delete it.
To change or delete your password:
1. Tap the Password box.
2. Enter the current password.
Tap here
3. Tap OK.
4. Do one of the following:
To change the password, enter the new password, and tap OK.
To delete the password, tap Delete.
Chapter 3 Page 45
Page 54

Locking your handheld
You can also lock your handheld so that you need to enter your
password to operate it.
Important: If you lock your handheld, you must enter the exact
password to re-activate your handheld. If you forget the
password, you need to perform a hard reset to resume
using your handheld. Performing a hard reset deletes all
the records in your handheld; however, you can restore
all previously synchronized data at the next HotSync
operation. See “Performing a hard reset” in Appendix A
for details.
To lock your handheld with a password:
1. Assign a password.
2. Tap Lock & Turn Off.
Tap Lock &
Turn Off
3. Tap Off & Lock.
4. To start your handheld, turn it on, and then enter the password.
Page 46 Managing Your Applications
Page 55

Recovering from a forgotten password
If you did not activate the Off & Lock feature and you forget your
password, you can delete the password from your handheld. Deleting
a forgotten password also deletes all entries and files marked as
Private.
Important: If you synchronize with your computer before deleting a
forgotten password, your handheld restores your private
entries the next time you perform a HotSync operation,
but it does not restore the password.
To delete a forgotten password:
1. Tap the Password box.
2. Tap Lost Password.
Tap here
3. Tap Yes.
Chapter 3 Page 47
Page 56

Page 48 Managing Your Applications
Page 57

Chapter 4
Overview of Basic Applications
This chapter briefly describes each application and how to open it.
Your Visor handheld computer includes these basic applications:
■ Date Book
■ Date Book Plus
■ Address
■ To Do List
■ Memo Pad
■ Calculator
■ CityTime
■ Expense
Chapter 4 Page 49
Page 58

Date Book
Date Book lets you quickly and easily schedule appointments
or any kind of activity associated with a time and date.
In Date Book, you can do the following:
■ Enter a description of your appointment and assign it to a specific
time and date.
■ Display a chart of your appointments for an entire week. The
Week View makes it easy to spot available times and any potential
scheduling overlaps or conflicts.
■ Display a monthly calendar to quickly spot days where you have
morning, lunch, or afternoon appointments.
■ Display an agenda with both your appointments and your To Do
items.
■ Set an alarm to sound prior to the scheduled activity.
■ Create reminders for events that are based on a particular date,
rather than time of day. Birthdays and anniversaries are easy to
track with your handheld computer.
■ Attach notes to individual events for a description or clarification
of the entry in your Date Book.
To open Date Book:
1. Tap the Applications icon .
2. Tap the Date Book icon .
View icons
Note: Tap the view icons to select a Date Book view.
Page 50 Overview of Basic Applications
Page 59

Date Book Plus
Date Book Plus is an enhanced version of the Date Book
application. In addition to all the standard Date Book features,
it provides a variety of advanced views and functions.
In Date Book Plus, you can do the following:
■ View To Do items in select calendar views.
■ Display a chart of your appointments for one or two weeks
complete with descriptions of each event.
■ Display a calendar of an entire year.
■ Display a list of your appointments in List View.
■ Create unscheduled events that float from one day to the next until
you complete them.
■ Create a Daily Journal to track events with automatic time stamps.
■ Save event templates and use them to quickly create similar
events.
To open Date Book Plus:
■ Press the Date Book Plus application button on the front panel of
your handheld. Date Book Plus opens to today’s schedule.
Date Book Plus button
Note: Press the Date Book Plus application button repeatedly to
cycle through the Day, Week, Week with Text, Month, Year,
and List views.
Chapter 4 Page 51
Page 60
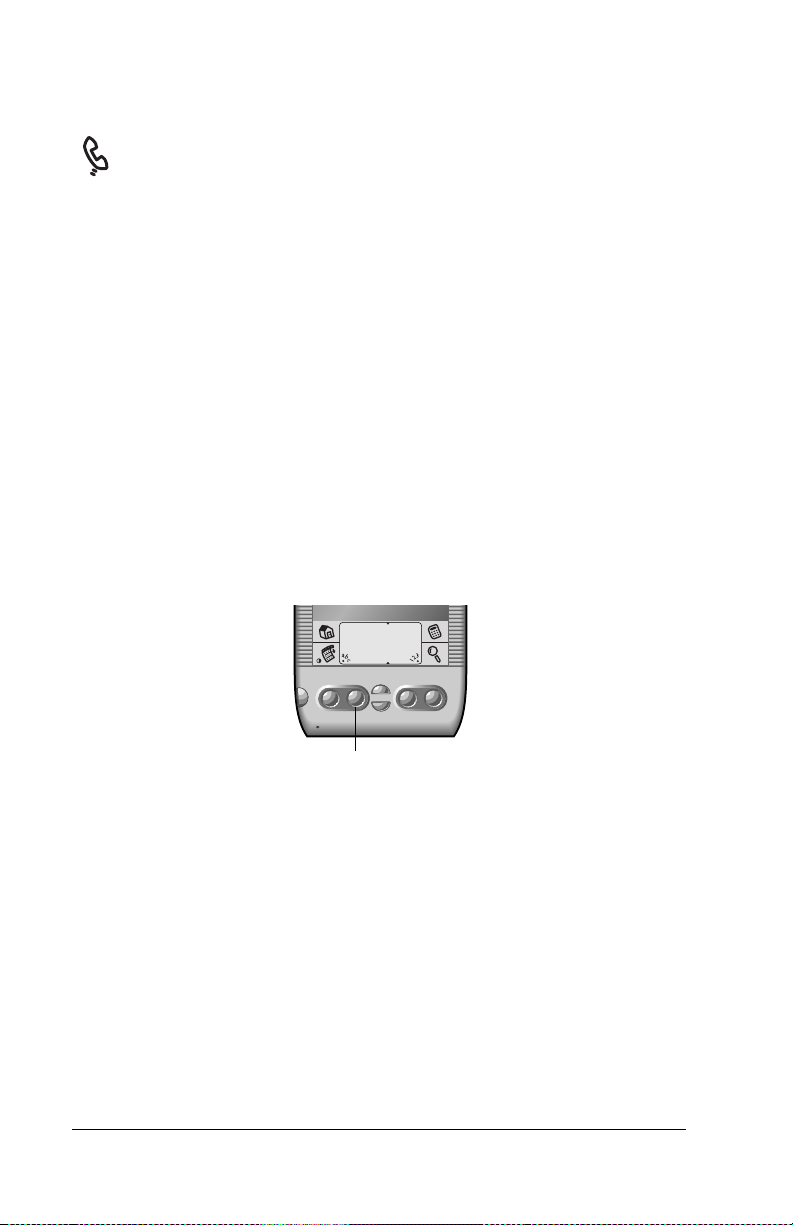
Address
Address enables you to keep names, addresses, phone numbers,
and other information about your personal or business contacts.
In Address, you can do the following:
■ Quickly look up, enter, or duplicate names, addresses, phone
numbers, and other information.
■ Enter up to five phone numbers (home, work, fax, mobile, etc.) or
e-mail addresses for each name.
■ Define which phone number appears in the Address list for each
Address entry.
■ Attach a note to each Address entry, in which you can enter
additional information about the entry.
■ Assign Address entries to categories so that you can organize and
view them in logical groups.
To open Address:
■ Press the Address application button on the front panel of your
handheld. Address opens to display the list of all your records.
Address button
Note: Press the Address application button repeatedly to cycle
through the categories in which you have records.
Page 52 Overview of Basic Applications
Page 61

To Do List
To Do List is a convenient place to create reminders and
prioritize the things that you have to do.
In To Do List, you can do the following:
■ Make a quick and convenient list of things to do.
■ Assign a priority level to each task.
■ Assign a due date for any or all of your To Do items.
■ Assign To Do items to categories so that you can organize and
view them in logical groups.
■ Sort your To Do items either by due date, priority level, or
category.
■ Attach notes to individual To Do items for a description or
clarification of the task.
To open To Do List:
■ Press the To Do List application button on the front panel of your
handheld. To Do List opens to display the category of items you
last viewed.
To Do List button
Note: Press the To Do List application button repeatedly to cycle
through the categories in which you have items.
Chapter 4 Page 53
Page 62

Memo Pad
Memo Pad provides a place to take notes that are not associated
with records in Date Book, Address, or To Do List.
In Memo Pad, you can do the following:
■ Take notes or write any kind of message on your handheld
computer.
■ Drag and drop memos into popular computer applications like
Microsoft Word when you synchronize using Palm™ Desktop
software and HotSync
■ Assign memos to categories so that you can organize and view
them in logical groups.
■ Write down phone numbers and other types of information. Later,
you can copy and paste this information to other applications.
To open Memo Pad:
■ Press the Memo Pad application button on the front panel of your
handheld. Memo Pad opens to display the last Memo Pad screen
that you viewed.
®
technology.
Memo Pad button
Note: Press the Memo Pad application button repeatedly to cycle
through the categories in which you have memos.
Page 54 Overview of Basic Applications
Page 63

Calculator
Calculator enables you to perform addition, subtraction,
multiplication, division and a variety of advanced math and
scientific calculations.
In Calculator, you can do the following:
■ Select a view to perform specific types of calculations including:
math, trigonometry, finance, logic, statistics, weight/temp, length,
area, and volume.
■ Store and retrieve values.
■ Display the last series of calculations, which is useful for
confirming a series of “chain” calculations.
■ Create a custom view with the buttons you use most often.
■ Switch to basic mode to perform simple calculations.
To open Calculator:
■ Tap the Calculator icon next to the Graffiti
®
writing area.
Chapter 4 Page 55
Page 64
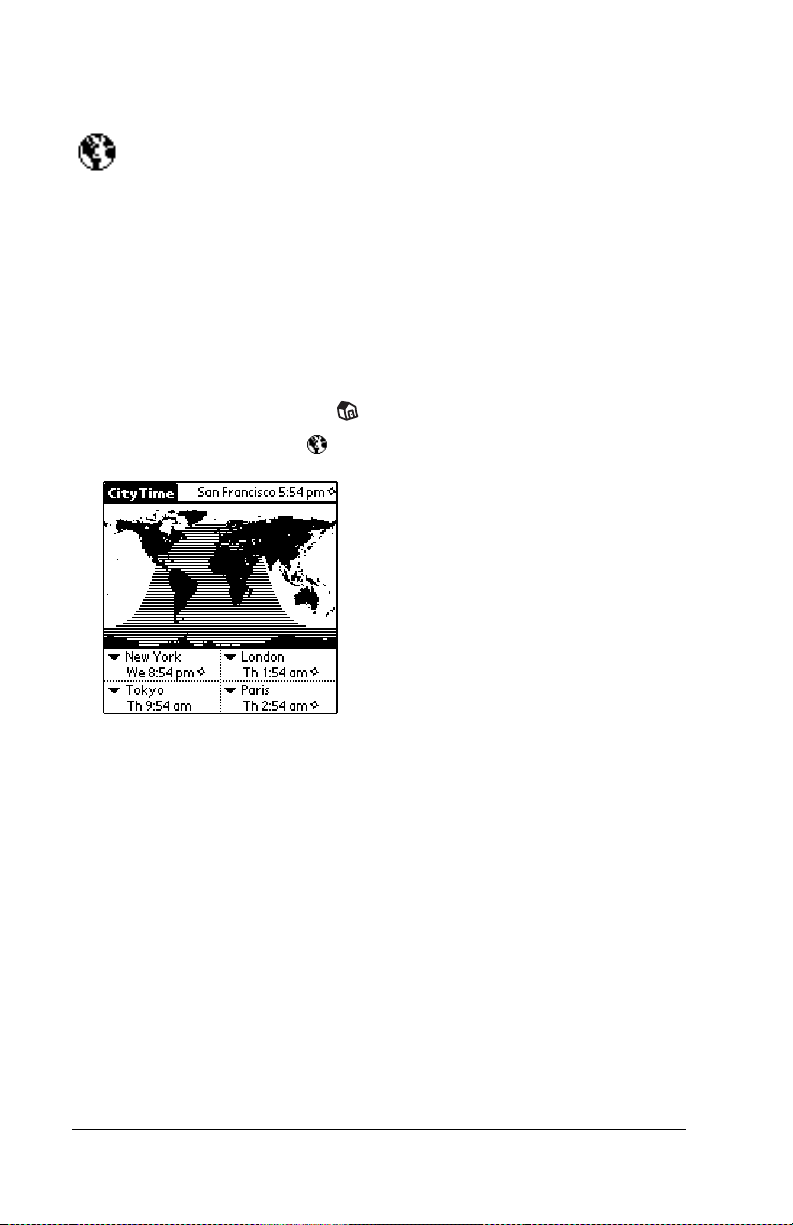
CityTime
CityTime helps you keep track of the time anywhere around
the globe.
In CityTime, you can do the following:
■ Select a home city as a point of reference.
■ Display the day and time in four other cities simultaneously.
■ Add a definition for any city that isn’t in the default list.
■ Display sunrise and sunset information for your home city.
To open CityTime:
1. Tap the Applications icon .
2. Tap the CityTime icon .
Page 56 Overview of Basic Applications
Page 65

Expense
Expense lets you keep track of your expenses.
In Expense, you can do the following:
■ Record dates, types of expenses, amount spent, payment method,
and other details associated with any money that you spend.
■ Assign expense items to categories so that you can organize and
view them in logical groups.
■ Keep track of vendors (companies) and people involved with each
particular expense.
■ Log miles traveled for a particular date or expense category.
■ Sort your expenses by date or expense type.
To open Expense:
1. Tap the Applications icon .
2. Tap the Expense icon .
Note: You cannot use the Macintosh version of Palm Desktop
software to synchronize Expense data between your handheld
and your computer.
Chapter 4 Page 57
Page 66

Page 58 Overview of Basic Applications
Page 67

Chapter 5
Common Tasks
This chapter provides instructions on how to do tasks that you can do
in most or all of the basic applications. It’s easy to transfer what you
learn in one application to the others because the structure and
behavior of all the applications are quite similar. The term “records”
is used to refer to an individual item in any of the basic applications: a
single Date Book Plus event, Address entry, To Do List item, Memo
Pad memo, or Expense item.
Creating records
You can use the following procedure to create a new record in Date
Book, Date Book Plus, Address, To Do List, Memo Pad, and Expense.
To create a record:
1. Select the application in which you want to create a record.
2. Tap New.
3. In Date Book Plus only: Select a record type from the pop-up list,
select the start and end times, and then tap OK.
4. Enter text for the record.
5. (Optional) Tap Details to select attributes for the record.
6. In Address and Memo Pad only: Tap Done.
There’s no need to save the record because your handheld saves it
automatically.
Chapter 5 Page 59
Page 68

Editing records
After you create a record, you can change, delete, or enter new text at
any time. Two screen features tell you when your handheld is in
editing mode:
■ A blinking cursor
■ One or more edit lines
Blinking cursor
Edit line
Entering text
For information on how to enter text using Graffiti writing, the
onscreen keyboard, or the keyboard attached to your computer, see
Chapter 2.
Edit menu
The Edit menu is available with any screen where you enter or edit
text. In general, commands available in the Edit menu apply to text
that you select in an application.
To select text in an application:
1. Tap the beginning of the text that you want to select.
2. Drag the stylus over the text to highlight it. You can drag across the
text to select additional words, or drag down to select a group of
lines.
Tip: To select a word, double-tap the word. To select a whole
line, triple-tap the line.
Page 60 Common Tasks
Page 69

The following commands may appear in an Edit menu:
Undo
Cut
Copy
Paste
Select All
Reverses the action of the last edit command. For
example, if you used Cut to remove text, Undo
restores the text you removed. Undo also
reverses deletions done by using backspace.
Removes the selected text and stores it
temporarily in the memory of your handheld.
You can paste the text you cut into another area
of the current application or into a different
application.
Copies the selected text and stores it
temporarily in the memory of your handheld.
You can paste the text that you copy into
another area of the current application or into a
different application.
Inserts the text that you cut or copied at the
selected point in a record. The text you paste
replaces any selected text. If you did not
previously cut or copy text, Paste does nothing.
Selects all of the text in the current record or
screen. This enables you to cut or copy all of the
text and paste it elsewhere.
Keyboard
Opens the onscreen keyboard. When you finish
with the onscreen keyboard, tap Done.
Graffiti Help
Opens screens that show all the Graffiti
character strokes. Use this command anytime
you forget a stroke for a character.
Chapter 5 Page 61
Page 70

Deleting records
To delete a record in any of the basic applications:
1. Select the record you want to delete.
2. Tap the Menu icon .
3. Tap Record, and then tap the Delete command:
Date Book, Date Book Plus: Delete Event
Address: Delete Address
To Do List: Delete Item
Memo Pad: Delete Memo
Expense: Delete Item
A confirmation dialog box appears. If you want to save a copy of
the deleted item to an archive file in Palm Desktop software, be
sure that the check box is checked. If you don’t want to save a copy,
tap the check box to remove the check.
4. Tap OK.
If you choose to save a copy of the selected item, your handheld
transfers it to the archive file on your desktop the next time you
perform a HotSync operation.
Other ways to delete records
You can also delete records in the following ways:
■ In the Details dialog box of the application, tap Delete, and then
tap OK.
■ Delete the text of the record.
■ Tap the Delete icon on the Command toolbar.
Note: In Date Book and Date Book Plus, if you delete the text of
a repeating event, you delete all instances of that event.
Page 62 Common Tasks
Page 71

Purging records
Over time, as you use Date Book or Date Book Plus, To Do List, and
Expense, you’ll accumulate records in these applications that have
outlived their usefulness. For example, events that occurred months
ago remain in the Date Book Plus, and To Do items that you marked
as completed remain in the list, as do Expense items.
All these outdated records take up memory on your handheld, so it’s
a good idea to remove them by using Purge. If you think Date Book
Plus or To Do List records might prove useful later, you can purge
them from your handheld and save them in an archive file.
Purging is also available in Mail. See Chapter 7 for more information.
Purging is not available in Address or Memo Pad, so delete outdated
records from these applications.
To purge records:
1. Open the application.
2. Tap the Menu icon .
3. Tap Record, and then tap Purge.
A confirmation dialog box appears.
Date Book, Date Book Plus: Tap the pick list and select how old a
record must be to be purged. Purge deletes repeating events if
the last of the series ends before the date that you purge
records.
Date Book, Date Book Plus, To Do List: If you want to save a copy of
the purged records to an archive file on your desktop, be sure
that the check box is checked. If you don’t want to save a copy,
tap the check box to remove the check box.
4. Tap OK.
If you chose to save a copy of the purged records, your handheld
transfers them to an archive file on your desktop the next time you
perform a HotSync operation.
Note: Purging does not happen automatically. You must tap the
command to make it happen.
Chapter 5 Page 63
Page 72

Exchanging and updating data: HotSync operations
The HotSync process automatically synchronizes — that is, exchanges
and updates — data between your handheld and Palm Desktop
software. Changes you make on your handheld or Palm Desktop
software appear in both places after a HotSync operation. HotSync
technology synchronizes only the needed portions of files, thus
reducing synchronization time. You can synchronize your data
directly by connecting your handheld to your computer with the
cradle or by beaming the data from the IR port on your handheld to
the IR port on your computer, or indirectly with a modem or network.
See Chapter 8 for information about performing HotSync operations
via the IR port, a modem, or a network.
Performing a HotSync operation for the first time
The first time you synchronize your data, you need to enter user
information on both the handheld and Palm Desktop software. After
you enter this information and synchronize, the HotSync Manager
recognizes your handheld and doesn’t ask for this information again.
If you are a System Administrator preparing several handhelds for a
group of users, you may want to create a user profile. See “Creating a
user profile” in Chapter 8 before performing the following steps.
Important: You must use the cradle for your first HotSync operation.
The following steps assume that you have already installed the Palm
Desktop software. If you have not installed this software, see
“Installing Palm Desktop software” in Chapter 1 for instructions.
Page 64 Common Tasks
Page 73

To perform a local HotSync operation:
1. Insert your handheld into the cradle.
The bottom edge of
the handheld should
align smoothly with
the cradle when it is
inserted properly.
2. If the HotSync Manager is not enabled, activate it: Open Palm
Desktop software, from the HotSync Menu, choose Setup. Click
the HotSync Controls tab and select the Enabled option.
3. Press the HotSync button on the cradle.
HotSync
button
4. From the Select User dialog box, choose the user name you
assigned to your handheld.
The HotSync Progress dialog box appears and synchronization
begins.
Chapter 5 Page 65
Page 74

5. Wait for a message on your handheld indicating that the process is
complete.
After the HotSync process is complete, you can remove your
handheld from the cradle.
Categorizing records
Categorize records in the Address, To Do List, Memo Pad, and
Expense applications so that they are grouped logically and are easy
to review. (You can also categorize applications. See “Using the
Applications Launcher” in Chapter 3 for more information.)
When you create a record, your handheld automatically places it in
the category that is currently displayed. If the category is All, your
handheld assigns it to the Unfiled category. You can leave an entry as
Unfiled or assign it to a category at any time.
System-defined and user-defined categories
By default, your handheld includes system-defined categories, such as
All and Unfiled, and user-defined categories, such as Business and
Personal.
You cannot modify the system-defined categories, but you can
rename and delete the user-defined categories. In addition, you can
create your own user-defined categories. You can have a maximum of
15 user-defined categories in each application.
Address contains the QuickList user-defined category, in which you
can store the names, addresses, and phone numbers you might need
in emergencies (doctor, fire department, lawyer, etc.).
Expense contains two user-defined categories, New York and Paris, to
show how you might sort your expenses according to different
business trips.
Page 66 Common Tasks
Page 75

Note: The illustrations in this section come from Address, but you
can use these procedures in all the applications in which
categories are available. Categories are not available in Date
Book and Date Book Plus.
To move a record into a category:
1. Select the record you want to categorize.
2. In Address only: Tap Edit.
3. Tap Details.
4. Tap the Category pick list to display the list of available categories.
5. Select the category for the record.
6. Tap OK.
To display a category of records:
1. Tap the category pick list in the upper-right corner of the list
screen.
Tap here
2. Select the category you want to view.
The list screen now displays only the records assigned to that
category.
Tip: Pressing an application button on the front panel of the
handheld toggles through all the categories of that application.
Chapter 5 Page 67
Page 76

To define a new category:
1. Tap the category pick list in the upper-right corner of the screen.
Tap here
2. Tap Edit Categories.
3. Tap New.
4. Enter the name of the new category, and then tap OK.
5. Tap OK.
You can assign any of your records to the new category.
Page 68 Common Tasks
Page 77

To rename a category:
1. Tap the category pick list in the upper-right corner of the screen.
2. Tap Edit Categories.
3. Select the category that you want to rename, and then tap Rename.
4. Enter the new name for the category, and then tap OK.
5. Tap OK.
Tip: You can group the records in two or more categories into one
category by giving the categories the same name. For example,
if you change the name of the Personal category to Business,
all records formerly in the Personal category appear in the
Business category.
Finding records
Your handheld offers several ways to find information quickly:
■ All applications: Find locates any text that you specify, always
starting with the current application.
■ Date Book, Date Book Plus, To Do List, Memo Pad: Phone Lookup
displays the Address list screen and lets you add the information
that appears in this list to a record.
■ Address: The Look Up line lets you enter the first letters of a name
to scroll immediately to that name.
■ Expense: Lookup displays the names in your Address list that have
data in the Company field. You can add these names to a list of
attendees associated with an Expense record.
Chapter 5 Page 69
Page 78

Looking up Address records
When working with Address, the scroll buttons on the front panel of
the handheld makes it easy to navigate among your address entries.
■ In the Address list screen, the scroll buttons move up or down an
entire screen of records. If you hold down a scroll button, you
accelerate the scrolling and display every third screen.
■ In the Address View screen, the scroll buttons move to the
previous or next address record.
You can also use the Address Look Up feature to quickly scroll to any
of your Address entries.
To look up an Address record:
1. Display the Address list screen.
2. Enter the first letter of the name you want to find.
Look Up line
The list scrolls to the first entry that begins with that letter. If
you write another letter, the list scrolls to the first entry that
starts with those two letters. For example, writing an “s” scrolls
to “Sands,” and writing “sm” scrolls further to “Smith.” If you
sort the list by company name, the Look Up feature scrolls to
the first letter of the company name.
3. Tap the record to view its contents.
Page 70 Common Tasks
Page 79

Using Find
You can use Find to locate any text that you specify, in any
application.
To use Find:
1. Tap the Find icon .
Tip: If you select text in an application before you tap Find, the
selected text automatically appears in the Find dialog box.
2. Enter the text that you want to find.
Find is not case-sensitive. For example, searching for the name
“davidson” also finds “Davidson.”
Find locates any word that begin with the text you enter. For example, searching for “plan” finds “planet,” but not “airplane.”
3. Tap OK.
Find searches for the text in all records and all notes.
As your handheld searches for the text, you can tap Stop at any
time. You may want to do this if the entry you want appears before your handheld finishes the search. To continue the search
after you tap Stop, tap Find More.
4. Tap the text that you want to review.
Chapter 5 Page 71
Page 80

Using Phone Lookup
Phone Lookup displays the Address list screen and lets you add the
information that appears in this list to a record.
To use Phone Lookup:
1. Display the record in which you want to insert a phone number.
The record can be in Date Book, Date Book Plus, To Do List, or
Memo Pad.
2. Tap the Menu icon .
3. Tap Options, and then tap Phone Lookup.
4. Begin to spell the last name of the name you want to find.
The list scrolls to the first record in the list that starts with the
first letter you enter. Continue to spell the name you’re looking
for, or when you see the name, tap it.
5. Tap Add.
The name you selected, along with the other information associated
with it, is pasted into the record you selected in step 1.
Phone Lookup tips
Write the Graffiti Command stroke “/L” to activate the Phone Lookup
feature. You can also activate it in the following circumstances:
■ While entering text: For example, to insert the full name and phone
number for someone with the last name “Williams,” write the
Graffiti characters for “Wi” and then the Phone Lookup
Command stroke “/L.” Assuming you have only one Address
record that begins with “Wi,” your handheld inserts the full name
“Fred Williams” (and its associated information). If you have more
than one name that begins with “Wi,” the Phone Lookup screen
appears and highlights the first record that begins with “Wi.”
Page 72 Common Tasks
Page 81

■ For selected text: Drag to highlight the text, and then write the Phone
Lookup Command stroke “/L.” Your handheld replaces the
selected text and adds the name and its associated information.
Looking up names to add to expense records
In Expense, Lookup displays the names in your Address list that have
data in the Company field. You can add these names to a list of
attendees associated with an Expense record.
To add names to an Expense record:
1. Tap the Expense record to which you want to add names.
2. Tap Details.
3. Tap Who.
Tap here
4. Tap Lookup.
The Attendees Lookup screen displays all the names in your
Address list that have data in the Company field.
5. Select the name you want to add, and then tap Add.
The name appears in the Attendees screen.
6. Repeat steps 4 and 5 to add more names.
7. Tap Done, and then tap OK.
Chapter 5 Page 73
Page 82

Sorting lists of records
You can sort lists of records in various ways, depending on the
application. Sorting is available in applications that have list screens:
Address, To Do List, Memo Pad, and Expense.
Note: You can also assign records to categories. See “Categorizing
records” earlier in this chapter.
To sort records in To Do List and Expense:
1. Open the application to display the list screen.
2. Tap Show.
3. Tap the Sort by pick list and select an option.
4. Tap OK.
To sort records in Address and Memo Pad:
1. Open the application to display the list screen.
2. Tap the Menu icon .
3. Tap Options, and then tap Preferences.
Address
Memo Pad
4. Do one of the following:
Address: Tap the setting you want.
Memo Pad: Tap the Sort by pick list and select Alphabetic or
Manual.
5. Tap OK.
To sort the Memo list manually, tap and drag a memo to a new
location in the list.
Note: To make the list of your memos appear in Palm Desktop
software as you manually sorted it on your handheld, open
Memo Pad in Palm Desktop software and click List by. Then
select Order on handheld.
Page 74 Common Tasks
Page 83

Making records private
In all basic applications, except Mail and Expense, you can make
individual records private. Private records remain visible and
accessible, however, until you select the Security setting to hide or
mask all private records. See “Security” in Chapter 3 for more
information.
Hiding and masking private records
You can hide records that you mark as private. When you hide
records, they do not appear anywhere in the application. When you
mask records, a visual placeholder appears where the record would
normally appear. If you define a password, you must enter it to
display private records.
To make a record private:
1. Display the entry that you want to make private.
2. Tap Details.
3. Tap the Private check box to select it.
4. Tap OK.
To hide or mask all private records:
1. Make sure the records you want to mask are marked private.
2. Tap the Applications icon .
3. Tap Security.
4. Tap the Current Privacy pick list.
Tap here
5. Tap either Hide Records or Mask Records.
6. Tap OK to confirm that you want to change the security setting.
Chapter 5 Page 75
Page 84

To display all private records:
1. Tap the Applications icon .
2. Tap Security.
3. Tap the Current Privacy pick list.
Tap here
4. Tap Show Records.
If you do not have a password, private records become visible.
If you have a password, the Show Private Records dialog box
appears. Enter your password in this dialog box, and tap OK.
To display a specific masked record:
1. Open the application that contains the record you want to view.
2. Tap the shaded bar that masks the record.
Tap here
Note: If you have a password, you must enter your password and
tap OK to view the record.
To display all private records in a specific application:
1. Open the application in which you want to display the records.
2. Tap the Menu icon .
Page 76 Common Tasks
Page 85

3. Tap Options, and then tap Security.
4. Tap the Current Privacy pick list.
5. Tap Show Records.
6. Tap OK.
Attaching notes
In all basic applications except Memo Pad, you can attach a note to a
record. A note can be up to several thousand characters long. For
example, for an appointment in Date Book Plus, you can attach a note
with directions to the location.
To attach a note to a record:
1. Display the entry to which you want to add a note.
2. In Address only: Tap Edit.
3. Tap Details.
4. Tap Note.
5. Enter your note.
6. Tap Done.
A small note icon appears at the right side of any item that has a note.
Note icon
To review or edit a note:
1. Tap the Note icon .
To delete a note:
1. Tap the Note icon .
2. Tap Delete.
3. Tap Yes.
Chapter 5 Page 77
Page 86

Choosing fonts
In all basic applications except Expense, you can change the font style
to make text easier to read. You can choose a different font style for
each application.
Small font
Bold font
To change the font style:
1. Open an application.
2. Tap the Menu icon .
3. Tap Options, and then tap Font.
4. Tap the font style you want to use.
Tap here for small font
5. Tap OK.
Large font
Tap here for bold font
Tap here for large font
Page 78 Common Tasks
Page 87

Chapter 6
Application Specific Tasks
This chapter is organized by application and gives instructions on
how to do tasks that are specific to each of the following applications:
■ Date Book
■ Date Book Plus
■ Address
■ To Do List
■ Memo Pad
■ Calculator
■ CityTime
■ Expense
Chapter 6 Page 79
Page 88

Date Book
When you open Date Book, the screen shows the current date and a
list of times for a normal business day.
Scheduling an event
A record in Date Book is called an “event.” An event can be any kind
of activity that you associate with a day. You can enter a new event on
any of the available time lines.
When you schedule an event, its description appears on the time line,
and its duration is automatically set to one hour. You can easily
change the start time and duration for any event.
Note: It’s possible to schedule events that overlap, but Date Book
makes it easy to find such conflicts. See “Spotting event
conflicts” later in this chapter.
You can also schedule events in your Date Book that occur on a
particular date but have no specific start or end times, such as
birthdays, holidays, and anniversaries. These are referred to as
“untimed events.” Untimed events appear at the top of the list of
times, marked with a diamond. You can have more than one untimed
event on a particular date.
You can also schedule a repeating event, such as a weekly meeting,
and continuous events, such as a three-day conference or a vacation.
To schedule an event for the current day:
1. Tap the time line that corresponds to the beginning of the event.
Tap a time
line
Time bar
shows
duration
Enter event
2. Enter a description of the event. You can enter up to 255 characters.
Page 80 Application Specific Tasks
Page 89

3. If the event is one hour long, skip to step 7. If the event is longer or
shorter than an hour, tap the time of the event to open the Set Time
dialog box.
Tap the
time of an
event
Tip: You can also open the Set Time dialog (to select a start
time) by making sure no event is selected, and then
writing a number on the number side of the Graffiti
writing area.
4. Tap the time columns on the right side of the Set Time dialog to set
the Start Time.
Start Time
highlighted
Tap to scroll to
earlier hours
Tap to change
hours
Tap to change
minutes
Tap to scroll to
later hours
5. Tap the End Time box, and then tap the time columns to set the
End Time.
6. Tap OK.
7. Tap a blank area of the screen to deselect the event. A vertical line
appears next to the time, indicating the duration of the event.
Chapter 6 Page 81
Page 90

To schedule an event for another day:
1. Select the date you want for the event by doing one of the
following:
■ Tap the day of the week that you want in the date bar at the top of
the screen. If necessary, tap the Previous week or Next week scroll
arrows to move to another week.
Previous
week
Next
week
Tap to select a day of
the current week
Tip: You can also use the scroll buttons on the front panel of
your handheld to move forward or backward one day at
a time.
■ Tap Go To at the bottom of the screen to open the Go to Date
dialog box. Select a date by tapping a year, month, and day in the
calendar.
Previous year Next year
Tap to select a
month
Tap to select a
day
Tap to select
current date
Tip: In the Go to Date dialog box, you can also use the scroll
buttons on the front panel of your handheld to move
forward or backward one month at a time.
2. After you locate the date, follow the steps for scheduling an event
for the current day.
Page 82 Application Specific Tasks
Page 91

To schedule an untimed event:
1. Select the date that you want for the event as described in “To
schedule an event for another day.”
2. Tap New.
3. Tap OK, so that no start or end times are defined for the new event.
Tip: You can also create a new untimed event by making sure
no event is selected and then writing letters in the Graffiti
writing area.
4. Enter a description of the event.
New
untimed
event
No time
selected
5. Tap a blank area on the screen to deselect the untimed event.
Note: If you create an event and decide later that there is no
particular start or end time, you can easily change it to an
untimed event. Tap the time of the event in the Date Book
screen, tap No Time, and then tap OK.
Chapter 6 Page 83
Page 92

Rescheduling an event
You can easily make changes to your schedule with your handheld.
To reschedule an event:
1. Tap the event you want to reschedule.
2. Tap Details.
3. To change the time, tap the Time box and select a new time.
4. To change the date, tap the Date box and select a new date.
5. Tap OK.
Setting an alarm for an event
The Alarm setting enables you to set an audible alarm for events in
your Date Book. You can set an alarm to sound minutes, hours, or
days before an event. The default Alarm setting is 5 minutes before the
time of the event, but you can change this to any number of minutes,
hours, or days.
When you set an alarm, this icon appears to the far right of the
event with the alarm. When the alarm tone sounds, a reminder
message also appears onscreen.
To set an alarm for an event:
1. Tap the event to which you want to assign an alarm.
2. Tap Details.
3. Tap the Alarm check box to select it.
The default setting, 5 Minutes, appears.
4. Tap the pick list to select Minutes, Hours, or Days.
5. Select the 5 and enter any number from 0 to 99 (inclusive) as the
number of time units.
Enter number of
time units here
Tap here to
select unit of time
6. Tap OK.
Page 84 Application Specific Tasks
Page 93

Alarm for untimed events: You can set a silent alarm for an untimed event.
In this case, the alarm triggers at the specified period of minutes,
hours, or days before midnight (beginning) of the day of the untimed
event. No audible alarm sounds for an untimed event; instead, the
reminder message appears onscreen.
For example, you set an alarm for an untimed event that occurs on
February 4th. If the alarm is set for 5 minutes, the reminder message
appears at 11:55 PM on the night of February 3rd. The reminder
remains onscreen until you turn on your handheld and tap OK to
dismiss it.
To dismiss the alarm using the snooze option:
■ When the alarm Reminder dialog box appears, tap Snooze to
delay the alarm for five-minutes.
Note: Each time you tap Snooze, you dismiss the alarm for an
additional five-minute period.
Scheduling repeating or continuous events
The Repeat function lets you schedule events that recur at regular
intervals or extend over a period of consecutive days.
A birthday is a good example of an event that repeats annually.
Another example is a weekly guitar lesson that falls on the same day
of the week and the same time of day.
A business trip or a vacation is an example of a continuous event.
To schedule a repeating or continuous event:
1. Tap the event.
Typically, a continuous event is an untimed event.
2. Tap Details.
Chapter 6 Page 85
Page 94

3. Tap the Repeat box to open the Change Repeat dialog box.
Tap the
Repeat
box
4. Tap Day, Week, Month, or Year to set how often event repeats.
For a continuous event, tap Day.
5. Enter a number that corresponds to how often you want the event
to repeat on the Every line.
For example, if you select Month and enter the number 2, the
event repeats every other month.
6. To specify an end date for the repeating or continuous event, tap
the End on pick list and tap Choose Date. Use the date picker to
select an end date.
7. Tap OK.
After you schedule a repeating or continuous event, this icon
appears to the far right of the event.
Changing and deleting repeating or continuous events
If you change or delete a repeating or continuous event you can apply
the action to only the current event, to all instances of the event, or to
the current event and instances that follow.
To change or delete repeating events:
1. Select the record you want to change or delete.
2. Tap Details.
3. Enter the change and tap OK, or tap Delete.
4. Tap one of the following:
Page 86 Application Specific Tasks
Page 95

Current. Changes or deletes only the current instance of the re-
peating event.
Future. Changes or deletes the current event and all future oc-
currences of this event.
All. Changes or deletes all past, current, and future occurrences
of this event.
Considerations for repeating or continuous events
Keep the following points in mind:
■ If you change the start date of a repeating event, your handheld
calculates the number of days you moved the event. Your
handheld then automatically changes the end date to maintain the
duration of the repeating event.
■ If you change the repeat interval (e.g., daily to weekly) of a
repeating event, past occurrences (prior to the day on which you
change the setting) are not changed, and your handheld creates a
new repeating event.
■ If you change the date of an occurrence of a repeating event (e.g.,
from January 14th to January 15th) and apply the change to All
occurrences, the new date becomes the start date of the repeating
event. Your handheld adjusts the end date to maintain the
duration of the event. If you apply the change to Current or Future
occurrences, past occurrences (prior to the day on which you
change the setting) are not changed.
■ If you change other repeat settings (e.g., time, alarm, private) of a
repeating event and apply the change to Future occurrences, your
handheld creates a new event. The start date of this new event is
the day on which the setting is changed. Past occurrences (prior to
the day of the change) are not changed.
■ If you apply a change to a single occurrence of a repeating event
(e.g., time), that occurrence no longer shows the Repeat icon .
Chapter 6 Page 87
Page 96

Changing the Date Book view
In addition to displaying the calendar for a specific day, you can also
display a whole week or month, as well as the current time.
Note: The Date Book Plus application includes additional calendar
views and extended features. You can select Date Book Plus as
your default Date Book application. See “Selecting the default
Date Book” later in this chapter for details.
To cycle through Day, Week, and Month views:
■ Press the Date Book application button repeatedly to display the
next view.
To display the current time:
1. Tap and hold the stylus on the date in the date bar to display the
current time.
Tap and hold the date Current time displays
2. Drag the stylus below the date bar and then lift it.
Tip: If you lift the stylus while it is still on the date bar, the
menu bar appears.
Working in Week View
Week View shows the calendar of your events for an entire week. This
view lets you quickly review your appointments and available time
slots. In addition, the graphical display helps you spot overlaps and
conflicts in your schedule.
To display the Week View:
1. Tap the Week View button.
Week View
2. Tap the navigation controls to move forward or backward a week
at a time, or to display details of an event.
Note: The Week View also shows untimed events and events
that are before and after the range of times shown.
Page 88 Application Specific Tasks
Page 97

Previous
week
Next
week
Tap for that day
Bar indicates earlier event
Dot indicates untimed event
Bar indicates later event
3. Tap an event to show a description of the event.
Event details
Tap to show event details
Tips for using Week View
Keep the following points in mind:
■ To reschedule an event, tap and drag the event to a different time
or day.
■ Tap a blank time on any day to move to that day and have the time
selected for a new event.
■ Tap any day or date that appears at the top of the Week View to
move directly to that day without selecting an event.
■ The Week View shows the time span defined by the Start Time
and End Time in the Date Book Preferences settings. If you have
an event before or after this time span, a bar appears at the top
or bottom of that day's column. Use the onscreen scroll arrows
to scroll to the event.
Chapter 6 Page 89
Page 98

Working in Month View
The Month View screen shows which days have events scheduled.
Dots and lines in the Month View indicate events, repeating events,
and untimed events.
Previous/next month
Dashed line indicates continuous event
Dots on right side indicate events
Dots below date indicate untimed events
Month View button
You can control the dots and lines that appear in the Month View. See
“Options menu” later in this chapter.
Tips for using Month View
Keep the following points in mind:
■ Tap a day in the Month View to display that day in the Day View.
■ Tap the scroll arrows in the upper-right corner to move forward or
backward a month.
■ Tap Go to to open the date selector and select a different month.
■ Use the scroll buttons on the front panel of your handheld to move
between months. Press the upper half of the button to display the
previous month, the lower half to display the next month.
Working in Agenda view
The Agenda view lets you view appointments, untimed events, and
To Do items in a single screen. Although it is primarily a viewing
option, you can also use the Agenda view to check off completed To
Do items. To go to a Day View of any event on the Agenda view
screen, simply tap the desired event.
Page 90 Application Specific Tasks
Page 99

Tips for using Agenda view
■ Tap any appointment while in Agenda view to display the Day
View of the appointment.
■ Check off completed To Do items in the Agenda view, or click a
description of an item to go directly into the To Do List
application.
Spotting event conflicts
With the ability to define specific start and end times for any event, it’s
possible to schedule events that overlap (an event that starts before a
previous event finishes).
An event conflict (time overlap) appears in the Week View as
overlapping bars. The Day View displays overlapping brackets to the
left of the conflicting times.
Event
conflicts
Chapter 6 Page 91
Page 100

Date Book menus
Date Book menus are shown here for your reference, and Date Book
features that are not explained elsewhere in this guide are described
here.
See “Using menus” in Chapter 1 for information about choosing menu
commands.
Record menu
Options menu
Week View
Day View
Month View
Page 92 Application Specific Tasks
 Loading...