

Page 1
Digital Camera for the Handspring™ Visor™ handheld
Page 2
Introduction. . . . . . . . . . . . . . . . . . . . . . . . . . . . . . . . 1
Getting Started . . . . . . . . . . . . . . . . . . . . . . . . . . . . . 2
Icons and Buttons . . . . . . . . . . . . . . . . . . . . . . . . . . 4
Capturing Images . . . . . . . . . . . . . . . . . . . . . . . . . . . 6
Capturing Mini-Movies . . . . . . . . . . . . . . . . . . . . . . 8
Setting the Capture Timer . . . . . . . . . . . . . . . . . . . . 9
View Mode . . . . . . . . . . . . . . . . . . . . . . . . . . . . . . . 12
Thumbnail Mode. . . . . . . . . . . . . . . . . . . . . . . . . . . 16
List Mode. . . . . . . . . . . . . . . . . . . . . . . . . . . . . . . . . 17
Beaming Images . . . . . . . . . . . . . . . . . . . . . . . . . . 18
Bringing Images to Your Computer. . . . . . . . . . . . 20
Setting Preferences . . . . . . . . . . . . . . . . . . . . . . . 22
Viewing Images and Mini-Movies
on Your Computer . . . . . . . . . . . . . . . . . . . . . . . . . . 23
Bringing Images to Your Visor Handheld . . . . . . . 24
Specifications . . . . . . . . . . . . . . . . . . . . . . . . . . . . . 25
Tips and Troubleshooting . . . . . . . . . . . . . . . . . . . 26
Warranty . . . . . . . . . . . . . . . . . . . . . . . . . . . . . . . . . 27
Page 3
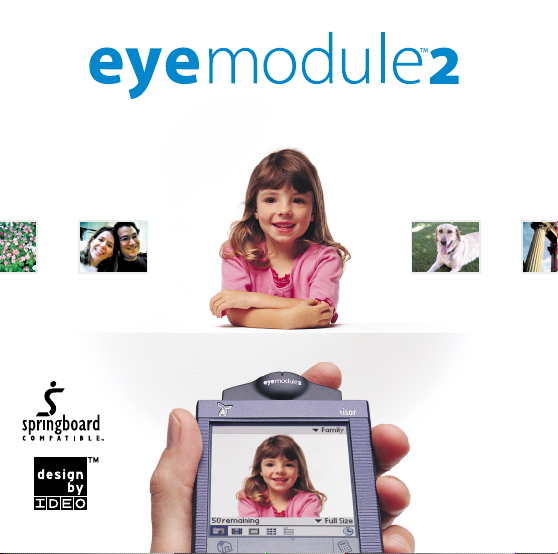
introduction
The eyemodule™2 digital camera turns
any one of the Handspring™Visor
handhelds into a convenient image
capture device.
Insert the eyemodule2 digital camera
into the Springboard™expansion slot
and you’re ready to capture and view
images and Mini-Movies, label them,
and beam them to other compatible
PalmOS®devices. Install the included
conduit software, and you can e-mail
and print your eyemodule2 images
from your computer. It’s fast and simple.
™
www.eyemodule.com
1
Page 4
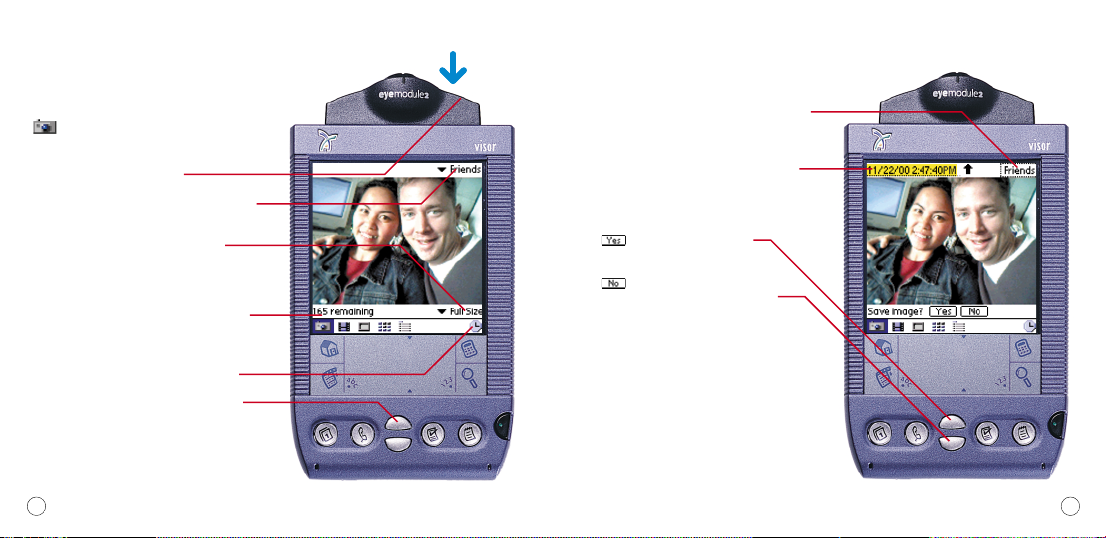
getting started
1
Insert the eyemodule2 digital camera into
the Springboard expansion slot. After a brief
introductory screen, your handheld will display
a live image.
2
eyemodule2 user guide
2
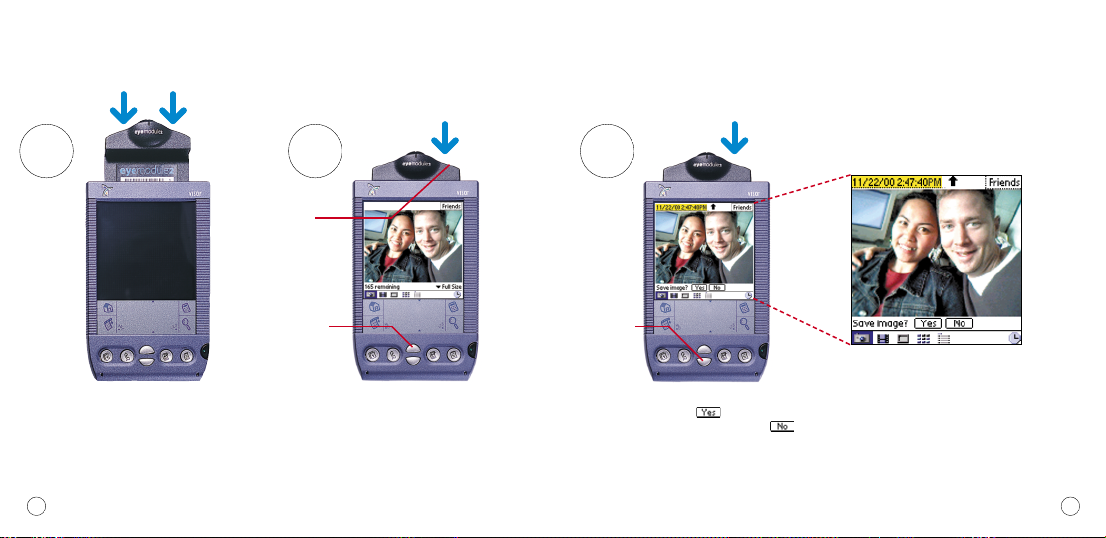
Capture
button
To freeze the image, press once on the Capture
button next to the lens. (You may also press the
Up button on the Visor handheld to perform the
same function.)
3
Down buttonUp button
If you want to save the frozen image, press
the Capture button, tap , or press the Up
button. If you don’t want to save it, tap
or press the Down button. Your handheld will
again display a live image.
www.eyemodule.com
3
Page 5
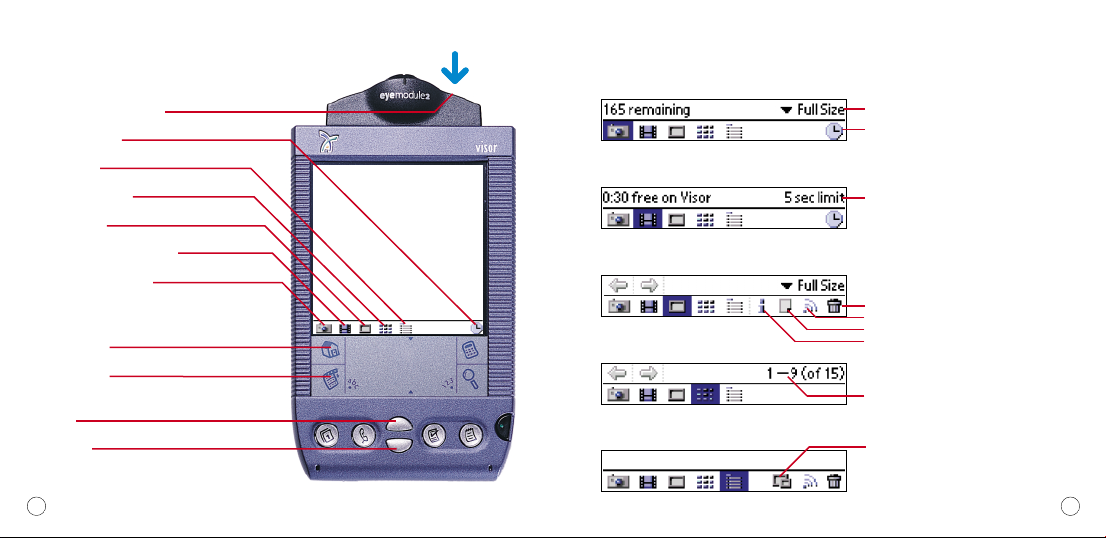
icons and buttons
eyemodule2 Capture button
Capture Timer icon
List Mode icon
Thumbnail Mode icon
View Mode icon
Mini-Movie Capture Mode icon
Image Capture Mode icon
Visor Home icon
Visor Menu icon
Up button
Down button
menu bar icons
Image Capture Mode (page 6)
Movie Capture Mode (page 8)
View Mode (page 12)
Thumbnail Mode (page 16)
List Mode (page 17)
Tap here to downsize a Full Size image.
Tap here to open Timer screen.
Indicates that the five second limit is enabled.
This can be disabled in Preferences (page 22).
Tap here to delete the current image or Mini-Movie.
Tap here to beam the current image or Mini-Movie.
Tap here to attach a note.
Tap here to access and change information about
the current image or Mini-Movie.
Indicates your location within the set of items you
are currently viewing.
Tap here to downsize all selected Full Size images
to Palm Size.
4
eyemodule2 user guide
www.eyemodule.com
5
Page 6
capturing images
When the Capture Mode icon
( ) is selected, you are ready
to capture images.
Press here to capture an image.
Tap here to select the category into which your
images will be saved.
Tap here to change the size of the image
being saved:
Palm Size =160x120 pixels
Full Size = 640x480 pixels (full VGA)
This area displays the approximate number of
images that can be saved at the current image
size setting.
Tap here to set the Capture Timer (page 10).
You may also press the Up button to capture
an image.
6
eyemodule2 user guide
Tap here to select the category into which your
image will be saved.
Images are automatically named with the date
and time. A custom name can be entered via
Graffiti®before saving the image. The name can
also be changed later in View Mode or in the
Image Info screen.
Tap or press the Up button to
save the image.
Tap or press the Down button to discard
the image and return to the live preview.
Note: If you switch modes without saving the
image, the image will be discarded.
www.eyemodule.com
7
Page 7

capturing mini-movies
In Movie Capture Mode ( ), you
can record short movies on your Visor
handheld. You can then view them in
View Mode or bring them to your computer
as QuickTime
Press the capture button to start and stop filming.
Tap here to select the category into which the
Mini-Movie will be saved.
The current maximum Mini-Movie length is indicated
here, based on the remaining memory.
The five second limit can be removed by tapping the
Visor Menu icon, selecting “Preferences” from the
Options menu, and then unchecking the “Limit Filming
to 5 seconds”option.
Tap here to set the Capture Timer (page 11).
Alternatively, you can start and stop filming by
pressing the Up button. Pressing the Down button
cancels filming.
Note: Mini-Movie capture consumes a lot of memory.
Keep your movies short to save memory space.
8
™
movies.
eyemodule2 user guide
After the Mini-Movie has been captured,
it is played back in a continuous loop
on the screen until it is either saved
or discarded.
Mini-Movies are automatically named with the
date and time. A custom name can be entered via
Graffiti before saving the Mini-Movie. The name
can also be changed later in View Mode or in the
Image Info screen.
Tap here to select the category into which the
Mini-Movie will be saved.
Tap or press the Up button to save
the Mini-Movie and return to the live preview.
Tap or press the Down button to discard
the Mini-Movie.
Note: Only a color Handspring handheld will capture
color Mini-Movies. B&W Visor handhelds can only
capture B&W Mini-Movies.
www.eyemodule.com
9
Page 8

setting the capture timer
When in Image Capture Mode, you can
open the Timer screen by tapping the
Capture Timer icon ( ). You then have
the option of having a simple 10 second
delay or doing multiple timed captures.
Tap here to capture one image after a
10 second pause.
Change these numbers to set up your own
image-capture sequence.
Tap here to enable or disable the capture beeps.
Note: The Timer will turn the Visor handheld back
on to perform each capture if the time between
captures exceeds Visor auto-off time. If your
Visor handheld runs out of memory during the
sequence, it will stop capturing images.
10
eyemodule2 user guide
In Movie Capture Mode, the Capture
Timer can be used to start filming after
a certain amount of time has elapsed.
Change this number to set the delay time before
filming begins.
Filming will stop if any of the following happens:
—Pressing the Capture button.
—Pressing the Up button
—Pressing the Down button (cancels filming)
—Five second limit is reached (if limit is on)
—Memory becomes full
Note: The Mini-Movie Capture Timer is not able to
capture multiple Mini-Movies.
www.eyemodule.com
11
Page 9

view mode
When the View Mode icon is selected,
you will be able to view saved images
and Mini-Movies.
images
Tap here to attach a note to the image.
Tap the Info icon to open the Image Info
screen (page 15).
Tap here to go to the previous or next image
or Mini-Movie.
Tap the Beam icon to beam the current image
to another compatible PalmOS®device (page 18).
Tap the Delete icon to delete the current item.
You can also press the Up or Down buttons to
view the previous or next image or Mini-Movie.
12
eyemodule2 user guide
mini-movies
You can edit the Mini-Movie name and
category directly from View Mode.
Tap here to play the Mini-Movie. When a
Mini-Movie is initially displayed, the first frame
will be shown.
Tap here to pause the Mini-Movie.
Tap here to go to the previous or next image or
Mini-Movie.
The handle on the progress bar can be dragged
with the stylus to move forward or backward
within the Mini-Movie. It can also be played
in slow motion by tapping and holding on the
slider track.
Tap here to turn looping on and off.
www.eyemodule.com
13
Page 10

slide show
The Slide Show option automatically
plays all the images and Mini-Movies
in the current View Mode category.
In View Mode, tap on the Visor’s Menu icon
to access the Options menu. Then select
“Slide Show”.
Tap the screen (or press the Up or Down button)
to stop the slide show and return the Visor
handheld to View Mode.
image info/notes
Tapping on the Info icon ( ) from the View
Mode will open the Image Info screen.
The image name can be edited.
The image category can be changed.
Tap here to attach a note to the image.
14
eyemodule2 user guide
www.eyemodule.com
15
Page 11

thumbnail mode
list mode
When the Thumbnail Mode icon
( ) is selected, the images in
the current category are presented
as thumbnails. Tapping on a thumbnail
opens the item in View Mode.
Tap here to change the category being viewed.
Indicates your location within the set of items
you are currently viewing.
Mini-Movies are identified with sprocket holes.
Press the Up or Down buttons to scroll to the
previous or next group of images.
16
16
eyemodule2 user guide
eyemodule2 user guide
When the List Mode icon ( ) is
selected, you will be able to view a list
of your images and Mini-Movies and
perform batch operations on them.
Tap here to change the category being viewed.
Tap an item name to open it in View Mode.
Tap here to view an attached note.
Check boxes allow you to select multiple items.
They can then be downsized, beamed, or deleted
by tapping the icons on the bottom right. Selected
images can be re-categorized by tapping on the
Visor‘s Menu icon and using the “Move Selected
Items” function under Options.
Tap here to downsize all selected Full Size images
to conserve memory. (Downsizing a Full Size image
on a B&W Visor handheld will convert the image
to B&W.)
Tap here to beam all selected items (page 18).
Tap here to delete all selected items.
www.eyemodule.com
www.eyemodule.com
17
17
Page 12

beaming images
Before other PalmOS users can
view your images, they must have
the eyemodule2 application installed.
See your handheld’s user guide for
instructions on beaming applications.
You can also install the application
on another Visor handheld by briefly
inserting the eyemodule2 digital camera.
Align the infrared ports as shown on
the next page. While in View Mode,
tap the Beam icon ( )to begin
transmission. Keep the ports aligned
until beaming is complete, or tap
to stop the transfer.
Tap here to beam.
18
eyemodule2 user guide
You can beam Full Size color images from color
to B&W Visor handhelds. The image will be
converted to B&W for viewing on the B&W Visor
handheld, but will still appear in color when
transferred to your computer.
For instructions on beaming multiple images,
see page 17.
www.eyemodule.com
19
Page 13

bringing images
to your computer
First, be sure that the Visor HotSync
operation functions properly. Then
use the enclosed CD to install the
eyemodule2 conduit software on
your computer:
1. Locate the enclosed CD and insert it
into the computer’s CD-ROM drive.
2. The eyemodule2 conduit installer
application will launch automatically.
3. Follow the installation instructions.
After the conduit is installed, place
your handheld in the cradle and push
the HotSync button. The eyemodule2
images and Mini-Movies will be transferred to the desktop computer and
placed in the folder specified during
conduit installation. Mini-Movies will be
converted to QuickTime movies, and still
images will be saved as JPEG files.
20
eyemodule2 user guide
®
custom settings for advanced users
HotSync custom settings window
To modify the eyemodule2 conduit
settings, access the custom settings
window from the HotSync Manager
or from the Palm Desktop application.
Choose the eyemodule2 images
conduit, then click Change.
The eyemodule2 conduit
setup window
Unchecking this box prevents
eyemodule2 images and Mini-Movies
from being copied from the Visor
handheld to the computer during
HotSync operations.
You can change the directory in which
your images are placed.
You can create an eyedrop desktop icon
for bringing images from your computer
to your Visor handheld (page 24).
Note: Appearance between
Windows (shown on this page) and
Mac will differ.
www.eyemodule.com
21
Page 14

setting preferences
You can customize your settings by tapping
the Visor Menu icon and then selecting
“Preferences” from the Options menu.
Tap here to change the mode into which the
eyemodule2 program will launch when the button
on the module is pressed.
Tap here to select the mode into which the
eyemodule2 program will launch when the Palm
desktop icon is tapped.
Tap here to open the backup settings window. If your
handheld’s data is lost, you can restore all your backed
up images with a HotSync operation (page 20). If this
happens, be sure to restore your lost images before
capturing new ones.
22
eyemodule2 user guide
viewing images
and mini-movies
on your computer
After a HotSync operation, the JPEG
files and converted QuickTime movies
can be found in the folder named
“eyemodule” that is placed in your
hard drive’s top level during installation.
The image files will be arranged in
subfolders named after the categories
on your handheld.
For your convenience, we have
included optional third-party software
on the eyemodule2 CD. This will allow
you to view, print, and share your
image files.
See the enclosed card for instructions on installing
and using the included third-party image viewing
software. The JPEG image files and converted
QuickTime movies can also be viewed on your
computer using your Web browser or any other
software that views JPEG image files.
Windows
Mac®Finder
®
Explorer
www.eyemodule.com
23
Page 15

bringing images
to your visor handheld
During the conduit installation process,
an eyedrop icon will be created on your
computer desktop (page 21).
To transfer images to your
Visor handheld, drag and
drop the image files from
your desktop computer onto
the eyedrop icon.
Note: To avoid an error, be sure any files that did
not originally come from an eyemodule2 digital
camera are 640x480 (Full Size) or 160x120 (Palm
Size) JPEG files.
Double-clicking the icon opens
this window. It lists the files to be
transferred. You can also change
users or remove files from the list.
The listed files will be transferred
during the next HotSync operation.
24
eyemodule2 user guide
Note: To bring Mini-Movies back to your Visor
handheld, drag and drop the files with the .ido
extension (such as mymovie.ido) located in
the eyemodule folder onto the eyedrop icon.
You cannot transfer QuickTime movies, that
were converted during HotSync, back to the
Visor handheld.
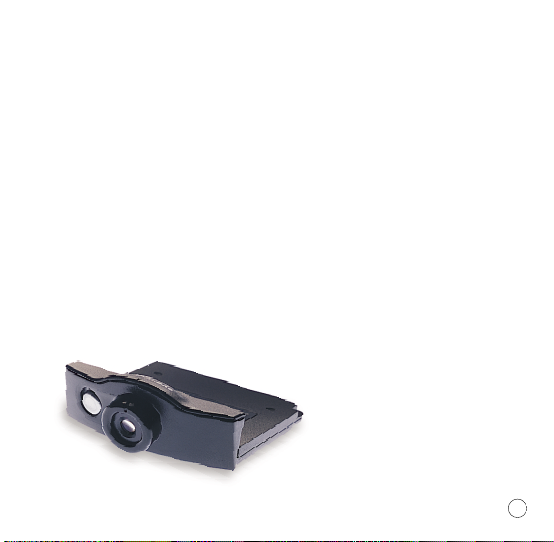
camera specifications
Camera Features
• Angled design for comfortable, unobtrusive
image and movie capturing.
• Easy one-button operation.
• Weighs only one ounce.
• Protective lens cap.
• Fixed focus (18” to infinity).
• f 2.8 multi-element lens.
• Two resolutions: Palm Size (160x120 pixels) and
Full Size (full VGA, 640x480 pixels) JPEG Format.
• Mini-Movie capture (~8 fps).
• A color Visor handheld with 6 MB free memory
can hold:
- Over 50 Full Size color images or
- Over 150 Palm Size color images or
- Over 20 seconds of color Mini-Movies
• A B&W screen Visor handheld with 6 MB free
memory can hold:
- Over 50 Full Size color images or
- Over 660 Palm Size B&W images or
- Over 85 seconds of B&W Mini-Movies
Platform Support
• Works with any Springboard compatible devices.
• Full 24-bit color capture and 16-bit color preview
on color Handspring Visor handhelds, 16 levels
of gray preview on B&W Visor handhelds.
Interaction Features
• Capture images and Mini-Movies on your
handheld.
• View images and Mini-Movies as thumbnails,
full screen, or in a list.
• Take time-lapse pictures.
• View slide shows on your handheld.
• Name and categorize images and
Mini-Movies as you take them.
• Perform batch operations including move
and delete.
• Downsize Full Size (full VGA) images to Palm
Size right on your handheld.
• Attach notes to images.
Connectivity
• Download images to your desktop computer.
• Mini-Movies are automatically converted into
QuickTime movies on your desktop computer.
• Bring eyemodule2 images from your desktop
computer to your handheld.
• Beam Palm Size images to other compatible
PalmOS devices.
www.eyemodule.com
25
Page 16

limited warranty and
product information
www.eyemodule.com
27
Your eyemodule™2 digital camera is covered by the following
warranty and return policies. The complete Limited Warranty
can be found on your CD.
Register Your eyemodule2 Digital Camera: Please
register your product with us by visiting our Web site at
www.eyemodule.com. You can also find contact information,
troubleshooting tips and warranty information on our
Web site.
General Repairs: Most problems with your eyemodule2
digital camera can be easily solved with the help of
online technical support. Please visit our Web site,
www.eyemodule.com, to find answers to frequently asked
questions (FAQs). If you still need help, please e-mail
questions to support@eyemodule.com, or call Technical
Support at 650-322-1776. Opening your eyemodule2 digital
camera or making unauthorized repairs may void your
warranty. See the complete Limited Warranty for details.
Overview of Limited Warranty: Blocks Products (“Blocks”)
warrants to the original end user that this product will be free
from defects in workmanship and materials, under normal
intended use, for one year from the date of original purchase
from Blocks. Subject to the terms and conditions of the
Limited Warranty, Blocks shall replace the defective product
with a comparable product, repair the product, or refund the
purchase price paid for the product. The Limited Warranty
does not cover any malfunction or damage caused by misuse,
neglect, improper installation or testing, unauthorized
attempts to open, repair, or modify the product, or any other
cause beyond the range of the intended use, by any
malfunction in any device to which it is connected, or by
accident, fire, lightning, extreme conditions, other hazards,
or acts of God. The Limited Warranty also does not cover
physical damage to the surface of the product, including
cracks or scratches on the lens or outside casing. For details
of coverage and exclusions, and the procedures for obtaining
warranty service, see the complete Limited Warranty on the
CD or on our Web site.
Unit Damaged In Shipping: If your product was damaged
during shipment, please contact the place of purchase.
Note: This equipment has been tested and found to comply
with the limits for a Class B digital device, pursuant to part 15
of the FCC.
FCC Rules: These limits are designed to provide reasonable
protection against harmful interference in a residential
installation.
This equipment generates, uses and can radiate radio
frequency energy and, if not installed and used in accordance
with the instructions, may cause harmful interference to radio
communications. However, there is no guarantee that
interference will not occur in a particular installation. If this
equipment does cause harmful interference to radio or
television reception, which can be determined by turning the
equipment off and on, the user is encouraged to try to correct
the interference by one or more of the following measures:
• Re-orient or relocate the receiving antenna.
• Increase the separation between the equipment and
receiver.
• Connect the equipment into an outlet on a circuit different
from that to which the receiver is connected.
• Consult the dealer or an experienced radio/TV technician
for help.
• For sharper images, hold the Visor handheld as
still as possible while capturing. This is
especially important in low light situations.
• Make sure the lighting around your subject
is adequate. Don’t backlight your subject.
• Adjust the screen contrast/brightness level
correctly.
• If you want to conserve memory on your Visor
handheld, capture Palm Size images, which
are 38K. Full Size images are around 130K.
• Expect synchronizing your images to extend
your HotSync time. You can minimize this by
unchecking the backup settings checkbox
under preferences. Synchronizing using a serial
cradle is considerably slower than using a
USB cradle.
• You can use the Up button to capture images
and Mini-Movies, and also to say “Yes” to the
“Save Image?” prompt.
• Mini-Movies consume a lot of memory. To save
memory, keep your movies short.
• You can use the Up or Capture buttons to start
and stop filming.
• By default, the Capture button launches the
eyemodule2 program, which is useful when you
want to start capturing quickly.
If the eyemodule2 digital camera doesn’t work:
• Be sure the eyemodule2 digital camera is
fully inserted.
• Be sure the Visor handheld is working properly.
• Check to see that there is sufficient battery life
remaining.
• Refer to the Visor handheld user guide for Visor
related problems.
For further assistance:
• See the FAQs at www.eyemodule.com
• e-mail support@eyemodule.com
• Call 650-322-1776
tips & troubleshooting
eyemodule2 user guide
26
Page 17

www.eyemodule.com
Design by IDEO is a trademark of IDEO Product Development. Handspring, Springboard, Visor, and the Handspring and Springboard logos are trademarks or registered
trademarks of Handspring, Inc. eyemodule is a trademark of Blocks Products. PalmOS, Graffiti, and HotSync are registered trademarks of Palm Computing, Inc. Windows
is a registered trademark of Microsoft Corporation. Mac is a registered trademark of Apple Computer, Inc. QuickTime and the QuickTime logo are trademarks used under
license. Other product and brand names may be trademarks or registered trademarks of their respective owners. Copyright © 2000 Blocks Products.
28
eyemodule2 user guide
 Loading...