

Handlink R-300NP User Manual

User Manual
R-300NP Wireless Router
Handlink Technologies Inc.
6830607-0010G EN V1.0
無線路由器
(WIFI)
Handlink

Easy Hotspot Kit
2
Copyright Notice
Copyright ©2014-2023 Handlink Technologies Inc. All rights reserved. No part of this document may be
copied, reproduced, or transmitted by any means, for any purpose without prior written permission.
Disclaimer
We shall not be liable for technical or editorial errors or omissions contained herein; nor for incidental or
consequential damages resulting from furnishing this material, or the performance or use of this
product. We reserve the right to change the product specification without notice. Information in this
document may change without notice.
Trademarks
Microsoft Win98, Windows 2000 , WinXP, Win Vista and Win7 are registered trademarks of Microsoft
Corporation.
General: All other brand and product names mentioned herein may be registered trademarks of their
respective owners. Customers should ensure that their use of this product does not infringe upon any
patent rights. Trademarks mentioned in this publication are used for identification purposes only and
are properties of their respective companies.

Easy Hotspot Kit
3
Table of Contents
1 Introduction ----------------------------------------------------------------------------------------------------------------- 5
1-1 Package Contents -------------------------------------------------------------------------------------------------------- 5
1-2 Features --------------------------------------------------------------------------------------------------------------------- 5
1-3 Precautions ----------------------------------------------------------------------------------------------------------------- 5
1-4 Outlook----------------------------------------------------------------------------------------------------------------------- 6
1-4-1 Front Panel ------------------------------------------------------------------------------------------------------- 6
1-4-2 Rear Panel -------------------------------------------------------------------------------------------------------- 7
1-5 Technical Specifications ------------------------------------------------------------------------------------------------ 8
1-5-1 Hardware Specifications -------------------------------------------------------------------------------------- 8
1-5-2 Software Specifications --------------------------------------------------------------------------------------10
2 Installation -----------------------------------------------------------------------------------------------------------------12
2-1 Installation Requirements ----------------------------------------------------------------------------------------------12
2-2 Hardware Setup ----------------------------------------------------------------------------------------------------------13
3. Configuring the R-300NP ----------------------------------------------------------------------------------------------14
3-1 Wizard Setup --------------------------------------------------------------------------------------------------------------14
3-2 Advanced Setup ----------------------------------------------------------------------------------------------------------22
3-2-1 System ------------------------------------------------------------------------------------------------------------23
3-2-2 WAN/LAN --------------------------------------------------------------------------------------------------------25
3-2-3 Server -------------------------------------------------------------------------------------------------------------31
3-2-4 Authentication---------------------------------------------------------------------------------------------------32
3-2-5 Bandwidth --------------------------------------------------------------------------------------------------------32
3-2-6 Filtering -----------------------------------------------------------------------------------------------------------34
3-2-7 Port forwarding -------------------------------------------------------------------------------------------------36
3-2-8 Syslog -------------------------------------------------------------------------------------------------------------36
3-2-9 Session Trace --------------------------------------------------------------------------------------------------40
3-2-10 SNMP -------------------------------------------------------------------------------------------------------------42
3-2-11 Wireless ----------------------------------------------------------------------------------------------------------43
3-2-12 Firewall -----------------------------------------------------------------------------------------------------------47

Easy Hotspot Kit
4
3-3 System Status ------------------------------------------------------------------------------------------------------------49
3-3-1 System ------------------------------------------------------------------------------------------------------------49
3-3-2 Current User ----------------------------------------------------------------------------------------------------51
3-3-3 DHCP Clients ---------------------------------------------------------------------------------------------------52
3-3-4 Session List -----------------------------------------------------------------------------------------------------52
3-4 System Tools --------------------------------------------------------------------------------------------------------------52
3-4-1 Configuration ----------------------------------------------------------------------------------------------------53
3-4-2 Firmware ---------------------------------------------------------------------------------------------------------54
3-4-3 System Account ------------------------------------------------------------------------------------------------56
3-4-4 PING Command------------------------------------------------------------------------------------------------56
3-4-5 Restart ------------------------------------------------------------------------------------------------------------57
3-4-6 Logout ------------------------------------------------------------------------------------------------------------57
Appendix A Regulations/EMI Compliance -------------------------------------------------------------------------------58
Appendix D LIMITED WARRANTY ----------------------------------------------------------------------------------------60

R-300NP
5
1 Introduction
R-300NP is the best WiFi solution provider for venue owner and its customers. Using our system, the
venue owner could be able to provide the free WiFi service that is safe and legally compliant. The
Venue Owner can use R-300NP and Coolbee WiFi service to promote the store to customer.
1-1 Package Contents
Please inspect your package. The following items should be included:
One R-300NP
One Power Adapter
Two detachable Antennas
One Ethernet Cable
One Quick Installation Guide
One Wi-Fi sticker
If any of the above items are damaged or missing, please contact your dealer immediately.
1-2 Features
Wireless data rates up to 300Mbps
IP Plug and Play (iPnP)
Comprehensive security
64/128-bit WEP encryption
WPA encryption
WPA2 Encryption
IP/URL filtering
Intelligent Management
Note: The "iPnP" Function only can be used with TCP/IP-based Network.
1-3 Precautions
Never remove or open the cover.
Never install the system in the wet locations.
Use only the original fitting power adapter otherwise there is a danger of severe electrical shock.
Avoid exposing the R-300NP to direct sunlight or another heat source.
Choose a well-ventilated area to position your R-300NP.
R-300NP
6
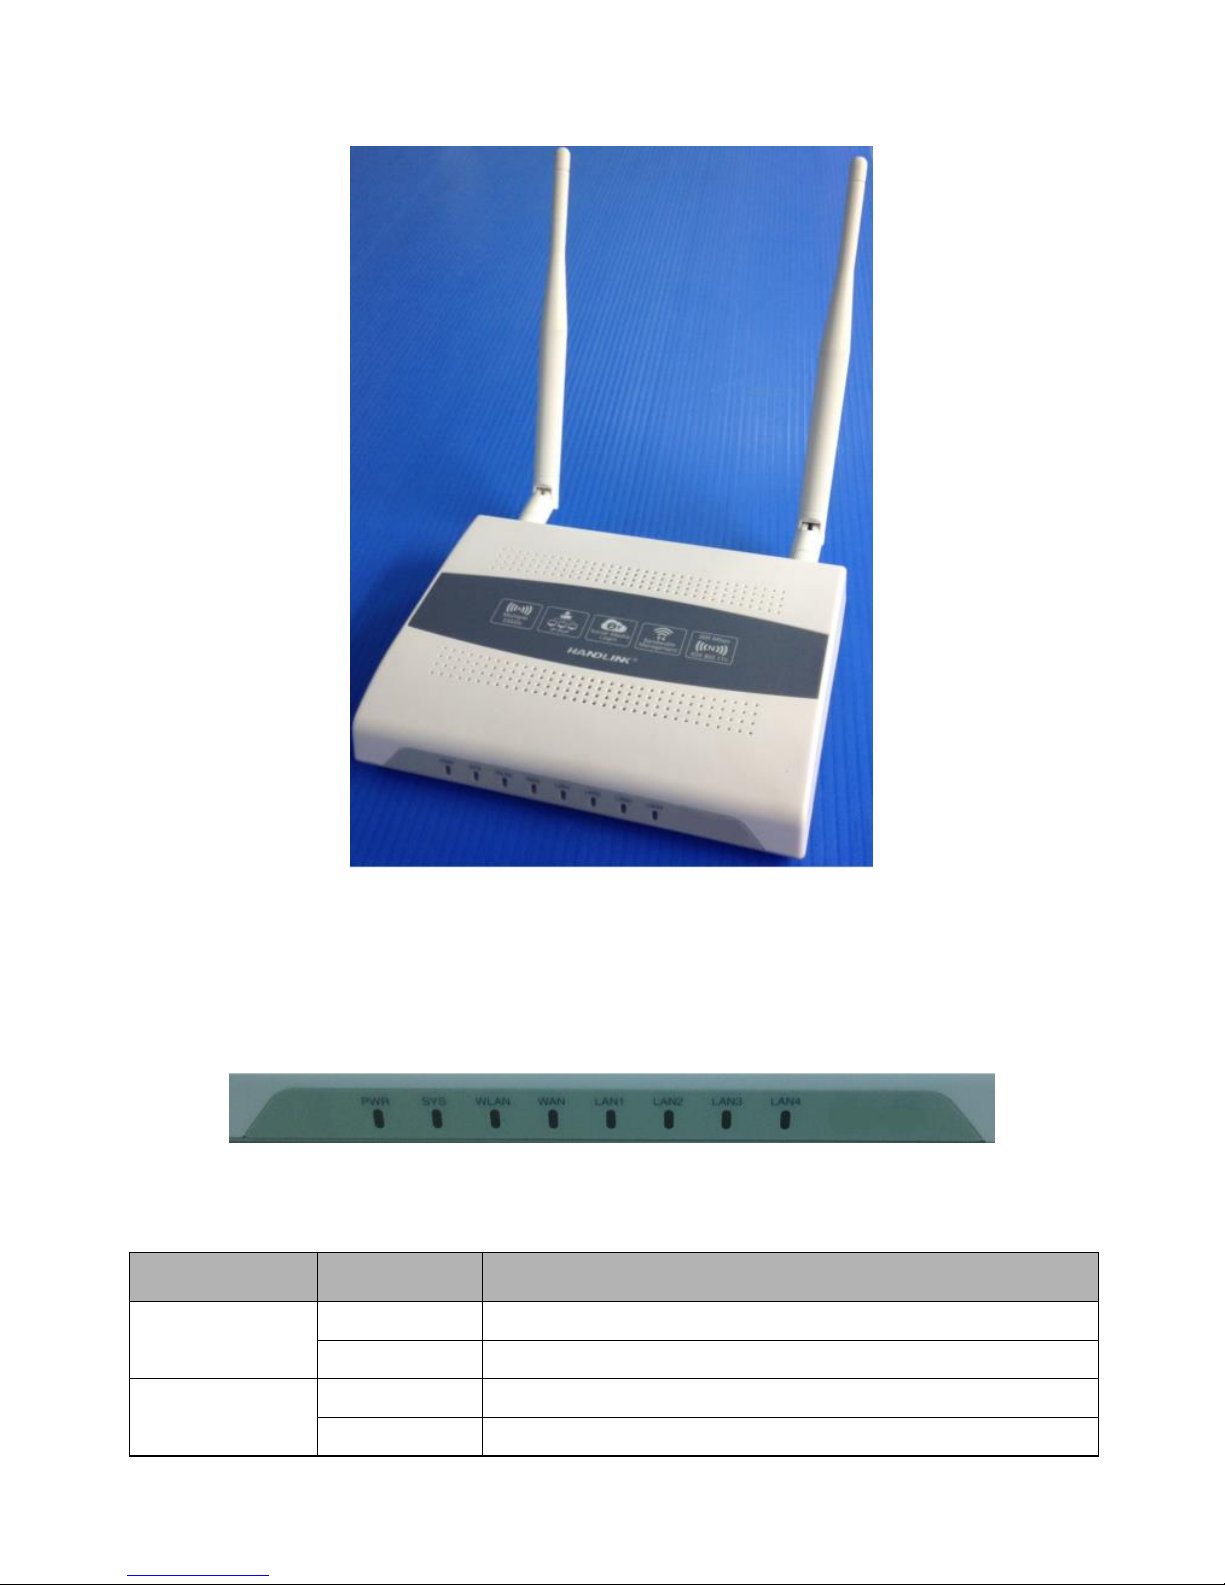
1-4 Outlook
Figure 1 Outlook
1-4-1 Front Panel
The front panel of the R-300NP is shown as below.
Figure 2 Front Panel
LED Indicators
LED
State
Description
PWR
Off
The device is not receiving electrical power.
On
The device is receiving electrical power.
SYS
Off
The device status is defective.
On
The device is up and running.
R-300NP
7
Blinking
During firmware upgrade, the system LED will be blinking.
WLAN
Off
The Wireless is not ready.
On
The device has established a valid wireless connection.
Blinking
The Wireless connection is active.
WAN
Off
The WAN is not connected.
On
The WAN has a valid 10/100Mbps network connection.
Blinking
The WAN is sending or receiving packet.
LAN-1~
LAN-4
Off
The LAN is not connected.
On
The LAN has a valid 10/100Mbps network connection.
Blinking
The LAN is sending or receiving packet.
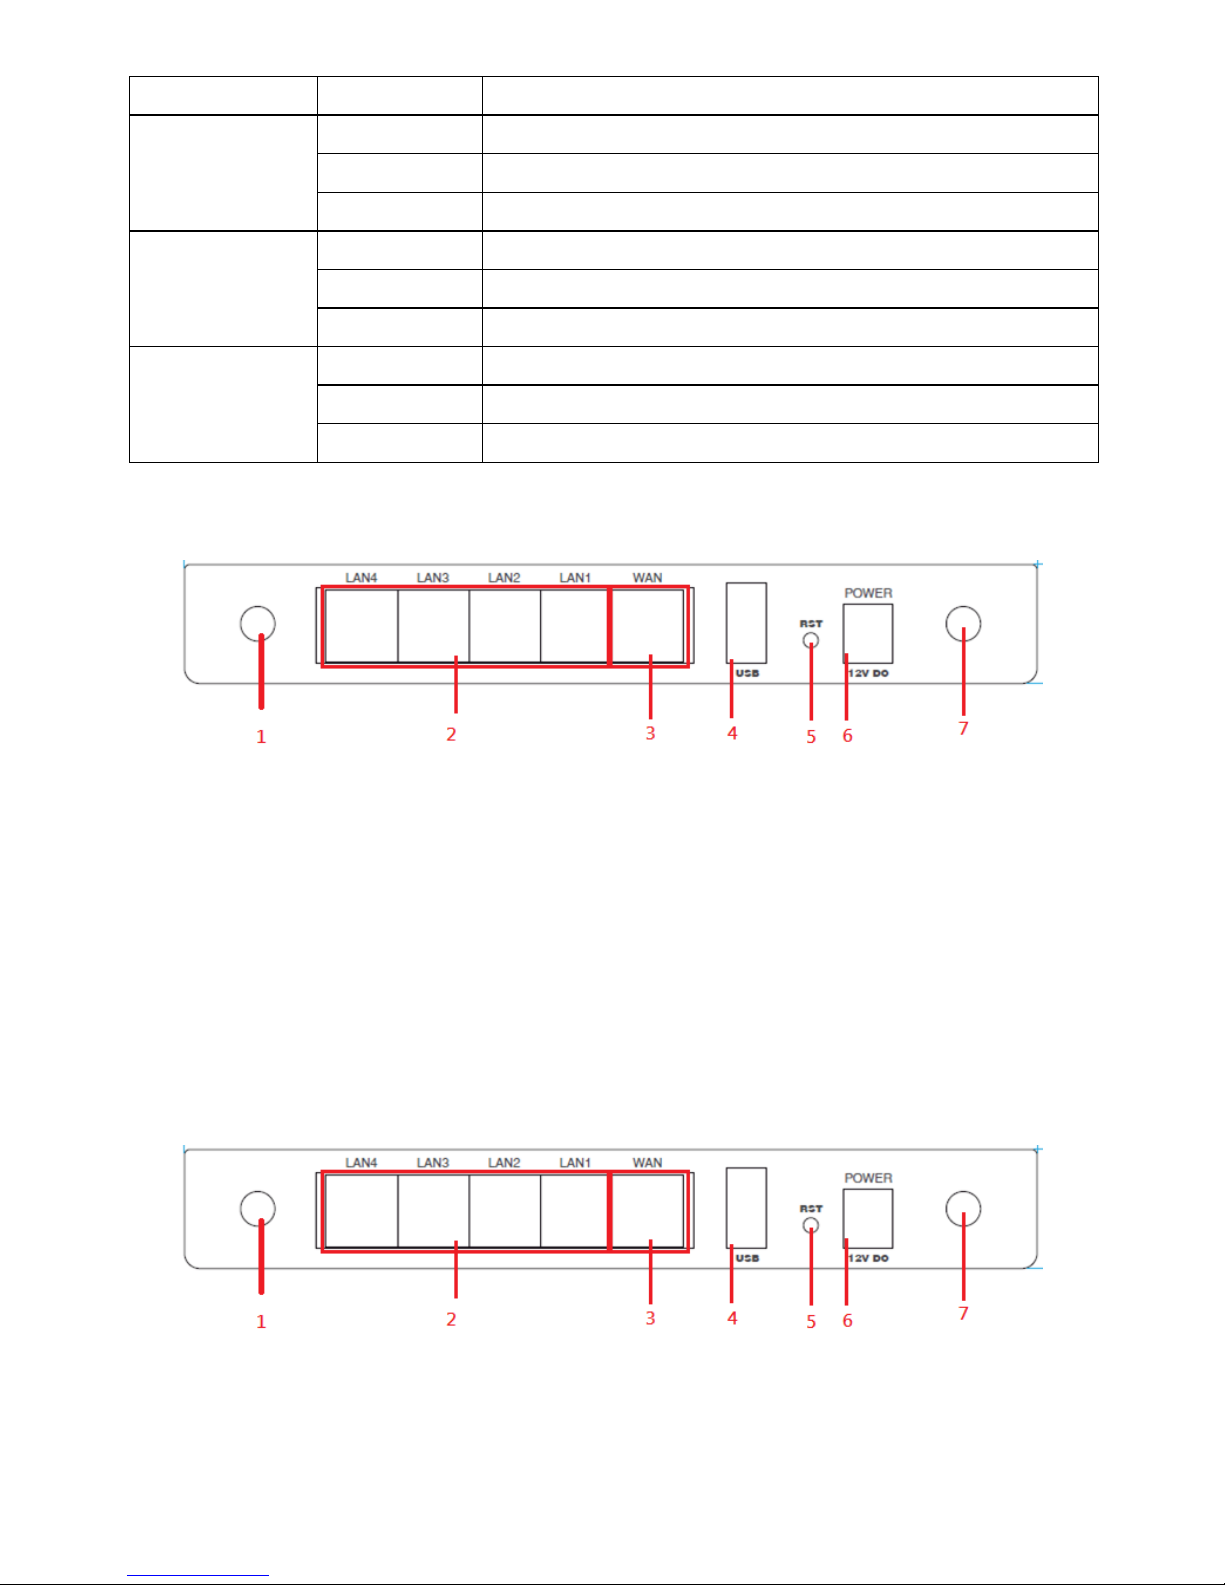
1-4-2 Rear Panel
The rear panel of R-300NP is shown as below.
Figure 3 R-300NP Rear Panel
1. Antenna
2. LAN Ports (1-4)
3. WAN/PoE port
4. USB
5. Reset
6. Power jack
7. Antenna
The rear panel of WG-701/WG-606 is shown as below.
Figure 4 R-300NP Rear Panel
1. Antenna
R-300NP
8
2. LAN Ports (1-4)
3. WAN Port
4. USB
5. Reset
6. Power jack
7. Antenna
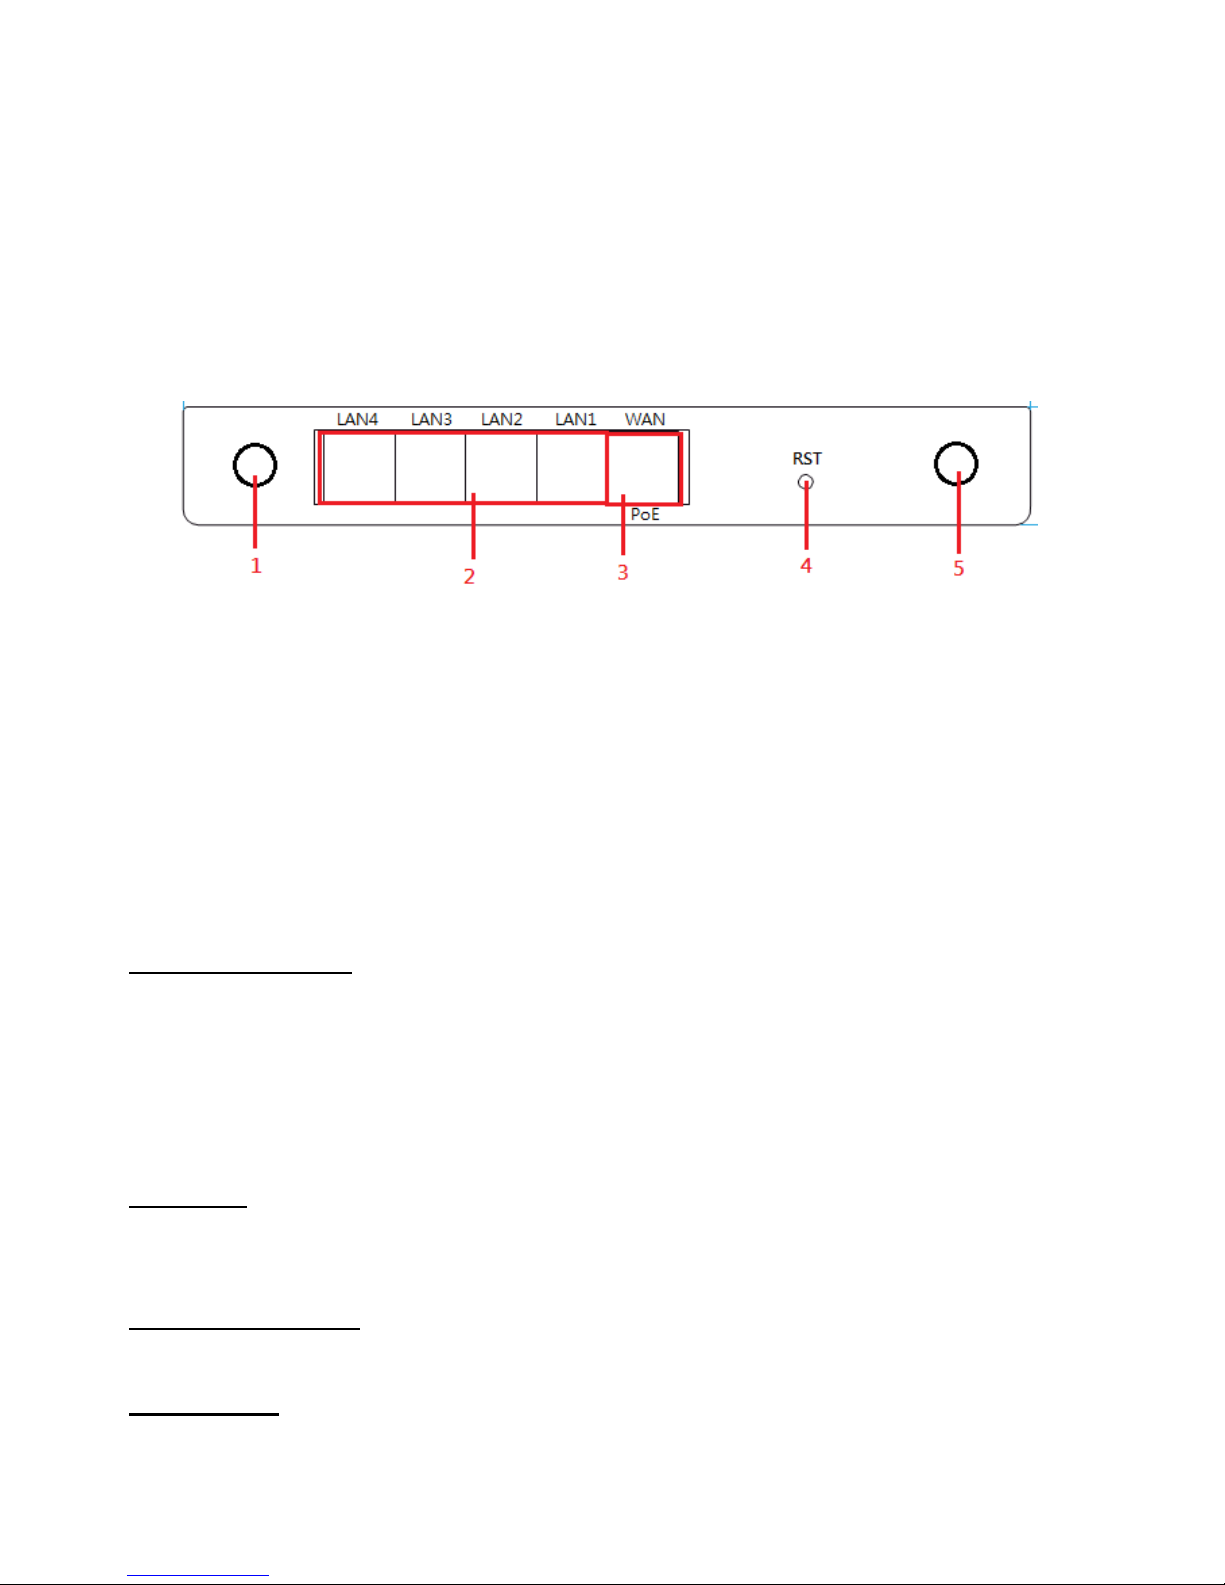
The rear panel of AP-300NP is shown as below.
1. Antenna
2. LAN Ports (1-4)
3. WAN/PoE Port
4. Reset
5. Antenna
1-5 Technical Specifications
1-5-1 Hardware Specifications
Network Specification
IEEE802.3 10BaseT Ethernet
IEEE802.3u 100BaseTX Fast Ethernet
IEEE802.11g Wireless LAN
ANSI/IEEE 802.3 NWay auto-negotiation
Wi-Fi Compatible
Connectors
Four LAN Ports (10BaseT/100BaseTX Auto cross-over)
One WAN Port (10BaseT/100BaseTX Auto cross-over)
External Antenna Type
4dBi (Max) Dual detachable diversity antenna with reverse SMA
LED Indicators
One POWER LED

R-300NP
9
One WAN 10/100M Link/Activity LED
Four LAN 10M/100M Link/Activity LEDs
One Wireless Link/Activity LED
One System LED
Power Requirement
R-300NP:
External Power Adapter:
Power input: 12V, 1A
Power consumption: Under 5 Watts
PoE:
Power input: 48Vdc, 0.4A, IEEE 802.3at Compliance
Power consumption: Under 5 Watts
WG-701:
External Power Adapter:
Power input: 12V, 1A
Power consumption: Under 5 Watts
WG-606:
External Power Adapter:
Power input: 12V, 1A
Power consumption: Under 5 Watts
AP-300NP:
PoE:
Power input: 48Vdc, 0.4A, IEEE 802.3at Compliance
Power consumption: Under 5 Watts
Environment Conditions
Operating Temperature: 0 to 40°C
Storage Temperature: -10 to 60°C
Operating Humidity: 10~90% non-condensing
Storage Humidity: 10% to 90% non-condensing
Certifications
FCC,CE,NCC, BSMI,NTC(Thailand)
Dimension
Size:222 (L) x 143 (W) x 36 (H) mm
Weight: About 400 g (Net)
Mounting
Desktop, Wall mounted

R-300NP
10
1-5-2 Software Specifications
Networking
IP Plug and Play (iPnP)
WEP 64/128bit
WPA-PSA (TKIP)
WPA2-PSK(AES)
WPA/WPA2 Mix Mode-PSK (AES)
DHCP Server (RFC 2131)
Static IP WAN Client
DHCP WAN Client
PPPoE WAN Client (RFC 2516)
PPTP WAN Client
NAT (RFC 1631)
NTP (Network Time Protocol) Support
Wireless
Wireless IEEE802.11n
User Authentication
Facebook Authentication
Access Form
Security and Firewall
Layer 2 Isolation
SSL Administration
VPN Pass through (IPSec/PPTP/L2TP)
Pass through Destination IP/URL
Pass through Source IP/MAC
Restricted Destination Filtering IP/URL
Anti-DDOS
Management
Administrator / Front Desk Access Management
Access Control List Management (ACL)
Remote Browser-based Configuration and management
Firmware Upgrade (RFC 1350) via HTTP/TFTP
Backup/Restore/Factory Default Setting
Port Forwarding

R-300NP
11
System Information Table
Real-time Current User List / DHCP Clients List /
Session List / Account List
Syslog
Bandwidth control per device
Session control per device
Session Trace
SNMP (Read Only)
Ping Command

R-300NP
12
2 Installation
The followings are instructions for setting up the R-300NP. Refer to the illustration and follow the simple
steps below to quickly install your R-300NP.
2-1 Installation Requirements
Before installing the R-300NP, make sure your network meets the following requirements.
The R-300NP requires one of the following types of software:
Windows XP/Vista/7
Red Hat Linux 7.3 or later version
MAC OS X 10.2.4 or later version
Web Browser Software (Microsoft I.E or Firefox , Google Chrome)
One computer with an installed 10Mbps, 100Mbps or 10/100Mbps Ethernet card
UTP network Cable with a RJ-45 connection (Package contents)
Note:
1. The gateway’s default IP address setting is “10.59.1.1”.
2. The gateway’s default subnet mask setting is “255.255.255.0”.

R-300NP
13
2-2 Hardware Setup
1. Connect the R-300NP WAN port to modem by Ethernet cable.(Usually, the ISP will provide one
Ethernet cable along with the modem)
2. Connect the R-300NP LAN port to PC by Ethernet cable.
3. Install the antennas.
4. Plug in the power adapter. The R-300NP will be booted once the power is connected.
5. Check the LED status of SYS, WAN, LAN and WLAN, the network connection is valid if the LED
turned on.
R-300NP
14
3. Configuring the R-300NP
3-1 Wizard Setup
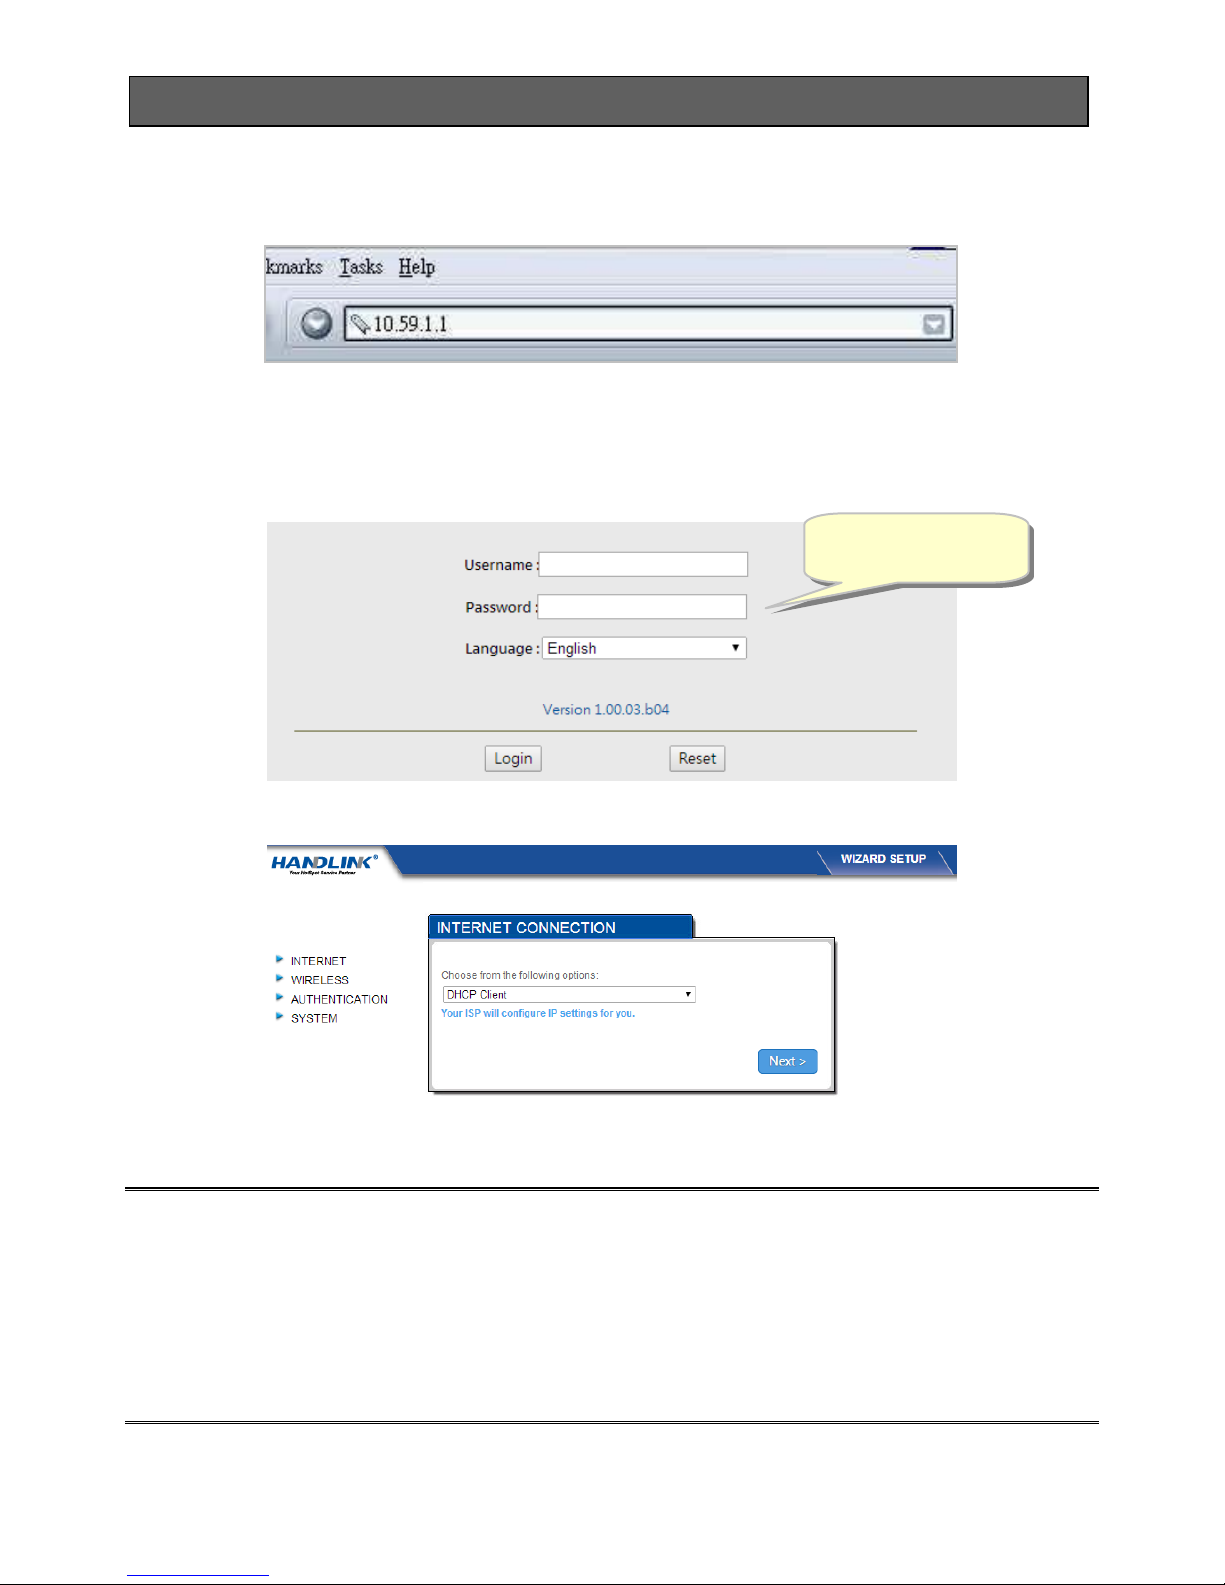
Step 1: Open your browser, and then enter the factory default IP address 10.59.1.1 in your browser’s
location box. Press Enter.
Figure 5 Web Browser
Step 2: The R-300NP login page will appear. Typing the factory default Username “admin” and
Password “admin” then click Login. If you are first time setting the system, the wizard setup
screen will appear as figure 7. You will be guided, step-by-step, through a basic setup
procedure.
Figure 6 R-300NP login page
Figure 7 Wizard Setup Screen
Note:
This Web agent is best viewed with IE 9.0 or Chrome and above browsers.
Username and Password can consist of up to 20 alphanumeric characters and are case sensitive.
If for some reason your password is lost or you cannot gain access to the R-300NP Configuration
Program, please press the reset button to load the device to manufacturer defaults.
If the R-300NP doesn’t send packet in 5 minutes (default), the R-300NP wills logout automatically.
Username: admin
Password: admin
R-300NP
15
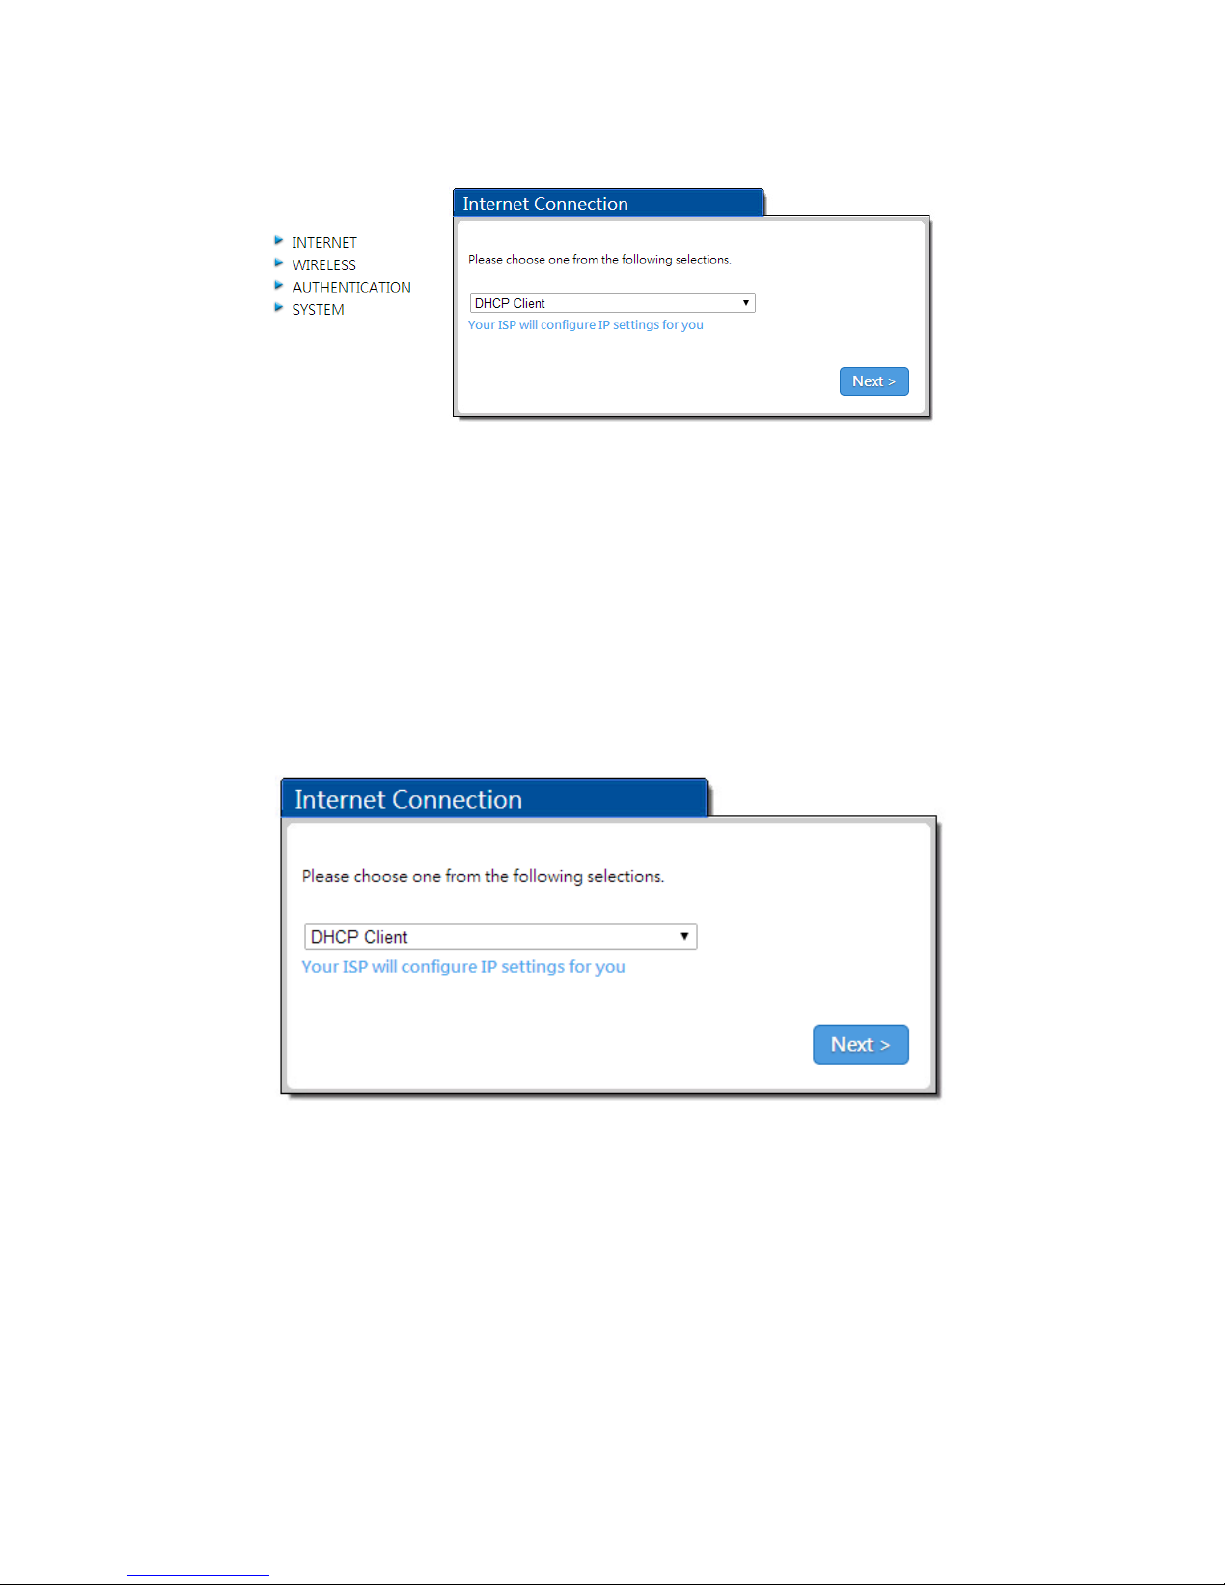
Step 3: Internet Connection Setting
Select the appropriate Internet connection type to connect to your ISP.
Figure 8 Internet Connection Setting Screen
DHCP Client
The device can work as a DHCP client. This allows the device to obtain the IP address and other
TCP/IP settings from your ISP. If your xDSL/Cable comes with this feature, please enable Use DHCP
Client.
Figure 9 Internet Connection Setting Screen—DHCP Client Setting
R-300NP
16
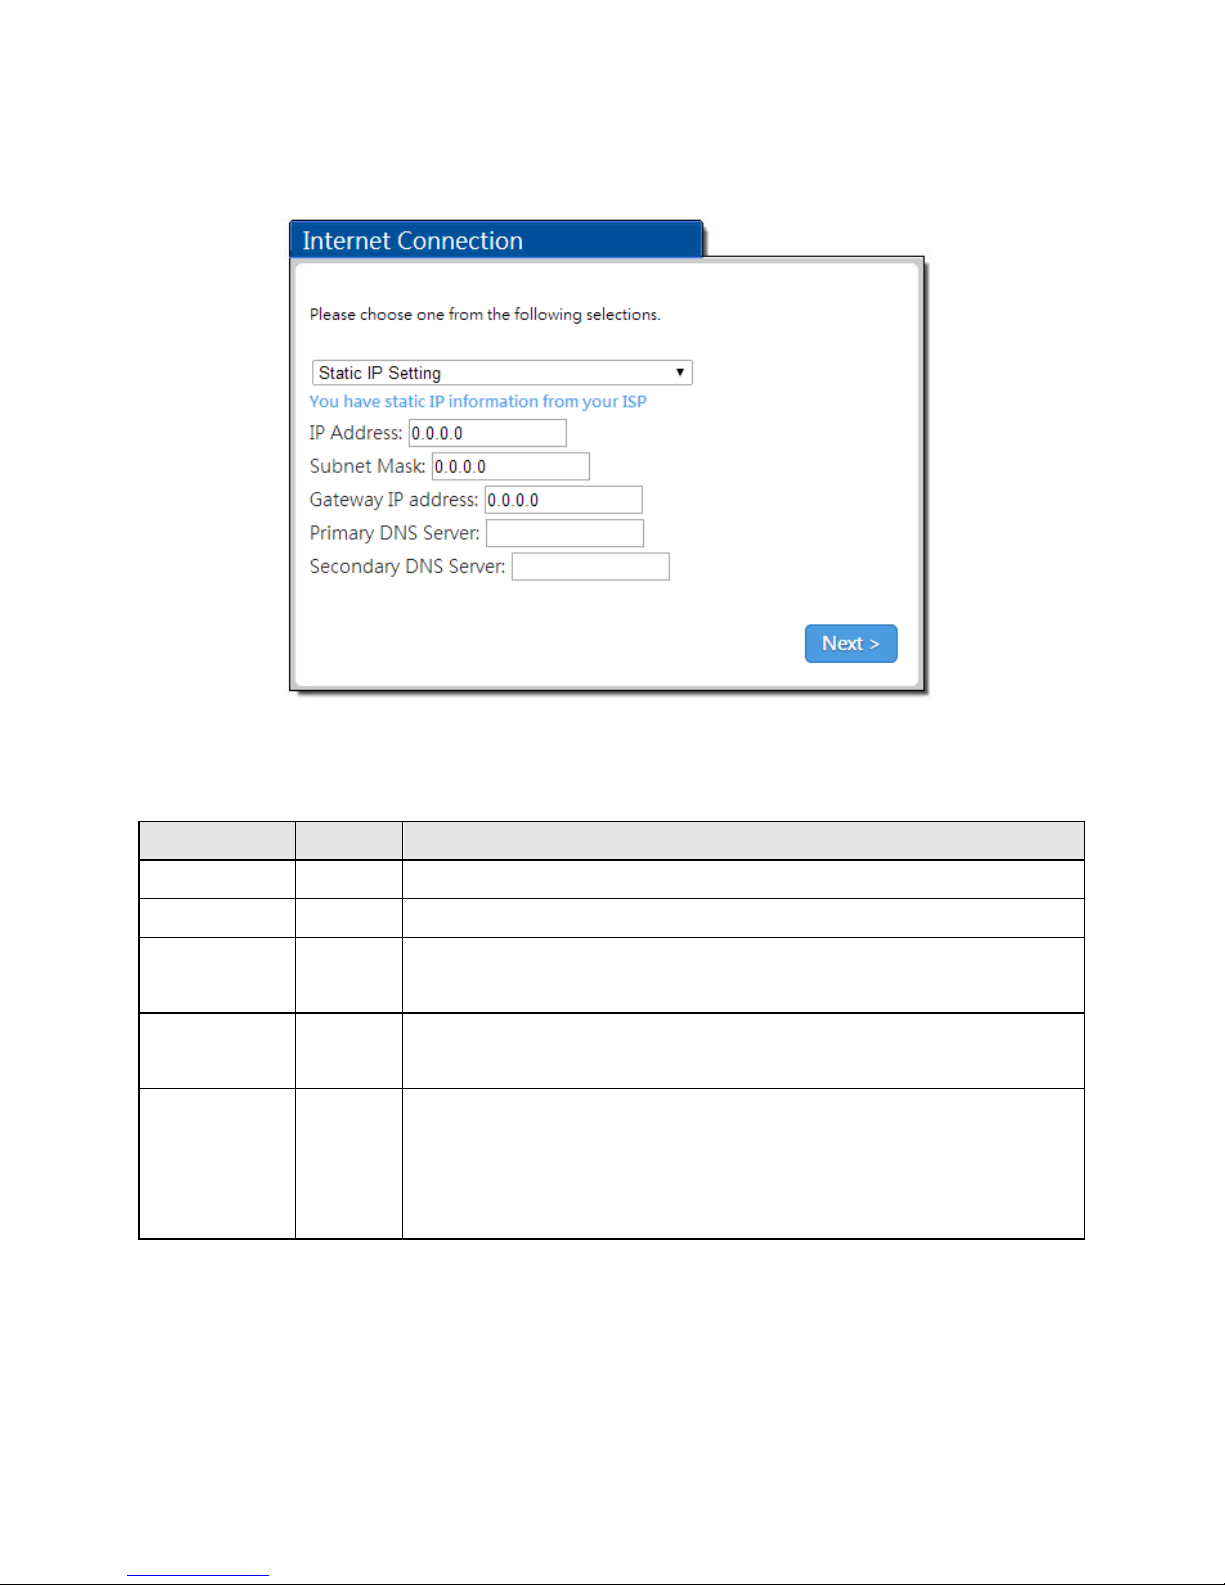
Static IP Setting
If Static IP Setting is selected, below setting screen will appear. Enter the IP address information
provided by your ISP.
Figure 10 Internet Connection Setting Screen—Static IP Setting
Item
Default
Description
IP Address
0.0.0.0
Enter the IP address provided by your ISP.
Subnet Mask
0.0.0.0
Enter the subnet mask for the IP address.
Gateway IP
Address
0.0.0.0
Enter the Gateway IP Address provided by your ISP.
Primary DNS
Server
Empty
Enter the primary DNS server IP address for the xDSL/Cable
connection (provided by your ISP).
Secondary
DNS Server
Empty
Enter the secondary DNS server IP address for the xDSL/Cable
connection (provided by your ISP). If the primary DNS Server IP were
not available, meanwhile, Secondary DNS Server IP would start in the
same time.
R-300NP
17
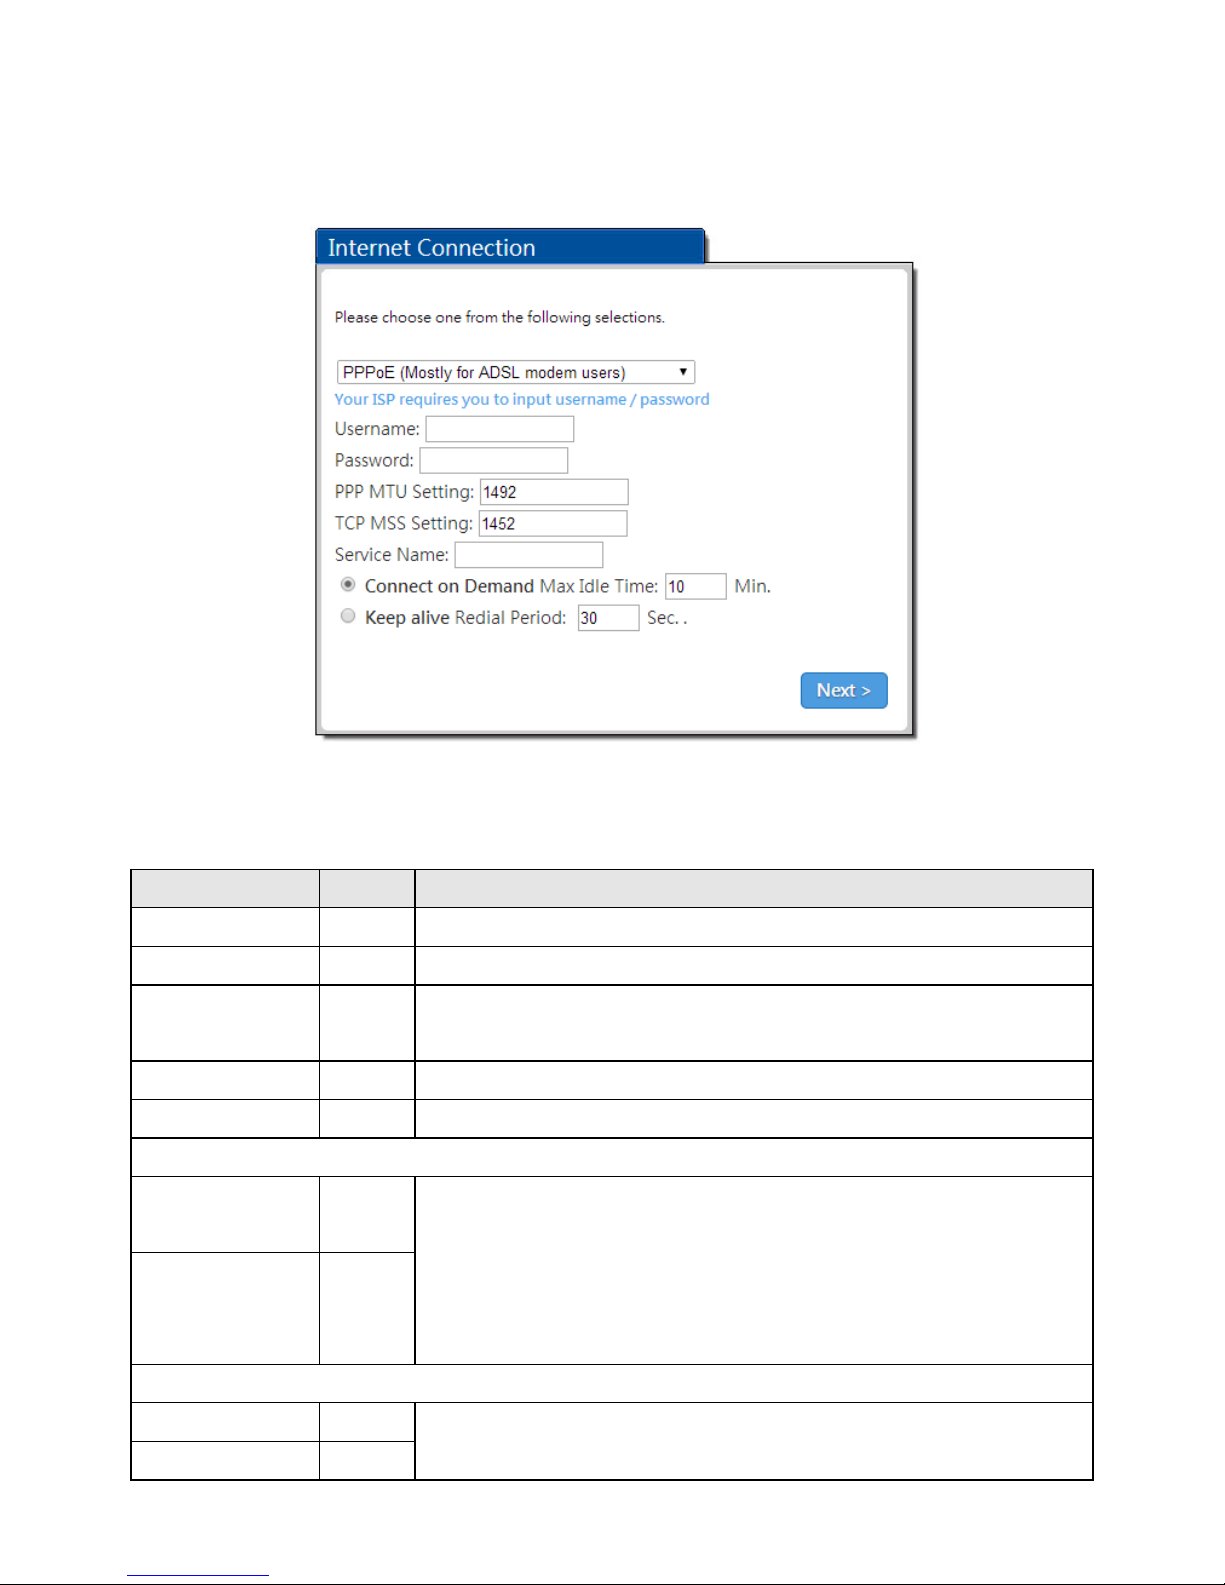
PPPoE (Mostly for ADSL modem users)
If “PPPoE” is selected, below setting screen will appear. Enter the username, password and other
major fields.
Figure 11 Internet Connection Setting Screen—PPPoE Setting
Item
Default
Description
Username
Empty
Enter the user name provided by your ISP.
Password
Empty
Enter the user password provided by your ISP.
PPP MTU Setting
1492
MTU (Maximum Transfer Unit) specifies maximum transmission unit
size.
TCP MSS Setting
1452
MSS (Maximum Segment Size) specifies maximum segment size.
Service Name
Empty
Enter the service name provided by your ISP.
Connect on Demand and Max Idle Time
Connect on
Demand
Enable
You can configure your R-300NP to cut your connection with your ISP
after a specified period of time (Max Idle Time). If you have been
disconnected due to inactivity, Connect on Demand enables your
R-300NP to automatically re-establish your connection as soon as you
attempt to access the Internet again
Max Idle Time
10 Min.
Keep alive and Redial Period
Keep alive
Disable
This option keeps your PPPoE enabled Internet access connected
indefinitely, even when it sits idle.
Redial Period
30 sec.

R-300NP
18
PPTP (Mostly for Europe ADSL modem users)
If “PPTP” is selected, then this screen will appear. Fill out all the information provided by your ISP.
Figure 12 Internet Connection Setting Screen—PPTP Client Setting
Item
Default
Description
My IP Address
Empty
Enter the PPTP local IP address provided by your ISP.
My Subnet Mask
Empty
Enter the PPTP local Subnet Mask IP address for the IP
address (My IP Address).
Gateway IP Address
Empty
Enter the PPTP server Gateway IP address provided by your
ISP.
PPTP Server IP Address
Empty
Enter the PPTP server IP address provided by your ISP.
Username
Empty
Enter the user name provided by your ISP.
Password
Empty
Enter the user password provided by your ISP.
PPP MTU Setting
1460
MTU (Maximum Transfer Unit) specifies maximum
transmission unit size.
TCP MSS Setting
1400
MSS (Maximum Segment Size) specifies maximum segment
size.
Connection ID/Name
Empty
Enter the connection ID or connection name.
R-300NP
19
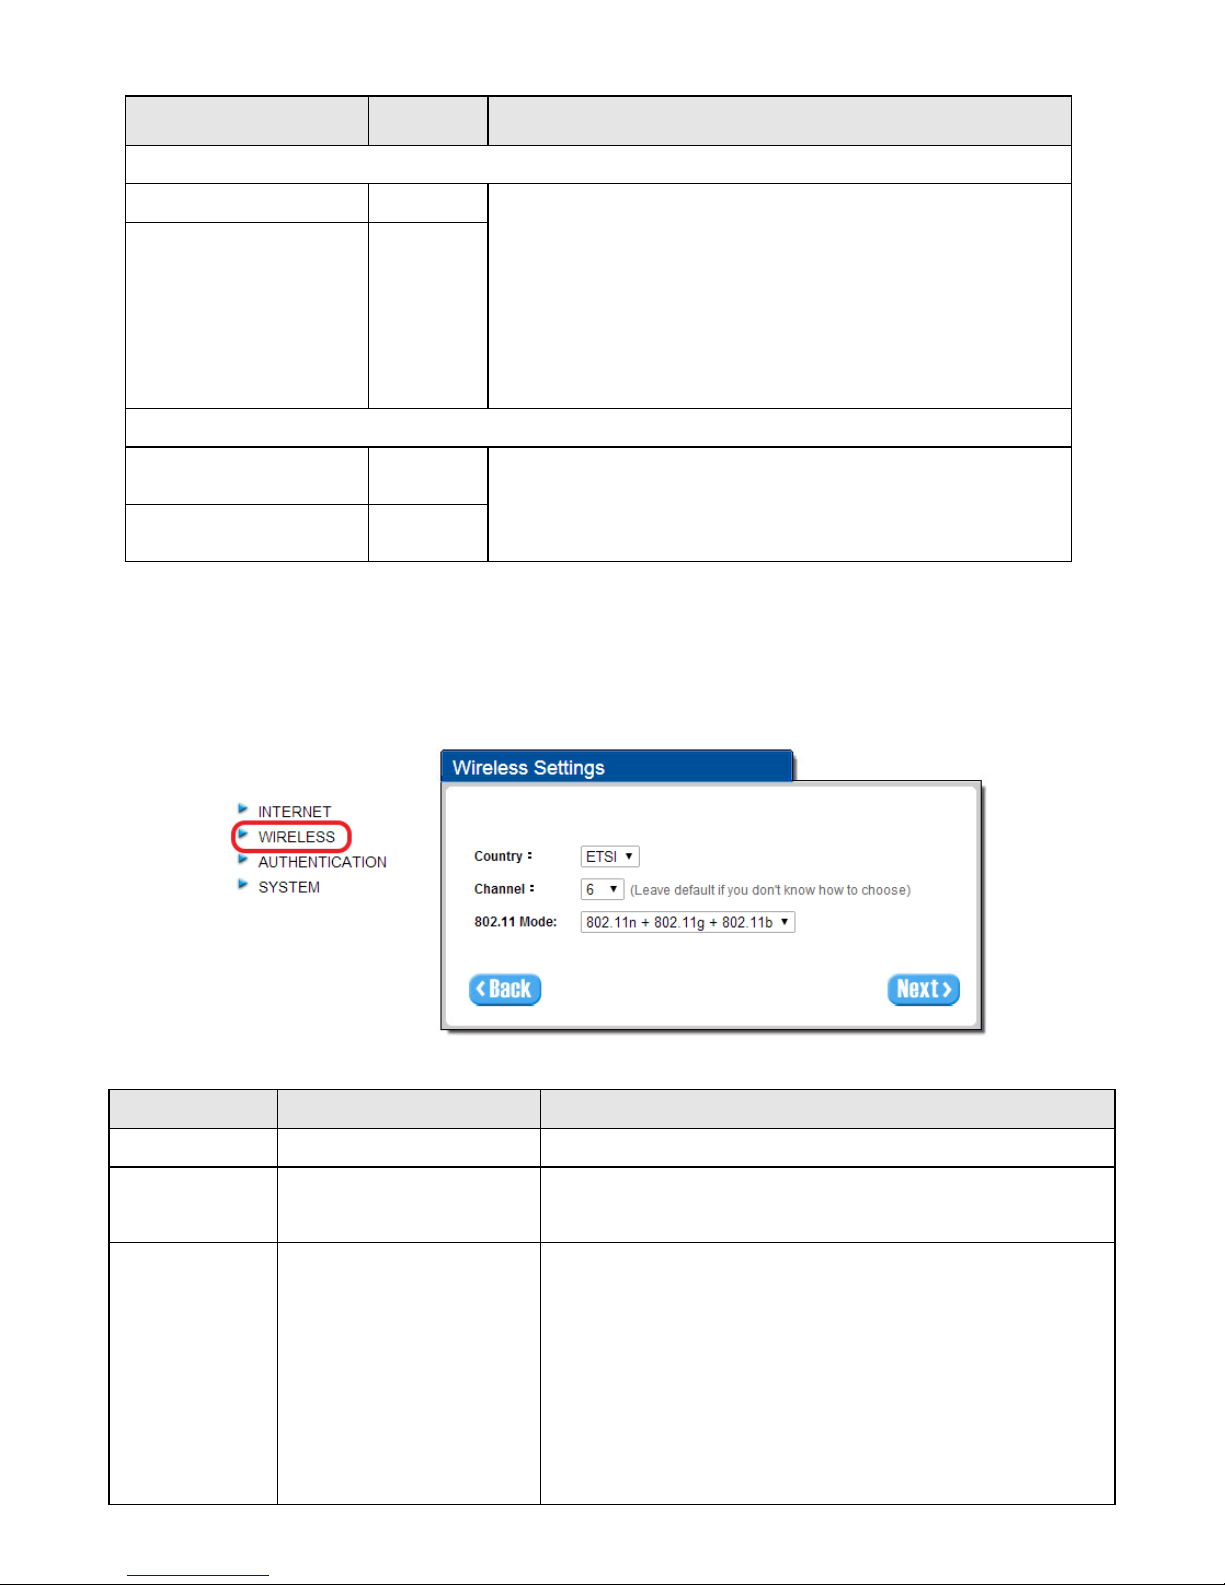
Step 4: Wireless Setting
This page allows you to define Country, Channel and 802.11 mode for wireless connection.
Figure 13 Wireless Setting Screen
Item
Default
Description
Country
ETSI
Select Wireless region you located.
Channel
6
Enter the channel ID for wireless connection. You could
choose from Ch1 to Ch11.
802.11 Mode
802.11n+802.11g+802.11b
Enter the 802.11 Mode for wireless connection
802.11n+802.11g+802.11b
802.11n+802.11g
802.11g+802.11b
802.11n only
802.11g only
802.11b only
Item
Default
Description
Connect on Demand and Max Idle Time
Connect on Demand
Enable
You can configure your R-300NP to cut your connection with
your ISP after a specified period of time (Max Idle Time). If
you have been disconnected due to inactivity, Connect on
Demand enables your R-300NP to automatically re-establish
your connection as soon as you attempt to access the
Internet again.
Max Idle Time
10 Minutes
Keep alive and Redial Period
Keep alive
Disable
This option keeps your PPTP enabled Internet access
connected indefinitely, even when it sits idle.
Redial Period
30 sec.
 Loading...