

Page 1
8 www.handlermfg.com
-
76M DUST COLLECTOR
IMPORTANT INSTRUCTIONS
Page 2
908-233-7796 72 www.handlermfg.com
1
2
6
5
4
3
8
7
9
11
10
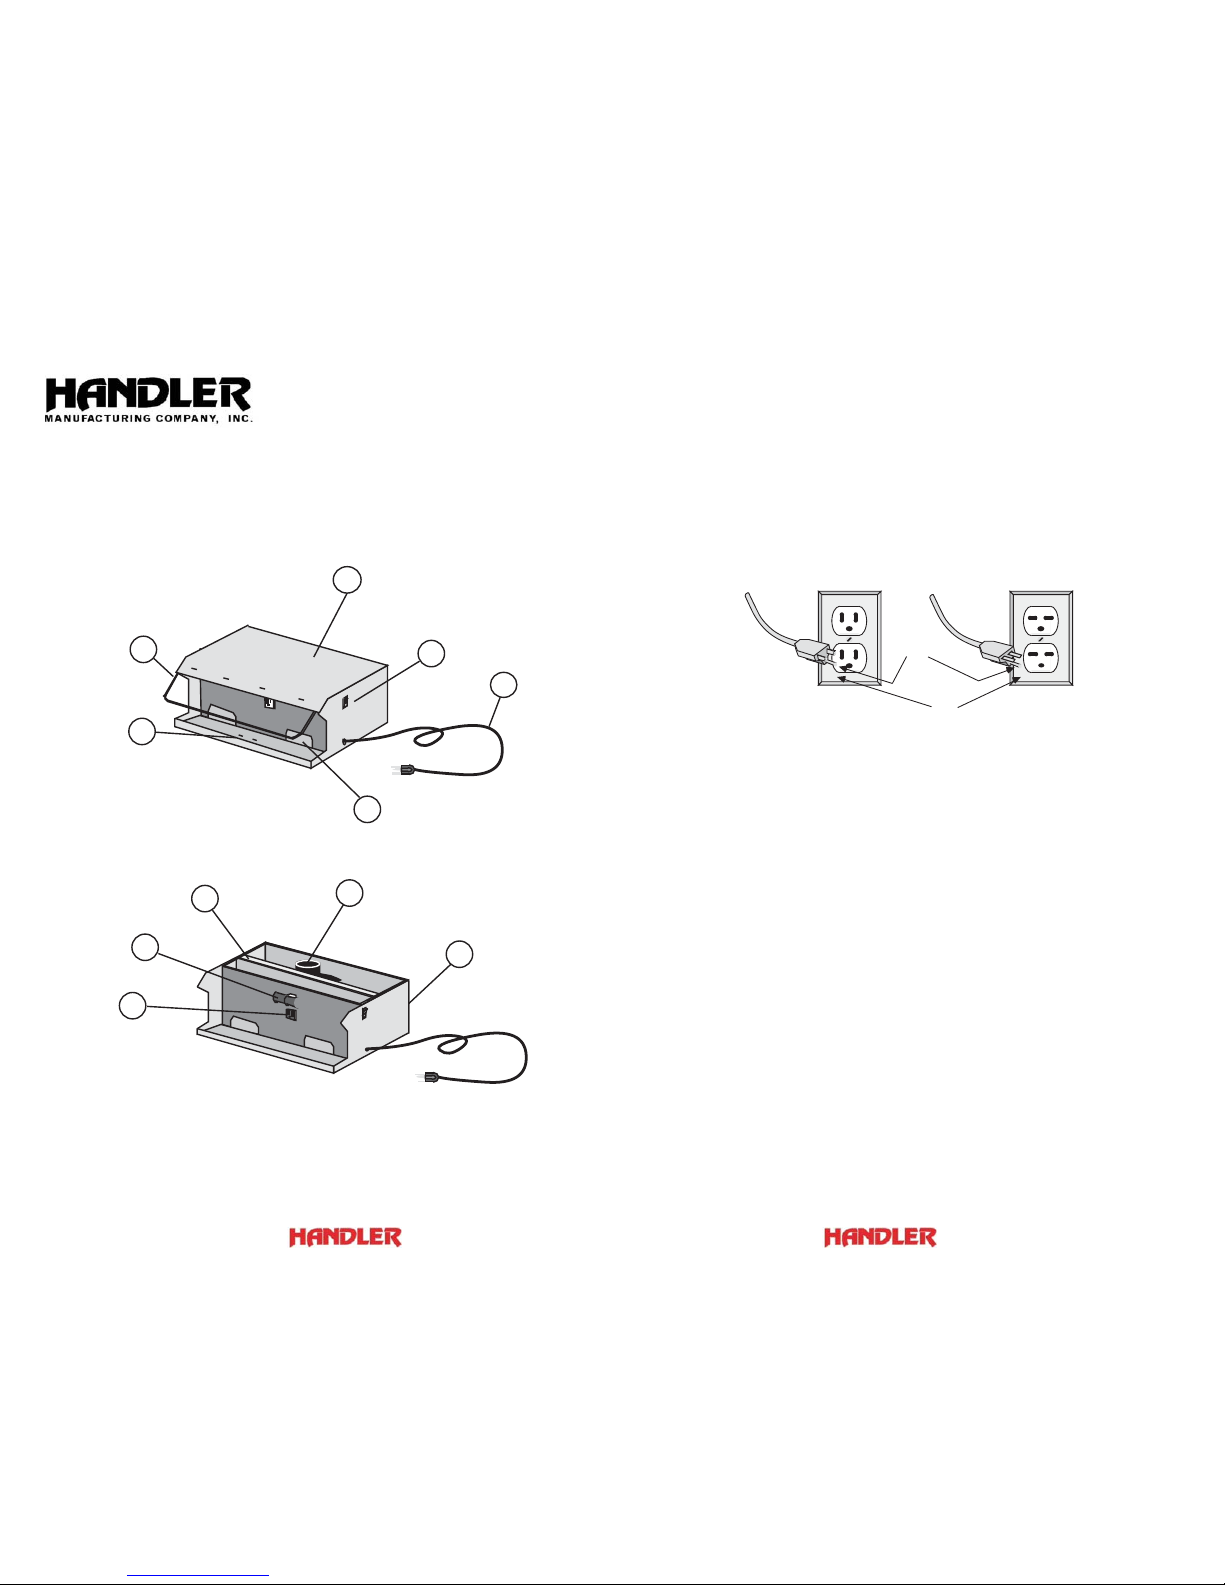
1 Power Cordset
2 ON/OFF Switch
3 Top (Cover)
4 Suction Inlet
5 Safety Shield
6 Motor Mount (Optional)
7 Cabinet Complete
8 Suction Assembly
9 76MF Replacement Filter - 12 x 20 x 2
10 Light Socket Assembly
11 Monoplex Receptacle
TOOL SAFETY INSTRUCTIONS
1. Keep Work Area Clean
Cluttered areas and benches invite accidents.
2. Avoid Dangerous Equipment
Don't expose power tools to rain. Do n't use power tools
in damp or wet locations. Keep work area well lit.
3. Keep Children Away
All visitors should be kept safe distance from work area
and appliance.
4. Store Idle Tools
When not in use, tools should be stored in dry, high, and
locked location out of the reach of children.
5. Don't Force Tool
It will do the job better and be safe at the rate for which
it was designed.
6. Use Right Tool
Don't force small tool or attachment to do the job of a
heavy-duty tool.
7. Wear Proper Apparel
Do not wear loose clothing or jewelry which may get
caught in moving parts. Tie back long hair or use a proper
hair net.
8. Use Safety Glasses
Use safety glasses with all rotating tools. Also use a face
or dust mask if cutting operation is dusty.
9. Don't Abuse Cord
Never carry tool by cord or yank it to disconnect from
receptacle. Keep cord from heat, oil, and sharp edges.
10. Secure Work
Use clamps or a vise to hold work. It's safer than using
your hand and it frees both hands to operate tool.
11. Don't Overreach
Keep proper footing and balance at all times.
12. Maintai
n Tools with Care
Keep tools sharp and clean for best and safest performance.
Follow instructions for lubricating and changing accessories.
13. Disconnect Tools and Turn Off Unit.
When not in use; before servicing; w he n changing accesso-
ries such as blades, bits, cutters, etc.
14. Avoid Accidental Starting
Be sure switch is OFF when plugging in.
I. GROUNDING INSTRUCTIONS
This tool must be grounded while in use to protect the operator from electric shock. The tool is equipped with an
approved three-conductor cord and three-prong grou
nding type plug to fit the proper grounding type receptacle. The
green (or green a nd yellow) conductor in the cord is the grounding wire. Never connect the green (or green and yellow)
wire to a live terminal. If your unit is for use on less than 150 volts, it has a plug that looks like that shown in sketch (A)
in Figure 1. If it is for use on 150 to 250 volts, it has a plug that looks like that shown in sketch (B). Use of an extension
cords or a 2 prong adapter is not recommended.
SAFETY INSTRUCTIONS
COVER OF GROUNDED
OUTLET BOX
(A)
(B)
FIGURE 1:
GROUNDING METHODS
GROUNDING
PRONG
Page 3

908-233-7796 36 www.handlermfg.com
INSTRUCTIONS FOR USE AND CARE OF A HANDLER’S
#76M DUST COLLECTOR
I. Open the carton carefully.Inspect the dust collector thoroughly. Should damage have occurred
in transit, note damage and contact the delivering carrier and your distributor immediately.
Do Not
contact Handler Manufacturing. The unit has been inspected at numerous intervals
before leaving our plant. It has been shipped in a new condition via an insured freight carrier.
If damage has occurred in transit, report it immediately. Failure to do so will result in loss of
your legal right to claim damage.
II. Placement and Maintenance:
Your Handler Bench Top Dust Collector has been constructed of heavy gauge sheet steel. It is
built to provide years of service, provided you follow the suggestions listed bellow:
(1) Locate your bench top unit on a horizontally flat, sturdy table.Allow for a minimum of
5 to 6 inches of clearance between the side of the unit and a wall or similar vertical
structure. This is to allow proper air flow through the aerodynamically designed dust
collection system.
(2) Remove the top cover of the #76M Dust Collector and place a 60 watt bulb (higher
wattage bulbs are not recommended) into the light socket provided. Should you utilize
a polishing motor other than a unit provided by Handler, make certain it contains a
grounded electrical supply cord which is properly grounded to the motor. Handler Mfg.
is not responsible for the function of motors manufactured by other companies. Plug
polishing motor into 115V/60Hz outlet located on the side vertical panel of the #76M.
(3) Familiarize yourself with the internal parts of your new Handler Dust Collector, Note
where the suction motor (#8) is located, the ON/OFF switch (#2), and the removablereplaceable filter. The filter (#9) must be kept clean to allow for proper air flow through
the unit. Check the filter periodically to insure it is not clogged with grinding and
polishing debris.When the filter becomes filled, replace it with a new Handler sanitized
filter to insure proper function of your dust collector. NOTE: Use of other filters of
insufficient density and proper size may void the warranty. Replace the filter with a
#76MF-12 x 20 x 2 filter obtainable from your distributor or from Handler Mfg.
(4) Replace the top cover of your #76M and connect the cordset to a grounded
115V/60Hz outlet, ONLY, having sufficient amperage rating. If the nearest outlet is not
properly grounded, contact a locally licensed electrician to change the outlet so that
the unit may be operated properly and grounded. DO NOT remove the third
grounding prong on the cordset. If this is removed, the warranty is void, and damage
will occur to the unit.
(5) Your 76M is made to accommodate a clear acrylic safety shield.This must be fitted to
the underside of the top inclined surface before you use the 76M. Use the bolts and
nuts supplied, to attach the shield. Please remove the protective paper covering prior
Page 4

908-233-7796 54 www.handlermfg.com
to attaching the shield.
(6) Activate the ON/OFF switch (#2) of the dust collector.The light and polishing motor
outlet will be activated simultaneously when the switch is turned on.
Yo ur #76M is now ready for use.
GENERAL INSTRUCTIONS
(1) Wear proper eye protection (safety glasses) and face mask when polishing.
(2) Always turn off your #76M when moving away from the unit.
(3) Never use buffing wheels larger than 6 inches in diameter.
(4) If you have long hair, tie it back and utilize a hair net.
(5) Wear clothing which is fitted closely. Never attempt to use your #76M Dust Collector
while wearing loose clothing, kerchiefs, tie, or similarly loose-fitted attire. Do not attempt to
use the #76M Bench Top Dust Collector for purposes other than that which it was designed.
Read and follow the safety instructions located on the following pages BEFORE operating
your 76M.
III. Warranty:
The Handler #76M Dust Collector is warranted for a period of one year from date of sale by
Handler. Should the unit malfunction during that period, contact your distributor and/or
Handler Manufacturing Co., Inc. Handler will repair or replace your dust collector and/or
Handler polishing motor at no cost except for appropriate transportation at our option. No
other warranties are implied, or intended. Your warranty will become null and void if the unit
is misused, not maintained, or not utilized as suggested.
IV. Lubrication:
Yo ur #76M Bench Top Dust Collector is manufactured with oil-lite bronze bearings.
NO lubrication is necessary for the life of your 76M suction motor. Keeping the filter clean
and replaced on a regular basis will allow the
unit to provide you with years of trouble free
services.
Polishing Motor:
The 76M may have been shipped with a polishing motor. If you’ve ordered a polishing motor
with your 76M, mount the polishing motor properly onto the front base of the 76M using the
sheet metal mounting base and bolts, provided. Make certain to securely tighten the base and
motor to the inside front base of the 76M Polishing unit.
Before connecting the electric cord to the socket in the vertical front panel of the 76M,
mount the Left and Right No. 20 chucks to the Left and Right shafts of the polishing motor.
Secure these to the motor shaft with the set screws located in the chucks.Tighten these
securely.Your polishing motor is now ready for use.
ADDITIONAL INFORMATION
Should you require additional information on your Bench Top Dust Collector or wish
to receive a catalogue illustrating Handler s complete line of dust collectors, polishing
equipment and accessories, please send your name and address to:
Handler Manufacturing Co., Inc
612 North Avenue East
Westfield,New Jersey 07090-0520
Or Visit us on the web at:WWW.HANDLERMFG.COM
Catalogue Request:
Name:
Address:
City: State: Zip:
Comments:
 Loading...