

Page 1
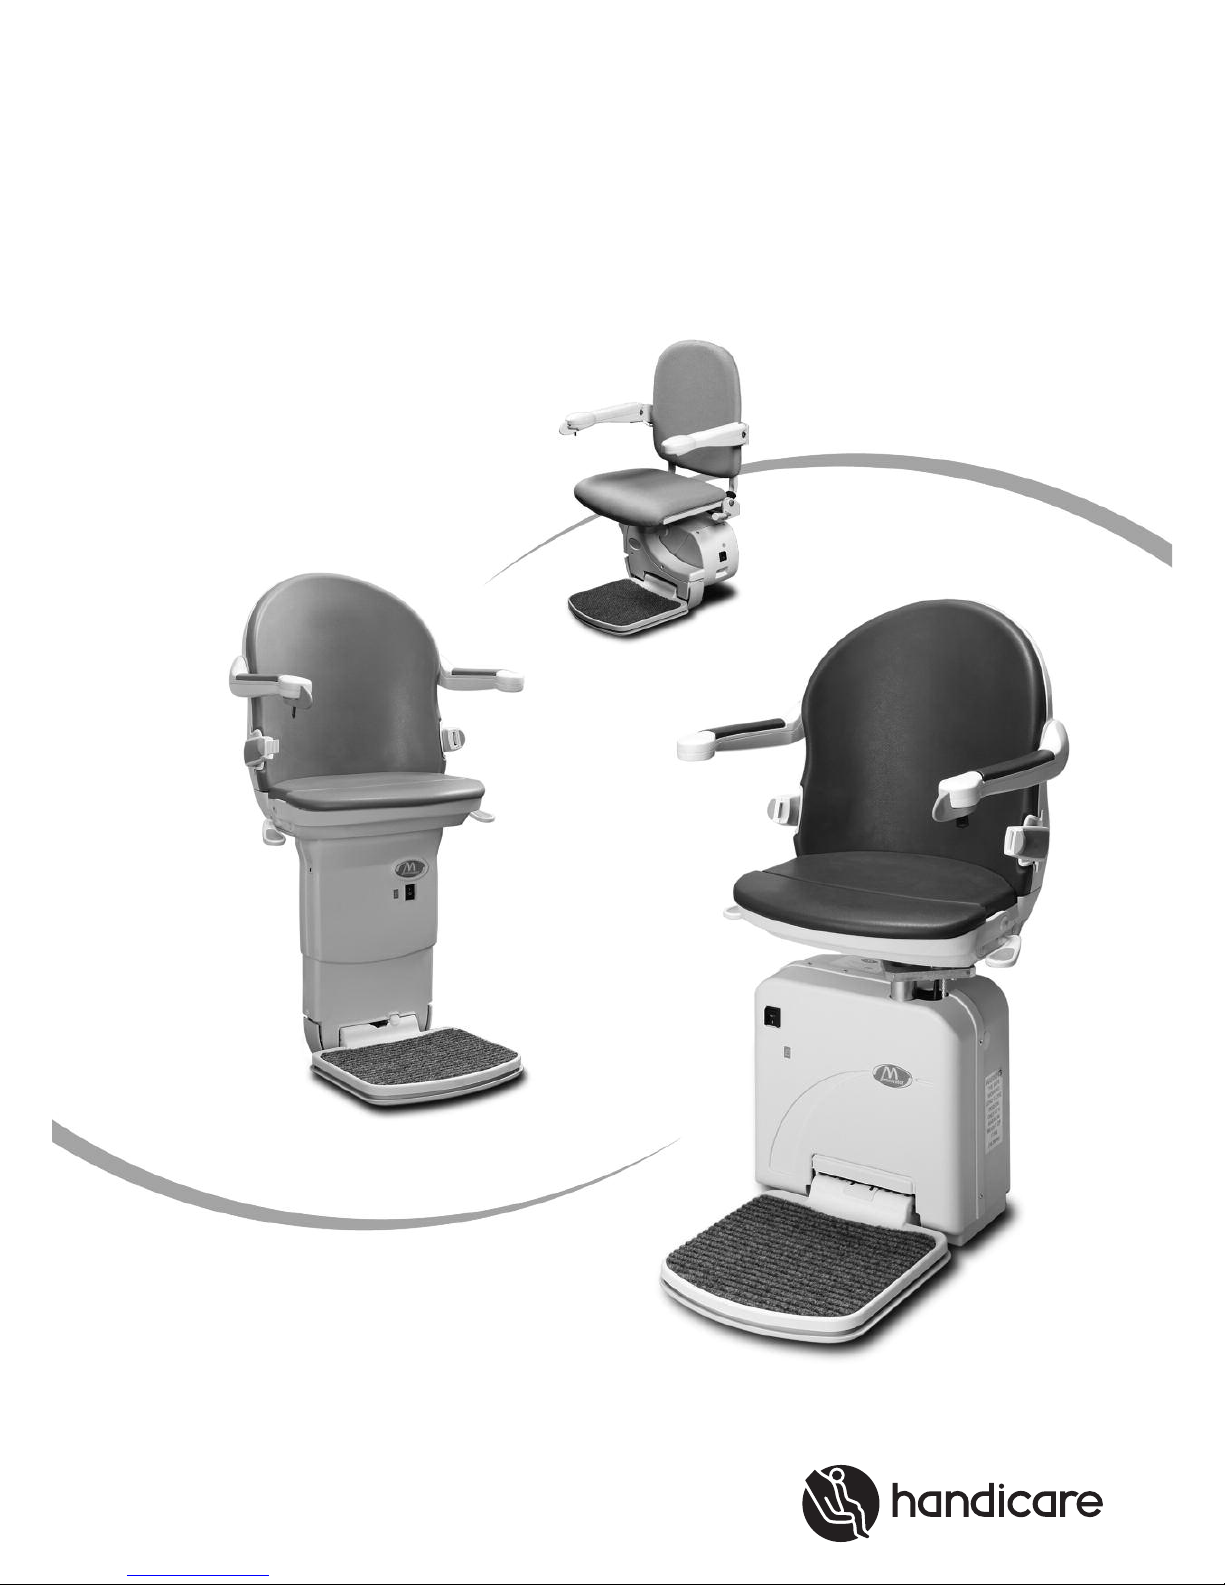
USER MANUAL
SIMPLICITY SERIES
MINIVATOR 1000
MINIVATOR 2000
Page 2

2 USER MANUAL
Contents
Features of your Minivator stairlift . . . . 3
Operating your Minivator stairlift
. . . . 4
Before use . . . . . . . . . . . . . . . . . . . . . . . . . . . . . . . . . . 4
On/off switch
. . . . . . . . . . . . . . . . . . . . . . . . . . . . . . . 4
Key switch
. . . . . . . . . . . . . . . . . . . . . . . . . . . . . . . . . 5
Operating toggle
. . . . . . . . . . . . . . . . . . . . . . . . . . . 5
Remote control
.
. . . . . . . . . . . . . . . . . . . . . . . . . . . .
6
Diagnostic display
. . . . . . . . . . . . . . . . . . . . . . . . . . 6
Emergency stop
. . . . . . . . . . . . . . . . . . . . . . . . . . . . 7
Operating the swivel
. . . . . . . . . . . . . . . . . . . . . . . 7
Folding your stairlift
. . . . . . . . . . . . . . . . . . . . . . . . 9
Slide Track
. . . . . . . . . . . . . . . . . . . . . . . . . . . . . . . . 10
Hinged track (powered)
. . . . . . . . . . . . . . . . . . . 11
Hinged track (manual)
. . . . . . . . . . . . . . . . . . . . . 12
Emergency hand winding instructions
. . . . 13
Trapped articles
. . . . . . . . . . . . . . . . . . . . . . . . . . . 13
Safety and servicing . . . . . . . . . . . . . . . . . . . 14
Annual service . . . . . . . . . . . . . . . . . . . . . . . . . . . . 14
Warnings and precautions
. . . . . . . . . . . . . . . . 14
Routine care and maintenance . . . . . 15
Battery care and charging . . . . . . . . . . . . . . . . 15
Care and cleaning
. . . . . . . . . . . . . . . . . . . . . . . . . 15
Disposal of your stairlift
. . . . . . . . . . . . . . . . . . . 15
Appendix 1 . . . . . . . . . . . . . . . . . . . . . . . . . . . . . . . 16
Diagnostic display
Appendix 2 . . . . . . . . . . . . . . . . . . . . . . . . . . . . . . . 20
Wiring diagrams
Appendix 3 . . . . . . . . . . . . . . . . . . . . . . . . . . . . . . . 22
Declaration of Conformity
Installation information . . . . . . . . . . . . . . . 23
Introduction
Thank you for choosing a Minivator stairlift
from Handicare. Please read these operating
instructions carefully. Your Minivator stairlift
has been designed and built with careful
attention to detail.
In order to obtain many years of trouble
free use please follow the instructions,
paying particular attention to the care
and maintenance requirements. Handicare
recommend that you do not undertake any
maintenance tasks other than the routine
care and cleaning explained in this handbook.
Please contact your Handicare dealer or our
Customer Service Department in the United
Kingdom on +44 (0) 8700 118282 if your
stairlift requires attention and we would be
pleased to help you.
European Standards
Handicare has been accredited as conforming
to the international standard of manufacturing,
recognised by the award of ISO 9001.
All Minivator stairlifts are built and tested
to conform to the European Standards –
EN 81-40:2008 as well as ISO 9386 -2:2000.
They also carry the CE mark.
Handicare are audited regularly to ensure we
continue to conform to ISO 9001 and this
provides you with the assurance of using a
high quality and well manufactured product.
In accordance with EN81-40:2008 the
emission sound pressure at the stairlift
operators position is expected not to
exceed 70dB(A).
Issue No of this manual is 0311-1
ORIGINAL LANGUAGE ENGLISH
Page 3
3
USER MANUAL 3
3
2
6 6
5
1
7
4
1
2
3
4
5
6
7
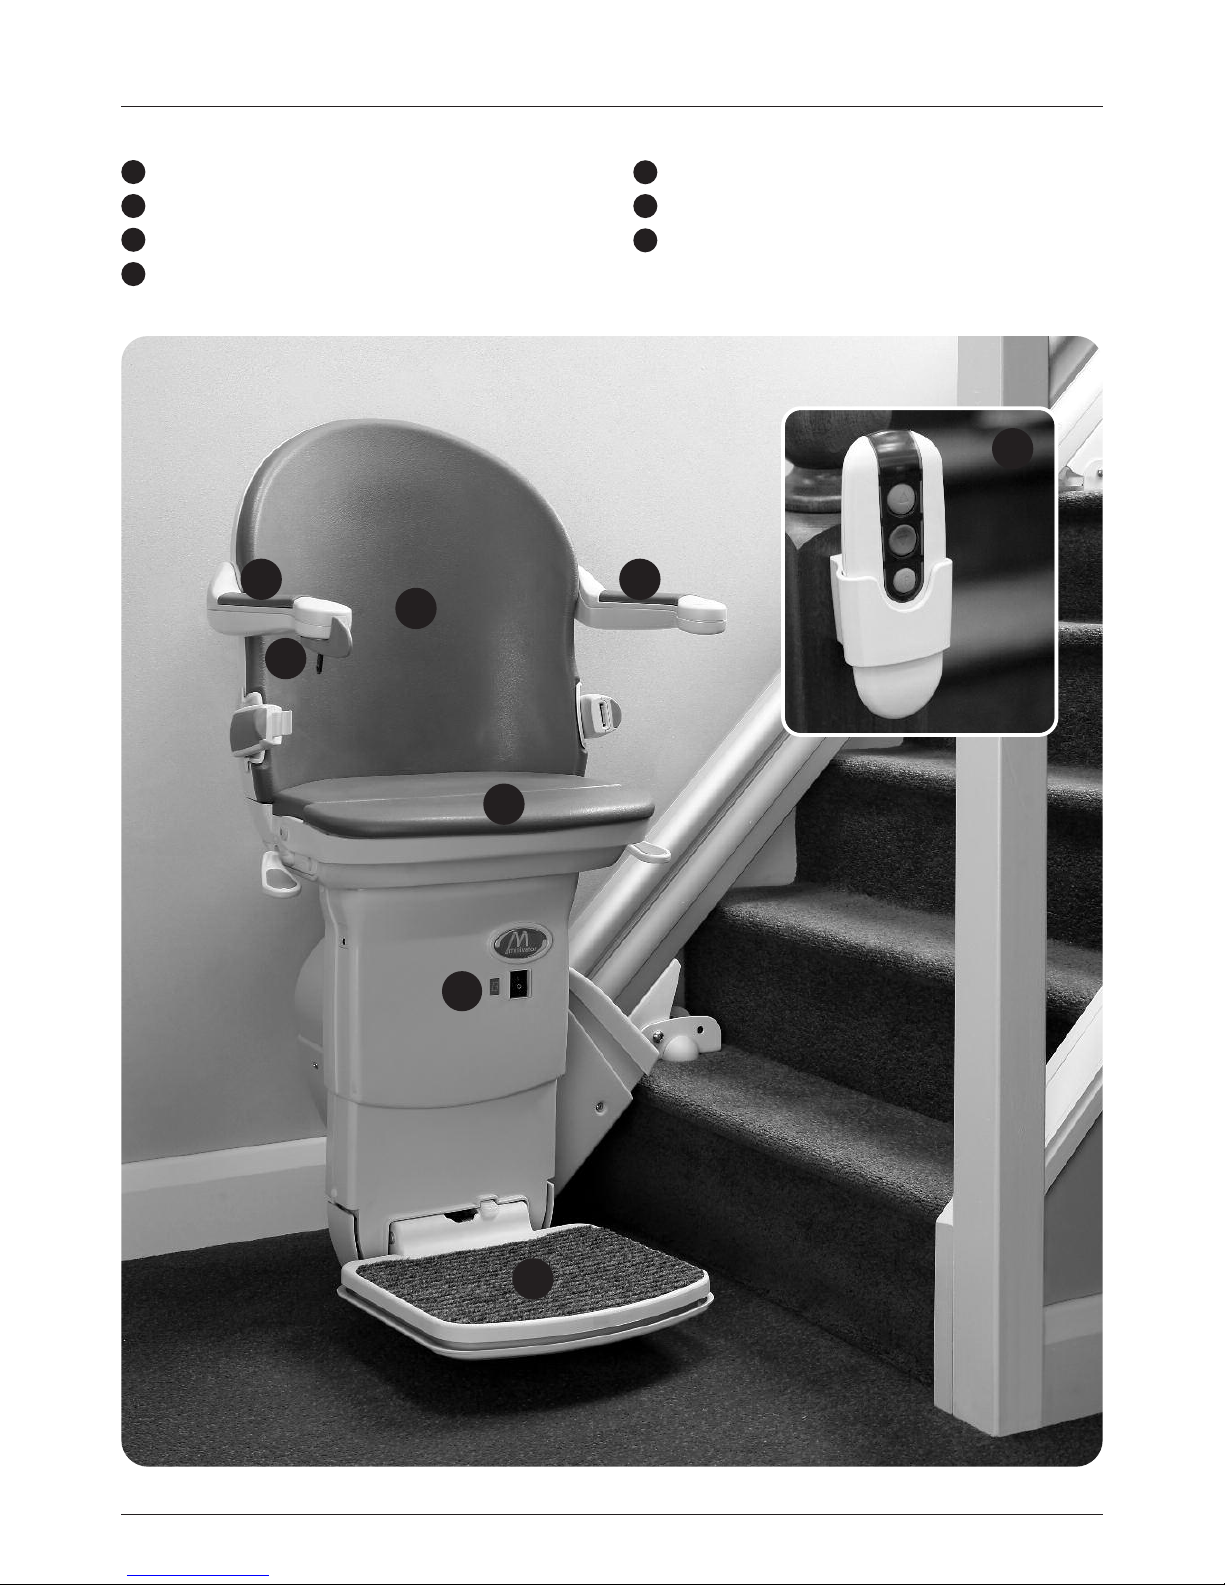
Features of your Minivator stairlift
Simple to operate key switch control
Folding armrests
Diagnostic display
Folding seat base
Swivel seat
Remote control
Folding footrest with safety edges
Page 4
4 USER MANUAL
4
Figure 2Figure 1
Operating your Minivator stairlift
Before use
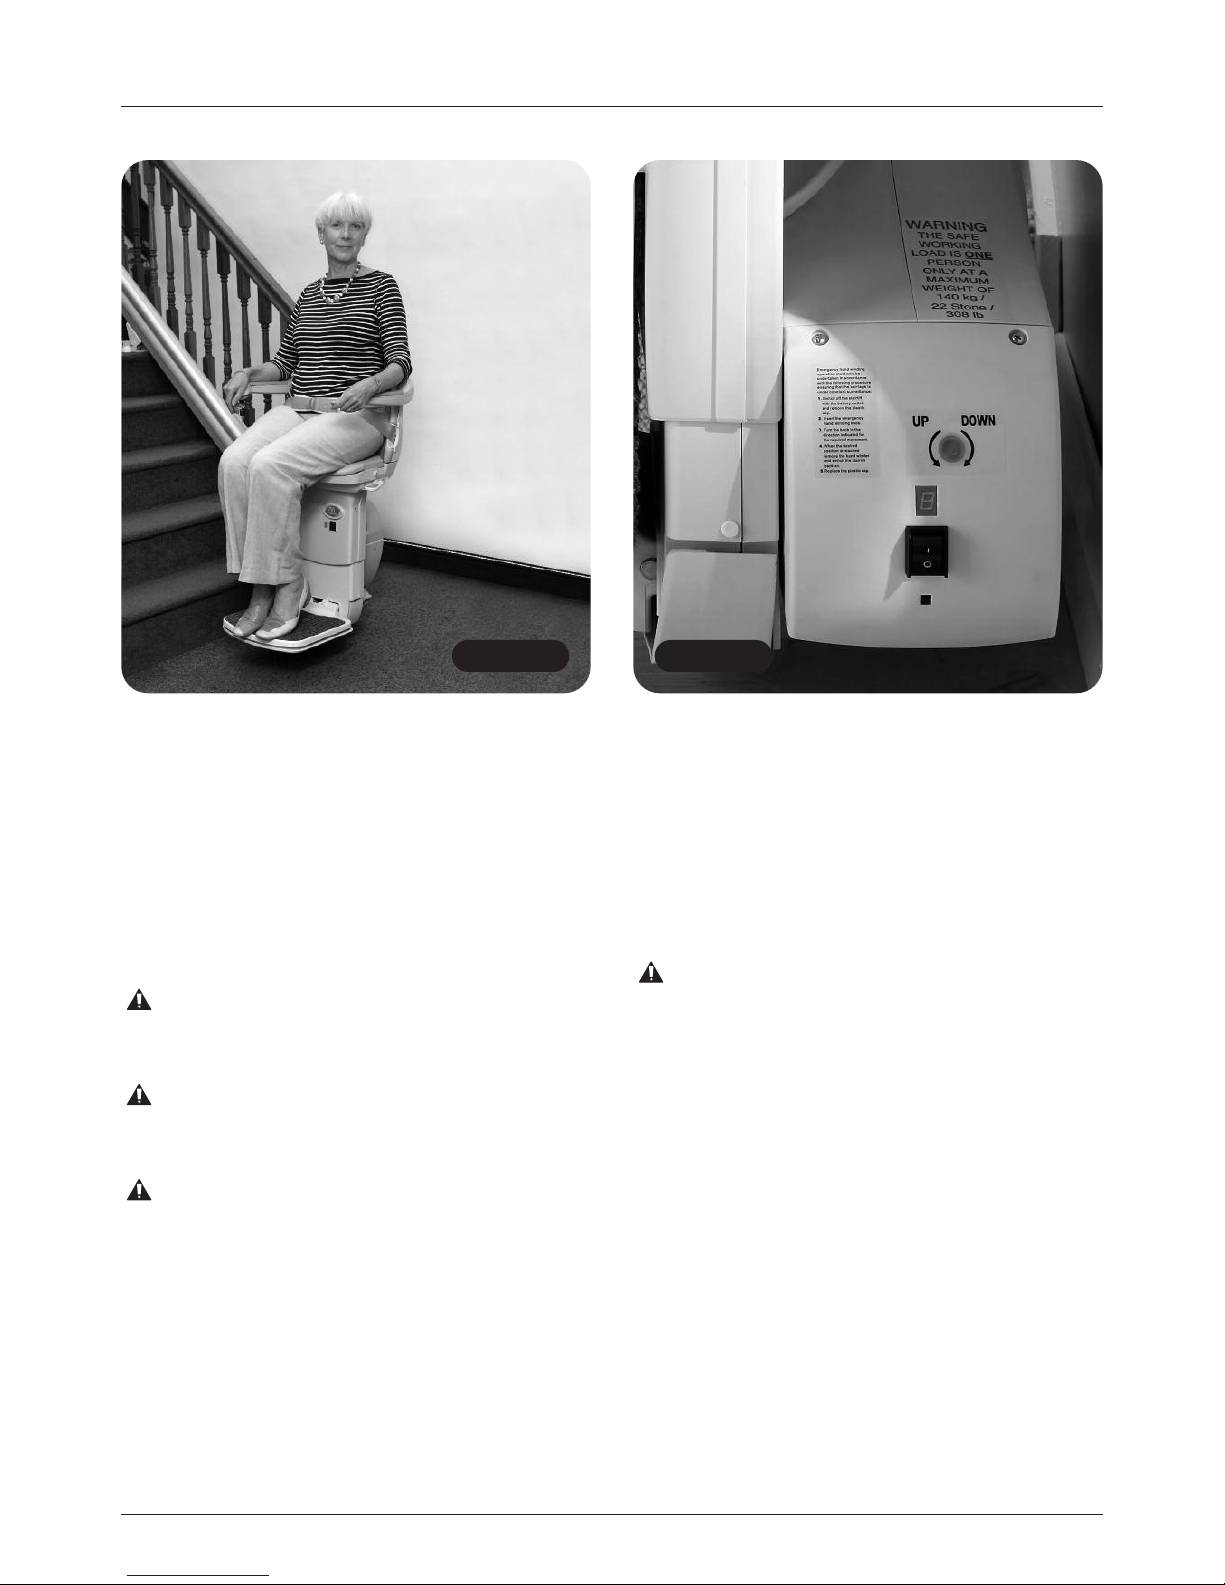
Before using your stairlift, MOST IMPORTANTLY
please ensure the stairs are clear of other people,
pets or any objects which may obstruct your
stairlift. Then ensure that the arms, footplate and
seat are folded down for use to ensure your
safety (Figure 1).
For your safety the stairlift will not operate
from the operating lever unless both arms
are in the down position.
BEFORE OPERATING YOUR
STAIRLIFT ALWAYS FASTEN
YOUR SAFETY BELT.
Users with poor upper body positioning or
control should have a body harness fitted.
On/off switch
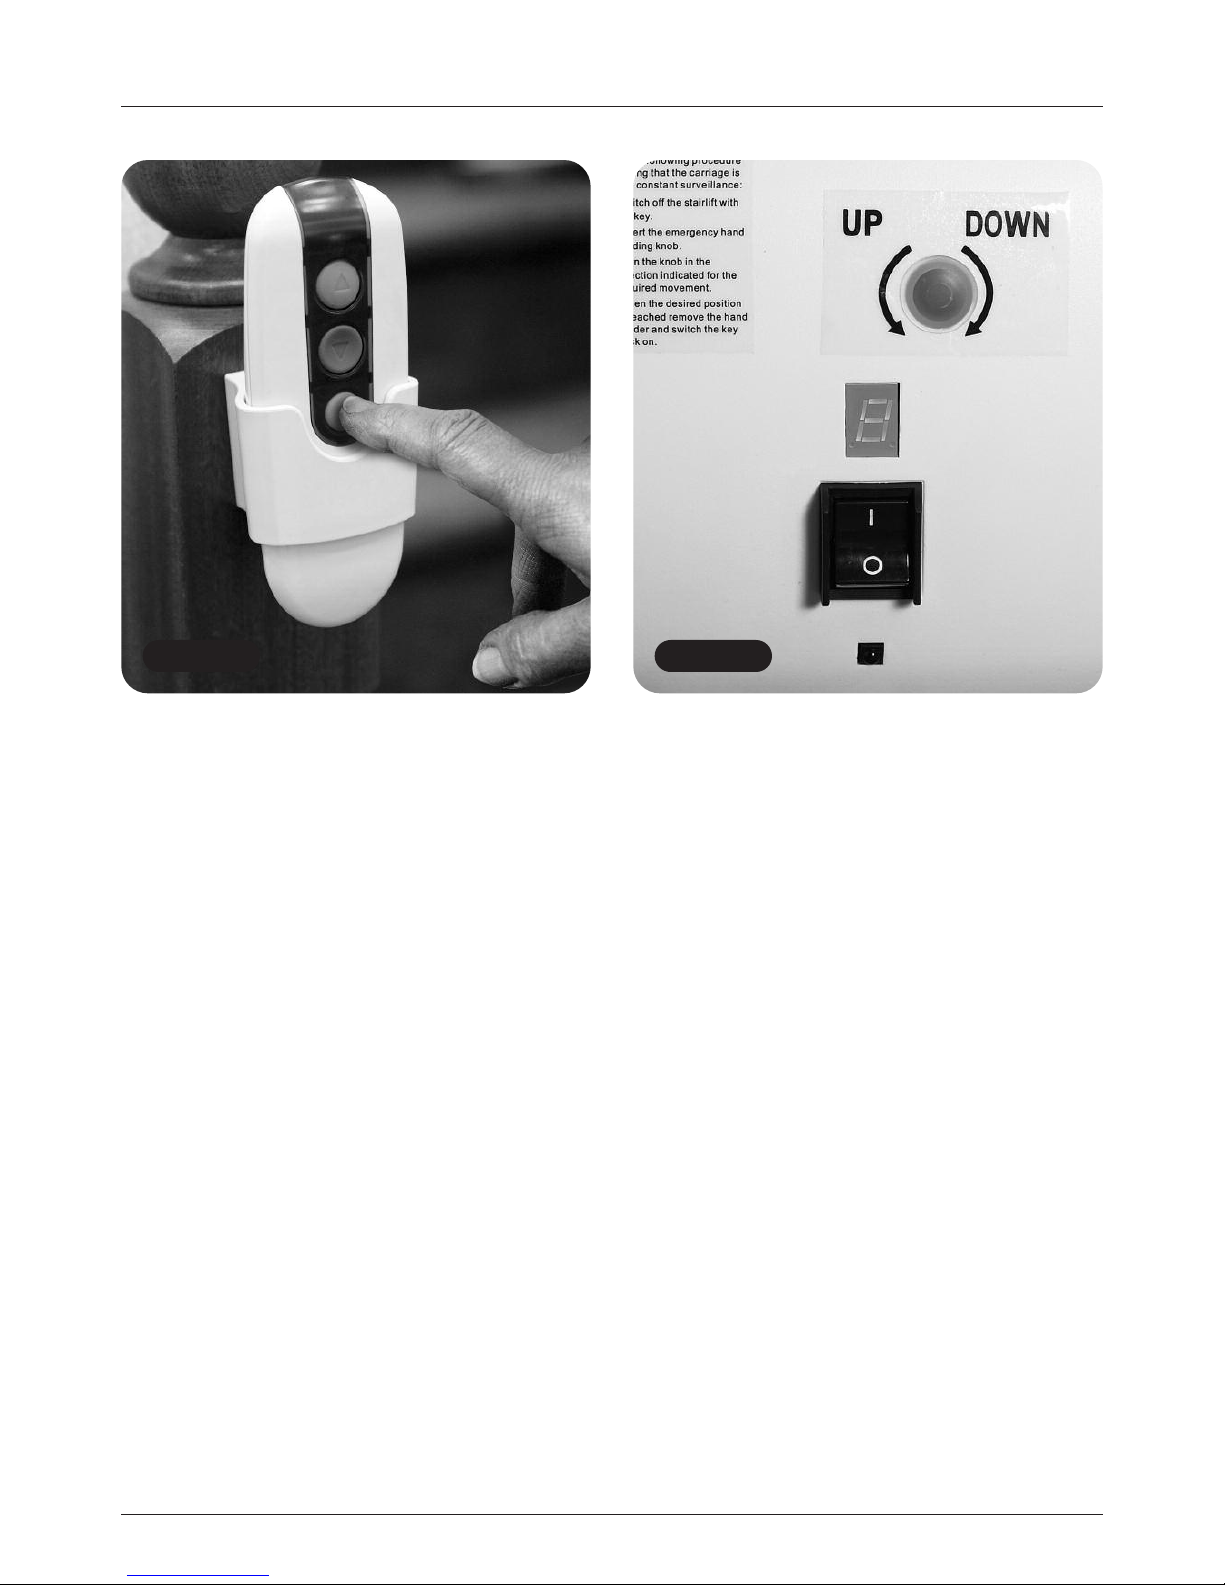
As well as a key switch your stairlift is fitted with
an on/off switch (Figure 2). This switch is either
located on the lower front panel of the lift or on
the downside panel of the main body of the lift
depending on your particular model.
Ensure that this is left in the ‘ON’ position.
The fault diagnosis display panel will be
illuminated to indicate this.
If you intend to be away from home for a long
period, and decide to switch off the mains supply,
it is important that you also switch off the lift from
this on/off switch.
This will ensure that the lift batteries will remain
charged while you are away.
Page 5
5
USER MANUAL 5
Figure 3 Figure 4
Operating toggle
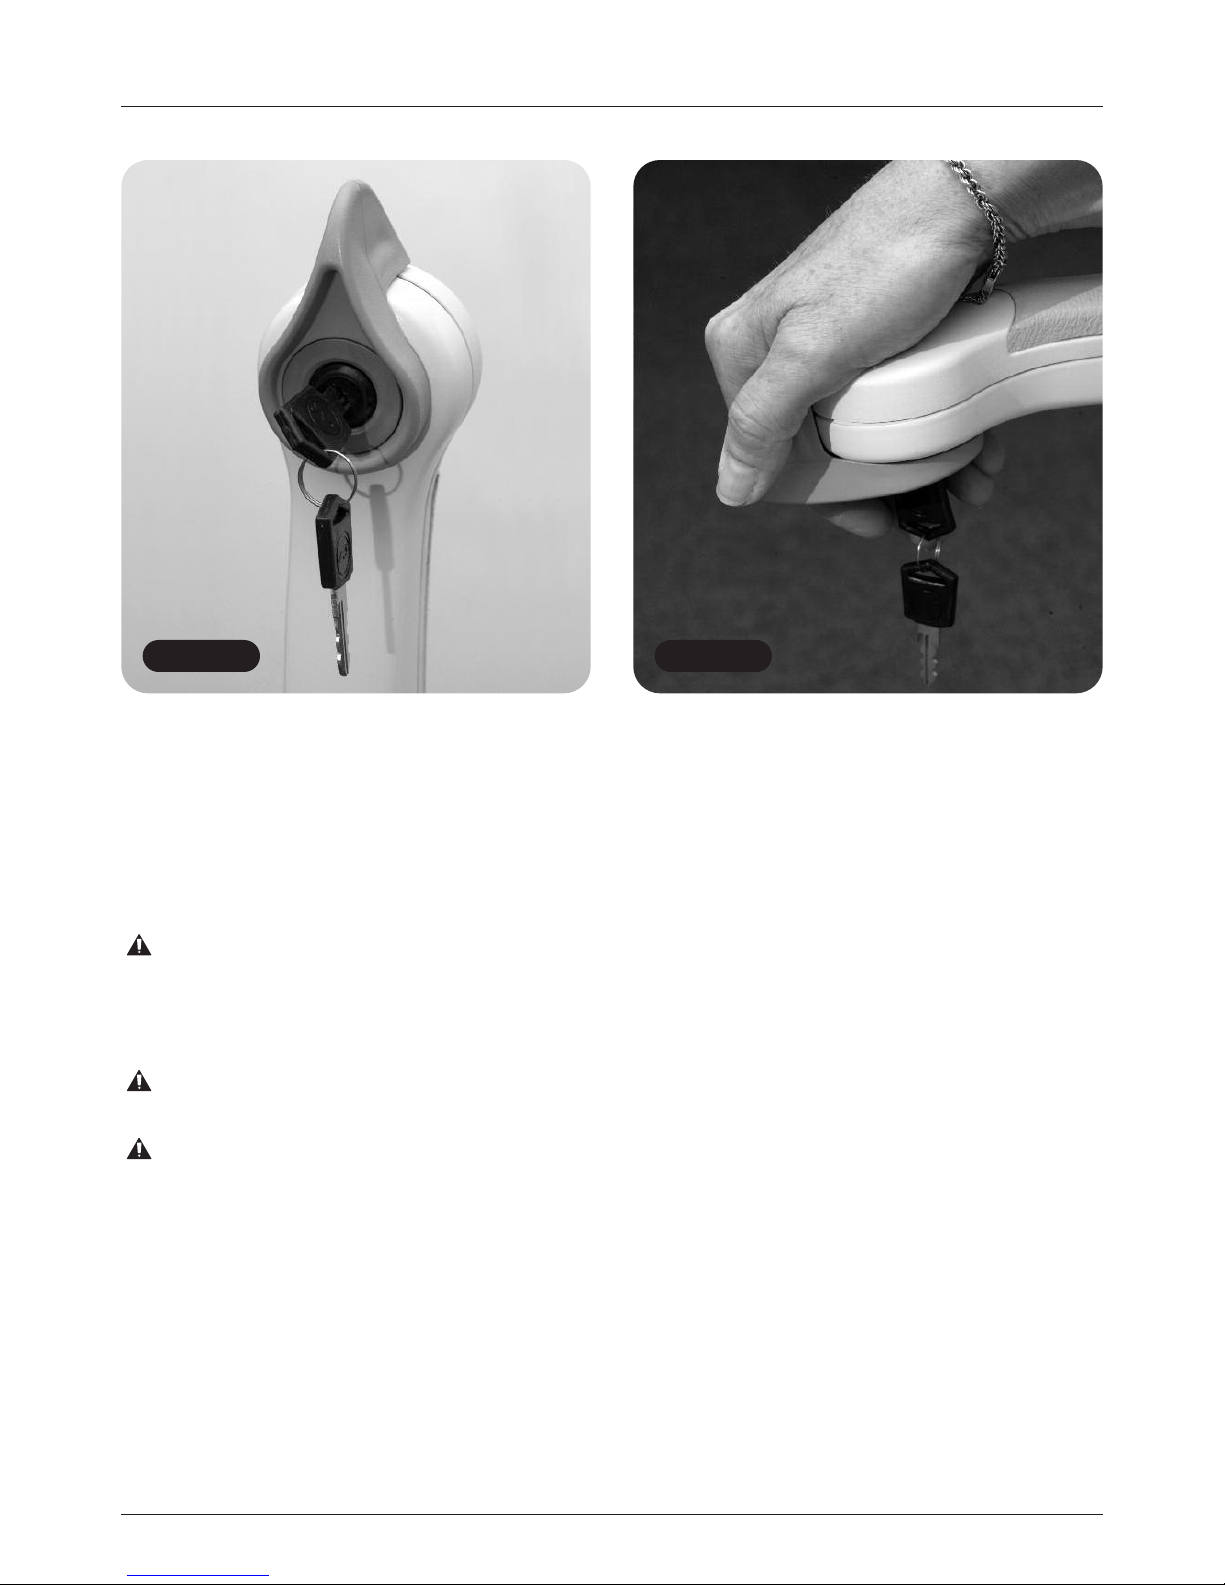
Your Minivator stairlift is operated by simply
pressing and holding the operating toggle in
the direction you wish to travel (Figure 4).
The stairlift will automatically stop when the
toggle is released or the stairlift has reached
the end of its travel.
PLEASE NOTE:
In the interest of safety, initial activation of the
stairlift is delayed by 1 second from pressing and
holding the operating toggle to avoid accidental
operation. If the toggle is released while the lift is
in motion, the lift will stop and a delay of 1 second
will occur before the toggle will re start the lift.
When changing the direction of travel the delay
will be 3 seconds before the lift begins to move.
Operating your Minivator stairlift
Key switch
Your Minivator stairlift is fitted with a key switch
(Figure 3). The stairlift cannot be operated
unless the key is inserted and turned to the
on position.
The key switch is provided to enable you
to lock the stairlift to prevent it being used
by others (for example children).
However, it can be left in the on position if desired.
If you remove your key for safety reasons,
please ensure you put it in a safe place.
For safety reasons, we recommend that
the key switch is turned off when the lift
is not in use.
If the key switch is turned off the lift will continue to
charge provided it is parked on a charge contact.
Page 6
6 USER MANUAL
Figure 5 Figure 6
Operating your Minivator stairlift
Remote control
The remote control (Figure 5) is used to call
the lift to either the top/bottom of the stairs or
to operate a powered folding hinge where fitted.
The control may also be used by an attendant
where the user is unable to operate the stairlift
themselves.
The attendant should always remain off
the staircase until the stairlift is stationary.
Diagnostic display
The stairlift is fitted with a diagnostic display
(Figure 6) that displays a code to help diagnose
faults. The display is either mounted on the lower
front panel of the lift or on the downside panel
of the main body of the lift depending on your
particular model. Refer to Appendix 1 for an
explanation of the diagnostic codes. If you
should experience a problem with your lift please
examine the display and make a note of any
codes that are displayed. Please inform the
customer services operator of these codes
when reporting any fault.
Page 7
7
USER MANUAL 7
Figure 8Figure 7
Operating your Minivator stairlift
Operating the swivel
A swivel seat is provided to enable you to
mount/dismount the seat more easily at the top
of the stairs by swivelling you on to the landing.
To operate the seat swivel, wait until the stairlift
has stopped.
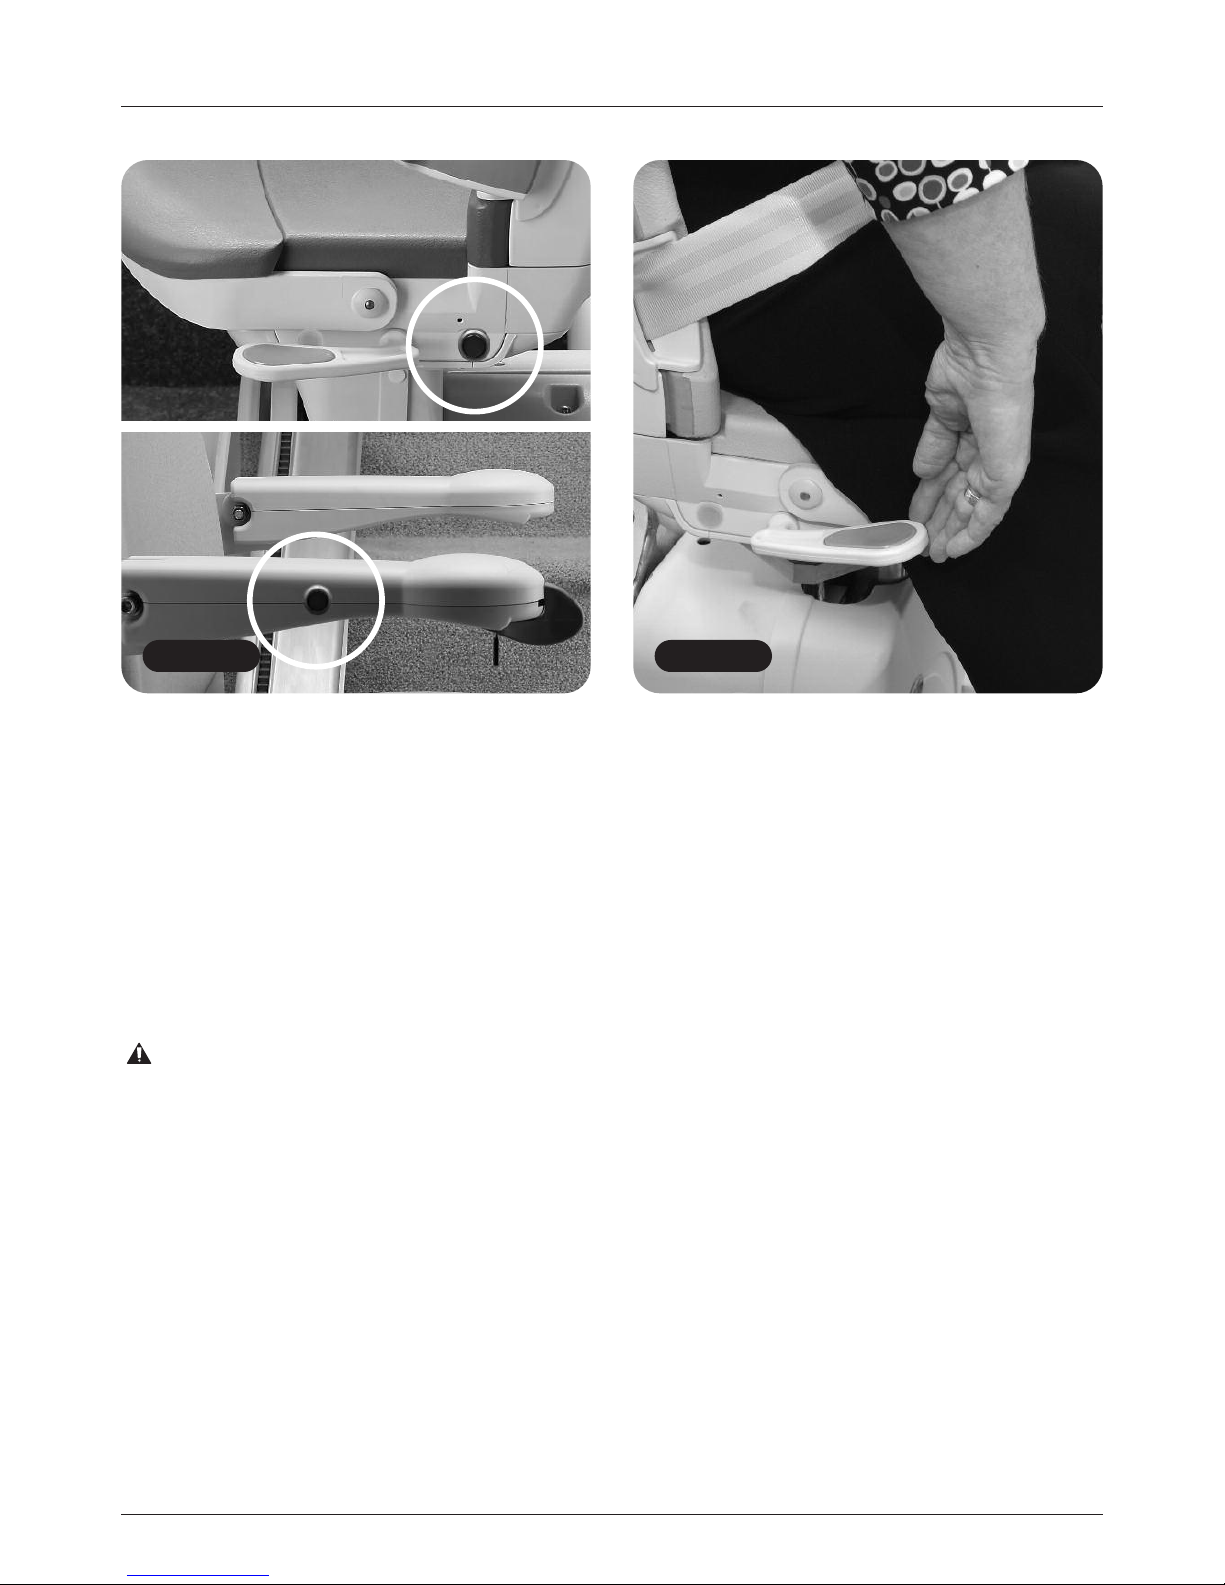
To swivel the seat hold either (there is one both
sides of the seat) swivel lever down or pull it up
(only up on the Simplicity or Simplicity
L
model).
This will release the seat lock and allow you to
move the seat round by pushing away from the
footplate. When the seat reaches 90 degrees it
will lock in position (Figure 8).
You should not attempt to leave the seat until
it has firmly ‘clicked’ into its locked position.
To swivel in the opposite direction follow the same
procedure, but push away from the landing.
Emergency stop
In the event of an emergency the Stairlift and all
its powered features can be stopped by pressing
the emergency stop button.
The emergency stop button is the red button
located on the upside of the seat base, or
the control arm on a Simplicity or Simplicity
L
(Figure 7). When activated the button will light up.
The emergency stop button will completely
immobilise the lift. To restore normal operation
press the button for a second time.
Page 8
8 USER MANUAL8 USER MANUAL
8
Figure 9
Operating your Minivator stairlift
Power operated swivel (optional)
In order to swivel the seat hold the operating
toggle in the up direction. When the stairlift
reaches the top of the stairs continue to hold the
operating toggle in the up direction. The stairlift
will beep three times and then the seat will swivel.
When the seat is fully swivelled to 90 degrees the
seat will stop.
You should not attempt to leave the seat until
it is fully rotated.
To swivel in the opposite direction follow the
same procedure in reverse. Push the operating
lever in the down direction. The seat will beep
three times and then after a short pause it will
rotate to the driving position. Continue to hold
the operating lever in the down direction. The
stairlift will then again beep three times before
beginning its descent.
PLEASE NOTE:
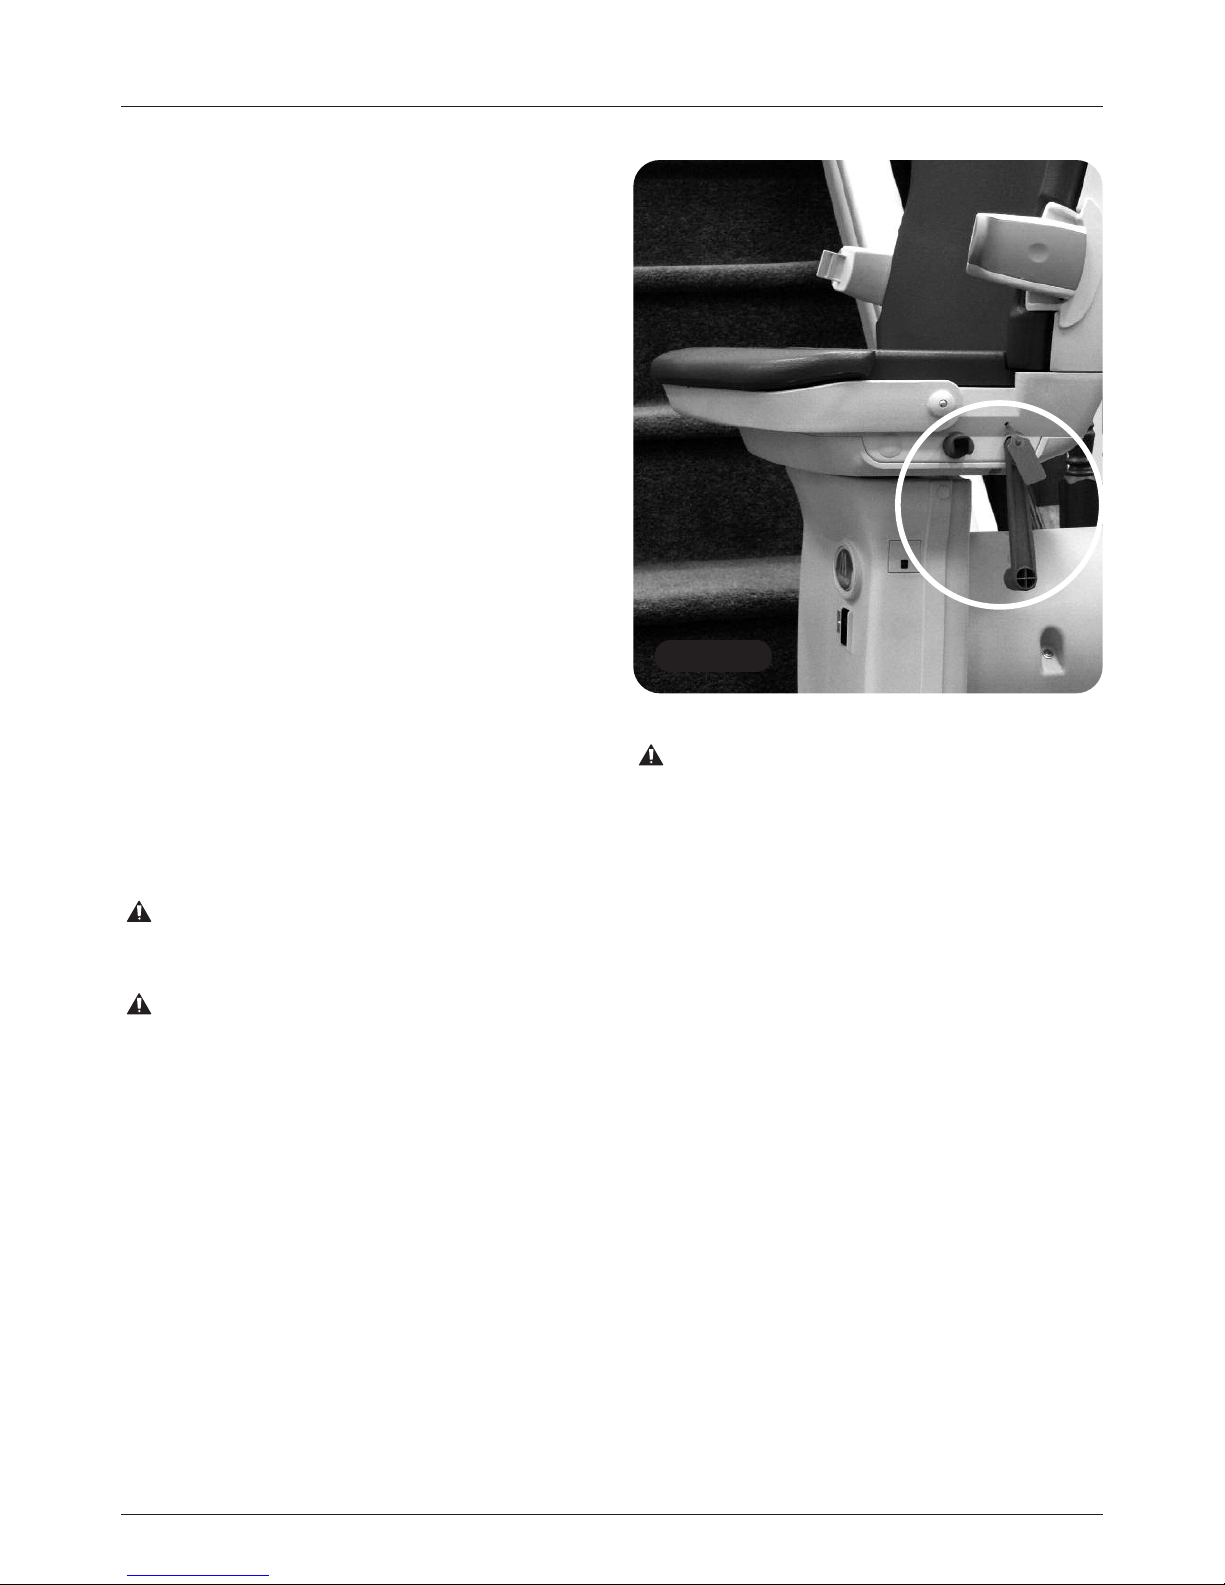
In an emergency, should the power swivel fail to
operate, a red emergency swivel lever is attached
to the downside of the lift. The emergency lever
should be twisted to break the anti-tamper seal
and must be held in place to operate the swivel
mechanism (Figure 9).
YOU SHOULD REPORT A FAILURE IN THE
POWER SWIVEL MECHANISM IMMEDIATELY
TO YOUR SERVICE PROVIDER.
SHOULD YOU REQUIRE A REPLACEMENT
ANTI-TAMPER SEAL CONTACT YOUR
DEALER OR HANDICARE.
SAFETY PRECAUTIONS
NEVER
Swivel the seat without the safety belt fastened.
NEVER
Mount or dismount the swivel seat unless it is
locked in position.
NEVER
Try to operate the swivel seat whilst the stairlift is
in motion. (As a safety precaution, should you try
to use it whilst the lift is in motion, it will cause the
lift to stop).
NEVER
Attempt to travel up or down the staircase unless
the seat is in the correct position (i.e. facing
directly across the staircase).
Page 9
USER MANUAL 9
Figure 10 Figure 11
9
Folding your stairlift
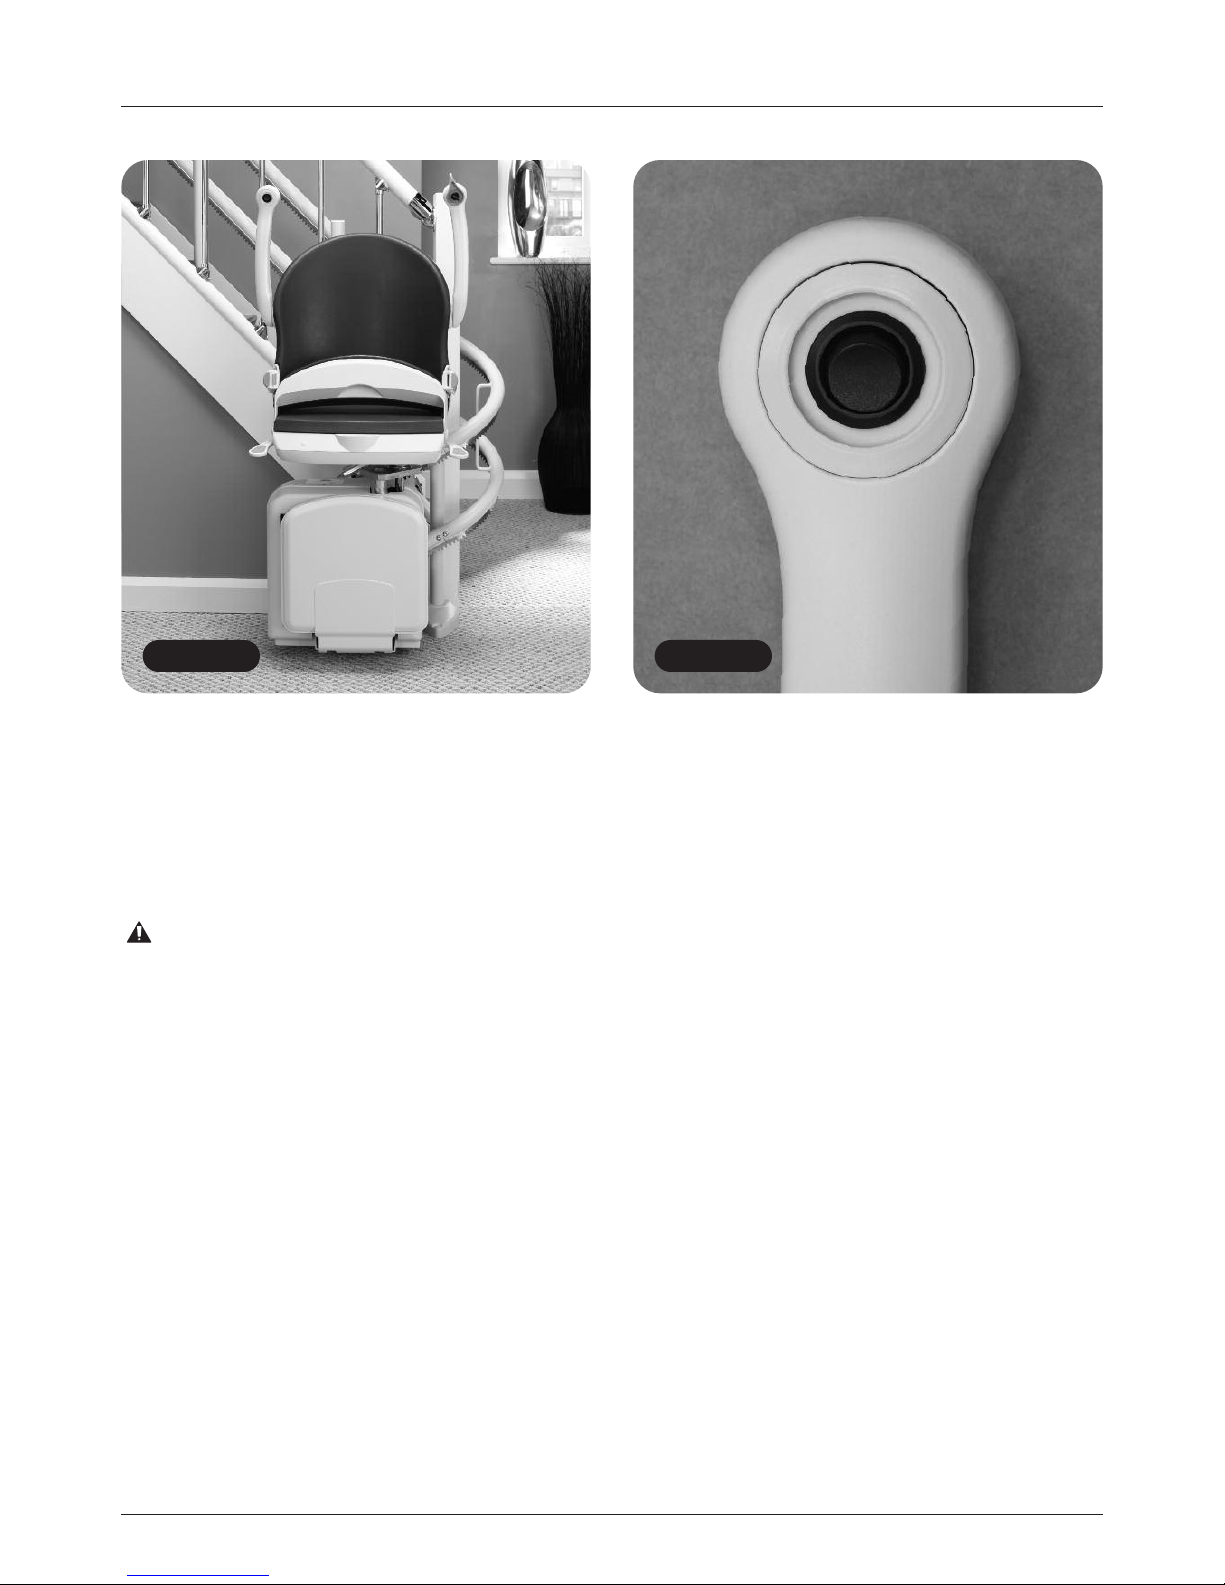
Your Minivator stairlift seat, armrests and footrest
can be folded to allow easier passage up and
down stairs when it is not in use (Figure 10).
SAFETY PRECAUTION
ALWAYS RETURN THE STAIRLIFT TO ITS
STOWED POSITION. I.E. WITH ARMRESTS,
SEAT AND FOOTREST FOLDED AND THE
CHAIR PARALLEL TO THE TRACK AS SHOWN
IN FIGURE 10, SO THAT EXITS ARE NOT
OBSTRUCTED.
Power footplate –
seat squab operated (optional)
If your stairlift is fitted with a power footplate
operated from the seat squab it will automatically
fold away the footplate when the front seat
squab is lifted. It will also lower the footplate
when the front seat squab is lowered.
Power footplate –
arm switch operated (optional)
If your stairlift is fitted with a power footplate
operated from the arm it will have an additional
switch under the arm (Figure 11). To lower the
footplate, use the rocker switch under the arm.
To lift the footplate move the rocker switch to
its alternate position.
PLEASE NOTE:
If moving the footplate while seated on the
stairlift please ensure your feet do not obstruct
the footplate whilst it is in motion.
Operating your Minivator stairlift
Page 10
10 USER MANUAL10 USER MANUAL
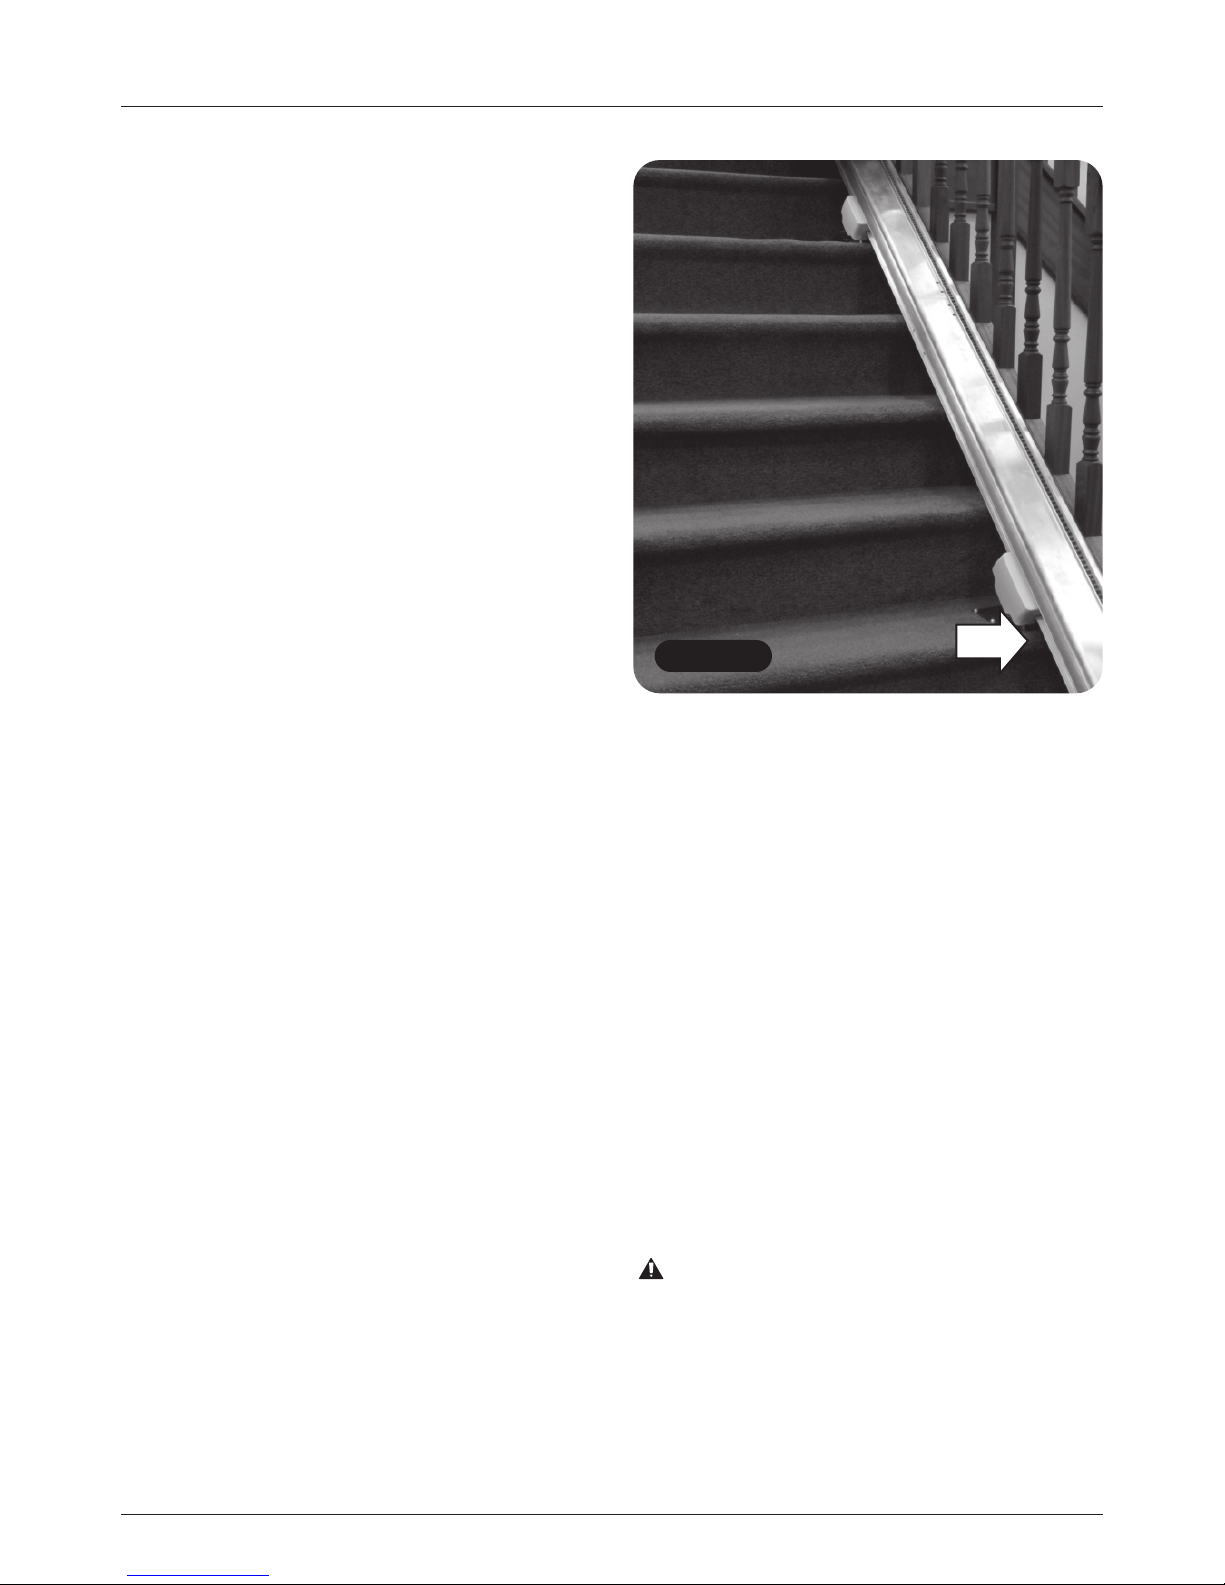
Figure 12
Operating your Minivator stairlift
IN THIS SITUATION KEEP THE TOGGLE
PRESSED IN THE DIRECTION OF TRAVEL
UNTIL ALL MOTION HAS CEASED.
Parking the Stairlift
WHEN THE STAIRLIFT IS NOT IN USE IT
SHOULD BE MOVED AWAY FROM THE
BOTTOM OF THE STAIRS SO THAT IT DOES
NOT CAUSE AN OBSTRUCTION.
To park the stairlift, press and hold the UP button
on the handset. The lift will travel up the stairs
and the Slide Track will move in the UP direction.
Continue to hold the UP button until the Slide
Track and stairlift are no longer causing an
obstruction. If you release the UP button the lift
or Slide Track will stop moving. To continue,
press and hold the UP button again. After a short
delay movement will start again.
WARNING
BEFORE YOU OPERATE THE SLIDE TRACK
PLEASE REMOVE ANY OBSTACLES
WHICH MAY OBSTRUCT THE TRACK.
Minivator Slide Track
or Hinged track
In some installations a hinged track or Minivator
Slide Track may be necessary, usually to move
the track out of the way of the doorway at the
foot of the stairs.
The Minivator powered hinged track and Slide
Track are fully automatic in operation and will
function as follows:
Minivator Slide Track
(optional)
Going up the stairs
Mount the stairlift as previously directed and push
the operating toggle in the up direction. The stairlift
will, after a short delay, move up the stairs. Both
the stairlift and the Slide Track will move at the
same time, though the stairlift will only travel at half
speed whilst the track is also moving.
Once the Slide Track has reached the end of its
travel (maximum 400mm) the stairlift will gradually
increase to its normal running speed and
continue to the top of the stairs – KEEP THE
TOGGLE PRESSED IN THE UP DIRECTION.
Going down the stairs
Mount the stairlift as previously directed and
push the operating toggle in the down direction.
The stairlift will, after a short delay, move down
the stairs. Both the stairlift and the Slide Track will
move at the same time, though the stairlift will
only travel at half speed whilst the track is also
moving. Once the Slide Track has reached the
end of its travel (maximum 400mm) the stairlift
will gradually increase to its normal running
speed and continue to the bottom of the stairs –
KEEP THE TOGGLE PRESSED IN THE DOWN
DIRECTION. ON SHORTER TRACKS THE
STAIRLIFT MAY REACH THE END OF THE
TRACK BEFORE THE SLIDE TRACK REACHES
THE END OF ITS TRAVEL.
Page 11
USER MANUAL 11
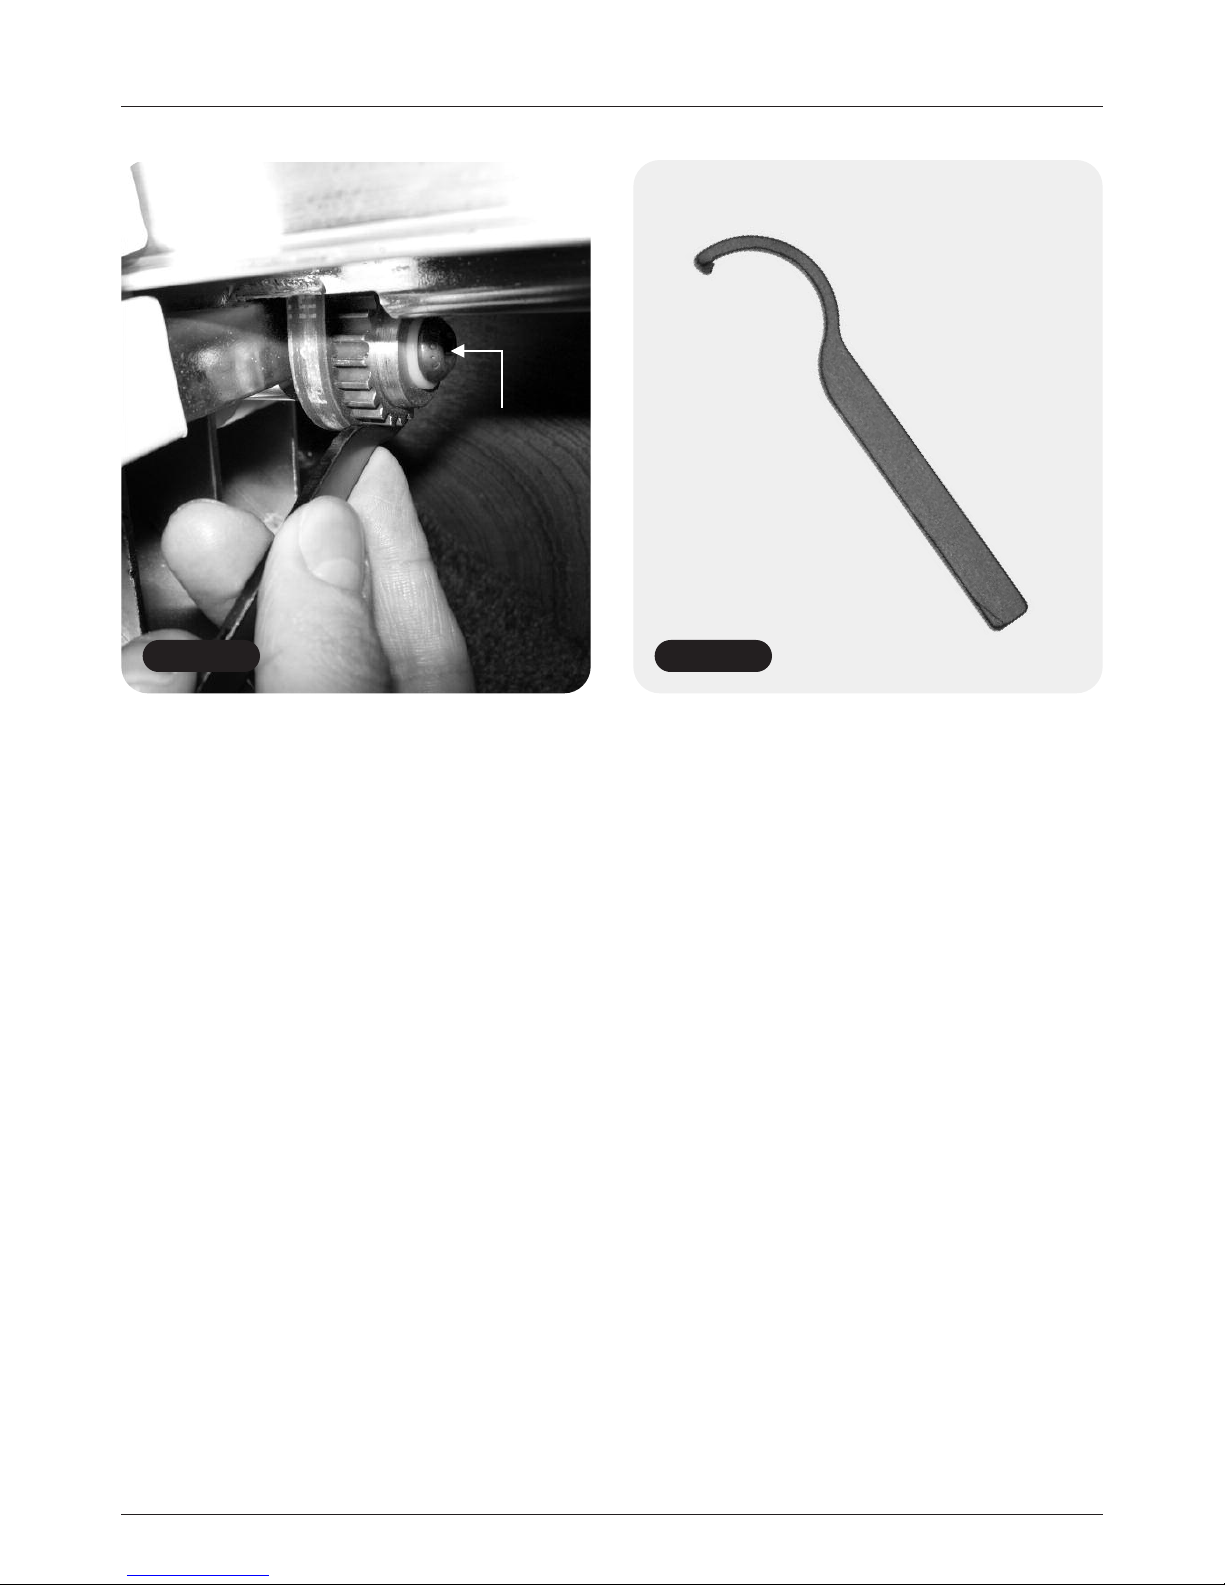
Figure 13 Figure 14
Locking
bolt
11
Hinged track
powered (optional)
Going up the stairs
Mount the stairlift as previously directed and
push the operating toggle in the up direction.
The stairlift will, after a short delay, move up the
stairs. Once the lift has passed the hinged track
section it will stop – KEEP THE TOGGLE
PRESSED IN THE UP DIRECTION. At this time
the seat will beep three times whilst the hinge
track automatically folds itself away. When the
hinge is fully folded the stairlift will continue to the
top of the stairs.
Going down the stairs
Mount the stairlift as previously directed and
push the operating toggle in the down direction.
The stairlift will, after a short delay, move down
the stairs. Before the lift has reached the hinged
track section it will stop – KEEP THE TOGGLE
PRESSED IN THE DOWN DIRECTION.
Emergency Manual Override
Your Slide Track is fitted with a manual override
that allows the track to be moved in case of an
emergency. This is positioned towards the
bottom of the track (Figure 12).
To move the Slide Track manually you must first
loosen the locking bolt (Figure 13). Use the
spanner supplied (Figure 14) as shown in
(Figure 13) to move the Slide Track.
Operating your Minivator stairlift
Page 12
12 USER MANUAL12 USER MANUAL
12
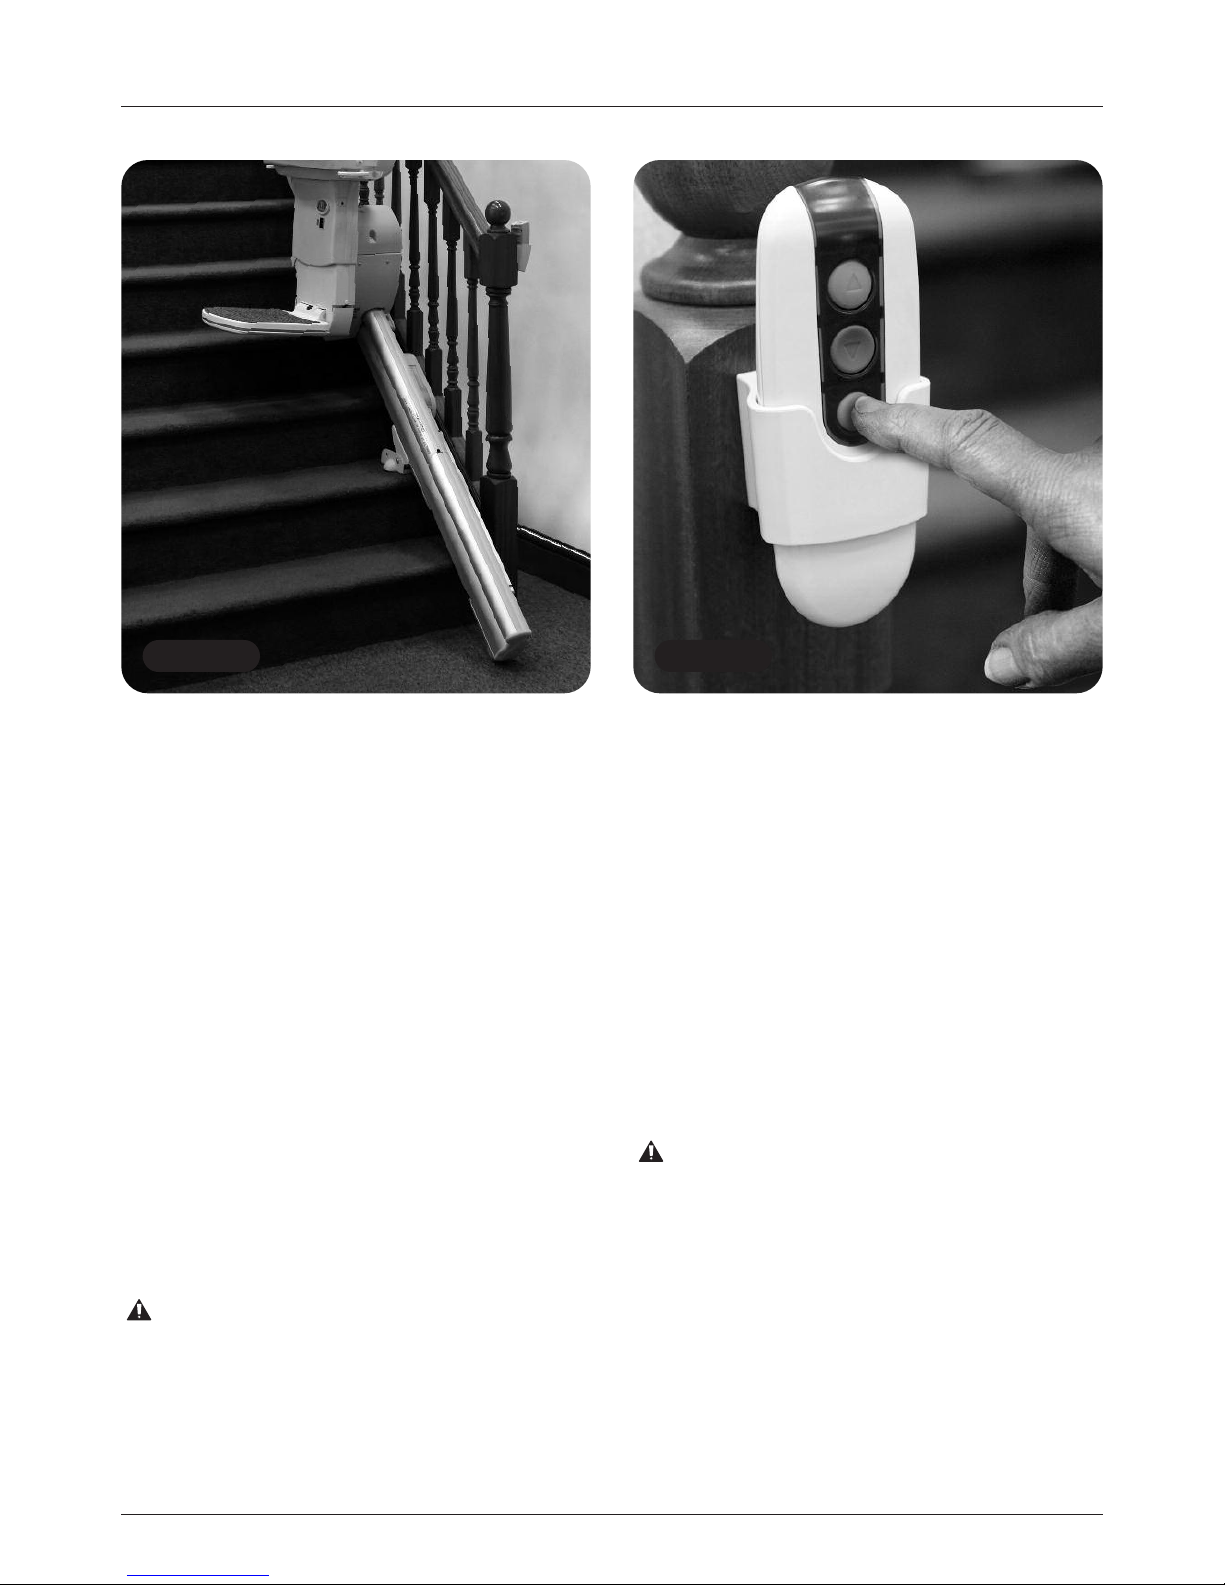
Figure 15 Figure 16
Operating your Minivator stairlift
At this time the seat will beep three times
whilst the hinge track automatically folds open
(Figure 15). When the hinge is fully open the
stairlift will continue to the bottom of the stairs.
Parking the Stairlift
WHEN THE STAIRLIFT IS NOT IN USE IT
SHOULD BE MOVED TO ITS PARK POSITION
SO THAT IT DOES NOT CAUSE AN
OBSTRUCTION.
THE STAIRLIFT DOES NOT CHARGE WHEN IT
IS PARKED AT THE BOTTOM OF THE STAIRS.
To park the stairlift, press and hold the P button
on the handset (Figure 16). The lift will travel up
the stairs to its park position and the hinge will
automatically fold itself. If you release the P
button the lift or track will stop moving. To
continue, press and hold the P button again.
After a short delay movement will start again.
WARNING
BEFORE YOU OPERATE THE HINGED
TRACK PLEASE REMOVE ANY OBSTACLES
WHICH MAY OBSTRUCT THE TRACK.
Hinged track
manual (optional)
Before raising the manual hinged track park
the stairlift on the charge points, above the
hinge, or at the top of the stairs.
Your stairlift will not work unless the track has
been lowered.
When you stairlift is not in use it should always
be positioned away from the hinged section
at a charging point with the hinge in the raised
position.
WARNING
BEFORE YOU OPERATE THE HINGED
TRACK PLEASE REMOVE ANY OBSTACLES
WHICH MAY OBSTRUCT THE TRACK.
Page 13
USER MANUAL 13
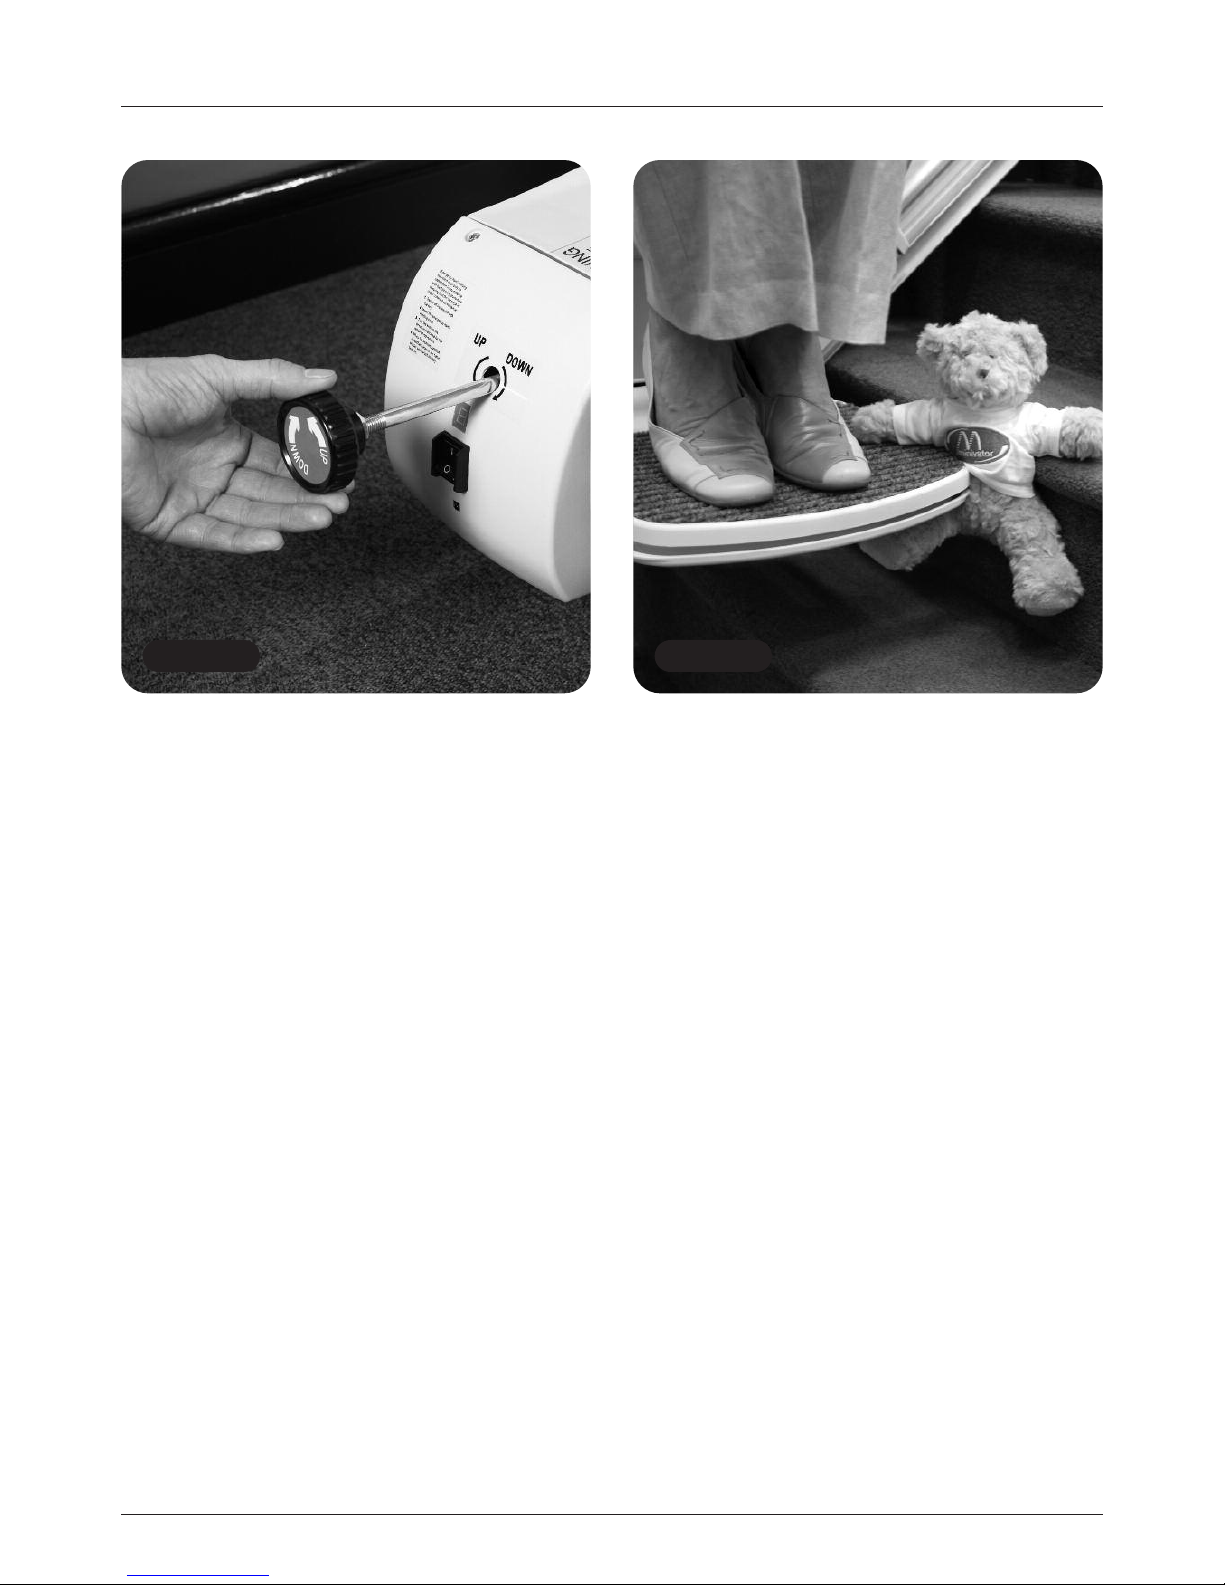
Figure 17 Figure 18
USER MANUAL
13
Trapped articles
Your stairlift is fitted with safety edges on the
bottom of the footrest and on the lift itself that
will stop the stairlift should any article become
trapped by the footrest (Figure 18).
To remove the article reverse the stairlift
away from the object then have the object
removed from the staircase. Proceed on
your stairlift as normal.
Emergency hand
winding instructions
In the unlikely event that the lift has a total power
failure or runs on to the final track stops there is
an emergency hand winding procedure. Please
follow these steps:
1 Switch off the stairlift with the key.
2 Insert the emergency hand winding knob
(Figure 17). The position of the hand winding
hole will always be on the downside main
body panel, regardless of the model that you
have.
3 Turn the knob in the direction indicated for the
required movement.
4 When the desired position is reached remove
the hand winder and switch the lift on.
If in any doubt contact your local Handicare
approved dealer or ring Handicare direct on
+44 (0) 8700 118282.
Operating your Minivator stairlift
Page 14

14 USER MANUAL14 USER MANUAL
14
Safety and servicing
Annual service
We advise that your stairlift is serviced after
the first 12 months and thereafter AT LEAST
EVERY 12 MONTHS. The service history log
must be filled in regularly as a proof of specified
maintenance. Failure to do so may invalidate
the product warranty.
This work must be carried out by a competent
person, i.e. a Handicare approved dealer.
If in doubt, please contact the Handicare Service
Department on +44 (0) 8700 118282.
If you own your stairlift and no longer require it
your dealer or Handicare may be interested in
purchasing it.
Warnings and
precautions
NEVER
Allow more than one person to use the stairlift at
any one time.
The maximum carrying capacity is dependant on
the model that you have:
NEVER
Allow children to play on or with the stairlift.
NEVER
Allow water to come into contact with the
components in the stairlift. If you have to
transport liquids DO SO WITH CARE.
NEVER
Use the stairlift without using the safety belt,
or any other harnesses fitted.
NEVER
Use the stairlift in a standing position.
NEVER
Place objects in the track or leave objects on
the stairs, where they could come into contact
with the lift in operation. Your stairlift is fitted with
pressure sensitive side edges and undertray on
the footplate, which will automatically stop the
lift if it detects any obstructions.
ALWAYS
Keep your FEET ON THE FOOTPLATE whilst the
stairlift is in motion, and try to avoid your feet
hanging over the edges of the footplate.
NEVER
Swivel the seat until the lift has come to a stop
at the top or bottom of the staircase.
ALWAYS
Fold the chair when it is not in use to avoid
obstructing exits.
WARNING
If the overspeed governor is activated it should
only be reset by a competent person, i.e. a
Handicare approved dealer. Activation of the
overspeed governor is indicated by the lift not
being able to be driven down the stairs and the
diagnostic display showing 0.
NEVER
Use for firefighting or evacuation during a fire.
NEVER
Use the track as a handrail.
Simplicity 950 series 140kg (22 Stone/310lb)
Simplicity 950 series
with Slide Track/hinge 120kg (19 Stone/265lb)
1000 series standard
or with hinge/platform 137kg (21 ½ Stone/300lb)
1000 series heavy duty 160kg (25 Stone/350lb)
1000 series US standard
2000 series 115kg (18 Stone/252lb)
2000 series heavy duty 137kg (21 ½ Stone/300lb)
Page 15

Routine care and maintenance
USER MANUAL 15
Care and cleaning
Before cleaning any part of your Minivator stairlift,
please ensure you have removed the key.
Your Minivator stairlift is manufactured from a
variety of materials, all with easy “wipe clean”
surfaces. The seat and body covers can be wiped
over with a damp, NOT WET, cloth and a small
quantity of washing up liquid.
PLEASE DO NOT use abrasive cleaners, bleach
or solvent based cleaners, as these will damage
the seat.
To clean the track, first send the stairlift to the
top of the stairs. The track can be cleaned with
a damp cloth. When most of the track is clean,
move the stairlift to the bottom of the stairs and
finish cleaning the track making sure that none
of the cleaning debris falls on to it.
To maintain your Minivator stairlift in good
mechanical order, it is recommended that annual
services are carried out by qualified service
engineers.
Disposal
of your stairlift
Your stairlift has been manufactured using high
quality materials and components, which can be
recycled and reused.
The crossed out wheeled bin symbol
indicates that your stairlift is covered
by the European Directive 2002/96/EC,
which governs the disposal of waste
electrical and electronic equipment.
This means that your stairlift should not be
disposed of as household waste but should
be appropriately disposed of for recycling.
Recycling this product will help to protect the
environment by ensuring that all materials
contained in the stairlift are appropriately handled.
Please contact Handicare on +44 (0) 8700
118282, your dealer or your local civic
office for further disposal information.
Battery care
and charging
Your Minivator stairlift is battery powered and
will continue to work for a period of time even
if you have a power cut. You should normally
be able to travel up and down the stairs at least
10 times without needing to charge the batteries.
Particularly in the event of a power cut, however
you should always ensure that there is sufficient
light to allow safe travel, and especially at each
end of the track where you get on and off the lift.
Your stairlift track is fitted with charging points,
normally at the top and bottom of the staircase.
Your stairlift should be left on one of these
charging points when not in use to ensure that
the batteries are charged. If the stairlift makes
a beeping noise and/or the display show a “2”
when it is left on a charging point and it is not
in use IT IS NOT CHARGING. Please check that
the power supply for the stairlift is switched on.
If it is switched on and the beeping continues
please contact your dealer or the Handicare
Service Department on +44 (0) 8700 118282.
WARNING
If you are leaving the stairlift unattended
for a long period of time and the power
supply is turned off you MUST turn the
main on/off switch on the stairlift to the off
position to prevent damage to your batteries
(see page 4). Failure to do so could cause
permanent damage to the batteries and
require them to be replaced.
Maintenance
There are no user serviceable parts fitted to your
stairlift. If any damage is visible or your stairlift
sounds or behaves unusually contact Handicare or
your approved dealer immediately. We advise that
your stairlift is serviced after the first 12 months
and thereafter AT LEAST EVERY 12 MONTHS.
Page 16
16 USER MANUAL16 USER MANUAL
16
Appendix 1
Code: Description:
None No display.
Self help action:
Press the toggle switch and see if display
comes on. Check that the main power
switch on the lift is turned on. If this does
not clear the fault, contact your dealer or
Handicare.
Code: Meaning:
Okay Charging.
Self help action:
If lift does not drive check that the arms
are down. If this does not clear the fault,
contact your dealer or Handicare.
Code: Meaning:
0 Final limit activated
or cable short circuit.
Self help action:
Check that the keyswitch is on and seat
is fully swivelled to the drive position. If this
does not clear the fault, contact your dealer
or Handicare.
0
Code: Meaning:
1 Requires charge.
Self help action:
The stairlift batteries require charging.
Drive the lift to the charge contacts – if the
‘Okay’ code does not show contact your
dealer or Handicare.
1
Code: Meaning:
2 Off charge.
Self help action:
The stairlift is not parked on a charging
position or is not charging. Drive the lift to
the charge contacts – if the ‘Okay’ code does
not show or the lift is already on the charge
contacts check the power supply is on.
Failing this contact your dealer or Handicare.
2
Code: Meaning:
3 Ends limit activated.
Self help action:
Contact your dealer or Handicare.
3
Code: Meaning:
4 Safety edge
(up/down direction)
activated – footplate.
Self help action:
Contact your dealer or Handicare.
4
Diagnostic Display
Page 17
USER MANUAL 17
USER MANUAL
17
Appendix 1
Code: Meaning:
5 Ends limit activated.
Self help action:
Contact your dealer or Handicare.
5
Code: Meaning:
6 Safety edge
(up/down direction)
activated – footplate.
Self help action:
Contact your dealer or Handicare.
6
Code: Meaning:
7 Batteries approaching
critical level.
Self help action:
The stairlift batteries require charging.
Drive the lift to the charge contacts – if the
’Okay’ code does not show contact your
dealer or Handicare.
7
Code: Meaning:
8 Shows when toggle
switch is activated
in up/down direction.
Self help action:
N/A.
8
Code: Meaning:
9 Shows when toggle
switch is activated
in down/up direction.
Self help action:
N/A.
Code: Meaning:
A Hinge is open.
Self help action:
N/A.
A
Code: Meaning:
b A switch is active at
power on i.e. Toggle Up,
Toggle Down, IR Up,
IR Down or Learn.
Self help action:
Contact your dealer or Handicare.
Code: Meaning:
C The IR address
(dip switch) does
not match.
Self help action:
Contact your dealer or Handicare.
C
Page 18
18 USER MANUAL
Appendix 1
18 USER MANUAL
Code: Meaning:
d The main power relay
is welded closed.
Self help action:
Contact your dealer or Handicare.
Code: Meaning:
E The main power relay
did not close.
Self help action:
Contact your dealer or Handicare.
E
Code: Meaning:
F Brake semi-conductor
failed.
Self help action:
Contact your dealer or Handicare.
F
Code: Meaning:
g Brake not connected.
Self help action:
Contact your dealer or Handicare.
Code: Meaning:
H The main power relay
has closed early.
Self help action:
Contact your dealer or Handicare.
H
Code: Meaning:
J Hinge interlock
switch error.
Self help action:
Push the up direction on the toggle or
remote until the lift stops at the top of the
stairs. If this does not clear the fault contact
your dealer or Handicare.
L
Code: Meaning:
L Current limit exceeded.
Self help action:
Contact your dealer or Handicare.
L
Code: Meaning:
n Half speed.
Self help action:
If permanently showing contact your dealer
or Handicare.
Page 19
USER MANUAL 19
Appendix 1
Code: Meaning:
r No charge current.
Self help action:
Make sure that power supply is switched
on from mains. If it is contact your dealer
or Handicare.
Code: Meaning:
o The main control board
has a memory problem.
Self help action:
Contact your dealer or Handicare.
Code: Meaning:
P Powered swivel
did not respond.
Self help action:
Contact your dealer or Handicare.
P
Code: Meaning:
U Faulty power supply.
Self help action:
Contact your dealer or Handicare.
U
Code: Meaning:
y The main control board
has a software fault.
Self help action:
Contact your dealer or Handicare.
Code: Meaning:
N/A Over current.
Self help action:
Contact your dealer or Handicare.
Code: Meaning:
N/A Lift is in “sleep mode” to
conserve battery power.
Self help action:
Press toggle or handset button to wake lift.
.8.
Note: If the display is showing
anything but the diagnostic
codes listed it requires resetting.
Drive the lift off the charge contacts.
Turn the main switch on the unit off
for 10 seconds and then back on.
Page 20
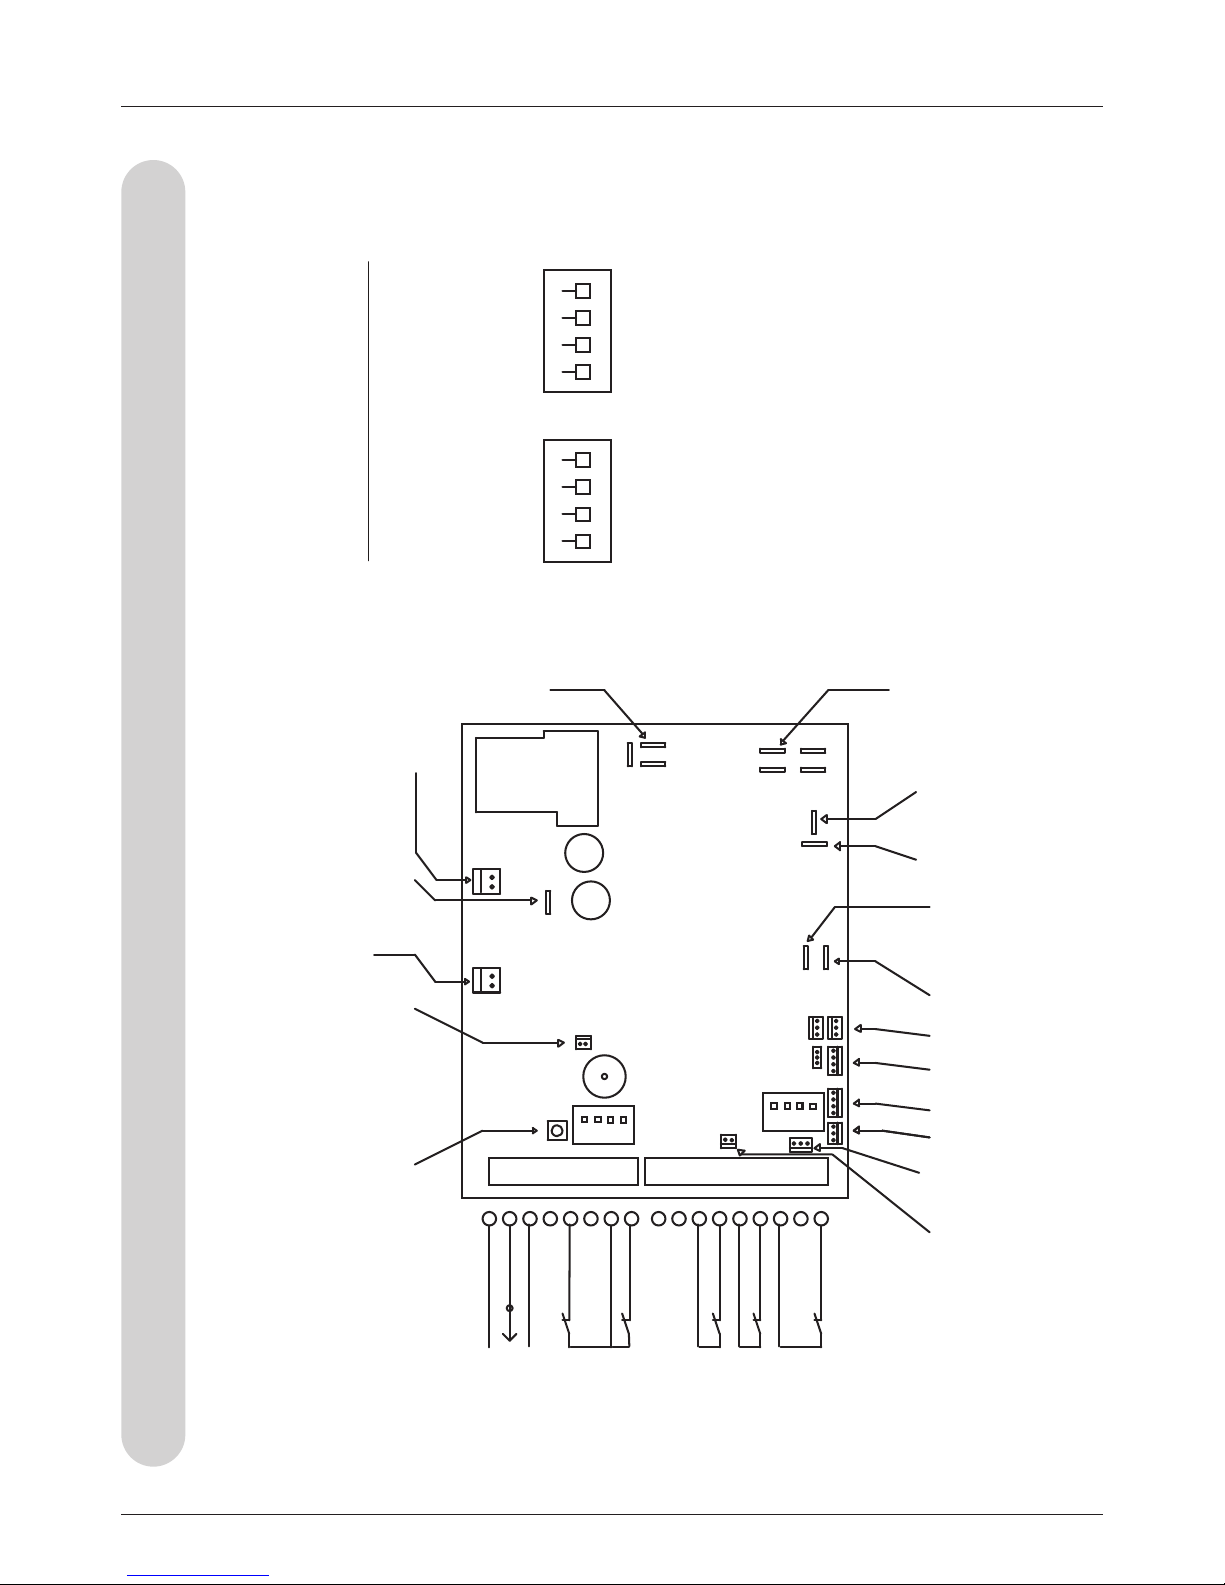
20 USER MANUAL
DIRECTION
COM
8 WAY CONNECTOR
DIP SWITCH 2
DIP SWITCH 1
DIAGNOSTIC
DISPLAY
HINGE INTERLOCK
CONNECTOR
POWER FOOTPLATE
ALL CONTACTS
NORMALLY CLOSED
EXCEPT DIRECTION
EXTERNAL DIAGNOSTIC
INTERNAL BEND
REED SWITCHES
INFRARED/
RADIO
HINGE
HINGE
MOTOR 1
MOTOR 2
BATTERY NEGATIVE
C
-to-P ENABLEC-to-P DISABLE
SLIDE DISABLE SLIDE ENABLE
PING ENABLEPING DISABLE
PLATFORM ENABLE
DIP 1 DIP 2
PLATFORM DISABLE
AUTO HINGE ENABLE
R
IGHT HAND LIFT
F
AST RAMP
UNUSED
AUTO HINGE DISABLE
L
EFT HAND LIFT
S
LOW RAMP
UNUSED
BATTERY POSITIVE
(24VDC)
CREEP TO PARK
CONNECTOR
CHARGE POSITIVE
(33VDC)
BRAKE
CONNECTOR
(24VDC)
FRONT PANEL
LED CONNECTION
INFRARED/RADIO
LEARN BUTTON
9 WAY CONNECTOR
NO CONNECTION
NO CONNECTION
NO CONNECTION
NO CONNECTION
COM
SAFE EDGE
SAFE EDGE
END STOP
END STOP
FINAL LIMIT
ON
1 2 3 4
ON
1 2 3 4
O
N
123 4
ON
123 4
FUNCTION OF SWITCHES
20 USER MANUAL
Appendix 2 – Wiring diagrams
MS 125 PCB Connections
Page 21
USER MANUAL 21
21
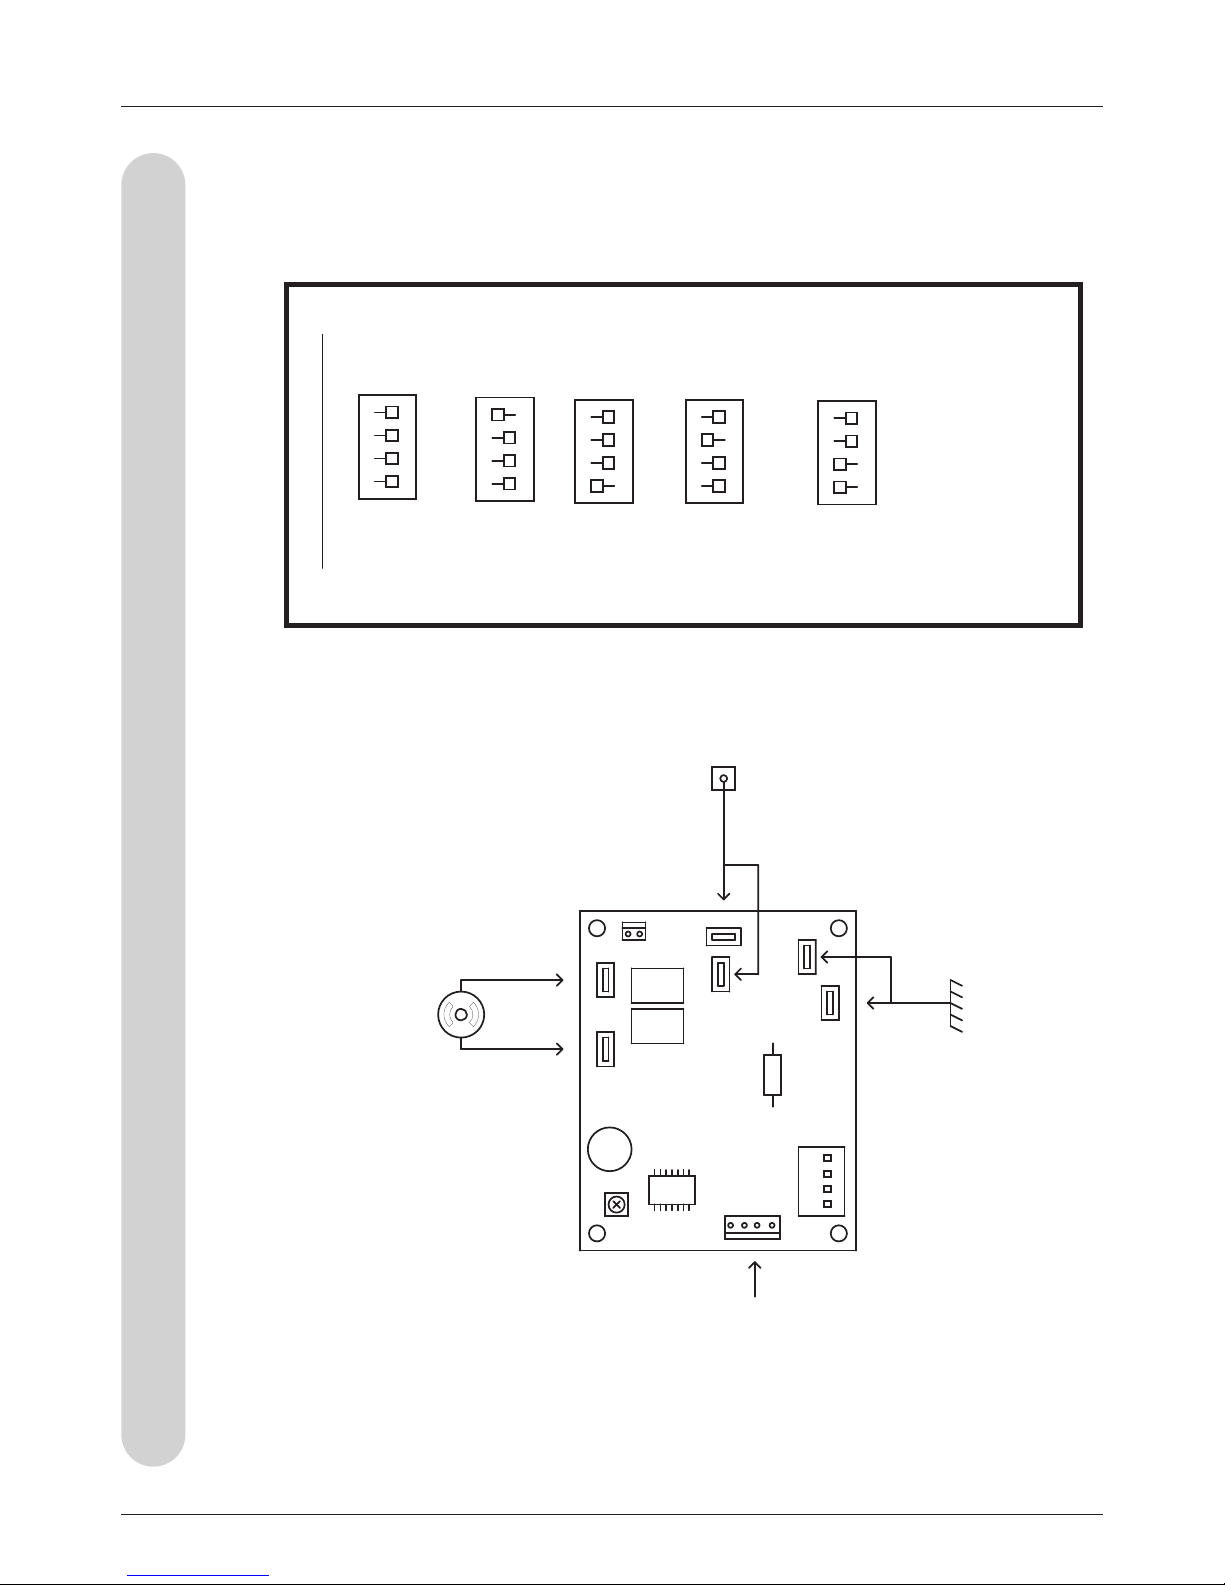
SWIVEL MOTOR
CSE126 POWER SWIVEL PCB
DIP SWITCH SETTINGS:
END LIMITS
DIP-SWITCH
NEGATIVE
(USE ANY CONNECTION)
COMMS
(USE ANY CONNECTION)
1000 HINGE
2000 HINGE
POWER SWIVEL - LUX/SS
POWER SWIVEL - SMART SEAT
POWER FOOTPLATE - SMART SEAT
1
ON
1 2 3 4
M2M1
ON
1 2 3 4
ON
1 2 3 4
ON
1 2 3 4
ON
1 2 3 4
ON
1 2 3 4
Appendix 2 – Wiring diagrams
MS 126 Power Swivel PCB
Page 22
22 USER MANUAL22 USER MANUAL
We
Handicare
of
82 First Avenue, Pensnett Estate, Kingswinford
West Midlands DY6 7FJ, England.
Declare under our sole responsibility that the products
Minivator Simplicity 950 Series Stairlifts
Minivator 1000 Stairlift
Minivator 2000 Stairlift
have been manufactured in conformity with the
following standards and specifications:
EN 81-40:2008
ISO 9386-2:2000
and that the products to which this declaration relates
are in conformity with the following EU directives:
Electro Magnetic Compatibility Directive 2004/108/EC
Low Voltage Directive – 2006/95/EC
Machinery Directive – 2006/42/EC
Signed:
Name: G.M.Welch
Date:
Position: New Product Development Manager
Technical documentation is available on request
from Handicare at the address above.
Appendix 3 – Declaration of conformity
Page 23

USER MANUAL 23
23
Important information about your stairlift which
should be completed by the installation engineer.
Installation information
Installed by: (Company Name)
Serial No:
Date of installation:
First service due:
Dealer Stamp:
Page 24

Handicare, 82 First Avenue, Pensnett Estate
Kingswinford, West Midlands DY6 7FJ, England
Customer Services: +44 (0) 8700 118282
Textphone: (180015) 020 7490 8913 ext 05
Voicephone: (18002) 020 7490 8913 ext 05
Email: [email protected]
www.handicare.co.uk
Handicare Treppenlifte GmbH, Gesellenweg 7
32427 Minden, Deutschland
Tel: +49 (0) 571 97 33 980
Fax: +49 (0) 571 97 33 9833
Email: [email protected]
www.handicare.de
North America
2201 Hangar Place, Suite 200
Allentown, PA 18109, United States
Tel: 610-266-5260
Toll Free: 866 276 LIFT/5438
Fax: 610-266-5266
Email: [email protected]
www.handicareusa.com
International websites
www.handicare.com
 Loading...