

Page 1
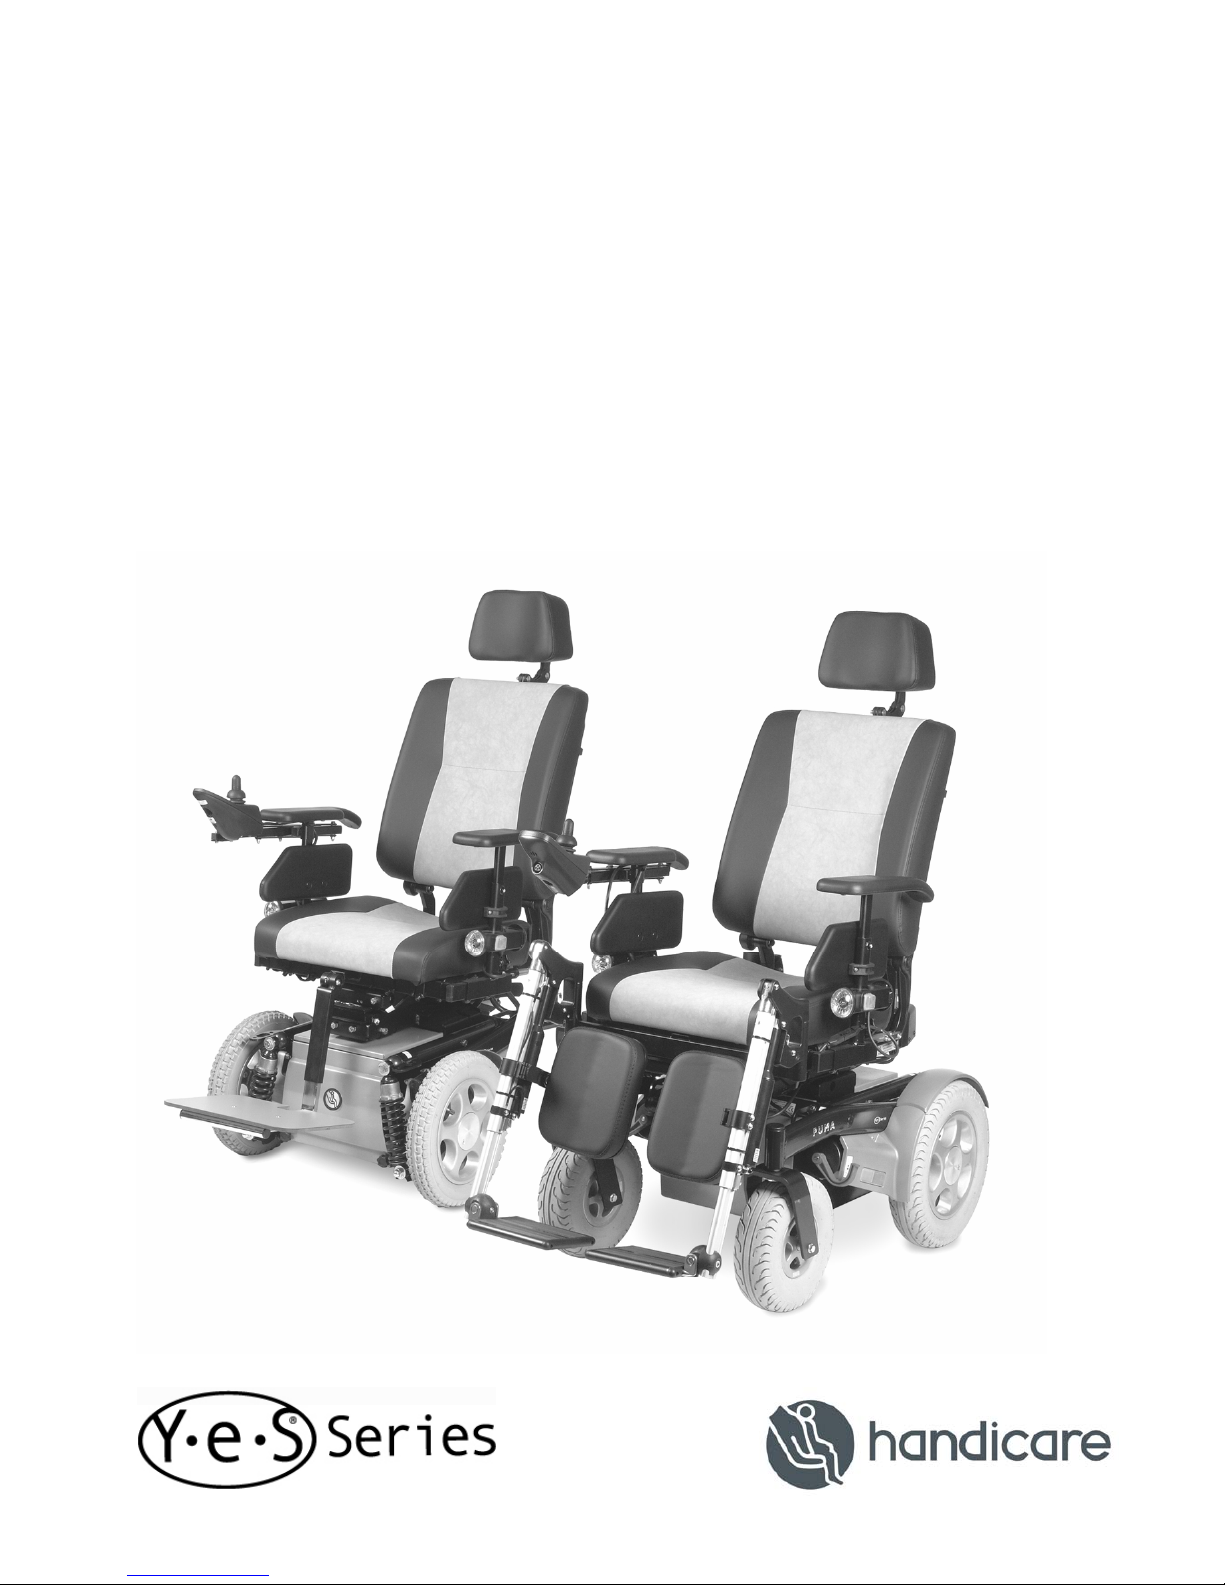
9002433B
USER MANUAL
ANVÄNDARE-MANUELLT
BEATLE – PUMA
Page 2

2
Page 3

3
English........................................................................................4
Svenska ....................................................................................36
Page 4

4
English
© 2008 Handicare
All rights reserved.
The information provided herein may not be reproduced and/or published in any form, by print,
photoprint, microfilm or any other means whatsoever (electronically or mechanically) without the
prior written authorisation of Handicare.
The information provided is based on general data concerning the constructions known at the time
of the publication of this manual. Handicare executes a policy of continuous improvement and
reserves the right to changes and modifications.
The information provided is valid for the product in its standard version. Handicare cannot be held
liable for possible damage resulting from specifications of the product deviating from the standard
configuration.
The available information has been prepared with all possible diligence, but Handicare cannot be
held liable for possible errors in the information or the consequences thereof.
Handicare accepts no liability for loss resulting from work executed by third parties.
Names, trade names, etc. used by Handicare may not, as per the legislation concerning the
protection of trade names, be considered as being available.
2008-01
Page 5

Contents
5
Preface...........................................................................................................................6
This manual ............................................................................................................6
Service and technical support .................................................................................6
Identification plate...................................................................................................6
Approval ................................................................................................................7
CE declaration ........................................................................................................7
Warranty ................................................................................................................7
Liability ................................................................................................................9
Used wheelchairs and the environment ..................................................................9
1 Safety ...................................................................................................................10
1.1 General safety instructions............................................................................10
1.2 Decals and instructions on the wheelchair ....................................................10
1.3 Electronic safety............................................................................................10
2 General description ............................................................................................11
2.1 Product description Beatle/Puma ..................................................................11
2.2 Main components..........................................................................................12
2.3 Controller 'DX' ...............................................................................................13
2.4 Controller 'SHARK'........................................................................................ 14
3 Operating instructions .......................................................................................15
3.1 Inspection before use....................................................................................15
3.2 Getting in and out..........................................................................................15
3.3 Freewheel lever ............................................................................................16
3.4 Switching on the DX......................................................................................16
3.5 Switching on the Shark .................................................................................16
3.6 Driving...........................................................................................................17
3.7 Driving forward and backward.......................................................................18
3.8 Improper use................................................................................................. 19
3.9 Curves...........................................................................................................19
3.10 Obstacles......................................................................................................20
3.11 Slopes...........................................................................................................20
3.12 Reducing the size of wheelchair ...................................................................22
3.13 Transport.......................................................................................................23
3.14 Electric adjustments......................................................................................24
4 Adjustment options ............................................................................................26
4.1 Seat height adjustment .................................................................................26
4.2 Seat belt........................................................................................................26
4.3 Adjustment ‘Swing-away’ controller...............................................................27
4.4 Adjustment ‘Fixed’ controller .........................................................................27
5 Maintenance ........................................................................................................28
5.1 Maintenance table.........................................................................................28
5.2 Batteries........................................................................................................28
5.3 Checking and inflating the tyres ....................................................................29
5.4 Cleaning the wheelchair................................................................................29
6 Troubleshooting..................................................................................................30
6.1 Troubleshooting table ‘DX’ ............................................................................30
6.2 Troubleshooting table ‘Shark’....................................................................... 31
7 Technical specifications ....................................................................................32
Connecting the battery charger.............................................................................35
Page 6
Preface
6
Preface
This manual
With this manual you can safely use
and maintain (clean) the wheelchair.
This manual should be used in
combination with Handicare’s Sedeo
seating system manual (supplement).
In case of doubt always contact your
dealer.
Strictly follow the procedures with a
caution symbol! These procedures
can - if they are not executed
properly - result in human injury or
damage to the product or the
environment.
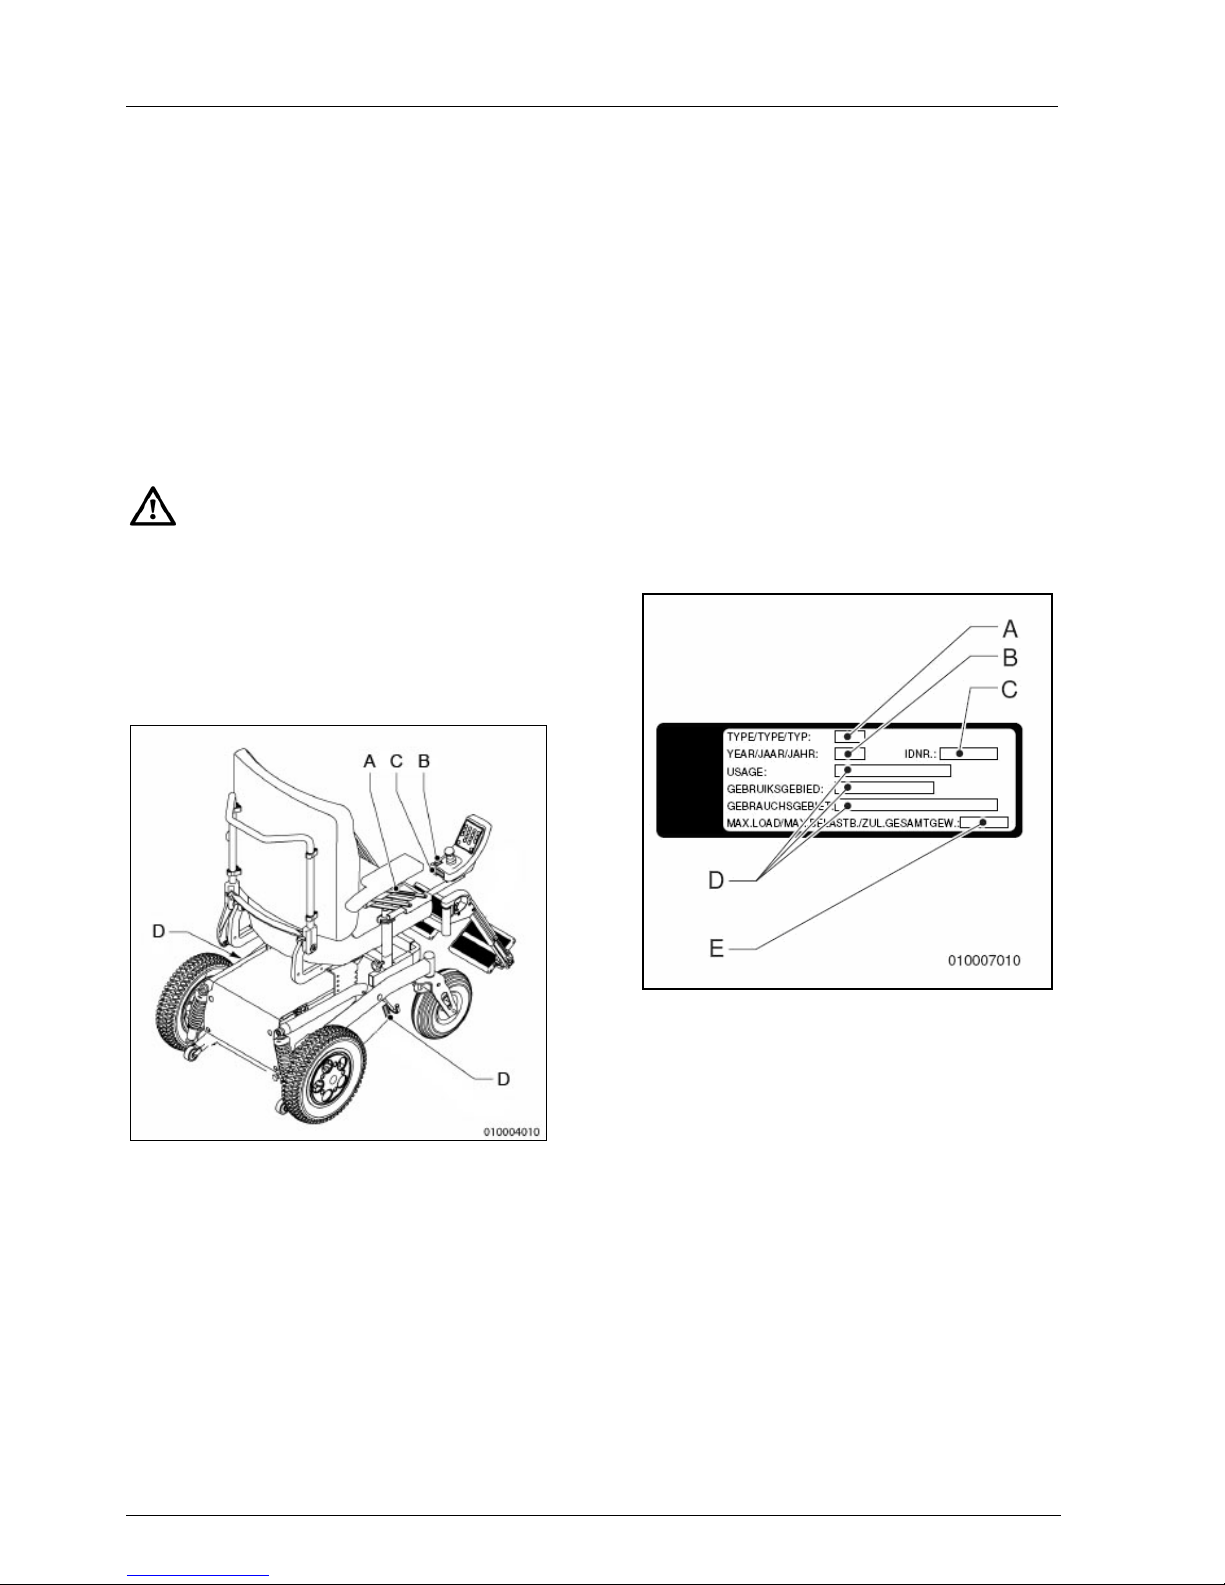
Figure 0.1
Sticker markings on the wheelchair
A. Beware of fracture!
B. Speed sticker.
C. Reference to manual.
D. Neutral, left and right.
Service and technical support
For information concerning specific
settings, maintenance or repair work,
please contact your dealer. Make sure
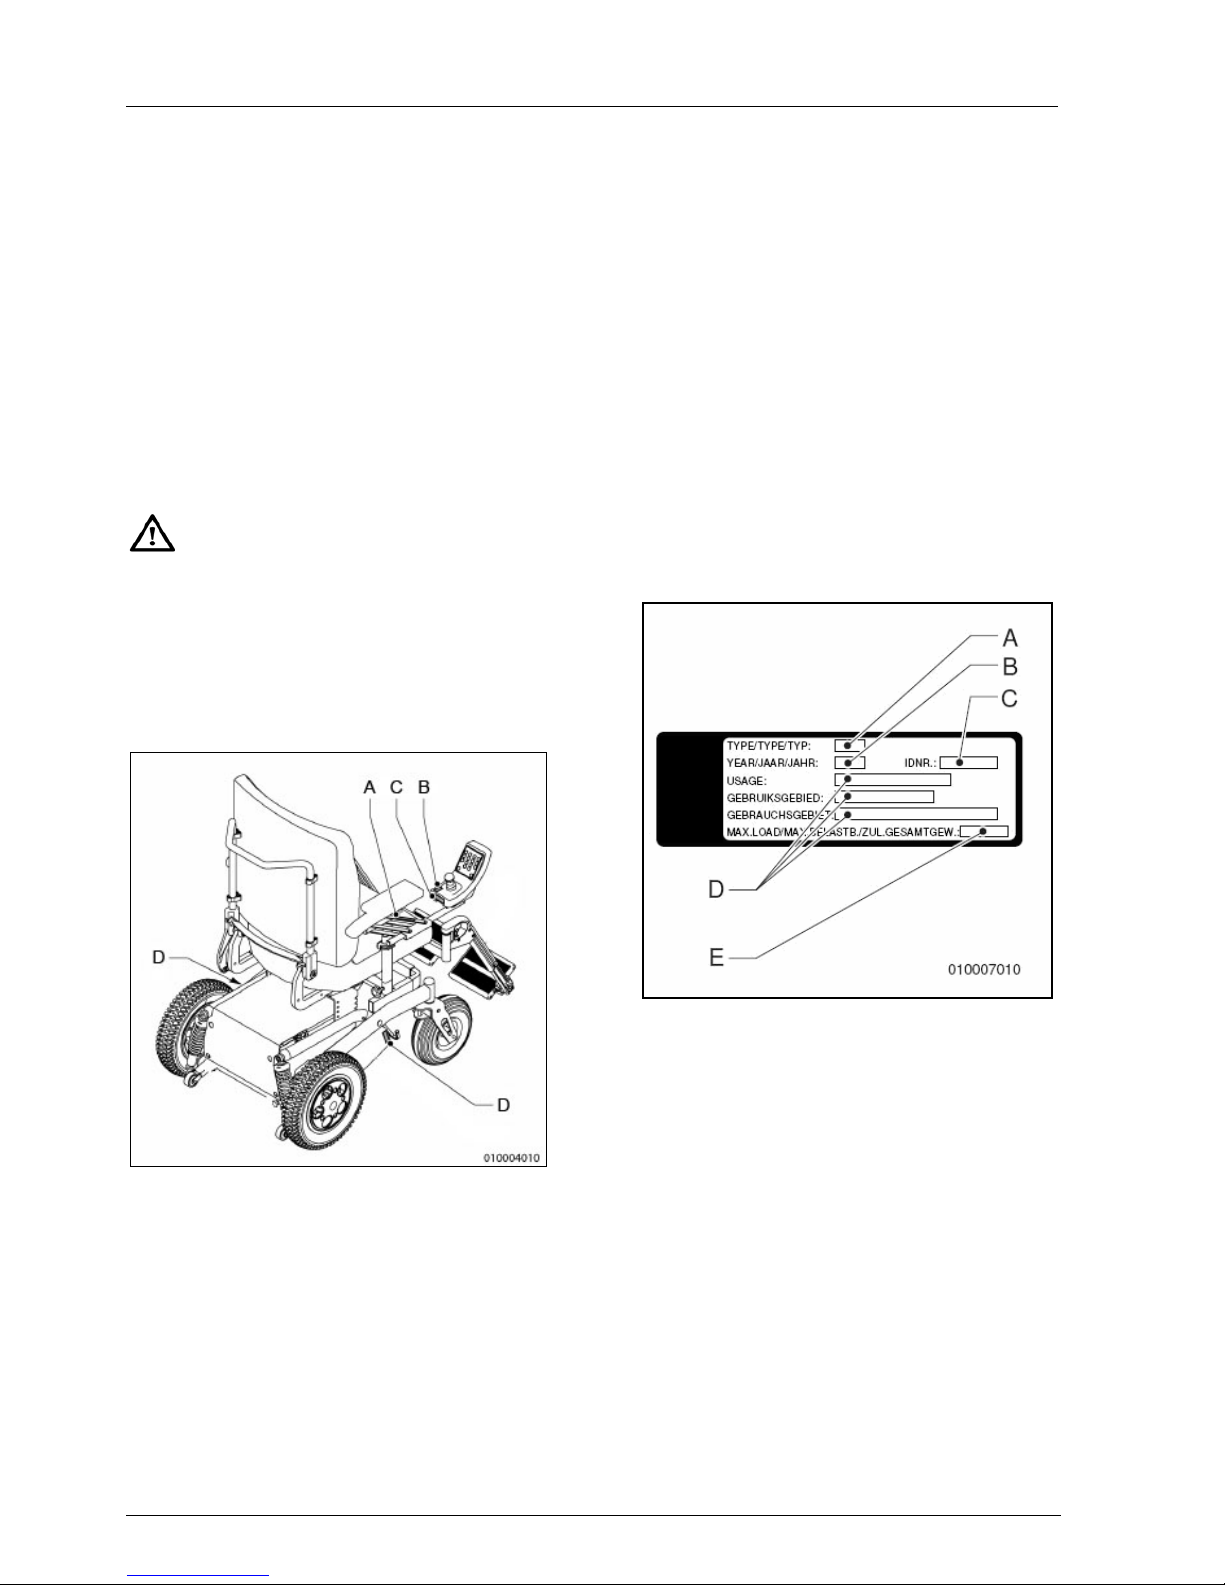
you always mention the model, year of
manufacture and identification number.
This information is provided on the
identification plate of the product (fig.
0.2).
Spare parts are available for the
Beatle and Puma. A service manual,
listing the spare parts among other
items, is available for the dealer.
Figure 0.2
Identification plate
A.
Model
B. Year of manufacture
C. Identification number
D. Usage is indoors or outdoors
E. Maximum load in kg
Page 7

Preface
7
Approval
The product meets the following
standards:
1. The applicable requirements as
specified in Annex 1 of the EU
directive
93/42 EEC.
2. The requirements of NEN-EN
12182 Technical tools for the
handicapped – General standards
and testing methods October 1997
- specified in NEN-EN 12184.
3. NEN-EN 12184 Electrically driven
wheelchairs, scooters and
associated charging equipment –
Standards and testing methods,
April 1999.
4. The Beatle is classified according
to EN12184 in class B.
5. The Puma is classified according to
EN12184 in class B.
6. ISO 7176-8 Standards and test
methods for impact, static, and
fatigue strength, July 1998.
7. ISO 7176-14 Standards and test
methods for controller systems of
electrically driven wheelchairs
1997.
8. ISO 7176-9 Climate test for
electrically driven wheelchairs.
9. ISO 7176-16 Standards for
resistance to fire, May 1997.
10. The Beatle/Puma has been
subjected to a dynamic crash test
and meets the requirements
imposed in ISO7176-19 in this
regard.
The quality is guaranteed by an
independent institution who controls
the fulfilment of the above mentioned
standards.
CE declaration
The product is in
conformity with the
provisions of the
Medical Devices Directive and thus
has CE marking.
Warranty
In the following warranty and liability
stipulations the terms and definitions
as summed up hereafter must be
explained as follows:
• Product: The hand-operated or
electric wheelchair or scooter
manufactured and delivered by
Handicare.
• Customer: The person who directly
obtains a Product from Handicare.
• Dealer: The person who delivers a
Product obtained from Handicare to
customers or third parties.
• User: The person who uses a
Product manufactured by
Handicare.
Irrespective of what is determined
concerning warranty conditions
applicable to the Product, in any case
the following applies with regard to the
warranty:
1. Except insofar as described
otherwise Handicare guarantees
the Product for its suitability for the
purpose for which the Product is
intended - all of these points as
described in this manual - and for
the quality of the material of which
the Product is made and the
manner in which the Product is
manufactured.
2. Repairs or replacement of parts of
the Product that may be necessary
as a result of faults that are based
on qualitatively faulty material or
manufacturing errors will be
executed free of charge, as long as
such faults occurred within one (1)
year after the date of delivery of the
Product to the Customer. The parts
to be replaced must be shipped
post-paid to Handicare.
Disassembly or assembly of these
parts is at the expense of the
Page 8

Preface
8
Customer. Therefore the following
cases are not eligible for free repair
or replacement as meant above:
• The repair or replacement that is
necessary in connection with
faults that arise after one (1)
year after the date of delivery of
the Product to the Customer;
• The repair or replacement that is
required in connection with
faults due to improper or
careless use of the Product or
that are based on the Product
being used for another purpose
than the one for which it is
intended, in which regard it
applies that if the Customer is a
Dealer, this Dealer will indemnify
Handicare against possible
claims from Users or other third
parties for faults based on an
incorrect or careless use of the
Product;
• Parts that are subject to wear,
and the need for repair or
replacement of the parts are the
actual consequence of normal
wear.
3. Irrespective of that stipulated under
2, it applies as far as an electric
Product is concerned that with
regard to the battery that forms part
of the Product warranty is only
given in case of faults or nonfunctioning of the battery that are
demonstrably the direct
consequence of material or
manufacturing errors. A fault or
non-functioning of the battery as a
result of normal wear is not
covered by the warranty as meant
in these warranty stipulations.
Similarly not covered by the
warranty are faults or nonfunctioning that are the
consequence of improper or
unprofessional use of the Product
or the battery that is part of the
Product, including the incorrect
charging of the battery and the
failure to carry out timely and good
maintenance, in which context it
also applies that if the Customer is
a Dealer, this Dealer will indemnify
Handicare against possible claims
from Users or other third parties
that are based on the above
mentioned improper or
unprofessional use of the Product
or the battery that is part of the
Product.
4. The warranty conditions as
mentioned in above stipulations in
any case become null and void if:
• The guidelines of Handicare for
the maintenance of the Product
are not, or insufficiently,
followed;
• A necessary repair or
replacement of parts is based on
neglect, damage or abuse of the
Product or a use of the Product
for another purpose than the
one for which it was intended;
• Parts of the Product are
replaced by parts of another
origin than those which
Handicare uses and/or parts of
the Product are replaced without
the permission of Handicare.
5. The warranties as mentioned in
stipulations 1 through 3 also
become null and void if what is
involved is re-used by a new user
within the warranty period and that
such re-use necessitates
adaptations to the product and
those adaptations are carried out
without the instructions and/or at
the order of Handicare.
6. To retain rights under the above
delineated warranties the
Customer must, in case of damage
or other calamities, as rapidly as
possible contact Handicare and
inform them as fully as possible.
The possibility of taking recourse to
the above-mentioned warranty
Page 9

Preface
9
conditions becomes null and void
for the Customer in any case after
20 workdays after the claim
situation or the calamity arises that
was the reason for the recourse to
the guarantee.
7. The replacement of a part or the
repair or the reconditioning of the
Product within a current warranty
period does not extend the
warranty period.
8. Handicare gives no warranty on
repair to or reconditioning of the
Product carried out other than
under order of and/or at the
instructions of Handicare. If repairs
and/or reconditioning are executed
by or on behalf of a Customer, the
Customer indemnifies Handicare
with respect to the claims of third
parties who result, in the broadest
sense of the word, from such
repairs or reconditioning.
Liability
Irrespective of what is determined
regarding liability in the general
conditions applicable to the Product,
with regard to liability in any case the
following applies:
1. Taking into consideration the
following stipulations, Handicare
only accepts liability for loss due to
death or physical injury that is the
result of a defect in the Product for
which Handicare is responsible and
for damage to another object that is
the private property of the user of
the Product, as long as said loss is
the direct result of a fault in the
Product.
2. Handicare accepts no other or
further liability than delineated
under 1. In particular Handicare
accepts no liability for
consequential damage, in any form
whatsoever.
Used wheelchairs and the
environment
If your wheelchair has become
superfluous or needs to be
replaced, it can usually be
taken back by your dealer. If
this is not possible, please
contact your local authorities for
the possibilities of recycling or
an environmentally friendly way
of disposing of the used
materials.
For the production of the wheelchairs
several plastics and metals have been
used. The wheelchair also contains
electronic components that must go to
electronic waste. Used batteries
belong to chemical waste.
Page 10

Safety
10
1 Safety
Handicare accepts no liability
whatsoever for damage or injury
caused by the failure to (strictly)
adhere to the safety guidelines and
instructions or else due to
carelessness during the use and
cleaning of the wheelchair and
possible accessories. Depending on
the specific work circumstances or the
accessories used, additional safety
instructions may be required. Please
contact your dealer immediately if you
observe a potential danger during the
use of the product.
1.1 General safety
instructions
• The user of the wheelchair is at
all times fully responsible for the
fulfilment of the locally
applicable safety regulations and
guidelines.
• The technical specifications
must not be altered.
• Modifications to (parts of) the
wheelchair are not permitted.
1.2 Decals and instructions
on the wheelchair
• Signs, symbols and instructions
placed on this wheelchair
comprise part of its safety
facilities. They must never be
covered or removed and must
remain present and clearly
legible throughout the entire
lifespan of the wheelchair.
• Immediately replace or repair
illegible or damaged signs,
symbols and instructions.
Contact your dealer with regard
to this.
1.3 Electronic safety
• The standard version of your electric
wheelchair has been tested
according to the applicable EMC
requirements. Mobile telephones
have no influence on the driving
behaviour of the wheelchair.
When using a mobile telephone in
the vicinity of an electric wheelchair
with special adaptations, you are
advised to first switch off the electric
wheelchair.
• Your electric wheelchair may
influence electromagnetic fields
such as alarm systems.
• If the electronics of the wheelchair is
not properly screened off, this may
affect sensitive electrical appliances,
such as shop alarms and garage
openers. The electric wheelchair
has been tested for this. Should any
problems of this nature occur,
please report these to your dealer
immediately.
Page 11

General description
11
2 General description
2.1 Product description
Beatle/Puma
The Beatle/Puma is an electrically
driven wheelchair with joystick control
for usage under various
circumstances, for use indoors and
outdoors.
The seating on the Beatle / Puma is
securely attached by means of a link
frame (also referred to as the interface)
to the undercarriage (also referred to
as the carrier) in which the entire
electrical installation is contained. The
drive consists of two electric motors,
one on each drive wheel. The steering
of the Beatle / Puma on curves takes
place by the change in the speed of
one of the motors, making the
wheelchair turn left or right.
The range of settings provides optimal
support of the body, making the Beatle
/ Puma a pleasant and comfortable
product for active lifestyles.
The Beatle/Puma has been designed
for:
• Transport of persons to a maximum
weight of 160 kg;
• Use on paved roads, pavements,
foot- and bicycle paths.
• Use in and around the house.
Your dealer must give you good
driver’s instructions before you can
independently operate the product and
participate in traffic.
You must be able to correct the
consequences of actions while driving
the wheelchair.
Consider operating the wheelchair
under the supervision of an
experienced dealer during first
operations.
The wheelchair is not a motorised
vehicle in the sense of traffic
regulations.
The Beatle/Puma has a maximum
speed of 6 or 10km/h.
If you use the wheelchair for other
purposes than those for which it is
intended, Handicare accepts no liability
whatsoever for damage or injury
resulting from such use other than for
which the wheelchair was developed
and designed.
Please study this manual carefully
before you use the wheelchair.
Page 12
General description
12
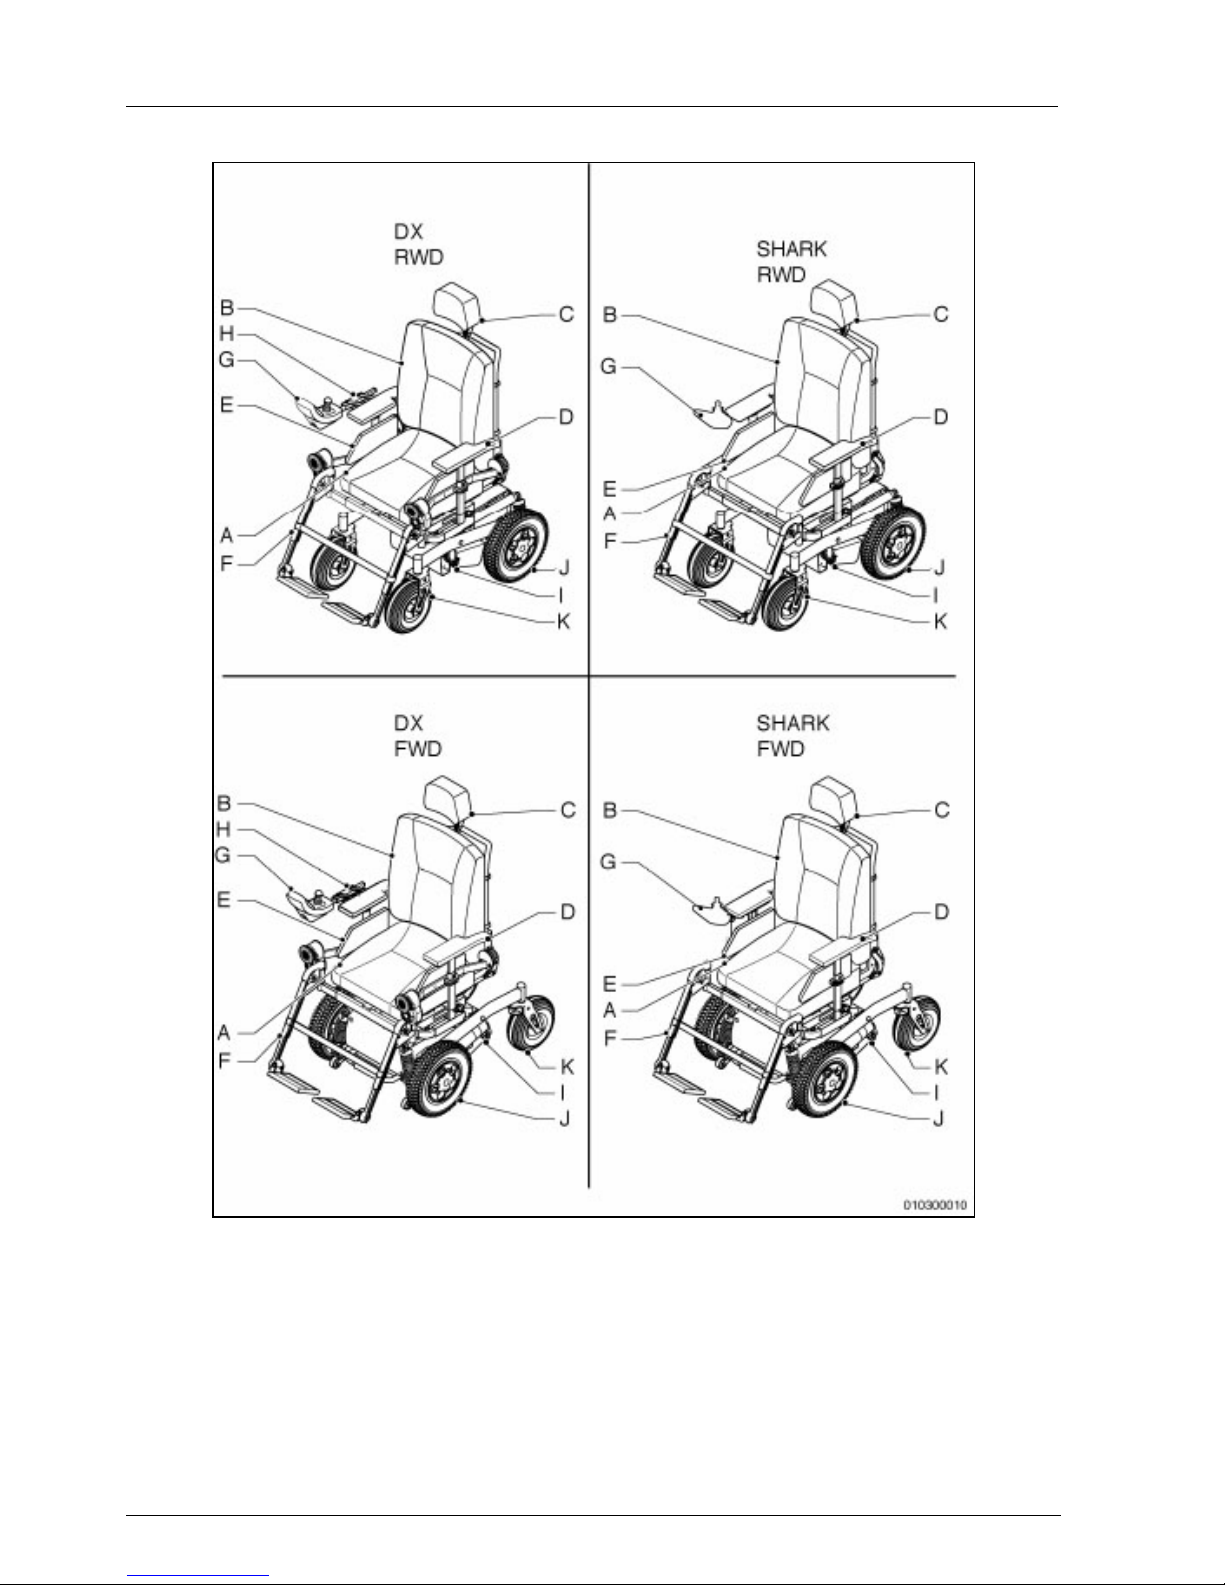
Figure 2.1
2.2 Main components
A.
Seat
B. Backrest
C. Headrest (option).
D. Arm-rest
E. Side panel.
F. Leg rest with footrest
G. Controller, type 'Shark' or “DX”
H. Controller attachment, fixed or
swing away.
I. Free wheel lever
J. Drive wheels
K. Swivel castors
Page 13
General description
13
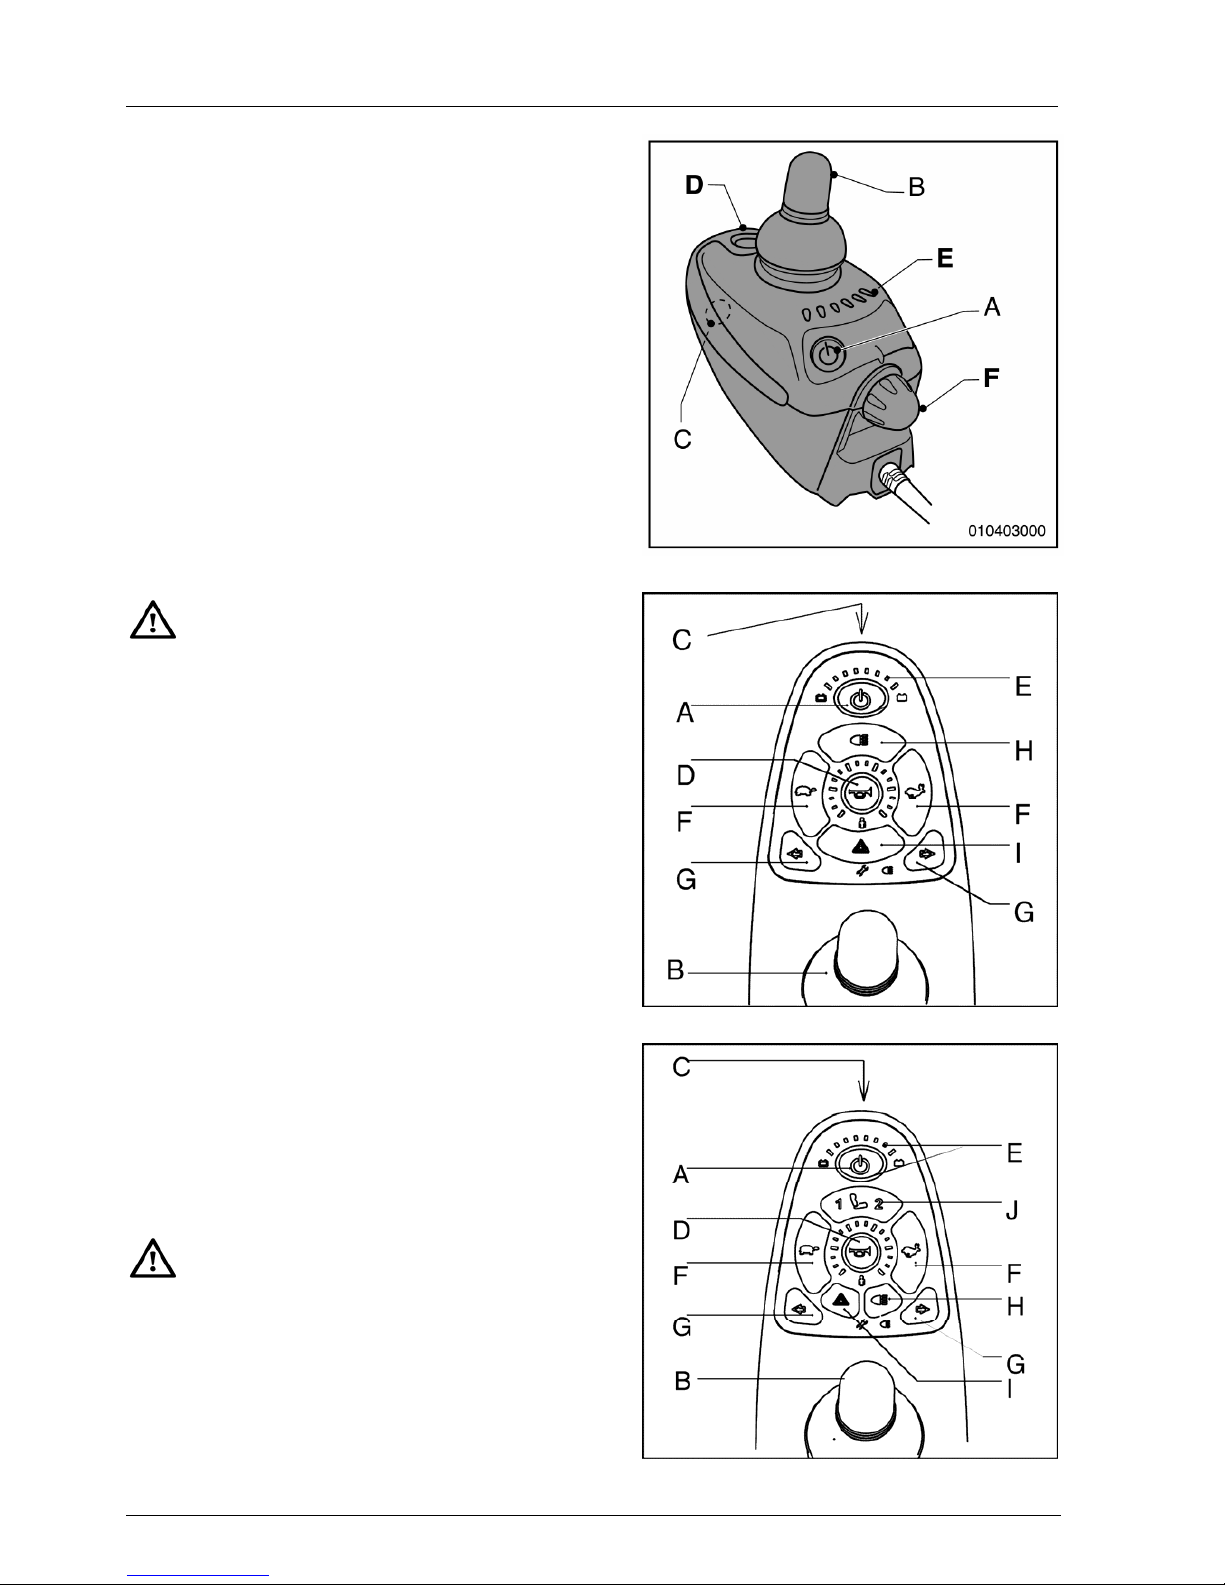
2.3 Controller 'DX'
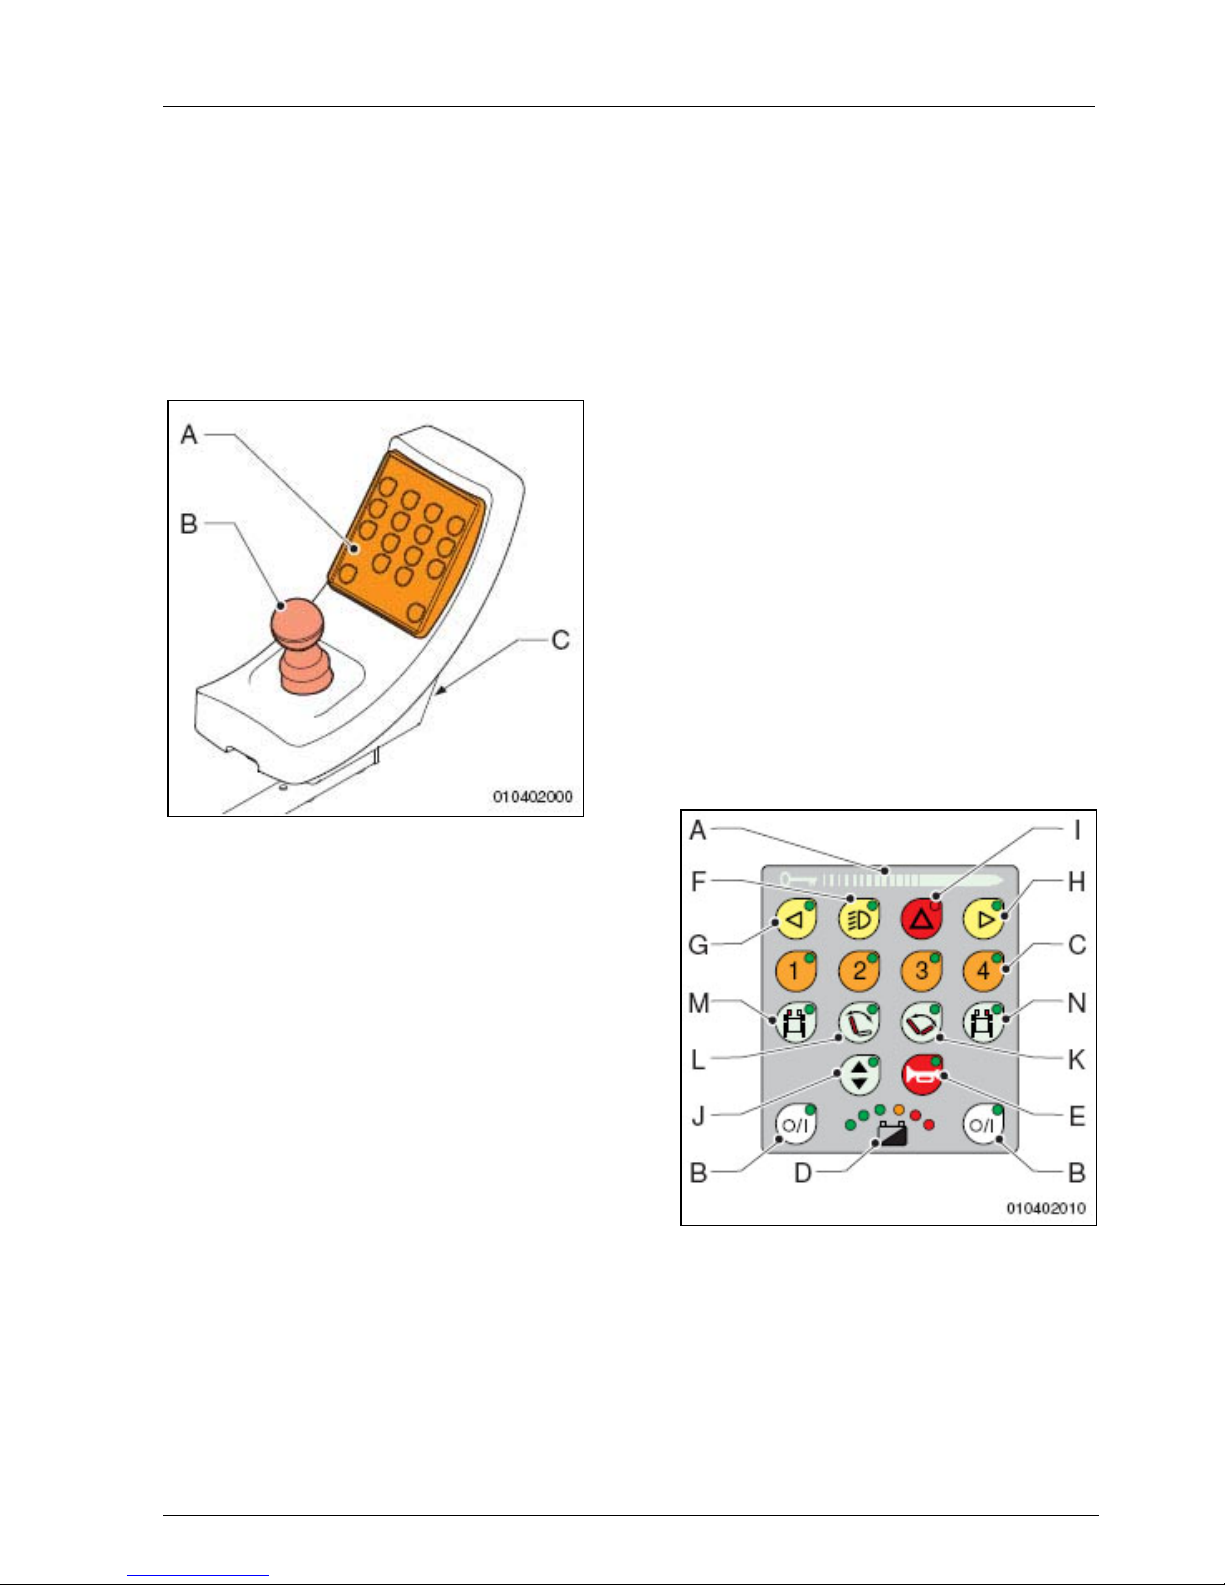
The controller contains the following
main components:
• Control panel (A in fig. 2.2).
• Joystick (B in fig. 2.2).
• Charge connection (C in fig. 2.2),
see 'charging batteries'.
Figure 2.2
All functions that can be installed on
the wheelchair can be found on the
control panel. This includes all
standard functions and all other
optional functions.
The joystick steers the wheelchair and
adjusts various settings, if these are
installed.
The charging connection connects the
battery charger to charge the batteries.
Control panel
The control panel contains the
following functions (see fig. 2.3):
A. Panel pad
B. On/off key
C. Speed (drive profile)
D. Battery meter
E. Horn
F. Lighting (option)
G. Turn signal left (option)
H. Turn signal right (option)
I. Hazard lights (option)
J. High/low seat adjustment (option)
K. Electrical tilt adjustment of the seat
(option)
L. Electrical adjustment of the angle
of the backrest (option)
M. Electrical adjustment of the left leg-
rest (option)
N. Electrical adjustment of the right
leg-rest (option)
Figure 2.3
Page 14
General description
14
2.4 Controller 'SHARK'
The controller contains the following
components (See fig. 2.4, 2.5 and fig.
2.6):
A. On/off key
B. Joystick
C. Charge connection
D. Horn
E. Battery indicator
F. Speed control
G. Indicators
H. Lightning
I. Warning lights
J. Actuators/adjustment options
Performance adjustments should
only be made by professionals
conversant with the adjustment
process and the operator’s
capabilities. Incorrect settings
could cause injury to the operator
or bystanders, or damage to the
vehicle or surrounding property.
The joystick is for driving the
wheelchair and adjusting the various
electrical options, if installed.
Battery indicator
The battery indicator shows the
Condition of the batteries. When all the
lights are on, the batteries are fully
charged. As the batteries are depleted,
lights from right to left will go out.
If only the red lights are on, the
Batteries must be charged
immediately.
Figure 2.4
Figure 2.5
Figure 2.6
Shark
Shark lights
Shark seats-lights
Page 15
Operating instructions
15
3 Operating instructions
3.1 Inspection before use
It is important to check the following
points before you start driving the
wheelchair:
• If the lights and indicators are
working properly.
• If the tyres are sufficiently inflated.
• If the batteries are charged
sufficiently. The green battery
indicator lights must be on.
In winter, the batteries have a lower
capacity. In case of light frost, the
capacity will drop to approximately
75% of the normal capacity. At a
temperature of less than -5° the
capacity will be approximately 50%
of the normal capacity. This will
affect the range.
Figure 3.1
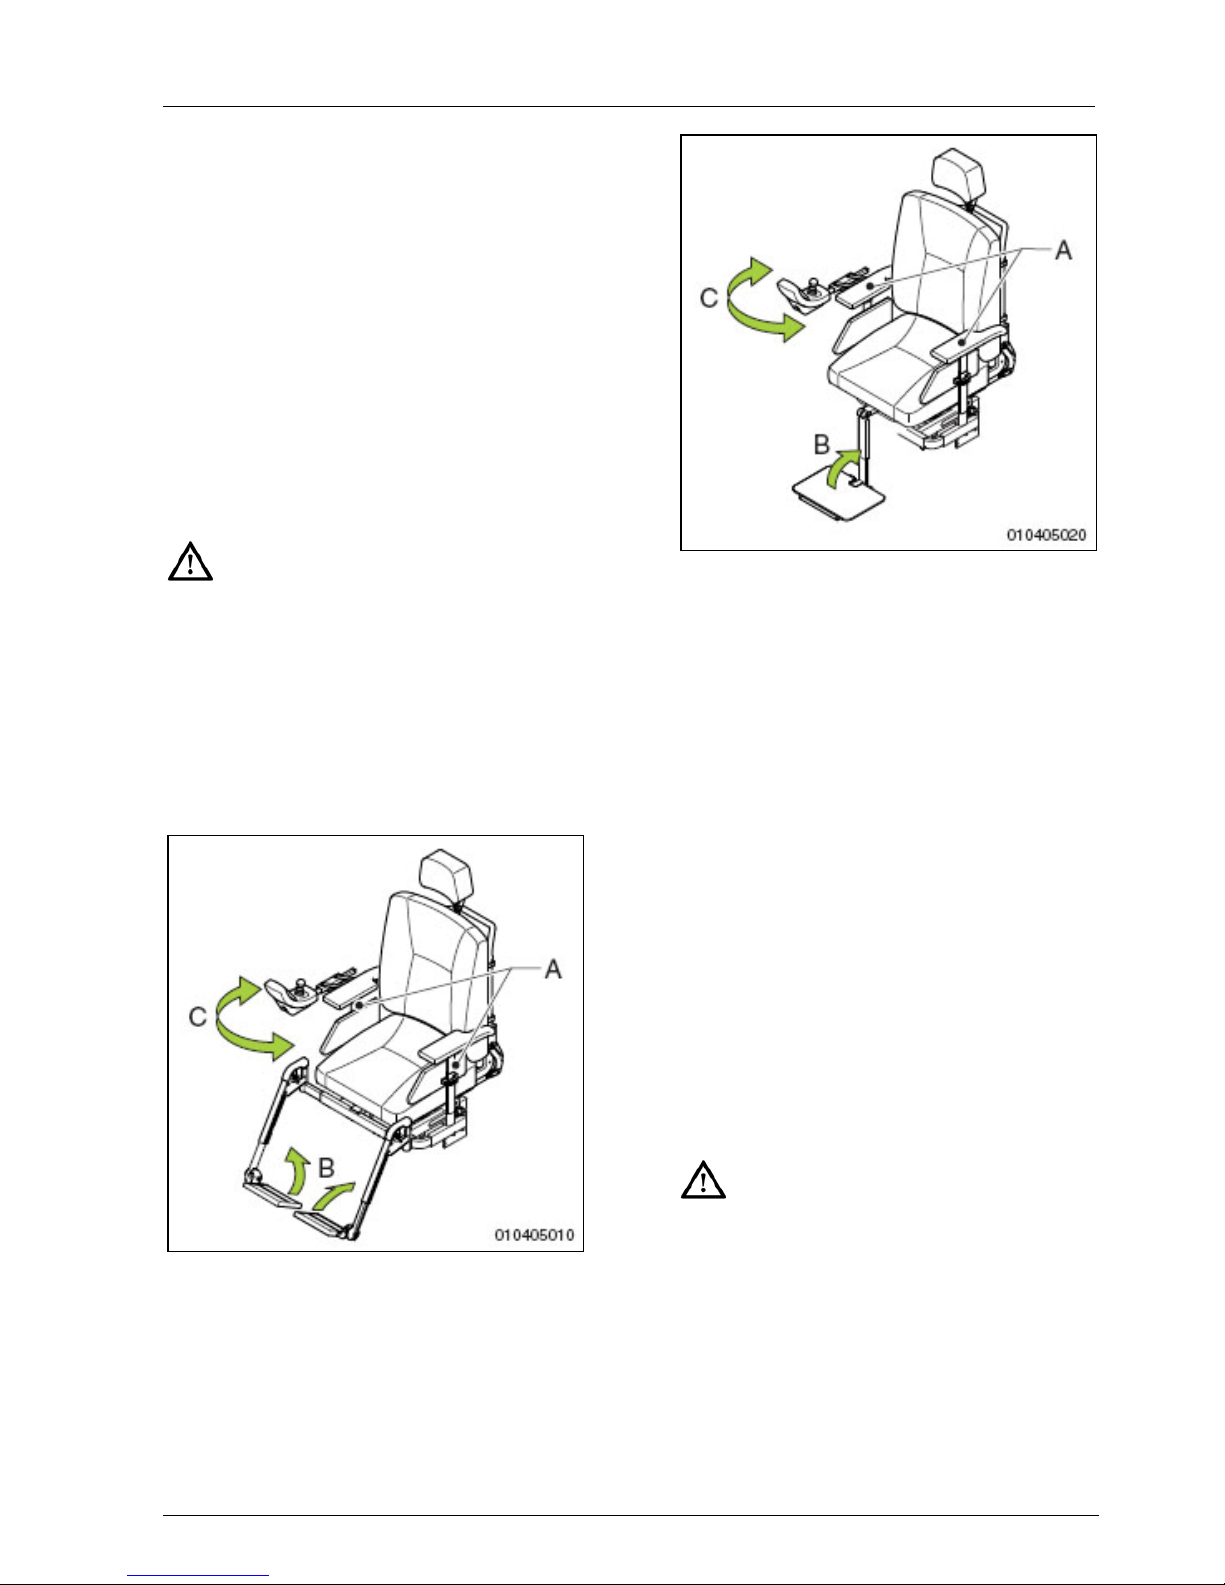
3.2 Getting in and out
1. Make sure the wheelchair is
switched off electrically.
2. Put the free wheel lever in the
Drive position.
Figure 3.2
Transfer forwards
1. Fold up the foot support (B in fig.
3.1 and fig. 3.2)
2. Swing away (if possible) the leg
rests
3. Seat yourself in the chair.
Transfer sideways
1. Loosen the star knob and remove
the armrest (A in fig. 3.1 and fig.
3.2) .
2. Seat yourself in the chair.
Depending on the version of the
controller and the location of the
transfer, it can be necessary that the
controller be swung away (C in fig. 3.1
and fig. 3.2).
Switch off the wheelchair
electrically before you get in or out!
This way you will avoid that the
wheelchair starts to move when you
accidentally move the joystick.
Page 16
Operating instructions
16
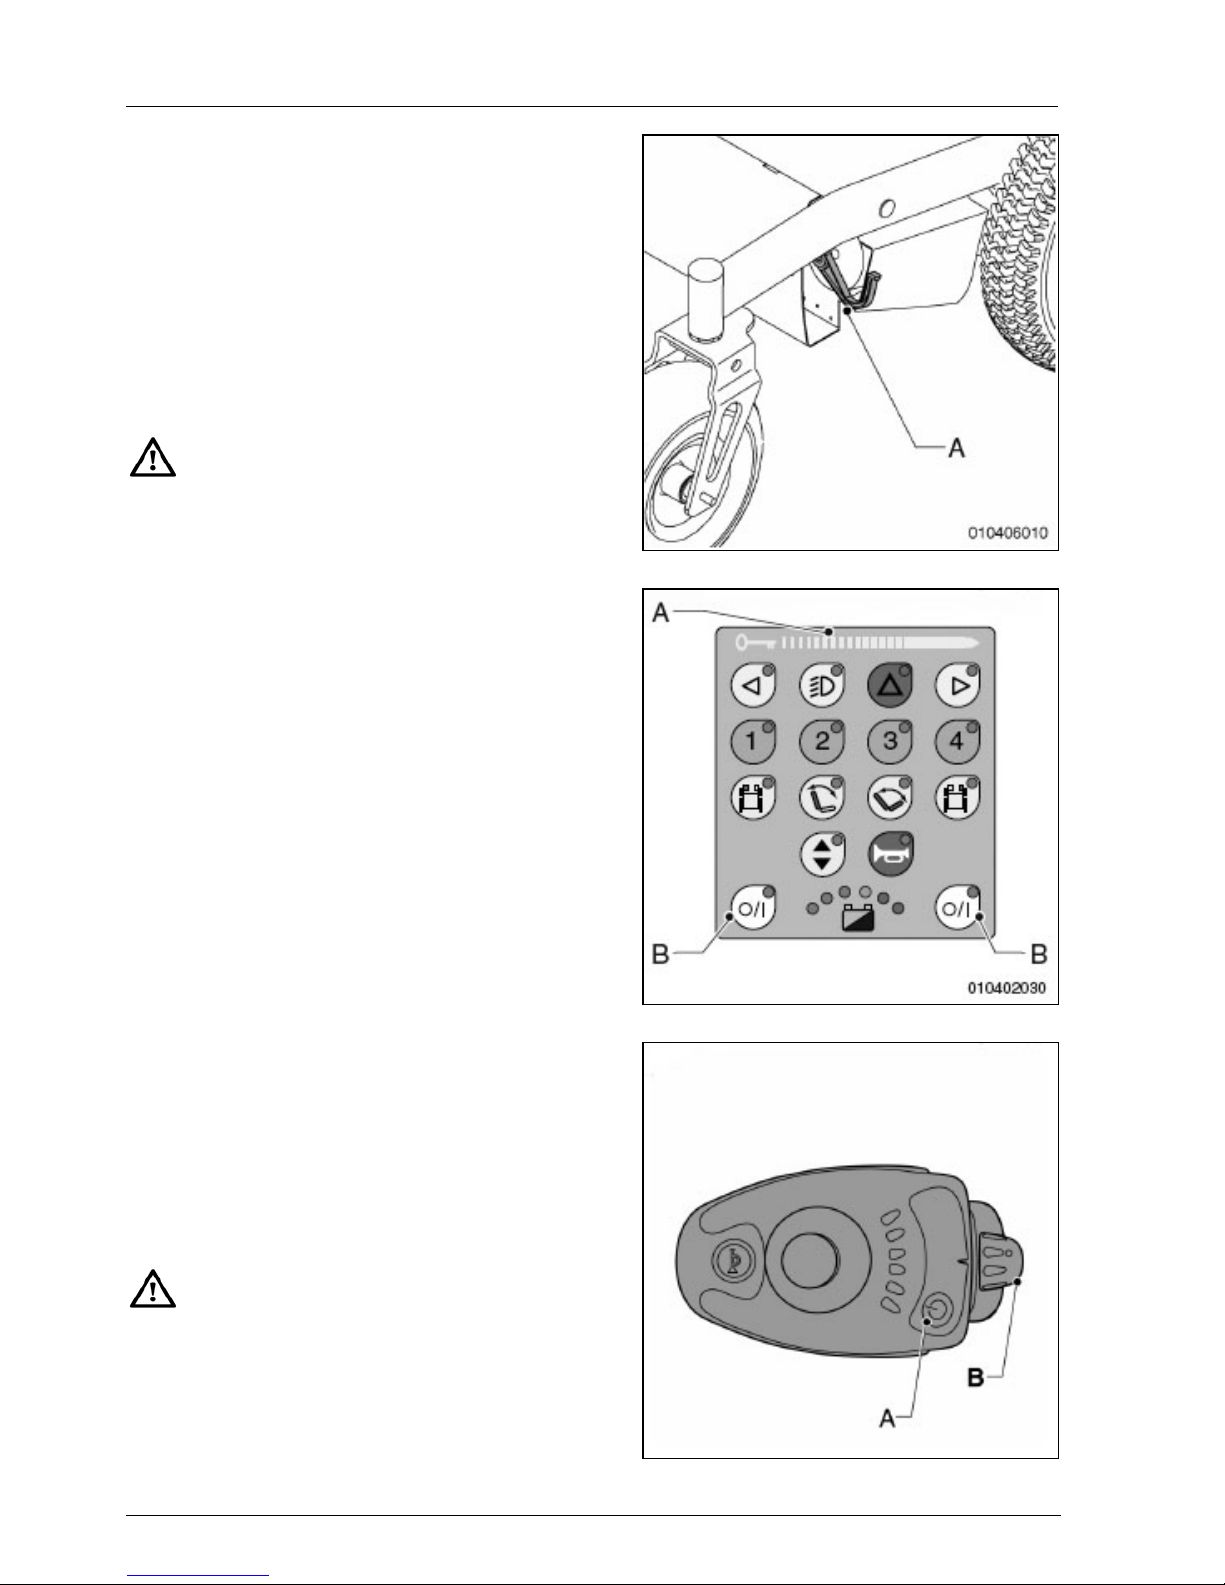
3.3 Freewheel lever
Put both freewheel levers (A in fig. 3.3)
in the Drive position to be able to drive
the wheelchair electrically.
To be able to push the wheelchair, put
both freewheel levers in the P
USH
position.
The freewheel levers must be
operated by the attendant.
• Never put the wheelchair in the
Drive position when you are
parked on a slope. When the
wheelchair is parked on a slope
that is too steep, it can start
moving down the slope.
• After pushing, the free wheel
lever should immediately be
returned to the Drive position.
• The free wheel lever should only
be put in the Push position if the
wheelchair is to be pushed. In
the Drive position the automatic
parking brake is activated.
3.4 Switching on the DX
Activate the wheelchair by moving the
magnetic key from left to right across
the panel (A in fig. 3.4).
Press the ON/OFF key (B in fig. 3.4) to
switch the wheelchair on.
3.5 Switching on the Shark
To switch on the wheelchair, push the
on/off key (A in fig. 3.5).
When an electronics error is
detected, the battery indicator will
start flashing. The electronics are
blocked.
Figure 3.3
Figure 3.4
Figure 3.5
Page 17

Operating instructions
17
3.6 Driving
As a wheelchair user you could be
vulnerable in traffic. When travelling
in or across a road, keep in mind
that other traffic participants may
not always notice you. Keep to the
applicable traffic regulations.
Avoid out-of-the way routes, so that
help can be on its way quickly when
needed.
Inspection before use
It is important to check the following
points before you start driving the
wheelchair:
• If the lights and indicators are
working properly.
• If the tyres are sufficiently inflated.
• If the batteries are charged
sufficiently. The green battery
indicator lights must be on.
• If the free wheel lever is in it’s Drive
position
• The joystick must be completely
in the zero position (centred),
before switching the wheel-chair
on. Otherwise the electronic
system will malfunction. As an
indication the lights of the
battery light up.
• To correct this fault the
wheelchair must be switched off
and then back on, with the
joystick in the ‘zero position’.
This safety fuse feature prevents
the wheelchair from unintended
movement.
Page 18
Operating instructions
18
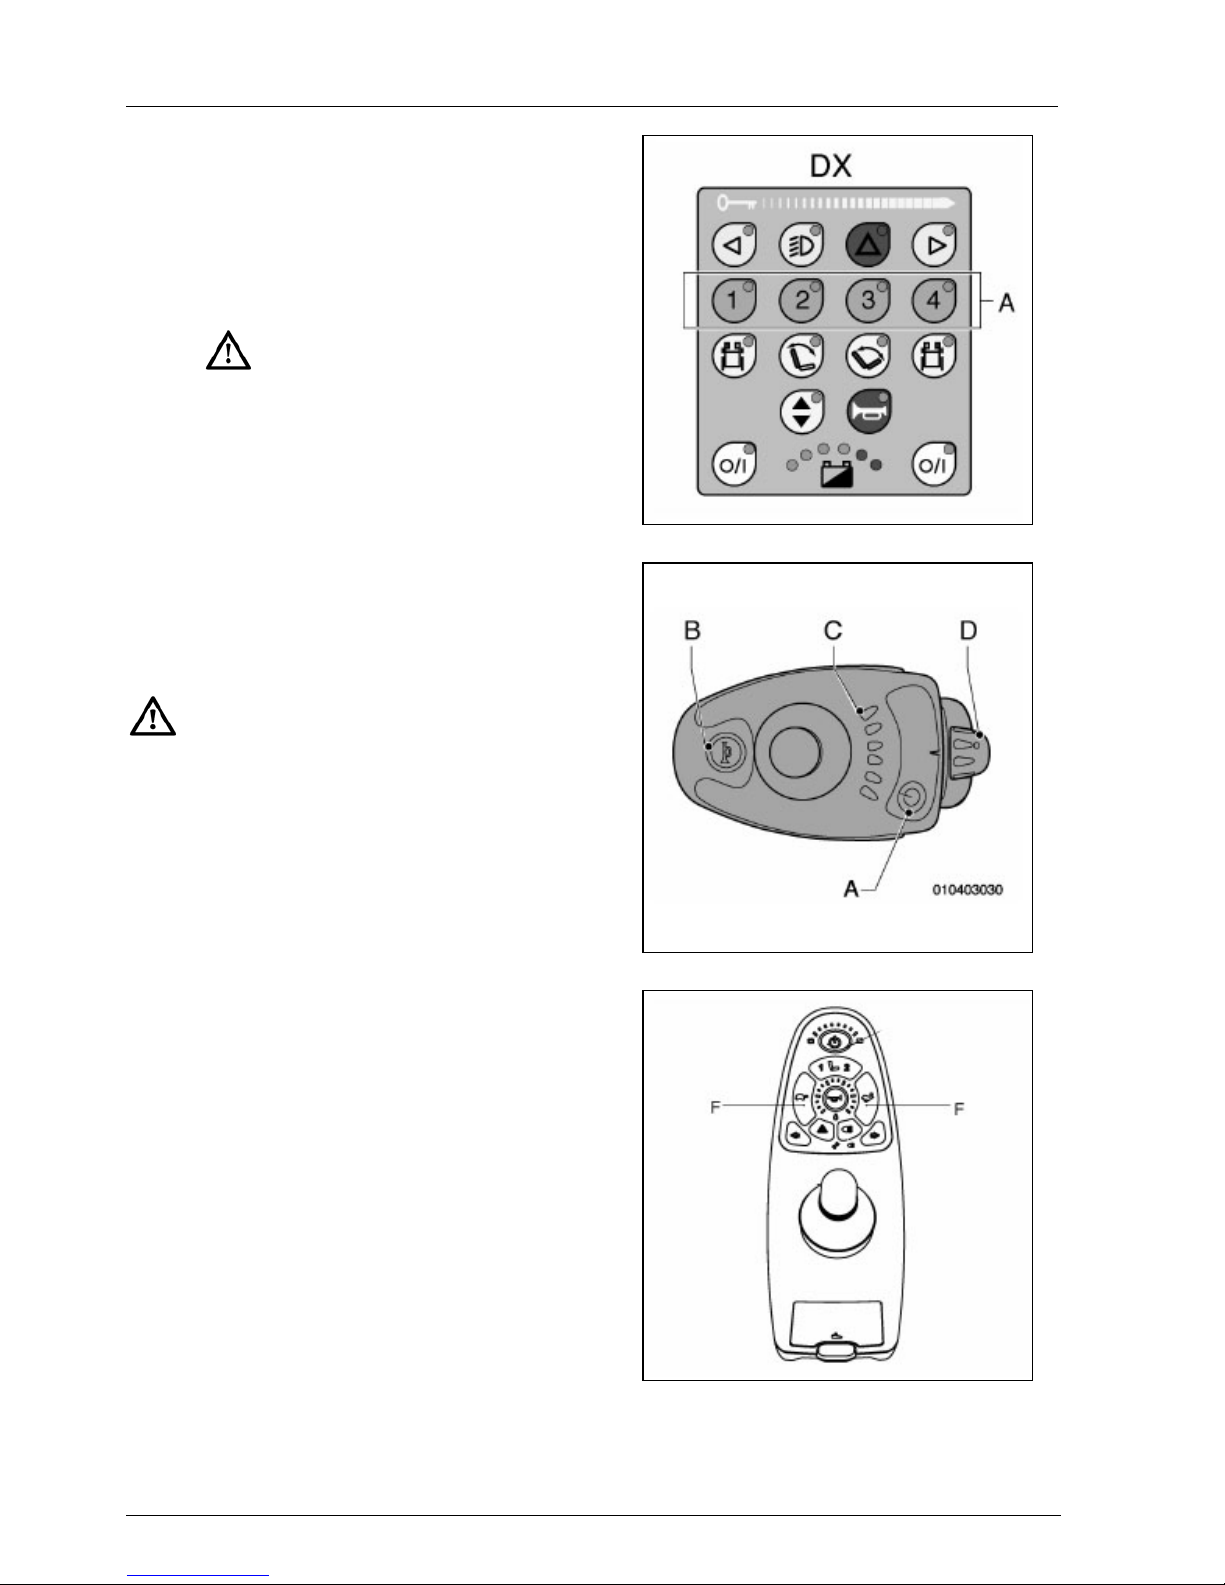
3.7 Driving forward and
backward
• Switch on the wheelchair
• Choose the desired speed value:
• With key 1, 2, 3 or 4 (A in fig.
3.6) for controller 'DX'.
• Maintain a maximum of 3
indoors or in pedestrian
areas.
• With the rotary knob (D in fig.
3.7) for controller 'Shark'.
• With the speed keys (F in fig.
3.8) on the ‘Shark seats/lights &
actuators’ controller.
• Push the joystick carefully forward
or backward, depending on which
direction you want to go, and the
wheelchair will begin to move.
With the joystick you can also
control the speed of the wheelchair.
The more you push the joystick
forward from the neutral position,
the faster the wheelchair goes
forward or backward.
• The wheelchair reacts very
quickly to force on the joystick.
• A smooth operating
characteristic is obtained by
even force on joystick.
Braking
When you release the joystick or move
it into the central position, you will
brake automatically.
Emergency stop
1. When driving forward pull the
joystick all the way backward with
one move. When reversing, push
the joystick all the way forward with
one move.
2. Immediately release the joystick
when the wheelchair has come to a
standstill.
Figure 3.6
Figure 3.7
Figure 3.8
Page 19
Operating instructions
19
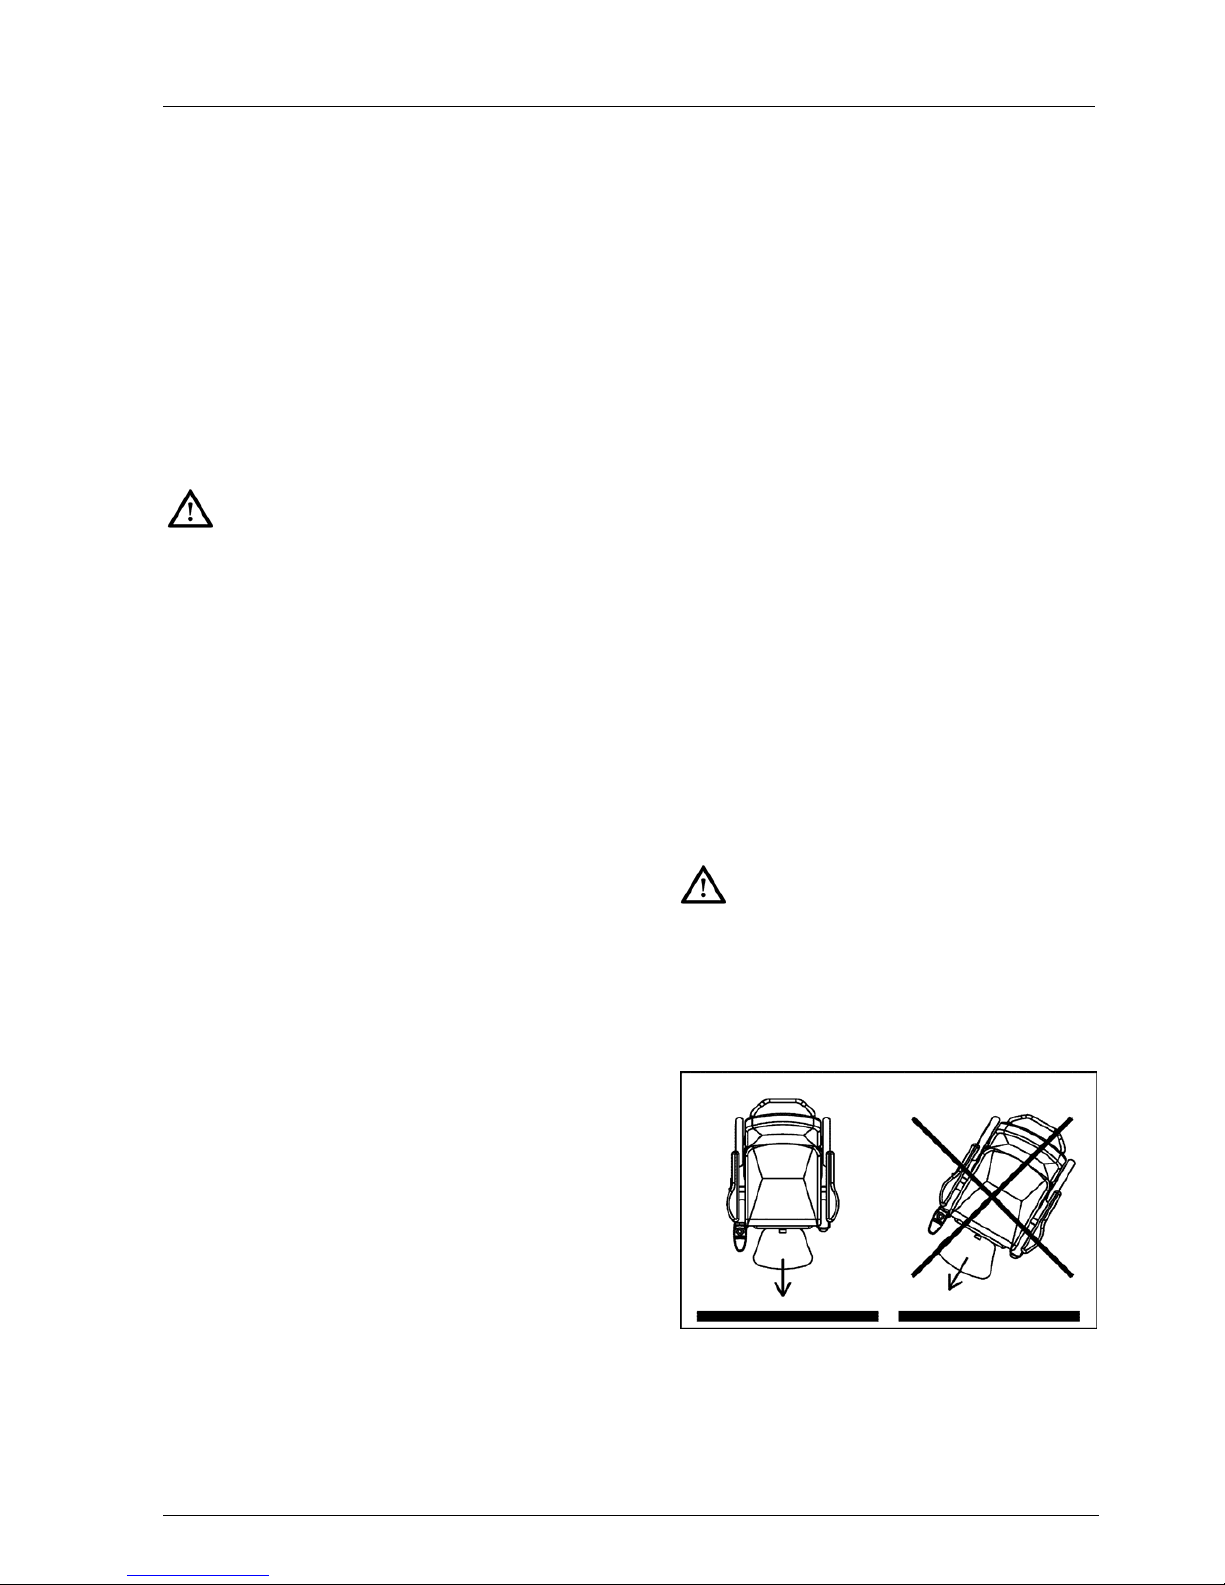
3.8 Improper use
Follow the instructions with a caution
symbol and consider suggestions!
Cautions concerning improper use of
the product have been included in the
chapter on the concerned subject
where possible. Cautions for improper
use can be recognized by the caution
symbol:
Miscellaneous improper use
• Drive carefully on slippery
roads, resulting from rain, ice or
snow!
• Prevent the wheelchair from
coming into contact with
seawater: seawater is caustic
and may damage the wheelchair.
• Prevent the wheelchair from
coming into contact with sand:
sand may affect the moving
parts of the wheelchair, resulting
in unnecessarily rapid wear.
• Do not put the wheelchair in
direct sunlight: the upholstery
may become too hot, which may
cause burning or an allergic
reaction of the skin.
• Do not drive the wheelchair
when you are under the
influence of drugs, alcohol or
medication that could affect your
ability to drive.
• You must have sufficient eye
sight to be able to safely drive
the wheelchair.
• It is imperative to turn on the
lights in case of reduced
visibility.
• When driving at a high speed
you must be extra careful. Select
a lower maximum speed
indoors, on pavements and in
pedestrian areas.
• Be sure that no items of clothing
hang loose. These could be
caught between the wheels.
• When driving on a slope, always
make sure that all adjustment
options are in the lowest
position and that the leg rests
are in the lowest position.
• Do not add weight to the
wheelchair without obtaining
advice from an expert. You could
inadvertently affect the stability
of the product.
• Do not push and/or drag objects
with the wheelchair.
• Do not open doors with the leg
rests.
• Do not use the footrests when
transferring.
• Do not drive off high obstacles.
• Do not alter the electrical circuit.
• Do not seat more than one
person on the wheelchair.
3.9 Curves
• Never take curves at full speed.
Decrease speed before taking a
curve.
• Use the indicators when
changing direction.
Figure 3.10
Page 20

Operating instructions
20
3.10 Obstacles
Driving up obstacles
1. Drive straight up to the kerb (fig.
3.10).
2. Slowly move the joystick forward.
Drive up the pavement without
changing direction.
3. As soon as the front wheels are on
the pavement, you must keep your
speed for the rear wheels to be
able to move up the pavement as
well.
If you cannot drive up onto the
pavement, find a lower place where
you can.
Driving down obstacles
1. Drive straight up to the edge of the
pavement.
2. Slowly move the joystick forward.
Drive carefully down the pavement
without changing direction.
Do not drive down stairs!
3.11 Slopes
1. Always drive slowly and with
awareness on slopes.
2. Avoid sudden and jerky
movements.
3. Avoid directional changes on
slopes.
4. Do not turn on slopes.
5. Only drive up a slope with all
adjustment options in the lowest
position and the leg rests in the
lowest position.
6. It can be very dangerous to
reverse down a slope.
7. Do not drive down slopes with
loose gravel or a sandy surface,
as one of the driving wheels
might slip.
8. If you notice a strong decrease
in speed when driving up a
slope, take a less steep route.
9. Prevent the wheelchair from
gaining too much speed.
10. Driving on a slope too long can
cause overheating.
11. When driving forward down a
slope with a FWD wheelchair we
always advise the use of an antitip device.
Page 21
Operating instructions
21
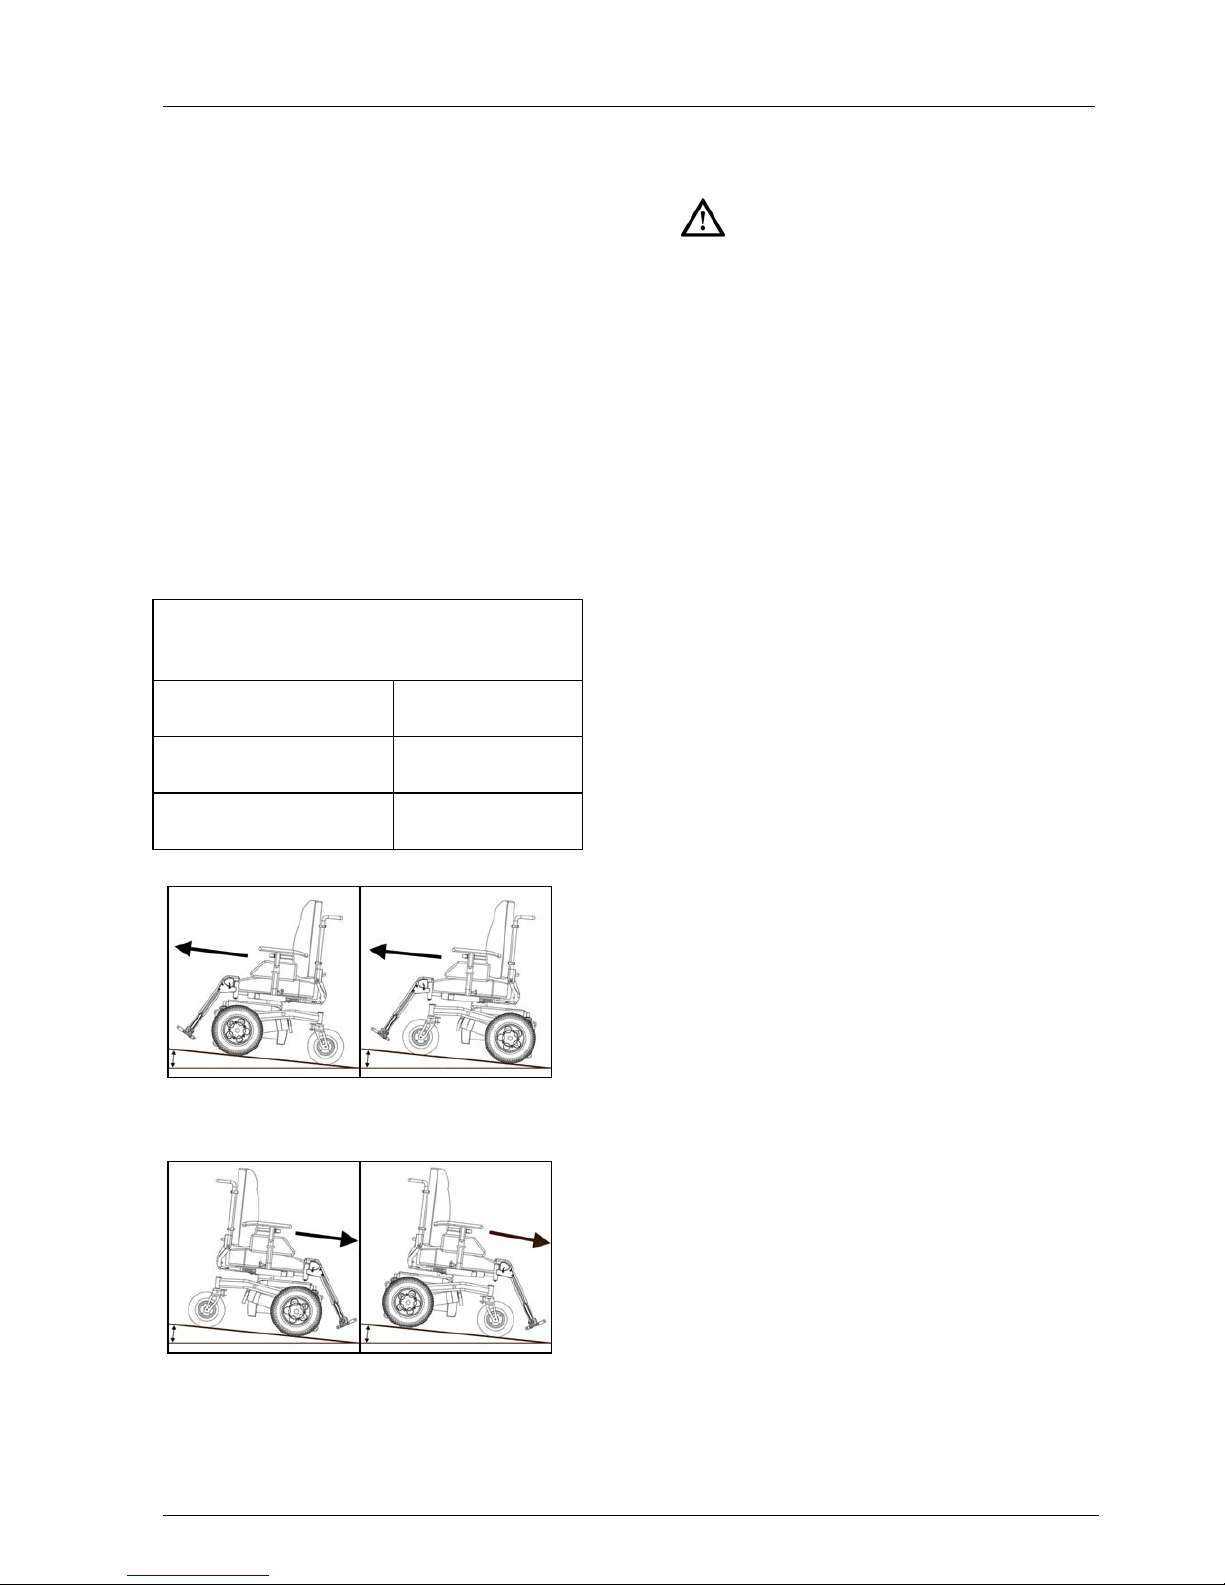
Safe slope
The Puma and Beatle meet the
requirements of a class B
(indoor/outdoor) wheelchair in
accordance with the European
standard EN12184.
The Puma and Beatle are available in
various configurations. Different
configurations have different
specifications. With regard to the
maximum safe slope, a distinction is
made between front-wheel driven
wheelchairs (FWD) and rear-wheel
driven wheelchairs (RWD). See the
table below.
Slopes tested in accordance with
EN12184 (Class B Indoor/Outdoor)
Maximum safe
slope
Puma/Beatle FWD
Front-wheel driven
6°
Puma/Beatle RWD
Rear-wheel driven
10°
Figure 3.11 Driving up a slope; left
FWD, right RWD.
Figure 3.12 Driving down a slope; left
FWD, right RWD.
Slopes steeper than the maximum
safe slope.
The Puma and Beatle are capable of
tackling slopes steeper than the
maximum safe slope. This
capability ensures optimal everyday
use of the wheelchair.
Driving on slopes steeper than the
maximum safe slope can engender
safety risks with regard to stability.
This requires the user to exert
considerable caution and full
control of the wheelchair. Always
drive carefully and never
experiment! Follow the instructions
with a caution symbol!
The stability and performance of a
wheelchair depend on many
variables. Wheelchairs are adapted
to the individual user.
Consequently, the variables will
vary from wheelchair to wheelchair.
Therefore, have your dealer
properly inform you about the use
of the wheelchair and whether the
specific settings or personal
adaptations will affect the driving
behaviour of the wheelchair.
Page 22
Operating instructions
22
3.12 Reducing the size of
wheelchair
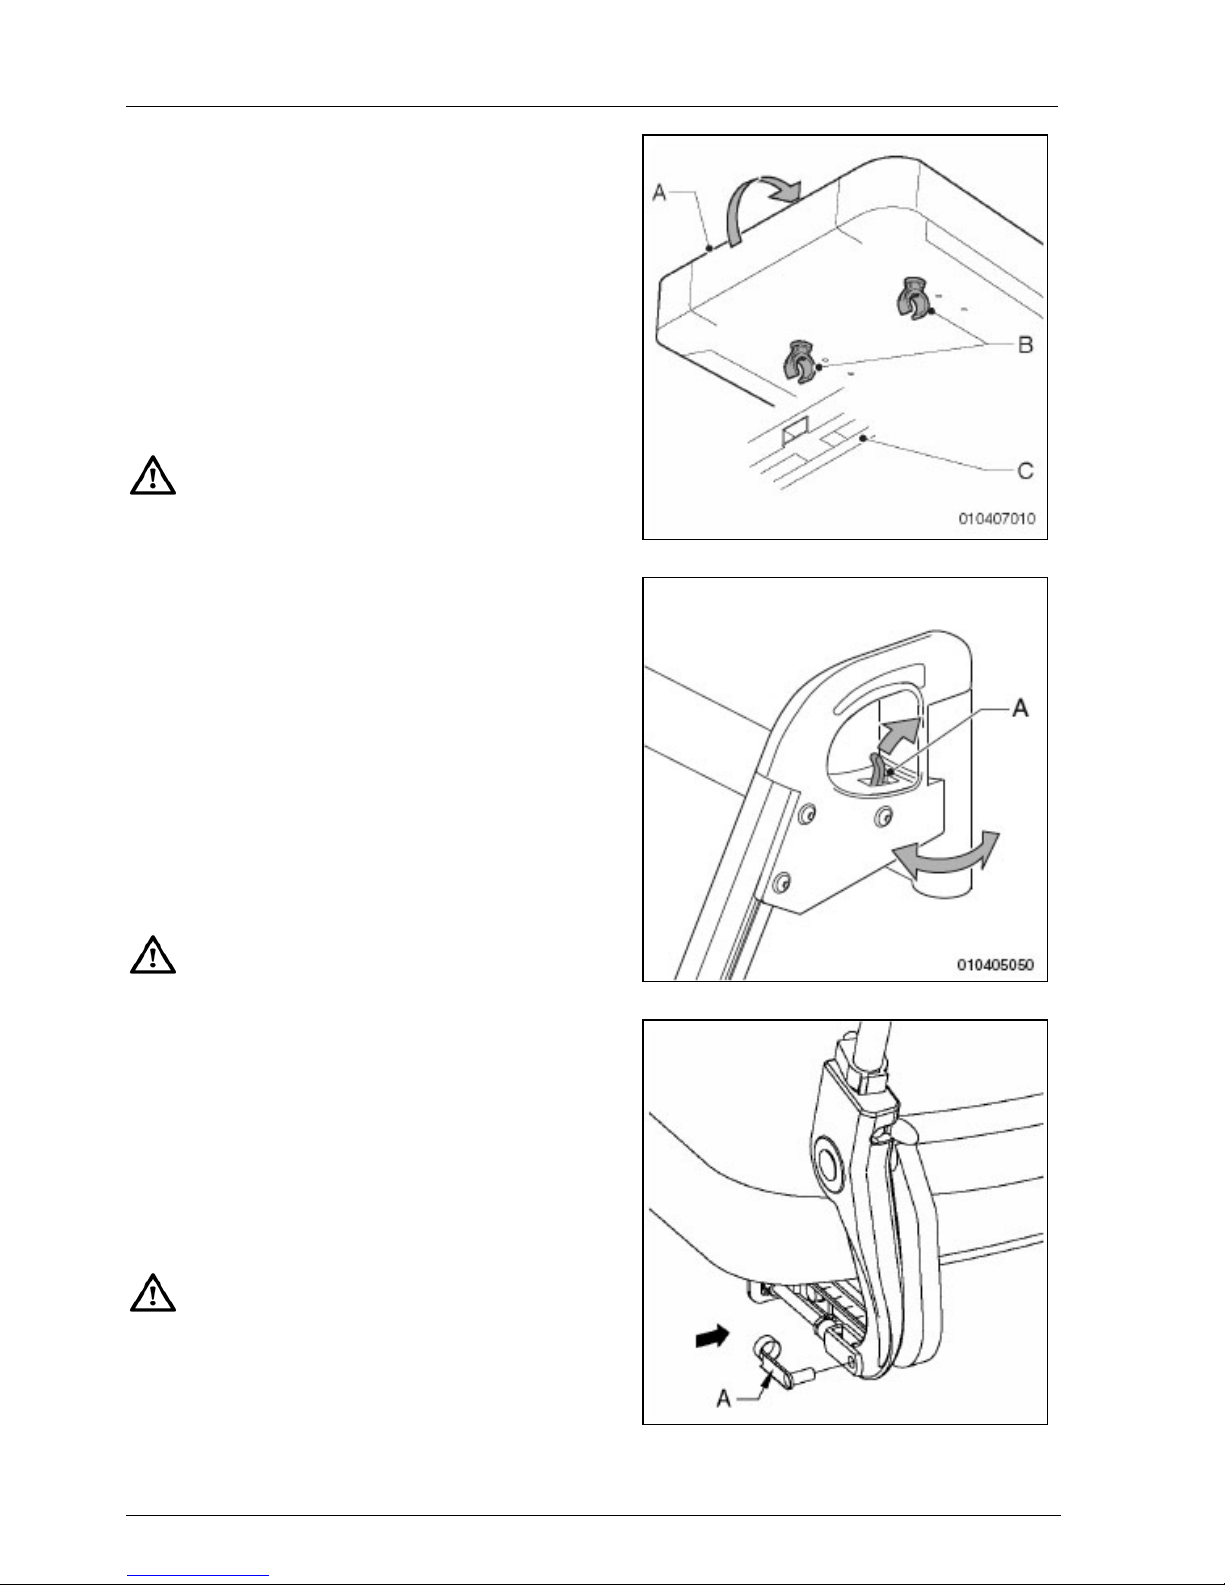
Removing the seat
1. Pull up the seat (A in fig. 3.13) in
the front.
2. When replacing the seat, the clips
(B in fig. 3.13) must click around
the frame (C in fig. 3.13) of the
chair.
Check if the seat is clicked in place
securely.
Folding down the backrest
1. Flip the lock clip (A in fig. 3.15) off
the adjusting bar.
2. Pull the lock clip from the hinged
joint.
3. Fold down the backrest.
Removing the armrest
Loosen the cap and remove the
armrest.
The controller remains connected to
the wheelchair with the cable.
Removing the legrest
1. Push the catch (A in fig. 3.14)
backward to unlock the leg rest.
2. Swing the legrest (B) outward.
3. Raise the legrest and remove it
from the guide.
Make sure you hear a click when
you put the legrest back in place.
The legrest is now securely locked.
Figure 3.13
Figure 3.14
Figure 3.15
Page 23
Operating instructions
23
3.13 Transport
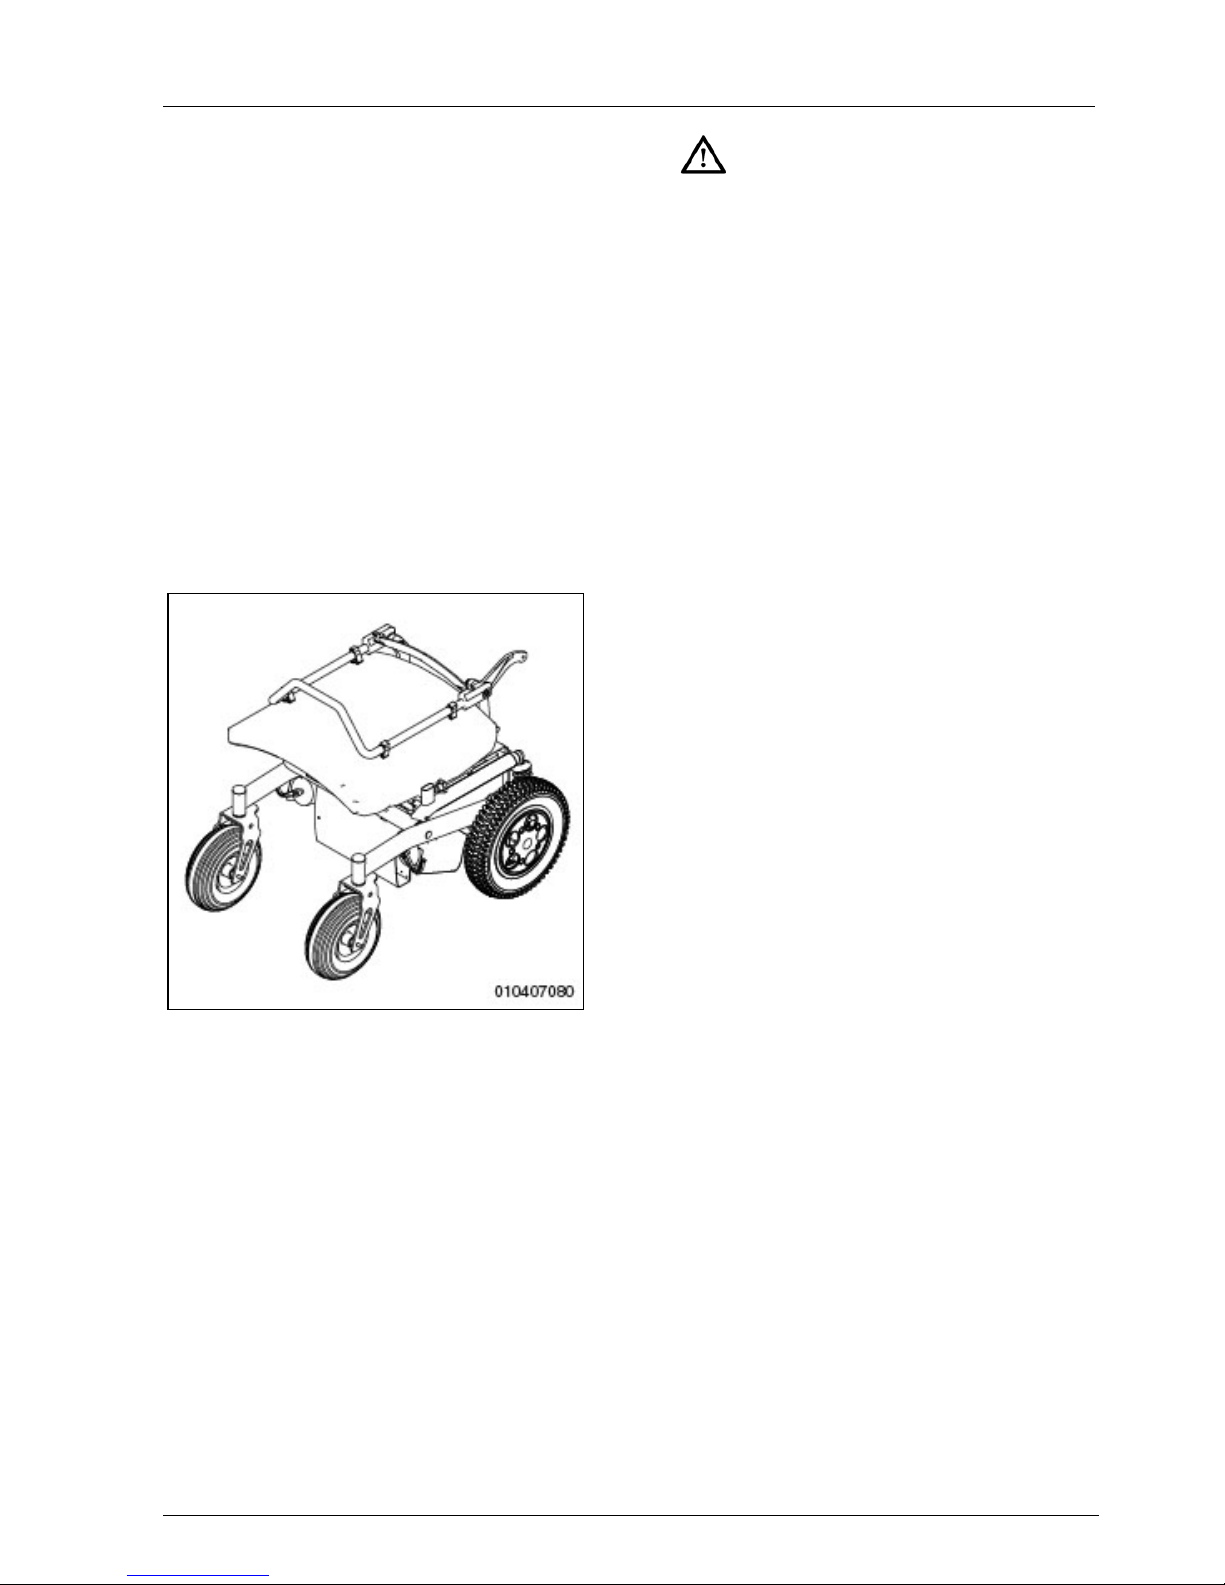
The wheelchair can be placed in a car.
The best way to do this is by reducing
the wheelchair and using steel ramps.
Handicare recommends wheelchair
users to travel in a regular car seat
whenever possible. A wheelchair is not
designed as a car seat and cannot
offer the level of safety that is offered
by standard car seats, no matter how
well the wheelchair is fixed to the
vehicle concerned. As it is not possible
for every wheelchair user to make a
transfer, the wheelchair should be
secured as described below.
Figure 3.16
• The Beatle/Puma has been
subjected to a dynamic crash
test and meets the concerned
requirements stipulated in
ISO7176-19.
• You should always ask for
confirmation from the
transporter that the vehicle is
suitably designed, insured and
equipped to transport a
passenger in a wheelchair.
• Parts of the wheelchair that can
be easily detached (accessories)
should be removed and stored
elsewhere during transportation.
• The wheelchair should always
be transported in a forward
facing direction.
• Handicare recommends a tiedown system that is tested and
approved according to ISO10542
with a max weight suitable for
the Puma and Beatle.
• The wheelchair should be
secured only at the tie-down
points on the frame, not onto
other parts of the wheelchair or
onto any accessories (armrests,
anti-tip brackets etc).
• Handicare recommends that the
wheelchair should be supplied
with a headrest and that this
should be used during
transportation.
• During transportation it is
essential that you are secured
by a three point lap belt, which is
anchored to the vehicle wall and
floor rails. A seat belt on your
wheelchair must not be
considered as an alternative to
the occupant restraint system.
Page 24
Operating instructions
24
3.14 Electric adjustments
The Beatle / Puma may be equipped
with electric (optional) adjustments,
which can be operated from the
controller.
The following electric adjustments may
have been provided:
• Seat with electric height adjustment
• Seat with electric tilt adjustment
• Backrest with electric angle
adjustment
• Leg-rest with electric angle
adjustment
With the DX version, the keys intended
for the operation of the electric
adjustments are standard mounted on
the controller panel.
With the ‘Shark’ version, available with
maximum two options, you have to
push the adjustment key (J in fig. 2.6)
several times to select the various
adjustment options.
Remark:
When you drive up or down a slope
of more than 4 degrees, you must
put all electric adjustments back
into the original position.
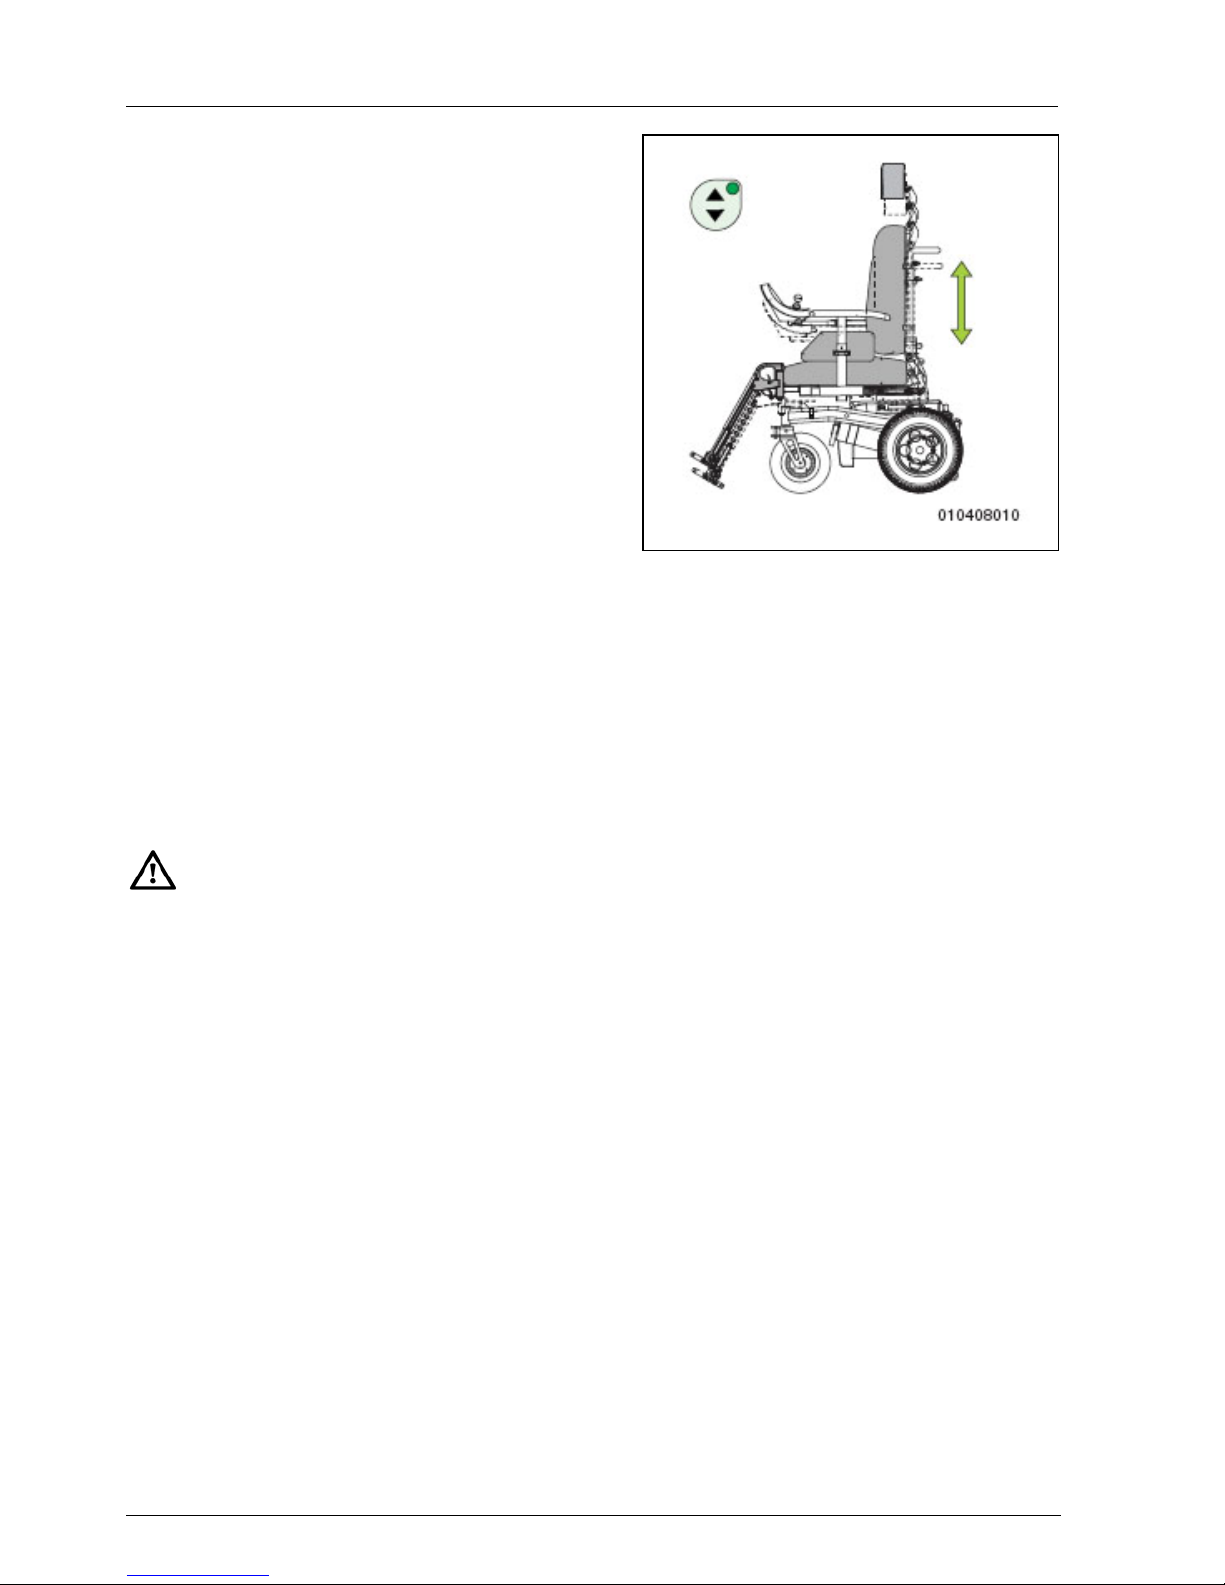
Seat with electric height
adjustment
The height of the whole seating
system of the Beatle / Puma you can
adjust electrically yourself.
As soon as the seating system has
been raised a couple of centimetres,
the light in the on/off switch will start
flashing. This is to indicate that the
wheelchair can now only be driven at
half speed.
Therefore, while you are adjusting the
seating system, do not confuse the
blinking on/off light with the diagnostic
function of this lamp.
Figure 3.17
Adjusting with ‘DX’ control:
1. Switch on the electrical wheelchair.
2. On the control panel of the
controller press the symbol for the
height adjustment of the seating
system. The light of the key should
now go on. The wheelchair can no
longer drive.
3. Now move the joystick to the front:
the seating system will be raised.
Or move the joystick to the back;
the seating system will move down.
4. Press the symbol once more to
switch on the function as soon as
the desired height has been
reached.
Adjusting with‘Shark’ control:
1. Switch on the wheelchair.
2. Push the adjustment key (J in fig.
2.6). The indicator light of the key
will go on. You can no longer drive
the wheelchair.
3. Move the joystick forward: the
adjustment option moves forward,
or move the joystick backward: the
adjustment option moves
backward.
4. Push the adjustment key (J in fig.
2.6) to switch off the adjustment
function.
Page 25
Operating instructions
25
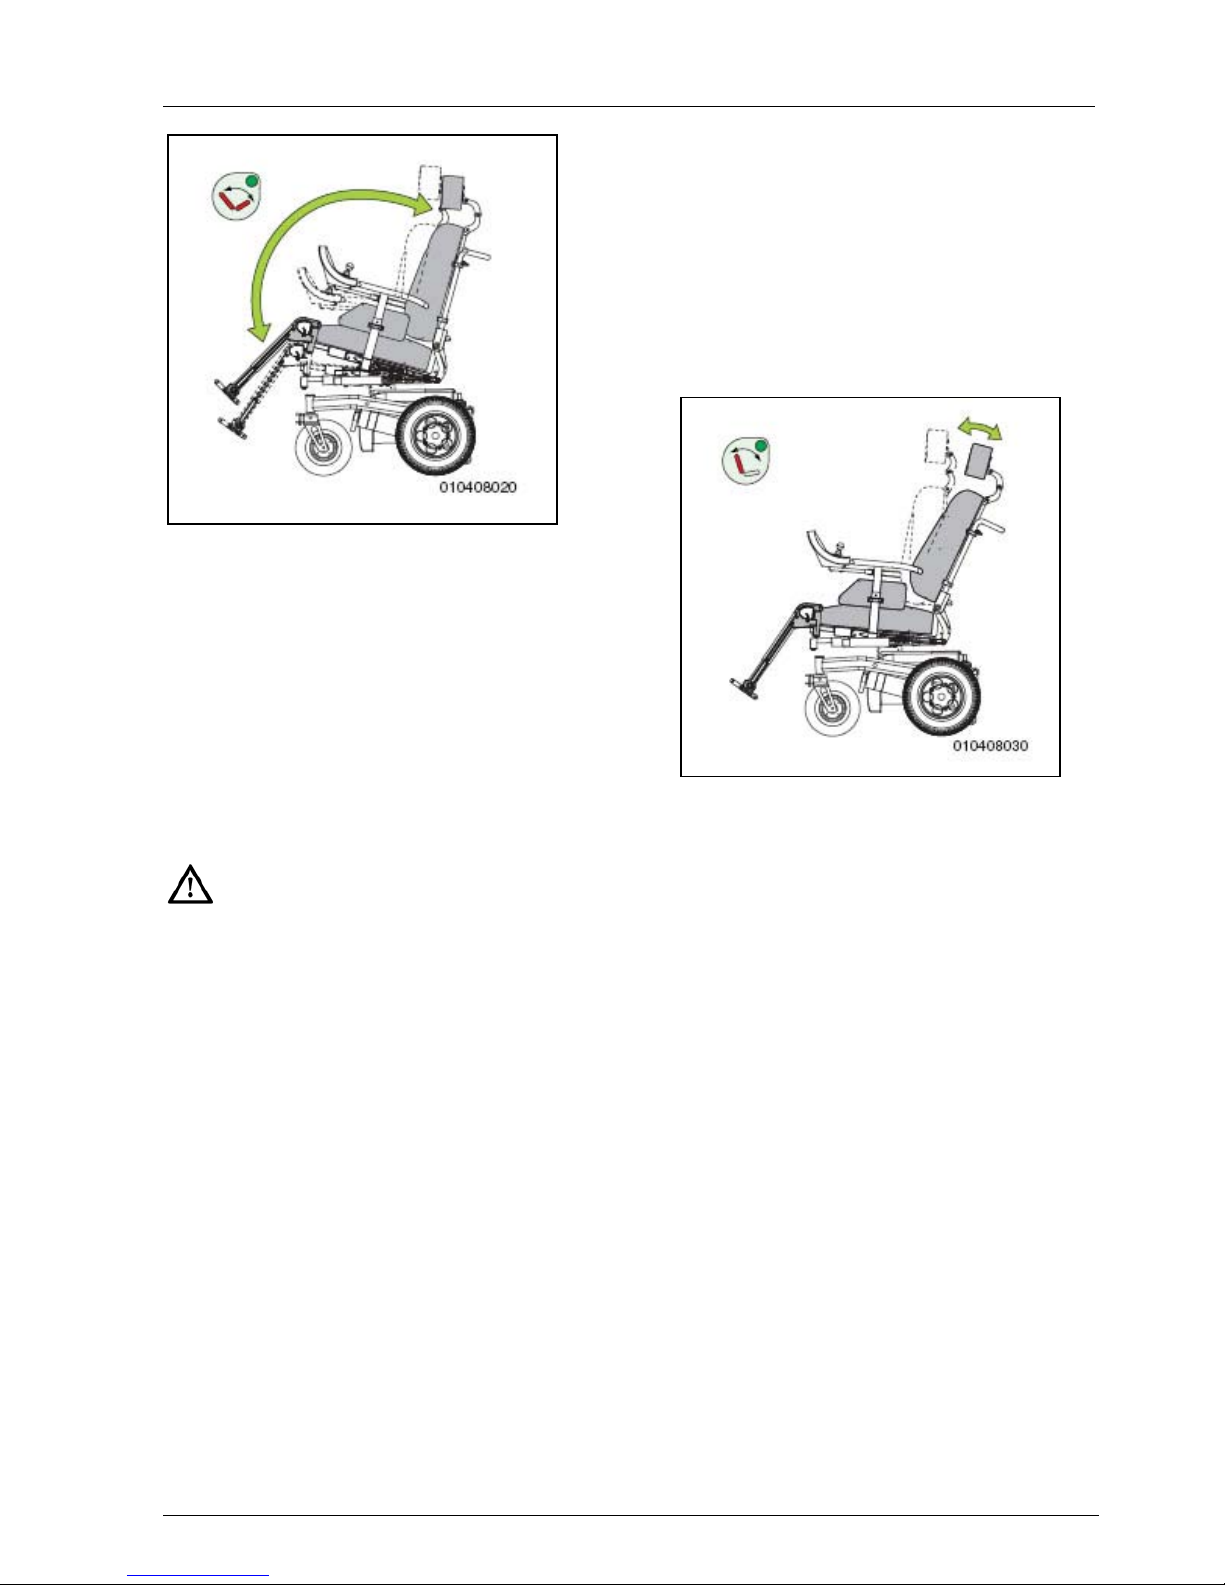
Figure 3.18
Seat with electric tilt adjustment
The seat part of your wheelchair can
be set at an angle that is comfortable
for you. In this adjustment, the angle of
the entire seating system is tilted with
respect to the bottom part of the chair.
Also, this adjustment can be used to
tilt the seating system backward, to
facilitate getting out.
For each degree that the seat is
tilted backward, the seat height is
raised by approximately 5 mm
(1/4").
Adjusting with ‘DX’ control:
1. Switch on the electrical wheelchair.
2. On the control panel of the
controller press the symbol for the
tilting adjustment of the seating
system. The light of the key should
now go on.
The wheelchair can no longer
drive.
3. Now move the joystick to the front:
the seating system will tilt forward.
Or move the joystick to the back:
the seating system will tilt
backward.
4. Press the symbol once more to
switch on the function as soon as
the desired tilting angle has been
reached.
Adjusting with ‘Shark’ control:
See ‘Seat with electric height
adjustment’.
Figure 3.19
Backrest with electric angle
adjustment
For optimal seating comfort, you can
adjust the angle of the backrest
yourself. This is done using continuous
adjustment.
Adjusting with ‘DX’ control:
1. Switch on the electrical wheelchair.
2. On the control panel of the
controller press the symbol for the
angle adjustment of the backrest of
the seating system. The light of the
key should now go on. The
wheelchair can no longer drive.
3. Now move the joystick to the front:
the backrest will tilt forward.
Or move the joystick to the back:
the backrest will tilt backward.
4. Press the symbol once more to
switch on the function as soon as
the desired angle has been
reached.
Page 26
Adjustment options
26
Adjusting with ‘Shark’ control:
See ‘Seat with electric height
adjustment’.
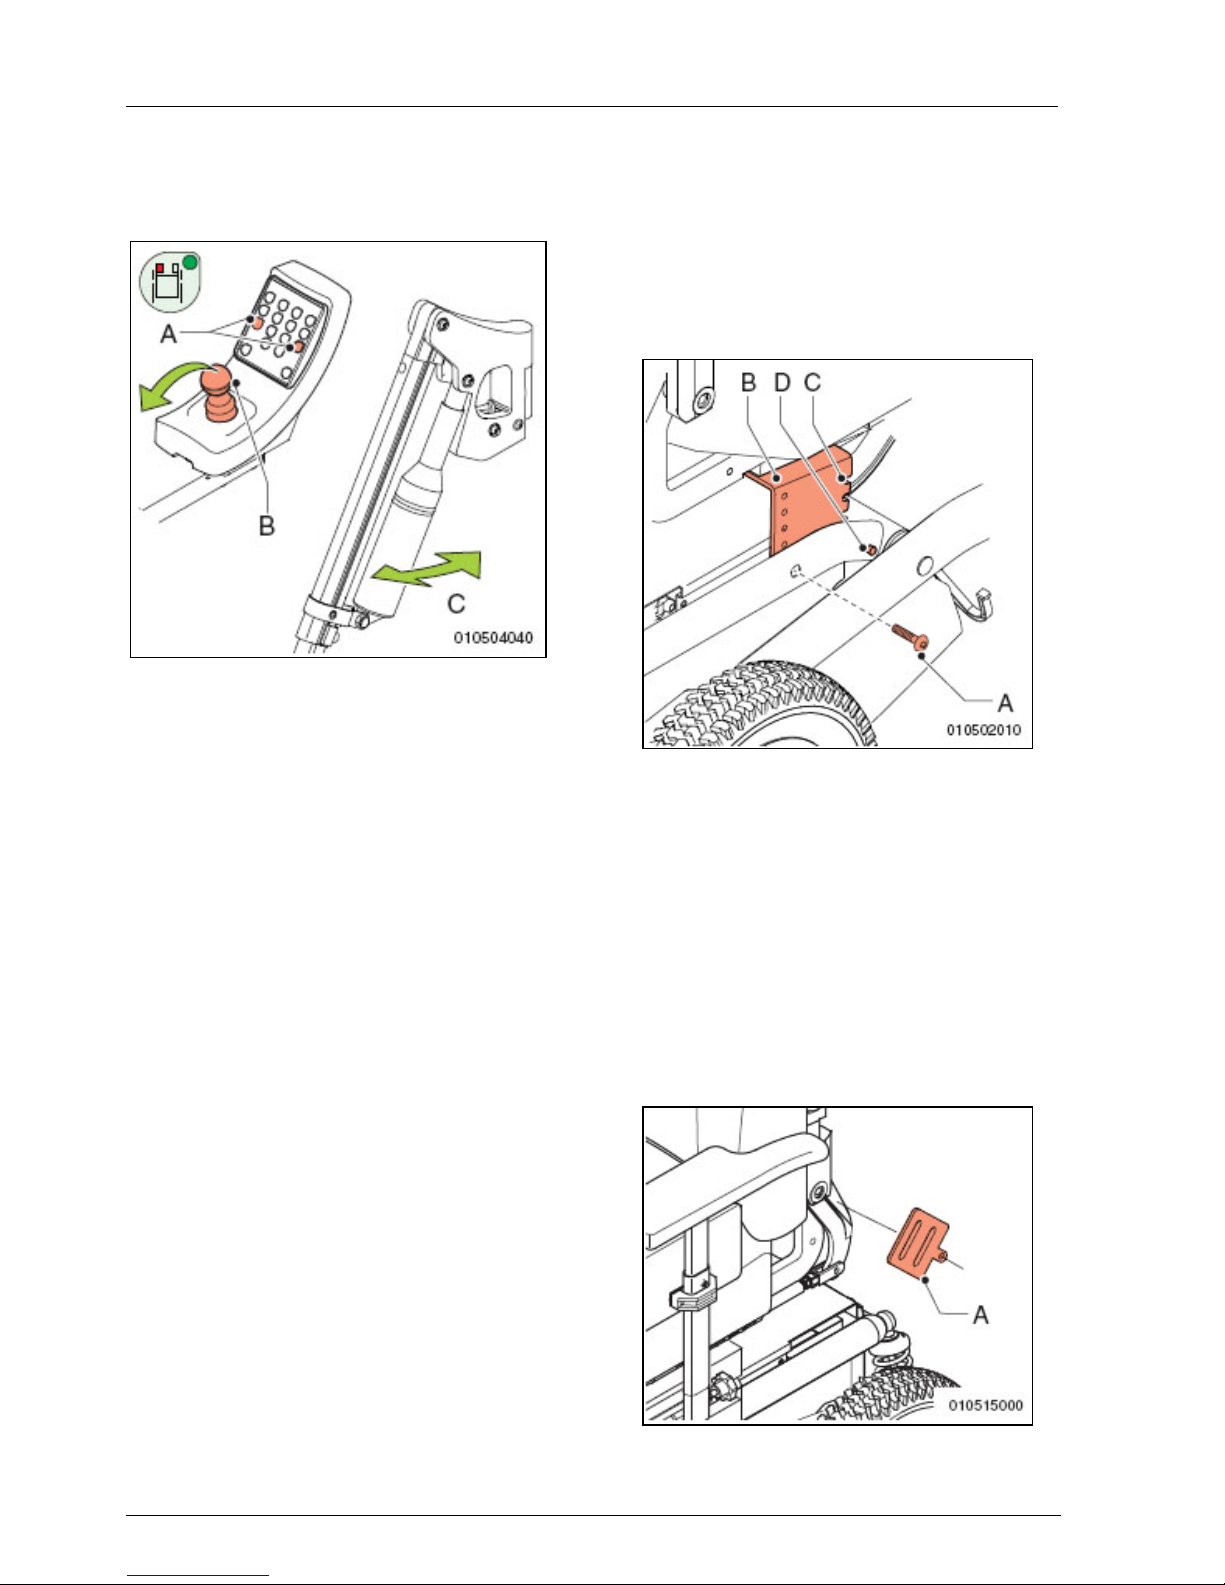
Figure 3.20
Leg rest with electrical motor
angle adjustment
The comfort leg-rests with electrical
set motor can be independently
adjusted. The motor on each leg-rest
provides enough power to lift the leg
rest without difficulty.
The adjustment of the angle of the leg
rests goes like this:
• Switch the electrical wheelchair on.
• On the control panel of the
controller, press the symbol for
angle adjustment of the leg rest (A
in fig. 3.13) of which the angle (C in
fig. 3.20) has to be adjusted .
The light of the pressed symbol
must now be on.
• Now move the joystick (B) forward
to adjust the leg-rest (C) upward or
backward to bring the leg-rest down.
• Press the relevant symbol again to
switch it off, or press on the symbol
of the other leg-rest to adjust this
one as well.
• Once again press the lit symbol, to
switch off the function of the angle
adjustment.
4 Adjustment options
4.1 Seat height adjustment
The seat height of the Beatle / Puma
can be adjusted to five levels in steps
of 25 mm by your dealer.
Figure 4.2
4.2 Seat belt
It is possible to equip the wheelchair
with a seat belt. The seat belt gives
extra sitting stability during normal use.
Ask your dealer for information.
For the assembly of the seat belt do
the following:
• Fasten the belt buckle (A in fig. 4.2)
with the aid of a bolt plus nut.
Figure 4.2
Page 27
Adjustment options
27
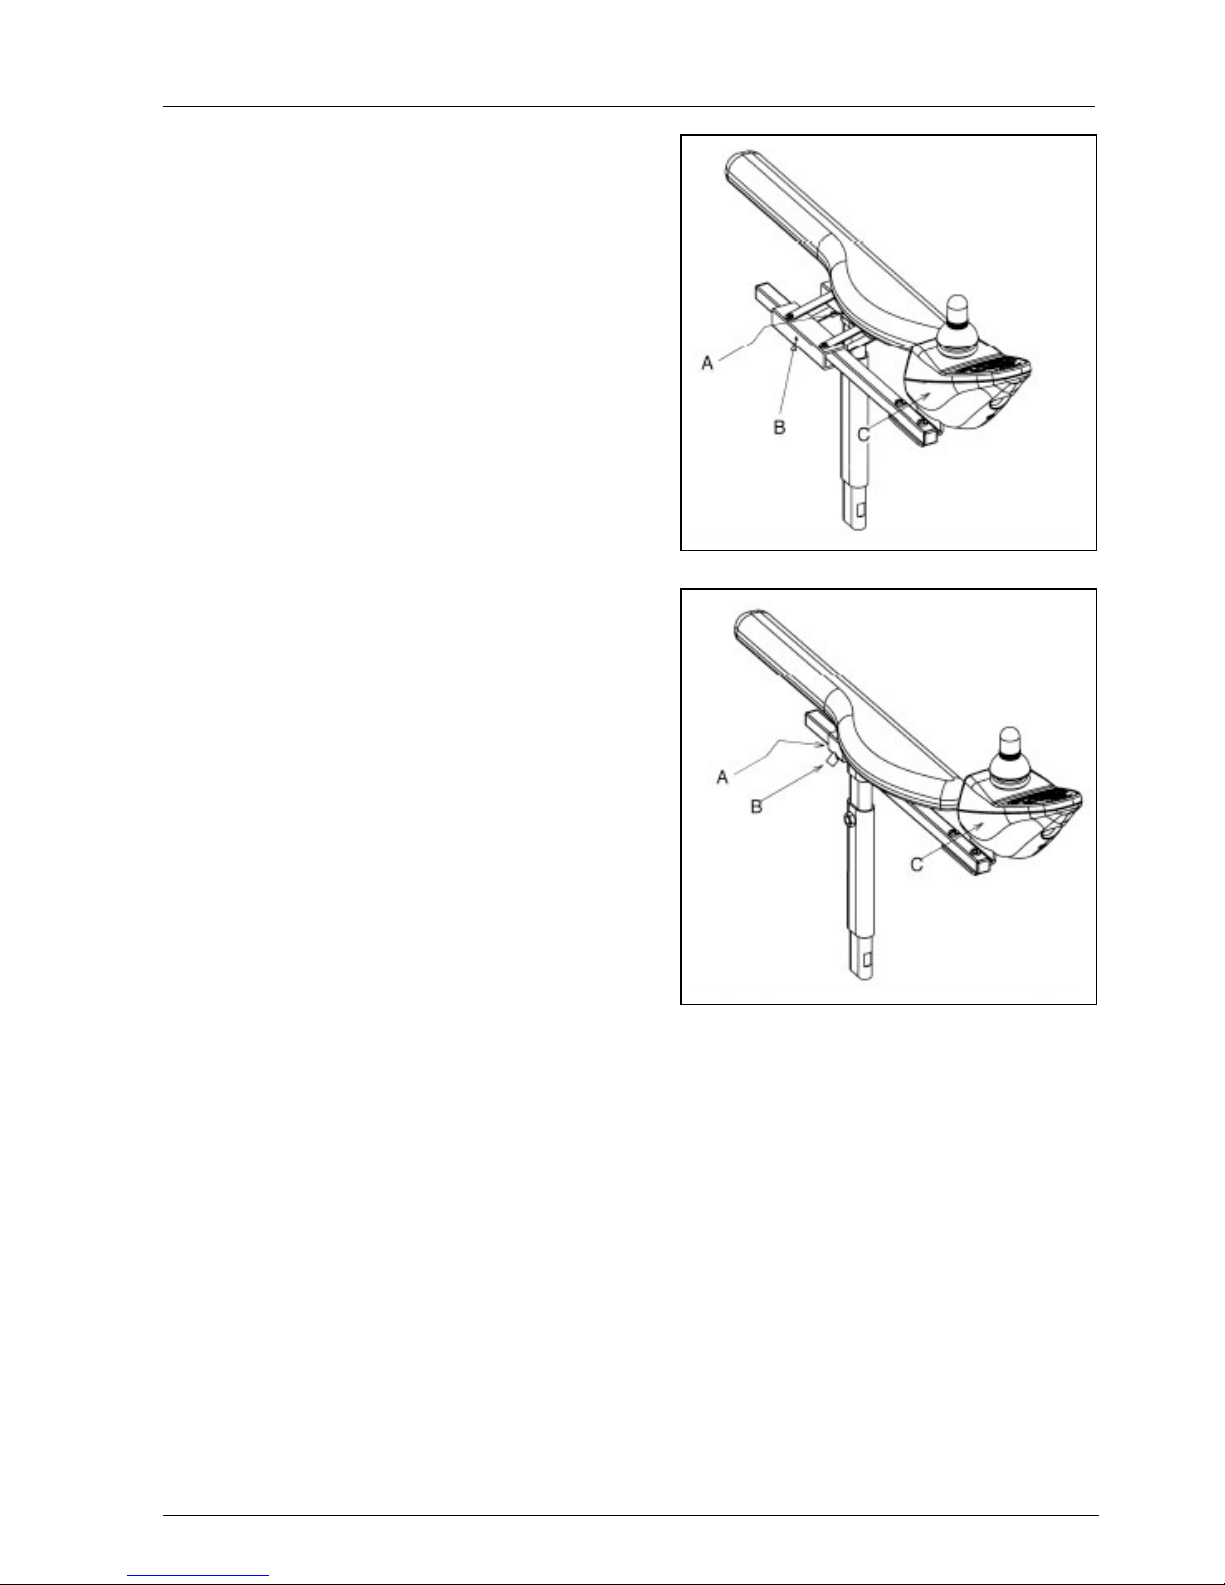
4.3 Adjustment ‘Swingaway’ controller
Height
1. Loosen the bolt (A in fig. 4.3) a few
turns with a 3 mm Allen key.
2. Slide the controller with the swing-
away mechanism in the desired
position.
3. Tighten the bolt securely.
Depth
1. Loosen the bolt (B in fig. 4.3) a few
turns with a 4mm Allen key.
2. Slide the controller in the desired
position.
3. Tighten the bolt securely.
4.4 Adjustment ‘Fixed’
controller
Depth:
1. Loosen the bolt (B in fig. 4.4) a few
turns with a 4mm Allen key.
2. Slide the controller (C in fig. 4.4) in
the desired position.
3. Tighten the bolt securely.
Height:
1. Loosen the bolt (A in fig. 4.4) a few
turns with a 3 mm Allen key.
2. Slide the controller (C in fig. 4.4) in
the desired position.
3. Tighten the bolt securely.
Figure 4.3
Figure 4.4
Page 28
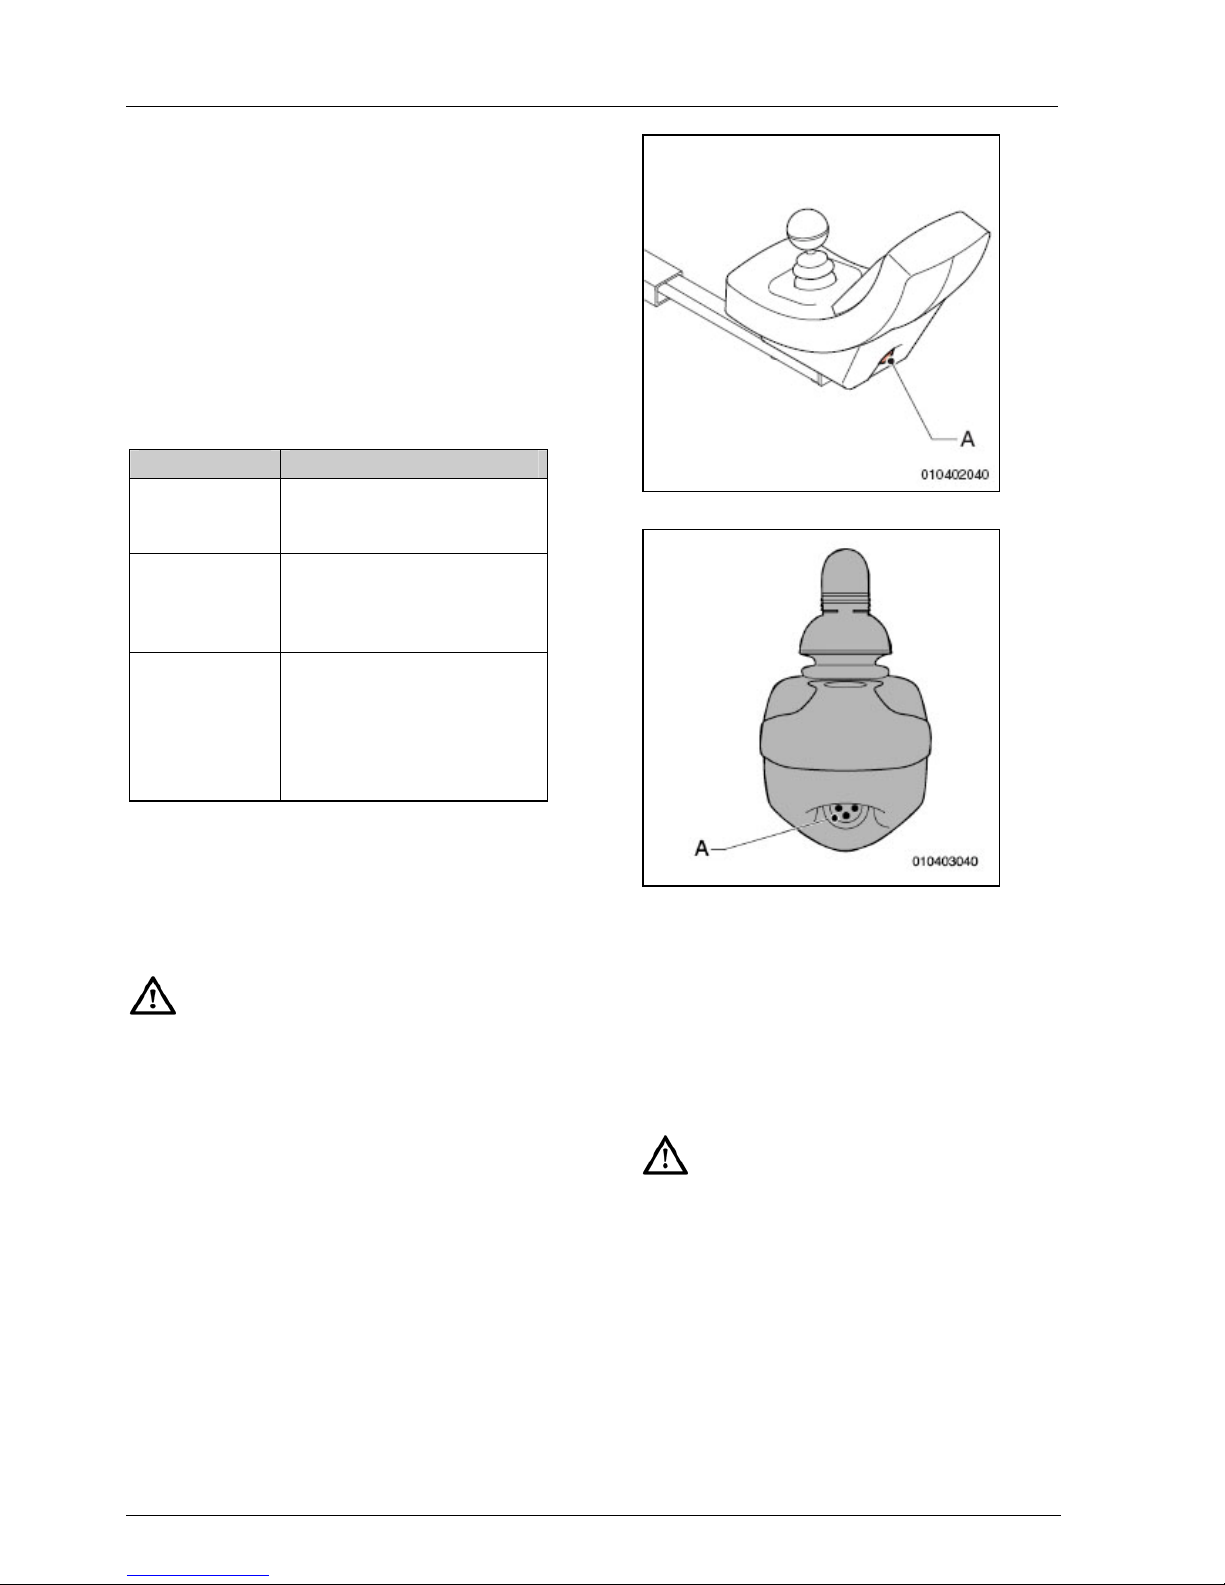
Maintenance
28
5 Maintenance
5.1 Maintenance table
It is recommended to have your
wheelchair serviced by your dealer
once a year or, in case of intensive
use, every six months. The table below
shows the maintenance activities you
can perform yourself.
Frequency Description
Daily Charge the batteries after
each use. See chapter
5.2.
Weekly Check tyre pressure and
inflate the tyres if
necessary. See chapter
5.3.
Monthly Clean the wheelchair. See
chapter 5.4.
Check the batteries (in
summer: once every
fortnight; in winter: once a
month). See chapter 5.2.
5.2 Batteries
The wheelchair has ‘dry’ gel batteries.
These dry batteries are entirely closed
and maintenance free.
The use of ‘wet’ batteries is not
permitted.
Charging the batteries
Consult the owner’s manual of the
battery charger to check for
compatibility with the batteries used.
In case of normal use, the batteries
should be charged every night.
1. Switch off the wheelchair.
2. Put the plug of the charge cord in
the charge connection (A).
3. Put the plug of the battery charger
in the wall outlet of the electricity
mains.
Figure 5.1
Figure 5.2
When the batteries have been
charged:
1. Remove the plug from the charge
connection.
2. Remove the plug of the battery
charger from the wall outlet of the
electricity mains.
• As soon as the plug of the
charge cord is connected to the
charge connection, the
operation of the wheelchair is
switched off.
• Always remove the charge cord
when the batteries have been
charged. This way, you will
prevent slow depletion of the
batteries.
Page 29

Maintenance
29
Maintenance of the batteries
Refer to the battery instructions.
• Make sure that the batteries are
always well charged.
• Do not use the wheelchair if the
batteries are almost depleted
and never completely deplete
the batteries. This can seriously
damage the batteries and you
run the risk to come to an
unintended standstill.
Cleaning the batteries
Keep the batteries clean and dry. Dirt
and water can cause a leak, reducing
the capacity of the batteries. After
cleaning grease the poles with acidfree Vaseline.
Replacing the batteries
If the capacity of the batteries is
reduced to the extent that the
wheelchair can only make very short
trips, the batteries are at the end of
their lifespan. The batteries must be
replaced as soon as possible. Contact
your dealer for this.
5.3 Checking and inflating
the tyres
• Make sure the tyres are kept at
the correct pressure.
• The tyre pressure may never
exceed the maximum value
indicated on the tyre.
Inflate the tyres with a foot pump or a
bicycle pump, in combination with the
reducing nipple included in the
delivery. You can also have your tyres
inflated at your local petrol station.
• Tire pressure driving wheel:
Puma: 1.75 bar
Beatle: 2.7 bar
• Tire pressure swivel castor:
• Outdoor type: 3.5 bar
• Indoor type: 2.5 bar
5.4 Cleaning the
wheelchair
Removing dry dirt
Upholstery, metal parts and frame
parts can usually easily be cleaned
with a dry soft cloth.
Removing mud and other wet dirt
The dirty parts can best be cleaned by
first wiping them with a wet sponge
and then wiping them dry with a dry
soft cloth.
• Never use abrasive or
aggressive cleansers. They can
scratch the wheelchair.
• Do not use organic solvents
such a thinner, benzene or white
spirit.
• Be careful with water in view of
the electronic installation.
Page 30

Troubleshooting
30
6 Troubleshooting
6.1 Troubleshooting table ‘DX’
Signal Possible cause Remedy
ON/OFF light is not on;
the wheelchair does
not drive.
The plug of the controller
is not properly placed in
the ‘power module".
Place the plug properly in the
"power module" (DX BUS).
The DX power module is behind
the cover that is on the outside
under the chair against the battery
tray.
The battery charger is still
connected to the
controller.
Take the plug of the charge cord
from the charging connection.
Neutral is still on. • Switch the wheelchair off
electrically.
• Switch off neutral.
• Switch the wheelchair on.
The batteries are not
properly connected.
Check the connections.
A connection of the
batteries is loose.
Secure the connection.
ON/OFF light flashes 7
times
The battery is too low. Charge the batteries.
The batteries are empty. Charge the batteries.
ON/OFF light flashes 8
times
The battery voltage is too
high, so that it exceeds 32
V.
This can only occur at charging.
ON/OFF light flashes
12 times.
System does not ‘fit’.
System modules are not
compatible.
After checking press the ON/OFF
key back to start driving.
In all other cases, contact your dealer. The contact information of your dealer can be
found on the last page of this manual.
Page 31
Troubleshooting
31
6.2 Troubleshooting table
‘Shark’
If the wheelchair will not function, while
the batteries are fully charged, check
the following points before contacting
your dealer.
• Switch off the wheelchair and then
switch it on again. Check if the
problem has been solved.
• Check if all charge plugs are
properly connected and secured.
• Check if the wheelchair is in the
Drive position (not in Neutral).
• Check if the position of the speed
control has not changed.
In case of a malfunction the battery
indicator lights will be flashing on the
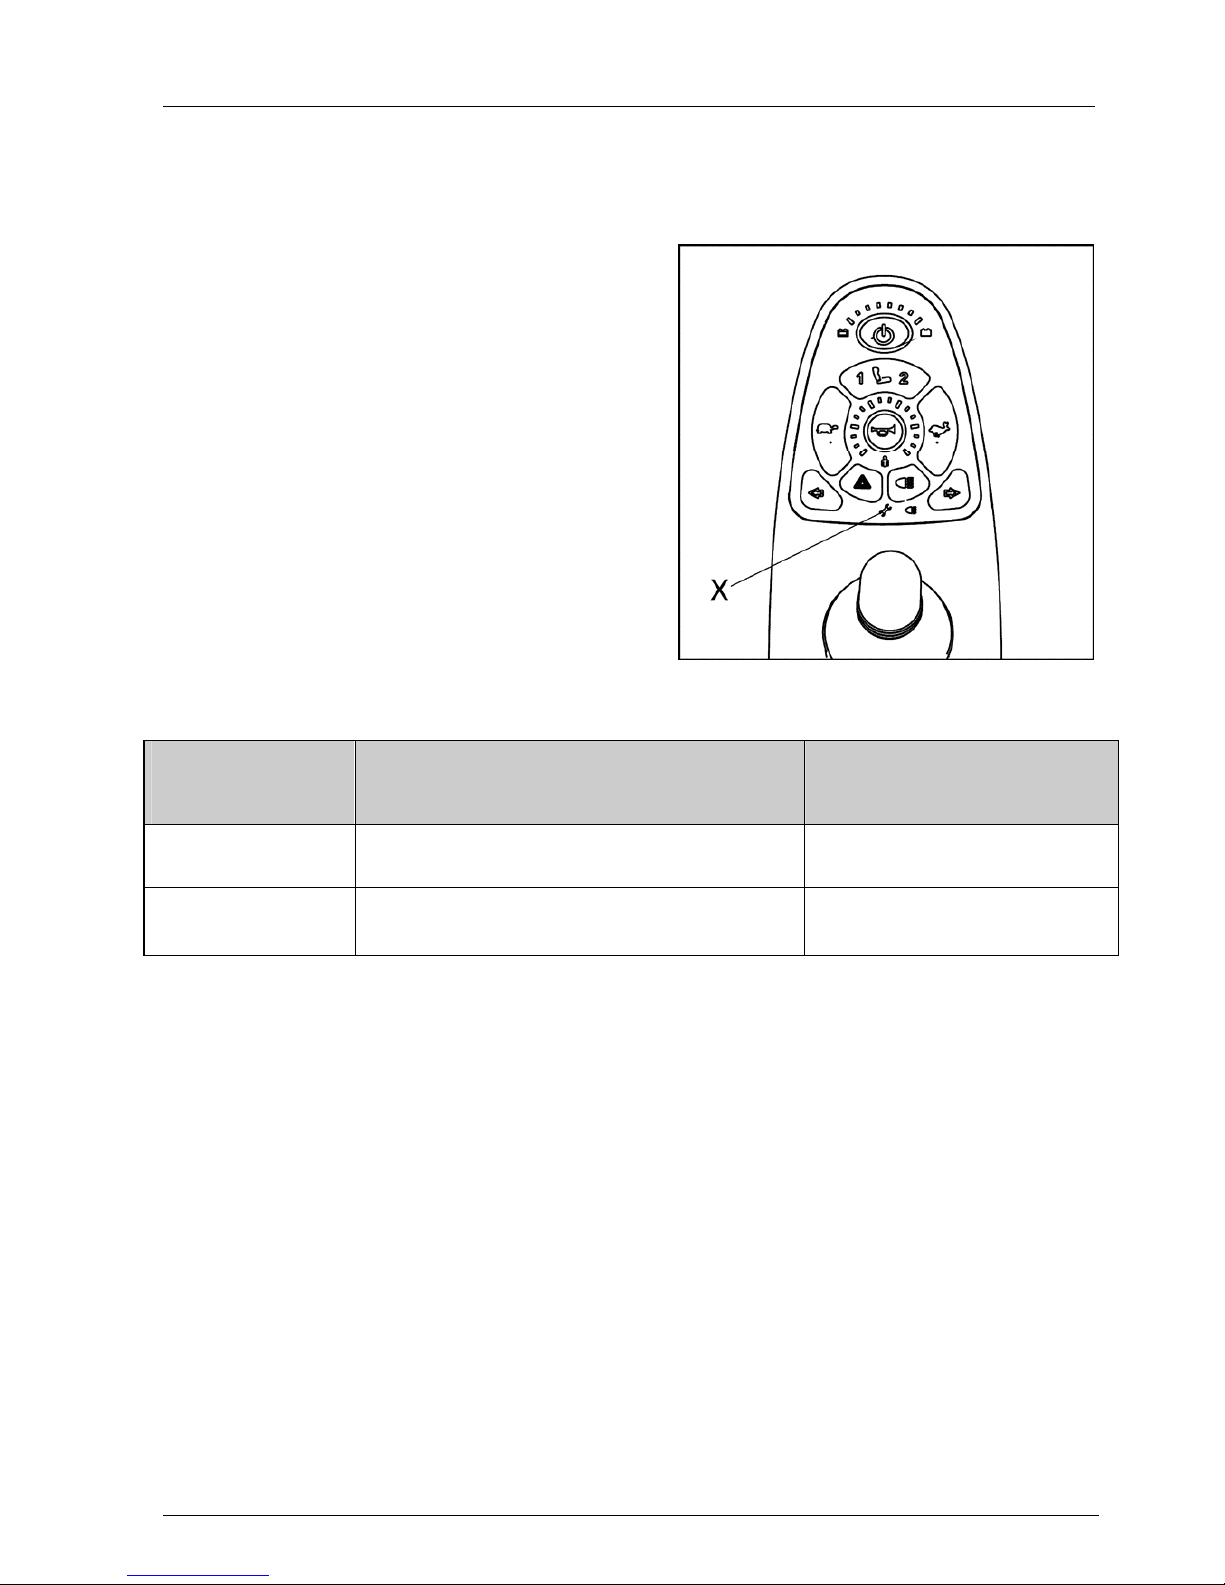
(Shark controller). On the Shark lights
and Shark seats-lights controllers the
spanner symbol will be flashing (see X
in fig. 6.1). Use the table below to find
out the cause and report this
information to your dealer.
Figure 6.1
In all other cases, contact your dealer. The contact information of your dealer can be
found on the last page of this manual.
Flashing
frequency
indicator lights
Fault description Action
5 Motor 1 is in the Neutral position Put the free wheel lever of
motor 1 in the Drive position
6 Motor 2 is in the Neutral position Put the free wheel lever of
motor 2 in the Drive position
Page 32
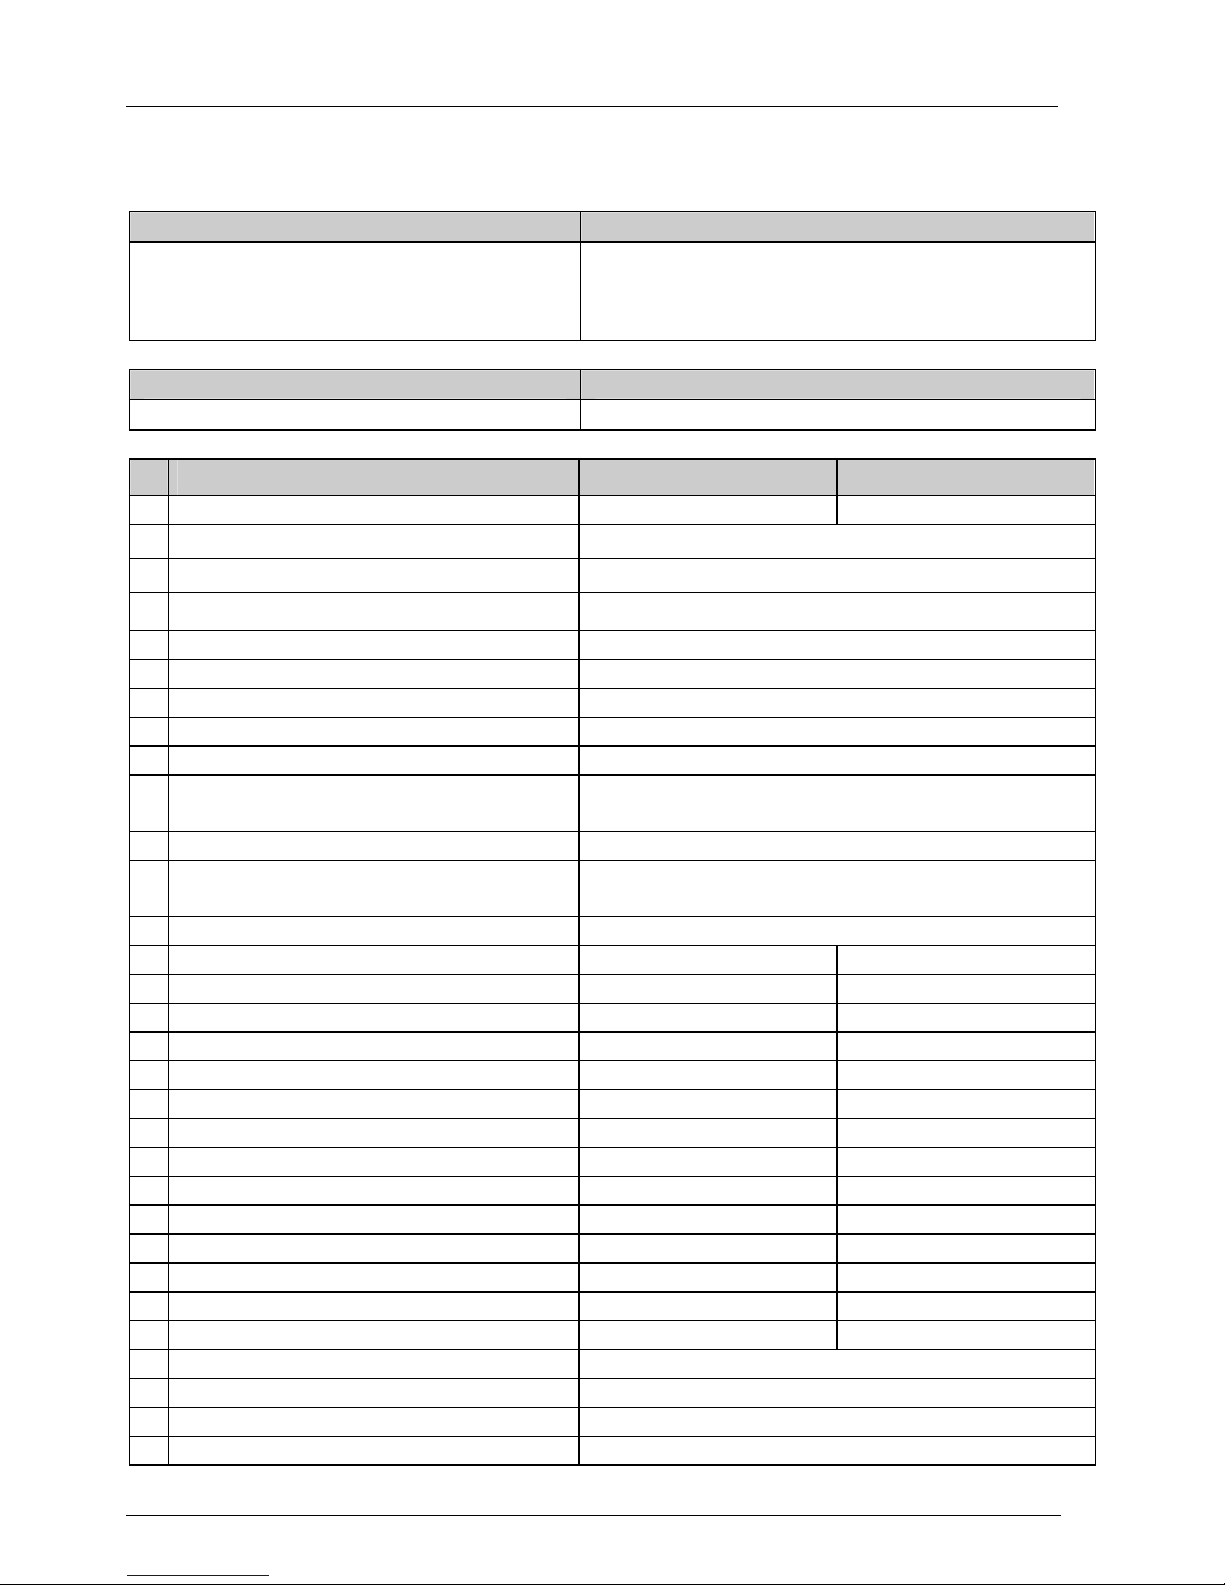
Technical specifications
32
7 Technical specifications
Manufacturer: Handicare B.V.
Address: Vossenbeemd 104
5705 CL Helmond
The Netherlands
Model: Beatle/Puma
Maximum user weight 160 kg (25.2 st)
Description Min. Max.
D Total length including leg- rest 1050 mm 1100 mm
B Total width Beatle 600 mm
B Total width Puma 650 mm
Total weight including batteries 122 kg (19.2 st)
Transport weight of the heaviest part 122 kg (19.2 st)
Maximum safe slope 6°
Static stability downward 15°
Static stability upward 15°
Static stability sideways 15°
Range (with max. user weight 160
kg. (352.7 Lbs))
36 km (22 miles) (56 Ah batteries)
Climbing cap. for obstacles Beatle 60 mm RWD / 60 mm FWD
Climbing cap. for obstacles Puma 80 mm RWD / 70 mm FWD
100 mm (RWD with kerbclimber)
Max. speed forward Beatle 6 km/h (4 mph)
Max. speed forward Puma 6 km/h (4mph) 10 km/h (6mph)
Seat angle 2° 7°
Tilt adjustment mechanical 2° 18°
C Effective sitting depth (adjustable) 440 mm 520 mm
A Effective sitting width (adjustable) 380 mm 525 mm
E Sitting height Beatle 470 mm 550 mm
E Sitting height Puma 490 mm 570 mm
Back angle 89° 118°
Back height 520 mm 570 mm
Lower leg length 370 mm 520 mm
Leg-rest angle 6° 70°
Arm-rest height 220 mm 290 mm
Arm-rest depth 60 mm 120 mm
Minimal turning radius 600 mm (FWD) 960 (RWD)
Ground clearance Beatle 60 mm
Ground clearance Puma 80 mm
Turning space 1220 mm
G Total height 1050 mm
Page 33
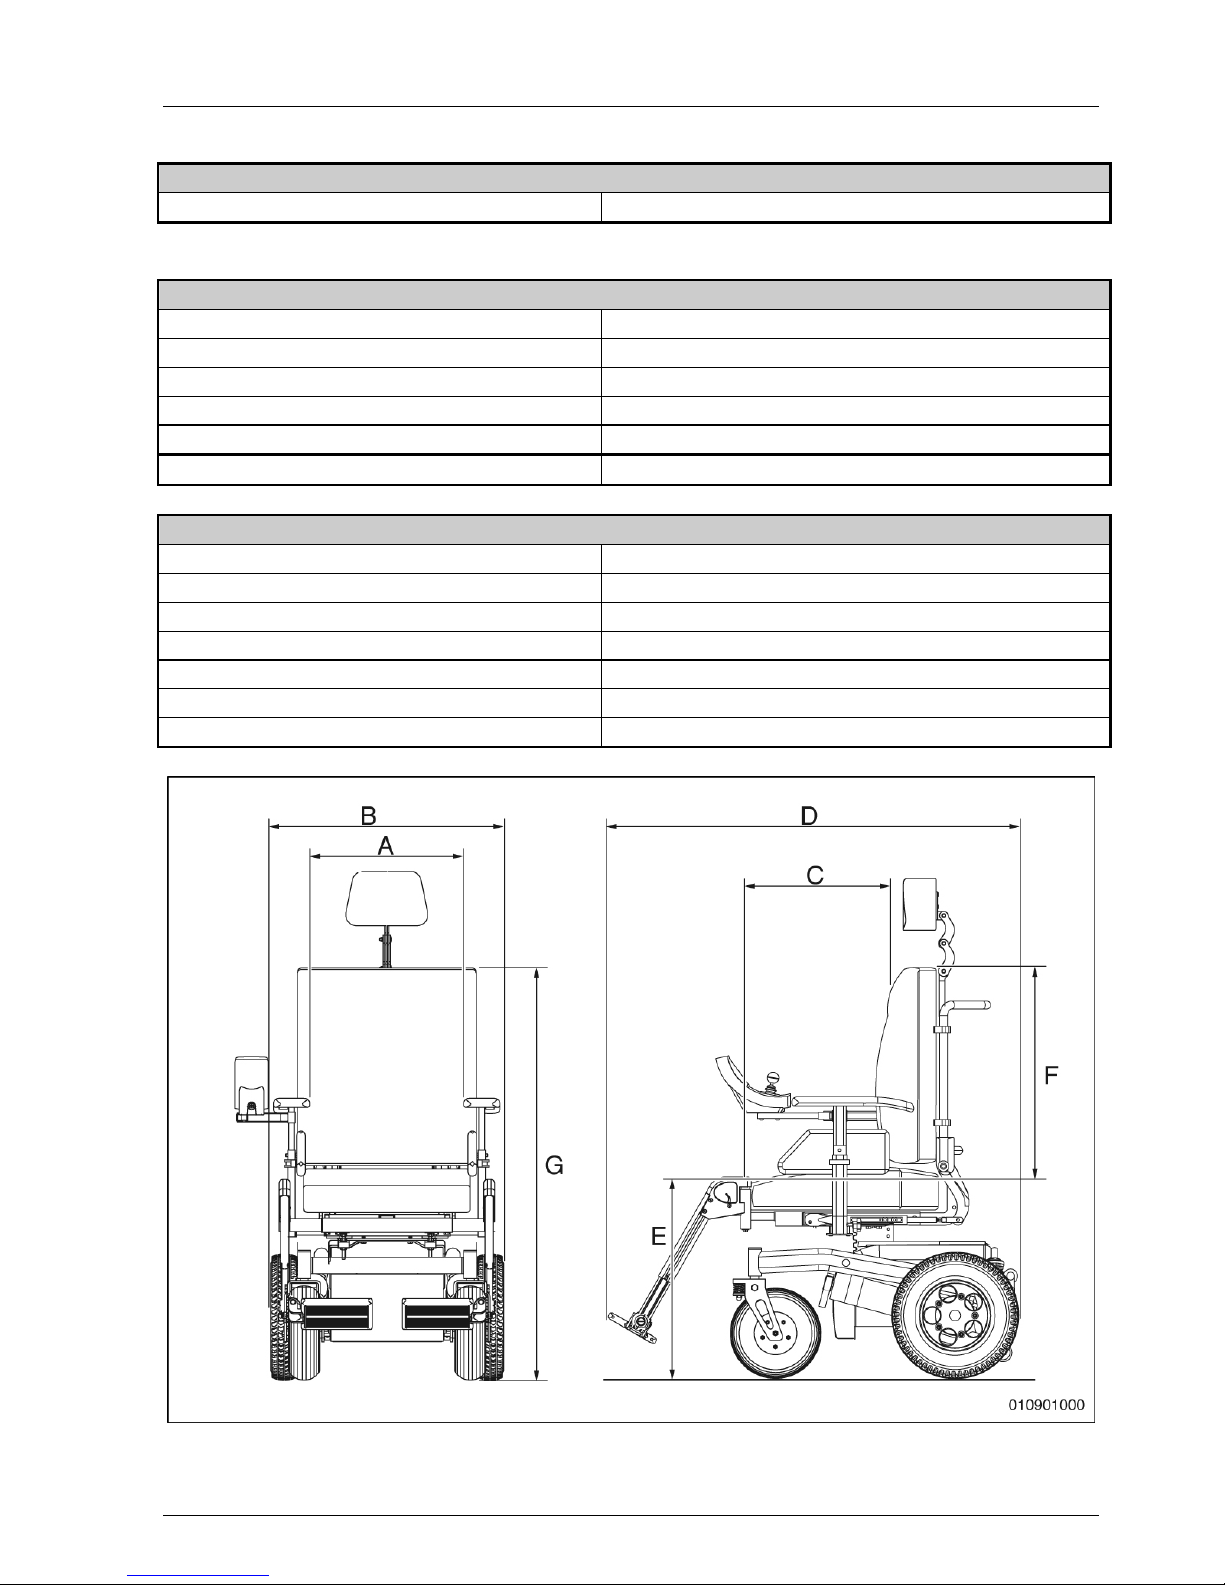
Technical specifications
33
Test data
Weight test dummy 160 kg (25.2 st)
Operating force
Joystick 15 N
Swinging away drive box 58 N
Electronic switches 13 N
Parking brake 58 N
Placing charging plug 58 N
Batteries
Maximum dimensions batteries 290 x 360 x 230 mm (bxdxh)
Weight wheelchair without batteries 82 kg (12.9 st)
Battery capacity Puma 40 Ah, 56 Ah or 73 Ah
Battery capacity Beatle 40 Ah
Maximal permissible charging voltage 13,6 V
Maximal charging voltage 12 A
Connector type A DIN 72311
Figure 7.1
Page 34
Technical specifications
34
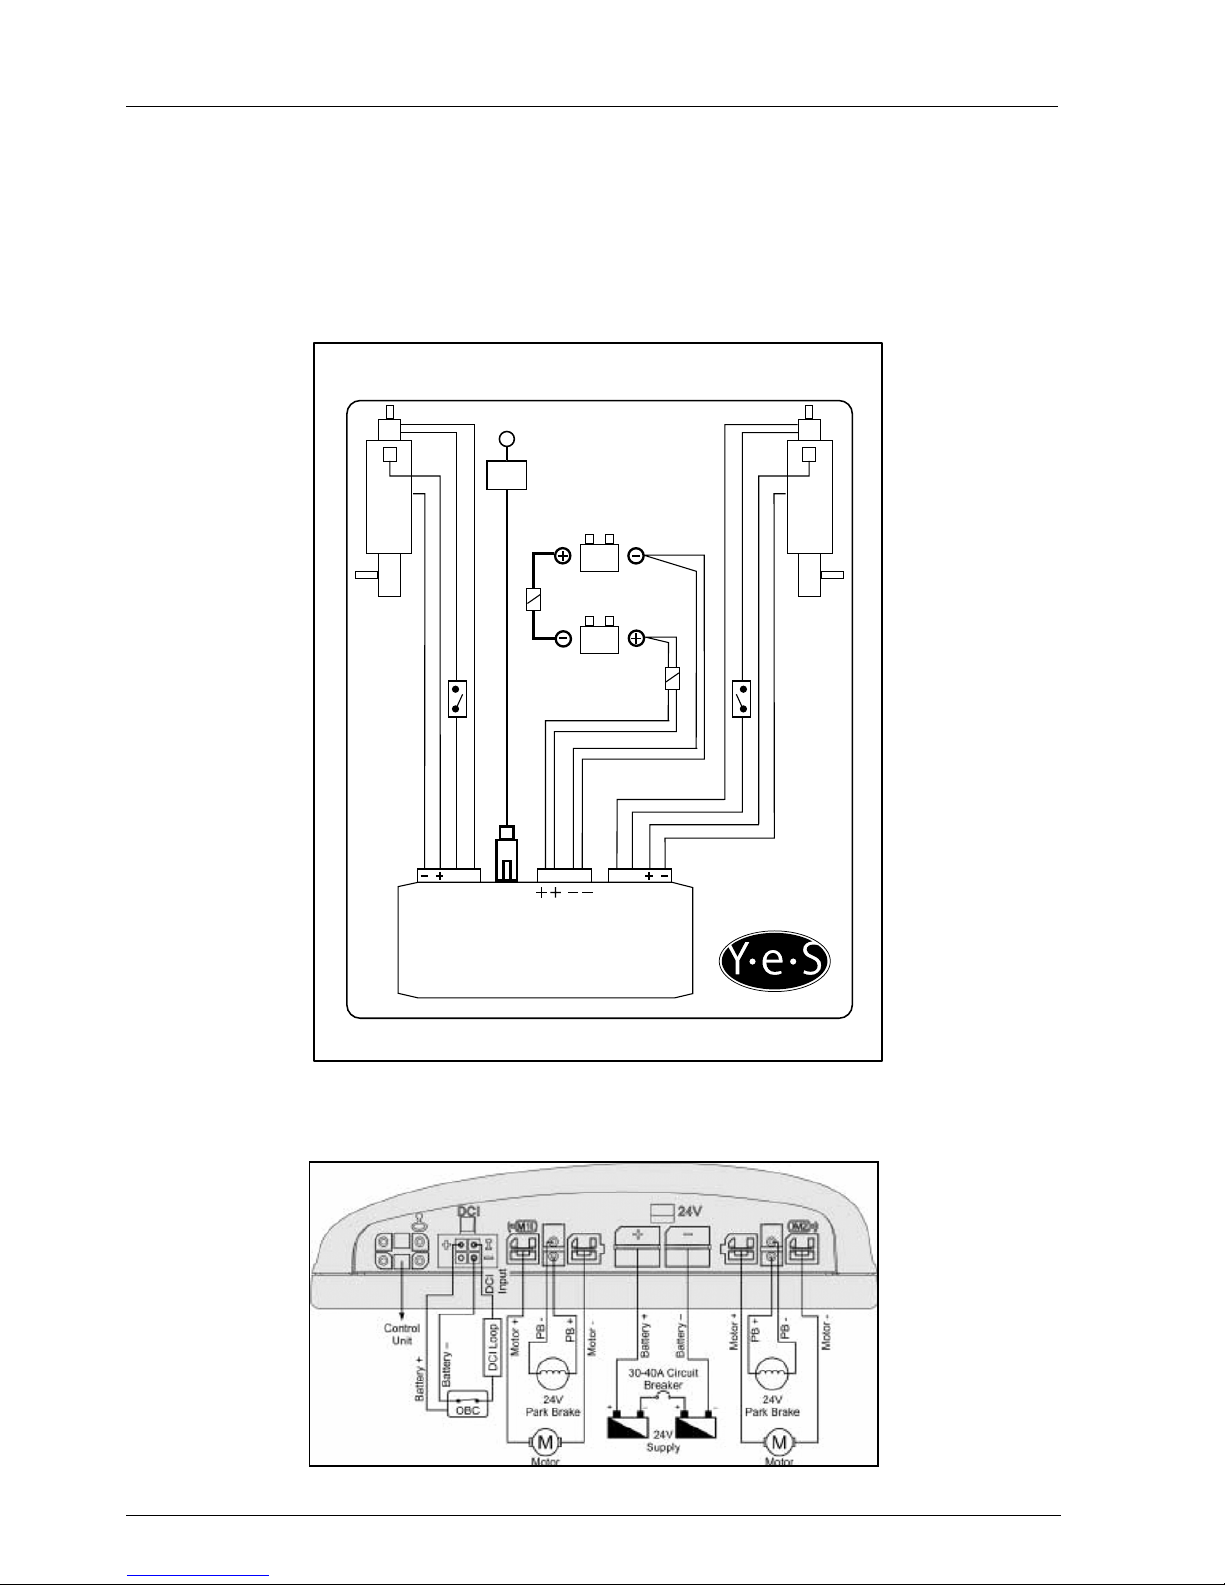
Electrical wiring diagram
The electrical wiring diagram of the electronic installation is affixed to the interior of the
battery box lid, wrapped in a plastic bag.
Electrical wiring diagram ‘DX’
Figure 7.2
Electrical wiring diagram ‘Shark’
Figure 7.3
BLAUW / BLUE
BLAUW / BLUE
ZWART / BLACK
ZWART / BLACK
ZWART / BLACK
ZWART / BLACK
ROOD / RED
ROOD / RED
M2M1 DX
BUS
ROOD
RED
ZWART
BLACK
DX POWER MODULE
ART. NR.:
008.00000.021
LR
®
50A
35A
010902010
Page 35
Technical specifications
35
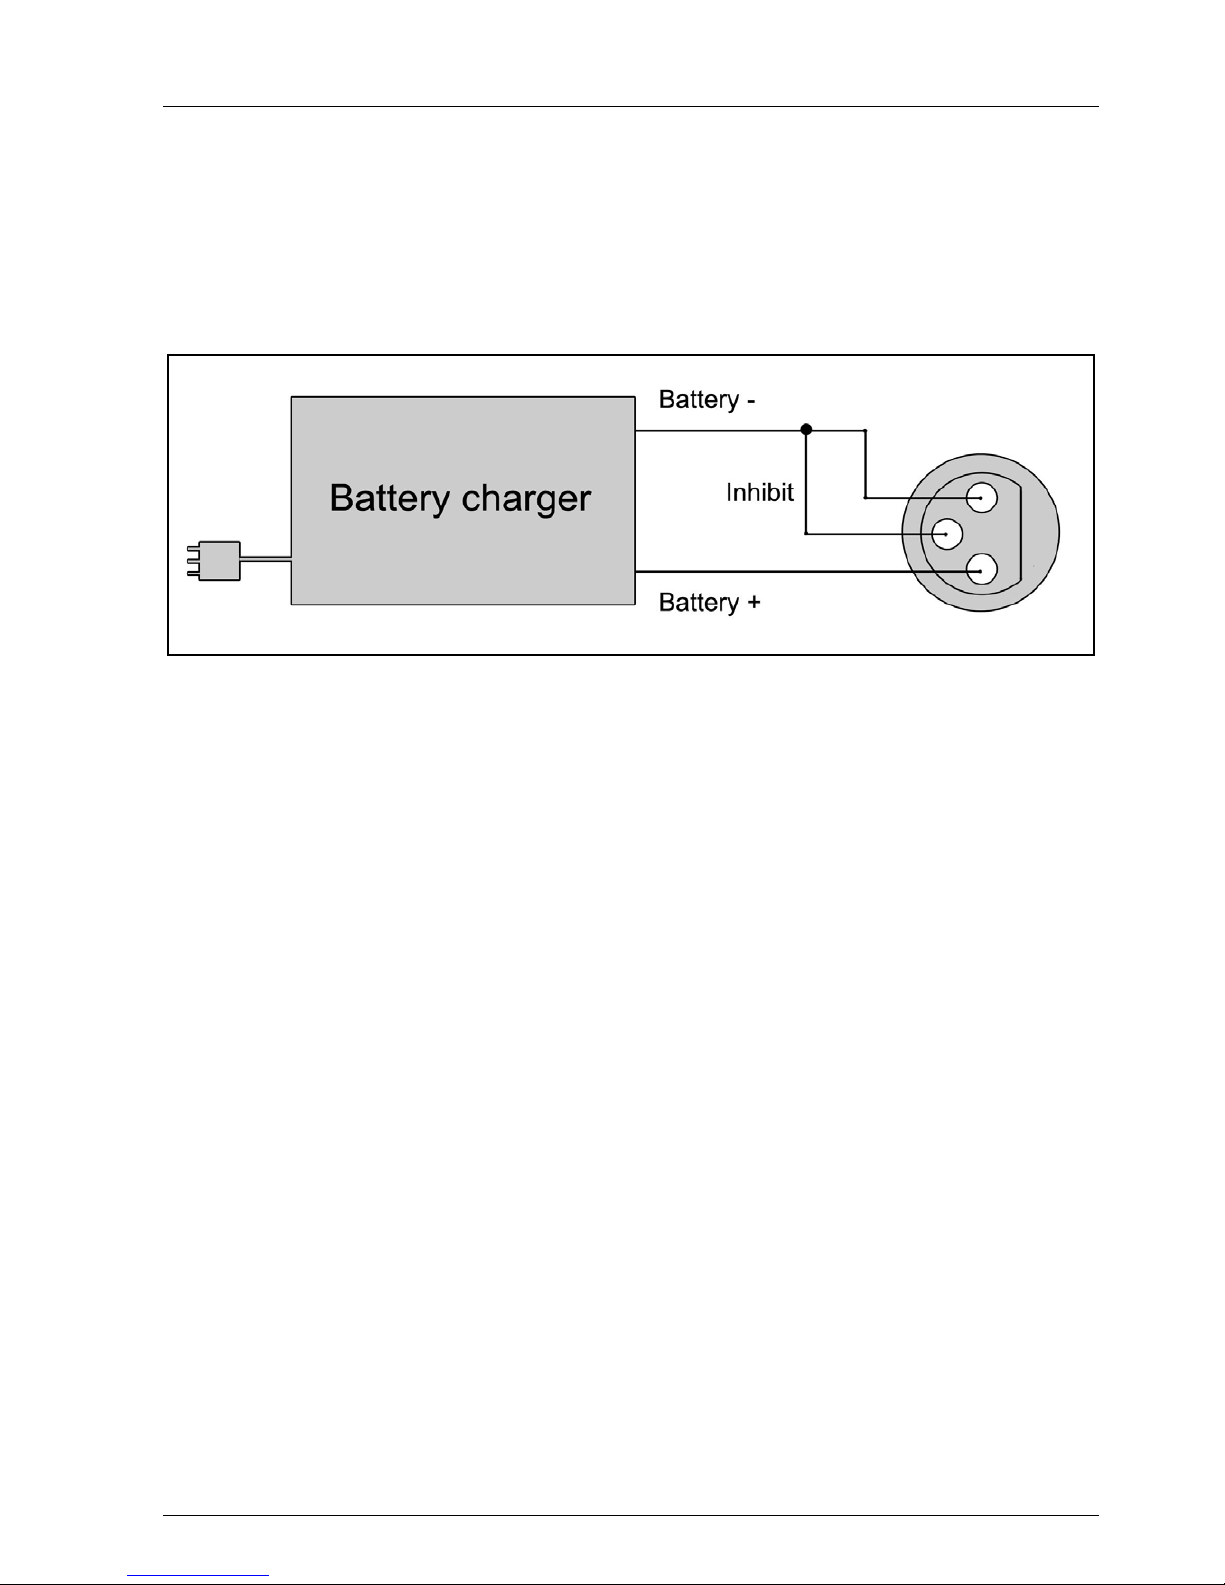
Connecting the battery charger
The joystick’s standard configuration includes a ‘3-pin connection’ (see also figure 7.4).
Ensure that the battery charger is properly connected so that the ‘negative pole’ (see
figure 7.4 ‘Battery –’) and the ‘inhibit’ (see figure 7.4 ‘Inhibit’) are connected, enabling
the system to prevent the wheelchair from moving when the battery is being charged.
Figure 7.4
Page 36

36
Svenska
© 2008 Handicare
Med ensamrätt.
Informationen i detta dokument får inte reproduceras och/eller publiceras i någon form, varken
tryckas, fotokopieras, mikrofilmas eller på annat sätt (elektroniskt eller mekaniskt) mångfaldigas
utan föregående skriftligt tillstånd från Handicare.
Den information som ges i manualen baserar sig på allmänna uppgifter om konstruktionen kända
vid den tidpunkt när manualen publiceras. Handicare har som princip att kontinuerligt utföra
förbättringar och vi förbehåller oss rätten att utföra ändringar.
Informationen i manualen gäller produkten i dess standardversion. Handicare kan inte hållas
ansvarig för eventuella skador som beror på produktspecifikationer som avviker från
standardutförandet.
Informationen i manualen har sammanställts med största möjliga omsorg, men Handicare kan inte
hållas ansvarig för eventuella fel i manualen eller kosekvenserna av dessa fel.
Handicare ansvarar inte för skador som uppstått efter att verksamheter utförts på produkten av
tredje man.
Namn, handelsnamn, handelsmärken etc. som används av Handicare kan, enligt lagen för
skyddande av handelsmärken, inte anses disponibla.
2008-01
Page 37

Introduktion
37
Introduktion.................................................................................................................38
Denna manual.......................................................................................................38
Markeringar på rullstolen ......................................................................................38
Service och teknisk support ..................................................................................38
Typplåt ..............................................................................................................38
Godkännande .......................................................................................................39
CE-deklaration ......................................................................................................39
Garanti ..............................................................................................................39
Ansvarsskyldighet................................................................................................. 41
Begagnade rullstolar och miljön ............................................................................41
1 Säkerhet...............................................................................................................42
1.1 Allmänna säkerhetsinstruktioner ................................................................... 42
1.2 Dekaler och instruktioner på rullstolen..........................................................42
1.3 Elsäkerhet .....................................................................................................42
2 Allmän beskrivning.............................................................................................43
2.1 Produktbeskrivning Beatle/Puma ..................................................................43
2.2 Huvuddelar.................................................................................................... 44
2.3 Styrenhet 'DX' ...............................................................................................45
2.4 Styrenhet 'SHARK'........................................................................................46
3 Användning .........................................................................................................47
3.1 Inspektion före användning ...........................................................................47
3.2 Stiga av och på .............................................................................................47
3.3 Elektrisk rullstol – spak för friläge..................................................................48
3.4 Sätta på ’DX’ .................................................................................................48
3.5 Sätta på ’Shark’............................................................................................. 48
3.6 Köra ..............................................................................................................49
3.7 Köra framåt och backa..................................................................................50
3.7 Köra framåt och backa..................................................................................50
3.8 Oegentlig användning ...................................................................................51
3.9 Kurvor ...........................................................................................................52
3.10 Hinder/trottoarkanter .....................................................................................52
3.11 Sluttningar/backar .........................................................................................52
3.12 Fälla ihop rullstolen .......................................................................................54
3.13 Transport.......................................................................................................55
3.14 Elektriska inställningar .................................................................................. 56
4 Inställningsalternativ ..........................................................................................58
4.1 Inställning av sätets höjd...............................................................................58
4.2 Bälte..............................................................................................................58
4.3 Inställning av styrenhetens ’svänga undan’-funktion..................................... 59
4.4 'Fast’ inställning av styrenheten. ...................................................................59
5 Underhåll .............................................................................................................60
5.1 Underhållstabell ............................................................................................60
5.2 Batterier ........................................................................................................60
5.3 Kontrollera och pumpa upp däcken ..............................................................61
5.4 Rengöra rullstolen.........................................................................................61
6 Felsökning...........................................................................................................62
6.1 Felsökningstabell ‘DX’...................................................................................62
6.2 Felsökningstabell ‘Shark’ ..............................................................................63
7 Tekniska specifikationer ....................................................................................64
Page 38
Introduktion
38
Introduktion
Denna manual
Med hjälp av den här manualen kan du
använda och underhålla (rengöra)
rullstolen på ett säkert sätt. Till
manualen hör också en
instruktionsbok om Handicare’s
sittsystem Sedeo. Om du är känner dig
tveksam eller har några frågor, ta
kontakt med din återförsäljare.
De instruktioner som är märkta med
en varningstriangel måste noggrant
efterföljas! Om handlingarna inte
utförs korrekt, kan det leda till
personskador eller skador på
produkten eller miljön.
Bild 0.1
Markeringar på rullstolen
A.
Varning för brott!
B. Hastighetsdekal
C. Se användarmanualen
D. Friläge, vänster och höger
Service och teknisk support
För information om specifika
inställningar, underhåll och
reparationsarbete var god ta kontakt
med din återförsäljare. Ange alltid
modellnummer, tillverkningsår och
identifikationsnummer. Denna
information hittar du på typplåten (bild
0.2).
Det finns reservdelar till Beatle och
Puma. I servicemanualen, som finns
tillgänglig för återförsäljaren, tas de
olika reservdelarna upp.
Bild 0.l2
Typplåt
A.
Modell
B. Tillverkningsår
C. Typnummer
D. Användningsområde, inomhus eller
utomhus
E. Maxlast i kg
Page 39

Introduktion
39
Godkännande
Produkten uppfyller följande
standarder och direktiv:
1. De erforderliga krav som
specificeras i bilaga 1 i EU-direktiv
93/42 EEC.
2. De i NEN-EN 12184 nämnda
kraven ur NEN-EN 12182 Tekniska
hjälpmedel för rörelsehindrade –
Allmänna standarder och
testmetoder, oktober 1997.
3. NEN-EN 12184 Elektriska
rullstolar, scootrar och tillhörande
uppladdningsutrustning Standarder och testmetoder, april
1999.
4. ”Beatle” är klassificerad enligt
EN12184 klass B.
5. ”Puma” är klassificerad enligt
EN12184 klass B.
6. ISO 7176-8 Krav och testmetoder
för kollisions-, statisk och
utmattningsstyrka, juli 1998.
7. ISO 7176-14 Standarder och
testmetoder för styrenhetssystem
för elektriska rullstolar 1997.
8. ISO 7176-9 Klimattest för elektriska
rullstolar.
9. ISO 7176-16 Krav för
brandbeständighet, maj 1997.
10. Beatle/Puma har utsatts för ett
dynamiskt kollisionstest och
uppfyller härmed kraven i SO 7176-
19.
Kvaliteten garanteras av ett oberoende
testinstitut som kontrollerar att
ovannämnda krav efterföljs.
CE-deklaration
Produkten uppfyller de
villkor som ställs i
direktivet för medicinska
hjälpmedel och har därför
försetts med CE-märkning.
Garanti
I nedanstående garanti- och
ansvarsbestämmelser sammanfattas
och förklaras de termer och definitioner
som används i manualen.
• Produkt: Manuell eller elektrisk
rullstol eller scooter tillverkad och
levererad av Handicare.
• Kund: Den person som direkt
mottar en Produkt från Handicare.
• Återförsäljare: Den person som
levererar en Produkt från Handicare
till kunder eller tredje man.
• Användare: Den person som
använder en Produkt tillverkad av
Handicare.
Oavsett vad som fastställts angående
garantibestämmelser tillämpliga på
produkten, gäller under alla
omständigheter:
1. Förutom i den mån detta beskrivits
på annat sätt garanterar Handicare
att Produkten lämpar sig för det
ändmål som Produkten är avsedd
för – alla punkter som beskrivs i
den här manualen – och för den
materialkvalitet som Produkten är
tillverkad av och sättet som
produkten är tillverkad på.
2. Reparationer av Produkten, samt
byte av delar som kan behövas
beroende på fel som härrör från
kvalitativt felaktiga material eller
tillverkningsfel kommer att utföras
kostnadsfritt, om dessa fel uppstått
inom ett (1) år efter att Produkten
levererats till Kunden. De delar
som ska bytas ut måste skickas,
med portot betalt, till Handicare.
Montering eller nedmontering av
dessa delar betalas av kunden. I
följande fall gäller EJ gratis
reparation eller byte enligt
ovanstående beskrivning:
• Reparation eller byte av delar
som behövs pga. fel som
uppstått efter ett (1) år från
Page 40

Introduktion
40
leveransdatum av produkten till
kunden.
• Reparation eller byte av delar
som behövs i samband med
felaktigheter som beror på
felaktig eller oförsiktig
användning av Produkten eller
som beror på att Produkten har
använts för andra ändamål än
den är avsedd för. I de fall
Kunden är en Återförsäljare,
kommer Återförsäljaren att hålla
Handicare skadelös för
eventuella krav från Användare
eller tredje man för felaktigheter
som beror på inkorrekt eller
oförsiktig användning av
Produkten;
• Delar som utsätts för slitage,
behövs repareras eller bytas ut
efter normal användning.
3. Oavsett av vad som angavs under
punkt 2, gäller vad beträffar
elektriska Produkter, att angående
ett batteri som utgör en del av
produkten, garanti endast kan ges
om felaktigheter eller störningar på
batteriet bevisligen beror på
material- eller tillverkningsfel. Om
batteriet uppvisar störningar eller
fel efter normal användning täcks
detta inte av garantin i dessa
garantibestämmelser. På liknande
sätt täcks inte heller av garantin; fel
eller störningar som härrör från
felaktig eller oprofessionell
användning av Produkten eller
batteriet som utgör en del av
Produkten, inklusive felaktig
uppladdning av batteriet och
försummelse att utföra lämpligt
underhåll vid rätt tillfälle. Detta
gäller också om Kunden är en
Återförsäljare. Återförsäljaren
kommer att hålla Handicare
skadeslös vid eventuella krav från
Användare eller tredje man för
felaktigheter som beror på inkorrekt
eller oförsiktig användning av
Produkten eller batteriet som utgör
en del av Produkten.
4. Garantibestämmelserna som
nämns ovan gäller inte heller om:
• De riktlinjer som Handicare har
ställt upp för underhåll av
Produkten inte, eller otillräckligt,
uppföljs;
• Nödvändiga reparationer eller
byten av delar som beror på
försummelse, skada eller
missbruk av Produkten eller
användning av Produkten för ett
annat ändamål än den är
avsedd för.
• Delar av Produkten har bytts ut
mot delar av ett annat ursprung
än de som används av
Handicare och/eller delar av
Produkten har bytts ut utan
tillåtelse av Handicare.
5. Den garanti som nämns under
punkt 1 till 3 gäller inte heller om
Produkten återanvänds av en ny
användare inom garantiperioden
och denna återanvändning kräver
anpassningar på Produkten och
dessa anpassningar har utförts
utan instruktioner från och/eller på
begäran av Handicare.
6. För att återfå rättigheterna i ovan
beskrivna garanti, måste Kunden,
vid skador eller andra kalamiteter,
så snart som möjligt ta kontakt med
Handicare och informera dem så
fullständigt som möjligt. Möjligheten
att tillgripa ovanstående
garantivillkor blir ogiltig för Kunden
efter 20 arbetsdagar från det tillfälle
då skadetillfället/kalamiteten
uppstod som var anledning till
garantiförfrågan.
7. Byte av en del eller reparation eller
återställande av Produkten inom
garantiperioden förlänger inte
garantiperioden.
8. Handicare ger ingen garanti på
reparationer och eller återställande
av Produkten som har utförts utan
Page 41

Introduktion
41
begäran av och/eller instruktioner
från Handicare. Om reparationer
och/eller återställande utförs av
eller på begäran av Kunden,
kommer Kunden att hålla
Handicare skadelös med hänsyn till
krav från tredje man som
resulterar, i ordets vidaste
bemärkelse, från sådana
reparationer eller återställande.
Ansvarsskyldighet
Oavsett vad som fastställts angående
ansvarsskyldighet i de allmänna
villkoren tillämpliga på produkten,
gäller under alla omständigheter:
1. Med hänsyn till följande villkor är
Handicare endast ansvarig för
skada som härrör från död eller
kroppsskada som beror på en
defekt på Produkten som
Handicare är ansvarig för samt för
skada på andra föremål som är
användaren av Produktens privata
egendom, i de fall nämnda förlust
är ett direkt resultat av ett fel på
Produkten.
2. Handicare tar inte på sig ansvaret
för annat än som angetts under
punkt 1. Handicare accepterar i
synnerhet inget ansvar för
följskador, i vilken form som helst.
Begagnade rullstolar och miljön
Om din rullstol har blivit
överflödig och måste bytas ut,
kan den vanligtvis återlämnas
till återförsäljaren. Om detta inte
är möjligt, var god kontakta dina
lokala myndigheter för
information om möjlig
återanvändning eller ett
miljövänligt sätt att kassera
förbrukade material.
Vid tillverkningen av scootern har olika
sorters plast och metall använts
Scootern innehåller också elektroniska
komponenter som måste lämnas till
elektronisk återvinning. Begagnade
batterier ska också källsorteras.
Page 42

Säkerhet
42
1 Säkerhet
Handicare tar inte på sig någon
ansvarsskyldighet för skador eller
personskador som förorsakats på
grund av att säkerhetsföreskrifter eller
instruktioner inte har efterföljts eller på
grund av ovarsamhet under
användningen eller rengöringen av
scootern och eventuella tillbehör.
Beroende på de specifika
användningsomständigheterna eller
tillbehör som använts, kan extra
säkerhetsinstruktioner krävas.
Kontakta genast återförsäljaren om du
observerar någon potentiell fara under
användningen av produkten.
1.1 Allmänna
säkerhetsinstruktioner
• Användaren av rullstolen är alltid
ansvarig för att lokala
säkerhetsföreskrifter och
direktiv efterföljs.
• De tekniska specifikationerna får
inte ändras.
• Ändringar får inte utföras på
(delar av) denna produkt.
1.2 Dekaler och
instruktioner på
rullstolen
• De dekaler, symboler och
instruktioner som finns på denna
rullstol utgör en del av dess
säkerhetsfaciliteter. De får aldrig
täckas över eller avlägsnas och
måste finnas på plats och vara
tydligt läsliga under hela
rullstolens livslängd.
• Byt genast ut eller laga oläsliga
eller skadade dekaler, symboler
och instruktioner. Ta kontakt
med din återförsäljare när detta
ska göras.
1.3 Elsäkerhet
• Standardversionen av din elektriska
rullstol har testats enligt tillämpliga
EMC-krav. Mobiltelefoner påverkar
inte körbeteendet på din rullstol.
Om du använder en mobiltelefon i
närheten av en elektrisk rullstol med
speciella anpassningar,
rekommenderar vi att du först
stänger av den elektriska rullstolen.
• Din elektriska rullstol kan påverka
elektromagnetiska fält såsom
larmsystem.
• Om rullstolens elektronik inte
avskärmas ordenligt kan den
påverka känsliga elektriska
apparater såsom affärslarm och
garageöppnare. Den elektriska
rullstolen har testats på detta. Om
problem av detta slag ändå skulle
förekomma, var god rapportera det
till din återförsäljare omedelbart.
Page 43

Allmän beskrivning
43
2 Allmän beskrivning
2.1 Produktbeskrivning
Beatle/Puma
Beatle/Puma är en eldriven rullstol
med styrspakskontroll för användning
under olika omständigheter, inomhus
och utomhus.
Sätet på Beatle / Puma är säkert
sammankopplat till underredet (även
kallat carrier) via en förbindelseram
(även kallad interface) som omfattar
hela den elektriska enheten. Driften
styrs av två elmotorer, en på varje
drivhjul. I kurvor styrs Beatle / Puma
genom att varvtalets ändras på en av
motorerna, vilket gör att rullstolen
svänger till vänster eller höger.
Rullstolen kan ställas in på olika sätt.
Det ger bästa möjliga stöd för kroppen.
På så sätt utgör Beatle / Puma en
behaglig och bekväm produkt för ett
aktivt liv.
Beatle / Puma är lämplig för:
• Transport av personer som väger
max 160 kg.
• Att användas på stenlagda gator,
trottoarer, gångvägar och
cykelvägar.
• Att användas inomhus och utomhus.
Din återförsäljare måste ge dig tydliga
instruktioner innan du självständigt kan
ge dig ut i trafiken.
Du måste kunna korrigera
konsekvenserna av handlingar när du
kör din rullstol.
Överväg att låta en erfaren
återförsäljare övervaka de första
gångerna du kör din rullstol.
En rullstol är enligt trafikförordningen
inte något motorfordon.
Beatle / Puma har en maxhastighet på
6 eller 10 km/h.
Om du använder rullstolen till andra
ändamål än den är tillämpad för är
Handicare inte på något sätt ansvarig
för produkt- eller personskador som
härrör från denna icke godkända
användning.
Var god läs den här manualen
noggrant innan du börjar använda
din rullstol.
Page 44
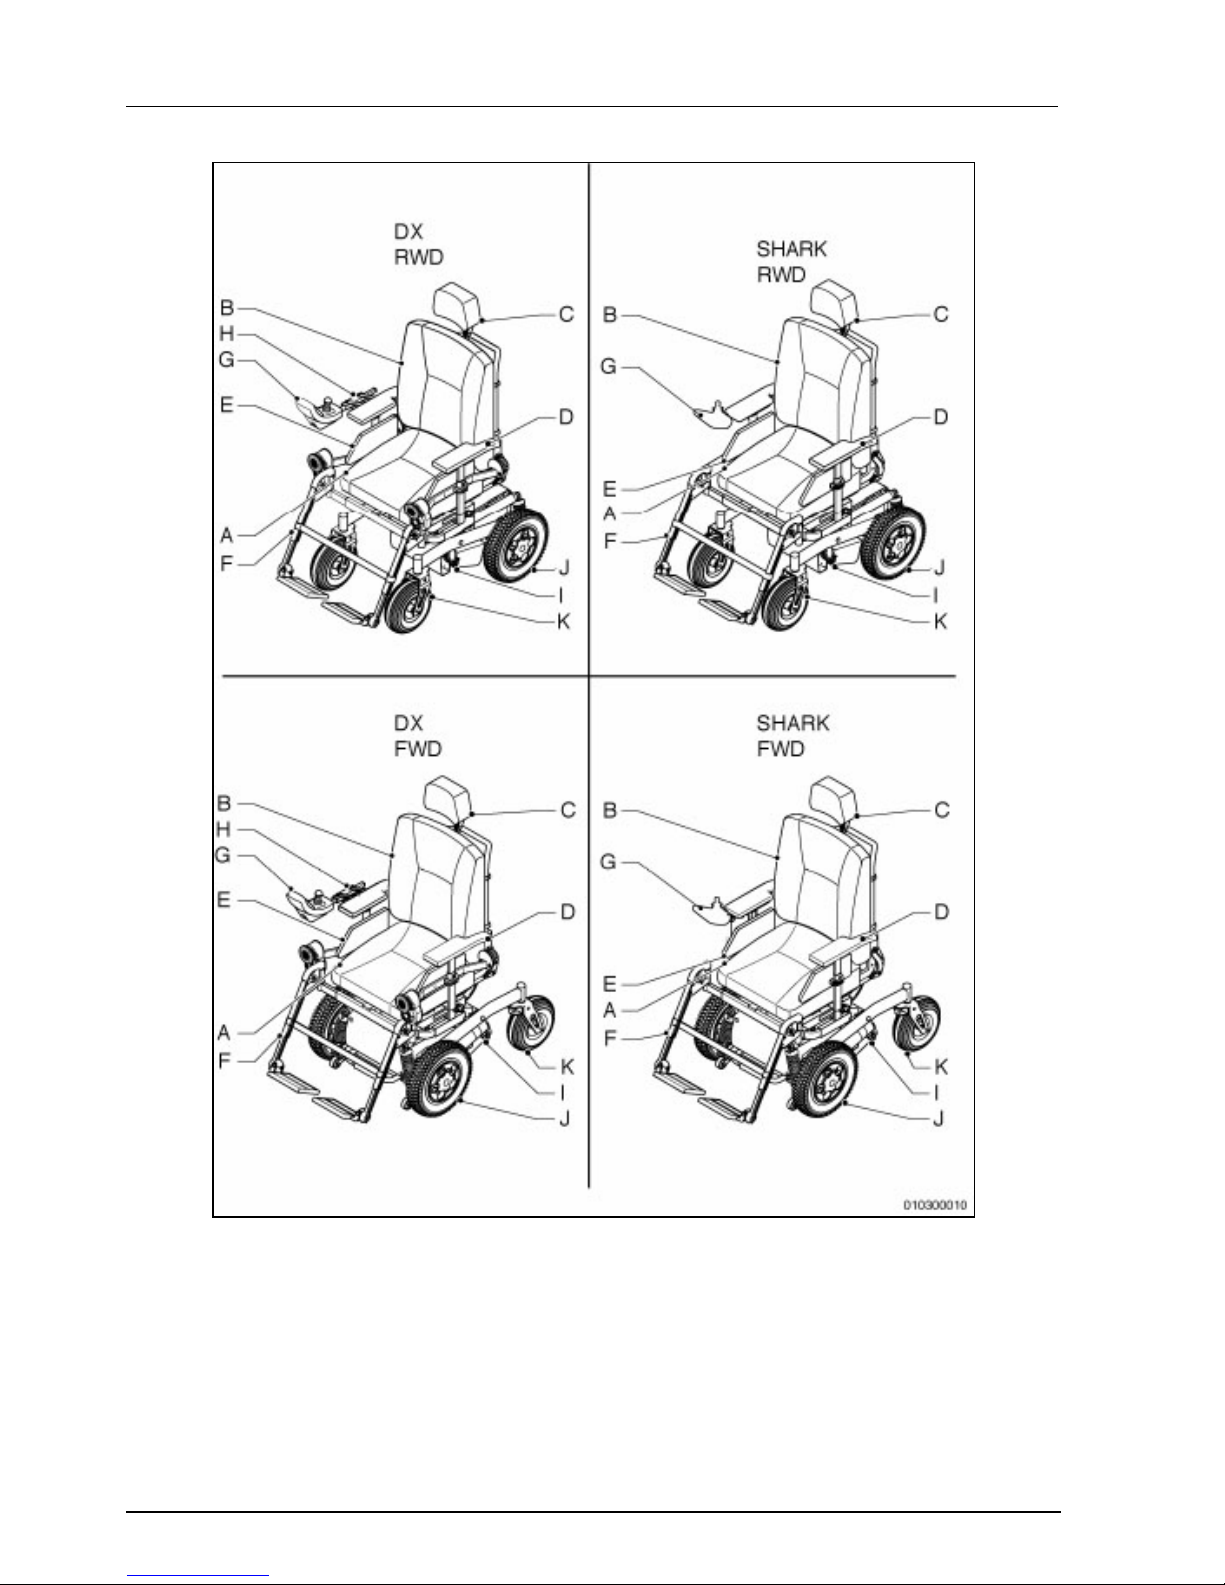
Allmän beskrivning
44
Bild 2.1
2.2 Huvuddelar
A.
Säte
B. Ryggstöd
C. Huvudstöd (valfritt)
D. Armstöd
E. Sidopanel
F. Benstöd med fotstöd
G. Styrenhet, typ ‘Shark’ eller ‘DX’
H. Styrenhetsfäste, fixerat eller
svängbart
I. Spak för friläge ’Shark’
J. Drivhjul
K. Svängbara hjul
Page 45
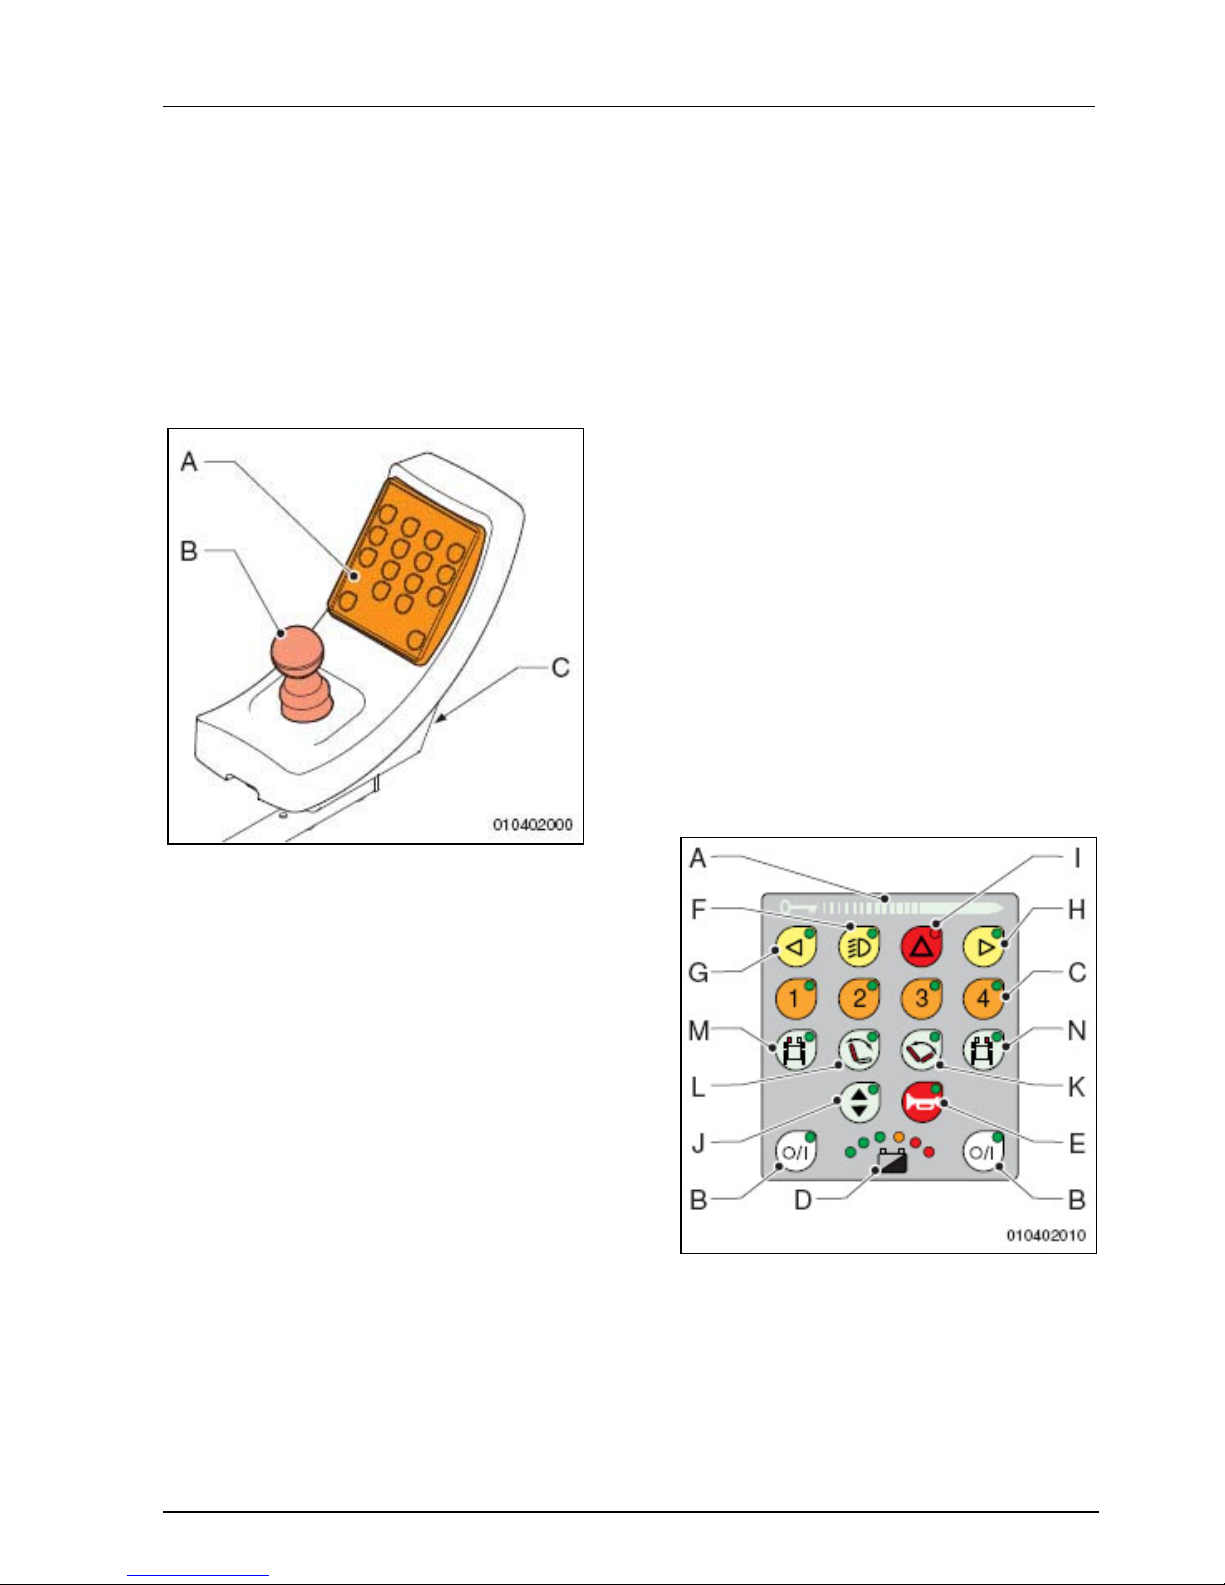
Allmän beskrivning
45
2.3 Styrenhet 'DX'
Se fig. 010402000.
Styrenheten omfattar följande
huvuddelar:
• Kontrollpanel (A på bild 2.2)
• Styrspak (B på bild 2.2)
• Uppladdningsanslutning (C på bild
2.2), se ’Ladda upp batterier’.
Bild 2.2
Alla funktioner som kan installeras på
rullstolen finns på kontrollpanelen.
Inklusive alla standardfunktioner och
valfria funktioner.
Styrspaken styr rullstolen och justerar
olika inställningar (om de finns
installerade).
Med uppladdningsanslutningen
ansluter man batteriladdaren för att
ladda upp batterierna.
Kontrollpanel
Se fig. 010402010.
Kontrollpanelen omfattar följande
funktioner (se bild 2.3):
A. Knappsats
B. På/Av-knapp
C. Hastighet
D. Batterimätare
E. Signalhorn
F. Belysning (valfritt)
G. Körriktningsvisare, vänster (valfritt)
H. Körriktningsvisare, höger (valfritt)
I. Blinkande varningsljus (valfritt)
J. Hög/låg-inställning av sätet (valfritt)
K. Elektrisk inställning av sätets
lutning (valfritt)
L. Elektrisk inställning av vinkeln på
ryggstödet (valfritt)
M. Elektrisk inställning av det vänstra
benstödet (valfritt)
N. Elektrisk inställning av det högra
benstödet (valfritt)
Bild 2.3
Page 46
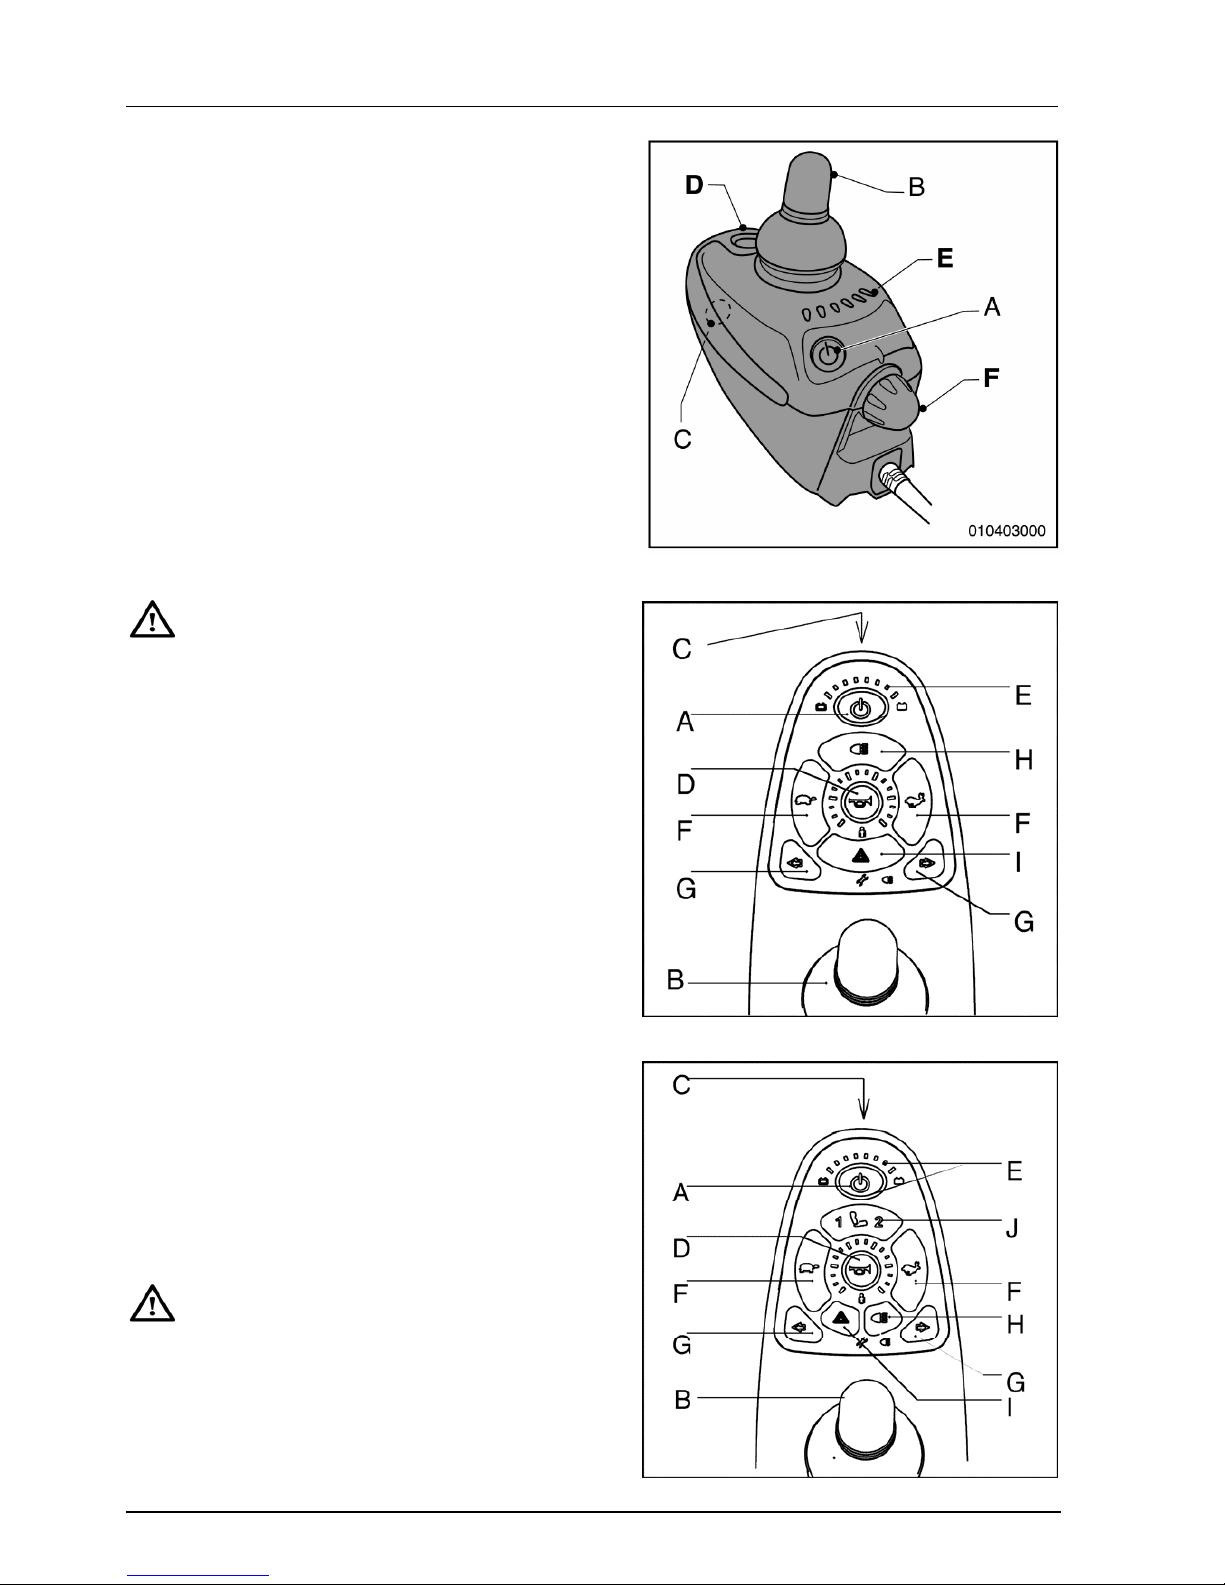
Allmän beskrivning
46
2.4 Styrenhet 'SHARK'
Styrenheten omfattar följande delar (se
bild 2.4, 2.5 och 2.6):
A. På/Av-knapp
B. Styrspak
C. Uppladdningsanslutning
D. Signalhorn
E. Batterinivåmätare
F. Hastighetskontroll
G. Körriktningsvisare
H. Belysning
I. Varningsljus
J. Aktuatorer/inställningsmöjligheter
Körprogrammen får endast justeras
av yrkesmän som är förtrogna med
justeringsprocessen och
användarens möjligheter. Inkorrekta
inställningar kan förorsaka
personskador, skador på
kringstående, fordonet eller föremål
i omgivningen.
Styrspaken är till för att köra rullstolen
och reglera olika elektriska
valmöjligheter (om de finns
installerade).
Batterinivåmätare
Batterinivåmätaren visar i vilket skick
batterierna är. När alla lampor lyser är
batterierna helt uppladdade. Om
batterierna är tomma kommer
lamporna från höger till vänster att
slockna.
Om bara de röda lamporna lyser
måste batterierna omedelbart
laddas upp.
Bild 2.4
Bild 2.5
Bild 2.6
Shark seats-lights
Shark
Page 47
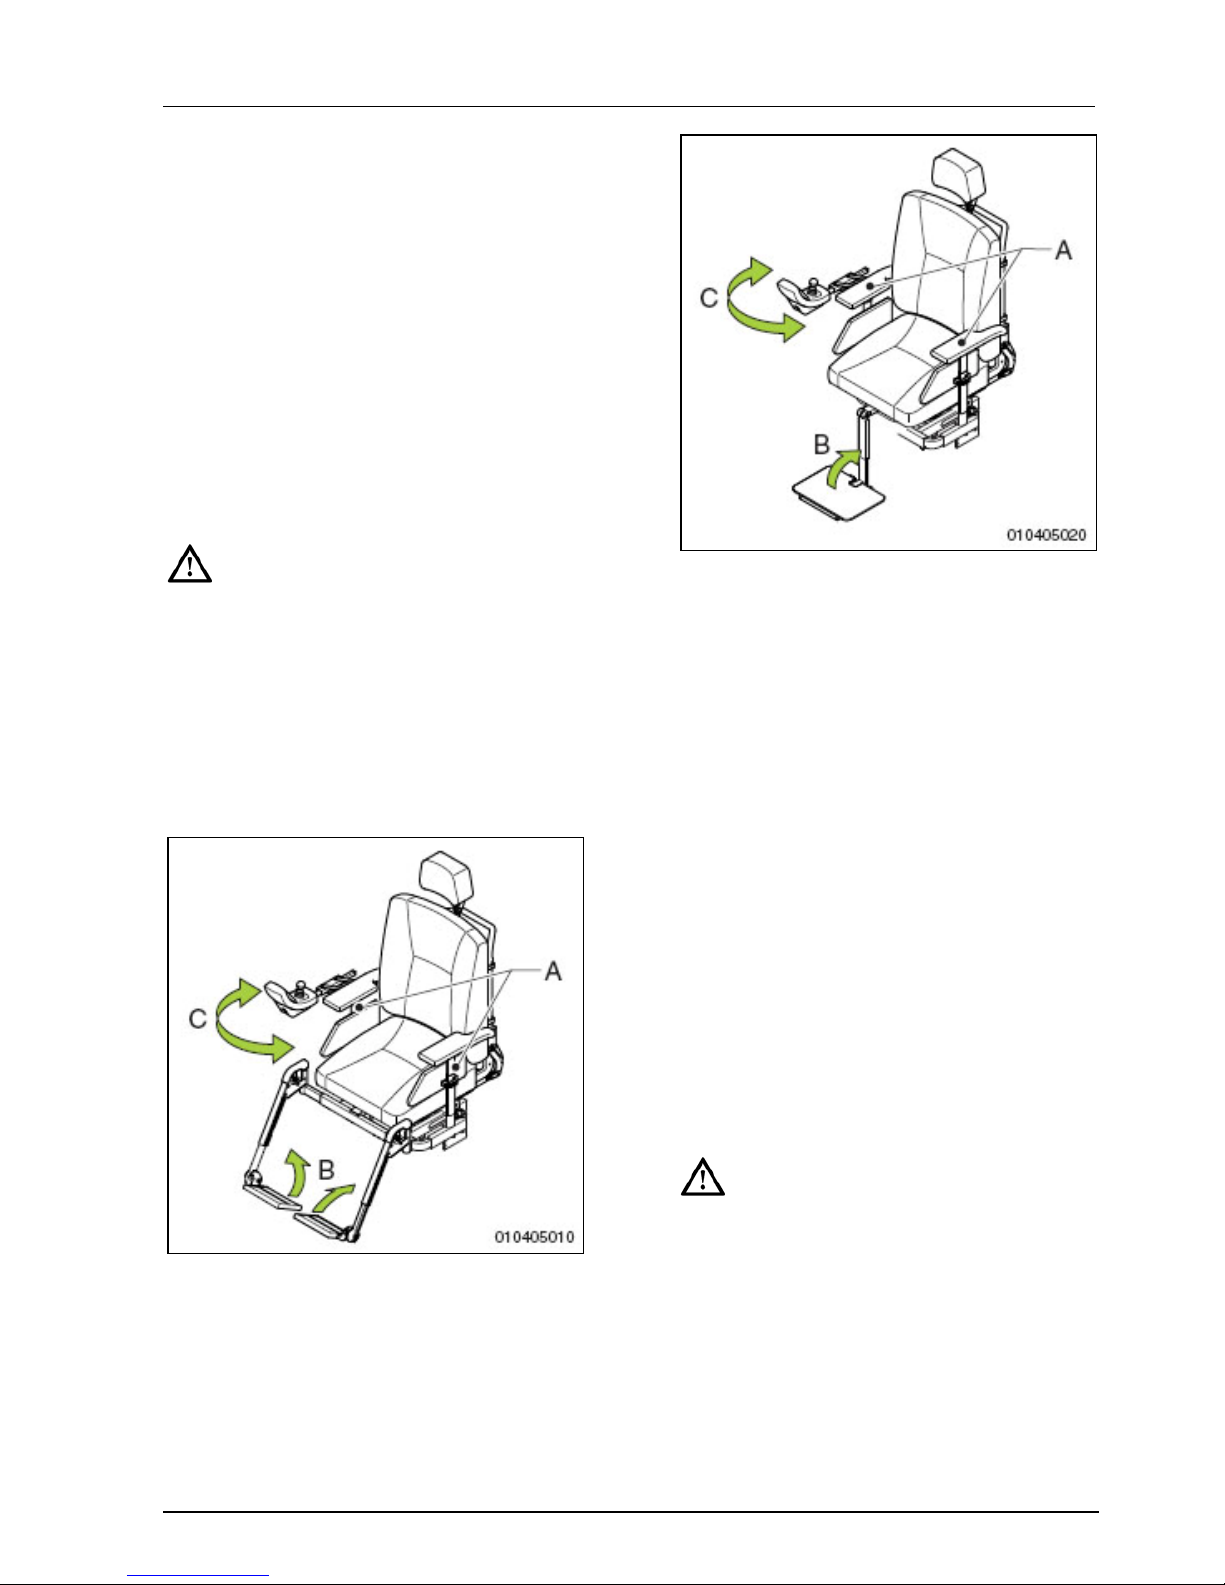
Användning
47
3 Användning
3.1 Inspektion före
användning
Det är viktigt att kontrollera följande
innan du börjar köra med din rullstol:
• Att ljuset och körriktningsvisarna
fungerar korrekt.
• Att däcken är tillräckligt uppumpade.
• Att batterierna är tillräckligt
uppladdade. De gröna
batterilamporna måste lysa.
På vintern har batterierna lägre
kapacitet. Vid minusgrader minskar
kapaciteten till cirka 75% jämfört
med den normala kapaciteten. Om
det är kallare än -5° kommer
kapaciteten att minska till ca 50% av
den normala kapaciteten. Detta
påverkar det avstånd man kan köra.
Bild 3.1
3.2 Stiga av och på
1. Kontrollera att rullstolen är
avslagen elektriskt.
2. Placera frilägesspaken i ”Kör”-läge.
Bild 3.2
Förflyttning upp på rullstolen
1. Vik upp fotstödet (B på bild 3.1 och
3.2).
2. Sväng undan (om möjligt)
benstöden.
3. Sätt dig i rullstolen.
Förflyttning åt sidan
1. Lossa skruven och ta loss
armstödet (A på bild 3.1 och 3.2)
2. Sätt dig i rullstolen.
Beroende på vilken version av
styrenhet du har och var förflyttningen
utförs kan det vara nödvändigt att
svänga undan styrenheten (C på bild
3.1 och 3.2).
Stäng av rullstolen elektriskt innan
du stiger av eller på. På så sätt
undviker man att rullstolen börjar
köra om du oavsiktligt rör
styrspaken.
Page 48
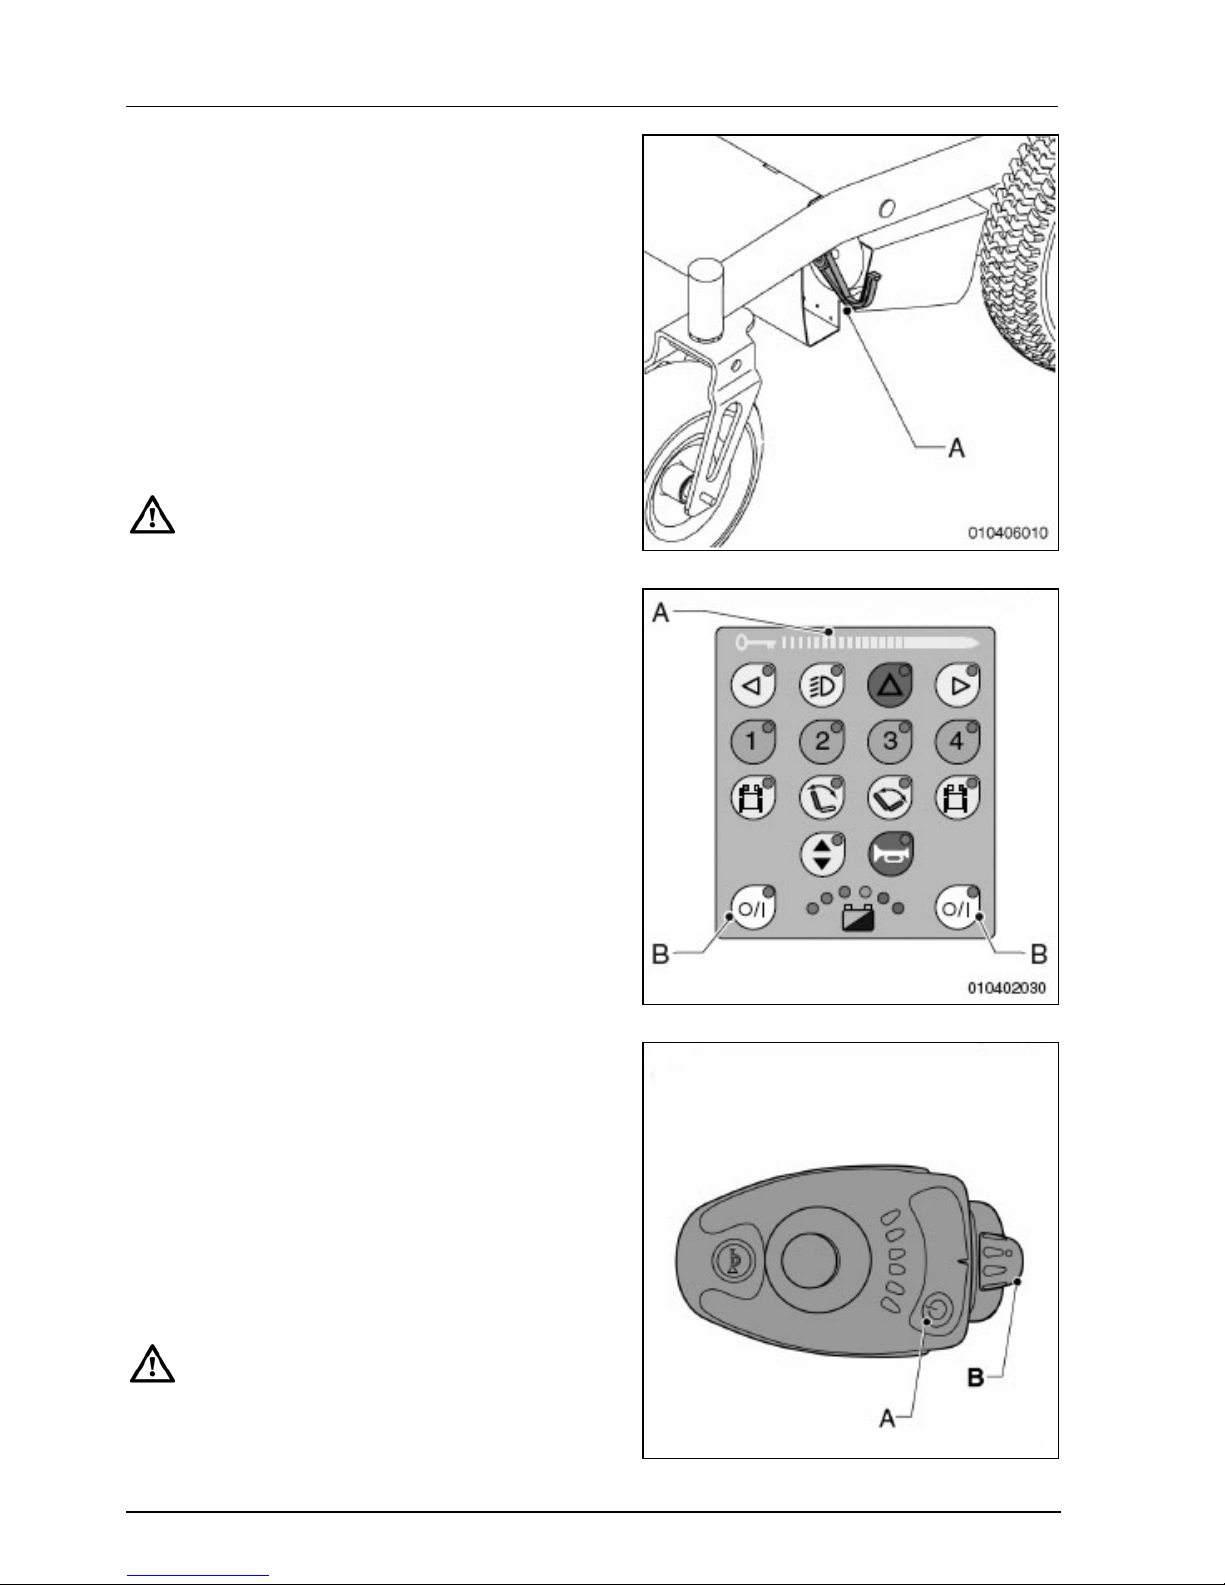
Användning
48
3.3 Elektrisk rullstol – spak
för friläge
För att kunna köra med den elektriska
rullstolen ställer man in båda
frilägesspakarna (A på bild 3.3) i
körläge (D
RIVE).
För att kunna skjuta rullstolen ställer
man in de båda frilägesspakarna i
skjutläge – P
USH.
Frilägesspakarna ska betjänas av
medhjälparen.
• Ställ aldrig in rullstolen i körläge
(Drive) om du står parkerad på
en sluttning. När rullstolen är
parkerad på en sluttning som är
brant kan den börja röra sig ned
för sluttningen.
• Efter att ha skjutit rullstolen ska
frilägesspaken genast ställas in
på körläge (Drive) igen.
• Frilägesspaken ska endast
ställas in på skjutläge (Push) om
rullstolen ska skjutas. I körläget
(Drive) är den automatiska
parkeringsbromsen aktiverad.
3.4 Sätta på ’DX’
Aktivera rullstolen genom att föra
magnetnyckeln från vänster till höger
över manöverpanelen (A på bild 3.4).
Tryck på AV/PÅ-knappen (B på bild
3.4) för att sätta på rullstolen.
3.5 Sätta på ’Shark’
Tryck på på/av-knappen (A på bild 3.5)
för att sätta på rullstolen.
Om ett elektroniskt fel upptäcks
kommer batterinivåmätarens lampor
att börja blinka. Elektroniken
blockeras.
Bild 3.3
Bild 3.4
Bild 3.5
Page 49

Användning
49
3.6 Köra
• Som rullstolsanvändare är du
sårbar i trafiken. När du kör på
eller korsar en väg, tänk på att
andra trafikanter kanske inte
alltid uppmärksammar dig. Följ
alla trafikregler.
• Undvik avlägsna eller avsides
belägna vägar så att du, om så
behövs, snabbt kan få hjälp.
Inspektion före användning
Det är viktigt att kontrollera följande
innan du börjar köra med din rullstol:
• Att ljusen och körriktningsvisarna
fungerar korrekt.
• Att däcken är tillräckligt uppumpade.
• Att batterierna är tillräckligt
uppladdade. De gröna
batterilamporna måste lysa.
Att frilägesspaken står på körläge
((Drive).
• Styrspaken måste vara i
‘nolläge’ innan rullstolen sätts
på. Annars kommer det
elektroniska systemet inte att
fungera korrekt. Som kontroll
tänds batterilamporna.
• För att korrigera detta fel måste
man stänga av rullstolen och
sätta på den igen med
styrspaken i 'nolläge'.
Säkringsfunktionen förhindrar
att rullstolen oavsiktligt börjar
röra sig.
Page 50
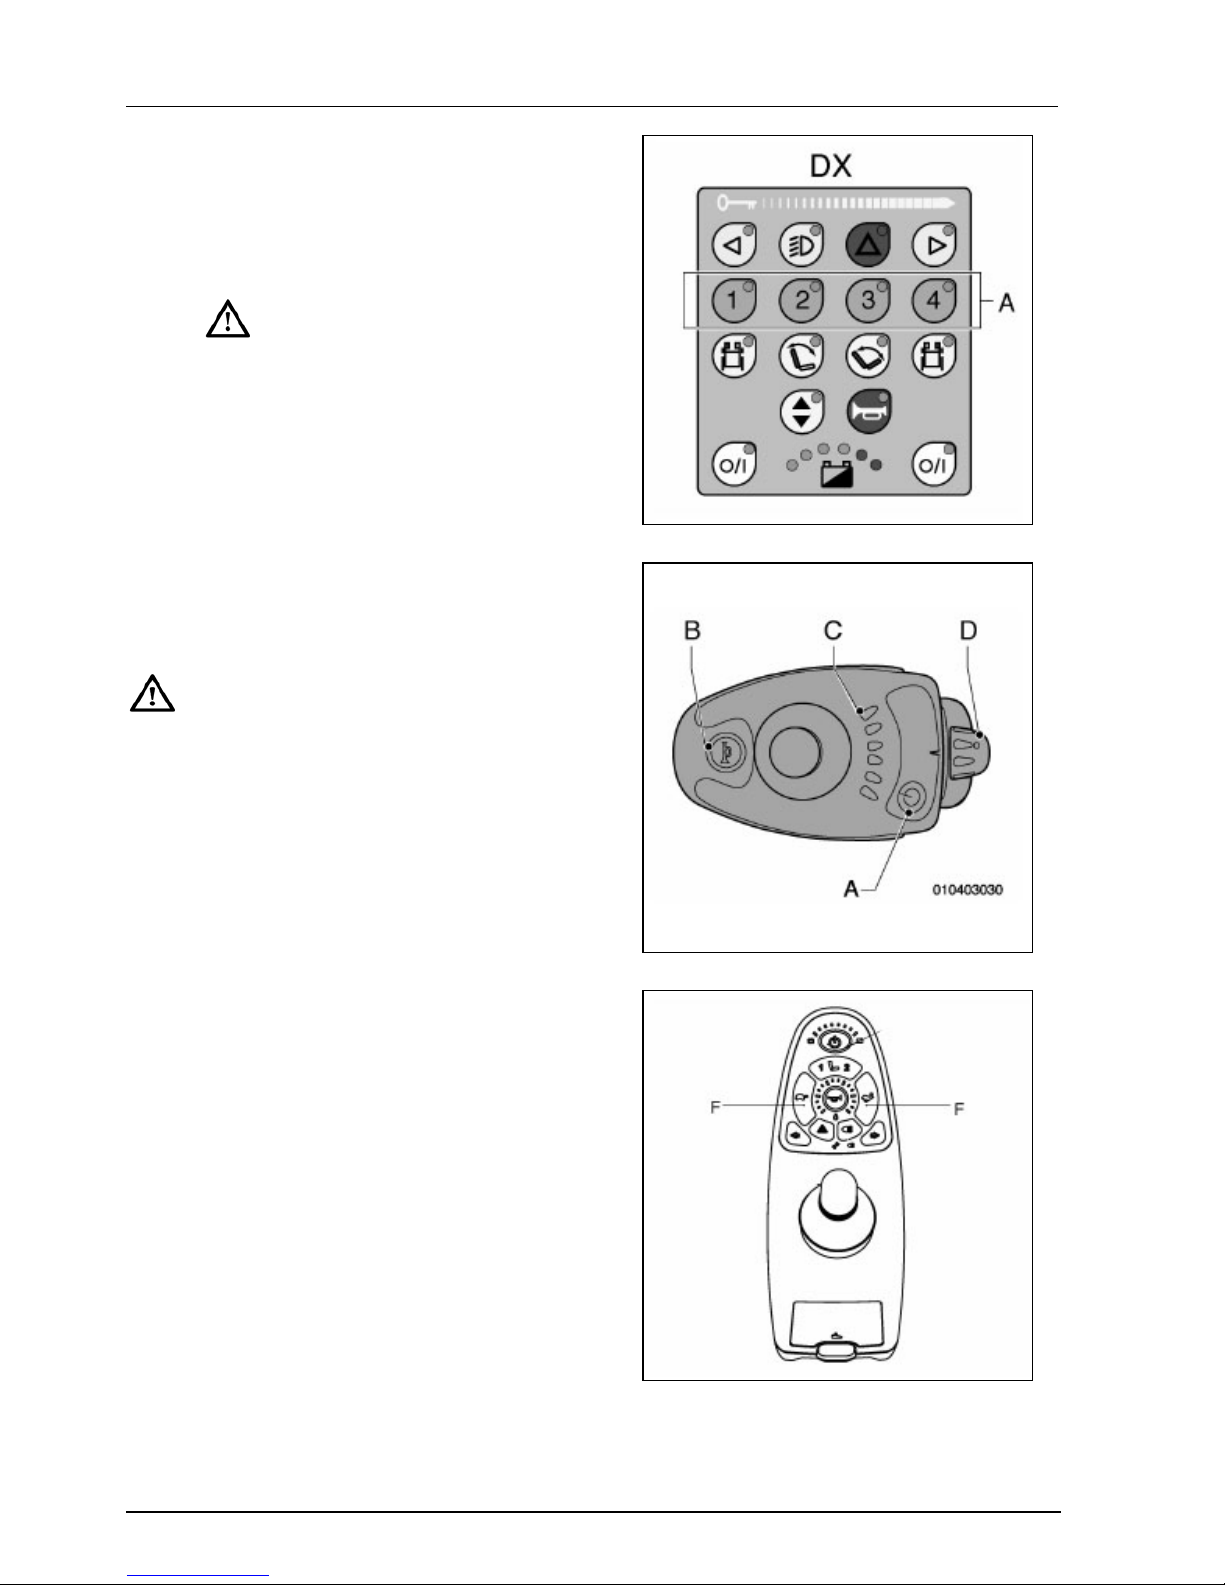
Användning
50
3.7 Köra framåt och backa
• Sätt på rullstolen.
• Välj önskat hastighetsvärde:
• Med knapparna 1, 2, 3 eller 4 (A
på bild 3.6) för styrenhet ’DX’.
• Inomhus eller i områden
med fotgängare bör max.
hastighet 3 användas.
• Med vridknappen (D på bild 3.7)
på ’Shark’-styrenheten.
• Med hastighetsknapparna (F på
bild 3.8) på ’Shark säte/ljus &
aktuatorer-styrenheten.
• Skjut styrspaken försiktigt framåt
eller bakåt beroende på i vilken
riktning du vill köra. Rullstolen börjar
röra på sig.
Med styrspaken kan du också styra
rullstolens hastighet. Ju mer du
skjuter styrspaken framåt ju
snabbare kör rullstolen.
• Rullstolen reagerar mycket
snabbt på tryck på styrspaken.
• Genom att utöva ett jämnt tryck
på styrspaken blir körandet
också jämnt.
Bromsa
När du släpper styrspaken eller flyttar
den till nolläge kommer rullstolen
genast att bromsa.
Nödstopp
1. När du kör framåt, flytta styrspaken
helt bakåt i en rörelse. När du
backar, flytta styrspaken helt
framåt i en rörelse.
2. Släpp genast styrspaken när
rullstolen stannat.
Bild 3.6
Bild 3.7
Bild 3.8
Page 51

Användning
51
3.8 Oegentlig användning
Observera instruktionerna vid
varningssymbolen och följ alla
rekommendationer! Varning för
oegentlig användning av produkten
anges, om möjligt, i respektive kapitel.
Varningar för oegentlig användning
känner man igen på varningstecknet:
Övrig oegentlig användning
• Kör försiktigt på vägar som är
hala på grund av regn, is eller
snö!
• Förhindra att rullstolen kommer i
kontakt med havsvatten:
havsvatten är frätande och kan
skada rullstolen.
• Förhindra att rullstolen kommer i
kontakt med sand: sand kan
påverka rullstolens rörliga delar
vilket leder till att den slits
onödigt snabbt.
• Ställ inte rullstolen i direkt
solljus: klädseln kan bli för het,
vilket kan bränna huden eller
förorsaka en allergisk reaktion.
• Kör aldrig rullstolen om du är
påverkad av droger, alkohol eller
mediciner som kan påverka
körförmågan.
• Du måste ha tillräcklig
synförmåga för att kunna köra
säkert med rullstolen.
• Vid minskad sikt är det absolut
nödvändigt att sätta på ljuset.
• Man måste vara extra försiktig
när man kör vid hög hastighet.
Välj en lägre maxhastighet när
du kör inomhus, på trottoaren
och i områden med fotgängare.
• Se till att inga föremål eller
klädesplagg hänger löst. De kan
fastna i hjulen.
• När du kör på en sluttning måste
du kontrollera att alla
inställningar samt benstöden
befinner sig i lägsta läge.
• Fäst inga tunga föremål vid
rullstolen utan råd från en
specialist. Du kan oavsiktligt
påverka stabiliteten.
• Skjut och/eller släpa inga
föremål med rullstolen.
• Öppna inte dörrar med
benstöden.
• Använd inte benstöden vid
förflyttningar.
• Kör inte ned för höga
kanter/hinder.
• Anpassa inte elkretsarna.
• Sitt inte med mer än en person
på rullstolen.
Page 52
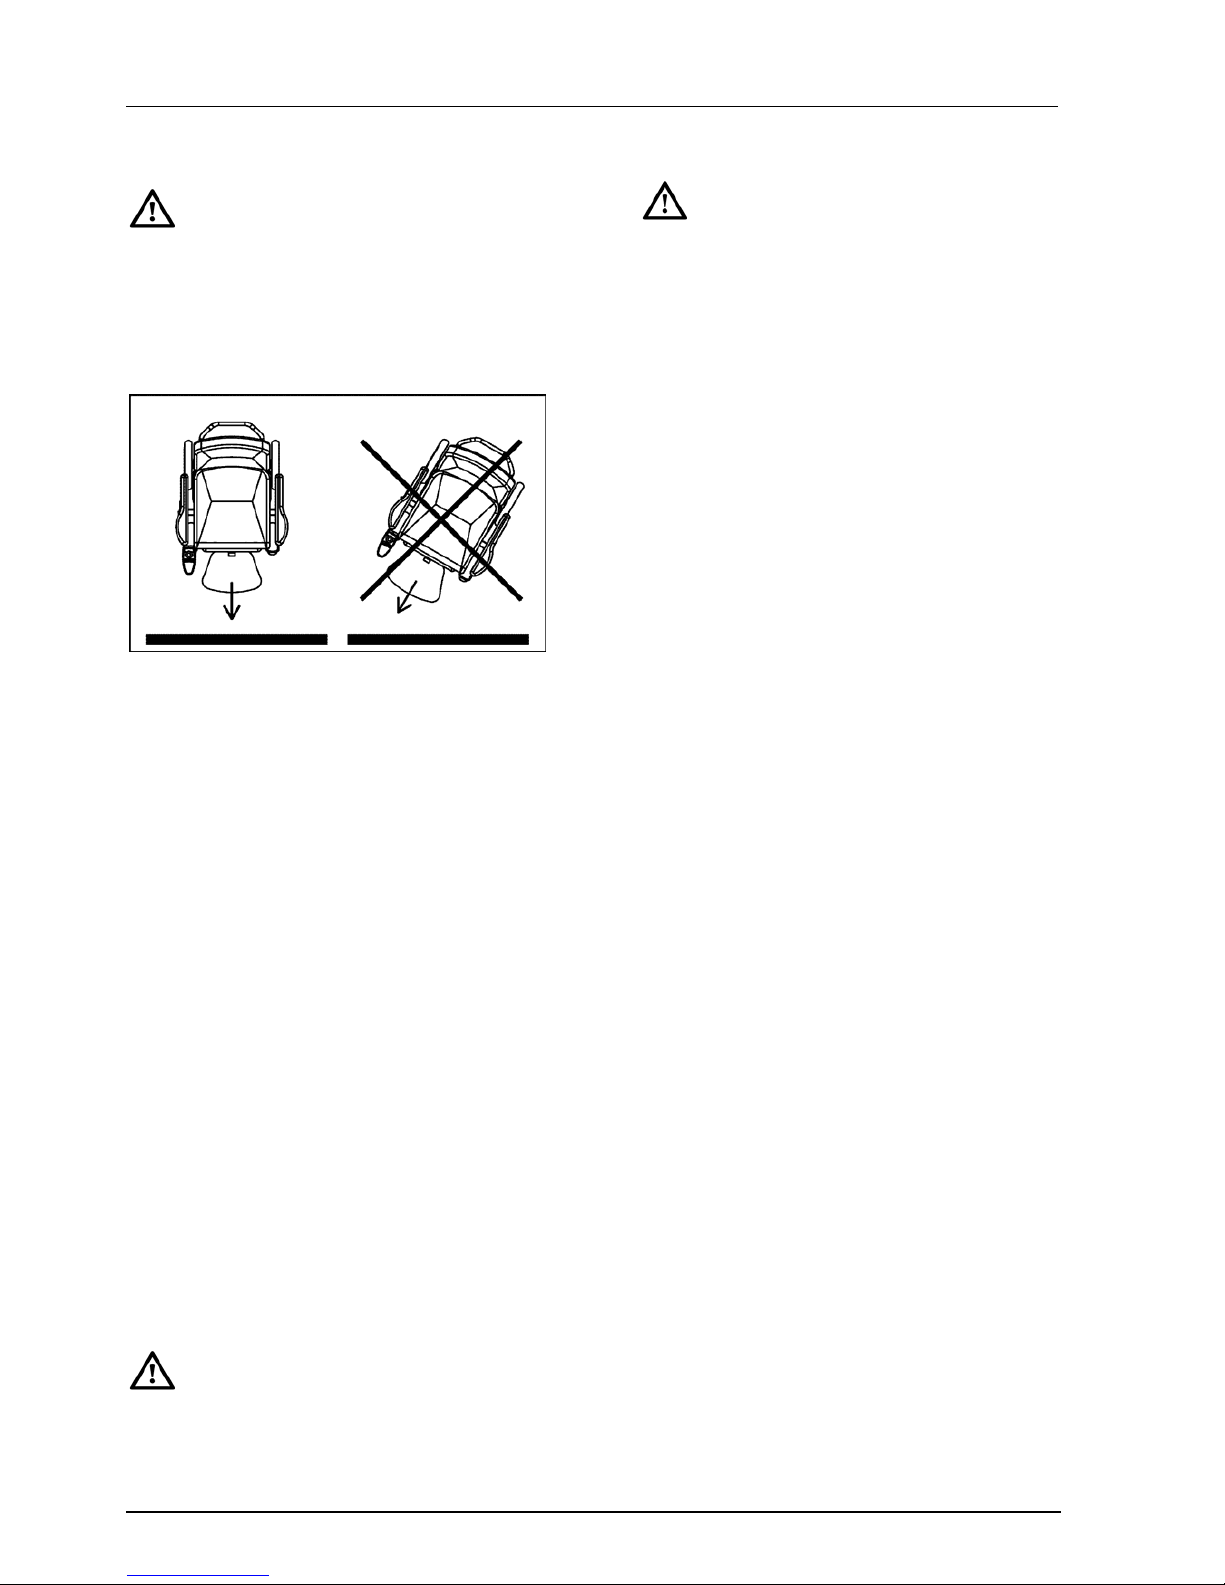
Användning
52
3.9 Kurvor
• Sväng aldrig med full hastighet.
Minska hastigheten när du
svänger.
• Använd körriktningsvisarna när
du svänger.
Bild 3.10
3.10 Hinder/trottoarkanter
Köra uppför hinder
1. Kör rakt fram mot trottoarkanten
(bild 3.10).
2. Rör styrspaken långsamt framåt.
Kör upp på trottoaren utan att byta
riktning.
3. Så snart framhjulen är på
trottoaren måste du hålla farten så
att bakhjulen också kan komma
upp på trottoaren.
Om du inte kan köra upp på
trottoaren, leta efter ett lägre ställe
där det visst går.
Köra nedför hinder
1. Kör rakt fram till trottoarkanten.
2. Rör styrspaken långsamt framåt.
Kör försiktigt nedför trottoaren utan
att byta riktning.
Kör inte nedför trappor!
3.11 Sluttningar/backar
1. Kör alltid långsamt och
koncentrerat på
sluttningar/backar.
2. Undvik plötsliga och ryckiga
rörelser.
3. Undvik att byta riktning på
sluttningar.
4. Vänd inte på en sluttning.
5. Kör bara uppför
sluttningar/backar med alla
inställningar och stöd i lägsta
läge och med benstöden
nedfällda så långt det går.
6. Det kan vara mycket farligt att
köra baklänges/backa nedför en
sluttning.
7. Kör inte på sluttningar med löst
grus eller sand. Drivhjulen kan
sladda.
8. Om du märker att hastigheten
minskar ordentligt när du kör
uppför en backe, välj då en
mindre brant väg.
9. Undvik att rullstolen uppnår en
alltför hög hastighet.
10. Om du kör allt för länge på en
sluttning kan det leda till
överhettning.
11. Om du kör nedför en sluttning
med en rullstol med
framhjulsdrift rekommenderar vi
en anti-tippanordning.
Säker lutning
Puma och Beatle uppfyller kraven för
en klass B (Inomhus/Utomhusbruk)
rullstol enligt det europeiska direktivet
EN12184.
Puma och Beatle finns tillgängliga i
olika varianter. De olika varianterna
har olika specifikationer. Om vi ser på
den maximala säkra lutningen
(maximum safe slope) så skiljer vi på
framhjulsdrivna (FWD) och
Page 53
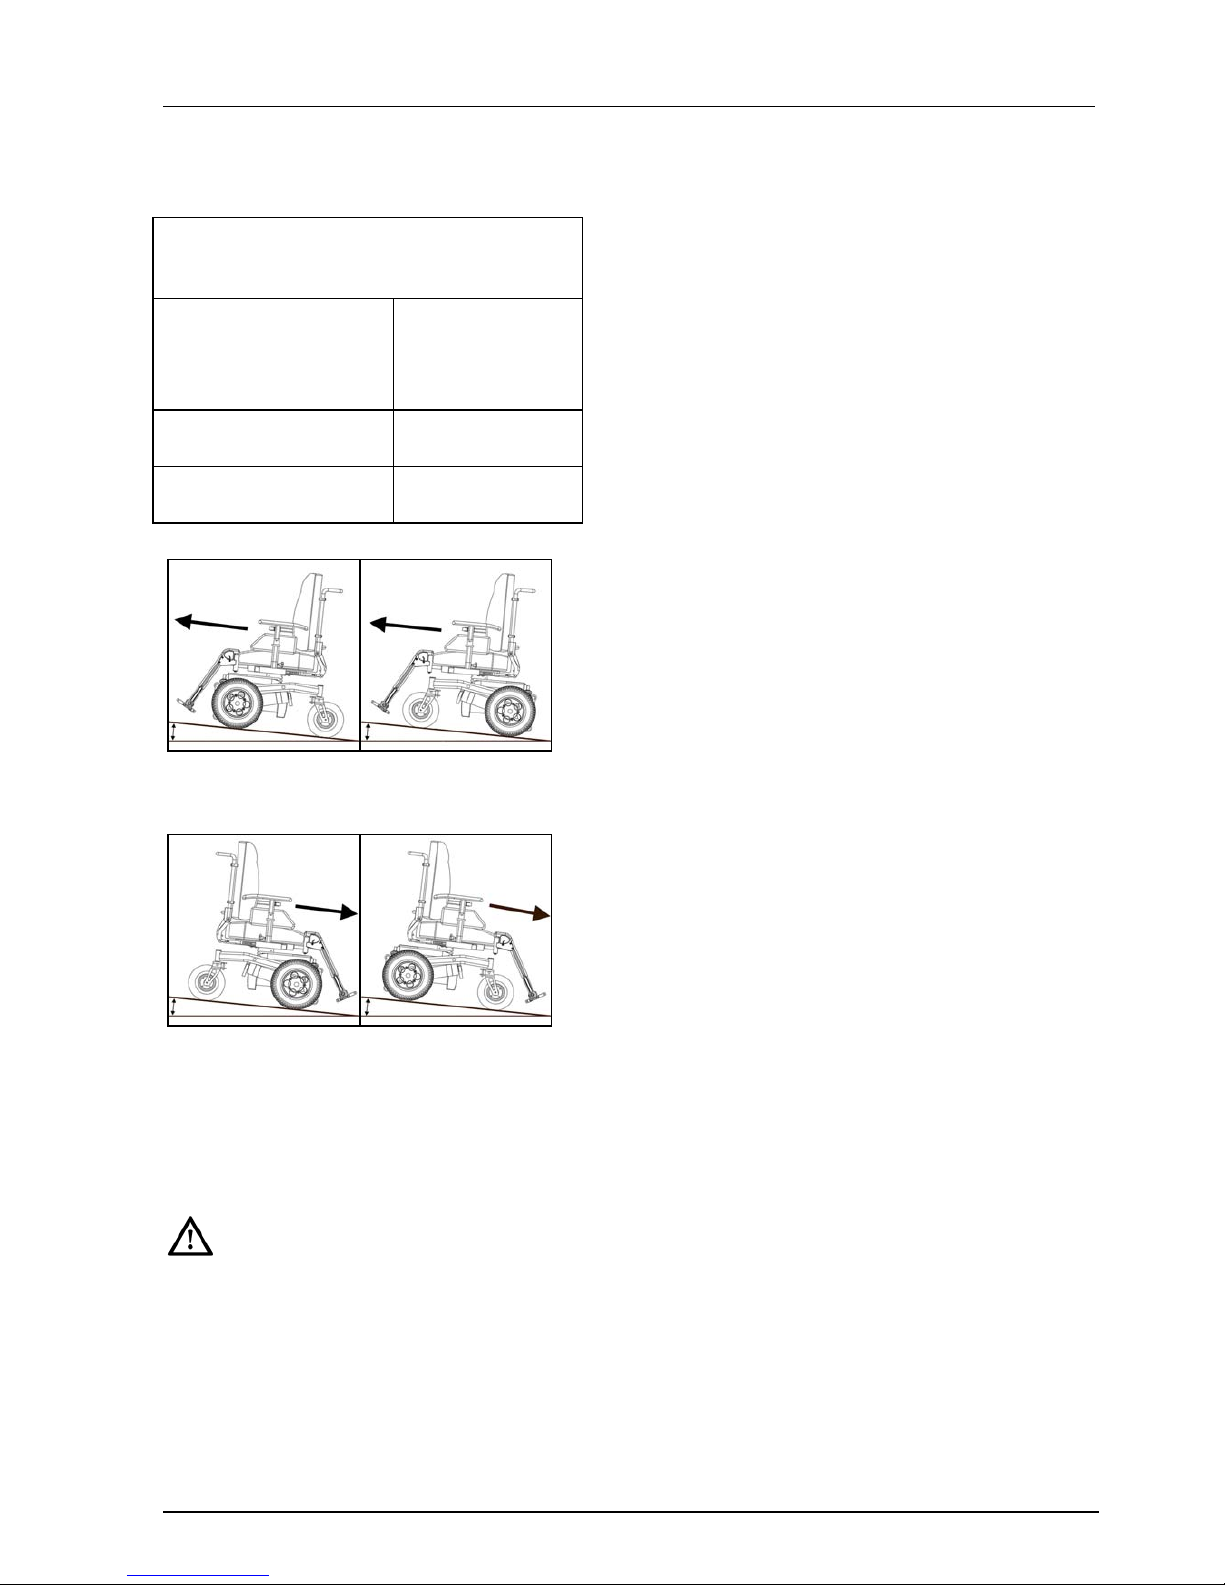
Användning
53
bakhjulsdrivna (RWD) rullstolar. Se
nedanstående tabell.
Testade sluttningar enligt EN12184
(Klass B Inomhus/Utomhus)
Maximal
allmänt säker
lutning (max.
safe slope)
Puma/Beatle FWD
Framhjulsdrift
6°
Puma/Beatle RWD
Bakhjulsdrift
10°
Bild 3.11 Uppförslut vänster FWD,
höger RWD
Bild 3.12 Helling nedförslut; vänster
FWD, höger RWD
Brantare lutningar än den maximalt
allmänt säkra lutningen.
Puma och Beatle har förmågan att
kunna köra uppför brantare
sluttningar än den maximalt allmänt
säkra lutningen. Denna förmåga gör
det möjligt för användaren att kunna
använda rullstolen på bästa möjliga
sätt i sitt dagliga liv.
Att köra uppför sluttningar som är
brantare än den maximalt allmänt
säkra lutningen kan leda till
säkerhetsrisker vad det gäller
stabiliteten. Det kräver stor
försiktighet och fullständig kontroll
av användaren. Kör alltid försiktigt
och börja aldrig experimentera
själv! Följ instruktionerna vid
varningssymbolerna!
Rullstolens stabilitet och förmåga
beror på olika saker. Rullstolarna är
individuellt anpassade efter
användaren. På så sätt skiljer sig
den ena rullstolen från den andra.
Låt din återförsäljare noga
informera dig om hur rullstolen ska
användas och om specifika
justeringar eller inställningar som
gjorts åt användaren som kan
påverka rullstolens köregenskaper.
Page 54
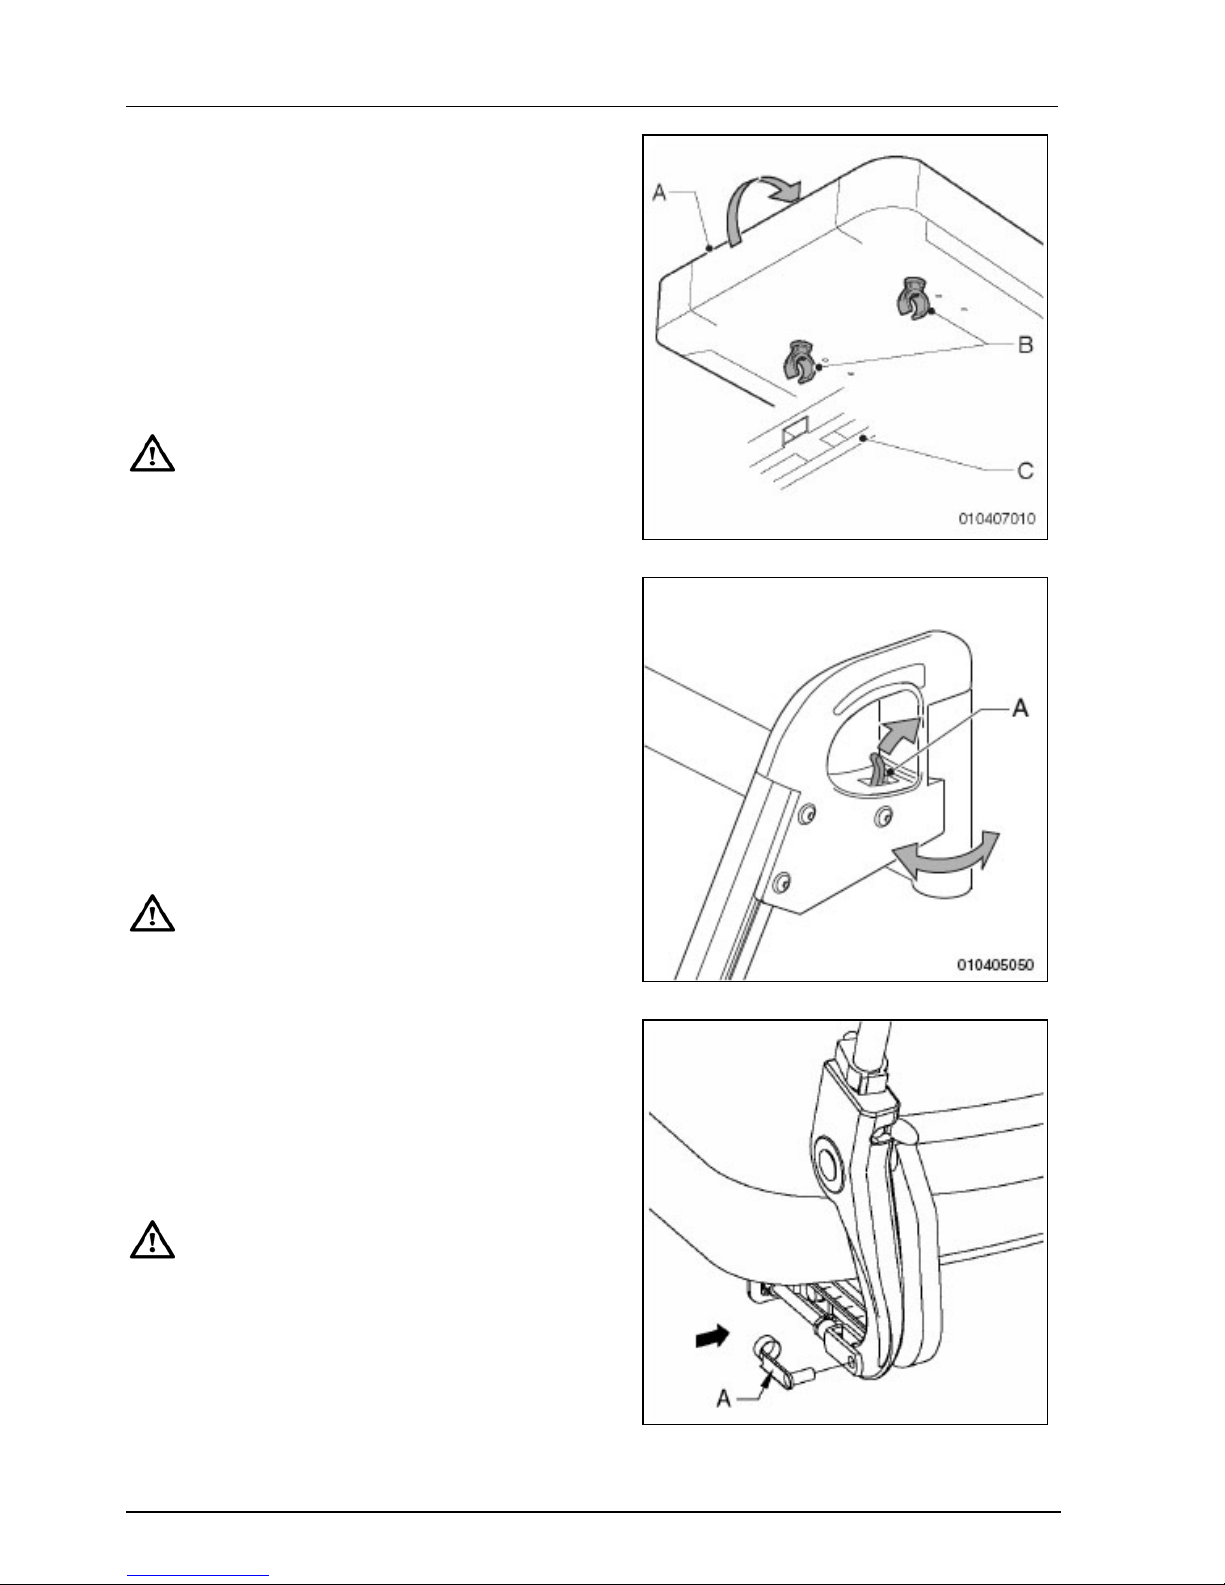
Användning
54
3.12 Fälla ihop rullstolen
Ta bort sätet
1. Dra upp sätet (A på bild 3.13)
framtill.
2. När du sätter tillbaka sätet måste
klämmorna (B på bild 3.13) klicka
fast runt stolens ram (C på bild
3.13).
Kontrollera att sätet klickat fast
ordentligt.
Fälla ned ryggstödet
1. Lossa låsklämman (A på bild 3.15)
från den justerbara stången.
2. Dra ut låsklämman från den
gängade leden.
3. Fäll ned ryggstödet.
Ta bort armstöden
Lossa skruven och ta loss armstödet.
Styrenheten förblir ansluten till
rullstolen via kabeln.
Ta bort benstödet
1. Tryck spärren (A på bild 3.14)
bakåt för att lossa benstödet.
2. Sväng benstödet (B) utåt.
3. Lyft upp och ta bort benstödet.
Se till att du hör ett klick när du
sätter tillbaka benstödet. Benstödet
är nu ordentligt spärrat.
Bild 3.13
Bild 3.14
Bild 3.15
Page 55
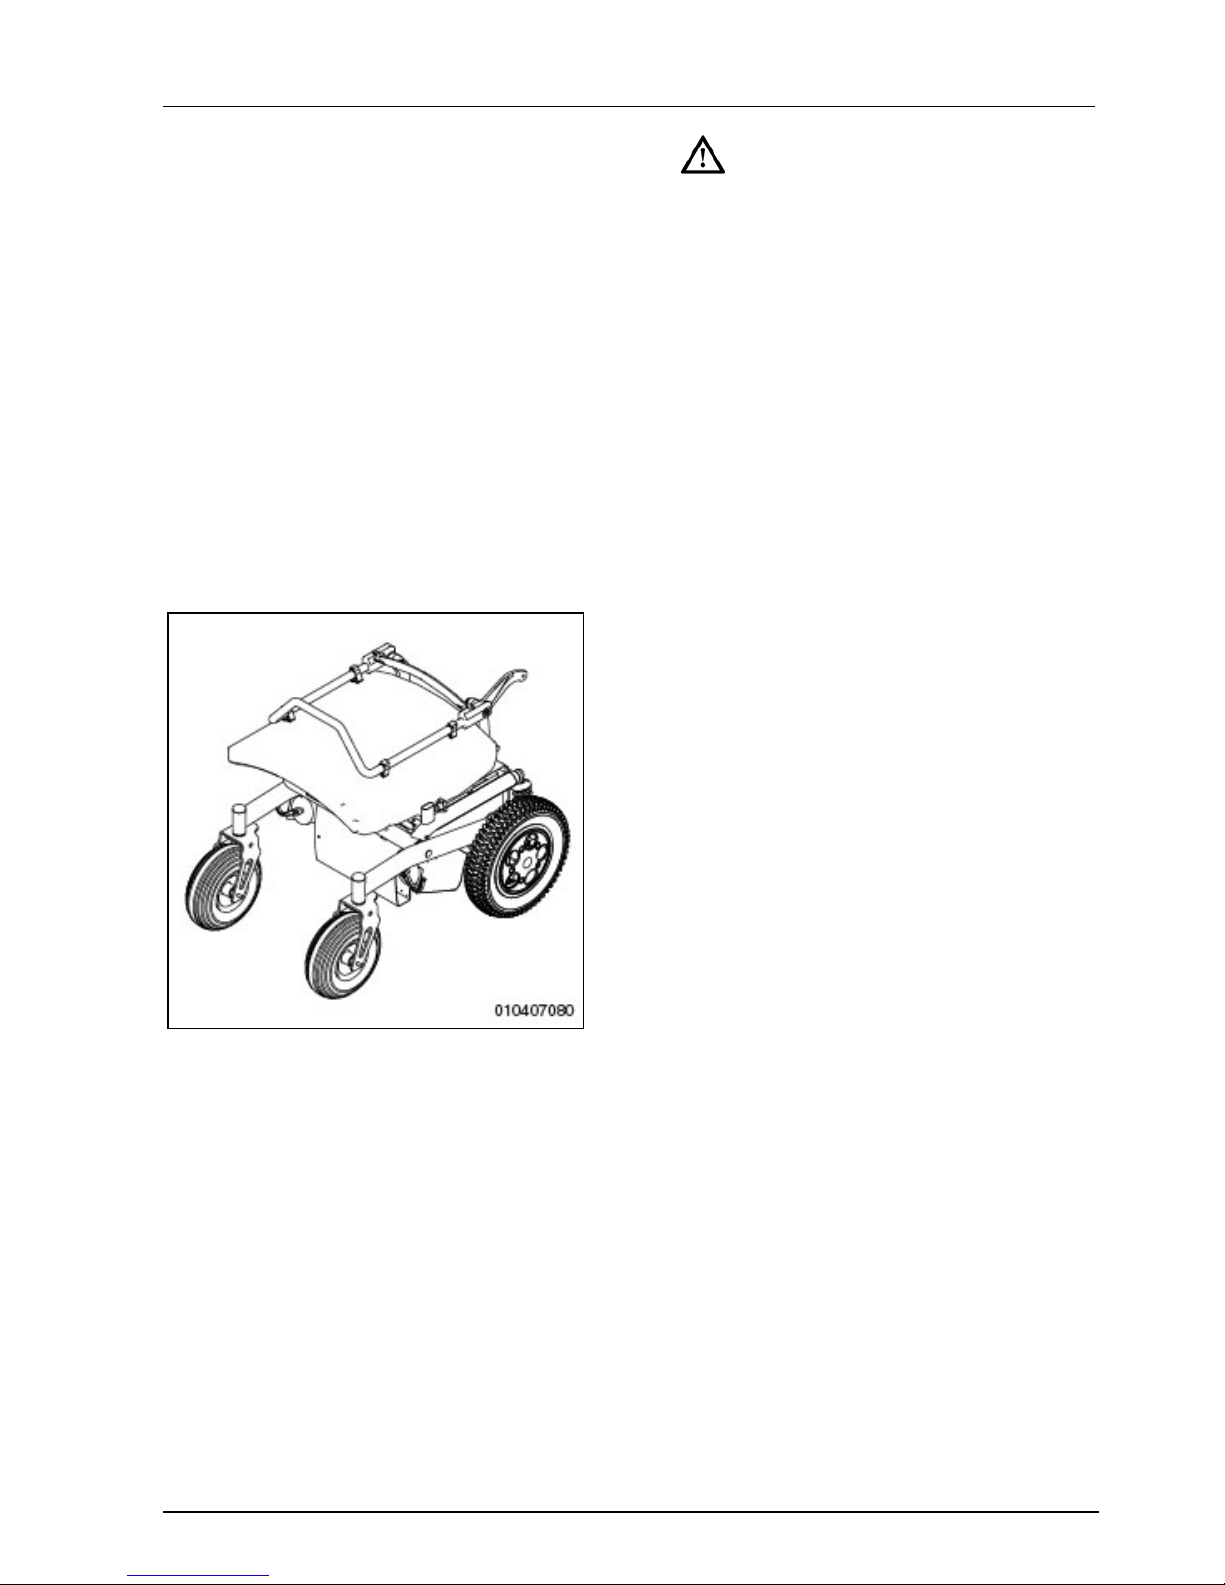
Användning
55
3.13 Transport
Rullstolen kan transporteras i en bil.
Bästa sättet att göra det på är att fälla
ihop rullstolen och att använda plankor
för att köra in den i bilen.
Handicare rekommenderar att
rullstolsanvändare, om möjligt,
använder ett vanligt bilsäte. En rullstol
är inte konstruerad som ett bilsäte och
kan inte erbjuda samma säkerhetsnivå
som bilsäten, oavsett hur väl rullstolen
fästs i fordonet. Eftersom inte alla
rullstolsanvändare kan flytta över till ett
bilsäte ska rullstolen fästas på det sätt
som beskrivs nedan:
Bild 3.16
• Beatle/Puma har utsatts för ett
dynamiskt kraschtest och
uppfyller alla krav i ISO7176 - 19.
• Du måste alltid få bekräftat av
fordonets förare att fordonet är
lämpligt, försäkrat och utrustat
att transportera en passagerare i
rullstol.
• Delar av rullstolen som enkelt
kan tas loss (tillbehör) ska tas av
och förvaras på annan plats
under transporten.
• Rullstolen ska alltid
transporteras framåtvänd.
• Handicare rekommenderar ett
fastsättningssätt som testats
och godkänts enligt ISO10542.
• Rullstolen får endast fästas vid
fastsättningsställena på ramen,
inte på andra delar av rullstolen
eller vid tillbehör (armstöd, antitipparmar etc.)
• Handicare rekommenderar att
rullstolen utrustas med ett
huvudstöd och att det används
under transport.
• Under transport är det livsviktigt
att användaren använder ett
trepunktsbälte som är fäst vid
fordonets vägg och golv. Ett
höftbälte i rullstolen är endast
ett ”sitthållningsbälte” och utgör
inte något alternativ till ett riktigt
säkerhetsbälte.
Page 56
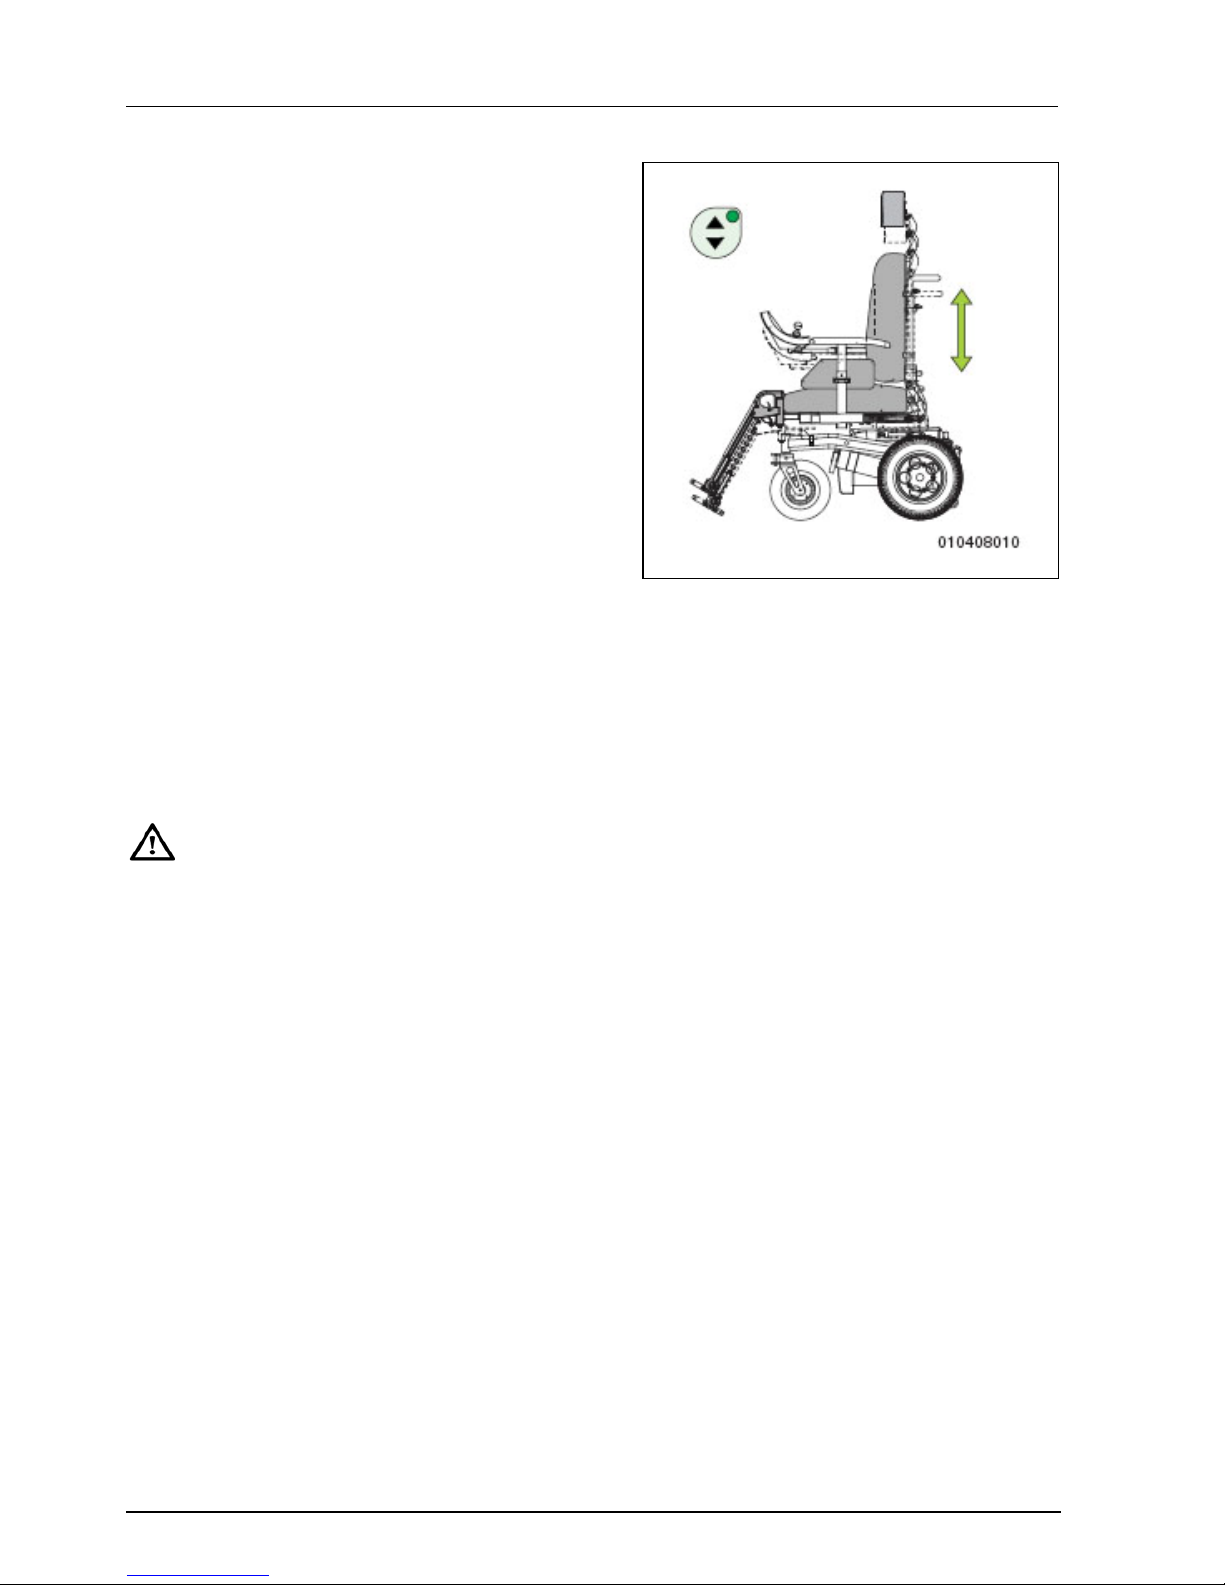
Användning
56
3.14 Elektriska inställningar
Beatle / Puma kan (alternativt) utrustas
med elektriska inställningar som kan
styras från styrenheten.
Följande elektriska inställningar kan
installeras:
• Säte med elektrisk höjdinställning
• Säte med elektrisk lutning
• Ryggstöd med elektrisk
vinkelinställning.
• Benstöd med elektrisk
vinkelinställning
För DX-modellen är knapparna för de
elektriska inställningarna standard
monterade på kontrollpanelen på
styrenheten.
På Shark-modellen, som har max två
alternativ, kan du välja mellan de olika
inställningarna genom att trycka på
inställningsknappen (J på bild 2.6)
flera gånger.
Anmärkningar:
När du kör upp eller ned för en
sluttning på mer än 4 grader måste
du ställa in alla elektriska
inställningar på normalläge.
Säte med elektrisk
höjdinställning
Höjden på hela sittsystemet på din
Beatle / Puma kan du själv ställa in
elektriskt.
Så snart sittsystemet har höjts ett par
centimeter kommer lampan på av/påknappen att börja blinka. Det är för att
ange att rullstolen nu bara kan köras
på halvfart.
När du ställer in sittsystemet måste du
tänka på att inte blanda ihop den
blinkande på/av-knappen med
kontrollampans diagnosfunktion.
Bild 3.17
Inställning med ’DX’-styrning:
1. Sätt på den elektriska rullstolen.
2. På styrenhetens kontrollpanel
trycker du på symbolen för
höjdinställning av sittsystemet.
Lampan på knappen kommer att
tändas.
Rullstolen kan nu inte längre köras.
3. Flytta styrspaken framåt:
sittsystemet kommer nu att höjas.
Eller flytta manöverspaken bakåt;
sittsystemet kommer nu att sänkas.
4. Tryck på symbolen en gång till för
att stänga av funktionen när önskad
höjd har uppnåtts.
Inställning med 'Shark’-styrning:
1. Sätt på rullstolen.
2. Tryck på inställningsknappen (J på
bild 2.6). Knappens kontrollampa
kommer att tändas. Rullstolen kan
nu inte längre köras.
3. Rör manöverspaken framåt:
inställningen rör sig framåt, eller rör
manöverspaken bakåt:
inställningen rör sig bakåt.
4. Tryck på inställningsknappen (J på
bild 2.6) för att stänga av
inställningsfunktionen.
Page 57
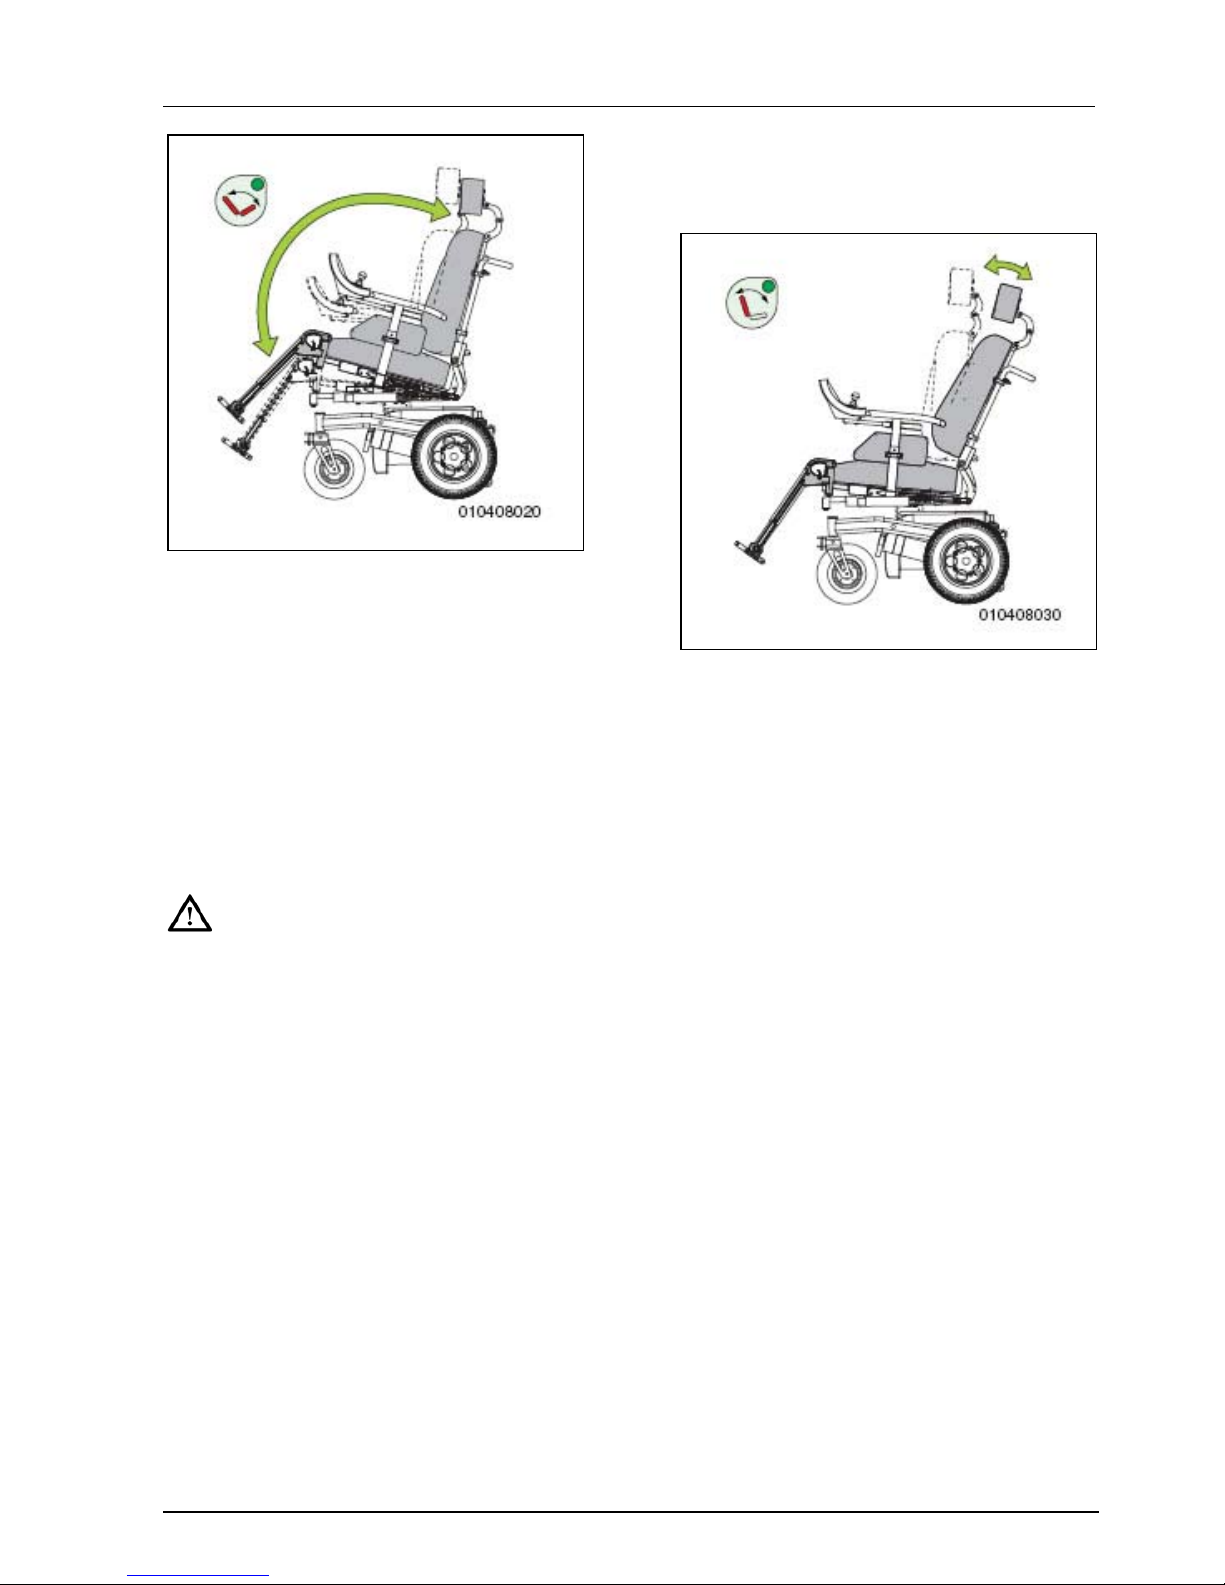
Användning
57
Bild 3.18
Säte med elektrisk inställning av
lutning
Sätet på din rullstol kan vinklas så att
det passar dig. Med den här
inställningen kan du vinkla den nedre
delen av stolens sittsystem.
Inställningen kan också användas för
att luta sittsystemet bakåt vilket gör det
lättare att stiga av stolen.
För varje grad som stolen lutas höjs
sätet med cirka 5 mm.
Inställning med ’DX’-styrning:
1. Sätt på den elektriska rullstolen.
2. På styrenhetens kontrollpanel
trycker du på symbolen för lutning
av sittsystemet. Lampan på
knappen kommer att tändas.
Rullstolen kan nu inte längre köras.
3. Flytta styrspaken framåt: sätet
kommer att lutas framåt.
Eller flytta styrspaken bakåt: sätet
kommer att lutas bakåt.
4. Tryck på symbolen en gång till för
att stänga av funktionen när
önskad vinkel har uppnåtts.
Inställning med 'Shark’-styrning:
Se ’Säte med elektrisk höjdinställning’
Bild 3.19
Ryggstöd med elektrisk
vinkelinställning.
För bästa möjliga sittkomfort kan du
själv ställa in vinkeln på ryggstödet.
Inställningen är trapplös.
Inställning med ’DX’-styrning:
1. Sätt på den elektriska rullstolen.
2. På styrenhetens kontrollpanel
trycker du på symbolen för
inställning av ryggstödet .
Lampan på knappen kommer att
tändas.
Rullstolen kan nu inte längre köras.
3. Flytta styrspaken framåt: ryggstödet
kommer att luta framåt.
Eller flytta styrspaken bakåt:
ryggstödet kommer att luta bakåt.
4. tryck på symbolen en gång till för
att stänga av funktionen när
önskad vinkel har uppnåtts.
Inställning med 'Shark’-styrning:
Se ’Säte med elektrisk höjdinställning’
Page 58
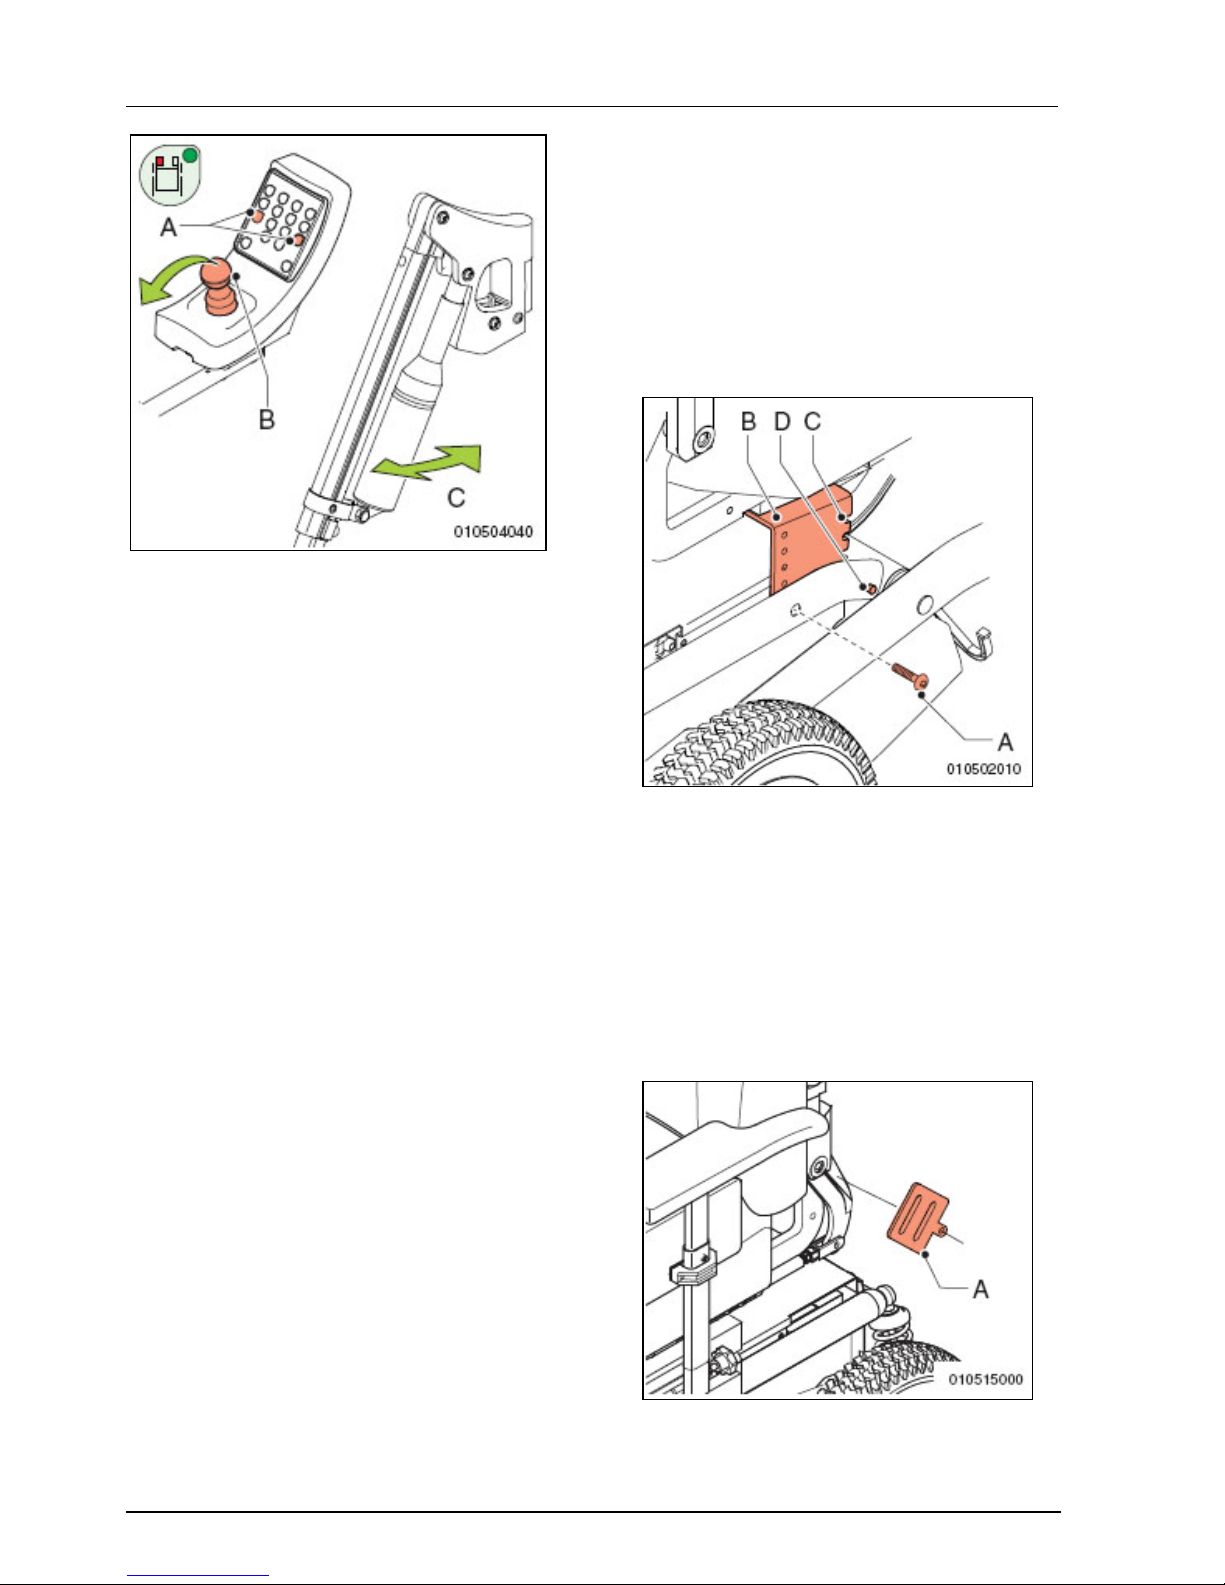
Inställningsalternativ
58
Bild 3.20
Benstöd med elektrisk
vinkelinställning
Benstöden kan ställas in elektriskt,
oberoende av varandra. Elmotorn på
varje benstöd kan utan problem lyfta
benstödet.
Inställningen av benstödets vinkel görs
på följande sätt:
• Sätt på den elektriska rullstolen.
• På styrenhetens kontrollpanel
trycker du på den symbol för
inställning av benstödets vinkel (A
på bild 3.20) som gäller den vinkel
(C på bild 3.20) som ska ställas in.
Lampan på den inställda symbolen
ska nu lysa.
• Rör styrspaken (B) framåt för att
flytta benstödet (C) uppåt eller
nedåt för att flytta benstödet nedåt.
• Tryck på respektive symbol igen för
att stänga av funktionen, eller tryck
på symbolen för det andra
benstödet för att ställa in det också.
• Tryck en gång till på knappen som
lyser så stängs funktionen av.
4 Inställningsalternativ
4.1 Inställning av sätets
höjd
Sätet på din Beatle / Puma kan ställas
in av återförsäljaren på fem olika
höjder, med 25 mm mellan varje steg.
Bild 4.1
4.2 Bälte
Rullstolen kan utrustas med ett
säkerhetsbälte. Bältet ger extra
stabilitet vid normal användning.
Be din återförsäljare om information.
Gör så här för att montera
säkerhetsbältet:
• Fäst bältesspännet (A på bild 4.2)
med hjälp av en bult och mutter.
Bild 4.2
Page 59
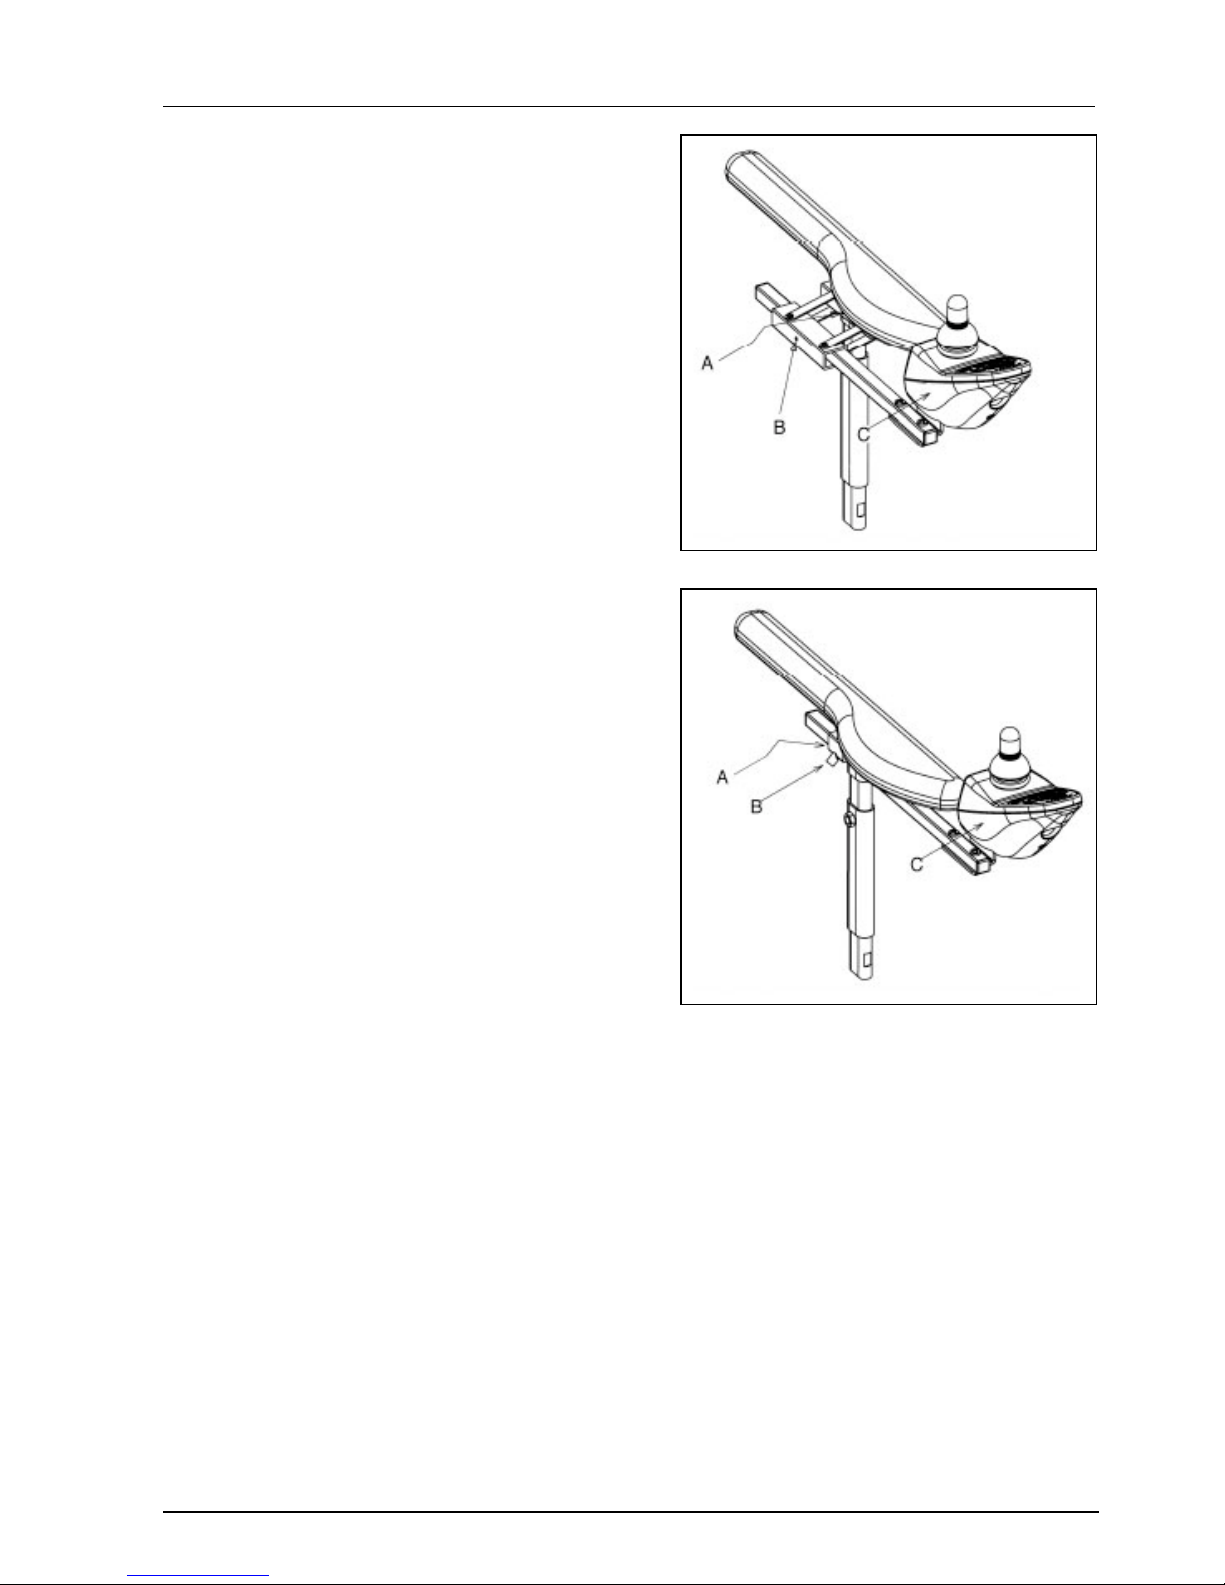
Inställningsalternativ
59
4.3 Inställning av
styrenhetens ’svänga
undan’-funktion
Höjd
1. Lossa ställskruven (A) ett par varv
med en skiftnyckel på 3mm.
2. Skjut styrenheten med 'svänga
undan’-mekanismen till önskat
läge,
3. Dra åt ställskruven ordentligt.
Djup
1. Lossa ställskruven (B på bild 4.3)
ett par varv med en sexkantsnyckel
på 4mm.
2. Skjut styrenheten till önskat läge.
3. Dra åt ställskruven ordentligt.
4.4 'Fast’ inställning av
styrenheten.
Höjd:
1. Lossa ställskruven (A på bild 4.4)
ett par varv med en skiftnyckel på
3mm.
2. Skjut styrenheten (C på bild 4.4) till
önskat läge.
3. Dra åt ställskruven ordentligt.
Djup:
1. Lossa ställskruven (B på bild 4.4)
ett par varv med en sexkantsnyckel
på 4mm.
2. Skjut styrenheten (C på bild 4.4) till
önskat läge.
3. Dra åt ställskruven ordentligt.
Bild 4.3
Bild 4.4
Page 60
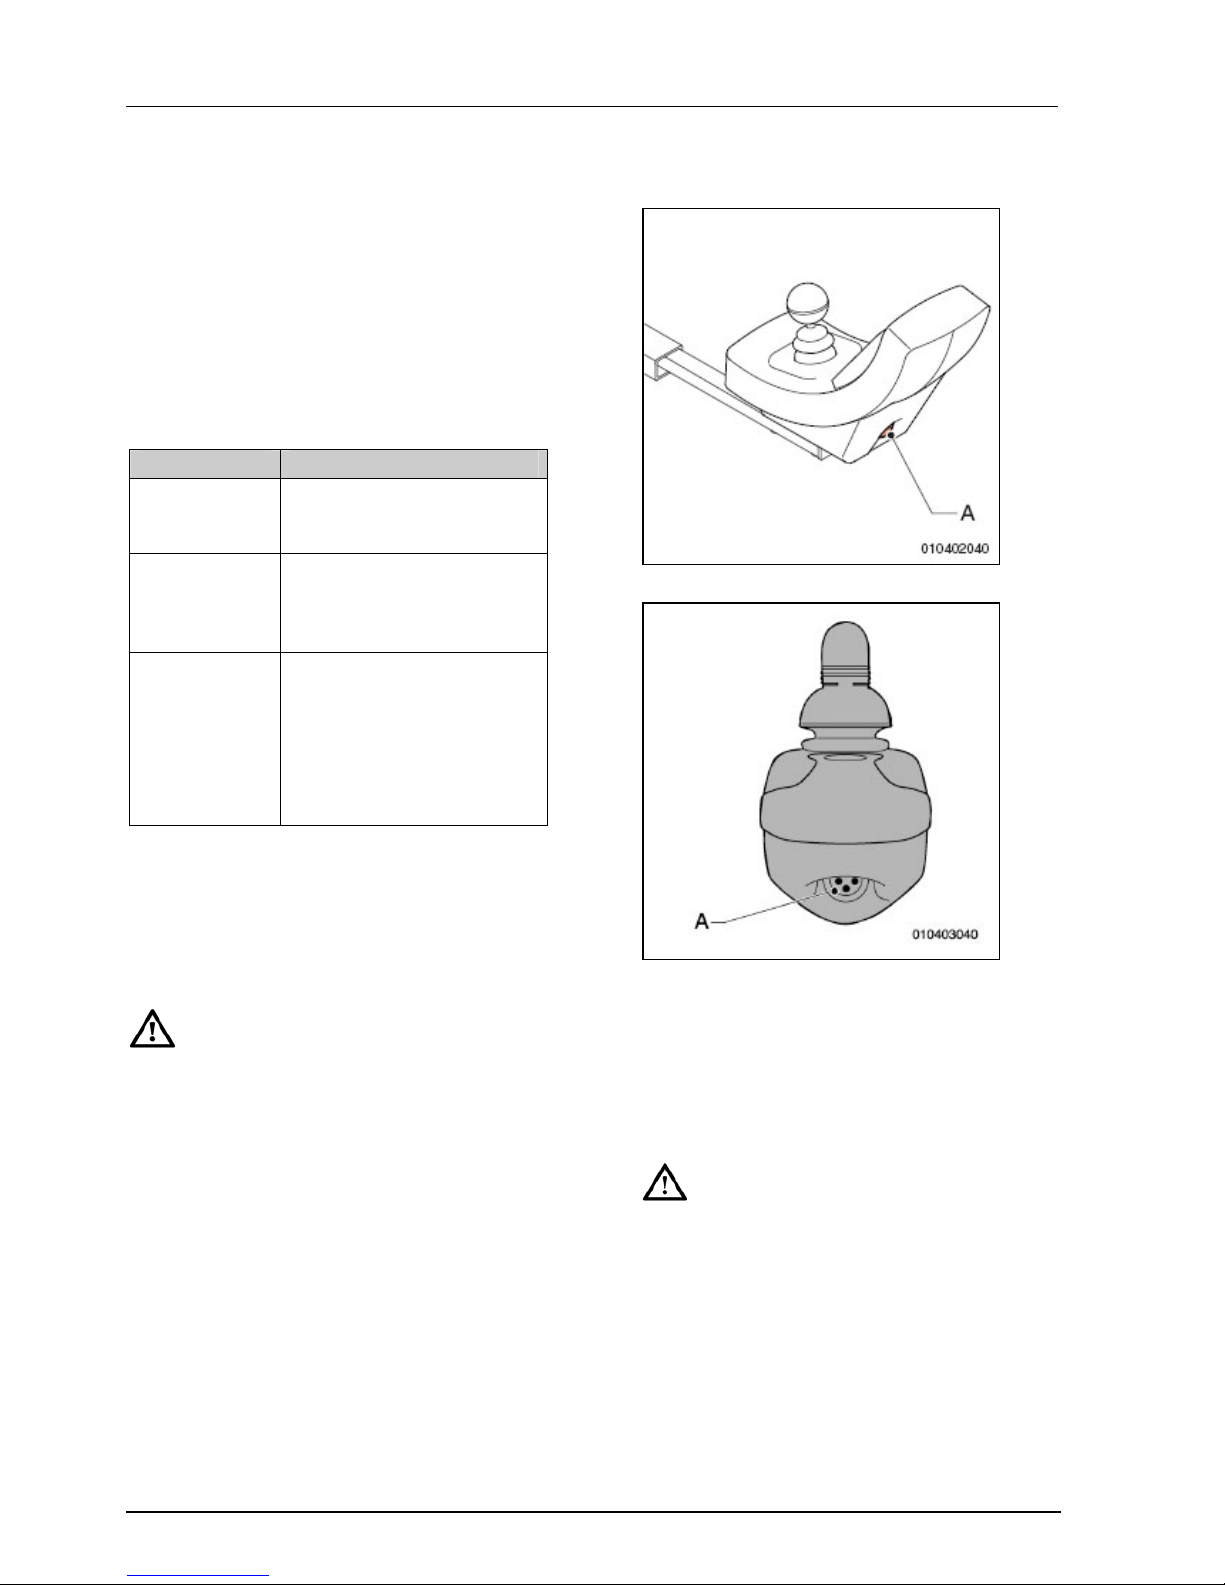
Underhåll
60
5 Underhåll
5.1 Underhållstabell
Vi rekommenderar att du låter
rullstolen servas av återförsäljaren
minst en gång om året, eller om den
används ofta, varje halvår. Tabellen
nedan visar vilket underhåll du kan
utföra själv.
Frekvens Beskrivning
Dagligen Ladda upp batterierna
efter varje användning, se
kapitel 5.2.
Varje vecka Kontrollera däcktrycket
och pumpa upp däcken
om så behövs, se kapitel
5.3.
Varje månad Rengör rullstolen, se
kapitel 5.4.
Kontrollera batterierna (på
sommaren: varannan
vecka; på vintern: en
gång i månaden), se
kapitel 5.2.
5.2 Batterier
Rullstolen har ’torra' gelbatterier.
Dessa torra batterier är helt förseglade
och underhållsfria.
Det är inte tillåtet att använda ’våta’
batterier.
Ladda upp batterierna
Se i bruksanvisningen som hör till
batteriladdaren om den lämpar sig för
batterierna.
Vid normal användning ska batterierna
laddas upp varje natt.
1. Stäng av rullstolen.
2. Sätt sladden till batteriladdaren i
uppladdningsanslutningen (A på
bild 5.1 och 5.2).
3. Sätt kontakten till batteriladdaren i
ett eluttag.
Bild 5.1
Bild 5.2
När batterierna är uppladdade:
1. Ta ur kontakten ur
uppladdningsanslutningen.
2. Ta ur kontakten till batteriladdaren
ur eluttaget.
• Så snart kontakten till
batteriuppladdaren har satts i
uppladdningsanslutningen är
rullstolens drift ur funktion.
• Ta alltid bort sladden när
batterierna har laddats upp. På
så sätt förhindrar man att
batterierna långsamt laddas ur
igen.
Page 61

Underhåll
61
Underhåll av batterierna
Se instruktionerna till batterierna.
• Se till att batterierna alltid är
ordentligt uppladdade.
• Använd inte rullstolen om
batterierna nästan är tomma och
ladda aldrig ur batterierna helt.
Detta kan skada batterierna och
du riskerar att oavsiktligt bli
stående.
Rengöra batterierna
Håll batterierna rena och torra. Smuts
och vatten kan förorsaka läckage,
vilket leder till att batteriernas kapacitet
minskar. Efter rengöringen, smörj in
polerna med syrafritt vaselin.
Byta batterier
Om batteriernas kapacitet har minskat
så pass att du bara kan köra mycket
korta turer med rullstolen, är
batterierna slut. Batterierna måste
bytas ut så snart som möjligt. Ta
kontakt med din återförsäljare.
5.3 Kontrollera och pumpa
upp däcken
• Se till att däcken har rätt tryck.
• Däcktrycket får aldrig överskrida
det maxvärde som anges på
däcket.
Pumpa upp däcken med en fotpump
eller en cykelpump (i kombination med
bifogade reducernippel). Du kan också
pumpa upp däcken på närmaste
bensinstation.
• Däcktryck drivhjul:
Puma: 2 bar
Beatle: 2,7 bar
• Däcktryck svängbara hjul:
• Typ utomhus: 3,5 bar
• Typ inomhus: 2,5 bar
5.4 Rengöra rullstolen
Ta bort torr smuts
Klädseln, metalldelar och ramen kan
enkelt rengöras med en torr, mjuk
trasa.
Ta bort lera och annan våt smuts
Rengör först de smutsiga delarna med
en våt svamp och torka dem sedan
torra med en torr, mjuk trasa.
• Använd aldrig slipande eller
starka rengöringsmedel. De kan
repa rullstolen.
• Använd inte organiska
lösningsmedel, exempelvis
thinner, bensen eller lacknafta.
• Var försiktig med vatten nära det
elektroniska systemet.
Page 62

Felsökning
62
6 Felsökning
6.1 Felsökningstabell ‘DX’
Signal Möjlig orsak Lösning
PÅ/AV-lampan är inte
på; rullstolen kör inte.
Kontakten till styrenheten
sitter inte ordentligt i
’elmodulen’.
Sätt i kontakten ordentligt i
’elmodulen’ (DX BUS).
DX ’elmodulen’ sitter bakom kåpan
på utsidan av stolen mot
batterifacket.
Batteriladdaren är
fortfarande ansluten till
styrenheten.
Ta ur kontakten till
uppladdningskabeln från
uppladdningsanslutningen.
Friläget är fortfarande på. • Stäng av rullstolen elektriskt.
• Stäng av friläget.
• Sätt på rullstolen.
Batterierna är inte
anslutna på rätt sätt.
Kontrollera anslutningarna.
En av batteriets
anslutningar sitter lös.
Sätt fast anslutningen.
PÅ/AV-lampan blinkar
7 gånger
Batteriets spänning är för
låg.
Ladda upp batterierna.
Batterierna är tomma. Ladda upp batterierna.
PÅ/AV-lampan blinkar
8 gånger
Batteriets spänning är för
hög, de överskrider 32 V.
Detta kan endast ske under
uppladdning.
PÅ/AV-lampan blinkar
12 gånger
Systemet ’passar’ inte.
Systemmodulerna är inte
kompatibla.
Kontrollera och tryck sedan på
PÅ/AV-knappen för att börja köra
igen.
I alla övriga fall, ta kontakt med din återförsäljare. På sista sidan i den här
bruksanvisningen hittar du återförsäljarens kontaktuppgifter.
Page 63
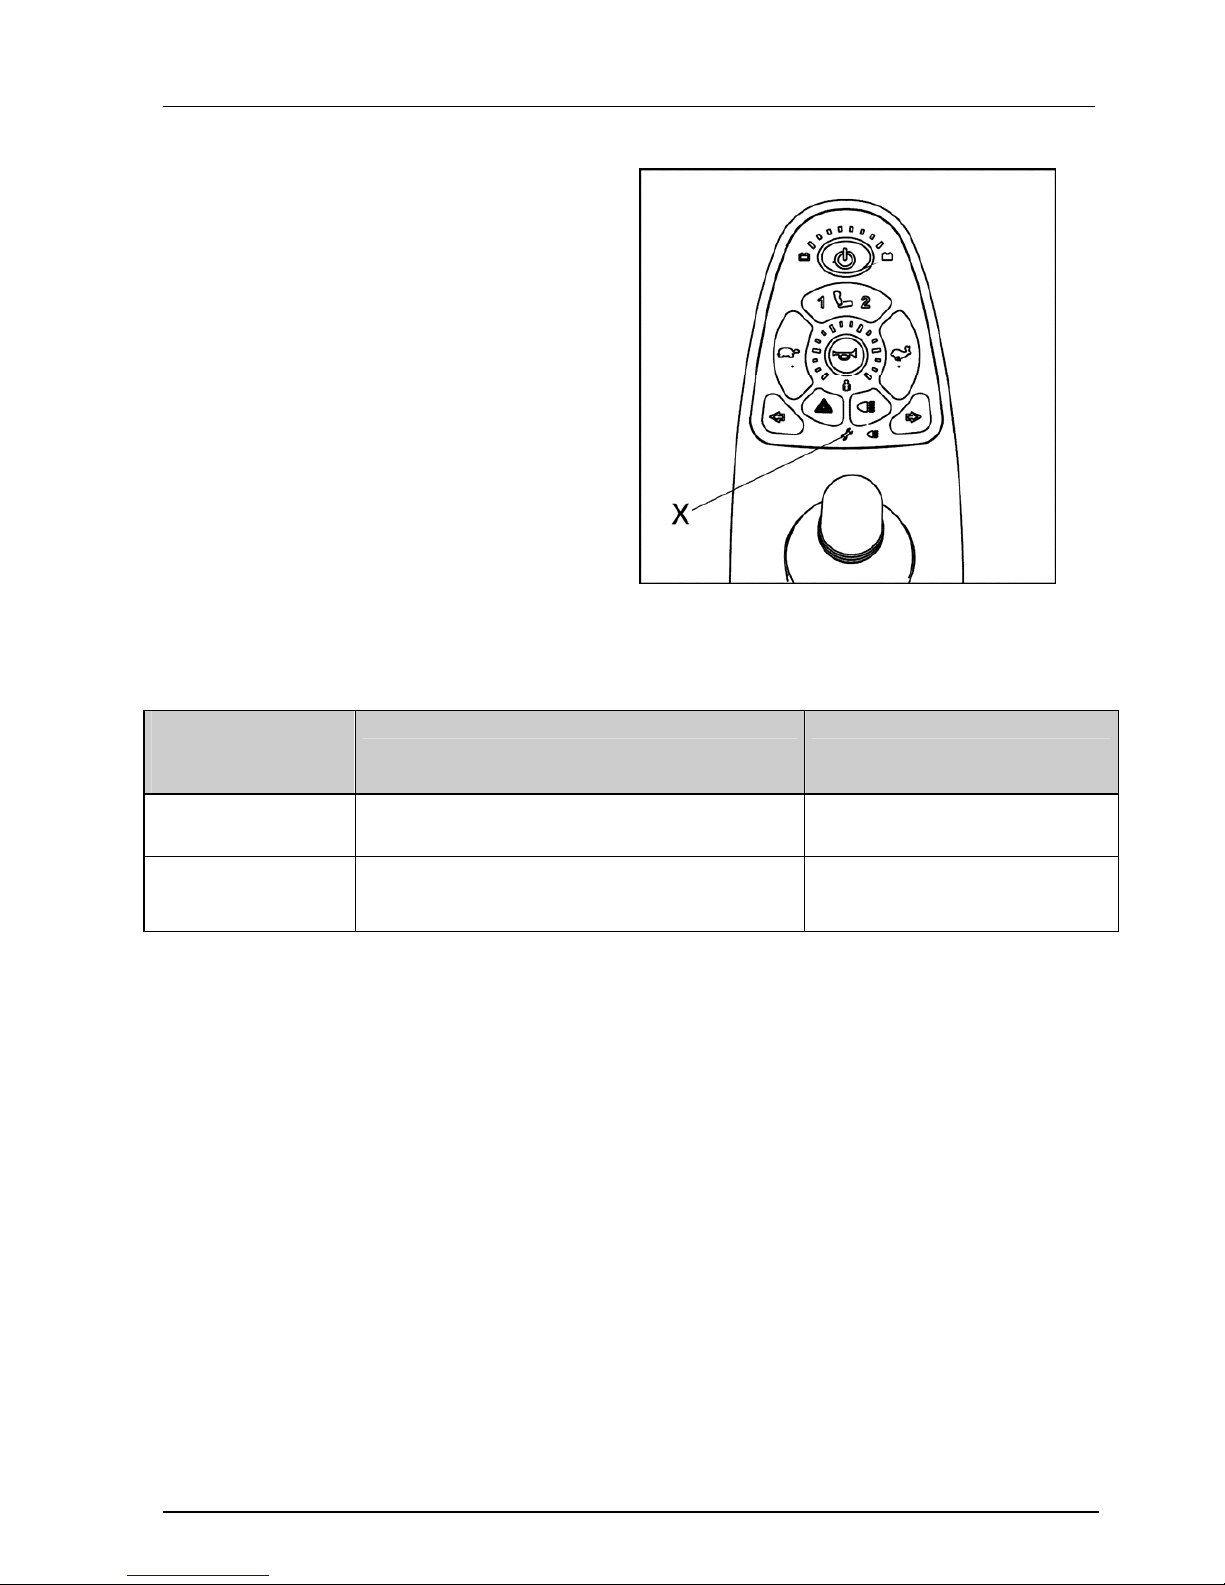
Felsökning
63
6.2 Felsökningstabell ‘Shark’
Om rullstolen inte fungerar, trots att
batterierna är helt uppladdade, gå igenom
följande punkter innan du tar kontakt med
din återförsäljare.
• Stäng av rullstolen och sätt på den
igen. Kontrollera om problemet har
lösts.
• Kontrollera om alla batteriklämmor
sitter fast ordentligt.
• Kontrollera om rullstolen står i körläge
(Drive), och inte i friläge (Neutral).
• Kontrollera att hastighetskontrollens
läge inte har ändrats.
Vid fel kommer batteriets kontrollampa att
blinka (på Shark styrenheten).
Skiftnyckelsymbolen på Shark-modellens kontrollampor för ljus och sätesljus kommer
att blinka (se X på bild 6.1). Använd tabellen nedan för att lista ut vad som är fel och
informera din återförsäljare.
I alla övriga fall, ta kontakt med din återförsäljare. På sista sidan i den här
bruksanvisningen hittar du återförsäljarens kontaktuppgifter.
Blinkande
kontrollampa
frekvens
Felbeskrivning Handling
5 Motor 1 är i Neutral –läge. Placera frilägesspaken för
motor 1 i ”Kör”-läge (Drive) .
6 Motor 2 är i Neutral –läge. Placera frilägesspaken för
motor 2 i ”Kör”-läge (Drive).
Page 64

Tekniska specifikationer
64
7 Tekniska specifikationer
Tillverkare: Handicare B.V.
Adress:
Vossenbeemd 104, 5705 CL Helmond,
Modell: Beatle/Puma
Maxvikt användare 160 kg
Beskrivning Min. Max.
D Total längd inklusive benstöd 1 050 mm 1 100 mm
B Total bredd Beatle 600 mm
B Total bredd Puma 650 mm
Total vikt inkl. batterier 122 kg
\Maximal allmänt säker lutning
helling (Maximum safe slope)
6°
Statisk stabilitet nedåtlut 15°
Statisk stabilitet uppförslut 15°
Statisk stabilitet sidledes 15°
Aktionsradie (med maxvikt 160 kg) 36 km (56 Ah-batterier)
Kapacitet att ta hinder - Beatle 60 mm bakåt / 60 mm framåt
Kapacitet att ta hinder - Puma 80 mm bakåt / 70 mm framåt
100 mm (bakåt med ’trottoarkantstagare’)
Maxhastighet framåt - Beatle 6 km/h
Maxhastighet framåt - Puma 6 km/h 10 km/h
Vinkel säte 2° 7°
Mekanisk lutningsjustering 2° 18°
C Effektivt sittdjup (inställbart) 440 mm 520 mm
A Effektivt sittdjup (inställbart) 380 mm 525 mm
E Sittdjup Beatle 470 mm 550 mm
E Sittdjup Puma 490 mm 570 mm
Ryggvinkel 89° 118°
Rygghöjd 520 mm 570 mm
Underbenslängd 370 mm 520 mm
Vinkel benstöd 6° 70°
Armstödshöjd 220 mm 290 mm
Armstödsdjup 60 mm 120 mm
Minsta radie 600 mm (FWD) 960 (RWD)
Kapacitet att köra över hinder, höjd
Beatle
60 mm
Kapacitet att köra över hinder, höjd
Puma
80 mm
Vändradie 1220 mm
G Total höjd 1050 mm
Page 65
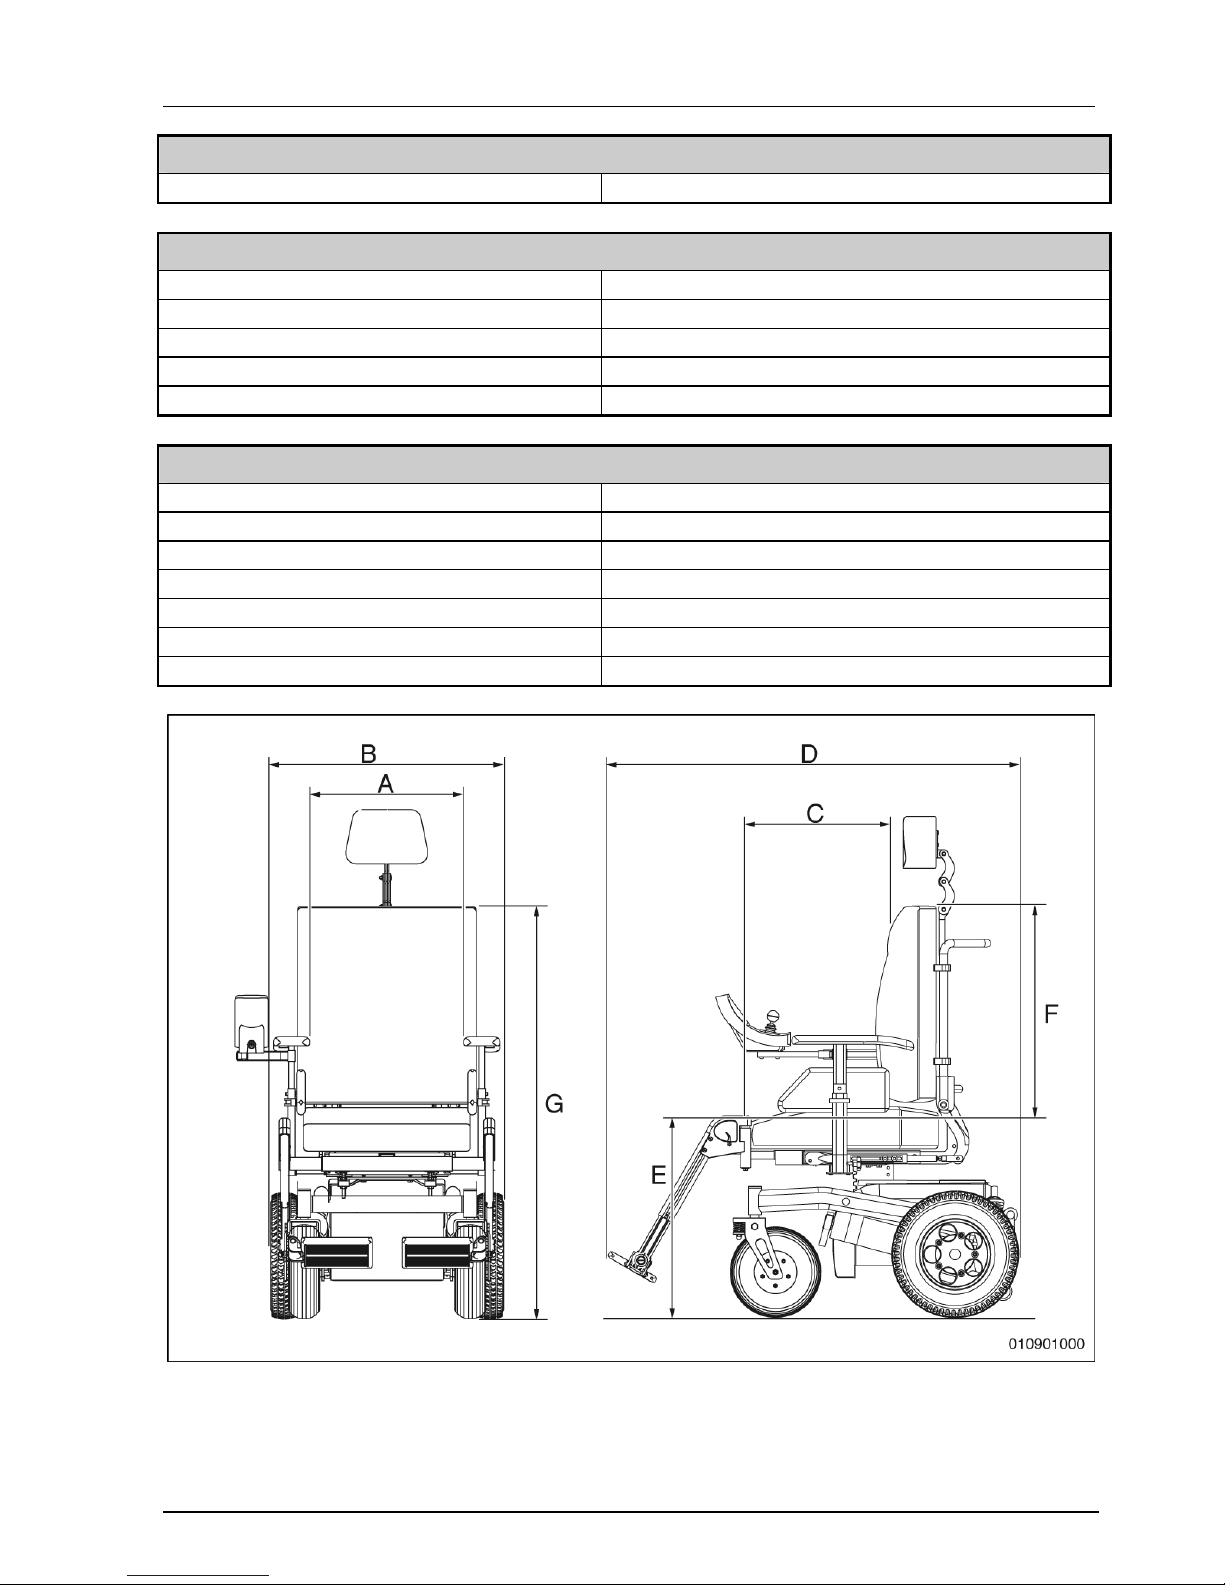
Tekniska specifikationer
65
Testdata
Vikt testdocka 160 kg
Ansättningskraft
Styrspak 15 N
Svänga iväg styrenhet 58 N
Elektroniska brytare 13 N
Parkeringsbroms 58 N
Sätta i uppladdningskontakten 58 N
Batterier
Maxmått batterier 290 x 360 x 230 mm (b x d x h)
Rullstolens vikt utan batterier 82 kg
Batterikapacitet Puma 40 Ah, 56 Ah eller 73 Ah
Batterikapacitet Beatle 40 Ah
Max. tillåten laddningsspänning 13,6 V
Max uppladdningsspänning 12 A
Anslutningstyp A DIN 72311
Bild 7.1
Page 66
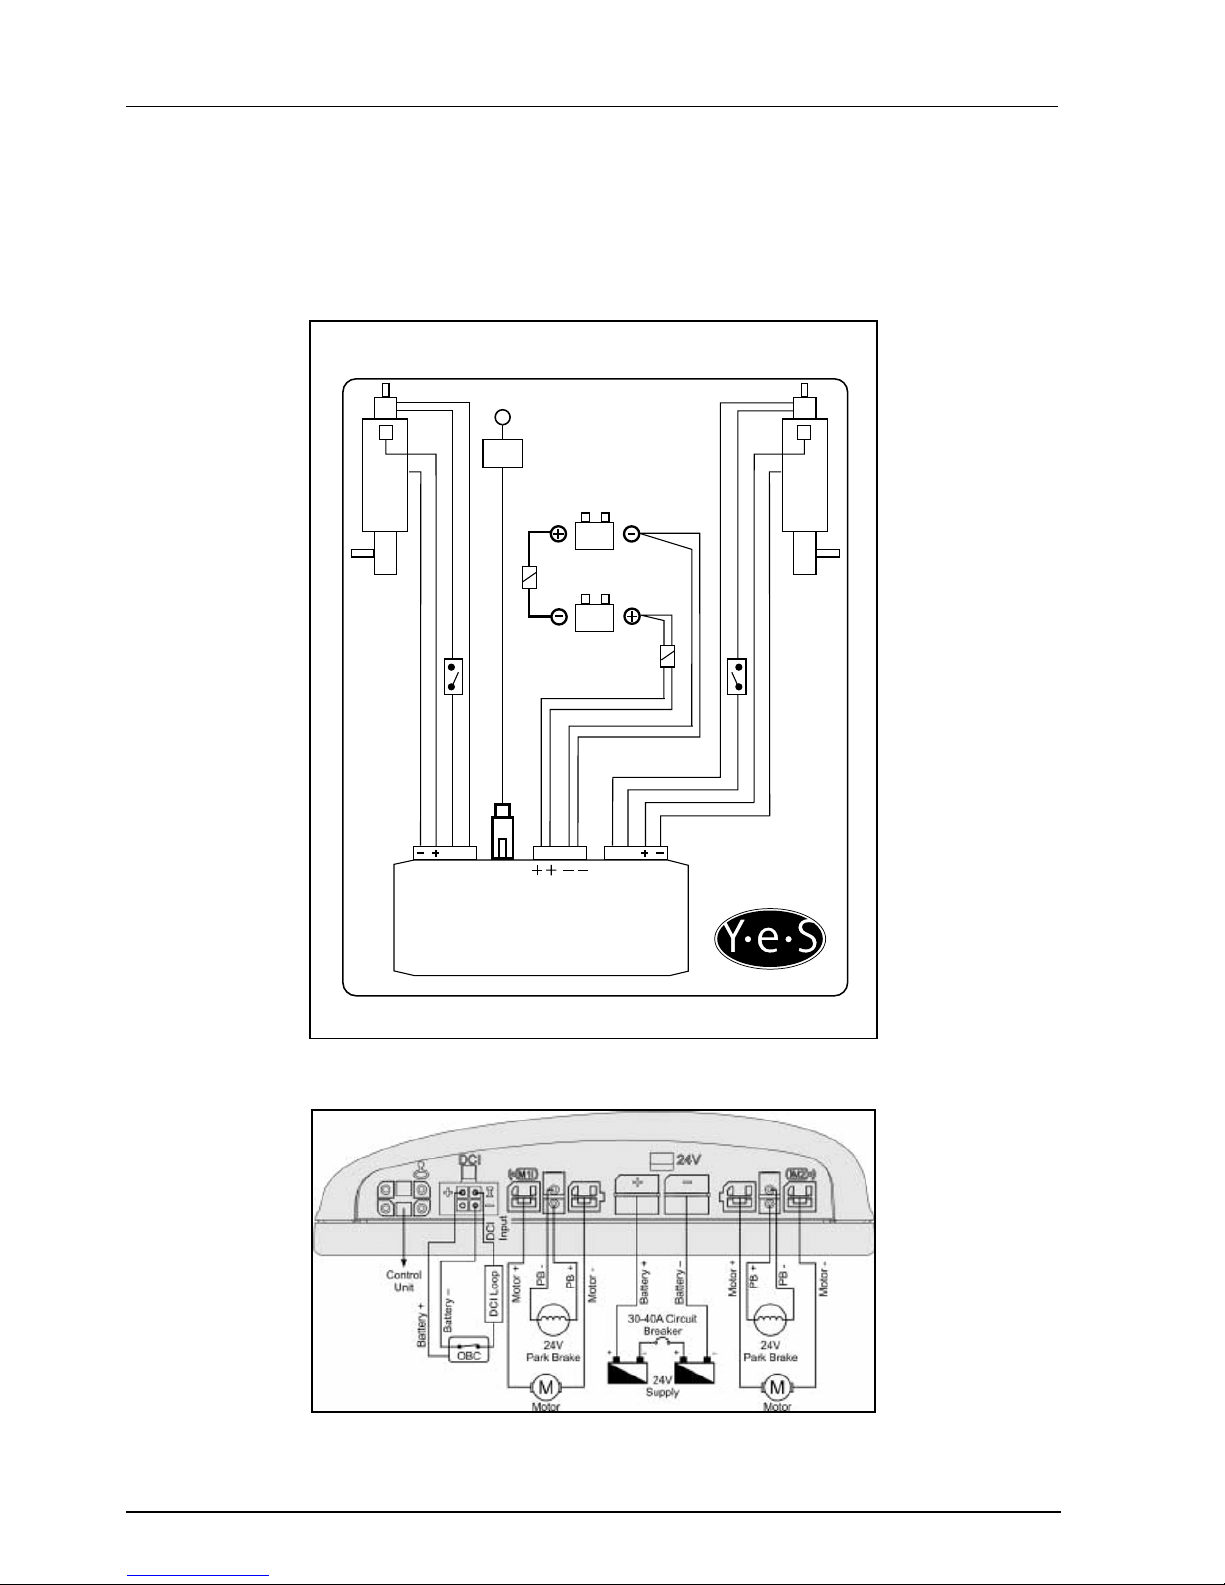
Tekniska specifikationer
66
Elektriskt kopplingsschema
Det elektriska kopplingsschemat för den elektroniska installationen sitter på insidan av
locket till batterifacket.
Elektriskt kopplingsschema ’DX’
BLAUW / BLUE
BLAUW / BLUE
ZWART / BLACK
ZWART / BLACK
ZWART / BLACK
ZWART / BLACK
ROOD / RED
ROOD / RED
M2M1 DX
BUS
ROOD
RED
ZWART
BLACK
DX POWER MODULE
ART. NR.:
008.00000.021
LR
®
50A
35A
010902010
Bild 7.2
Elektriskt kopplingsschema ‘Shark’
Bild 7.3
Page 67
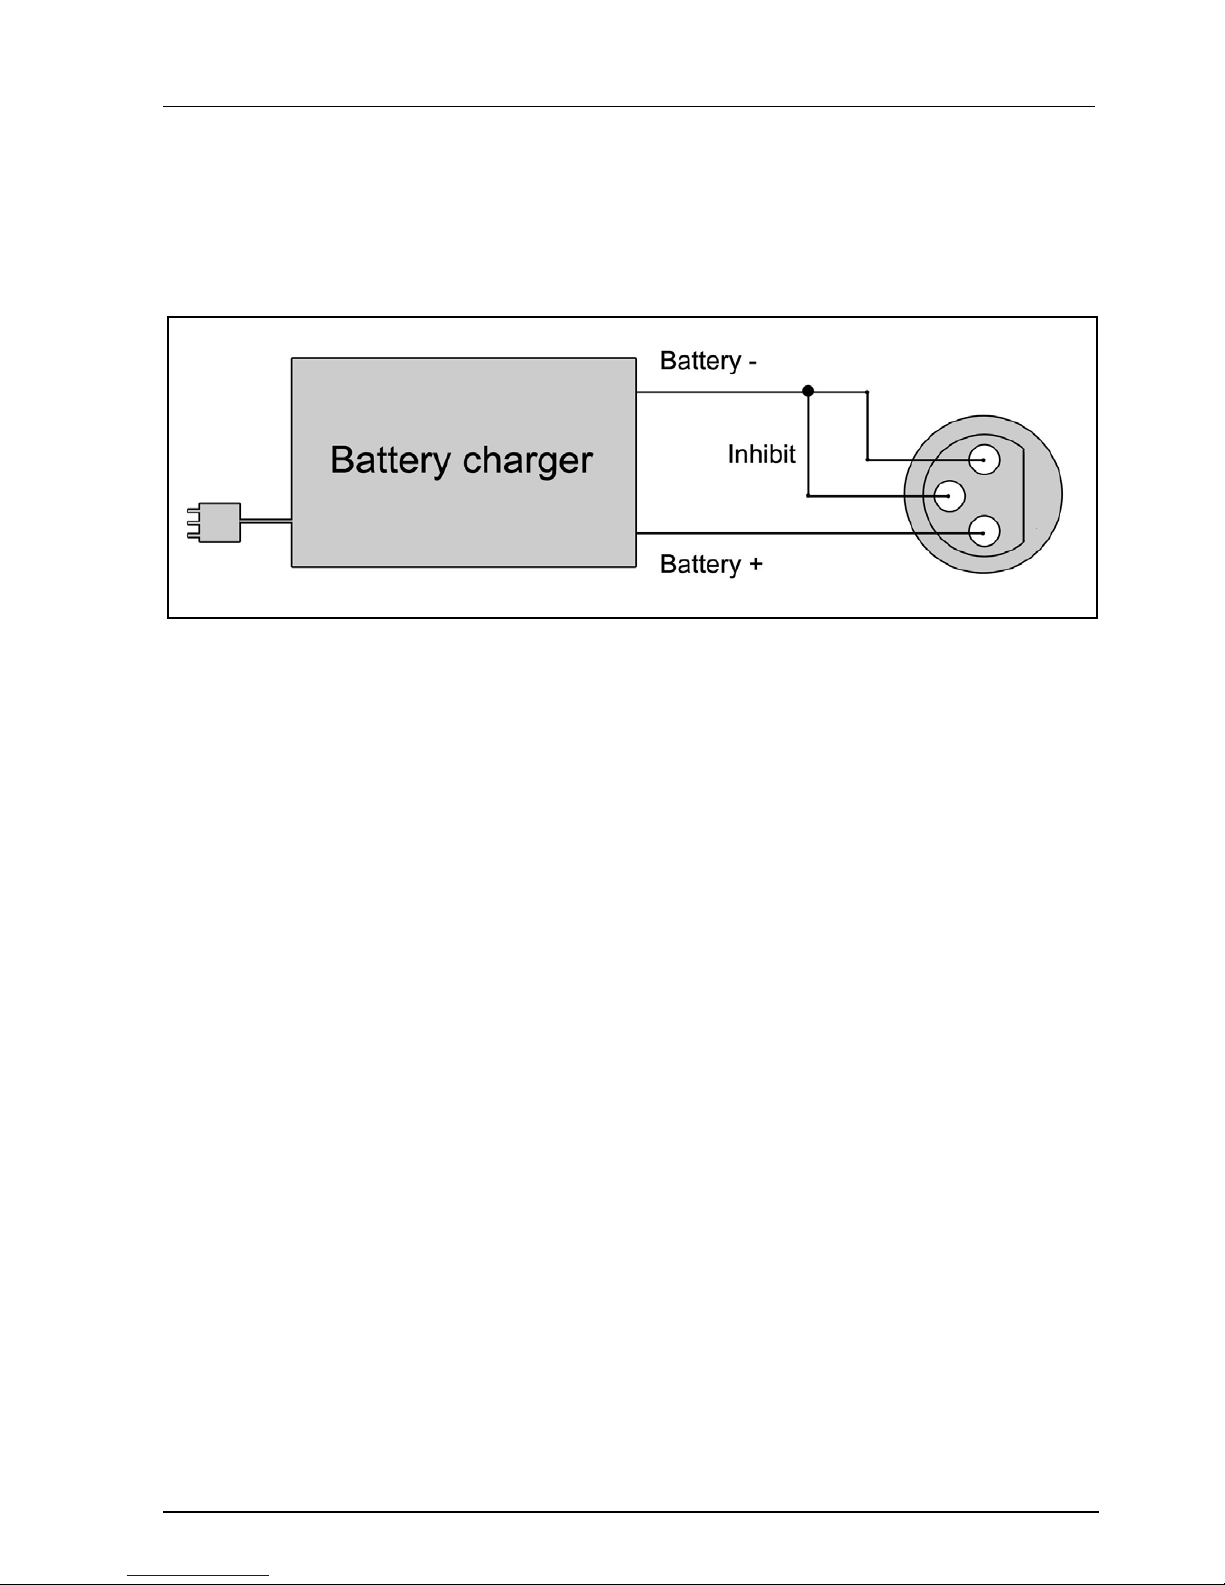
Tekniska specifikationer
67
Anslutning batteriuppladdare
Styrspaken har en standardkonfiguration som har en ‘3-stiftsanslutning' (se också bild
7.4). Se till att batteriladdaren ansluts korrekt så att den negativa polen (se bild 7.4
‘Battery –’) och ‘säkerhetsstiftet’ (även kallat ‘inhibit’, se bild 7.4, ‘Inhibit’) ansluts så att
systemet förhindrar att rullstolen kan köra medan batteriet laddas upp.
Bild 7.4
Page 68

Dealer:
 Loading...