

Page 1

Getting started with your Husky fex21
Please read these instructions before using your Husky fex21
Contains important safety information
Page 2

USING YOUR fex21
SETTING UP
How to adjust the screen contrast
How to use the screen backlight
How to use the pen
How to enter data
How to move the cursor
How to reset your fex21
Batteries
How to check the batteries
Main battery status
How to charge the battery
How to replace the battery
Cleaning
Peripherals
Problems
AC Power Adapter
Modem
European Modem Only (CTR21)
USA Modem Only (FCC part 68)
Contents
Electromagnetic Compatibility
Page 3

© Copyright 1999 WPI Husky Technology Limited
Contents
All Rights Reserved
The information stored in this document is copyright and may not be
reproduced, stored in a retrieval system in any form or by any means,
electronic, mechanical, photocopying or otherwise without prior permission
from the copyright holder, WPI Husky Technology Limited.
Whilst every precaution has been taken in the preparation of this document, the
publisher assumes no responsibility for errors and omissions neither is any
liability assumed for damage resulting from the use of the information contained
within this document.
WPI HUSKY TECHNOLOGY LIMITED
Eden Road
Walsgrave Triangle Business Park
Coventry CV2 2TB
England
Telephone: 024 76 604040
International: +44 24 76 604040
Facsimile: 024 76 603060
International: +44 24 76 603060
Email: support@husky.co.uk
Web: www.wpihusky.com
fex21 is a trademark of WPI H
Microsoft and Windows are trademarks of Microsoft Corporation in the U.S.A.
and/or other countries..
Any other trademarks used in this booklet are acknowledged.
SoftModem is Copyright © 1993-1999, AltoCom, Inc. All rights reserved
Written, designed and illustrated by Derek Watkins & Associates, Coventry.
Tel: 024 76 454419
Issue 1.02
HTL Document ID DMA7000-080-02
USKY TECHNOLOGY LTD
Page 4

Read ALL this leaflet before using your fex21. It contains
Contents
essential information about setting up your computer and
getting started.
This is not intended to be an exhaustive guide to the computer. Refer to the
fex21 Developer’s Guide (supplied on CD-ROM) for further information about
using and maintaining your fex21.
USING YOUR fex21
Your HUSKY fex21 computer is rugged and water resistant. However, we
recommend the following precautions to ensure that your fex21 will give you
many years of reliable service.
Avoid unnecessarily subjecting the unit to extreme temperatures, such as
•
bright sunlight in a vehicle.
Avoid leaving it in extremely damp or dusty conditions.
•
Avoid dropping it or subjecting it to severe impacts.
•
Do not use hard or sharp objects to touch the display screen.
•
Do not apply excessive pressure to the display screen.
•
If you carry it in your briefcase or with other items, make sure it is protected
•
against scratching and other damage.
Use only a soft, dry cloth to remove dust and dirt.
•
NEVER use solvents of any kind on the case, the keyboard or the display
•
screen.
Your fex21 will have left our factory without a battery fitted. To set up a new unit
for the first time you should carry out the following steps:
1. Fit the battery pack
•
SETTING UP
If your fex21 is supplied for use with Alkaline batteries then they will need to
be fitted into the battery pack - you should insert four AA size Alkaline cells
into the battery holder, taking care that the polarity of each is correct. If in
doubt, check the label fitted to the battery holder.
NOTE: Alkaline batteries are less suitable for use in low temperatures and
cannot be recharged.
Rechargeable NiMH (Nickel Metal Hydride) batteries, if supplied, are in a
sealed pack, ready to be fitted into the unit.
Page 5

Slot the battery pack into your fex21 by locating the two small lugs in the
Contents
•
side of the computer unit and pressing the battery pack firmly in place until
the two small catches click into position.
2. Switch the unit on
After fitting the battery, press the
TWICE to switch your fex21 on - it may take a few seconds before the screen
displays data. To switch off, press the key again. If you have not pressed any
keys for a few minutes, your fex21 will automatically switch off to conserve
power.
When you switch the unit on for the first time, it will display the Windows CE
welcome screen. Tap the screen or press
Calibration instructions will be displayed. Read these instructions, then tap
the screen again to start the calibration process. A rectangle will be displayed
on the screen, with a cross at its centre. More calibration instructions will be
displayed above the cross.
Use the pen supplied with your computer and follow these instructions
carefully - your fex21 will then automatically start Windows CE.
NOTE: ensure that only the tip of the pen touches the screen during the
calibration process.
3. Set the date and time
Once the touch screen calibration is complete, the World Clock dialogue box
will be displayed.
If it is not already selected, click on the Home City tab, then select your home
city from the drop list that appears when you click on the downward arrow
symbol (or by starting to type it in, e.g. “l”, “o” will section London).
key at the top centre of the keyboard
ù
´
and the Touch Screen
Once you have chosen a city, click on the Date & Time tab and set the correct
date on the calendar. Then set the correct time on the left-hand clock by
dragging the hour and minute hands on the clock face using the pen, or by
typing-in the time.
Finally, click on the N
now set to the correct date and time, and to your own home city.
4. Record Personal Information
The Owner Properties box will now be displayed. You can, if you wish, use
this to enter your name and contact details (this is optional). Once you have
finished, click on the N
Once set-up is complete, follow the on-screen instructions and your fex21 will
start Windows CE.
ext tab at the bottom right of the screen. Your fex21 is
ext tab again - this will complete the set-up process.
Page 6
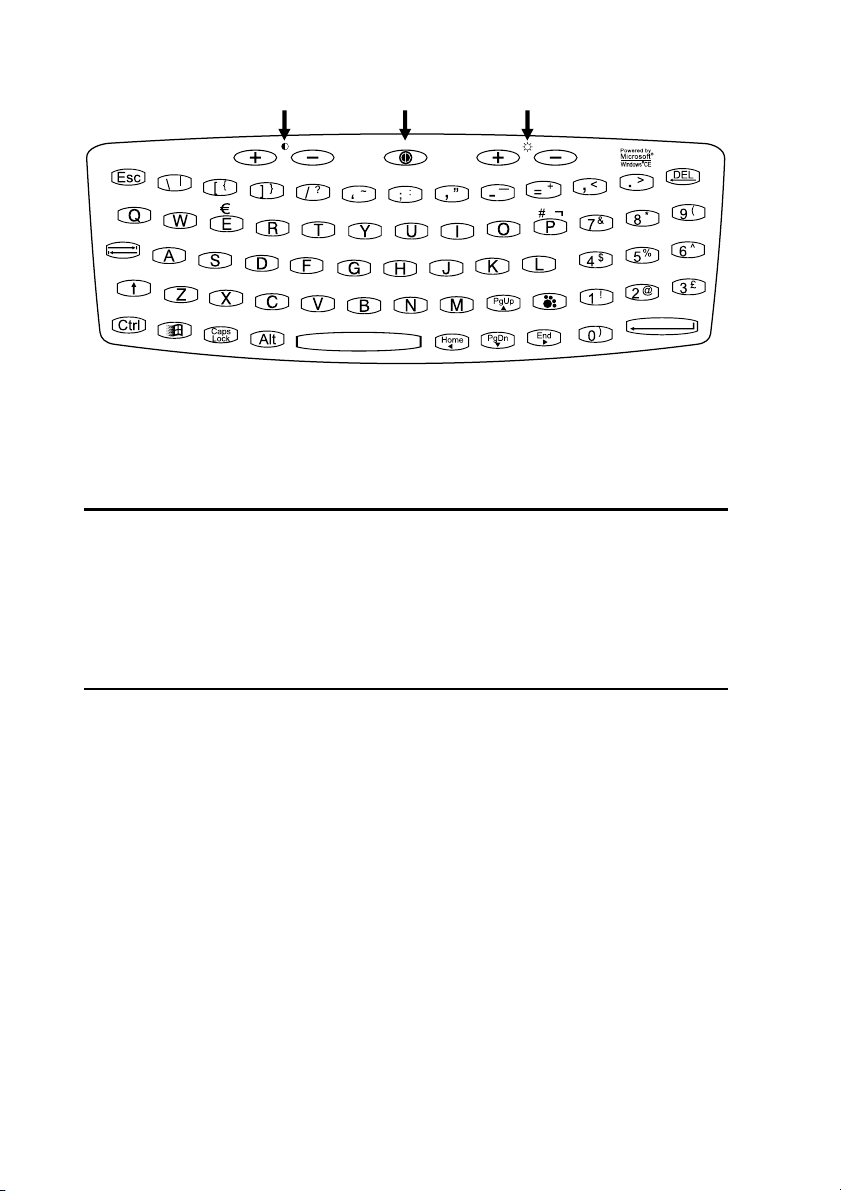
Contrast Power
Contents
The controls on your fex21 are simple and, for the most part, self-explanatory.
The only combination of keys you need to remember is that to reset your
computer, as detailed below.
Backlight
How to adjust the screen contrast
To the left of the
marked
the screen contrast and the key marked
and the other marked
÷
switch, below theúsymbol, there are two keys, one
ù
. Press the key marked
ø
to decrease the screen contrast.
ø
÷
to increase
Pressing the
default contrast setting.
How to use the screen backlight
To the right of the
marked
function slightly differently for colour and mono units.
EL Backlight - for units with a monochrome display
Press the
switch it off.
Because the backlight increases the power drain on the batteries, we suggest
you use it only when necessary. The backlight switches off automatically after a
few minutes if no keys have been pressed.
CCFL backlight - for units with a colour display
Press the
û
transflective screen, the backlight can be turned off completely. For units with
the STN (transmissive) display the backlight can be reduced to low intensity but
cannot be switched off.
ú
and the other marked
÷
÷
û
÷
û
key to decrease the intensity by one step. For units fitted with a
ø
ú
switch, below theûsymbol, there are two keys, one
ù
key to switch on the screen backlight and the
key to increase the backlight intensity by one step and the
and
÷
keys at the same time will return the unit to the
ø
. These control the backlight, and
ø
û
ø
key to
Page 7

How to use the pen
Contents
Your fex21 is supplied with a special pen or stylus with which to click on the
display screen icons to enable you to navigate through the application software
installed on your computer. You can also use your finger instead of the pen to
tap the screen. The pen is stored in the bottom of the computer, alongside the
standard serial port (COM1).
It is most important not to use a ballpoint pen or sharp-pointed object to click
on the display as this could cause damage to the surface of the screen.
How to enter data
To type numbers or letters, simply press the appropriate keys. To type a space,
press the large
To delete characters you have just typed, press the
To type capital letters or select the characters or functions shown at the top of
each key, hold down the
µ
key at the bottom centre of the keyboard.
(BACKSPACE) key.
ü
(SHIFT) key and press the appropriate key.
þ
If you want to type several capital letters, press the
then press the appropriate letter keys. When you have finished, press the
key again.
To start a new paragraph or to enter data when you have finished typing it,
press the large
´
(ENTER) key.
(CAPS LOCK) key and
…
…
How to move the cursor
You can move the cursor a character or line at a time using the four arrow keys
(
Š,ˆ,‡&‰
„+‡
To move the cursor to the beginning of the first line press the
together. To move to the end of the last line, press the
together.
together (to move up) or
). To move the cursor up or down several lines, use
„+ˆ
together (to move down).
„+‰
„+Š
keys
keys
How to reset your fex21
If your fex21 locks up or fails to operate, you may need to reset it in one of two
ways.
Soft RESET
First, press the
both the
press and hold the
your unit will perform a soft RESET. When you use Soft RESET you do not lose
the Windows CE registry and therefore your data is safe.
ú
÷
key to switch off your fex21. Then press and hold down
ù
and
ú
ù
keys. Next, without releasing the contrast keys,
ø
key for 6-10 seconds. Finally, release all three keys -
Page 8

NOTE: For the soft RESET to work correctly, the screen must be displaying data
Contents
while the three keys are held down.
Take care not to hold the keys down for more than 16 seconds or the unit will
perform a hard RESET (as detailed below).
Hard RESET
Press and hold down the three keys
between 16 and 32 seconds.
When you use Hard RESET you lose the Windows CE registry and all data
stored in RAM. You also have to re-calibrate your fex21. For this reason, treat
the Hard RESET as an emergency procedure only, and use Soft RESET
whenever possible.
NOTE: Data stored on PCCards and CompactFlash is not affected by Soft and
Hard RESET.
ú
÷
,
ú
ø
, and the
ù
key for
Batteries
The fex21 is designed for use with either a rechargeable NiMH battery pack or 4
AA-size Alkaline cells. Both types are contained in an appropriate battery holder
for ease of removal and replacement.
In addition to the main battery pack, a rechargeable backup battery is fitted. It
will provide data retention for up to 72 hours if the main battery pack is removed
or fully discharged.
Whenever working near an AC power outlet, we recommend that you use your
fex21 with its AC adapter to conserve power. Whenever the AC adapter is
plugged in and switched on, both the main battery and the backup battery are
constantly topped up.
If your fex21 is fitted with an Alkaline battery pack, you can still use the AC
adapter to power the unit, but the battery will not be recharged. This is a safety
precaution to avoid damage to your fex21.
NOTE: You should remove the battery pack if you intend to store your fex21 for
more than two months. Alkalines will discharge (and rechargeable batteries may
degrade) if left inside a stored unit for this length of time.
How to check the batteries
•
•
•
•
Double-click on the My Handheld PC icon.
Double-click on the Control Panel icon.
Double-click on the Husky fex21 icon. This will open the Husky fex21
Configuration Options box, which has four tabs.
Click on the Power tab. This will display information about the battery.
Page 9

Main battery status
Contents
If the main battery status is shown as High, your battery should not need
charging in the next few hours. If the status is shown as Low, you should
consider changing or recharging the battery within the next hour or so.
However, if the status is shown as Critical, you should change or re-charge the
battery immediately.
You will not lose the Windows CE registry or any data held in RAM while you
change or re-charge the battery.
NOTE: if the Ni-MH battery was last charged outside your unit, the ‘Main Battery
Level’ percentage displayed will not be entirely accurate. This inaccuracy will be
slight if the battery was fully charged (in another unit, or using an external
charger) within the last day or two. Fully recharging the battery in your unit will
restore the accuracy of the ‘Main Battery Level’ display.
Battery conservation
To conserve the batteries in your fex21 you can set it to switch itself off while it
is not being used.
From the start menu, select S
panel box opens, double-click on the Power icon to open the Power
Properties box. Select the Power Off tab and set the length of time you would
like the computer to remain idle before switching off. Do this by clicking on the
down arrow alongside the time box and selecting the time from the drop list that
will then appear.
ettings, then Control Panel. When the control
Page 10

How to charge the battery
Contents
Use only the AC adapter and battery charger supplied with your fex21.
Connect the AC adapter to an AC mains power supply and plug the charge lead
into the power port at the left-hand front of your fex21, pushing it gently until you
hear a click.
Leave the battery pack to recharge, which will typically take up to 2 hours.
NOTE: The fex21 unit must be powered on while the battery recharges.
The red LED in the IR window at the right hand side of the front of the unit
indicates the state of charging.
•
•
•
•
LED Off: AC Adapter not connected or AC adapter not switched on
LED On: The unit is running on AC Adapter power. Charging is complete, is
disabled or is not allowed (battery too hot/cold, or no rechargeable battery
fitted).
Slow regular flashing (once a second): The unit is running on AC Adapter
power and the battery is charging.
Fast irregular flashing: The unit is running on AC Adapter power. Battery
charging has not started, or has been aborted. This may be due to a battery
fault - If the problem persists then change batteries and/or contact your
system provider.
Page 11

How to replace the battery
Contents
CAUTION: Before removing the old battery pack, check that the fex21 pen is
not slotted into the unit. Attempting to remove the battery pack while a pen is
fitted may cause damage to both battery pack and pen.
Switch off the unit.
•
Pull the two small catches forward until they click open. Remove the old
•
battery pack, using a small coin as a lever if necessary.
Fit a new battery pack into your fex21by locating the two small lugs in the
•
side of the computer unit and pressing the battery pack firmly in place until
the two small catches click into position.
How to replace Alkaline batteries
Switch off the unit and remove the battery pack by pulling forward the two
•
small catches and levering the pack out, using a small coin if necessary.
Remove the four AA-size Alkaline cells from the pack.
•
Insert four new cells, checking that the polarity is correct.
•
Replace the battery pack.
•
NOTE: Alkaline batteries are not recommended for use with peripheral loads or
some PCCards, and are not suited to low temperature operation.
CAUTION!
Keep batteries out of children’s reach.
•
Replace batteries with the same or equivalent type as recommended.
•
Dispose of or recycle used batteries in accordance with the manufacturer’s
•
recommendations and local customs.
Take care to replace batteries correctly; there is a danger of explosion if
•
batteries are replaced incorrectly.
Battery chemical leakage is corrosive. In the unlikely event of battery
•
leakage, DO NOT TOUCH. In case of accidental contact, wash immediately
with running water.
Page 12

Cleaning
Contents
If the screen of your fex21 should become dirty, clean it with a dry, clean cloth.
If the computer gets very dirty, clean it as follows:
Make sure the battery is correctly fitted. If you have dropped your fex21,
•
check that the case is intact.
Wipe the unit with a damp cloth.
•
To remove stubborn deposits, use a soft bristle brush. TREAT THE SCREEN
•
AND KEYBOARD GENTLY.
Blow any water out of the connectors, then leave the unit to drain and
•
air-dry. DO NOT EXPOSE THE UNIT TO TEMPERATURES ABOVE 50°C.
Polish the screen with a clean cloth.
•
CAUTION: Do not use organic solvents or harsh detergents, as they may
damage the casing.
Page 13

Peripherals
Contents
CAUTION: Connect only approved cables and peripherals to your fex21.
To connect a suitable peripheral :
•
Switch off your fex21 and peripheral.
•
If fitted, remove the protective cap from the appropriate connector.
•
Fit the peripheral to the connector.
•
Use connector locking mechanisms where fitted.
•
Switch on the fex21 and peripheral.
•
To use the infrared (IR) communications option, make sure the IR window on
your fex21 is pointing at the peripheral’s IR port and is more than 15cm (but no
more than 1m) away. If you have difficulties, try again at a different range.
To disconnect a peripheral:
Switch off the fex21 and peripheral.
•
Disconnect the peripheral from the connector.
•
If provided, fit the protective cap to the connector.
•
Problems
If you have problems with your fex21 you should contact your system provider.
However, here are a few checks:
If the unit will not switch on, check the battery pack and try using the AC
•
adapter or fit another charged battery pack or a new set of Alkaline cells.
If you cannot read the display, try adjusting the screen contrast (see
•
Controls).
If you drop the unit and it stops working, try switching off and on, and check
•
the battery pack is connected correctly.
Your application may provide a RESET facility. Alternatively, you may be
•
able to reset your fex21 as described in the Controls section.
CAUTION: There are no user serviceable parts inside the fex21, and high
voltages can be present. Do not attempt to open.
Page 14

AC Power Adapter
Contents
CAUTION: Use the ac power adapter only after reading and understanding
the following instructions.
Hazardous voltages inside. No user serviceable parts inside. Do not attempt
•
to open.
Use indoors only.
•
Avoid liquid spillage. Do not connect if suspected damp.
•
Ensure ventilation is not restricted.
•
Use only the special adapter supplied. Do not replace with an alternative
•
unapproved model, as damage may result.
Inspect adapter before connecting. Do not use if there are signs of damage
•
or deterioration.
Ensure connectors are firmly mated.
•
Avoid mechanical strain to cables or connectors.
•
Switch on or connect mains (line) supply only after making all connections.
•
Switch off or disconnect mains (line) supply before disconnecting.
•
In the event of overloading due to a fault, the adapter is designed to fail safe
•
and may stop functioning.
Do not attempt to use the special AC Adapter to power other equipment.
•
Avoid use in dusty or contaminated environments.
•
Page 15

Modem
Contents
If your fex21 contains a modem, read these important notes before using it:
Connect the cable to the fex21 before connecting it to the network.
•
Where applicable, connect the cable so that the end closest to the ferrite
•
bead is attached to the fex21 unit.
Use only the supplied telephone cable, which incorporates a radio
•
interference suppresser.
Use only as instructed.
•
Do not connect to the telephone network if the unit is wet.
•
Do not attempt to open or modify the unit.
•
Refer to the fex21 label to establish which of the following set of regulatory
•
statements applies:
European Modem Only (CTR21)
The equipment has been approved in accordance with Council Decision
98/482/EC for pan-European single terminal connection to the public switched
telephone network (PSTN). However, due to differences between the individual
PSTNs provided in different countries, the approval does not, of itself, give an
unconditional assurance of successful operation on every PSTN network
termination point.
In the event of problems, you should contact your equipment supplier in the first
instance.
USA Modem Only (FCC part 68)
ANALOG DEVICE WARNINGS
This equipment complies with Part 68 of the Federal Communications
Commission (FCC) rules for the United States.
A label is located on the underside of the base unit containing the registration
number and Ringer Equivalence Number (REN). You must upon request
provide the following information to your local telephone company:
USOC Jack Type: RJ-11
REN: 0.8
Should you experience trouble with this telephone equipment, please contact
WPI H
USKY TECHNOLOGY - contact addresses are listed on the back cover of this
booklet.
Page 16

The REN is used to determine the quantity of devices, which may be connected
Contents
to the telephone line. Excessive REN’s on the telephone line may result in the
devices not ringing in response to an incoming call. In most, but not all areas,
the sum of REN’s should not exceed five (5.0). To be certain of the number of
devices that may be connected to a line, as determined by the total REN’s,
contact the local telephone company.
If trouble is experienced with your fex21 modem, for repair or warranty
information please contact WPI
harm to the telephone network, the telephone company may request that you
disconnect the equipment until the problem is resolved.
Your telephone company may disconnect your service if your equipment
causes harm to the telephone network. They will notify you in advance of
disconnection, if possible. During notification, you will be informed of your right
to file a complaint to the FCC.
Occasionally, your telephone company may make changes in its facilities,
equipment, operation, or procedures that could affect the operation of your
equipment. If so, you will be given advance notice of the change to give you an
opportunity to maintain uninterrupted service.
Husky Technology. If the equipment is causing
Page 17

Electromagnetic Compatibility
Contents
CAUTION!
Approved accessories only may be used with this equipment. In general, all cables must be high quality,
shielded, correctly terminated and normally restricted to 2 metres in length.
special provisions to avoid radio interference and should not be altered or substituted.
Unapproved modifications or operations beyond or in conflict with these instructions for use may void
authorisation by the authorities to operate the equipment.
Europe
This product complies with the European EMC Directive 89/336.
USA
RADIO INTERFERENCE, FCC Statement
NOTE: This equipment has been tested and found to comply with the limits for a Class B digital device,
pursuant to Part 15 of the FCC Rules. These limits are designed to provide reasonable protection against
harmful interference in a residential installation. This equipment generates, uses, and can radiate radio
frequency energy and, if not installed and used in accordance with the instructions, may cause harmful
interference to radio communications. However, there is no guarantee that interference will not occur in a
particular installation. If this equipment does cause harmful interference to radio or television reception,
which can be determinedby turning the equipment offand on, the user is encouraged to try to correct the
interference by one or more of the following measures:
Reorient or relocate the receiving antenna
•
Increase the separation between the equipment and the receiver.
•
Connect the equipment to an outlet on a circuit different from that to which the receiver is
•
connected.
Consult the dealer or an experienced radio/TV technician for help.
•
Canada
English
This digital apparatus does not exceed class B limits for radio noise emissions from digital apparatus set
out in the Radio Interference Regulations of the Canadian Department of Communications, standard
ICES-003.
Français
Avis de conformité aux normes du Ministère des Communications du Canada.
Le présent appareil numérique n’émetpas de bruitsradioélectriques dépassant leslimites applicable aux
appareils numériques de classe B préscrites dans le Règlement sur le brouillage radioélectrique édicté
par le Ministère des Communications du Canada, NMB-003.
Husky AC adapters employ
Page 18

WPI H T has offices in the following countries
USKY ECHNOLOGY
UK
Eden Road, Walsgrave Triangle Business Park
Coventry CV2 2TB, England
Int Tel: +44 24 7660 4040
Int Fax: +44 24 7660 3060
E-mail: support@husky.co.uk
USA
18167 US 19 North, Suite 285
Clearwater, Florida 33764 USA
Int Tel: +1 727 530 4141
Int Fax: +1 727 536 9906
E-mail: techsupport@huskyinc.com
France
12 Rue Le Corbusier, SILIC 216
94518 RUNGIS Cedex, France
Int Tel: +33 1 46 87 8009
Int Fax: +33 1 45 60 5595
E-mail: support_technique@husky.co.uk
Germany
Auelsweg 18, 53797 Lohmar, Germany
Int Tel: +49 2246 92030
Int Fax: +49 2246 18572
E-mail: support_germany@husky.co.uk
Web: http://www.wpihusky.com
 Loading...