

Page 1
Quick Check® 600/800 Series
Bar Code Verifiers
™
User’s Guide
Page 2

Disclaimer
Hand Held Products, Inc. (“Hand Held Products”) reserves the right to make
changes in specifications and other information contained in this document
without prior notice, and the reader should in all cases consult Hand Held
Products to determine whether any such changes have been made. The
information in this publication does not represent a commitment on the part of
Hand Held Products.
Hand Held Products shall not be liable for technical or editorial errors or
omissions contained herein; nor for incidental or consequential damages
resulting from the furnishing, performance, or use of this material.
This document contains proprietary information that is protected by copyright. All
rights are reserved. No part of this document may be photocopied, reproduced,
or translated into another language without the prior written consent of Hand
Held Products.
© 2001-2007 Hand Held Products, Inc. All rights reserved.
Web Address: www.handheld.com
For European Community Users
Hand Held Products complies with Directive 2002/69/EC OF THE EUROPEAN
PARLIAMENT AND OF THE COUNCIL of 27 January 2003 on waste electrical
and electronic equipment (WEEE).
Waste Electrical and Electronic Equipment Information
This product has required the extraction and use of natural resources for its
production. It may contain hazardous substances that could impact health and
the environment, if not properly disposed.
In order to avoid the dissemination of those substances in our environment and
to diminish the pressure on the natural resources, we encourage you to use the
appropriate take-back systems for product disposal. Those systems will reuse or
recycle most of the materials of the product you are disposing in a sound way.
The crossed out wheeled bin symbol informs you that the product should
not be disposed of along with municipal waste and invites you to use the
appropriate separate take-back systems for product disposal.
If you need more information on the collection, reuse, and recycling systems,
please contact your local or regional waste administration.
You may also contact your supplier for more information on the environmental
performances of this product.
Page 3

Table of Contents
Chapter 1 - Getting Started
About This Guide ................................................................. 1-1
Unpacking the Quick Check 600/800 Verifier ..................... 1-2
Noting the Verifier’s Features........................................ 1-3
Specifications........................................................................ 1-7
Installing the Batteries .......................................................... 1-7
Charging the Batteries.................................................... 1-8
Turning the Unit On and Off.......................................... 1-9
Calibrating the Quick Check 600/800 Verifier ............ 1-12
Properly Scanning With the Unit ................................. 1-13
Cleaning the Wand....................................................... 1-14
Accessories and Options .............................................. 1-14
Chapter 2 - Quick Start Guide
Chapter 3 - Changing the Settings
Changing the Specifications ................................................. 3-1
Symbologies................................................................... 3-2
Symbology Specifications.............................................. 3-3
Magnification Factor...................................................... 3-4
Expand U.P.C./EO ......................................................... 3-4
Check Options................................................................ 3-4
Modes Shown................................................................. 3-4
Character Font & Tolerances ......................................... 3-5
Wide-to-Narrow Ratio ................................................... 3-6
Fixed Message Length ................................................... 3-6
Industry Applications ..................................................... 3-7
Changing the Test Criteria.................................................... 3-8
Scan Grade ..................................................................... 3-8
Decodability ................................................................... 3-9
ISO/IEC grades .............................................................. 3-9
Number of Scans ............................................................ 3-9
i
Page 4

Changing the Scanning Options ......................................... 3-10
Beeper Pitch ................................................................. 3-11
Extended Accuracy ...................................................... 3-11
Decode Direction ......................................................... 3-11
Changing the Output Options ............................................. 3-12
Display Options............................................................ 3-12
Parameter Result Lines ................................................ 3-12
Print Options ................................................................ 3-13
AutoPrint/Store ............................................................ 3-13
Scan Profile .................................................................. 3-14
Resetting the Default Settings ............................................ 3-15
Locking the Settings ........................................................... 3-15
Using a Command Code..................................................... 3-16
About Command Codes ............................................... 3-16
Choosing a Command Code......................................... 3-18
Customized Command Codes...................................... 3-18
Chapter 4 - Reviewing Scan Data
Reviewing Scan Results ....................................................... 4-1
Scan Grades .......................................................................... 4-1
ISO/IEC Symbol Grade.................................................. 4-2
Reviewing a Scan Example .................................................. 4-5
LED Display ......................................................................... 4-7
Audio Sounds........................................................................ 4-8
Reviewing the Dimensional Parameters............................... 4-9
Errors in Dimensional Parameters ................................. 4-9
Calculating X ............................................................... 4-10
Reviewing the Reflectance Parameters .............................. 4-11
Errors in Reflectance Parameters ................................ 4-12
Reviewing the Format Parameters...................................... 4-14
Errors in Format Parameters ........................................ 4-14
Reviewing Messages.................................................... 4-15
Using SSTR Codes to Review Data............................. 4-16
Using the Quick Check Verifier as a Reflectometer .......... 4-17
ii
Page 5

Chapter 5 - Saving and Printing
Saving Data........................................................................... 5-1
Checking the Print Buffer During Operation........................ 5-1
Printing Data ......................................................................... 5-2
Deleting Stored Data............................................................. 5-3
Interfacing With a Computer.......................................... 5-4
Reviewing the Printouts ................................................. 5-4
Printing Guidelines ............................................................... 5-6
Using the QCP or QCHSP.............................................. 5-6
Troubleshooting the QCP or QCHSP........................... 5-11
Chapter 6 - Background Information
General Bar Code Information.............................................. 6-1
Symbology Specifications .................................................... 6-2
Symbologies ................................................................... 6-2
Symbology Characteristics ................................................... 6-4
How a Bar Code Verifier Works .......................................... 6-6
Additional Information ......................................................... 6-7
Chapter 7 - Using DataMatch
Understanding the DataMatch Feature ................................. 7-1
Downloading DataMatch ...................................................... 7-1
Structuring and Loading the Database.................................. 7-1
Selecting the DataMatch Feature .......................................... 7-4
Reviewing DataMatch Results.............................................. 7-5
Chapter 8 - Using a Quick Check 800 Verifier
Using the Quick Check 800 Verifier with a QC3800V Linear
Imager ................................................................................ 8-1
General Operation .......................................................... 8-1
Reflectance-Based Information...................................... 8-2
ScanProfile Output ......................................................... 8-2
Percent Decoded/Scanned Mode.................................... 8-2
iii
Page 6

Chapter 9 - Error, Application, and Type Messages
Chapter 10 - Flow Charts
Chapter 11 - SSTR Codes
Chapter 12 - Special Codes
Chapter 13 - Unrecognized Symbols
Unrecognized Symbols....................................................... 13-1
Chapter 14 - Customer Support
Troubleshooting.................................................................. 14-1
Technical Assistance .......................................................... 14-1
Online Technical Assistance............................................... 14-2
For Further Information...................................................... 14-2
Product Service and Repair ................................................ 14-2
Online Product Service and Repair Assistance .................. 14-3
Limited Warranty................................................................ 14-3
iv
Page 7

1
Getting Started
About This Guide
This manual contains information on the Quick Check® 600/800 Series Bar
Code Verifiers. It describes all the features and functions of the Quick Check
600/800 Verifier and all the industry applications that can be enabled on the
Quick Check 600/800 Verifier. Your particular Quick Check Verifier may have
fewer applications.
This manual is organized into the following chapters:
Chapter 1 Getting Started
Chapter 2 Quick Start Guide
Chapter 3 Changing the Settings
Chapter 4 Reviewing Scan Data
Chapter 5 Saving and Printing
Chapter 6 Background Information
Chapter 7 Using DataMatch
Chapter 8 Using a Quick Check 800 Verifier
(Specific to the Quick Check 800 Verifier
Chapter 9 Error, Application, and Type Messages
Chapter 10 Flow Charts
Chapter 11 SSTR Codes
Chapter 12 Special Codes
Chapter 13 Unrecognized Symbols
Chapter 14 Customer Support
only
)
Quick Check® 600/800 Series User’s Guide 1 - 1
Page 8

This manual uses several special symbols to refer to the controls on the
instrument. The following table shows the symbols and their descriptions.
Symbol Description
POWER or SELECT
or ↑, ↓, ←, →
Scan or Low Battery
♦
Some terms used in this manual may differ slightly from the terms used in the
Quick Check Verifier software menus due to space restrictions. The following
table shows these terms.
Term in manual Term in software
W/N WN
U.P.C.
(Universal Product Code)
Represents a button on the Quick Check
Verifier unit
Shows the LED display on the Quick Check
unit
Indicates steps to follow to perform a
procedure
UPC
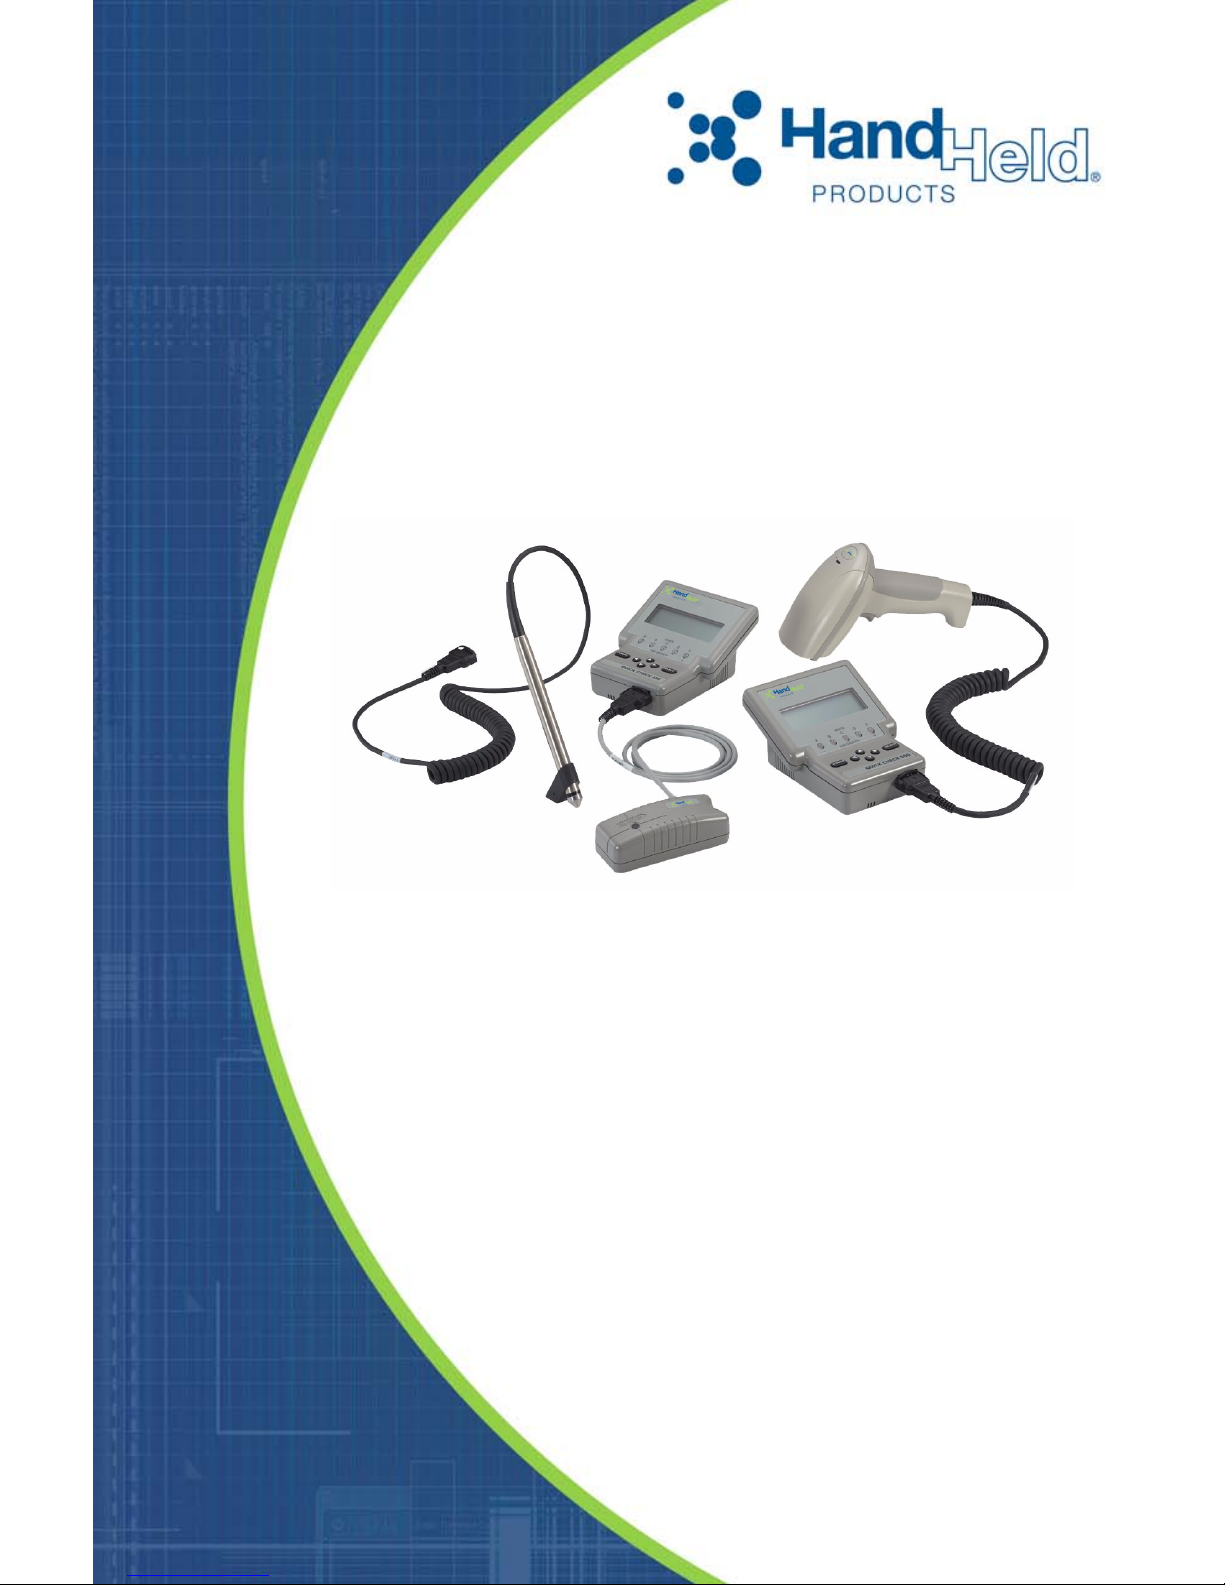
Unpacking the Quick Check 600/800 Verifier
When you first receive your Quick Check 600/800 Verifier, you should unpack it
carefully. Before attempting to use the instrument, inspect the contents of the
package for any shipping damage. If there is evidence of damage, please keep
all packing materials and contact the delivery carrier as soon as possible for
claim procedure.
Confirm that you have the following items:
• Quick Check 600/800 Verifier
• Wand scanner (specific to the QC600 series)
• Linear Imager (specific to the QC800 series)
• AC Charger
• Four “AA” NiCad batteries
• Quick Check 600/800 Verifier User’s Guide
(this publication)
• Manual Package containing:
Test Symbols
Warranty Card
Gauge Ruler
1 - 2 Quick Check® 600/800 Series User’s Guide
Page 9

“X” Dimension Ruler
QCRFPG Calibration Reflectance Bar Code Page
If you do not have all these items, contact your sales representative.
Noting the Verifier’s Features
The Quick Check 600/800 Verifier is a full-featured bar code verifier compatible
with all major linear bar code symbologies. It is suitable for desktop use in the
office and is easily carried for portable verification in the field. It is both a quick
and easy to use pass/fail tester for bar code symbols and a powerful measuring
tool for detailed testing of these same symbols.
All the information you need to interpret overall symbol quality is available. The
Quick Check 600/800 Verifier unit is housed in a compact and lightweight impact
resistant case.
Quick Check® 600/800 Series User’s Guide 1 - 3
Quick Check 600/800 Verifier
Page 10

The symbologies tested by the verifier include
•EAN/UPC
• Code 39
• Interleaved 2 of 5
• Code 128
• Code 93
• Codabar
• Code 11
• Code 16K
• Code 49
•MSI
•IATA 2 of 5
• Interleaved 2 of 5
Each model of the Quick Check 600/800 Verifier is capable of testing either all,
none, or different sets of industry applications. If you are not sure which
applications are available on your unit, refer to "Changing the Specifications" on
page 3-1 of this manual to display a list of available applications. Industry
standard symbols (applications) tested by the Quick Check 600/800 Verifier
include:
•AIAG
• CTIA/ABCD
• LOGMARS
•HIBC
• CCBBA
•SISAC
•SCC
• BOOKLAND
• Coupon Code
The Quick Check 600/800 Verifier provides the following types of scan data:
• Type of symbology verified
• ISO/IEC and traditional print quality results
• Uniformity in bar guard size (UPC)
• Data string identifiers
• Application identifiers
• Function characters
• Data check characters
• Bar/Space dimensional indication and measurement
• Wide/Narrow ratio measurement
• Character format verification
• Quiet zone tests
• With a printer, hardcopy results and ISO/IEC scan profiles
•Profile
1 - 4 Quick Check® 600/800 Series User’s Guide
Page 11

You can customize the settings for specifications, test criteria, scanning options,
and output options to your preferences. These options are described in
3, Changing the Settings
.
Chapter
Display
The liquid crystal display (LCD) provides four lines of text, each with up to 20
characters per line. The four lines allow you to quickly and easily review a large
amount of scan data and view a variety of options. Some text, such as the word
“SCAN,” is displayed in a larger size for easier reading. Each scan grade and
the resulting ISO/IEC symbol grade appear in a large letter or number on the right
of the display.
While the scan and symbol grade look the same, the difference is clear. The
second line of a symbol grade display states it is a symbol grade, either running
or final. For additional information, refer to
Chapter 4, Reviewing Scan Data
LEDs
If you set the verifier to evaluate symbols using traditional methods, the lightemitting diodes (LEDs) indicate bar growth and shrinkage. If you set the verifier
to use ISO/IEC evaluation criteria, the LEDs display the ISO/IEC grade. For your
convenience, the display option feature called LEDs allows you to select ISO/IEC
test criteria, yet have the LEDs display bar growth rather than pass or fail. See
"Changing the Output Options" on page 3-12 for additional information.
Buttons
You can review the software selections using the four arrow buttons (↓,↑,←,→)
and the SELECT button. The arrows allow you to move the on-screen cursor. If
the scan data length exceeds the display length, a right-hand arrow appears as
the right character of the display. Press → to review the additional data and then
press ← to restore the original display.
Audio Sound
An audio signal gives you a quick indication if a scan passes or fails the current
test. You can change the pitch/volume of these beeps. After a scan, one beep
indicates that the symbol passes an appropriate battery of tests, while three
beeps indicate that it fails in some regard.
Special Features
In addition, the Quick Check 600/800 Verifier has a database feature. You can
connect the verifier to your computer and download a database into the verifier.
While scanning, the verifier can provide additional information about the scanned
code; for example, the name of the product. More information about the
database feature is provided in
Chapter 7, Using DataMatch
.
Quick Check® 600/800 Series User’s Guide 1 - 5
Page 12

The Quick Check 600/800 Verifier also supports two customized operational
modes: Reflectometer mode and Command Code function. In the Reflectometer
mode, the unit operates as a free-running reflectometer. "Using the Quick Check
Verifier as a Reflectometer" on page 4-17 contains information about
reflectometer mode. The Command Code is a specially structured bar code
symbol that offers a unique way for you to quickly program the settings.
3, Changing the Settings
manual contains separate and versatile bar code menus to Single-Scan-toResult (SSTR) Codes or to customize the unit (Command Code).
, contains instructions on changing the settings. This
Chapter
Ports
The ports on the back of the unit connect to a recharging unit or to a printer
interface cable. The smaller port is for charging the unit. The larger port
connects to RS-232 serial communication devices, such as Hand Held Products’
QCPand QCHSPprinters.
The port on the front of the unit connects to the pen or mouse wand scanner. A
wand scanner holder, on the back of the unit, secures the wand when it is not in
use.
1 - 6 Quick Check® 600/800 Series User’s Guide
Page 13
Specifications
Item Specification
Dimensions
Weight
Temperature
Humidity 5% to 95% RH non condensing
Sealability Designed to meet NEMA 1
Regulatory approvals FCC - Class A limits
Display 4 x 20 characters/line LCD
Keypad 6-button: POWER, SELECT, ↑, ↓, ←, →
Audible signal
LED indicators Five tri-colored LEDs
Batteries Four “AA” NiCad
Data Buffer
4.30”W x 2.75”H x 5.25”D
(10.9 cm W x 7.0 cm H x 13.3 cm D)
1.0 lb. (454 g) with wand attached and batteries
installed
Storage: -20° to 70°C
Operational: 0° to 50°C
Volume/tone adjustable beeper
(includes volume off position)
32 KB; the onboard memory can store data and scan
profiles.
Installing the Batteries
The Quick Check 600/800 Verifier is shipped with four “AA” NiCad rechargeable
batteries. You must install the batteries in the unit before you use it. The
batteries may be discharged and need to be charged.
You must install the four NiCad rechargeable batteries in the
Quick Check 600/800 Verifier before you connect the charger or
WARNING
the printer to the unit. If you do not install the batteries first, you
may damage the unit and consequently void the warranty. Use
only the supplied batteries. If you use other types of batteries
(such as alkaline) and attempt to recharge them, you could
cause the batteries to explode, damage the unit, and possibly
cause a personal injury. Damage caused by attempts to
recharge any batteries, except those supplied with the unit, voids
any and all Quick Check 600/800 Verifier warranties.
Quick Check® 600/800 Series User’s Guide 1 - 7
Page 14

♦ To Install the Batteries
1. Slide off the battery cover on the bottom of the unit.
2. Insert the four batteries into the compartment, matching the “+” on the
battery ends with the “+” on the bottom of the compartment, and press each
battery into place.
3. Slide the battery cover back in place.
Charging the Batteries
The Quick Check 600/800 Verifier uses rechargeable batteries. An AC charger
is supplied to recharge these batteries. The Quick Check 600/800 Verifier is
intended to be powered from the batteries, not directly from an adapter or AC
outlet. With a set of properly charged batteries, the unit operates continuously
for a minimum of 1.5 hours. When not in use, you can leave the unit connected
to the charger. To extend the battery life, battery manufacturers recommend you
fully charge the unit, use it until the batteries are
fully charge the batteries.
A Low Battery message on the bottom line of the opening display may appear
when you power up your Quick Check 600/800 Verifier or during use. When this
message appears, you cannot scan bar code symbols, but you can perform other
operations, such as changing the settings. If you turn the unit off and then on
again, the Low Battery message may disappear momentarily, but reappears
when the batteries are discharged more.
completely
discharged, and then
Low Battery message appears before the battery is completely
The
discharged to preserve proper unit operation. However, this message may
appear for a variety of other reasons including variations in battery power,
temperature, component efficiency, or rapid cycle time. If your battery has not
lasted for a continuous hour and a half of operation, and you suspect a low
not
battery is
the message reappears immediately on power up, the batteries are discharged
and you should recharge the unit. If the message does not reappear, you can
continue to use the unit. If you think there is a problem with your batteries,
contact Hand Held Products.
the cause for the message, turn the unit off and then on again. If
♦ To charge the batteries:
1. Turn off the verifier.
2. Plug the AC charger into the port on the back of the unit.
3. Plug the AC charger into a VAC wall outlet.
4. The batteries start charging. If you have completely discharged the
batteries, charge them for a minimum of 12 hours. If the batteries are
partially discharged, charge them for less time.
5. After charging, remove the AC charger from the unit. The verifier is ready for
use.
1 - 8 Quick Check® 600/800 Series User’s Guide
Page 15
Turning the Unit On and Off
When you turn on the verifier, it contains the settings stored from the last time
you changed them.
Chapter 3, Changing the Settings
describes these settings
and provides instructions for changing them.
The verifier shuts itself off after a minute of inactivity to conserve battery power.
You can also turn the unit off at any time. When you turn off the unit, the setting
options you selected are automatically saved. There is no need for a separate
save command.
Insert the wand scanner into the port on the front of the unit.
♦ To turn on the unit:
1. Press the POWER button.
The unit emits four quick beeps and displays the opening screen. The upper
lines of the opening display show the Quick Check 600/800 Verifier model
number. The bottom line of the opening display provides a variety of
information. If the bottom line of the opening display states:
Low Battery, then charge the batteries as described previously.
•
Recalibrate, then calibrate the unit as described later in this
•
chapter.
• Other information as described below. Review it and then scan a bar
code symbol.
• If the unit was set to verify an industry application (rather than
symbologies) before being turned off, the bottom line of the opening
display shows the name of the application that was in use.
If the unit was set to verify symbologies before being turned off, the bottom
line shows the spectral response of the wand scanner connected to the unit,
such as 660 nanometers (nm) and the wand aperture size for the unit such as
6 mils (one thousandth of an inch).
"Accessories and Options" on page 1-14 describes the available wands. The
wavelength and aperture described are necessary to obtain the proper
symbol grade.
If the unit was set to use the database feature before being turned off, the
bottom line shows the term DATABASE.
X Dimension
inches (mm)
0.004 (0.102)<
0.007 (0.178)<
0.013 (0.330)<
0.025 (0.635)<
X<0.007 (0.178) 0.003 (0.076) 03
X<0.013 (0.330) 0.005 (0.127) 05
X<0.025 (0.635) 0.010 (0.254) 10
X 0.020 (0.508) 20
Quick Check® 600/800 Series User’s Guide 1 - 9
Measuring Aperture
Diameter inches (mm) Number
Page 16

Note: 6 mil (0.006 inch) diameter aperture is recommended for EAN/UPC.
2. The display that follows the opening screen depends on two conditions:
whether a printer is available, and how the AutoPrint/Store feature is set. If
the first line of the display states:
No Printer Attached, then refer to step 2.a
•
•
Print Buffer, then refer to step 3.
2.a If a
2.b To continue obtaining scan results with the AutoPrint/Store feature
No Printer Attached message appears, it indicates that
a printer is not available to the verifier; that is, the verifier is not connected to a printer, or the verifier is connected to a printer but the
printer is turned off. The second line of this display provides both the
percent of the memory used for the stored records and the number of
scan records in the memory. If there are no stored records, both values are zero.
Depending on the status of the AutoPrint/Store feature (on or off),
you have different ways to respond to this display.
If the AutoPrint/Store feature is set to On
• Continue with the AutoStore
• Clear
• Change
The cursor is at the asterisk next to the term
AutoStore
setting
display and are automatically stored in the memory. The previously
stored results remain in the memory.
On, press SELECT. After a scan, the results appear on the
.
(the default), you can:
Continue with
2.c To clear (delete) the records stored in the memory, press ↓ to place
the cursor on the asterisk next to the term
SELECT. The stored results and the result from the last scan are
deleted from the Quick Check 600/800 Verifier’s memory.
2.d To change the AutoPrint/Store feature setting to
→ to place the cursor on the asterisk next to the term
then press SELECT. The Change settings printout options display
appears. Press → to change the setting to
results appear on the display, but are not automatically stored in the
memory. The previously stored results remain in the
memory.
Clear and then press
Off, press ↓ and
Change and
Off. After a scan, the
1 - 10 Quick Check® 600/800 Series User’s Guide
Page 17

If the AutoPrint/Store feature is set to Off, you can:
• Continue
•Clear
• Continue with AutoStore
The cursor is at the asterisk next to the term
2.e To continue obtaining scan results with the AutoPrint/Store feature
setting
display but are not automatically stored in the memory. The previously stored results remain in the memory.
2.f To clear (delete) the records stored in the memory,
press → to place the cursor on the asterisk next to the term
and then press SELECT. The stored results and the results from the
last scan are deleted from the Quick Check 600/800 Verifier’s memory.
2.g To continue obtaining scan results but change the Auto Print/Store
feature setting to
to the terms
After a scan, the results appear on the display and are automatically
stored in the memory. The previously stored results remain in the
memory.
3. If a
Print Buffer message appears, it indicates a printer is available
(the Quick Check 600/800 Verifier is connected to a printer that is turned on)
and the Auto Print/Store feature setting is
provides both the percent of the memory used for the stored records and the
number of scan records in the memory. If there are no stored records, both
values are zero. You can
Off, press SELECT. After a scan, the results appear on the
On, press ↓ to move the cursor to the asterisk next
Continue w/AutoStore and then press SELECT.
On. The second line of this display
Continue.
Clear
• Continue
•Print
•Clear
The cursor is at the asterisk next to the term
3.a To continue obtaining scan results, press SELECT. The opening
display appears. You can then scan a symbol. The scan results
print on the printer. The previously stored results remain in the memory.
3.b To print the stored records, press ↓ to place the cursor on the asterisk next to
Once printed, the stored results are removed from the Quick Check
600/800 Verifier’s memory, however, the results from the last scan
remaining in the buffer. (Press ← at the opening menu to display the
last scan’s results.)
Print. Then press SELECT. The stored records print.
Continue.
Quick Check® 600/800 Series User’s Guide 1 - 11
Page 18

3.c To clear (delete) the records stored in the memory, press ↓ and → to
place the cursor on the asterisk next to the term
press SELECT. The stored results and the result from the last scan
are deleted from the Quick Check 600/800 Verifier’s memory.
Clear and then
♦ To turn off the unit:
1. Press and hold down POWER for about two seconds until the unit beeps
once and clears the display.
OR
Let the unit turn itself off.
If the unit is connected to a charger, it turns off after ten
minutes of inactivity. If the unit is not connected to a charger, it turns off after
one minute of inactivity.
Note: If the unit turned itself off and you want to review the results of the last
←
scan, press POWER to turn on the unit and then press
from the last scan appear.
. The results
Calibrating the Quick Check 600/800 Verifier
Even though the verifier is calibrated at the factory, you should calibrate it before
its first use to ensure its accuracy. For continued accuracy, periodically calibrate
the unit during normal operation. You calibrate the unit using a reflectance page
that is included in the pack of accessories. Each page has a serial number on it.
For accurate calibration and data collection, you scan the reflectance page ten
times and the Quick Check 600/800 Verifier performs a consistency test. If it
passes, the unit is calibrated.
If, during the measurement of a symbol, a scan reflectance value of
appears on the display or on a printout, an out-of- range reading was recorded.
Recalibrate the unit and then rescan the symbol.
The reflectance page is a precision standard made of photographic materials. If
it becomes physically damaged or dirty, replace it to insure proper calibration. To
order a new reflectance page, contact your sales representative.
XX or — —
♦ To calibrate the Quick Check 600/800 Verifier:
1. Using the proper scan technique, scan the reflectance symbol from the
accessory pack. You will hear a long beep followed by two short beeps after
the first good scan, and the LCD displays
-9- More Scans!
2. Continue to scan the reflectance page for a total of ten good scans. After
each good scan, a single beep sounds and the display indicates how many
good scans you need to obtain. After the tenth good scan, three beeps
sound and the message
Target
appears. To scan, set the wand scanner on a symbol’s quiet zone.
appears. When you lift the scanner up, the opening display
.
Now Lift the Scanner Up off the
REFLECTANCE CALIBRATION
1 - 12 Quick Check® 600/800 Series User’s Guide
Page 19

Three beeps (one long followed by two short beeps) sound if the unit detects
reflectance readings significantly different from the previously recorded
ones. You may be scanning too slowly, too quickly or unevenly, or using an
improper scan angle. A message appears and prompts you to begin again.
Continue scanning using the recommended scanning technique until the unit
is calibrated.
Properly Scanning With the Unit
Variations in scan rates and angles can affect bar code verification. Before you
begin collecting data, review and practice the recommended method for
whichever configuration you are using, the pen wand or the mouse wand.
♦ To scan properly using a pen wand:
1. Turn on the verifier and confirm that it is operational (that is, does not need to
be charged or calibrated).
2. Hold the pen wand as you would a pen or pencil, placing your fingers on
each side of the foot near the tip.
3. Lightly touch the scanner tip against either quiet zone (clear area) of the bar
code. You have the proper scanning angle when the tip and the reflectance
guide are flat on the scan surface. (If the unit does not respond, press
POWER.)
4. At about the same speed with which you would quickly underline a sentence
in this manual, and without interruption, gently drag the tip across the center
of the bar code. You do not need to press the tip on the bar code. Gentle
pressure on the tip will not scratch the contacted surface.
5. Listen for audible tones.
• If you hear a long beep tone followed by a short tone, it signifies a good
read.
• If you hear a long beep and then three short beeps, the unit detects an
error in the scanned symbol.
• If one of these messages appears
please!;
technique accordingly. If a symbol consistently produces no beeping,
it is either fatally out of spec or it is not one of the symbologies
programmed on the unit.
• If you receive a message about a bad quiet zone, you may have
started scanning too close to the first bar. Rescan the symbol, starting
a little farther away from the first bar.
6. Practice your scanning technique until you can successfully scan, on the first
attempt, each of the test symbols supplied with the verifier.
or more evenly, please!; adjust your scan
slowly, please!; faster,
♦ To scan properly using a mouse wand:
1. Turn on the Quick Check 600/800 Verifier and confirm that it is operational
(that is, does not need to be charged or calibrated).
Quick Check® 600/800 Series User’s Guide 1 - 13
Page 20

2. Hold the mouse wand as you would a computer mouse, placing your fingers
on each side of the mouse near the front.
3. Lightly pass the mouse wand over either quiet zone (clear area) of the bar
code. If the unit does not respond, press POWER.
4. At about the same speed with which you would quickly underline a sentence
in this manual, and without interruption, gently pass the mouse wand across
the center of the bar code. You do not need to press the mouse on the bar
code.
5. Listen for audible tones.
• If you hear a long beep tone followed by a short tone, it signifies a good
read.
• If you hear a long beep and then three short beeps, the unit detects an
error in the scanned symbol.
• If one of these messages appears,
please!;
technique accordingly. If a symbol consistently produces no beeping,
it is either fatally out of spec or it is not one of the symbologies
programmed on the unit.
• If you receive a message about a bad quiet zone, you may have
started scanning too close to the first bar. Rescan the symbol, starting
a little farther away from the first bar.
6. Practice your scanning technique until you can successfully scan, on the first
attempt, each of the test symbols supplied with the verifier.
or more evenly, please!; adjust your scan
slowly, please!; faster,
Cleaning the Wand
Occasionally the scanner tip or window may become partially obstructed by ink,
paper fibers, or other particulate deposits (such as wax or varnish). To ensure
reliable scanning, you should periodically check and, if necessary, clean the tip
with a soft cloth.
Note: Damaged tips for the pen wand should be replaced. Consult your dealer
or Hand Held Products’ Customer Service Department for details.
Accessories and Options
Hand Held Products supplies a variety of accessories and options for the Quick
Check 600/800 Verifier. The items indicated by an asterisk are supplied with the
verifier.
Item/DescriptionOrder code
Charger & Batteries
*Quick Check 600/800 Verifier AC Charger . . . . . . . . . QCAC = 110 VAC
QCAC 220B = 220 VAC UK
QCAC 220A = 220 VAC Europe
*NiCad Rechargeable batteries (set of four “AA” size) . . . . . . . . . . QCB
1 - 14 Quick Check® 600/800 Series User’s Guide
Page 21

Documentation
*QC600/800 User’s Guide & Programming Manual . . . . QC600-800-UG
*QC600/800 Reflectance Page . . . . . . . . . . . . . . . . . . . . . . . . . QCRFPG
Printers
QC Standard Speed Dot Matrix Printer . . . . QCP68-USA/QCP68-EURO
QC High Speed Dot Matrix Printer . . QCHSP68-USA/QCHSP68-EURO
Printer supplies
Power supply for QCP & QCHSP Printers. . . . . . . . . . . . . . . . . . QCPAC
Printer ribbon for QCP & QCHSP . . . . . . . . . . . . . . . . . . . . . . . . . QCPR
Printer paper for QCP & QCHSP (4 roll/pack). . . . . . . . . . . . . . . . QCPP
Interface cable for QC600/800 to QCP or QCHSP . . . . . . . . . . . . QCPC
Wand Scanner
QCIW05V Pen Wand 5 mil visible red . . . . . . . . . . . . . . . . . . . . . .622301
QCIW06V Pen Wand 6 mil visible red . . . . . . . . . . . . . . . . . . . . . .622302
QCIW10V Pen Wand 10 mil visible red . . . . . . . . . . . . . . . . . . . . .622299
QCMWI03 Mouse Wand 3 mil infrared . . . . . . . . . . . . . . . . MOUSE3MIR
QCMWV03 Mouse Wand 3 mil visible red . . . . . . . . . . . . MOUSE3MVR
QCMWI05 Mouse Wand 5 mil infrared . . . . . . . . . . . . . . . . MOUSE5MIR
QCMWV05 Mouse Wand 5 mil visible red . . . . . . . . . . . . MOUSE5MVR
QCMWI06 Mouse Wand 6 mil infrared . . . . . . . . . . . . . . . . MOUSE6MIR
QCMWV06 Mouse Wand 6 mil visible red . . . . . . . . . . . . MOUSE6MVR
QCMWI10 Mouse Wand 10 mil infrared . . . . . . . . . . . . . . MOUSE10MIR
QCMWV10 Mouse Wand 10 mil visible red . . . . . . . . . . MOUSE10MVR
QCMWI20 Mouse Wand 20 mil infrared . . . . . . . . . . . . . . MOUSE20MIR
QCMWV20 Mouse Wand 20 mil visible red . . . . . . . . . . MOUSE20MVR
Quick Check® 600/800 Series User’s Guide 1 - 15
Page 22

1 - 16 Quick Check® 600/800 Series User’s Guide
Page 23

2
Quick Start Guide
If you are familiar with bar code verifiers, this section will get you up and running
in a few minutes. We assume the factory defaults are in effect.
1. Install the batteries Chapter 1
• Slide off battery cover on the bottom of unit.
• Insert four batteries into compartment, matching “+” on battery ends
with “+” in case.
• Slide battery cover back in place.
2. Charge the batteries Chapter 1
• Plug AC charger into port on back of unit.
• Plug charger into a VAC wall outlet.
• Charge completely discharged batteries at least 12 hours; charge low
charge batteries less time.
• After charging, remove AC charger from unit.
3. Turn on the verifier Chapter 1
•Press POWER. Unit emits four quick beeps.
If unit displays:
• RECALIBRATE, calibrate unit. Go to step 4.
• LOW BATTERY!, charge batteries. Go to step 2.
• NO PRINTER ATTACHED... records may be stored in buffer. Use
arrow keys to select an option. Either continue to scan using current
AutoPrint/Store setting, clear (delete) records, or change AutoPrint/
Store setting to
• PRINT BUFFER... records are stored in buffer. Use arrow keys to
select an option. Either continue to scan and leave records in buffer,
print records, or clear (delete) records. Go to step 5.
• SCAN, go to step 5.
• QUICK-CHECK Opening Menu, go to step 5.
4. Calibrate the unit Chapter 1
• Scan reflectance page if you’re using either a pen or mouse wand.
Three beeps (one long, two short) sound after a good scan.
• Continue to scan page for ten good scans.
5. Scan the bar code symbol Chapter 3
Off (not store data). Go to step 5. Chapter 5
• The scan grade display appears. (Extended Accuracy setting default
is off).
• To obtain final symbol grade, scan symbol nine more times (# Scan/
Symbol setting default is 10).
6. Review the scan results Chapter 4
Quick Check® 600/800 Series User’s Guide 2 - 1
Page 24

• The standard decode display appears.
• Use arrow keys to view data
OR
Scan SSTR Codes to view data.
7. Print your scan results Chapter 3
• If the Quick Check 600/800 Verifier is connected to a printer and it is
turned on, results print automatically (AutoPrint/Store setting default is
On).
• If a printer is not connected or is turned off, results are stored in buffer.
8. Review the option settings: Chapter 3
• If data parameters are not customized the way you want, press
SELECT to display Print Results menu and then press Ø three times
to change the settings.
2 - 2 Quick Check® 600/800 Series User’s Guide
Page 25

3
Changing the Settings
There are four types of options on the Quick Check 600/800 Verifier you can
customize: specifications (applications and symbologies), test criteria, scanning
options, and output options. Each option has several items that you can turn on,
turn off, or change a value. This section describes all the selectable option
settings.
You can easily review and change the settings using SELECT and the ↑, ↓, ←
and → buttons. You save settings by displaying their name and then making the
changes you want. A separate save command is not necessary. You can exit
the settings menu at any point and scan a bar code symbol by placing the wand
tip or the mouse wand on a quiet zone and scanning or by pressing POWER.
It may be useful to create a customized Command Code for each type or set type
of operations you perform. When you need to perform another procedure, just
scan the Command Code that contains those settings. Refer to instructions for
making and using a Command Code starting on "Using a Command Code" on
page 3-16. Sometimes you may want to change just one or two of the settings,
but not create a new Command Code that differs only slightly from the one you
frequently use. You can easily change settings after you use a Command Code.
Chapter 10, Flow Charts
changes you can make and how to access each of them using the menus.
contains a flow chart that displays all the settings
Changing the Specifications
The Quick Check 600/800 Verifier specification section consists of the industry
application standards and symbologies. The Quick Check 600/800 Verifier can
verify the quality of the following symbologies and industry application standards:
Symbologies
• EAN/UPC
• Code 39
• Interleaved 2 of 5
• Code 128
• Code 93
• Codabar
• Code 11
• Code 16K
• Code 49
• MSI Code
• IATA 2 of 5
• Regular 2 of 5
Industry Applications
• AAIG
• Comp Tia
• LOGMARS
• SCC
• HIBCC
• CCBBA
• SISAC
• BOOKLAND
• Coupon Code
Quick Check® 600/800 Series User’s Guide 3 - 1
Page 26

Symbologies
You can enable (turn on) the symbologies available on your Quick Check 600/
800 Verifier so they are recognized. When a symbology is enabled, you can
modify some of its test parameters. "Symbology Specifications" on page 3-3 lists
the parameters you can modify and their factory installed defaults. The
parameters are described after the table.
3 - 2 Quick Check® 600/800 Series User’s Guide
Page 27

Symbology Specifications
Symbology
EAN/UPC
Code 39
Interleaved
2 of 5
Code 128
Code 93
Codabar
Code 11
Parameters (defaults are in bold)
Enable: On or off
Magnification factor: (080/085/090/100/105/110/115/120/130/140/150/
160/180/200)
Expand U.P.C.-EO: Yes or No
Enable: On or off
Check Character: None or Checked
Fixed W/N: None or a value between 1.4 and 3.9 +
Fixed Msg Len*: None or a value between 1 and 49 characters
Enable: On or off
Check Digit: None or Checked
Fixed W/N: None or a value between 1.4 and 3.9 +
Fixed Msg Len*: None or a value between 1 and 78 digits
Enable: On or off
Modes Shown? Yes or No
Fixed Msg Len*: None or a value between 1 and 70 characters
Enable: On or off
Fixed Msg Len*: None or a value between 1 and 80 characters (from
Code 39 set)
Enable: On or off
Character Font & Tolerances: Trad’l ,”USS” or ISO/IEC’83
Fixed W/N: None or a value between 1.4 and 3.9 +
Fixed Msg Len*: None or a value between 1 and 61 digits
Enable: On or off
1 or 2 check digits
Fixed Msg Len*: None or a value between 1 and 80 digits
0.2
0.2
0.2
Code 16K
Code 49
MSI Code
IATA 2 of 5
Regular 2 of 5
Enable: On or Off
Modes Shown? Yes or No
Fixed Msg Len*: None or up to 154 characters, full symbol
Enable: On or Off
Fixed Msg Len*: None or up to 49 alpha (81 numeric characters, full
symbol
Enable: On or Off
User Check: None, Mod 10 or Mod 11
Fixed Msg Len*: None or a value between 1 and 50 digits
Enable: Yes or No
Enable: Yes or No
Enable: Checked or None
* The message length specification for each symbology is listed. Although you can enter
any value between 0 and 255, the unit does not decode more than the values indicated by
the specification.
Quick Check® 600/800 Series User’s Guide 3 - 3
Page 28

Magnification Factor
The Magnification (Mag) Factor applies to the EAN/UPC symbologies. By setting
the size of the bar code symbols that you test, you define appropriate tolerances.
You can select a mag factor from the following values: 80%, 90%, 95%, 100%,
105%, 110%, 115%, 120%, 125%,130%, 140%, 150%, 160%, 180% or 200%.
The default is 100%.
Expand U.P.C./EO
The Yes setting for this parameter allows you to expand the compressed U.P.C.
code. When you expand the scan data, the digits are shifted to the left and +
appears on the display to indicate that additional data is available for your review.
The No setting for this parameter presents the data in zero suppression format.
Check Options
The check character, check digit and UserCheck are optional characters or digits
in some symbologies that are placed in a predetermined position in a symbol.
You can use them to validate that the correct data has been decoded.
Check characters in a symbol may be mandated by a bar code symbology
industry specification, by you, by both, or not at all. Refer to the relevant
industry’s publication for specific information on check characters.
• When you select Checked, the verifier looks for and checks the check
character or digit.
• When you select None, the verifier does not look for the check character or
digit. None is the default setting.
Selected symbologies offer additional options:
• Code 39 contains an optional Mod 43 check character.
• Interleaved 2 of 5 contains an optional 3-1-3-1 weighted check digit.
• MSI Code can contain a second check digit (UserCheck), either the Modulo
(Mod) 10 or Modulo (Mod) 11.
Modes Shown
This parameter allows you to have additional information appear on the display
and on the printout. This information includes special extra characters and
control characters within the encoded message. Having this extra information
displayed may help you analyze reading or printing problems. In Code 128, for
example, you can display starting mode, mode changes and shifts. Code 16K
allows you to display similar additional characters.
3 - 4 Quick Check® 600/800 Series User’s Guide
Page 29
The Yes setting for this parameter is the default. Some of the extra characters
are represented by special character “strings” as shown in the following
Character Translation Table. When you select the No setting, this information
does not appear on the display or the printout.
Character Translation Table
(Code 128, Code 16K, and Code 49)
Character
00(NUL)
01(SOH)
02(STX)
03(ETX)
04(EOT)
05(ENQ)
06(ACK)
07(BEL)
08(BS)
09(HT)
0A(LF)
0B(VT)
0C(FF)
0D(CR)
0E(SO)
0F(SI)
10(DLE)
11(DCI)
12(DC2)
13(DC3)
14(DC4)
On
LCD
0
1
2
3
4
5
6
7
8
9
A
B
C
D
E
F
10
11
12
13
14
On
Printout
<NL>
<SH>
<SX>
<EX>
<ET>
<EQ>
<AK>
<8L>
<BS>
<HT>
<LF>
<VT>
<FF>
<CR>
<SO>
<SI>
<DE>
<D1>
<D2>
<D3>
<D4>
Character
15(NAK)
16(SYN)
17(ETB)
18(CAN)
19(EM)
1A(SUB)
1B(ESC)
1C(FS)
1D(GS)
1E(RS)
1F(US)
7F(DEL)
FCN1
FCN2
FCN3
FCN4
Mode A
Mode B
Mode C
Shift
Pad**
On
LCD
15
16
17
18
19
1A
1B
1C
1D
1E
1F
*
F1
F2
F3
F4
A
B
C
Sh
Pd
On
Printout
<NK>
<SY>
<EB>
<CN>
<EM>
<SB>
<ES>
<FS>
<GS>
<RS>
<US>
<DL>
<F1>
<F2>
<F3>
<F4>
<A:>
<B:>
<C:>
<Sh>
Pd
* No “special” character is displayed for <DEL>.
** For Code 16K only.
Character Font & Tolerances
Codabar supports two options for Character font and tolerances.
• Trad’l (Traditional Codabar) uses traditional print tolerances based on
Monarch’s original print tolerances. This is the default setting.
• USS Codabar uses the ISO/IEC 1983 MH10.8M standards.
Refer to Codabar and ISO/IEC publications for specific information on print
tolerances.
Quick Check® 600/800 Series User’s Guide 3 - 5
Page 30

Wide-to-Narrow Ratio
The wide-to-narrow ratio (W/N) applies to symbologies with two
element widths, including Codabar, Interleaved 2 of 5, and Code 39. “W/N” is the
ratio of wide to narrow elements. Only one symbology can have a W/N ratio at
a time. The range of values is 1.4 to 3.9 ± 0.2.
Fixed Message Length
You can set a Fixed Message Length for any symbology except EAN/UPC, but
only one symbology can have a fixed message length at a time. You can enter
the message length for any value between 0 and 255. "Symbology
Specifications" on page 3-3 lists the message length specification for each
symbology.
♦ To modify the symbology options:
1. Display the menu that begins with
then SELECT).
Print Results (press POWER and
2. Set the cursor on the asterisk next to
SELECT.
A menu that begins with
3. With the cursor on the asterisk next to
A menu that begins with
4. With the asterisk next to
A list containing the names of the first four available
symbologies appears. Next to each symbology name is either the term
OFF indicating its enable status. To review the entire list, press ↑ or ↓
or
and hold it down, or press ↑ or ↓ and let up each time. The names of the
additional available symbologies appear.
5. To change the enable status of a symbology, position the cursor next to the
symbology name and press SELECT. For all the symbologies except Code
93 and Code 49, a new menu appears with the name of the symbology on
top and a list of parameters that you can change.
With the cursor on the asterisk next to
symbology enable status changes between
• To change a parameter, use ↓ to move the cursor to the asterisk next
to the name of the first parameter.
• To change a numeric value such as the magnification factor, press →
to move the cursor from the asterisk to the parameter value, then
press ↑ or ↓ until the value you want appears.
• To change a selection such as
→ or SELECT.
• To return to the previous menu, press POWER.
Specifications appears.
Symbologies appears.
Symbologies, press SELECT.
Change Settings and then press
Specifications, press SELECT.
ON
ENABLE, press → or SELECT. The
Yes and No.
Yes/No or Checked!/None, press
When you exit any menu, all the displayed parameter choices are saved.
3 - 6 Quick Check® 600/800 Series User’s Guide
Page 31

6. To change which symbology has a W/N Ratio:
•Press ↑ or ↓ to set the cursor on the asterisk next to Fixed W/N Ratio
and then press SELECT. A menu appears with Fixed W/N Ratio on
top and asks you to choose the symbology name and the ratio
amount.
• To choose the symbology, press SELECT or → to move the cursor
from the asterisk next to Symbgy to the name of the specific
symbology. You can set the W/N ratio for only one symbology at a
time. Now press ↑ or ↓ to display the symbology that you want to have
a fixed W/N ratio.
• To save the selection, press SELECT or ← to move the cursor back
to the asterisk next to Symbgy.
• To set the fixed W/N ratio amount, press ↓ to move the cursor to the
asterisk next to Ratio. Then press SELECT or → to move the cursor
to the numeric value. Use ↑ or ↓ to display the value you want. The
value can range from 1.4 to 3.9 ± 0.2.
• To save the selection, press SELECT or ← to move the cursor back
to the asterisk next to Ratio.
• To return to the previous menu, press POWER.
7. To change which symbology has a fixed message length:
•Press ↑ or ↓ to set the cursor on the asterisk next to Fixed Len and
then press SELECT. A menu appears with Fixed Message Length on
the top and asks you to choose the symbology name and the specific
length.
• To choose the symbology, press SELECT or → to move the cursor
from the asterisk next to Symbgy to the name of the specific
symbology. Now press ↑ or ↓ to display the symbology that you want
to have a fixed message length.
• To save the selection, press SELECT or ← to move the cursor back
to the asterisk next to Symbgy.
• To set the specific length, press ↓ to move the cursor to the asterisk
next to Length. Then press SELECT or → to move the cursor to the
numeric value. Now press ↑ and
length can range from 0 to 255 characters. (See "Symbology
Specifications" on page 3-3.)
• To save the selection, press SELECT or ← to move the cursor back
to the asterisk next to Length.
• To return to the previous menu, press POWER.
8. To change other symbologies and their parameters, repeat
step 5. on page 3-6.
↓ to display the value you want. The
• To return to the previous menu, press POWER.
• To scan a symbol, set the wand on the symbol’s quiet zone.
Industry Applications
You can enable only one application at a time. Your verifier may not have all the
applications installed in it.
Quick Check® 600/800 Series User’s Guide 3 - 7
Page 32

♦ To select an application:
1. Display the menu that begins with Print Results (press POWER and
SELECT).
2. Set the cursor on the asterisk next to Change Settings and then press
SELECT.
A menu that begins with Specifications appears.
3. With the asterisk next to Specifications, press SELECT.
A menu that begins with Symbologies appears.
A list containing the term Symbologies and the names of the applications
appears. The application that is currently enabled has a ← to the right of the
name. If a → is to the right of the term Symbologies, no application is enabled.
4. To enable another application, set the cursor next to the application name
and then press SELECT.
• When you select AIAG, SCC, Coupon Code or
BOOKLAND, you are prompted to provide additional
information. AIAG asks if you want Supplier or Customer. Use ↑ and
↓ to set the cursor on the asterisk next to the term you want and then
press SELECT.
• When you select SCC for the SCS/ITF, Coupon Code and BOOKLAND, you are prompted to provide a magnification factor. Use ↑ and
↓ to display the magnification factor you want to use and then press
SELECT.
5. To return to the previous menu, press POWER.
To scan a symbol, set the wand on the symbol’s quiet zone.
Changing the Test Criteria
The test criteria apply to the standards used to evaluate the scanned symbols.
You can select the following items:
• ISO/IEC scan grade or pass/fail criteria for traditional parameters
• Character averaged decodability or ISO/IEC Decodability
• ISO/IEC grades in letters or numbers
• Number of scans used to determine the final ISO/IEC Symbol Grade
Scan Grade
The Quick Check 600/800 Verifier acquires data using the ScanProfile
Methodology specified in the ISO/IEC’s “Bar Code Print Quality Guideline.” The
verifier then evaluates the acquired data and provides a scan grade (also called
a scan profile grade).
The default number of scans used to obtain the scan grade is one (with Extended
Accuracy set to Off). You can obtain an averaged scan grade when the
Extended Accuracy scanning option is On (set to a value >1).
3 - 8 Quick Check® 600/800 Series User’s Guide
Page 33

You can obtain the scan grade result in two ways:
• Set the verifier to use traditional print quality parameters to make a pass/fail
judgment about the symbol and provide detailed
measurements.
• Set the verifier to use ISO/IEC methods to judge the symbol and report an
ISO/IEC scan grade of A, B, C, D or F. The default setting is ISO/IEC scan
grade C.
All the test criteria options are available for you to select regardless of which scan
grade method (ISO/IEC or traditional) you selected. For example, if you select
the traditional pass/fail criteria, you can view and change the ISO/IEC grade
letter or number option, even though it has no affect on the traditional criteria you
selected.
Decodability
Decodability is the percentage of the symbology’s safe decoding margin
available for the scanner after printing errors. Lower margin values and
corresponding lower grades indicate an increased susceptibility to decoding
failure due to scanning errors. Scanning variations, such as acceleration, cause
bar or space deviations due to uneven, too fast or too slow scanning and could
yield lower margin values.
You can choose the decodability method you want to use — ISO/IEC
Decodability or character averaged decodability (Avg):
• ISO/IEC Decodability is a graded measure of how close a given scan comes
to a reference decode failure due to variations in bar and/or space widths.
The default setting is ISO/IEC decodability.
• Avg is the character-averaged value of decodability and is referred to as “D
Margin” on a Quick Check 600/800 Verifier printout.
ISO/IEC grades
For all symbologies, and most of the applications, you can view the test results,
ISO/IEC scan grade and ISO/IEC symbol grades reported as letters (A, B, C, D,
or F) or as numbers (4, 3, 2, 1, or 0). The default setting is letters, with A=4, B=3,
C=2, D=1, and F=0. For some applications, such as AIAG, the grade level is
specified by the application and you cannot change it. If you set an incorrect
grade level, the application resets the correct one.
Number of Scans
You use the #Scans/Symbol setting to specify the number of individual scan
grades that you want used to calculate the final symbol grade. The term
“#Scans/Symbol” is shorthand for the number of scan grades used to determine
the final symbol grade. For further discussion and comparison to scan grades,
refer to "Reviewing Scan Results" on page 4-1.
You can select from the following settings: 1 through 10, 12, 15, 20, 30, 50, 100
and Var. The default #Scans/Symbol setting is 10.
Quick Check® 600/800 Series User’s Guide 3 - 9
Page 34

Consider the symbol grade as the average resulting from scans you take from all
over the symbol. The ISO/IEC standard requires you to obtain ten scans of each
symbol.
For example, you might sample the symbol at ten different paths in the symbol
— four in the upper portion, two in the middle and four in the lower portion.
Multiple scans of the same symbol across different scan paths take advantage
of the vertical redundancy of bar codes and give you a more accurate value of
the symbol’s overall print quality.
♦ To change the test criteria:
1. Display the menu that begins with Print Results (press POWER and then
SELECT).
2. Set the cursor on the asterisk next to Change Settings and then press
SELECT. A menu that begins with Specifications appears.
3. Set the cursor on the asterisk next to Test Criteria and then press SELECT.
A menu that begins with Passing appears.
• To change the pass/fail criteria, set the cursor on the asterisk next to
the term Passing and then press SELECT or →. The cursor moves to
the right of Passing. Press ↑ and ↓ until the grade (Trad’l, ISO/IEC
“A,” ISO/IEC “B,” ISO/IEC “C,” ISO/IEC “D,”) you want appears. To
save the selection, press SELECT, POWER or ←. The cursor moves
back to the asterisk next to Passing.
• To change the Decodability, set the cursor on the asterisk next to
Decodability and then press SELECT or →. The setting changes
between ISO/IEC and Avg.
• To change the Grades, set the cursor on the asterisk next to Grades
and then press SELECT or →. The setting changes between Letters
and Numbers.
• To change the number of scans used to determine the final ISO/
IEC Symbol Grade, set the cursor on the asterisk next to #Scans/
Symbol and then press SELECT or →. The cursor moves to the right
of the terms #Scans/Symbol. Press ↑ and ↓ until the numeric value
you want (1 through 10, 12, 15, 20, 30, 50, 100 or Var) appears. To
save the selection, press SELECT or ←. The cursor moves back to
the asterisk next to #Scans/Symbol.
When you exit any menu (press POWER), all the displayed parameter
choices are saved.
4. To return to the previous menu, press POWER.
To scan a symbol, set the wand on the symbol’s quiet zone.
Changing the Scanning Options
The scanning options apply to the general operation of the Quick Check 600/800
Verifier. You can change the following options:
3 - 10 Quick Check® 600/800 Series User’s Guide
Page 35

• Beeper Pitch (raise or lower)
• Extended Accuracy
• Decoding direction (both ways or forward only)
Beeper Pitch
You can change the pitch of the verifier’s beeper. Higher pitches seem to sound
louder. You can also turn off the tone. The default is 16. The range includes Off
and 1 through 31.
Extended Accuracy
The Extended Accuracy setting is the number of scans of the same symbol,
taken at the same path in the symbol, that yields the scan grade.
• With Extended Accuracy on, individual parameter measurements and results
are averaged over successive scans of the symbol. Using the extended
accuracy mode greatly reduces reading variability due to variations in
scanning motion and minor scan path variations. When Extended Accuracy
is on, you select the number of scans for the averaged result from 2 through
10, 12, 15, 20, 30, 50 and 100.
• When Extended Accuracy is off (set to one), each scan of the symbol gives
the measured results. The default is Extended Accuracy turned off.
When you scan a symbol with Extended Accuracy on, a numeric counter appears
on the display telling you how many additional scans of the same path you must
obtain. After you satisfy the setting, the scan grade appears. If you do not scan
the same symbol within five seconds, the unit assumes you do not want to satisfy
the Extended Accuracy setting you chose and displays the scan results from that
individual scan. If you scan a different symbol after your first scan, the Extended
Accuracy counter resets.
For further discussion and comparison of scan grade to symbol grade, refer to
Chapter 4, Reviewing Scan Data
.
Decode Direction
You can set the Quick Check 600/800 Verifier to read bar code symbols from leftto-right, called “forward only,” or from either direction, called “Both Ways.” The
BothWays setting (default) makes scanning easier and more flexible than
forward-only scanning.
♦ To change the scanning options:
1. Display the menu that begins with Print Results (press POWER and
SELECT).
2. Set the cursor on the asterisk next to Change Settings and then press
SELECT.
A menu that begins with Specifications appears.
Quick Check® 600/800 Series User’s Guide 3 - 11
Page 36

3. Set the cursor on the asterisk next to Scanning Options and then press
SELECT.
A menu that begins with Beeper Pitch appears.
4. To make any necessary changes:
• To change the beeper pitch, set the cursor on the asterisk next to
Beeper and then press SELECT or →. The cursor moves to the right
of the term Pitch. Press ↑ and ↓ until you hear the beeper pitch you
want. To save the selection, press SELECT or ←. The cursor moves
back to the asterisk next to Beeper.
• To change the Extended Accuracy setting, set the cursor on the
asterisk next to Extended Accur and press SELECT or →. The cursor
moves to the right of Accur. Press ↑ and ↓ until the number of scans
you want for the average appears. To save the selection, press
SELECT or ←. The cursor moves to the asterisk next to Extended.
• To change the decoding direction setting, set the cursor on the
asterisk next to Decoding and then press SELECT or →. The setting
changes between BothWays and FwdOnly!.
• When you exit any menu, all the displayed parameter choices are
saved.
5. To return to the previous menu, press POWER.
To scan a symbol, set the wand on the symbol’s quiet zone.
Changing the Output Options
The output options include the display options and the print options.
Display Options
The display options include:
• Upper Parameter Result Line display
• Lower Parameter Result Line display
• Error Override display
• LEDs either display ISO/IEC Grade or indicate bar growth or loss
The display options allow you to set the two types of results that are most
important to you in the upper and lower parameter result lines so they appear
immediately after a scan. (The upper parameter result line is the third line of the
display and the lower line is the fourth or bottom line of the display.) Then, by
pressing a few buttons, you can review all the other results.
Parameter Result Lines
On the parameter lines, you can display either the result defaults set at the
factory, or results you select.
• For traditional pass/fail criteria, the factory-set defaults are PCS and AvgBar.
• For ISO/IEC criteria, the factory-set defaults are Decodability and Modulation.
3 - 12 Quick Check® 600/800 Series User’s Guide
Page 37

Additional results you can display and the criteria used include:
• Symbol type
• Wide-to-narrow ratio (traditional)
• Light reflectance (traditional and ISO/IEC)
• Dark reflectance (traditional and ISO/IEC)
• Symbol contrast (ISO/IEC)
• Reflectance minimum/maximum (ISO/IEC)
• Edge contrast minimum (ISO/IEC)
• Defects (ISO/IEC)
• Message length
• Bar growth (traditional)
Error override allows you to set the verifier to replace the default or user-selected
Upper and Lower Parameter Result lines with any error information or messages
that might result from the bar code scan analysis. If more than two errors result
from a scan, the first two appear on the display and you can scroll the display to
view the other errors. The default for Error Override is NO.
When you select ISO/IEC criteria, you can use the LED’s display feature to set
the LEDs to indicate bar growth/loss or pass/fail grade and result grade. In
addition, when you select ISO/IEC criteria, the five multi-colored LEDs normally
indicate symbol pass or fail based on the ISO/IEC criteria. With the LED feature
set to Bar Growth, the LEDs provide information on bar growth or loss, just as
they would if you selected traditional pass/fail test criteria.
Print Options
The print options allow you to select:
• Printer type (QCP or QCHSP)
• Printout form (long or short)
• Automatic options — automatically print data when the unit is connected to a
printer and turned on, automatically store data when the unit is not connected
to a printer
• Auto Print/Store with or without Profile
You can use any one of the three optional accessory hardcopy printers, but you
need to select the printer before you try to print. Supported printers include:
• QCP (standard printer)
• QCHSP (High-Speed Printer)
Refer to
printers.
Chapter 5, Saving and Printing
for more information about these
AutoPrint/Store
The AutoPrint/Store option automatically prints or stores your data:
• When you have the AutoPrint/Store feature turned on and a printer connected
to your verifier and turned on, your scan results print automatically. You
cannot store results when a printer is connected and turned on.
Quick Check® 600/800 Series User’s Guide 3 - 13
Page 38

• When you have the AutoPrint/Store feature turned on, but no printer is
connected to your verifier, or your printer is connected, but is turned off, your
scan results are automatically stored in the verifier’s memory.
• When you have the AutoPrint/Store feature turned off, after each scan you
need to instruct the verifier to print your data (if a printer is connected and
turned on) or to store your data (if a printer is not connected or is turned off).
The default is setting for AutoPrint/Store is ON.
Scan Profile
The Quick Check 600/800 Verifier allows you to print the scan profile which is a
record of the reflectance values seen by a scanner as it moves across a symbol.
The scan profile is the basis of ISO/IEC evaluation and is usually presented in a
graphic form.
• When you use the AutoPrint/Store feature with Profile, you can choose to
have the scan results stored so you can later print a graphic scan profile on a
printout.
• When you use AutoPrint/Store without Profile, the raw data is not stored.
♦ To change the output options:
1. Display the menu that begins with Print Results (press POWER and then
SELECT).
2. Set the cursor on the asterisk next to Change Settings and then press
SELECT. A menu that begins with Specifications appears.
3. Set the cursor on the asterisk next to Output Options and then press
SELECT. A menu that contains Display Options and Printout Options
appears.
4. To change the display options:
• To change the display options, set the cursor on the asterisk next to
Display Options and then press SELECT. A menu with four display
options selections appears.
• To change the data displayed in the upper (3rd line) or the lower (4th
line) parameter result line, set the cursor on the asterisk next to
UpperLine and then press SELECT or →. The cursor moves to the
right of the term. Press ↑ and ↓ until the name of the data that you
want to show up on the parameter result line appears. To save the
selection, press SELECT or ←. The cursor moves back to the asterisk
next to the term.
• To change the error override feature, set the cursor on the asterisk
next to Error Override and then press SELECT or → until the setting
you want, YES (Y) or NO (N), appears.
• To change what the LEDs indicate, set the cursor on the asterisk next
to LEDs and then press SELECT or → until the setting you want, P/F
Criteria or Bar Growth!, appears.
•Press POWER to return to the menu that contains Display Options
and Printout Options.
3 - 14 Quick Check® 600/800 Series User’s Guide
Page 39

5. To change the printout options:
• To change the printout options, set the cursor on the asterisk next to
Printout Options and then press SELECT. A menu with the printout
options selections appears.
• To change the printer type, set the cursor on the asterisk next to
Printer Type and then press SELECT or → until the setting you want,
QCP or QCHSP, appears.
• To change the printout form, set the cursor on the asterisk next to
Printout and then press SELECT or → until the setting you want, Long
or Short, appears.
• To change the AutoPrint and Store setting, set the cursor on the
asterisk next to AutoPrint/Store and then press SELECT or → until the
setting you want, On or Off appears. If you set the AutoPrint and Store
setting On, you may want to use it with or without Profile. To change
the Profile settings, set the cursor on the asterisk next to w/Profile?.
Press SELECT or → until the setting you want, Yes or No, appears.
6. To return to the previous menu, press POWER.
To scan a symbol, set the wand on the symbol’s quiet zone.
Resetting the Default Settings
If you make changes to your Quick Check 600/800 Verifier’s settings, you can
easily reset them to the factory installed defaults.
♦ To reset a unit:
1. Scan the special “Reset All Options” code located in
Codes
2. Recalibrate the unit.
Refer to
. The unit reinstalls the factory default settings.
Chapter 2, Quick Start Guide
for instructions.
Chapter 12, Special
Locking the Settings
After you set all the options (specifications, test criteria, scanning options and
output options) on the Quick Check 600/800 Verifier, you can “lock” the unit so
that you or others cannot accidentally change the settings during routine use. If
you lock the unit, you must unlock it to change any settings. Use the Special
Codes provided in the back of this manual to lock and unlock the unit. The
verifier is shipped in the unlocked mode.
♦ To lock the unit:
1. Customize your verifier by setting all the options the way you want them.
2. Scan the “Lock Specs and Tests” Special Code.
The unit is now locked. You cannot change any option settings unless you
unlock the unit or scan "Reset All Options" which sets the unit to its factory
defaults.
Quick Check® 600/800 Series User’s Guide 3 - 15
Page 40

♦ To unlock the unit:
1. Scan the “Unlock Specs and Tests” Special Code.
The unit is now unlocked. You can now change any option setting.
Using a Command Code
A Command Code is a bar code symbol that allows you to customize the Quick
Check 600/800 Verifier for your use. It is especially useful when you have one or
two setups and you frequently switch between them. After you turn on the unit
or when you want to change setups, just scan your customized Command Code
for that type of operation and then begin your work.
About Command Codes
There are two different types of Command Codes — Command- (Minus) Codes
and Command+ (Plus) Codes. These codes differ in the type of information they
store.
• Command+ Codes let you store all the settings on the “Command Code
Selections Lists” below.
• Command- Codes allows you to store all the settings listed on the Command
Code selection list except the beeper pitch, the decode direction and the
output option settings (printer type, printout form and the AutoPrint/Store
setting).
Command Code Selections List
Test Criteria
Passing grade: (Choose One)
Traditional or ISO/IEC “A,” ISO/IEC “B,” ISO/IEC “C,” ISO/IEC “D”
Decodability: Avg or ISO/IEC
Grades: Letters or Numbers
Number or scans/symbol: (Choose one)
2, 3, 4, 5, 6, 7, 8, 9, 10, 12, 15, 20, 30, 50, 100, Var
Scanning Options
Beeper Pitch: (Choose One)
Off or value between 1 and 31
Extended Accuracy: (Choose One)
Off, 2, 3, 4, 5, 6, 7, 8, 9, 10, 12, 15, 20, 30, 50, 100, Var
Decoding Direction: BothWays or Forward Only
Output Options
Display Options
UpperLine: (Choose One)
Default or Average Bar Error, W/N Ratio, Decodability,
RI & RD, P.C.S., Symbol Contrast, Rmin/Rmax, Modulation,
EC(min), Defects, Message Type, Message Length or Check Character
LowerLine: (Choose One)
Default or Average Bar Error, W/N Ratio, Decodability,
3 - 16 Quick Check® 600/800 Series User’s Guide
Page 41

RI & RD, P.C.S., Symbol Contrast, Rmin/Rmax, Modulation, EC(min),
Defects, Message Type, Message Length or Check Character
Error Override: Yes or No
LEDs: P/F Criteria or Bar Growth
Output Options
Printer Type: (Choose One)
Q C P, H S P, S S P
Printout: Long form or short form
AutoPrint/Store: On or Off
With profile: Yes or No
Generic Code Selections
U.P.C./EAN/JAN
Enable: On or Off
Magnification Factor? (Choose One)
080/085/095/100/105/110/115/120/125/130/140/150/160/180/200
Expand UPC-EO: Yes or No
Code 39
Enable: On or Off
Character Check: None or Checked
Fixed W/N: None or select value between 1.4 and 3.9 ± 0.2
Fixed message length: None or select value between 1 and 49
characters
Interleaved 2 of 5
Enable: On or Off
Character Digit: None or Checked
Fixed W/N: None or select value between 1.4 and 3.9 ± 0.2
Fixed message length: None or select value between 2 and 78 digits
Code 128
Enable: On or Off
Modes Shown: Yes or No
Fixed message length: None or select value between 1 and 70
characters
Code 93
Enable: On or Off
Fixed message length: None or select value between 1 and 80
characters (from Code 39 set)
Codabar
Enable: On or Off
Character Font and Tolerances: (Choose one)
Trad’l, “USS” or ISO/IEC ‘83
Fixed W/N: None or select value between 1.4 and 3.9 ± 0.2
Fixed message length: None or select value between 1 and 61 digits
Code 11
Enable: On or Off
Quick Check® 600/800 Series User’s Guide 3 - 17
Page 42

Check digits: 1 or 2
Fixed message length: None or select value between 1 and 80 digits
Code 16K
Enable: On or Off
Modes Shown: Yes or No
Fixed message length: None or up to 154 characters, full symbol
Code 49
Enable: On or Off
Fixed message length: None or up to 49 alpha (81 numeric)
characters, full symbol
MSI code
Enable: On or Off
Character Digit: None or Mod10 or Mod 11
Fixed message length: None or select value between 1 and 50 digits
IATA 2 of 5
Enable: Yes or No
Regular 2 of 5
Enable: Yes or No
Check Digit: Yes or None
Choosing a Command Code
You may want to use a Command- Code rather than a Command+ Code if you
often use the same setup on two units with different printers. With the
Command- Code, you can easily change the setups for the units without
changing the printer types, which may be more confusing because all the other
settings on these two Command Codes would be identical.
Customized Command Codes
Creating your own Command Code requires a Quick Check 600/800 Verifier
printer. If you do not have a printer, you can request a Command Code from
Hand Held Products.
You can use your Quick Check 600/800 Verifier printer to produce your own
Command Code using the Special Codes in Chapter 11. These four Special
Codes are labeled “Command- Code (Locked),” “Command Code- (Unlocked),”
“Command+ Code (Locked)” and Command+ Code (Unlocked)”.
The locked codes have an additional setting which locks the changes into the unit
after the Command Code is scanned. The lock prevents accidental
reprogramming during routine use. The lock can only be removed by scanning
another, previously prepared, Command Code that does not include the lock,
such as an unlocked code. When shipped to you, the Quick Check 600/800
Verifier settings are unlocked.
If you do not have a Quick Check 600/800 Verifier printer or if you want to have
a sharper, more durable Command Code, Hand Held Products can prepare a
customized code for you.
3 - 18 Quick Check® 600/800 Series User’s Guide
Page 43

♦ To use a customized Command Code:
1. Scan the Command Code for the type of work you will be doing.
The settings stored in that Command Code are now set in your unit.
♦ To create a customized Command Code:
1. Connect the Quick Check 600/800 Verifier to a printer and turn on both units.
Refer to
unit and the printer. If you locked your unit by scanning a Locked Command
Code, you must scan an Unlocked Code before you can make any changes.
2. Make any settings changes on the unit that you want to save on your
Command Code. If you want to prevent others or yourself from making
accidental or intentional changes to the verifier settings, scan a locked Code.
(Remember, if you later decide to make changes, you must scan an
unlocked code.) Your Command Code begins printing.
3. Label your customized printed Command Code on the line provided with a
description of the code. You may also want to indicate if it is a Command- or
Command+ Code.
4. To improve the bar code quality, make a copy of it on an office copier.
Making a “reduced size” copy may also improve the quality.
5. If you want to change any of the settings, make sure your unit is unlocked,
and repeat steps 2 through 4.
Chapter 5, Saving and Printing
for instructions on connecting the
♦ To request a Command Code from Hand Held Products:
You can have Hand Held Products create your customized Command Code by
mailing or faxing Hand Held Products a copy of the Customized Command Code
Selections List with all of the options you want on the Code indicated. Be sure
to keep the original list with your Command Code selections for your future
reference. Mail your completed list to the Hand Held Products’ office nearest you
Chapter 14, Customer Support
(see
).
Quick Check® 600/800 Series User’s Guide 3 - 19
Page 44

3 - 20 Quick Check® 600/800 Series User’s Guide
Page 45

4
Reviewing Scan Data
Reviewing Scan Results
After you customize the verifier settings for your use, you are ready to scan bar
code symbols. The verifier acquires and analyzes data using the ScanProfile
Methodology specified in ISO/IEC’s
182). After a scan, the audio signal and the LEDs provide auditory and visual
information about the symbol. The verifier provides results using either
traditional print quality parameters to make a pass/fail judgement about the
symbol or the ISO/IEC methods to judge a symbol and report an ISO/IEC scan
grade. You can also review specific traditional or ISO/IEC parameters
(dimensional, reflectance and format parameters). Each parameter is described
later in this section. The flow chart in
scan data you can review and how to access each item using the menus.
Bar Code Print Quality Guideline
Chapter 10, Flow Charts
displays all the
Scan Grades
(ANS X3,
The scan grade is also known as the “Scan Profile Grade.” You can think of the
scan grade as the grade resulting from a single scan across the symbol, for
example, at exactly three millimeters from the top of the symbol. The scan grade
is the lowest grade received by one of the following parameters after a specified
number of scans (you specify the number of scans using the Extended Accuracy
setting):
• Edge determination
•Rmin/Rmax
• Symbol contrast
• Minimum edge contrast
• Modulation
• Decodability
•Defects
The scan grade must also comply with any additional requirements imposed by
the appropriate industry application standard, symbology specification or both for
each scan. For example, if you set the passing option test criteria to traditional,
the scan grade is a pass/fail judgement. However, if you set the passing option
to ISO/IEC, the scan grade is a letter or number grade.
Using the Extended Accuracy mode greatly reduces reading variability due to
variations in scanning motion and minor scan path variations. The Extended
Accuracy settings you can specify to calculate the scan grade include off (1), 2
through 10, 12, 15, 20, 30, 50 and 100.
Quick Check® 600/800 Series User’s Guide 4 - 1
Page 46

ISO/IEC Symbol Grade
The ISO/IEC Symbol Grade is the average of the scan grades resulting from
scans you take from different paths across the symbol. The ISO/IEC Symbol
Grade is also referred to as the overall or final symbol grade. You can obtain a
symbol grade only if the passing option test criteria is set to an ISO/IEC grade
(not to traditional).
You use the #Scans/Symbol setting to specify the number of individual scan
grades that you want the verifier to use to calculate the symbol grade. The
available settings are 1 through 10, 12, 15, 20, 30, 50, 100 and Var. The default
setting for #Scans/Symbol is 10.
The ISO/IEC standard requires you obtain ten scans of each symbol. For
example, you might sample the symbol at ten different places in the symbol —
four in the upper portion, two in the middle and four in the lower portion. Multiple
scans of the same symbol across different scan paths take advantage of the
vertical redundancy of bar codes and give you a more accurate value of the
symbol’s overall print quality. The flow chart shown on page 4-3 explains how
the ISO/IEC Symbol grade is determined.
4 - 2 Quick Check® 600/800 Series User’s Guide
Page 47

Determining the ISO/IEC Symbol Grade
Quick Check® 600/800 Series User’s Guide 4 - 3
Page 48
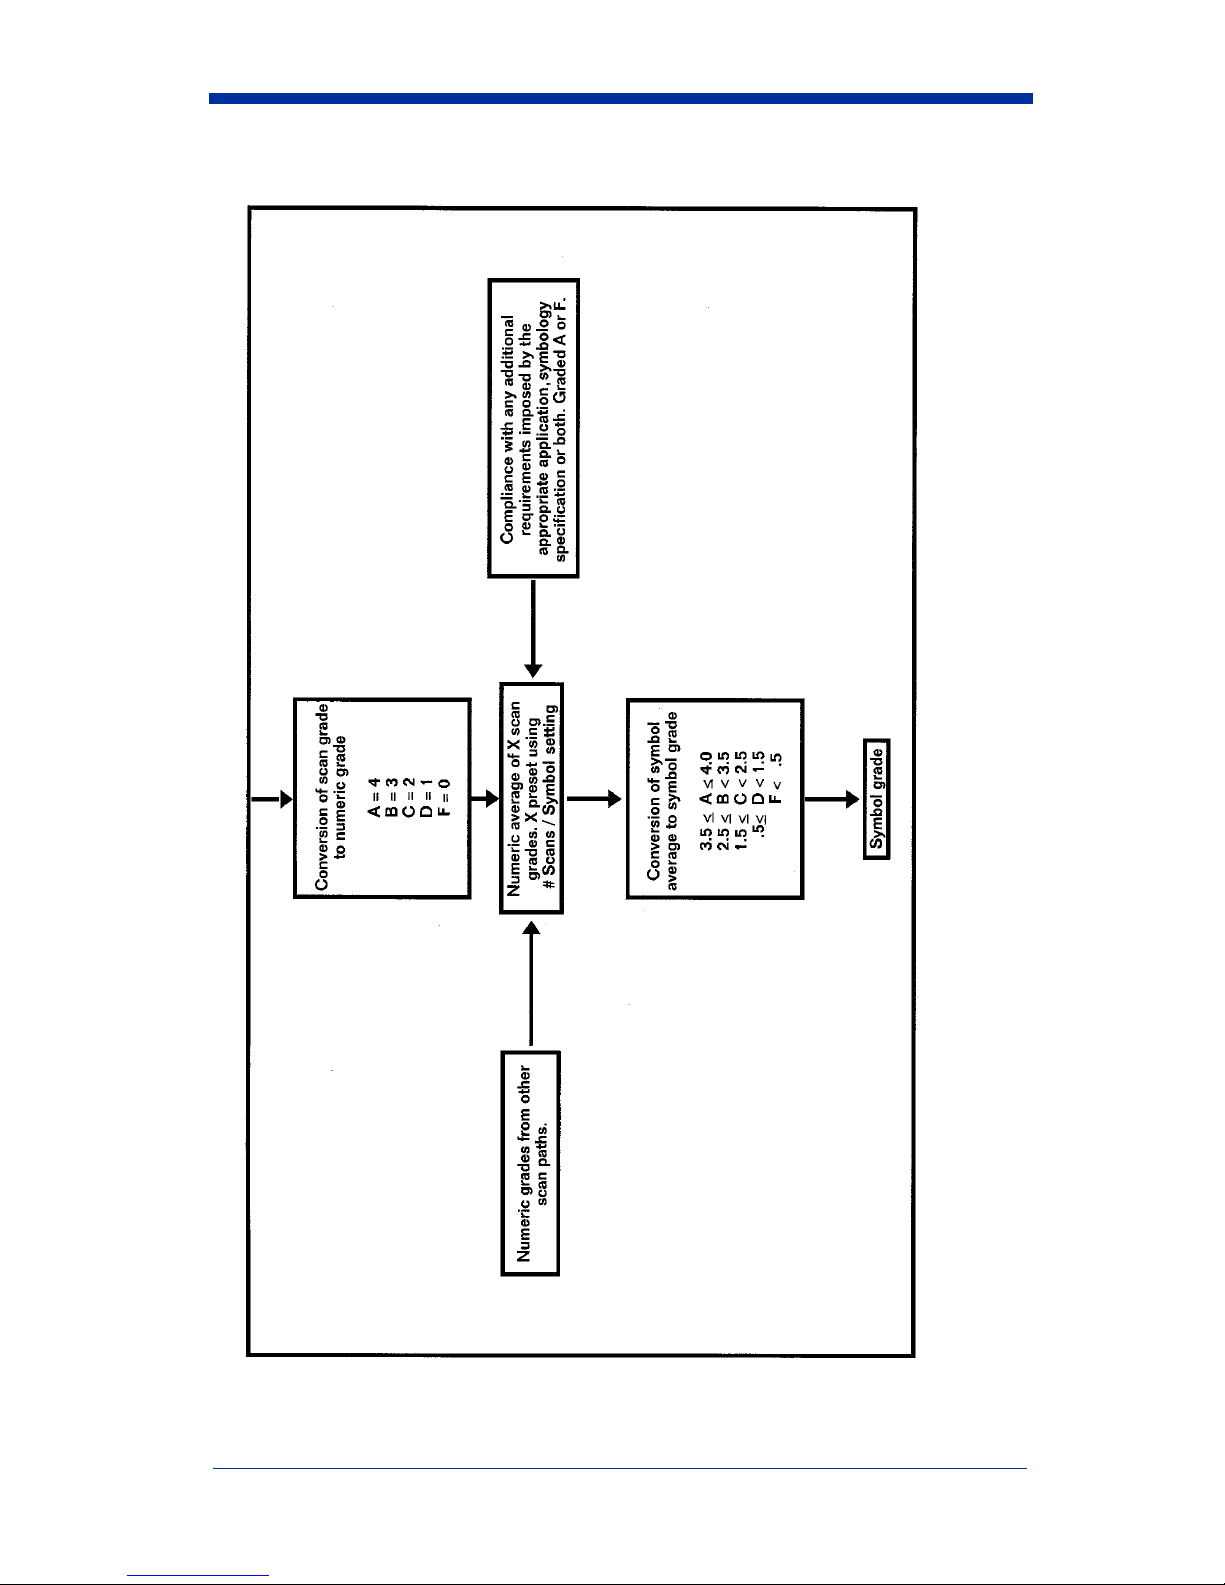
Determining the ISO/IEC Symbol Grade
(continued)
4 - 4 Quick Check® 600/800 Series User’s Guide
Page 49

Reviewing a Scan Example
To clarify the difference between a scan grade and a symbol grade, this section
presents an example of how you might set up your verifier, scan the symbols and
review the results. In this example, we change the verifier settings and see how
they affect the results.
1. To begin, we set up the verifier with the following settings:
• Test Criteria Passing Option set to ISO/IECISO/IEC; the letter grade
selected does not matter
• Scanning Options Extended Accuracy set to 3; note that this setting
affects the scan grade.
2. Scan a bar code symbol.
After the first scan, a message appears stating we have two more scans to
go (of the same scan path or line across the symbol) to
satisfy the preset Extended Accuracy setting of 3.
3. Continue to scan the same line of the symbol for a total of three scans.
After the third scan, the scan grade appears on the display (the scan grade
is the lowest of the grades of all of the parameters, in this case, averaged for
the three scans).
We now have the scan grade for a specific path across the symbol.
4. Scan another line or path of the symbol three times to obtain a
second scan grade.
After the third scan of the second set, a different display appears. This
display is the value we set for the #Scans/Symbol (2) and the number of
scan grades used to determine the symbol grade.
Note: If you set the Test Criteria Passing to traditional rather than to ISO/IEC
grade, the scan grade is reported as Pass or Fail. The verifier does not
report an ISO/IEC symbol grade when you select “traditional.”
♦ To obtain the scan grade and ISO/IEC Symbol grade:
1. Enter the Scanning Options Extended Accuracy setting you want. This setting determines the number of scans of the same path you want used to calculate the scan grade.
If you set the Test Criteria Passing setting to ISO/IEC, you can obtain the
ISO/IEC symbol grade:
• Enter the Test Criteria Passing setting to an ISO/IEC grade
• Set the Test Criteria #Scans/Symbol setting to the value you want.
This setting determines the number of scans grades you want to use
to calculate the final symbol grade.
Refer to
the settings.
2. Scan the bar code symbol.
The first line of this display provides the symbol or application name and the
encoded scan data. If the first line of scan data exceeds 16 characters in
length, a right arrowhead appears as the rightmost character of the display.
Press → on the verifier to review all the decoded data. A left arrowhead
Chapter 3, Changing the Settings
for instructions on changing
Quick Check® 600/800 Series User’s Guide 4 - 5
Page 50

appears at the beginning of the decoded data to indicate there is more data
to the left. Press ← to review the beginning of the message.
The text on the other lines of the display depends on the Extended Accuracy
option setting.
- If the Extended Accuracy setting is off, the scan grade display appears after
a single scan of a symbol.
- If the Extended Accuracy setting is set to any value except off, a display
appears with the term Extended Accuracy and the number of scans
remaining to satisfy this setting.
3. To satisfy the Extended Accuracy setting, scan the same bar code symbol on
the same path for the displayed number of times.
- If you do not scan the same symbol within five seconds, the unit assumes
you do not want to satisfy the Extended Accuracy setting you chose and
displays the scan grade from that individual scan. If, after your first scan,
you scan a different symbol type or a differently encoded symbol, the
Extended Accuracy counter resets.
- When you satisfy the Extended Accuracy setting, the scan grade display
appears.
- The second line of the scan grade display lists the three types of
parameters, Dim (dimensional), Ref (reflectance) and Fmt (format). If an
error exists in any of the parameters, that parameter name appears in all
capital letters with a left and right caret pointing to it, for example, >DIM<.
- The third and fourth lines of the scan grade display contain either ISO/IEC
or traditional measurement results (parameters) depending on how you set
the Test Criteria setting. Refer to later sections in this chapter for information
about each parameter. You can review all the scan results using the arrow
keys on the unit or use the SSTR (Single Scan to Result) codes described
later in this section to review most of the scan results. For additional scan
results, the LEDs light and/or flash, depending on how you set them up.
- The large letter or number on the right of the display is the scan grade. If
you set the verifier to use ISO/IEC criteria to test symbols, you can display
the scan grade as a letter (A, B, C, D, or F) or as a number (4, 3, 2, 1, 0)
using the Test Criteria Grades setting. If you set the unit to use traditional
criteria to test symbols, a P or F appears for test pass or fail.
Note: You may want to print each scan grade result. The printout you obtain
after the verifier calculates the final symbol grade shows the symbol grade
and the results of the last scan grade only, but does not show each scan
grade averaged to calculate the final symbol grade. The results of each
scan grade may be helpful if you are trying to determine if particular paths
(upper versus middle versus lower) consistently provide different results.
4. If you set the Test Criteria Passing setting to an ISO/IEC grade and you set
the #Scans/Symbol setting to any value except 1, press ↑ to display the
running symbol grade.
To review the scan grade display, press ↓. Press ↑ to return to the symbol
grade display.
4 - 6 Quick Check® 600/800 Series User’s Guide
Page 51

Note: If you set the Test Criteria Passing parameter to an ISO/IEC grade and
you set the #Scans/Symbol parameter to 1, the scan grade is the same
as the ISO/IEC symbol grade.
• The first line of the symbol grade display provides the symbol or
application name, the same as the first line of the scan grade display.
• The second line of this display indicates this data is a final symbol
grade, that is, it is an average of the scan grades you have obtained.
• The third line provides a variety of information. The first of the three
terms refers to the current average grade the symbol received. The
subsequent terms, for example 06/660, refer to the wand aperture and
the wavelength. These values are used to determine the symbol
grade. Refer to "If the unit was set to use the database feature before
being turned off, the bottom line shows the term DATABASE." on
page 1-9 for additional information.
• The last line lets you check your status in relation to the
symbol grade. The first value in this line tells you how many scan
grades were used to calculate the displayed symbol grade. The
second value tells you the number of scan grades required to
calculate the final symbol grade.
• The large letter or number on the right of the display is the symbol
grade. The verifier can display the symbol grade either as letter (A, B,
C, D, F) or as a number (4, 3, 2, 1, 0), depending on how you set the
Test Criteria Grades parameter.
5. To obtain the final symbol grade, you must satisfy the #Scans/Symbol
setting. Repeat steps 2 through 4, scanning the same bar symbol at
different paths within the symbol.
• When you satisfy the #Scans/Symbol setting, the final
symbol grade display appears.
To review the scan grade display, press ↓. Press ↑ to return to the
final symbol grade display.
The types of data provided in the final symbol grade display are the
same as those in the symbol grade display.
♦ To review data from the last scan:
1. If the Quick Check Verifier is turned off, turn it on.
The opening display appears.
2. Press ←.
The results from the last scan appear.
LED Display
The light-emitting diodes (LEDs) can indicate either bar growth and shrinkage
based on traditional test criteria or a pass/fail grade result based on ISO/IEC
grade criteria. You set the type of test criteria. Refer to "Changing the Test
Criteria" on page 3-8 for additional information.
Quick Check® 600/800 Series User’s Guide 4 - 7
Page 52

For your convenience, the display option feature called “LEDs” allows you to
select ISO/IEC test criteria yet have the LEDs display bar growth rather than ISO/
IEC pass/fail grade. Refer to "Changing the Output Options" on page 3-12 for
additional information.
If you set the verifier to use traditional pass/fail test criteria, the color of each
LEDs is always the same (first is red, second is yellow, third is green, fourth is
yellow, fifth is red). After a scan, one or two of the LEDs flash to indicate the
amount of growth or shrinkage. The following table correlates the LED color and
the percent tolerance used.
% of bar growth
LED lit
Green 0% to25% OK!
Green and yellow 25% to 50% OK!
Yellow 50% to 75% OK-,OK+
Yellow and red 75% to 100% OK-, OK+
Red >100% LO!, HI!
tolerance used
LCD bar growth
indication
For example, if you scan a UPC symbol at 100% magnification and the yellow
LED on the left center flashes, it indicates that the tested symbol has used
approximately 2 mil (2.0 to 3.0 mil [0.002” to 0.003”]) of the total tolerance (± 4
mil [0.004”]) and that the symbol’s bars are too narrow.
If you set the verifier to use ISO/IEC methods to calculate the grade, the color of
the LEDs will vary. After a scan, one of the LEDs flashes to indicate the scan
grade (ISO/IEC Grade A, B, C or D). For example, if you selected ISO/IEC
Grade C as passing and obtained a scan grade of A, the A LED flashes to
indicate the scan grade the symbol received. In this case, the A, B and C LEDs
will be green to indicate that all three grades are acceptable.
Audio Sounds
The audio signal sounds to indicate the bar code symbol’s status to a
battery of tests:
• One long beep followed by one short beep indicates a passing grade.
• One long beep followed by three short beeps indicates a failing grade.
You can easily and quickly perform pass/fail testing by scanning symbols and
listening for a set of triple beeps to indicate failure and then review the display for
specific information.
4 - 8 Quick Check® 600/800 Series User’s Guide
Page 53

Reviewing the Dimensional Parameters
The following table lists the dimensional parameters and summarizes their
results. Descriptions of the parameters follow the tables.
Parameter Trad’l ISO/IEC
Average Bar Error (Avg Bar Err)
Wide-to-narrow ratio (Wide/Nar Ratio)
Decodability*
* The method you select (Avg Decode or ISO/IECISO/IEC) determines the scan and symbol grades.
√
√
√
Parameter Result
Avg Bar Err Compared against traditional print tolerance crite-
ria set by symbology or application
OK if within criteria
Fail if outside criteria
Wide/Narrow Ratio Compared against generic or user set limits for the
symbology or application
OK if within limits
Fail if outside limits
Decodability A if >
.62
B if >
.50
C if >
.37
D if >
.25
F if < .25
Errors in Dimensional Parameters
If, after a scan, the abbreviation for dimensional appears as >DIM<, an error
exists in one or more of the dimensional parameters. If there is an error, use the
arrow buttons to review each parameter to identify the problem. If the
abbreviation for dimensional appears as Dim, the symbol has no dimensional
errors.
Average Bar
The average bar print error (AvgBar) value is the amount of average bar growth
or loss in the measured symbol relative to its “X” dimension. This value is
compared against traditional print tolerance criteria and rated. If the AvgBar is
within these limits, it is rated OK! or pass. If the AvgBar is outside these limits,
this test fails.
Quick Check® 600/800 Series User’s Guide 4 - 9
Page 54

W/N Ratio
The wide-to-narrow ratio (W/N) applies to symbologies with two element widths
including Code 39, Interleaved 2 of 5 and USS-Codabar. W/N is not meaningful
for the other symbologies and is not displayed. When measured, the W/N value
is compared against generic or user-specified limits appropriate for the
symbology. If the W/N Ratio is within these limits, it is rated OK! or pass. If the
W/N Ratio is outside these limits (HI! or LO!) this test fails.
Decodability
Decodability is the percentage of the symbology’s safe decoding margin
available for the scanner after printing errors. Lower margin values and
corresponding lower grades indicate an increased susceptibility to decoding
failure due to scanning errors.
Scanning variations such as acceleration can cause bar or space deviations due
to uneven, too fast or too slow scanning and provide lower margin values. You
can set the type of decodability in the test criteria options to either ISO/IEC
Decodability or character averaged decodability (Avg). With either calculation
method, the decodability is rated A if >
D if >
.25 or F if < .25.
• ISO/IEC Decodability is a graded measure of how close a given scan comes
to reference decode failure due to variations in bar and/or space widths.
• Character averaged decodability is also called “D margin.”
.62, B if > .50, C if > .37,
♦ To review the dimensional parameters:
1. Scan a symbol.
2. If the cursor is not next to Dim, use the arrows to place it there.
The first two dimensional parameters appear in the results line.
3. To view other dimensional parameters, press ↓.
The names of the dimensional parameters and their results scroll.
4. To review other types of data (Ref or Fmt), press →.
OR
5. To resume scanning, start at the quiet zone and scan the
symbol.
Calculating X
The total shown as the dimensional parameter is the total symbol width in “X”
dimension terms. Formally, a bar code symbol’s width includes the quiet zones.
The value presented as total is a calculated count of the number of “X”
dimensions from the starting bar through the ending bar of the scanned symbol.
You can use this value and manually measure the symbol’s actual width to
calculate “X.”
1. Press SELECT to display the menu with the term Print Results on top.
2. Press ↓ to move the cursor next to Calculate “X”.
4 - 10 Quick Check® 600/800 Series User’s Guide
Page 55

3. Press SELECT. The term Symbol Measures 00.00 Inches appears. The
cursor appears in the whole number position. If you want to enter the
symbol length in metric units (centimeters), enter the numeric value and then
press → to move the cursor to Inches. Press ↑. The term changes to
Centim.
4. Use the supplied ruler to measure the symbol length in decimal inches.
Measure from the left edge of the first bar to the right edge of the last bar.
5. Press ↑ or ↓ repeatedly until you display the whole number of the symbol
length. Press → to move the cursor to the tenths decimal place. Again,
press ↑ or ↓ repeatedly until you display the value you want. In the same
manner, enter the hundreths and thousandths values.
6. If you entered the symbol length in inches, continue with
step 7. If you entered the symbol length in centimeters, press → to move the
cursor to Inches. Press ↑. The term changes to Centim. Continue with step
7.
7. Press SELECT. The X value and the AvgBar value are calculated and
displayed. If you entered 00.00, the X value is not calculated.
8. If you want to recalculate the X value using a different value for the symbol
length, press ← to move the cursor to the left. The two lower lines of text
disappear. Now press ↑ or ↓ repeatedly until you display the new value.
Press SELECT. The X value and the AvgBar value are recalculated and
displayed.
Reviewing the Reflectance Parameters
The following table lists the reflectance parameters and summarizes their
results. Descriptions of the parameters follow these tables.
Parameter Trad’l ISO/IEC
Print Contrast Signal(Prnt Contr Sig)
Reflectance (Light) (Reflect (Light))
Reflectance (Dark)(Reflect (Dark))
Symbol Contrast (SymCntr)
Reflectance min/max (Rmin/Rmax)
Modulation
Edge contrast min (EdgeContr (min))
Defects
√
√√
√√
√
√
√
√
√
Quick Check® 600/800 Series User’s Guide 4 - 11
Page 56

Parameter Result
PCS
RI/Rd
SymCont
Edge contrast (min)
Modulation
Defects
Pass if PCS >
Fail if not satisfied
Pass if Rd/RI <
Fail if Rd/RI > 50%
70%
A if >
B if >
55%
C if >
40%
D if >
20%
F if < 20%
A if >
15%
F if < 15%
A if >
.70
B if >
.60
C if >
.50
D if >
.40
F if < .40
A if <
.15
B if <
.20
C if <
..25
D if <
.30
F if > .35
75%,RL > 25% and RD < 30%
50%
* For UPC, the minimum P.C.S. varies depending on the measured R-Max.
Errors in Reflectance Parameters
If, after a scan, the abbreviation for Reflectance appears as >REF<, an error
exists in one or more of the reflectance parameters. If so, you should use the
arrow buttons to review each parameter. If the abbreviation for Reflectance
appears as Ref, the symbol has no reflectance errors.
Print Contrast Signal, Light and Dark Reflectance
During a scan, the Quick Check Verifier obtains the maximum light reflectance
from spaces (Rmax or RI) and minimum dark reflectance from bars (Rmin or Rd).
The print contrast signal, “P.C.S.,” is a traditional measure of print contrast.
PCS= (R[L]-R[D]/R[L]. The traditional pass/fail criteria are PCS, 75% with RI >
25% and Rd < 30%.
The traditional parameters are rated OK! or pass if the PCS, RI and Rd meet
these criteria. If a value does not meet the criteria, the Ref parameters fail (LO!).
If the PCS, RI or Rd values appears on the display or on a printout as “XX” or “—
—,” the reading is out-of-range. You should recalibrate the unit and then rescan
the symbol.
4 - 12 Quick Check® 600/800 Series User’s Guide
Page 57

Note: Certain high reflectance materials may always read “XX” or
“— —.” You should repeat the calibration.
The ratio of Rd/RI (Rmin/Rmax) must be less than 50% to pass this test.
Alternately, you can consider Rd <
rated HI!, while Rd may be rated HI! but is never rated LO!.
50% RI. RI may be rated LO!, but it is never
Symbol Contrast, Minimum and Maximum Reflectance
Symbol contrast, SymContr, is a graded measure of the difference between the
highest reflectance value R (max) and the lowest reflectance value, R (min),
obtained during a scan. SC = R(max)-R(min). Symbol contrast is rated A if >
70%, B if >
F if < 20%.
55%, C if > 40%, D if > 20% and
Edge Contrast
Edge Contrast minimum is the smallest edge contrast or “edge transition” in a
scan reflectance profile. The edge contrast is the difference between the
reflectance of an adjacent bar and space. EC (min) is the minimum value of the
edge contrast obtained during a scan. The criteria that edge contrast must be >
15% must be met. The EC (min) is rated A if > than 15% or F < 15%.
Modulation
Modulation is a ratio of the edge contrast minimum value divided by the symbol
contrast (EC (min)/SC). Modulation is rated A if >
.60, C if > .50, D if > .40 and F if < .40.
B >
.70,
Defects
Defects is the graded measure of the maximum element reflectance non
uniformity (noise within any element due to spots, voids, etc.), normalized to
symbol contrast. High readings are caused by print defects found:
• in the symbol
• adjacent to the quiet zone
• at the transition of the label’s edge when a label which may have a marginal
or inadequate quiet zone is laid on top of another material.
Defects are rated A if <
F if > 30.
.15, B if < .20, C if < .25, D if < .30 and
♦ To review the reflectance parameters:
1. Scan a symbol.
2. If the cursor is not next to Ref, use the arrows to place it there.
The first two reflectance parameters appear in the results line.
3. To view other reflectance parameters, press ↑ or ↓.
The names of the reflectance parameters and their results scroll.
4. To review other types of data (dimensional or format), press → or ←.
OR
Quick Check® 600/800 Series User’s Guide 4 - 13
Page 58

5. To resume scanning, start at the quiet zone and scan the
symbol.
Reviewing the Format Parameters
The following tables list the format parameters and their results. Descriptions of
the parameters follow the tables.
Parameter Trad’l ISO/IEC
Message Length
Check Character
Symbol type
√√
√√
√√
Parameter Result
Message length
Check Character
Compared against the appropriate symbology, user or
application specification
- OK if it meets the specification
- Fail if it does not meet the specification
Compared against the appropriate symbology or
application specification or set by user
- CkChr Checks if it meets the specification
- Check Character Fails if it does not meet the specification
- No Check Character if you do not set the unit to test
check characters
Errors in Format Parameters
If, after a scan, the abbreviation for format appears as >FMT<, an error exists in
one or more of the format parameters. If so, use the arrow buttons to review each
parameter. If the abbreviation for format appears as Fmt, the symbol has no
format errors.
Message Length
The length of an encoded message is the number of characters in the output less
any of the following characters:
• Start and stop characters (for Codabar and Code 39)
• Any symbology-required check characters (for EAN/UPC and Code 128)
• Any function characters (for Code 128, 16K and Code 49)
4 - 14 Quick Check® 600/800 Series User’s Guide
Page 59

Check Character
A check character in a symbol may be mandated by a bar code symbology
specification, by you, by both or not at all. The display reflects the requirement
and the result, either CkChr Checks if it passes or Check Character Fails if it fails.
If you do not set the unit to test for a check character, the message NO Check
Character appears. If the check character is bad, a message indicating that
appears.
Symbol Type
The symbol type refers to differences in symbol formats used in various
applications. That is, the same symbol used in different applications may have
a different length or a unique data or application identifier.
When you set the verifier to an application, the unit attempts to identify the
symbol type. For example, if an AIAG Code 39 symbol is six or fewer numeric
characters with a data identifier of Q, it is a “quantity” symbol. If the symbol is
nine or fewer alphanumeric characters with a data identifier of S, it is a “serial
number” symbol.
Chapter 8, Using a Quick Check 800 Verifier
messages. If an application does not have a unique symbol format, the unit will
simply display the symbology.
lists the symbol types and error
♦ To review the format procedures:
1. Scan a symbol.
2. If the cursor is not next to Fmt, use the arrows to place it there.
The first two format parameters appear in the results line.
3. To view other format parameters, press ↑ and ↓.
The names of the format parameters and their results scroll.
4. To review other types of data (dimensional or reflectance), press → or ←.
OR
5. To resume scanning, start at the quiet zone and scan the symbol.
Reviewing Messages
Errors can result from a variety of causes. They can result from errors in
dimensional, reflectance or format parameters generically or based on an
application. An example of a generic (symbology) error message that may
appear after scanning a symbol is “BAD QuietZon.” This message indicates that
there is insufficient quiet zone width.
Verif i er
lists error, application and type messages.
Chapter 8, Using a Quick Check 800
Quick Check® 600/800 Series User’s Guide 4 - 15
Page 60

Using SSTR Codes to Review Data
A Single Scan to Result (SSTR) Code is a bar code symbol that tells the verifier
to execute certain command functions. If you scan an SSTR Code, the unit
displays the scan result parameter represented by that bar code symbol. After
you scan a symbol, either the default results appear (listed below) or, if you
changed the output display options, the results you specified appear.
SSTR Codes
SSTR Code Type and
Name
Parameter SSTR Codes
Average Bar Error
W/N Ratio
Decodability
R(I) : R(d)
P. C . S .
Symbol Contrast
Rmin/Rmax
Modulation
Edge Contrast (Min)
Defects
Symbol Type
Message Length
Default
Install Upper Line
Install Lower Line
Save Settings
Type
Dim
Dim
Dim
Ref
Ref
Ref
Ref
Ref
Ref
Ref
Fmt
Fmt
Dim/Ref
—
—
—
Test Criteria and
Notes
traditional
traditional
ISO/IEC
traditional and ISO/IEC
traditional
ISO/IEC
ISO/IEC
ISO/IEC
ISO/IEC
ISO/IEC
traditional and ISO/IEC
traditional and ISO/IEC
ISO/IEC Decodability &
Modulation traditional
Average Bar Error and
P. C . S .
installs upper result line
installs lower result line
saves settings
To review results that are not on the display, use the arrow buttons or simply
scan one of the parameter SSTR codes for the type result you want. The result
appears on the verifier’s lower display line. Use the arrow buttons to step
through the verifier’s menus (Dim, Ref and Fmt) to view these results.
11, SSTR Codes
includes a list of SSTR Codes.
Use the other SSTR Codes (Default, Install Upper Line, Install Lower Line and
Save Settings) to customize your verifier.
If you want to review one or two parameter results after each scan, you can
customize the verifier so these results appear as the default first screen. For
example, if you are most interested in the message length and symbol contrast
data, you can set your unit to display the message length and symbol contrast
results automatically after each scan.
4 - 16 Quick Check® 600/800 Series User’s Guide
Chapter
Page 61

If you save your customized default results, the unit automatically enters these
changes in the Output Options, Display Options line. To change the upper and
lower result lines using the Display Options menu, refer to "Changing the Output
Options" on page 3-12.
If you customize the display, you can use the SSTR Codes to review the data
quickly. You can also use the Default SSTR Code to return the
display to its factory default settings.
♦ To quickly review data using SSTR Codes:
1. Scan a symbol
2. Scan the SSTR Code that contains the parameter result you want to review.
The parameter result appears on the lower line of the display.
To review scan results not available using a SSTR Code (check character,
error messages and calculating X), use the verifier’s arrow buttons to select
them. Refer to “Reviewing Scan Results” on page 4-1 for instructions on
reviewing data manually.
♦ To customize the result display:
1. Scan the Install UpperLine SSTR Code.
The message Upper Line Result—INSTALL— appears.
2. Scan the SSTR Code for the result that you want displayed on the upper line
after a scan.
3. Scan the Install LowerLine SSTR Code.
The message Lower Line Result—INSTALL— appears.
4. Scan the SSTR Code for the result that you want displayed on the lower line
after a scan.
5. Scan the Save Settings SSTR Code twice.
After you scan this code once, the message —CONFIRM— Scan Again for
YES appears.
To save the display results, rescan the Save Settings Code. If you don’t
want to save the results, scan any other code.
♦ To return the customized display to the default display:
1. Scan the Default SSTR Code.
After you scan a symbol, the default display appears. If you set the test criteria option to ISO/IEC, it has the ISO/IEC defaults; if you set the test criteria to
Traditional, it has the traditional defaults.
Using the Quick Check Verifier as a Reflectometer
Your verifier is capable of functioning as a static reflectometer. This capability is
especially useful to investigate the underlying reflectance characteristics of bar
code symbols or for testing the reflectance of potential bar (for example, ink) and
space (for example, substrate) components.
Quick Check® 600/800 Series User’s Guide 4 - 17
Page 62

When using the reflectance mode, the reflectance “seen” by the unit is
continuously shown on the verifier’s display as both a two-digit reflectance
percentage (from 0% to 99%) and on a graphic bar graph (gas gauge). For
meaningful and consistent static reflectance values, you must calibrate the unit
and hold the wand at the proper scan angle with its “foot” just touching the
symbol. For information on proper scan technique and calibration, see
2, Quick Start Guide
.
Chapter
♦ To use the Quick Check Verifier as a static reflectometer:
1. Recalibrate the Quick Check Verifier if the calibration has not been performed recently.
2. Press SELECT to display the menu with the term Print Results on top.
3. Press ↓ to move the cursor next to Reflectom’r.
4. Press SELECT.
The display changes to show the percent reflectance in large letters on the
left of the display. The term Reflectance appears below the reading and a
bar graph appears on the right of the display.
4 - 18 Quick Check® 600/800 Series User’s Guide
Page 63

5
Saving and Printing
Saving Data
When you scan a bar code symbol and you do not have a printer connected to
the Quick Check 600/800 Verifier, or a printer is connected but not turned on, you
can store or save, the scan results in the verifier’s print buffer. You can print the
stored results at a later time. There are two ways to save data — using the
AutoPrint/Store feature or through the Print Results menu.
♦ To save scan data:
1. Set the AutoPrint/Store feature to On.
Refer to the instructions in
the settings.
2. Scan a bar code symbol.
The verifier automatically saves the results in its print buffer.
OR
Chapter 3, Changing the Settings
for changing
1. Scan a bar code symbol.
2. If the AutoPrint/Store feature is set to Off, press SELECT three times.
• Pressing SELECT the first time displays a menu that begins with Print
Results and the cursor is on the asterisk next to Print Results.
•Pressing SELECT a second time displays a message stating that a
printer is not attached and asks if you want to store the data.
•Pressing SELECT a third time saves the data. The verifier saves the
results in its print buffer.
Checking the Print Buffer During Operation
When you turn on the Quick Check 600/800 Verifier, a message appears if there
are records stored in its print buffer. You can also check the print buffer status
during operation, called “on-demand checking.”
The print buffer display provides both the percent of the memory used for the
stored records and the number of scan or profile records in the memory. The
amount of data you can store in the buffer depends on the symbology type and
the number of encoded data characters. In some cases when you are saving
scan profile data, memory may be almost full with data from just a few scans. In
other cases, the buffer may contain data from hundreds of scans, but only be
50% full. The unit can store approximately 2000 scans of U.P.C.-A code. When
the buffer reaches capacity, a full buffer message appears.
Quick Check® 600/800 Series User’s Guide 5 - 1
Page 64

♦ To check the print buffer during operation:
1. Display the menu that begins with Print Results.
If scan results are displayed on the verifier, press SELECT.
If a menu (for example, a change setting menu) is displayed on the verifier,
press POWER repeatedly.
2. Press POWER.
3. Press ↑.
The on-demand print buffer display screen appears. The display provides
the percent of the memory used for the stored records and the number of
scan records in the memory. You can respond in one of three ways: a.)
Cont., b.) Prnt or c.) Cir. The cursor is at the asterisk next to Continue.
3.a To continue obtaining scan results, press SELECT. The opening
display appears. You can then scan a symbol.
3.b To print the stored records, press → to place the cursor on the
asterisk next to Print. Then press SELECT. The stored records
print. Once printed, the stored results are removed from the verifier’s
memory; however, the results from the last scan remain in the buffer.
(Press ← to display the last scan’s results.)
3.c To clear (delete) the records stored in the memory, press →
twice to place the cursor on the asterisk next to Clear and then press
SELECT. The stored results and the results from the last scan are
deleted from the verifier’s memory.
Printing Data
When a printer is attached to the verifier and turned on, you can print the current
scan results stored in the buffer. For this discussion, “current data” are data from
a scan that you just took and whose results are on the verifier’s display, or data
from a scan that you will perform momentarily. “Stored data” are scan records
stored or saved in the buffer. There are two ways to print current data — using
the AutoPrint/Store feature or through the Print Results menu. There are also
two methods to print stored data — through the Print Results menu or through
the Print Buffer menu.
To print results, the Printer type (QCP or QCHSP) in the Printer Options menu
must match the type of printer you have connected to the verifier. If the
connected printer and the displayed printer abbreviation do not match, the
printout will be illegible.
♦ To print current data:
1. Connect the verifier and the printer and turn on both units. Be sure the
Printer type setting in the Output Options, Print Options menu matches the
type of printer to which the verifier is connected. Refer to "Changing the Out-
put Options" on page 3-12 for instructions.
5 - 2 Quick Check® 600/800 Series User’s Guide
Page 65

2. Scan a bar code symbol.
- If the AutoPrint/Store feature is set to On, the results print.
- If the AutoPrint/Store feature is set to Off, press SELECT twice. After you
press SELECT the first time, a menu that begins with Print Results appears
and the cursor is on the asterisk next to Print Results. After you press
SELECT a second time, a message appears that asks if you want to print all
the stored results, print just the results of the last scan or if you want to clear
the buffer.
3. Press ↓ to move the cursor next to Latest Result Only.
4. Press SELECT.
The data prints.
♦ To print stored data:
1. Connect the verifier and the printer and turn on both units. Be sure the
Printer type setting in the Output Options, Print Options menu matches the
type of printer the verifier is connected to. Refer to "Changing the Output
Options" on page 3-12 for instructions.
2. With any data displayed on the verifier, press SELECT three times. After
you press SELECT the first time, a menu that begins with Print Results
appears and the cursor is on the asterisk next to Print Results. After you
press SELECT a second time, a message appears that asks if you want to
print out all the stored results, print just the results of the last scan or if you
want to clear the buffer. The cursor appears next to All Stored Results. After
you press SELECT the third time, the stored data prints.
OR
1. Display the print buffer message. Refer to "Checking the Print Buffer During
Operation" on page 5-1 for instructions.
2. Use the arrow buttons to move the cursor to the asterisk next to Print.
The stored data prints and clears the records from the buffer, but the data
from the last scan remains in the verifier.
♦ To stop printing:
1. During printing, press and momentarily hold POWER on the verifier.
Printing stops when the printer’s internal buffer is clear.
OR
2. Wait until the printer stops automatically.
Deleting Stored Data
You can delete stored data from the verifier’s memory using the Print Buffer
menu or the Print Results menu.
Quick Check® 600/800 Series User’s Guide 5 - 3
Page 66

♦ To delete stored data:
1. Connect your printer to the verifier and turn on both units.
The opening display appears.
2. A PRINT BUFFER message appears asking if you want to continue, print or
clear.
3. Press ↓ and then → to move the cursor next to Clear.
4. Press SELECT.
The results stored in the verifier and the data from the last scan are deleted.
If you don’t want to clear the stored results, move the cursor next to Cont and
press SELECT.
OR
1. Connect your printer to the verifier and turn on both units.
The opening display appears.
2. When you select the Print Results menu, a menu appears asking if you want
to print All Stored Results, the Latest Stored Results Only or Clear Buffer!.
3. Press ↓ to move to select Clear Buffer!.
4. Press SELECT.
The results stored in the verifier and the data from the last scan are deleted.
If you don’t want to clear the stored results, move the cursor next to Cont and
press SELECT.
Interfacing With a Computer
You can use the QCViewerII software and print to a local or network printer, or
connect the verifier to an RS-232 serial communication device using the larger
port on the back of the unit and a QCDB09F cable. If you have the appropriate
computer software, you can display the verifier data on your computer. Contact
Hand Held Products for additional information about connecting the verifier to a
computer.
Reviewing the Printouts
All the information presented on the printout is also available on the display after
you scan a bar code symbol. Refer to
information on displaying this data.
Chapter 4, Reviewing Scan Data
for
5 - 4 Quick Check® 600/800 Series User’s Guide
Page 67

QCP and QCHSP Printouts
***Quick Check 600***
660 nm, 06 mil Scanner
Interleaved 2/5
123456
- Extended Accuracy! Avg Bar Err = -.05X OK!
Wide/Nar Ratio = 2.5 OK!
Decodability = 53% <B>
Symbol Total = 055”X”
Prnt Contr Sig = 92% OK!
Reflect(Light) = 86% OK!
Reflect(Dark) = 05% OK!
Symbol Contrst = 81% <A>
R(min)/R(max) = 06% <A>
Modulation = 91% <A>
EdgeContr(min) = 73% <A>
“Defects” = 05% <A>
Message Length = 06 OK!
— No Check Character —
Bar Growth IN TOL
“P C S” OK
Traditional Tests -PASS-
Format Tests -PASS-
ISO/IEC Parameters <B>
Add’l P/F Checks <P>
Format Checks <P>
Profile Quality Grade <B>
Passing Level: ISO/IEC <C>
==> ScanProfile PASSES
Symbol Grade
Avg. 4.0 => A/06/660
After 002 of 010 Scans
Name:
Date:
Quick Check® 600/800 Series User’s Guide 5 - 5
Page 68

Printing Guidelines
The verifier supports two different Hand Held Products serial printers:
®
• Quick Check
• Quick Check
The QCP and QCHSP are both impact printers.
When you first receive your printer, you should unpack it carefully. Before
attempting to use it, inspect the contents of the package for any shipping
damage. If there is evidence of damage, please keep ALL packing materials and
contact the delivery carrier as soon as possible for the claim procedure.
Confirm that you have the following items:
•Printer
• One roll of paper
• Power supply
For optimal printer performance, follow these general guidelines for any type of
printer:
• Never place the printer where it is exposed to direct sunlight.
• Never apply power while you are plugging or unplugging an input connector.
• Do not print without paper or a ribbon because this may damage the print
head.
• Do not subject the printer to temperatures below 5° C or above 40° C during
operations or to a sudden change in temperature.
• Insert the connectors so that a slight pressure seats the cable properly. Never
force the connectors because this could
damage the cable.
Standard Speed Printer (QCP)
®
High Speed Printer (QCHSP)
Using the QCP or QCHSP
The QCP and QCHSP models are shown on page 5-7.
5 - 6 Quick Check® 600/800 Series User’s Guide
Page 69

Quick Check Printer (QCP) and Quick Check High Speed Printer (QCHSP)
A three-position power switch on the printer’s front panel determines its function:
Switch Position Function
Down Left
Center
Down Right
A red light-emitting diode (LED) to the right of the power switch lights to indicate
the On and Paper Feed states.
The printer has a VAC transformer with an 8-foot cord. The power transformer
cord has a transformer on one end and has a mating
connector to the printer on the other end.
An interface cable connects the printer directly to the verifier to provide easy
exchange of scanning results. The connectors on each end of the cable are
keyed so that they cannot be plugged in the wrong way.
Quick Check® 600/800 Series User’s Guide 5 - 7
Off
On
Paper Feed
Page 70

The printer has a replaceable cartridge ribbon. Replace the paper roll when it is
empty.
♦ To turn on and off the QCP or QCHSP:
1. To turn on the printer, press the power switch into the On (center) position.
2. To turn off the printer, press the power switch into the Off (down left) position.
After you turn off the printer, wait at least three seconds to turn on the power
for the proper initialization procedure.
♦ To set up the QCP or QCHSP:
1. Place the printer on a hard, flat surface such as a table or desk top.
2. Press the power switch into the Off (down left) position.
3. Plug the power connector from the transformer into the printer.
4. Plug the transformer into a VAC wall outlet.
♦ To install or replace the QCP or QCHSP paper roll:
1. Press the printer power switch to the Off (down left) position.
2. Remove the printer cover by locating the four small grooves embossed on
each side of the printer cover and tilting the cover open by pushing down
gently on both sets of these grooves.
3. If necessary, remove the empty roll. Press and hold the power switch in the
Paper Feed (down right) position to advance the paper about one inch
beyond the paper cutter.
Lift the empty roll from the printer housing.
Do not pull paper out of the back of the printer as this will
damage the mechanism.
WARNING
4. Unroll several inches of paper from a new roll and cut a straight edge on the
paper if it is jagged or wrinkled. (A straight edge helps guide the paper into
the printer.)
5 - 8 Quick Check® 600/800 Series User’s Guide
Page 71

5. Slide the paper’s straight edge into the slot between the paper compartment
and the printer compartment until about one-quarter of an inch is inserted.
6. Press the power switch to the center On position and wait a few seconds.
7. While holding the paper in place, press and hold the power switch in the
Paper Feed (down right) position until an inch of paper emerges from the
printer and then release the switch.
8. Pull the paper through the printer until several inches are exposed.
9. Put the paper spindle into the paper roll and place the roll and spindle onto
the grooves near the back of the printer.
10. Roll the paper to take up any slack inside the printer.
11. Ensure the roll turns freely. If the paper roll does not turn freely, the paper
may jam and damage the mechanism.
12. Slide the paper’s straight edge through the slot in the printer cover.
13. Replace the printer cover by pushing the back of it down into place and
pressing the front down to lock it in place.
♦ To remove the ribbon from the QCP or QCHSP:
1. Press the printer power switch to the Off (down left) position.
2. Remove the printer cover by locating the four small grooves embossed on
each side of the printer cover and tilting the cover open by pushing down
gently on both sets of these grooves. The ribbon cartridge should be visible.
3. Push down on the right side of the ribbon cartridge (marked PUSH) and
remove the cartridge from the printer compartment.
Quick Check® 600/800 Series User’s Guide 5 - 9
Page 72

4. Slide the paper through the gap between the inked ribbon and the frame of
the new ribbon cartridge.
5. Set the new cartridge into the printer compartment and press both sides to
secure it in place.
The cartridge must be properly seated and aligned for the best print quality.
If you get ribbon ink on the printer’s plastic case, wipe it off immediately.
Once the ink dries, it is difficult to remove.
6. Replace the printer cover by pushing the back of it down into place and
pressing the front down to lock it in place.
7. Turn the cartridge ribbon advance knob (marked by an arrow on the
cartridge) clockwise to remove slack from the ribbon.
8. Replace the printer cover.
♦ To connect the QCP or QCHSP to the Quick Check 600/800 Verifier:
1. Press the printer power switch to the Off (down left) position.
2. Plug the transformer into a VAC outlet.
3. Plug the interface cable into the socket on the side of the
verifier.
4. Connect the 25-pin connector of the interface cable into the rear of the
printer. Secure the connector by tightening the screws on each side of the
connector.
5. Press the power switch to the On (center) position.
The red LED lights and a Ready message appears indicating that the
printer’s built-in microprocessor has verified its
internal operation.
♦ To perform a QCP or QCHSP self-test:
The self-test tests the print head and ribbon.
1. Ensure the power switch is in the Off (down left) position and there is paper
in the printer.
2. Plug the power source into the printer.
3. Press and hold down the power switch in the Paper Feed (down right)
position until the LED lights and the printer starts to operate.
4. Release the power switch.
The printer performs the self-test and prints its full set of
characters.
5 - 10 Quick Check® 600/800 Series User’s Guide
Page 73

Troubleshooting the QCP or QCHSP
Printing difficulties may be caused by selecting the incorrect printer interface
configuration for the type of printer you are using.
• For the QCP, select QCP.
• For the QCHSP, select HSP.
For instructions on selecting the printer interface setting, see
Changing the Settings
If you use your printer infrequently, the print impression can become weak if the
ribbon dries out. If the printed material is difficult to read and you suspect this is
the cause of the problem, press the power switch to the Paper Feed position and
advance to a properly inked portion of the ribbon.
.
Chapter 3,
Quick Check® 600/800 Series User’s Guide 5 - 11
Page 74

5 - 12 Quick Check® 600/800 Series User’s Guide
Page 75

6
Background Information
General Bar Code Information
Bar code technology allows you to get information into a computer much more
accurately than keying. Quick Check 600/800 Verifiers measure the quality of
the bar code symbols to ensure the proper information is encoded and can be
read. This instrument is both a quick, easy-to-use pass/fail tester for bar code
symbols and a powerful measuring tool for detailed testing of these same
symbols. You can set your verifier to use either traditional or ISO/IEC
parameters to analyze bar code symbols. The quality information from the
verifier is presented through an easy-to-read liquid crystal display (LCD), light
emitting diodes (LEDs), audible tones and printouts.
Bar code symbols consist of a series of parallel, adjacent bars and spaces. Data
is encoded in the width patterns of the symbol. These patterns, when interfaced
with computer software, provide a large amount of information. Bar code
systems offer a high degree of confidence that data entry is accurate. The
substitution error rate, the rate at which a character may contain an error, is very
low. The first read rate, the probability (percentage) that an attempt to input data
will result in data being captured on the first attempt, is very high.
Bar code technology dates back to the 1960s and early 1970s, but did not come
into widespread use as we know it today until the later 1970s. Retail
applications, primarily grocery stores, saw the need for automatic identification
technology and pushed development ahead. As many other industries began to
take advantage of bar code technology, they often needed to develop their own
symbology, or type of bar code, with unique specifications and standards.
Depending on the data that needs to be recorded, several different symbologies
can be used. Communication cannot occur unless the reading and printing tools
use a compatible symbology.
The symbologies tested by the verifier include:
•EAN/UPC
• Code 39
• Interleaved 2 of 5
• Code 128
• Code 93
• Codabar
• Code 11
• Code 16K
• Code 49
•MSI Code
Quick Check® 600/800 Series User’s Guide 6 - 1
Page 76

The industry standards (applications) tested by the verifier include:
•AIAG
• BOOKLAND
• CCBBA
•COMPTIA/CTIA
•HIBCC
•LOGMARS
• SCC (SCS/ITF, UCC/
EAN-128)
•SISAC
• UPC Coupon Code
Symbology Specifications
The reading and printing specifications for each symbology are defined by
various organizations. The verifier uses these specifications to give you
quantitative and qualitative information. You can set the verifier to provide
different standards to suit your company’s internal quality control guidelines.
Symbologies
The following table lists the symbologies that your Quick Check 600/800 Verifier
can verify, the major industries that use each symbology, and the organizations
that hold the standards. Following the table is a list of the abbreviations for each
organization, along with an address and phone number you can write or call for
additional information.
Symbology Industries Organization
UPC
Codabar & USS
Codabar
Code 39
Code 11
Interleaved 2 of 5
Code 16K
Code 128
Code 49
Code 93
MSI Code
grocery, identifies product
and manufacturer
blood banking, Library of Congress, photo finishing, air parcel delivery
automotive, health, industry,
non-retail
industrial
shipping containers for grocery
warehousing and distribution
health, microcomputer
serials industry, UCC shipping
containers, health, industry
health, industrial
industrial
shelf marking
GS1
CCBC
AIM-USA
DOD, AIAG,
HIBCC,
AIM-USA
AIM-USA
GS1
AIM-USA
HIBCC,ABCD
AIM-USA
SISAC, GS1,
HIBCC
AIM-USA
AIM-USA
6 - 2 Quick Check® 600/800 Series User’s Guide
Page 77

ABC (formerly CCBC) - America's Blood Centers, 725 15th Street NW, Suite
700, Washington, DC 20005, Tel: (202) 393 5725, Fax: (202) 393 1282,
http://www.americasblood.org/
AIAG - Automotive Industry Action Group, 26200 Lahser Rd., Suite 200,
Southfield, MI 48033, Tel: (248) 358-3570,
http://www.aiag.org/Index.cfm
AIM North America - A chapter organization of AIM, Inc., 125 WarrendaleBayne Road, Warrendale, PA 15086, Tel: (724) 934 5688, Fax: (724) 934 4495,
http://www.aimusa.org/
BASIC - Book and the Serial Industry Systems Advisory Committee, SubCommittee of the Book Industry Study Group (BISG), 19 West 21st Street, Suite
905, New York, NY 10010, Tel: 646-336-7141, Fax: 646-336-6214, email:
info@bisg.org
Comp TIA - Computing Technology Industry Association, 1815 S. Meyers Road,
Suite 300, Oakbrook Terrace, IL 60181-5228, Tel: (630) 678 8300, Fax: (630)
678 8384, http://www.comptia.org/association_home.aspx
DoD Logistics AIT Office - Automatic Identification Technology, 8725 John J.
Kingman Road, Fort Belvoir, VA 22060, Tel: (703) 767 6200,
http://www.dodait.com/
GS1 (formerly UCC and EAN)
Brussels - Blue Tower, Avenue Louise, 326, BE 1050 Brussels Belgium,
Tel: +32 2 788 7800, Fax: +32 2 788 7899
GS1 US - Princeton Pike Corporate Center, 1009 Lenox Drive, Suite 202,
Lawrenceville, New Jersey, 08648 USA, Tel: (609) 620 0200,
Fax: (609) 620 1200, E-mail: info@gs1us.org, http://www.gs1us.org
HIBCC - Health Industry Business Communications Council, 2525 E Arizona
Biltmore Circle, Suite 127, Phoenix, AZ 85016,
Tel: (602) 381 1091, Fax: (602) 381 1093, E-mail: info@hibcc.org,
http://www.hibcc.org/
Quick Check® 600/800 Series User’s Guide 6 - 3
Page 78

Symbology Characteristics
Your Quick Check 600/800 Verifier can handle bar code symbologies with a
variety of characteristics. To help understand symbologies, you should be
familiar with the following commonly used terms:
• Code refers to the actual data contained in the bar code symbol, such as a
part number, serial number, transaction code or other type of data.
• Symbol refers to the actual arrangement of parallel bars and spaces that
encode the data.
• The character set describes the range of data characters that can be
encoded in a given symbol. For example, UPC uses only
numbers and is called a numeric symbology, whereas Code 39 uses
alphabetical characters, numbers and special characters.
• There are two symbology types, discrete and continuous.
•In a discrete code, each character stands alone and can be decoded.
Between characters is a loosely toleranced intercharacter gap which
contains no information. Every discrete character has a bar on each
end. One example of a discrete code is Code 39.
•In a continuous code, there are no intercharacter gaps. Every
character begins with a bar and ends with a space. The end of one
character is indicated by the start of the next
character. An example of a continuous code is UPC.
•The bar and space widths can vary within or between symbologies;
those with only two-element widths (wide and narrow) versus those
that use multiple widths.
• Two-width symbologies, such as Code 39, have a ratio of wide to
narrow typically between two and three.
• Multiple-width symbologies, such as UPC, allow the bars and
spaces to assume more than two different widths. Most multiple-width
symbologies have characters whose length is subdivided into a
predetermined number of modules. In addition, the width of each bar
or space is always an integral number of modules.
Bar code symbologies vary on the amount of information that can be encoded in
a given length. Usually, only characters have a specified density, since the
overall length of a symbol must include other characters. These other characters
may include a start/stop code and a check character.
•A start code is a pattern of bars and spaces that appears at the beginning of
a symbol to inform the reading tool where the symbol begins.
•A stop code is a pattern placed at the end of a symbol for marking the end of
the data characters. Sometimes the start and/or the stop characters also
indicate the scanning direction.
Quiet zones are areas at the beginning and end of a bar code symbol that allow
the optical equipment to differentiate a bar code from other printed material.
Most of the symbologies in use today are bidirectional; this means that they can
be read by a scanner either left-to-right or right-to-left without affecting the
decoded data.
6 - 4 Quick Check® 600/800 Series User’s Guide
Page 79

A check character is a character placed in a predetermined position in a symbol
and whose value is based on some mathematical relationship of the other
characters in the symbol. It is used by the scanner to validate that the correct
data has been decoded. If a numeric symbology contains a check character, it
is often called a check digit.
The following illustration shows many of these bar code parameters.
Bar code symbol parameters
Quick Check® 600/800 Series User’s Guide 6 - 5
Page 80

The following table lists some characteristics of the nine bar code symbologies
decoded by the Quick Check 600/800 Verifier.
Element
Symbology Character Set
widths
UPC
EAN
Codabar/USS Codabar
Code 39
Code 11
Interleaved 2 of 5
Code 16K
Code 128
Code 49
Code 93
MSI Code
numeric
numeric
numeric with 6 special characters
alphanumeric, 26 uppercase
letters, 10 digits, 7 special
characters
numeric and --numeric
alphanumeric with all function codes and special characters (full ASCII set)
alphanumeric with all function codes and special characters (full ASCII set)
alphanumeric (all 128 ASCI
characters)
alphanumeric (all 128 ASCI
characters)
numeric
How a Bar Code Verifier Works
4 widths
4 widths
2 widths
2 widths
3 widths
2 widths
2 widths
4 widths
6 widths
(stacked symbology)
4 widths
4 widths
A bar code reader or scanner extracts the information that is optically encoded
in a bar code symbol and converts it into computer-compatible digital data.
Hand Held Products provides a variety of handheld wand or pen scanners with
the verifier that are designed to minimize scratching the symbol. When you place
the wand on a bar code symbol and move it across the symbol, electro-optical
techniques read the symbol. All wands contain a light emitting diode (either
visible or infrared light) which illuminates the symbol.
The area of the symbol that is actually being scanned at any given time is
referred to as the “spot” and is defined by an aperture. The spot size varies
depending on which wand is used. The spot is formed by flooding the symbol
with light. A tightly focused aperture collects the light. The light reflected from
the spot is directed to a photodiode detector which generates a small current
6 - 6 Quick Check® 600/800 Series User’s Guide
Page 81

proportional to the amount of light returned. A symbol’s spaces reflect more light
than the bars. As the wand is moved across the bar code symbol, the analog
voltage varies, creating a graphic scan profile. The scan profile is the basis for
verifying the bar code symbol.
Scanner Illumination
It is important to have a uniform velocity when scanning bar code symbols
because the relative widths of the actual bars and spaces are determined by
measuring the time that the electrical signal from the scanner spends at the
voltages that represent either black or white, respectively. The verifier will notify
you if you scan too fast, too slow or unevenly.
Also, severe changes in ambient light may cause misleading scan profile or
reflectance readings. Therefore, it is important to calibrate and use the verifier
in the same general ambient light and, when in use, to minimize variation in the
intensity of the ambient light.
Once collected by the electro-optical components, the data is transmitted to the
computer in the verifier. The verifier assesses the data and determines the
quality parameters.
Additional Information
For additional information on bar code technology, you can refer to the
associations and books listed below.
• AIM North America - A chapter organization of AIM, Inc., 125
Warrendale-Bayne Road, Warrendale, PA 15086, Tel: (724) 934
5688, Fax: (724) 934 4495, Email: Mary Lou Bosco,
http://www.aimusa.org/
• GS1 (formerly UCC and EAN)
Brussels - Blue Tower, Avenue Louise, 326, BE 1050 Brussels
Belgium, Tel: +32 2 788 7800, Fax: +32 2 788 7899
• GS1 US - Princeton Pike Corporate Center, 1009 Lenox Drive, Suite
202, Lawrenceville, New Jersey, 08648 USA, Tel: (609) 620 0200,
Fax: (609) 620 1200, E-mail: info@gs1us.org, http://www.gs1us.org
Quick Check® 600/800 Series User’s Guide 6 - 7
Page 82

• ANSI - American National Standards Institute, 25 West 43rd Street,
(between 5th and 6th Avenues), 4 floor, New York, NY 10036,
Tel: (212) 642 4900, Fax: (212) 398 0023, http://www.ansi.org/
The Bar Code Book-Reading, Printing and Specification of Bar Code
•
Symbols
. Roger C. Palmer. Helmers Publishing, Inc., Fourth Edition.
2001, ISBN: 0911261133.
Reading between the lines: an introduction to bar code technology.
•
Craig K. Harmon and Russ Adams, Helmers Publishing, Inc., Fourth
Edition. 1989
, ISBN: 0911261001.
• Revolution at the Checkout Counter : The Explosion of the Bar Code.
Stephen A. Brown, Harvard University Press 1997, ISBN:
0674767209.
6 - 8 Quick Check® 600/800 Series User’s Guide
Page 83

7
Using DataMatch
Understanding the DataMatch Feature
You can load a database into your Quick Check 600/800 Verifier. Then, when
you scan a bar code symbol, you can review not only the scan results, but also
any information contained in the database about that scanned symbol. The
additional information may be, for example, the name of the product.
You can use the DataMatch feature in any of these ways:
• Display (append) the database information to the decoded data so both types
of information appear on the first line of the verifier display.
• Replace the first line of the verifier display with the database
information.
• Verify that the symbol is in the database.
If the verifier was set to use DataMatch before it was turned off, the term
DataMatch appears on the last line of the opening display when you turn on the
unit.
Downloading DataMatch
DataMatch.EXE is a PC database compacting and downloading utility program
available from www.handheld.com. Select Services & Support - Download
Software, and select the Quick Check 600/800 Verifier. You can also use the
following link: http://www.handheld.com/Site.aspx/na/en//developers/
download_software/?product=2.
Structuring and Loading the Database
You must structure each record in your data file before you use this program to
load the database. The data file structure must be:
SYM<TAB>DECODE<TAB>MATCH<CR><LF>
SYM
SYM
is a three character symbology identifier:
SYM Identifier Code
Quick Check® 600/800 Series User’s Guide 7 - 1
Page 84

UPC or upc
EAN or ean
CBR or cbr
C39 or c39
I25 or i25
C93 or c93
128
C11 or c11
MSI or msi
DECODE
UPC Code
European Article Number
Codabar
Code 39
Interleaved 2 of 5
Code 93
Code 128
Code 11
MSI Code
DECODE
is the encoded information that appears on the verifier
display in a “human readable format.” The following constraints apply to the
format of DECODE:
• UPC and EAN must include the check digit and number system character or
“flags” separated by “-”
UPC-A: X-XXXXXXXXXX-X
UPC-E: X-XXXXXX-X
EAN-8: X-XXXXXX-X
EAN-13: XX-XXXXXXXXXX-X
• If applicable, Code 39, Interleaved 2 of 5, Code 11 and MSI should include
proper check digits in parentheses.
• Codabar and Code 39 should show applicable Start/Stop Characters.
Codabar Start is represented by “A” and Stop by “B.” Code 39 Start and Stop
are both represented by “*.”
MATCH
MATCH
encoded data. It should be a maximum of forty (40) characters.
The length of
store in the database section of your verifier. For example, with a 40-character
MATCH per record maximum, you can store one thousand records or items.
is the alternate message or database descriptor for the symbol and its
MATCH
will affect the number of records (or items) that you can
You can name your database in any manner, adding the extension .dat to the
filename.
♦ To load the database into the verifier:
1. Structure your database as described above.
2. Connect the verifier to your computer’s serial port using a PC Interface Cable
(QCDB09F or QCDB25) and turn on the unit.
7 - 2 Quick Check® 600/800 Series User’s Guide
Page 85

3. Open DataMatch (exe).
4. Select a database file.
5. Select the "Compress/Download" button.
Quick Check® 600/800 Series User’s Guide 7 - 3
Page 86

6. The program walks you through the download steps and lets you know when
the process is finished.
Selecting the DataMatch Feature
You can enable the verifier to verify symbologies, an application or use
DataMatch. You enable DataMatch using the same procedure as you would to
select a symbology or an application.
♦ To select DataMatch:
1. Download the database into your verifier.
2. Press SELECT from the main menu.
3. Set the cursor on the asterisk next to Change Settings and then press
SELECT.
A menu that begins with
4. With the cursor on the asterisk next to
A menu with a list of symbologies appears.
5. Set the cursor on the asterisk next to
The display shows:
Select Option:
* Append DMatch Msg
* Xchange Msg w
* Verify Only
Append DMatch Msg – includes Symbology type, encoded data and
Scan
Specifications appears.
Specifications, press SELECT.
DataMatch and press SELECT.
7 - 4 Quick Check® 600/800 Series User’s Guide
Page 87

database match description
Xchange Msg w
See "Reviewing DataMatch Results" on page 7-5 for an explanation of the
options.
6. To change the DataMatch option, press ↓ to move the cursor to the asterisk
next to the option you want and then press SELECT until the database
option you want appears.
7. Scan a symbol. If the DataMatch feature is turned on and
information about the scanned symbol is in the database, it appears on the
display.
Scan – includes just database Match description
Reviewing DataMatch Results
After you scan a symbol, one of the following displays appears, depending on the
DataMatch option you selected.
• If you selected Append DMatch, the information from the database
appears on the first line of the verifier’s display.
It follows the scan’s decode information. If there is no database
information, a message to this effect appears.
• If you selected
appears on the first line of the verifier’s display. It replaces the scan’s
decode information.
• If you selected
contained in the database, the verifier display shows the scan result
information depending on the settings you selected. If the scanned
bar code symbol is not in the database, the message
DMATCH: BAD(F) appears on the display.
XChange wScan, the information from the database
Verify Only and the scanned bar code symbol is
Under FMT the message DataMatch:OK appears if the scanned symbol is in
the database.
Quick Check® 600/800 Series User’s Guide 7 - 5
Page 88

7 - 6 Quick Check® 600/800 Series User’s Guide
Page 89

8
Using a Quick Check 800 Verifier
The Quick Check Series 800 Bar Code Verifier is a high performance,
professional tool for verifying the readability and standards compliance of printed
bar codes in non-contact mode. The Quick Check 800 Verifier units use a
handheld linear imaging bar code reader for simple, convenient aim and shoot
operation. The Series 800 verifiers are enhanced versions of Hand Held
Products’ Series 600 verifiers and are designed to not only provide the user with
all the features of the Series 600 models, but also allow the ease of use of a noncontact device for certain verification tasks.
This chapter details where the operation of a Series 800 verifier differs from a
Series 600 unit.
Using the Quick Check 800 Verifier with a QC3800V
Linear Imager
Only
the QC3800V can be used as the non-contact input device
with a Series 800 unit. The QC3800V should not be used with
WARNING
any other decoder or terminal.
General Operation
Scanning is initiated by depressing the trigger on the QC3800V after the Quick
Check 800 Verifier has been turned on. When the unit starts scanning, it emits
a single beep.
If the unit cannot decode a bar code after a trigger pull, it emits four beeps and
returns to the main display.
After a successful decode, with a result that passes the minimum acceptable
grade set point, the unit emits three beeps (one short, two long).
A decode that fails to receive a grade above the minimum requirement set
causes the unit to emit five beeps (one short, one long, three short).
The optimum reading orientation for the QC3800V is 6 inches (152.4 mm) with
an angle of incidence of 15° from perpendicular. At this orientation, the system
performance approximates an average circular aperture size of .006 to .008
inches (.152 to .203 mm). Extreme variations from this orientation may affect the
accuracy of some parameter results.
Battery life of the Quick Check 800 Verifier with the QC3800V attached will be
shorter than when using the QC Mouse Wand or Pen Wand. To extend battery
charge life, use the unit with the charger connected.
Quick Check® 600/800 Series User’s Guide 8 - 1
Page 90
Reflectance-Based Information
When connected to a QC3800V, the Main display indicates the Series 800
verifier model, and the bottom line displays:
Linear Imager
Once a successful scan is performed, the Main display shows, for example:
C39:ABCD012345678
Dim --- Fmt
Decod’ty 75% <A>
WN Ratio 2.3 OK!
Note that the second line, where the reflectance information would normally be
displayed, shows
measured. The reflectance information is measured and displayed when a
Mouse Wand or Pen Wand is connected to the Series 800, but not when a
QC3800V is used. No reflectance-based values are displayed or printed. This
includes Rmin, Rmax, Print Contrast Signal, Symbol Contrast, Edge Contrast
Minimum, Modulation, and Defects.
---, which indicates that the reflectance information is not
ScanProfile Output
No ScanProfile Output is available in either the Printer Output modes or the
"PROF to PC" mode (as used by QCViewerII software).
Percent Decoded/Scanned Mode
No Reflectance Calibration is necessary when the QC3800V is connected.
When a Mouse Wand or Pen Wand is reconnected, however, the reflectance
calibration is necessary.
When using the QC3800V, a special Percent Decoded/Scanned Mode replaces
the Reflectometer Mode found on a Series 600 verifier. When the QC3800V is
connected, the second level (Print Results) menu changes from:
* Print Results
* Calculate "X"
* Reflectometer
* Change Settings
8 - 2 Quick Check® 600/800 Series User’s Guide
Page 91
to:
* Print Results
* Calculate "X"
* % Decoded/Scanned
* Change Settings
When the new * % Decoded/Scanned option is selected, this screen
appears:
Symbol Grade: -----
---% Scans Decoded
---% Scans Passed
Decoded nnn of nnn
An example of this completed screen would be:
Symbol Grade: A-3.8
100% Scans Decoded
95% Scans Passed
Decoded 20 of 30
Symbol Grade
upon the average of the individual scan grades for the scans decoded within the
total run of scans. The individual scan grades are weighted as shown below:
The numeric average mapping to the displayed grade is shown below:
% Scans Decoded
number of scans that were made.
% Scans Passed
minimum required ISO/IEC grade set in the unit.
Decoded
total number of scans made. The maximum number of scans that will be made
is based on the number of scans set in the
found in the menu chain:
is the running average grade of the symbol being tested based
A = 4.0
B = 3.0
C = 2.0
D = 1.0
F = 0.0
3.5 ≤ A ≤ 4.0
2.5 ≤ B ≤ 3.5
1.5 ≤ C ≤ 2.5
0.5 ≤ D ≤ 1.5
0.0 ≤ F ≤ 0.5
is the percent of scans successfully decoded out of the total
is the percent of decoded scans that met or exceeded the
is the total number of scans successfully decoded compared to the
* #Scans/Symbol: line option
Quick Check® 600/800 Series User’s Guide 8 - 3
Page 92

* Change Settings
* Test Criteria
* #Scans/Symbol: nnn
Since the Scan Profile output capability does not exist with the QC3800V
connected, the Printer Output screen also changes. The program sequence for
that display is:
* Change Settings
* Output Options
* Printout Options
* Printer Type: HSP
* Printout: Long
* AutoPrint/Stor On
8 - 4 Quick Check® 600/800 Series User’s Guide
Page 93

9
Error, Application, and Type Messages
Type Display Message Printout Message
GENERAL BAD # System BAD Number System
BAD 2nd Chek BAD 2nd Check Chr
BAD Addm Chk BAD Addendum Check
BAD AlphaNum BAD AlphanumericField
BAD Char Seq BAD Char Sequence
BAD Symbol Check Chr
BAD CheckChr
or Check Charctr Fails BAD
or ModCheck Fails BAD
BAD CtrGuard BAD Center Guard Patrn
BAD LH Guard BAD Left Guard Pattern
BAD Msg Chek BAD Message Check
BAD Numbers BAD Numeric Field
BAD RH Guard BAD Right Guard Pattrn
BAD Separatr BAD Seperator
BAD User Chk BAD User Check Chr
ILLEGAL Chr ILLEGAL Character
MISSING S/S MISSING Start/Stop
No Check Charctr No Check Character
OK Check Chr
SHORT LH Q-Z BAD Left Quiet Zone
SHORT RH Q-Z BAD Right Quiet Zone
UNRECOGNIZED
Check Charctr Passes OK!
or ModCheck Passes OK!
UNRECOGNIZED symbology
Quick Check® 600/800 Series User’s Guide 9 - 1
WIDE I-C Gap WIDE I-C Gaps
% Mag Factor
U.P.C.:(or EAN:) xxx%
Mag Factor
Page 94

Type Display Message Printout Message
DATABASE Match Match
NOT in DBase NOT in Database
ABCD AdvShipmnt Adv Shipmnt Notice
Authoriz # Authorization #
BAD ID Char. BAD ID Character
BAD UnitMeas BAD Unit of Measure
Bookland Bookland
DestPostCd Dest. Postal code
EAN ITF-14 EAN ITF-14
EAN-13 EAN-13
Package ID Package ID
Product ID Product ID
PurOrder # Purchase Order #
Qty/UofMes Quantity/UofMeas
SupID/Prt# Supl ID / Part #
SupID/Ser# Supl ID / Serial#
Supplier ID ID Code (Supl)
UCC/EAN128 UCC/EAN-128
UPC-A UPC-A
AIAG Actual Wgt Actual Weight
BAD ID Char BAD ID Character
BAD Source BAD Source Code
BAD Trace Fd BAD Trace Field
Container Container Type
Cust Part # Part # (Cust)
CustmrDefn Customer Defined
CustOrder# Order # (Cust)
CustProdID Product ID (Cust)
9 - 2 Quick Check® 600/800 Series User’s Guide
CustTrace# Trace # (Cust)
Page 95

Type Display Message Printout Message
ECV /VCVS ECV /VCVS
Emissn Test Emissions Test
Employee# Employee Pass ID
EngrChgLv1 Engr change Level
Gross Amt. Gross Amount
HeatProcss Heat/Process #
Internal Internal Only!
Len /Weight Length/theor.Wgt
MastrSerl# Serial # (Master)
MixedSerl# Serial # (MixedLd)
Net Amount Net Amount
NO Separator Missing Separator
Part# cont Part# (cont)
Quantity Quantity
ReturnCode Return Code
Serl#(Itm) Serial # (Item)
Serl#Pkg Serail # (Pack)
Stock Locn Stocking Location
Supl Part# Part# (Supl)
Supl&Part# Supplier .Part #
SuplOrder# Order # (Supl)
SuplTrace# Trace# (Supl)
Suppl Defn Supplier Defined
Suppl (Cus) Supplier (Cust)
Suppl (Sup) Supplier (Supl)
Trans Defn Transport Defined
UnlistedID Unlisted ID Char
UofMeasure Unit of Measure
Quick Check® 600/800 Series User’s Guide 9 - 3
“VIN” # Vehicle ID Number
Page 96

Type Display Message Printout Message
BOOKLAND Andorra Andorra
Argentna Argentina
BAD Publsh # BAD Publisher #
Bangldsh Banglasdesh
Botswana Botswana
Brazil Brazil
Bulgaria Bulgaria
Caribben Caribbean
Chile Chile
China China
Colombia Colombia
CostaRic Costa Rica
Croatia Croatia
Cuba Cuba
Cyprus Cyprus
Czechlov Czechoslovakia
Denmark Denmark
Egypt Egypt
EnglSpkg English Speaking
Equador Equador
Finland Finland
FrenSpkg French Speaking
Gambia Gambia
GermSpkg German Speaking
Ghana Ghana
Greece Greece
HongKong Hong Kong
Hungary Hungary
9 - 4 Quick Check® 600/800 Series User’s Guide
Iceland Iceland
Page 97

Type Display Message Printout Message
India India
Indonesa Indonesia
Israel Israel
Italy Italy
Japan Japan
Kenya Kenya
Korea Korea
Lesotho Lesotho
Malawi Malawi
Malaysia Malaysia
Maldives Maldives
Malta Malta
Mauritis Mauritius
Mexico Mexico
Morocco Morocco
N.Antils Neth.Antilles
Namibia Namibia
Netherld Netherlands
Message on Display Message on Printout
Nigeria Nigeria
Norway Norway
NOT Bookland NOT Bookland
Pakistan Pakistan
PapNGuna Papua N.Guinea
Philppns Philippines
Poland Poland
Romania Romania
RussSpkg Russian Speaking
Quick Check® 600/800 Series User’s Guide 9 - 5
S.Pacifc S.Pacific
Page 98

Type Display Message Printout Message
Singpore Singapore
Slovinia Slovinia
Spain Spain
SriLanka Sri Lanka
Suriname Suriname
Sweden Sweden
Ta iw an Ta i wa n
Tanzania Tanznaia
Thailand Thailand
Tunesia Tunesia
Tu r ke y Tu r ke y
Unesco Unesco
Uruguay Uruguay
Venzuela Venezuela
Yugoslav Yugoslavia
Zambia Zambia
CCBBA Attribute Attribute
Autol Use AutologusUse Only
BAD CtrlCode BAD Control Code
BAD GroupCod BAD Grouping Code
Biohazard Biohazard
BloodProd Blood Product
Dir Donor Directed Donor
Donation# Donation #
EmergyUse Emergency Use Only
ExpirDate Expiration Date
FDA Reg# FDA Regis. #
GroupLbl Grouping Label
9 - 6 Quick Check® 600/800 Series User’s Guide
Hold! Hold for procsng
Page 99

Type Display Message Printout Message
Hospital# Hospital #
Irradiatd Irradiated
NegAntCMV Neg for Anti-CMV
NotTransf Not For Transfn
Obsolete Fmt Obsolete Format
PatientID Pat ID (Blood Bg)
PatientID Pat ID (Sample)
PatientID Pat ID (Wrist)
PersonlID Personnel ID#
PrimryBag Primary Col Bag
ThPhlebty Frm TherPhlebtmy
TrnsfrBag Transfer Bag
Type A Blood Type A
Type A+ Blood Type A+
Type A- Blood Type A-
Type AB Blood Type AB
Type AB+ Blood Type AB+
Type AB- Blood Type AB-
Type B Blood Type B
Type B+ Blood Type B+
Type B- Blood Type B-
Type O Blood Type O
Type O+ Blood Type O+
Type O- Blood Type O-
HIBCC Alternat* Alternate*
Alternate Alternate
AltSecndry Alter.Secondary
BAD # System BAD # System
Quick Check® 600/800 Series User’s Guide 9 - 7
BAD Date BAD Date
Page 100

Type Display Message Printout Message
BAD Descrptr BAD Descriptor
BAD Flags BAD Flags
BAD Indus.ID BAD Industry ID
BAD Quantity BAD Quantity
BAD UnitMeas BAD Unit of Measure
(EAN ITF) (SCS /ITF)
Prim/Sec* Primary/Secondary*
Prim/Secd Primary/Secondary
Primary Primary
Primary* Primary*
Provider Provider
Provider* Provider*
Secondary Secondary
Secondry* Secondary*
(UPC/EAN) (UPC/EAN)
Messages with an asterisk (*) indicate the symbol was
created in Code 128.
LOGMARS LOGMARS:-OK! LOGMARS:-OK!
SISAC BAD Descrpter BAD Descriptor
BAD ISSN BAD “ISSN”
BAD Version# BAD Version #
Ver 1 ‘92 Ver “1” (1992)
Ver O ‘87 Ver “O” (1987)
UCC/EAN-ITF BAD LogVarnt BAD Logis. Variant
BAD Prefix BAD Prefix
FixdCon Fixed Content
ITF-14 ITF-14
9 - 8 Quick Check® 600/800 Series User’s Guide
ITF-16 ITF-16
 Loading...