

Page 1

Image Kiosk 8560/8570
with Microsoft® Windows® CE 5.0
con Microsoft
com o Microsoft
™
®
Windows® CE 5.0
®
Windows® CE 5.0
Guia rápido de introdução
Quick Start Guide
Guía de Inicio Rápido
Page 2

Page 3
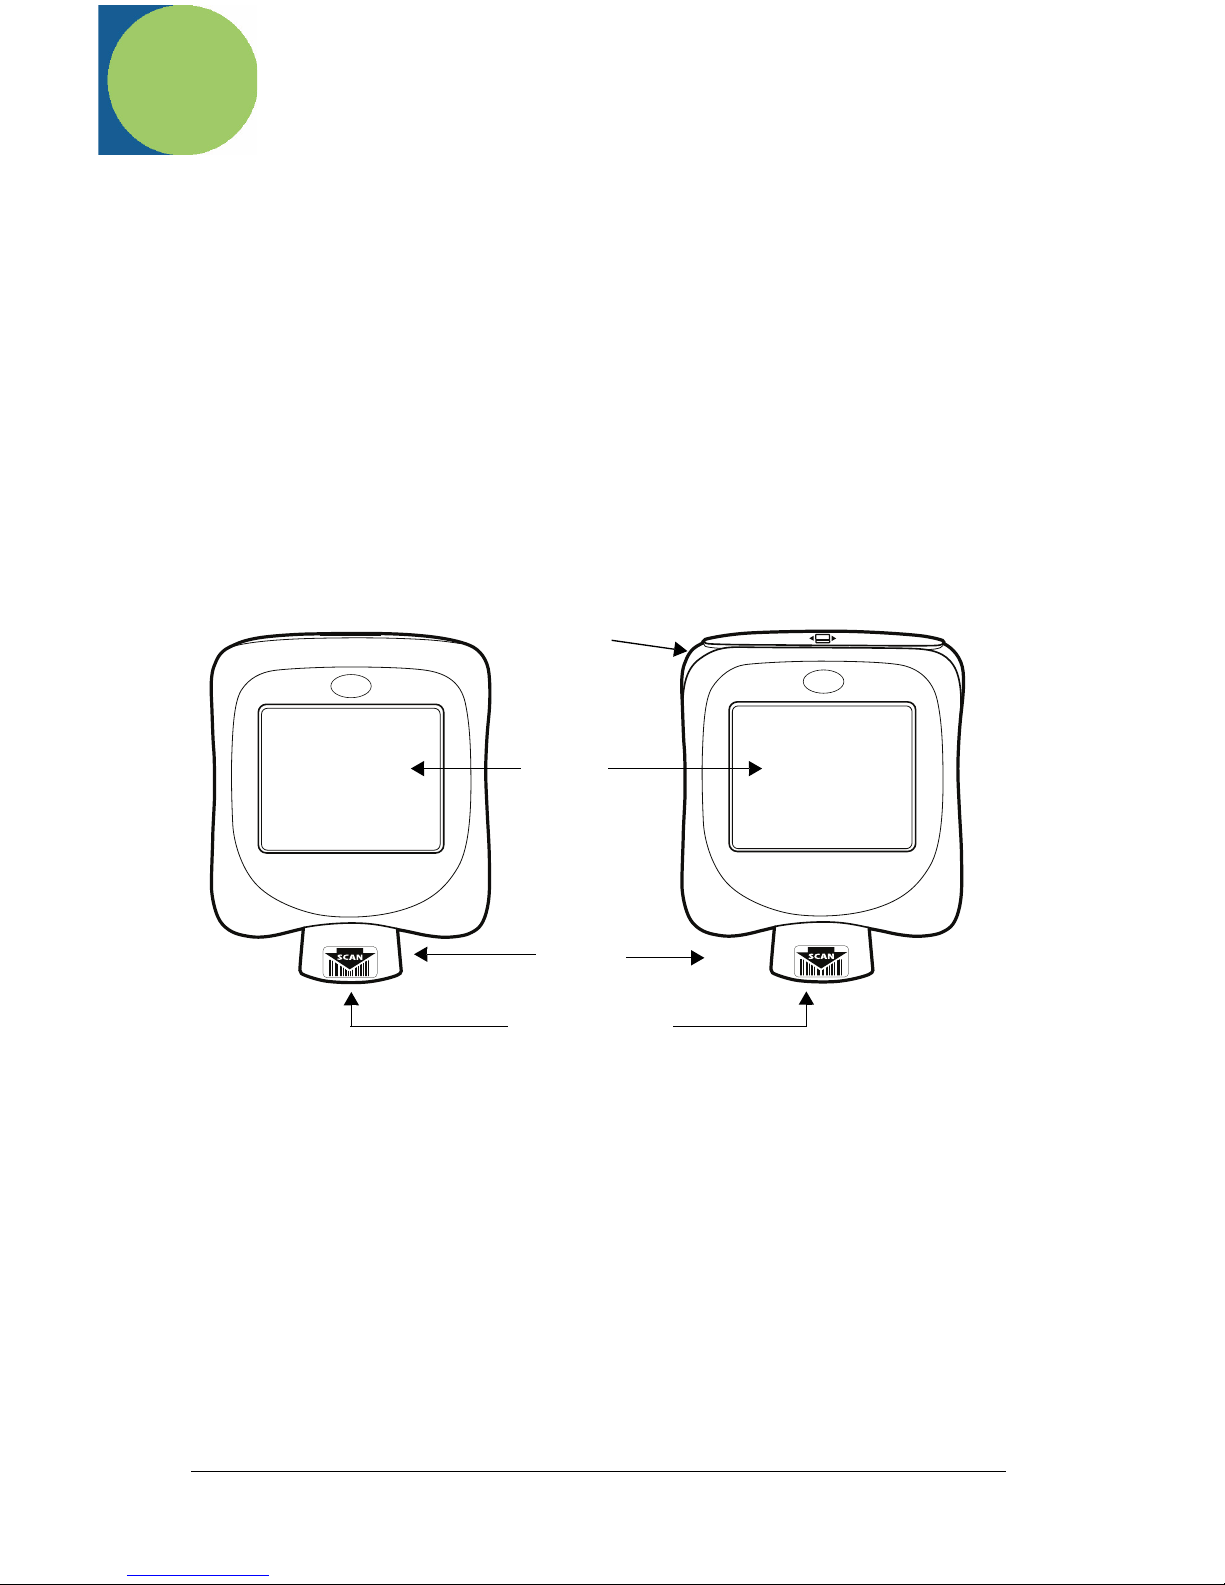
Image Kiosk 8560/8570
Quick Start Guide
Hardware Requirements
Verify that you have the necessary hardware to install your device:
• IK8560/70 device
• Power cable with AC adapter power supply
• Communication cable
• Image Kiosk 8560/8570 Quick Start Guide
Be sure to keep the original packaging in case the device needs to be shipped
for service.
Front Panel
IK8560 IK8570
Magnetic
Stripe
Reader
Touch
Screen
Display
Illumination
Cone
Image Engine
EN-1
Page 4
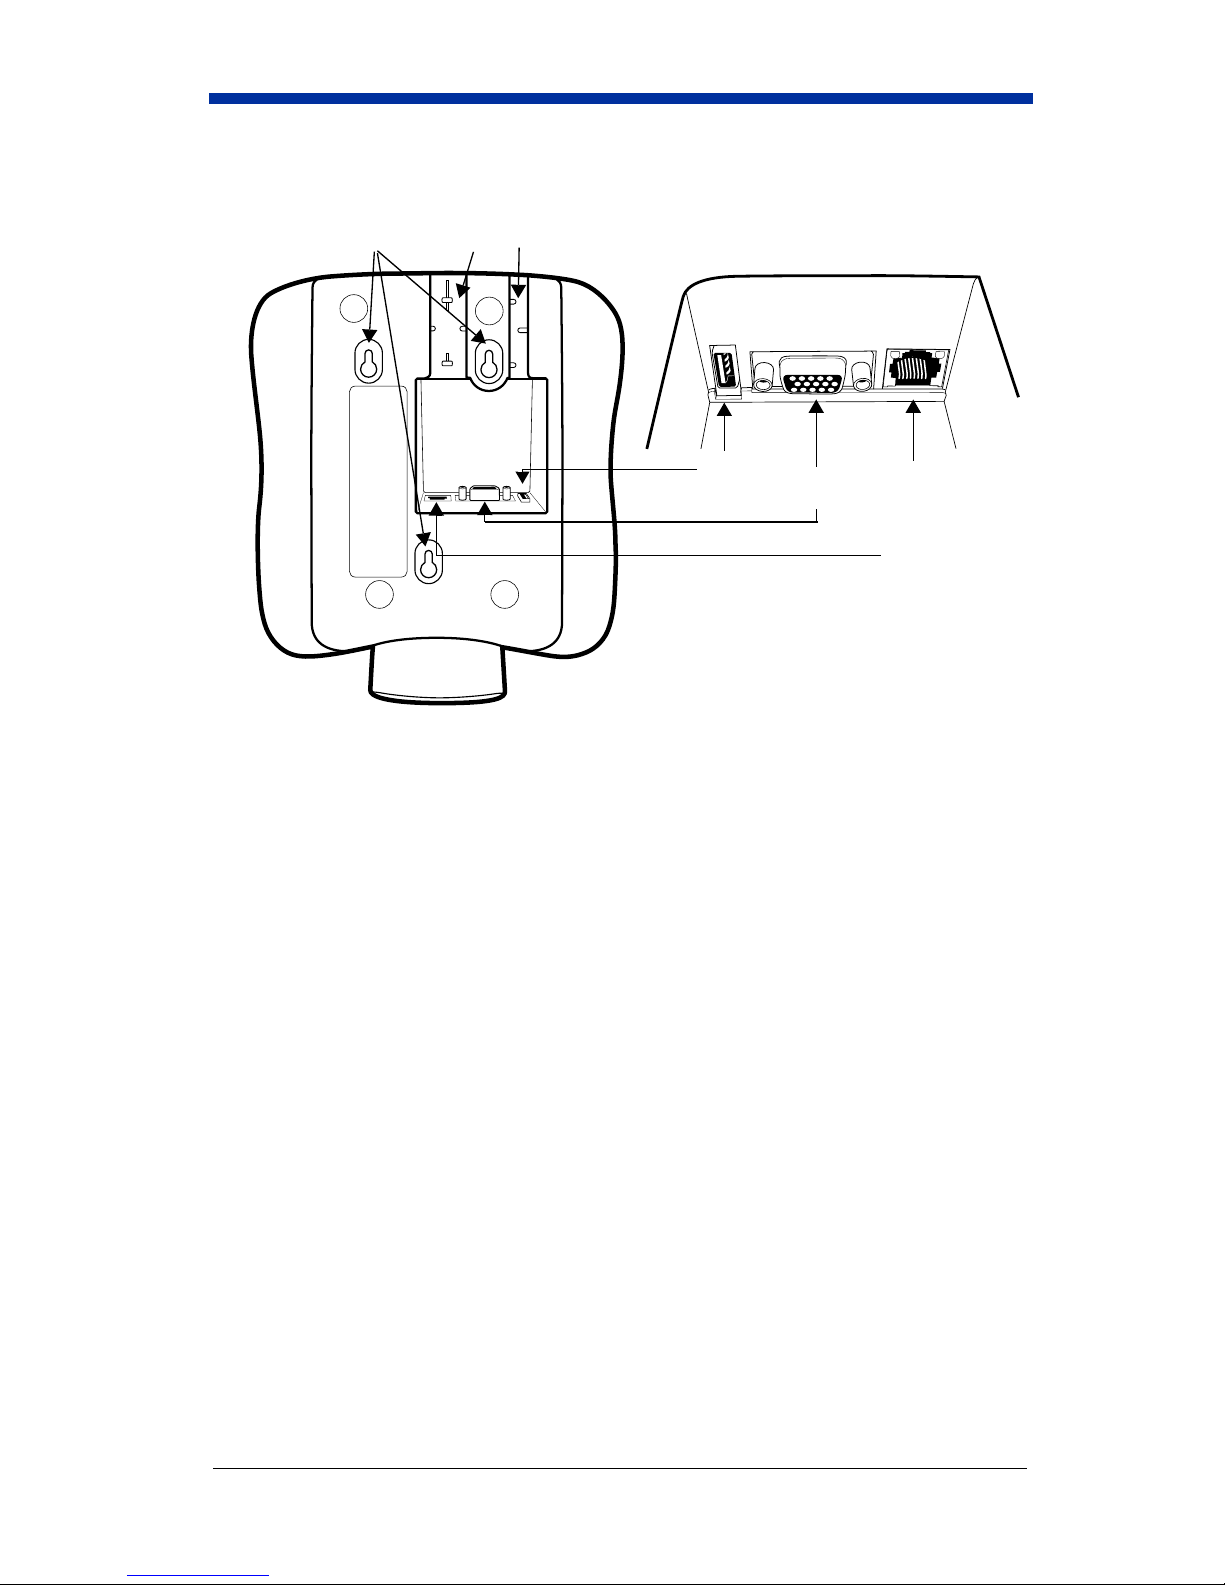
Back Panel
Screw Holes
(for mounting)
Wire Slots
(for cable wires)
USB
Host
Port
DB15
Connector
IK8560EE,
IK8570E, &
IK8570EUE:
Ethernet
Connector
IK8560CE &
IK8560CEUE:
RJ45 Jack is
not functional.
EN-2
Page 5
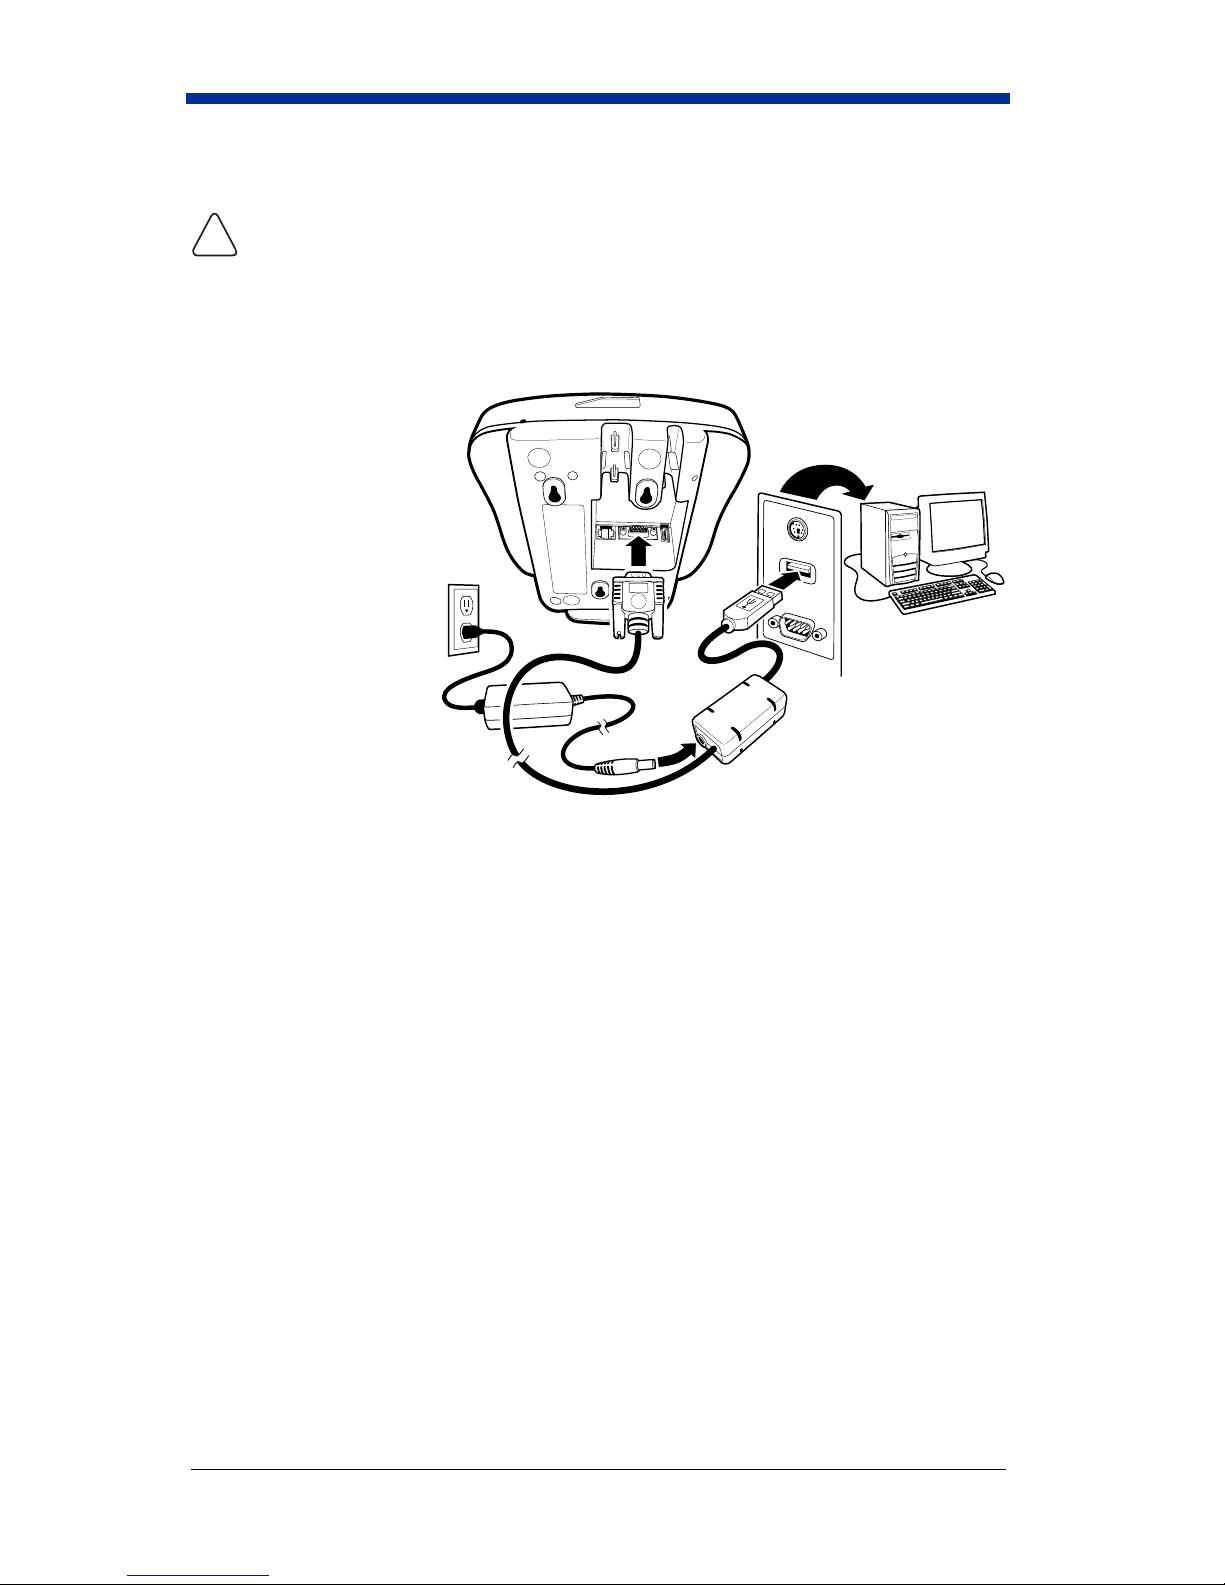
Step 1. Connect the Power and USB Communication Cables
Use only IK8560/70 power cables and power adapters. Use of peripherals, cables, or
power adapters not sold/manufactured by Hand Held Products will void the warranty and
!
may damage the device.
To run, the IK8560/70 must be connected to an external power source at all
times.
Note: Make sure the power switch is turned off on the workstation where you
are installing the IK8560/70.
1. Plug the 15-pin
connector (HDB15)
on the cable into the
DB15 connector on
the back of the
IK8560/70.
2. Plug the USB
connector into the
port on your host
workstation.
3. Plug the power plug
into the pod on the
communication
cable.
4. Plug the AC power
supply into a power
outlet.
Hardware installation is now complete. Your IK8560/70 powers on and autoconfigures to USB.
4
1
3
Host
2
Note: These instructions specify the USB communication cable (p/n 42206398-
01E). For information about additional cables, consult the Image Kiosk
8560/8570 User’s Guide.
Step 2. Boot the Device
1. The IK8560/70 begins booting as soon as power is applied from the cable.
2. The splash screen appears as the system cold boots. The software version
numbers for both the bootloader and the kernel appear on the splash screen.
3. The device begins loading software; this is Autoinstall. A status bar appears
for each program that loads. Do NOT interrupt Autoinstall!
4. Autoinstall completes and the splash screen appears again as the system
warm boots.
EN-3
Page 6
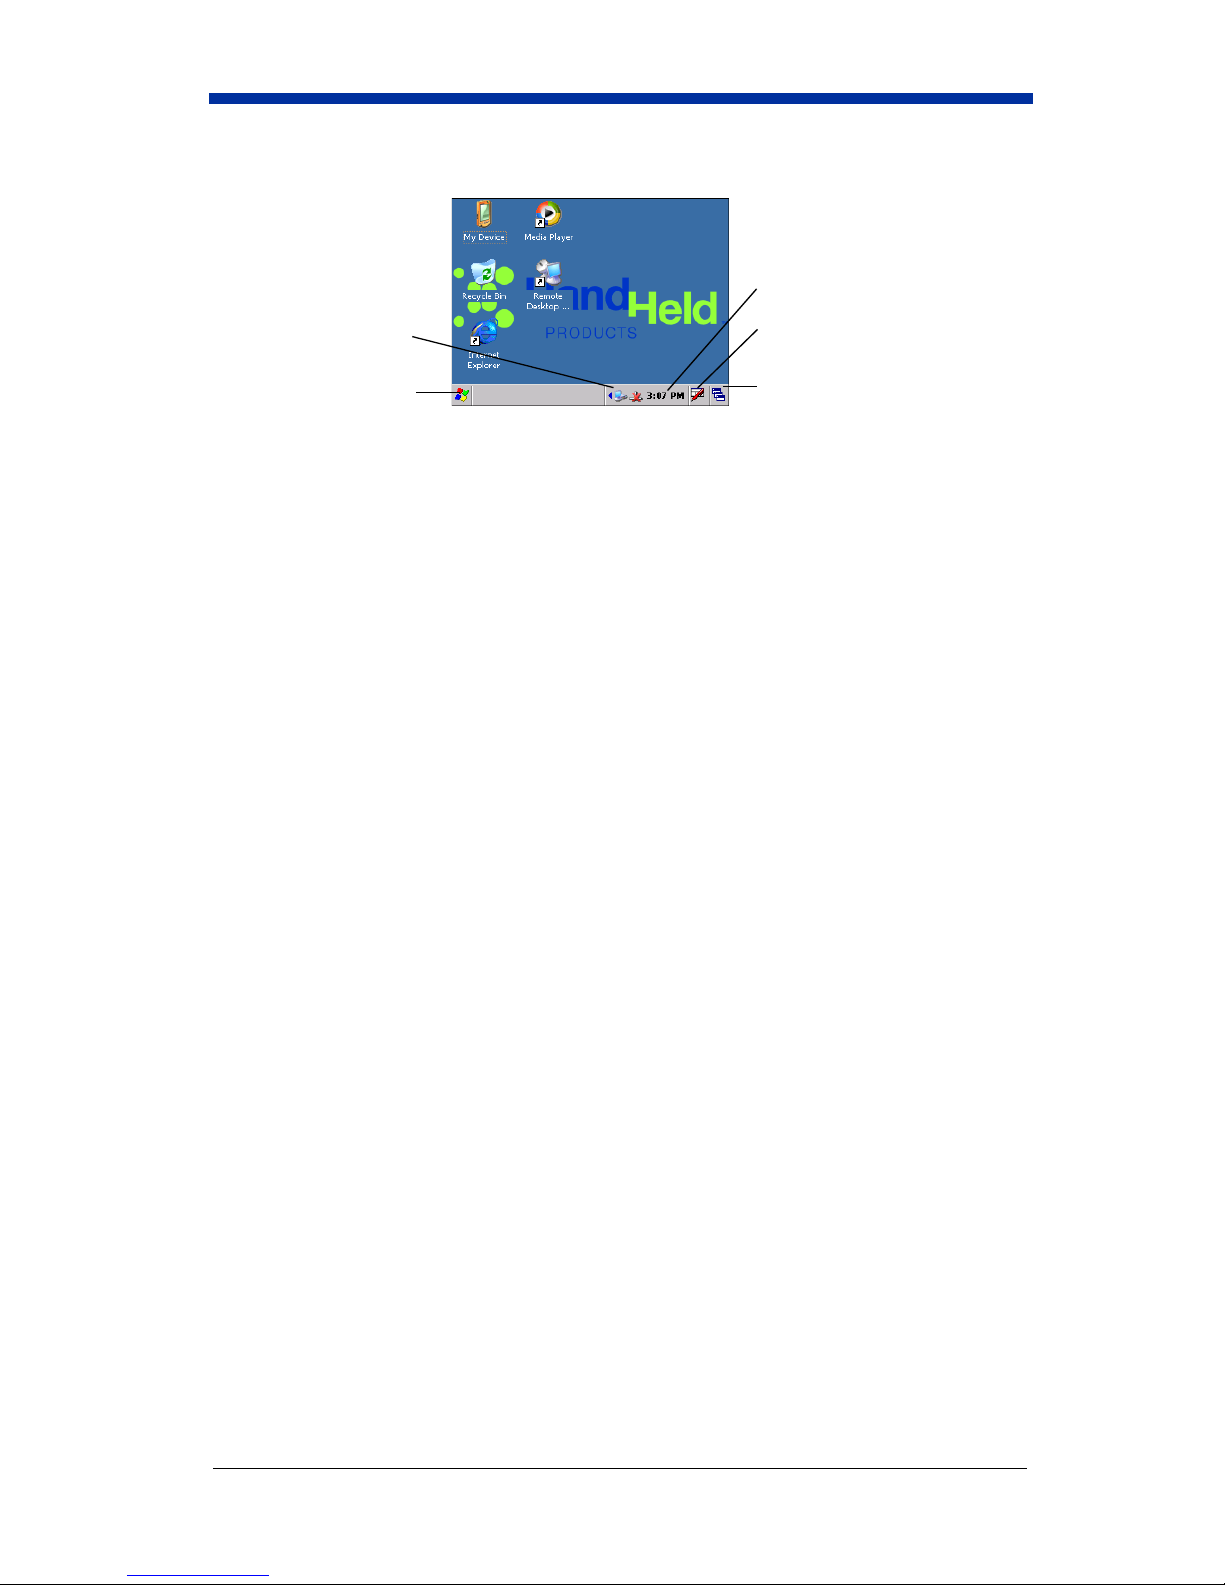
5. When initial boot is complete, the Start screen appears.
Time and date.
Displays cable and
network connections.
Tap to open soft input panel
(keyboard).
Opens the Start menu.
Tap to toggle between open
applications.
You are now ready to use the IK8560/70.
Microsoft® ActiveSync® Communication
When you power on the workstation, you will receive a message about new USB
hardware. You must have the IK8560.inf and wceusbsh.sys files installed in the
Windows\System32 directory on your workstation to establish ActiveSync
communication with the IK8560/70 device.
You can download these files from www.handheld.com.
For complete installation instructions, please refer to the Image Kiosk 8560/8570
User’s Guide, which is also available for download at www.handheld.com.
Rebooting the Device
There are two ways to reboot the device: warm boot and cold boot. A warm boot
preserves data and applications stored in RAM memory. A cold boot erases RAM
data and applications and runs Autoinstall.
Warm Boot: Tap Start > Power Tools > Reboot > Warm Boot.
Cold Boot: Power cycle or reset switch (for reset switch details, refer to the
Image Kiosk 8560/8570 User’s Guide).
EN-4
Page 7

Technical Assistance
If you need assistance installing or troubleshooting, please call your Distributor
or the nearest Hand Held Products technical support office:
North America/Canada
Telephone: (800) 782-4263, option 4 (8 a.m. to 6 p.m. EST)
Fax number: (315) 685-4960
E-mail: natechsupport@handheld.com
Latin America
Telephone: (704) 998-3998, option 8, option 3
Telephone: (800) 782-4263, option 8, option 3
E-mail: latechsupport@handheld.com
Brazil
Telephone: +55 (21) 2178-0500
Fax: +55 (21) 2178-0505
E-mail: brsuporte@handheld.com
Mexico
Telephone: (704) 998-3998, option 8, option 3
E-mail: latechsupport@handheld.com
Europe, Middle East, and Africa
Telephone: +31 (0) 40 7999 393
Fax: +31 (0) 40 2425 672
E-mail: eurosupport@handheld.com
Asia Pacific
Telephone - Hong Kong:+852-3188-3485 or
Telephone - China: +86 21 6361 3818
E-mail: aptechsupport@handheld.com
Japan
Telephone: +813 5770-6312
E-mail: aptechsupport@handheld.com
Malaysia
Telephone: +603-6201-7020
E-mail: aptechsupport@handheld.com
2511-3050
Online Technical Assistance
You can also access technical assistance online at www.handheld.com.
For Further Information
To download the full User’s Guide for these products, visit our website at
www.handheld.com
.
EN-5
Page 8

Product Service and Repair
Hand Held Products provides service for all its products through service centers
throughout the world. To obtain warranty or non-warranty service, return the unit
to Hand Held Products (postage paid) with a copy of the dated purchase record
attached. Contact the appropriate location below to obtain a Return Material
Authorization number (RMA #) before returning the product.
North America
Telephone: (800) 782-4263, option 3
Fax: (704) 566-6015
E-mail: naservice@handheld.com
Latin America
Telephone: (704) 998-3998, option 8, option 4
Telephone: (800) 782-4263, option 8, option 3
Fax: (239) 263-9689
E-mail: laservice@handheld.com
Brazil
Telephone: +55 (21) 2178-0500
Fax: +55 (21) 2178-0505
E-mail: brservice@handheld.com
Mexico
Telephone: +52 (55) 5203-2100
Fax: +52 (55) 5531-3672
E-mail: mxservice@handheld.com
Europe, Middle East, and Africa
Telephone: +31 (0) 40 2901 633
Fax: +31 (0) 40 2901 631
E-mail: euservice@handheld.com
Asia Pacific
Telephone: +852-2511-3050
Fax: +852-2511-3557
E-mail: apservice@handheld.com
Japan
Telephone: +813-5770-6312
Fax: +813-5770-6313
E-mail: apservice@handheld.com
Online Product Service and Repair Assistance
You can also access product service and repair assistance online at
www.handheld.com.
EN-6
Page 9

Guía de inicio rápido de
Image Kiosk 8560/8570
Requisitos de hardware
Compruebe que tiene el hardware necesario para instalar su dispositivo:
• Dispositivo IK8560/70
• Cable eléctrico con suministro de energía de adaptador de corriente alterna
• Cable de comunicación
• Guía de inicio rápido de Image Kiosk 8560/8570
Asegúrese de conservar el envase original en caso de que el dispositivo tenga
que enviarse a reparar.
Panel delantero
IK8560 IK8570
Lector de Banda
Magnética
Pantalla
de toque
Cono de
iluminación
Motor de imagen
ES-1
Page 10

Panel posterior
Agujeros para tornillos
(para montar)
Ranuras para cables
(para los cables)
Puerto
principal
USB
Conector
DB15
IK8560EE,
IK8570E, &
IK8570EUE:
Ethernet
Connector
IK8560CE &
IK8560CEUE: El
conector RJ45 no
esta habilitado
ES-2
Page 11

Paso 3. Conecte los cables eléctricos y de comunicación USB.
Use solamente cables y adaptadores eléctricos IK8560/70. El uso de unidades
periféricas, cables o adaptadores eléctricos que no son vendidos ni fabricados por Hand
!
Held Products anulará la garantía y puede dañar el dispositivo.
Para funcionar, el dispositivo IK8560/70 debe estar siempre conectado a una
fuente de energía externa.
Nota: Asegúrese de que el interruptor principal esté apagado en la estación de
trabajo cuando instale el IK8560/70.
1. Enchufe el conector
de 15 pines
(HDB15) del cable
en el conector
DB15 ubicado en la
parte posterior del
IK8560/70.
2. Enchufe el conector
USB en el puerto de
su estación de
trabajo principal.
3. Enchufe la clavija
de corriente en el
receptáculo del
cable de
comunicación.
4. Enchufe el
suministro de energía de corriente alterna en la toma de corriente.
La instalación del hardware ahora está completa. El dispositivo IK8560/70 se
enciende y se configura automáticamente en USB.
4
1
3
Nota: Estas instrucciones son específicas para el cable de comunicación USB
(n/p 42206398-01E). Para mayor información sobre cables adicionales,
consulte la Guía de Usuario del Image Kiosk 8560/8570.
Host
2
Paso 4. Inicie el dispositivo
1. El dispositivo IK8560/70 se inicia apenas el cable tiene electricidad.
2. A medida que el sistema se inicia en frío aparece la pantalla splash. En la
pantalla splash aparecen los números de la versión del software para el
cargador de inicio y el kernel.
3. El dispositivo comienza a cargar el software; ésta es la instalación
automática. Aparece una barra de estado para cada programa que se carga.
NO interrumpa la instalación automática.
4. La instalación automática termina y la pantalla splash aparece de nuevo a
medida que el sistema se inicia en caliente.
ES-3
Page 12

5. Cuando finaliza el inicio, aparece la pantalla de inicio.
Hora y fecha.
Muestra las
conexiones de
cable y red.
Abre el menú de inicio.
Toque para abrir el panel de
ingreso por toque (teclado).
Toque para cambiar entre las
aplicaciones abiertas.
Ahora está listo para usar el dispositivo IK8560/70.
Comunicación con Microsoft® ActiveSync
®
Ud. debe tener los archivos IK8560.inf y wceusbsh.sys instalados en el directorio
Windows\System32 en su PC para establecer una comunicación vía ActiveSync
con el dispositivo IK8560/70.
Ud. puede descargar el archivo IK8560.inf desde www.handheld.com.
Para obtener instrucciones completas de instalación, consulte la Guía de
usuario de Image Kiosk 8560/8570, que también se puede descargar en
www.handheld.com.
Reinicio del dispositivo
Hay dos formas de reiniciar el dispositivo: inicio en caliente e inicio en frío. Un
inicio en caliente conserva los datos y las aplicaciones guardados en la memoria
RAM. Un inicio en frío borra los datos y aplicaciones de la memoria RAM y
ejecuta la instalación automática.
Inicio en caliente: toque Start > Power Tools > Reboot > Warm Boot.
Inicio en frío: presione el botón de ciclo o reinicio (para obtener los
detalles del botón de reinicio, consulte la Guía de usuario de
Image Kiosk 8560/8570).
ES-4
Page 13

Asistencia técnica
Si necesita asistencia para instalar o solucionar problemas con el lector, póngase en contacto
con su distribuidor o con la oficina de soporte técnico de Hand Held Products más cercana:
Norteamérica/Canadá
Teléfono: (800) 782-4263, opción 4
(8 a.m.–6 p.m., hora estándar oriental)
Fax: (315) 685-4960
Email: natechsupport@handheld.com
Latinoamérica
Teléfono: (704) 998-3998, opción 8, opción 3
Teléfono: (800) 782-4263, opción 8, opción 3
Email: latechsupport@handheld.com
Brasil
Teléfono: +55 (21) 2178-0500
Fax: +55 (21) 2178-0505
Email: brsuporte@handheld.com
México
Teléfono: (704) 998-3998, opción 8, opción 3
Email: latechsupport@handheld.com
Europa, Oriente Próximo y África
Teléfono: +31 (0) 40 7999 393
Fax: +31 (0) 40 2425 672
Email: eurosupport@handheld.com
Pacífico Asiático
Teléfono - Hong Kong: +852-3188-3485
Teléfono - China: +86 21 6361 3818
o
2511-3050
Email: aptechsupport@handheld.com
Japón
Teléfono: +81-3-5770-6312
Email: aptechsupport@handheld.com
Malasia
Teléfono: +603-6201-7020
E-mail: aptechsupport@handheld.com
Asistencia técnica en línea
También puede obtener asistencia técnica en línea en www.handheld.com.
Información adicional
Para descargar la guía del usuario completa de estos productos, visite nuestro sitio web:
www.handheld.com
.
ES-5
Page 14

Servicio posventa y de reparación de productos
Hand Held Products proporciona servicio para todos sus productos a través de centros de
posventa distribuidos por todo el mundo. Para obtener un servicio que se incluya o no en la
garantía, devuelva la unidad a Hand Held Products (a portes pagados) junto con una copia del
resguardo de compra con la fecha de adquisición. Póngase en contacto con la oficina adecuada
de las que se muestran abajo para obtener un número de autorización de devolución (RMA Return Material Authorization) antes de devolver el producto.
Norteamérica
Teléfono: (800) 782-4263, opción 3
Fax: (704) 566-6015
Email: naservice@handheld.com
Latinoamérica
Teléfono: (704) 998-3998, opción 8, opción 4
Teléfono: (800) 782-4263, opción 8, opción 3
Fax: (239) 263-9689
Email: laservice@handheld.com
Brasil
Teléfono: +55 (21) 2178-0500
Fax: +55 (21) 2178-0505
Email
: brservice@handheld.com
México
Teléfono: +52 (55) 5203-2100
Fax: +52 (55) 5531-3672
Email
: mxservice@handheld.com
Europa, Oriente Próximo y África
Teléfono: +31 (0) 40 2901 633
Fax: +31 (0) 40 2901 631
Email: euservice@handheld.com
Pacífico Asiático
Teléfono: +852-2511-3050
Fax: +852-2511-3557
Email: apservice@handheld.com
Japón
Teléfono: +813-5770-6312
Fax: +813-5770-6313
Email: apservice@handheld.com
Asistencia en línea del servicio posventa y de reparación de
productos
También puede obtener asistencia en línea del servicio posventa y de reparación de productos
en www.handheld.com.
ES-6
Page 15

Guia rápido de introdução do
Image Kiosk 8560/8570
Requisitos de hardware
Verifique se você possui o hardware necessário para instalar o terminal:
• Terminal IK8560/70
• Cabo de energia com fonte de alimentação AC
• Cabo de comunicação
• Guia de Introdução do Image Kiosk 8560/8570
Certifique-se de guardar a embalagem original caso o dispositivo precise ser
enviado para reparos.
Painel frontal
IK8560 IK8570
Leitor de
Cartão
Magnético
Te la
sensível
ao toque
Cone de
iluminação
Mecanismo
de imagem
BP-1
Page 16

Painel traseiro
Orifícios do parafuso
(para montagem)
Slots para fios
(para os cabos)
Porta
USB
Host
Conector
DB15
IK8560EE,
IK8570E, &
IK8570EUE:
Conector
Ethernet
IK8560CE &
IK8560CEUE:
Porta RJ45
Indisponível
BP-2
Page 17

Etapa 5. Conectar os cabos de comunicação USB e de
energia
Use apenas os adaptadores e cabos de energia do IK8560/70. O uso de periféricos,
cabos ou adaptadores de energia que não forem vendidos/fabricados pela Hand Held
!
Products cancelará a garantia e poderá danificar o dispositivo.
Para ser executado, o IK8560/70 deve sempre ser conectado a uma fonte de
alimentação externa.
Observação: Certifique-se de que a estação de trabalho em que o IK8560/70
será instalado está desligada.
1. Insira o conector de
15 pinos (HDB15)
do cabo no
conector DB15, na
parte posterior do
IK8560/70.
2. Insira o conector
USB na porta da
estação de
trabalho.
3. Conecte o cabo de
energia no plugue
do cabo de
comunicação.
4. Conecte a fonte de
alimentação AC na
tomada.
1
4
3
Host
2
A instalação do hardware foi concluída. Seu IK8560/70 inicia e é automaticamente configurado para usar a porta USB.
Observação: Essas instruções são específicas do cabo de comunicação USB
(item número 42206398-01E). Para obter informações sobre
cabos adicionais, consulte o Guia do Usuário do Image Kiosk
8560/8570.
BP-3
Page 18

Etapa 6. Inicializar o dispositivo
1. O IK8560/70 começa a inicialização logo que a energia é fornecida pelo
cabo.
2. A tela inicial é exibida à medida que o sistema é inicializado. Os números da
versão de boot e kernel são exibidos na tela inicial.
3. O terminal inicia o carregamento do software; essa é a instalação
automática. Uma barra de status é exibida para cada programa carregado.
NÃO interrompa a instalação automática!
4. A instalação automática é concluída e a tela inicial é exibida novamente
enquanto o sistema é reiniciado.
5. Quando a primeira inicialização for concluída, a tela inicial será exibida.
Hora e data.
Exibe as conexões
de cabo e de rede.
Clique para abrir o painel
virtual (teclado).
Abre o menu Iniciar.
Clique para alternar entre os
aplicativos abertos.
Você já pode usar o IK8560/70.
Comunicação com o Microsoft® ActiveSync®
Ao ligar o computador, será exibida uma mensagem sobre um novo dispositivo
USB encontrado. Os arquivos IK8560.inf e wceusbsh.sys deverão estar
instalados na pasta \Windows\System32 do computador para estabelecer a
comunicação entre o ActiveSync e o terminal IK8560/70.
Estes arquivos estão disponíveis para download no endereço
www.handheld.com.
Para obter instruções completas de instalação, consulte o Guia do Usuário do
Image Kiosk 8560/8570, que também está disponível para download no site
www.handheld.com.
Reinicializando o dispositivo
Há duas maneiras de reinicializar o dispositivo: o Warm Boot e o Cold Boot.
O Warm Boot mantém os dados e os aplicativos armazenados na memória
RAM. O Cold Boot apaga os dados e os aplicativos da memória RAM e executa
a instalação automática.
Warm Boot: Clique em Start > Power Tools > Reboot > Warm Boot.
Cold Boot: Reinicie ou use o botão de reinicialização (para obter detalhes
sobre o botão de reinicialização, consulte o Guia do Usuário do
Image Kiosk 8560/8570).
BP-4
Page 19

Assistência técnica
Se precisar de assistência para instalar ou solucionar problemas no leitor, entre em contato
com o distribuidor ou com o escritório de suporte técnico da Hand Held Products mais próximo:
América do Norte/Canadá:
Telefone: (800) 782-4263, ramal 4
(das 08h00 às 18h00, horário da costa leste dos Estados Unidos)
Fax: (315) 685-4960
E-mail: natechsupport@handheld.com
América Latina:
Telefone: (704) 998-3998, ramal 8, ramal 3
Telefone: (800) 782-4263, ramal 8, ramal 3
E-mail: latechsupport@handheld.com
Brasil
Telefone: +55 (21) 2178-0500
Fax: +55 (21) 2178-0505
E-mail: brsuporte@handheld.com
México
Telefone: (704) 998-3998, ramal 8, ramal 3
E-mail: latechsupport@handheld.com
Europa, Oriente Médio e África:
Telefone: +31 (0) 40 7999 393
E-mail: eurosupport@handheld.com
Pacífico Asiático:
ou
Telefone - Hong Kong: +852-3188-3485
2511-3050
Telefone - China: +86 21 6361 3818
E-mail: aptechsupport@handheld.com
Japão
Telefone: +813-5770-6312
E-mail: aptechsupport@handheld.com
Malaysia
Telefone: +603-6201-7020
E-mail : aptechsupport@handheld.com
Para obter mais informações
Para fazer o download do Guia do usuário completo para esses produtos, visite nosso site no
endereço www.handheld.com
.
Manutenção e reparo do produto
A Hand Held Products fornece manutenção para todos os seus produtos por meio dos centros
de serviço localizados no mundo inteiro. Para obter manutenção que seja ou não coberta pela
garantia, devolva a unidade para a Hand Held Products (postagem paga) com uma cópia
BP-5
Page 20

anexada do registro de compra datado. Entre em contato com o local adequado abaixo para
obter um número de autorização de devolução do material (nº RMA) antes de devolver o
produto.
América do Norte
Telefone: (800) 782-4263, ramal 3
Fax: (704) 566-6015
E-mail: naservice@handheld.com
América Latina
Telefone: (704) 998-3998, ramal 8, ramal 4
Telefone: (800) 782-4263, ramal 8, ramal 3
Fax: (239) 263-9689
E-mail: laservice@handheld.com
Brasil
Telefone: +55 (21) 2178-0500
Fax: +55 (21) 2178-0505
E-mail: brservice@handheld.com
México
Telefone: +52 (55) 5203-2100
Fax: +52 (55) 5531-3672
E-mail: mxservice@handheld.com
Europa, Oriente Médio e África
Telefone: + 31 (0) 40 2901 633
Fax: + 31 (0) 40 2901 631
E-mail: euservice@handheld.com
Pacífico Asiático
Telefone: +852-2511-3050
Fax: +852-2511-3557
E-mail: apservice@handheld.com
Japão
Telefone: +813-5770-6312
Fax: +813-5770-6313
E-mail: apservice@handheld.com
Assistência on-line para reparo e manutenção do produto
Também é possível acessar a assistência para manutenção e reparo do produto on-line, no site
www.handheld.com.
BP-6
Page 21

Limited Warranty
Hand Held Products, Inc. ("Hand Held Products") warrants its products to be free from defects
in materials and workmanship and to conform to Hand Held Products’ published specifications
applicable to the products purchased at the time of shipment. This warranty does not cover any
product which is (i) improperly installed or used; (ii) damaged by accident or negligence,
including failure to follow the proper maintenance, service, and cleaning schedule; or (iii)
damaged as a result of (A) modification or alteration by the purchaser or other party, (B)
excessive voltage or current supplied to or drawn from the interface connections, (C) static
electricity or electro-static discharge, (D) operation under conditions beyond the specified
operating parameters, or (E) repair or service of the product by anyone other than Hand Held
Products or its authorized representatives.
This warranty shall extend from the time of shipment for the duration published by Hand Held
Products for the product at the time of purchase ("Warranty Period"). Any defective product
must be returned (at purchaser’s expense) during the Warranty Period to Hand Held Products’s
factory or authorized service center for inspection. No product will be accepted by Hand Held
Products without a Return Materials Authorization, which may be obtained by contacting Hand
Held Products. In the event that the product is returned to Hand Held Products or its authorized
service center within the Warranty Period and Hand Held Products determines to its
satisfaction that the product is defective due to defects in materials or workmanship, Hand Held
Products, at its sole option, will either repair or replace the product without charge, except for
return shipping to Hand Held Products.
EXCEPT AS MAY BE OTHERWISE PROVIDED BY APPLICABLE LAW, THE FOREGOING
WARRANTY IS IN LIEU OF ALL OTHER COVENANTS OR WARRANTIES, EITHER
EXPRESSED OR IMPLIED, ORAL OR WRITTEN, INCLUDING, WITHOUT LIMITATION, ANY
IMPLIED WARRANTIES OF MERCHANTABILITY OR FITNESS FOR A PARTICULAR
PURPOSE.
HAND HELD PRODUCTS’ RESPONSIBILITY AND PURCHASER’S EXCLUSIVE REMEDY
UNDER THIS WARRANTY IS LIMITED TO THE REPAIR OR REPLACEMENT OF THE
DEFECTIVE PRODUCT. IN NO EVENT SHALL HAND HELD PRODUCTS BE LIABLE FOR
INDIRECT, INCIDENTAL, OR CONSEQUENTIAL DAMAGES, AND, IN NO EVENT, SHALL
ANY LIABILITY OF HAND HELD PRODUCTS’ ARISING IN CONNECTION WITH ANY
PRODUCT SOLD HEREUNDER (WHETHER SUCH LIABILITY ARISES FROM A CLAIM
BASED ON CONTRACT, WARRANTY, TORT, OR OTHERWISE) EXCEED THE ACTUAL
AMOUNT PAID TO HAND HELD PRODUCTS FOR THE PRODUCT. THESE LIMITATIONS ON
LIABILITY SHALL REMAIN IN FULL FORCE AND EFFECT EVEN WHEN HAND HELD
PRODUCTS MAY HAVE BEEN ADVISED OF THE POSSIBILITY OF SUCH INJURIES,
LOSSES, OR DAMAGES. SOME STATES, PROVINCES, OR COUNTRIES DO NOT ALLOW
THE EXCLUSION OR LIMITATIONS OF INCIDENTAL OR CONSEQUENTIAL DAMAGES, SO
THE ABOVE LIMITATION OR EXCLUSION MAY NOT APPLY TO YOU.
All provisions of this Limited Warranty are separate and severable, which means that if any
provision is held invalid and unenforceable, such determination shall not affect the validity of
enforceability of the other provisions hereof.
Hand Held Products, Inc. extends these warranties only to the first end users of the products.
These warranties are non-transferable.
The limited duration of the warranty for the Image Kiosks is one year.
Page 22

Page 23

Disclaimer
Hand Held Products, Inc. (“Hand Held Products”) reserves the right to make
changes in specifications and other information contained in this document
without prior notice, and the reader should in all cases consult Hand Held
Products to determine whether any such changes have been made. The
information in this publication does not represent a commitment on the part of
Hand Held Products.
Hand Held Products shall not be liable for technical or editorial errors or
omissions contained herein; nor for incidental or consequential damages
resulting from the furnishing, performance, or use of this material.
This document contains proprietary information that is protected by copyright. All
rights are reserved. No part of this document may be photocopied, reproduced,
or translated into another language without the prior written consent of Hand
Held Products.
2007 Hand Held Products, Inc. All rights reserved.
Web Address: www.handheld.com
Trademarks
Microsoft, Windows, Windows CE, Windows NT, Windows 2000, Windows XP,
ActiveSync, and the Windows logo are trademarks or registered trademarks of
Microsoft Corporation.
Other product names mentioned in this manual may be trademarks or registered
trademarks of their respective companies and are the property of their
respective owners.
Page 24

Hand Held Products, Inc.
700 Visions Drive
P.O. Box 208
Skaneateles Falls, NY 13153-0208
IK-LA-QS
Rev A
2/15/07
 Loading...