

Hand Held Products Dolphin 9500, Dolphin 9550, Dolphin 9501, Dolphin 9551 Quick Start Manual
Page 1

Dolphin® 9500 Series
Mobile Computers
Microsoft® Windows Mobile™ 2003
Second Edition Software for Pocket PCs
™
Quick Start Guide
Page 2

Disclaimer
Hand Held Products, Inc. (“Hand Held Products”) reserves the right to make
changes in specifications and other information contained in this document
without prior notice, and the reader should in all cases consult Hand Held
Products to determine whether any such changes have been made. The
information in this publication does not represent a commitment on the part of
Hand Held Products.
Hand Held Products shall not be liable for technical or editorial errors or
omissions contained herein; nor for incidental or consequential damages
resulting from the furnishing, performance, or use of this material.
This document contains proprietary information that is protected by copyright. All
rights are reserved. No part of this document may be photocopied, reproduced,
or translated into another language without the prior written consent of Hand
Held Products.
© 2005 Hand Held Products, Inc. All rights reserved.
Web Address: www.handheld.com
Trademarks
Dolphin, HomeBase, Mobile Base and QuadCharger are trademarks or
registered trademarks of Hand Held Products, Inc.
Windows Mobile, Windows, Windows NT, Windows 2000, Windows ME,
Windows XP, ActiveSync, Outlook, and the Windows logo are trademarks or
registered trademarks of Microsoft Corporation.
The Bluetooth trademarks are owned by Bluetooth SIG, Inc., U.S.A. and licensed
to Hand Held Products.
Other product names mentioned in this manual may be trademarks or registered
trademarks of their respective companies and are hereby acknowledged.
Page 3

Table of Contents
Congratulations! ...................................................................... 1
Dolphin 9500 Series Terminals ............................................... 1
Dolphin 9500 Series Peripherals and Accessories.................. 1
Hardware Overview................................................................. 2
Setting Up Dolphin 9500 Series Terminals.............................. 4
Unpack the Carton and Verify its Contents ............................. 4
Install the Main Battery Pack................................................... 5
Charge the Main and Backup Batteries...................................5
Initialize the Mobile Computer................................................. 7
Today Screen ......................................................................... 9
Navigation Bar and Start Menu ............................................... 9
Verifying Operations with Demos ......................................... 10
Verifying Radio Status .......................................................... 11
Adjusting the Backlight.......................................................... 12
Entering Information.............................................................. 12
Using the Keyboards ............................................................ 13
Using the Stylus..................................................................... 17
Using the Imager .................................................................. 18
Taking an Image ...................................................................20
Soft Reset (Warm Boot) ....................................................... 21
Hard Reset (Cold Boot)......................................................... 21
Suspend Mode ...................................................................... 21
Communications....................................................................21
Troubleshooting.....................................................................22
Product Service and Repair .................................................. 24
Technical Assistance ............................................................25
Limited Warranty .................................................................. 26
Regulatory and Safety Approvals for Dolphin 9500 Series
FCC Compliance................................................................... 28
.. 28
Dolphin® 9500 Series Quick Start Guide iii
Page 4

iv Dolphin® 9500 Series Quick Start Guide
Page 5

Dolphin 9500 Series Quick Start Guide
Congratulations!
You have made a wise choice in selecting the Dolphin, a device known
worldwide for the following features:
• Microsoft Windows Mobile 2003 Second Edition Software for Pocket PCs
• Integrated, wireless, triple-radio design for real-time data collection
• Ergonomic form factor and lightweight design
• Rugged construction that withstands harsh treatment and real world use
• Adaptus Imaging Technology provides advanced point-and-shoot decoding
and imaging
• 7.4V, 14.8 watt hour Lithium-ion (Li-ion) batteries
Dolphin 9500 Series Terminals
There are four terminals in the Dolphin 9500 Series:
Dolphin 9500 Ergonomic form factor for single-handed use.
Dolphin 9550 Integrated pistol grip for high-volume scanning applications.
Dolphin 9501 Flashlight form factor with a laser scanner and imager.
Dolphin 9551 Integrated pistol-grip with a laser scanner and imager.
Dolphin 9500 Series Peripherals and Accessories
Charging/communications cradle with auxiliary battery
Dolphin HomeBase
Dolphin MobileBase
Dolphin
QuadCharger
Dolphin Mobile
Charger
Dolphin Net Base
Dolphin ChargeBase
Dolphin Cable Kits
™
well. Data transfers via RS-232 serial or USB ports.
Mobile charging/communication cradle. RS-232 serial
™
transfers data transfers and powers out at 5 volts.
Four-slot battery charger that charges four Li-ion
™
batteries in under four hours. One slot doubles as a
battery analyzer.
Charges a Dolphin terminal by plugging into a vehicle
cigarette lighter/power port.
Four-slot charging/communication cradle designed for
Ethernet-based communications.
Four-slot charging cradle that stores, powers, and
charges a terminal in each slot.
USB or serial cables that charge and communicate with
the terminal directly, without a cradle.
Dolphin® 9500 Series Quick Start Guide 1
Page 6
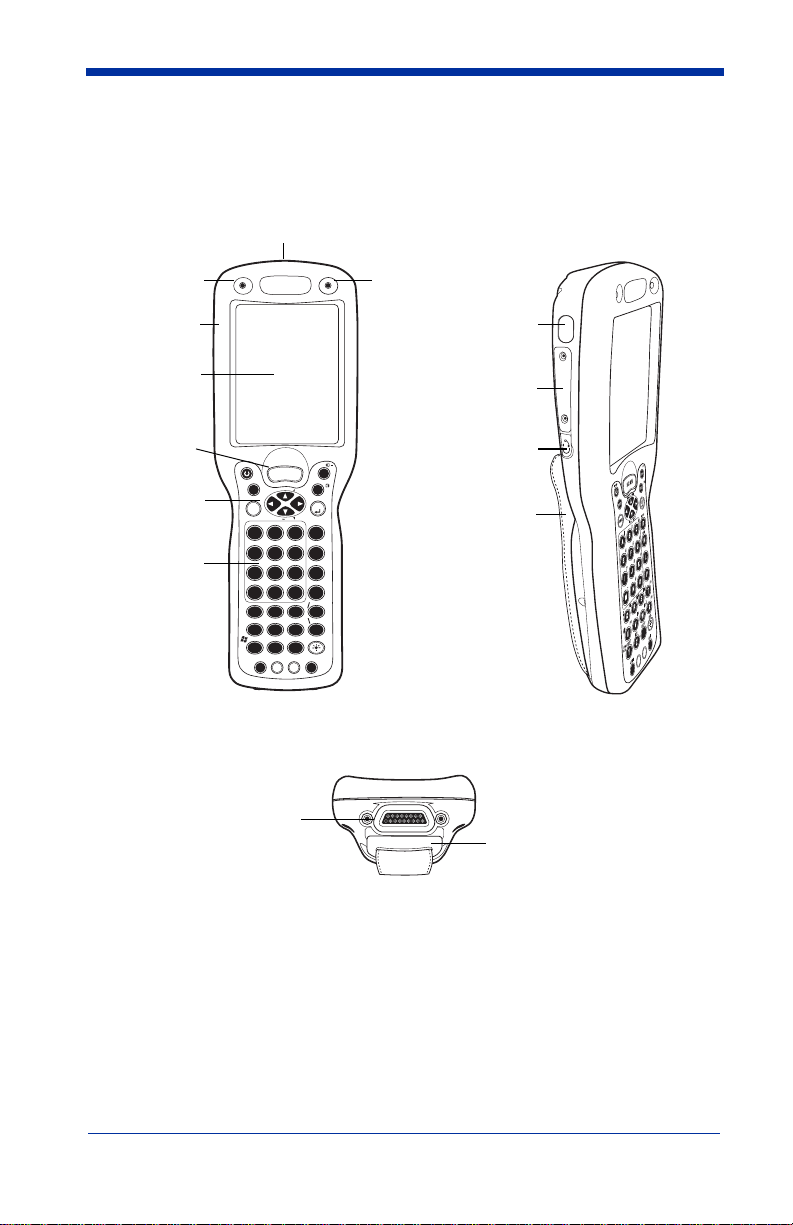
Hardware Overview
The front, side, and bottom panels of all Dolphin 9500 Series terminals are the same.
Front Panel Side Panel
Image Engine window
Decode LED
Magnesium-
alloy top cover
LCD with
Touch Screen
SCAN key
Navigation keys
Keypad
Bottom Panel
17-pin industrial-grade
mechanical connector
POWER
SCAN
+
L
O
V
SFT
NUM
V
O
L
P
1 2 3
AB
4 5 6
F
E
7 8 9
I
J
- 0
MNO
F1 F2 F3 F4
; :
*
RQ
F5 F6 F7 F8
@
UV
START INS BKSP DEL
Y
Z
CTRL ALT
Scan LED
IrDA COM Port
Access Door to the
Secure Digital (SD)
memory interface
Audio Jack
ESC
+
P
G
TAB
ENT
G
SEND
C
D
END
G
H
K
L
,
P
S
T
X
W
SP
(2.5mm)
Hand Strap
Hand strap clip
Note:
Dolphin 9550/9551 terminals do not have a hand strap.
2 Dolphin® 9500 Series Quick Start Guide
Page 7

Dolphin 9500/9501 Back Panel
Stylus (in slot)
Speaker
Microphone
(underneath the battery)
Note:
The back panel of the Dolphin 9501 has an expanded bottom housing to
Battery Well
Battery
accommodate the laser engine.
Dolphin 9550/9551 Back Panel
Dolphin 9550/9551 terminals feature an integrated pistol-grip on the back panel.
Image Engine
Window
Rubber Nose
Bumpers
Scan Trigger
Pistol-Grip Handle
Rubber Bumper
Note:
The back panel of the Dolphin 9551 has an expanded bottom housing to
Stylus (inserted
in the handle)
accommodate the laser engine.
Dolphin® 9500 Series Quick Start Guide 3
Page 8
Setting Up Dolphin 9500 Series Terminals
1. Unpack the carton and verify its contents - page 4.
2. Install the battery in the terminal - page 5.
3. Charge the main battery in the terminal for a minimum of four hours - page 5.
4. Wake the terminal and initialize the mobile computer - page 7.
5. Allow AutoInstall to run (page 8) and end on the Today screen.
Unpack the Carton and Verify its Contents
Verify that the carton contains the following items:
• Dolphin 9500 Series mobile computer (the terminal)
• Main battery pack (7.4v Li-ion)
• Microsoft Companion CD-ROM
• Dolphin 9500 Series Quick Start Guide
Be sure to keep the original packaging in the event that the Dolphin terminal
should need to be returned for service - see page 24.
Each order includes a Dolphin Software Development Kit and User’s Guide CD;
verify that you received this CD with your order.
If you ordered accessories, verify that they are also included with the order.
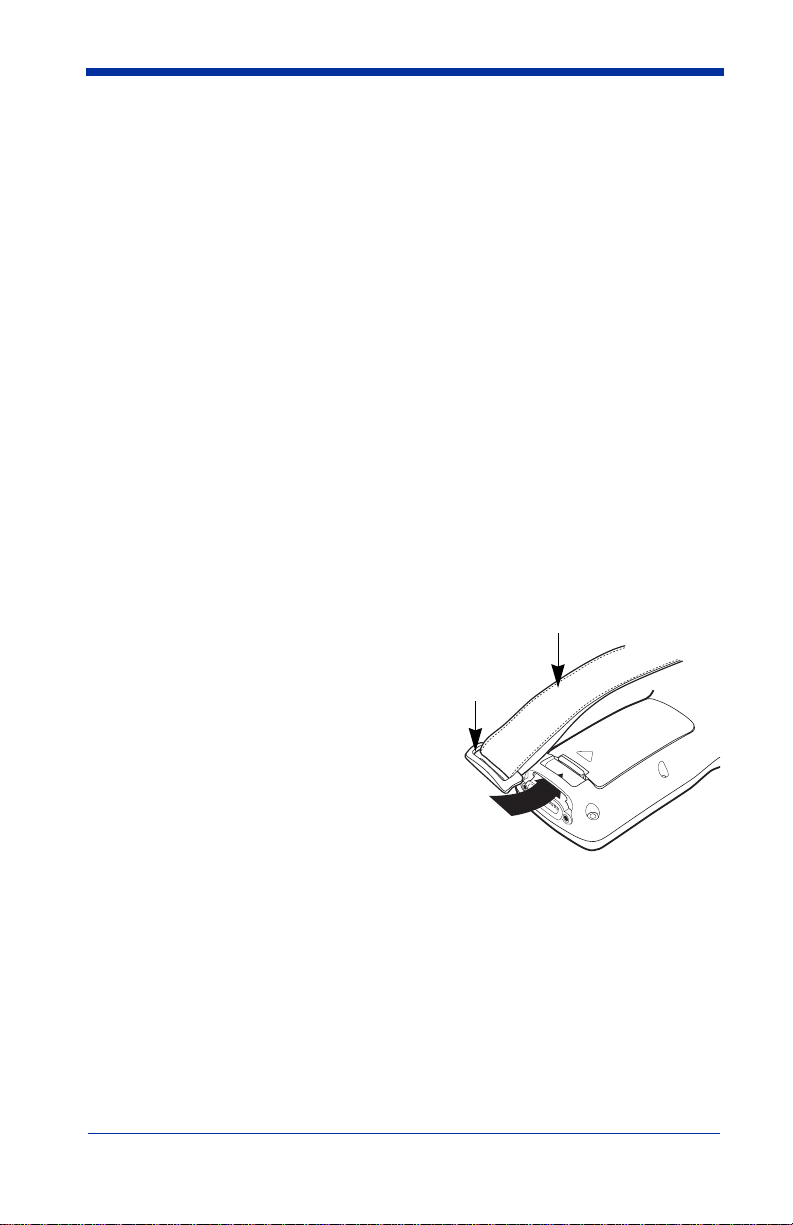
Dolphin 9500/9501 Hand Strap
The Dolphin 9500/9501 ship with the hand
strap installed and fastened with a clip on the
bottom panel.
To install the battery pack, you must detach
the hand strap.
Push the clip of the hand strap down and
away from the terminal. Move the strap up
and away from the bottom panel.
To re-attach the hand strap, slide the clip
back into place on the bottom panel.
Hand Strap
Clip
4 Dolphin® 9500 Series Quick Start Guide
Page 9
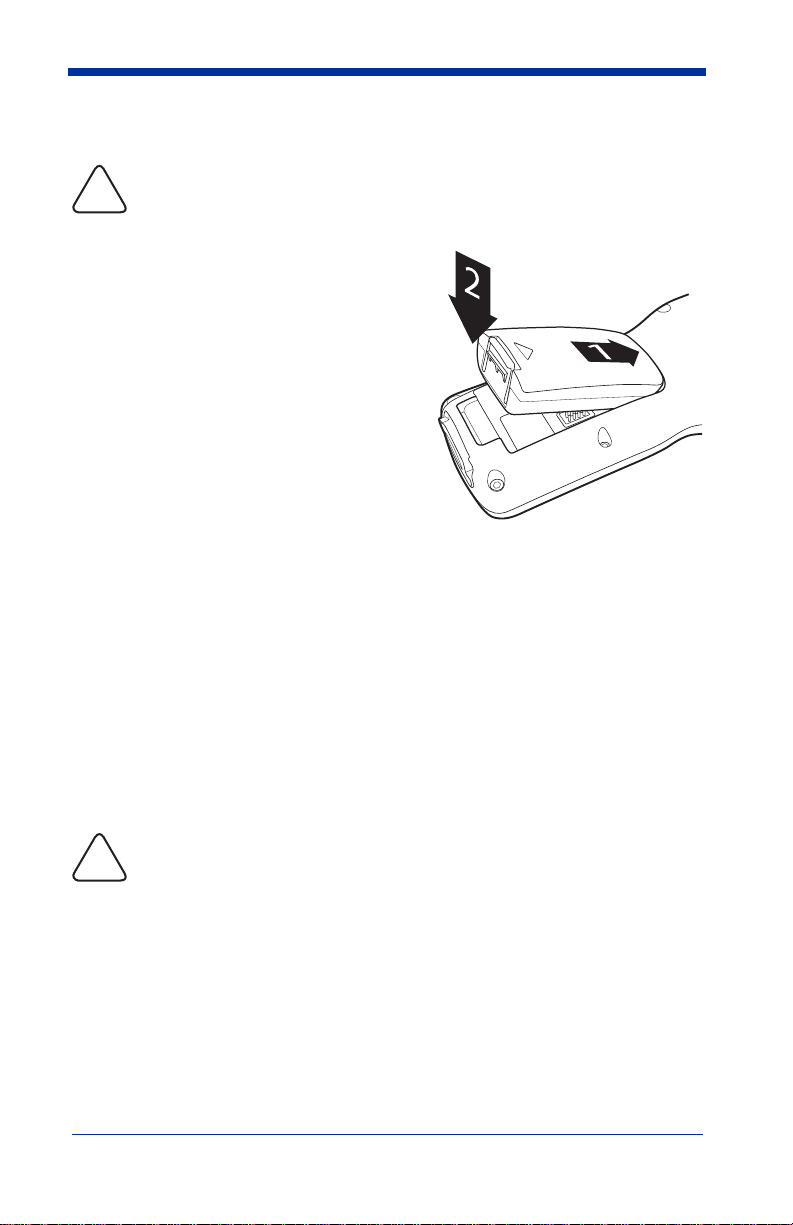
Install the Main Battery Pack
Use only the Li-ion battery packs provided by Hand Held Products. The
use of any battery pack not sold/manufactured by Hand Held Products
!
in the Dolphin 9500 Series terminal will void your warranty and may
result in damage to the Dolphin terminal or battery.
1. Remove the Li-ion battery pack from its
package.
2. Hold the terminal with the front panel
(keyboard) facing down.
3. If necessary, detach the hand strap.
4. Take the battery and insert the end
without the locking tab into the top of the
battery well and push down with a hinging
motion until the locking tab snaps.
5. If necessary, re-attach the hand strap.
To remove the battery pack, detach the hand
strap, press the locking tab on the battery
pack away from the bottom panel, and pull
the battery pack up with a hinging motion.
Charge the Main and Backup Batteries
The power supply consists of two types of battery power:
1. The main battery pack installed in the back panel and
2. The backup battery located inside the terminal.
The main battery powers the terminal and charges the internal backup battery.
The internal backup battery maintains the data stored in RAM memory and the
keeps the system clock running for up to 30 minutes when the main battery is
completely discharged or removed.
Terminals are shipped with both batteries completely discharged. Charge the
main battery pack for a minimum of four hours before initial use in the
terminal!
For charging, use a Dolphin 9500 Series peripheral and the power
cables provided by Hand Held Products. Use of peripherals or cables
!
not sold/manufactured by Hand Held Products will void the warranty
and may damage the terminal.
Dolphin® 9500 Series Quick Start Guide 5
Page 10
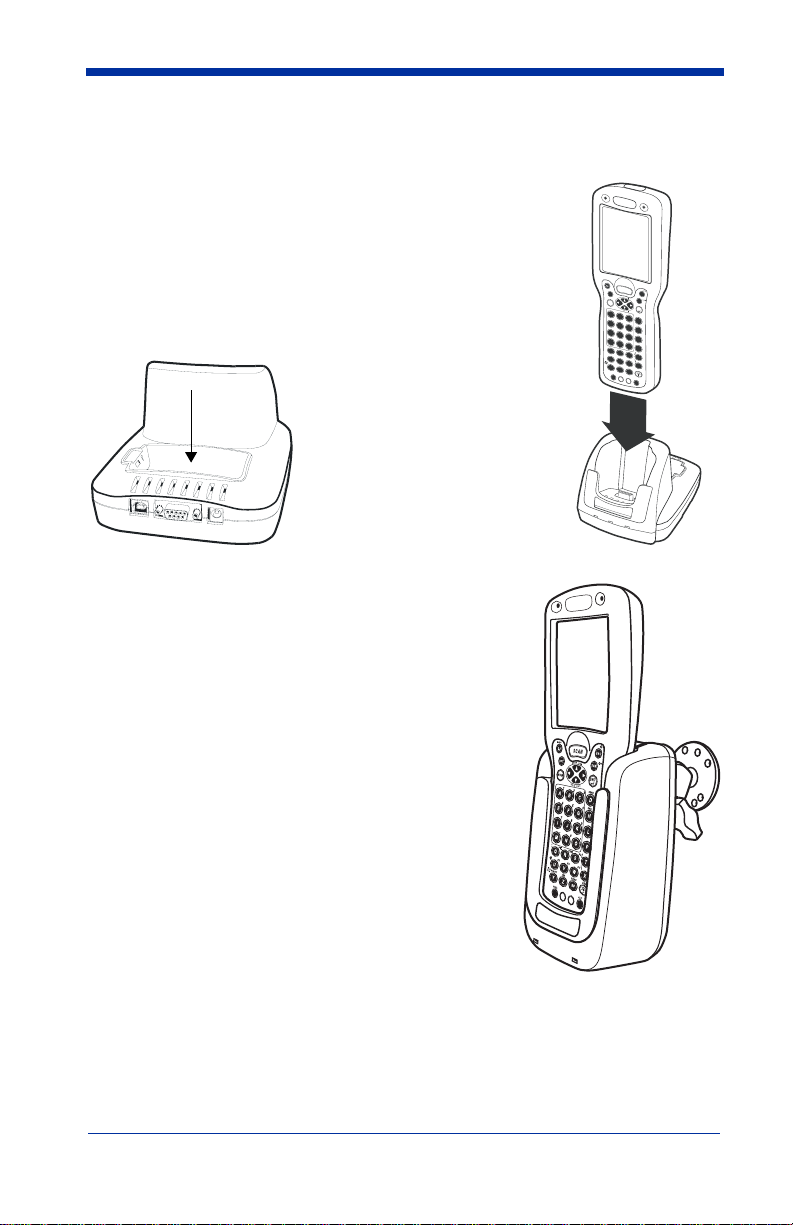
Charging with the Dolphin HomeBase
S
C
A
N
E
S
C
T
A
B
S
F
T
A
B
C
E
F
G
I
J
K
M
N
O
S
R
Q
U
V
W
Y
Z
D
H
L
P
T
X
N
U
M
E
N
T
1
2
3
7
8
9
4
5
6
;
:
*
@
F
1
F
2
F
3
F
4
F
5
F
6
F
7
F
8
S
T
A
R
T
I
N
S
B
K
S
P
D
E
L
C
T
R
L
A
L
T
S
E
N
D
E
N
D
P
O
W
E
R
V
O
L
P
G
V
O
L
P
G
+
+
0
,
S
P
1. Connect the HomeBase to the power supply provided
by Hand Held Products.
2. Slide the terminal into the terminal well until the Dock
LED lights solid green to indicate that the terminal is
properly seated.
3. The battery pack begins charging.
Charging a Spare Battery Pack
The HomeBase features an
auxiliary battery well. Insert a
spare battery pack in this well
and the battery charges in
four hours.
Charging occurs
independently of terminal
charging and the Aux Battery
LED indicates charging
status.
Charging with the Dolphin Mobile Base
1. Connect the Mobile Base to the appropriate
power source using a cable from Hand Held
Products.
2. Slide the terminal into the terminal well until the
Dock LED lights solid green to indicate that the
terminal is properly seated.
3. The battery pack begins charging.
Other Charging Options
When the Li-ion battery is installed in the terminal,
use a charging/communication cable.
When the Li-ion battery is not installed in the
terminal, place the battery pack in the Dolphin
QuadCharger and charge it completely. Then, install
the battery in the terminal.
6 Dolphin® 9500 Series Quick Start Guide
D
O
C
K
C
O
M
M
Page 11
Initialize the Mobile Computer
Note:
Do NOT press any keys while the mobile computer is initializing.
1. Wake the terminal by pressing the Power key. The decode LED lights and
the scan LED blinks for approximately three seconds.
2. The terminal initializes and the splash screen displays for a few seconds.
The Build numbers
indicate the software
version number.
7.XX 7.XX 7.XX
Bootloader Kernel Keyboard
3. The system performs a hard reset. When the display activates again, follow
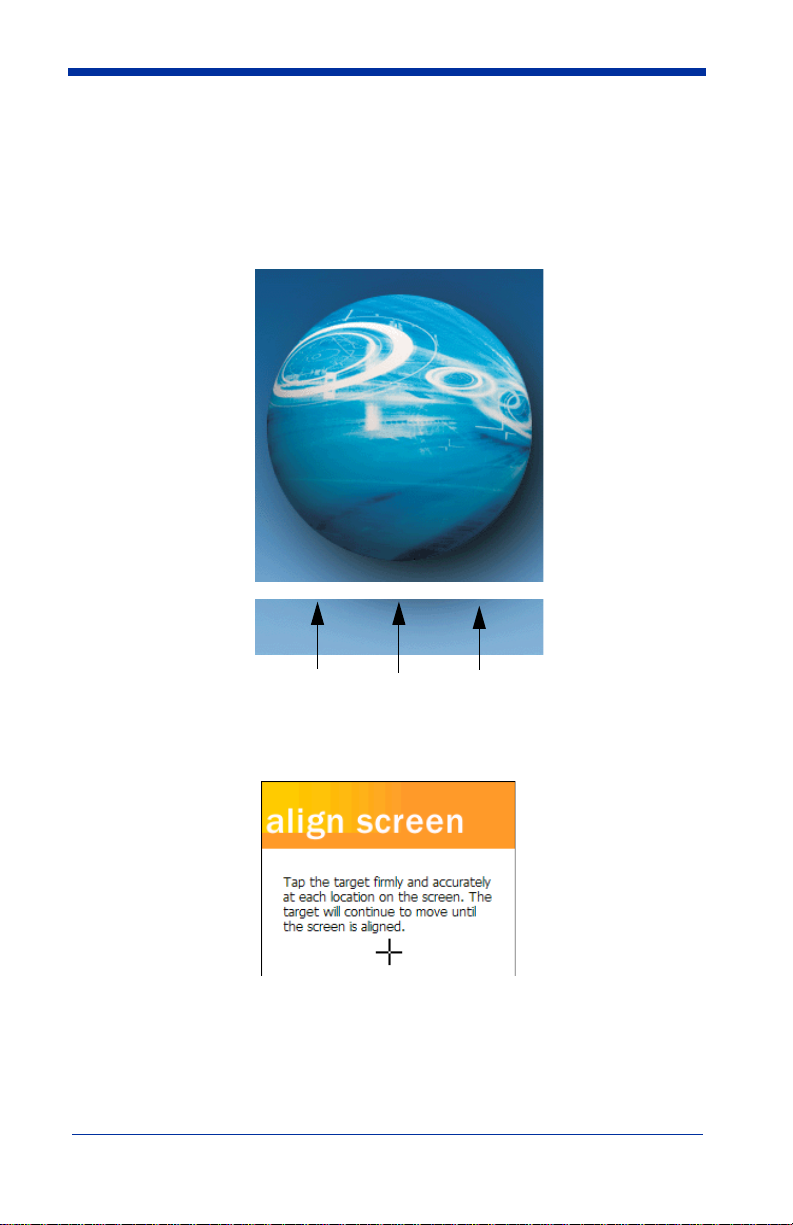
the instructions that appear.
4. When prompted to align the screen, use the stylus provided with the terminal.
• Alignment should always be performed with a stylus designed for touch
screen applications. The small point is required for accurate calibration.
• Press the stylus firmly into the center of the cross-hair target once and
release. Do not “double-tap” the target.
• You can re-align the screen any time by tapping Start > Settings >
System tab > Screen.
Dolphin® 9500 Series Quick Start Guide 7
Page 12

5. Setup is complete and AutoInstall begins. Wait as your terminal installs the
programs stored in the AutoInstall folder.
6. When AutoInstall is complete, the system performs a soft reset that ends on
the Today Screen (page 1-9).
AutoInstall
AutoInstall occurs after each Hard Reset (Cold Boot) (page 1-21) and installs the
programs stored in the AutoInstall folder. This includes Demos, Utils, and the
appropriate radio drivers and utilities for wireless radios.
For each program, a status bar appears on the screen that identifies the program
and indicates install progress. Do NOT touch the keyboard or the screen while
programs are loading.
After AutoInstall is complete, the terminal performs a Soft Reset (Warm Boot)
(page 1-21) automatically and ends on the Today Screen (page 1-9).
8 Dolphin® 9500 Series Quick Start Guide
Page 13

Today Screen
When you turn on your device for the first time, you’ll see the Today screen. It
provides the basic tools you need to navigate the system.
Navigation Bar and Start Menu
The navigation bar at the top of the screen displays the date and time and
provides access to the Start menu.
Command Bar
The command bar along the bottom of the screen contains menus, appropriate
application icons, and perform tasks.
Dolphin® 9500 Series Quick Start Guide 9
Page 14

Verifying Operations with Demos
Dolphin terminals contain Demos you can use to verify imaging and decoding.
Verify Imaging
The Image Demo enables you to use the imager to capture an image.
1. Tap Start > Demos > Image Demo. The Image Demo opens.
2. Point the terminal at an object and press the SCAN key. A preview of the
object appears on the screen, and the decode and scan LEDs light.
3. Release the SCAN key. The image is captured.
By default, images save to the My Device folder as “imagedemo.jpg.” To
save to a different location, tap File > Save As and select a new location.
4. Press the ESC key to close the demo.
For more information about taking an image, see Using the Imager on page 18.
Verify Decoding
The Scan Demo enables you to decode bar codes.
1. Tap Start > Demos > Scan Demo.
2. Aim the terminal at a bar code and press the SCAN key. The scan LED lights
red, and the aimer beam or pattern projects out from the scanner.
3. When a good scan is obtained, the decode LED lights solid green and the
terminal beeps. The bar code readout appears on the screen.
4. Press the ESC key to close the demo.
Sample Bar Codes
Use the following bar codes to verify decoding:
Sample 128 Sample PDF417
“Code 128” “PDF417 Test Message”
Note:
Dolphin 9501/9551 terminals support only 1D symbologies; use Code
128 to verify scanning.
For more information, see Decoding a Bar Code on page 18.
10 Dolphin® 9500 Series Quick Start Guide
Page 15

Verifying Radio Status
Dolphin 9500 Series terminals can be configured with 802.11b, Bluetooth™,
GSM/GPRS (Dolphin 9500 only) radios or a combination of these radios.
Radio Driver Installation
Radio drivers install during AutoInstall (page 1-8) after a hard reset. Only the
appropriate drivers for your terminal’s radio configuration install.
Radio Combinations
Co-located radios
Both radios can be installed but only
one can be operated at a time.
• 802.11b and GSM/GPRS
Co-operational radios
Both radios can operate
simultaneously.
• Bluetooth and 802.11b
• Bluetooth and GSM/GPRS
Radio Manager
The Radio Manager allows you to enable radios installed on the terminal. When
enabled, the radio is transmitting; when disabled, the radio is not transmitting.
Verify which radio is enabled after AutoInstall (page 1-8) is complete. When a
single radio installs, its radio driver is enabled automatically. When more than
one radio installs, the terminal enables the 802.11b radio unless a GSM radio is
installed. Then, the terminal enables the GSM radio.
Verify the Radio Status
1. Tap Start > Settings > Connections tab > Radio Manager. The Radio
Manager opens identifying the radio modules installed in the terminal.
2. Select the radio. If the Status field says “Ready,” the radio(s) is enabled.
Dolphin® 9500 Series Quick Start Guide 11
Page 16

Enabling a Radio or Radio Combination
To successfully enable a radio, both the hardware module and the software
driver must be installed.
1. In the Radio Modes list, select the radio or radio combination.
2. Tap Apply. When the radio is enabled, the Status field reads “Success.”
If an error occurs during this process, the change is abandoned and an error
message appears in the Status field.
3. Tap OK to save and exit the Radio Manager.
For detailed information about the Radio Manager and radio options, see the
Dolphin 9500 Series User’s Guide.
Adjusting the Backlight
Both the keyboard and display are backlit to enable better viewing in low-light
conditions.
The Backlight key on each keyboard turns the keyboard backlight on and off; see
Backlight, page 1-13.
The backlight for the color display is user-defined. There are two tabs: one for
Battery and the other for External power. The options on each tab are the same.
Tap Start > Settings > System tab >
Backlight. Backlight settings open displaying
the Battery tab.
In the Turn off backlight… drop-down list,
select the number of minutes you want to
elapse before the backlight automatically turns
off.
Select the Turn on backlight… option if you
want the display backlight to turn on when the
a button is pressed or the touch screen is
tapped.
In the Dim backlight if… drop-down list, select
the number of minutes you want to elapse
before the backlight dims.
Move the Backlight Intensity slider to set the
intensity of the backlight.
Tap OK to save settings. The display backlight
functions according to the settings saved here.
Entering Information
To enter information, you can use the
• Keyboard (page 13),
• Stylus on the touch screen (page 17),
• Imager (page 18).
12 Dolphin® 9500 Series Quick Start Guide
Page 17

Using the Keyboards
The Dolphin 9500 Series features three keyboard options: 35-key numeric/alpha,
43-key alpha/numeric, and 56-key full alpha/numeric. Each keyboard contains
centrally located keys for both right- and left-hand operation as well as function,
navigation, and modifier keys.
Using the Function Keys
Name Key Function
Backlight
Backspace
Delete
Enter
Escape
Power
SCAN
Space
The Backlight key turns the keyboard backlight on and off.
The BKSP key moves the cursor back one space each
time the key is pressed. If you are typing te xt, the previous
charac3ter is deleted each time this key is pressed. Press
and hold to delete multiple characters.
This key appears only on 35- and 56-keyboards. On the
43-key keyboard, backspacing is achieved by pressing
Red + SP keys.
The Delete key deletes the next character forward each
time the key is pressed.
This key appears only on 35- and 56-key keyboards. On
the 43-key keyboard, deleting is achieved by pressing
Red + Backlight keys.
The Enter key confirms data entry.
The Escape key performs a cancel action.
The Power key puts the terminal into and wakes the
terminal from suspend mode. This is also known as
suspend/resume.
The SCAN key activates the image/scan engine and
“wakes” the terminals from suspend mode. Its position
allows convenient one-handed engine activation.
The Space key moves the cursor one space.
Tab
The Tab key moves the cursor to the next tab stop or the
next control (on a form, for instance).
Dolphin® 9500 Series Quick Start Guide 13
Page 18

Using the Navigation Keys
Located in the center of each keyboard for easy access with either hand, the
navigation keys enable you to navigate the cursor through an application screen.
Press To …
Move the cursor up one row or line.
Move the cursor down one row or line.
Move the cursor one character to the right.
Move the cursor one character to the left.
Using the Modifier Keys
Name & Key Function
Shift
CTRL and ALT
Blue and Red
The SFT key modifies only the next key pressed. In addition, you
can double-tap SFT or press SFT + Red to toggle Caps Lock on
and off.
Functions of the ALT and CTRL keys depend on the software
application in use and the keys pressed in combination with each.
The blue and red keys are used in combination with other keys to
type special characters and perform system functions. Each key
modifies only the next key pressed. The o v erlay of each k e yboard is
color-coded to indicate the character typed or function performed
when each key is pressed with the red or blue keys.
14 Dolphin® 9500 Series Quick Start Guide
Page 19

35-key Numeric/Alpha Keyboard
SCAN key
Power key
Shift key
Alpha Lock key
Navigation keys
Alpha Lock Indicators
Space key
Function keys
Backspace key
CTRL, Blue, Red, ALT Modifier keys
Escape key
Tab key
Enter key
Delete key
Backlight key
Alpha Lock Key
The Alpha Lock key on the 35-key keyboard enables you to toggle between the
numeric and alpha modes. Numeric mode is when you type numbers with the
number keys. Alpha mode is when you type letters with the number keys.
The 35-key keyboard defaults to numeric mode.
On the overlay, there are Alpha Lock Indicators above number keys 2-9 that
specify the letter that will be typed when you press that number key in alpha
mode.
Please note that when pressing number keys in alpha mode, you must use the
same multi-press method you would use when typing letters on a phone keypad.
Each key press will type the next letter in the sequence displayed in the Alpha
Lock Indicator.
Dolphin® 9500 Series Quick Start Guide 15
Page 20

43-key Alpha/Numeric Keyboard
SCAN key
Power key
Shift key
Number Lock key
Navigation keys
Number Lock Pad
Number Lock
Indicators
CTRL, Blue, Red, ALT Modifier keys
Escape key
Tab key
Enter key
Backlight key (use with
SFT to delete)
Space key (use with SFT
to backspace)
Number Lock Key
The Number Lock key on the 43-key keyboard enables you to toggle between
the alpha and numeric modes. Alpha mode is when you type letters with the letter
keys. Numeric mode is when you type numbers with the letter keys.
The 43-key keyboard defaults to alpha mode.
The Number Lock Indicators above the letter keys in the Number Lock Pad
specify the number or character that will be typed when you press that letter key
in numeric mode.
16 Dolphin® 9500 Series Quick Start Guide
Page 21

56-key Full Alpha/Numeric Keyboard
SCAN key
Power key
Backlight key
Shift key
Navigation keys
Insert key
Space key
Backspace key
Delete key
CTRL, Blue, Red, ALT Modifier keys
Escape key
Tab key
Enter key
Key Combinations
In addition to the color-coded functions indicated on each overlay, there are
keyboard combinations for specific functions and special characters on each
keyboard. For charts of the key combinations associated with each keyboard,
see the Appendix A of the Dolphin 9500 Series User’s Guide.
Using the Stylus
The stylus functions as a mouse; generally, a tap is the same as a click.
Tap: Tap the touch screen once to open menu items and select options.
Drag: Hold the stylus on the screen and drag across the screen to select
Tap & hold: Tap and hold the stylus on an item and a popup menu appears. On
!
!
Dolphin® 9500 Series Quick Start Guide 17
text and images. Drag in a list to select multiple items.
the pop-up menu, tap the action of the task you want to perform.
Use the stylus or your finger to select or enter information on the touch
screen. Use of other objects, such as paper clips, pencils, or ink pens
can damage the touch screen and will void the warranty.
Page 22

Using the Imager
The compact image engine instantly reads all popular 1D and 2D bar codes and
supports omni-directional aiming and decoding for greater flexibility in real-world
settings.
The imager can also capture digital images, such as signatures and pictures of
damaged inventory. Images are saved in industry-standard file formats.
Image Engine Options - Dolphin 9500/9550
Name Aimer Decodes from …
IT4100SR Green aiming beam
IT4300SR Laser aimer pattern
IT4100SF Green aiming beam
IT4300SF Laser aimer pattern
IT4100HD Green aiming beam 2.2 to 6.5 in. (5.6 to 16.5 cm.)
Image Engine Options - Dolphin 9501/9551
Name Aimer Decodes from …
SE1200HP Long-range 5 mil—2.75 to 7 in (0.07 to 0.17 m)
SE1200LR Long-range 10 mil—10 to 24 in (0.25 to .6 m)
SE1200ALR Long-range 13 mil—18 to 39 in (0.45 to 1 m)
2.5 to 12.5 in. (6.3 to 32 cm.)
2.1 to 8.9 in. (5 to 22.6 cm.)
55 mil reflective—5 to 50 in (.13 to 1.27 m)
100 mil reflective—66 to 232 in (1.67 to 5.9 m)
100 mil reflective—102 to 363 in (2.6 to 9.2 m)
Decoding a Bar Code
See Sample Bar Codes on page 10 to practice decoding.
1. Point the Dolphin terminal directly at the bar code. The aimer should be
oriented in line with the bar code to achieve optimal decoding.
2. Project the aimer by pressing and holding the SCAN key.
You can also press and hold the Scan Trigger on the Dolphin 9550/9551.
3. The scan LED lights red.
Decode
LED
4. Center the aiming beam over the bar code.
A range of 4–10 inches (10–25 cm) from the bar code is recommended.
5. When a bar code is successfully decoded, the decode LED lights green and
the terminal beeps.
18 Dolphin® 9500 Series Quick Start Guide
Scan
LED
Page 23

Scanning Position Options
Dolphin 9500/9550 terminals equipped with an IT4100SF/SR/HD engine support
omni-directional aiming and feature a green aiming beam.
1D Linear
2D Matrix Symbol
Dolphin 9500/9550 terminals equipped with an IT4300SF/SR support omnidirectional aiming and feature a red laser aimer pattern (1D bar code shown).
Dolphin 9501/9551 terminals read only 1D linear bar codes, and do not support
omni-directional scanning, and feature a red aiming beam.
Dolphin® 9500 Series Quick Start Guide 19
Page 24

Taking an Image
The image-capture process is an intuitive, split-second operation. The terminal
is capable of saving images in a number of industry-standard file formats such
as *.bmp, *.jpg and *.png. The default file format for images is a grayscale *.jpg.
Note:
Dolphin 9501/9551 terminals do not support image capture.
1. Point the Dolphin terminal directly at the object. The imager points straight
out the top panel.
2. To preview the image, press and hold the SCAN key.
You can also press and hold the Scan Trigger on the Dolphin 9550.
3. The display shows a preview of the object. This is a live video image of what
the imager is currently viewing. It has a slightly degraded appearance
compared to the captured image. This is normal.
4. Adjust the terminal’s position until the object appears on the screen the way
you want it to appear in the image.
5. Hold the terminal still and release the SCAN key or Scan Trigger. The scan
and decode LEDs flash red, the touch screen flashes, and the captured
image appears on the screen.
6. Unless otherwise specified by the application in use, the image is saved to
the My Device folder. The image file can be uploaded to a host PC using
Microsoft
®
ActiveSync® and a Dolphin communication peripheral.
20 Dolphin® 9500 Series Quick Start Guide
Page 25

Soft Reset (Warm Boot)
A soft reset re-boots the device without losing RAM data. You would perform a
soft reset when the terminal fails to respond, after installing certain software
applications, or after changing certain system settings, such as network cards.
1. Press and hold the CTRL + SFT keys for approximately five seconds.
2. The decode and scan LEDs flash for approximately three seconds as the
terminal resets.
3. When the reset is complete, the Today screen displays.
Hard Reset (Cold Boot)
A hard reset resets the operating system, restores the terminal back to factory
defaults, and resets the terminal after a bootloader, keyboard, and kernel
upgrade.
A hard reset erases all of the data stored in RAM memory and all RAM
installed applications.
!
1. Press and hold the CTRL + ESC keys for approximately five seconds.
2. The decode and scan LEDs flash for approximately three seconds.
3. The terminal re-initializes (see page 7 for details).
Suspend Mode
The Dolphin terminal goes into suspend mode automatically when the terminal
is inactive for a programmed period of time. To put the Dolphin terminal in
suspend mode manually, press and hold the Power key until the screen goes
blank.
To wake the Dolphin terminal from suspend mode (when the screen is blank),
press the Power or SCAN key.
Communications
Dolphin 9500 Series terminals communicate with a host computer or peripheral
device through the
• Mechanical connector on the Bottom Panel (page 1-2),
• IrDA COM Port (page 1-2) on the side panel, or
• Integrated wireless radio; see page 11.
Dolphin terminals support data exchange via
• Microsoft ActiveSync and
• Wireless connection.
For more information, refer to the Dolphin 9500 Series User’s Guide.
Dolphin® 9500 Series Quick Start Guide 21
Page 26

Troubleshooting
Issue Cause Solution
The terminal does
not power on or
loses power
quickly.
The terminal turns
itself off.
Tapping a button
or icon does not
perform the
associated task.
A message
appears stating
that the memory
is full.
The terminal is
not accepting
scan data.
Li-ion battery is
not installed
properly.
Li-ion battery not
fully charged.
A Li-ion battery
from a company
other than Hand
Held Products is
installed.
Terminal is in
suspend mode.
The screen is not
aligned.
Too many files
stored on the
terminal.
Storage memory
is set too low for
the applications in
use.
Too many
applications are
installed on the
terminal.
The scan is not
functioning
properly.
The bar code is
unreadable.
The terminal has
not been
programmed to
decode the bar
code type.
Verify that the Li-ion battery is seated
securely in the battery well so that the battery
contacts connect; see page 5
Using a peripheral, fully charge the Li-ion
battery for a minimum of four hours, re-install
the battery (see page 5.), and power on
again. For more information about batteries,
see the Dolphin 9500 Series User’s Guide.
Use of any battery not sold/manufactured by
Hand Held Products may damage the
terminal and/or the battery and will void the
warranty.
Dolphin terminals are programmed to go into
Suspend Mode automatically after a period of
inactivity . The default is three min utes running
on battery power. These settings can be
changed from one to five minutes on battery
or external power. Tap Start > Settings >
System tab > Power.
Tap Start > Settings > System tab > Screen >
Align Screen and align the screen; see page
7.
Delete or move unnecessary files. Upload
files to a host PC or device with enough
memory to store them.
Adjust the storage memory allocation. Go to
Start > Settings > System tab > Memory. Use
the slider to increase the storage memory.
Remove unnecessary programs. Go to Start
> Settings > System tab > Remove Programs.
The Remove Programs function removes
programs from RAM memory.
Verify scanning with the Image Demo; see
page 10.
Check the bar code to see if it is unreadable.
Check the bar code type and if the terminal
has been programmed to decode it. Tap Start
> Demos > Scan Demo > Options menu >
Symbologies. The symbologies selected in
the list are the symbologies that the terminal
is currently programmed to decode.
22 Dolphin® 9500 Series Quick Start Guide
Page 27

Troubleshooting
Issue Cause Solution
The radio is not
transmitting.
Slow system
performance.
The radio is not
powered up.
Too many
programs are
running.
Verify that the radio is enabled; see Verifying
Radio Status on page 11.
Tap Start > Settings > System tab > Memory.
To stop running programs, tap the Running
Programs tab.
Dolphin® 9500 Series Quick Start Guide 23
Page 28

Product Service and Repair
Hand Held Products provides service for all its products through service centers
throughout the world. To obtain warranty or non-warranty service, return the unit
to Hand Held Products (postage paid) with a copy of the dated purchase record
attached. Contact the appropriate location below to obtain a Return Material
Authorization number (RMA #) before returning the product.
North America
Hand Held Products Corporate Offices
Telephone: (800) 782-4263, Option 3
Fax: (704) 566-6015
E-mail: naservice@handheld.com
America Latina
Hand Held Products America Latina
Teléfono: (239) 263-7600
Fax: (239) 263-9689
E-mail: laservice@handheld.com
Brazil
Hand Held Products Brazil
Telefone: +55 (11) 2178-0500
Fax: +55 (11) 2178-0502
E-mail: suporte@handheld.com
Europe, Middle East, and Africa
Hand Held Products Europe
Telephone:+ 31 (0) 40 29 01 633
Fax: + 31 (0) 40 2901631
E-mail: euservice@handheld.com
Asia Pacific
Hand Held Products Asia/Pacific
Telephone: +852-2511-3050
Fax: +852-2511-3557
E-mail: apservice@handheld.com
Japan
Hand Held Products Japan
Telephone: +81-3-5770-6312
Fax: +81-3-5770-6313
E-mail: apservice@handheld.com
Online Product Service and Repair Assistance
You can also access product service and repair assistance online at
www.handheld.com.
24 Dolphin® 9500 Series Quick Start Guide
Page 29

Technical Assistance
If you need assistance installing or troubleshooting, please call your Distributor
or the nearest Hand Held Products technical support office:
North America/Canada:
Telephone: (800) 782-4263, option 4 (8 a.m. to 6 p.m. EST)
Fax number: (315) 685-4960
E-mail: natechsupport@handheld.com
Europe, Middle East, and Africa:
TelephoneEuropean Ofc: Int+31 (0) 40 79 99 393
U.K. Ofc: Int+44 1925 240055
E-mail:eutechsupport@handheld.com
Asia Pacific:
Telephone: Int+852-3188-3485
E-mail: aptechsupport@handheld.com
America Latina:
Teléfono: (704) 998-3998, opción 8
E-mail: latechsupport@handheld.com
Brazil
Telefone: +55 (11) 2178-0500
Fax: +55 (11) 2178-0502
E-mail: suporte@handheld.com
Online Technical Assistance
You can also access technical assistance online at www.handheld.com.
or
2511-3050
Dolphin® 9500 Series Quick Start Guide 25
Page 30

Limited Warranty
Hand Held Products, Inc. (“Hand Held Products“) warrants its products to be free from
defects in materials and workmanship and to conform to Hand Held Products’ published
specifications applicable to the products purchased at the time of shipment. This warranty
does not cover any Hand Held Products product which is (i) improperly installed or used;
(ii) damaged by accident or negligence, including failure to f ollow the proper maintenance ,
service, and cleaning schedule; or (iii) damaged as a result of (A) modification or
alteration by the purchaser or other party, (B) excessive voltage or current supplied to or
drawn from the interface connections, (C) static electricity or electro-static discharge, (D)
operation under conditions beyond the specified operating parameters, or (E) repair or
service of the product by anyone other than Hand Held Products or its authorized
representatives.
This warranty shall extend from the time of shipment for the duration published by Hand
Held Products for the product at the time of purchase (“Warranty Period”). Any defective
product must be returned (at purchaser’s expense) during the Warranty Period to Hand
Held Products’ factory or authorized service center for inspection. No product will be
accepted by Hand Held Products without a Return Materials Authorization, which may be
obtained by contacting Hand Held Products. In the event that the product is returned to
Hand Held Products or its authorized service center within the Warranty Period and Hand
Held Products determines to its satisfaction that the product is defective due to defects in
materials or workmanship, Hand Held Products, at its sole option, will either repair or
replace the product without charge, except for return shipping to Hand Held Products.
EXCEPT AS MAY BE OTHERWISE PROVIDED BY APPLICABLE LAW, THE
FOREGOING WARRANTY IS IN LIEU OF ALL OTHER COVENANTS OR
WARRANTIES, EITHER EXPRESSED OR IMPLIED, ORAL OR WRITTEN, INCLUDING,
WITHOUT LIMITATION, ANY IMPLIED WARRANTIES OF MERCHANTABILITY OR
FITNESS FOR A PARTICULAR PURPOSE.
HAND HELD PRODUCTS’ RESPONSIBILITY AND PURCHASER’S EXCLUSIVE
REMEDY UNDER THIS WARRANTY IS LIMITED TO THE REPAIR OR REPLACEMENT
OF THE DEFECTIVE PRODUCT. IN NO EVENT SHALL HAND HELD PRODUCTS BE
LIABLE FOR INDIRECT, INCIDENTAL, OR CONSEQUENTIAL DAMAGES, AND, IN NO
EVENT, SHALL ANY LIABILITY OF HAND HELD PRODUCTS ARISING IN
CONNECTION WITH ANY PRODUCT SOLD HEREUNDER (WHETHER SUCH
LIABILITY ARISES FROM A CLAIM BASED ON CONTRACT, WARRANTY, TORT, OR
OTHERWISE) EXCEED THE ACTUAL AMOUNT PAID TO HAND HELD PRODUCTS
FOR THE PRODUCT. THESE LIMITATIONS ON LIABILITY SHALL REMAIN IN FULL
FORCE AND EFFECT EVEN WHEN HAND HELD PRODUCTS MAY HAVE BEEN
ADVISED OF THE POSSIBILITY OF SUCH INJURIES , LOSSES, OR DAMAGES. SOME
STATES, PROVINCES, OR COUNTRIES DO NOT ALLOW THE EXCLUSION OR
LIMITATIONS OF INCIDENTAL OR CONSEQUENTIAL DAMAGES, SO THE ABOVE
LIMITATION OR EXCLUSION MAY NOT APPLY TO YOU.
All provisions of this Limited Warranty are separate and severable, which means that if
any provision is held invalid and unenforceable, such determination shall not affect the
validity of enforceability of the other provisions hereof.
The limited duration of the warranty for the Dolphin 9500 Series is as follows:
• Dolphin 9500/9550 terminals with an integrated imager are covered by a two-year
limited warranty.
• Dolphin 9501/9551 terminals with an integrated laser engine are covered by a one-year
limited warranty.
• Touch screens are covered by a one-year limited warranty.
• Dolphin 9500 Series HomeBase, Mobile Base, Mobile Charger, Net Base,
ChargeBase, and QuadCharger are covered by a one-year limited warranty.
• The limited duration of the warranty for batteries is one year. Use of any battery not
sold/manufactured by Hand Held Products may damage the terminal and/or the battery
and will void the warranty. Batteries returned to Hand Held Products in a reduced state
may or may not be replaced under this warranty. Battery life will be greatly increased
when following the battery instructions in the Dolphin 9500 Series User’s Guide.
26 Dolphin® 9500 Series Quick Start Guide
Page 31

• Use of any peripheral not manufactured/sold by Hand Held Products will void the
warranty. This includes but is not limited to: cables, power supplies, cradles, and
docking stations.
• Use only power adapters approved for use by Hand Held Products. Failure to do so may
result in improper operation or damage to the unit and will void the warranty.
Hand Held Products, Inc. extends these warranties only to the first end-users of the
products. These warranties are non-transferable.
Dolphin® 9500 Series Quick Start Guide 27
Page 32

Regulatory and Safety Approvals for Dolphin 9500 Series
Parameter Specification
U.S.A
Canada
European Community
The CE Mark on the product indicates that the system has been tested to and
conforms with the provisions noted within the 89/336/EEC Electromagnetic
Compatibility Directive and the 73/23/EEC Low Voltage Directive.
For further information, please contact:
Hand Held Products, Inc.
Nijverheidsweg 9
5627 BT Eindhoven
The Netherlands
Hand Held Products shall not be liable for use of our product with equipment (i.e., power
supplies, personal computers, etc.) that is not CE marked and does not comply with the
Low Voltage Directive.
FCC Part 15, Class B
ICES-003
EN 55022 (CISPR 22) Class B
EN60950
EN60825-1
EN55024:1998
FCC Compliance
Dolphin mobile computers meet or exceed all applicable standards and have been
manufactured to the highest level of quality.
To see the specific labels associated with RF terminals configurations, see Chapter 1 of
the Dolphin 9500 Series User’s Guide.
Dolphin 9500 Series Batch Terminal
Dolphin 9500 Series Batch terminals comply with part 15 of the FCC rules. Operation is
subject to the following two conditions: 1) devices may not cause harmful interference,
and 2) devices must accept any interference received, including interference that may
cause undesired operation.
Dolphin 9500 Series RF Terminal with 802.11b and/or Bluetooth Radio
This device complies with Part 15 of the FCC Rules. Operation is subject to the following
two conditions: 1) this device may not cause harmful interf erence , and 2) this device must
accept any interference received, including interference that may cause undesired
operation.
This equipment has been tested and found to comply with the limits for a Class B digital
device pursuant to Part 15 of the FCC Rules. These limits are designed to provide
reasonable protection against harmful interference in a residential installation. This
equipment generates, uses, and can radiate radio frequency energy and, if not installed
and used in accordance with the instructions, may cause harmful interference to radio
communications. If this equipment does cause harmful interference to radio or television
reception, which can be determined by turning the equipment off and on, the user is
encouraged to try to correct the interference by one or more of the following measures:
• Reorient or relocate the receiving antenna.
• Increase the separation between the equipment and receiver.
• Connect the equipment into an outlet on a circuit different from that to which the receiver
is connected.
28 Dolphin® 9500 Series Quick Start Guide
Page 33

• Consult the dealer or an experienced radio/TV technician for help.
If necessary, the user should consult the dealer or an experienced radio/television
technician for additional suggestions. The user may find the following booklet helpful:
“Something About Interference.” This is available at FCC local regional offices. Our
company is not responsible for any radio or television interference caused by
unauthorized modifications of this equipment or the substitution or attachment of
connecting cables and equipment other than those specified by our company. The
correction is the responsibility of the user. Use only shielded data cables with this system.
In accordance with FCC 15.21, changes or modifications not expressly approved by the
party responsible for compliance could void the user’s authority to operate the equipment.
This device and its antenna must not be co-located or operating in conjunction
with any other antenna or transmitter. To maintain compliance with FCC RF
exposure guidelines for body-worn operation, do not use accessories that
!
contain metallic components other than specified by the manufacturer.
Canadian Compliance
This Class B digital apparatus complies with Canadian ICES-003. Operation is subject to
the following two conditions: 1) this device ma y not cause harmful interf erence, and 2) this
device must accept any interference received, including interference that may cause
undesired operation.
To prevent radio interference to the licensed service, this device is intended to be
operated indoors and away from windows to provide maximum shielding. Equipment (or
its transmit antenna) that is installed outdoors is subject to licensing.
Cet appareil numérique de la Classe B est conforme à la norme NMB-003 du Canada.
RF, Regulatory, and Safety Agency Approvals for 802.11b and Bluetooth
Parameter Specification
RF Approvals
U.S.A
Canada
FCC Part 15.247
RSS 210
RF, Regulatory, and Safety Agency Approvals for GSM
Parameter
RF Approvals
U.S.A
Canada
Specification
FCC Part 24
RSS 133
Dolphin 9500 Series 802.11b and/or Bluetooth R&TTE Compliance Statement
The Dolphin RF are in conformity with all essential requirements of the R&TTE Directive
(1999/5/EC). This equipment has been assessed to the following standards:
Parameter Specification
R&TTE EN 300 328-2:2000
EN 301 489-1 (2002-08)
EN 301 489-17 (2002-08)
EN 60950:2000
EN 50361:2001
Dolphin® 9500 Series Quick Start Guide 29
Page 34

This product is marked with in accordance with the Class II product
!
requirements specified in the R&TTE Directive, 1999/5/EC. The equipment is intended f or
use throughout the European Community.
PAN European Frequency Range: 2.402 - 2.480 GHz
Restrictions for use in France are as follows:
• Indoor use - Maximum power (EIRP*) of 100 mW for the entire 2400-2483.5 MHz
• Outdoor use - Maximum power (EIRP*) of 100 mW for the 2400-2454 MHz band and
maximum power (EIRP*) of 10 mW for the 2454-2483 MHz band.
0681
!!
Dolphin 9500 GSM R&TTE Compliance Statement
The Dolphin 9500 terminal is the only terminal that supports a GSM/GPRS radio.
The Dolphin RF is in conformity with all essential requirements of the R&TTE Directive
(1999/5/EC).
This equipment has been assessed to the following standards:
Parameter Specification
R&TTE EN 301 511: 2000
EN 301 489-1 (2002-08)
EN 301 489-7 (2002-08)
EN 60950:2000
EN 50361:2001
Pacemakers, Hearing Aids, and Other Electrically Powered Devices
Most manufacturers of medical devices adhere to the IEC 601-1-2 standard. This
standard requires devices to operate properly in an EM Field with a strength of 3V/m over
a frequency range of 26 to 1000MHz.
The maximum allowable field strength emitted by the Dolphin is 0.3V/m according to
Subpart B of Part 1 of the FCC rules. Therefore, the Dolphin RF has no effect on medical
devices that meet the IEC specification.
Microwaves
The radio in the Dolphin RF terminal operates on the same frequency band as a
microwave oven. Therefore, if you use a microwave within range of the Dolphin RF
terminal you may notice performance degradation in your wireless network. How ev er , both
your microwave and your wireless network will continue to function. The Dolphin Batch
terminal does not contain a radio, and therefore, is not affected by microwave ovens.
Care and Cleaning of the Dolphin 9500 Series
When needed, clean the image engine window and the LCD display with a clean, nonabrasive, lint-free cloth. The terminal can be cleaned with a damp cloth.
30 Dolphin® 9500 Series Quick Start Guide
Page 35

Este produto está homologado pela ANATEL, de acordo com os procedimentos regulamentados pela
Resolução 242/2000, e atende aos requisitos técnicos aplicados.
Para maiores informações, consulte o site da ANATEL – www.anatel.gov.br
Page 36

Hand Held Products, Inc.
700 Visions Drive
P.O. Box 208
Skaneateles Falls, NY 13153-0208
95-QS
Rev B
7/11/05
 Loading...