

User’’
User
s Manual NB--
s Manual NB
500
500
Save your Riding with Nubeam!
1. Features
NB-500 has the following attributes:
1. Anti-theft mode
2. Remote-controlled directional signal lights
3. Automatic brake signaling when suddenly slowing down or abruptly stopping
4. Taillight brightness that is effectively seen at night or darkness
5. Automatic energy saving mode
- When idle for 5 minutes, automatically enters energy saving mode level 1 (turns off all LED)
- When idle for additional 10 minutes, automatically enters energy saving mode level 2
- After additional 15 minutes, all power turns off
6. Brightness level control (Energy saving mode/ High intensity mode)
7. Easy installation
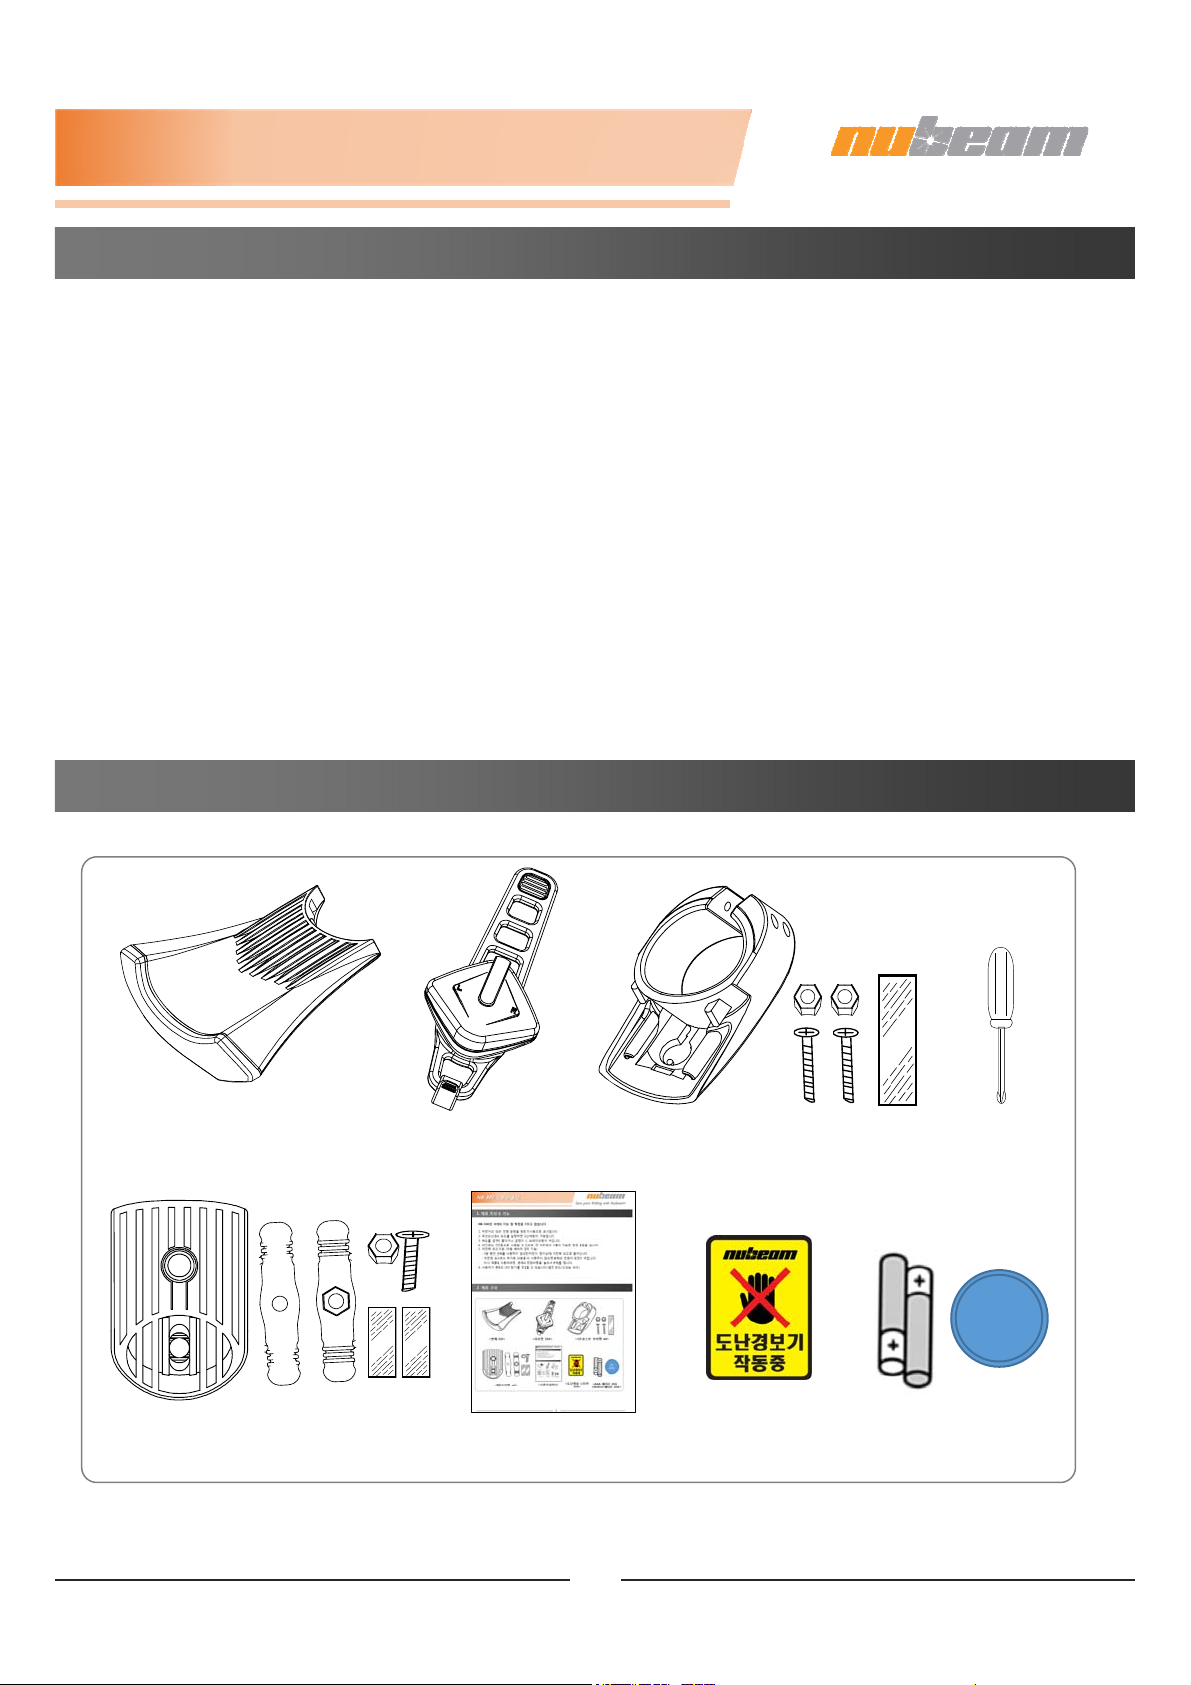
2. Product Composition
Main Body NB-500 1EA> <Seat Post Bracket set>
<Remote R-100A 1EA><
<mini screw
driver>
CR
2032
<Rail Bracket set>
<User Manual 1EA>
1
<Anti-Theft Mode
Warning Sticker 1EA>
<1set of AAA Batt
CR2032 Battery >
eries>
3. Functions
1. Main Body & Bracket
1. Body Power Button
- Power on/off (Hold for a few seconds)
- Taillight setting (Press once)
- Brightness control (Press twice)
2. Remote Control
2-1. Seat Post Bracket
- Attach on seat post.
2-2. Rail Bracket
-Attach onto saddle rail.
1. Left/Right Remote
Control
- Directional signal light
control (left/right)
2. Remote M(mode) Button
-Day/Night mode setting
(Press shortly once)
- Anti-Theft Mode
(Hold for a few seconds)
- Turn Signal light sound on/off
(Press shortly twice)
2
3. Remote Control Band
& Holder
4. Installation Guide
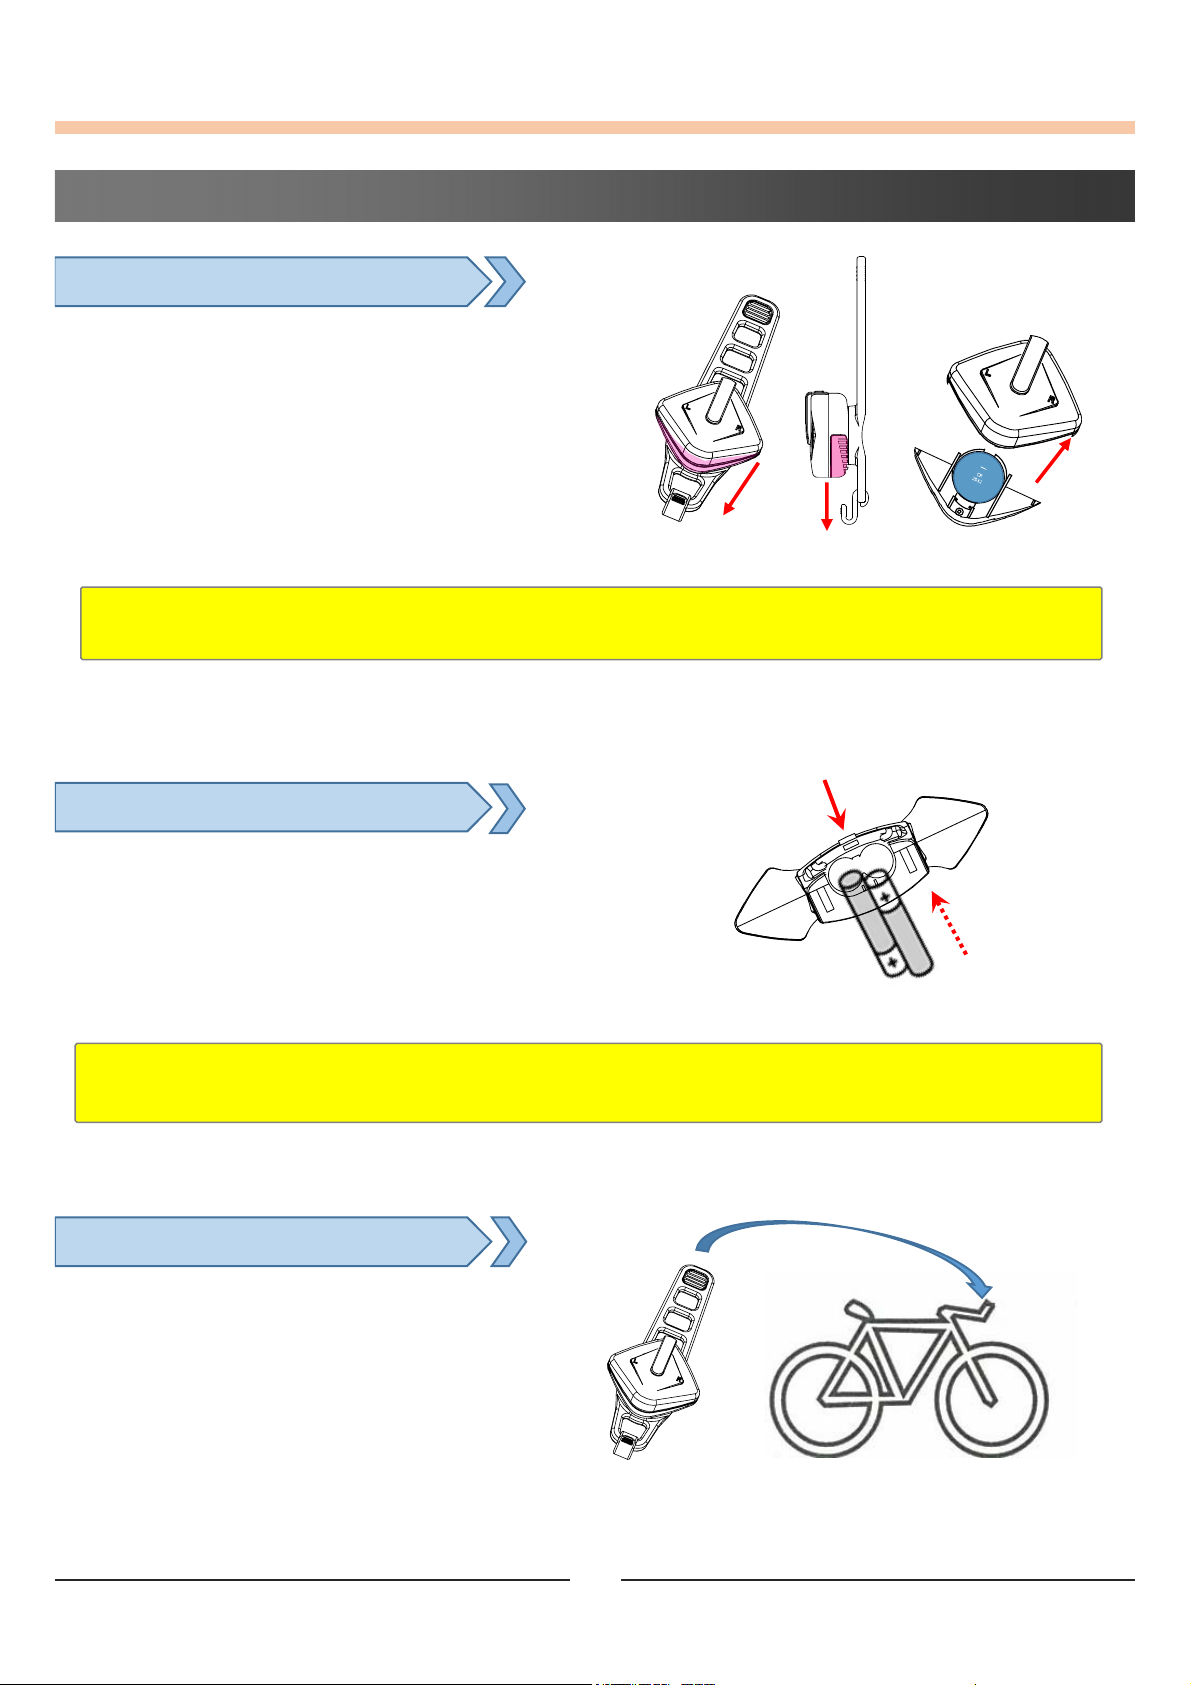
Exchanging Batteries of the Remote
1. Remove the screws of the battery cover, and detach
from the battery in the direction as shown on drawing ①.
2. Insert the provided batteries correctly.
(Be careful about side of +/- terminals.)
3. Assemble the batter cover and then tighten the screws.
<Caution>
* Use CR2032 (Lithium Battery).
Main Body Battery Replacement
1. Open the battery cover by pressing the hook as
shown on drawing ①.
2. Insert two batteries as shown in ② and close the
battery cover. (Be careful about side of +/- terminals.)
Caution >
Only use alkaline AAA batteries for the main body.
Front
①
②
Side
①
②
Remote Control Installation
1. Using the rubber component, fix the remote
onto the handlebar.
(It is possible to rotate the direction of the
remote with user’s convenience.)
3

Body Installation
Rail Bracket Installation Manual
1. After setting the location of the upper rail bracket holder (①) on the seat post, assemble the lower rail
bracket holder (②) onto the seat post by inserting ① into the bottom of the seat post. (Secure when
parallel)
2. After assembling the rail bracket body (③) onto the bottom of the rail bracket holder, insert the
provided screws into the holes and secure the bracket.
3. Assemble the main body onto the rail bracket in the directionof ④.
4. Press ⑤ and remove the main body to disassemble.
①
④
⑤
Seat Post Bracket Installation
1. After assembling the seat post bracket onto the seat post, secure with the 2 provided screws.
2. Assemble the main body onto the bracket in the direction of ②.
3. Press the ③ button and then remove the main body to disassemble.
③
②
①
②
Screw Tightening
Hole
③
Caution>
- When assembling, tighten accordingly, and attach the provided rubber pad onto the inside of the
bracket when needed. (Thickness maximum 31.6mm)
- It supports only the cycle type of Seat Post.
4

5. Instruction Manual
Below functions are operational only when the main body is On.
Turn on the power of main body before using the unit.
1. Directional Signal Lights
• Operating: Press/hold the left/right button on the remote control to signal directions.
- Flash 5 times: Press the designated direction for 0.5 second.
(For signaling before immediate directional change)
- Flash 30 times: Hold the designated direction for 1 second.
(For signaling during upcoming directional change)
- Stop : Press signal button again during operation to discontinue signaling
2. Anti-Theft Mode
• How to set :
- Hold (for 2 seconds) the M button on the middle of the remote control. With a beep sound
on the main body and remote control, anti-theft mode will be activated.
- To deactivate, hold the M button (for 2 seconds) again and anti-theft mode will be deactivated
with a beep sound on the main body and remote control.
• During anti-theft mode :
- The LED lights (Left/Right buttons) on the remote will flash every 4 seconds.
- When the main body and remote control is not within operable distance, the left/right directional signal
control on the remote will flash alternately.
• In the case of theft
-With an alarm, the LED lights (Left/Right buttons) on the remote will flash fast (every 0.5 seconds).
- The LED on main body will be on for 5 minutes with an alarm.
(one left-end LED and one right-end LED will be blinking, while 4 LED’s in the middle will be steadily on)
- When deactivating anti-theft mode, hold the M button (for 2 seconds) on the remote control.
• This product is for theft prevention security measures only,
therefore It is recommended to use this product with additional locking devices.
• Operable distance of the remote and main body may vary depending on the surrounding conditions.
• During anti-theft mode, continuous operation may speed up battery consumption.
(Maximum of 6 hrs when continuously operating anti-theft mode)
• When anti-theft mode is unnecessary, deactivate anti-theft mode to reduce battery consumption.
5

3. Brake Warning
• When suddenly slowing down or abruptly stopping, all LED lights of the main body will be turned on
automatically.
4. Tail Light Brightness Level Control of Day/Night Mode
• Settings :
Set day/night mode by pressing the M button once on the middle of the remote.
• During day/night mode :
- When the mode is switched, the LED directional signal lights on the remote control will flash twice
with a sound.
- During day mode, all 4 center LED lights are turned off, and during night mode, the 4 center LED
lights are lighted accordingly to the set pattern.
5. Mute function of Directional Signal Lights
• Settings :
- Rapidly double-click the center M button on the remote control to mute the system.
• Operating :
- The left/right LED directional signal lights on the remote control alternately flashes twice.
- The center 4 LED lights of the main body flashes once.
6. Tail Light Night Mode Operation
• Settings : Changing between modes: Consecutively press the power button of the main body.
• Operating : blinking patter (refer to the below table)
1. Mode 1 : Activate only the 4 center
LED lights.
2. Mode 2: Flash only the 4 center LED
lights.
3. Mode 3: Flash the 4 center LED
lights alternately. (Left/right)
Mode Pattern
Mode 1 ●●●● ●●●● ●●●● ●●●● ●●●● ●●●● ●●●● ●●●●
Mode 2 ○○○○ ●●●● ○○○○ ●●●● ○○○○ ●●●● ○○○○ ●●●●
Mode 3 ●○○○ ○●○○ ○○●○ ○○○● ○○○● ○○●○ ○●○○ ●○○○
Mode 4 ○●●○ ●○○● ○●●○ ●○○● ○●●○ ●○○● ○●●○ ●○○●
4. Mode 4: Flash the 4 center LED
lights radially.
7. Brightness setting of Tail Light
• Settings: Double-click the power button of the main button.
• Operating : The LED brightness modes of the main body consist of energy saving
mode and high intensity mode.
6

8. Low Battery Alarm
When the battery becomes unstable, it alerts the time of battery exchange with beep and LED lighting.
-Remote Control : When press any key, the beep alarm will sound twice shortly.
-Main body : When power on the main body, the beep alarm will sound, the L/R of main body will blinking
twice.
6. . Troubleshooting
Problems Solutions
Light does not turn on. Replace the batteries.
The button does not respond. Replace the batteries.
Brake mode does not work
properly.
The light does not turn off. Replace the batteries.
The sound does not turn off. Replace the batteries.
Make sure the main body and the ground is parallel, and adjust if
necessary.
7. Specification
Remote Control Main Body
Frequency 2433MHz 2433MHz
Size 38 x 43 x24 (mm) 101 x 94 x26 (mm)
Weight
(included Bracket 1set : 110g)
Battery
22g(Battery Included) 69g(Battery Included)
DC 3.0V
(CR2032, Lithium Battery)
DC 3.0V
(2 Alkaline AAA Batteries)
Battery Life - 100hours (Operated on Mode 1)
LED 2 LED (Orange) 10 LED (Red)
KEY 3개 (Left, Mode, Right) 1 개 (Power)
Operating Temperature -10 ~ 50℃ -10 ~ 50℃
Operable distance between Main body and Remote Control :
Within 16ft (5m) when operating signal lights / within 164ft (50m) when operating anti-theft mode
7

8. Safety Warnings
• After reading the instruction manual, store in an easily accessible location.
• Do not throw or expose to excessive force.
(This product may be damaged when exposed to excessive force. Please regard that warranty does not
cover damages due to customer negligence or outside forces during transport, storage, etc.)
• Please handle with care.
• Keep out of excessive, rain, wind, humidity, toxic gas, volatile chemicals, direct sunlight, heat, etc.
It can cause damage to the product.
• Obstacles between the bicycle and the remote control may affect operable range.
• The wireless feature of the product may malfunction. The company cannot provide any services regarding
personal safety.
• This product is suitable and intended for domestic (level B) use and can be used in any region.
• Discard as industrial waste.
Caution
1. Any manufacturing defect visible to a naked eye may be dangerous. Immediately consult a manufacturer
or merchandizer
2. Do not touch the live terminal with any metallic objects like necklaces, coins, keys, watches, etc.
3. Do not disassemble, compress, penetrate, etc.
4. Do not drop from high altitudes or apply excessive force.
Warning
This equipment may generate or use radio frequency energy. Changes or modifications to this equipment
may cause harmful interference unless this modifications are expressly approved in the instructional
manual.
The user could lose the authority to operate this equipment if an unauthorized change or modification is
made.
FCC Notice
This device complies with part 15 of the FCC rules. Operation is subject to the following two conditions :
(1)This device may not cause harmful interference.
(2)This device must accept any interference received including interference that may cause undesired
operation.
Note> This equipment has been tested and found to comply with the limits for a Class B digital device
pursuant to part 15 of the FCC Rules. These limits are designed to provide reasonable protection against
harmful interference in a residential installation. This equipment generates, use and can radiate radio
frequency energy and if not installed and used in accordance with the instructions, may cause harmful
interference to radio communications. However there is no guarantee that interference will not occur in a
particular installation. If this equipment does cause harmful interference to radio or television reception,
which can be determined by turning the equipment off and on. The user is encouraged to try to correct
the interference by one or more of the following measures ;
-Reorient or relocate the receiving antenna.
-Increase the separation between the equipment and receiver.
-Connect the equipment into an outlet on a circuit different from that to which the receiver is connected.
-Consult the dealer or an experienced radio/ TV technician for help.
8

9. Warrantee Policy
This product provides the following warrantee.
Contact the store of purchase to request service or receive repair service at the assigned service centers.
1. Please provide the following when requesting service:
; Name of the product, serial number, date of purchase, store of purchase, receipt.
Service is limited to genuine products and use under normal conditions. (Does not include physical
damage due to customer negligence or outside forces.)
2. Free service : 1 year from date of purchase.
Service is provided at no cost for any manufacturing defects, (internal, electrical, functional, etc. problem
with the device itself) not including physical damages due to customer negligence or outside forces.
3. Repair services for damages due to customer negligence, outside forces (excessive force, humidity, heat,
etc.), or products with expired warrantee are offered as well.
9
 Loading...