

Page 1
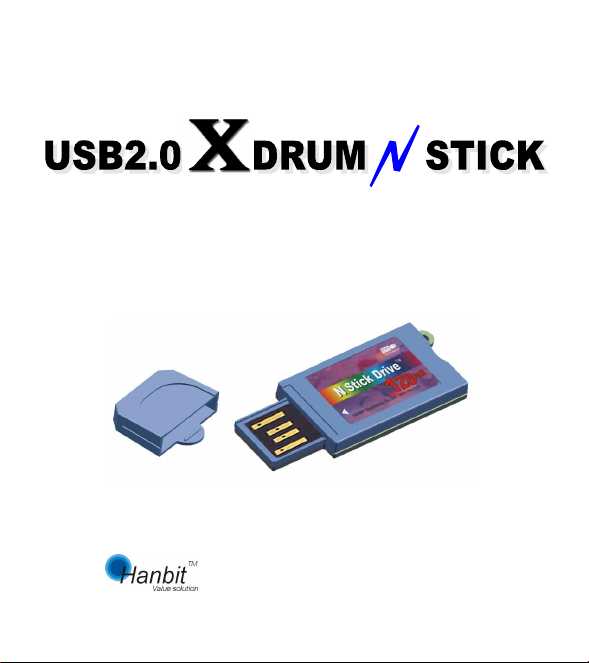
Model : HSD329TN
USER’S MANUAL
Hanbit Electronics Co., Ltd
http://www.hbe.co.kr
Page 2

Hanbit Electronics Co.,Ltd. All rights reserved
3,
4,
5,
6,
7,
8,
Contents
1. Package Contains ------------------ Page 3
2, Locations and Function ------------------ Page 3
XDRUM N Stick ------------------ Page 4
* Key lock ------------------ Page 6
Windows98 Install ------------------ Page 7
Utility program ------------------ Page 9
* Password Set and Change ------------------ Page 11
* Boot Up function ------------------ Page 13
USB2.0 XDRUM N Stick ------------------ Page 16
Important Notice ------------------ Page 17
A/S and Cautions ------------------ Page 18
9, Guarantee ------------------ Page 19
Rev.5.0, 2003-09-03 Page 2/2 www.hbe.co.kr
Page 3
Hanbit Electronics Co.,Ltd. All rights reserved
Neck Strap
■ Package Contains
1. USB2.0 XDRUM N Stick 1pcs 4. Extra cap 1pcs(option)
2. USB extension cable 1pcs(option) 5. CD Drive 1pcs(option)
3. Neck strap 1pcs(option) 6. Manual 1pcs(option)
※ Please check Package Contains in Box
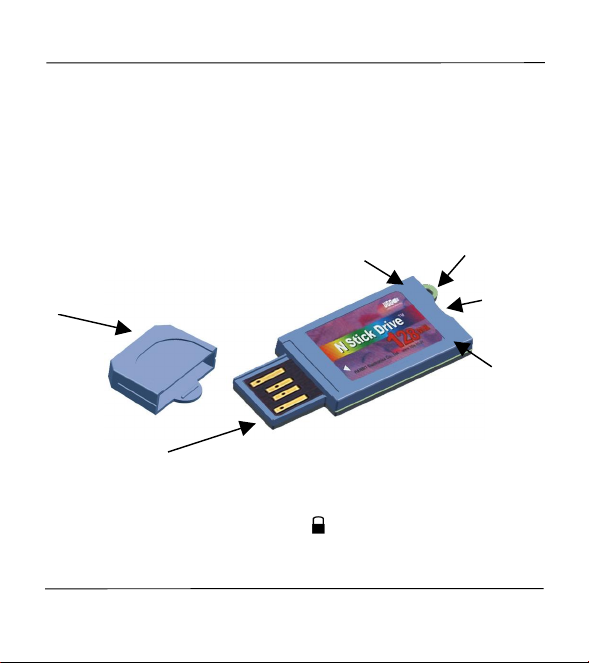
■ Location and Function
LED
Cap
Write Protect Switch
LED
USB Connector
─ Cap : USB Connector protect cap
─ LED : Lighting on operation
─ Write Protect Switch : Change switch to direction
─ Neck strap jack
─ USB Connector : USB Port connect part
Rev.5.0, 2003-09-03 Page 3/3 www.hbe.co.kr
Page 4
Hanbit Electronics Co.,Ltd. All rights reserved
■ How to Use the USB2.0 XDRUM N Stick
You can use the USB2.0 XDRUM N Stick right away simply by inserting it in the
USB port of your PC. (WindowsME/2000/XP and beyond, excluding
Windows98/SE, will automatically recognize the USB2.0 XDRUM N Stick)
For users with Windows98/SE O/S, the Windows98/SE driver must first be
installed. Please refer to page 7 for driver installation.
Should you wish to use the security or partition functions, install the USB2.0
XDRUM N Stick.EXE program. Please refer to page 9.
For more information about USB, visit http://www.usb.org.faq/.
■ How to Use the USB2.0 XDRUM N Stick with Windows
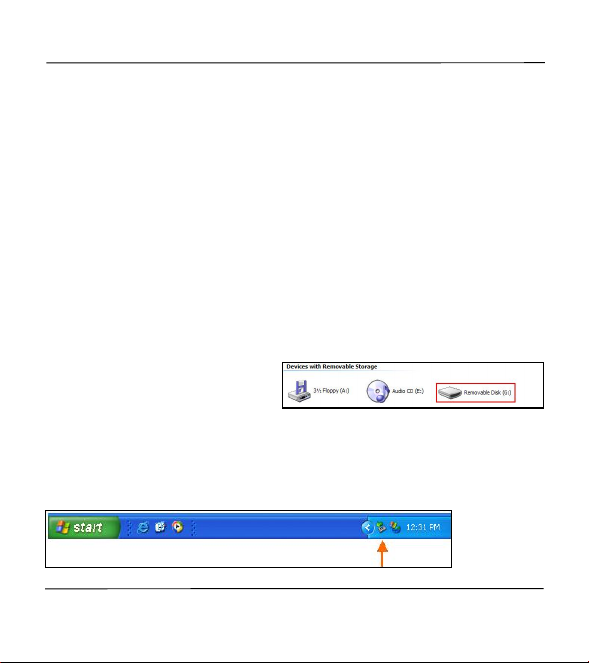
When you insert the USB2.0
XDRUM N Stick in your USB port,
Windows will automatically
recognize it as a “ portable storage device” and designate the drive accordingly.
Go to “ My Computer”, and the [portable disk] icon will appear.
When the [safe hardware removal] icon is displayed on the [task bar], you can
double-click it to remove the device safely.
Rev.5.0, 2003-09-03 Page 4/4 www.hbe.co.kr
Page 5
Hanbit Electronics Co.,Ltd. All rights reserved
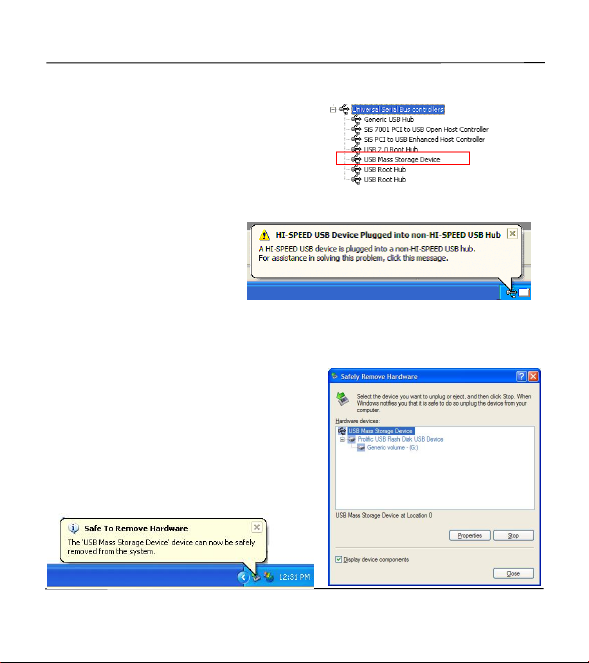
To confirm whether the device is installed properly, choose “ Start-> Settings->
Control Panel-> System-> Hardware”,
then double-click on the device manager
to display the [Universal Serial Bus] icon.
Double-click that icon to see if the “USB
mass storage device” is installed.
It is recommended to use
USB2.0 XDRUM N Stick
compatibly with “ Hi-Speed
USB 2.0”. If you connect the
USB2.0 XDRUM N Stick to a
“ non Hi-Speed USB 2.0 Hub”, Windows will display a warning message as
shown below. You may use the device without changing any settings, but
reading/writing speed will slow down.
Remove the USB2.0 XDRUM N Stick
In order to remove the device safely,
double-click the [safe hardware removal]
icon, remove device, then choose “ Stop->
OK-> OK-> Close”.
Rev.5.0, 2003-09-03 Page 5/5 www.hbe.co.kr
Page 6
Hanbit Electronics Co.,Ltd. All rights reserved
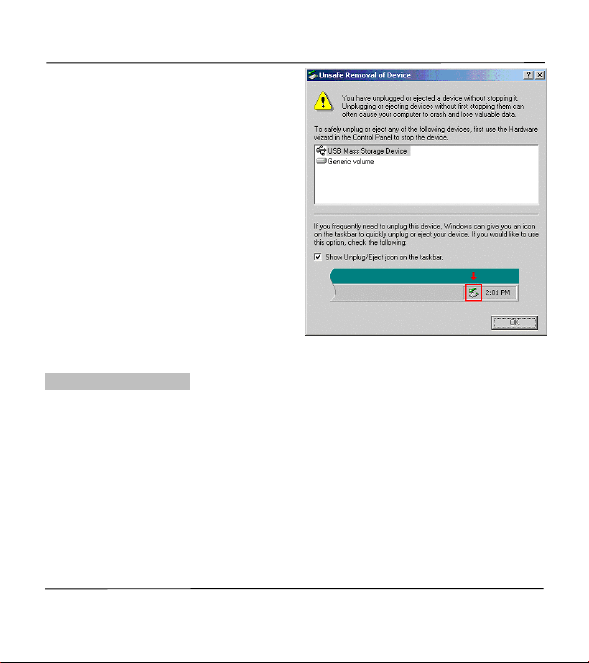
Note: Whenever you remove a device
without executing safe removal, a
warning message that the “computer
may stop responding, or you may lose
data” will be displayed. Do not remove
the device when the LED is flashing
since this indicates that reading or
writing is active. Remove the device
safely after the LED turns off.
Write-Protect Function
◈ Write-protect tab is located at the lower part of XDRUM N Stick.
◈ Open (when tab is slid up): you can freely read and write.
◈ Locked (when tab is pushed down): you can read, but cannot write.
Note: If you change the setting of the tab when the device is not connected to
the computer, it may cause the loss of data.
Rev.5.0, 2003-09-03 Page 6/6 www.hbe.co.kr
Page 7
Hanbit Electronics Co.,Ltd. All rights reserved
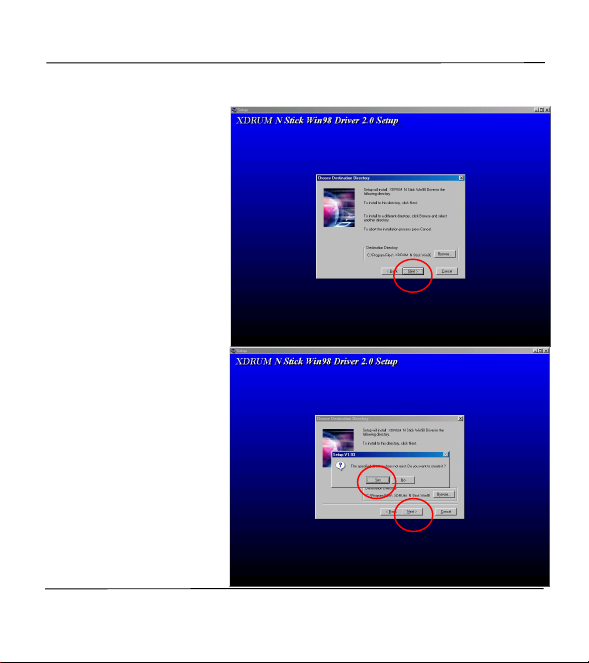
■ How to Install the USB2.0 XDRUM N Stick with Windows98
1) Double-click and
execute “ XDRUM N Stick
Win98 Driver2.0. EXE”
from the CD, and then
choose “ Next” when the
“ Installation Manager” file
appears as follows.
2) When given options to
make a new directory
during installation, choose
“ Yes” and click “Next”.
Rev.5.0, 2003-09-03 Page 7/7 www.hbe.co.kr
Page 8

Hanbit Electronics Co.,Ltd. All rights reserved
3) After the UBS XDRUM N
Stick is installed, click
“ OK” to finish installation.
4) When the UBS N Stick
is connected to a UBS
port, the computer will
automatically locate
software for the new
device. Simply find the
drive where your UBS N
Stick is connected and
use it.
Rev.5.0, 2003-09-03 Page 8/8 www.hbe.co.kr
Page 9
Hanbit Electronics Co.,Ltd. All rights reserved
■ How to Use the XDRUM N Stick Utility Program
The XDRUM N Stick provides functions such as password protection, partitioning,
and booting setup alteration.
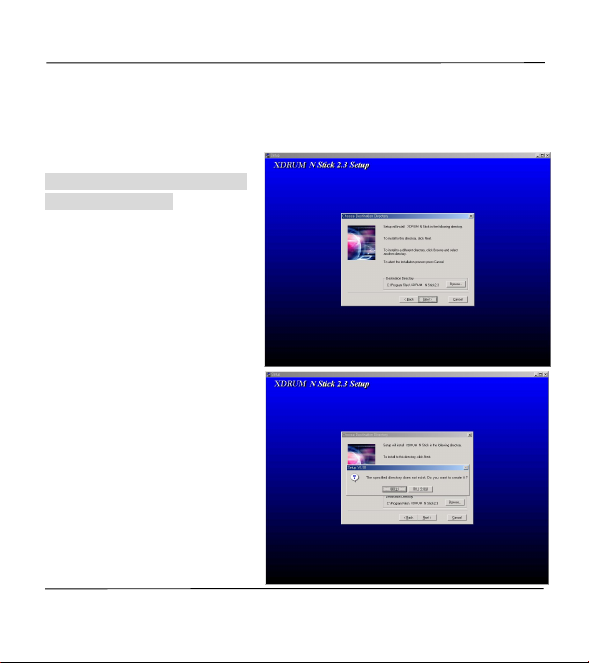
How to Install the XDRUM N
Stick Utility Program
Follow the installation guide:
1. Execute “XDRUM N
Stick.EXE” from the driver
CD enclosed with the
product.
2. When the Installation
Wizard appears, click
[Next>].
3. Installation Wizard begins
to copy and install required files
and programs. Click “ Yes”, and
then “ Next”.
Rev.5.0, 2003-09-03 Page 9/9 www.hbe.co.kr
Page 10
Hanbit Electronics Co.,Ltd. All rights reserved
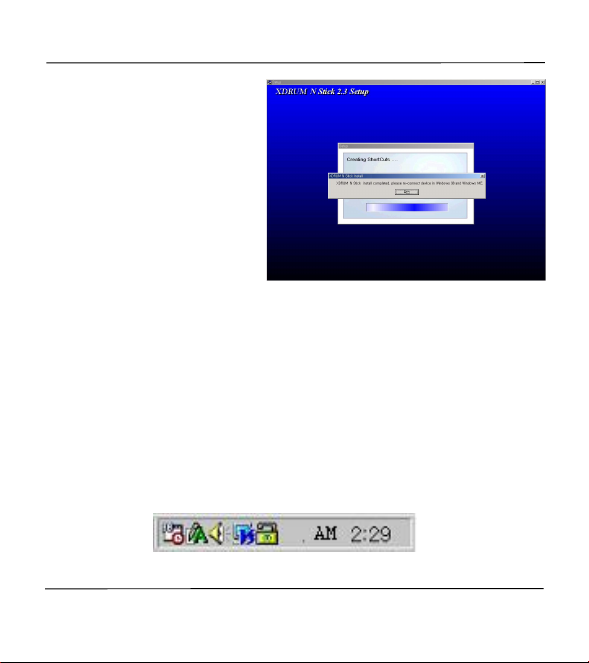
4. Clicking on “ OK”, to
completes installation of the
utility program.
5. Check if the [XDRUM N
Stick] folder is displayed in the
[program] folder of the [Start]
menu.
Note: When the “ XDRUM N Stick” is inserted into the USB port, a key-shaped
program execution icon will appear in the lower right corner of the
startup screen. Click that icon to execute the utility program.
Rev.5.0, 2003-09-03 Page 10/10 www.hbe.co.kr
Page 11

Hanbit Electronics Co.,Ltd. All rights reserved
■ How to Use the XDRUM N Stick Utility Program
Set/Check Password
The XDRUM N Stick allows the setting or alteration of a [password]. In order to
set a password for the first time, choose “resize” as displayed in the following
picture. If a password is already set, a message will appear advising you to enter
that password. If you want to alter the password, follow this procedure.
1. Double-click the key-shaped icon on the tray bar in the lower right corner of
the startup screen to execute the XDRUM N Stick utility.
2. To enter secure mode, select “ Public Area + Security Area”, enter the
password you wish to use in the “ New Password” box, then click “ OK”.
Rev.5.0, 2003-09-03 Page 11/11 www.hbe.co.kr
Page 12

Hanbit Electronics Co.,Ltd. All rights reserved
3. When you connect the “XDRUM
N Stick” with a password set, a
key shape will be displayed in
red on the tray bar.
4. To use the XDRUM N
Stick after setting the
password, enter the
appropriate password
in the “ password” box,
and clock “ OK”. (To
quit using secure
mode, click “ logout”,
then “ OK”, to go to
the public area.)
Change Password
A function of altering the
XDRUM N Stick password.
First, enter the existing
password, and then a new
one. For confirmation, enter
the new password two times.
Rev.5.0, 2003-09-03 Page 12/12 www.hbe.co.kr
Page 13
Hanbit Electronics Co.,Ltd. All rights reserved
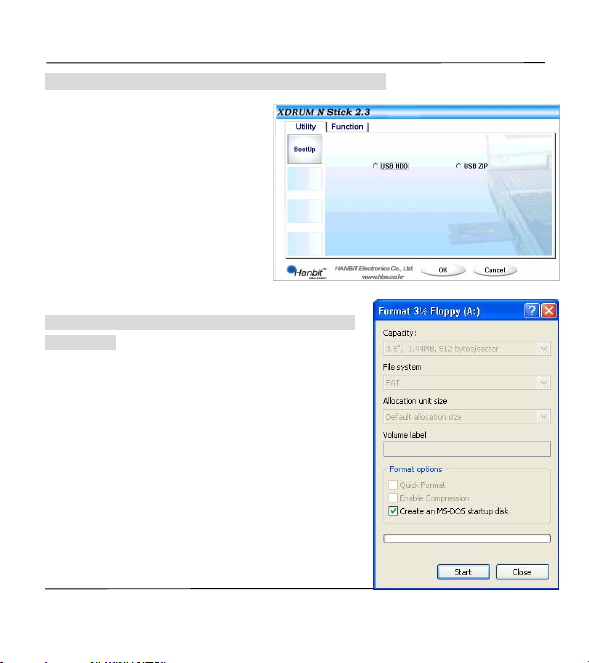
How to Use the Boot Up Function [Copy System File]
This function is used to enable
you to boot your computer with
the USB disk. Choose [Utility],
and the following window will pop
up. USB Flash Disk supports
USB FDD, ZIP or HDD booting
functions. However, you can use
this function only when your PC’s
mainboard supports it.
How to Make a Boot Up Floppy for Win XP [Copy
System File]
1. Click 3.5 Floppy disk (A:) in the Win XP “My
Computer” menu, choose “Format”, then “Make
DOS Starting Disk”, and click “Start”.
Rev.5.0, 2003-09-03 Page 13/13 www.hbe.co.kr
Page 14
Hanbit Electronics Co.,Ltd. All rights reserved
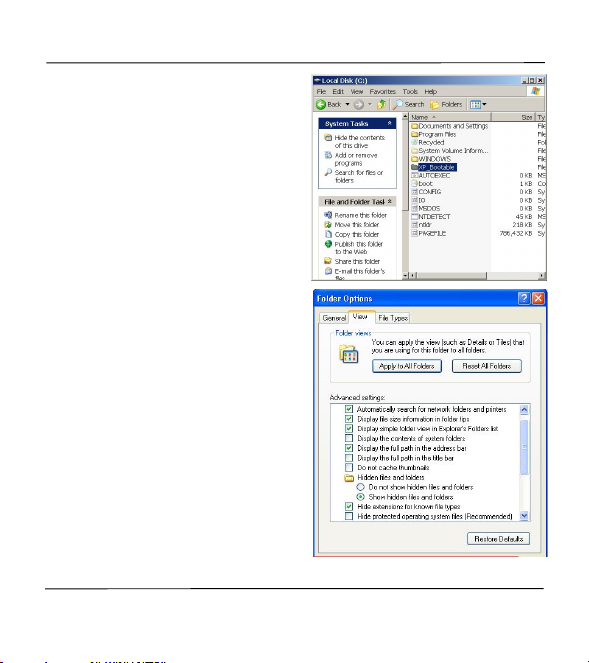
2. Create a new XP_Bootable folder
within the C Drive (System Disk), copy
all files from 3.5 Floppy disk (A:), and
paste them in the new XP_Bootable
folder.
Note: To copy the system file from
3.5 Floppy disk (A:), set all
files and system file as
“ view” using folder options
as the following picture
shows, and then click “ OK” .
Rev.5.0, 2003-09-03 Page 14/14 www.hbe.co.kr
Page 15
Hanbit Electronics Co.,Ltd. All rights reserved
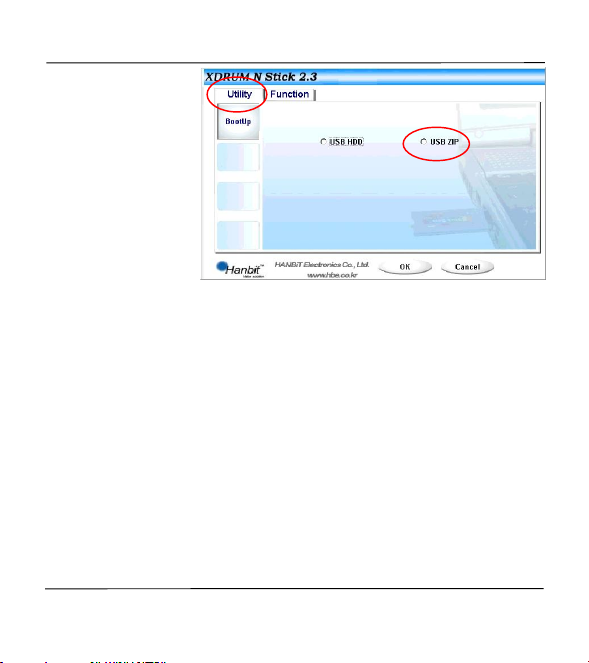
3. Choose the [Utility]
index from the
XDRUM N Stick utility,
and click “USB ZIP”,
then “ OK”.
Note: This function may not be supported depending on the O/S that you
use. When your O/S does not support this function, utility index
window wont be activated. (available only on Win98/XP)
Note: To use this booting function on Win XP, BootDisk folder should be
located at C Drive.
Note: This function is not supported in Windows ME or Windows 2000.
Note: Not all computers support the USB Flash Disk. When your computer
does not support it, contact the PC or mainboard manufacturer. In this
case, you should set a proper [boot sequence] compatible with your
USB Flash Drive in the mainboard BIOS Setup.
Rev.5.0, 2003-09-03 Page 15/15 www.hbe.co.kr
Page 16

Hanbit Electronics Co.,Ltd. All rights reserved
■ USB XDRUM N Stick Specification
Capacity 16, 32, 64, 128, 256, 512MB
Read Performance 56Mbit/sec(Depend on PC mainboard type)
Write Performance 48Mbit/sec(Depend on PC mainboard type)
Available PC IBM PC/Mac..PC System with USB Port
Available O/S
Windows 98 / ME / 2000 / XP /
Linux 2.4 or higher, Mac OS 9.0 or Higher
Drive Support Windows98/SE Install driver
Power Supply USB power supply
LED 1 (LED State)
LED fast mode for Transmitting and
Receiving data
LED 2 (LED State) Power State
USB Interface USB2.0 and USB1.1 Compatible
Suspend Current < 350 μ A ( Max :< 500μ A )
Operating Current < 31mA
Operating Temperature 0℃ to 70℃
Storage Temperature -10℃ to 125℃
Dimention 18.5(W)× 42.55(H)× 4(T)mm(Without CAP)
Security Function and
6type of Software
GUI software installed Password function &
E-mail, PC-Lock, File-Lock, AutoRun,
Time-Lock Soft Ware supported
Booting Disk Function Usable as Booting Disk
Write protect switch Write protect switch supported
Rev.5.0, 2003-09-03 Page 16/16 www.hbe.co.kr
Page 17

Hanbit Electronics Co.,Ltd. All rights reserved
※ How to remove the USB2.0 XDRUM N Stick safely
● All O/S : Unplug the XDRUM N Stick from the USB port after the activating
pointer of mouse is stopped.
● Windows 98 : Do not unplug the XDRUM N Stick from the USB port while its
LED is blinking.
● Windows ME, 2000,XP : Execute hardware separation icon located on the
bottom of the right in the Windows to remove the device safely or unplug it by
using hardware wizard on the control pannel.
The operating system can be discontinued and the data can be damaged when
the device is unplugged before executing the device removed from program
action.
● Mac : Unplug the XDRUM N Stick from the USB port after throwing it away to
the trash box in your computer.
● Linux : Unplug the XDRUM N Stick from the USB port after executing
“ Unmount” commend.
Rev.5.0, 2003-09-03 Page 17/17 www.hbe.co.kr
Page 18

Hanbit Electronics Co.,Ltd. All rights reserved
※ Customer Service
· Website : http://www.hbe.co.kr / e-mail : [email protected]
· Address : 414-5 Woncheon-Dong, Paldal-Gu, Suwon-City, Kyoungki-Do, Korea
Hanbit Electronics Customer Service team
· Telephone : +82 31 218 1900 / Fax : +82 31 217 1926
※ Caution
· To use your Data safely, Please make back-up file. Because NAND Flash memory chip
has a feature which can write data within 300,000 times.
· All the information in this document is subject to change without prior notice. The
manufacturer does not make any representations or any warranties (implied or
otherwise) regarding the accuracy and completeness of this document and shall in no
event be liable for any loss of profit or any other commercial damage, including but
not limited to special, incidenal, consequential, or other damages.
· No part of this document may be reproduced or transmitted in any form by any means
without the express written permission of the manufacturer.
· All brand names and product names used in this document are trademarks or
registered trademarks of their respective holders.
Rev.5.0, 2003-09-03 Page 18/18 www.hbe.co.kr
Page 19

Hanbit Electronics Co.,Ltd. All rights reserved
Regulatory Information
FCC Compliance Statement
Caution : Any changes or modifications not expressly approved by the party responsible for
compliance could void the user's authority to operate the equipment.
Note : This equipment has been tested and found to comply with the limits for a Class B
digital device, pursuant to Part 15 of the FCC Rules. These limits are designed to
provide reasonable protection against harmful interference in a residential installation.
This equipment generates, uses and can radiate radio frequency energy and, if not
installed and used in accordance with the instructions, may cause harmful interference to
radio communications. However, there is no guarantee that interference will not occur in
a particular installation. If this equipment does cause harmful interference to radio or
television reception, which can be determined by turning the equipment off and on, the
user is encouraged to try to correct the interference by one or more of the following
measures:
Ÿ Reorient or relocate the receiving antenna.
Ÿ Increase the separation between the equipment and receiver.
Ÿ Connect the equipment into an outlet on a circuit different
from that to which the receiver is connected.
Ÿ Consult the dealer or an experienced radio/TV technician for help.
This device complies with Part 15 of the FCC Rules. Operation is subject to the
following
Rev.5.0, 2003-09-03 Page 19/19 www.hbe.co.kr
Page 20
Hanbit Electronics Co.,Ltd. All rights reserved
two conditions: (1) this device may not cause harmful interference, and (2) this device
must
accept any interference received, including interference that may cause undesired
operation.
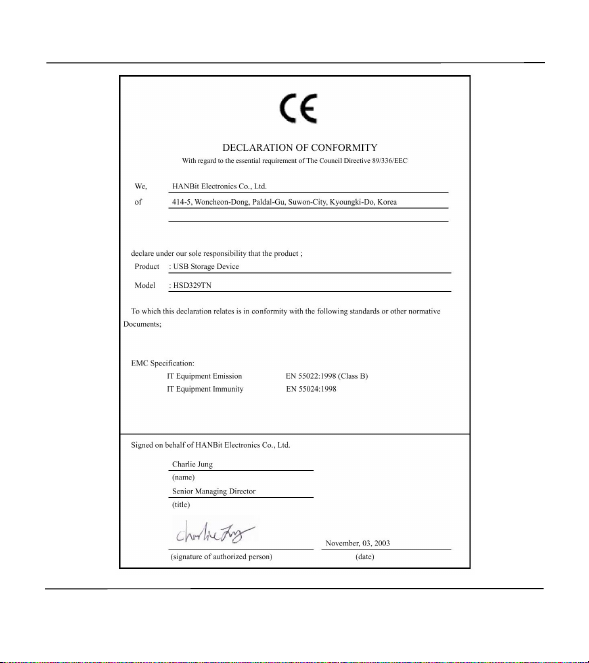
CE Marking and European Union Compliance
Products intended for sale within the European Union are marked with
the CE Mark which indicates compliance to applicable Directives and
Ens are included:
Applicable Directives
Ÿ Electromagnetic Compatibility Directive 89/336/EEC
Applicable Standards
Ÿ EN 55022:1998, Limits and Methods of Measurement of Radio Interference
Characteristics of
Information technology Equipment
Ÿ EN 55024:1998; Information technology equipment-Immunity characteristics Limits
and methods
of measurement.
Rev.5.0, 2003-09-03 Page 20/20 www.hbe.co.kr
European Normes (EN), as follows. Amendments to these Directives or
Page 21

Hanbit Electronics Co.,Ltd. All rights reserved
Address:
HANBtT Electronics Co.,Ltd. Tel )+82
-31-
218-1900 Fax)+82
-31-
217-1926 URL:
www.hbe.co.kr
Product Name: Model:
Purchasing Data: Customer:
E-mail: Telephone:
The product purchased is warranted and tested to be free from defects in material and Workmanship
and conform to the published specifications. Hanbit Electronics Co.,Ltd will offer a service for product
Malfunction in the conditions as below.
1. Limited Quality Warranty
1) For a period of one year from the date of purchase.
2) HANBIT Elec. Co., Ltd will repair or replace your product with a comparable product for an defect
occurred by improper workmanship or materials within the warranty period.
3) The target of no compensation service:
The product proved not to pass a period of one year from the date of purchase.
Hanbit Electronics Co., Ltd will charge the cost for malfunction occurred by a negligence,
a mistake, repair and rebuilding in other place no Hanbit ’s agency.
4) Duration of no compensation service is one year.
Compensation service will be offered in a principle as below after one year.
2. Compensation / No compensation Service
1) No compensation Service
A. Content of compensation for damage ( within 1 year from purchasing date) :
Need to repair due to a functional defect in the normal state within 10 days after purchasing.
B. Exchange or Repayment : Need to repair for the efficiency or functional defect in the normal
state within 1 month after purchasing.
C. Product Exchange : Occurrence defects until 3 times as the same reason within 1 month.
2) Compensation Service Charge Service
Hanbit Electronics Co.,Ltd can charge a customer the cost to ask for repairs and can refuse the
repairs in the reason as below.
A. Defects of function occurred in product which is exceeded the validity period of quality warranty.
B. The case crushed or cracked by shock.
C. The case destroyed by using a non standardized parts.
D. The case modified by disassembly or remodeled construction or function.
E. The malfunction occurred by the natural disaster.
F. The Obvious fault occurred by mishandling of purchaseree
※ Note : Exhibit the customer card in order to get the service, This card is not reissued again.
Rev.5.0, 2003-09-03 Page 21/21 www.hbe.co.kr
Customer Card
Warranty Card
1Year
Limited
Warrenty
Page 22
Hanbit Electronics Co.,Ltd. All rights reserved
Rev.5.0, 2003-09-03 Page 22/22 www.hbe.co.kr
Page 23

Hanbit Electronics Co.,Ltd. All rights reserved
Company Registered
HANBiT Electronics Co.,Ltd
Address : 414-5 Woncheon-Dong, Paldal-Gu, Suwon-City, Kyungki-Do, Korea (ZIP 442-823 )
Telephone : +82 (31) - 218 - 1900 / Facsimile : +82 (31) - 217 -1926
E-mail : [email protected]
URL : www.hbe.co.kr
Rev.5.0, 2003-09-03 Page 23/23 www.hbe.co.kr
 Loading...