

Page 1

HAMTRONICS R144 VHF FM RECEIVER, REV. 4/94:
INSTALLATION AND MAINTENANCE
FUNCTIONAL DESCRIPTION.
The R144 is a premium commercial
grade single-channel vhf fm receiver.
It features a helical resonator front
end with low-no ise dual gate fe t's, an
8-pole crysta l filter plus a ceram ic filter for superior i-f selectivity, and
hysteresis squelch circuit to lock onto
fading signals. The R144 kit is available for the 143-150 MHz band, and
wired units are ava ilable fo r this ba nd
and also the 150-174 MHz commercial band.
CRYSTALS.
The channel crystal plugs into
sockets on the board. We can order
crystals for any frequency desired. If
you order your own, be sure to supply
the following specs.
The receiver uses 32 pF parallel
resonant crystals in HC-25/u holders.
Crystals operate in the fundamental
mode. The crystal frequency for the
143-174 MHz band models is (F-
10.7)/9. Frequency tolerance is
.001%. We recommend that any new
crystals be o rdered directly f rom us to
be sure that they will perform properly
over the -30 to +60 °C range for which
the unit was designed. This is especially true for commercial receivers
with the temperature-compensated
crystal oscilla tor (TCXO) option, since
the crystal must be matched exactly
to the compen sation circuit in the receiver. If you use an OV-1 crystal
oven, specify a crystal with a 60°C
breakpoint.
INSTALLATION.
Power Connections.
The receiver operates on +13.6 Vdc
at about 150 mA peak with full audio.
Current drain with no audio is only
about 35-40 mA. A crystal oven adds
about 450 mA peak current drain
when cold and only about 25 mA
when warm. A well regulated power
supply should be used.
Be sure that the power source does
not carry high voltage or reverse polarity transients on the line, since
semiconductors in the receiver can be
damaged. The positive power supply
lead should be connected to the receiver at terminal E3, and the negative power lead should be connected
to the ground plane of the board
through the mounting hardware or
the shield of the coaxial cable. Be
sure to observe polarity!
Speaker.
An 8-ohm loudspeaker should be
connected to E2 with g r ou n d retu rn to
the ground plane through the
mounting h ardware. Use of lower impedance speaker or shorting of
speaker terminal can result in ic
damage. The receiver can also drive
higher impedances, like 1K to 10K input impedances of COR boards, etc.
There is no need to load down the
output to 8 ohms.
Note th at the audi o outpu t ic is designed to be heatsunk to the pc board
through the many ground pins on the
ic. When running moderately low
audio levels as most applications require, it is no problem to use an ic
socket; so we have provided one for
your convenience. If you will be running high audio levels, check to see if
the ic is getting hot. If so, you should
remove the ic socket, and solder the
LM-380 ic directly to the board for better heatsinking.
Antenna Connections.
The antenna connection should be
made to the receiver with a phono
plug. If you want to extend the antenna connection to a panel connector, we recommend using a short
length of RG-174/u coax and a good
phono plug with cable clamp (see
catalog). We do not recommend trying
to use direct coax soldered to board or
another type of connector. The
method designed into the board results in lowest loss practical. When
soldering the cable, keep the stripped
ends as short as possible.
Mounting.
Some form of support should be
provided under the pc board, generally mounting the board with spacers
to a chassis. 3/8-inch holes should
be provided in a front panel for the
bushings of the SQUELCH and VOL-
UME controls. After s liding bushings
through panel, washers and nuts can
be installed on the outside of the
panel. Be sur e to provide support for
the board; do not rely on th e controls
to support the board.
For repeater applications, the receiver should be mounted in an rf
tight box, such as our model A16.
The receiver board relies on the
mounting h ardware to provide the d c
and speaker ground connections to
the ground plane on the board.
OPTIONS.
Squelch Circuit.
The squelch circuit has about 3 to
6 dB of hysteresis built in, so that
once the squelch opens, the signal
must drop 3 to 6 dB below the opening threshold before squelching again.
This allows for so me fadin g on mo bile
stations and prevents squelch pumping on heavy modulation. It also prevents cycling due to slight desense in
repeater installations. Of course, this
requires setting the threshold a little
higher than if there was no hysteresis
so that it will close with no signal. If
you prefer the older type squelch, you
can simply remove Q5 from the circuit; however, this is not recommended for repeater installations. If
you want more or less hysteresis, you
can decrease or increase the value of
R25.
Repeater Use.
E4 provides a "carrier operated
switch" output which may be connected to a COR module to turn a
transmitter on and off. The output
level is about 7V unsquelched and 0V
squelched. There is a resistor in series with the output to limit current.
Refer to COR module instructions for
details.
If your repeater controller uses
discriminator audio, rather than the
speaker output, filtered discriminator
audio is available at E5. The level is
about 2V p-p. If you need audio
which is squelched, take it from the
input (right hand terminal on the
VOLUME control.
Audio Muting.
If the receiver is used as a part of a
transceiver, audio muting can be accomplished without switching the
power or speaker lines. If the transmitter is keyed by applying B+ to the
exciter, simply connect the keyed B+
through a 100K resistor to the junction of R25 and R27 on the receiver
board. The dc level will be sufficient
to trigger the squelch circuit in U2,
regardless of the rf signal level coming
into the receiver.
Of course, some means of discon-
©1999 Hamtronics, Inc.; Hilton NY; USA. All rights reserved. H amtronics is a registered trademark. Manual revised: 1/1/00 Page 1
Page 2

necting the receiver from the antenna
must be provided, and we recommend
our TRR Coax Relay Module if the
power level is under 25 Watts. Otherwise, a larger coax relay will be required.
Discriminator Meter.
If you wish to u se a discriminator
meter and you are handy in designing
with op-amps, you can run a samp le
of the dc voltage at DISCRIMINATOR
output termina l E5 to one in put of a n
op-amp and tie the other input to a
voltage divider pot set to provide a reference voltage of about +3.5Vdc.
S-Meter.
There is no s-meter function, as
such, available in i-f amplifier ic's
made for professional receivers; however, a signal strength indication is
available a t test point TP2. This voltage is a function of the noise level detected in the squelch circuit. It is
about +3Vdc with no signal an d 0Vdc
with full quieting . Y ou ca n ta p o ff this
point with a high-impedance circuit,
such as an op-amp, to drive a meter
or a computerized repeater controller.
Subaudible Tone Decoder.
To use our TD-3 Subaudible Tone
Decoder or a similar module, connect
its audio input to DISCRIMINATOR terminal E5. If you want to use it to
mute the aud io (in s tea d o f in h ib itin g a
repeater transmitter as is normally
done), conne ct the mute ou tput of the
TD-3 to the righ t-hand lug of th e volume control.
ALIGNMENT.
Equipment needed for alignment is
an fet voltmeter, an rf signal generator, a regulated 13.6Vdc power supply
with a 0-200 mA meter internally or
externally connected in the supply
line.
The slug tuned coils in the receiver
should be adjusted with the proper
aluminum .062" square tuning tool to
avoid cracking the powdered iron
slugs. Variable capacitors should be
adjusted with a plastic tool with a
small metal bit on the end. Tools are
available for adjusting the rf coils
(model A28) and variable capacitor
(model A2).
The squelch pot should be set fully
counterclockwise. The volume pot
should be set just a little clockwise.
a. Install channel crystal in
socket.
b. Connect speaker and +13.6
Vdc. You should hear white noise.
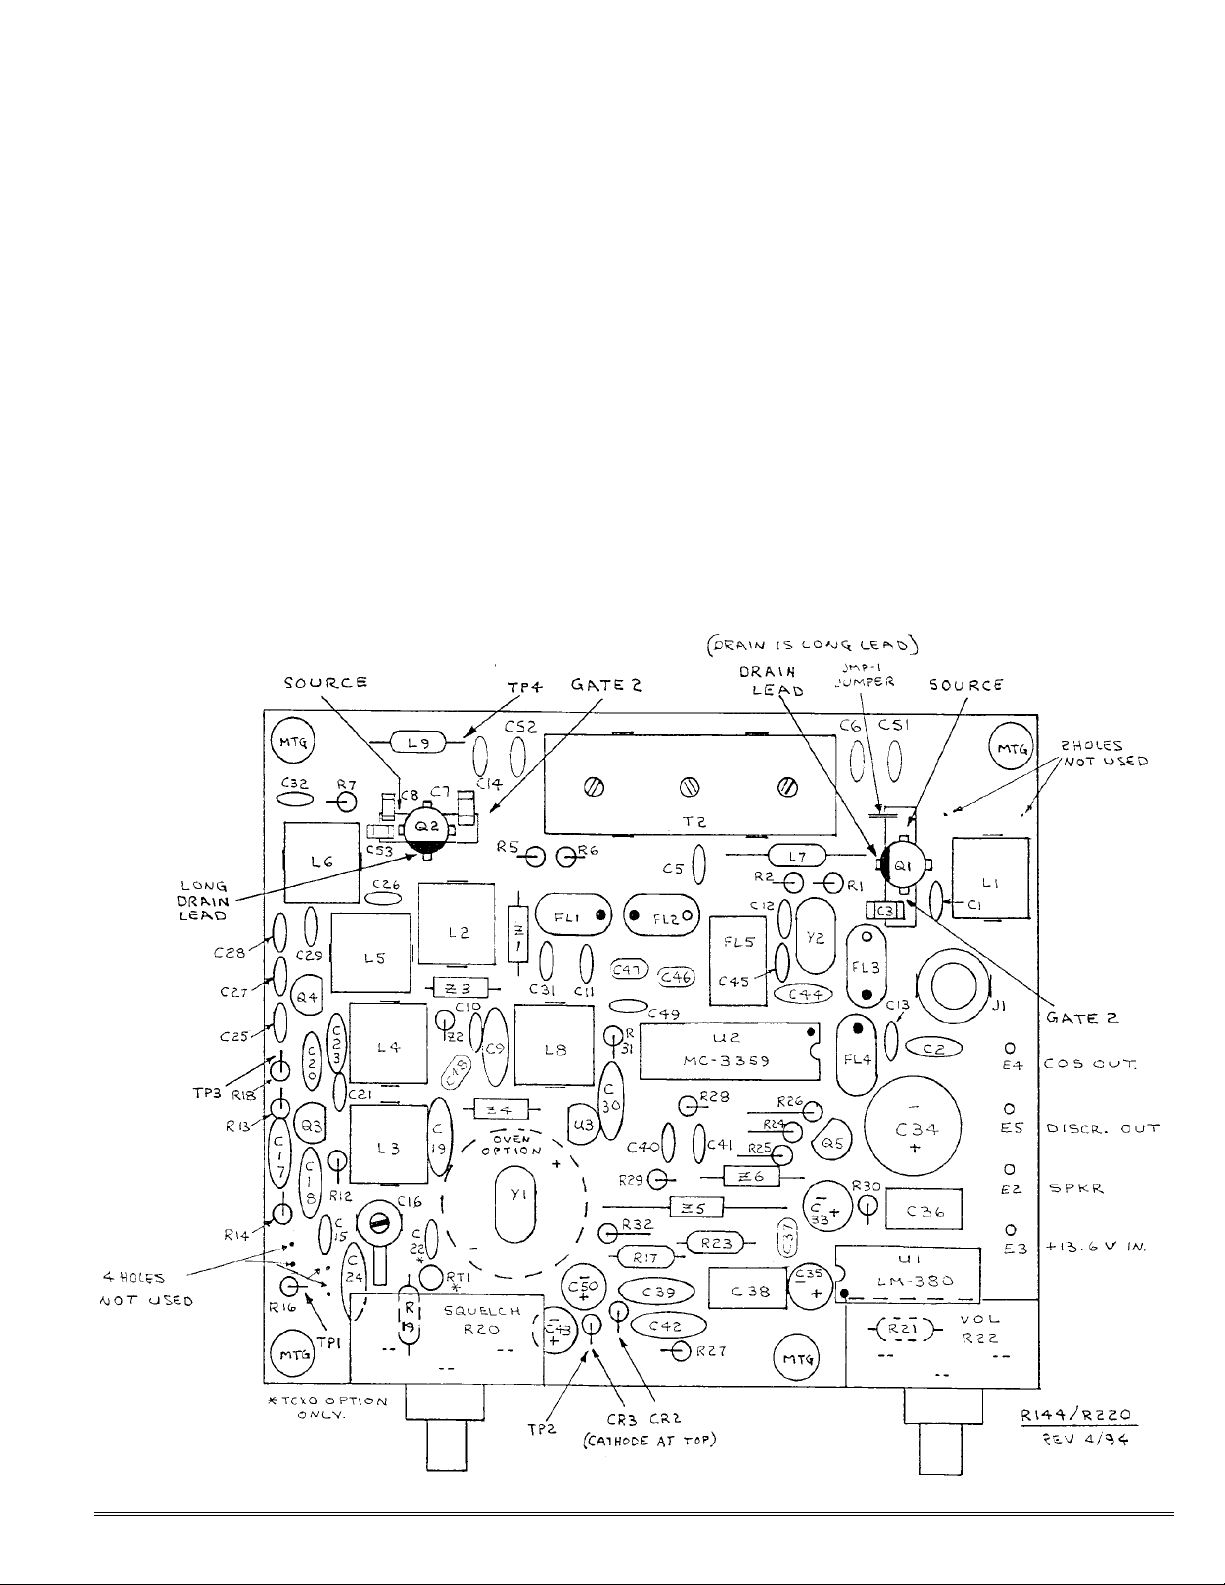
c. Connect dc voltmeter to TP3
(top lead of R1 8 ). Ad ju st f irs t L4 , th e n
L3 and L4 alternately for maximum
response. (Approx. +1.2 to 2.2 Vdc
typical.)
d. Connect stable signal generator
to TP4 (right-hand lead of rf choke
L9), using coax clip lead. Connect
coax shield to pcb ground. Set generator to exactly 10.7000 MHz. Use a
frequency counter or synthesized signal generator. Set level just high
enough for full q uie tin g . (A t 1 uV , y o u
should notice some quieting, but y ou
need something near full quieting for
the test.
e. Connect dc voltmeter to TP1
(top lead of R16). Adjust discriminator transformer L8 for +3.5Vdc.
Note that the voltage changes very
rapidly with tuning. Full swing of
about 1 to 8V occurs within a few
kHz, and a little drift (+/-1kHz) may
be noticed d ue to the high sensitivity
of the test signal. It is not necessary
to maintain exactly 3.5V.
Note: There are two methods of
adjusting the mixer and front end.
One is to use an fet voltmeter with test
point TP2, which is the top lead of
CR3. The voltage at th is point is proportional to the amount of noise detected in the squelch circuit; so it
gives an indication of the quieting of
the receiver. A signal peak, therefore,
is indicated by minimum noise voltage,
not maximum.
The other meth od is to us e a r egular professional SINAD meter.
In either case, a weak to modera te
signal is required to observe any
change in noise. If the signal is too
strong, ther e will be no cha nge in the
reading as tuning progresses; so keep
the signal generator turned down as
receiver sensitivity increases during
tuning.
If you use TP2 with a voltmeter,
the signal can be modulated or unmodulated. If you use a SINAD meter,
the standard method is a 1000 Hz
tone with 3 kHz deviation.
f. Check that signal generator is
still on 10.7000 MHz. With weak signal applied to Q2 gate-1 as before,
adjust L2 for minimum noise or distortion. This step is cr itica l to g et lo west distortion in the crystal filter.
g. Remove signal generator so the
receiver hears just noise. Readjust L8
slightly so that the voltage at TP1 is
+3.5V with just n oise coming thr ough
the i-f.
h. Connect signal generator to J1.
Adjust to exact channel frequency,
and turn output level up fairly high.
Adjust frequency trimmer capacitor
C16 to net the c rystal to channel f requency, indicated by +3.5Vdc at test
point TP1. If you can't find the signal
at all, tune your signal generator up
and down the band slightly. (Also
check that osc illator is peaked as per
step c.) If your crystal has the wrong
load correlation or is slightly out of
tolerance, you may be able to compensate by changing the value of C15 so
C16 can net the crystal on frequency.
The piston capacitor tuning range is
restricted to provide best frequency
stability; so sometimes it may be necessary to change the fixed capacitor.
The proper adjustment results in
+3.5Vdc, the same as preset for the
exact 10.700 MHz i-f frequency earlier.
Maximum capacitance (lowest frequency) occurs with the piston
screwed in all the way, and minimum
capacitance (highest frequency) is
with the piston all the way up. Be
careful not to completely remove the
piston. If the piston screw becomes a
little tight (squea ky), you can app ly a
small amount of silicone oil to the
threads.
i. Connect fet dc voltmeter to TP2
(top lead of CR3). Set signal generator
for relatively weak signal, one which
shows some change in the dc voltage
indication at TP2. Alternately peak
L5, L6, and L1 until no further improvement can be made.
j. Helical reson ator T2 supplied in
the kit has been factory aligned to 145
(223) MHz. Re adjus tment o f the th ree
screws may be necessary even if you
are operating close to the preset frequency. Alternately adjust the three
screws for best sensitivity.
Be careful not to adjust any screw
more than just a few turns or you may
unscrew the metal tuning slug from
the end of its lead screw inside the
resonator. If that should happen, you
may be able to carefully disassemble
the affected section and repair it.
k. Repeak L6 and L1 after the
helical resonator is tuned to work out
any interactions.
When properly tuned, sensitivity
should be about 0.15 to 2.0 µV for12
dB SINAD.
TROUBLESHOOTING.
The usual troubleshooting techniques
of checking dc voltages and signal
tracing work well in troubleshooting
the receiver. A dc voltage chart and a
©1999 Hamtronics, Inc.; Hilton NY; USA. All rights reserved. H amtronics is a registered trademark. Manual revised: 1/1/00 Page 2
Page 3
list of typical audio levels are given to
act as a guide to troubleshooting.
Although voltages may vary widely
from set to set and under various operating and measurement conditions,
the indications may be helpful when
used in a logical tr oubleshooting procedure.
The most common troubles in all
kits are interchanged components,
cold solder joints, and solder
splashes. Another common trouble is
blown transistors and ic's due to reverse polarity o r po wer lin e tra nsie nts.
Remember if you encounter problems
during initia l testing that it is easy to
install parts in th e wro n g p la ce . Do n ' t
take anything for granted. Double
check everything in the event of trouble.
If the receiver is completely dead,
try a 10.700 MHz signal applied to
TP4 (right-hand lead of rf choke L9)
with a coax cable clip lead. You
should be ab le to hea r the q uieting effect of a 10 uV carrier at 10.700 MHz.
You can also connect the 10.700 MHz
clip lead through a blocking capacitor
to various section s of the crystal f ilter
to see if there is a large loss of signal
across one of the filter sections. Also,
check the 10.245 MHz oscillator with
a scope or b y listening with an hf receiver or service monitor.
TABLE 1. TYPICAL DC VOLTAGE S .
Xstr E(S)B(G1)C(D) G2 .
Q1 0084
Q2 0.5084
Q3 2.7 2.4 8 Q4 2.2 0 8 Q5 Squelched 0 0 0.7 Q5 Unsq 0 0.7 0
U1 1 6 8 14
7 0 7 13.6
U2 1 2 3 4 5 6 7 8
7.9 7.2 7.2 8 1.1 1.1 1.1 8
U2 9 10 11 12 13 14
4.4 3.5 1 To 8 2.5 2.5 .3 To .7
U2 . 15 16 17 18
0(Sq), 7.2(Unsq) 0 0 2. 3
A signal generator on the channel
frequency can be injected at various
points in the front en d. If th e m ixer is
more sensitive than the rf amplifier,
the rf stage is suspect. Check the dc
voltages looking for a damaged fet.
If audio is present at the VOLUME
control but not at the speaker, the
audio ic may have been damaged by
reverse polarity or a transient on the
B+ line. If no audio is present on the
volume control, the squelch circuit
may not be ope ratin g p rop erly . Ch eck
the dc voltages, and look for noise in
the 10 kHz region, which should be
applied to noise detector CR2/CR3
with no input signal. (Between pins
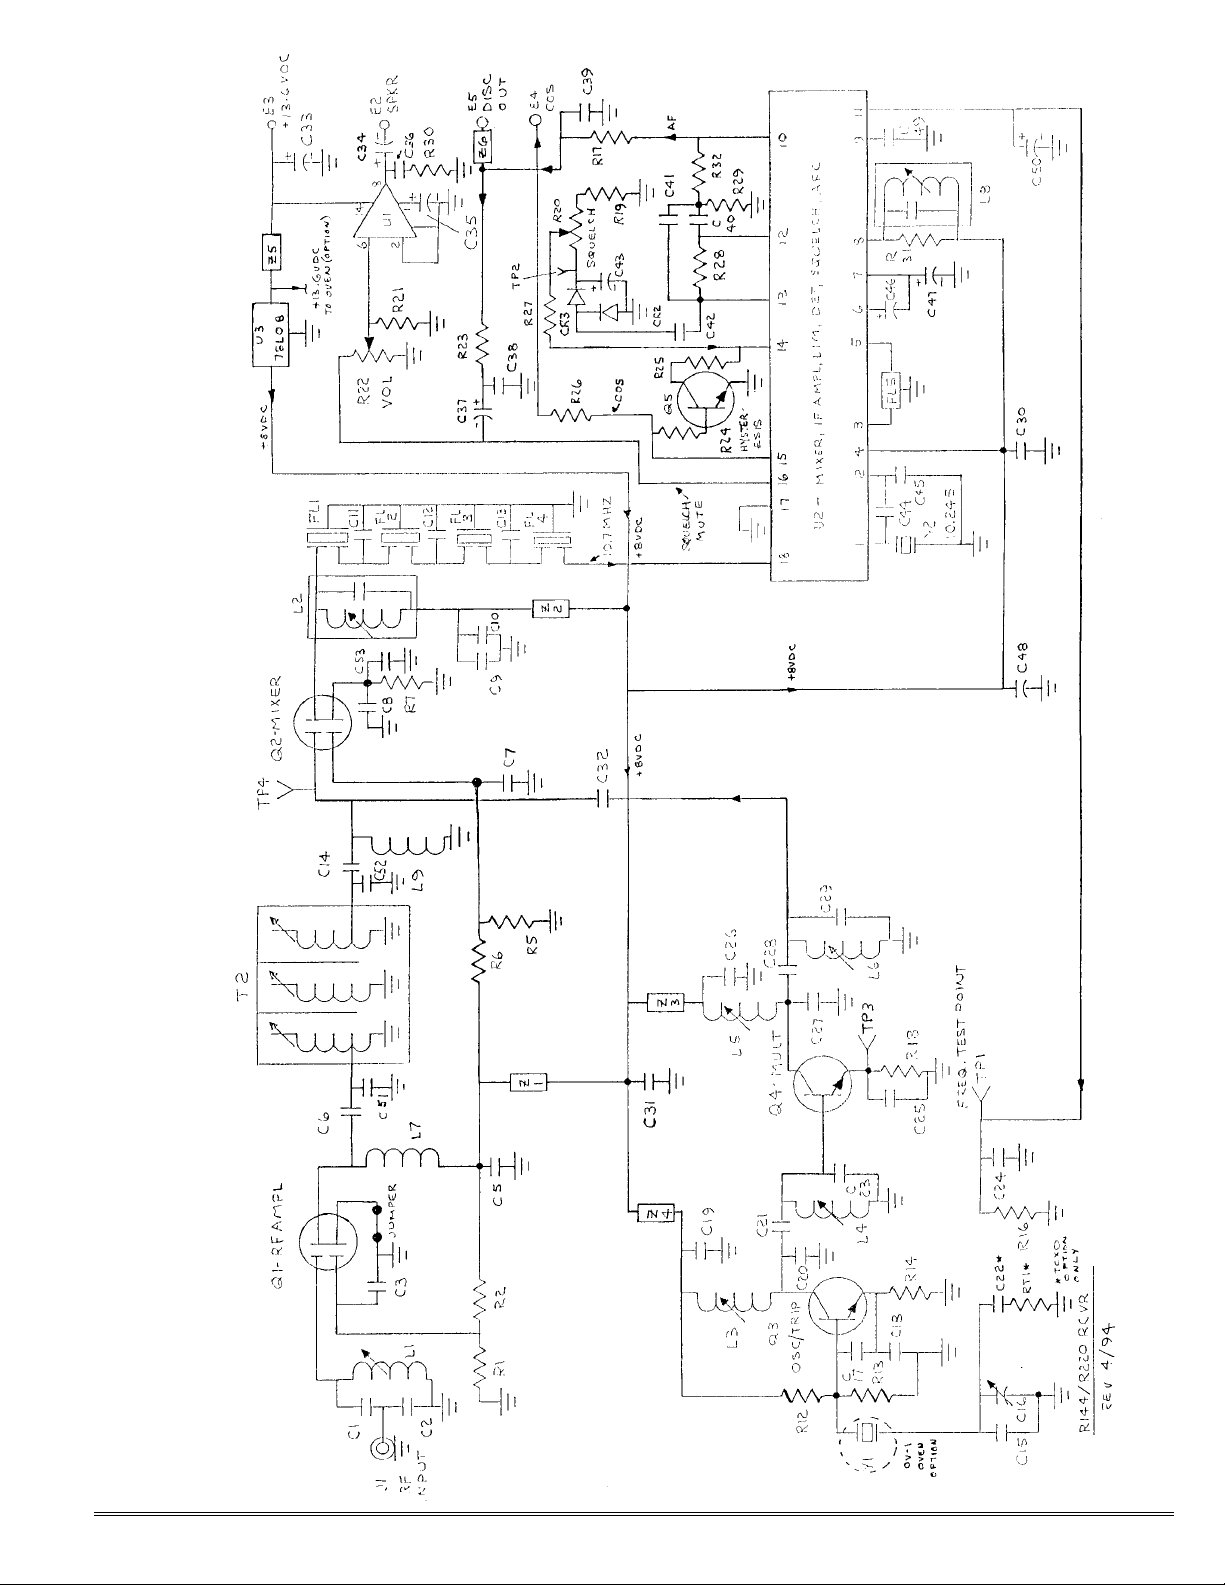
12 and 13 of U2 is an op-amp active
filter tuned to 10 kHz.)
Typical Dc Voltages.
The dc levels in Table 1 were measured with an 11 megohm fet vm on a
sample unit with 13.6 vd c b+ ap plied.
All voltages may vary considerably
without necessarily indicating trouble.
The chart sh ould be used with a logical troubleshoo ting plan. All voltages
are positive with resp ect to gro und e xcept as indicated. Voltages are measured with no signal applied but
oscillator running properly and with
squelch open unless otherwise specified.
Typical Audio Levels.
Following are rou gh mea sur eme nts
of audio circuits, using an oscilloscope. Measurements were taken under two conditions. The first is with
no input signal, just white noise so
conditions can be reproduced easily.
The second is with an input signal
having a 1000 Hz tone modulated
±3kHz.
TABLE 2. TYPICAL AUDIO LEVELS (V p-p)
Measured At On Noise On Tone
U2 pin 10 (discrim.): 4 2
E5 (discriminator out): 3 1.5
U2 pin 13 (noise ampl): 4 0.4
Top of volume control: 0.8 0.2
Across 8Ω spkr term: 12 10
©1999 Hamtronics, Inc.; Hilton NY; USA. All rights reserved. H amtronics is a registered trademark. Manual revised: 1/1/00 Page 3
Page 4

PARTS LIST FOR R144
Note: Capacitor values and helical
resonator vary with frequency segments. Above 150 MHz, values may
vary.
Ref # Value (marking)
C1 18 pf
C2 62 pf
C3 .001 uf chip capacitor
C4 not assigned
C5 .001 uf (1nK or 1nM)
C6 4 pf
C7-C8 .001 uf chip capacitor
C9 .01 uf disc (103)
C10 .001 uf (1nK or 1nM)
C11 2 pf
C12 2 pf
C13 2 pf
C14 3 pf
C15 39 pf
C16 Piston trimmer, 2-11.2 pf
C17-C18 150 pf (151)
C19 .001 uf (102 or 1nK)
C20 68 pf
C21 1 pf
C22 7 pf (TXCO option only -
see text)
C23 68 pf
C24 .01 uf disc (103)
C25-C26 .001 uf (1nK or 1nM)
C27 22 pf
C28 0.5 pf
C29 22 pf
C30 .01 uf disc (103)
C31 .001 uf (102, 1nM, or 1nK)
C32 0.5 pf
C33 47 uf electrolytic
C34 470 uf electrolytic
C35 10 uf electrolytic
C36 0.15 uf (red)
C37 0.1 uf monolithic (104)
C38 0.15 uf (red)
C39 .01 uf disc (103)
C40-C41 .001 uf (102, 1nM, or 1nK)
C42 .01 uf disc (103)
C43 0.47 uf electrolytic
C44 62 pf
C45 220 pf (221)
C46-C48 0.1 uf monolithic (104)
C49 120 pf
C50 0.47 uf electrolytic
C51 20 pf
C52 20 pf
C53 .047 uf chip capacitor
CR1 not used
CR2-CR3 1N4148 (may not be
marked)
E1 Not assigned
E2-E5 Socket pins
FL1-FL4 Matched xtal filter set
FL5 Ceramic filter (blue)
J1 RCA jack
JMP-1 Jumper - see dwg
L1 2-1/2 turns (red)
L2 7A-691F IF transformer
L3-L4 6-1/2 turns (blue)
L5-L6 2-1/2 turns (red)
L7 0.22 uH rf choke (red-sil-
red-red)
L8 455kHz IF transformer
p/n 831-5 or YMC-15002
or T1003
L9 0.22 uH rf choke (red-sil-
red-red)
OV-1 Crystal oven (option)
Q1-Q2 N.E.C. 3SK122 or Philips
BF-988 dual-gate mos fet
(static handling pre-
cautions required)
Q3-Q5 2N3904 or 2N4124
R1-R2 100K
R3-R4 not assigned
R5-R6 100K
R7 180 ohms
R8-R11 not assigned
R12-R13 15K
R14 680 ohms
R15 not used
R16 330K
R17 1.2K
R18 470
R19 27K
R20 100K pot
R21 27K
R22 100K pot
R23 6.8K
R24 510K
R25 100K
R26 3.3K
R27 100K
R28 330K
R29 680 ohms
R30 3Ω (orn-blk-gold-gold)
-or-
3.3Ω (orn-orn-gold-gold)
R31 47K
R32 15K
RT1 Thermistor (TXCO option
only - see text)
T1 Not assigned
T2 Helical Res #1008
[#1080]
U1 LM-380N Speaker
Amplifier
U2 MC-3359P IF Amplifier
U3 78L08 +8Vdc Regulator
Y1 Channel xtal (see text)
Y2 10.245 MHz, 62 pf IF xtal
Z1-Z6 Ferrite beads
©1999 Hamtronics, Inc.; Hilton NY; USA. All rights reserved. H amtronics is a registered trademark. Manual revised: 1/1/00 Page 4
Page 5
©1999 Hamtronics, Inc.; Hilton NY; USA. All rights reserved. H amtronics is a registered trademark. Manual revised: 1/1/00 Page 5
Page 6
©1999 Hamtronics, Inc.; Hilton NY; USA. All rights reserved. H amtronics is a registered trademark. Manual revised: 1/1/00 Page 6
 Loading...