

HAMPTON BAY 132 cm Fan, Valle Paraiso 14035, Valle Paraiso 14036 User Manual
Date Purchased
Store Purchased
Model No.
Serial No.
Vendor No.
UPC
219054
Hampton Bay Lifetime Motor Warranty
The retailer warrants the fan motor to be free from defects in workmanship and material present at time of
shipment from the factory for a lifetime after the date of purchase by the original purchaser. The retailer also
warrants that all other fan parts, excluding any glass or plexiglass parts, to be free from defects in
workmanship and material at the time of shipment from the factory for a period of one year after the date of
purchase by the original purchaser. We agree to correct such defects without charge or at our option replace
with a comparable or superior model if the product is returned to the retailer. To obtain warranty service, you
must present a copy of the receipt as proof of purchase. All costs of removing and reinstalling the product are
your responsibility. Damage to any part such as by accident or misuse or improper installation or by affixing
any accessories, is not covered by this warranty. Because of varying climatic conditions in the United States
this warranty does not cover any changes in brass finish, including rusting, pitting, corroding, tarnishing or
peeling. Brass finishes of this type give their longest useful life when protected from varying weather
conditions. A certain amount of wobble is normal and should not be considered a defect. Servicing performed
by unauthorized persons shall render the warranty invalid. There is no other express warranty. The retailer
hereby disclaims any and all warranties, including but not limited to. Those of merchantability and
fitness for a particular purpose to the extent permitted by law. The duration of any implied warranty
which cannot be disclaimed is limited to the time period as specified in the express warranty. Some states do
not allow limitation on how long an implied warranty lasts, so the above limitation may not apply to you. The
retailer shall not be liable for incidental, consequential, or special damages arising out of or in
connection with product use or performance except as may otherwise be accorded by law. Some states
do not allow the exclusion of incidental or consequential damages, so the above exclusion or limitation may
not apply to you. This warranty gives specific legal rights, and you may also have other rights which vary
from state to state. This warranty supersedes all prior warranties.
Hampton Bay Lifetime Motor Warranty
718212140352 (xxx-xxx)
xxx-xxx
xxx-xxx
718212140369 (xxx-xxx)

Table of Contents
SAFETY RULES....................................................................................................
PACKAGE CONTENTS ........................................................................................
INSTALLING YOUR FAN.....................................................................................
HANGING THE FAN.............................................................................................
ELECTRICAL CONNECTIONS ..........................................................................
FINISHING THE INSTALLATION.......................................................................
BLADE INSTALLATION ....................................................................................
............................................................
...................................
OPERATING TRANSMITTER....................................................................
CARE OF YOUR FAN..........................................................................................
TROUBLESHOOTING.......................................................................................
SPECIFICATIONS..............................................................................................
INSTALLING THE MOUNTING PLATE
INSTALLING THE LIGHT KIT............................................................................
INSTALLING THE LIGHT BULBS AND GLASS SHADE
THE
1
2
3
4
5
6
7
8
9
10
11
12
13
14
1. Before you begin installing the fan, shut power off at the circuit
breaker or the fuse box.
2. Be cautious! Read all instructions and safety information before
installing your new fan. Review accompanying assembly diagrams.
3. Make sure that all electrical connections comply with local codes,
ordinances, or National Electrical Codes. Hire a qualified electrician or
consult a do-it-yourself wiring handbook if you are unfamiliar with
installing electrical wiring.
4. Make sure the installation site you choose allows the fan blades to rotate
without any obstructions. Allow a minimum clearance of 7 feet from the
floor and 18 inches from the tip of the blades to the wall.
5. If you are mounting the fan to a ceiling outlet box, use U.L. Listed
metal octagonal outlet box marked "Acceptable for fan support". Secure
the box directly to the building structure. The outlet box and its support
must be able to support the moving weight of the fan. (at least 35 lbs.) Do
not use a plastic box.
6. Caution: To reduce the risk of personal injury use only the screws
provided with the outlet box.
7. If you are mounting the fan to a joist, make sure it is able to support the
moving weight of the fan (at least 50 lbs.).
8. After you install the fan, make sure that all mountings are secured to
prevent the fan from falling.
9. Do not insert anything into the fan blades while the fan is operating.
10. Turn the fan off and wait for it to stop completely before changing the
fan direction.
NOTE: The important safeguards and instructions appearing in this
manual are not meant to cover all possible conditions and situations that
may occur. It must be understood that common sense, caution and care are
factors which can not be built into this product. These factors must be
supplied by the person(s) installing, caring for and operating the unit.
1. Safety Rules
TO REDUCE THE RISK OF FIRE, ELECTRIC SHOCK, OR OTHER
PERSONAL INJURY, MOUNT FAN ONLY TO A U.L. LISTED OUTLET BOX
OR SUPPORTING SYSTEM MARKED ACCEPTABLE FOR FAN SUPPORT
AND USE MOUNTING SCREWS AND LOCK WASHERS PROVIDED WITH
THE OUTLET BOX, MOST OUTLET BOXES COMMONLY USED FOR THE
SUPPORT OF LIGHTING FIXTURES ARE NOT ACCEPTABLE FOR FAN
SUPPORT AND NEED TO BE REPLACED. CONSULT A QUALIFIED
ELECTRICIAN IF IN DOUBT.
TO REDUCE THE RISK OF PERSONAL INJURY, DO NOT BEND THE BLADE
HOLDERS WHILE INSTALLING, BALANCING THE BLADES, OR
CLEANING THE FAN. DO NOT INSERT FOREIGN OBJECTS BETWEEN
ROTATING FAN BLADES.
TO REDUCE THE RISK OF FIRE OR ELECTRIC SHOCK, DO NOT USE THIS
FAN WITH ANY SOLID-STATE SPEED CONTROL DEVICE.
WARRING
NOTE
READ AND SAVE ALL INSTRUCTIONS!
ATTENTION: The Energy Policy Act of 2005 requires this fan to be
equipped with a 190 watt limiting device. If lamping exceeds 190
watts, the ceiling fan's light kit will shut off automatically.
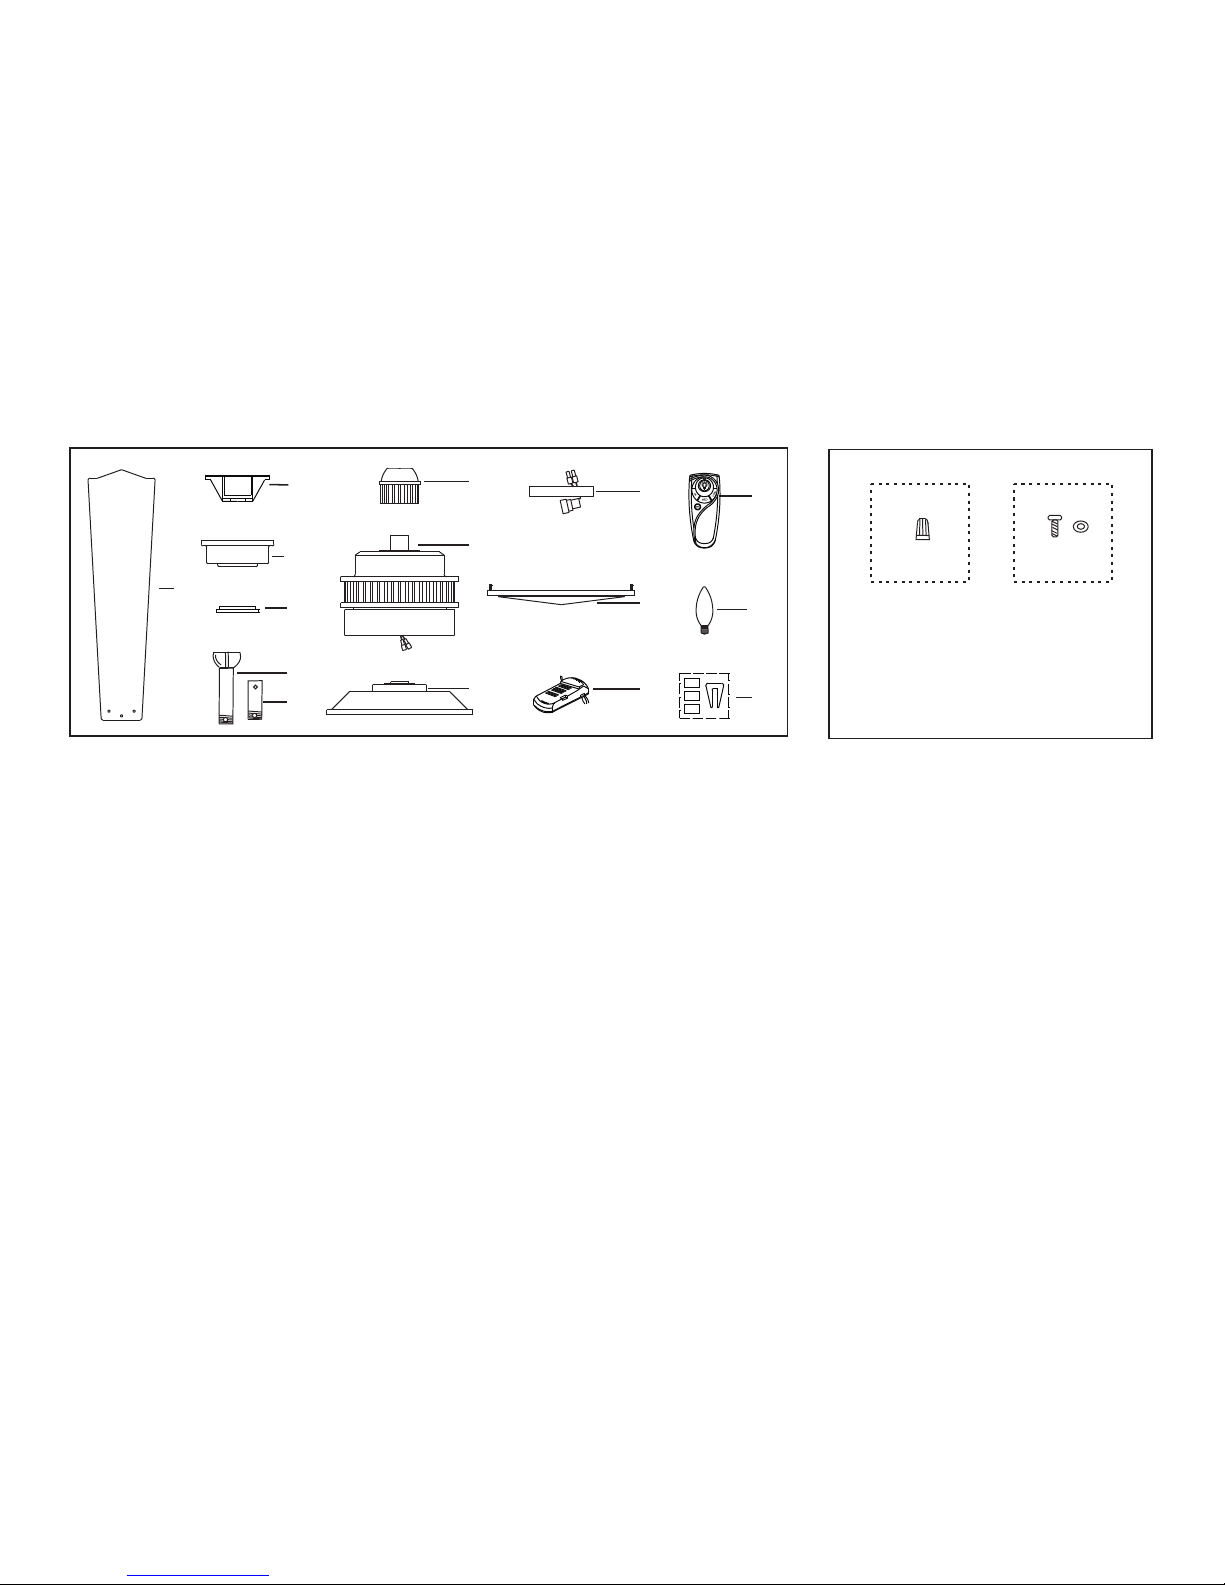
Unpac k your fan and c heck the con tents. You should have the following items;
.
1 Fan blade s (4)
2. Hanger br acket
3. Canopy
4. Canopy cov er
5a. Standard d ownrod assembly
5b. Minimum-length d ownrod (for clo se
to the ceili ng installation on ly)
6. Coupling c over
7. Fan motor a ssembly
8. Mountin g plate
9. Light kit
10. Glass sh ade
11.
12.
13. 40 (3)
14. Balanc ing kit
Receiver +6 wire nuts
Tra nsmitter+holder+2 mounting screws
Watt candela bra bulbs
3
1
2
5a
5b
9
10
11
12
14
4
6
7
8
13
Package Contents 2.
a
b
a. Mounting Hardware:
Wire nuts (3 Pcs.)
b. Blade At tac hment Hardware :
3/16" x 12.3mm Screws (13 PCs.)
Fiber washers (13 Pcs.)

Phillips scr ew d river; slotted screw driver; step ladder; wi re cutters; electr ical tape.
Tools Required
Mounting Options
Out let box
Figure 1
Cei ling
joi st
Cei ling
joi st
Cro ss brac e
Out let box
Figure 2
Cei ling jo ist
or cr oss bra ce
Par allel
woo d brace
Pro vide st rong
sup port
Rec essed
out let box
Han ger bra cket
ope ning mu st
be fa cing up -side
Figure 3
O
utl
et b
o
x
Figure 4
Cei ling
joi st
Han ger bar
(op tiona l)
Han ger
bra cket
Ang led cei ling
max imum
18 an gle
If there isn't an existing mounting box, then read the
following instructions. Disconnect the power by
removing fuses or turning off circuit breakers.
Secure the outlet box directly to the building
structure. Use appropriate fasteners and building
materials. The outlet box and its support must be able
to fully support the moving weight of the fan (at least
50 lbs.). Use a UL Listed metal outlet box. Do not use
a plastic outlet box.
Figure 1, 2 and 3 are examples of different ways to
mount the outlet box.
Note: You may need a longer downrod to maintain
proper blade clearance when installing on a steep,
sloped ceiling. Longer downrods are available from
your Hampton Bay dealer.
To hang your fan where there is an existing fixture
but no ceiling joist, you may need to install a hanger
bar as shown in Fig. 4 (available at your Hampton
Bay dealer).
3. Installing Your Fan
 Loading...