

HAMPTON BAY Springview, Springview 750809 Owner's Manual
by
®
Hampton Bay
Springview

52 Springview
Ceiling Fan by Hampton Bay
Date Purchased
Store Purchased
ETL
Model No.
Serial No.
Vendor No.
UPC
Table of Contents
Safety Rules . . . . . . . . . . . . . . . . . . . . 1
Unpacking Y
our
Fan . . . . . . . . . . . . . . 2
Installing Y
our
Fan . . . . . . . . . . . . . . . 3
Installing the Light Kit. . . . . . . . . . . . . 8
Care of Y
our
Fan . . . . . . . . . . . . . . . . 10
Troubleshooting . . . . . . . . . . . . . . . . . 10
Specifications . . . . . . . . . . . . . . . . . . 11
Warranty Information . . . . . . . . . . . . 12
445993
Thank you for purchasing our ceiling fan. Thi s product has been
manufact ured with the highest standards of safety and quality.
750 809
718212149225
Y
our
Fan . . . . . . . . . . . . . . . . 9
Operating

Safety Rules - Read and Save These Instructions
WARNING
WARNING
ATTENTION
To reduce t he ri sk of electr ic sh ock, insur e electricity h as been
turn ed off at t he circuit b rea ker or fuse bo x bef ore beginn ing .
All wir ing must be in a cco rdance wit h the N ational El ectrical
Code “ ANS I/NFPA 70- 1999” and local e lectrica l cod es. Electr ica l
inst allation shou ld be performed b y a qualified lic ensed
elec trician.
WARNING: To red uce the risk o f ele ctrical sh ock o r fire, do not
use th is fa n with any sol id-state fan sp eed control dev ice. It will
perm anently damag e the electroni c circuitry.
CAUT ION : To re duce the ris k of pe rsonal inj ury, use o nly t he
scre ws pr ovided wit h the outlet box.
The ou tlet box and supp ort structure m ust be securely m ounted and
capa ble of reliably s upporting a min imum of 35 pounds . Use only
UL Listed outle t boxes marked “F OR FAN SUPPORT ”.
The fa n must be mounted w ith a minimum of 7 fe et clearance fr om
the tr ailing edge of th e blades to the flo or.
Avoid pla cing objects in p ath of the bla des .
To avoid pe rso nal injury o r dam age to the fan a nd other items, b e
caut ious when worki ng around or clea ning the fan.
Do not u se wa ter or detergents w hen cleani ng th e fan or fan bla des .
A dry dus t cloth or lig htl y dampened c lot h will be suit able for most
clea ning.
1.
2.
3.
4.
5.
6.
7.
8.
9.
Afte r making electr ical connecti ons, spliced co nductors shou ld be
turn ed up ward and pus hed c arefully u p into outlet box . Th e wir es
shou ld be s pread apar t with the ground ed conductor an d the
equi pment-groun ding conducto r on one side of the ou tlet box and
ungr oun ded conduc tor on the other si de of the outlet bo x.
All se t scr ews must be ch ecked and retig htened where ne cessary
befo re in stallati on.
10.
11.
TO RE DUCE THE RISK O F PERSONA L INJURY, DO NOT BEN D TH E
BLADE ARM S (A LSO REF ER RED TO AS FLA NG ES), WHEN
INSTAL LING THE BRAC KETS, BAL AN CING THE BLAD ES O R
CLEANI NG THE FAN. D O NO T IN SERT FO RE IGN OBJ EC TS IN –
BETWEE N ROTATING FAN BLADE S.
TO RE DUCE THE RISK O F FIRE, ELE CT RIC SHO CK O R PERSONA L
INJURY, MOUNT FAN TO O UTLET BOX MAR KE D ACC EPTAB LE FOR
FAN SU PPORT WIT H THE SC RE WS PROV ID ED WITH TH E OUTLET
BOX.
FAN IN CLUDES A 1 90W LI MITER TO C OMPLY W IT H TH E
DEPARTMEN T OF E NE RGY 2009 R EGULATION. LA MPING THIS
PRODUC T OV ER 1 90W WI LL CAUSE THIS FAN TO NOT LIG HT. PLEAS E
USE BULB S WI TH A TOTAL WATTAGE U ND ER THE 190W
REGULATION .
1
3
1
2
6
4
7
9
13
B
A
5
10
8
11
12
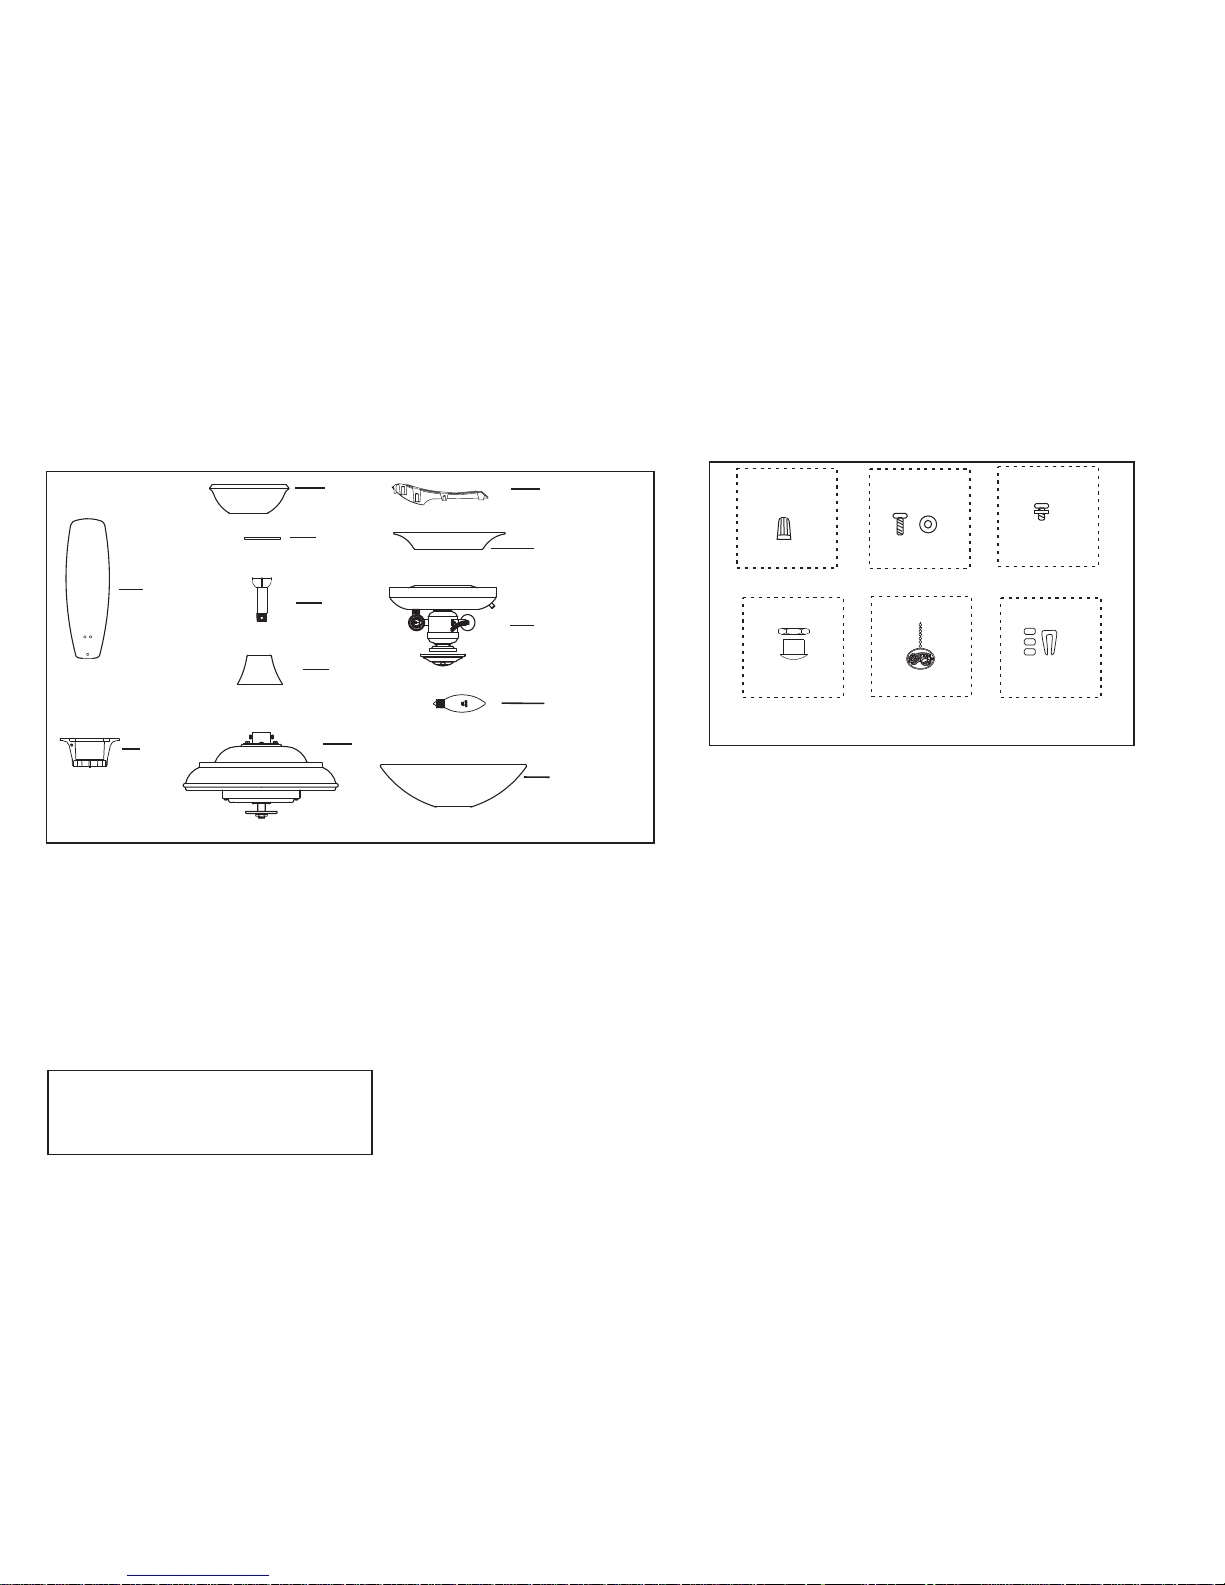
9. Fly whe el (1)
10. Li ght k it (1)
11. 40 Watt E12 bulb (3 )
12. Gl ass s hade (1)
1.
2. Han ger b racket (1)
3. Can opy ( 1)
4. Can opy c over (1)
5. Bal l/downrod ass embly (1)
6. Cou pli ng cover (1)
7. Fan m oto r assembly ( 1 )
8. Set o f bla des bracke ts (5)
Set of b lades (5)
WA RNI NG
DO N OT I NS TA LL O R US E FA N
IF A NY P AR T IS D AM AG ED O R MI SS IN G.
CA LL T OL L FR EE 1 -8 00 -5 27 -0 99 8
Unpa ck yo ur fan and che ck the contents . You should ha ve the followin g items:
2
D
E
F
Loose parts bag containing:
A. Mounting hardware
Plastic wire connectors (3pcs)
B . Blade attachment h ardware
3/16″ 6mm
Screw(16pcs )
×
Fiber washer (16pcs )
C. Blade bracket hardware
1/4*9.5mm screws (10pcs)
Flywheel hardware
1/4*9.5mm screws (6pcs)
D. Extra plug with nut (1)
E.
F.
Pull chain f ob (2pcs)
Balancin g kit (1)
Unpacking Your Fan
Unpack your fan and check the contents. You should have the following items:
C
 Loading...