

Page 1
Français P.6
Español P.11
INSTRUCTION MANUAL
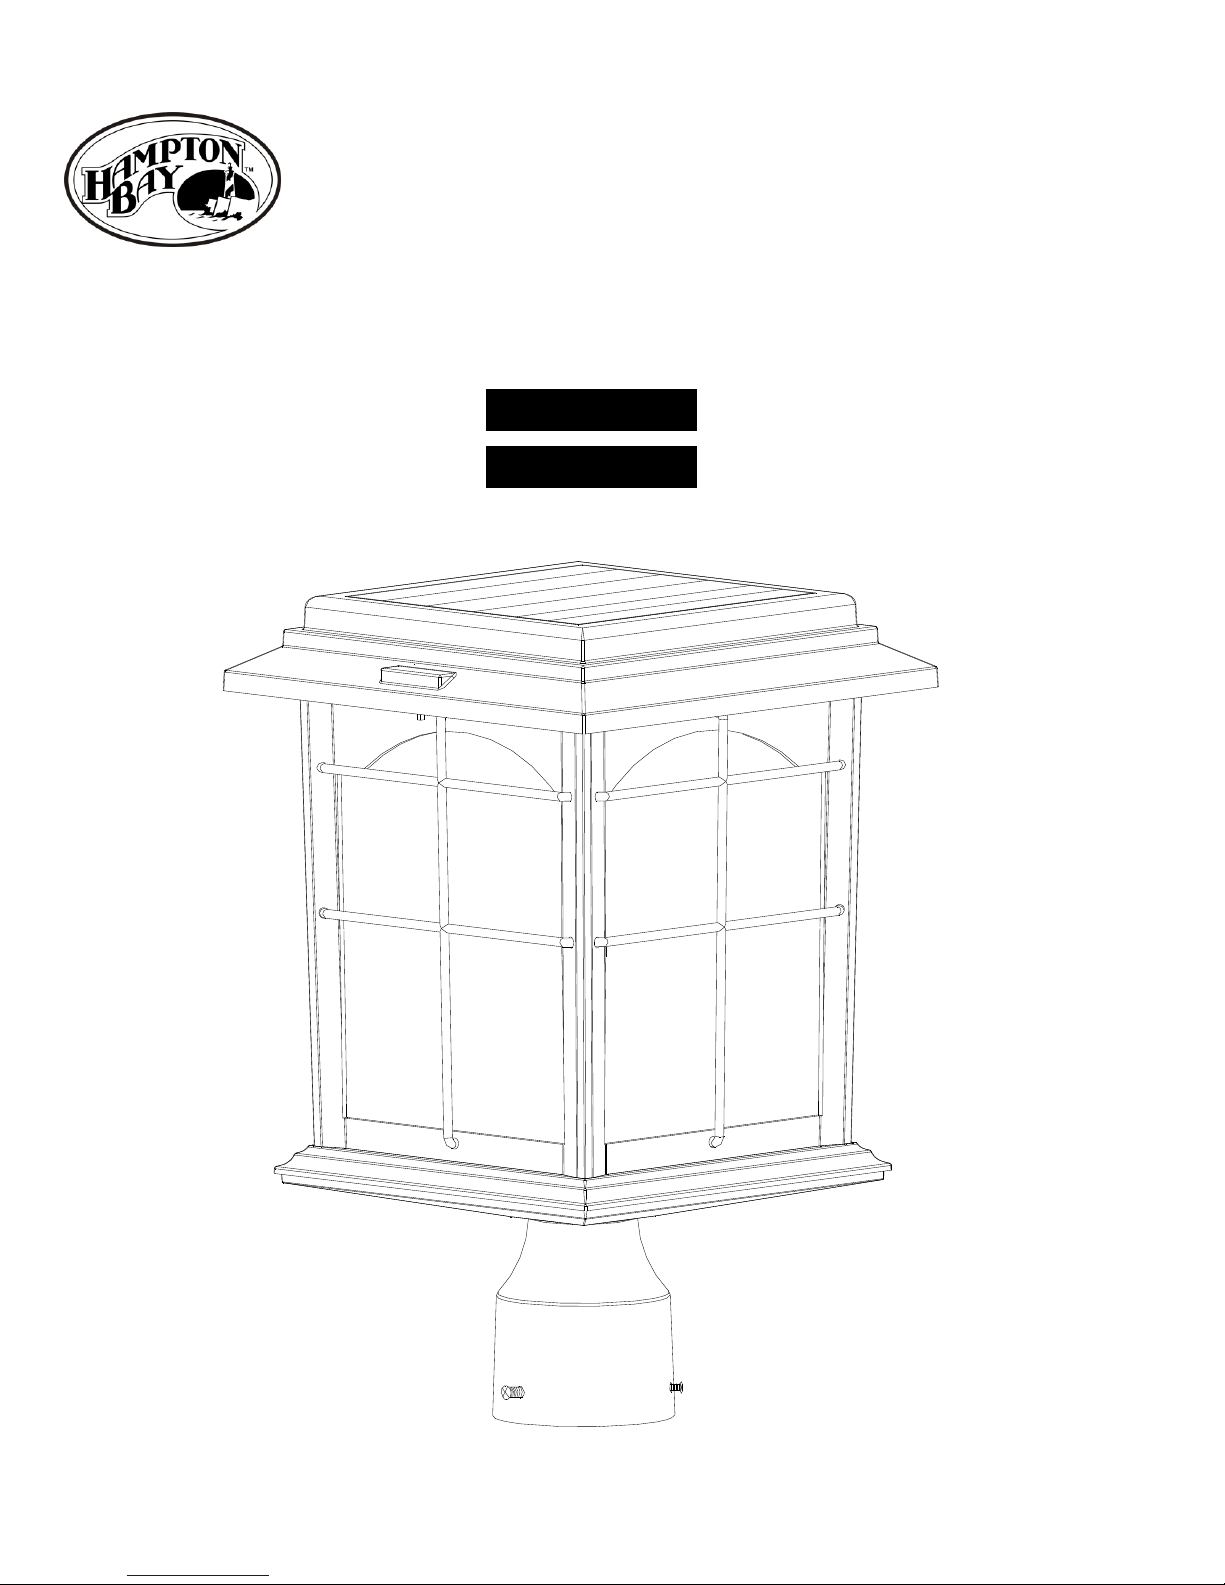
Solar Post Lantern
Home Depot SKU 414-713 (UPC 609839462401)
1
Page 2

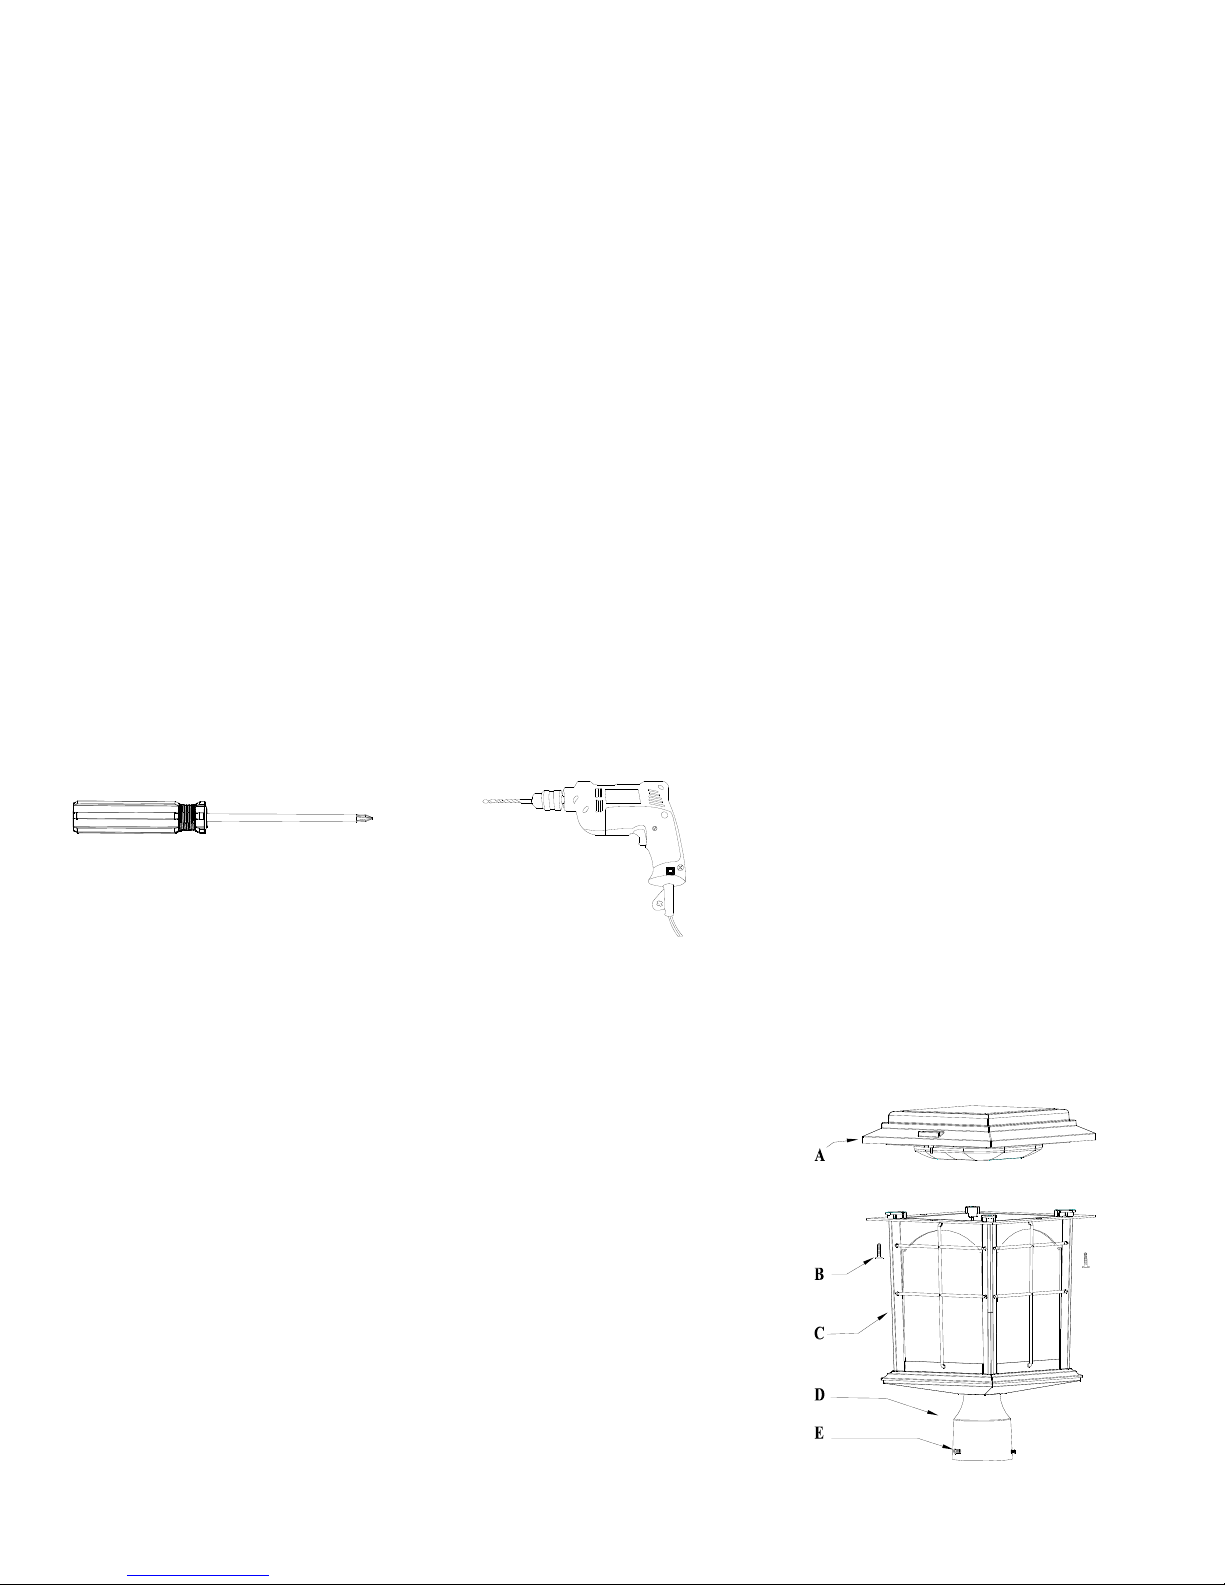
Screwdriver
Drill
Thank you for the purchase of your new solar lamp. We take great pride in providing you a
superior quality ecologically friendly solar lamp. Contained in this instruction sheet are some
simple steps to gain the most enjoyment and longevity from your solar lamp.
FEATURES:
1. Durable cast-aluminum outdoor construction and attractive age-iron finish for all weather.
2. Provided with 23 warm white LEDs in up to 100+ lumens high output.
3. Seedy textured glass creates a diffused effect when illuminated.
4. Includes Lithium Phosphate Rechargeable Battery.
5. Perfect for Installing near driveways, pathways, decks, gardens, and outdoor living spaces.
6. Fits 3-inch diameter round poles and pier base.
QUESTIONS, PROBLEMS, MISSING PARTS:
Should you experience problems with your solar post lantern, before returning to your local
Home Depot, please contact a Customer Service representative at CustomerService@Creativeprc.us or 830-249-1200. Please reference your SKU 414-713 Solar Post Lantern when
speaking to a Customer Service representative.
TOOLS REQUIRED FOR INSTALLATION:
CAUTION:
Your solar light may not function in temperature below -4ºF(-20ºC) or above 140ºF(60ºC).
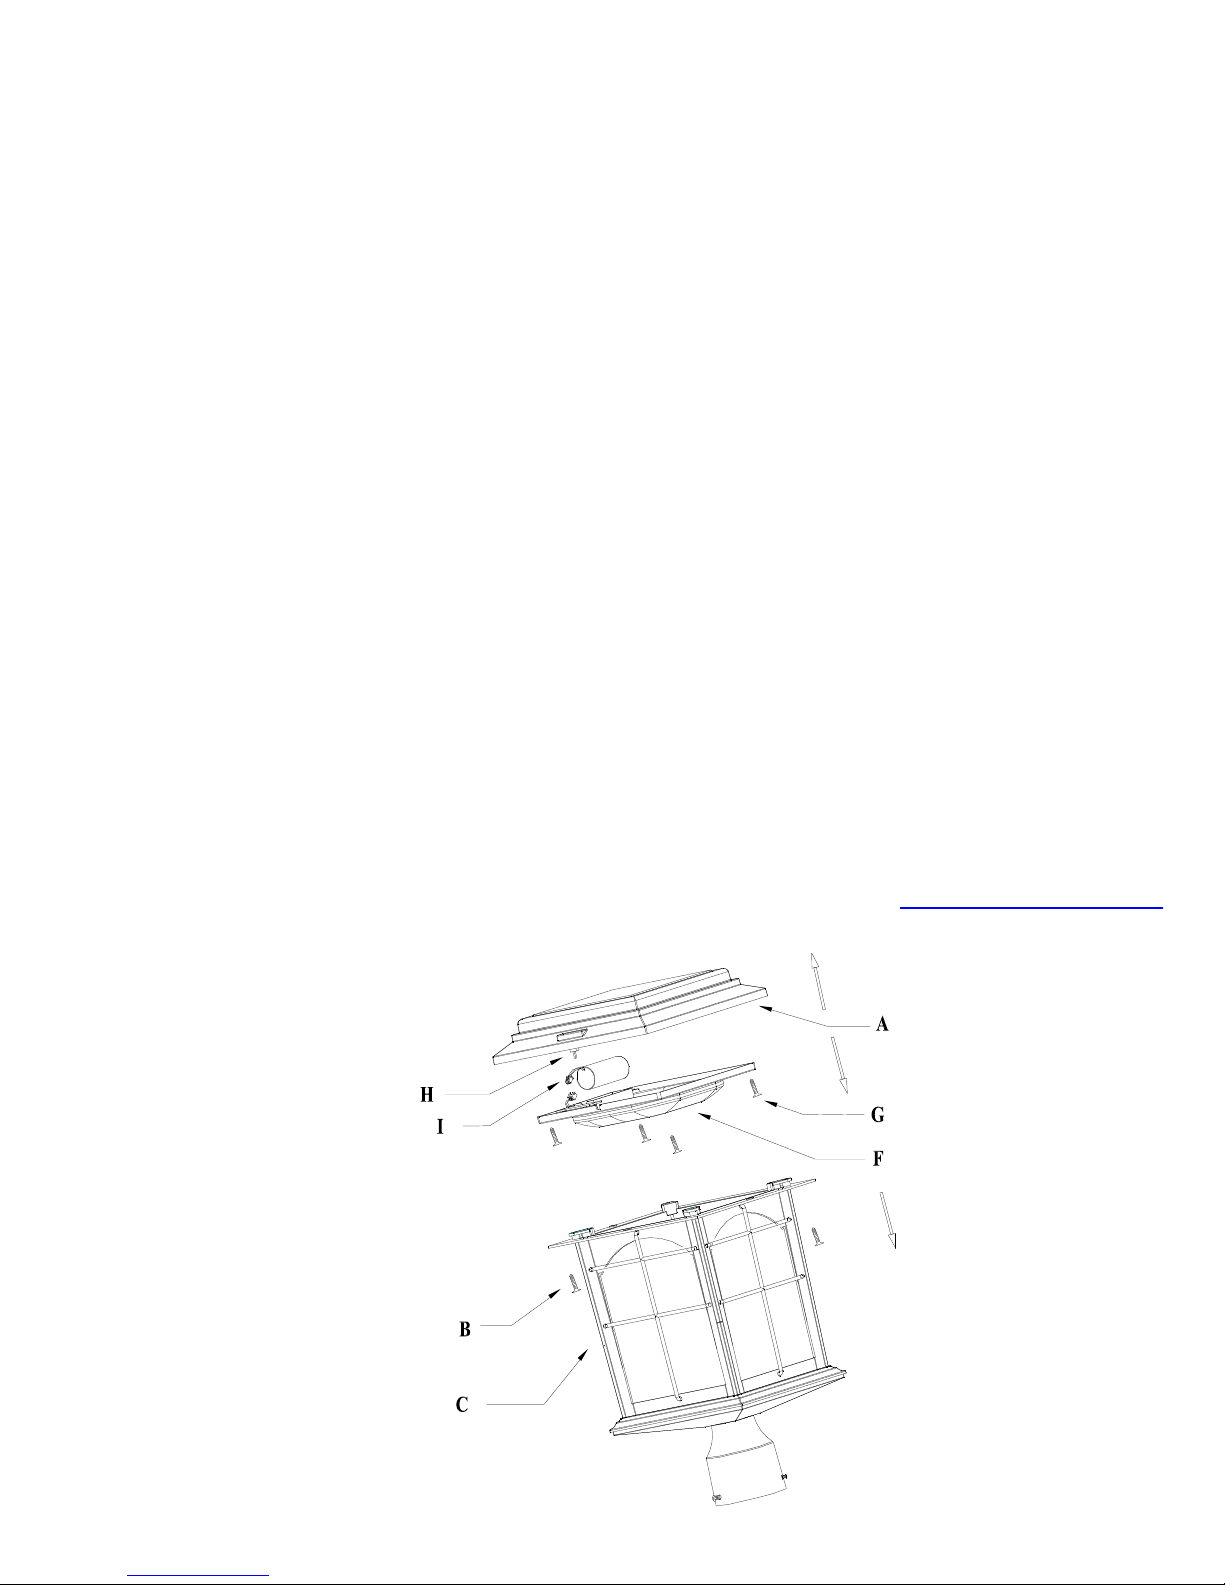
PARTS INCLUDED FOR ASSEMBLY / INSTALLATION:
Before starting to assemble your solar post lantern, make sure all
parts are present as shown on part list and diagram. If there are
missing or damaged parts, please contact a Customer Service
representative at CustomerService@Creative-prc.us or
830-249-1200.
A. Top Cap Assembly (1)
B. Lock Screw (2)
C. Housing (1)
D. Mounting Collar (1)
E. Set Screw (3)
2
Page 3
CHARGING INSTRUCTIONS:
BATTERY CARE INSTRUCTIONS:
Use one 26650 Lithium Phosphate (LiFePO4), 3000mAh, 3.2V rechargeable battery. For best
performance, replace with rechargeable 3.2V LiFePO4 battery every 3 years or when
performance diminishes. Refer to the following steps and the illustration provided to replace
battery.
1. Loosen 2 lock screws (B), remove top cap assembly (A) from housing (C).
2. Remove battery cover plate (F) from top cap assembly (A) by loosening 4 screws (G) as
shown on diagram below. NOTE: To reduce the risk of damage to electrical connections,
exercise caution when separating the battery cover plate (F) from the top cap assembly (A).
3. Disconnect the wire connection of battery lead (I) and remove the old battery from battery
compartment located on battery cover plate (F) as shown on diagram below. Replace with a
new 26650 LiFePO4, 3000mAH, 3.2V rechargeable battery pack.
4. Reassemble battery cover plate (F) and top cap (A), with screws (B & G).
IMPORTANT: Use Rechargeable Battery only. Battery(s) must be recycled or disposed
of properly. Replacement battery Model 46240-000RB is available at www.creative-prc.us
or by emailing CustomerService@Creative-prc.us.
All solar-powered lighting requires a sufficient amount of sunlight to recharge the battery(s).
Solar lighting performance is based on the amount of sunlight received during the day. Your
Solar Light can run up to 10 hours when fully charged. Place your solar light in an area which
is free from cover, shade or shadow. Note that if it is placed in a shaded area, the performance
may be dramatically reduced. In winter months or on cloudy days, the time required to fully
charge the battery(s) will increase.
3
Page 4
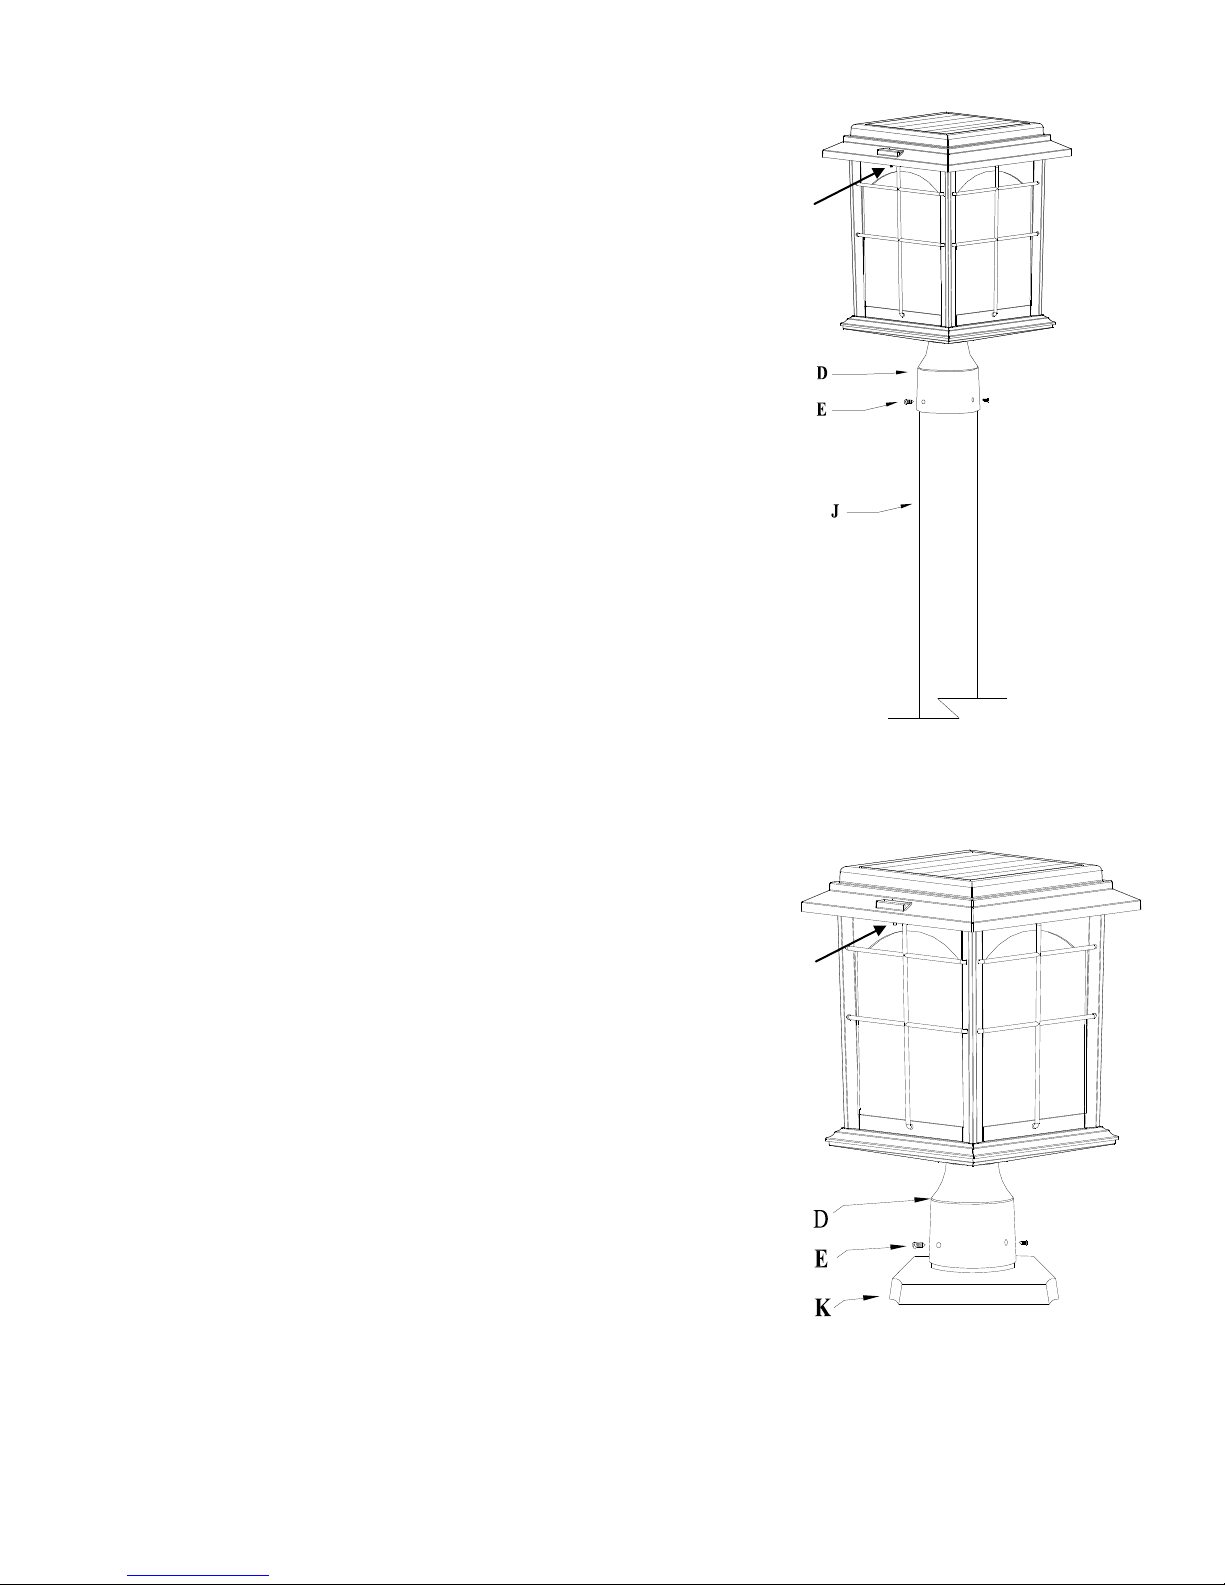
Assembly / Installation for Post Mounting:
1. Place mounting collar (D) of post lantern over
the top of 3-inch diameter pole (J) (sold
separately).
2. Tighten 3 set screws (E) against pole.
3. Alternative Securement: Remove set screws
(E) and mark hole locations with marker. Drill
holes in pole and secure mounting collar by
screwing set screws into holes drilled into pole.
4. Set switch (H) located on the bottom plate
under top cap to AUTO position and allowed to
charge a full sunny day. The AUTO position
automatically turns the unit ON at dusk.
Assembly / Installation for Surface Mounting:
1. Place mounting collar (D) of post lantern onto the
fixed 3-inch diameter pier base (K) (sold
separately).
2. Secure mounting collar (D) to pier base (K) with
3 set screws (E).
3. Alternate Securement: Refer to Step 3 of Post
Mounting instructions.
4. Set switch (H) located on the bottom plate under
top cap to AUTO position and allowed to charge a
full sunny day. The AUTO position automatically
turns the unit ON at dusk.
H
H
ASSEMBLY / INSTALLATION INSTRUCTIONS:
4
Page 5

FREQUENT ASKED
QUESTIONS
ANSWERS
Light(s) not ON or
Light(s) Flashing or
Blinking On/Off
a) Make sure unit is placed under direct sunlight to charge
and not in a shaded or partially shaded area.
b) Prior to use, for units with an AUTO/OFF switch, check
that the unit has been set to AUTO (or ON) position and
allowed to charge a full sunny day. The AUTO position
automatically turns the unit ON at dusk. For units without
an AUTO/OFF switch, remove battery isolator tag and
allowed to charge a full sunny day.
c) Your solar light is equipped with a photosensor that
shuts the light off during the day. If the solar light is
placed too close to another light source, it may detect the
light and prevent the unit from turning on. Avoid placing
the solar light near other light sources.
d) For best performance, replace with rechargeable 3.2V
LiFePO4 battery every 3 years or when performance
diminishes. The 26650 LiFePO4, 3000mAH, 3.2V
rechargeable battery Model 46240-000RB is available at
www.creative-prc.us, CustomerService@creative-prc.us, or
by phone at 830-249-1200.
Will rain or sprinklers
damage my solar lights?
Your solar lights are designed for outdoor use in all
climates. Rain and sprinklers will not damage your solar
lights.
Why do my solar lights
seem to be on shorter in
the winter months?
The normal charging time for solar lights is decreased in
the winter months due to the shorter days and longer
nights. Expect your solar light performance to diminish in
the winter months.
PRODUCT MAINTENANCE:
1. Remove the plastic film on the solar panel before using. The solar panel should be cleaned
periodically with a damp cloth to help maintain optimum performance.
2. Do not use any cleaners with chemicals, solvents or harsh abrasives.
3. When storing any solar product for an extend period of time, be sure to remove the batteries.
Storing any solar product without regular recharge or removal could cause permanent
damage to the rechargeable batteries.
TROUBLESHOOTING:
5
Page 6

MANUEL D'INSTRUCTIONS
Lanterne solaire pour poteau
Home Depot UGS 414-713 (CUP 609839462401)
6
Page 7

Tournevis
Perceuse
Merci d'avoir acheté ce nouveau luminaire solaire. Nous sommes très fiers de vous fournir un
luminaire solaire écologique de qualité supérieure. Cette fiche d'instructions décrit quelques
étapes simples pour tirer le plus de satisfaction de votre luminaire solaire et en assurer la
longévité maximale.
CARACTÉRISTIQUES :
1. Structure pour l'extérieur en aluminium coulé durable et fini attractif en fer vieilli à
l'épreuve des intempéries.
2. Fournie avec 23 DEL blanc chaud émettant jusqu'à plus de 100 lumens
3. Verre granuleux qui crée un effet diffus lorsqu'il est illuminé.
4. Comprend une pile rechargeable au phosphate de lithium.
5. Parfaite pour une installation près des voies d'accès pour voitures, des chemins d'accès, des
terrasses, des jardins et des espaces de vie en plein air.
6. Adaptée à un poteau rond de 7,62 cm de diamètre ou un socle de pilier.
QUESTIONS, PROBLÈMES, PIÈCES MANQUANTES :
Si vous rencontrez des problèmes avec votre lanterne solaire pour poteau, avant de retourner à
votre magasin Home Depot, veuillez communiquer avec le service à la clientèle à
CustomerService@Creative-prc.us ou au 830-249-1200. Veuillez indiquer l'UGS 414-713 de
la lanterne solaire pour poteau quand vous communiquez avec un représentant du service à la
clientèle.
OUTILS REQUIS POUR L’INSTALLATION :
ATTENTION :
Votre luminaire solaire peut ne pas fonctionner à une température inférieure à -20 º C ou
supérieure à 60 ºC.
PIÈCES COMPRISES POUR L’ASSEMBLAGE / L'INSTALLATION :
Avant de commencer à assembler la lanterne solaire pour
poteau, assurez-vous qu'il ne manque aucune pièce d'après la
liste illustrée et le schéma. Si des pièces manquent ou sont
endommagées, veuillez communiquer avec le service à la
clientèle à CustomerService@Creative-prc.us ou au
830-249-1200.
A. Couvercle supérieur (1)
B. Vis de verrouillage (2)
C. Boîtier (1)
D. Col de montage (1)
E. Vis à pression (3)
7
Page 8

INSTRUCTIONS DE CHARGEMENT :
ENTRETIEN DE LA PILE :
Utilisez une pile rechargeable au phosphate de lithium (LiFePO4) modèle 26650, de
3000mAh, 3,2 V. Pour un meilleur rendement, remplacez la pile rechargeable LiFePO4 de
3,2 V par une pile identique tous les trois ans ou lorsque son rendement diminue. Reportezvous aux étapes suivantes et aux illustrations fournies pour changer la pile.
1. Desserrez les 2 vis de verrouillage (B), retirez le couvercle supérieur (A) du boîtier (C).
2. Retirez le couvercle du compartiment à pile (F) du couvercle supérieur (A) en desserrant les
4 vis (G) comme illustré dans le schéma ci-dessous. REMARQUE : Pour réduire le risque
de dommages aux connexions électriques, faites attention lorsque vous séparez le couvercle
du compartiment à pile (F) du couvercle supérieur (A).
3. Déconnectez la connexion du fil conducteur de la pile (I) et retirez la vieille pile du
compartiment à pile situé sur le couvercle du compartiment à pile (F) comme illustré dans
le schéma ci-dessous. Remplacez-la par une pile rechargeable au phosphate de lithium
(LiFePO4) modèle 26650, de 3000mAh, 3,2 V.
4. Remontez le couvercle du compartiment à pile (F) et le couvercle supérieur (A), avec les
vis (B et G).
IMPORTANT : Utilisez seulement une pile rechargeable. La ou les piles doivent être
recyclées ou jetées de manière appropriée. La pile de rechange modèle 46240-000RB est
disponible à www.creative-prc.us ou par courriel à CustomerService@Creative-prc.us.
Tous les luminaires solaires ont besoin de recevoir une quantité suffisante de lumière solaire
pour recharger la ou les pile(s). Le rendement lumineux d'un luminaire solaire est fonction de la
quantité de lumière reçue pendant le jour. Votre luminaire solaire peut fonctionner jusqu'à
10 heures s'il est complètement chargé. Positionnez votre luminaire solaire dans un
emplacement dégagé, sans ombre. Sachez que si vous le placez dans un emplacement ombragé,
son rendement peut être considérablement diminué. Pendant les mois d'hiver ou les jours à
couvert nuageux, le temps nécessaire à une charge complète de la ou des pile(s) augmentera.
8
Page 9

Assemblage /Installation sur un poteau :
1. Placez le col de montage (D) de la lanterne
pour poteau par dessus le haut d'un poteau de
7,62 cm (3 po) de diamètre (J) (vendu
séparément).
2. Serrez les 3 vis à pression (E) contre le poteau.
3. Autre méthode de fixation : Retirez les vis à
pression (E) et marquez l'emplacement des
trous avec un marqueur. Percez des trous dans
le poteau et fixez solidement le col en vissant
les vis à pression dans les trous percés dans le
poteau.
4. Placer le commutateur (H) situé sur la plaque
de fond en vertu de capuchon supérieur à la
position AUTO et laissez le luminaire se
charger pendant une journée ensoleillée
complète. La position AUTO allume
automatiquement le luminaire au crépuscule.
Assemblage /Installation en surface :
1. Placez le col de montage (D) de la lanterne pour
poteau sur le socle d'un pilier fixe de 7,62 cm
(3 po) de diamètre (K) (vendu séparément).
2. Fixez solidement le col de montage (D) au socle
du pilier (K) avec 3 vis à pression (E).
3. Autre méthode de fixation : Reportez-vous à
l'étape 3 des instructions de montage sur un
poteau.
4. Placer le commutateur (H) situé sur la plaque de
fond en vertu de capuchon supérieur à la position
AUTO et laissez le luminaire se charger pendant
une journée ensoleillée complète. La position
AUTO allume automatiquement le luminaire au
crepuscule.
H
H
INSTRUCTIONS D’ASSEMBLAGE ET
D’INSTALLATION :
9
Page 10

ENTRET IEN DU PRODUIT :
FOIRE AUX
QUESTIONS
RÉPONSES
La ou les lumières ne
s'allument pas ou
clignotent ou s'allument et
s'éteignent
a) Assurez-vous que le luminaire est exposé à la lumière
solaire directe et n'est pas placé dans un endroit ombragé ou
partiellement ombragé.
b) Avant de les utiliser, pour les luminaires avec un
interrupteur AUTO/ARRÊT, vérifiez que cet interrupteur est
sur la position AUTO (ou MARCHE) et laissez le luminaire se
charger pendant une journée ensoleillée complète. La position
AUTO allume automatiquement le luminaire au crépuscule.
Pour les luminaires sans interrupteur AUTO/ARRÊT, retirez
l'étiquette isolante de la pile et laissez le luminaire se charger
pendant une journée ensoleillée complète
c) Le luminaire solaire est équipé d'un capteur optique qui
l'éteint pendant la journée. Si le luminaire solaire est placé
trop près d'une autre source de lumière, il peut la détecter et ne
pas s'allumer. Évitez de placer le luminaire solaire près
d'autres sources de lumière.
d) Pour un meilleur rendement, remplacez la pile rechargeable
LiFePO4 de 3,2 V par une pile identique tous les trois ans ou
lorsque son rendement diminue. La pile de rechange LiFePO4
26650, 3000mAH, 3,2 V, modèle 46240-000RB est disponible
à www.creative-prc.us, CustomerService@creative-prc.us, ou
par téléphone au 830-249-1200.
La pluie ou les gicleurs
endommageront-ils mes
luminaires solaires?
Les luminaires solaires sont conçus pour un usage à l'extérieur
sous tous les climats. La pluie ou les gicleurs n'abîmeront pas
les luminaires solaires.
Pourquoi les luminaires
semblent s'allumer moins
longtemps en hiver?
Le temps normal de charge pour les luminaires solaires est
raccourci pendant les mois d'hiver du fait des jours plus courts
et des nuits plus longues. Attendez-vous à un rendement
diminué des luminaires solaires pendant les mois d'hiver.
1. Retirez le film en plastique du panneau solaire avant de l'utiliser. Le panneau solaire doit
être nettoyé régulièrement avec un linge humide pour l'aider à conserver son rendement
optimal.
2. N’utilisez jamais de nettoyant contenant des produits chimiques, des solvants ou des abrasifs
corrosifs.
3. Lors du rangement prolongé de tout produit solaire, veillez à retirer les piles. Ranger tout
produit solaire sans une recharge régulière des piles ou sans les retirer pourrait endommager
de façon permanente les piles rechargeables.
DÉPANNAGE :
10
Page 11

MANUAL DE INSTRUCCIONES
Farol de Poste Solar
Home Depot SKU 414-713 (UPC 609839462401)
11
Page 12
Gracias por comprar esta nueva lámpara solar. Nos enorgullece sobremanera ofrecerte una
Destornillad
Taladro
lámpara solar de calidad superior, que no daña el medio ambiente. En esta hoja de
instrucciones hay varios pasos simples para obtener el mayor disfrute y duración de tu lámpara
solar.
CARACTERÍSTICAS:
1. Estructura de aluminio fundido resistente para exteriores y acabado atractivo de hierro
envejecido para todo tipo de climas.
2. Incluye 23 bombillas LED blanco cálido de hasta 100 o más lúmenes de alta intensidad.
3. El cristal de textura granulada crea un efecto difuso cuando se ilumina.
4. Incluye Batería Recargable de Fosfato de Litio.
5. Perfecto para Instalar cerca de entradas para autos, senderos, terrazas, jardines y espacios de
estar en exteriores.
6. Sirve en varas redondas y pilares de 7,62 cm.
PREGUNTAS, PROBLEMAS O PIEZAS FALTANTES:
Si experimentas problemas con tu farol de poste solar, antes de regresar a tu tienda local de The
Home Depot, por favor, contacta a nuestro departamento de Servicio al Cliente a través de
CustomerService@Creative-prc.us o llama al 830-249-1200. Por favor usa como referencia el
SKU 414-713 Farol de Poste Solar cuando hables con un representante de Servicio al Cliente.
HERRAMIENTAS NECESARIAS PARA LA INSTALACIÓN:
PRECAUCIÓN:
Tu lámpara solar puede no funcionar a temperaturas inferiores a -4ºF(-20ºC) o superior a los
140ºF(60ºC).
PIEZAS INCLUIDAS PARA EL ENSAMBLAJE/INSTALACIÓN:
Antes de comenzar a ensamblar tu farol de poste solar,
asegúrate de que todas las piezas estén presentes como se
muestra en la lista de piezas y el diagrama. Si hay piezas
faltantes o dañadas, por favor, contacta al departamento de
Servicio al Cliente a través de CustomerService@Creativeprc.us o llama al 830-249-1200.
A. Ensamblaje de la Tapa Superior (1)
B. Tornillo de Cierre (2)
C. Carcasa (1)
D. Collarín de Montaje (1)
E. Tornillo de Ajuste (3)
INSTRUCCIONES DE CARGA:
12
Page 13

INSTRUCCIONES DE MANTENIMIENTO DE LA BATERÍA:
Usa una batería recargable 26650 de Fosfato de Litio (LiFePO4), de 3000 mAh y 3,2 V. Para
un mejor funcionamiento, reemplaza con baterías LiFePO4 recargables de 3.2V cada 3 años o
cuando el rendimiento disminuya. Sigue los pasos a continuación y consulta la ilustración
incluida para reemplazar la batería.
1. Afloja los 2 tornillos de cierre (B), y saca el ensamblaje de la tapa superior (A) de la carcasa (C).
2. Saca la placa de cubierta de la batería (F) del ensamblaje de la tapa superior (A) aflojando los 4
tornillos (G) como se muestra en el diagrama a continuación. NOTA: Para reducir el riesgo de
daño a las conexiones eléctricas, toma precaución al separar la placa de cubierta de la batería (F)
del ensamblaje de la tapa superior (A).
3. Desconecta la conexión de cable del plomo de la batería (I) y quita la batería vieja del
compartimiento ubicado en la placa de cubierta de la batería (F) como se muestra en el diagrama a
continuación. Reemplaza con un paquete de baterías recargables 26650 de Fosfato de Litio
(LiFePO4), de 3000 mAh y 3,2 V.
4. Reensambla la placa de cubierta de la batería (F) y la tapa superior (A), con tornillos (B y G).
IMPORTANTE: Usa Sólo Baterías Recargables. La(s) batería(s) debe reciclarse o
desecharse de forma adecuada. El modelo de reemplazo de la batería 46240-000RB está
disponible en www.creative-prc.us o enviando un correo electrónico a
CustomerService@Creative-prc.us.
Todas las lámparas solares requieren una cantidad suficiente de luz solar para recargar la o las
baterías. El rendimiento de la iluminación por luz solar está basado en la cantidad de luz
recibida durante el día. Tu Lámpara Solar puede durar encendida hasta 10 horas cuando está
cargada completamente. Coloca tu lámpara solar en un área que no esté cubierta o a la sombra.
Observa que si se coloca en un área de sombra, el rendimiento se reducirá considerablemente.
En los meses de invierno o en días nublados, el tiempo requerido para cargar la(s) batería(s)
aumentará.
13
Page 14

INSTRUCCIONES DE ENSAMBLAJE/
Ensamblaje/Instalación para Montaje del
Poste:
1. Coloca el collarín de montaje (D) del farol de
poste sobre la parte superior del poste de 7,62
cm de diámetro (J) (vendido por separado).
2. Aprieta los 3 tornillos de ajuste (E) contra el
poste.
3. Fijación Alternativa: Quita los tornillos de
ajuste (E) y marca las ubicaciones de los
orificios con un marcador. Taladra los orificios
en el poste y asegura el collarín de montaje
apretando los tornillos en los orificios
taladrados en el poste.
4. Ponga el interruptor (H) ubicado en la placa
inferior debajo de la tapa de arriba a la posición
AUTO y deja que se carguen durante todo un
día soleado. La posición de AUTO enciende
automáticamente la unidad al anochecer.
Ensamblaje/ Instalación sobre Superficie
1. Coloca el collarín de montaje (D) del farol de
poste sobre la base del pilar fija de 7,62 cm de
diámetro (K) (vendido por separado).
2. Asegura el collarín de montaje (D) a la base del
pilar (K) con 3 tornillos de ajuste (E).
3. Fijación Alternativa: Consulta el Paso 3 de las
instrucciones de Montaje del Poste.
4. Ponga el interruptor (H) ubicado en la placa
inferior debajo de la tapa de arriba a la posición
AUTO y deja que se carguen durante todo un día
soleado. La posición de AUTO enciende
automáticamente la unidad al anochecer.
H
H
INSTALACIÓN:
14
Page 15

MANTENIMIENTO DEL PRODUCTO:
PREGUNTAS
FRECUENTES
RESPUESTAS
La Luz o Luces no
Encienden o las Luces
Parpadean o Se Apagan
y se Encienden.
a) Asegúrate de que la unidad esté ubicada bajo luz solar directa
y no en un área de sombra parcial o total.
b) Antes de usar, en unidades que tengan un interruptor de
Apagado/Encendido, chequea que la unidad esté en la posición
de AUTO (o Encendido) y deja que se carguen durante todo un
día soleado. La posición de AUTO enciende automáticamente
la unidad al anochecer. Para unidades sin un interruptor de
AUTO/APAGADO, quita la etiqueta aislante de la batería y
deja que se cargue durante todo un día soleado.
c) Tu lámpara solar está equipada con un fotosensor que apaga
la luz durante el día. Si la lámpara solar se coloca muy cerca de
otra fuente de luz, puede detectar la luz y evitar que la unidad
se encienda. Evita colocar la lámpara solar cerca de otras
fuentes de luz.
d)Para un mejor funcionamiento, reemplaza con baterías
LiFePO4 recargables de 3,2V cada 3 años o cuando el
rendimiento disminuya. El modelo de reemplazo de la batería
26650 LiFePO4 de 3000 mAH y 3,2 V está disponible en
www.creative-prc.us, CustomerService@creative-prc.us, o por
vía telefónica llamando al 830-249-1200.
¿La lluvia o los
rociadores dañarán mis
lámparas solares?
Tus lámparas solares están diseñadas para uso en exteriores en
todo tipo de clima. La lluvia o los rociadores no dañarán tus
lámparas solares.
¿Por qué mis lámparas
solares parecen durar
menos durante los meses
de invierno?
El tiempo normal de la carga para las lámparas solares
disminuye durante los meses de invierno debido a que los días
se acortan y las noches se alargan. Es de esperarse que el
rendimiento de tu lámpara solar disminuya durante los meses de
invierno.
1. Quita la película de plástico del panel solar antes de usarlo. El panel solar debe limpiarse
periódicamente con un paño húmedo para ayudar a mantener un rendimiento óptimo.
2. No uses limpiadores con químicos, solventes ni productos abrasivos.
3. Cuando almacenes cualquier producto solar durante un largo período de tiempo, asegúrate
de quitar las baterías. Almacenar cualquier producto solar sin cargarlo regularmente o quitar
las baterías puede dañarlas permanentemente.
SOLUCIÓN DE PROBLEMAS:
15
 Loading...