

HAMPTON BAY SKU 240-336, SKU 240-339, SKU 433-659 User Manual
Page
1
INSTRUCTIONMANUAL
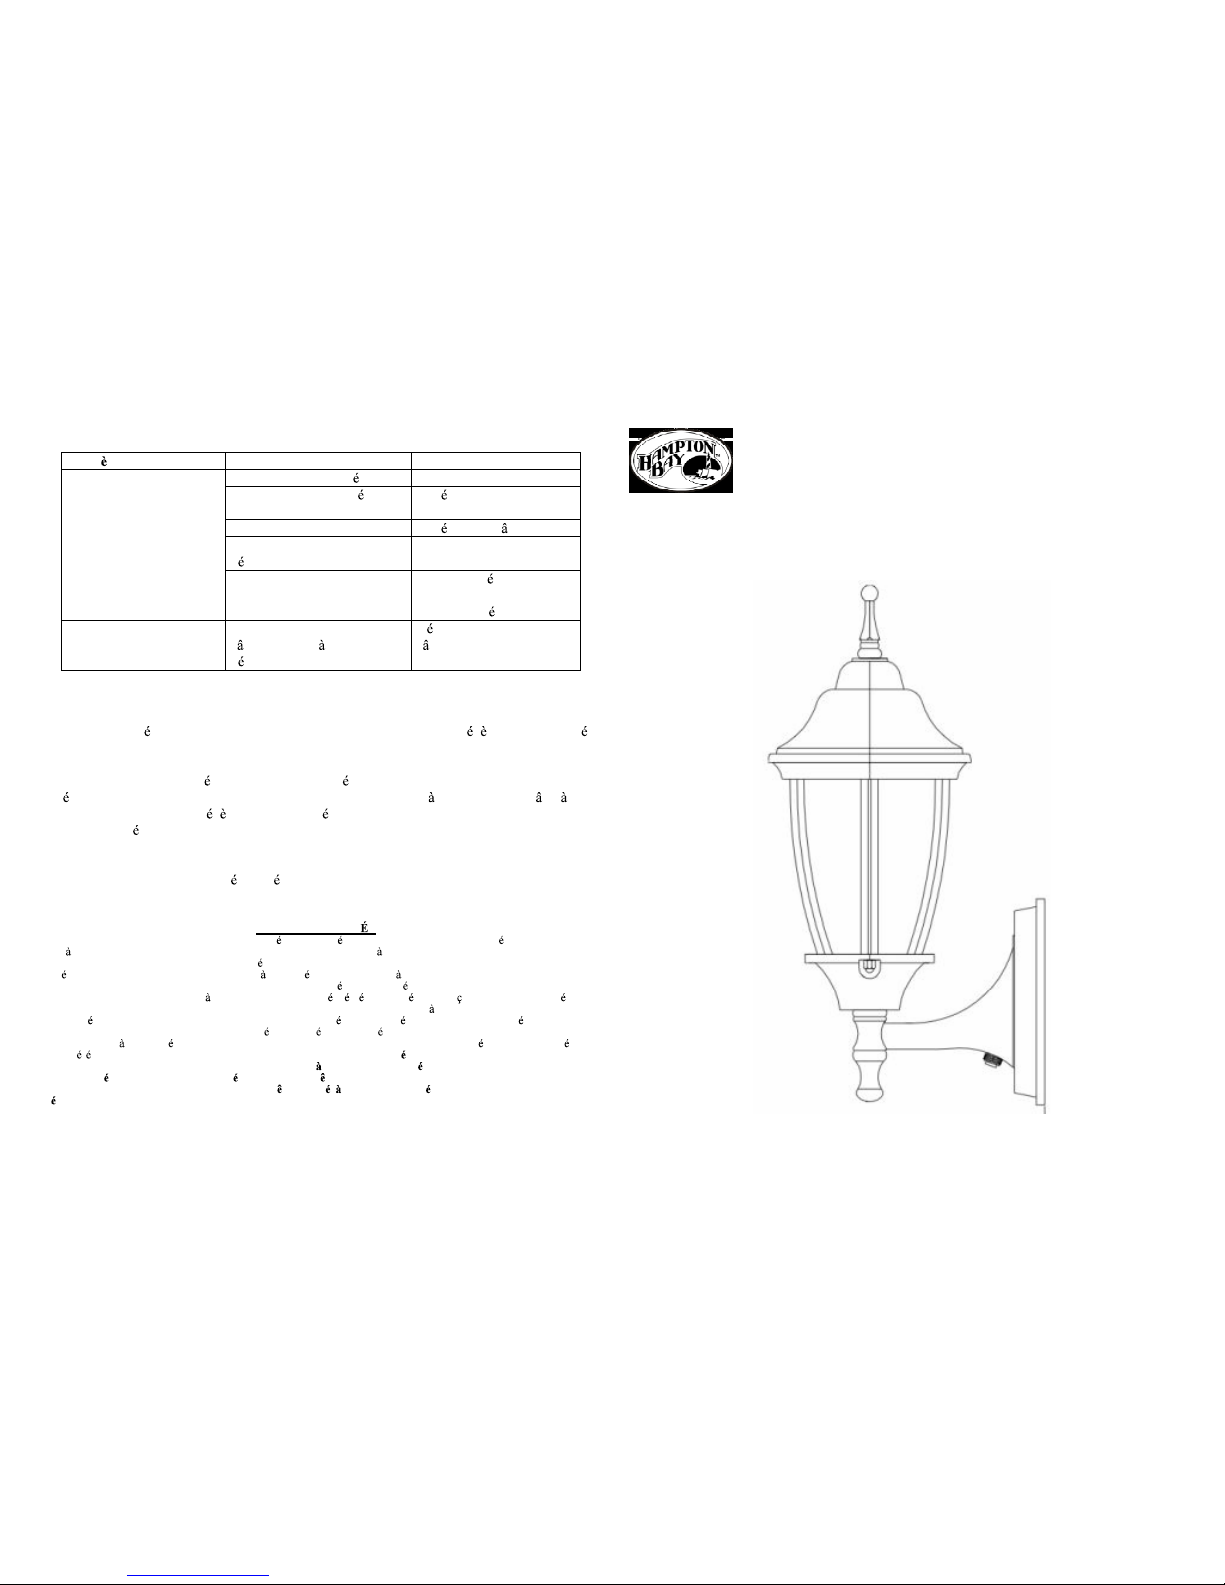
1LTExteriorWall LanternwithPhotocell
HomeDepotSKU 240-336 (UPC 725916814205)(blackfixture)
Home DepotSKU 240-339 (UPC 725916814212)(whitefixture)
HomeDepotSKU 433-659 (UPC 6940500311234) (bronzefixture)
Page 24
SOLUTIONSDEDEPANNAGE:
ENTRETIENDU PRODUIT:
1. Nettoyezl'ext rieur duluminaireavec un chiffonpropreetsec ou l g rementhumidifi
(utilisezde l'eaupropre,pasdesolvant)pouressuyerleverreetlasurface.
2. Avant denettoyer l'int rieurduluminaire, dconnectez l'alimentationdecelui-cien
teignantledisjoncteurouenenlevantlefusibleducoffret fusible.Puis,gr ce un
chiffon propresecou l g rement humidifi (utilisezdel'eaupropre,pasdesolvant),
essuyez l'int rieurduverreetlasurfaceinterne duluminaire.
3. Nepasutiliserdenettoyantchimiques,desolvantsou d'abrasifs durs.Utilisez seulement
un chiffon douxetsec pour d poussi rer ou essuyer.
GARANTIELIMIT E
Lefabricantgarantitce luminairecontretout d fautdemat riaux,defabricationpourune p riodedetrois (3)
ans partirdeladate d'achat.Cettegaranties'appliqueseulement l'acheteur d'origine et seulementpour un
usagenormal duproduit.Si leproduitest d fectueux,l'uniqueobligationdufabricant,etvotreseulrecours, est
la r parationouleremplacementduproduit ladiscr tiondufabricant, condition que le produitn'estpassubi
demauvaisusage,d'abus, d'accident,de modifications,d'alt rations,de n gligences ou demauvaiseutilisation.
Cette garantie nes'appliquepas tout produit mal install , r gl ouutilis d'une fa onautrequecelle d crite
danslesinstructionsaccompagnant le produit.Cettegarantie nes'appliquepas unmauvais fonctionnementdu
produit r sultantd'unaccident,mauvaiseutilisation,abus, n gligence, alt ration, ou installation d fectueuse,ou
toutautremauvais fonctionnement non caus par un d fautdemat riauxoudefabrication.Cette garantie ne
s'appliquepas lacosm tiquedetoute partieduproduittel quesasurfaceet/oula d coloration, ceci tant
consid r comme uneusurenormale. Le fabricantne garantitpaset d clinetouteautregarantie,expresse
ouimplicite,ycomprisles garanties de convenance unautreusage sp cifique noninclus ci dedans. Le
fabricant d cline touteresponsabilit etneserapas tretenuresponsablepourtoutdommageouperte
indirecteouaccessoire, incluant,maissans trelimit ,lesfraisengag sdansleremplacementoula
r parationduditproduit.
Probl me Cause Possible Mesure Corrective
1. L'ampouleestgrill e. 1.Remplacez l'ampoule.
2. Lecourantestcoup . 2. V rifiezsilecourant est
soustension.
3.Mauvaiseconnexiondefil.3. V rifiezle c blage.
4.Interrupteurmural
d fectueux.
4.Testezouremplacez
l'interrupteur.
L'ampoulenes'allume
pas.
5.CullulePhoto 5.Sila journ e,couvrez
CullulePhoto aveclamain
ouduruban lectrique.
Lefusiblesaute ou le
disjoncteurdisjoncte lors
del'allumage.
Mauvaiseconnexiondes
c bles ou mise terre
d fectueuse.
V rifiezlesconnexionsdes
c bles.
Page
23
INSTALLATION:
Page 2
ThankyouforpurchasingthisHamptonBayexteriorwalllantern.This
producthasbeenmanufacturedwiththehigheststandardsof safetyand
quality.The finishofthislanternisweatherresistant butover timewill
naturallyweatherandfade.Thisfixtureisequippedwithanenergy saving
dusk-to-dawnphotocell.If thepowerisleft on,thefixturewillautomatically
turn on at duskand offatdawn.
FEATURES:
1. Energy savingfixtureconservesenergybyautomaticallyturninglightonat
duskand offatdawn.
2. Thisfixturehasbeenengineeredto safelyuse up toa100wattmedium
baseincandescentlight bulb(do notexceed100watts)(notincluded)or
equivalentstandardbasecompactfluorescentlight bulb (notincluded).
3. The dusk-to-dawnfeatureautomaticallyilluminatesyour homeatnightfor
addedsecurity.
QUESTIONS,PROBLEMS,MISSINGPARTS:
BeforereturningtoyourlocalHomeDepot,please call ourCustomerService
Teamat1-877-527-0313 orvisit www.homedepot.com.Pleasereferenceyour
SKU (240-336 blackfixture,240-339 whitefixture, 433-659 bronze fixture)
orUPC (725916814205 black fixture, 725916814212 white fixture,
6940500311234 bronze fixture)

Page
3
CAUTION:
1. Beforestarting installationofthisfixtureorremovalofapreviousfixture,
disconnectthepowerbyturning offthecircuit breakerorbyremoving the
fuseat thefusebox.
2. CONSULTAQUALIFIED ELECTRICIAN IF YOU HAVE ANY
ELECTRICAL QUESTIONS.
3. Ifyou haveany non-electricalquestionsaboutthisfixture,pleasecontact
our Customer Service Team at 1-877-527-0313 or visit
www.homedepot.com.PleasereferenceyourSKU (240-336 blackfixture,
240-339 whitefixture, 433-659bronzefixture)orUPC(725916814205
blackfixture,725916814212 whitefixture, 6940500311234 bronze
fixture).
4. Keepyour receiptand these InstructionsforProofofPurchase.
TOOLSREQUIREDFORASSEMBLY & INSTALLATION
(not included):
LightBulb Safetygoggles Ladder Gloves Wirestrippers
(100 wattmaximum)
(orCFLequivalent)
Flatheadscrewdriver Phillipsscrewdriver Electricaltape Wirecutters SiliconRubberSealant
forexterioruse
Page 22
PIECESINCLUSESP
OURL'INSTALLATION(lespicesnesontpasl'chelle):
1x VisTerre (#11) 2xVis Bo te deSortie (#12) 2xVisdeMontage(#13)
1x Entretoise(#14) 2x Serre-Fils (#15) 2x croudeVerrouillage (#18)
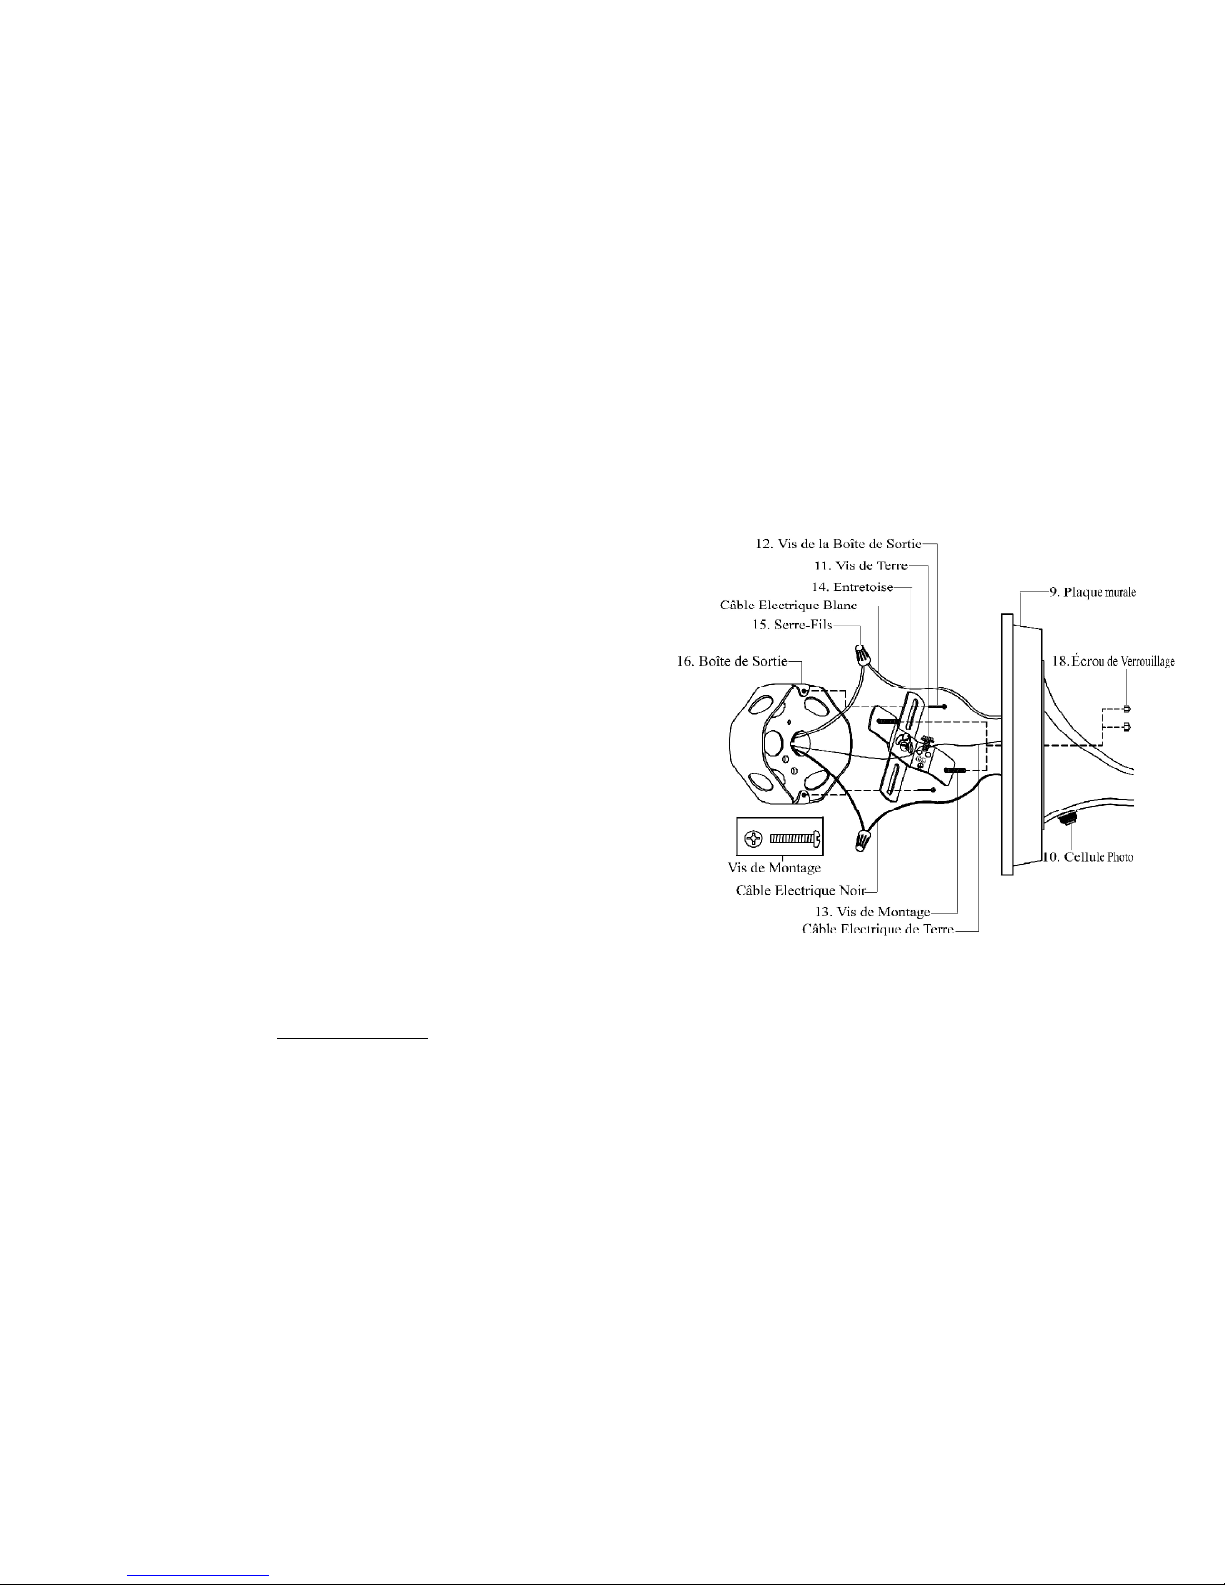
INSTRUCTIONSD'INSTALLATION:
1. VisserlesdeuxVisdeMontage(#13)surlaEntretoise(#14).FixerlaEntretoise(#14)sur
la Bo tedeSortie(#16) gr ceauxdeuxVisde Bo tedeSortie(#12).[S'assurerquele
filetagedesVisdeMontage(#13)faitface l'ext rieurquandlaEntretoise(#14)est
attach e la Bo tedeSortie(#16).]
2. Enroulerle c ble lectriquedeterreduluminaireautourdelaVisdeTerre(#11) pr sente
surlaSangledeMontage(#14),et puisconnecterle c ble lectriquedeterredu luminaire
celui dela Bo tedeSortie(#16). Connecterle c blesansmarque crite(avecdes
nervuresenrelief)duluminaireau c ble blancdela Bo tedeSortie(#16).Connecterle
c bleavec unemarque critedu luminaireau c blenoirdela Bo tedeSortie(#16).
Couvrirlesconnecteurs gr ceauxSerre-Fils(#15). Envelopperlesconnexionsdes c bles
avec du rubanadh sifisolant pourunemeilleureconnexion.Placerles c bles l'int rieur
dela Bo tedeSortie(#16). Note:Sivousavezdesquestionsrelatives l' lectricit ,
consultezvotrecode lectrique localconcernant les m thodesdemise terreenvigueur.
3. Installerlecorpsdu luminaireaumurenfaisantpassercompl tement lesVisdeMontage
(#13)protub rantesparlestrousdelaPlaquedeMur(#9).Veillez nepaspincerles
c blessitu sentrele luminaireetla Bo tedeSortie(#16).Bienfixerleluminaireau mur
envissantlesdeuxEcrousdeBlocage(#7)surlesdeuxVisdeMontage(#13).
4.Unefoisle luminaire install surlemur,colmater l'espaceentrelemuretles3/4sup rieurs
delaPlaqueMurale(#9) pouremp cherl'eaudefiltrerdansla Bo tedeSortie(#16).
Laisserle1/4inf rieurnoncolmat pour pouvoir vacuer touteeauayantpu p n trerdans
le bo tier.
5. L'installationestachev e.Remettrelecourantau disjoncteur ou la bo te fusible.
Appuyezsurl'interrupteurdelumi repourallumerle luminaire.
6. L'ampoulenes'allumerapass'ilfait jour.Pourtesterleluminaire,recouvrirlaCellule
Photo(#10)avecdurubanisolantafin d'allumerl'ampoule.Enleverlerubanisolant apr s
s' treassur quel'ampoules'allume.
Page
21
ASSEMBLAG
E:
Page 4
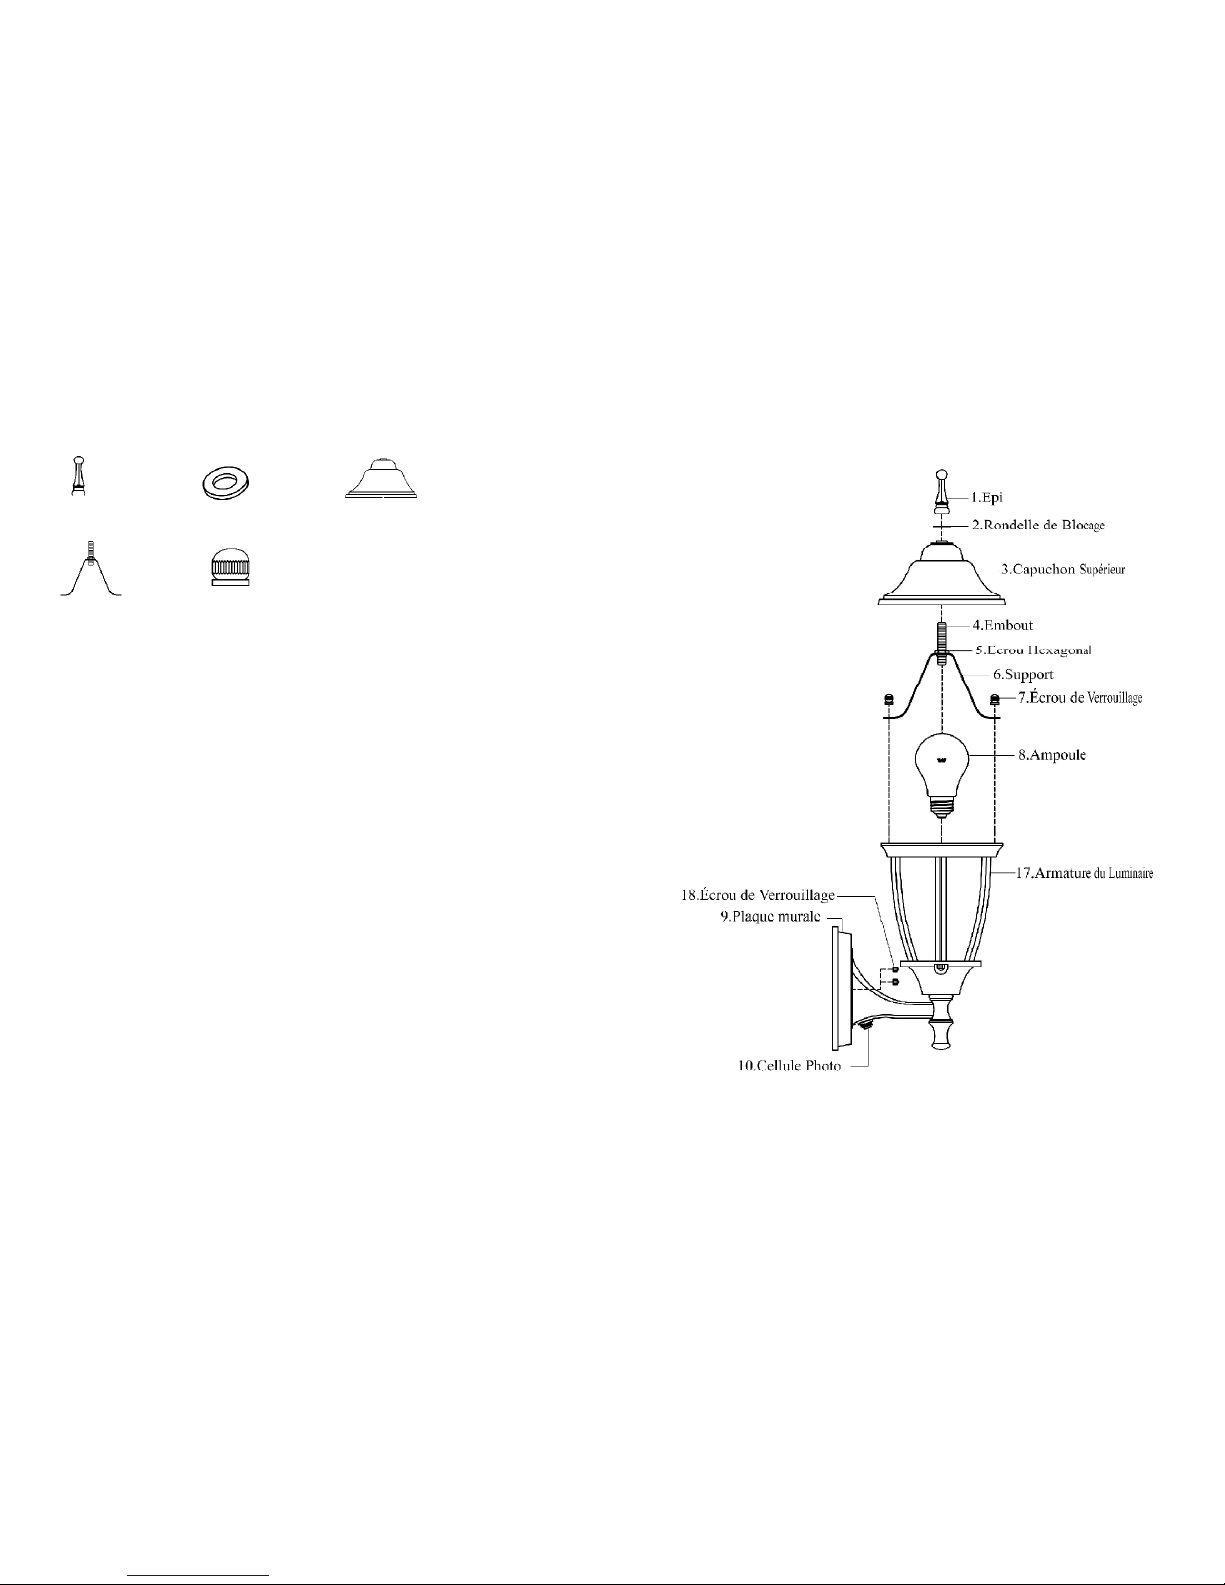
PARTSINCLUDEDFORASSEMBLY (partsareno
t toscale
):
1eaFinial (#1) 1ea LockWasher(#2) 1ea TopCover (#3)
1ea Nipple(#4) 2eaLockNuts(#7)
1ea HexNut (#5)
1eaHarp(#6)
ASSEMBLYINSTRUCTIONS:
1. Carefully unpack thefixture.Lay outallpartsonacleansurface.
2. Installuptoa100 watt incandescentLightBulb(#8)(notincluded)or
ListedSBCFL(Self-BallastedCompactFluorescentLamp)(notincluded)
inthesocketintheFixtureFrame(#17).Do notexceeda100 watt
incandescent light bulb,ora32 watt SBCFL.
3. PlacetheNipple(#4) ontotheHarp(#6)by screwing theHexNut(#5)into
position.AttachtheHarp(#6)andtheNipple(#4)tothefixtureby
screwing thetwoLock Nuts (#7) intoplace.
4. PlacetheTop Cover(#3)and thentheLockWasher(#2) overtheNipple
(#4).SecuretheTop Cover(#3)by screwing theFinial(#1)totheend of
theNipple (#4).
 Loading...