

Page 1
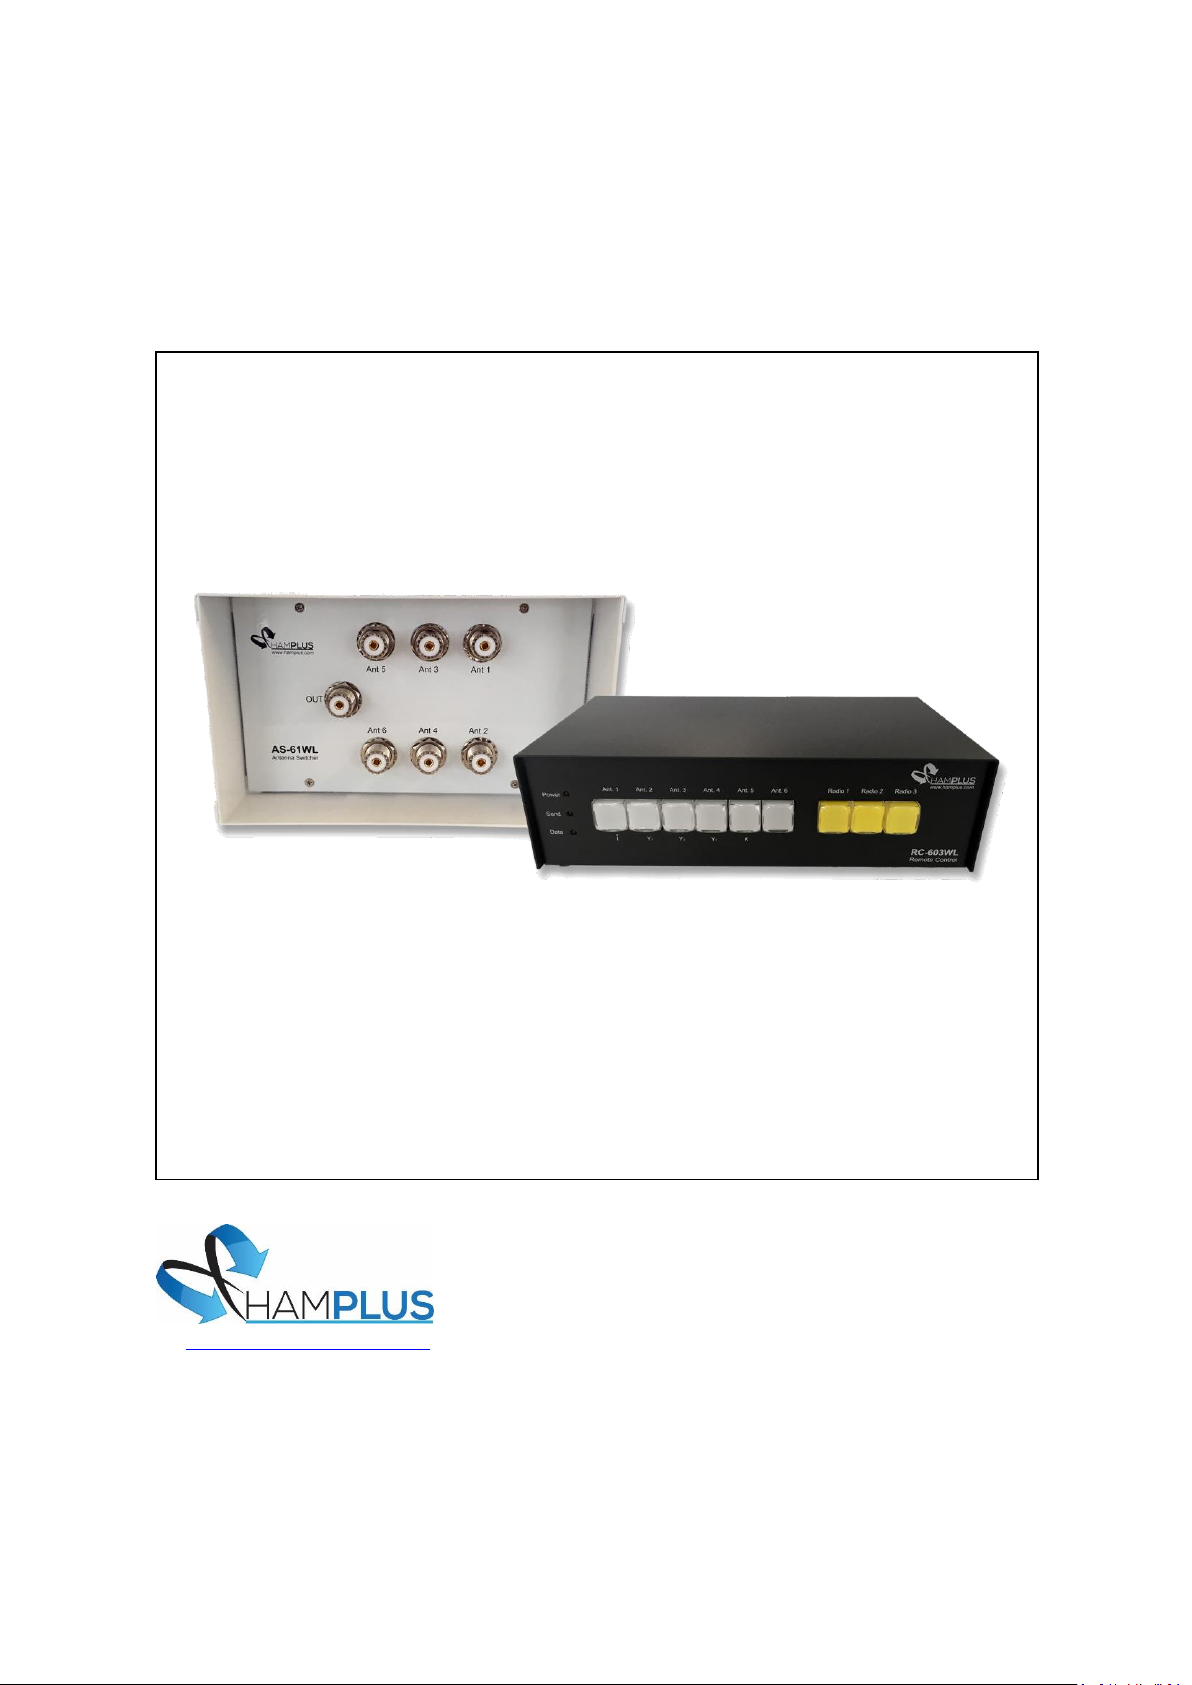
AS-61WL / RC-603WL ANTENNA SWITCH
http://www.hamplus.com
Operation Manual
V. 1.8
Page 2

AS-61WL / RC603WL
Operation Manual
Automatic Antenna Switch 6x3
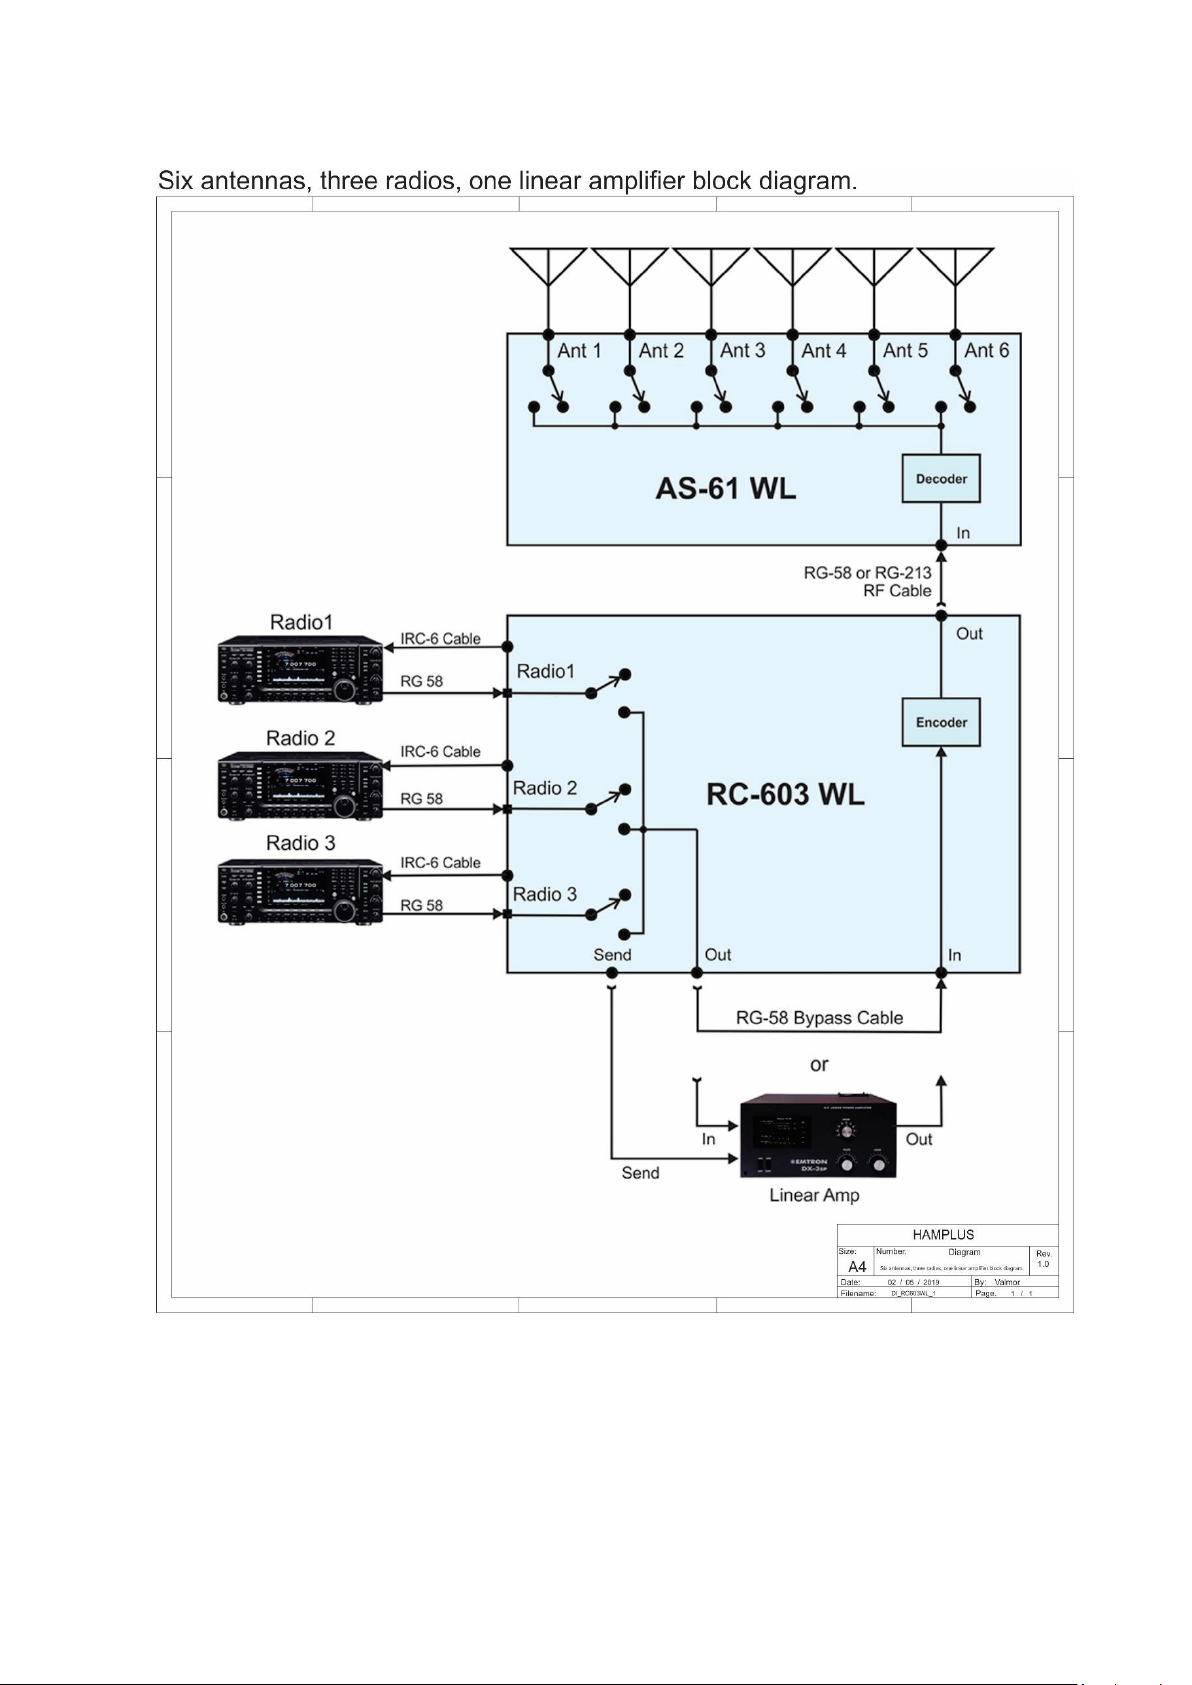
The AS-61WL/RC-603WL is an automatic antenna switch for three radios and six
antennas. There are two independent boxes, one for the antenna switch that is near the
antennas, AS-61WL, and another box with the Push Buttons for the selection of the
antennas and the Radios, RC-603WL that is next to the Radio. The connection between the two
boxes is only made with the RF cable (RG-58 or RG-213). This cable takes RF, power and the
necessary commands for the perfect operation of this system. The RC-603WL also allows the
insertion of a linear amplifier or a wattmeter, or both. In this way these equipment will always
be connected with the Radio and the antenna selected. The operation is individual, which means
that only the selected radio will have access to the antennas. Unused antennas are
automatically short circuited.
To facilitate the operation, the RC-601WL also has a third internal switch that
switches the Send commands and the Com port to the selected Radio.
The AS-61WL / RC-603WL supports communication with the following radios:
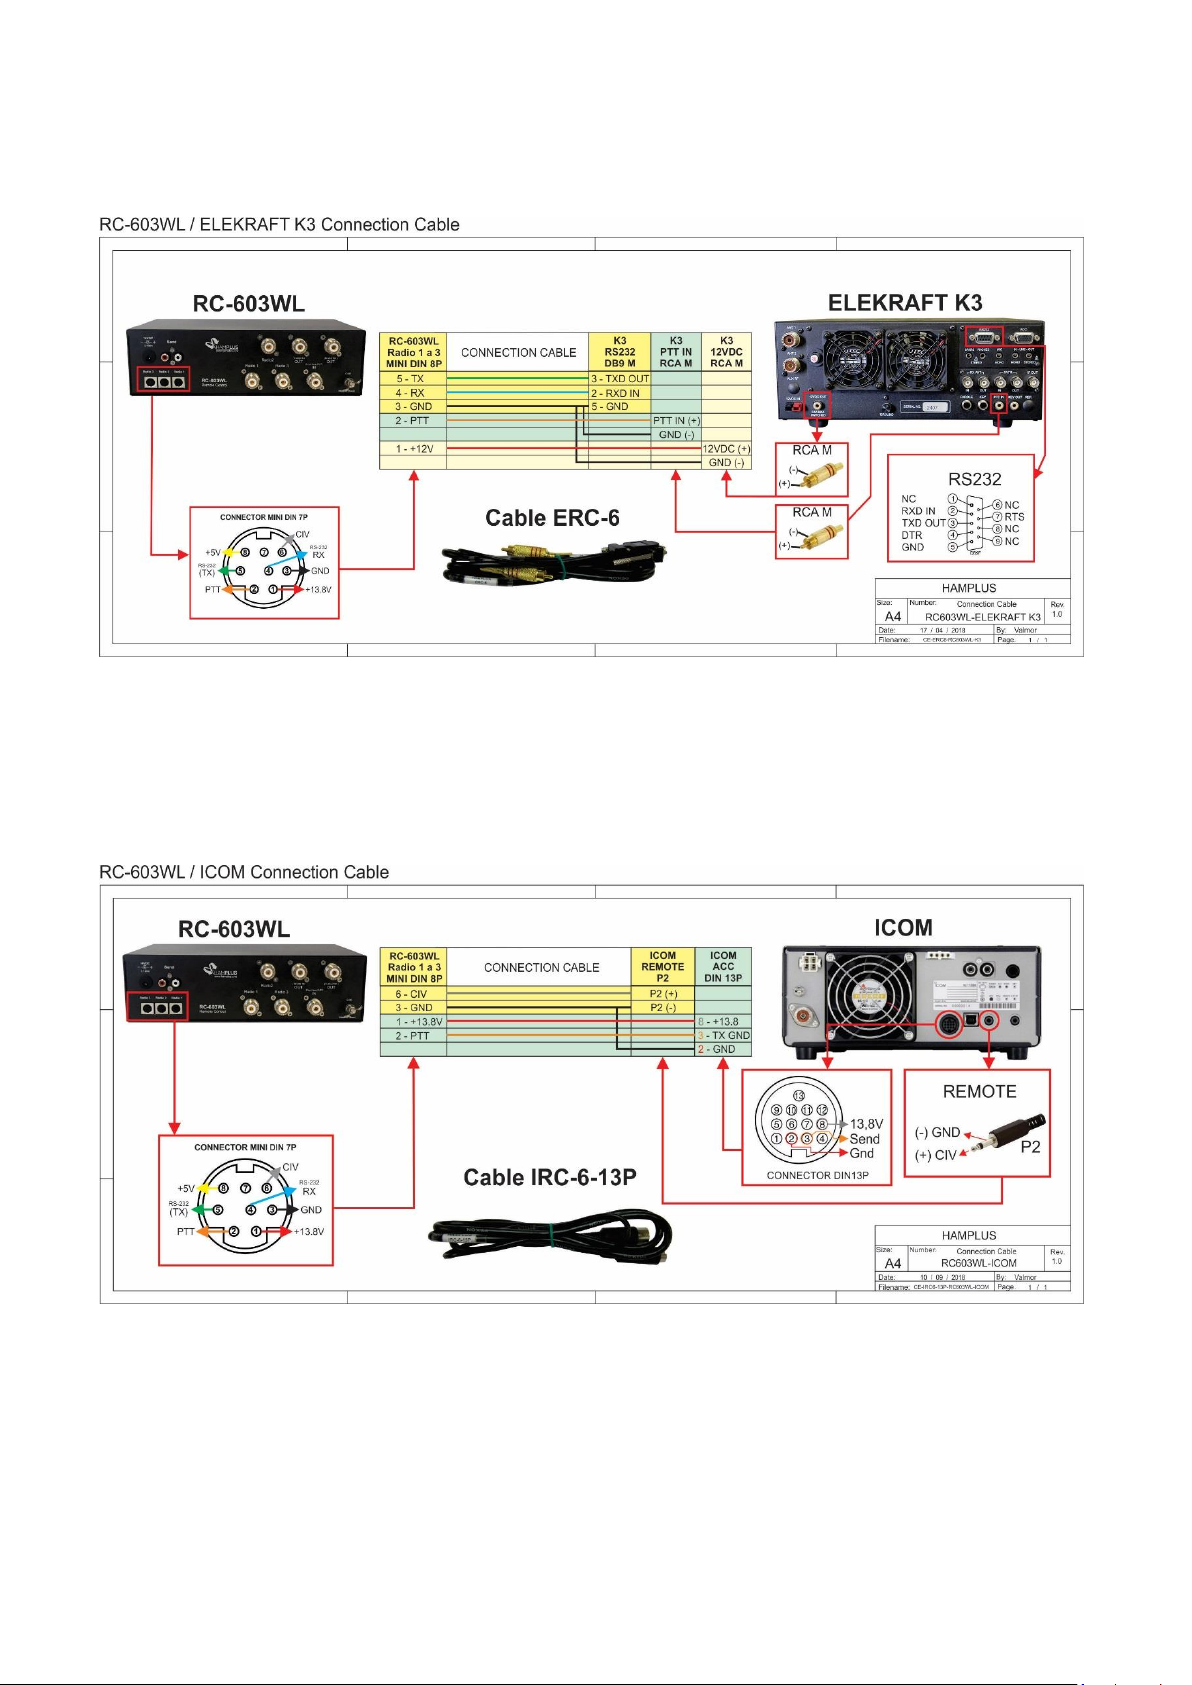
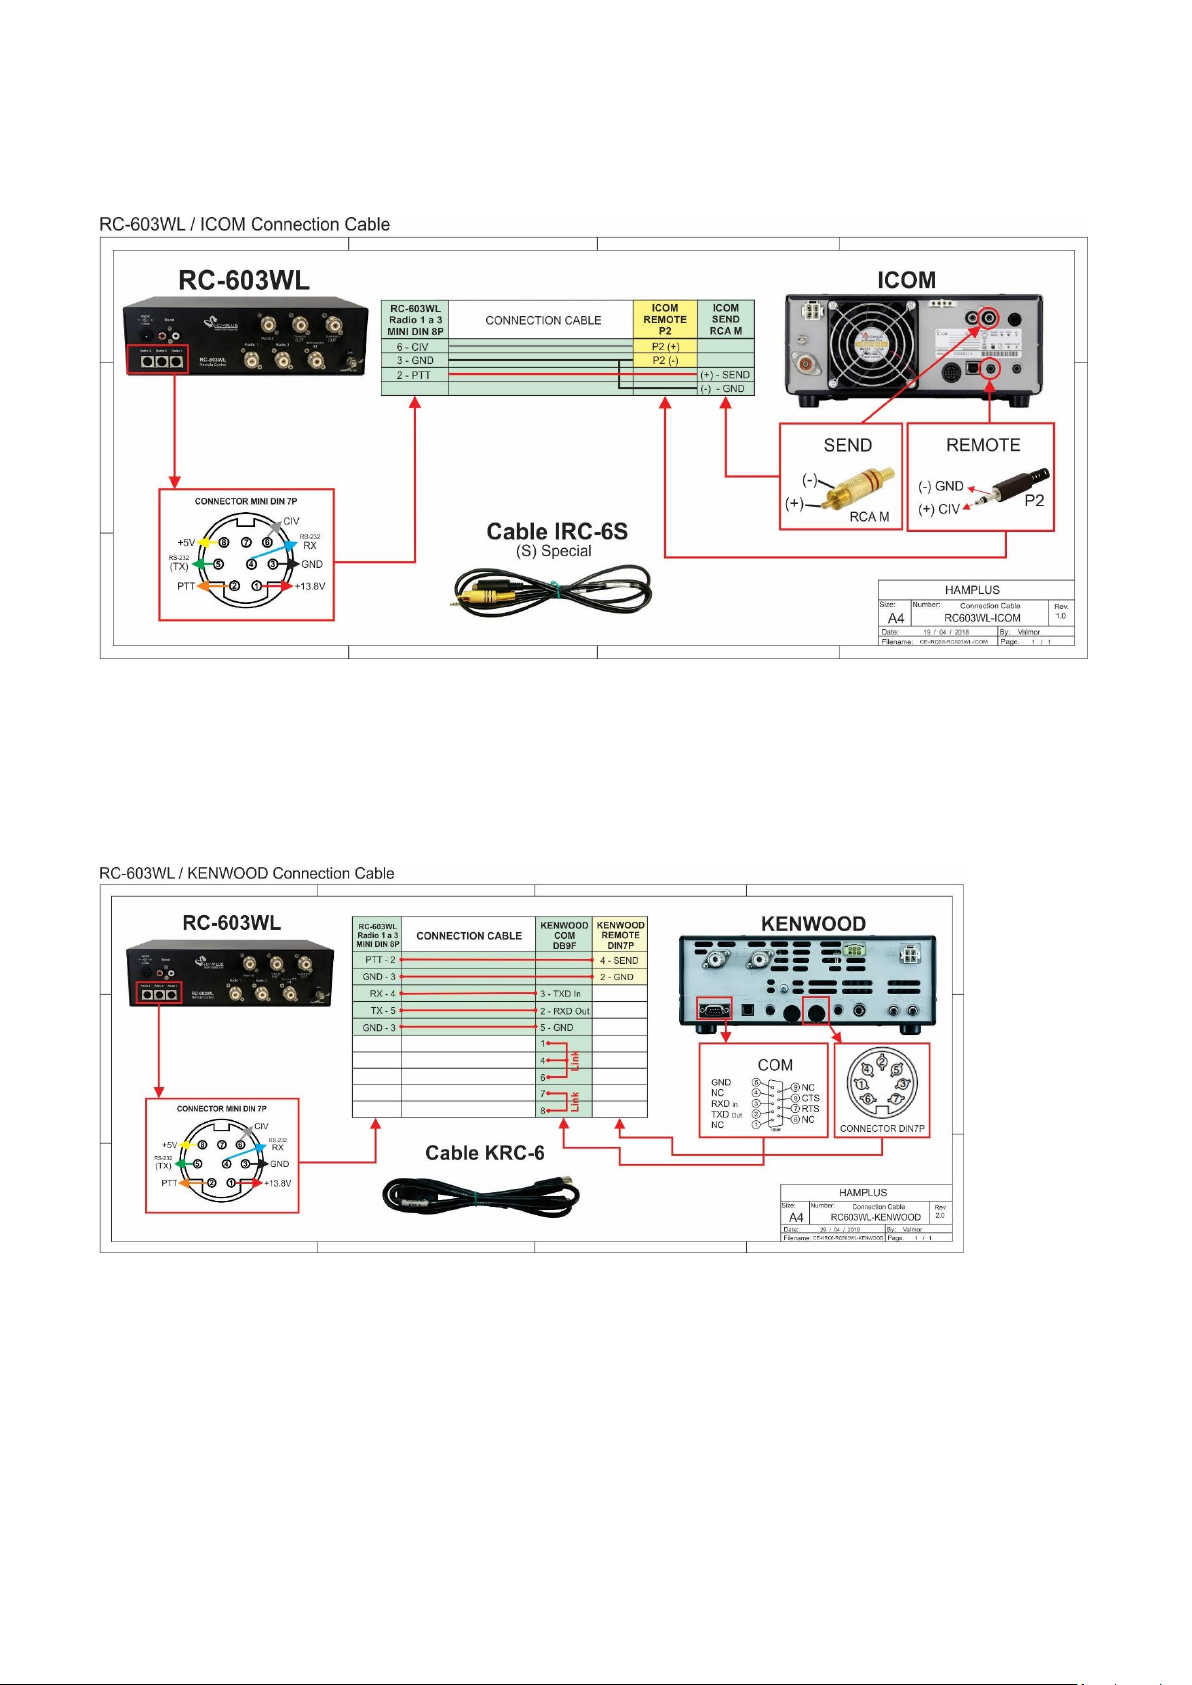
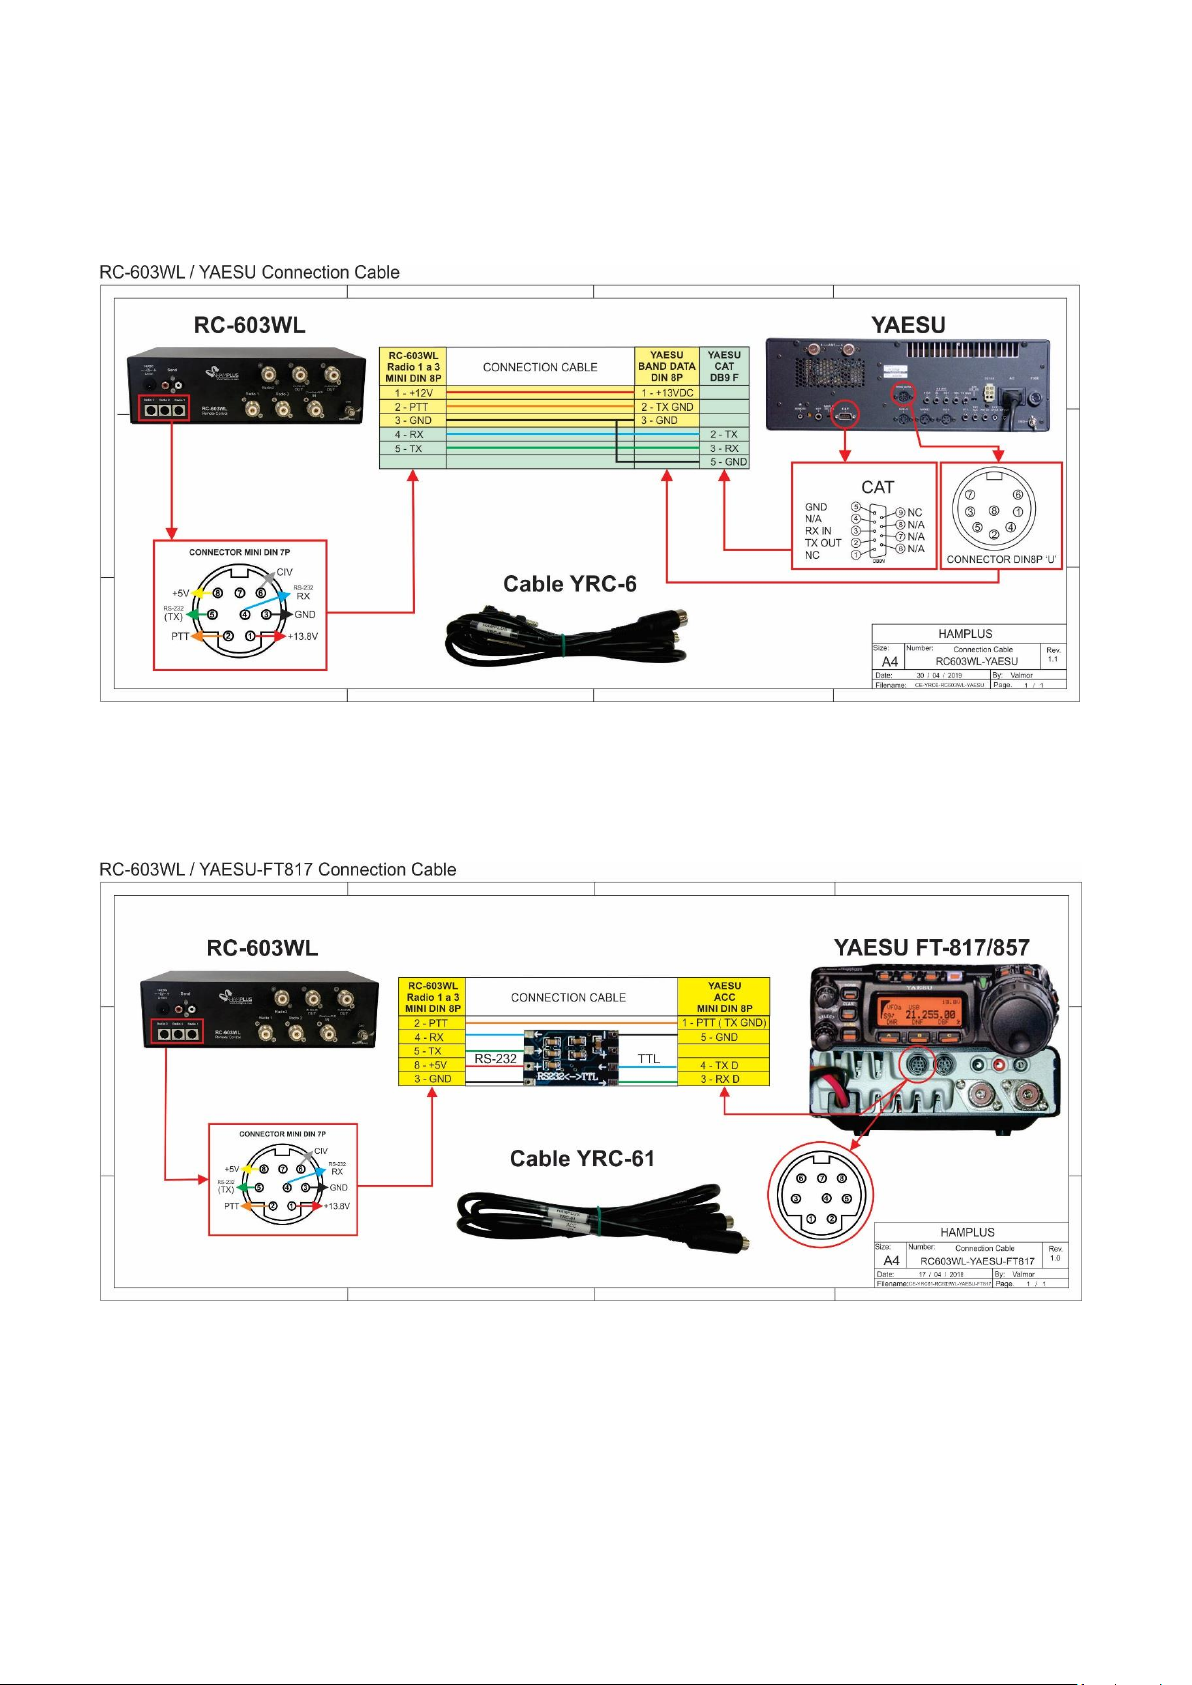
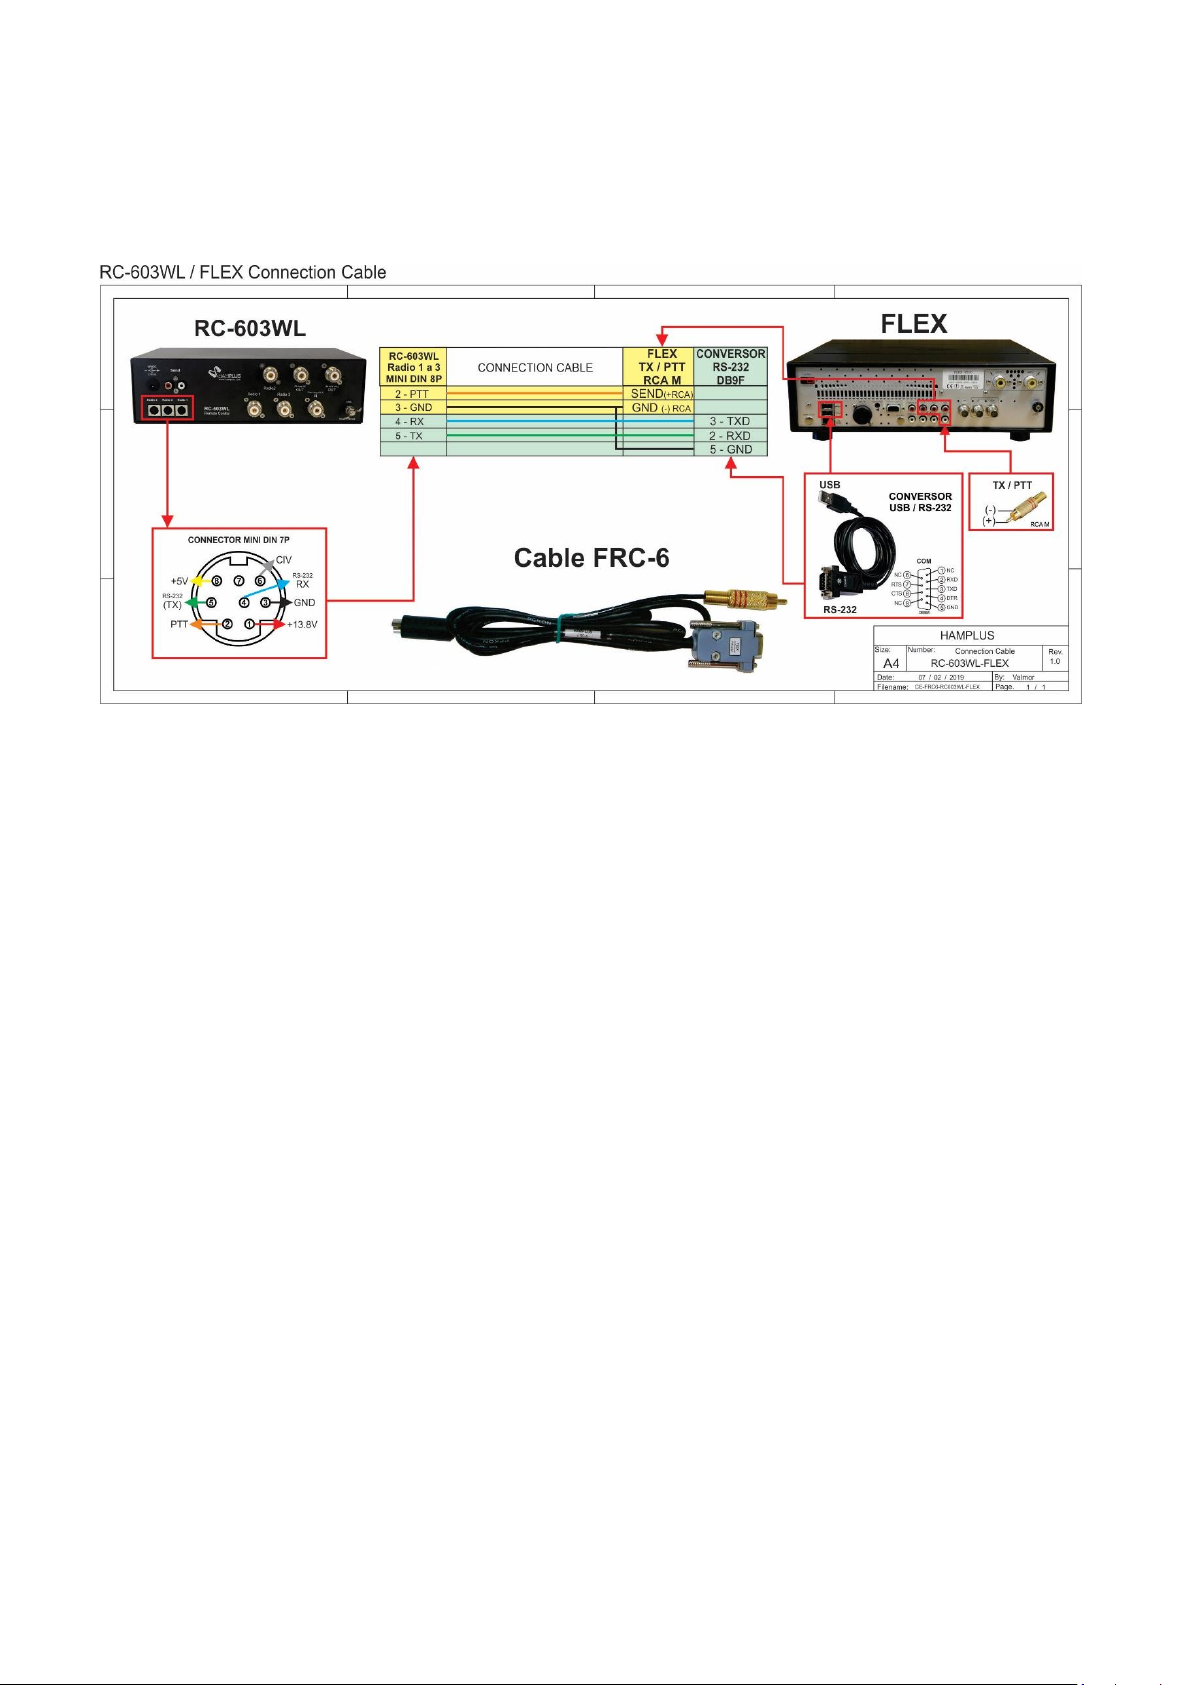
Icom (CI-V), Kenwood (RS-232), Elecraft K3 (RS-232), Yaesu (RS-232) or any other Radio that
uses one of these communication protocols.
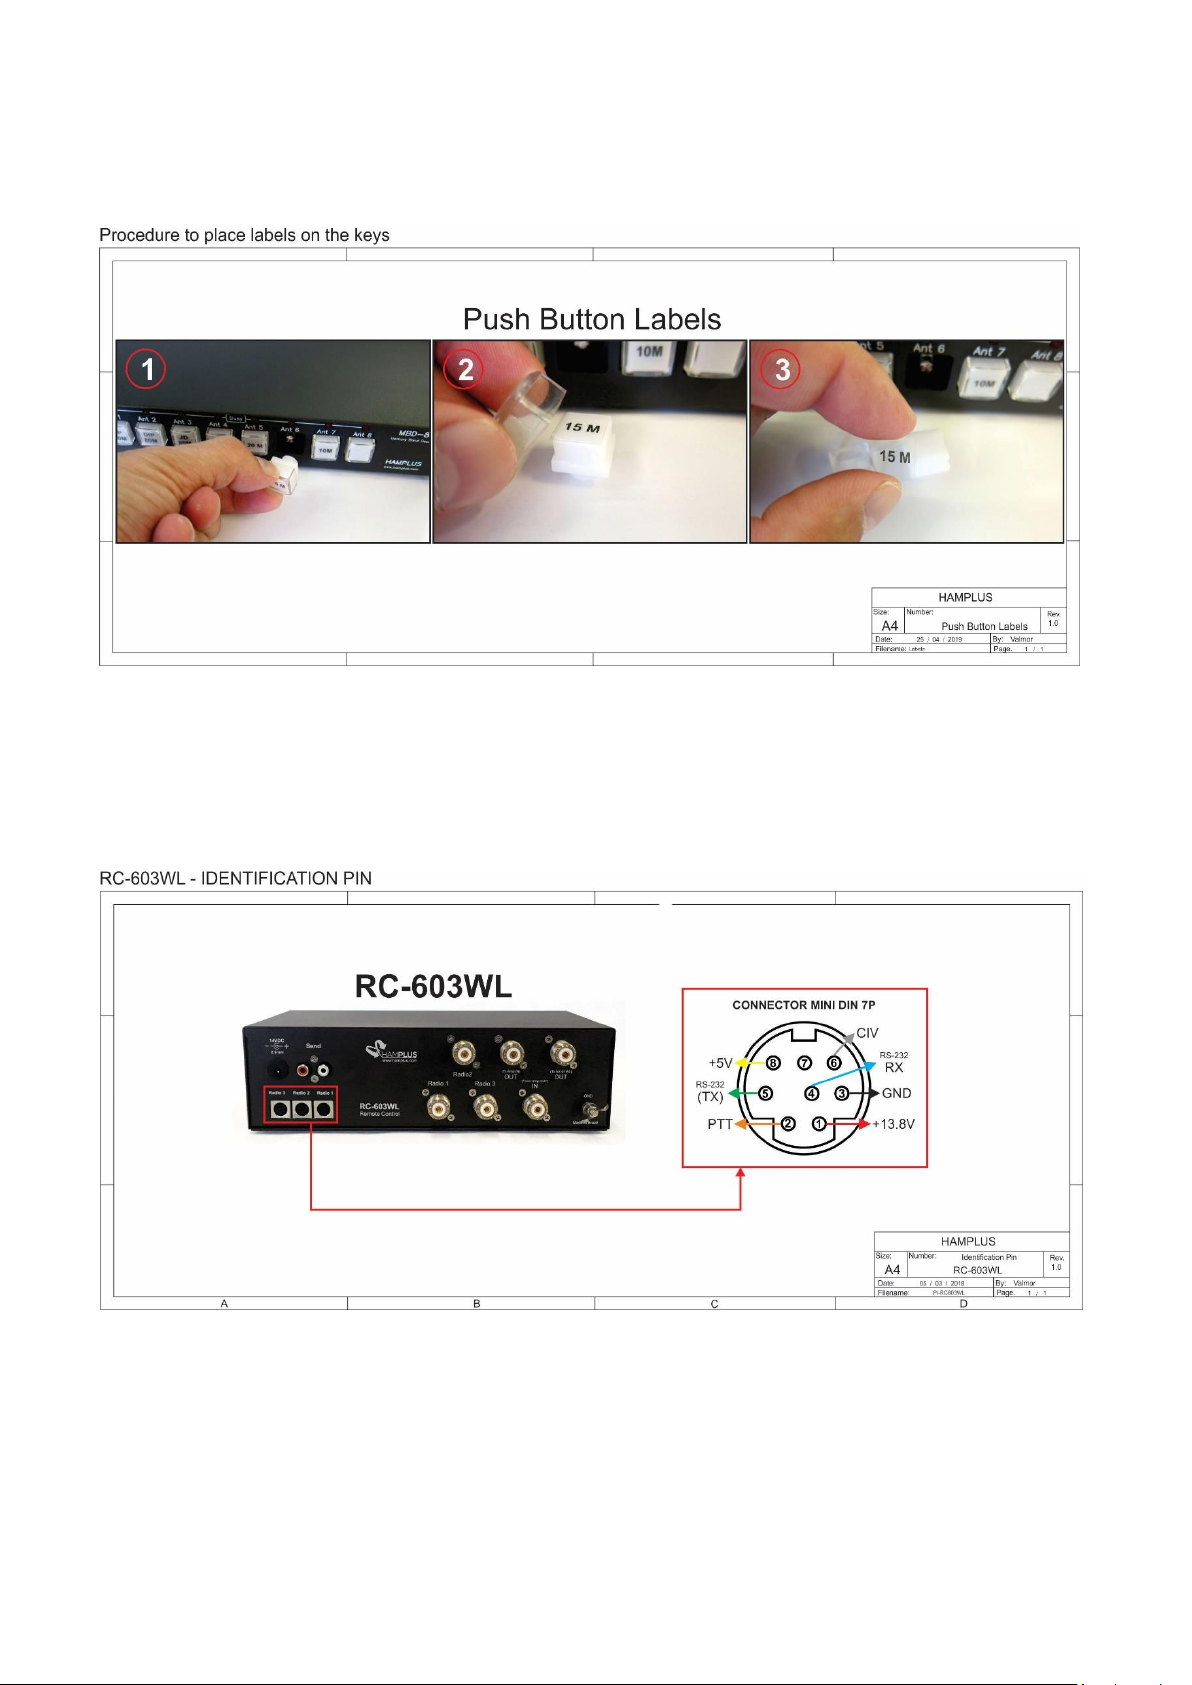
Procedure for connecting the RC-603WL to the radio:
1- On the RC-603WL press and hold the yellow radio select Push button and turn on
the RC-603WL.
2- Then press the Antenna Push Button corresponds to the model of the radio that
you will connect, according to the list below;
a- Ant 1 Push Button for Icom (CI-V) radios Baud rate 19200
b- Ant 2 Push Button for Yaesu type FT-817, FT-857 and others. Baud rate 4800
c- Ant 3 Push Button for Yaesu type FT-1000 MP radios and others. Baud rate 4800
d- Ant 4 Push Button for Yaesu type FT-5000 radios and others. Baud rate 4800
e- Ant 5 Push Button for Kenwood, Elecraft, Flex Radio, and others. Baud rate 4800
After the choice, the Data LED stops blinking, this indicates the end of this
procedure.
Procedure to activate Split mode:
To activate Split mode, the RC-603WL must be connected to the radio with the
appropriate cable.
1- Press the PTT on the radio and watch the RC-603WL's Send LED light up.
2- Then, with the PTT still pressed, press and release the button of the antenna that you
want to receive.
3- When PTT is released, the RC-603WL will switch to the chosen receiving antenna.
Each time you press the PTT, it returns to the transmitting antenna.
Any change of antenna or band on the radio deactivates Split mode.
Page 3

Testing and using the automatic antenna selection feature of the RC-603WL and AS61WL with a connected and selected radio:
NOTE: No computer programming, PC connection or internal changes are required. A
connected radio means that it is interfaced to the RC-603WL with a cable, such as
Hamplus ERC-6, IRC-6, KRC-6, YRC-6, FRC-6 or YRC-61, and the radio set to the correct
baud rate (19,200 baud CI-V or 4800 baud CAT and COM) and set up as described in the
previous section.
If the RC-603WL is not interfaced as described, then it may be operated as a Manual
Antenna Switch.
When connected, the RC-603WL is an Automatic Band Memory Antenna Switch that
may be operated manually. “Programming” automatic antenna selections are made as
each different band is selected on the connected and selected radio. The initial manual
selection of a specific antenna for that band is made by depressing the desired Ant
button, which is then automatically memorized. There is no “SAVE” button nor is there a
multi-button programming sequence. Just set the antenna by the band on the radio.
Restated, simply assign or reassign any RC-603WL Ant button number to any band by
initial or subsequent manual selection. For every and any band chosen and displayed on
the connected and selected radio, every time a different antenna button is manually
depressed, that selection is memorized.
Here is an example of antenna memorization by band setting on the transceiver
connected to and selected as Radio 1 on the RC-603WL:
1. Select 40 meters on Radio 1 and press Ant 2 on the RC-603WL (as if your 40 meter
antenna is connected to the Ant 2 port on the AS-61WL)
2. Select 80 meters on Radio 1 and press Ant 1 on the RC-603WL (as if your 80 meter
antenna is connected to the Ant 1 port on the AS-61WL)
3. Select 20 meters on Radio 1 and press Ant 3 on the RC-603WL (as if your 20 meter
antenna is connected to the Ant 3 port on the AS-61WL)… and so on.
Now, test the automation by changing back to the 40 meter band on your radio.
The RC-603WL should now automatically switch to Ant 2.
Then, select 80 meters on your radio and the RC-603WL automatically switches
to Ant 1, and so on.
If automatic antenna selection by band or frequency does not occur, then reattempt
the Procedure for connecting the RC-603WL to the radio in the section above.
Supporting the use of a multi-band antenna, the RC-603WL provides the ability to
assign any single antenna port to any number of bands on the connected radio, also by
initial manual selection.
For example: A 20/15/10 meter tri-band beam coaxial cable is connected to Ant 3 port
on the AS-61WL.
4. Select 20 meters on the connected radio and press Ant 3 on the RC-603WL
(because your tri-band antenna is connected to Ant 3 port on the AS-61WL)
5. Select 15 meters on the connected radio and press Ant 3 on the RC-603WL
(because your tri-band antenna is connected to Ant 3 port on the AS-61WL)
6. Select 10 meters on the connected radio and press Ant 3 on the RC-603WL
(because your tri-band antenna is connected to Ant 3 port on the AS-61WL)
Page 4

Now, test the tri-bander automation by selecting any of those bands, 20, 15 and
10 meters, on your radio. The RC-603WL will now automatically stay on Ant 3, or
go back to Ant 3 after selecting a band with a different band memorized.
7. Select 80 meters on your radio and the RC-603WL automatically switches to Ant 1,
8. Then, select 20 meters on your radio and the RC-603WL automatically switches back
to Ant 3… and so on.
IMPORTANT FEATURE: PC interface to this antenna switch controller is not necessary.
Interfaced transceivers that are also controlled locally or remotely by USB or LAN will
continue to benefit from this Automatic Band Memory Antenna Switch. This smart
controller method of automatic antenna selection is simply made by band or frequency
selection with the radio control program.
REMINDER: Reassignment of any band or frequency to a different antenna port is simply
made by manual reselection of the new antenna port number whenever the connected
radio is set on that specific band or frequency. The manual change is automatically
updated by the RC-603WL for only the selected radio. Simply stated, reassign any Ant #
to any band by manual reselection of the new Ant # whenever the radio is set to that
band.
For example, let’s say that you now want to move your 40 meter antenna to the Ant 5
port on the AS-61WL. Simply select 40 meters on the connected radio and press Ant 5
on the RC-603WL, and it memorizes this change. Each time you change this radio to a 40
meter frequency, Ant 5 will now be automatically selected.
NOTE: On any given radio band, any manual antenna selection that is made,
even if it happens to be incorrect, will be memorized. So, check and recheck each
of your band memorized antenna selections by changing to each of the bands on
your connected and selected radio and watching the RC-603WL automatically
change to the correct antenna. Correct any wrong Ant # on any band by manual
selection.
-----------------------x----------------------
Page 5
Page 6
Page 7
Page 8
Page 9
Page 10
Page 11
 Loading...