

Page 1

HA<O>
XPK-10 0
MIDI PEDALBOARD
Quick Features Guide
HAMMOND SUZUKI, LTD.
Hamamatsu, Japan
Page 2

IMPORTANT - READ THIS FIRST
Your Hammond XPK-100 MIDI Pedalboard is designed to interface with a great variety of keyboards, synthesizers and sound
modules to further enhance your playing and real-time performance. This Guide is designed to explain the operating features
of your Hammond XPK-100 as simply and graphically as possible.
Because we want to make this manual, as well as the XPK-100 itself, as easy to understand as possible, each feature is treated
as an explanation unto itself, and does not require you to already ha ve prior working knowledge of some other feature. The
explanations are presented such that, if you follow the steps outlined, the message you see in the Information Center Display
screen will be identical to that shown in the manual at that stage of the explanation.
Do not be daunted by the number of steps required to perform each operation. Each step is simple. Simply bear these things
in mind:
1. Read each step carefully.
2. Don't skip any of the steps.
3. Don't perform the steps out of sequence.
With these guidelines, you are well on your way to mastering all of the many features of your Hammond XPK-100.
- Table of Contents -
INTRODUCTION 1
ADVANCED FEATURES 8
Basic Hook-Up ............................................................................... 1
A.C. Power ........................................................................... 1
MIDI Connections ..................................................................... 1
A Word About MIDI ............................................................ 1
Connecting the XPK-100 to a Hammond Drawbar Keyboard .......................... 2
Connecting the XPK-100 to another keyboard instrument ............................. 2
MIDI Merge - Connecting the XPK-100 to the Hammond XM-1 Drawbar Module ........... 3
Connecting the XPK-100 to a Hammond Drawbar Keyboard and another keyboard instrument
..................................................................... 3
Using a Sequencer with the XPK-100 and MIDI Keyboards ............................. 4
Using a Sequencer with the XPK-100 and the Hammond XM-1 ......................... 4
Basic Controls ............................................................................... 5
Switches ............................................................................. 5
PLAY/EDIT Switch .............................................................. 5
PRESET/EDIT NUMBER Switches .................................................. 5
TRANSPOSE/LOCK Switch ........................................................ 5
CONTROL Switch .............................................................. 5
Information Center Display ............................................................. 6
PLAY Mode ................................................................... 6
EDIT Mode ................................................................... 7
ALL RESET ................................................................................... 7
Advanced Feature - E00 PK MIDI Channel ........................................................ 10
Advanced Feature - E01 Transpose .............................................................. 12
Advanced Feature - E02 Octave ................................................................ 14
Advanced Feature - E03 Poly/Mono Mode ........................................................ 16
Advanced Feature - E04 PK Hold ON/OFF ........................................................ 17
Advanced Feature - E05 PK Volume ............................................................. 18
Advanced Feature - E06 Fixed Vel. Value ......................................................... 19
Advanced Feature - E07 Control Channel ........................................................ 20
Advanced Feature - E08 CONTROL Sw. Function ...................................................22
Advanced Feature - E09 CONTROL Sw. Mode ...................................................... 25
Advanced Feature - E10 Program Number ........................................................ 26
Advanced Feature - E11 Bank No. MSB .......................................................... 27
Advanced Feature - E12 Bank No. LSB ........................................................... 29
Advanced Feature - LOCK Feature .............................................................. 32
PRESETS 33
SPECIFICATIONS 35
Hammond XPK-100 Quick Features Guide
Selecting a Preset ............................................................................ 33
Saving to a Preset ............................................................................ 34
Appendix A - EDIT Parameter List ............................................................... 35
Appendix B - Default Preset Settings ............................................................. 35
Appendix C - MIDI Implementation Chart ........................................................ 36
Page 3

INTRODUCTION
Basic Hook-Up
All connections are found on the Accessory Panel on the back of the XPK-100.
Ë A.C. Power
To connect the XPK-100 to A.C. power:
1. Locate the A.C. Power Supply that came with your XPK-100.
2. Plug the female end of the Power Cord into the receptacle on the XPK-100 marked,
“DC IN.”
Introduction
1
3. Plug the other end of the Power Supply into an A.C. power outlet.
Since the XPK-100 has no Power Switch, A.C. power will be applied as soon as the unit is
connected to an outlet.
NOTE: The XPK-100 is also outfitted with a clip next to the AC receptacle. This is used to secure the AC cord so that
it will not accidentally come unplugged.
Ë MIDI Connections
In order to use the XPK-100, the unit must be connected via MIDI to a keyboard or other MIDIcompatible device.
A Word About MIDI
The letters MIDI stand for Musical Instrument Digital Interface. MIDI is an international standard for
allowing electronic musical instruments equipped with MIDI capability to exchange performance
information. For example, a synthesizer can be used to communicate with a drum machine, an
electronic piano can interface with a com puter, and so forth. Additionally, since MIDI is an international
standard recognized and implemented by all musical instrument manufacturers worldwide, instruments
made by different manufacturers can communicate with each other via MIDI.
Hammond XPK-100 Quick Features Guide
Page 4

Introduction
2
Connecting the XPK-100 to a Hammond Drawbar Keyboard
The XPK-100 is designed to interface directly with any current single-manual Hammond Drawbar
Keyboard. Simply connect the MIDI OUT of the XPK-100 into the MIDI IN of the Hammond Drawbar
Keyboard.
Connecting the XPK-100 to another keyboard instrument
The XPK-100 can also interface with other keyboard instruments - simply connect the MIDI OUT of the
XPK-100 into the MIDI IN of the other keyboard.
NOTE: Since there are a wide variety of MIDI-compatible keyboard instruments available, please consult the
documentation that came with your instrument to insure maximum compatibility. You may need to set certain
parameters such as MIDI Channel, etc., before the XPK-100 will function with your particular instrument.
Hammond XPK-100 Quick Features Guide
Page 5

Introduction
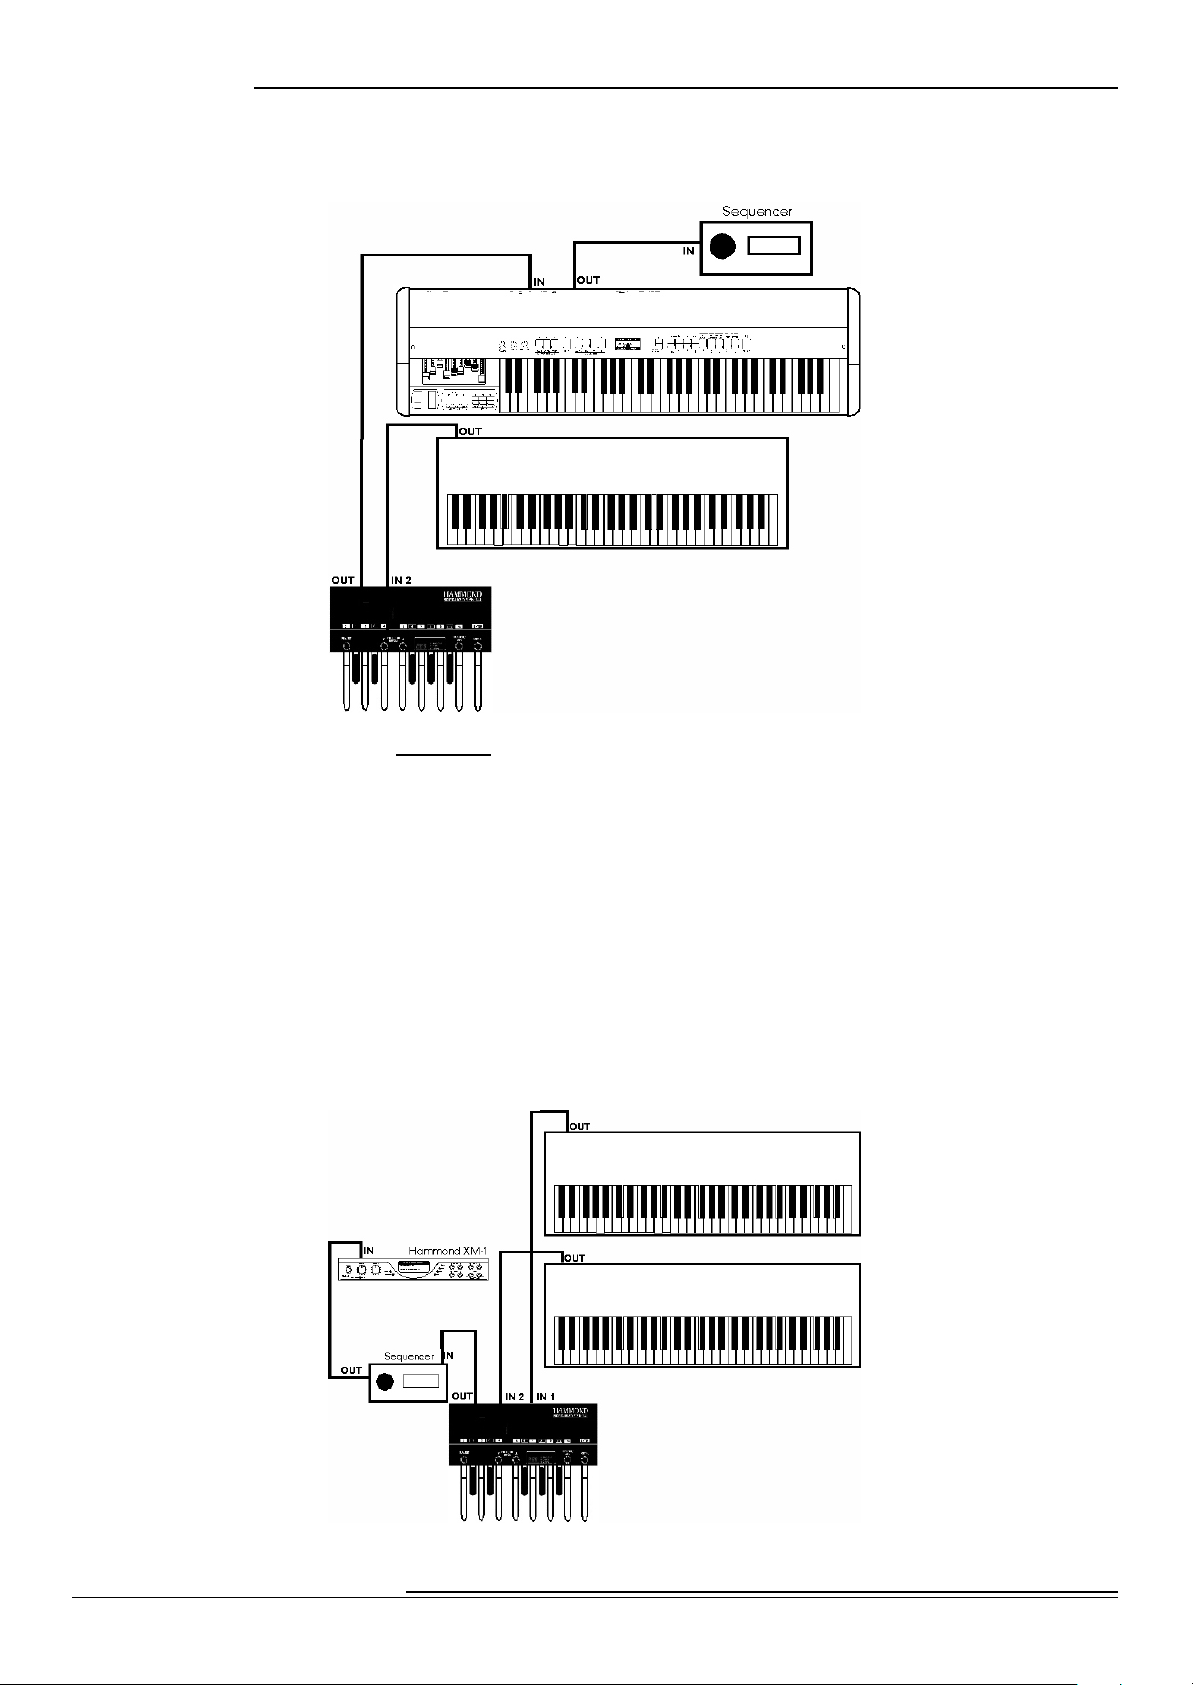
MIDI Merge - Connecting the XPK-100 to the Hammond XM-1 Drawbar Module
Your XPK-100 is equipped with MIDI Merge technology, thereby making it easier to connect multiple
keyboards to it in order to play “organ style”: i.e., two manuals and pedals. Below is an example of how
to connect multiple keyboards and the XPK-100 together with the Hammond XM-1 Drawbar Module to
create a “virtual B-3":
Channel 1 Upper Manual
Channel 2 Lower Manual
Hammond XM -1
3
Channel 3 Pedals
Connecting the XPK-100 to a Hammond Drawbar Keyboard and another keyboard instrument
The bottom diagram shows how your XPK-100 can be connected to two keyboards, one of them being
a Hammond Drawbar Keyboard.
Hammond XPK-100 Quick Features Guide
Page 6
Introduction
4
Using a Sequencer with the XPK-100 and MIDI Keyboards
The bottom diagram shows you how to connect a Sequencer to two manuals and the XPK-100:
Channel 1 Upper Manual
(Hammond Keyboard)
Channel 2 Lower Manual
Channel 3 Pedals
Use the above settings for recording your Sequence. Also, be sure to enable your Hammond Drawbar
Keyboard’s MIDI SOFT THRU function so that all the parts can be recorded. When you are ready to play
back your Sequence, be sure to:
1. Turn MIDI SOFT THRU “OFF” on your Hammond Drawbar Keyboard.
2. Disconnect the MIDI cable going out from your Hammond Drawbar Keyboard into your
Sequencer.
3. Connect the MIDI OUT from your Sequencer into the MIDI IN 1 of your XPK-100.
Using a Sequencer with the XPK-100 and the Hammond XM-1
The diagram below shows how to connect a Sequencer to a set of MIDI instruments including the
Hammond XM-1. No reconnecting of cables is necessary between the Record and Play operations.
Hammond XPK-100 Quick Features Guide
Page 7

Ë Basic Controls
The basic controls on your Hammond XPK-100 include the Switches and an Information Center Display.
Ë Switches
Switches are the large buttons on either side of the Information Center Display. The basic functions of
these Switches are:
1. Turning something "ON" or "OFF.”
2. Modification of parameters - increasing or decreasing.
3. Selecting among multiple functions.
4. Confirmation - YES, NO or OK.
PLAY/EDIT Switch
Your Hammond XPK-100 has two modes - PLAY Mode and EDIT Mode. This Switch allows
you to switch between the two modes.
NOTE: More information about Modes is covered in the section, *Information Center Display” starting on
page 5.
PRESET/EDIT NUMBER Switches
Introduction
5
These two Switches are located to the left of the Information Center
Display. They function in two ways:
PLAY Mode - The two Switches allow you to scroll through and
select the Preset number you want.
EDIT Mode - The two Switches allow you to scroll through and select the Advanced Feature you
want.
NOTE: More information about Modes & Advanced Features is covered later in this Guide.
TRANSPOSE/LOCK Switch
This Switch allows you to change the key in which the XPK-100 will sound, as well as
to “lock” the control panel so that you will not accidentally change a setting during
performance.
NOTE: The LOCK Feature is explained in detail starting on page 32.
CONTROL Switch
This Switch allows you to add different effects, such Leslie Slow/Fast, Pedal Sustain, etc.,
during performance. Its function can be determined via the Advanced Feature Menu.
NOTE: The “CONTROL Sw. Function” Advanced Feature is explained in detail starting on page 22.
Hammond XPK-100 Quick Features Guide
Page 8
Information Center Display
6
Ë Information Center Display
The Information Center Display is an LED (Light-Emitting Diode) display located in the center of the
front panel.
The Information Center Display has two modes: (1) the PLAY Mode, and (2) the EDIT Mode. The PLAY
Mode allows you to see which Preset is selected and is the normal mode used in live performance. The
EDIT Mode allows you to change and edit the XPK-100's software parameters such as MIDI Channel,
Volume, etc. The PLAY/EDIT Switch allows you to switch between the two modes.
PLAY Mode
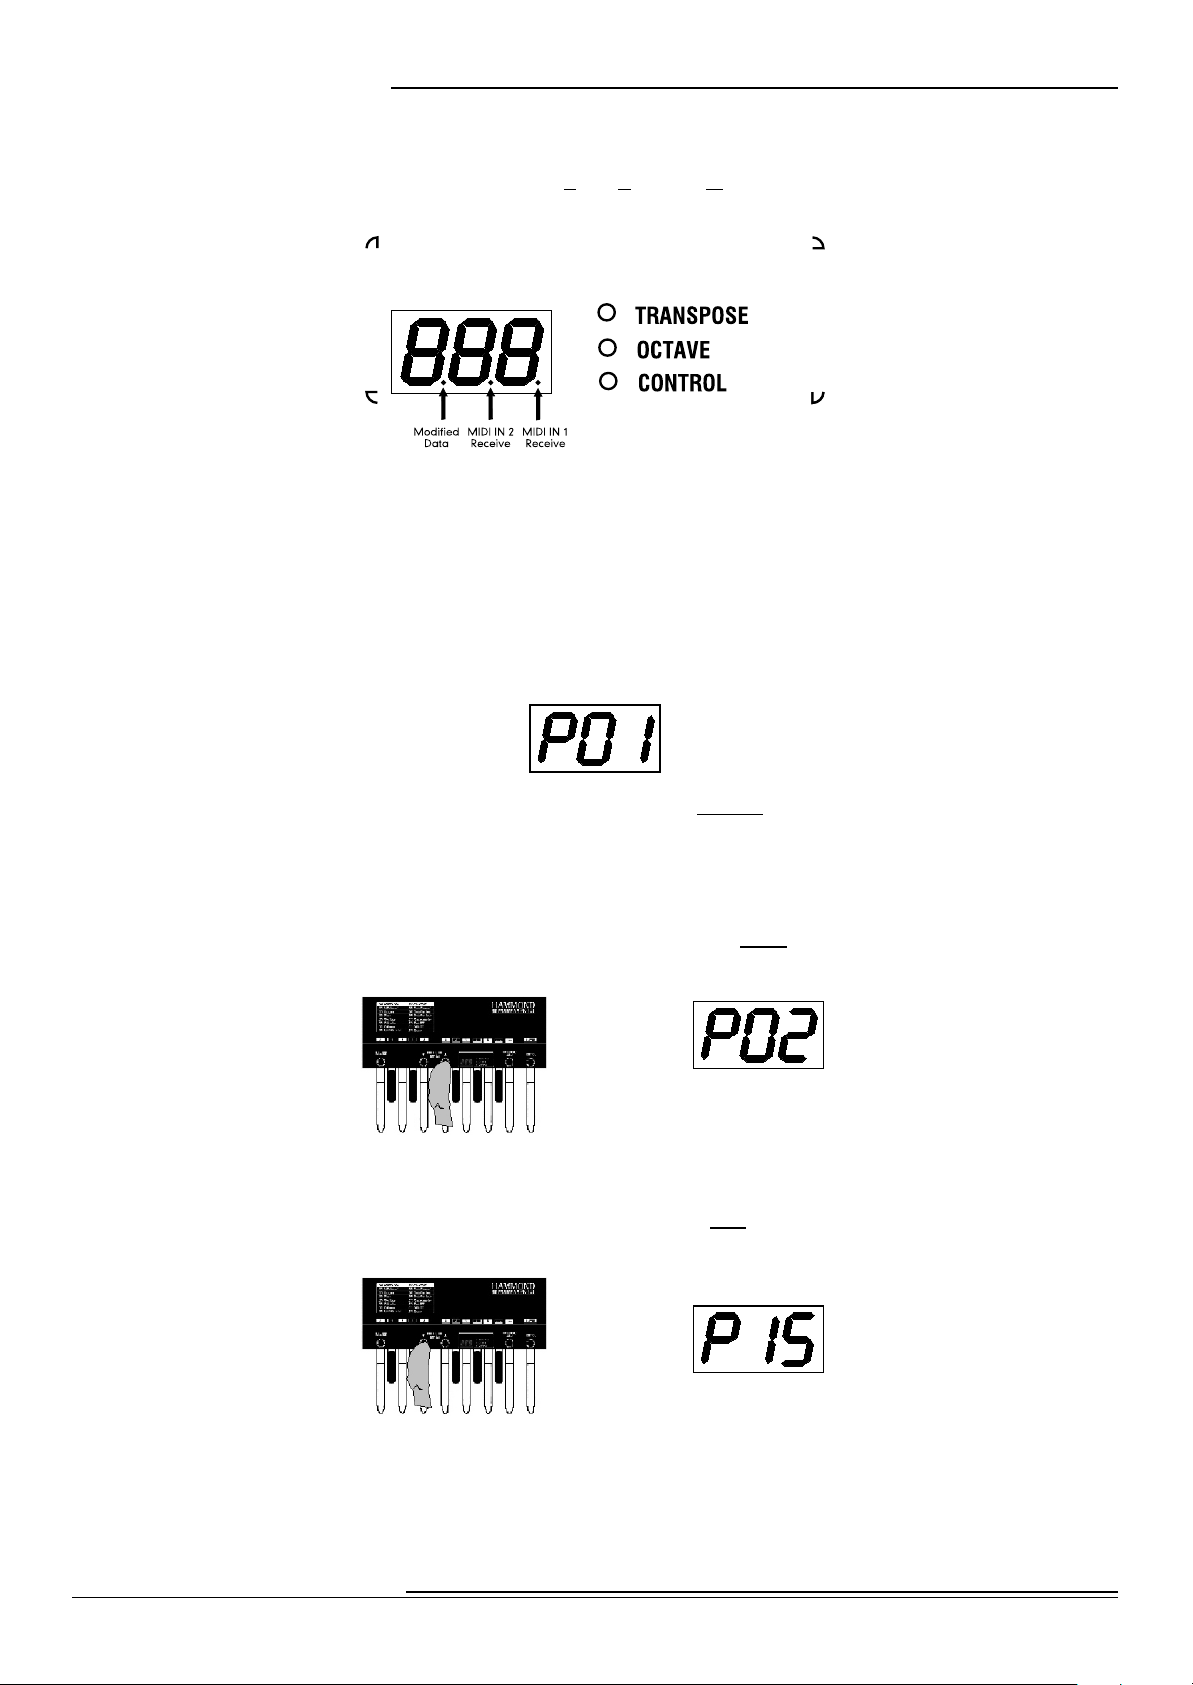
When you first connect the XPK-100 to AC power, the PLAY Mode will display. The Information Center
Display should look similar to this:
The designation, “P01” indicates that Preset 1 is active. Presets are predefined combinations of the
various parameters on the XPK-100 that can be modified using the Advanced Features. There are 15
Presets in all.
NOTE: The Advanced Features are explained in detail starting on page 8.
From the above screen, touch the PRESET/EDIT “” Switch once. The Information Center Display
should now show the following:
You have now selected the next Preset, or Preset 2.
From the above screen, touch the PRESET/EDIT “” Switch two times. The Information Center Display
should now show the following:
You have now selected Preset 15, or the last Preset. By using the PRESET/EDIT “” and “” Switches,
you can scroll forward as well as backward through the Preset selections until you find the one you want.
Hammond XPK-100 Quick Features Guide
Page 9

EDIT Mode
If you touch the PLAY/EDIT Switch once from any of the PLAY screens, the Information Center Display
will alternate between two messages as shown below:
You are now in EDIT Mode.
You can now use the PRESET/EDIT Switches to select from among the different Advanced Features.
Use the “” Switch to scroll up through the Advanced Feature selections.
Use the “” Switch to scroll down through the Advanced Feature selections.
The Advanced Features are explained in full starting on page 8.
Ë ALL RESET
Information Center Display
Current Parameter Current Value
7
You can insure that the XPK-100 contains the factory-default settings for all parameters before applying
power to it.
NOTE: Doing the following procedure will erase all parameters, settings and registrations, returning the XPK-100 to the
original Hammond factory default settings. To ensure that important data is saved, save your information to a MIDI Data
recorder before doing this procedure.
1. Plug the AC power supply that came with your XPK-100 into an AC outlet.
2. On the XPK-100, Press and Hold the two PRESET/EDIT Switches with two fingers of one
hand.
3. While holding down the two PRESET/EDIT Switches, insert the plug from the AC power
supply into the jack on the back of the XPK-100 with the other hand. The Information
Center Display will flash the following for approximately 1 second:
The above is an abbreviation for, “ALL Initialize.”
When the above message stops displaying, the Information Center Display will show the
following:
5. Release the two PRESET/EDIT Switches. All parameters are now reset.
Hammond XPK-100 Quick Features Guide
Page 10
Advanced Features
8
ADVANCED FEATURES
Your Hammond XPK-100 has a number of special functions, called Advanced Features, that allow you
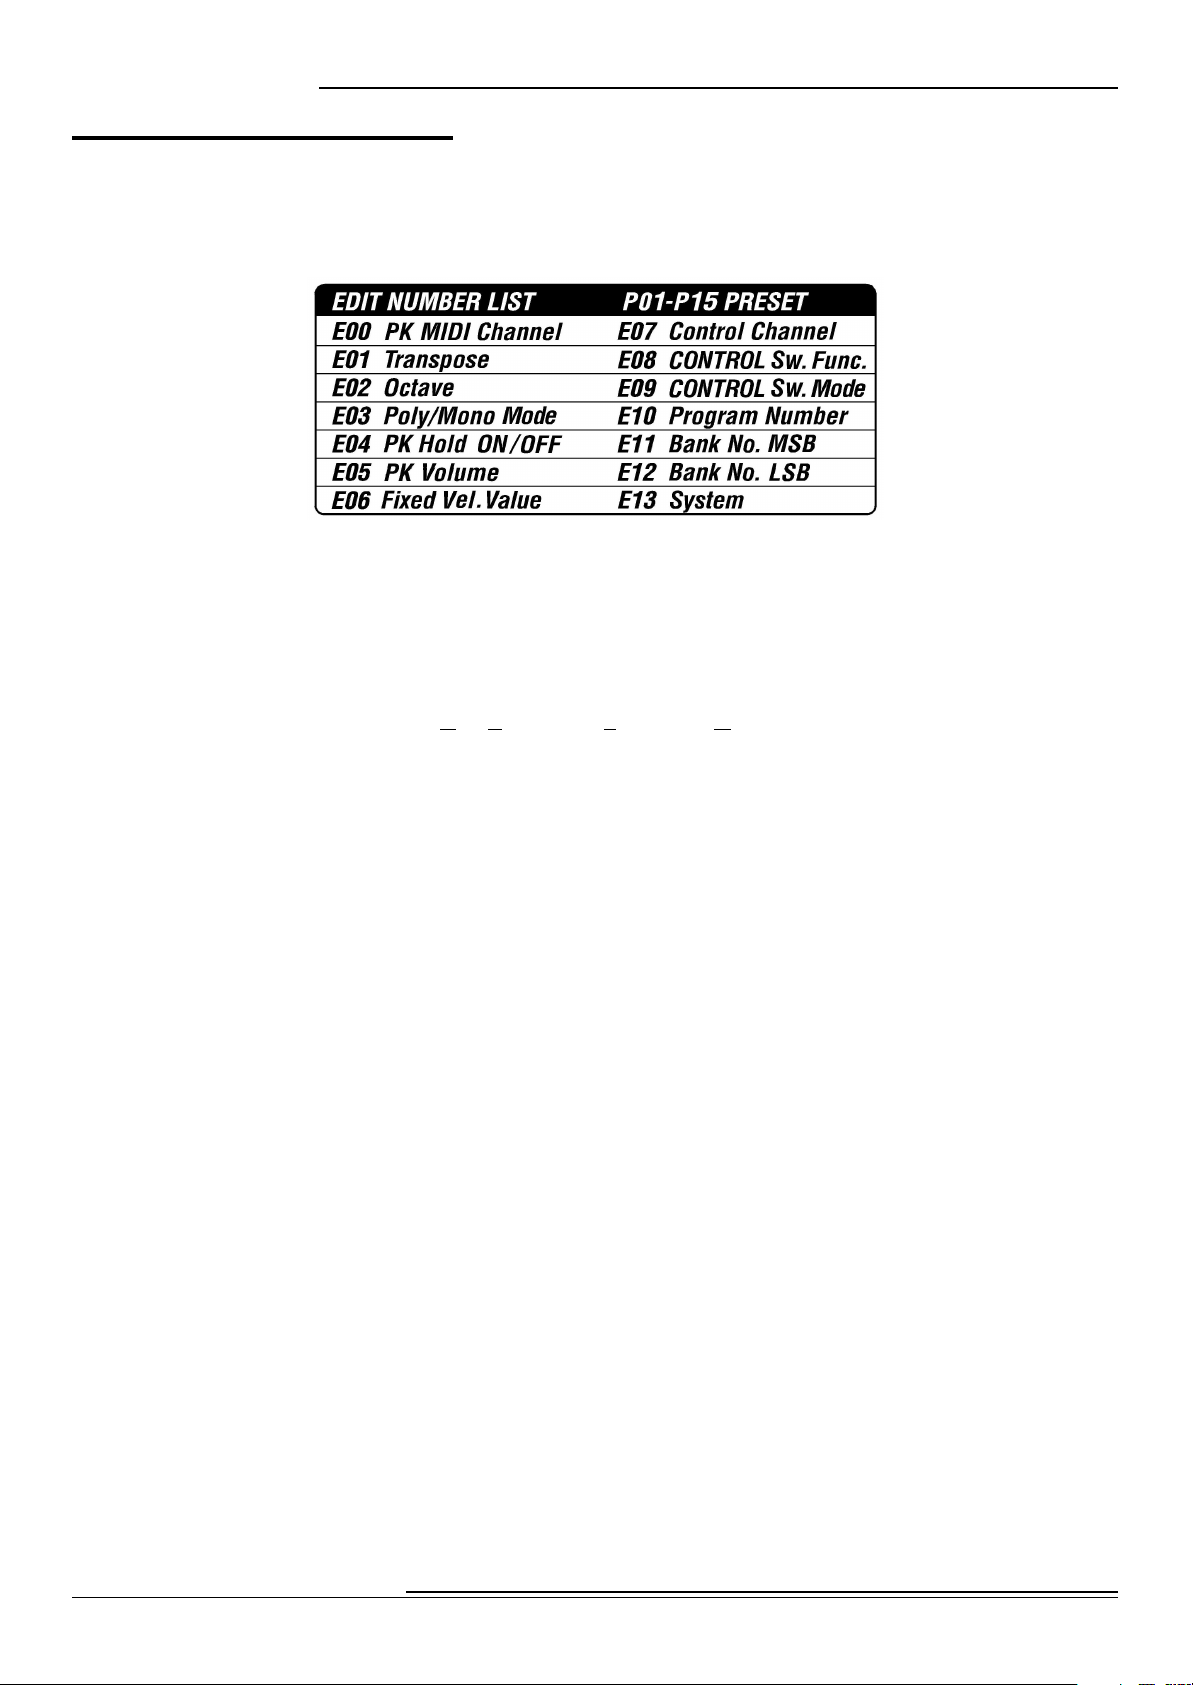
to further enhance your playing and create exactly the musical performance you want. A list of the
Advanced Features can be affixed to the XPK-100 itself to make them easier to remember.
The above picture shows the decal which can be affixed to the XPK-100. Notice that the Advanced
Features appear in two groups.
Advanced Features E00 through E06 control the internal MIDI data of the XPK-100.
Advanced Features E07 through E12 are features which send MIDI Controller data out to
a connected MIDI device. This data falls into two categories:
1. NPRN (Non-Registered Parameter Data) which activates Touch Tabs on a
Hammond Drawbar Keyboard or functions on the Hammond XM-1 Drawbar
Module;
2. Universal Controller data to which most MIDI devices will respond in a
predictable way, such as Controller #64 for Sustain, etc.
The following is a brief explanation of each of the Advanced Feature functions.
E00 PK MIDI Channel - Allows you to select the MIDI Channel on which the XPK-100 will transmit.
(See page 10.)
E01 Transpose - Allows you to raise or lower the pitch by half-steps sp as to play in one key but sound
in another. (See page 12.)
E02 Octave - Allows you to select the octave in which the XPK-100 will play. (See page 14.)
E03 Poly/Mono Mode - Allows you to select either Polyphonic (two or more notes) or Monophonic
(only one note) Mode. (See page 16.)
E04 PK Hold ON/OFF - Allows you to select whether you want the pedal notes to continuously play.
(See page 17.)
E05 PK Volume - Allows you to control the maximum volume or loudness of the pedal notes. (See
page 18.)
E06 Fixed Vel. Value - Allows you to transmit a fixed Velocity number from 0 through 127 from the
XPK-100 to a connected MIDI device. (See page 19.)
E07 Control Channel - Allows you to select the MIDI Channel on which Controller information will
be transmitted. (See page 20.)
E08 CONTROL Sw. Function - Allows you to select the function for the CONTROL Switch. (See
page 22.)
Hammond XPK-100 Quick Features Guide
Page 11

Advanced Fea tures
9
E09 CONTROL Sw. Mode - Allows you to select how the CONTROL Switch works. (See page 25.)
E10 Program Number - Allows you to transmit a Program Number from the XPK-100 to a connected
MIDI device, or select a Program Number for each Preset. (See page 26.)
E11 Bank No. MSB - Allows you to select different Bank numbers for voices. You can select the
“MSB” (Most Significant Bit) for each Bank selection. (See page 27.)
E12 Bank No. LSB - Allows you to select different Bank numbers for voices. You can select the “LSB”
(Least Significant Bit) for each Bank selection. (See page 29.)
NOTE: Advanced Features E11 and E12 are for the purpose of giving you access to the great number of voices available
on modern sound modules. Please refer to the documentation for your module to determine the Bank numbers for specific
voices.
E13 System - Allows you to perform certain functions associated with the basic system or setup of the
XPK-100, such as All Reset, MIDI Data Dump, etc. (See page 31.)
When you are in EDIT Mode, use the Pedal keys to select the value of the parameter you want to edit.
The data chart below shows the value for each Pedal key.
PEDAL KEY VALUES
Pedal Key Value
Lo ”C” Pedal 0
“C<” Pedal 1
“D” Pedal 2
“D<” Pedal 3
“E” Pedal 4
“F” Pedal 5
“F<” Pedal 6
“G” Pedal 7
“G<” Pedal 8
“A” Pedal 9
“A<” Pedal DEC (Decrease value)
“B” Pedal INC (Increase value)
Hi “C” Pedal ENT (ENTER - select the value)
As a reminder, the number value represented by each Pedal key is printed above each Pedal.
The following pages explain the Advanced Features in detail. The default settings of the Advanced
Features for all of the Presets are identical. Please refer to page 35 for a list of the default Preset settings.
Hammond XPK-100 Quick Features Guide
Page 12
Advanced Features
10
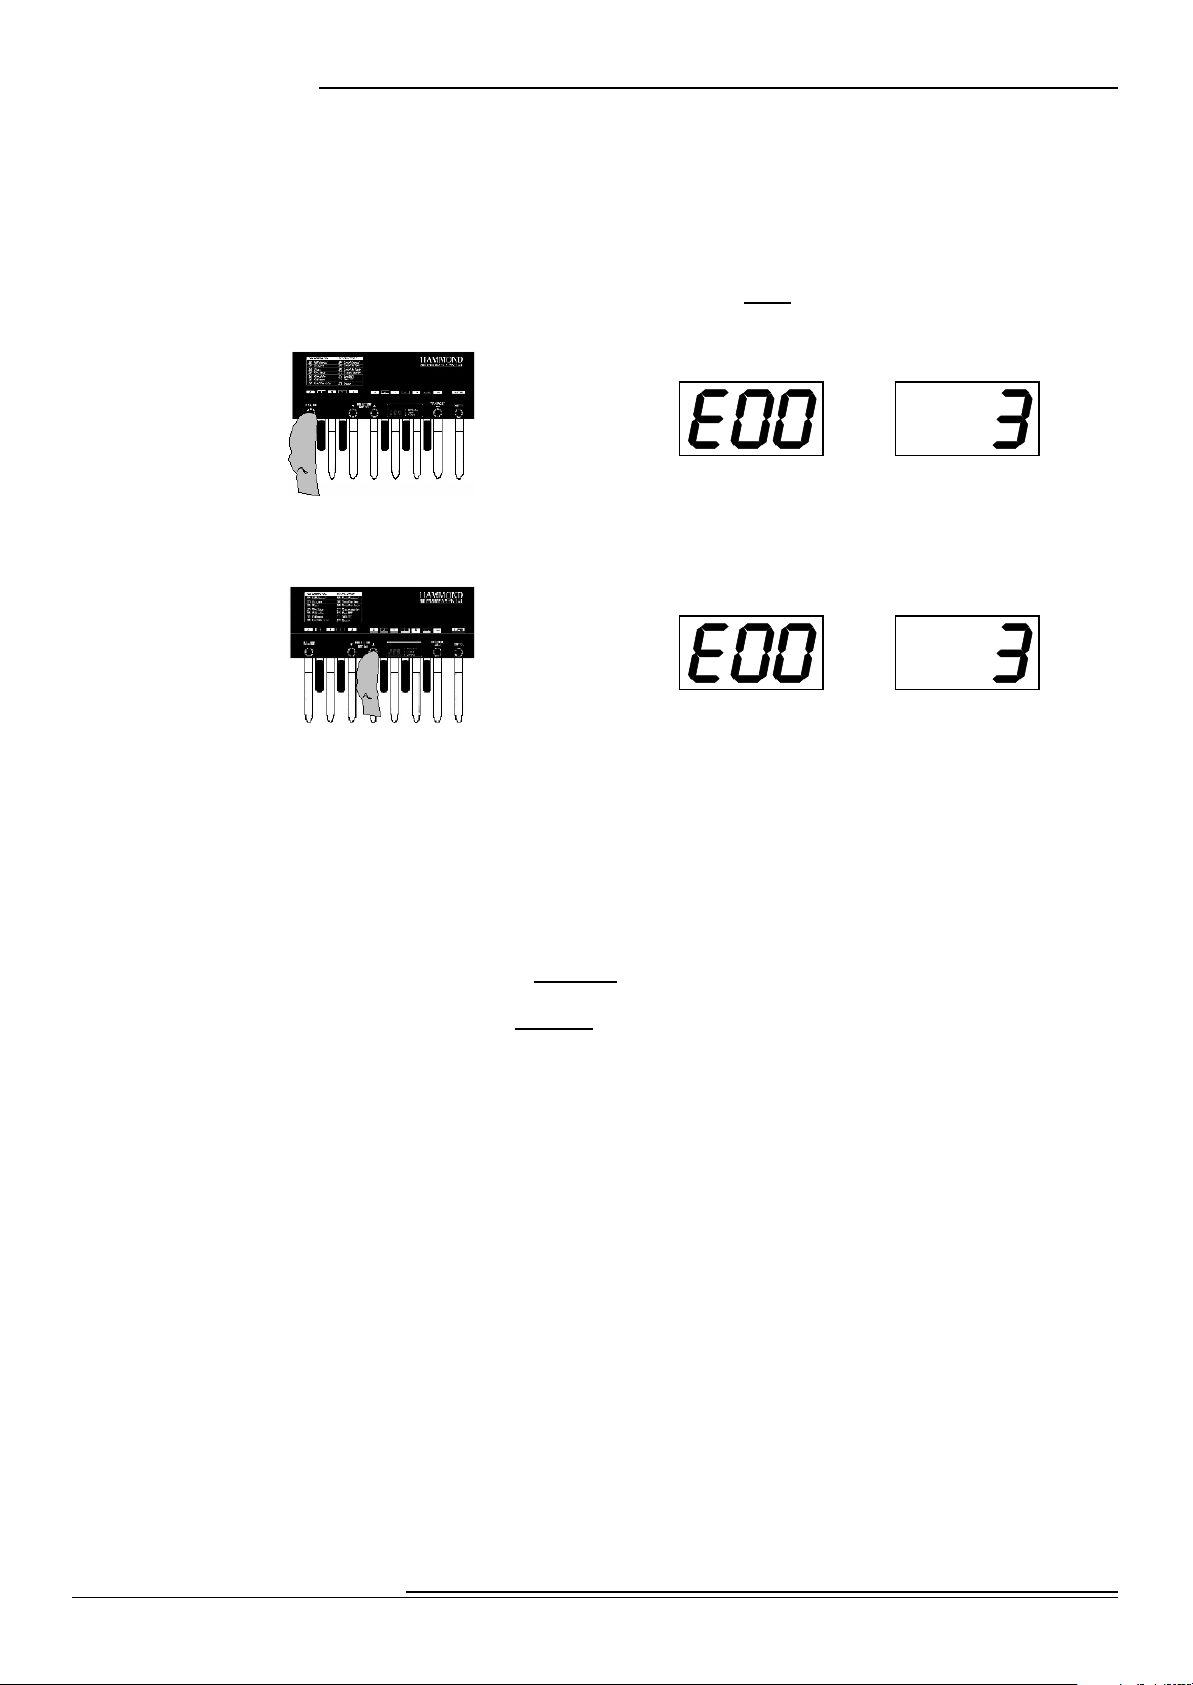
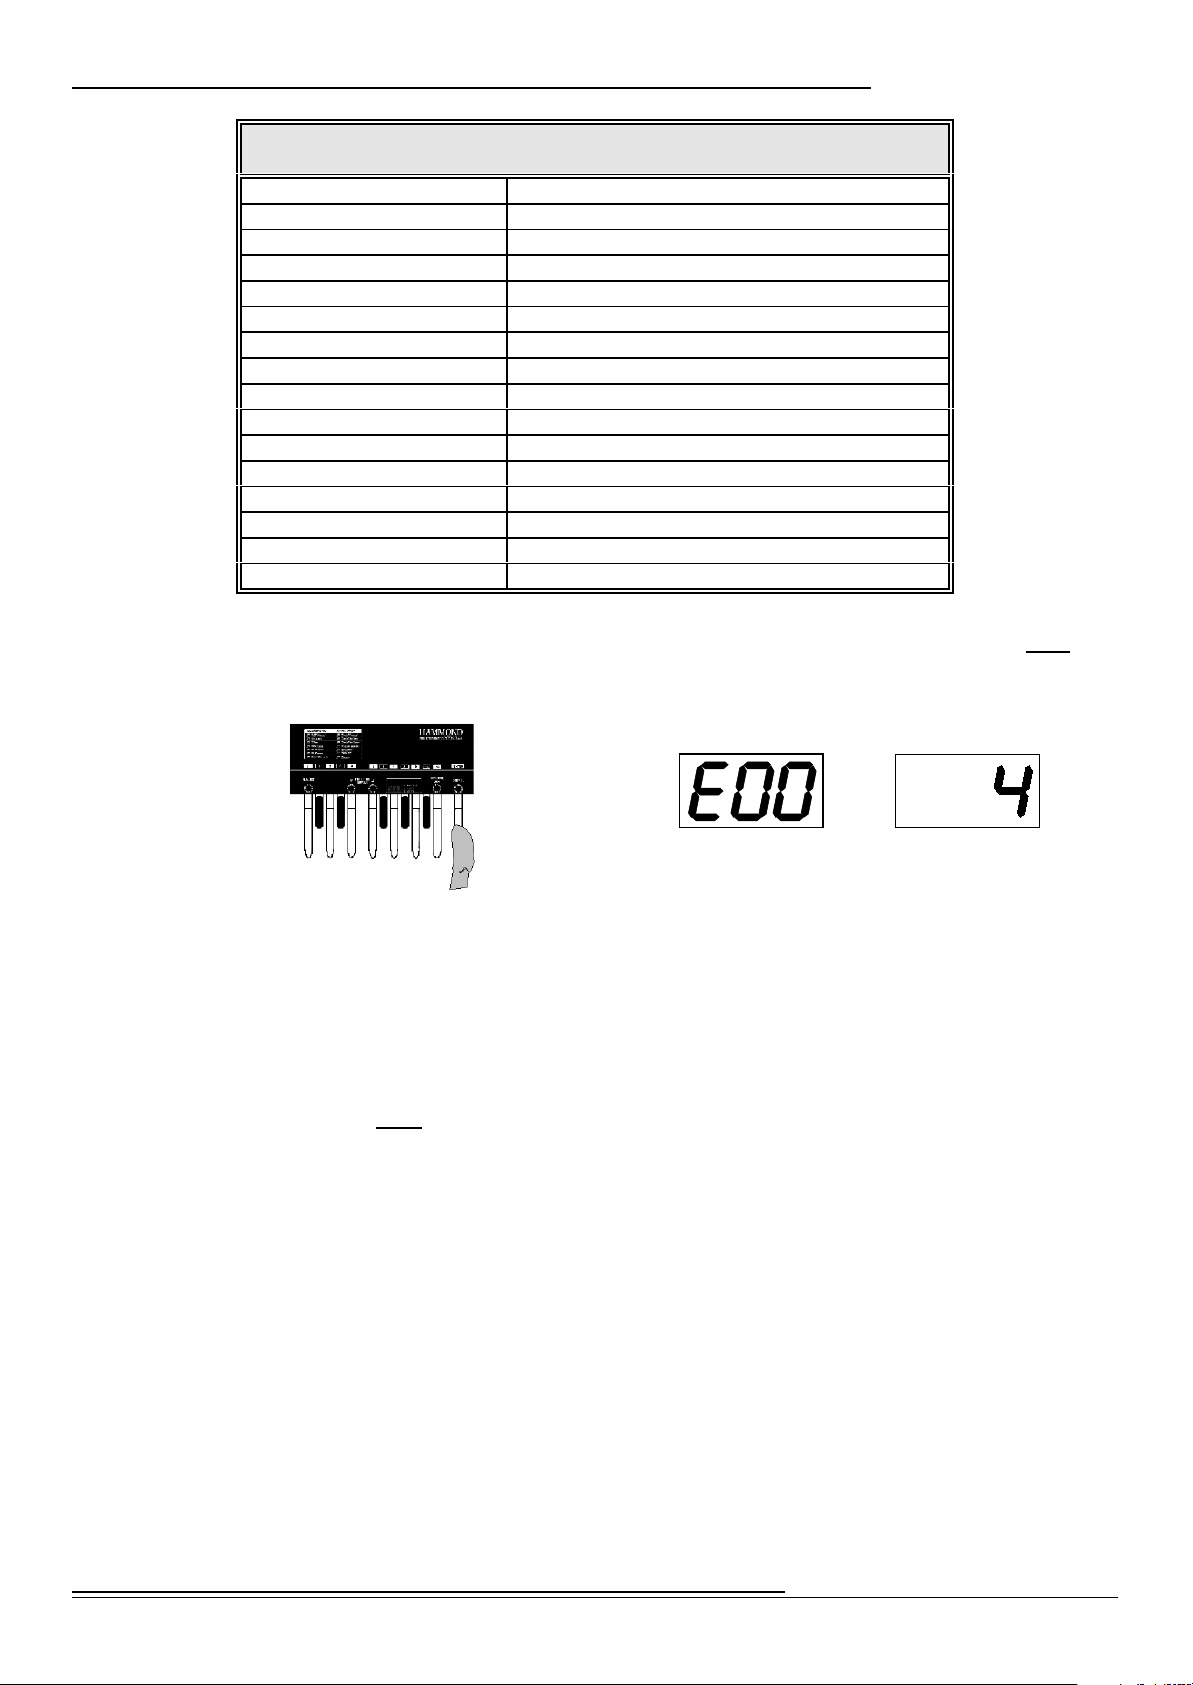
Ë Advanced Feature - E00 PK MIDI Channel
This Advanced Feature allows you to select the MIDI Channel on which the XPK-100 will transmit. You
can select from “1" through “16.” The default setting is “3.”
TRY THIS:
2. From PLAY Mode, press the PLAY/EDIT Switch once. The Information Center Display
should alternate between two messages as shown below:
2. Press the PRESET/EDIT “” Switch repeatedly until the Information Center Display
alternates between two messages as shown below:
Current Parameter Current Value
Current Parameter Current Value
NOTE: You can also press the PRESET/EDIT “” Switch to arrive at the same Advanced Feature selection.
NOTE: After resetting the XPK-100, “E00" is normally the first Advanced Feature to display when the PLAY/EDIT
Switch is pressed from PLAY Mode. In this case, it is not necessary to press either of the PRESET/EDIT Switches
to access this Advanced Feature.
3. Now use the Pedal keys to select the MIDI Channel you want.
Using the DEC/INC Pedal keys:
Use the DEC (“A<”) Pedal key to decrease the MIDI Channel number selection.
Use the INC (“B”) Pedal key to increase the MIDI Channel number selection.
Using the Pedal keys from “Lo C” through “A”:
You can use the other Pedal keys to select MIDI Channels. The data chart on the next page
shows how to do this.
Hammond XPK-100 Quick Features Guide
Page 13
Advanced Fea tures
MIDI CHANNEL OPTIONS
MIDI Channel Number Action
MIDI Channel 1 Press the “Lo C” Pedal
MIDI Channel 2 Press the “C<” Pedal
MIDI Channel 3 Press the “D” Pedal
MIDI Channel 4 Press the “D<” Pedal
MIDI Channel 5 Press the “E” Pedal
MIDI Channel 6 Press the “F” Pedal
MIDI Channel 7 Press the “F<<” Pedal
MIDI Channel 8 Press the “G” Pedal
MIDI Channel 9 Press the “G<<” Pedal
MIDI Channel 10 Press the “A” Pedal
MIDI Channel 11 Press the “Lo C” Peda l, then press the “Lo C” Pedal again.
MIDI Channel 12 Press the “Lo C” Peda l, then press the “C<” Pedal.
MIDI Channel 13 Press the “Lo C” Peda l, then press the “D” Pedal.
MIDI Channel 14 Press the “Lo C” Peda l, then press the “D<” Peda l.
MIDI Channel 15 Press the “Lo C” Peda l, then press the “E” Pedal
MIDI Channel 16 Press the “Lo C” Peda l, then press the “F” Pedal.
11
4. When you have selected the proper MIDI Channel, then press the Hi “C” Pedal once. The
Information Center Display will show you the current parameter alternating with your
selected value:
Current Parameter
Your Selected Value
5. To exit the EDIT Mode and return to PLAY Mode, press the “Hi C” Pedal again. The XPK100 is now transposed to the value you selected.
NOTE: After doing the above, you will notice a small red dot between the first and second characters of the
Information Center Display. This indicates that your new value has not been saved to a Preset. For information
on how to save your settings to a Preset, see page 34.
6. To continue editing, instead of pressing the Hi “C” Pedal, use the PRESET/EDIT Switches
to select the parameter you want to edit. When you are finished editing, press the “Hi
C” Pedal once to return to PLAY Mode. All of your changes will now take effect.
Hammond XPK-100 Quick Features Guide
Page 14

Advanced Features
12
Ë Advanced Feature - E01 Transpose
This Advanced Feature allows you to transpose the XPK-100 into another key. You can select from “-5"
(down 5 half-steps) through “6” (up 6 half-steps). The default setting is “0.”
NOTE: The TRANSPOSE LED to the right of the Information Center Display will light whenever the XPK-100 is set to play
in any octave other than “0.”
You can transpose the XPK-100 using two methods:
1. Using the TRANSPOSE/LOCK Switch.
2. Using EDIT Mode.
TRY THIS - To transpose the XPK-100 using the TRANSPOSE/LOCK Switch:
1. From PLAY Mode, press the TRANSPOSE/LOCK Switch once. The Information Center
Display should look similar to what is shown below:
Notice that the red LED by the word, “TRANSPOSE” is flashing. This indicated that the XPK-100
is ready to be transposed.
2. Now select the Transposition interval you want by using the Pedal keys. That data chart
below shows how to do this.
TRANSPOSE OPTIONS
Transposition Interval Action
No Transposition Press the “Lo C” Pedal
Up 1 half-step Press the “C<” Pedal
Up 2 half-steps Press the “D” Pedal
Up 3 half-steps Press the “D<” Pedal
Up 4 half -st eps Press the “E” Pedal
Up 5 half -steps Press the “F” Pedal
Up 6 half-steps Press the “F<<” Pedal
Down 5 half-steps Press the “G” Pedal
Down 4 half-steps Press the “G<<” Pedal
Down 3 half-steps Press the “A” Pedal
Down 2 half-steps Press the “A<” Peda l.
Down 1 half-steps Press the “B” Pedal
NOTE: Pressing the “Hi C” Pedal will have no effect.
As soon as you press and release the Pedal of your choice, the TRANSPOSE LED will stop flashing
and glow continually. This indicates that the XPK-100 is now transposed.
Use the TRANSPOSE/LOCK Switch to turn Transpose “ON” and “OFF.” Only a momentary touch
is required.
Hammond XPK-100 Quick Features Guide
Page 15

TRY THIS - To transpose the XPK-100 using EDIT Mode:
1. From PLAY Mode, press the PLAY/EDIT Switch once. The Information Center Display
should alternate between two messages as shown below:
Current Parameter Current Value
2. Press the PRESET/EDIT “” Switch repeatedly until the Information Center Display
alternates between two messages as shown below:
Current Parameter Current Value
NOTE: You can also press the PRESET/EDIT “” Switch to arrive at the same Advanced Feature selection.
3. Now use the Pedal keys to select the Transpose value you want. The data chart below
shows how to do this.
Advanced Fea tures
13
TRANSPOSE OPTIONS
Transposition Interval Action
No Transposition Press the “Lo C” Pedal
Up 1 half-step Press the “C<” Pedal
Up 2 half-steps Press the “D” Pedal
Up 3 half-steps Press the “D<” Pedal
Up 4 half-steps Press the “E” Pedal
Up 5 half-steps Press the “F” Pedal
Up 6 half-steps Press the “F<<” Pedal
Down 5 half-steps Press the “G” Pedal
Down 4 half-steps Press the “G<<” Pedal
Down 3 half-steps Press the “A” Pedal
Down 2 half-steps Press the “A<” Pedal.
Down 1 half-steps Press the “B” Pedal
4. When you have made your selection, then press the Hi “C” Pedal once. The Information
Center Display will show you the current parameter alternating with your selected value:
Current Parameter Your Selected Value
5. To exit the EDIT Mode and return to PLAY Mode, press the “Hi C” Pedal again. The XPK100 is now transposed to the value you selected.
NOTE: After doing the above, you will notice a small red dot between the first and second characters of the
Information Center Display. This indicates that your new value has not been saved to a Preset. For information
on how to save your settings to a Preset, see page 34.
6. To continue editing, instead of pressing the Hi “C” Pedal, use the PRESET/EDIT Switches
to select the parameter you want to edit. When you are finished editing, press the “Hi
C” Pedal once to return to PLAY Mode. All of your changes will now take effect.
Hammond XPK-100 Quick Features Guide
Page 16

Advanced Features
14
Ë Advanced Feature - E02 Octave
This Advanced Feature allows you to select the Octave in which the XPK-100 will sound. You can select
from “-1" (down 1 octave) through “4” (up 4 octaves). The default setting is “0.”
NOTE: The OCTAVE LED to the right of the Information Center Display will light whenever the XPK-100 is set to play in any
octave other than “0.”
TRY THIS:
1. From PLAY Mode, press the PLAY/EDIT Switch once. The Information Center Display
should alternate between two messages as shown below:
2. Press the PRESET/EDIT “” Switch repeatedly until the Information Center Display
alternates between two messages as shown below:
Current Parameter Current Value
Current Parameter Current Value
NOTE: You can also press the PRESET/EDIT “” Switch to arrive at the same Advanced Feature selection.
3. Now use the Pedal keys to select the MIDI Channel you want.
Using the DEC/INC Pedal keys:
Use the DEC (“A<”) Pedal key to decrease the Octave number selection.
Use the INC (“B”) Pedal key to increase the Octave number selection.
Using the other Pedal keys:
You can use the other Pedal keys to select Octaves. The data chart below shows how to do this.
OCTAVE SELECTIONS
Octave Selection Action
Unison Press the “Lo C” Pedal
Up 1 octave Press the “C<” Pedal
Up 2 octaves Press the “D” Pedal
Up 3 octaves Press the “D<” Pedal
Up 4 octaves Press the “E” Pedal
NOTE: Pressing the “F” through the “B” Pedals will have no effect.
Hammond XPK-100 Quick Features Guide
Page 17

Advanced Fea tures
15
4. When you have made your selection, then press the Hi “C” Pedal once. The Information
Center Display will show you the current parameter alternating with your selected value:
Current Parameter Your Selected Value
5. To exit the EDIT Mode and return to PLAY Mode, press the “Hi C” Pedal again. The XPK100 is now set to the value you selected.
NOTE: After doing the above, you will notice a small red dot between the first and second characters of the
Information Center Display. This indicates that your new value has not been saved to a Preset. For information
on how to save your settings to a Preset, see page 34.
6. To continue editing, instead of pressing the Hi “C” Pedal, use the PRESET/EDIT Switches
to select the parameter you want to edit. When you are finished editing, press the “Hi
C” Pedal once to return to PLAY Mode. All of your changes will now take effect.
Hammond XPK-100 Quick Features Guide
Page 18

Advanced Features
16
Ë Advanced Feature - E03 Poly/Mono Mode
This Advanced Feature allows you to select either “Poly” (polyphonic - more than one pedal note will
play at the same time) or “Mono” (monophonic - only one pedal note will sound if two or more pedal
keys are pressed together) Mode. The default setting is “Mono.”
TRY THIS:
1. From PLAY Mode, press the PLAY/EDIT Switch once. The Information Center Display
should alternate between two messages as shown below:
Current Parameter
Current Value
2. Press the PRESET/EDIT “” Switch repeatedly until the Information Center Display
alternates between two messages as shown below:
Current Parameter Current Value
NOTE: You can also press the PRESET/EDIT “” Switch to arrive at the same Advanced Feature selection.
3. Now use the Pedal keys to select between Poly and Mono Mode.
Use the WHITE Pedal keys (“Lo C” “D” “E” “F” “G” “A” and “B”) to select Poly Mode.
Use the BLACK Pedal keys (“C<” “D<” “F<” “G<” and “A<”) to select Mono Mode.
4. When you have made your selection, then press the Hi “C” Pedal once. The Information
Center Display will show you the current parameter alternating with your selected value:
5. To exit the EDIT Mode and return to PLAY Mode, press the “Hi C” Pedal again. The XPK100 is now set to the value you selected.
NOTE: After doing the above, you will notice a small red dot between the first and second characters of the
Information Center Display. This indicates that your new value has not been saved to a Preset. For information
on how to save your settings to a Preset, see page 34.
6. To continue editing, instead of pressing the Hi “C” Pedal, use the PRESET/EDIT Switches
to select the parameter you want to edit. When you are finished editing, press the “Hi
C” Pedal once to return to PLAY Mode. All of your changes will now take effect.
Hammond XPK-100 Quick Features Guide
Current Parameter
Your Selected Value
Page 19

Ë Advanced Feature - E04 PK Hold ON/OFF
This Advanced Feature allows you to select whether you want the pedal notes to continuously play. The
default setting for this Advanced Feature is “OFF.”
TRY THIS:
1. From PLAY Mode, press the PLAY/EDIT Switch once. The Information Center Display
should alternate between two messages as shown below:
Advanced Fea tures
17
Current Parameter
Current Value
2. Press the PRESET/EDIT “” Switch repeatedly until the Information Center Display
alternates between two messages as shown below:
Current Parameter
NOTE: You can also press the PRESET/EDIT “” Switch to arrive at the same Advanced Feature selection.
Current Value
3. Now use the Pedal keys to turn PK Hold “ON” or “OFF.”
Use the WHITE Pedal keys (“Lo C” “D” “E” “F” “G” “A” and “B”) to turn PK Hold ON.
Use the BLACK Pedal keys (“C<” “D<” “F<” “G<” and “A<”) to turn PK Hold OFF.
4. When you have made your selection, then press the Hi “C” Pedal once. The Information
Center Display will show you the current parameter alternating with your selected value:
Current Parameter
Your Selected Value
5. To exit the EDIT Mode and return to PLAY Mode, press the “Hi C” Pedal again. The XPK100 is now set to the value you selected.
NOTE: After doing the above, you will notice a small red dot between the first and second characters of the
Information Center Display. This indicates that your new value has not been saved to a Preset. For information
on how to save your settings to a Preset, see page 34.
6. To continue editing, instead of pressing the Hi “C” Pedal, use the PRESET/EDIT Switches
to select the parameter you want to edit. When you are finished editing, press the “Hi
C” Pedal once to return to PLAY Mode. All of your changes will now take effect.
Hammond XPK-100 Quick Features Guide
Page 20

Advanced Features
18
Ë Advanced Feature - E05 PK Volume
This Advanced Feature allows you to select the maximum volume or loudness of the pedal notes. You
can select from “0" through “127.” The default value is “127.”
TRY THIS:
2. From PLAY Mode, press the PLAY/EDIT Switch once. The Information Center Display
should alternate between two messages as shown below:
Current Parameter
Current Value
2. Press the PRESET/EDIT “” Switch repeatedly until the Information Center Display
alternates between two messages as shown below:
Current Parameter Current Value
NOTE: You can also press the PRESET/EDIT “” Switch to arrive at the same Advanced Feature selection.
3. Now use the Pedal keys to select the Volume setting you want.
Using the DEC/INC Pedal keys:
Use the DEC (“A<”) Pedal key to decrease the Volume setting.
Use the INC (“B”) Pedal key to increase the Volume setting.
4. When you have made your selection, then press the Hi “C” Pedal once. The Information
Center Display will show you the current parameter alternating with your selected value:
5. To exit the EDIT Mode and return to PLAY Mode, press the “Hi C” Pedal again. The XPK100 will now play at the Volume level you selected.
NOTE: After doing the above, you will notice a small red dot between the first and second characters of the
Information Center Display. This indicates that your new value has not been saved to a Preset. For information
on how to save your settings to a Preset, see page 34.
6. To continue editing, instead of pressing the Hi “C” Pedal, use the PRESET/EDIT Switches
to select the parameter you want to edit. When you are finished editing, press the “Hi
C” Pedal once to return to PLAY Mode. All of your changes will now take effect.
Hammond XPK-100 Quick Features Guide
Current Parameter
Your Selected Value
Page 21

Ë Advanced Feature - E06 Fixed Vel. Value
This Advanced Feature allows you to transmit a fixed Velocity number from 0 through 127 from the XPK100 to a connected MIDI device. This is useful if you are transmitting to a sound module or synthesizer
which has specific sounds for different Velocity values. You can select from “1" through “127.” The
default setting is “100.”
TRY THIS:
1. From PLAY Mode, press the PLAY/EDIT Switch once. The Information Center Display
should alternate between two messages as shown below:
Advanced Fea tures
19
Current Parameter
Current Value
2. Press the PRESET/EDIT “” Switch repeatedly until the Information Center Display
alternates between two messages as shown below:
Current Parameter Current Value
NOTE: You can also press the PRESET/EDIT “” Switch to arrive at the same Advanced Feature selection.
3. Now use the Pedal keys to select the Velocity setting you want.
Using the DEC/INC Pedal keys:
Use the DEC (“A<”) Pedal key to decrease the Velocity setting.
Use the INC (“B”) Pedal key to increase the Velocity setting.
4. When you have made your selection, then press the Hi “C” Pedal once. The Information
Center Display will show you the current parameter alternating with your selected value:
Current Parameter
Your Selected Value
5. To exit the EDIT Mode and return to PLAY Mode, press the “Hi C” Pedal again. The XPK100 will now play at the Velocity you have selected.
NOTE: After doing the above, you will notice a small red dot between the first and second characters of the
Information Center Display. This indicates that your new value has not been saved to a Preset. For information
on how to save your settings to a Preset, see page 34.
6. To continue editing, instead of pressing the Hi “C” Pedal, use the PRESET/EDIT Switches
to select the parameter you want to edit. When you are finished editing, press the “Hi
C” Pedal once to return to PLAY Mode. All of your changes will now take effect.
Hammond XPK-100 Quick Features Guide
Page 22

Advanced Features
20
Ë Advanced Feature - E07 Control Channel
This Advanced Feature allows you to select the MIDI Channel on which Controller information will be
transmitted. You can select from “1" through “16,” or “Pdl,” (the Control Channel will automatically be
the same as the PK MIDI Channel). The default setting is “1.”
TRY THIS:
1. From PLAY Mode, press the PLAY/EDIT Switch once. The Information Center Display
should alternate between two messages as shown below:
2. Press the PRESET/EDIT “” Switch repeatedly until the Information Center Display
alternates between two messages as shown below:
Current Parameter Current Value
Current Parameter Current Value
NOTE: You can also press the PRESET/EDIT “” Switch to arrive at the same Advanced Feature selection.
3. Now use the Pedal keys to select the MIDI Control Channel you want.
Using the DEC/INC Pedal keys:
Use the DEC (“A<”) Pedal key to decrease the MIDI Control Channel number selection.
Use the INC (“B”) Pedal key to increase the MIDI Control Channel number selection.
Hammond XPK-100 Quick Features Guide
Page 23

Advanced Fea tures
21
Using the Pedal keys from “Lo C” through “A”:
You can use the other Pedal keys to select MIDI Channels. The data chart below shows how to
do this.
MIDI CHANNEL OPTIONS
MIDI Channel Number Action
MIDI Channel 1 Press the “Lo C” Pedal
MIDI Channel 2 Press the “C<” Pedal
MIDI Channel 3 Press the “D” Pedal
MIDI Channel 4 Press the “D<” Pedal
MIDI Channel 5 Press the “E” Pedal
MIDI Channel 6 Press the “F” Pedal
MIDI Channel 7 Press the “F<<” Pedal
MIDI Channel 8 Press the “G” Pedal
MIDI Channel 9 Press the “G<<” Pedal
MIDI Channel 10 Press the “A” Pedal
MIDI Channel 11 Press the “Lo C” Pedal, then press the “Lo C” Pedal again.
MIDI Channel 12 Press the “Lo C” Pedal, then press the “C<” Pedal.
MIDI Channel 13 Press the “Lo C” Peda l, then press the “D” Peda l.
MIDI Channel 14 Press the “Lo C” Pedal, then press the “D<” Peda l.
MIDI Channel 15 Press the “Lo C” Peda l, then press the “E” Pedal
MIDI Channel 16 Press the “Lo C” Pedal, then press the “F” Peda l.
4. When you have made your selection, then press the Hi “C” Pedal once. The Information
Center Display will show you the current parameter alternating with your selected value:
Current Parameter Your Selected Value
5. To exit the EDIT Mode and return to PLAY Mode, press the “Hi C” Pedal again. The
Control Channel of the XPK-100 is now set to the value you selected.
NOTE: After doing the above, you will notice a small red dot between the first and second characters of the
Information Center Display. This indicates that your new value has not been saved to a Preset. For information
on how to save your settings to a Preset, see page 34.
6. To continue editing, instead of pressing the Hi “C” Pedal, use the PRESET/EDIT Switches
to select the parameter you want to edit. When you are finished editing, press the “Hi
C” Pedal once to return to PLAY Mode. All of your changes will now take effect.
Hammond XPK-100 Quick Features Guide
Page 24

Advanced Features
22
Ë Advanced Feature - E08 CONTROL Sw. Function
This Advanced Feature allows you to select the function for the CONTROL Switch.
NOTE: The CONTROL LED to the right of the Information Center Display will light whenever the CONTROL Switch is active.
TRY THIS:
1. From PLAY Mode, press the PLAY/EDIT Switch once. The Information Center Display
should alternate between two messages as shown below:
2. Press the PRESET/EDIT “” Switch repeatedly until the Information Center Display
alternates between two messages as shown below:
Current Parameter Current Value
Current Parameter Current Value
NOTE: You can also press the PRESET/EDIT “” Switch to arrive at the same Advanced Feature selection.
3. Now use the Pedal keys to select the function you want.
Using the DEC/INC Pedal keys:
Use the DEC (“A<”) Pedal key to scroll down through the choices.
Use the INC (“B”) Pedal key to scroll up through the choices.
The data chart on the next page gives a description of the functions available for the CONTROL
Switch.
Hammond XPK-100 Quick Features Guide
Page 25

Advanced Fea tures
CONTROL SWITCH FUNCTIONS
Function Description
*Pedal Susta in LONG Adds a LONG relea se to the Pedal tones. This is the defa ult setting.
*Pedal Sustain MEDIUM Adds a MEDIUM release time to the Pedal tones.
*Percussion 3rd Ha rmo nic Turns on the Percussion THIRD HARMONIC Touch Tab.
*Percussion 2nd Ha rmonic Turns on the Percussion SECON D HARMO NIC Touch Tab.
*Leslie SLOW/FAST Turns on the LESLIE FAST Touch Tab.
*Leslie OFF Turns on the LESLIE ON Touch Tab.
*Leslie BRAKE Turns on the LESLIE BRAKE Touch Tab.
Octave Up Transposes up one octave.
Transpose Turns the selected Transpose interval ON or OFF.
Damper Transmits Controller#64.
Portamento ON/OFF Transmits Controller#65.
Sostenuto Transmits Controller#66.
Soft Transmits Controller#67.
Rhythm Start Starts a rhythm playing on a connected rhythm unit.
Rhythm Pause/Continue Pauses a rhythm or sequence, then allows you to start the sequence aga in at
the point at which you stopped it.
Modulation Minimum Transmits a Modulation value of 48 (30h).
Modulation Mid Transmits a Modulation value of 65 (41h).
Modulation Maximum Transm its a Modulation value of 96 (7Fh).
*V1/C1 Turns on the V1/C1 Touch Tab.
*V2/C2 Turns on the V2/C2 Touch Tab.
*V3/C3 Turns on both the V1/C1 and V2/C2 Touch Tabs.
+C2 Turns on C2 (Chorus 2).
+C3 Turns on C3 (Chorus 3).
+Vibrato ON/OFF Turns on Vibrato.
*Chorus ON/OFF Turns on Chorus.
Controller#16 Transmits Controller#16.
Controller#17 Transmits Controller#17.
Controller#18 Transmits Controller#18.
Controller#19 Transmits Controller#19.
Reverb Depth Transmits Controller#91.
Tremolo Depth Transm its Controller#92.
Chorus Depth Transm its Controller#93.
Controller#94 Transmits Controller#94.
Controller#95 Transmits Controller#95.
Controller#96 Transmits Controller#96.
Controller#97 Transmits Controller#97.
23
* - Applies to XB-1/XK-2 Hammond Drawbar Keyb oard only.
+ - Applies to Hammond XM -1 Drawbar Mo dule only.
NOTE: In order to use the CONTROL Switch functions that apply to a Hammond MIDI instrument, NRPN must be
“ON.” Please refer to the Owner’s Guide or Quick Features Guide for your Hammond Keyboard or Module for
information on how to turn on NRPN (Non-Registered Parameter Number).
Hammond XPK-100 Quick Features Guide
Page 26

Advanced Features
24
4. When you have made your selection, then press the Hi “C” Pedal once. The Information
Center Display will show you the current parameter alternating with your selected value:
5. To exit the EDIT Mode and return to PLAY Mode, press the “Hi C” Pedal again. The
CONTROL Switch will now control the function you have selected.
NOTE: After doing the above, you will notice a small red dot between the first and second characters of the
Information Center Display. This indicates that your new value has not been saved to a Preset. For information
on how to save your settings to a Preset, see page 34.
6. To continue editing, instead of pressing the Hi “C” Pedal, use the PRESET/EDIT Switches
to select the parameter you want to edit. When you are finished editing, press the “Hi
C” Pedal once to return to PLAY Mode. All of your changes will now take effect.
Current Parameter Your Selected Value
Hammond XPK-100 Quick Features Guide
Page 27

Ë Advanced Feature - E09 CONTROL Sw. Mode
This Advanced Feature allows you to select how the CONTROL Switch operates . You can select either
"Alt" (Alternate - pressing and releasing the CONTROL Switch toggles between “ON” and “OFF”) or
“Mom” (Mom entary - pressing the CONTROL Switch turns its function “ON,” while releasing the
CONTROL Switch turns the selected function “OFF”). The default setting is “Alt.”
NOTE: The CONTROL LED to the right of the Information Center Display will light whenever the CONTROL Switch is active.
TRY THIS:
1. From PLAY Mode, press the PLAY/EDIT Switch once. The Information Center Display
should alternate between two messages as shown below:
Advanced Fea tures
25
Current Parameter
Current Value
2. Press the PRESET/EDIT “” Switch repeatedly until the Information Center Display
alternates between two messages as shown below:
Current Parameter Current Value
NOTE: You can also press the PRESET/EDIT “” Switch to arrive at the same Advanced Feature selection.
3. Now use the Pedal keys to select between Alternate and Momentary Mode.
Use the WHITE Pedal keys (“Lo C” “D” “E” “F” “G” “A” and “B”) to select Alt (alternate)
Mode.
Use the BLACK Pedal keys (“C<” “D<” “F<” “G<” and “A<”) to select Mom (momentary)
Mode.
4. When you have made your selection, then press the Hi “C” Pedal once. The Information
Center Display will show you the current parameter alternating with your selected value:
Current Parameter
Your Selected Value
5. To exit the EDIT Mode and return to PLAY Mode, press the “Hi C” Pedal again. The
CONTROL Switch on the XPK-100 will now operate in the Mode you have selected.
NOTE: After doing the above, you will notice a small red dot between the first and second characters of the
Information Center Display. This indicates that your new value has not been saved to a Preset. For information
on how to save your settings to a Preset, see page 34.
6. To continue editing, instead of pressing the Hi “C” Pedal, use the PRESET/EDIT Switches
to select the parameter you want to edit. When you are finished editing, press the “Hi
C” Pedal once to return to PLAY Mode. All of your changes will now take effect.
Hammond XPK-100 Quick Features Guide
Page 28

Advanced Features
26
Ë Advanced Feature - E10 Program Number
This Advanced Feature allows you to select the Program Number that will be transmitted. You can select
from “1" through “128.” The default setting is the same as the selected Preset number (“P01" is Program
Number 1, “P02" is Program Number2, etc.).
NOTE: You can also select “OFF,” meaning that no Program Number data will be sent.
TRY THIS:
1. From PLAY Mode, press the PLAY/EDIT Switch once. The Information Center Display
should alternate between two messages as shown below:
Current Parameter
Current Value
2. Press the PRESET/EDIT “” Switch repeatedly until the Information Center Display
alternates between two messages as shown below:
Current Parameter Current Value
NOTE: You can also press the PRESET/EDIT “” Switch to arrive at the same Advanced Feature selection.
3. Now use the Pedal keys to select the Program number you want.
Using the DEC/INC Pedal keys:
Use the DEC (“A<”) Pedal key to scroll down through the Program numbers.
Use the INC (“B”) Pedal key to scroll up through the Program numbers.
4. When you have made your selection, then press the Hi “C” Pedal once. The Information
Center Display will show you the current parameter alternating with your selected value:
5. To exit the EDIT Mode and return to PLAY Mode, press the “Hi C” Pedal again.
NOTE: After doing the above, you will notice a small red dot between the first and second characters of the
Information Center Display. This indicates that your new value has not been saved to a Preset. For information
on how to save your settings to a Preset, see page 34.
6. To continue editing, instead of pressing the Hi “C” Pedal, use the PRESET/EDIT Switches
to select the parameter you want to edit. When you are finished editing, press the “Hi
C” Pedal once to return to PLAY Mode. All of your changes will now take effect.
NOTE: The CONTROL Channel and the PK MIDI Channel must be set to the same number in order for Program
Changes to be properly recognized by the receiving instrument.
Hammond XPK-100 Quick Features Guide
Current Parameter
Your Selected Value
Page 29

Ë Advanced Feature - E11 Bank No. MSB (Most Significant Bit)
This Advanced Feature allows you to select different Bank numbers for voices. You can select the “MSB”
(Most Significant Bit) for each Bank selection. This is so that you have access to the great number of
voices available on modern sound modules. Please refer to the documentation for your module to
determine the Bank numbers for specific voices. You can select from “0" through “127.” The default
setting is “0.”
TRY THIS:
1. From PLAY Mode, press the PLAY/EDIT Switch once. The Information Center Display
should alternate between two messages as shown below:
Current Parameter Current Value
2. Press the PRESET/EDIT “” Switch repeatedly until the Information Center Display
alternates between two messages as shown below:
Advanced Fea tures
27
Current Parameter Current Value
NOTE: You can also press the PRESET/EDIT “” Switch to arrive at the same Advanced Feature selection.
3. Now use the Pedal keys to select the Bank number you want.
Using the DEC/INC Pedal keys:
Use the DEC (“A<”) Pedal key to decrease the Bank number selection.
Use the INC (“B”) Pedal key to increase the Bank number selection.
Using the Pedal keys from “Lo C” through “A”:
You can also use the other Pedal keys to select Bank numbers . The data chart below shows the
numbers represented by each Pedal.
PEDAL NUMBER OPTIONS
Number Action
“0" Press the “Lo C” Pedal
“1" Press the “C<” Pedal
“2" Press the “D” Pedal
“3" Press the “D<” Pedal
“4" Press the “E” Pedal
“5" Press the “F” Pedal
“6" Press the “F<” Pedal
“7" Press the “G” Pedal
“8" Press the “G<” Pedal
“9" Press the “A” Pedal
Hammond XPK-100 Quick Features Guide
Page 30

Advanced Features
28
You can select numbers by pressing the Pedals representing numbers in succession. For
example, if you want the number “73,” press the “G” Pedal, then the “D<” Pedal:
+ =
If you want a three-digit number (up to 127), press three numbered Pedals. For
example, the number “115" would be selected like this:
+ + =
4. When you have made your selection, then press the Hi “C” Pedal once. The Information
Center Display will show you the current parameter alternating with your selected value:
Current Parameter Your Selected Value
5. To exit the EDIT Mode and return to PLAY Mode, press the “Hi C” Pedal again.
NOTE: After doing the above, you will notice a small red dot between the first and second characters of the
Information Center Display. This indicates that your new value has not been saved to a Preset. For information
on how to save your settings to a Preset, see page 34.
6. To continue editing, instead of pressing the Hi “C” Pedal, use the PRESET/EDIT Switches
to select the parameter you want to edit. When you are finished editing, press the “Hi
C” Pedal once to return to PLAY Mode. All of your changes will now take effect.
Hammond XPK-100 Quick Features Guide
Page 31

Ë Advanced Feature - E12 Bank No. LSB (Least Significant Bit)
This Advanced Feature allows you to select different Bank numbers for voices. You can select the “LSB”
(Least Significant Bit) for each Bank selection. This is so that you have access to the great number of
voices available on modern sound modules. Please refer to the documentation for your module to
determine the Bank numbers for specific voices. You can select from “0" through “127.” The default
setting is “0.”
TRY THIS:
1. From PLAY Mode, press the PLAY/EDIT Switch once. The Information Center Display
should alternate between two messages as shown below:
Current Parameter Current Value
2. Press the PRESET/EDIT “” Switch repeatedly until the Information Center Display
alternates between two messages as shown below:
Advanced Fea tures
29
Current Parameter Current Value
NOTE: You can also press the PRESET/EDIT “” Switch to arrive at the same Advanced Feature selection.
3. Now use the Pedal keys to select the Bank number you want.
Using the DEC/INC Pedal keys:
Use the DEC (“A<”) Pedal key to decrease the Bank number selection.
Use the INC (“B”) Pedal key to increase the Bank number selection.
You can also use the other Pedal keys to select Bank numbers . The data chart below shows the
numbers represented by each Pedal.
PEDAL NUMBER OPTIONS
Number Action
“0" Press the “Lo C” Pedal
“1" Press the “C<” Pedal
“2" Press the “D” Pedal
“3" Press the “D<” Pedal
“4" Press the “E” Pedal
“5" Press the “F” Pedal
“6" Press the “F<” Pedal
“7" Press the “G” Pedal
“8" Press the “G<” Pedal
“9" Press the “A” Pedal
Hammond XPK-100 Quick Features Guide
Page 32

Advanced Features
30
You can select numbers by pressing the Pedals representing numbers in succession. For
example, if you want the number “73,” press the “G” Pedal, then the “D<” Pedal:
+ =
If you want a three-digit number (up to 127), press three numbered Pedals. For
example, the number “115" would be selected like this:
+ + =
4. When you have made your selection, then press the Hi “C” Pedal once. The Information
Center Display will show you the current parameter alternating with your selected value:
Current Parameter Your Selected Value
5. To exit the EDIT Mode and return to PLAY Mode, press the “Hi C” Pedal again.
NOTE: After doing the above, you will notice a small red dot between the first and second characters of the
Information Center Display. This indicates that your new value has not been saved to a Preset. For information
on how to save your settings to a Preset, see page 34.
6. To continue editing, instead of pressing the Hi “C” Pedal, use the PRESET/EDIT Switches
to select the parameter you want to edit. When you are finished editing, press the “Hi
C” Pedal once to return to PLAY Mode. All of your changes will now take effect.
Hammond XPK-100 Quick Features Guide
Page 33

Ë Advanced Feature - E13 System
This Advanced Feature allows you to perform certain functions associated with the basic system or setup
of the XPK-100.
TRY THIS:
1. From PLAY Mode, press the PLAY/EDIT Switch once. The Information Center Display
should alternate between two messages as shown below:
2. Press the PRESET/EDIT “” Switch repeatedly until the Information Center Display
alternates between two messages as shown below:
Advanced Fea tures
Current Parameter Current Value
31
NOTE: You can also press the PRESET/EDIT “” Switch to arrive at the same Advanced Feature selection.
3. Now use the Pedal keys to select the System function you want.
Using the DEC/INC Pedal keys:
Use the DEC (“A<”) Pedal key to scroll down through the selections.
Use the INC (“B”) Pedal key to scroll up through the selections.
Using the Pedal keys from “Lo C” through “A”:
You can use the other Pedal keys to select System functions.
SYSTEM PARAMETERS
Function Action
PRESET RESET - Allows you to restore the factory-
default settings to the selected Preset.
MIDI Merge OFF - Disables the XPK-100's MIDI Merge
feature.
MIDI Merge ON - Enables the XPK-100's MIDI Merge
feature.
MIDI Data Dump - All ows you to send the mem ory
contents of the XPK-100 to a MIDI Data recorder.
Current Parameter Current Value
Press the “C<” Pedal
Press the “D” Pedal
Press the “D<” Pedal
Prepare your MIDI Data recorder for receiving data, start
the record er, then press the “E” Pedal
NOTE: The MIDI Merge feature affects only the MIDI IN 1 port.
4. After doing the above, press the Hi “C” Pedal. The XPK-100 will return to PLAY Mode.
Hammond XPK-100 Quick Features Guide
Page 34

Advanced Features
32
Ë Advanced Feature - LOCK Feature
This Advanced Feature is designed to make the XPK-100 easier to use in live-performance situations by
greatly reducing the possibility of accidental changes in sounds or setups.
When using the XPK-100 in performance, it may be possible that you would accidentally touch one of
the Switches with your foot and change, say, a Preset when you did not intend to do so. This Advanced
Feature is designed to minimize the possibility of this happening.
When the LOCK Feature is “ON,” all of the Switches except the CONTROL Switch are disabled
from operating any of their assigned function s. If you accidentally strike a Switch during
performance, your settings will not be disrupted.
When the LOCK Feature is “OFF,” the Switches will all work normally.
NOTE: The CONTROL Switch is not affected by the LOCK Feature. This is so you can continue to use the CONTROL Switch
to add Pedal Sustain, switch a Leslie effect from SLOW to FAST, etc.
TRY THIS:
1. From PLAY Mode, Press and Hold the TRANSPOSE/LOCK Switch for approximately 1
second. The Information Center Display should display the message shown below:
LOCK Feature enabled
Press and Hold
When the XPK-100 is in this mode, except for the CONTROL Switch, touching the Switches will have no
effect.
To turn the LOCK Feature “OFF” and re-enable the Switches, Press and Hold the TRANSPOSE/LOCK
Switch again for approximately 1 second. The Information Center Display should now look similar to
this:
LOCK Feature disabled
Press and Hold
All the Switches will now function normally.
Hammond XPK-100 Quick Features Guide
Page 35

PRESETS
Your Hammond XPK-100 contains 15 pre-programmed Advanced Feature settings called Presets. The
factory-programmed settings can be changed and programmed with your own registrations. The factory
Presets can be restored by doing the RESET ALL procedure.
Ë Selecting a Preset
You must be in PLAY Mode to select Presets. When you first connect the XPK-100 to AC power, the PLAY
Mode will display. The Information Center Display should look similar to this:
The designation, “P01” indicates that Preset 1 is selected.
TRY THIS:
1. From the above screen, touch the PRESET/EDIT “” Switch once. The Information
Center Display should now show the following:
Presets
33
You have now selected the next Preset or Preset 2.
2. From the above screen, touch the PRESET/EDIT “” Switch two times. The Information
Center Display should now show the following:
You have now selected Preset 15, or the last Preset.
The above example shows you how, by using the PRESET/EDIT “” and “” Switches, you can
scroll forward as well as backward through the Preset selections until you find the one you want.
Hammond XPK-100 Quick Features Guide
Page 36

Presets
34
Ë Saving to a Preset
After you have made changes to the instrument using the Advanced Features in EDIT Mode, you can save
your changes to a Preset for later use.
TRY THIS:
1. From PLAY Mode, press the PLAY/EDIT Switch once to enter EDIT Mode.
2. Make whatever changes you wish to the XPK-100 by using the Advanced Features.
3. When you have finished editing, then press the Hi “C” Pedal once. The Information
Center Display will show you the current parameter alternating with your selected value.
For example if “CONTROL Sw Function” was the last parameter you edited, the
Information Center Display would look similar to this:
Current Parameter
Your Selected Value
4. Press and Hold the PLAY/EDIT Switch. The Information Center Display should now flash
a Preset Number similar to this:
Current Preset
5. You can now select which Preset Number to save your edits to. If you wish to select a
different Preset Number, use the PRESET/EDIT “” and “” Switches to make your
selection. You can select from “1" through “15,” or you may select “ALL” if you want to
save your edits to all of the Presets.
NOTE: If at this point DO NOT wish to save your edited parameters to a Preset, press the PLAY/EDIT Switch. The
Information Center Display will show, “Can,” meaning that the Save operation is canceled.
6. After you have made your selection, press the Hi “C” Pedal again. The Information
Center Display should now flash the following message:
After the above message is finished flashing, the Information Center Display will return to PLAY
Mode. Your parameters are now saved to the Preset you selected.
Hammond XPK-100 Quick Features Guide
Preset Saving
Page 37

SPECIFICATIONS
! 13-note pedalboard, fixed velocity
! LED display: 7 segments, 3 characters
! Panel Switches: PLAY/EDIT, PRESET/EDIT Plus and Minus, TRANSPOSE/LOCK, CONTROL
! Jacks, DC power input, MIDI IN 1, MIDI IN 2, MIDI OUT
! Accessories, AC power supply, MIDI cable
! Weight: 8.5 kg
! Dimensions: W 56cm D 39cm H 13cm
Ë Appendix A - EDIT Parameter List
Advanced Feature Values
*E00 PK MIDI Channel 1 ~ 16
*E01 Transpose -5 ~ +6
*E02 Octave -1 ~ +4
*E03 Poly/Mono Mode Poly/Mono
*E04 PK Hold ON/OFF ON/OFF
*E05 PK Volume 1 ~ 127
*E06 Fixed Vel. Value 1 ~ 127
*E07 Control Channel 1 ~ 16, Pedal
*E08 CONTROL Sw. Func. See page 23
*E09 CONTROL Sw. Mode Alternate/Mo men tary
*E10 Program Change OFF, 1 ~ 128
*E11 Bank Select MSB 0 ~ 127
*E12 Bank Select LSB 0 ~ 127
E13 System Preset Reset, MIDI Merge ON/OFF, MIDI Data
Dump
Specifications
35
* - Data can be saved to a Preset.
Ë Appendix B - Default Preset Settings
Advanced Feature Default Setting
E00 PK MIDI Channel 3
E01 Transpose 0
E02 Octave 0
E03 Poly/Mono Mode Mono
E04 PK Hold ON/OFF OFF
E05 PK Volume 127
E06 Fixed Vel. Value 100
E07 Control Channel 1
E08 CONTROL Sw. Func. Pedal Sustain LONG
E09 CONTROL Sw. Mode Alternate
E10 Program Change Same as Preset Number
E11 Bank Select MSB 0
E12 Bank Select LSB 0
E13 System Reset
Hammond XPK-100 Quick Features Guide
Page 38

Specifications
36
Ë Appendix C - MIDI Implementation Chart
FUNCTION TRANSMITTED RECOGNIZED REMARKS
Date: 4-16-99
Version 1.00
Basic
Channel
Mode
Note
Number: True voice
Velocity Note ON
After
Touch
Default
Changed
Default
Changed
Altered
Note OFF
Key's
Ch's
1-16 *1
***************
Mode 3
×
***************
24-96 *3
***************
*4
×
×
×
1 *2
****************
Mode 3
***************
Pitch Bend × ×
Control
Change
Bank Select 0,32
Modulation 1
Data Entry 6,38
Main Volume 7
16,17,18,19
64,65,66,67
91,92,93,94,95
96,97
98,99
*1 PK = 3,Control=1
*2 When MIDI Merge is OFF
×
×
*3 Normal octave 36-48
×
×
*4 Fixed value
×
×
×
×
×
×
×
×
×
×
×
×
Bank Select
Modulation
Data Entry
Main Volume
General Purpose 1-4
Pedal Switches
Effects 1-5 Depth
INC,DEC
NRPN,LSB,MSB
Program
Change :True #
**************
1-15 *5
System Exclusive *6 *7
Common
System
Real Time
Aux
Messages
:Song Pos
:Song Sel
:Tune
:Clock
:Commands
:Local On/Off
:Reset All Controllers
:All Notes Off
:Reset
×
×
×
×
×
×
×
×
×
×
× FAh,FCh,FBh
×
×
×
×
Notes * MIDI IN 2 is SOFT THRU
*6 Transpose Set, NRPN ON, RAM Data OUT
*7 RAM Data IN
Mode 1 : OMNI ON, POLY
Mode 3 : OMNI OFF, POLY
Mode 2 : OMNI ON, MONO
Mode 4 : OMNI OFF, MONO
*5 Preset Select
(123)
: Yes
× : No
Hammond XPK-100 Quick Features Guide
Page 39

37
Hammond maintains a policy of continuously improving and upgrading its instruments and therefore
reserves the right to change specifications without notice. Although every attempt has been made to
insure the accuracy of the descriptive contents of this Guide, total accuracy cannot be guaranteed.
Should the player require further assistance, inquiries should first be made to your Authorized
Hammond Dealer. If you still need further assistance, contact Hammond at the following addresses:
In the United States contact:
In Germany, Switzerland and
All other countries contact:
Austria contact:
HAMMOND SUZUKI USA, Inc.
733 Annoreno Dr.
Addison, IL 60101
UNITED STATES
HAMMOND SUZUKI
DEUTSCHLAND GmbH
Karlstraße 38
HAMMOND SUZUKI Ltd.
25-12, Ryoke 2 Chome
Hamamatsu 430 (Shizuoka)
JAPAN
D-89129 LANGENAU/ULM
In the United Kingdom contact:
HAMMOND SUZUKI U.K. LTD.
GERMANY
In Europe contact:
19 Presley Way
Crownhill
Milton Keynes MK8 OE5
UNITED KINGDOM
HAMMOND SUZUKI EUROPE
B.V
Industriepark Hagestein
Ir. D.S. Tuynmanweg 4A
4131 PN Vianen
THE NETHERLANDS
Technical materials are available and can be obtained by mailing a request to the appropriate address listed
above marked ATTENTION: SERVICE DEPARTMENT.
Manufacturer:
SUZUKI MUSICAL INSTRUMENT MFG. CO., Ltd
25-12, Ryoke 2 Chome
Hamamatsu 430 (Shizuoka)
JAPAN
ACKNOWLEDGMENTS
In appreciation of the many fine players who have made their contributions to Hammond over the years:
Axel Alexander
Milt Buckner
Buddy Cole
Jesse Crawford
Wild Bill Davis
Jackie Davis
"Papa" John DeFrancesco
Lenny Dee
Collins Driggs
Artie Dunn
Eddie Dunstedter
Charles Earland
Richard Ellsasser
Keith Emerson
Fred Feibel
Virgil Fox
Ken Griffin
Jon Hammond
Glenn Hardman
Porter Heaps
Richard "Groove" Holmes
Milt Herth
Al Kooper
Eddie Layton
Jon Lord
Captain Jack McDuff
Jimmy McGriff
Lee Micheals
Don Patterson
Big John Patton
Richard Purvis
Rosa Rio
Freddie Roach
Bryan Rodwell
Dr. Mario Salvador
Shirley Scott
Hal Shutz
Ethel Smith
Jimmy Smith
Paul Taubman
Shay Torrent
Juan Torres
Rick Wakeman
Thomas "Fats" Waller
Walter Wanderly
Lew White
Baby Face Willette
George Wright
Pietro Yon
Larry Young
and many others too numerous to
list.
Hammond XPK-100 Quick Features Guide
Page 40

HAMMOND SUZUKI, LTD., Hamamatsu, Japan
Page 41

HA<O> XPK-100
Version 1.20 Addendum
The contents of page 1, 6, 7 are changed as follows:
1 Introduction
The display of the Accessory Panel has been changed as shown below, and
the Adaptor AD1-1508 or AD3-1508 is possible to use.
Basic Hook-Up
+
DC IN 1 0V
USE AD1-1010
AD2-1010
AD3-1010
ADAPT OR
ONL Y
IN 1
6 Infomation Center Display
LOCK Feature is memorized even after switching off the power.
The default setting is LOCK Feature enabled.
The Information Center Display will flash
the following for approximately 1 second:
IN 2
MIDI
OUT
PLAY Mode
DC IN 10 -1 5V
USE
SUZ UKI AD-Series
ADAPT OR o nly
+
IN 1
New Ac ces s o ry PanelOld Accessory Panel
IN 2
MI DI
120
Pre ss and Ho ld
the TRANSPOSE/LOCK
Swit ch f or 1 seco nd
LO?
ATTENTION - LOCK Feature
This Advance Feateure is designed to make the XPK-100 easier to use in live-performance
situations by greatly reducing the possibility of accidental changes in sounds or setups.
LOCK Feature enabled LOCK Feature disabled
P01
OUT
When using the XPK-100 in performance, it may be possible that you would accidentally touch
one of the Switches with your foot and change, say, a Preset when you did not intend to do so.
This Advanced Feature is designed to minimize the possibility of this happening.
When the LOCK Feature is "ON," all of the Switches except the CONTROL Switch are
disabled from operating any of their assigned functions If you accidentally strike a Switch
during performance, your settings will not be disrupted.
When the LOCK Feature is "OFF," the Swicthes will all work normally.
7 Infomation Center Display
If it is all reset, it starts from LOCK Feature enabled.
The Information Center Display will flash the following for approximately 1 second:
ALL RESET
AIN
Pre ss and Ho ld
the TRANSPOSE/LOCK
Swit ch f or 1 seco nd
LO? P01
LOCK Feature enabled LOCK Feature disabled
SUZUKI MUSICAL. INST.MFG.CO.,LTD.
Printed in Japan
457- 40147 V1.0 070828
 Loading...