

Page 1
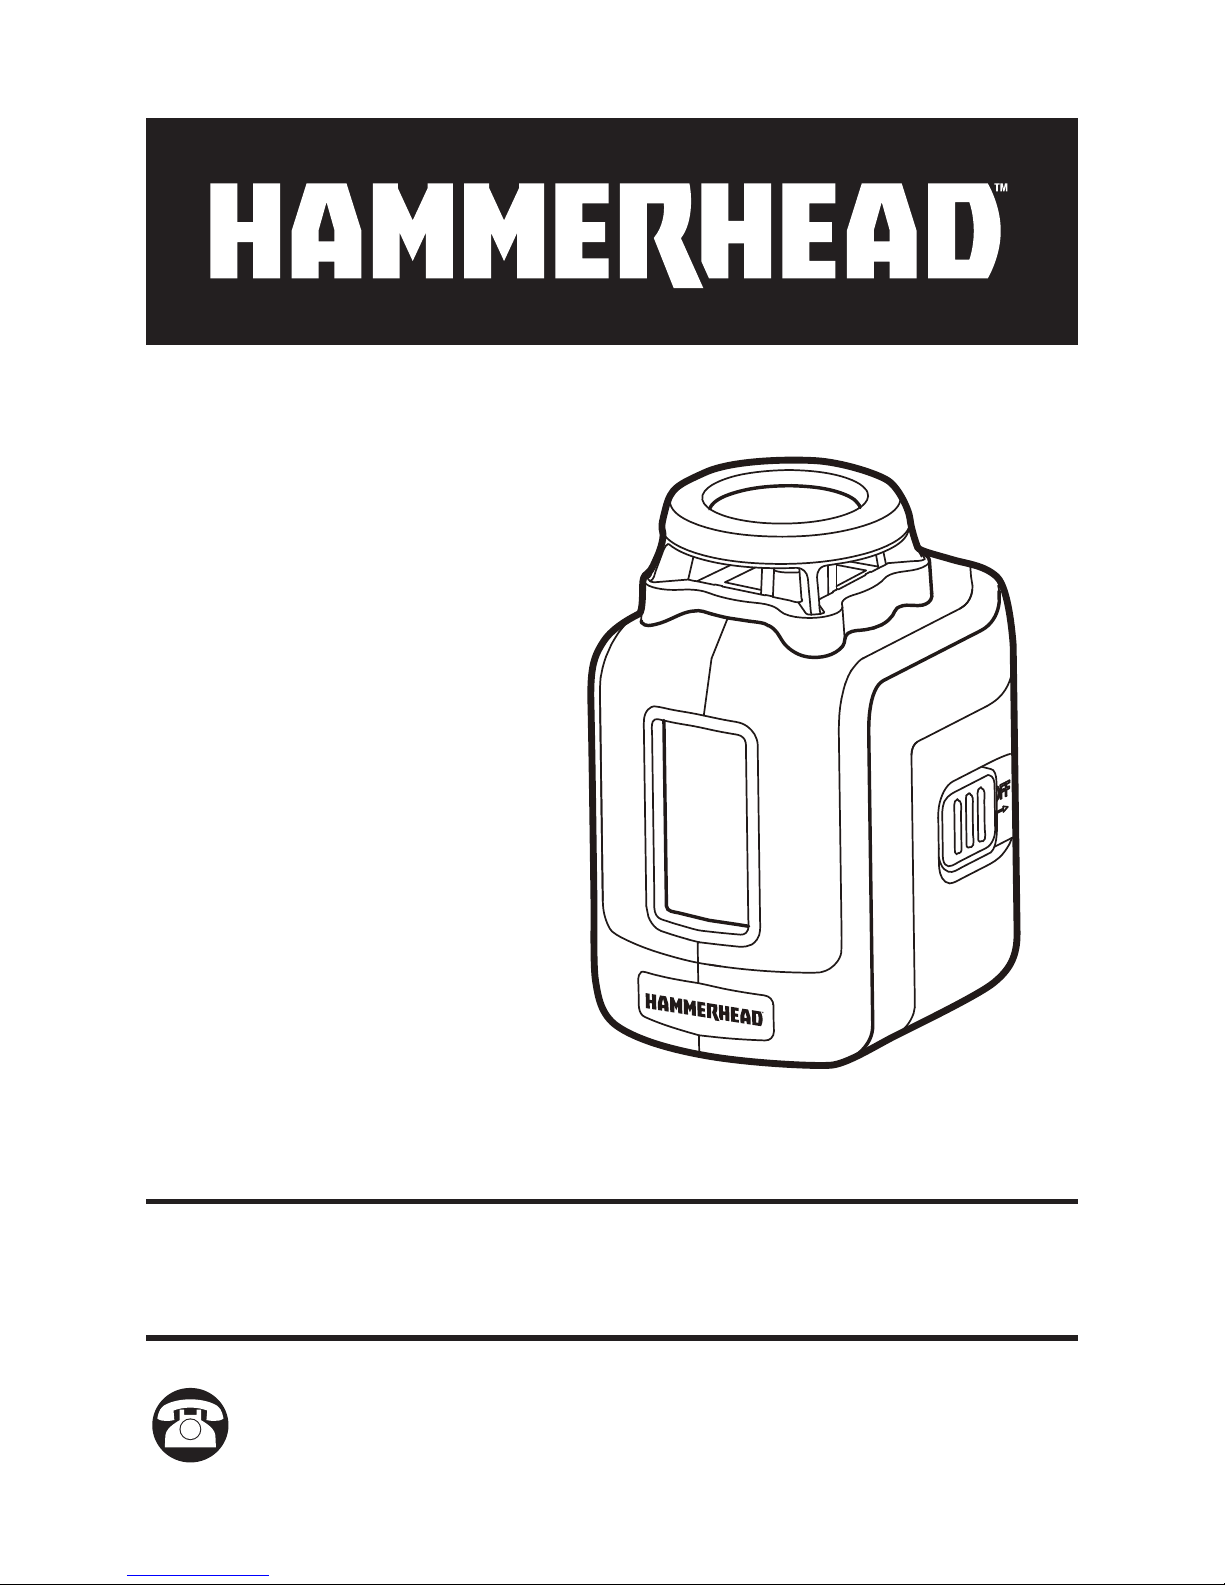
SELF-LEVELING
360-DEGREE
CROSS LINE LASER
MODEL HLCL360
ATTACH YOUR RECEIPT HERE
Serial Number ______________________ Purchase Date _______________________
Questions, problems, missing parts? Before returning to your retailer, call
our customer service department at 1-877-888-1880, 8:30 a.m. – 8:00 p.m.
EST (Monday – Friday) & 10:00 a.m. – 6:00 p.m. EST (Saturday and Sunday).
Page 2

2 SELF-LEVELING 360-DEGREE CROSS LINE LASER
TABLE OF CONTENTS
Technical Specications ...........................................2
Safety Instructions ...............................................3
Unpacking .....................................................5
Description .....................................................6
Operation ......................................................7
Maintenance ...................................................13
Troubleshooting ................................................14
Warranty ......................................................15
TECHNICAL SPECIFICATIONS
COMPONENT SPECIFICATIONS
Power supply
6V
(4 x 1.5V AA alkaline battery)
Laser
λ=635 nm, Class II laser, maximum laser
output<1 mW
Self-leveling range ±4°
Accuracy ±1/8 inch @ 30 feet
Operating range 30 feet (diameter 60 feet)
Operating time Approx. 35 hours
Operating temperature 32°F to 104°F (0°C to 40°C)
Storage temperature 14°F to 158°F (-10°C to 70°C)
*Important: Under unfavorable conditions, such as in bright sunlight or when
targeting poorly reecting or very rough surfaces, the tool’s measuring range and
accuracy will be reduced.
Page 3
SELF-LEVELING 360-DEGREE CROSS LINE LASER 3
SAFETY INSTRUCTIONS
Safety Instructions for Self-Leveling 360-Degree Cross Line Laser
WARNING
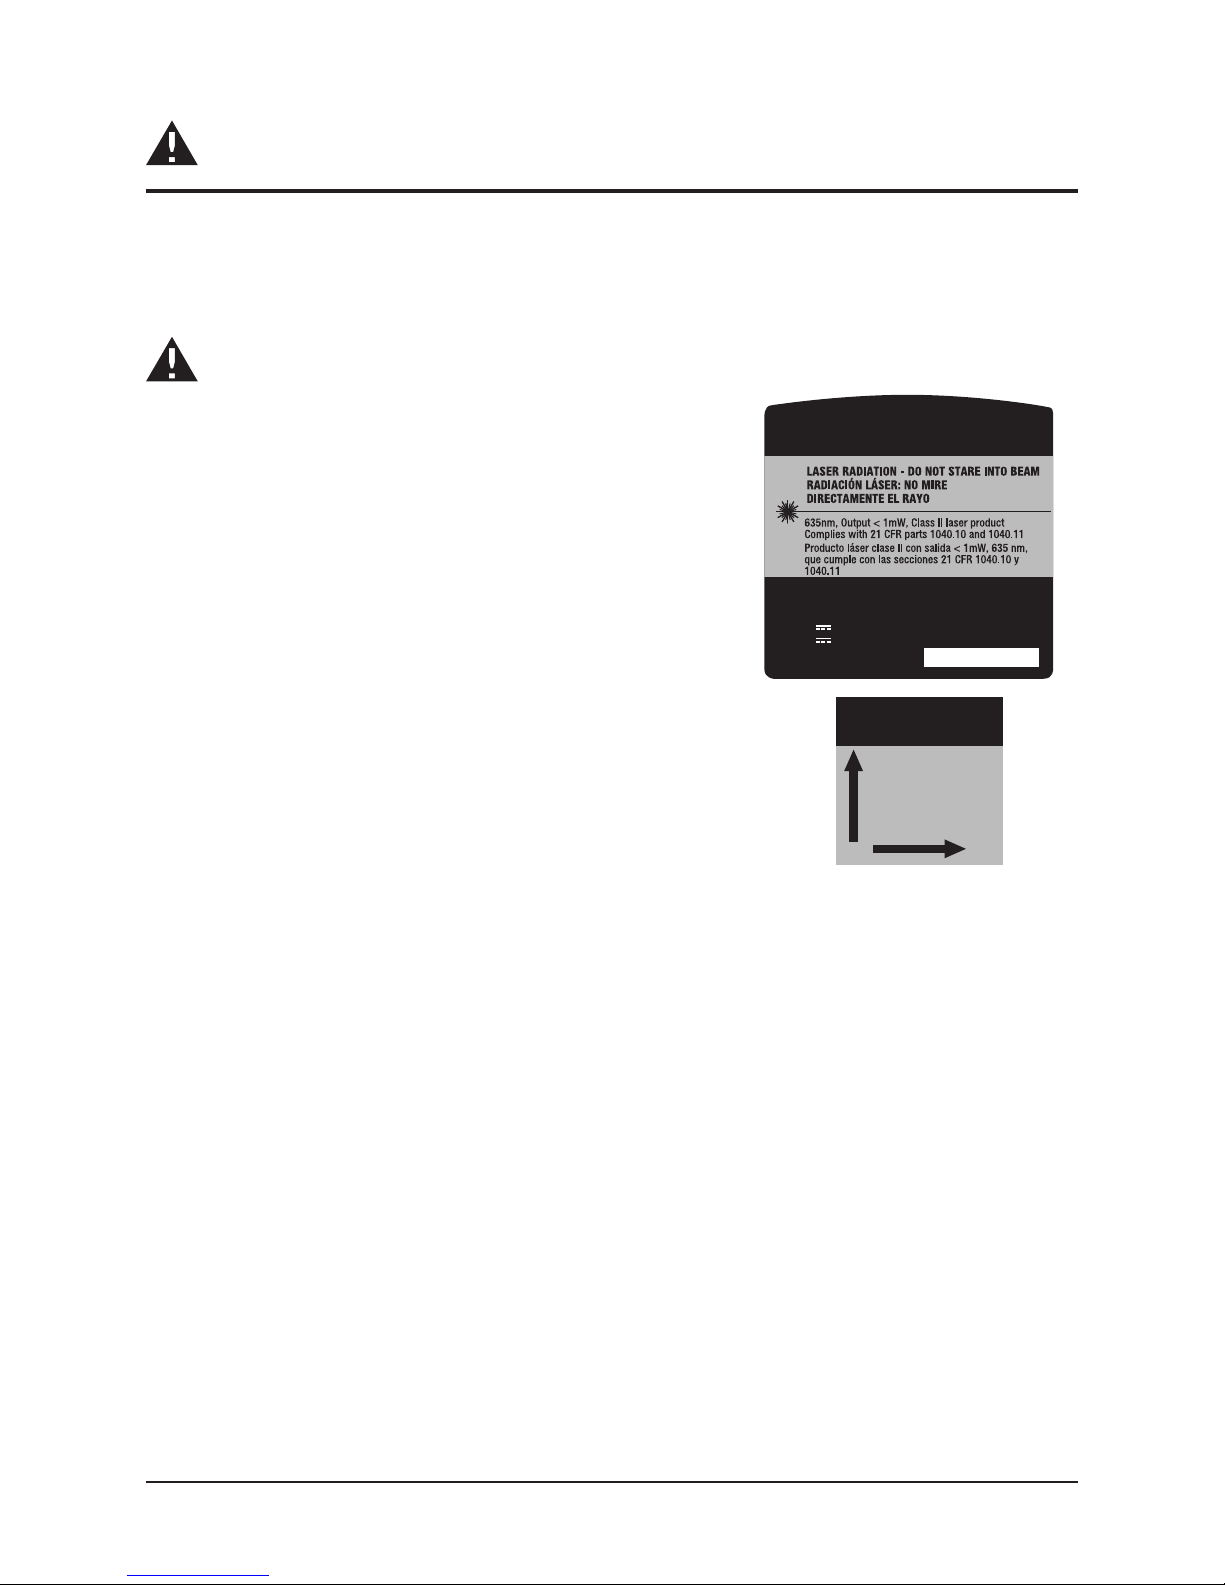
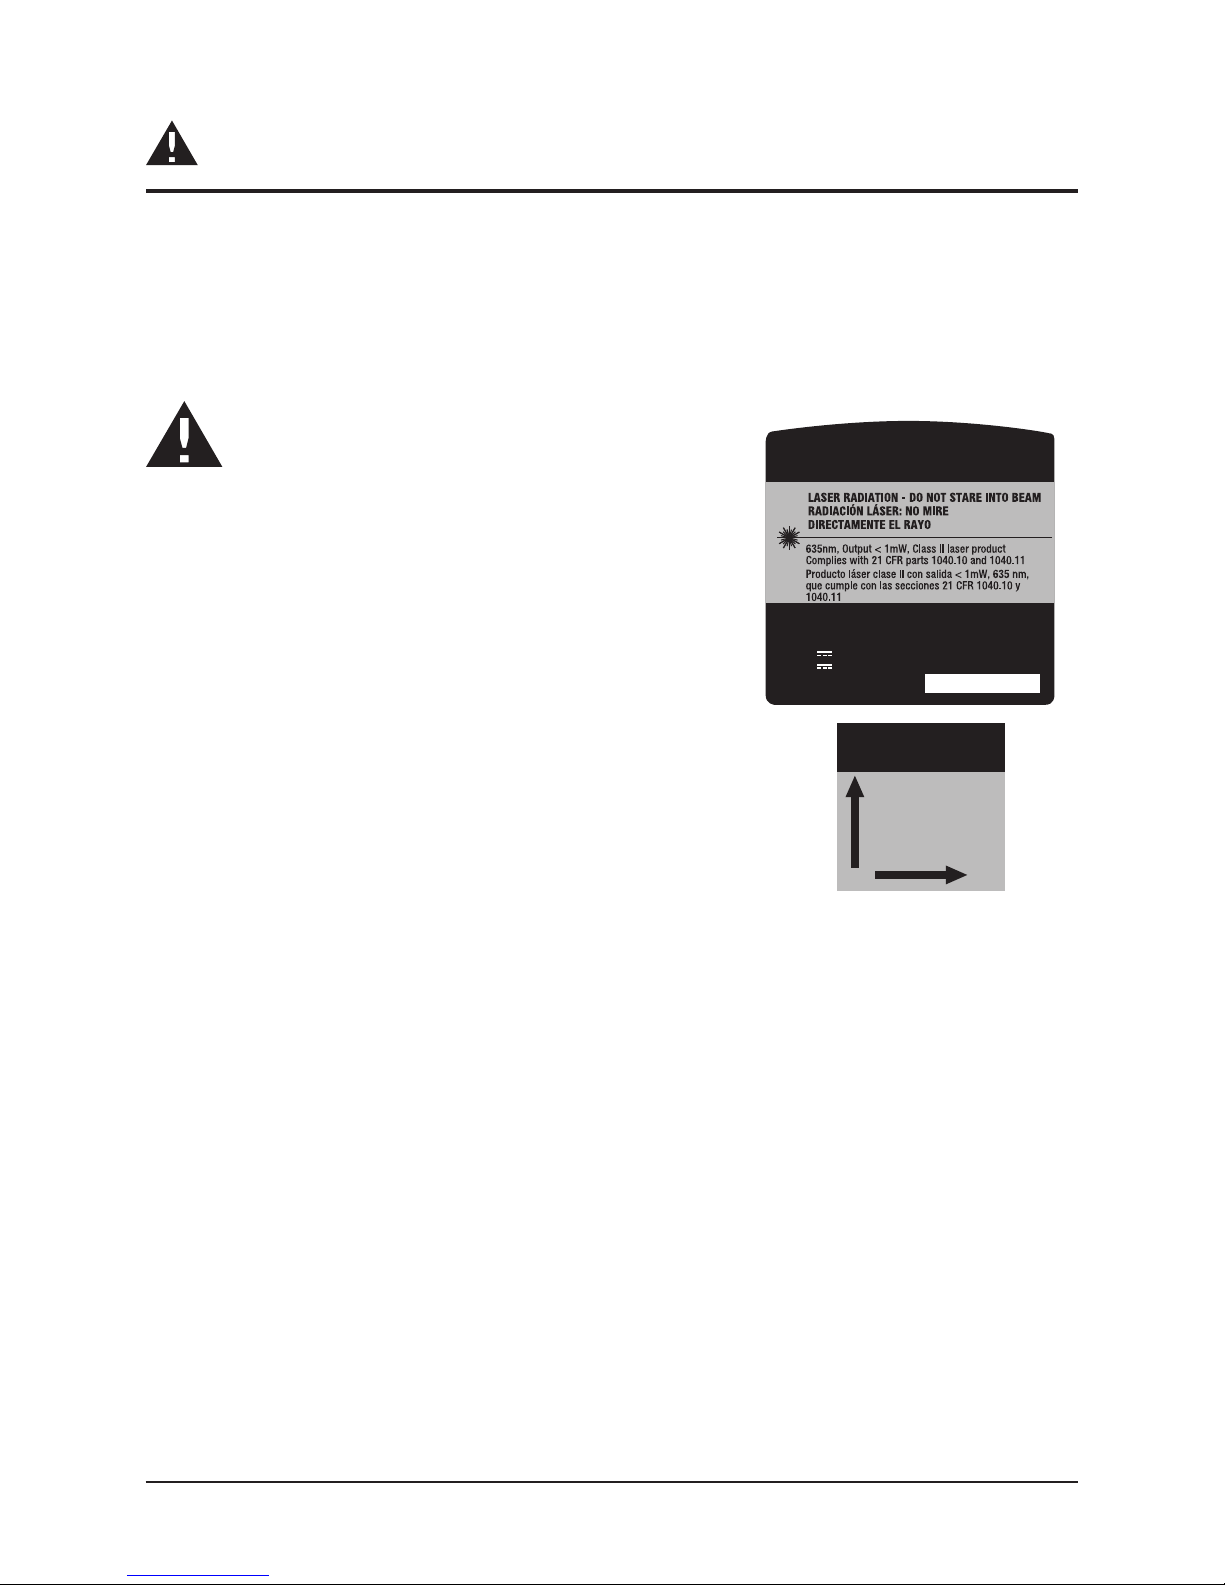
LASER RADIATION. Do not stare into beam. Class
II laser product. Turn the laser beam on only when
using this tool.
• Do not remove or deface any product labels.
• Avoid direct eye exposure. The laser beam can
cause ash blindness.
• Do not operate the tool around children or allow
children to operate the tool.
• Do not place the tool in a position that may
cause anyone to stare at the laser beam,
whether intentionally or unintentionally.
• Do not use on surfaces, such as sheet steel, that have shiny, reective
surfaces. The shiny surface could reect the beam back at the operator.
• Always turn the laser tool off when not in use. Leaving the tool on
increases the risk of someone inadvertently staring into the laser beam.
• Do not attempt to modify the performance of this laser device in any way.
This may result in a dangerous exposure to laser radiation.
• Do not attempt to repair or disassemble the self-leveling 360-degree cross
line laser. If unqualied persons attempt to repair this product, serious injury
may occur. Any repair required on this laser product should be performed only
by qualied service personnel.
• Use of other accessories that have been designed for use, with other laser
tools could result in serious injury.
• Do not place or store tool under extreme temperature conditions.
CAUTION
PRECAUCIÓN
CAUTION
PRECAUCIÓN
MADE IN CHINA
SERIAL NO.
SERIE NO.
HECHO EN CHINA
Model / Modelo : HLCL360
6V 4×1.5 V AA Battery
6V Batería AA 4×1,5 V
Self-Leveling 360-Degree Cross Line Laser
Láser autonivelante de líneas cruzadas de 360 grados
AVOID EXPOSUREEVITE LA EXPOSICIÓN-
Laser radiation is emitted
from this aperture
La radiación láser se emite
de esta abertura
Page 4

4 SELF-LEVELING 360-DEGREE CROSS LINE LASER
SAFETY INSTRUCTIONS
IMPORTANT SAFETY INSTRUCTIONS – SAVE THESE INSTRUCTIONS
DANGER
TO REDUCE THE RISK OF FIRE OR ELECTRIC SHOCK, CAREFULLY FOLLOW
THESE INSTRUCTIONS
FCC Statement
1. This device complies with Part 15 of the FCC Rules. Operation is subject to
the following two conditions:
1) This device may not cause harmful interference.
2) This device must accept any interference received, including interference
that may cause undesired operation.
2. Changes or modifications not expressly approved by the party responsible
for compliance could void the user’s authority to operate the equipment.
NOTICE:
This equipment has been tested and found to comply with the limits for a Class
B digital device, pursuant to Part 15 of the FCC Rules. These limits are designed to
provide reasonable protection against harmful interference in a residential installation.
This equipment generates, uses, and can radiate radio frequency energy and, if not
installed and used in accordance with the instructions, may cause harmful interference
to radio communications. However, there is no guarantee that interference will not
occur in a particular installation. If this equipment does cause harmful interference
to radio or television reception, which can be determined by turning the equipment
off and on, the user is encouraged to try to correct the interference by one or more
of the following measures: Reorient or relocate the receiving antenna. Increase the
separation between the equipment and receiver. Connect the equipment into an outlet
on a circuit different from that to which the receiver is connected. Consult the dealer or
an experienced radio/TV technician for help.
Page 5

SELF-LEVELING 360-DEGREE CROSS LINE LASER 5
SAFETY INSTRUCTIONS
DANGER
People with electronic devices, such as pacemakers, should consult their
physician(s) before using this product. Operation of electrical equipment in
close proximity to a heart pacemaker could cause interference or failure of the
pacemaker.
UNPACKING
When unpacking the box, do not discard any packing materials until all of the
contents are accounted for:
a. Open the carton to locate the following:
• Self-leveling 360-degree cross line laser
• 4 X AA alkaline batteries
• Soft bag
• Operator’s manual
b. Carefully lift the cross line laser out of the carton and place it on a
stable, flat surface.
Page 6
6 SELF-LEVELING 360-DEGREE CROSS LINE LASER
DESCRIPTION
KNOW YOUR SELF-LEVELING 360-DEGREE CROSS LINE LASER
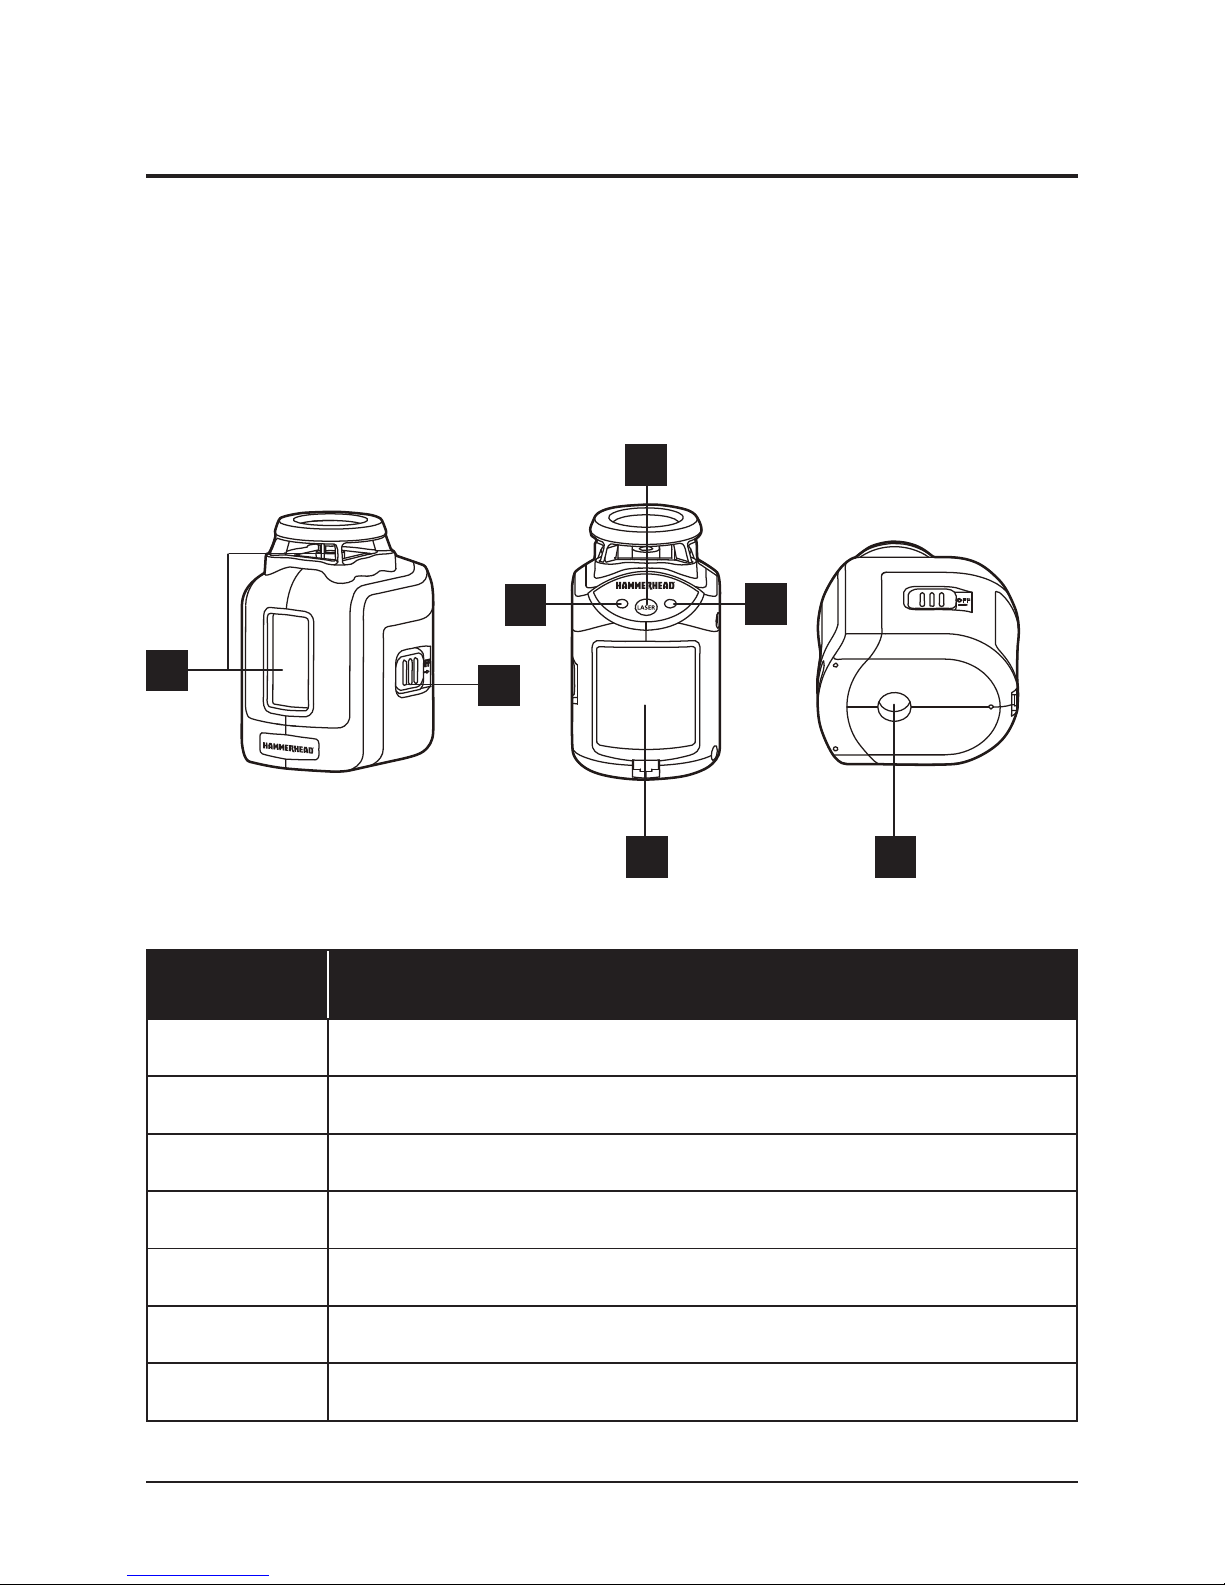
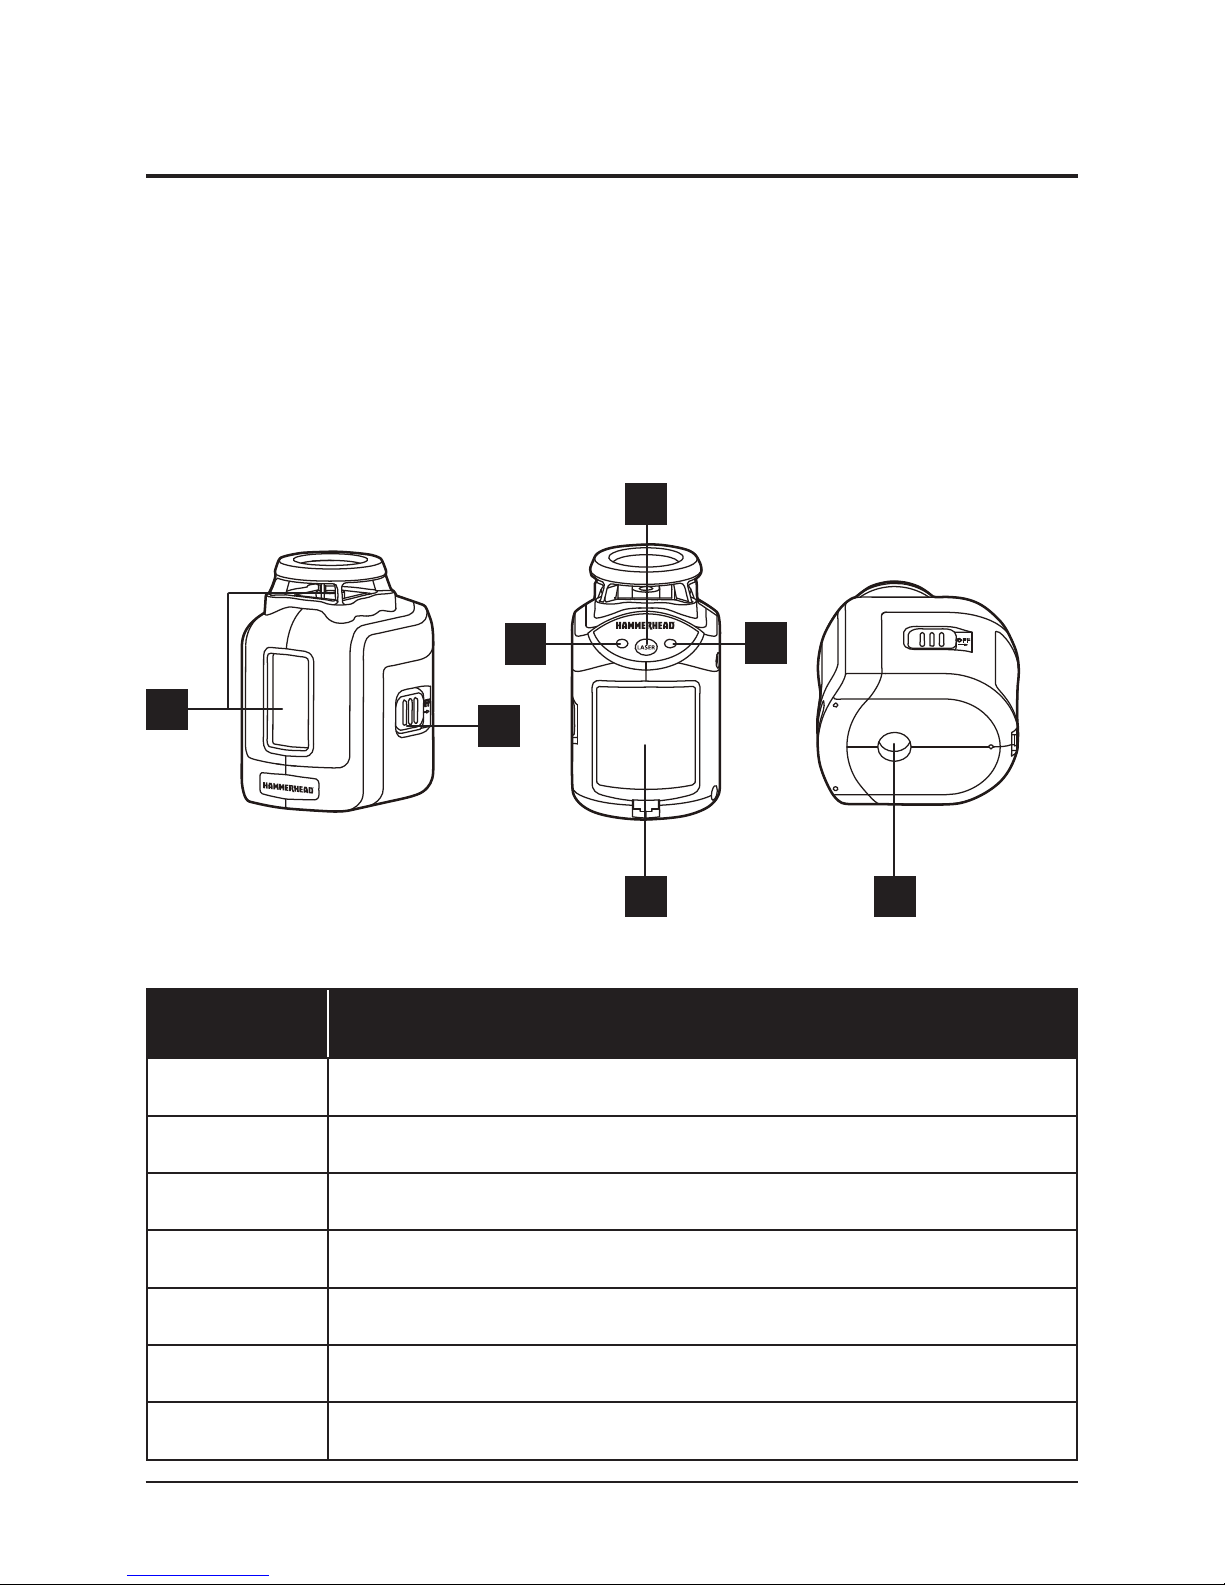
This self-leveling 360-degree cross line laser is highly versatile. It can be
hand-held, leveled on a horizontal surface or mounted on a tripod (available
separately).
1
2
3
4
5
PARTS DESCRIPTION
1 Mode button
2 Leveling LED indicator
3 Hand receiver LED indicator
4 Power switch
5 Laser apertures
6 5/8" threaded mounting hole
7 Battery compartment
7 6
Page 7
SELF-LEVELING 360-DEGREE CROSS LINE LASER 7
OPERATION
1. TO INSTALL BATTERIES
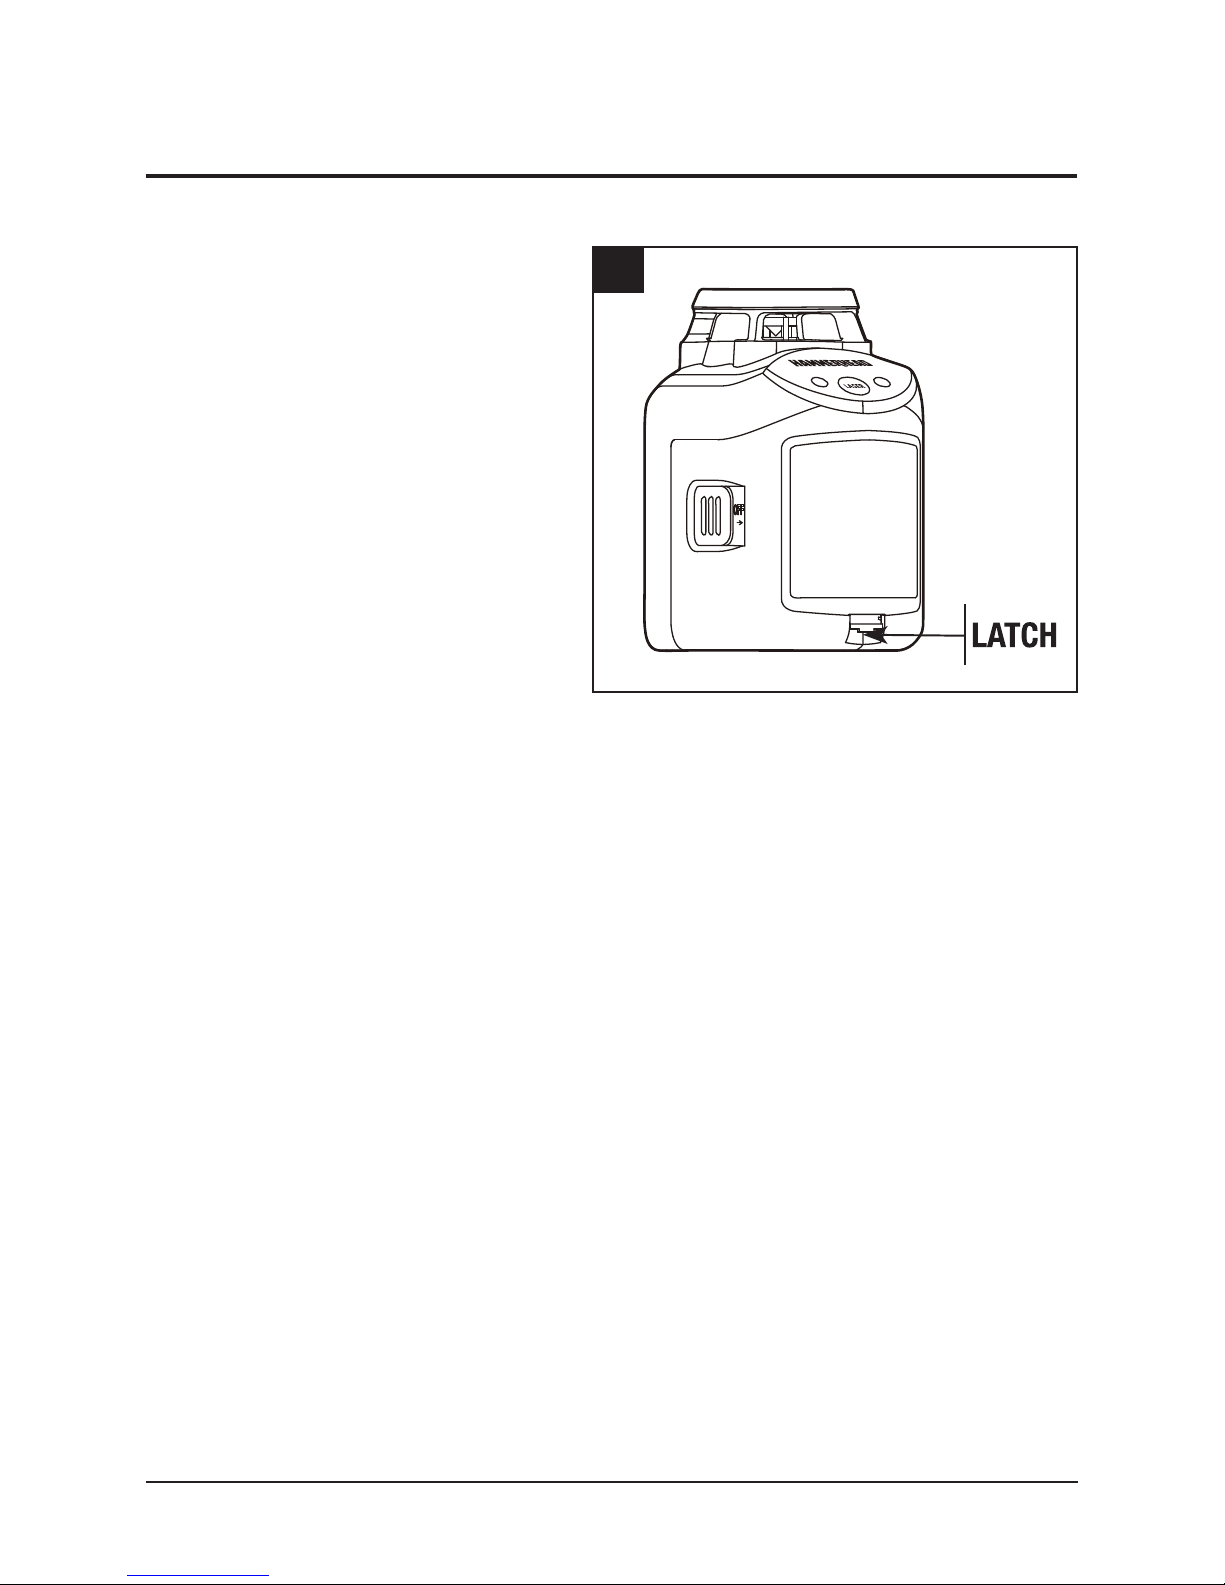
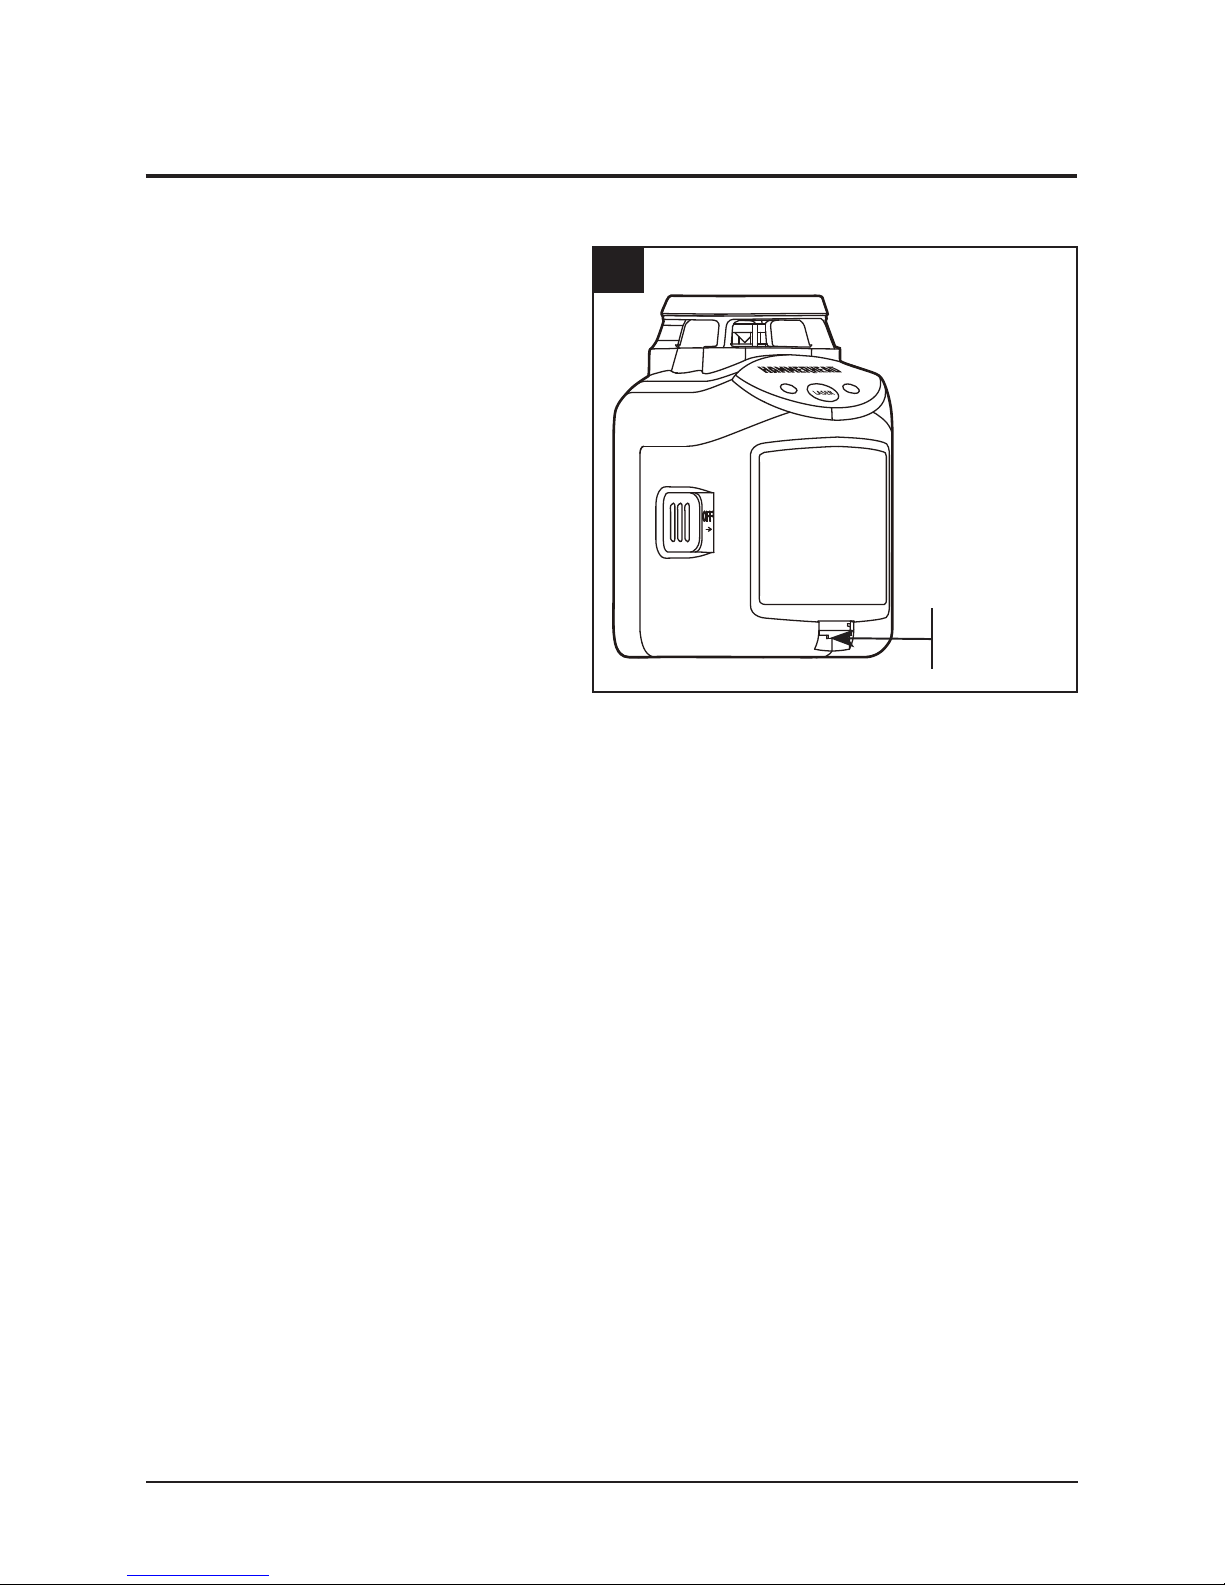
The battery compartment holds four
“AA” batteries.
a. Push the latch to open the
battery cover.
b. Insert four new “AA” alkaline
batteries, following the polarity
(+/-) as indicated on the inner of
the compartment.
c. Securely close the cover.
NOTE:
• Always turn off the tool before installing or replacing the batteries.
• Remove the batteries from the tool when not using it for extended periods.
• The 4 AA batteries should match each other in brand and type.
• Do not mix old and new batteries.
• Remove depleted batteries immediately, and dispose of them according to the
laws and regulations governing your community.
1
Page 8
8 SELF-LEVELING 360-DEGREE CROSS LINE LASER
OPERATION
2. TO TURN THE SELF-LEVELING
360-DEGREE CROSS LINE
LASER ON AND OFF
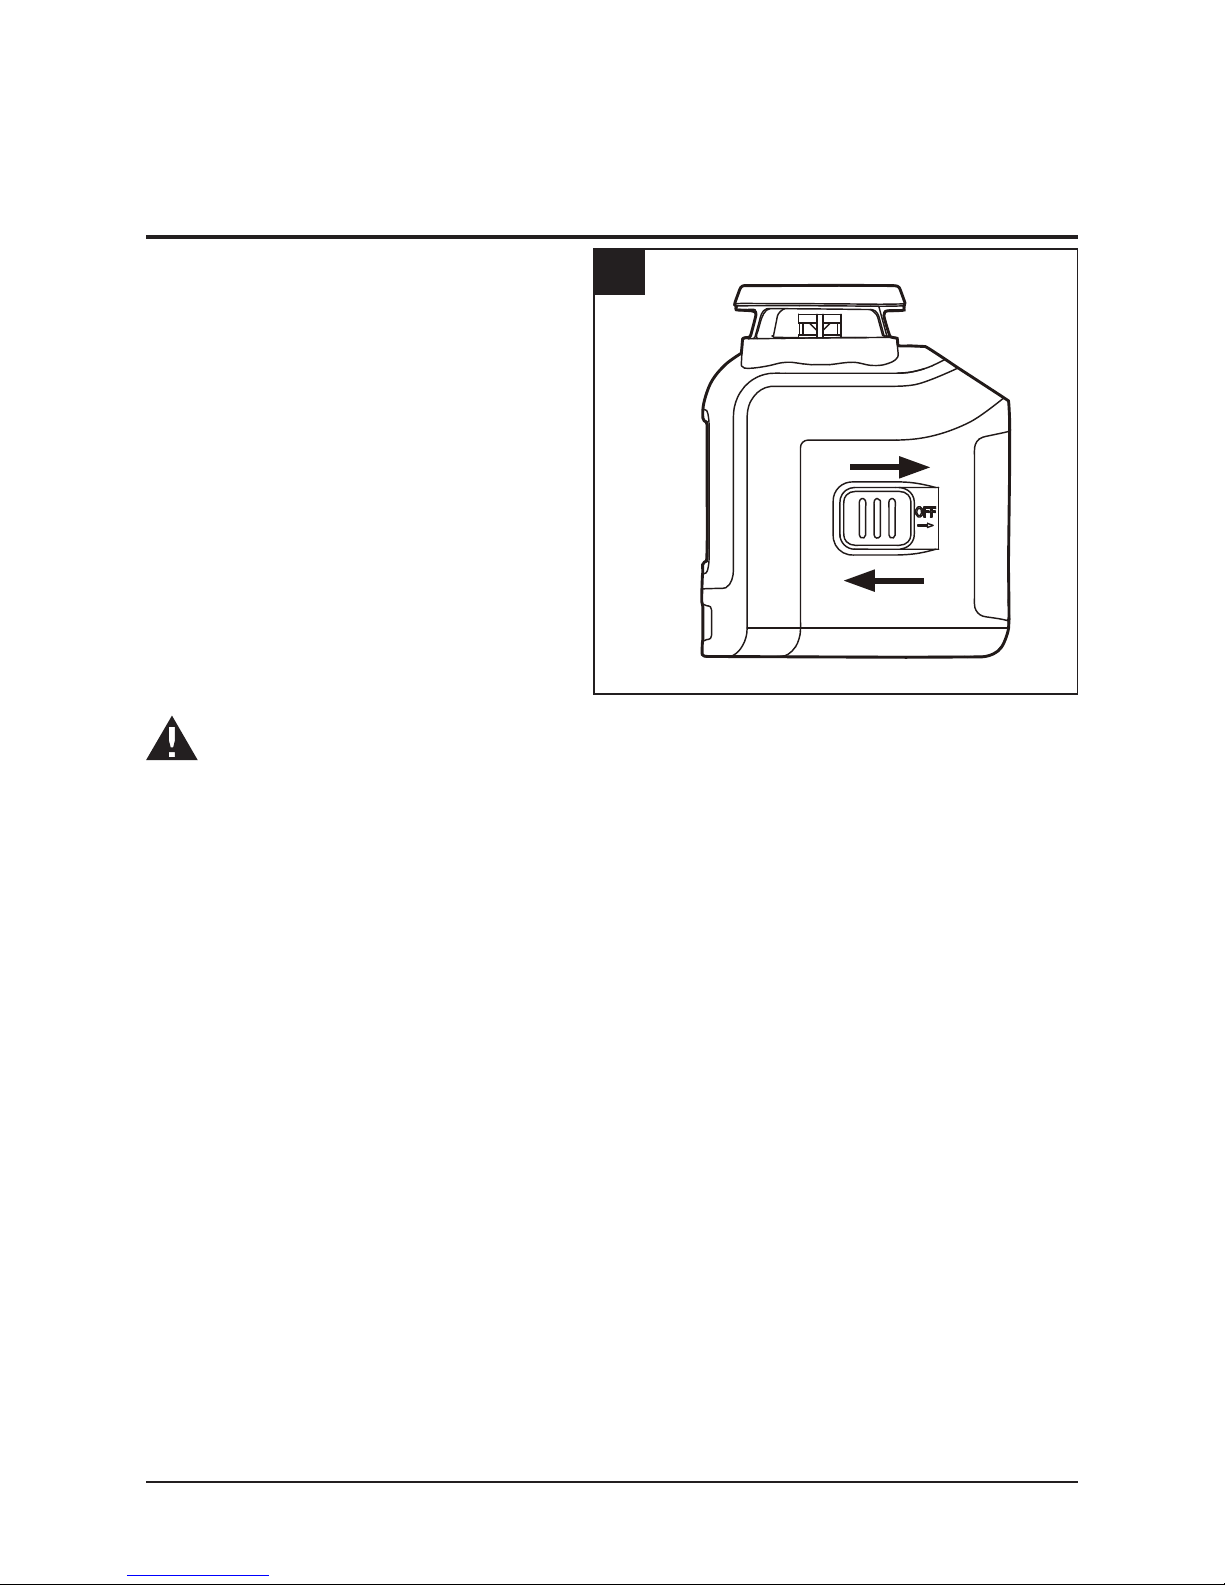
The power switch is located on the
side of the tool.
a. To turn the self-leveling
360-degree cross line laser on,
push the power switch in the
direction of the “ON” arrow.
WARNING
When turning on the self-leveling 360-degree cross line laser, always be aware
of protecting your eyes and the eyes of those around you. Never point the selfleveling 360-degree cross line laser at anyone’s face, including your own.
b. To turn the tool off, slide the switch in the direction of the “OFF” arrow.
ON
OFF
2
Page 9
SELF-LEVELING 360-DEGREE CROSS LINE LASER 9
OPERATION
3. LASER LINE PROJECTION
MODES
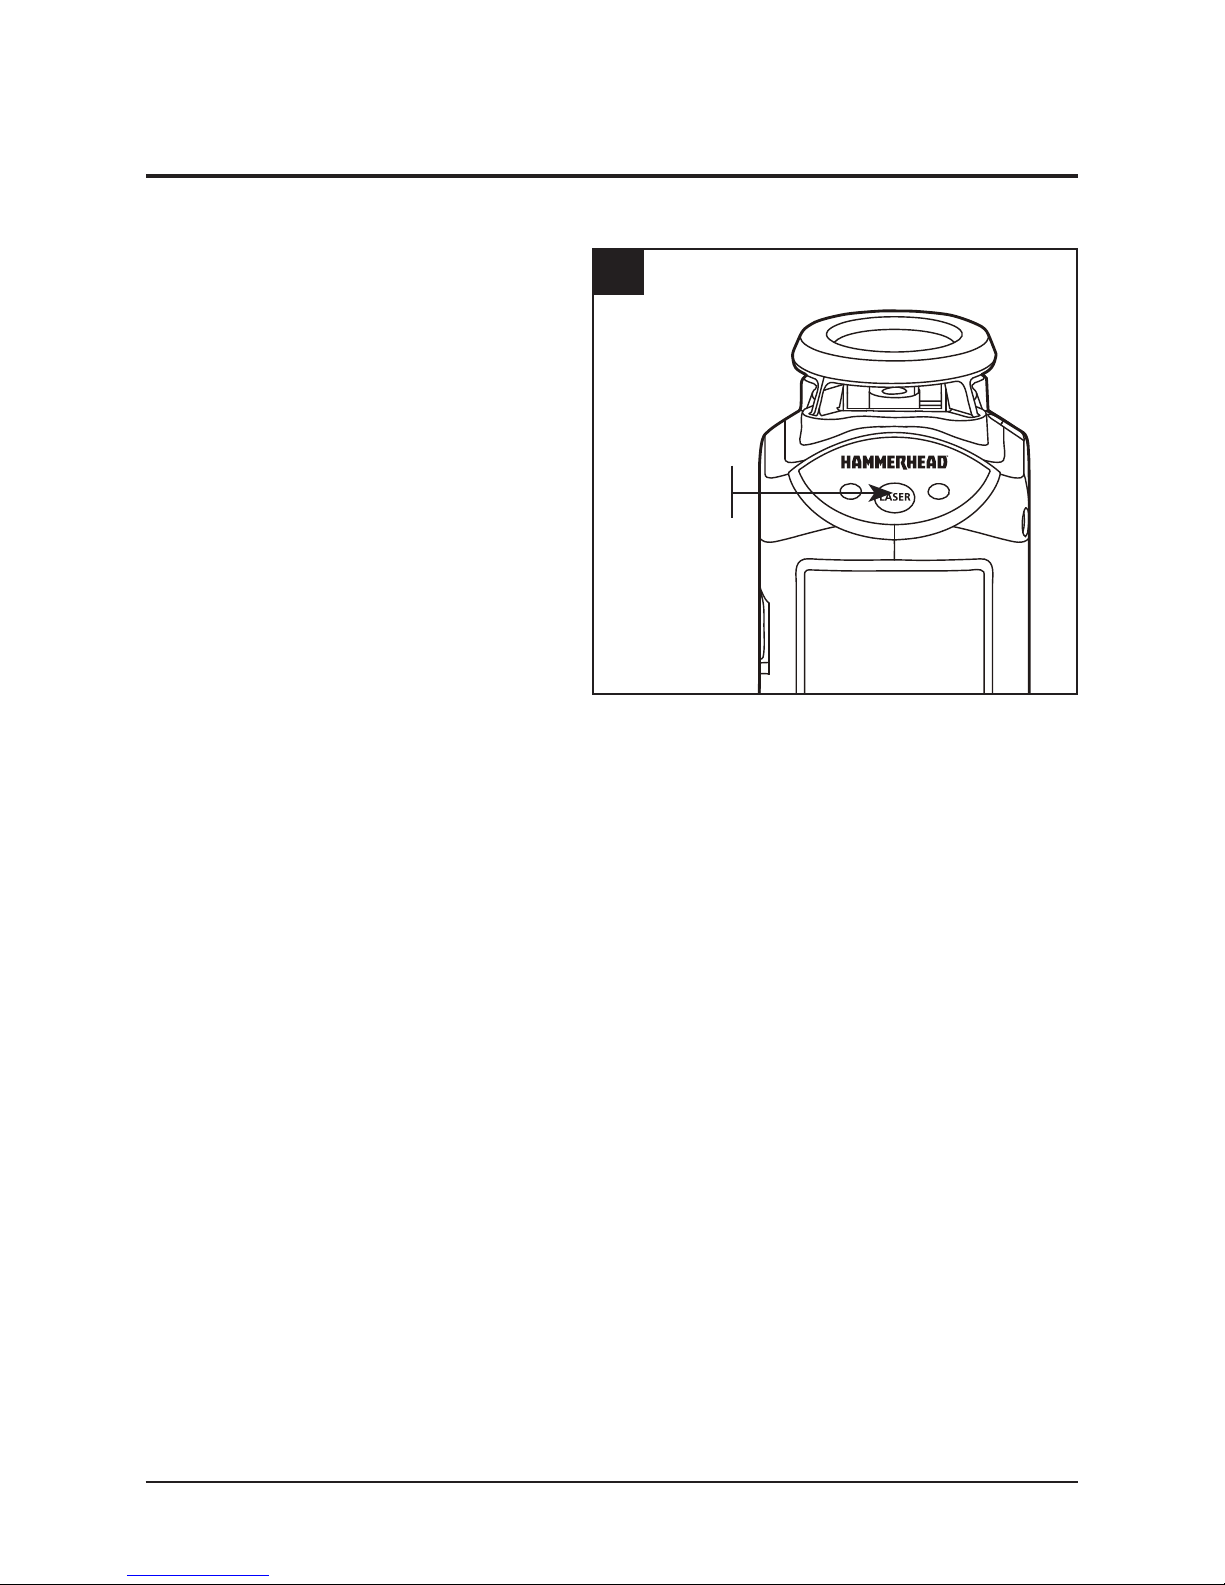
Your self-leveling 360-degree cross
line laser has three laser-projection
modes. To select a specic laserprojection mode, press the mode
button until you reach the desired
projection mode. This laser tool
defaults to the cross-hair pattern
mode when it is turned on.
To choose a projection mode, press
the mode button:
a. Press the button once to select the horizontal laser line.
b. Press the button twice to select the vertical laser line.
c. Press the button three times to return to the cross-hair pattern (both
horizontal and vertical lines).
3
MODE
BUTTON
Page 10
10 SELF-LEVELING 360-DEGREE CROSS LINE LASER
OPERATION
4. HAND RECEIVER MODE
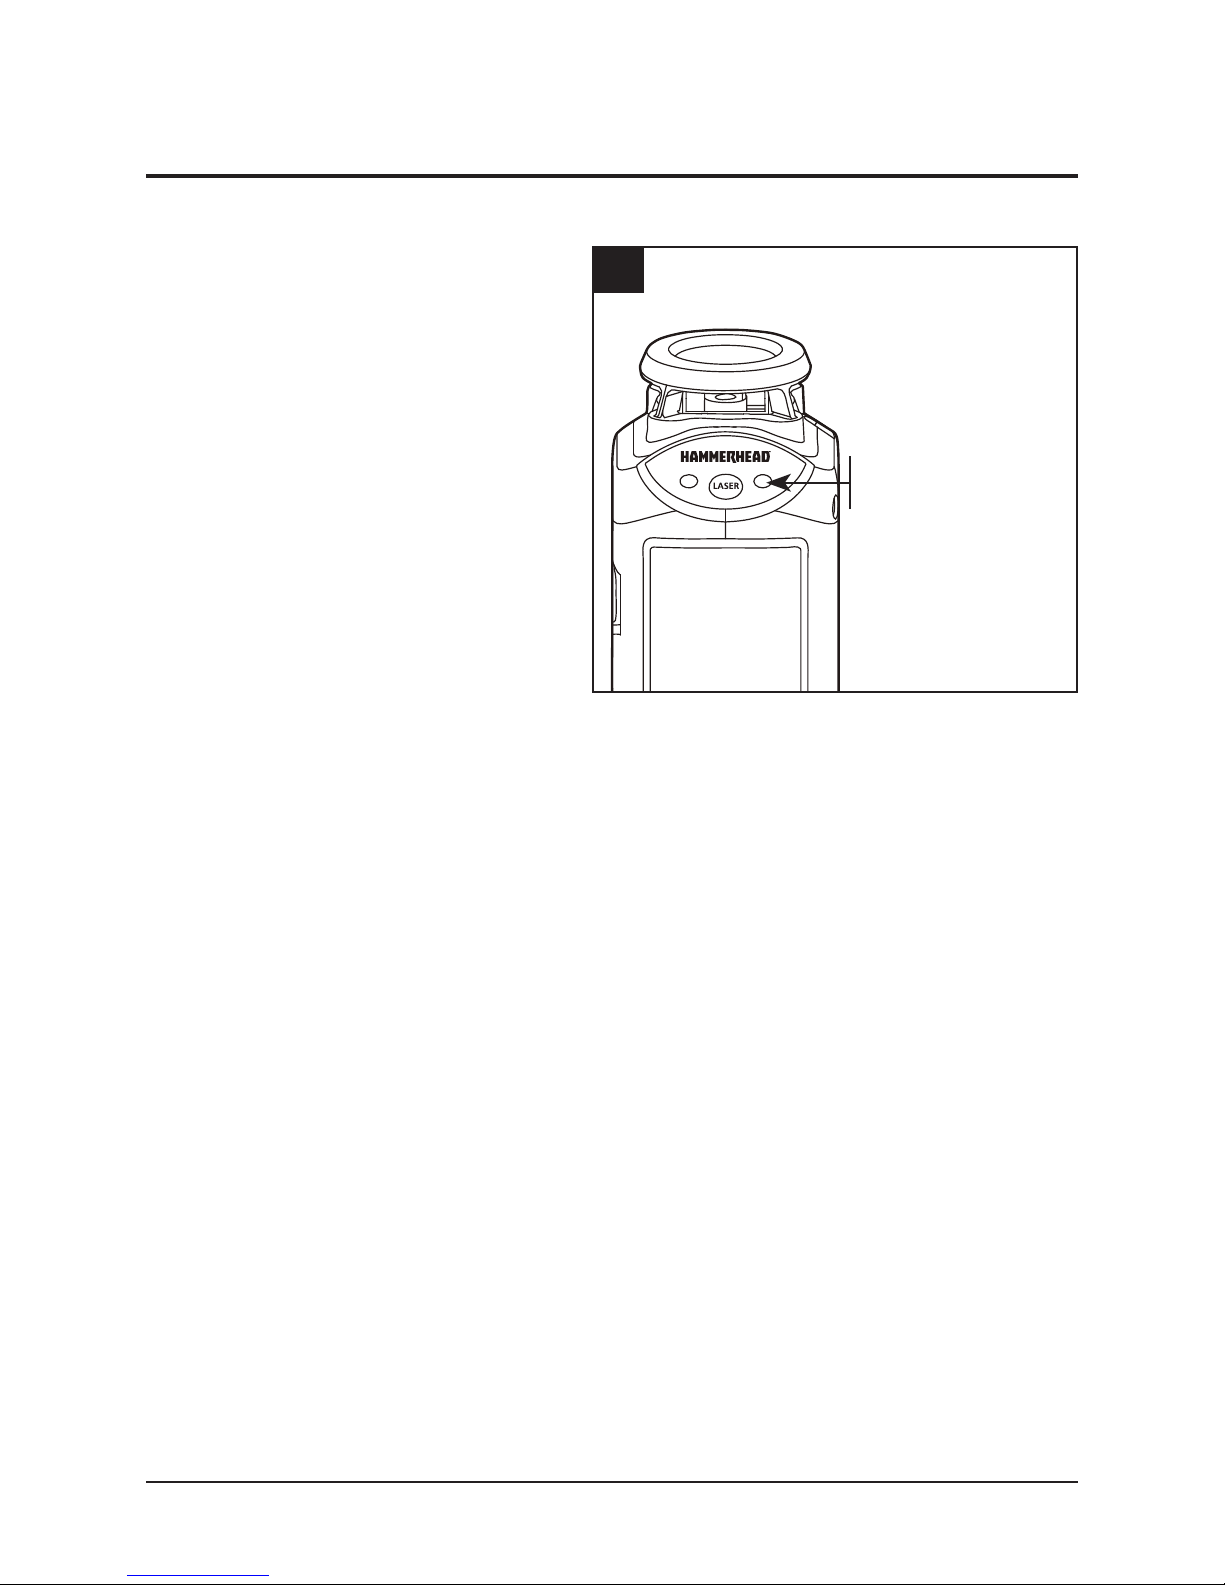
When working with the tool
outdoors, the strong sunlight will
make the laser lines hard to be
identied. Switch to hand receiver
mode: the laser lines will now
pulsate with high frequency. When
received by the a laser receiver
(available separately), the laser can
be detected up to 100 ft. away.
To switch to hand receiver mode,
keep the mode button pressed; the
LED indicator will illuminate.
This mode can be used when the tool is in self-leveling or lock mode.
4
HAND RECEIVER
LED INDICATOR
Page 11
SELF-LEVELING 360-DEGREE CROSS LINE LASER 11
OPERATION
5. SELF-LEVELING MODE
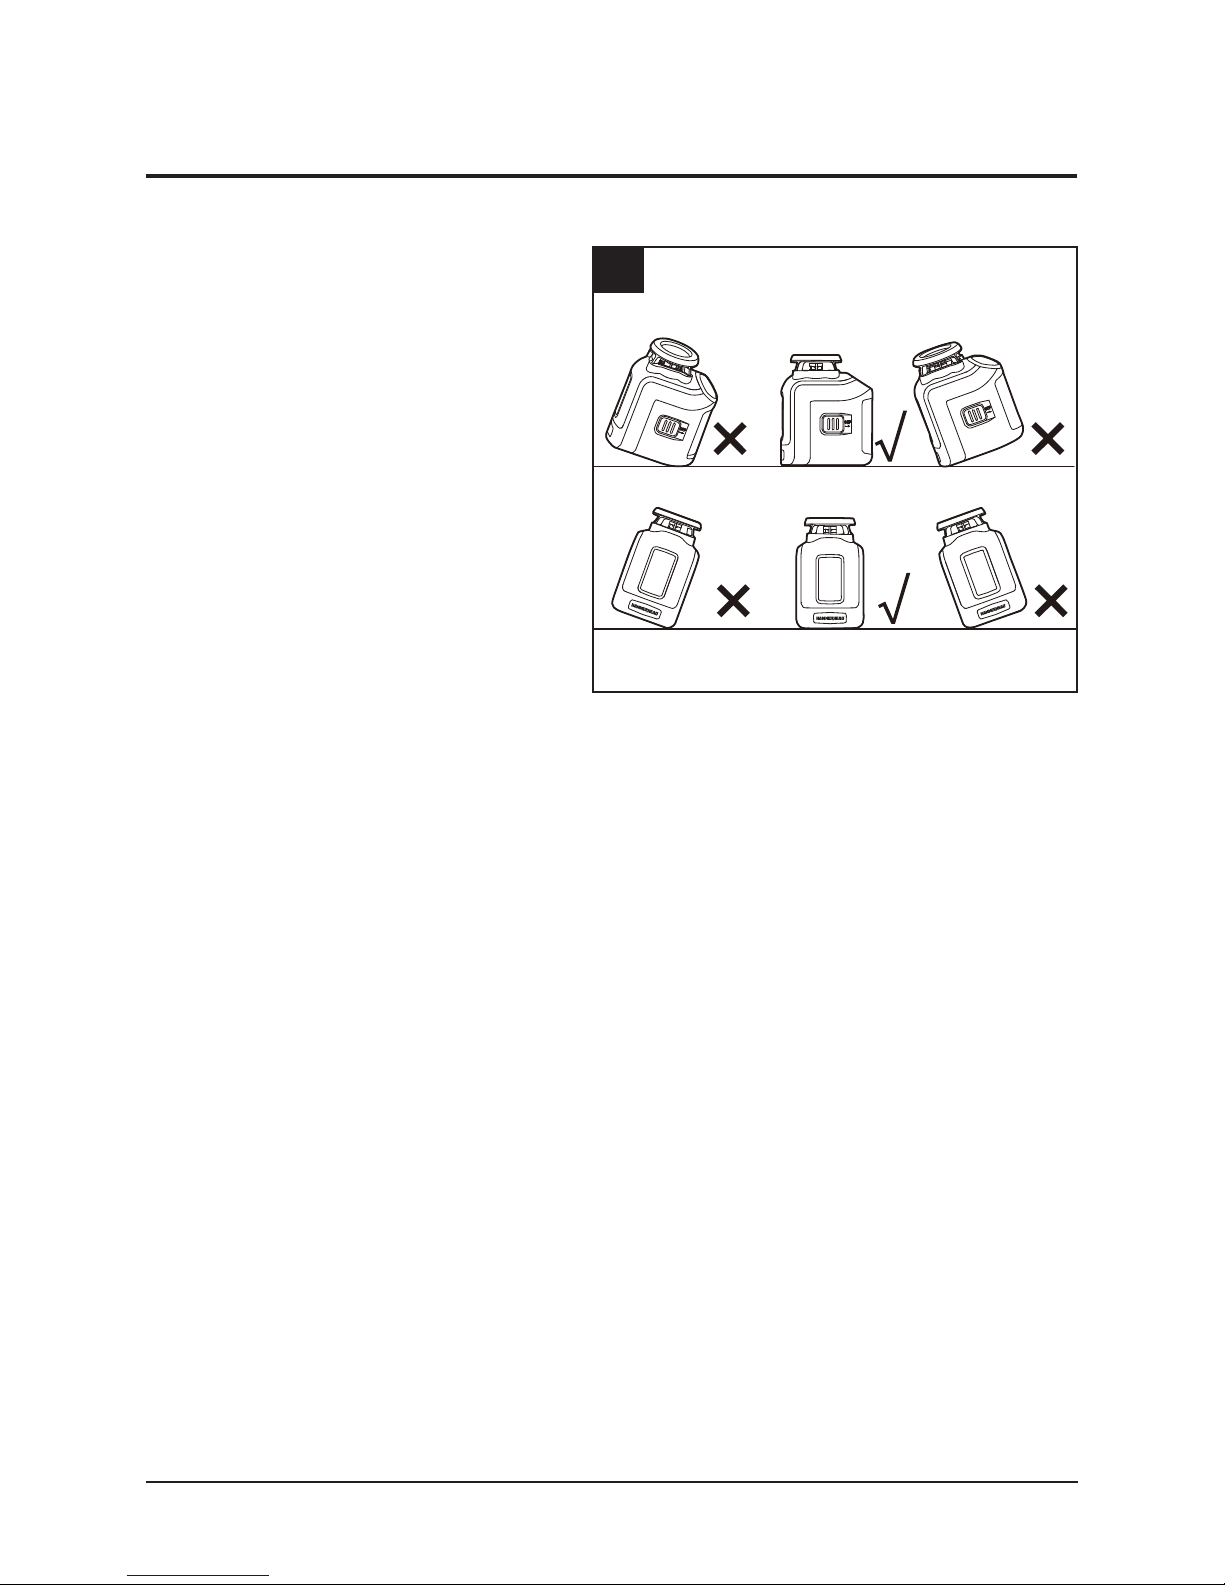
Your self-leveling 360-degree cross
line laser has two working modes:
self-leveling mode and lock (manual)
mode. In self-leveling mode, the tool
will level itself if it is within ±4° of
horizontal.
a. Place the self-leveling
360-degree cross line laser on
a at, smooth surface that is
within ±4° of horizontal.
b. Turn the tool on by sliding
the power switch in the direction of the “ON” arrow. The self-leveling
360-degree cross line laser will automatically level within 4 seconds. The
LED indicator will illuminate in green.
c. Press the mode button until the desired laser-projection mode is achieved
and the laser line is projected from the laser aperture.
d. If the surface on which the self-leveling 360-degree cross line laser is
placed exceeds ±4° from horizontal, the laser line will blink as an alarm
and the LED indicator will illuminate in red. In this event, adjust the angle
of the surface slightly.
e. To turn off the laser lines, slide the switch in the direction of the “OFF”
arrow.
5
Page 12

12 SELF-LEVELING 360-DEGREE CROSS LINE LASER
OPERATION
6. LOCK MODE
This mode cannot be used to perform horizontal or vertical leveling, because the
laser lines are no longer self leveling. In this mode, the LED indicator will always
illuminate in red.
a. Keep the power switch in the “OFF” position and press the mode button
to turn on the laser. The laser lines are now locked, and are no longer
self-leveling.
b. Press the mode button repeatedly to change the laser-projection mode.
c. Slope your self-leveling cross laser to project a straight line for reference.
In this mode, the laser lines are projected continuously and will not blink,
even if the slope angle exceeds 4°.
d. To turn the laser off, press the mode button repeatedly until the laser shuts off.
7. APPLICATIONS
Your self-leveling 360-degree cross line laser can be hand-held for point
marking and simple alignment by sight, or it can be used to make a “chalk line”
by using the lock mode. It also can be mounted on a standard 5/8" tripod (not
included) to project laser lines on walls. It is ideal for the following applications:
• Hanging pictures, photos, or artwork on walls
• Wallpapering and stencil work
• Framing doors and windows
• Installing electrical wiring and pipes
• Mounting wall xtures, electrical outlets, switches and lighting
• Installing a drop ceiling
• Painting
• Installing closets
• Laying tile and ooring
Page 13

SELF-LEVELING 360-DEGREE CROSS LINE LASER 13
MAINTENANCE
This self-leveling 360-degree cross line laser has been designed to be a lowmaintenance tool.
However, in order to maintain its performance, you must always follow these
simple directions:
a. Avoid exposing the tool to shock, continuous vibration or extreme hot or
cold temperature.
b. Always store the tool indoors.
c. Always keep the tool free of dust and liquids. Use only a clean, soft cloth
for cleaning. If necessary, slightly moisten the cloths with pure alcohol or a
little water.
d. Do not disassemble the self-leveling 360-degree cross line laser; this will
expose the user to hazardous radiation exposure.
e. Do not attempt to change any part of the laser lens.
f. Remove the batteries from the tool and store it in a cool dry location.
g. After you have nished using the tool, always make sure that the switch is
in the off position.
Page 14

14 SELF-LEVELING 360-DEGREE CROSS LINE LASER
TROUBLESHOOTING
PROBLEM CAUSE SOLUTION
The laser line
projection is weak.
Batteries are weak. Replace with new batteries.
The laser line is
hard to see.
The tool is too far from
the target.
Move the tool closer to the
target.
The surrounding is too
bright.
Switch to the hand receiver
mode and nd the laser
line with laser receiver
(available separately).
Laser line is not
projected.
No batteries installed or
batteries are depleted.
Install new batteries.
The power switch is
not pushed to the “ON”
position.
Slide the power switch to
the “ON” position.
Laser line ickers
for alert.
The surface where the
tool has been placed is
uneven or the tool is out
of its automatic selfleveling range.
Place the tool on a more
level surface (within ±4°).
Set the tool to its lock mode.
Page 15

SELF-LEVELING 360-DEGREE CROSS LINE LASER 15
3 YEAR LIMITED WARRANTY
This self-leveling 360-degree cross line laser is warranted to the original
purchaser from the original purchase date for two years, plus one additional year
with product registration at www.hammerheadtools.com (2+1), for a total three
years subject to the warranty coverage described herein.
Please retain your receipt.
This self-leveling 360-degree cross line laser is warranted to the original user to
be free from defects in material and workmanship. If you believe that the tool is
defective at any time during the specied warranty period, call HAMMERHEAD
support at 1-877-888-1880 to speak with a customer service agent. This
warranty does not cover: (1) Part failure due to normal wear or tool abuse
(2) Any parts have been altered or modied by anyone other than authorized
HAMMERHEAD personnel.
This warranty excludes bits, bulbs and accessories. This warranty gives you
specic legal rights, and you may also have other rights that vary from state.
Page 16

Page 17
LÁSER
AUTONIVELANTE
DE LÍNEAS
CRUZADAS DE
360 GRADOS
MODELO HLCL360
ADJUNTE SU RECIBO AQUÍ
Número de serie ____________________ Fecha de compra _____________________
¿Preguntas, problemas, piezas faltantes? Antes de volver a la tienda, llame
a nuestro departamento de Servicio al Cliente al 1-877-888-1880, de 8:30 a.m.
a 8:00 p.m. hora estándar del Este (lunes a viernes) y de 10:00 a.m. a 6:00 p.m.
hora estándar del Este (sábado y domingo).
Page 18

18 LÁSER AUTONIVELANTE DE LÍNEAS CRUZADAS DE 360 GRADOS
ÍNDICE
Especificaciones técnicas .........................................18
Instrucciones de seguridad ........................................19
Desembalaje. . . . . . . . . . . . . . . . . . . . . . . . . . . . . . . . . . . . . . . . . . . . . . . . . . .22
Descripción ...................................................23
Operación .....................................................24
Mantenimiento .................................................30
Solución de problemas ...........................................31
Garantía ......................................................32
ESPECIFICACIONES TÉCNICAS
COMPONENTE ESPECIFICACIONES
Suministro de electricidad
6V
(batería alcalina AA 4 x 1,5 V)
Láser
λ = 635 nm, láser clase II, salida del láser
máxima < 1 mW
Rango de autonivelación ±4°
Precisión ±1/8 pulg. a 30 pies
Rango de operación 30 pies (60 pies de diámetro)
Tiempo de operación Aproximadamente 35 horas
Temperatura de operación 32°F a 104°F (0°C a 40°C)
Temperatura de almacenaje 14°F a 158°F (-10°C a 70°C)
*Importante: la escala de medición de la herramienta y la precisión disminuirán
en condiciones poco favorables, como estar bajo la luz solar brillante o cuando se
trabaja sobre supercies resistentes o con poca reectancia.
Page 19
LÁSER AUTONIVELANTE DE LÍNEAS CRUZADAS DE 360 GRADOS 19
INSTRUCCIONES DE SEGURIDAD
Instrucciones de seguridad para el láser autonivelante de líneas cruzadas
de 360 grados
ADVERTENCIA
RADIACIÓN LÁSER. No mire directamente al rayo.
Producto láser clase II. Encienda el rayo láser solo
cuando utilice la herramienta.
• No retire ni desgure las etiquetas del
producto.
• Evite la exposición directa a los ojos. El rayo
láser puede causar ceguera por destello.
• No utilice la herramienta cerca de niños, ni
permita que estos la utilicen.
• No ubique la herramienta en una posición en
la que una persona pueda mirar al rayo láser, ya sea de manera intencional
o no.
• No utilice la herramienta en supercies (como chapas) que puedan brillar o
reejar. La supercie brillante podría reejar el rayo hacia el operador.
• No se olvide de apagar la herramienta láser cuando no esté en uso. Al
dejar la herramienta encendida, aumenta el riesgo de que alguna persona
mire al rayo láser sin darse cuenta.
• No intente modicar el rendimiento de este dispositivo láser, de ninguna
manera. Esto puede causar una exposición peligrosa a la radiación
láser.
CAUTION
PRECAUCIÓN
CAUTION
PRECAUCIÓN
MADE IN CHINA
SERIAL NO.
SERIE NO.
HECHO EN CHINA
Model / Modelo : HLCL360
6V 4×1.5 V AA Battery
6V Batería AA 4×1,5 V
Self-Leveling 360-Degree Cross Line Laser
Láser autonivelante de líneas cruzadas de 360 grados
AVOID EXPOSUREEVITE LA EXPOSICIÓN-
Laser radiation is emitted
from this aperture
La radiación láser se emite
de esta abertura
Page 20

20 LÁSER AUTONIVELANTE DE LÍNEAS CRUZADAS DE 360 GRADOS
INSTRUCCIONES DE SEGURIDAD
• No intente reparar o desarmar el láser autonivelante de líneas cruzadas
de 360 grados. Si personas no calicadas intentan reparar este equipo, se
pueden ocasionar lesiones graves. Solo el personal de servicios calicado
debe realizar las reparaciones de este equipo láser.
• El uso de accesorios que se diseñaron para otras herramientas láser podría
ocasionar lesiones graves.
• No ubique ni guarde la herramienta bajo condiciones de temperatura extremas.
INSTRUCCIONES IMPORTANTES DE SEGURIDAD: GUARDE ESTAS
INSTRUCCIONES
PELIGRO
SIGA CON CUIDADO LAS SIGUIENTES INSTRUCCIONES PARA REDUCIR EL
RIESGO DE INCENDIO O DESCARGAS ELÉCTRICAS.
Page 21

LÁSER AUTONIVELANTE DE LÍNEAS CRUZADAS DE 360 GRADOS 21
INSTRUCCIONES DE SEGURIDAD
Declaración de la FCC
1. Este dispositivo cumple con la Sección 15 de las Normas de la Comisión
Federal de Comunicaciones de los EE. UU. (FCC, por sus siglas en inglés).
El funcionamiento está sujeto a las siguientes dos condiciones:
1) Este dispositivo no debe causar interferencia dañina.
2) Este dispositivo debe aceptar cualquier interferencia que reciba, incluida
la interferencia que pueda causar un funcionamiento no deseado.
2. Cualquier tipo de cambio o de modificación que no esté aprobado
explícitamente por la parte responsable del cumplimiento podría anular la
autoridad del usuario para utilizar el equipo.
AVISO:
Este equipo ha sido probado y ha resultado estar en conformidad con los límites
para un dispositivo digital Clase B, conforme a la Sección 15 de las Normas de la
FCC. Estos límites tienen el propósito de brindar una protección razonable de la
interferencia perjudicial en una instalación residencial.
Este equipo genera, usa y puede irradiar energía de radiofrecuencia y, si no
se instala y usa de acuerdo con las instrucciones, puede causar interferencia
perjudicial para las comunicaciones por radio. Sin embargo, no hay garantía de que
no se produzca esa interferencia en una instalación en particular. Si este equipo
no produce interferencia perjudicial a la recepción de radio o televisión, lo que
puede determinarse apagando y encendiendo el equipo, el usuario debe intentar
corregir la interferencia mediante alguna de las siguientes acciones: Modique la
orientación o reubique la antena receptora. Aumente la separación entre el equipo
y el receptor. Conecte el equipo a un tomacorriente de otro circuito (no donde
estaba conectado el receptor). Consulte al distribuidor o a un técnico en radio y
televisión capacitado para obtener asistencia.
Page 22

22 LÁSER AUTONIVELANTE DE LÍNEAS CRUZADAS DE 360 GRADOS
INSTRUCCIONES DE SEGURIDAD
PELIGRO
Las personas que poseen dispositivos electrónicos, como marcapasos, deben
consultar al médico antes de usar este producto. La utilización de equipos
eléctricos cerca de un marcapasos puede producir interferencias o fallas en el
marcapasos.
DESEMBALAJE
Cuando desembale la caja, no deseche el material de embalaje hasta que
verique que esté todo el contenido:
a. Abra la caja para ubicar lo siguiente:
• Láser autonivelante de líneas cruzadas de 360 grados
• 4 baterías alcalinas AA
• Bolsa suave
• Manual del usuario
b. Con cuidado, retire de la caja el láser de líneas cruzadas y ubíquelo
en una superficie estable y plana.
Page 23
LÁSER AUTONIVELANTE DE LÍNEAS CRUZADAS DE 360 GRADOS 23
DESCRIPCIÓN
CONOZCA SU LÁSER AUTONIVELANTE DE LÍNEAS CRUZADAS DE 360
GRADOS
Este láser autonivelante de líneas cruzadas de 360 grados es muy versátil.
Puede sostenerse en la mano, ubicarse en una supercie horizontal o montarse
en un trípode (disponible por separado).
1
2
3
4
5
PIEZAS DESCRIPCIÓN
1 Botón de modo
2 Indicador LED de nivelación
3 Indicador LED del receptor manual
4 Interruptor de encendido
5 Oricio del láser
6 Oricio para montaje de 5/8"
7 Compartimento para las baterías
7 6
Page 24
24 LÁSER AUTONIVELANTE DE LÍNEAS CRUZADAS DE 360 GRADOS
OPERACIÓN
1. INSTALACIÓN DE LAS BATERÍAS
El compartimento para las baterías
lleva cuatro baterías AA.
a. Presione la palanca para abrir
la tapa del compartimento.
b. Inserte cuatro baterías alcalinas
“AA’’ nuevas, teniendo en
cuenta la polaridad (+/-)
indicada en el interior del
compartimento.
c. Cierre bien la tapa.
NOTA:
• Apague siempre la herramienta antes de instalar o reemplazar las baterías.
• Retire las baterías de la herramienta cuando no vaya a usarla durante un
período prolongado.
• La marca y el tipo de las 4 baterías AA deben coincidir.
• No mezcle baterías viejas con nuevas.
• Retire las baterías utilizadas de inmediato y deséchelas acorde a las leyes y
normas vigentes en su comunidad.
1
PALANCA
Page 25
LÁSER AUTONIVELANTE DE LÍNEAS CRUZADAS DE 360 GRADOS 25
OPERACIÓN
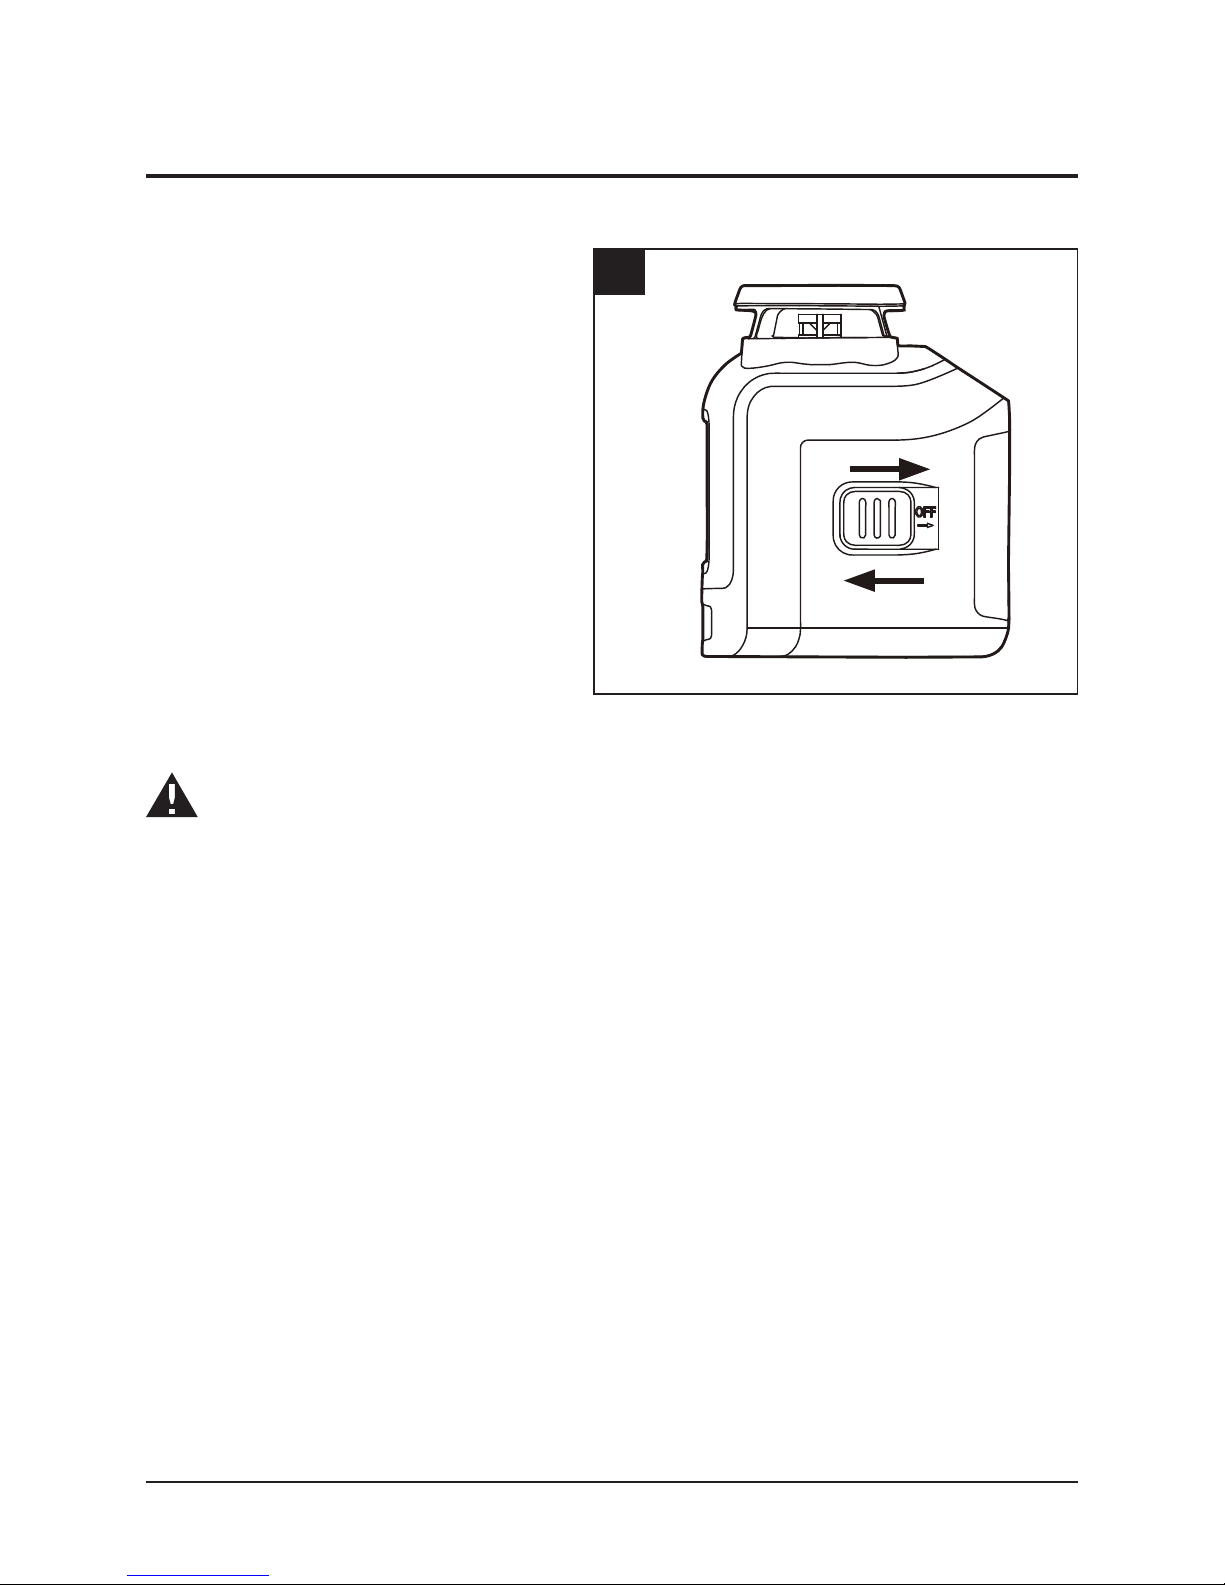
2. CÓMO ENCENDER O APAGAR EL
LÁSER COMPACTO AUTONIVELANTE DE LÍNEAS CRUZADAS
DE 360 GRADOS
El interruptor de encendido se ubica
en la parte lateral de la herramienta.
a. Para encender el láser
autonivelante de líneas
cruzadas de 360 grados,
presione el interruptor de
encendido en la dirección de la
echa “ON”.
ADVERTENCIA
Cuando encienda el láser autonivelante de líneas cruzadas de 360 grados,
proteja siempre la vista propia y la de los demás. Nunca apunte el láser
autonivelante de líneas cruzadas de 360 grados hacia el rostro de ninguna
persona, incluido el suyo.
b. Para apagar la herramienta, deslice el interruptor en la dirección de la
echa “OFF”.
ENCENDIDO
APAGADO
2
Page 26
26 LÁSER AUTONIVELANTE DE LÍNEAS CRUZADAS DE 360 GRADOS
OPERACIÓN
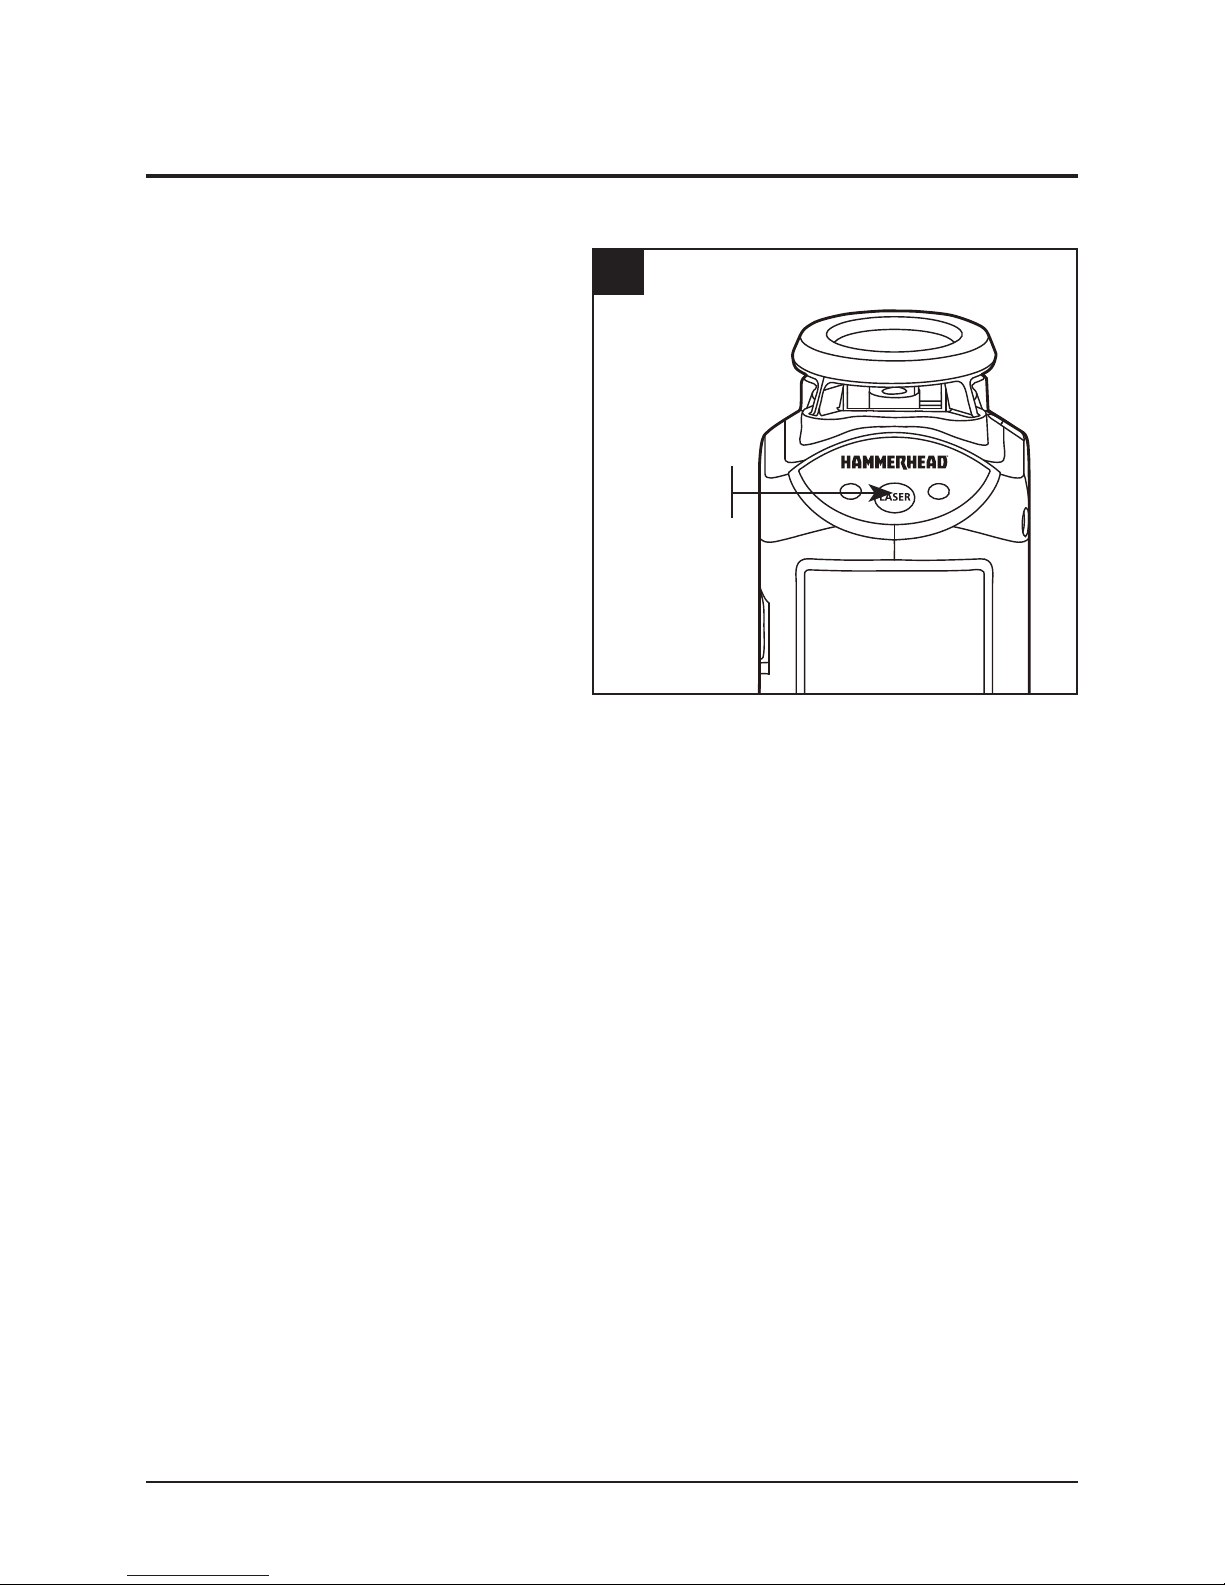
3. MODOS DE PROYECCIÓN DE
LAS LÍNEAS DEL LÁSER
El láser autonivelante de líneas
cruzadas de 360 grados tiene
tres modos de proyección: Para
seleccionar el modo de proyección
del láser, presione el botón de modo
hasta que alcance el modo de
proyección deseado. Al encender
esta herramienta láser, tiene por
defecto el modo de patrón cruzado.
Para elegir un modo de proyección,
presione el botón de modo.
a. Presione el botón una vez para seleccionar la línea de láser horizontal.
b. Presione el botón dos veces para seleccionar la línea de láser vertical.
c. Presione el botón tres veces para regresar al patrón cruzado (línea
horizontal y vertical).
3
BOTÓN
DE MODO
Page 27
LÁSER AUTONIVELANTE DE LÍNEAS CRUZADAS DE 360 GRADOS 27
OPERACIÓN
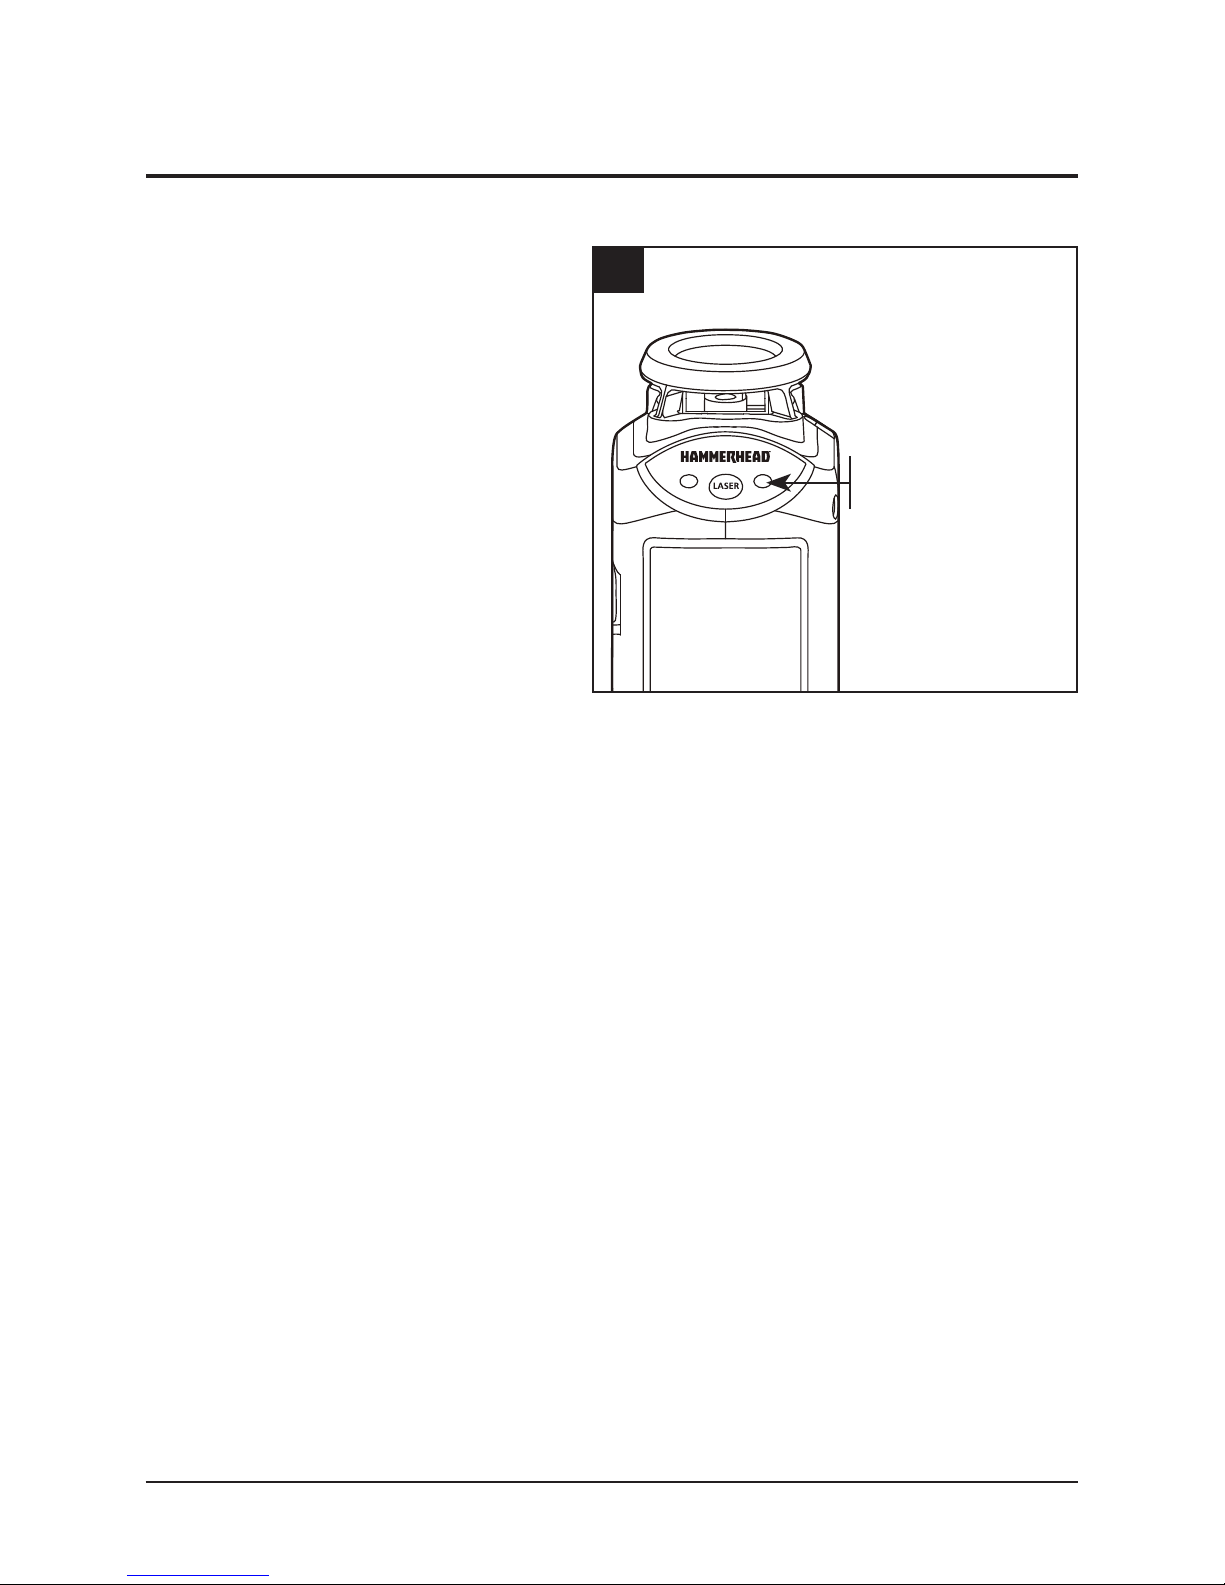
4. MODO DE RECEPTOR MANUAL
Al trabajar con la herramienta
en exteriores, la fuerte luz solar
hará que sea difícil identicar las
líneas del láser. Cambie al modo
de receptor manual: las líneas del
láser pulsarán ahora con una alta
frecuencia. Cuando la recepción
es mediante un receptor de láser
(disponible por separado), el láser
puede detectarse hasta 30,48 m a
lo lejos.
Para cambiar a modo de receptor manual, mantenga presionado el botón de
modo; el indicador LED se iluminará.
Este modo puede utilizarse cuando la herramienta se encuentra en modo
autonivelante o de bloqueo.
4
INDICADOR LED
DEL RECEPTOR
MANUAL
Page 28
28 LÁSER AUTONIVELANTE DE LÍNEAS CRUZADAS DE 360 GRADOS
OPERACIÓN
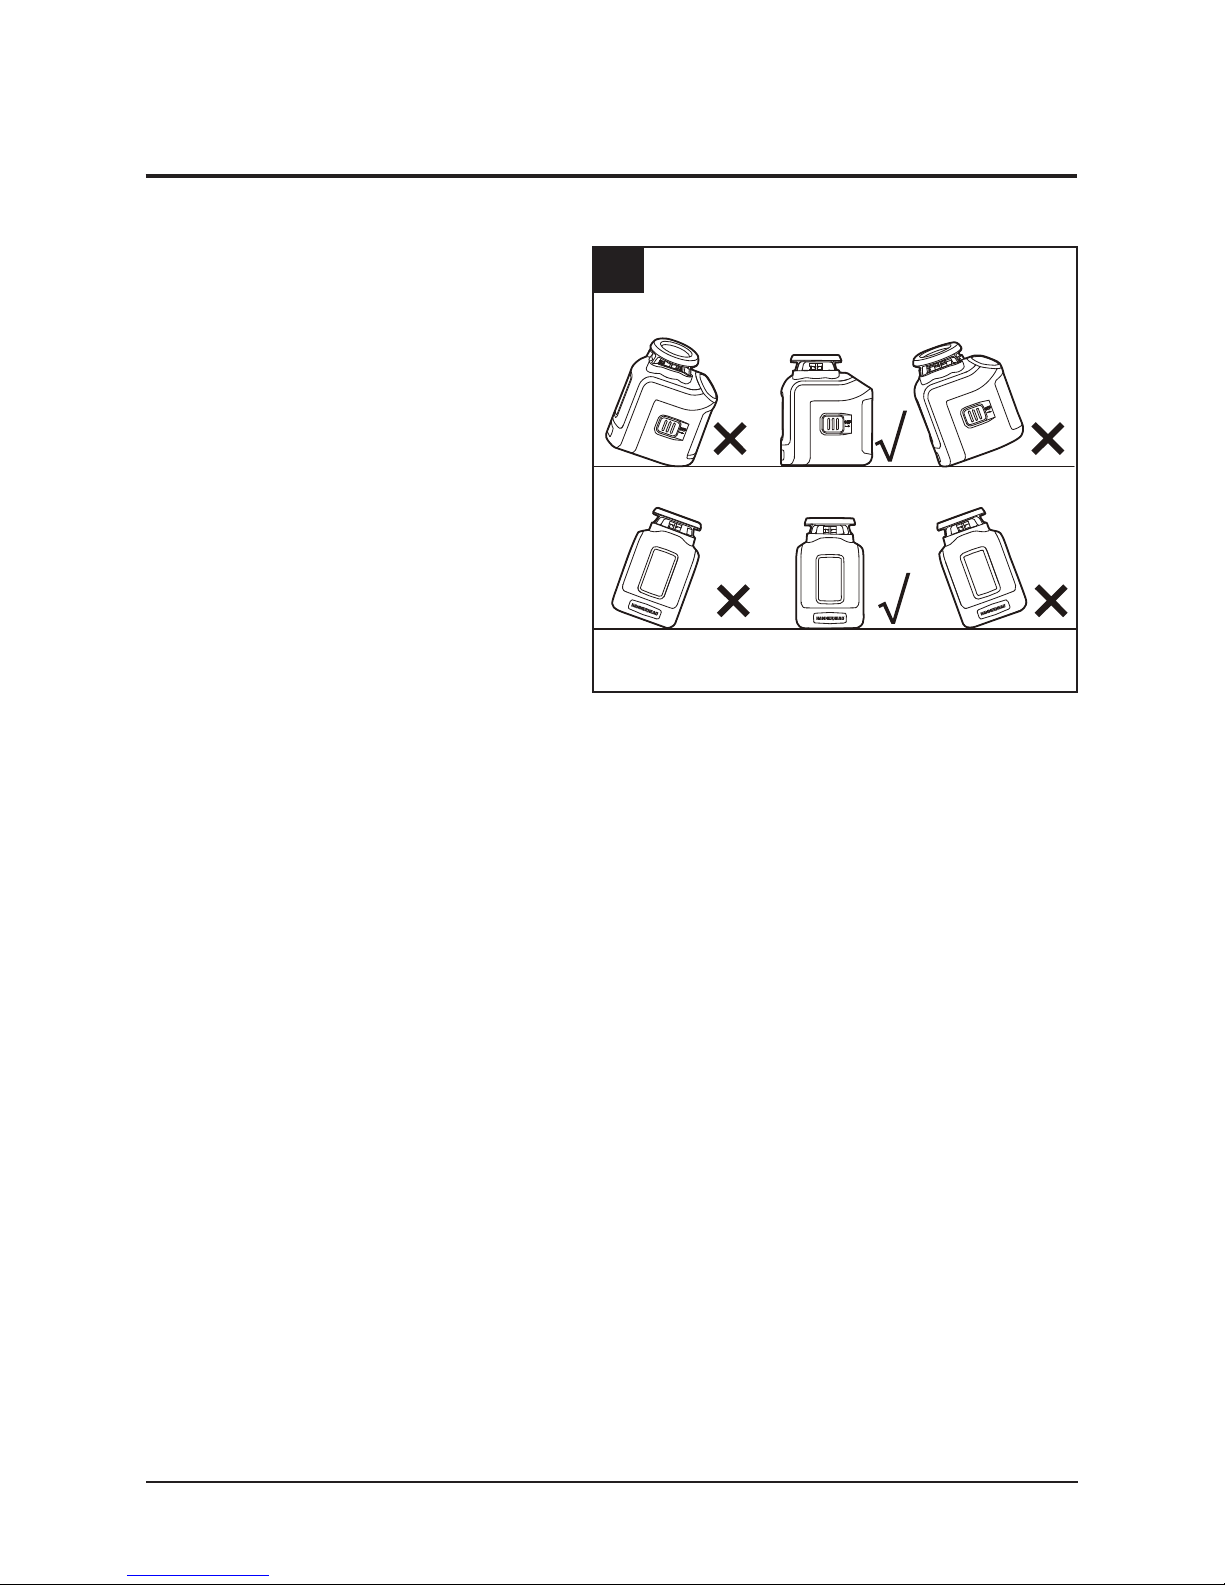
5. MODO AUTONIVELANTE
El láser autonivelante de líneas
cruzadas de 360 grados tiene dos
modos de funcionamiento: modo
autonivelante y modo de bloqueo
(manual). En el modo autonivelante,
la herramienta se nivelará sola si
se encuentra dentro de ±4° de la
horizontal.
a. Ubique el láser autonivelante
de líneas cruzadas de 360
grados en una supercie
plana y lisa que se encuentre dentro de ±4° de la horizontal.
b. Para encender la herramienta, deslice el interruptor de encendido en la
dirección de la echa “ON”. El láser autonivelante de líneas cruzadas de
360 grados se nivelará de forma automática en 4 segundos. El indicador
LED se iluminará de color verde.
c. Presione el botón de modo hasta alcanzar el modo de proyección láser
deseado y la línea del láser se proyecte desde el oricio del láser.
d. Si la supercie donde está colocado el láser autonivelante de líneas
cruzadas de 360 grados supera los ±4° de la horizontal, la línea del láser
titilará como alarma y el indicador LED se encenderá de color rojo. En
este momento, ajuste levemente el ángulo de la supercie.
e. Para apagar las líneas del láser, deslice el interruptor en la dirección de
la echa “OFF”.
5
Page 29

LÁSER AUTONIVELANTE DE LÍNEAS CRUZADAS DE 360 GRADOS 29
OPERACIÓN
6. MODO DE BLOQUEO
Este modo no puede utilizarse para realizar nivelaciones horizontales o
verticales, porque las líneas ya no son autonivelantes. En este modo, el
indicador LED siempre se iluminará de color rojo.
a. Mantenga el interruptor de encendido en la posición “OFF” y presione el
botón de modo para encender el láser. Las líneas del láser ahora están
bloqueadas y ya no son autonivelantes.
b. Presione el botón de modo varias veces para cambiar el modo de proyección láser.
c. Incline su láser autonivelante de líneas cruzadas de 360 grados para proyectar
una línea recta de referencia. En este modo, las líneas del láser se proyectan
de forma continua y no titilarán, aunque la inclinación del ángulo supere los 4°.
d. Para apagar el láser, presione el botón de modo varias veces hasta
apagar el láser.
7. APLICACIONES
Su láser autonivelante de líneas cruzadas de 360 grados puede sostenerse con la
mano para marcar un punto a simple vista, o puede usarse para hacer una “línea de
marcar” utilizando el modo de bloqueo. Es ideal para las siguientes aplicaciones:
• Colgar cuadros, fotos u obras de arte en las paredes
• Tapizar y estarcir
• Enmarcar puertas y ventanas
• Instalar cableado eléctrico y tuberías
• Montar accesorios en la pared, tomacorrientes, interruptores e iluminación
• Instalar un falso techo
• Pintar
• Instalar armarios
• Colocar azulejos y pisos
Page 30

30 LÁSER AUTONIVELANTE DE LÍNEAS CRUZADAS DE 360 GRADOS
MANTENIMIENTO
Este láser autonivelante de líneas cruzadas de 360 grados se diseñó para ser
una herramienta de bajo mantenimiento.
Sin embargo, para mantener su rendimiento, siempre debe seguir siempre estas
instrucciones sencillas:
a. Evite exponer la herramienta a descarga, vibración continua o temperatura
de calor o frío extremo.
b. Siempre guarde la herramienta en interiores.
c. Siempre mantenga la herramienta libre de polvo y líquidos. Use solo un
paño limpio y suave para limpiarla. Evite usar cualquier solvente.
d. No desarme el láser autonivelante de líneas cruzadas de 360 grados, esto
puede exponer al usuario a una radiación peligrosa.
e. No intente cambiar las piezas de los lentes láser.
f. Retire las baterías de la herramienta y guárdelas en un lugar fresco y seco.
g. Después de haber terminado de usar la herramienta, siempre asegúrese
de que el interruptor esté en la posición de apagado.
Page 31

LÁSER AUTONIVELANTE DE LÍNEAS CRUZADAS DE 360 GRADOS 31
SOLUCIÓN DE PROBLEMAS
PROBLEMA CAUSA SOLUCIÓN
La proyección
de línea del láser
es débil.
Las baterías están
descargadas.
Reemplace por una batería
nueva.
La proyección
de línea del
láser es difícil
de ver.
La herramienta está muy
lejos del objetivo.
Acerque la herramienta al
objetivo.
El entorno está demasiado
brillante.
Cambie al modo de receptor
manual y encuentre la línea
del láser con un receptor
de láser (disponible por
separado).
La línea de láser
no se proyecta.
No se han instalado
las baterías o están
descargadas.
Instale baterías nuevas.
El interruptor de encendido
no está presionado en la
posición "ON".
Deslice el interruptor de
encendido a la posición
"ON".
La línea del láser
parpadea como
alerta.
La supercie donde se ha
colocado la herramienta
está dispareja o la
herramienta está fuera del
alcance de autonivelación.
Coloque la herramienta en
una supercie más nivelada
(dentro de ±4°).
Ajuste la herramienta en el
modo de bloqueo.
Page 32

32 LÁSER AUTONIVELANTE DE LÍNEAS CRUZADAS DE 360 GRADOS
GARANTÍA LIMITADA DE 3 AÑOS
El comprador original de este láser de autonivelación de líneas cruzadas de
360 grados cuenta con una garantía de dos años a partir de la fecha de compra
original, más un año adicional si registra el producto en www.hammerheadtools.
com (2 + 1), lo que suma un total de tres años, sujeto a la cobertura de la
garantía que se describe en el presente documento.
Conserve su recibo.
Se garantiza al comprador original que este láser autonivelante de líneas
cruzadas de 360 grados está libre de defectos en los materiales y la mano de
obra. Si cree que la herramienta tiene algún defecto en cualquier momento
durante el período de garantía especicado, simplemente llame a Ayuda al
cliente de HAMMERHEAD al 1-877-888-1880 para hablar con un agente de
Servicio al Cliente. Esta garantía no cubre: (1) Falla de las piezas debido al
desgaste normal o al maltrato de la herramienta (2) Cualquier pieza alterada o
modicada por alguien ajeno al personal autorizado de HAMMERHEAD.
Esta garantía excluye puntas de destornillador, bombillas y accesorios. Esta
garantía le otorga derechos legales especícos, pero podría tener también otros
derechos que varían según el estado.
 Loading...