

Page 1
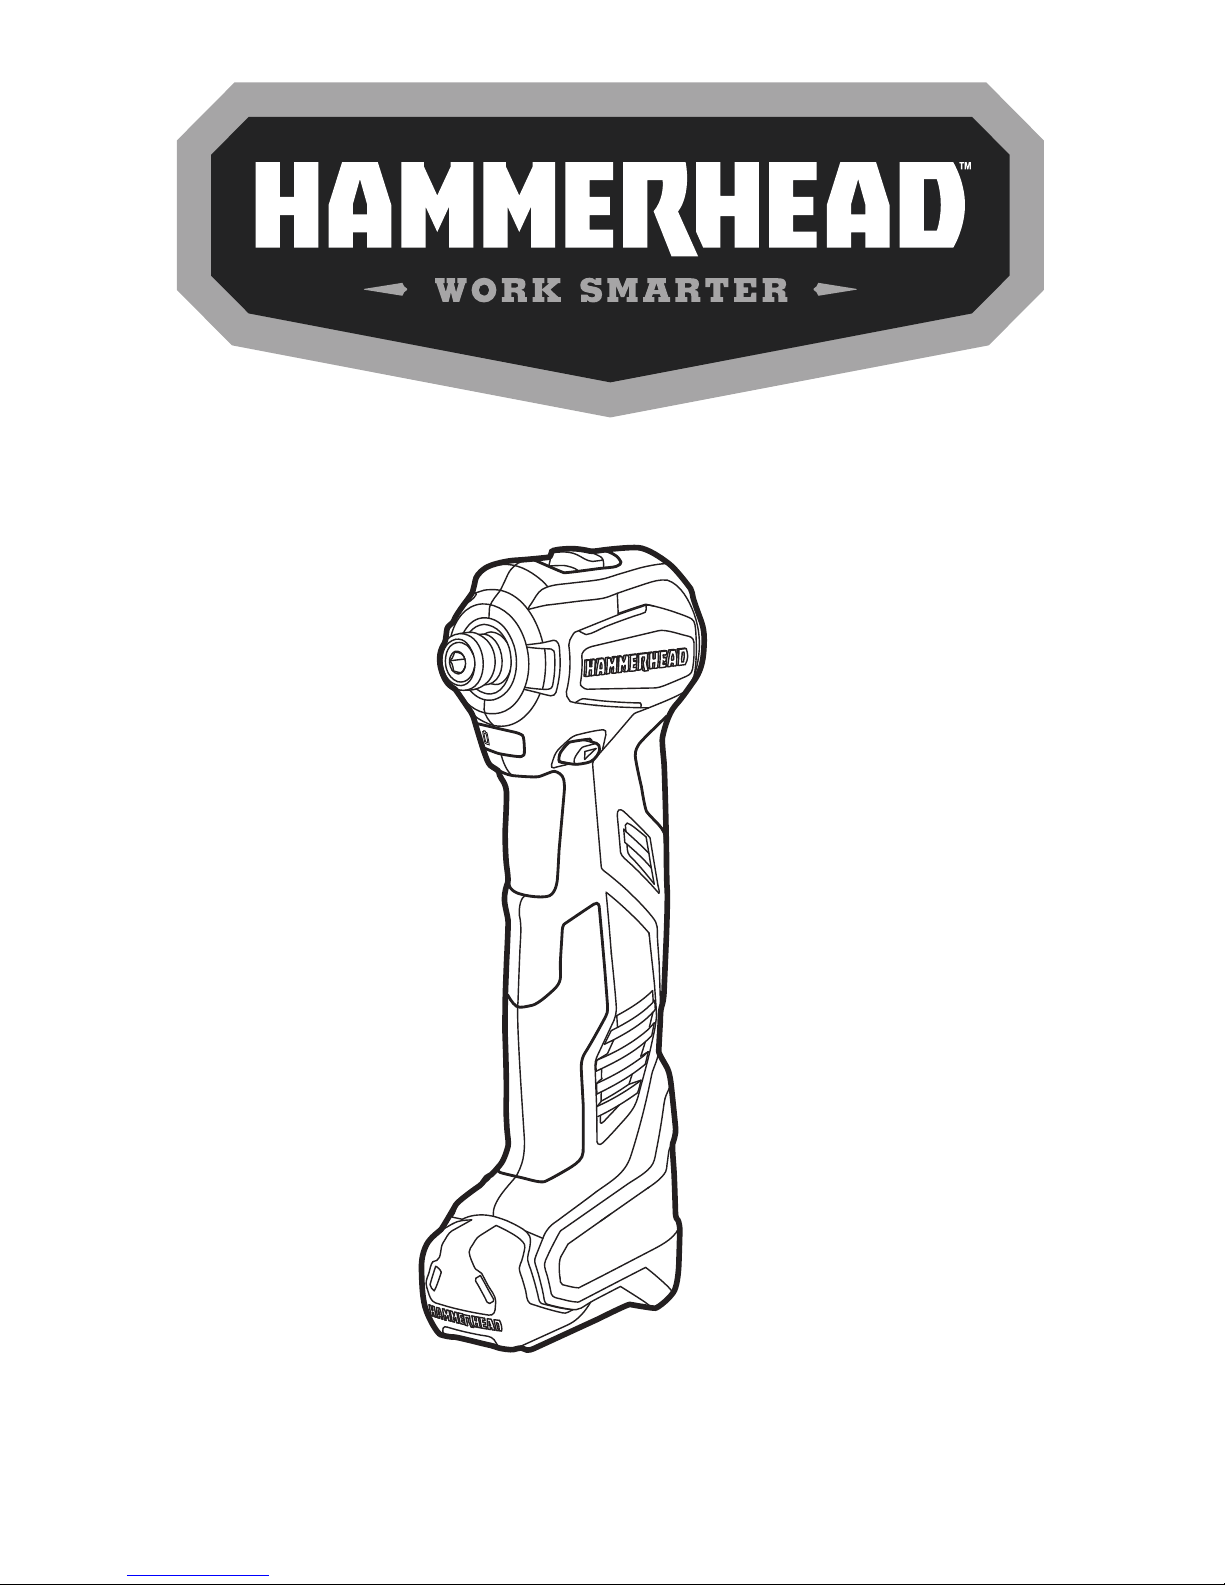
COMPACT
IMPACT DRIVER/
AUTO HAMMER
MODEL HCID120
CHARGE THE INTEGRATED LITHIUM-ION
BATTERY BEFORE FIRST USE.
MADE IN CHINA 2015
Page 2
2 COMPACT IMPACT DRIVER/AUTO HAMMER
TABLE OF CONTENTS
Product Specications .................................................... 2
Safety Information .......................................................3
Preparation ............................................................. 7
Package Contents ........................................................ 8
Operating Instructions ...................................................10
Care and Maintenance ...................................................16
Troubleshooting ........................................................16
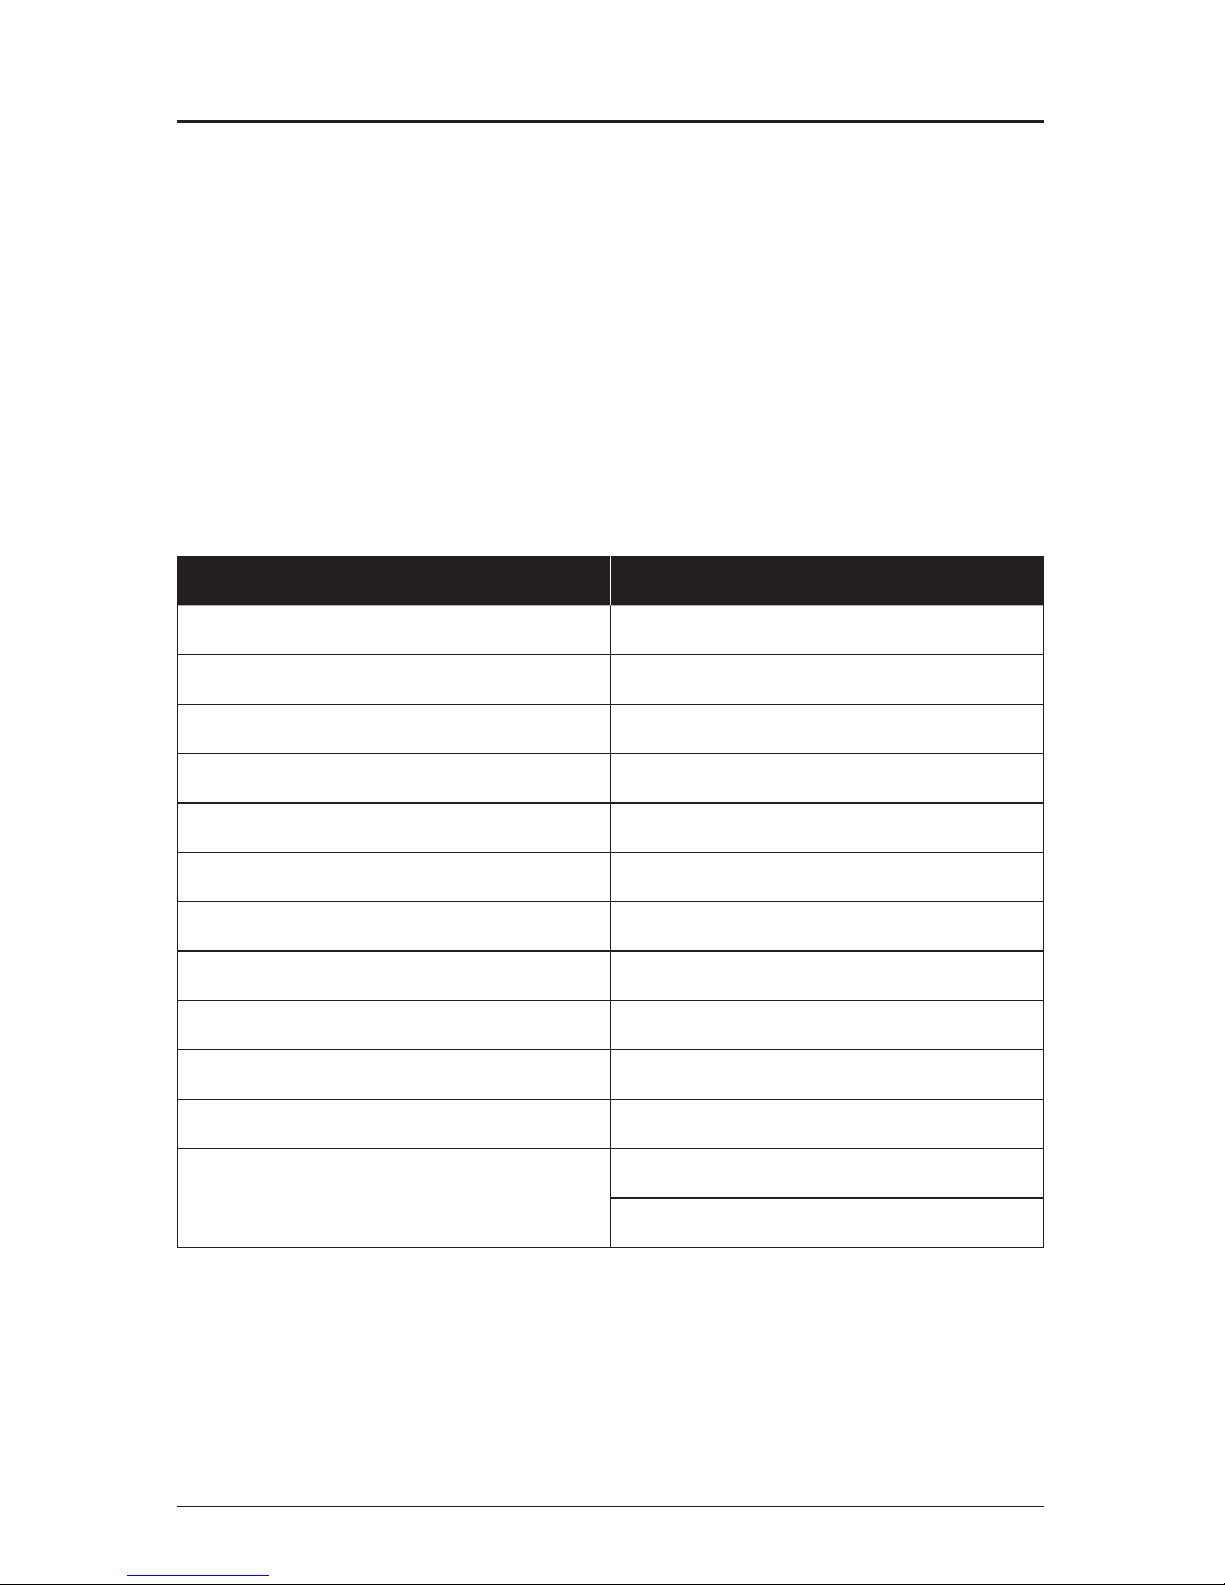
PRODUCT SPECIFICATIONS
COMPONENT SPECIFICATIONS
Motor 12.0 V DC
Switch VSR (Variable Speed Reversible)
No-load speed 0-2,100 RPM
Beats per minute 0-3,500 BPM
Maximum torque (Impact Driver) 80 Nm
Collet size 6.35 mm
Nail capacity (Auto Hammer) Up to 65 X 2.8mm
Screw capacity (Impact Driver) Up to 8G X 75mm
Lag screw capacity (Impact Driver) Up to M6 X 75mm
Level of acoustic pressure L
pA
(KpA=3 dB(A)) 84.54 dB(A)
Level of acoustic power L
wA
(KwA=2.5 dB(A)) 95.54 dB(A)
Level of vibration a
h
(K=1.5 m/s2)
Fixing nails vertically downwards 5.082m/s
2
Screwdriving without impact 0.451m/ s
2
NOTICE:
— That the declared vibration total value has been measured in accordance with a
standard test method and may be used for comparing one tool with another;
— That the declared vibration total value may also be used in a preliminary assessment
of exposure.
Page 3

COMPACT IMPACT DRIVER/AUTO HAMMER 3
WARNING
— That the vibration emission during actual use of the power tool can differ from the
declared total value depending on the ways in which the tool is used.
— Avoid vibration risk
Suggestion: 1) wear glove during operation
2) limit operating time and shorten trigger time.
SAFETY INFORMATION
WARNING
• The operation of any power tool can result in foreign objects being thrown into your eyes,
which can result in severe eye damage. Before beginning power-tool operation, always
wear safety goggles or safety glasses with side shields and a full-face shield, when
needed. We recommend using a wide vision safety mask over eyeglasses or standard
safety glasses with shields. Always use eye protection marked to comply with ANSI Z87.1.
• Some dust created by power sanding, sawing, grinding, drilling and other construction
activities contains chemicals known to the State of California to cause cancer, birth
defects or other reproductive harm. Some examples of these chemicals are:
— Lead from lead-based paints.
— Crystalline silica from bricks, cement, and other masonry products.
— Arsenic and chromium from chemically-treated lumber.
• Your risk from these exposures varies, depending upon how often you do this type of
work. To reduce your exposure to these chemicals:
— Work in a well-ventilated area.
— Work with approved safety equipment, such as dust masks that are specially
designed to lter out microscopic particles.
— Avoid prolonged contact with dust from power sanding, sawing, grinding, drilling, and
other construction activities. Wear protective clothing and wash exposed areas with
soap and water. Allowing dust to get into your mouth or eyes or to lie on the skin may
promote absorption of harmful chemicals.
Page 4
4 COMPACT IMPACT DRIVER/AUTO HAMMER
SAFETY INFORMATION
Know the Tool
To operate this tool, carefully read this manual and all labels afxed to the impact driver/
auto hammer before using it. Keep this manual available for future reference.
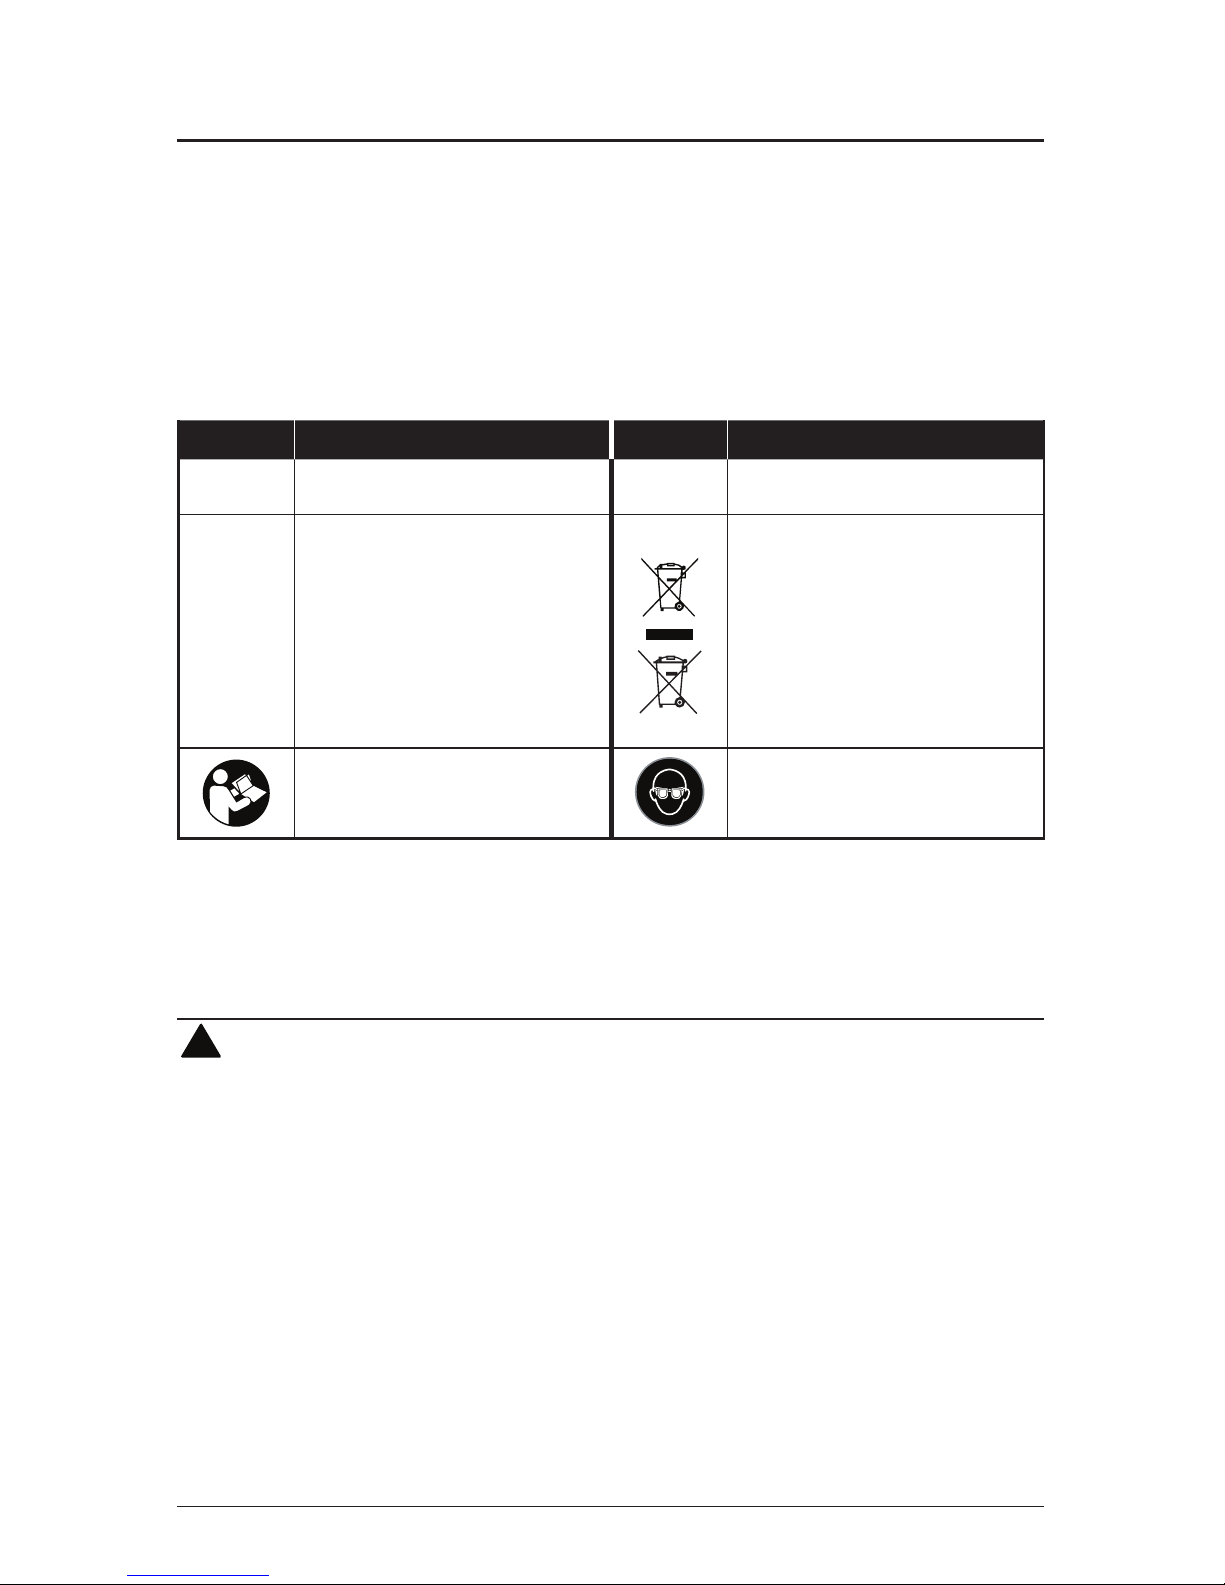
Some of the following symbols may be used on this tool. Please study them and their
meaning. Proper interpretation of these symbols will allow you to operate the tool better
and more safely.
SYMBOL DEFINITION SYMBOL DEFINITION
V Volts
Direct Current
A danger, warning or caution.
It means ‘ATTENTION! Your
safety is involved.’
Li
Faulty and/or discarded electrical or electronic apparatus
have to be collected at the
appropriate recycling locations
Read instructions carefully Wear eye protector
IMPORTANT: This tool should only be serviced only by a qualied service technician.
GENERAL POWER TOOL SAFETY WARNINGS
!
WARNIN G
Read all safety warnings and instructions. Failure to follow the warnings and
instructions may result in electric shock, re and/or serious injury.
SAVE ALL WARNINGS AND INSTRUCTIONS FOR FUTURE REFERENCE.
The term “power tool” in the warnings refers to your mains-operated (corded) power tool or
battery-operated (cordless) power tool.
1) Work area safety
a) Keep work area clean and well lit. Cluttered and dark areas invite accidents.
b) Do not operate power tools in explosive atmospheres, such as in the presence
of ammable liquids, gases or dust. Power tools create sparks which may ignite the
dust or fumes.
c) Keep children and bystanders away while operating a power tool. Distractions
can cause you to lose control.
Page 5

COMPACT IMPACT DRIVER/AUTO HAMMER 5
2) Electrical safety
a) Power tool plugs must match the outlet. Never modify the plug in any way. Do
not use any adapter plugs with earthed (grounded) power tools. Unmodied plugs
and matching outlets will reduce risk of electric shock.
b) Avoid body contact with earthed or grounded surfaces such as pipes, radiators,
ranges and refrigerators. There is an increased risk of electric shock if your body is
earthed or grounded.
c) Do not expose power tools to rain or wet conditions. Water entering a power tool
will increase the risk of electric shock.
d) Do not abuse the cord. Never use the cord for carrying, pulling or unplugging
the power tool. Keep cord away from heat, oil, sharp edges or moving parts. Dam-
aged or entangled cords increase the risk of electric shock.
e) When operating a power tool outdoors, use an extension cord suitable for outdoor use. Use of a cord suitable for outdoor use reduces the risk of electric shock.
f) If operating a power tool in a damp location is unavoidable, use a residual current device (RCD) protected supply. Use of an RCD reduces the risk of electric shock.
3) Personal safety
a) Stay alert, watch what you are doing and use common sense when operating
a power tool. Do not use a power tool while you are tired or under the inuence
of drugs, alcohol or medication. A moment of inattention while operating power tools
may result in serious personal injury.
b) Use personal protective equipment. Always wear eye protection. Protective
equipment such as dust mask, non-skid safety shoes, hard hat, or hearing protection
used for appropriate conditions will reduce personal injuries.
c) Prevent unintentional starting. Ensure the switch is in the off-position before
connecting to power source and /or battery pack, picking up or carrying the tool.
Carrying power tools with your nger on the switch or energizing power tools that have
the switch on invites accidents.
d) Remove any adjusting key or wrench before turning the power tool on. A wrench
or a key left attached to a rotating part of the power tool may result in personal injury.
e) Do not overreach. Keep proper footing and balance at all times. This enables better control of the power tool in unexpected situations.
f) Dress properly. Do not wear loose clothing or jewellery. Keep your hair, clothing and gloves away from moving parts. Loose clothes, jewellery or long hair can be
caught in moving parts.
g) If devices are provided for the connection of dust extraction and collection
facilities, ensure these are connected and properly used. Use of these devices can
reduce dust related hazards.
Page 6

6 COMPACT IMPACT DRIVER/AUTO HAMMER
4) Power tool use and care
a) Do not force the power tool. Use the correct power for your application. The
correct power tool will do the job better and safer at the rate for which it was designed.
b) Do not use the power tool if the switch does not turn it on and off. Any power
tool that cannot be controlled with the switch is dangerous and must be repaired.
c) Disconnect the plug from the power source and/or the battery pack from the
power tool before making any adjustments, changing accessories, or storing
power tools. Such preventive safety measures reduce the risk of starting the power tool
accidentally.
d) Store idle power tools out of the reach of children and do not allow persons
unfamiliar with the power tool or these instructions to operate the power tool.
Power tools are dangerous in the hands of untrained users.
e) Maintain power tools. Check for misalignment or binding of moving parts,
breakage of parts and any other condition that may affect the power tool’s
operation. If damaged, have the power tool repaired before use. Many accidents are
caused by poorly maintained power tools.
f) Keep cutting tools sharp and clean. Properly maintained cutting tools with sharp
cutting edges are less likely to bind and are easier to control.
g) Use the power tool, accessories and tool bits etc. in accordance with these
instructions, taking into account the working conditions and the work to be
performed. Use of the power tool for operations different from those intended could
result in a hazardous situation.
5) Battery tool use and care
a) Recharge only with the charger specied by the manufacturer. A charging
adaptor that is suitable for one type of battery pack may create a risk of re when used
with another battery pack.
b) Use power tools only with specically designated battery packs. Use of any
other battery packs may create a risk of injury and re.
c) When battery pack is not in use, keep it away from other metal objects like
paper clips, coins, keys, nails, screws, or other small metal objects that can make
a connection from one terminal to another. Shorting the battery terminals together
may cause burns or a re.
d) Under abusive conditions, liquid may be ejected from the battery; avoid contact.
If contact accidentally occurs, ush with water. If liquid contacts eyes, additionally
seek medical help. Liquid ejected from the battery may cause irritation or burns.
Page 7

COMPACT IMPACT DRIVER/AUTO HAMMER 7
6) Service
Have your power tool serviced by a qualied repair person using only identical
replacement parts. This will ensure that the safety of the power tool is maintained.
Specic Safety Warnings for Right-Angle Impact Driver Function
• Hold power tools by their insulated gripping surfaces when performing an
operation where the cutting accessory may contact hidden wiring. Cutting
accessory contacting a “live” wire may make exposed metal parts of the power tool
“live” and could give the operator an electric shock.
Specic Safety Warnings for Auto-Hammer Function
• Wear ear protectors. Exposure to noise can cause hearing loss.
• Use auxiliary handle(s), if supplied with the tool. Loss of control can cause
personal injury.
• Hold power tools by their insulated gripping surfaces when performing an
operation where the cutting accessory may contact hidden wiring. Cutting
accessory contacting a "live" wire may make exposed metal parts of the power tool
“live” and could give the operator an electric shock.
PREPARATION
Before attempting to use the tool, familiarize yourself with all of its operating features and
safety requirements.
Page 8
8 COMPACT IMPACT DRIVER/AUTO HAMMER
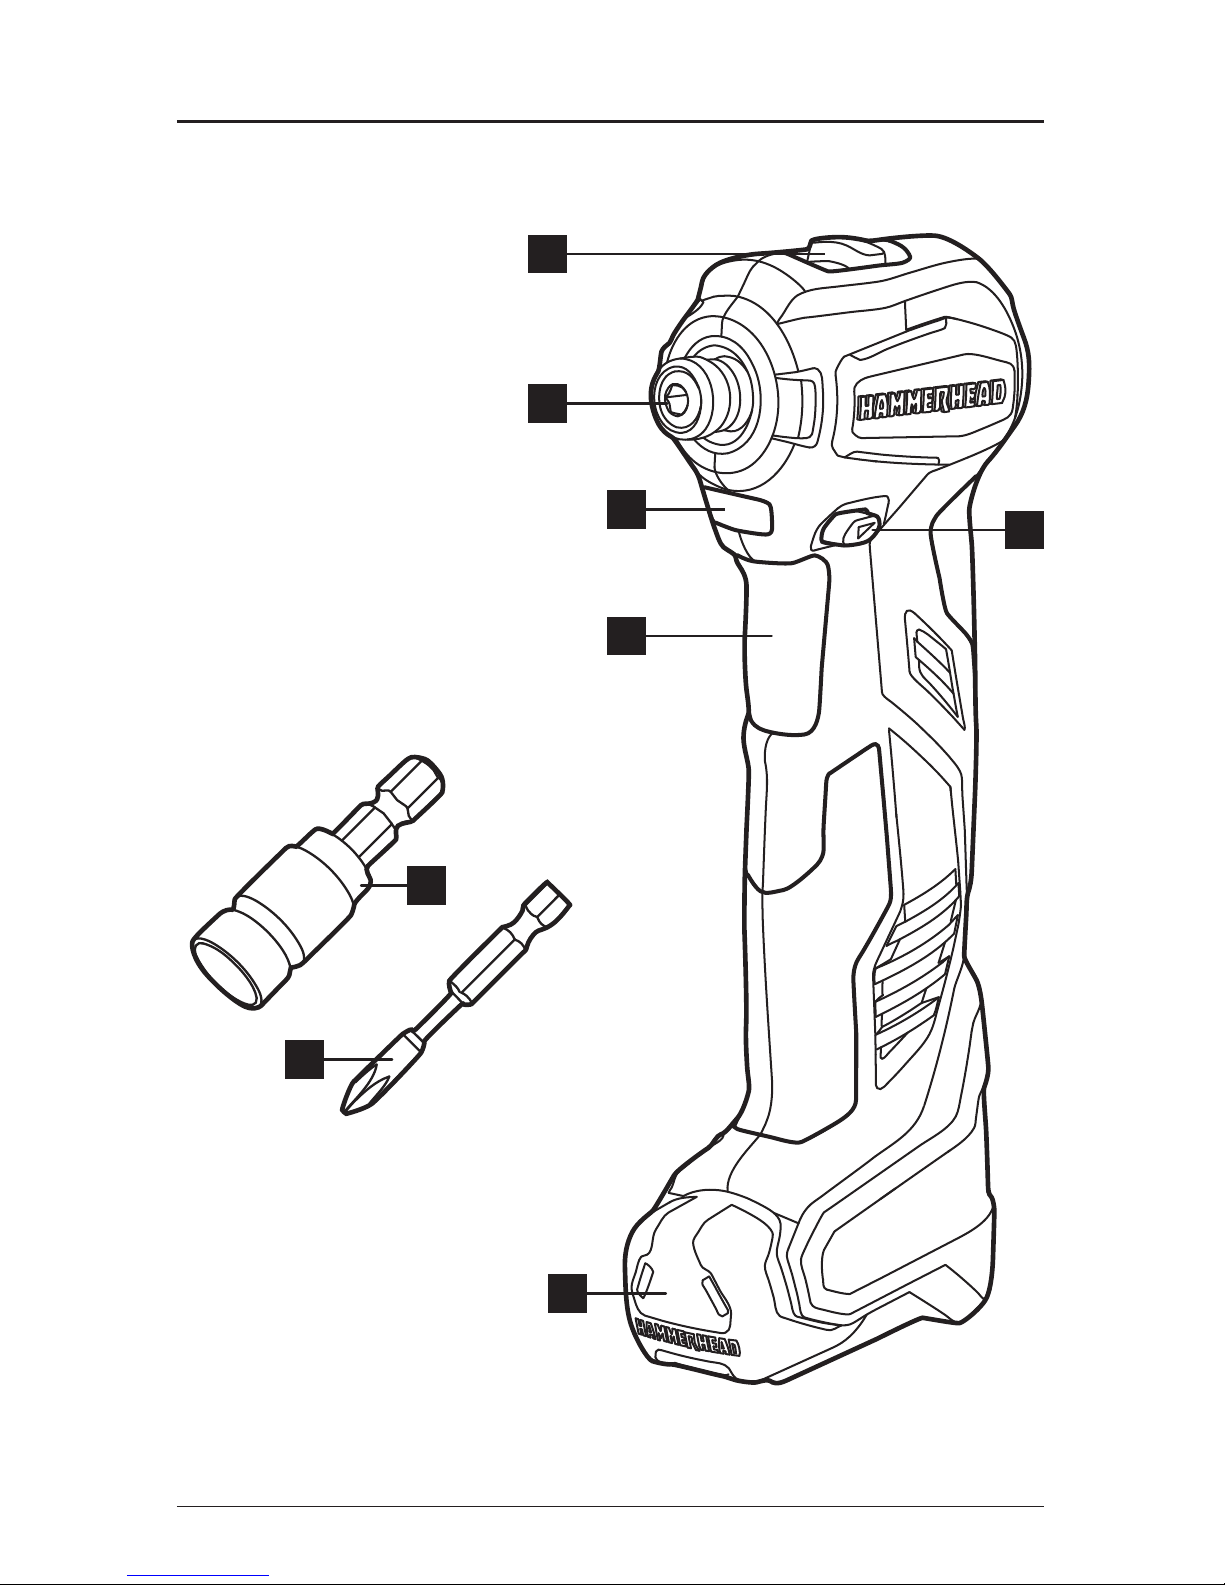
PACKAGE CONTENTS
B
D
C
E
A
G
F
H
Page 9
COMPACT IMPACT DRIVER/AUTO HAMMER 9
PACKAGE CONTENTS
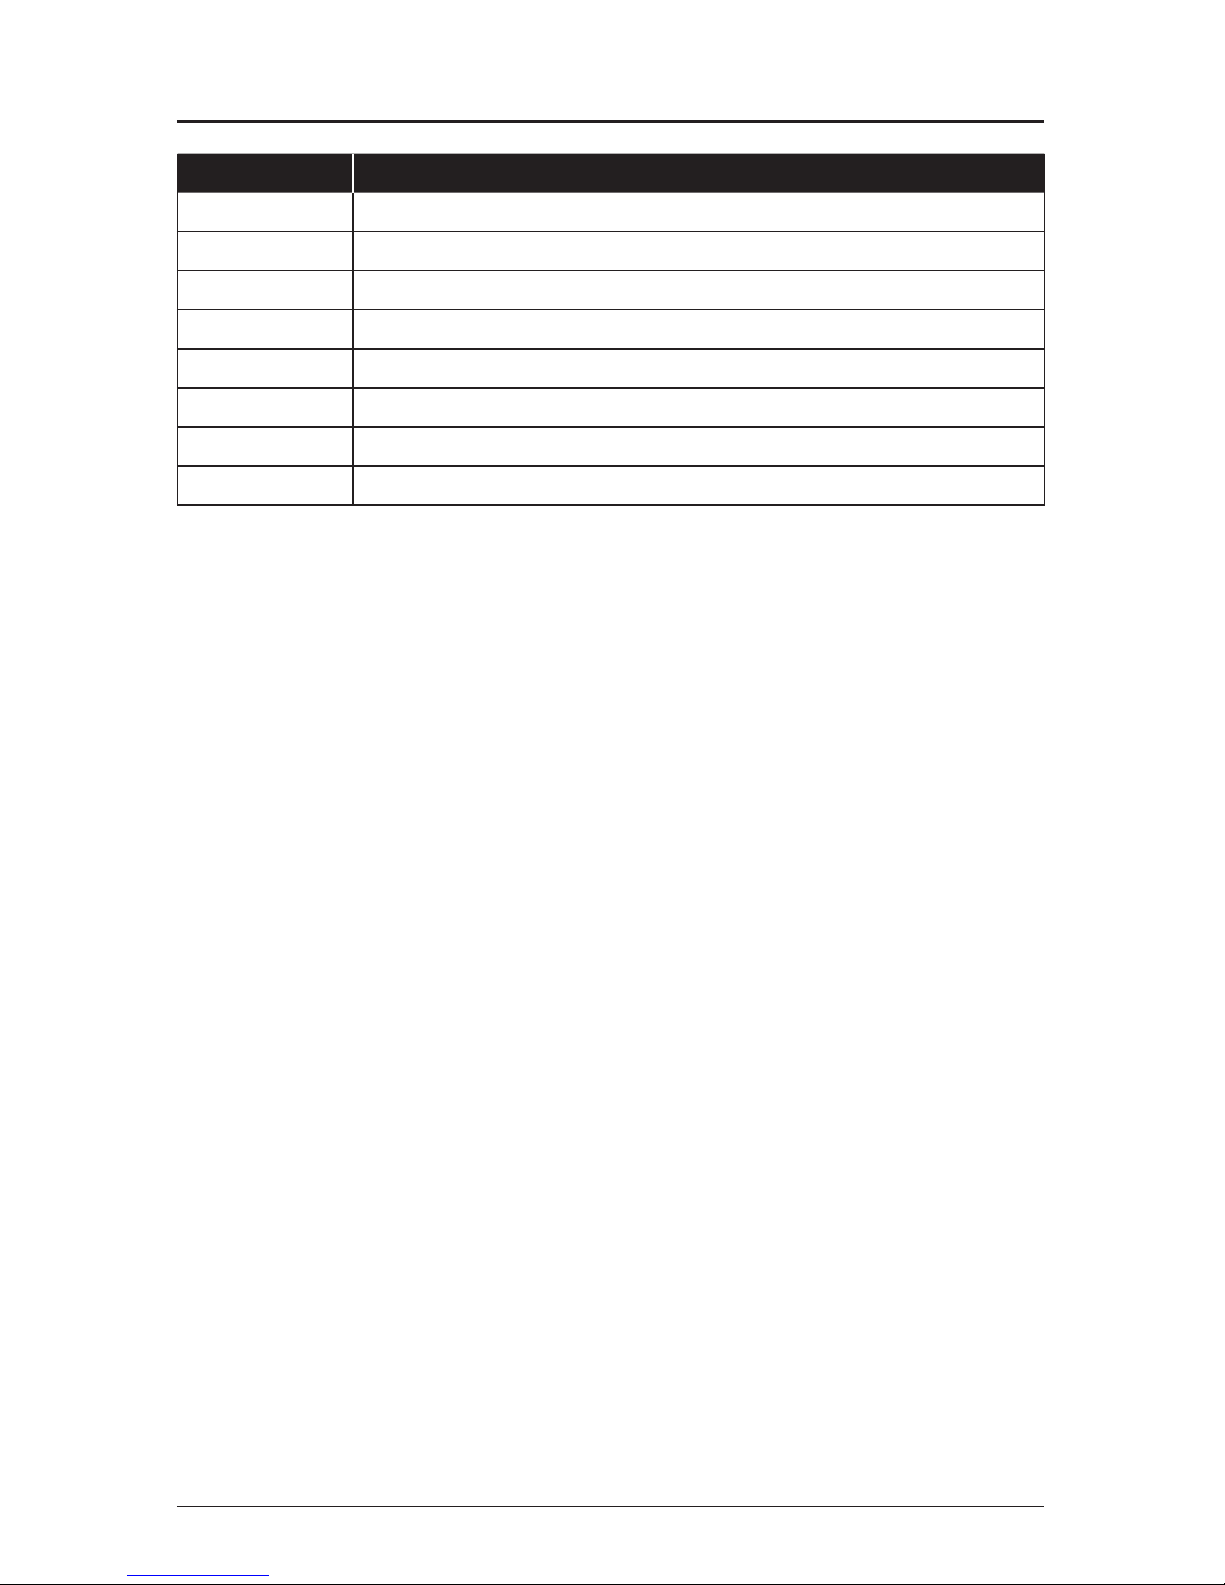
PARTS DESCRIPTION
A Dual-Function Switch
B Quick-Release 6.35mm Hex Collet
C LED Worklight
D Variable-Speed Trigger
E Forward/Lock/Reverse Selector
F Integrated 12V Lithium-Ion Battery
G Auto Hammer Adaptor
H Impact Bit
Page 10
10 COMPACT IMPACT DRIVER/AUTO HAMMER
OPERATING INSTRUCTIONS
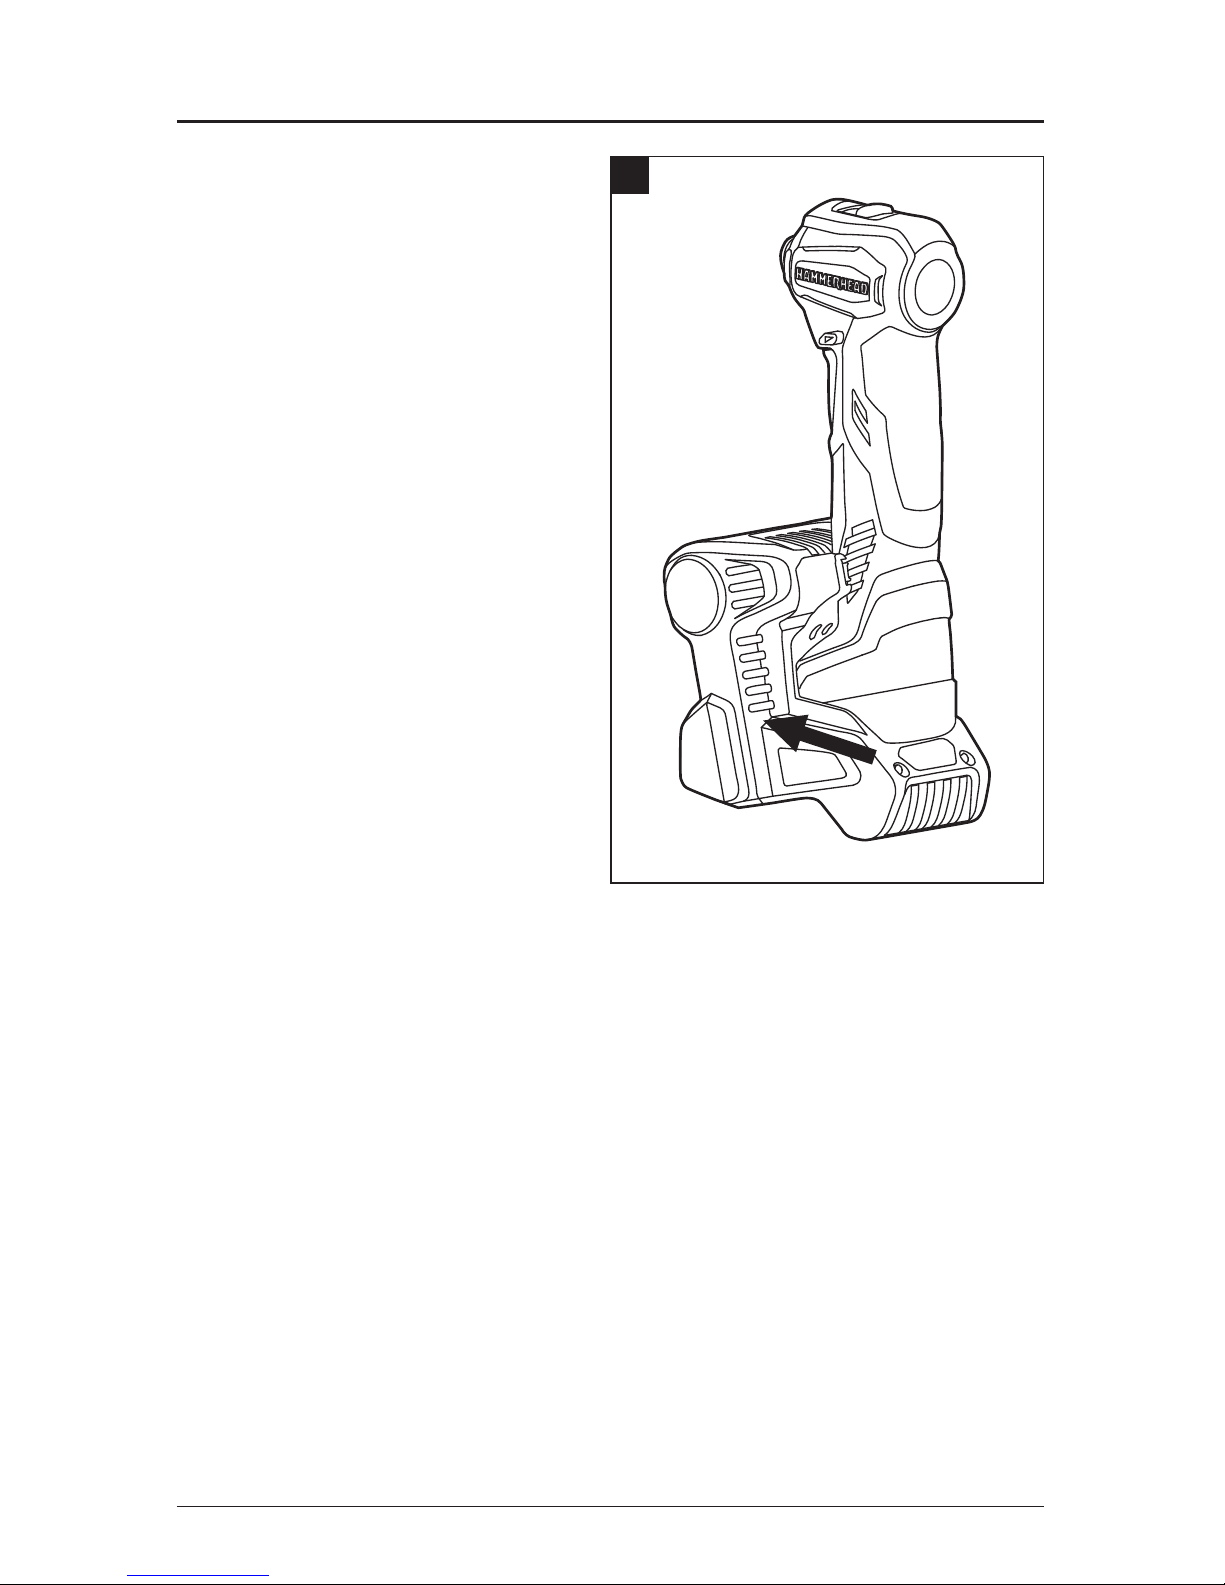
1. How To Charge
NOTICE: The integrated Lithium-Ion
battery is shipped partially charged.
Before using it the first time, fully
charge the battery. A fully discharged
battery will normally charge in about
30min in a surrounding temperature
between 0°C and 55°C
a. Charge the tool only with the
correct charger.
b. Lock the variable-speed trigger
on the tool by placing the forward/
lock/reverse selector in the center
position.
c. Align the slots of the integrated
Lithium-Ion battery with the
electrical contacts of the charger,
and then slide the tool into the
charger.
d. Connect the charger to the power
supply. The charger can only
be used with normal household
voltage of 220-240 volt AC, 50Hz.
e. The red and green charging indicator lights will illuminate for approximately one
second and then turn off. The charger will communicate with the tool to evaluate the
condition of the integrated Lithium-Ion battery.
f. The green light will ash while the integrated Lithium-Ion battery is charging
normally. When charging is complete, the green indicator light on the charger will
illuminate.
g. A ickering red light indicates a defective battery or a bad connection between the
integrated Lithium-Ion battery and the charger.
h. The integrated Lithium-Ion battery will fully charge if left on the charger, but it will
not overcharge.
1
Page 11
COMPACT IMPACT DRIVER/AUTO HAMMER 11
OPERATING INSTRUCTIONS
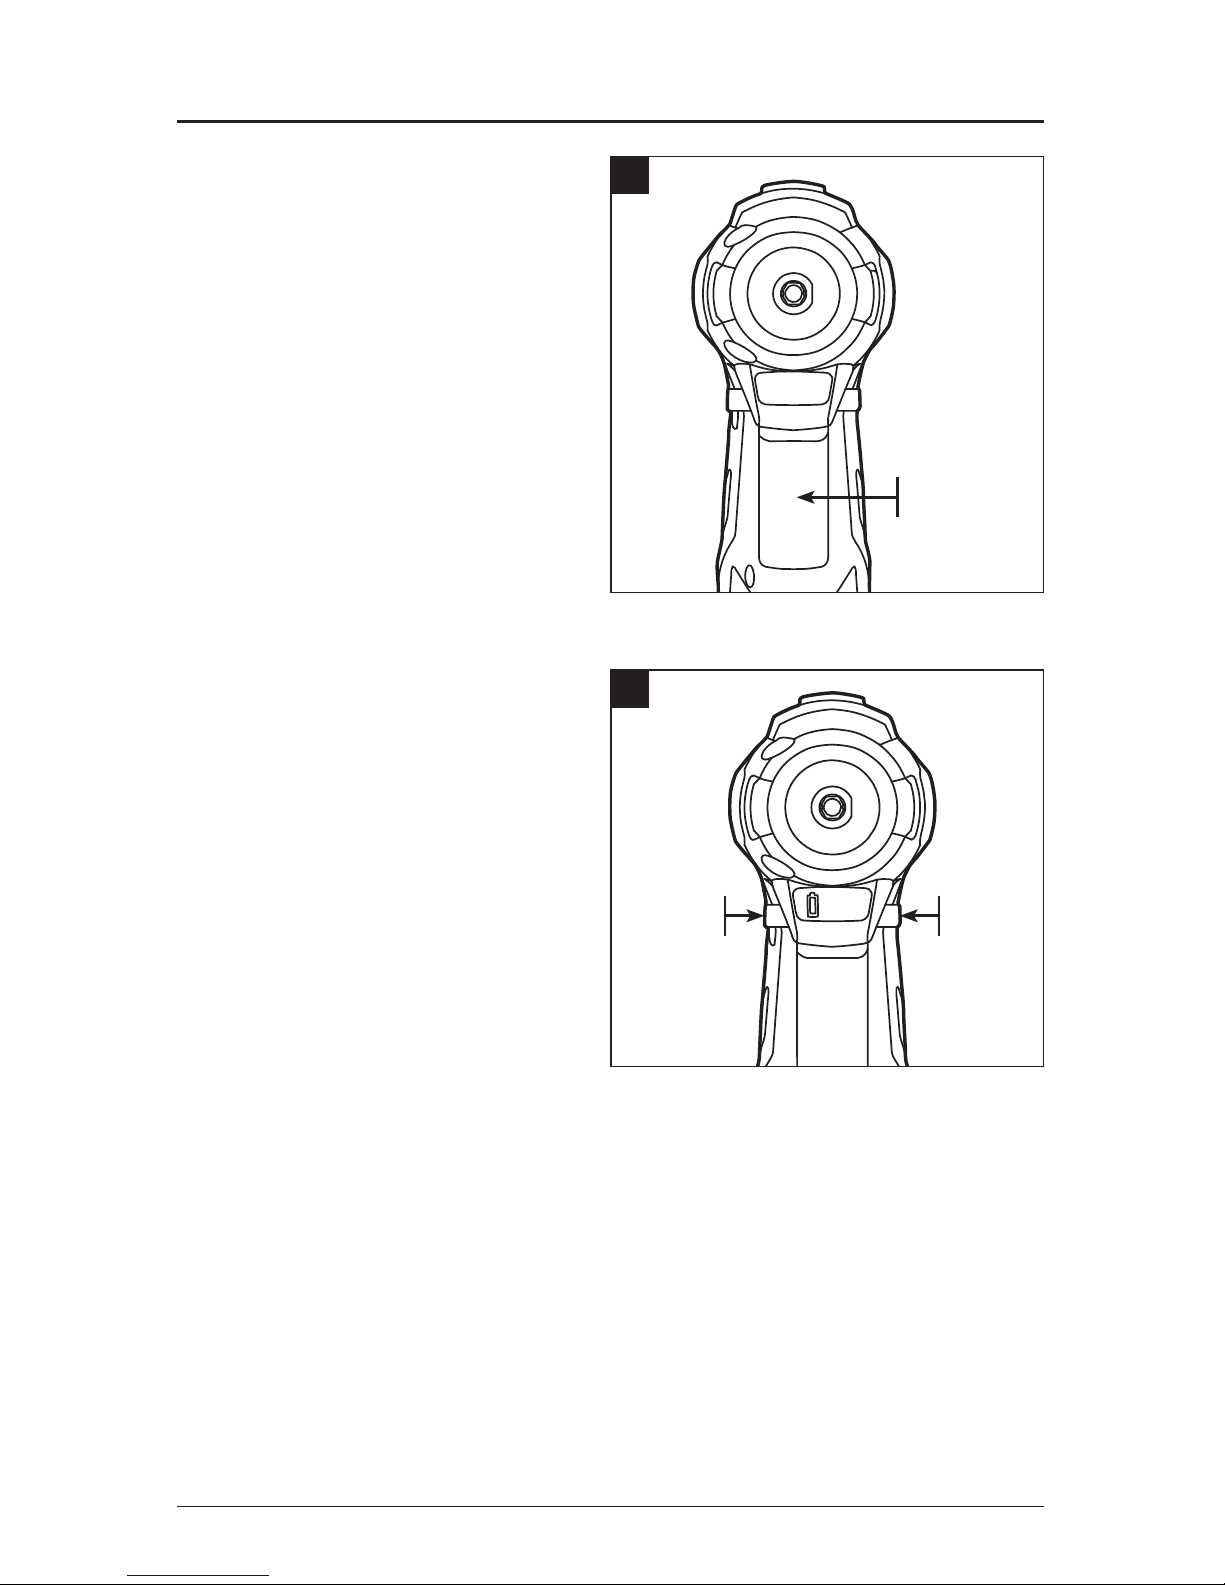
2. Variable-speed Trigger
a. To turn the tool ON, depress the
variable-speed trigger.
b. To turn it OFF, release the
variable-speed trigger.
NOTICE: The variable-speed trigger
delivers higher speed with increased
trigger pressure and lower speed with
decreased trigger pressure.
3. Forward/Lock/Reverse Selector
The direction of rotation while impact
driving is reversible and is controlled
by a selector located above the
variable-speed trigger. With the tool
held toward you as shown in figure 3.
a. Position the forward/lock/reverse
selector to the right of the tool for
forward rotation.
b. Position the forward/lock/reverse
selector to the left of the tool for
reverse rotation.
c. Setting the forward/lock/reverse
selector in the OFF (center-lock) position helps reduce the possibility of accidental
starting when not in use.
NOTICE: To prevent gear damage, always allow the tool to come to a complete stop before
changing the direction of rotation.
NOTICE: The tool will not run unless the forward/lock/reverse selector is engaged to the left
or right.
3
REVERSEFORWARD
2
VARIABLESPEED
TRIGGER
Page 12
12 COMPACT IMPACT DRIVER/AUTO HAMMER
OPERATING INSTRUCTIONS
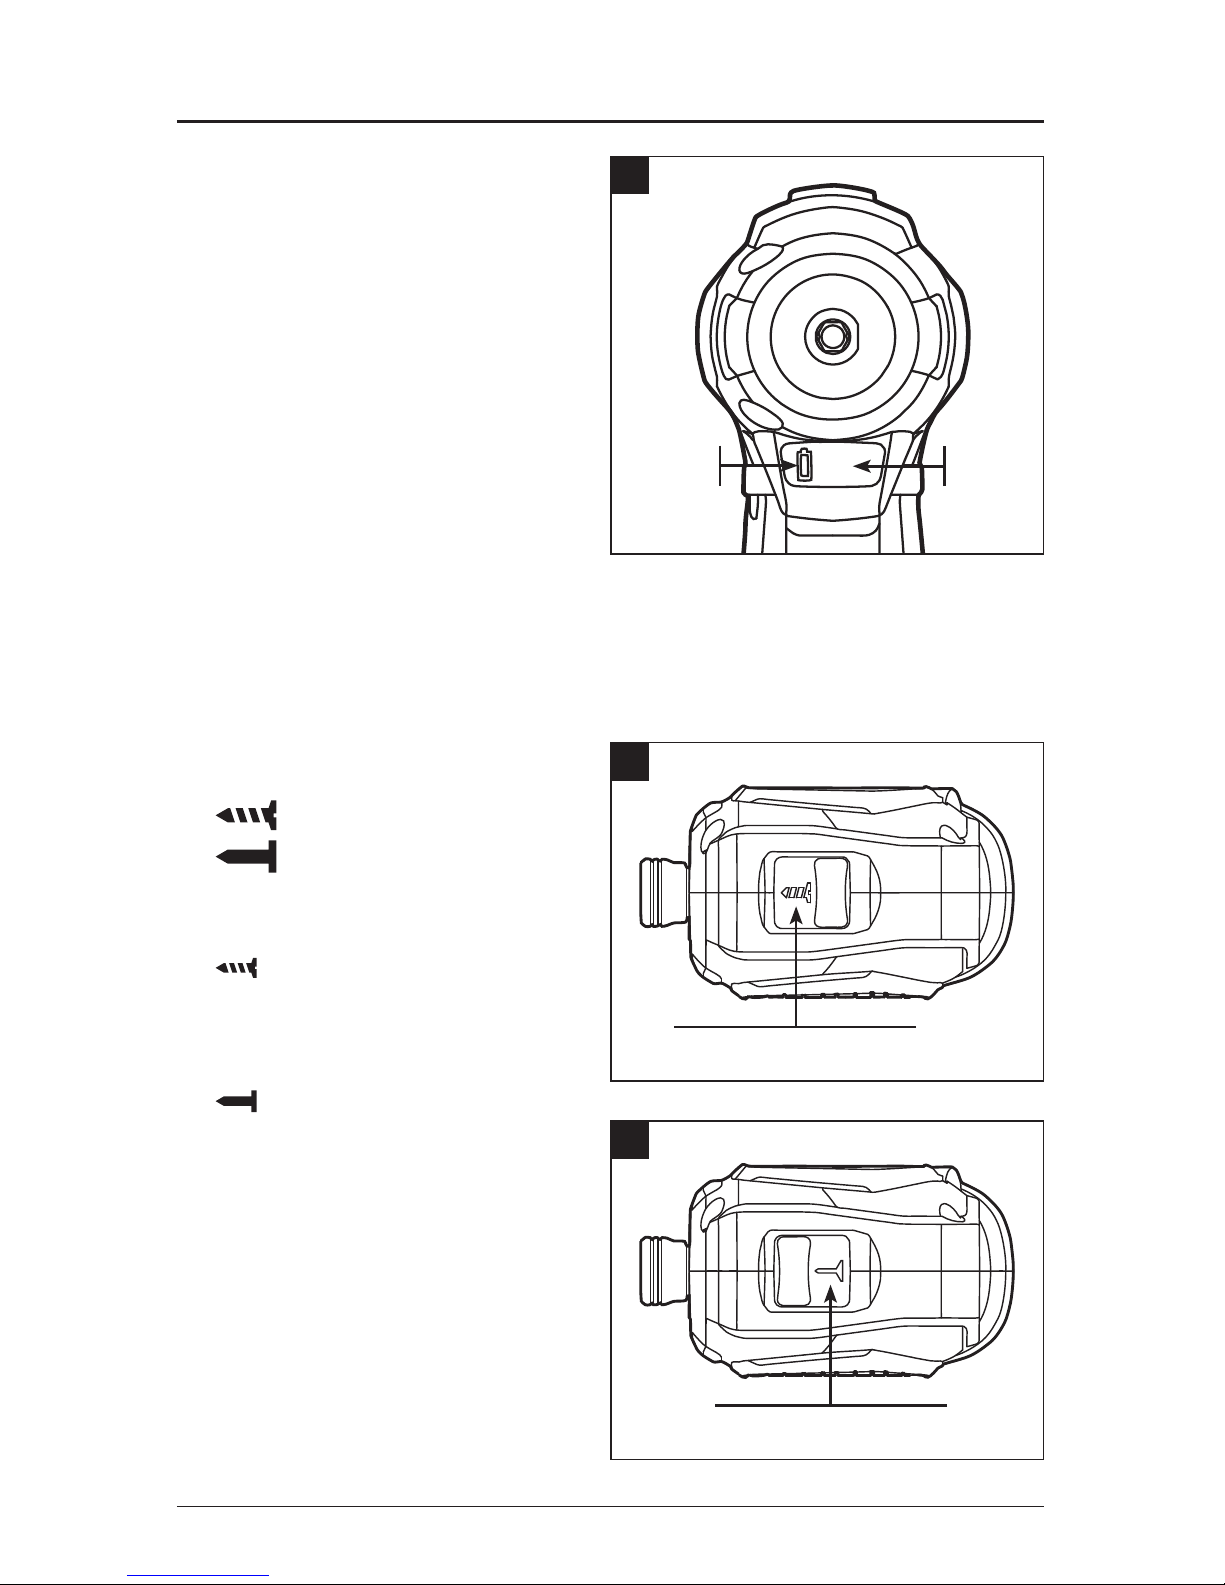
4. LED Worklight
a. The LED worklight, located on
the head of the tool, illuminates
when the variable-speed trigger
is depressed. This provides
additional light on the surface of
the workpiece for operation in
lower-light areas.
b. The LED worklight will turn off
when the variable-speed trigger
is released.
c. This tool is equipped with a
Fuel Gauge that indicates the
charge remaining in the integrated
Lithium-Ion battery.
If the Fuel Gauge displays a red light, it indicates that the integrated Lithium-Ion
battery needs to be charged.
5. Dual-Function Switch
Impact Driving Function
Auto Hammer Function
Set the dual-function switch to
Impact driving function, marked
for tightening or loosening
screws and nuts or drilling.
Set the dual-function switch to auto
hammering function, marked with
for hammering nails.
5
AUTO HAMMER FUNCTION
5
IMPACT DRIVING FUNCTION
4
FUEL
GAUGE
LED
Page 13
COMPACT IMPACT DRIVER/AUTO HAMMER 13
OPERATING INSTRUCTIONS
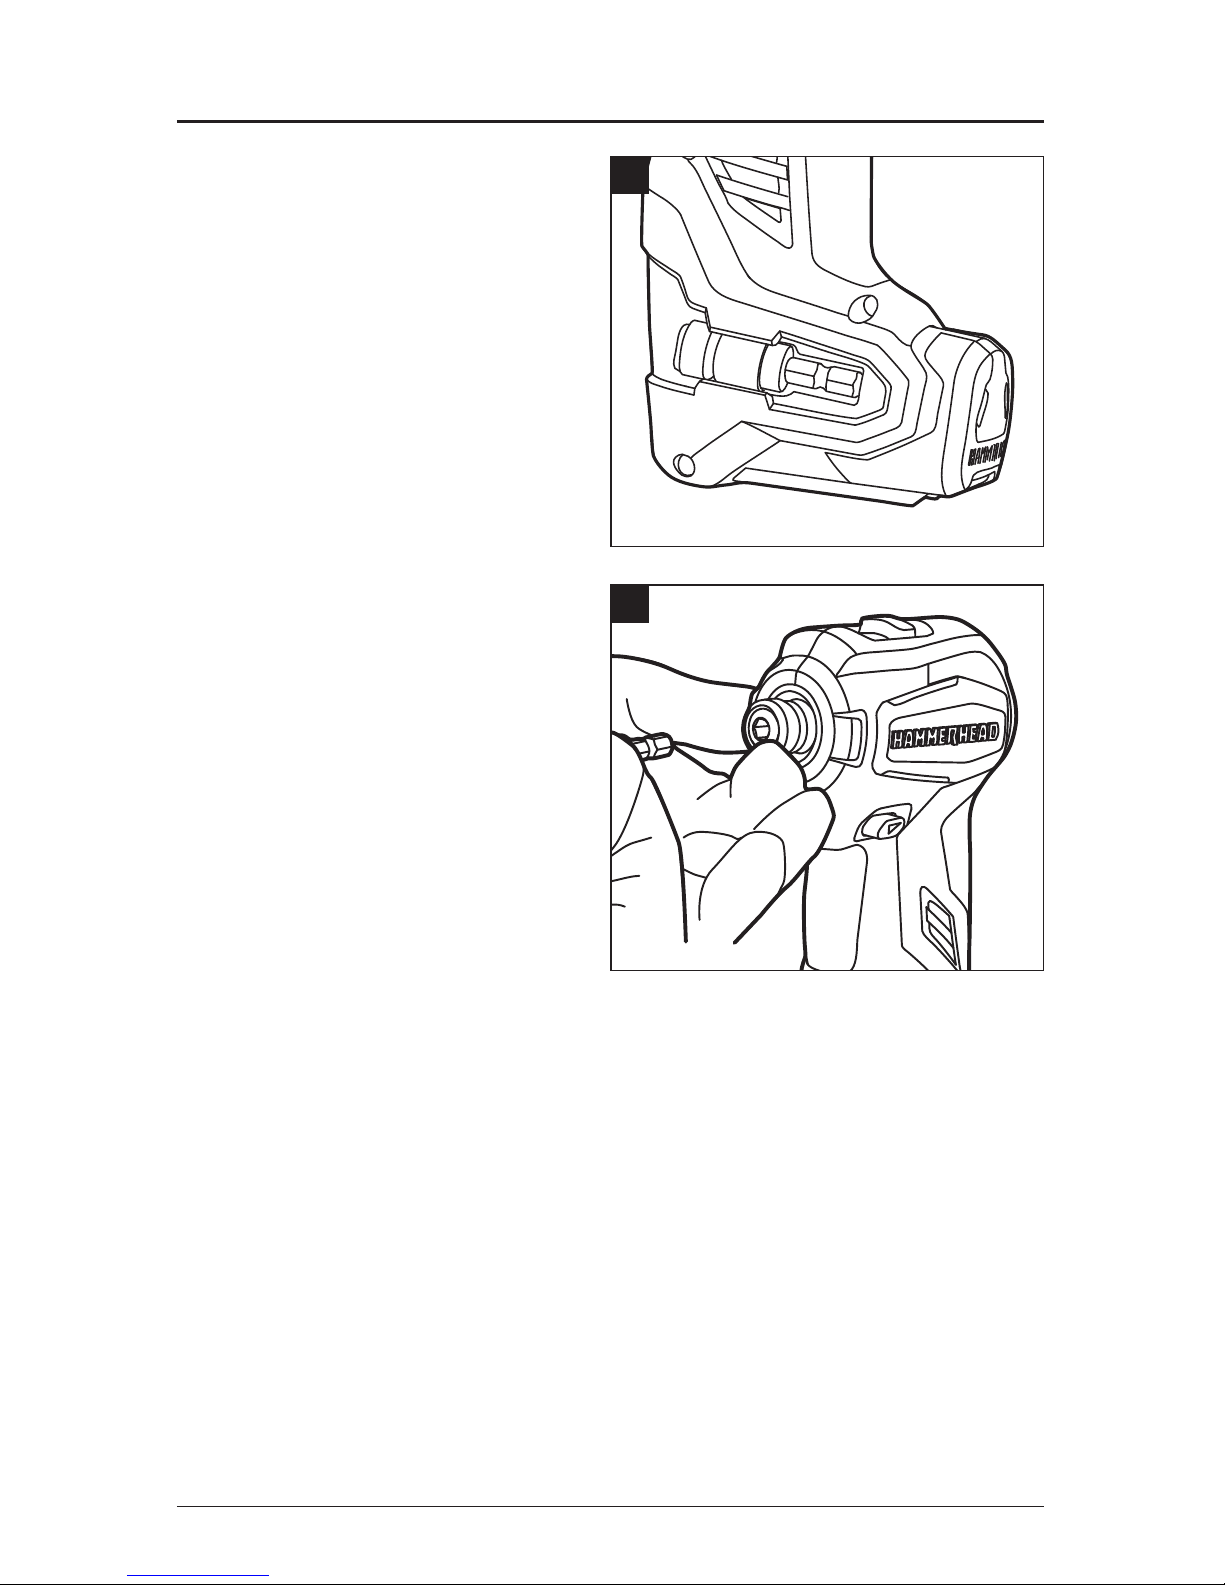
6. Auto Hammer Adaptor
The auto hammer adapter permits the
tool to be used in the auto hammer
function.
When not in use, the auto hammer
adaptor provided with the tool
can be placed in the storage area
located on the base of the tool.
Store the adaptor on the base of the
tool by snapping it into place.
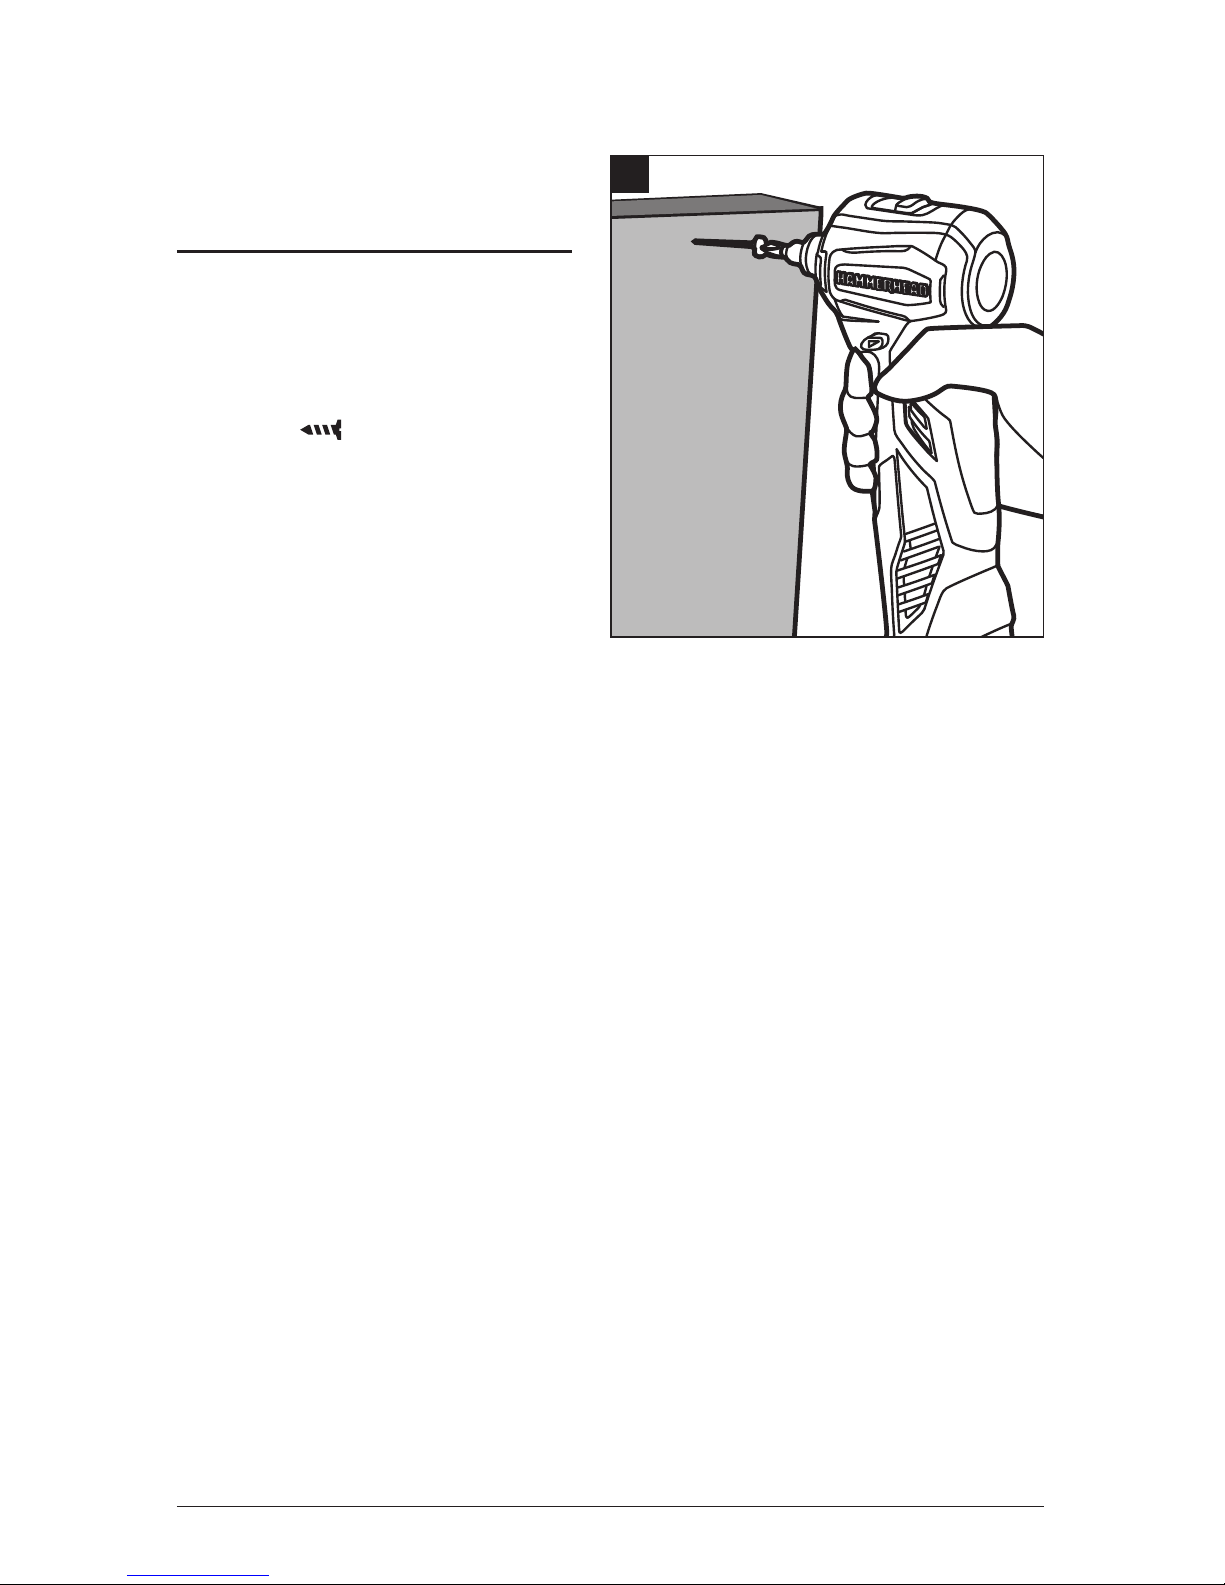
7. Installing Bits /
Auto Hammer Adaptor
a. Lock the variable-speed trigger
by placing the forward/lock/
reverse selector in the LOCKED
(center) position.
b. With one hand, pull the quick-
release 6.35mm hex collet toward
the front of the tool and hold it in
place.
c. With the other hand, insert a
6.35mm bit or the auto hammer
adaptor into the hexagonal
opening in the bit retainer.
d. Release the quick-release 6.35mm hex collet and check that it returns to itsoriginal
position.
WARNING: If the quick-release 6.35mm hex collet does not return to its original
position, the bit or adaptor is not correctly installed. Retry until the bit or adaptor is properly
installed and the quick-release 6.35mm hex collet returns to its original position.
Removing Bits /Auto Hammer Adaptor
a. Lock the variable-speed trigger by placing the forward/lock/reverse selector in the
LOCKED (center) position.
b. Pull the quick-release 6.35mm hex collet towards the front of the tool and hold it in
place.
c. Remove the bit or adaptor from the hexagonal opening in the bit retainer.
d. Release the quick-release 6.35mm hex collet.
6
7
Page 14
14 COMPACT IMPACT DRIVER/AUTO HAMMER
WARNING: The bit may be hot after prolonged use. Use protective gloves when
removing the bit or adaptor from the tool, or rst allow the bit to cool down.
OPERATING INSTRUCTIONS
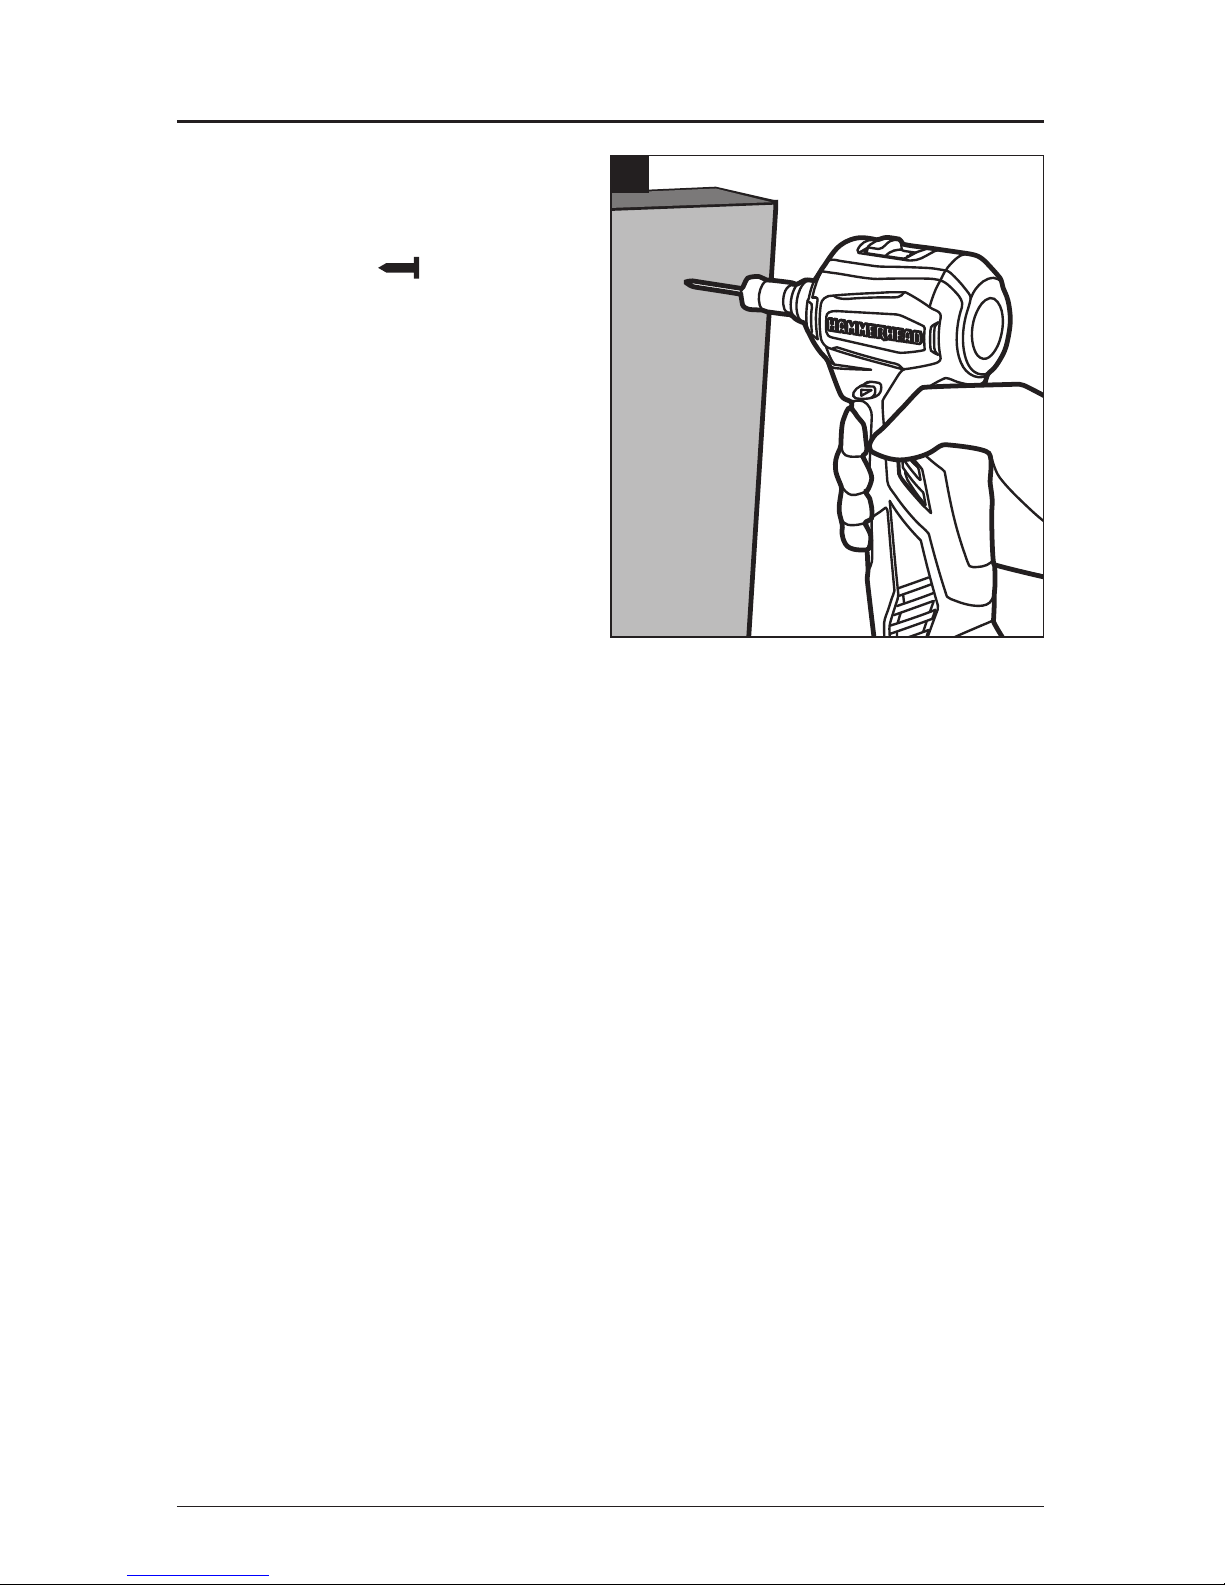
8. Tightening and Loosening
Screws and Nuts
a. Set the dual-function switch to the
impact driving function, marked
with “
”
.
b. Install the correct bit.
c. Position the forward/lock/reverse
selector to the proper direction.
d. Apply just enough pressure to
keep the bit engaged on the screw
or nut.
e. Apply minimal pressure to the variable-speed trigger initially. Increase the speed
only when you can maintain full control.
WARNING: Do not over-tighten, as the force of the impact driver can break the
fastener. Keep the Impact driver at a right angle to the fastener to avoid damaging the
fastener head.
WARNING: After operating, the tool should be placed horizontally on a surface; do not
attempt to stand it upright.
NOTICE: This tool can also be used for drilling in wood with suitable drilling bits when the
dual-function switch is set to drive function. For maximum performance, never use this tool
for drilling in metal or masonry.
8
Page 15
COMPACT IMPACT DRIVER/AUTO HAMMER 15
OPERATING INSTRUCTIONS
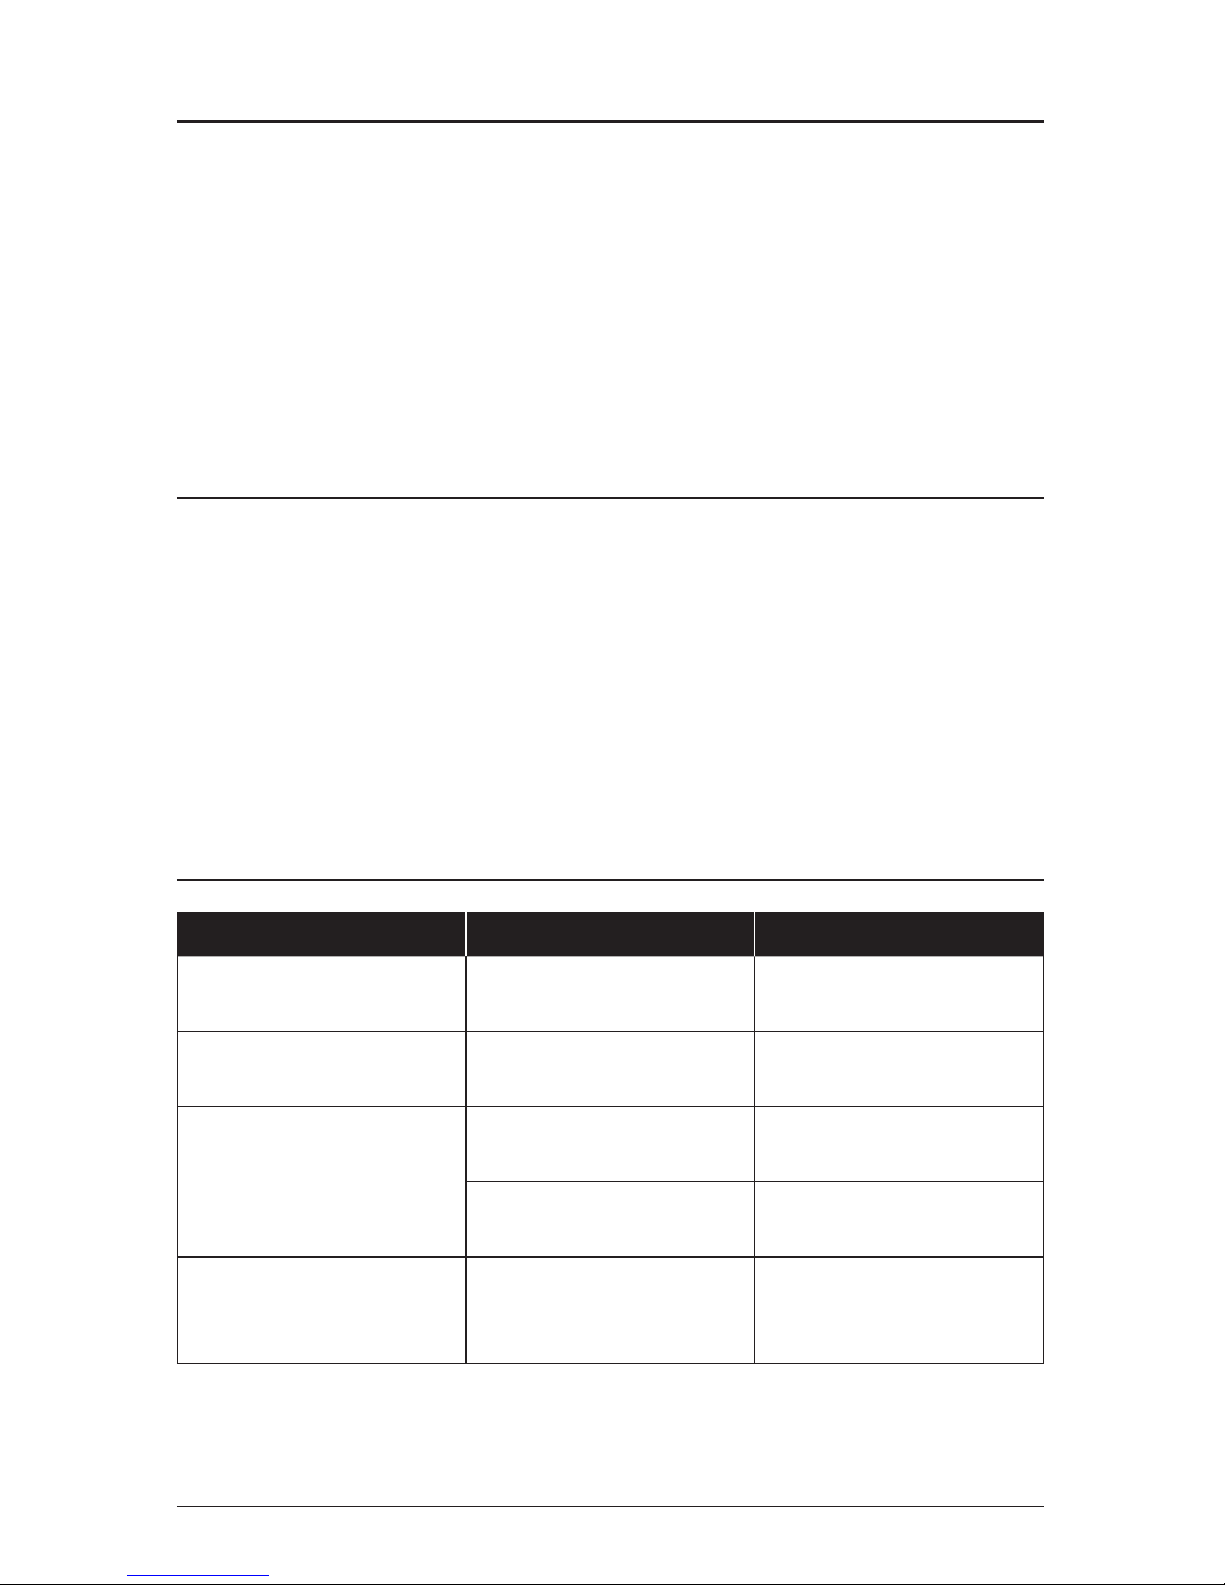
9. Hammering Nails
a. Set the dual-function switches
to the auto hammering function
marked with “ ”.
b. Attach the auto hammer adaptor
to the tool.
c. Position the forward/lock/reverse
selector to either the right or the left.
d. Secure the material to be nailed
with clamps to keep it from
turning when hammering.
e. Insert the head of the nail into the
adaptor so that it contacts the
recessed shaft. Place the tip of the
nail against the workpiece.
WARNING: Before depressing the variable-speed trigger to start hammering, make
sure that the adaptor is securely attached on the tool. Otherwise, the adaptor would move,
causing serious personal injury.
f. Holding the shaft of the nail steady with your hand, push down on the tool and press
the variable-speed trigger to initiate the hammering action, and drive the nail just far
enough into the workpiece so that it will stand on its own. Release variable-speed
trigger and remove your hand from the nail.
CAUTION: Be especially careful when driving shorter nails, such as brads, that you
remove your hand as soon as the nail stands on its own in the workpiece.
g. Resume pushing down on the tool and pressing the variable-speed trigger to
continue hammering until the nail is fully driven into the workpiece. Near the end
of hammering, the adaptor will retract to allow the hammerhead to drive the nail
head ush to the workpiece.
WARNING: To avoid possible serious injury, do not exert excessive force on the tool
or apply side pressure. Hold the tool rmly while pushing steadily to allow the hammerhead
to drive the nail automatically.
9
Page 16
16 COMPACT IMPACT DRIVER/AUTO HAMMER
OPERATING INSTRUCTIONS
Recommended Nails to Use
The tool is versatile for use with a variety of nails. Bright common and nishing nails from
2d to 8d are recommended for use with this tool.
Recommended Nailing Materials for the Impact Driver/Auto-hammer
The tool may be used for nailing into all types of woods, wood-like materials, and plaster board.
NOTICE: The tool is not suitable for nailing in hard metal or concrete.
CARE AND MAINTENANCE
All maintenance should only be carried out by an authorized service organization.
Cleaning
Before cleaning or performing any maintenance, lock the variable-speed trigger on the
tool by placing the forward/lock/reverse selector in the OFF (center) position. For safe and
proper operation, always keep the tool and its ventilation slots clean.
Always use only a soft, dry cloth to clean your impact driver/auto-hammer; never use
detergent or alcohol.
TROUBLESHOOTING
PROBLEM POSSIBLE CAUSE CORRECTIVE ACTION
The tool does not work Integrated Lithium-Ion
battery is depleted
Charge the integrated
Lithium-Ion battery
The tool stops rotation
during operation
Integrated Lithium-Ion
battery is depleted
Charge the integrated
Lithium-Ion battery
Bit cannot be installed
Quick-release 6.35mm hex
collet is not released
Release the quick-release
6.35mm hex collet
Bit does not t the quickrelease 6.35mm hex collet
Use suitable adaptor
Motor overheating
Be sure the cooling vents
are free from dust and
obstacles
Clean and clear vents. Do
not cover with hand during
operation
Chervon Australia Pty Ltd
Unit 13, 1488 Ferntree Gully Rd
Knoxeld, VIC 3180
Page 17
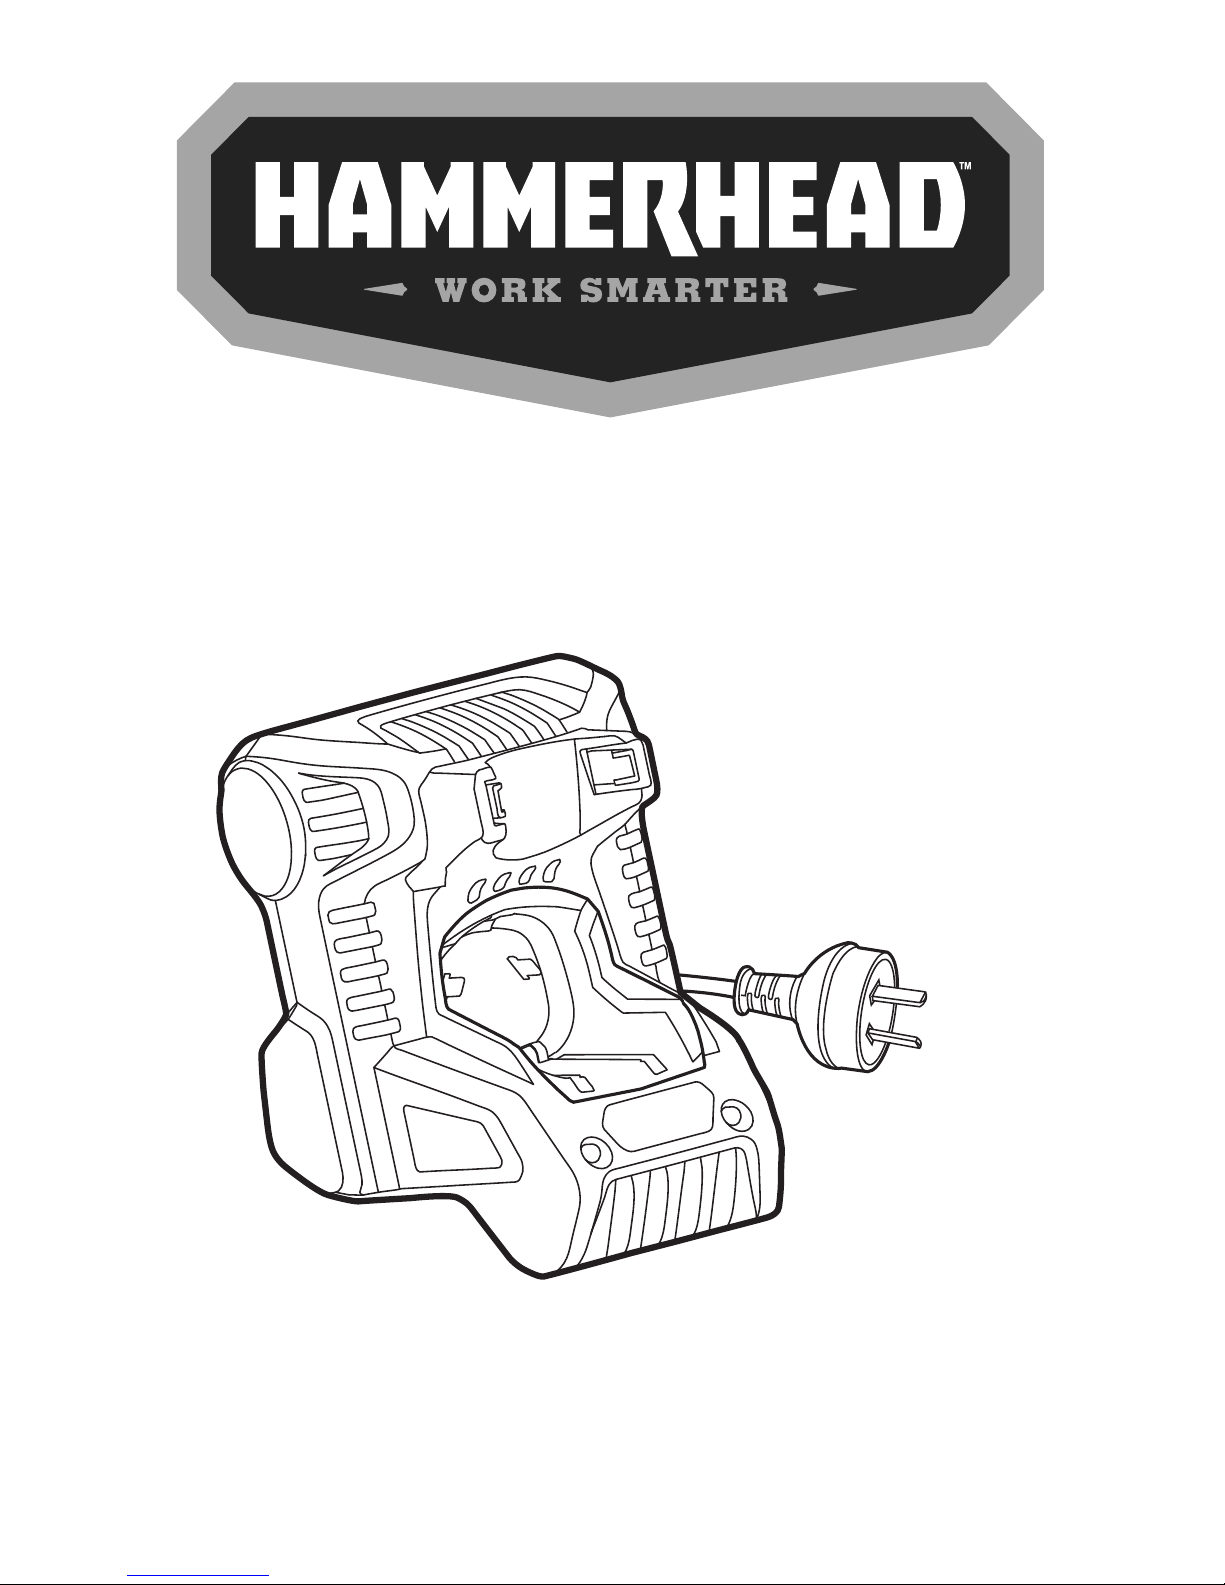
CHARGER FOR
COMPACT IMPACT DRIVER/
AUTO HAMMER
MODEL HCCH120
MADE IN CHINA 2015
Page 18
2 CHARGER FOR COMPACT IMPACT DRIVER/AUTO HAMMER
TABLE OF CONTENTS
Safety Information .......................................................3
Preparation ............................................................. 5
Package Contents ........................................................ 6
Operating Instructions ....................................................7
Care and Maintenance ....................................................9
PRODUCT SPECIFICATIONS
COMPONENT SPECIFICATION
Charger Input 220-240V a.c. 50Hz 45W
Charger Output 12V d.c. 3A
Optimum Charging Temperature 0°C- 55°C
Page 19
CHARGER FOR COMPACT IMPACT DRIVER/AUTO HAMMER 3
SAFETY INFORMATION
Know the Tool
To operate this tool, carefully read this manual and all labels afxed to the charger before
using it. Keep this manual available for future reference.
Some of the following symbols may be used on this charger. Please study them and their
meaning. Proper interpretation of these symbols will allow you to operate the tool better
and more safely.
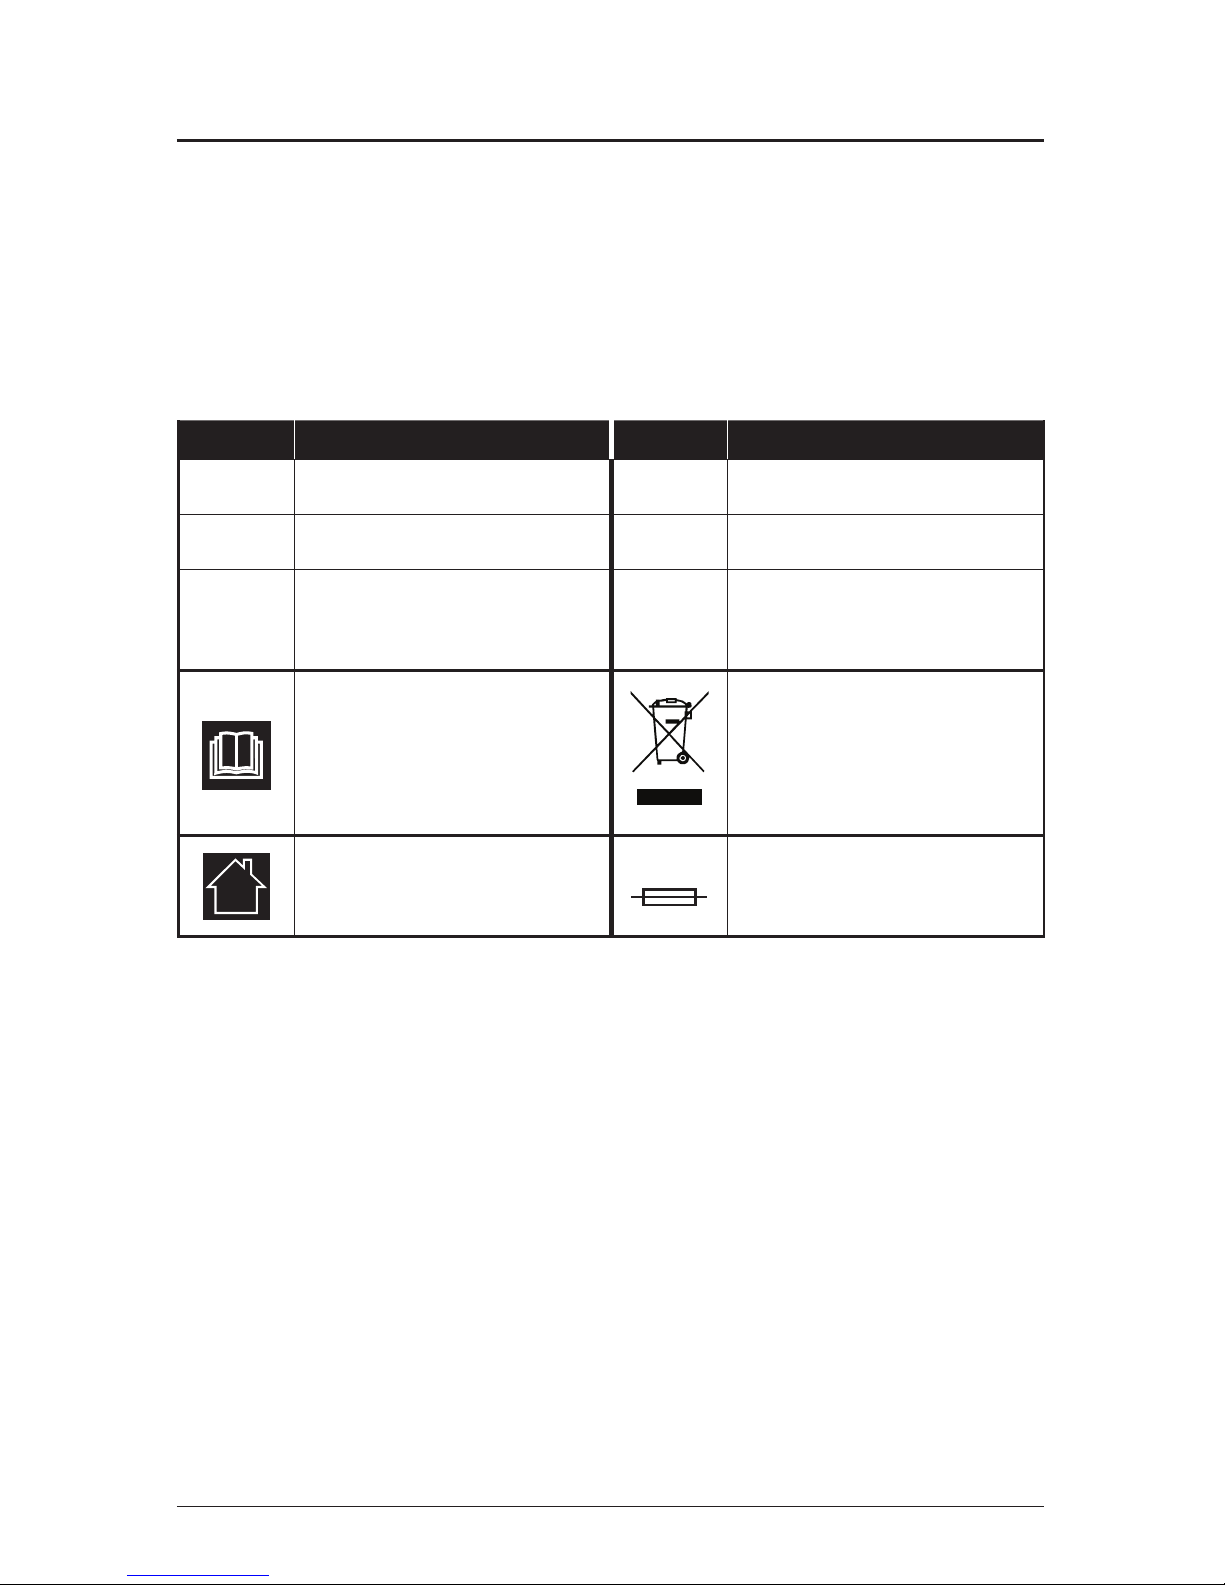
SYMBOL DEFINITION SYMBOL DEFINITION
Hz Hertz
⧈
Class II Construction
W Watts
Direct Current
A danger, warning or caution.
It means ‘ATTENTION! Your
safety is involved.’
Alternating Current
WARNING – To reduce the
risk of injury, user must read
instruction manual.
Faulty and/or discarded
electrical or electronic
apparatus have to be collected
at the appropriate recycling
locations
Indoor use only
T3,15A
Thermal fuse. Fuse will open
when electric current above
3.15A.
IMPORTANT: This tool should only be serviced only by a qualied service technician.
IMPORTANT SAFETY INSTRUCTIONS
SAVE THESE INSTRUCTIONS – This manual contains important safety and operating
instructions for battery charger Model HCCH120.
DANGER – To reduce the risk of re or electric shock. Carefully follow these instructions.
CAUTION – To reduce risk of injury, charge only the integrated battery of the
compact impact driver / auto hammer. Other types of batteries may burst causing
personal injury and damage.
• For indoor use only.
• Dry location use only.
Page 20

4 CHARGER FOR COMPACT IMPACT DRIVER/AUTO HAMMER
• Never charge a frozen battery.
• To reduce the risk of injury, close supervision is necessary when an appliance is used
near children.
• For a portable appliance—to reduce the risk of electrical shock, do not put battery in water
or other liquid. Do not place or store appliance where can fall or be pulled into a tub or sink.
SAFETY INFORMATION
Safety Warnings for Charger
WARNING: Read and understand all instructions. Failure to follow all instructions
listed below may result in electric shock, re, and/or serious personal injury.
• Before using the battery charger, read all instructions and cautionary markings in this
manual and on the battery charger.
CAUTION: To reduce the risk of electric shock or damage to the charger and battery,
charge only those rechargeable batteries specically designated on your charger’s label.
Other types of batteries may burst, causing personal injury or damage.
• Do not use the charger outdoors or expose it to wet or damp conditions. Water entering
the charger will increase the risk of electric shock.
• Use of an attachment not recommended or sold by the battery charger manufacturer
may result in a risk of re, electric shock or injury to persons.
• Do not abuse the cord or charger. Never use the cord to carry the charger. Do not pull the
charger cord to disconnect the plug from a receptacle. Damage to the cord or charger
could occur and create an electric shock hazard. Replace damaged cords immediately.
• Make sure that the cord is located so that it will not be stepped on, tripped over, come
in contact with sharp edges or moving parts, or be otherwise subjected to damage or
stress. This will reduce the risk of accidental falls, which could cause injury and damage
to the cord, which could then result in electric shock.
• Keep the cord and charger away from heat to prevent damage to the housing or internal parts.
• Do not allow gasoline, oils, petroleum-based products, etc. to come in contact with plastic
parts. These materials contain chemicals that can damage, weaken, or destroy plastic.
• An extension cord should not be used unless absolutely necessary. Use of an improper
extension cord could result in a risk of re and electric shock. If an extension cord must
be used, make sure that:
The pins on the plug of extension cord are the same number, size and shape as those of
the plug on charger.
The cord is properly wired and in good electrical condition.
Page 21

CHARGER FOR COMPACT IMPACT DRIVER/AUTO HAMMER 5
SAFETY INFORMATION
• Do not operate the charger with a damaged cord or plug, which could cause shorting
and electric shock. If damaged, have the charger repaired or replaced by an authorized
service technician.
• Do not operate the charger if it has received a sharp blow, been dropped, or has otherwise
been damaged in any way. Take it to an authorized service technician for an electrical
check to determine if the charger is in good working order.
• Do not disassemble the charger. Take it to an authorized service technician when service
or repair is required. Incorrect reassembly may result in a risk of electric shock or re.
• Unplug the charger from the electrical outlet before attempting any maintenance or
cleaning to reduce the risk of electric shock.
• Disconnect charger from the power supply when not in use. This will reduce the risk of
electric shock or damage to the charger if metal items should fall into the opening. It will
also help prevent damage to the charger during a power surge.
• Risk of electric shock. Do not touch the uninsulated portion of output connector or
uninsulated battery terminal.
• Save these instructions. Refer to them frequently and use them to instruct others who
may use this tool. If you loan this tool to someone else, also loan these instructions to
them to prevent misuse of the product and possible injury.
PREPARATION
Before attempting to use the charger, familiarize yourself with all of its operating features
and safety requirements.
Page 22
6 CHARGER FOR COMPACT IMPACT DRIVER/AUTO HAMMER
PACKAGE CONTENTS
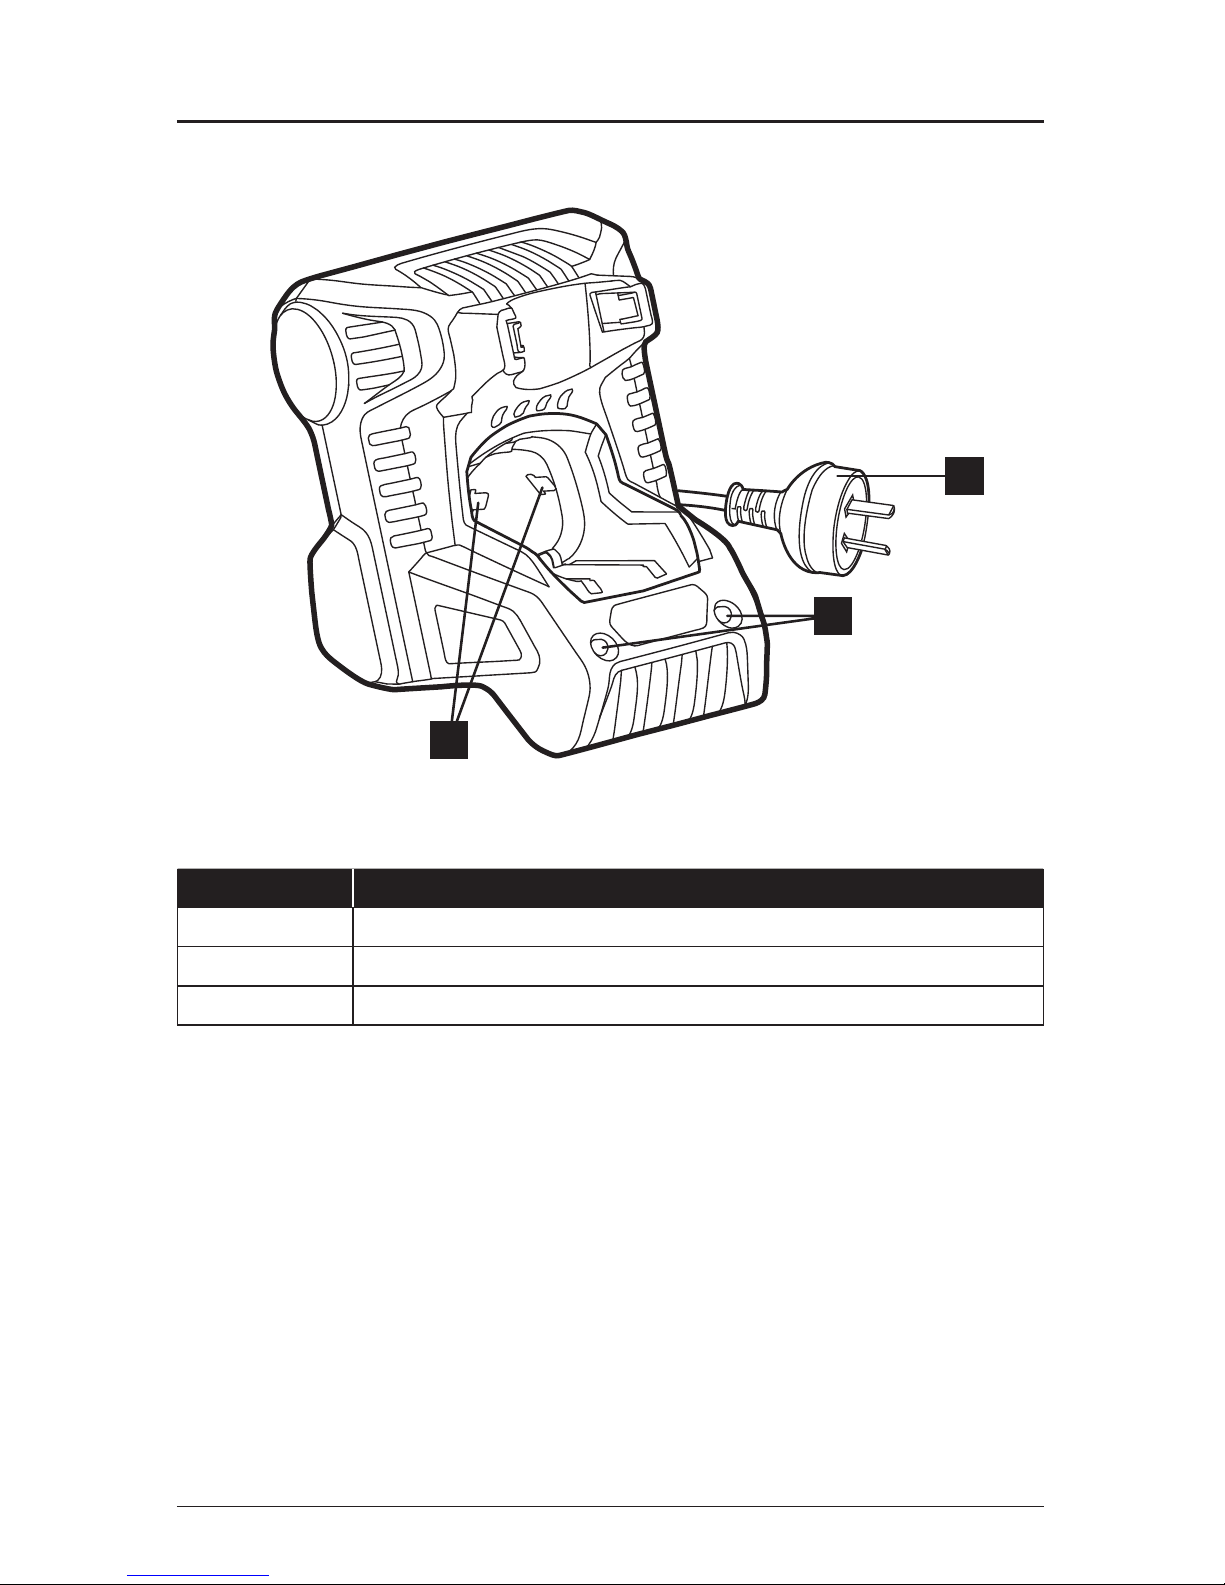
PARTS DESCRIPTION
A Electrical contacts
B Charging indicators
C Plug
A
B
C
Page 23
CHARGER FOR COMPACT IMPACT DRIVER/AUTO HAMMER 7
OPERATING INSTRUCTIONS
1. How To Charge
NOTICE: The integrated battery is shipped
partially charged. Before using it the
rst time, fully charge the battery. A fully
discharged battery will normally charge
in about 30min in a surrounding
temperature between 0°C and 55°C
a. Charge the tool only with the
correct charger.
b. Lock the variable-speed trigger
switch on the tool by placing the
direction-of-rotation selector in the
center position.
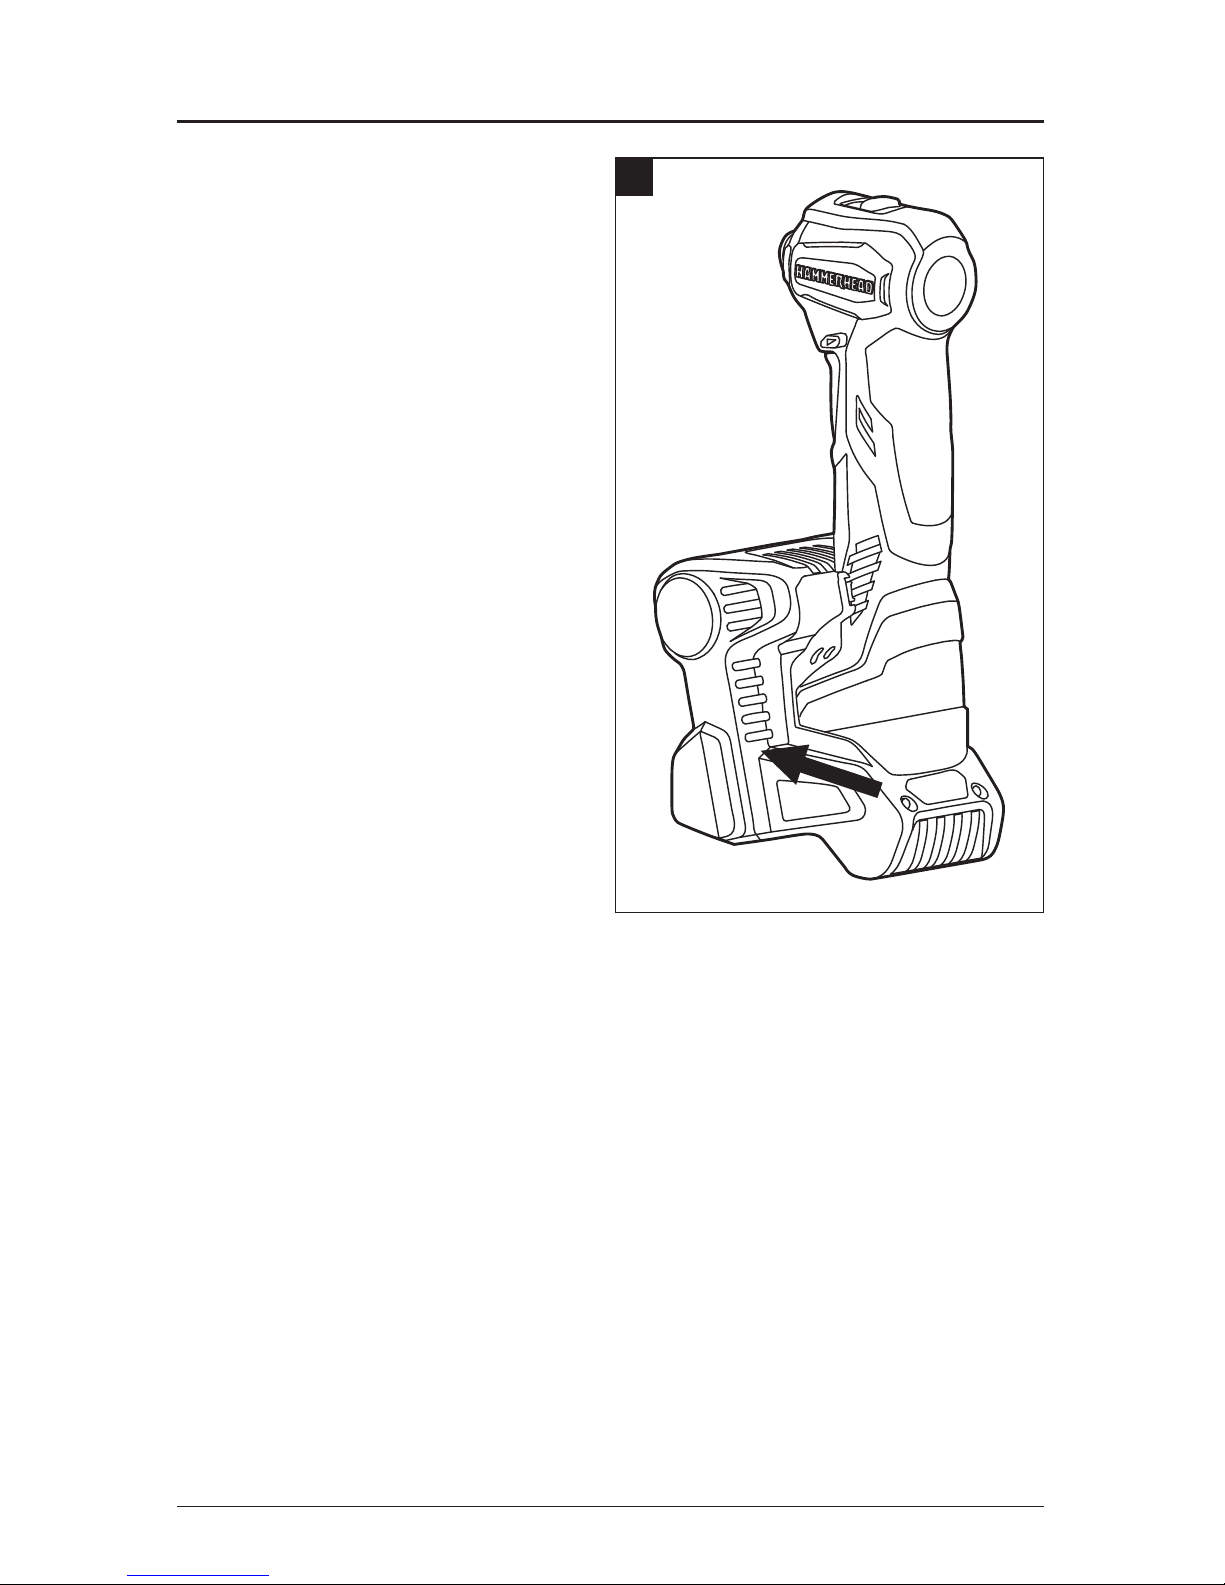
c. Align the slots of the integrated
battery with the electrical contacts
of the charger, and then slide the
tool into the charger.
d. Connect the charger to the power
supply. The charger can be only
used with normal household
voltage of 220-240 volt AC, 50Hz.
e. The red and green charging
indicator lights will illuminate for
approximately one second and
then turn off. The charger will
communicate with the tool to evaluate the condition of the battery.
f. The green light will ash while the battery is charging normally. When charging is
complete, the green indicator light on the charger will illuminate.
g. A ickering red light indicates a defective battery or a bad connection between the
battery and the charger.
1
Page 24
8 CHARGER FOR COMPACT IMPACT DRIVER/AUTO HAMMER
OPERATING INSTRUCTIONS
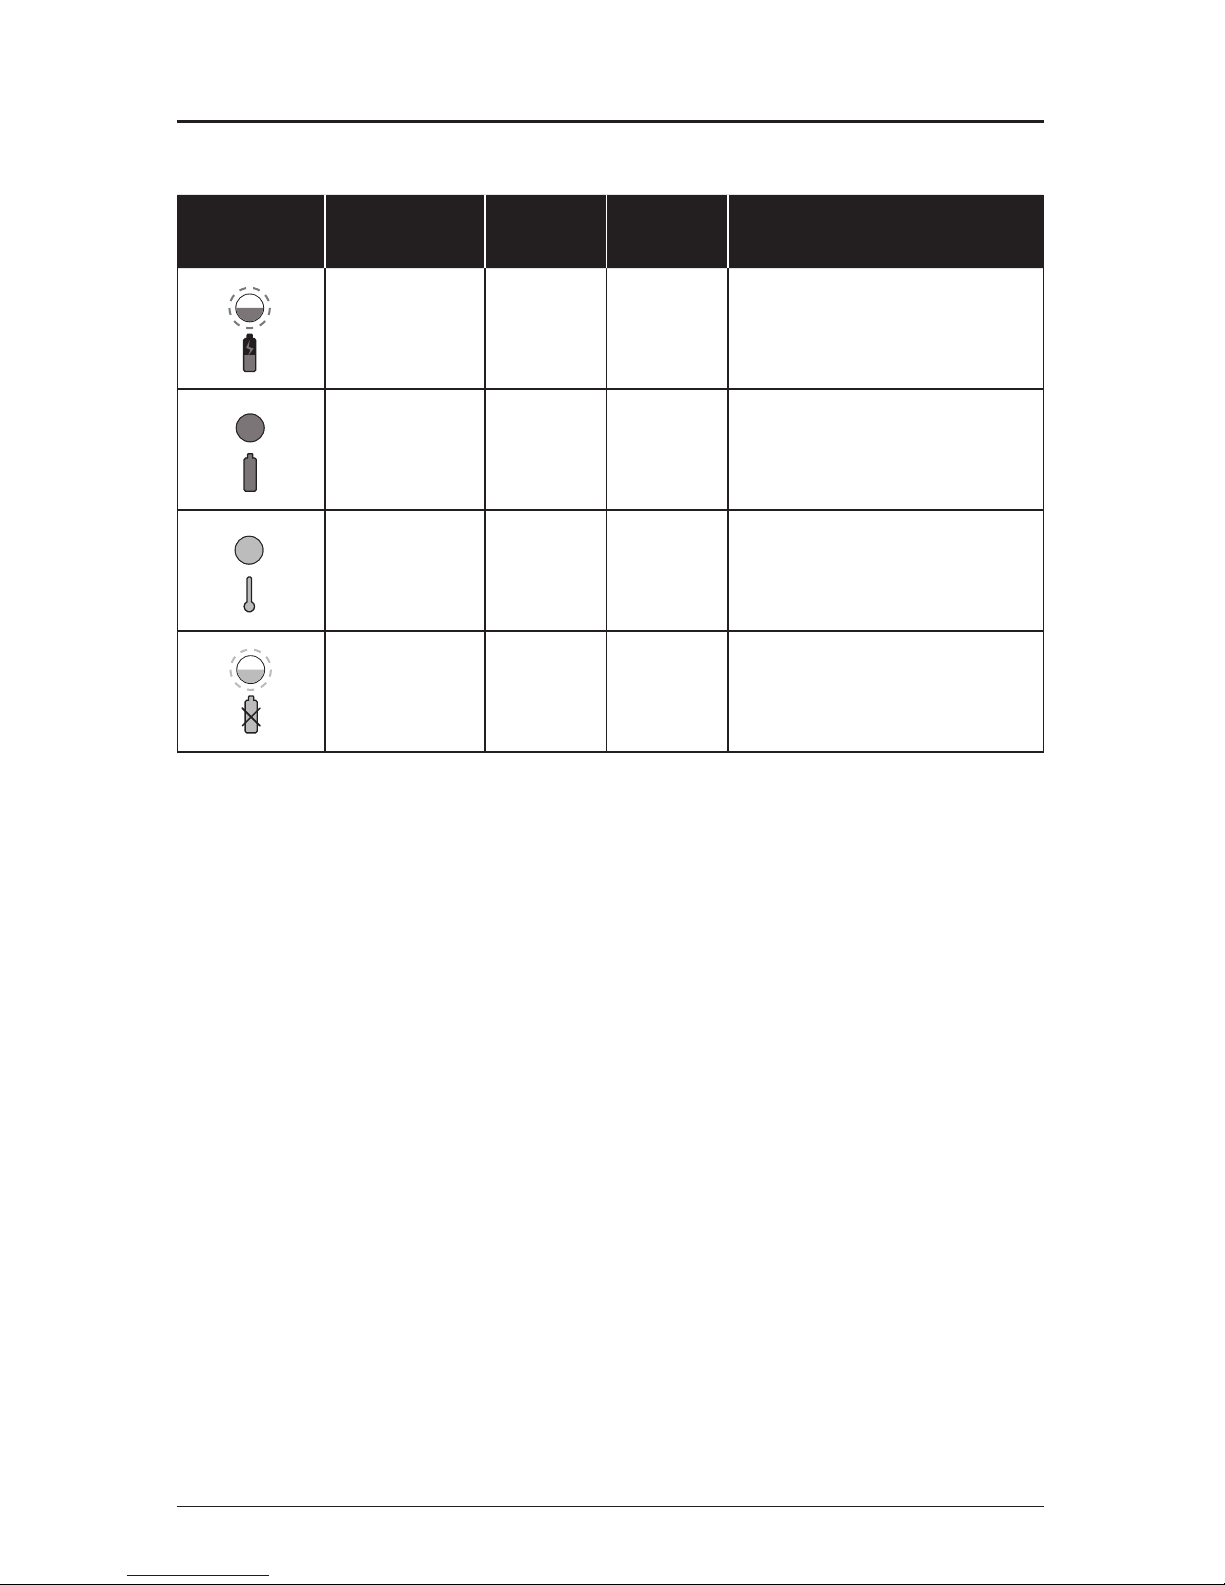
2. Charger Display
LED
INDICATOR
INTEGRATED
BATTERY
RED
LED
GREEN
LED
ACTION
Normal
Charging
Off Flashing Charging
Fully
Charged
Off On Charging is complete
Hot/Cold
Battery
On Off
Normal charging will begin when
battery returns to 0°C- 55°C
Defective Flashing Off
Integrated battery or charger
is defective or bad connection
between battery and charger
3. Charging a Hot Battery
If the integrated battery is above the normal temperature range, the red LED
will illuminate and the green LED will be off. When the battery cools down to
approximately 55°C, the charger will automatically begin normal charging.
4. Charging a Cold Battery
If the integrated battery is below normal temperature range, the red LED will illuminate
and the green LED will be off. When the battery warms to a temperature of more than
0°C, the charger will automatically begin normal charging.
5. Defective Battery
If the charger detects a problem, the red LED light will begin flashing and the green
LED will be off.
a. If registering as defective, remove and reinsert the tool in the charger. If the LED
status reads “defective” a second time, try charging a different tool.
b. If a different tool charges normally, have the integrated battery repaired by a
qualied service technician.
c. If a different tool also indicates “defective,” the charger may be defective.
NOTICE: If you cannot conrm if the charger functions well or not, please contact our
customer service center.
Page 25

CHARGER FOR COMPACT IMPACT DRIVER/AUTO HAMMER 9
OPERATING INSTRUCTIONS
6. Battery Normal Charging
If the integrated battery is within the normal surrounding temperature range of 0°C
and 55°C, the green LED will begin flashing, the red LED will be off during normal
charging.
7. Battery Full
If the integrated battery is within the normal temperature range, the green LED will
illuminate and the red LED will be off. The battery will be fully charged in about 30min
and ready to use. The battery will fully charge, but will not overcharge, if left on the
charger.
NOTICE: The charger may warm with several continuous charge cycles. This is part of the
normal operation of the charge. Please charge in a well ventilated area.
CARE AND MAINTENANCE
All maintenance should only be carried out by an qualied service technician.
Cleaning
Before cleaning or performing any maintenance, remove the impact driver/auto-hammer
from the charger. For safe and proper operation, always keep the charger and its ventilation
slots clean.
Always use only a soft, dry cloth to clean your charger; never use detergent or alcohol.
Chervon Australia Pty Ltd
Unit 13, 1488 Ferntree Gully Rd
Knoxeld, VIC 3180
Page 26

10 CHARGER FOR COMPACT IMPACT DRIVER/AUTO HAMMER
Page 27

CHARGER FOR COMPACT IMPACT DRIVER/AUTO HAMMER 11
Page 28

 Loading...