

Page 1
Page 2

1. Turvallisuusohjeet
2. Yleistä
2.1 Pakkaus
2.2 Hävittäminen ja kierrättäminen
3. Kasaaminen
3.1 Kasaamisen vaiheet
4. Ylläpito ja huolto
5. Näyttö ja ohjainyksikkö
5.1 Ohjainyksikön painikkeet
5.2 Ohjainyksikön toiminnot
5.3 Ohjainyksikön toiminnot
5.3.1 Nopea käyttöönotto
5.3.2 Esiasennetut harjoitteet
5.3.2.1 Manuaalinen käyttö
5.3.2.2 Harjoitteet
5.3.2.3 Käyttäjän luomat harjoitteet
5.3.2.4 Sykkeen mukaan mukautuvat harjoitteet
5.4 Ongelman ratkaisu
6. Tekniset tiedot
6.1 Virran kytkentä
7. Harjoiteopas
7.1 Harjoittelun tiheys
7.2 Harjoittelun intensiivisyys
7.3 Sykkeeseen pohjautuva harjoittelu
7.4 Harjoittelun rajat
7.5 Harjoittelun kesto
8. Räjäytyskuva
9. Osaluettelo
1. Safety instructions 02
2. General 03
2.1 Packaging 03
2.2 Disposal 03
3. Assembly 04
3.1 Assembly Steps 04
4. Care and Maintenance 14
5. Computer (UK) 14
5.1 Computer keys 14
5.2 Computer functions 15
5.3 Computer functions 16
5.3.1 Immediate-Start function 16
5.3.2 Exercise with settings 16
5.3.2.1 MANUAL 16
5.3.2.2 PROGRAMS 17
5.3.2.3 USER-programs 18
5.3.2.4 HRC 19
5.4 Diagnostic and troubleshooting 20
6. Technical details 12
6.1 Adapter 21
7. Training manual 22
7.1 Training frequency 22
7.2 Training intensity 22
7.3 Heartrate orientated training 22
7.4 Training control 23
7.5 Trainings duration 24
8. Explosion drawing 26
9. Parts list 28
Sisällysluettelo
Index
Sivunumero/Page
01
Page 3

TÄRKEÄÄ TIETOA LAITTEESTA!
l
l Käyttäjän maksimipaino on130 kg.
l Laitetta tulee käyttää ainoastaan sille suunnitellussa
käyttötarkoituksessa
l Muu kuin käyttötarkoituksen mukainen käyttö on kielletty,
sillä se saattaa aiheuttaa vaaratilanteen. Maahantuoja
ei ota vastuuta vahingoista, jotka ovat aiheutuneet
laitteen väärinkäytöstä.
l Laite on suunniteltu uusimpien turvallisuus-
standardien mukaisesti.
Välttääksesi loukkaantumiset ja vaaratilanteet lue ja noudata
seuraavia ohjeita:
1. Lasten ei tulisi leikkiä laitteella tai laitteen läheisyydessä
2. Tarkista säännöllisesti pulttien, muttereiden, kädensijojen
ja polkimien kiinnitys.
3. Tarvittaessa huolla ja vaihda vaurioituneet osat.
Tarkista mahdolliset kulumat osissa.
4. Vältä korkeita lämpötiloja ja kosteutta
5. Lue käyttöohjeet tarkasti ennen laitteen käyttöönottoa
6. Laite vaatii ympärilleen riittävästi vapaata tilaa
(1,5m suuntaansa).
7. Sijoita laite tukevalle ja tasaiselle alustalle.
8. Älä harjoittele heti ruokailun jälkeen
9. Tarkastuta terveydentilasi lääkärissä ennen harjoittelua
10. Laitteen turvallinen käyttö vaatii kuluvien osien kunnon
tarkastelua käytön mukaan. Nämä osat on merkitty
osaluettelossa *-symbolilla. Säätömekanismien
ei tulisi rajoittaa liikkuvuutta harjoituksen aikana.
11. Laitetta ei koskaan tule käyttää leikkikaluna.
12. Älä astu kotelon päälle, vaan ainoastaan astumista varten
tarkoitetuille alustoille.
13. Harjoittellessa pukeudu tarkoituksenmukaisesti.
14. Käytä harjoitellessa aina kenkiä.
15. Pidä huoli, että muut henkilöt eivät ole laitteen läheisyydessä
harjoitellessasi.
16. Älä säilytä laitetta tiloissa, jossa on korkea kosteusarvo,
esimerkiksi kylpyhuoneessa, parvekkeella tai ulkotiloissa.
IMPORTANT!
l The Cross-Trainer is produced according to DIN EN 9571/9 class HC.
l Max. user weight is 130 kg.
l The Ergometer should be used only for its intended purpose.
l Any other use of the item is prohibited and maybe
dangerous. The importeur cannot be held liable for
damage or injury caused by improper use of the
equipment.
l The Ergometer has been produced according to the latest
safety standards.
To prevent injury and / or accident, please read and
follow these simple rules:
1. Do not allow children to play on or near the equipment.
2. Regularly check that all screws, nuts, handles and pedals
are tightly secured.
3. Promptly replace all defective parts and do not use the
equipment until it is repaired. Watch for any material
fatigue.
4. Avoid high temperatures, moisture and splashing water.
5. Carefully read through the operating instructions before
starting the equipment.
6. The equipment requires su
cient free space in all
directions (at least 1.5 m).
7. Set up the equipment on a solid and
at surface.
8. Do not exersice immediately before or after meals.
9. Before starting any
tness training, let yourself examined
by a physician.
10. The safety level of the machine can be ensured only if you
regularly inspect parts subject to wear. These are
indicacated by an * in the parts list. Levers and other
adjusting mechanisms of the equipment must not obst
ruct the range of movement during training.
11. Training equipment must never be used as toys.
12. Do not step on the housing but only on the steps
provided for this purpose.
13. Do not wear loose clothing; wear suitable training
gear such as a training suit, for example.
14. Wear shoes and never exercise barefoot.
15. Make certain that other persons are not in the area of
the home trainer, because other persons may be injured
by the moving parts.
16. It is not allowed to place the item in rooms with high
humidity (bathroom) or on the balcony.
1. Turvallisuusohjeet
1. Safety instructions
02
Cross-trainer on valmistettu DIN EN 957-1/9 säädöksen
mukaisesti
Page 4
Tämä laite on suunniteltu kotikäyttöön.
Laite täyttää seuraavat vaatimukset:
EN 957-1/9 luokka HC. CE-merkintä viittaa
EU-direktiiveihin 2004/108/EEC ja 2006/95/EEC.
Laitteen väärinkäyttö saattaa aiheuttaa vakavan loukkaantumisen
tai vaaratilanteen. Vältä laitteen käyttöä, mikäli se saattaa
vaarantaa terveytesi.
Ennen laitteen käyttöönottoa tulisi terveydentilasi tarkistaa
lääkärillä, jotta mahdollisilta terveysriskeiltä voidaan välttyä.
2.1 Pakkaus
Alla on lueteltu pakkauksen kierrätettävät materiaalit:
l Laitteen pahvipakkaus
l CSF-vapaat styroksiosat
l Pakkausmateriaalit polyeteenistä
l Pakkausremmit polyeteenistä
2.2 Hävittäminen
Säilytä laitteen pakkausmateriaalit
mikäli joudut siirtämään tai lähettämään
laitetta. Laitteen pakkausta ei tulisi hävittää
sekajätteen mukana.
This training equipment is for use at home. The equipment
complies with the requirements of DIN EN 957-1/9 Class HC.
The CE marking refers to the EU Directive 2004/108/EEC
and 2006/95/EEC. Damage to health cannot be ruled out if
this equipment is not used as intended (for example, excessive
training, incorrect settings, etc.).
Before starting your training, you should have a complete physical examination by your physician, in order to rule out any
existing health risks.
2.1 Packaging
Environmentally compatible and recyclable materials:
l External packaging made of cardboard
l Molded parts made of foam CFS-free polystyrol (PS)
l Sheeting and bags made of polyethylene (PE)
l Wrapping straps made of polypropylene (PP)
2.2 Disposal
Please be sure to keep the packing
for the event of repairs / warranty
matters. The equipment should not be
disposed of in the household rubbish!
2. Yleistä
2. General
03
Page 5
Jotta laitteen kasaaminen olisi mahdollisimman helppoa
olemme esiasentaneet laitteen tärkeimmät osat.
Ennen laitteen käyttöönottoa, lue huolellisesti käyttöohjeet
ja etene kasaamisessa ohjeiden mukaisesti.
Pakkauksen sisältö
l Pura pakkaus ja aseta irto-osat helposti saataville
l Aseta laitteen runko lattiaa suojaavalle alustalle,
koska kasaamaton laite saattaa vahingoittaa lattiaa
l Varmista, että ympärillä on riittävästi tilaa
laitteen kasaamista varten. (1,5m suuntaansa).
In order to make assembly of the item as easy as possible for
you, we have preassembled the most important parts. Before
you assemble the equipment, please read these instructions
carefully and then continue step by step as described
Contents of packaging
l Unpack all individual parts and place them alongside
each other on the
oor.
l Place the main frame on a pad protecting the
oor,
because without its assembled base feet it can
damage / scratch your
oor. The pad should be
at and not too thick, so that the frame has a
stable stand.
l Make certain that you have adequate room for
movement (at least 1.5 m) on all sides during
assembly.
3. Kasaaminen
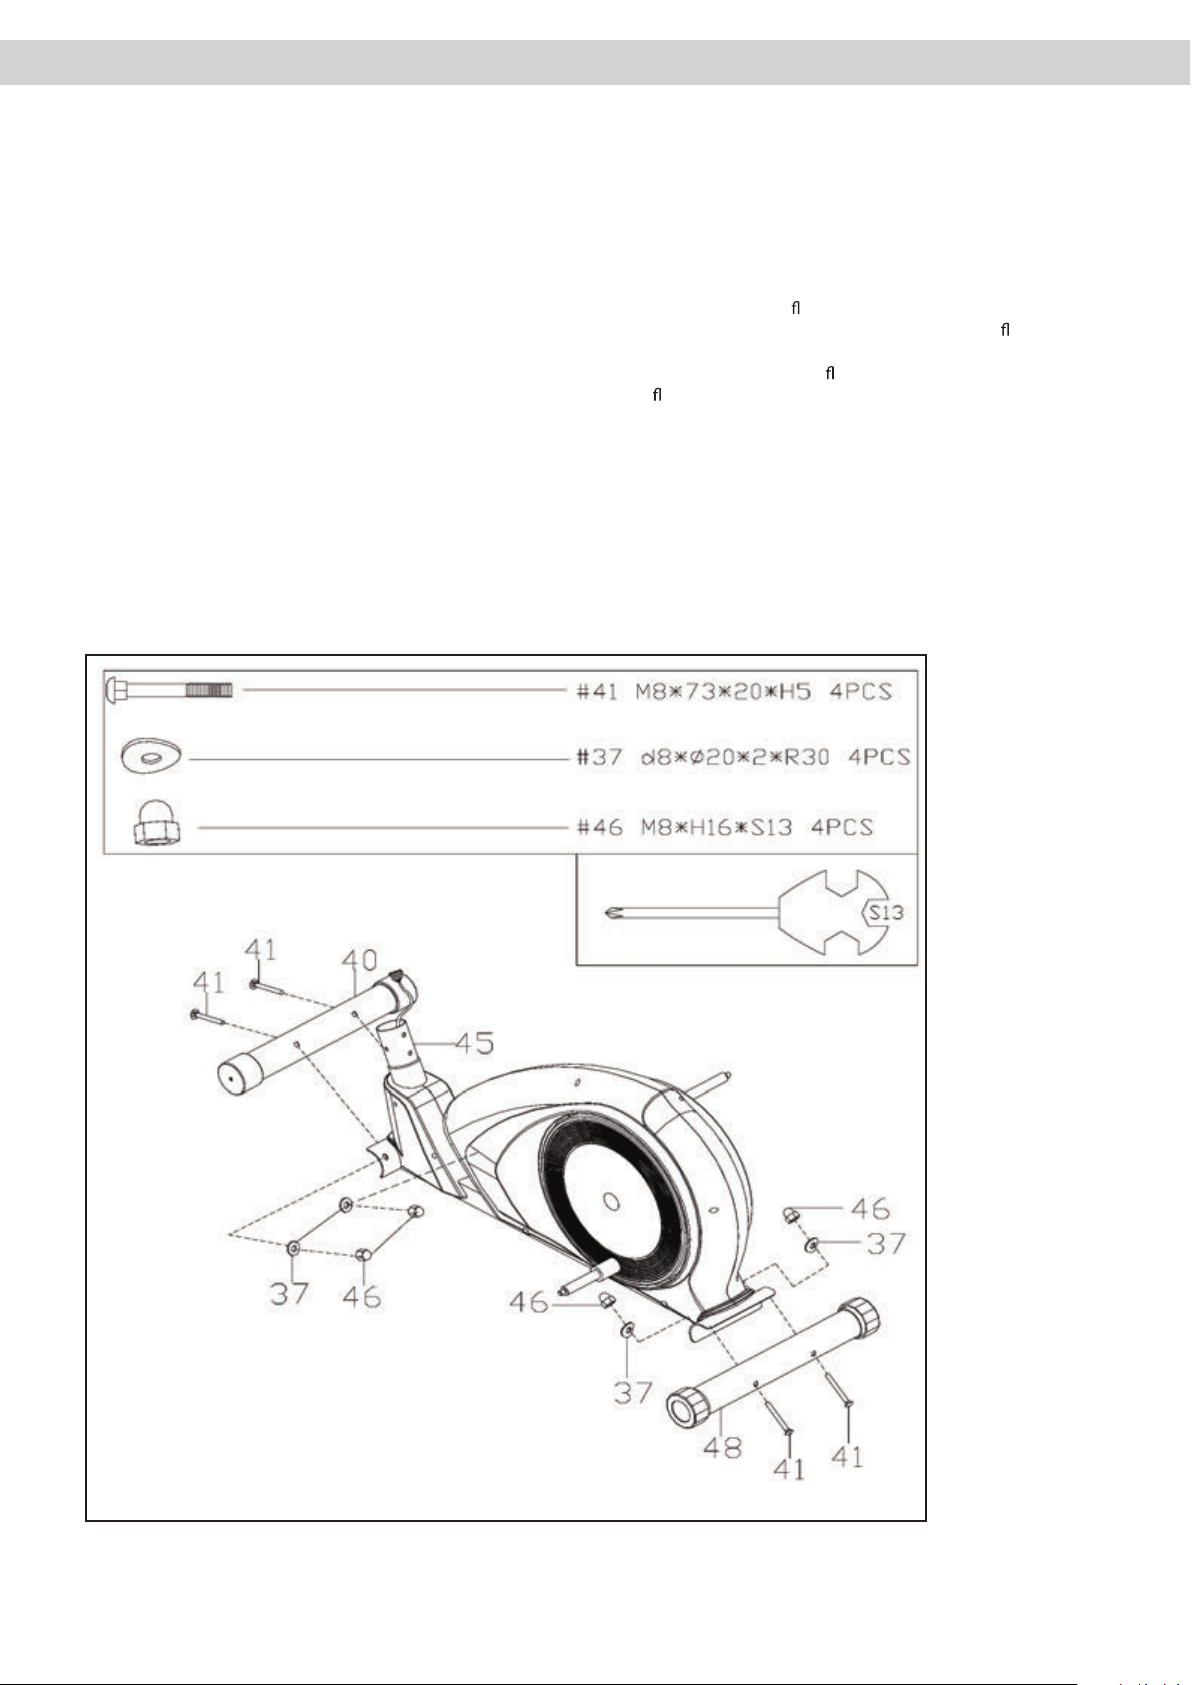
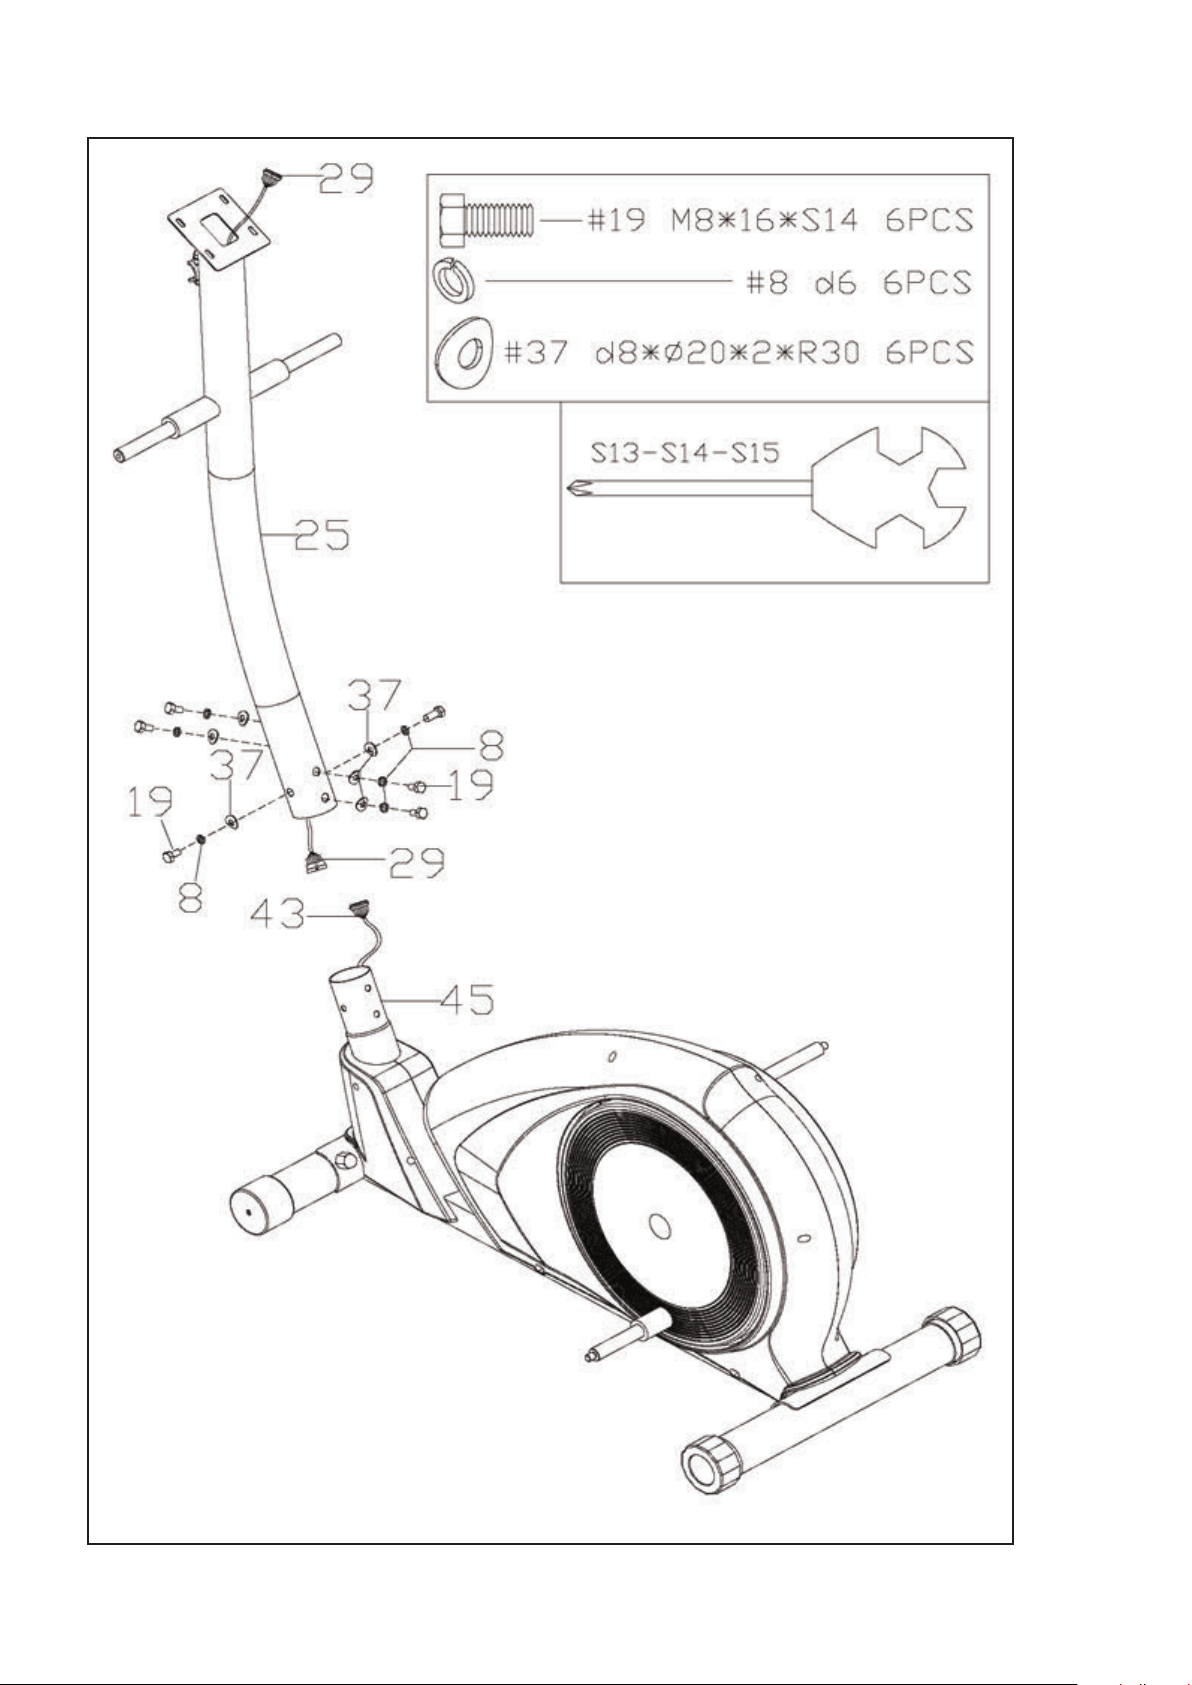
3. Assembly
04
3.1 Kasaamisen vaihteet/Assembly steps
Vaihe / Step 1
Page 6
05
Vaihe / Step 2
Page 7
06
Vaihe / Step 3
Page 8
07
Vaihe / Step 4
Page 9
08
Vaihe / Step 5
Page 10
09
Vaihe / Step 6
Page 11

10
Vaihe / Step 7
Page 12

11
Vaihe / Step 8
Page 13

12
Vaihe / Step 9
Page 14

13
Vaihe / Step 11
Vaihe / Step 10
Page 15

Ylläpito
l Tarkista säännöllisesti laitteen osat ja tarkista kiinnitykset
l Tarvittaessa vaihda kuluvat osat. Mikäli osia on tarve
huoltaa tai vaihtaa, tee se ennen kuin jatkat laitteen
käyttöä.
Huolto
l Puhdistaessa laitetta, käytä ainoastaan kosteaa pyyhettä.
Älä käytä voimakkaita pesuaineita. Varmista ettei kosteutta
pääse laitteen sisään.
l Osat jotka saattavat altistua hikoilusta johtuvalle kosteudelle
tulisi pyyhkiä kostealla pyyhkeellä.
Maintenance
l Regularly inspect all parts of the equipment and the
secure seating of all screws and connections.
l Promptly replace any defective parts through our
customer service. Until it is repaired, the equipment
must not be used.
Care
l When cleaning, use only a moist cloth and avoid harsh
cleaning agents. Ensure that no moisture penetrates
into the computer.
l Components that come into contact with perspiration,
need cleaning only with a damp cloth.
4. Ylläpito ja huolto
4. Care and Maintenance
5. Ohjainyksikkö / Computer
14
5.1 Ohjainyksikön painikkeet
RESET:
- Painikkeen lyhyt painallus nollaa asetuksen setting-valikossa
- Painikkeen lyhyt painallus average/trip -valikossa aktivoi
päävalikosta (main menue): HRC; PROGRAM;MANUAL ja INDIVIDUAL
- Pidempi painallus (yli 2 sekunttia), average/trip - valikossa aktivoi
käyttäjän valitsemisen.
MODE:
Painamalla tätä painiketta vahvistetaan valinta
RECOVERY:
Recovery pulse mittaa kuinka nopeasti käyttäjän syke palaa
leposykkeeseen harjoituksen jälkeen. Tälle on määritelty arvo
yhdestä kuuteen (1-6).
UP/ DOWN:
Ohjelman/harjoitteen valinta tai syötetyn arvon muuttaminen..
Pidempi painallus käynnistää automaattisen arvon hakemisen.
START/ STOP:
Aloittaa tai lopettaa harjoituksen.
5.1 Computer keys
RESET:
- Briey pressing this key will resets the activated value in the
setting mode
- Briey pressing this key in the average/Trip-mode will activate
the main menue: HRC; PROGRAM;MANUAL and INDIVIDUAL.
- Longer pressing (> 2 seconds) in in the average/Trip-mode
will activate the user selection.
MODE:
By pressing this key, a function can be conrmed.
RECOVERY:
Recovery pulse measurement with assignment of a tness
score 1–6.
UP/ DOWN
Program selection or increase/decrease of values. A longer
press will start the automatic value nder.
START/ STOP
Start and nish the exercise
Page 16

15
RPM
Pyörimisnopeus (15-200 kierrosta minuutissa)
SPEED
Nopeuden näyttäminen (0-99.99 kilometriä/tunnissa, teoreettinen
arvioitu arvo). Nopeutta ei voi suoraan verrata ulkokäytössä olevaan
pyörään.
DISTANCE
Mittaa teoreettisen kuljetun matkan 100 metrin välein.
TIME
Mittaa harjoitteen keston sekunneissa. (00:00 – 99:59)
CALORIES
Arvio energian kulutuksesta
HEARTRATE
Antaa suuntaa antavan arvion sykkeestä (70-199).
VAROITUS: Laitteen antama arvio sykkeestä ei välttämättä
ole sykkeen todellinen arvo. Liiallinen harjoittelu voi johtaa
loukkaantumiseen tai kuolemaan. Mikäli tunnet itsesi huonovointiseksi keskeytä harjoittelu välittömästi!
LEVEL
Näyttää vastuksen 16 porrasta RPM-harjoitteissa.
Harjoitteen proilit näytetään myös.
Huomiot
A) Käynnistääksesi laitteen lepotilasta paina mitä tahansa
painiketta.
B) Asetusten arvot
Tavoitearvot: saavuttaessasi tavoitearvot laite piippaa
ja ohjainyksikkö lopettaa laskemisen.
C) Recovery
Lopetettuasi harjoitteen, paina “RECOVERY” ja lopeta jalasten
pyörittäminen ja muu liike. Ohjainyksikkö mittaa pulssiasi
60 sekunnnin ajan. Jos alkusykkeen ja loppusykkeen ero on noin
20%, antaa ohjainyksikkö arvon F1 (erittäin hyvä).
5.2 Computer functions
RPM
Revolutions per minute.(15-200rpm).
SPEED
Display of speed in km/h, 0-99.99km/h, (theoretical assumed
value), which cannot be compared with the speed value of a
regular outdoor bike.
DISTANCE
Records the distance in 0.1 km increments (0 -999.9)
TIME
Records the training time in seconds (00:00 – 99 :59).
CALORIES
Shows the energy consumption, based on a eciency of 22% to
provide the mecahnical power. Range from 1-9990Kcal.
HEARTRATE
Shows the approximation of the heartrate, range from 70-199bpm.
WARNING: Systems with heartrate control can be
incorrect. To much exercise could injure your body or
can cause dead. If you feel light theaded or weak, stop
your exercise immediately!
LEVEL
Shows the resistance in 16 levels in the rpm-dependant exercise.
Additional the prole of the programs, will be shown, too.
Remarks
B) Setting values
Target values: After achieving the target values, there will be a
beep and the computer will stop counting.
C) Recovery
After you nished your exercise press RECOVERY and stop
pedalling. The computer will measure the heartrate for the next
60 seconds. If the dierence between the starting and end
heartrate is around 20%, you will get the grade F1 (very good).
A) Waking up the computer from the snooze mode
To reactivate the computer from the snooze mode, press any
button, please. A pedalling has no function in this mode.
5.2 Ohjainyksikön toiminnot
Page 17

16
5.3 Computer Functions
5.3.1 Immediate-Start function
In order to provide optimum user friendliness of your training
equipment, an opportunity for quick and uncomplicated initiation
of training was devised. Please do the following :
t Connect the power supply included in the scope of delivery
to the bottom end of the equipment, at the socket provided.
A test image will briey appear on the computer. The main
menue starts is blinking.
t Start your exercise by pressing START. All data starts
counting up. By pressing the Level Up or Down buttons you
can increase or decrease the work load, more rows will light
indicating a harder workout. The elliptical will get harder
to pedal as the rows increase. There are sixteen levels of
resistance available for plenty of variety.
5.3 Ohjainyksikön toiminnot
5.3.1 Nopea käyttöönotto
Käyttömukavuuden takaamiseksi laitteeseen on ohjelmoitu
nopean käyttöönoton mahdollistava toiminto.
t Kiinnitä virtajohto laitteeseen ja pistorasiaan.
Testikuva ilmestyy ohjainyksikön näyttöön.
• Aloita harjoite painamalla START. Laite alkaa kerätä tietoja.
Painamalla UP/DOWN -painikkeita voit nostaa tai keventää
vastusta. Useammat palkit ohjainyksikön näytössä merkitsevät
suurempaa vastusta, eli raskaampaa harjoitusta.
Vastukselle on valittavissa 16 eri tasoa.
5.3.2 Esiasennetut harjoitteet
1) Kiinnitä virtajohto laitteeseen
2) Ohjainyksikön näyttö esittää kaikki näytön kuvakkeet lyhyen
ajan. Tämän jälkeen päävalikko vilkkuu näytössä.
5.3.2.1 Manual
Jos valitset “MANUAL”, kohdan voit säätää vastusta
nuolinäppäimillä “UP/DOWN” 20 eri tasosta.
Paina “MODE” ja voit muuttaa MANUAL toiminnon asetuksia
Seuraavaksi voit valita ajan kohdasta “Time”. Voit muuttaa arvoa
nuolinäppäimillä “UP/DOWN”. Paina “START” aloittaaksesi
harjoitteen. Ajan syöttäminen ei ole pakollista.
Paina “MODE”
Seuraavaksi voit määrittää matkan nuolinäppäimillä “UP/DOWN”.
Arvon syöttäminen ei ole pakollista. Paina “START” aloittaaksesi
harjoitteen.
Paina “MODE”
Seuraavaksi voit määrittää kalorit-toiminnon. Arvoa voi muuttaa
nuolinäppäimillä “UP/DOWN”. Arvon syöttäminen ei ole
pakollista. Paina “START” aloittaaksesi harjoitteen.
Paina “MODE”
Seuraavaksi voit määrittää pulssi-toiminnon. Voit säätää harjoitteen
aikaista maksimi sykettä. Mikäli sykkeesi ylittää raja-arvon laite
aloittaaa piippaamisen. Vastus ei siis säädy sykkeen mukaisesti.
Paina “START” ja harjoite alkaa.
5.3.2 Exercise with settings
1) Connect the cable from the adapter to the plug at the rear
side of the housing
2) The display will show a full display for a short period of time
and afterwards, the main Menue is blinking.
5 .3.2.1 Manual
If you choose “MANUAL”, you can change the resistance by
pressing the arrow keys in 20 resistance levels.
Press MODE and you are entering the setting mode of MANUAL.
Next is Time. You may adjust the Time with UP and DOWN. It
is not a must to set the time. Press START and your excercise
beginns.
Press MODE
Next is DISTANCE. You may adjust the distance with UP and
DOWN. It is not a must to set the time. Press START and your
excercise beginns.
Press MODE
Next is CALORIES. You may adjust the calories value with UP and
DOWN. It is not a must to set the calorie value. Press START
and your excercise beginns.
Press MODE
Next is PULSE. You may adjust the the max heartrate for
your exercise. If your actual heartrate is over the set value,
the computer starts beeping. It is not a heartratwe controlled
exercise!
Press START and your excercise beginns.
Page 18

17
5.3.2.2 Harjoitteet
Laitteeseen on esiasennettu kaksitoista erilaista harjoitetta.
Valite “PROGRAM” nuolinäppäimillä “UP/DOWN” ja
paina “MODE” vahvistaaksesi valinnan.
Esiasennetun harjoitteen valinta
Valitse yksi kahdestatoista esiasennetusta harjoitteesta
nuolinäppäimillä “UP/DOWN”. Harjoitteen pro
ili esitetään
ohjainyksikön näytöllä. Paina “MODE” valitaksesi halutun
harjoitteen.
Painamalla nuolinäppäimiä “UP/DOWN” voit säätää harjoitteen
vastusta.
Paina “MODE”
Seuraavaksi voit valita ajan kohdasta “Time”. Voit muuttaa
arvoa nuolinäppäimillä “UP/DOWN”. Paina “START” aloittaaksesi
harjoitteen. Ajan syöttäminen ei ole pakollista.
Paina “MODE”
Seuraavaksi voit määrittää matkan nuolinäppäimillä “UP/DOWN”.
Arvon syöttäminen ei ole pakollista. Paina “START” aloittaaksesi
harjoitteen.
Paina “MODE”
Seuraavaksi voit määrittää kalorit-toiminnon. Arvoa voi muuttaa
nuolinäppäimillä “UP/DOWN”. Arvon syöttäminen ei ole pakollista.
Paina “START” aloittaaksesi harjoitteen.
Paina “MODE”
Seuraavaksi voit määrittää pulssi-toiminnon. Voit säätää harjoitteen
aikaista maksimisykettä. Mikäli sykkeesi ylittää raja-arvon laite
aloittaaa piippaamisen. Vastus ei siis säädy sykkeen mukaisesti.
Paina “START” ja harjoite alkaa.
5.3.2.2 PROGRAMS
The computer has twelve di
erent programs that have been
designed for a variety of workouts.
Select PROGRAM by using the UP/ DOWN- keys and press
MODE to con
rm the selection.
Programming preset programs
Choose one of tweleve programs by pressing the UP/ DOWN
keys, the program
gure and the pro le will be shown in
the display. If you
nd the desired program press MODE for
con
rmation.
BY pressing the UP/ DOWN keys, you can set the height
(resistance) of the pro
le.
Press MODE
Next is Time. You may adjust the Time with UP and DOWN. It
is not a must to set the time. Press START and your excercise
beginns.
Press MODE
Next is DISTANCE. You may adjust the distance with UP and
DOWN. It is not a must to set the time. Press START and your
excercise beginns.
Press MODE
Next is CALORIES. You may adjust the calories value with UP and
DOWN. It is not a must to set the calorie value. Press START
and your excercise beginns.
Press MODE
Next is PULSE. You may adjust the the max heartrate for
your exercise. If your actual heartrate is over the set value,
the computer starts beeping. It is not a heartratwe controlled
exercise!
Press START and your excercise beginns.
Page 19

18
5.3.2.3 Käyttäjän luomat harjoitteet
Voit luoda halutessasi omia harjoitteita.
Valite käyttäjä “USER”-kohdasta nuolinäppäimillä
“UP/DOWN” ja paina “MODE” vahvistaaksesi valinnan.
Nuolinäppäimillä “ UP/DOWN” voit säätää ensimmäisen
palkin vastustasoa ohjainyksikön näytössä. Paina “MODE”
vahvistaaksesi valinnan. Seuraavan palkin vastustasoa pystyy
säätäämään vastaavalla tavalla aina aina viimeiseen palkkiin
asti.
Paina “MODE”
Seuraavaksi voit valita ajan kohdasta “Time”. Voit muuttaa arvoa
nuolinäppäimillä “UP/DOWN”. Paina “START” aloittaaksesi
harjoitteen. Ajan syöttäminen ei ole pakollista.
Paina “MODE”
Seuraavaksi voit määrittää matkan nuolinäppäimillä “UP/DOWN”.
Arvon syöttäminen ei ole pakollista. Paina “START” aloittaaksesi
harjoitteen.
Paina “MODE”
Seuraavaksi voit määrittää kalorit-toiminnon. Arvoa voi muuttaa
nuolinäppäimillä “UP/DOWN”. Arvon syöttäminen ei ole pakollista.
Paina “START” aloittaaksesi harjoitteen.
Paina “MODE”
Seuraavaksi voit määrittää pulssi-toiminnon. Voit säätää harjoitteen
aikaista maksimi sykettä. Mikäli sykkeesi ylittää raja-arvon laite
aloittaaa piippaamisen. Vastus ei siis säädy sykkeen mukaisesti.
Paina “START”harjoite alkaa ja pro
ili tallennettaan.
Voit säätää vastuksen määrää harjoitteen aikana
nuolinäppäimillä “UP/DOWN”.
5.3.2.4 TARGET HR (Sykkeen mukaan mukautuva harjoite)
Maksimisykkkeen mukaisesti ohjainyksikkö voi säätää vastusta
automaattisesti perustuen sykkeeseesi.
Valitse “TARGETHR” nuolinäppäimillä “UP/DOWN” ja paina
“MODE”.
Seuraavaksi voit syöttää ikäsi nuolinäppäimillä “UP/DOWN”.
Paina “MODE”.
Voit halutessasi valita harjoitteen tason:
55%, 75% tai 90%. Paina “MODE” valitaksesi halutun tason.
Ohjainyksikkö määrittää maksimisykkeen automaattisesti.
5.3.2.3 USER programs
The Computer has the possibility to save your own designed
pro
le.
Select USER by using the UP/ DOWN- keys and press MODE to
con
rm the selection.
By pressing the UP/ DOWN keys, the resistance level for the
rst bar can be set. If it is done press MODE to con rm it. The
next bar is blinking. do it in the same way as described before,
till you set the last bar.
Press MODE
Next is Time. You may adjust the Time with UP and DOWN. It
is not a must to set the time. Press START and your excercise
beginns.
Press MODE
Next is DISTANCE. You may adjust the distance with UP and
DOWN. It is not a must to set the time. Press START and your
excercise beginns.
Press MODE
Next is CALORIES. You may adjust the calories value with UP and
DOWN. It is not a must to set the calorie value. Press START
and your excercise beginns.
Press MODE
Next is PULSE. You may adjust the the max heartrate for
your exercise. If your actual heartrate is over the set value,
the computer starts beeping. It is not a heartratwe controlled
exercise!
Press START and your excercise beginns and the pro
le will be
saved. You can adjust the resistance during you exercise all the
time by pressing UP/ DOWN.
5.3.2.4 TARGET HR (Heart rate controlled exercise)
According to your max heartrate level, the Computer can adjust
the resistance by himself, so you will not overtrain you.
Choose „TARGETHR“ with the UP/ DOWN-keys and press MODE
Now you need to set your age, as well with the UP/ DOWN-keys.
Press MODE
You have the option to select 55% (regeneration), 75% (cardio
vascular exercise), 90% anerob endurance or to set a target
heartrate (THR). Press MODE if you have chosen the percentage
(THR will be explained later). The computer is calculating the
max heartrate automatically
Page 20

19
Seuraavaksi voit valita ajan kohdasta “Time”. Voit muuttaa
arvoa nuolinäppäimillä “UP/DOWN”. Paina “START”
aloittaaksesi harjoitteen. Ajan syöttäminen ei ole pakollista.
Paina “MODE”
Seuraavaksi voit määrittää matkan nuolinäppäimillä “UP/DOWN”.
Arvon syöttäminen ei ole pakollista. Paina “START” aloittaaksesi
harjoitteen.
Paina “MODE”
Seuraavaksi voit määrittää kalorit-toiminnon. Arvoa voi muuttaa
nuolinäppäimillä “UP/DOWN”. Arvon syöttäminen ei ole
pakollista. Paina “START” aloittaaksesi harjoitteen.
THR-harjoitteen käyttäminen
Valitse “THR”- nuolinäppäimillä “UP/DOWN” ja vahvista valinta
painamalla “MODE”.
Harjoitteen syke voidaan asettaa nuolinäppäimillä
“UP/DOWN”.
Paina “MODE”
Seuraavaksi voit valita ajan kohdasta “Time”. Voit muuttaa
arvoa nuolinäppäimillä “UP/DOWN”. Paina “START”
aloittaaksesi harjoitteen. Ajan syöttäminen ei ole pakollista.
Paina “MODE”
Seuraavaksi voit määrittää matkan nuolinäppäimillä
“UP/DOWN”. Arvon syöttäminen ei ole pakollista.
Paina “START” aloittaaksesi harjoitteen.
Paina “MODE”
Seuraavaksi voit määrittää kalorit-toiminnon. Arvoa voi
muuttaa nuolinäppäimillä “UP/DOWN”. Arvon syöttäminen
ei ole pakollista. Paina “START” aloittaaksesi harjoitteen.
Paina “START” ja harjoite alkaa.
Next is Time. You may adjust the Time with UP and DOWN. It
is not a must to set the time. Press START and your excercise
beginns.
Press MODE
Next is DISTANCE. You may adjust the distance with UP and
DOWN. It is not a must to set the time. Press START and your
excercise beginns.
Press MODE
Next is CALORIES. You may adjust the calories value with UP and
DOWN. It is not a must to set the calorie value.Press START and
your excercise beginns.
How to deal THR
Select THR with the UP/ DOWN keys and conrm by pressing
MODE.
The exercise heartrate can be set by pressing UP/ DOWN.
Press MODE
Next is Time. You may adjust the Time with UP and DOWN. It
is not a must to set the time. Press START and your excercise
beginns.
Press MODE
Next is DISTANCE. You may adjust the distance with UP and
DOWN. It is not a must to set the time. Press START and your
excercise beginns.
Press MODE
Next is CALORIES. You may adjust the calories value with UP and
DOWN. It is not a must to set the calorie value.
Press START and your excercise beginns.
Page 21

Ongelma
Näyttö on pimeänä tai ohjainyksikkö ei toimi
Syy
Virta ei kytketty
Ongelma
Pulssin mittaus ei toimi
Syy
Virhe kytkennöissä
Häiriösignaalit
Sykevyö
Vääränlainen vyö
Ongelma
Vastusta ei pysty säätämään
Syy
Mekaniikka/ohjainyksikkö
Ongelma
Laite heiluu
Syy
Kalteva lattia
Tukijalat ovat löysällä
Mitä tehdä?
Syötä virtajohto laitteeseen
ja pistorasiaan.
Katso kasaamisen vaihe 9.
Tarkista kytkennät.
-
Mitä tehdä?
Tarkista kytkennät
Ota yhteyttä jälleenmyyjään
5.4 Ongelman ratkaisu
20
Mitä tehdä?
Säädä tukijalkojen tasoa
kunnes laite seisoo tukevasti
Kiristä pultit ja mutterit
5.4 Diagnostics and Troubleshooting
Error
No display or computer is not functioning
Cause
No power
Error
Pulse display defective
Cause
No reception
Interference with in the room
Chest Strap:
Incorrect chest strap
Error
Step resistance cannot be
regulated.
Cause
Mechanics/control system
Error
Wobbly equipment
Cause
Uneven oor
Stand feet are loose
What to do?
Plug the power supply into
the socket, or plug the power
supply into the connection
port on the housing (see
Assembly Step 9), or Check
cable connections
What to do?
Check the packing or
Call Service
What to do?
Rotate the height adjusting
caps until the stand is stable.
Tighten the cap nuts.
Mitä tehdä?
Tarkista kaikki kytkennät
Siirrä muut elektroniset laitteet
lähettyviltä. -
Vaihda sykevyötä. Lähettimen taajuus
tulee olla. 5,0 – 5,5 kHz
What to do?
Check all connections
Remove (for example cell
phone/loud speakers)
in the room
Use another chest strap, if
necessary. The transmitting
frequency must be between
5.0 -5.5 kHz.
Page 22

6. Tekniset tiedot
6. Technical Details
6.1 Virransyöttö
Kiinnitä johto virtalähteestä pistokkeeseen laitteen taka
alaosaan.
Virtalähteen tiedot:
Input: 230 V, 50Hz
Output: 8V, 500mA
l Käytä ainoastaan virtalähdettä, joka tulee tuotteen mukana.
Käytettäessä muuta virtalähdettä, varmista että virransyöttö
katkeaa automaattisesti ylikuormituksen sattuessa, on
suojattu oikosululta ja on sähköisesti kontrolloitu.
Ohjeiden noudattamatta jättäminen voi johtaa oikosulkuun
tai laitteen vioittumiseen.
l Virtajohdon irroittaminen johtaa käyttäjän
uudelleen valitsemiseen ohjainyksiköstä.
6.1 Power Supply (included in the scope of delivery)
Connect the cable from the power supply to the respective
socked on the lower rear end of the housing.
Power Supply Specification:
Input: 230 V, 50Hz
Output: 8V, 500mA
l Use only the power supply included in the scope of
delivery. If you use another manufacturer’s power
supply, please ensure that it automatically cuts-o in
the event of overload, is short-circuit protected and is
electronically controlled. Non-compliance may result in
short-circuiting and damage to the computer.
l Disconnection of the power pack from the mains or of the
power pack plug from the equipment results in a return
to User Selection U0 – U4 input mode.
21
Page 23

7. Harjoiteopas
7. Training Manual
Laitteella harjoittelu mahdollistaa kokonaisvaltaisen
kunnon kohottamisen ja tärkeiden lihasryhmien
vahvistamisen.
Yleisiä huomioita harjoittelusta.
l Älä harjoittele heti ruokailun jälkeen
l Jos mahdollista, mukauta harjoitus pulssin mukaan
l Tee veryttelyä/venyttelyä ennen harjoituksen
aloittamista.
l Lopettaessasi harjoituksen vähennä vauhtia
hiljalleen. Älä koskaan lopeta harjoitetta
äkillisesti.
l Venyttele harjoituksen jälkeen.
7.1 Harjoittelun tiheys
Kohottaaksesi fyysistä kuntoasi suosittelemme harjoittelua
vähintään kolme kertaa viikossa. Tämä on keskimääräinen
harjoitustiheys aikuselle, jolla saavutetaan tuloksia kunnonkohotuksessa tai rasvanpoltossa.
7.2 Harjoittelun intesiteetti
Valmistele harjoituksesi huolellisesti. Aloita harjoittelu
rauhallisesti, jotta vältyt loukkaantumisilta ja sopeudut
harjoitteluun.
RPM
Kestävyysharjoittelun kannalta on suositeltua
valita pienempi vastus ja harjoitella suuremmalla kierrosmäärällä.
Varmista, että RPM on yli 80, mutta ei yli 100.
7.3 Sykkeeseen pohjautuva harjoittelu
Löytääksesi henkilökohtaisen sykealueen suosittelemme,
että harjoittelet aerobisella sykealueella. Apunasi voit käyttää
ohjekirjan sykediagramia tai laitteen tarjoamia sykkeeseen
pohjautuvia harjoitteita. Suosittelemme että 80% harjoitteesta
tehtäisiin aerobisella alueella. Voit mukauttaa harjoitteita
kuntotasosi kasvaessa ja saavuttaa parempia tuloksia
samalla syketasolla. Mikäli sinulla on aiempaa kokemusta
sykkeeseen perustuvasta harjoittelusta, voit käyttää sitä
apunasi suunnitellessasi harjoitusta.
Training with the Ergometer is an ideal movement training for
strengthening important muscle groups and the cardio-circulatory system.
General notes for Training
l Never train immediately after a meal.
l If possible, orient training to pulse rate.
l Do muscle warm-ups before starting training
by loosening or stretching exercises.
l When nishing training, please
reduce speed. Never abruptly end training.
l Do some stretching exercises when nished training.
7.1 Training frequency
To improve physical tness and to enhance condition over the
long term, we recommend training at least three times a week.
This is the average training frequency for an adult in order to
obtain long-term condition success or high fat burning. As your
tness level increases, you can also train daily. It is particularly
important to train at regular intervals.
7.2 Training intensity
Carefully structure your training. Training intensity should be
increased gradually, so that no fatigue phenomena of the musculature or the locomotion system occurs.
RPM
In terms of objective endurance training it is recommended
in principle to select a lower step resistance and to train at a
higher rpm (revolutions per minute). Ensure that the
rpm is higher than 80 RPM but does not exceed 100.
7.3 Heartrate oriantated training
For your personal pulse zone it is recommended that
an aerobic training range be chosen. Performance
increases in the endurance range are principal ly achieved by long training units in the aerobic range.
Find this zone in the target pulse diagram or orient yourself
on the pulse programs. You should complete 80 % of your
training time in this aerobic range (up to 75 % of your
maximum pulse). In the remaining 20 % of the time, you
can incorporate load peaks, in order to shift your aerobic
threshold upwards. With the resulting training success you
can then later produce higher performance at the same
pulse; this means an improvement in your physical shape.
If you already have some experience in pulse-controlled training,
you can match your desired pulse zone to your special training
plan or tness status.
22
Page 24

Huomautus:
Yksilöllisten erojen vuoksi sykealueet voivat vaihdella.
Tämän vuoksi suosittelemme, että määrittelet harjoittelun
myös oman kokemuksesi mukaisesti.
-
7.4 Harjoittelun rajat
Terveyden, hyvinvoinnin ja tehokkaan harjoittelun kannalta
suosittelemme harjoittelun mukauttamista sykkeen mukaan.
-
-
Tämä sääntö pätee niin aloittelijoihin, kuin myös
kokeneimpiin kuntoilijoihin.
-
Suosittelemme pulssin pitämistä 70% - 85% tasolla
maksimisykkeestä.
Mittaa sykkeesi harjoituksen seuraavissa vaiheissa:
1. Ennen harjoitusta
2. 10 minuuttia harjoituksen aloittamisesta
3. Minuutti harjoituksen lopettamisen jälkeen
l Ensimmäisten harjoitteluviikkojen aikana
on suositeltavaa rajoittaa harjoittelun sykeraja
70% tasolle maksimisykkeestä.
l Seuraavien 2-4 kuukauden aikana, voit tehostaa
harjoittelua, kunnes saavutat noin 85% tason
maksimisykkeestä, kuitenkaan rasittamatta liikaa
itseäsi.
l Jokaista harjoitetta ylemmällä pulssialueella tulisi
seurata palauttava harjoite alemmalla pulssi-
alueella (korkeintaan 75% tasolla maksimi-
sykkeestä).
Note:
Because there are persons who have „high“ and „low“ pulses,
the individual optimum pulse zones (aerobic zone, anaerobic
zone) may
from those of the general public (target pulse
diagram).
In these cases, training must be
according to individual experience. If beginners are confronted with this phenomenon, it is important that a physician be consulted before starting
training, in order to check health capacity for training.
7.4 Training control
Both medically and in terms of training physiology, pulse-controlled training makes most sense and is oriented on the individual maximum pulse.
This rule applies both to beginners, ambitious recreational athletes and to pros. Depending on the goal of training and performance status, training is done at a
intensity of individual
maximum pulse (expressed in percentage points).
In order to
cardio-circulatory training according to sports-medical aspects, we recommend a training pulse
rate of 70 % - 85 % of maximum pulse. Please refer to the
following target pulse diagram.
Measure your pulse rate at the following points in time:
1. Before training = resting pulse
2. 10 minutes after starting training = training / working pulse
3. One minute after training = recovery pulse
l During the
weeks, it is recommended that training
be done at a pulse rate at the lower limit of the training
pulse zone (approximately 70 %) or lower.
l During the next 2 - 4 months, intensify training stepwise
until you reach the upper end of the training pulse zone
(approximately 85 %), but without overexerting yourself.
l Every loading training unit in the upper pulse range of
individual performance should always be followed in
subsequent training by a regenerative training unit in the
lower pulse range (up to 75 % of the maximum pulse).
23
Page 25

Kun kuntosi kohoaa, suosittelemme myös tehostamaan
harjoittelua, jotta saavutat oikean sykealueen. Voit myös
tarkastella kuntosi kohoamista “higher tness score”
tuloksen avulla.
-
Harjoittelusykkeen laskeminen :
220 syketasosta vähennetään oma ikä, jolloin saadaan
arvio omasta maksimisykkeestä (100%).
Harjoittelusyke
Alaraja: (220 - ikä) x 0,70
Yläraja: (220 - ikä) x 0,85
7.5 Harjoittelun kesto
Jokaisen harjoituskerran tulisi sisältää lämmittelyvaihe,
harjoitteluvaihe, sekä palauttava vaihe loukkaantumisten
välttämiseksi.
Lämmittely:
5-10 minuuttia matalatempoista harjoittelua
Harjoittelu:
15-40 minuuttia intensiivistä harjoittelua yllä mainittujen
syketasojen mukaisesti.
Palauttava:
5-10 minuuttia matalatempoista harjoittelua. Lopeta harjoittelu
välittömästi mikäli tunnet itsesi huonovointiseksi.
Aineenvaihdunta harjoittelun aikana:
l Ensimmäisten 10 minuutin aikana harjoittelusta
kehomme kuluttaa lihaksiin varastoitunutta sokeria.
l Noin 10 minuuttin harjoittelun jälkeen rasva alkaa
palaa.
l 30-40 minuutin harjoittelun jälkeen rasvanpoltto on
kehon pääenergian lähde.
When condition has improved, higher intensity of training is
required in order for the pulse rate to reach the „training zone“;
that is, the organism is capable of higher performance. You will
recognize the result of improved condition in a higher tness
score (F1 - F6).
Calculation of the training / working pulse:
220 pulse beats per minute minus age = personal, maximum
heart rate (100 %).
Training pulse
Lower limit: (220 - age) x 0.70
Upper limit: (220 - age) x 0.85
7.5 Trainings duration
Every training unit should ideally consist of a warm-up phase,
a training phase, and a cool-down phase in order to prevent
injuries.
Warm-up:
5 to 10 minutes slow exercising.
Training:
15 to 40 minutes of intensive or not overtaxing training at the
intensity mentioned above.
Cool-down:
5 to 10 minutes of slow exercising. Stop training immediately if
you feel unwell or if any signs of overexertion occur.
Alterations of metabolic activity during training:
l In the rst 10 minutes of endurance performance our
bodies consume the sugars stored in our muscles.
l After about 10 minutes fat is burned in addition.
l After 30 - 40 minutes fat metabolism is activated, then
the body‘s fat is the main source of energy
24
Page 26

Sykealue diagrammi / Pulse Diagram
(Syke / Ikä) / (Heart Rate / Age)
Syke (Lyöntiä/min.) / Heart Rate (beats / min.)
Ikä / Age
= 220- Age
Max. heartrate *90%
Max. heartrate *70%
Suggested lower limit
Max. heartrate *85%
Suggested upper limit
Maksimisyke:
= 220 - ikä
Maksimisyke * 90%
Maksimisyke * 80%
Aerobinen alue
Maksimisyke * 70%
Page 27

8. Räjäytyskuva / Expolosion Drawing
26
Page 28

27
Page 29

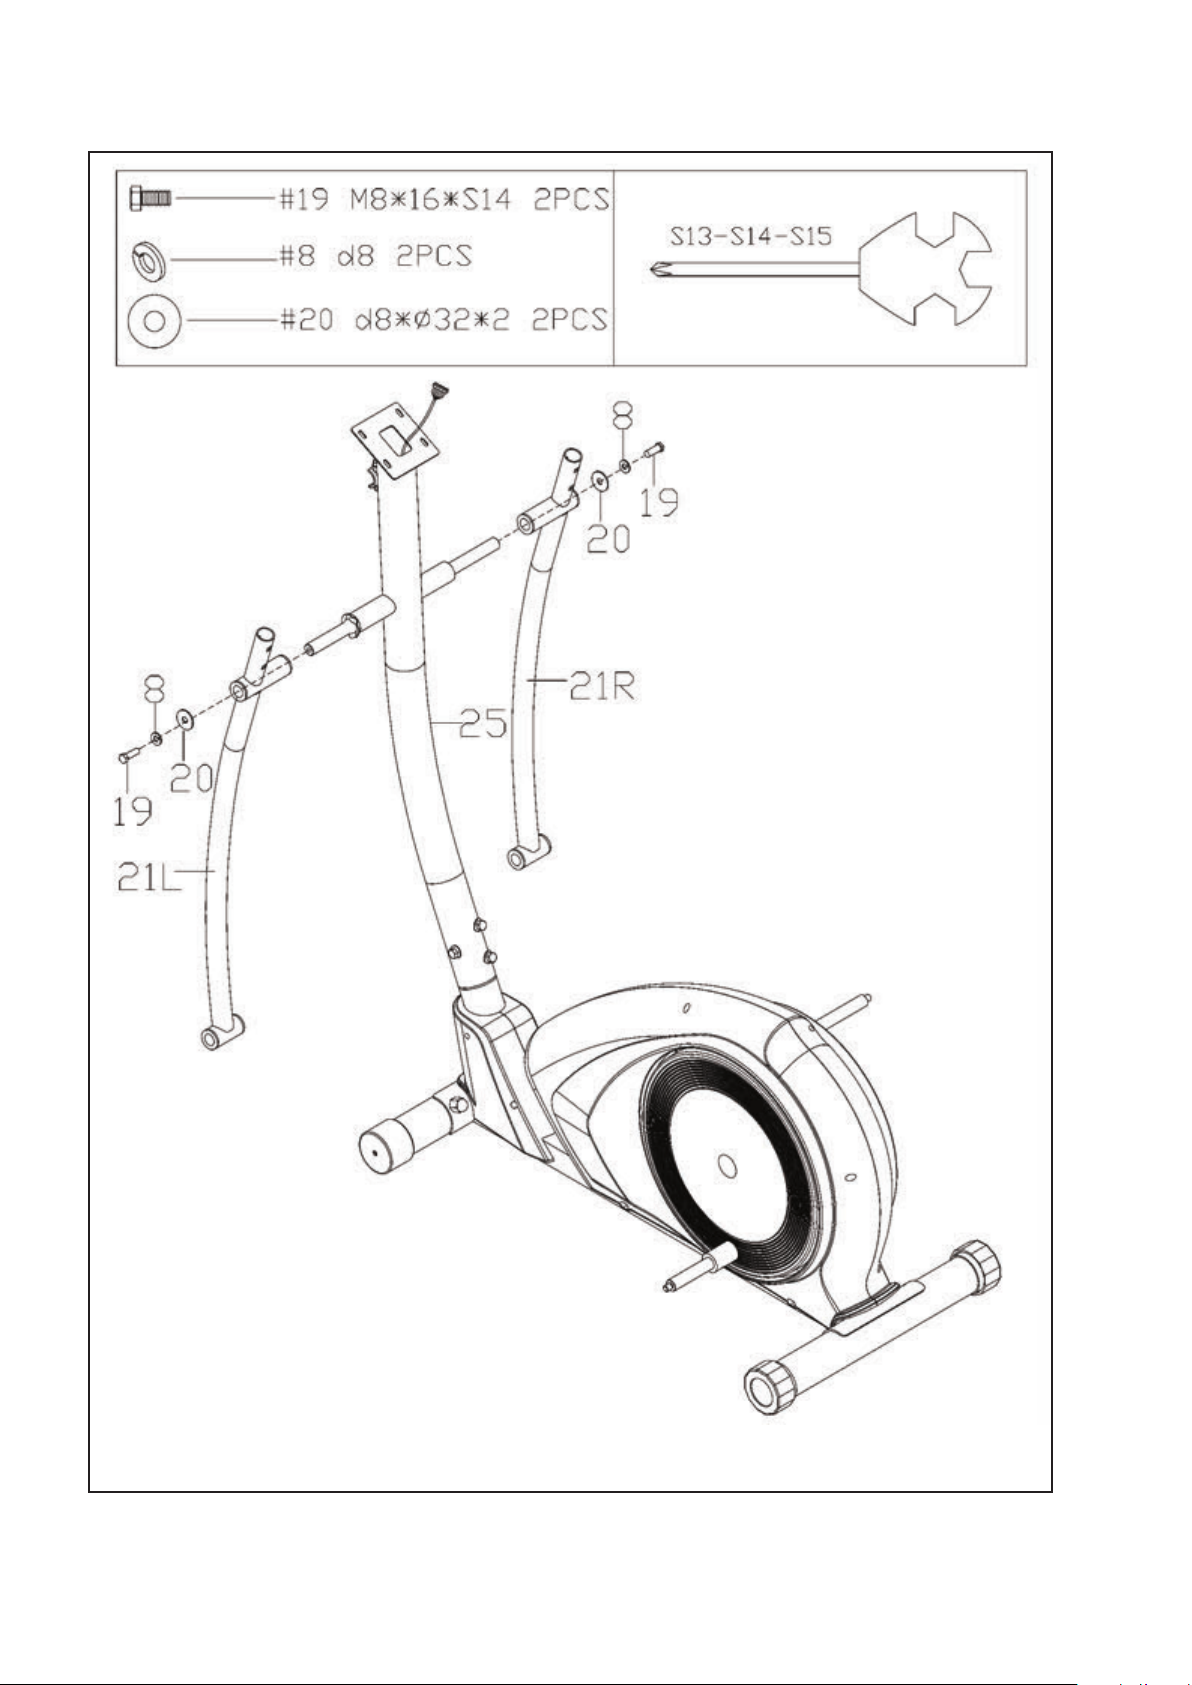
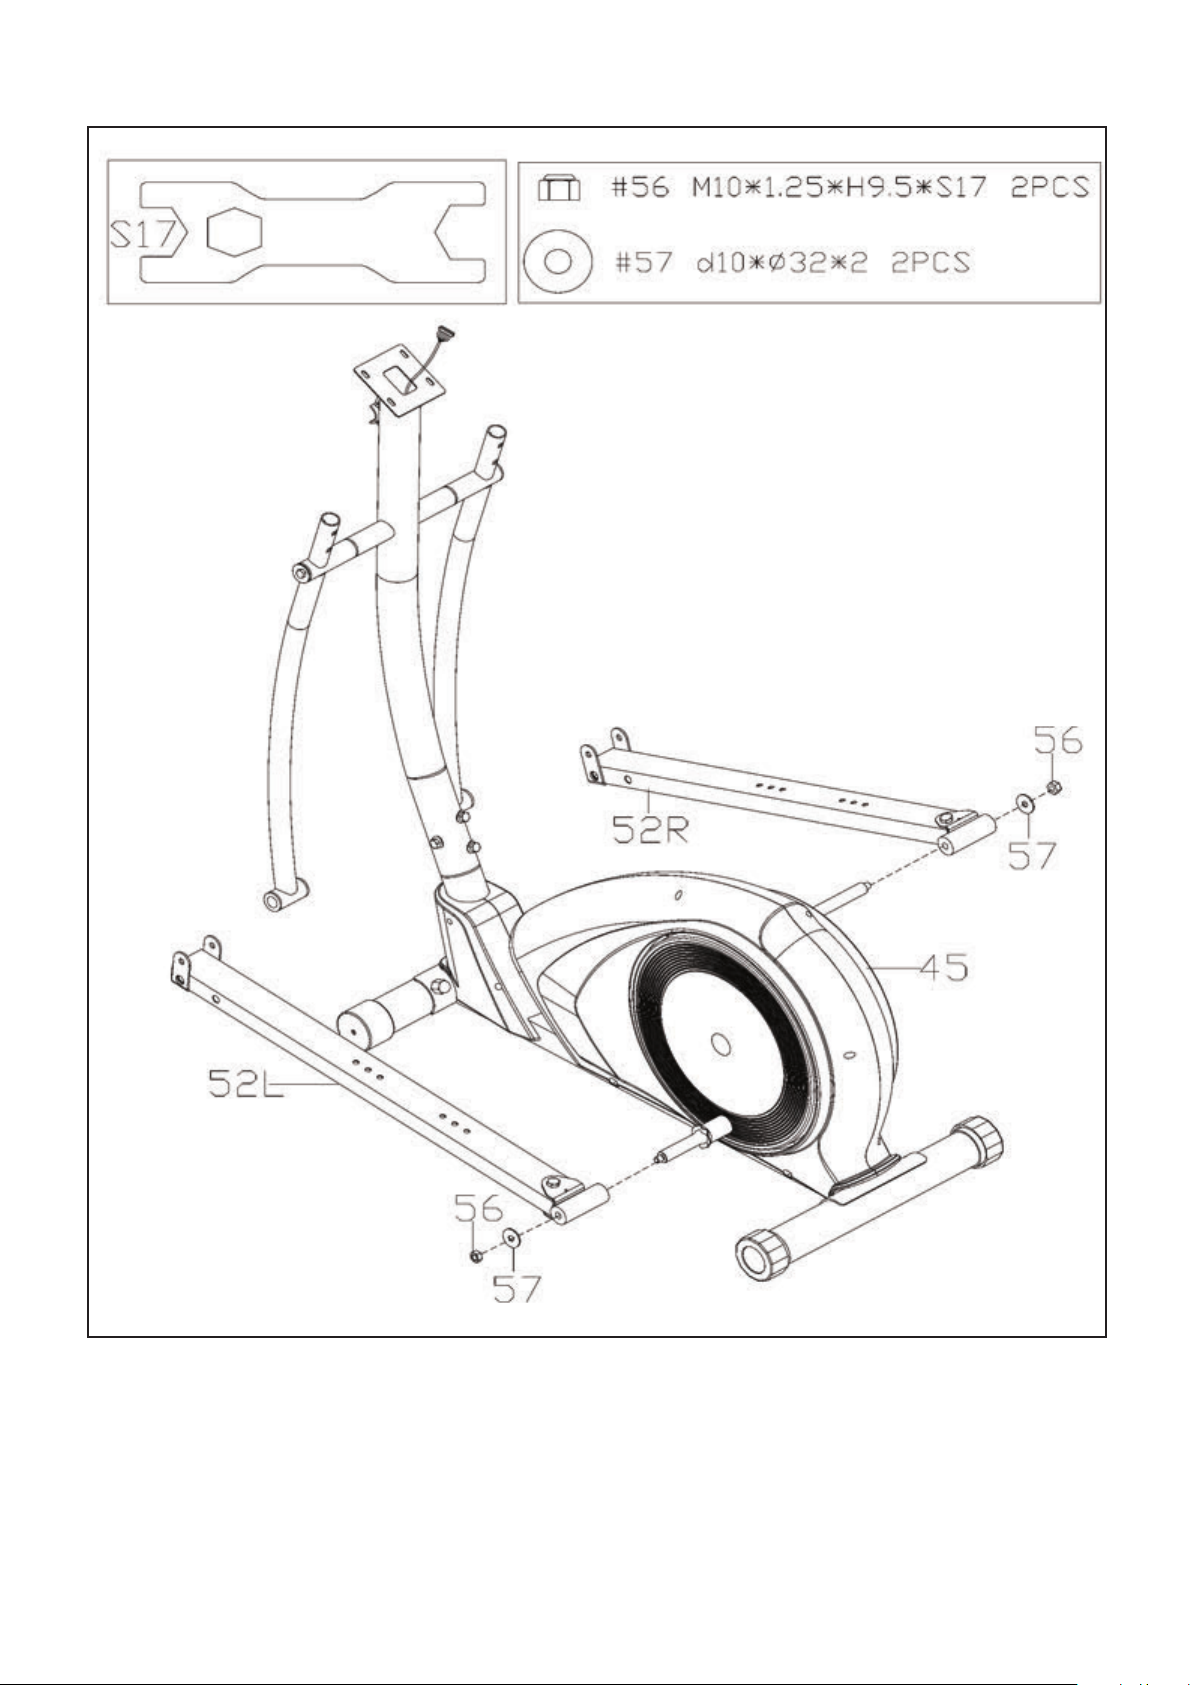
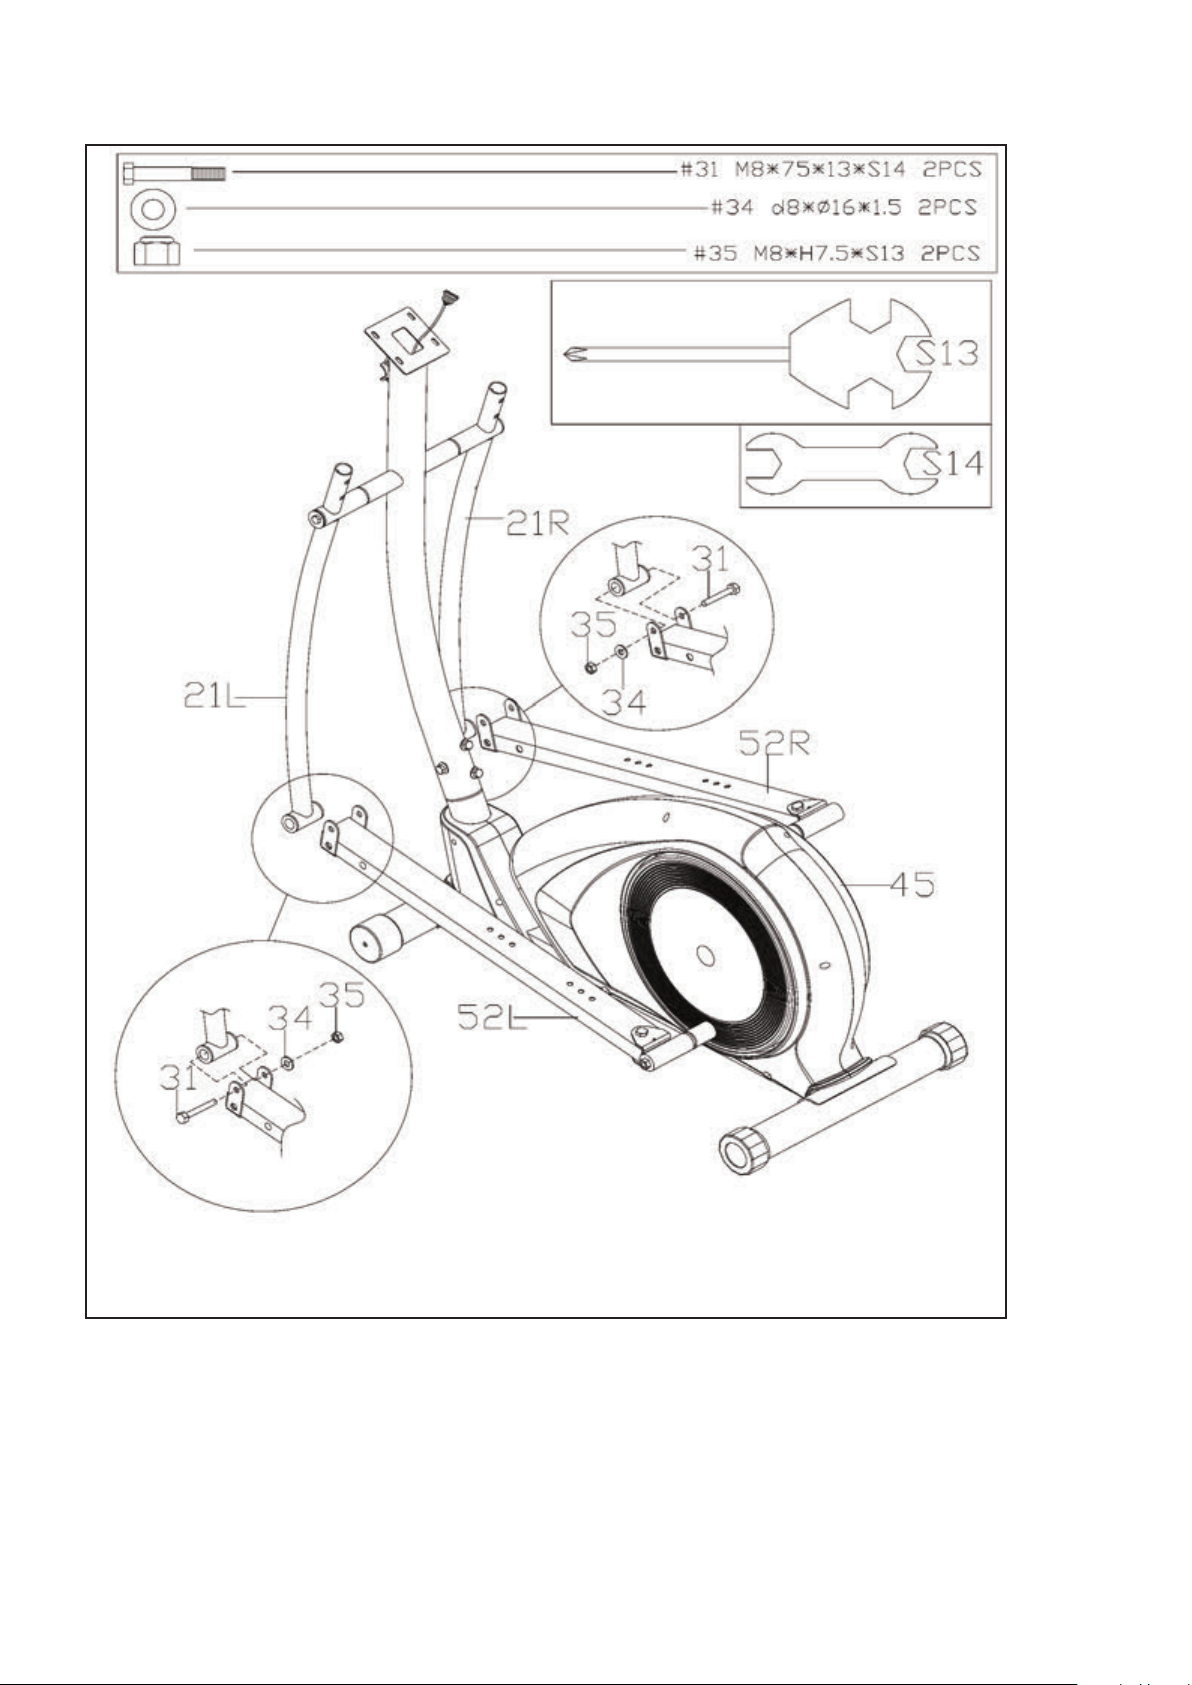
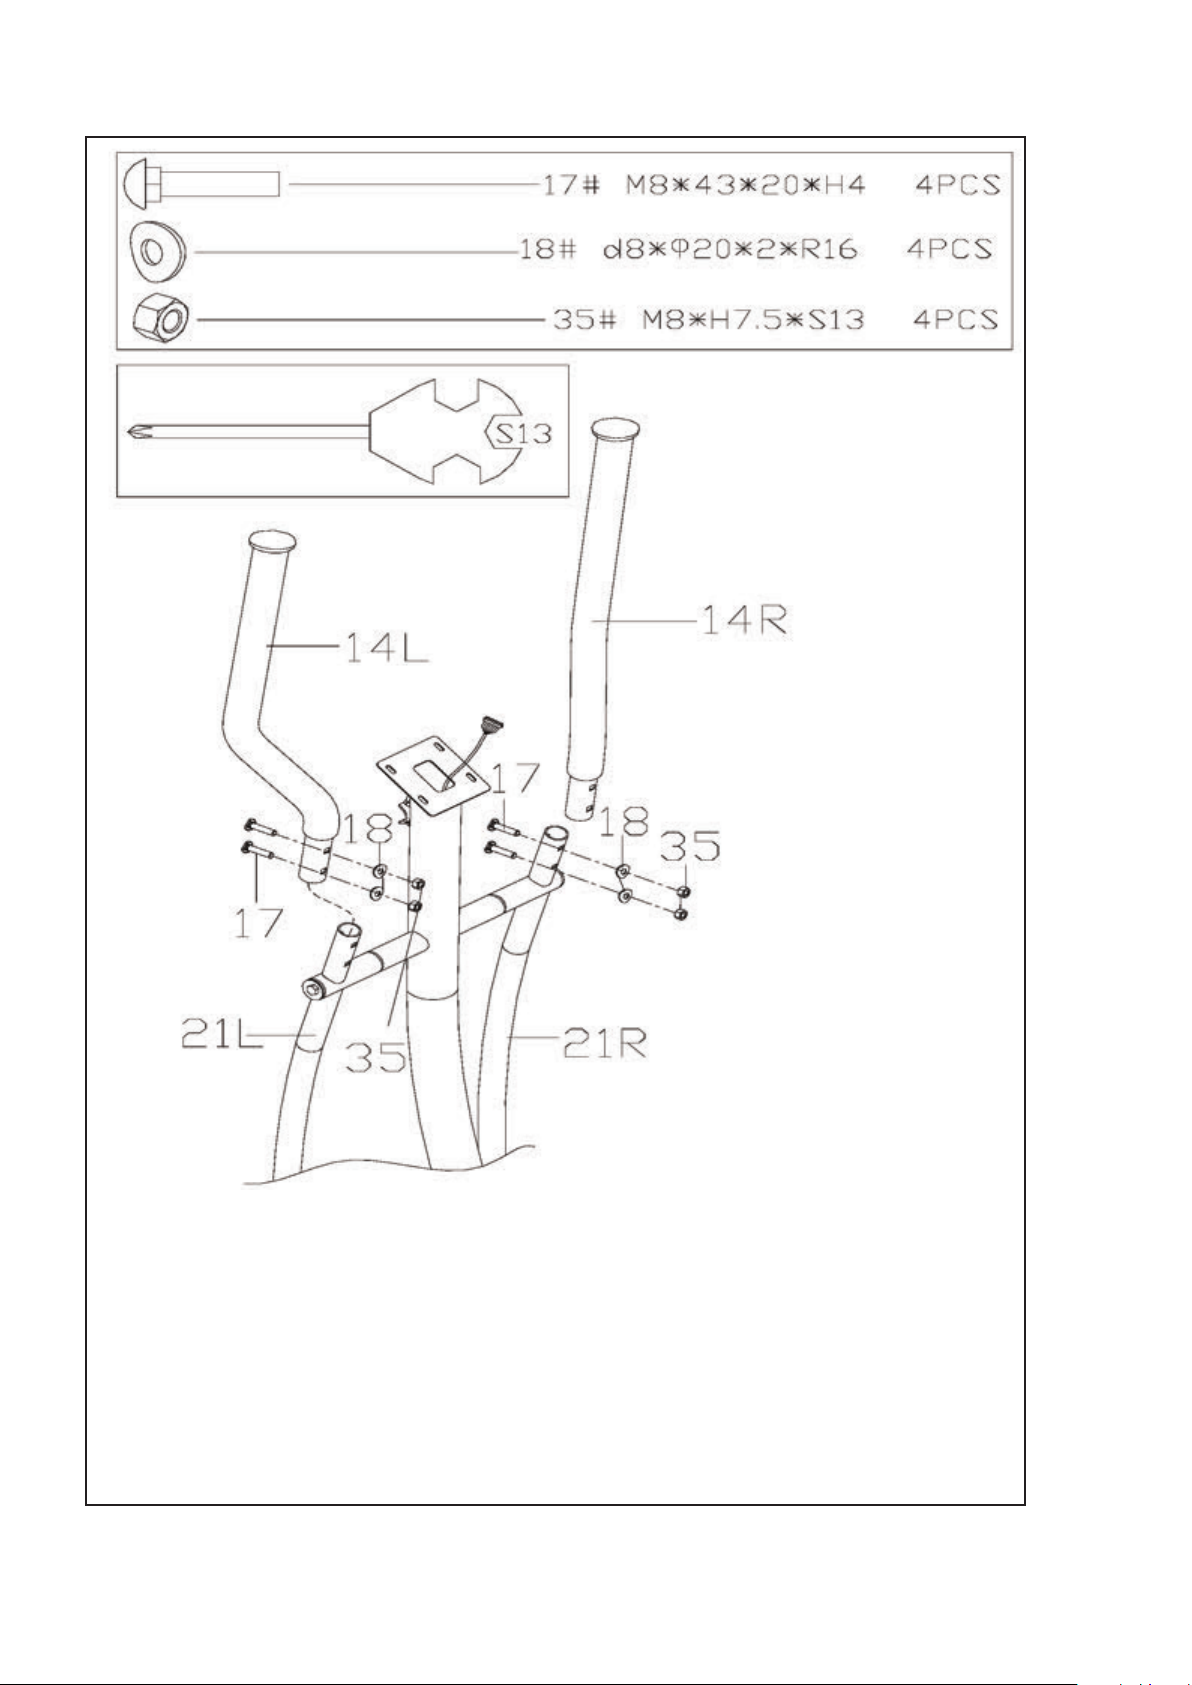
9. Osaluettelo / Parts list
Osa / Part
Quantity
4123 -1 Ohjainyksikkö Computer FY-8103 1
-2* Kädensuojat Foam for
-3 Sykesensorit käsille Handpulse sensor 2
-4 Tanko Fixed handlebar 1
-5 Päätytulppa End cap Ø25x16 2
-6 Aluslevy Washer Ø6xØ12x1.0 2
-7 Ristipääruuvi Crosshead screw ST4.0x19 2
-8 Jousialuslevy Spring washer Ø8 10
-9 Kuusiokoloruuvi Allen screw M8x30 2
-10 Tangon kiinnikkeen suoja Cover for
-11 Holkki Bushing 1
-12 Sykesensorin kaapeli Handpulse sensor cable 1
-13 Päätytulppa End cap Ø32xØ46x50 2
-14L Liikkuva tanko/vasen
-14R Liikkuva tanko/oikea
-15* Liikkuvan tangon kädensuoja Foam for mobable handlebar 2
-16L Tangon kiinnikkeen suoja/vasen/etu Cover for movable arm, left front side 1
-16R Tangon kiinnikkeen suoja/vasen/taka Cover for movable arm, left rear side 1
-17 Pultti Bolt M8x43 4
-18 Aluslevy Arc washer Ø20xØ8x2.0 4
-19 Kuusioruuvi Hex head screw M8x16 8
-20 Aluslevy Washer Ø8xØ32x2.0 2
-21L Liikkuvan tangon varsi/vasen Left movable arm 1
-21R Liikkuvan tangon varsi/oikea Right movable arm 1
-22 Holkki Bushing Ø32xØ28x21 8
-23 Aluslevy Arc washer Ø19xØ25x0.3 4
-24 Holkki Bushing Ø31.8xØ19.2x76 2
-25 Tangon/ohjainyksikön varsi Handlebar post 1
-26 Polkimen sovitin Joint for pedal arm 2
-27 Lukkomutteri Safety nut M10 2
-28 Ristipääruuvi Crosshead screw M5x10 4
-29 Ohjainyksikön yläkaapeli Upper computercable 1
-30L Tangon kiinnikkeen suoja/oikea/etu Cover for movable arm, right front side 1
-30R Tangon kiinnikkeen suoja/oikea/taka Cover for movable arm, right rear side 1
-31 Ristipääruuvi Hex head screw M8x75 2
-32 Holkki Bushing Ø14xØ8.3x59 2
-33 Holkki Bushing Ø32xØ28x16 4
-34 Aluslevy Washer Ø8xØ16x1.5 6
-35 Lukkomutteri Safety nut M8 6
-36 Muuntaja Adapter 8V, 500mA 1
-37 Aluslevy Arc washer Ø8xØ20x2.0 10
-38 Mutteri, käsin kierrettevä Grip screw 4
-39L Tukijalan pääty /vasen Transportation cap 1
-39R Tukijalan pääty /oikea Transportation cap 1
-40 Tukijalka / etu Front stabilizer 1
-41 Ruuvi Bolt M8x73 4
-42 Ristipääruuvi Crosshead screw ST3x10 2
-43 Ohjainyksikön alakaapeli Lower computer cable 1
-44 Aluslevy Arc washer Ø10xØ20x2.0 2
-45 Runko Main frame 1
-46 Kupumutteri Cap nut M8 4
-47 Tukijalan pääty /säädettävä Height regulation endcap 2
-48 Tukijalka /taka Rear stabilizer 1
-49 Ristipääruuvi
-50L Vasemman jalansijan suoja /etu/vasen Cover left pedal arm, left front side 1
-50R Vasemman jalansijan suoja /etu/oikea Cover left pedal arm, right front side 1
-51 Päätytulppa End cap 60x30x15 2
-52L Jalansijan tuki /vasen Left pedal arm 1
-52R Jalansijan tuki /oikea Right pedal arm 1
-53L Jalansija /vasen Left pedal 1
-53R Jalansija /oikea Right pedal 1
-54 Kuusiokoloruuvi Hexhead screw M8x45 4
-55L Oikean jalansijan suoja /etu/vasen
-55R Oikean jalansijan suoja /etu /oikea
-56 Lukkomutteri Safety nut M10 2
-57 Aluslevy Washer Ø10xØ32x2.0 2
-58 Ristipääruuvi Crosshead screw M5x10 4
-59L Vasemman jalansijan suoja /taka/ylä Cover left pedal arm, upper rear side 1
Left movable upper handlebar
Right movable upper handlebar
Crosshead screw
Cover right pedal arm, left front side
Cover right pedal arm, right front side
xed handlebar Ø23x5x500 2
xed handlebar 1
Koko/Dimension Määrä /
1
1
ST4.2x19 4
1
1
28
Page 30

-59R Vasemman jalansijan suoja /taka/ala Cover left pedal arm, bottom rear side 1
-60 Holkki Bushing Ø32xØ19.2x30 2
-61L Oikean jalansijan suoja /taka/ylä Cover right pedal arm, upper rear side 1
-61R Oikean jalansijan suoja /taka/ala Cover right pedal arm, bottom rear side 1
-62 Kuusioruuvi Hexhead scew M10x55 2
-63 Holkki Bushing Ø18xØ10.1x3 4
-64 Kiintoavain Wrench S13-14-15 1
-65 Kuusiokoloavain Allen Spanner S6 1
-66 Kiintoavain Wrench S13-14 1
-67 Kiintoavain Wrench S17-1 1
-68 Virtajohto Power line 1
-69 Muuntajan johto Resistance control cable 1
-70 Moottori Motor 1
-71 Ristipääruuvi Crosshead screw M5x16 4
-72L Kotelo /etu/vasen Housing front left side 1
-72R Kotelo /etu/oikea Housing front right side 1
-73L Kotelo /vasen Housing left side 1
-73R Kotelo/oikea Housing right side 1
-74 Vauhtipyörän suoja Cover for rotation wheel 1
-75 Vauhtipyörän kiinnikkeen suoja Screw cover for rotation wheel 2
-76 Mutteri Nut M10 2
-77 Vauhtipyörä Flywheel 1
-78 Mutteri Nut M10 2
-79 Silmäpultti Eyebolt M6 2
-80 Mutteri Nut 2
-81 U-kiinnike U-Bracket 2
-82 Mutteri Nut 2
-83 Ristipääruuvi Crosshead screw ST4.2x16 6
-84 Ristipääruuvi Crosshead screw ST4.2x18 9
-85 Ristipääruuvi Crosshead screw ST4.2x20 17
-86 Vauhtipyörän kiinnike Cross for rotation wheel 2
-87 Holkki Ring 1
-88 Kuulalaakeri Ball Bearing 6203-2RS 2
-89 Holkki Bushing Ø18Ø22x4 1
-90 Kuusioruuvi Hexhead screw M6x16 4
-91 Magneetti Magnet 1
-92 Vauhtipyörä Reive Wheel 1
-93 Hihna Belt 6PJ410 1
-94 Akseli Axel 1
-95 Lukitusmutteri Safety nut M6 4
-96 Välipyörän tuki Idler Rod 1
-97 Lukitusmutteri Safety Nut M8 2
-98 Kuusiokoloruuvi Allen Screw M8 1
-99 Aluslevy Washer Ø12Ø15x0.5 1
-100 Kuusioruuvi Hexhead screw M6x10 1
-101 Aluslevy Washer Ø6xØ16x1.5 1
-102 Välipyörä Idler Wheel 1
-103 Kuulalaakeri Ball Bearing 6001-2RS 2
-102 Välipyörä Idler Wheel 1
-103 Kuulalaakeri Ball Bearing 6001-2RS 2
-104 Silmäpultti Eyebolt M8x120 1
-105 Aluslevy Washer Ø8xØ25x2.0 1
-106 Jousi Spring 1
-107 Kuulalaakeri Ball Bearing 6001-2RS 1
-108 Mutteri Nut M8 2
-109 Joustoaluslevy Wavy Washer Ø12xØ15.5x0.3 1
Osat jotka ovat merkitty *-symbolilla ovat kuluvia osia,
joita joutuu tasaisin väliajoin vaihtamaan, mikäli käyttö
on aktiivista. Tässä tapauksessa olkaa ystävällisesti
yhteydessä maahantuojaan.
The part numbers with an * are wear and tear parts, which
are subject to natural wear and which must be replaced
after intensive or long-term use. In this case, please contact
Customer-Service.
29
Page 31

Page 32

 Loading...