

400x Digital Microscope
3-in-1 USB Digital Microscope
Instruction Manual
www.hamletcom.com

Dear Customer,
thanks for choosing a Hamlet product. Please carefully follow the instructions for its use and maintenance and, once this item
has run its life span, we kindly ask You to dispose of it in an environmentally friendly way, by putting it in the separate bins for
electrical/electronic waste, or to bring it back to your retailer who will collect it for free.
We inform You this product is manufactured with materials and components in compliance with RoHS Directive 2011/65/EU,
with WEEE Directives 2002/96/CE, 2003/108/CE Italian Legislative Decree 2005/151 and EMC Directive 2014/30/EU for the
following standards:
EN 55032: 2015
EN 55024: 2010 + A1: 2015
The complete CE declaration of conformity of the product can be obtained by contacting Hamlet at info@hamletcom.com
specifying the product code and the documentation.
The information on the importer for your country are available in the “About Us” section of the Hamlet website at
www.hamletcom.com.

CONTENTS
BEFORE USE
Important information
Care and maintenance
Warning
Product description
Computer requirements
PRODUCT AT A GLANCE
Package contents
Product overview
Product specication
GETTING STARTED
Software installation
Connecting the device
Starting the xploview software
BASICS
Battery Installation
Selecting a light source
Installing a specimen slide
Viewing Angle
Focusing
Zooming
Assembling the product
Taking a snapshot (when
observing with a computer only)
USING THE XPLOVIEW SOFTWARE
Button menu
Full screen viewing
Image rotation / ip
System settings menu
Device setup
Timed shot setup
Movie setup
Save setting
Language setting
Advanced settings
Saved les
Uninstalling the xploview software
4
4
4
4
5
6
7
7
8
9
10
10
11
11
12
12
13
14
15
16
17
18
18
19
19
20
21
22
23
23
23
24
24
25
26
26
3

BEFORE USE
Important information
Please read this instruction manual carefully before using this product, and retain
this instruction for future reference.
Improvements and changes to this text necessitated by typographical errors, or
improvements to the software and / or equipments may be made at any time
without notice.
Care and maintenance
Avoid vibration, shock and pressure e.g. dropping the microscope.
Keep the device dry and protect it from water or vapour.
Do not leave your device in a place with extreme high or low temperature.
Do not touch the device with a wet hand as it may damage the device, or
cause an electric shock to the user.
Do not use or store the device in dusty, dirty areas as its moving parts may be
damaged.
Do not use harsh chemicals, cleaning solvents or strong detergents to clean
the device. Wipe it with a soft cloth slightly dampened in a mild soap-andwater solution.
Warning
Do not attempt to open or dismantle the digital microscope.
4

Product description
This is a dual system (optical and digital) device. It can be used as a
conventional microscope by viewing through an eyepiece, as well as via a
computer through the digital camera adaptor.
The microscope has three objective lenses with magnication power of
50x, 100x and 200x respectively. With the built-in 2x zoom, the device can
magnies specimens up to 400x when viewing through an eyepiece.
By using the digital camera adaptor, specimens can be magnied by up to
780x on a 17" computer monitor. Snapshots and video capture function is
also available.
In addition, the microscope body can be detached from the microscope
stand and used as a handheld microscope.
5

Computer requirements
Windows based PC
Compatible operating Windows 10 (32 bit or 64 bit)
systems Windows 8 (32 bit or 64 bit)
Windows 7 (32 bit or 64 bit)
Windows Vista (32 bit or 64 bit)
Windows XP SP2, SP3
USB USB 2.0
Mac OS based PC
Compatible operating Mac OS X 10.5.6 - Mac OS X 10.11.x
systems
USB USB 2.0
6

7
PRODUCT AT A GLANCE
Package contents
Microscope (consists of Installation CD
microscope body and stand)
Digital camera adaptor User manual
Blank specimen slides x3 Dropper
Prepared slide with cotton swatch
Blank specimen slides cover x6 Tweezers

8
Product overview
1. Snap button
2. Optical zoom wheel
3. Objective lenses turret
4. Objective lenses
5. Stage clips
6. Specimen stage
7. Microscope base
8. Focusing knob
9. LED illumination
10. Storage drawer
11. LED switch
12. USB cable

9
Product specication
Connection type
Eective observation
area (without zoom)
Eective observation
area (with max zoom)
Magnication power
Illumination
Optics
Power supply
Sensor
Maximum snapshot
resolution
Maximum video
capturing resolution
Size
Weight
USB 2.0
Ø2.3mm (50x), Ø1.2mm (100x), Ø0.56mm (200x)
Ø1.2mm (100x), Ø0.6mm (200x),
Ø0.28mm (400x)
Through eyepiece: 50x-100x, 100x-200x,
200x-400x
100x-180x, 190x-350x, 415x-780x
on a 17" monitor
Two LEDs
3-objective turpet, 2x optical zoom
5V 250mA (via USB) or 3 x 1.5V AA alkaline
batteries
CMOS
1600 x 1200 pixels (UXGA)
640 x 480 pixels (VGA)
112mm x 134mm x 252mm
380 grams (not including batteries)

10
GETTING STARTED
Software installation
Windows based PC
Insert the supplied application CD to the CD-ROM of the computer.
Double click the "xploview v3.2.xx.exe" icon < > located on the driver
CD.
Follow the xploview setup wizard to install the application software for the
digital microscope.
Mac OS based PC
Insert the supplied application CD to the CD-ROM of the computer.
Double click the "xploview v3.2.xx.dmg" icon < > located on the driver CD.
Drag the xploview icon < > into the Applications folder.

11
Connecting the device
Connect the device to the computer using the USB cable provided.
Starting the xploview software
Windows based PC
The xploview software can be launched by double clicking the xploview icon
< > from the desktop, or from the start menu.
Mac OS based PC
The xploview software can be launched by double clicking the xploview icon
< > from the Applications menu.
When the device is connected to the computer for the rst time, a driver
will automatically be installed by Windows or Mac OS. This process could
take up to a few minutes.
Each time when the xploview software is started, the device should start up
automatically. Otherwise, the device can be selected from the device setup
section of the system settings menu.
12
BASICS
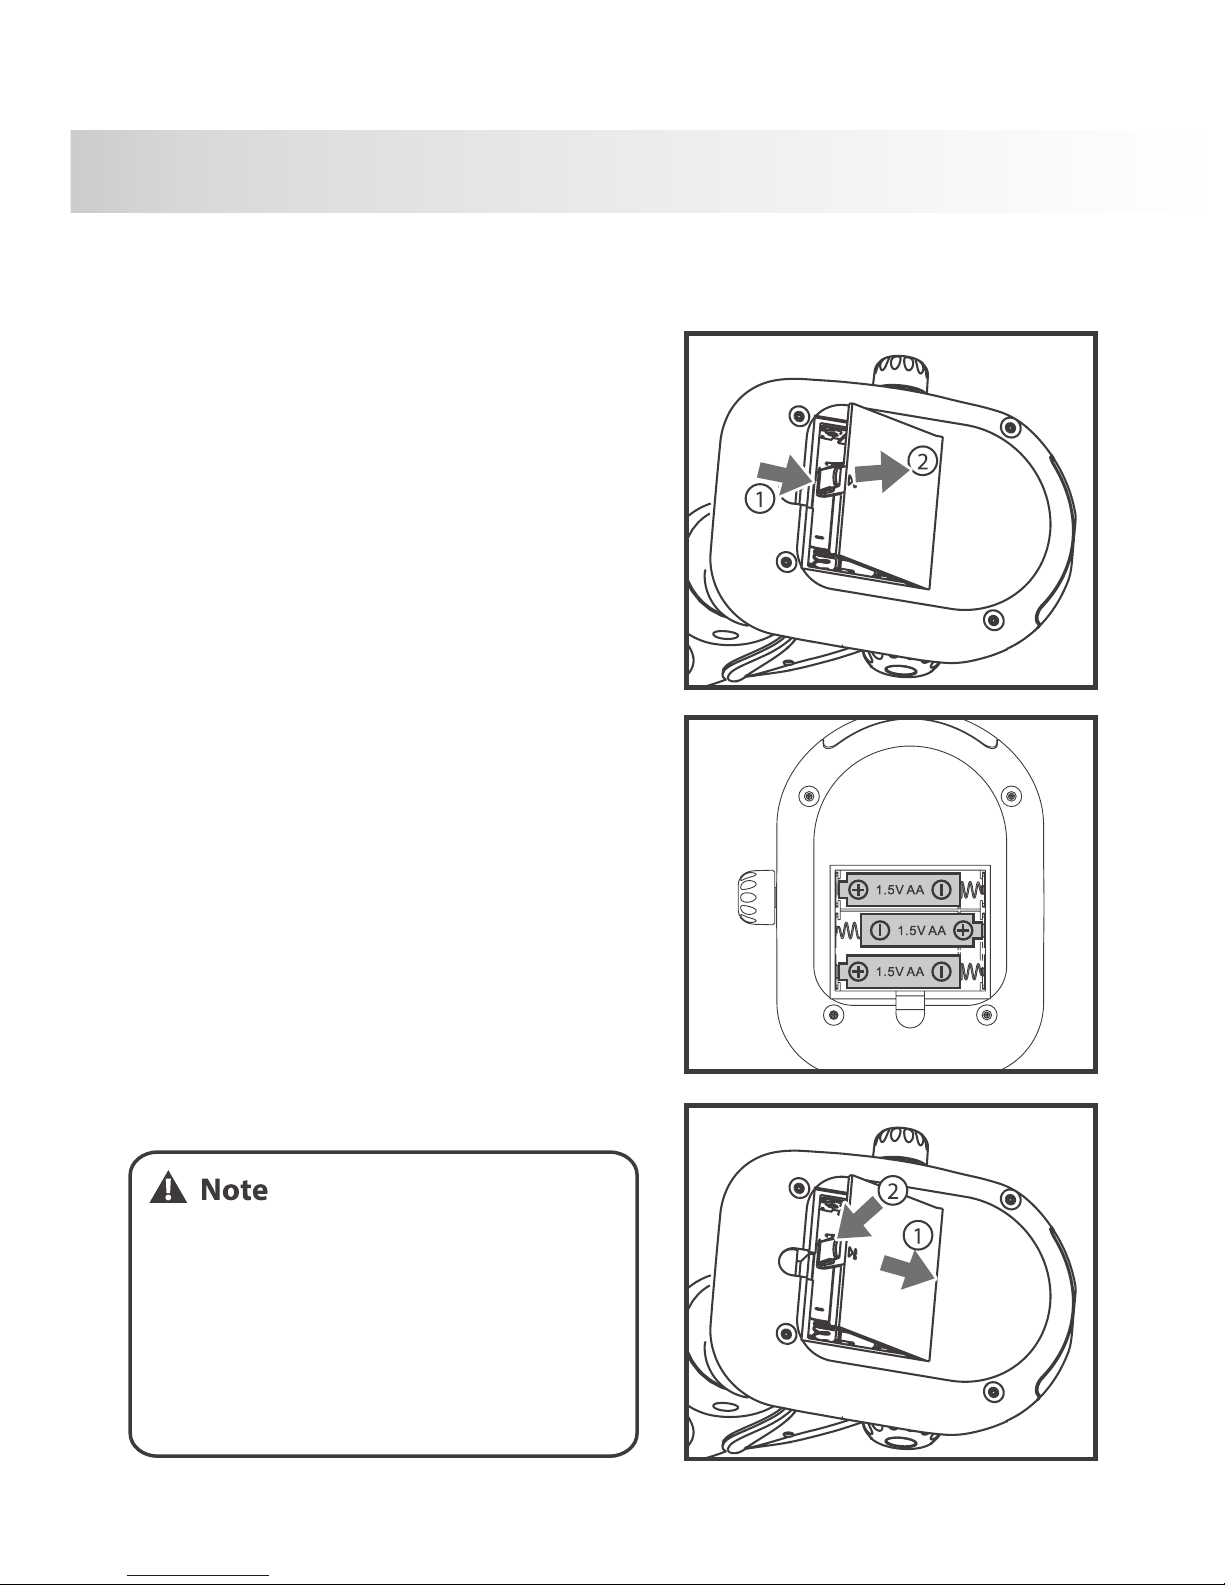
Battery Installation
Open the battery compartment door,
located at the bottom of the microscope
base, by lifting and pushing the
compartment door latch in the direction
shown in the diagram below.
Install 3 x AA alkaline batteries with the
correct polarity shown inside the battery
compartment.
Replace the battery compartment door.
Do not mix dierent types of batteries or new and
used batteries; do not charge non-rechargeable
batteries; for rechargeable batteries, only charge
rechargeable batteries under adult supervision
and remove rechargeable batteries from the
product before being charged; remove exhausted
batteries from the product; do not short circuit
the supply terminals.
13
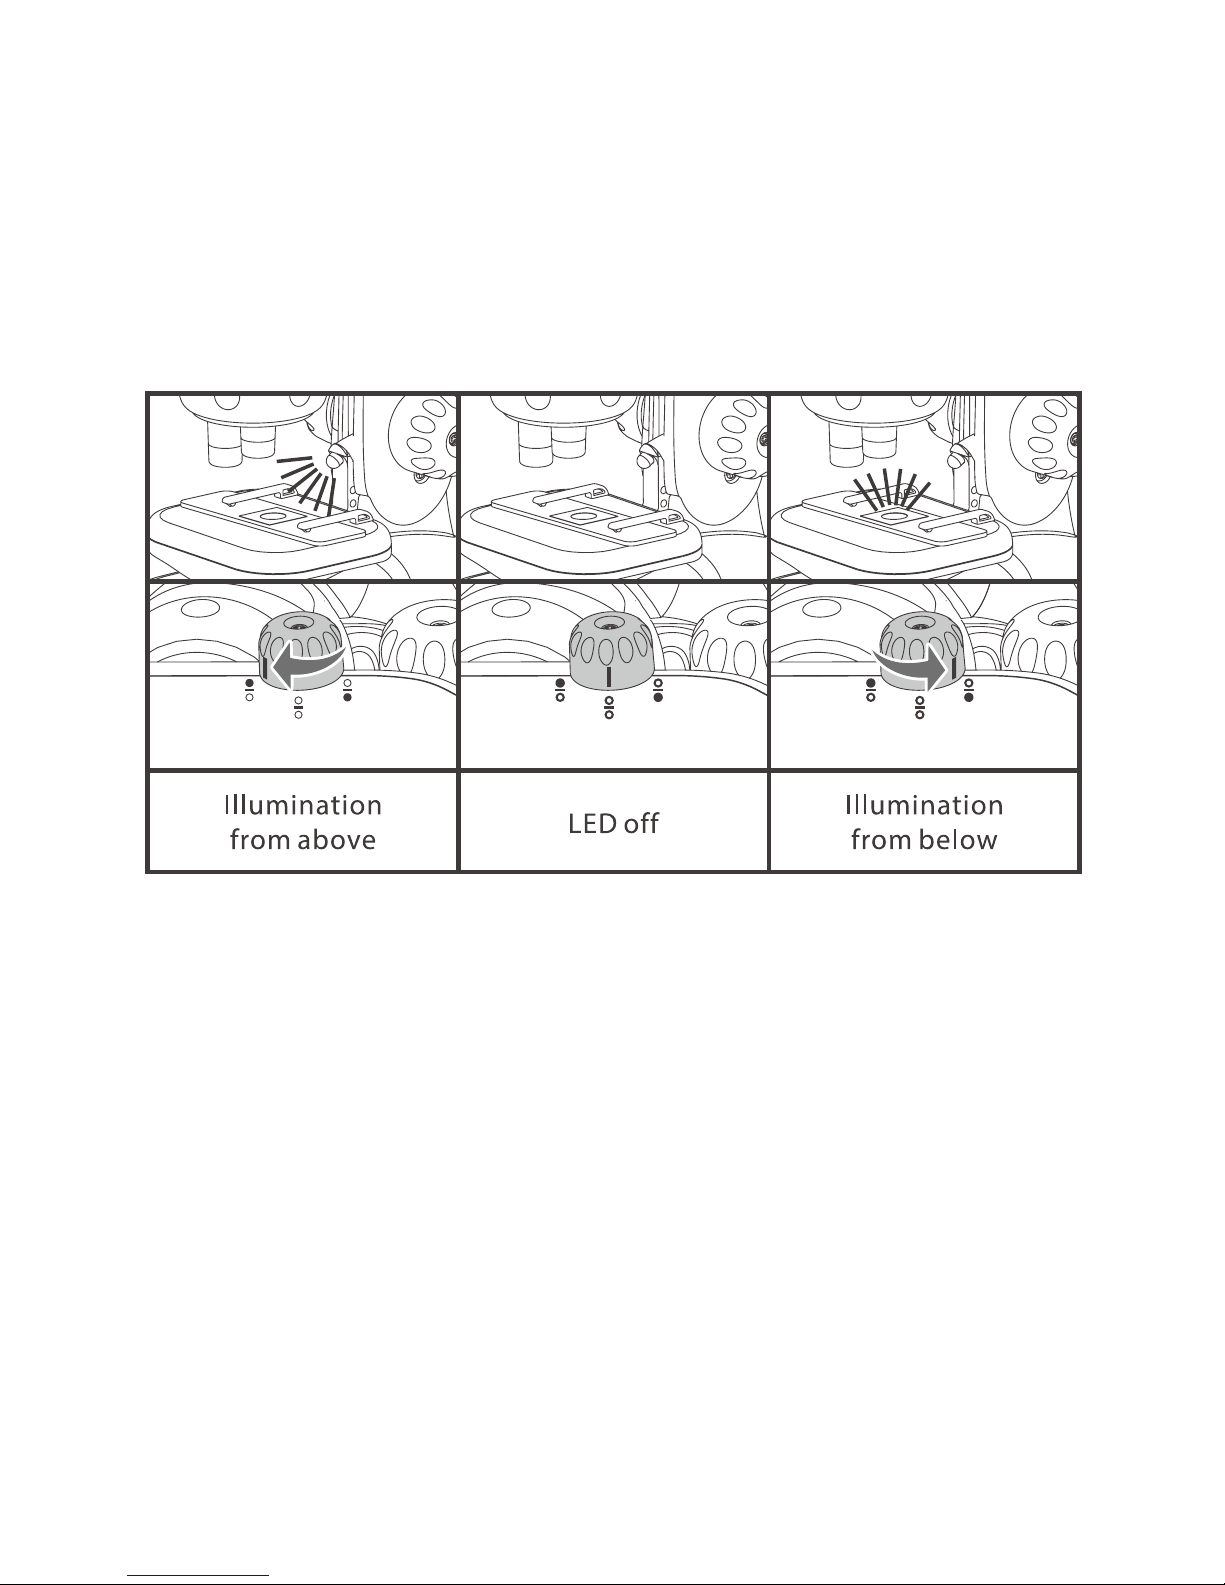
Selecting a light source
There are two LED illumination sources on your microscope, one above the
specimen stage and one below the specimen stage. You may select one of them
at a time by rotating the LED switch to an appropriate location. The illumination
modes are shown in the diagram below.

14
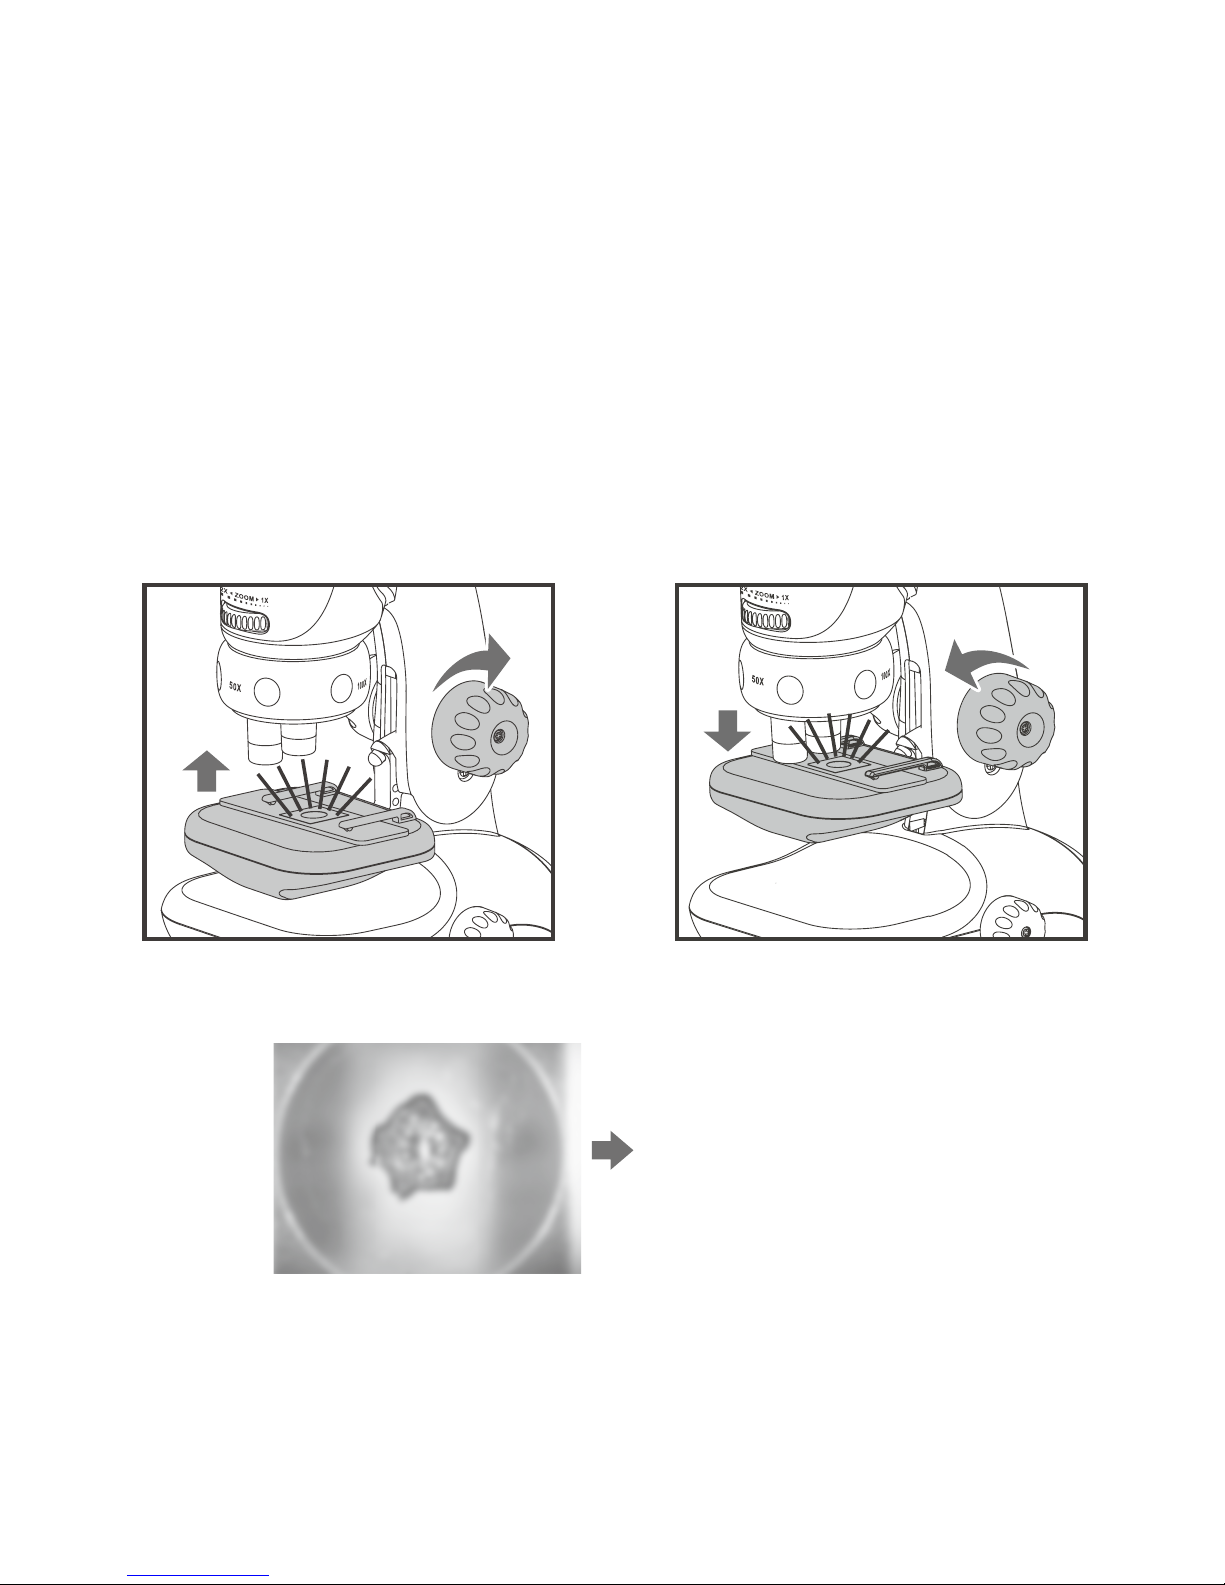
Installing a specimen slide
Rotate the focusing knob counterclockwise to fully lower the specimen
stage.
Place a specimen slide on the specimen
stage and secure the slide with the stage
clips.
Rotate the objective lens turret to
obtain the desire magnication power.
It is recommended to start from a
magnication power of 50x.

15
Rotate the focusing knob clockwise to
raise the specimen stage towards the
objective lens as far as you can but avoid
collision with the objective lens.
Viewing Angle
For your comfort when using the microscope, the microscope stand column can
be adjusted backwards for approximately 30° from vertical. Explore this feature
to obtain a suitable, comfort viewing angle.
Collision between your specimen slide and an
objectivelens may cause damage to your specimen
and the objective lens.
16
Focusing
Focusing is carried out by rotating the focusing knob. It is recommended you
follow the following steps.
Rotate the focusing knob clockwise to raise the specimen stage towards the
objective lens as far as you can but avoid collision to the objective lens.
While viewing through the eyepiece or using digital camera adaptor, rotate the
focusing knob counter-clockwise to lower the specimen stage until you see a
clear image. You may also need to move the specimen slide to locate the desire
area of examination.

17
Zooming
If you require a higher magnication power, rotate the optical zoom wheel to
zoom into the image. After zooming into the image, you may require to readjust
the focus.

18
Assembling the product
Slide in the digital camera adaptor onto the microscope for observation on
a computer monitor. Always start at 50x magnication before zooming in or
turning to a higher magnication.
Taking a snapshot (when observing with a computer only)
Press the snapshot button to take a snapshot.

19
USING THE XPLOVIEW SOFTWARE
Button menu
The icons on the button menu :
Open System Settings Menu (see system settings menu on
page 22).
Capture on screen image.
To start and to stop Timed Shot. Images will be captured at a
regular interval (see system settings menu on page 23 to adjust
frequency and duration).
To start and to stop Video Recording.
Information of the application software. This information
maybe helpful when updating software.
Shut down the application software.
20
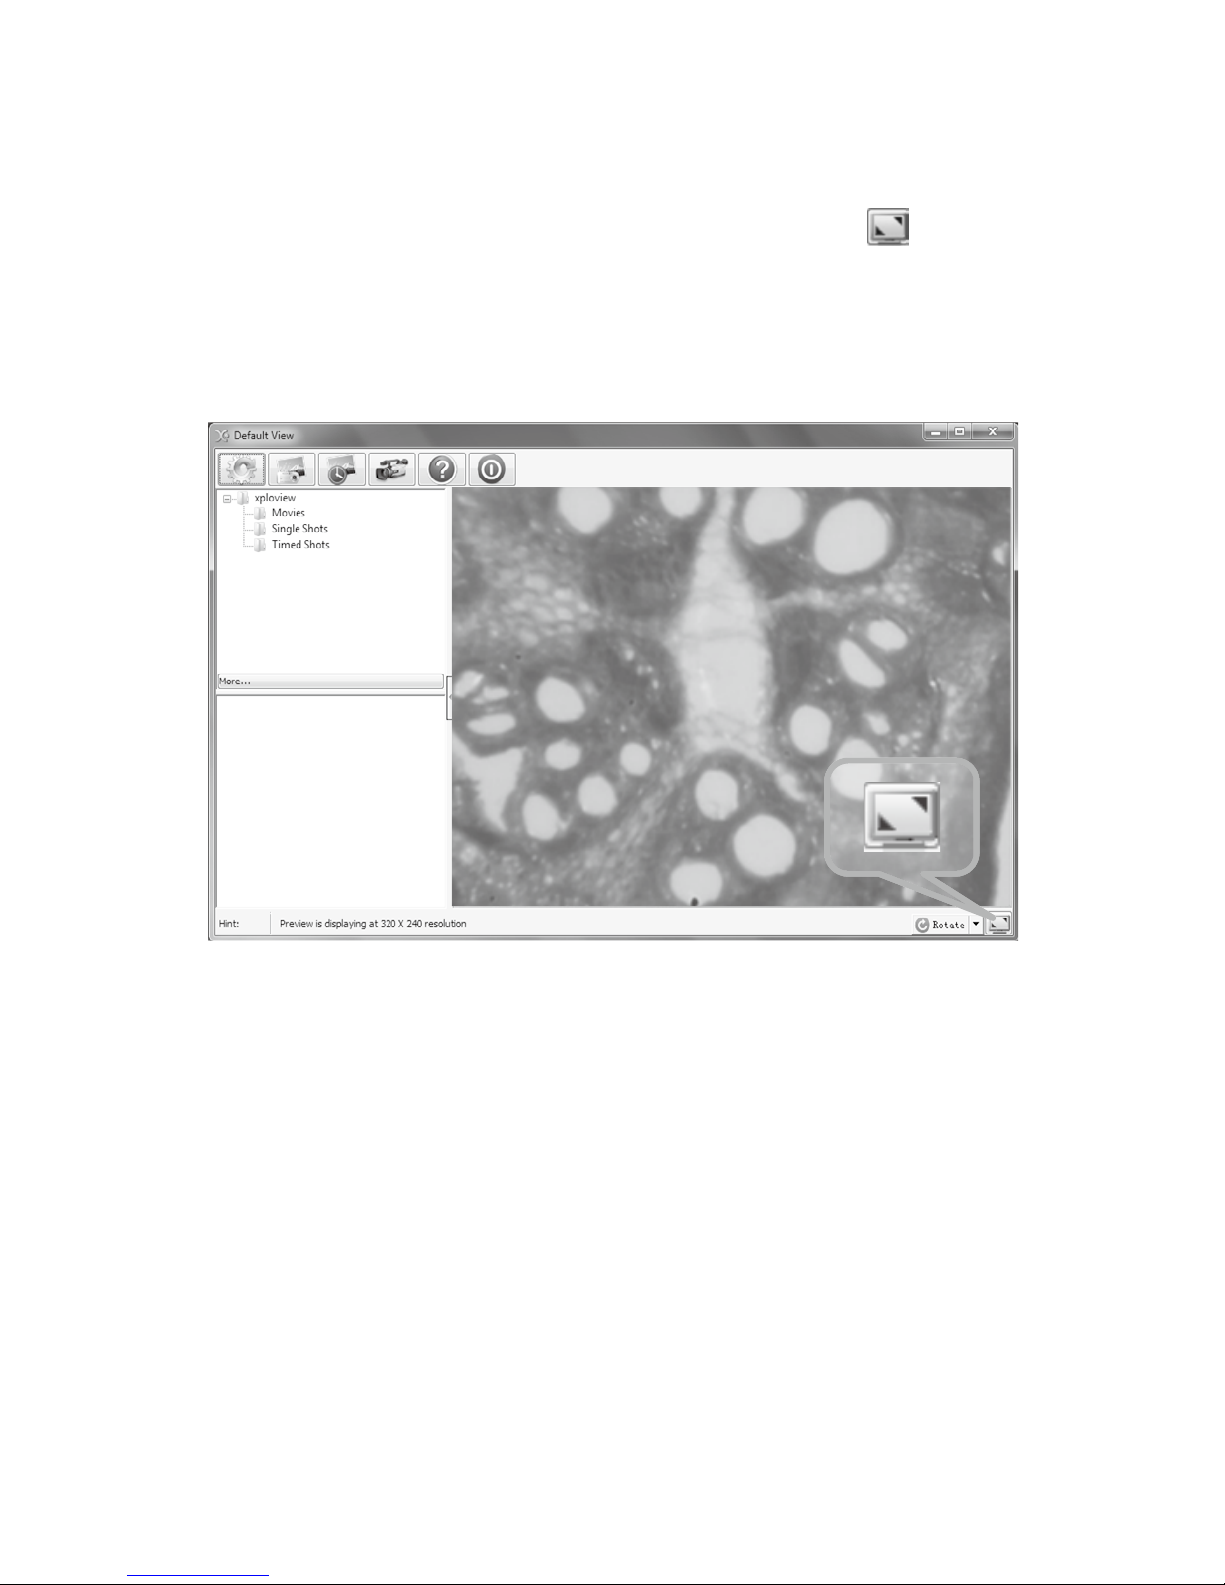
Full screen viewing
To activate the full screen mode, click the full screen button < > located on
the bottom right corner of the xploview application software window.
To exit full screen mode, either double click on the screen, or press the "Esc"
button on the keyboard.

21
Image rotation / ip
Click < > button to rotate or ip the image.

22
System Settings Menu
The rst time the xploview software is started, the default settings will be loaded,
you may change these settings manually in the system settings menu.

23
Device setup
If the image captured by the digital microscope was not displayed by default,
you can change this by selecting it from the "Device" drop-down menu.
The resolution of images you capture can be changed from the "Resolution"
drop-down menu.
Timed Shot setup
The frequency and duration of automatic images capture can be adjusted under
this option.
Movie setup
The resolution of videos you record can be changed from the "Resolution" menu.
You can also set a maximum le size for each video.

24
Save setting
The default location for captured images or videos can be changed under this
option.
Language setting
The language of the xploview software can be changed under this option.
25
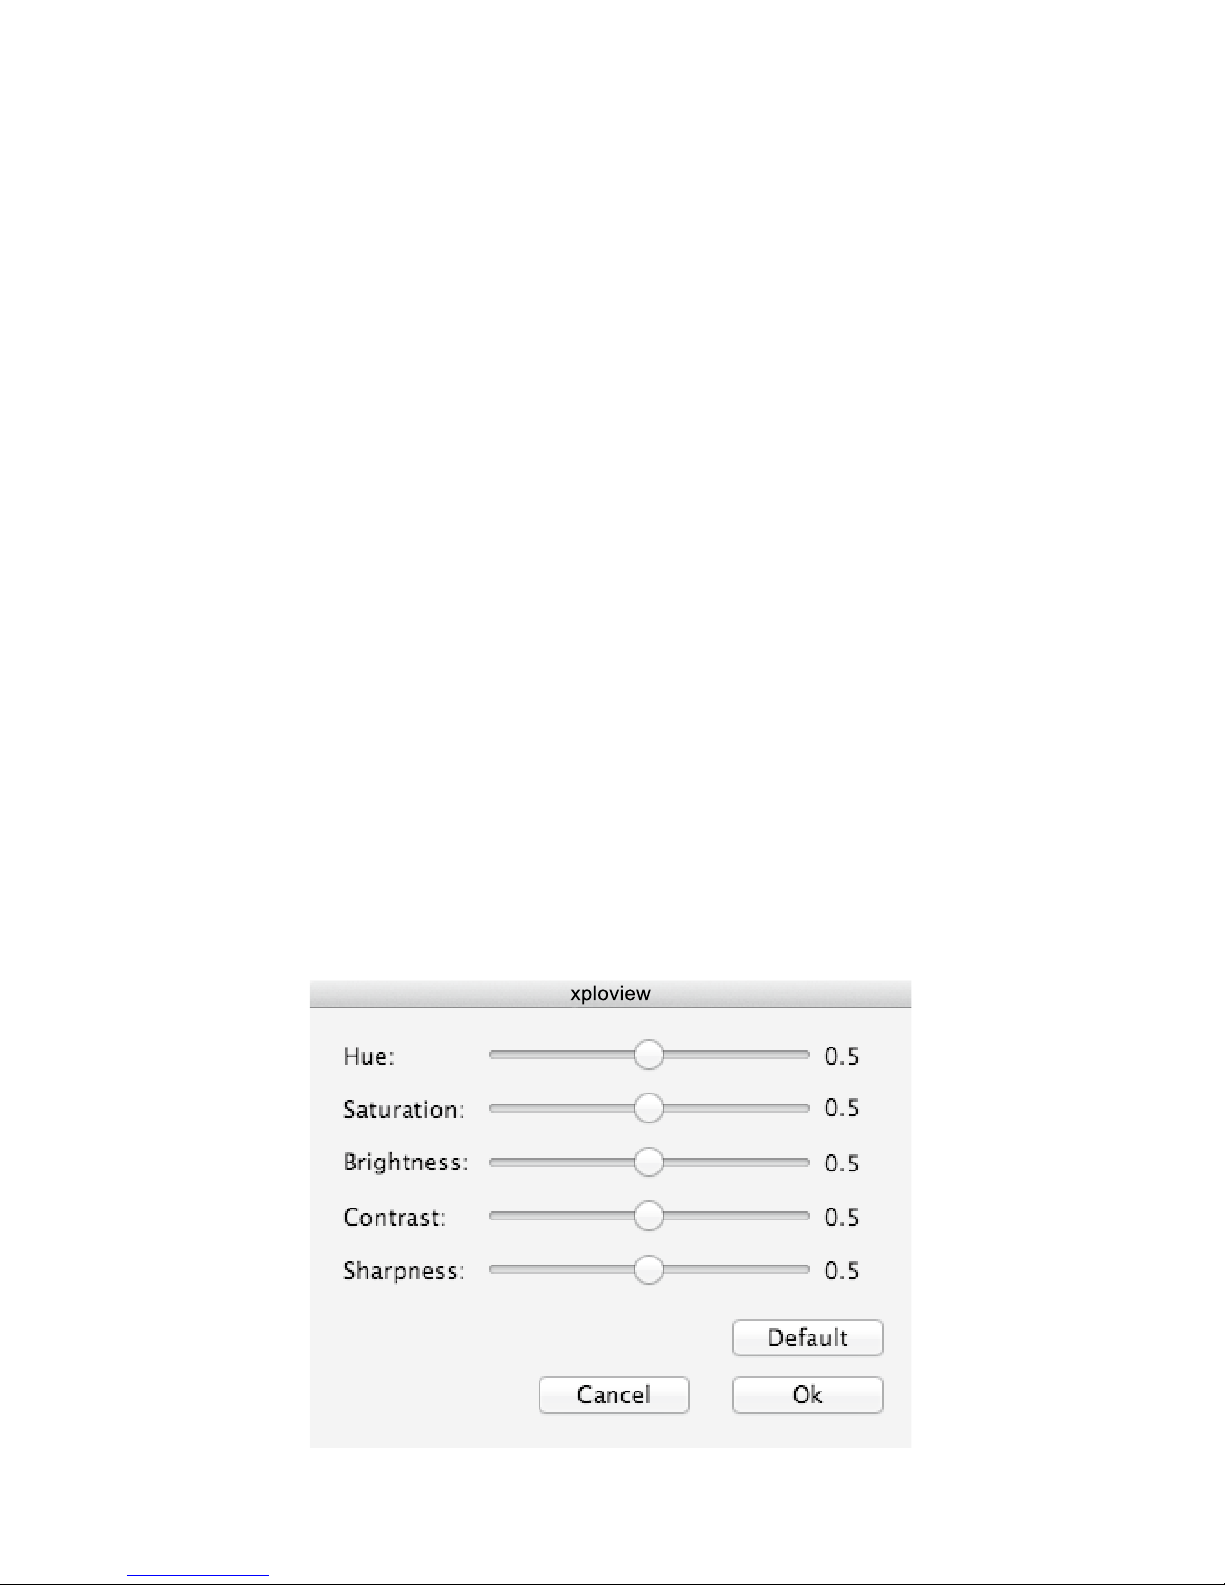
Advanced settings
By clicking the "More..." button on the right of the system settings menu, you
will be able to manually adjust all of the image settings. Note that the settings
available may be dierent, depending on your operating system.
Windows based PC
Mac OS based PC

26
Saved les
With the xploview application software opened, you can locate the saved les
folder by clicking the "More..." button located on the left of the main software
window.
Uninstalling the xploview software
Windows based PC
Select "Uninstall" from the start menu (Start > All Programs > xploview >
Uninstall).
Mac OS based PC
Drag the xploview application icon from the "Applications" folder to "Trash".

27

FCC compliance statement (United States only)
This device complies with part 15 of the FCC Rules. Operation is subject to the following two conditions: (1) This device may
not cause harmful interference, and (2) this device must accept any interference received, including interference that may
cause undesired operation.
Changes or modications not expressly approved by the party responsible for compliance could void the user’s authority to
operate this device.
This device has been tested and found to comply with the limits for a Class B digital device, pursuant to part 15 of the FCC
Rules. These limits are designed to provide reasonable protection against harmful interference in a residential installation.
This device generates, uses and can radiate radio frequency energy and, if not installed and used in accordance with the
instructions, may cause harmful interference to radio communications. However, there is no guarantee that interference will
not occur in a particular installation. If this device does cause harmful interference to radio or television reception, which can
be determined by turning the equipment o and on, the user is encouraged to try to correct the interference by one or more
of the following measures:
— Reorient or relocate the receiving antenna.
— Increase the separation between the equipment and receiver.
— Connect the device into an outlet on a circuit dierent from that to which the receiver is connected.
— Consult the dealer or an experienced radio / TV technician for help.
Legal information
This document is published without any warranty. While the information provided is believed to be accurate, it may include
errors or inaccuracies. In no event shall the manufacturer or its distributors be liable for incidental or consequential damages
of any nature, including but not limited to loss of prots or commercial loss, arising out of the use of the information in this
document.
All rights reserved. Mac, Mac OS and OS X are trademarks of Apple Inc., registered in the U.S. and other countries. Windows is
a registered trademark of Microsoft Corporation in the United States and other countries. All other trademarks and brands are
property of their respective owners.
BP10271
 Loading...