

Hamilton Beach Commercial HMD300, HMD300-CE Manuel de service
840206801
1/12
Batteur de
boisson
Manuel d’utilisation
Page 11
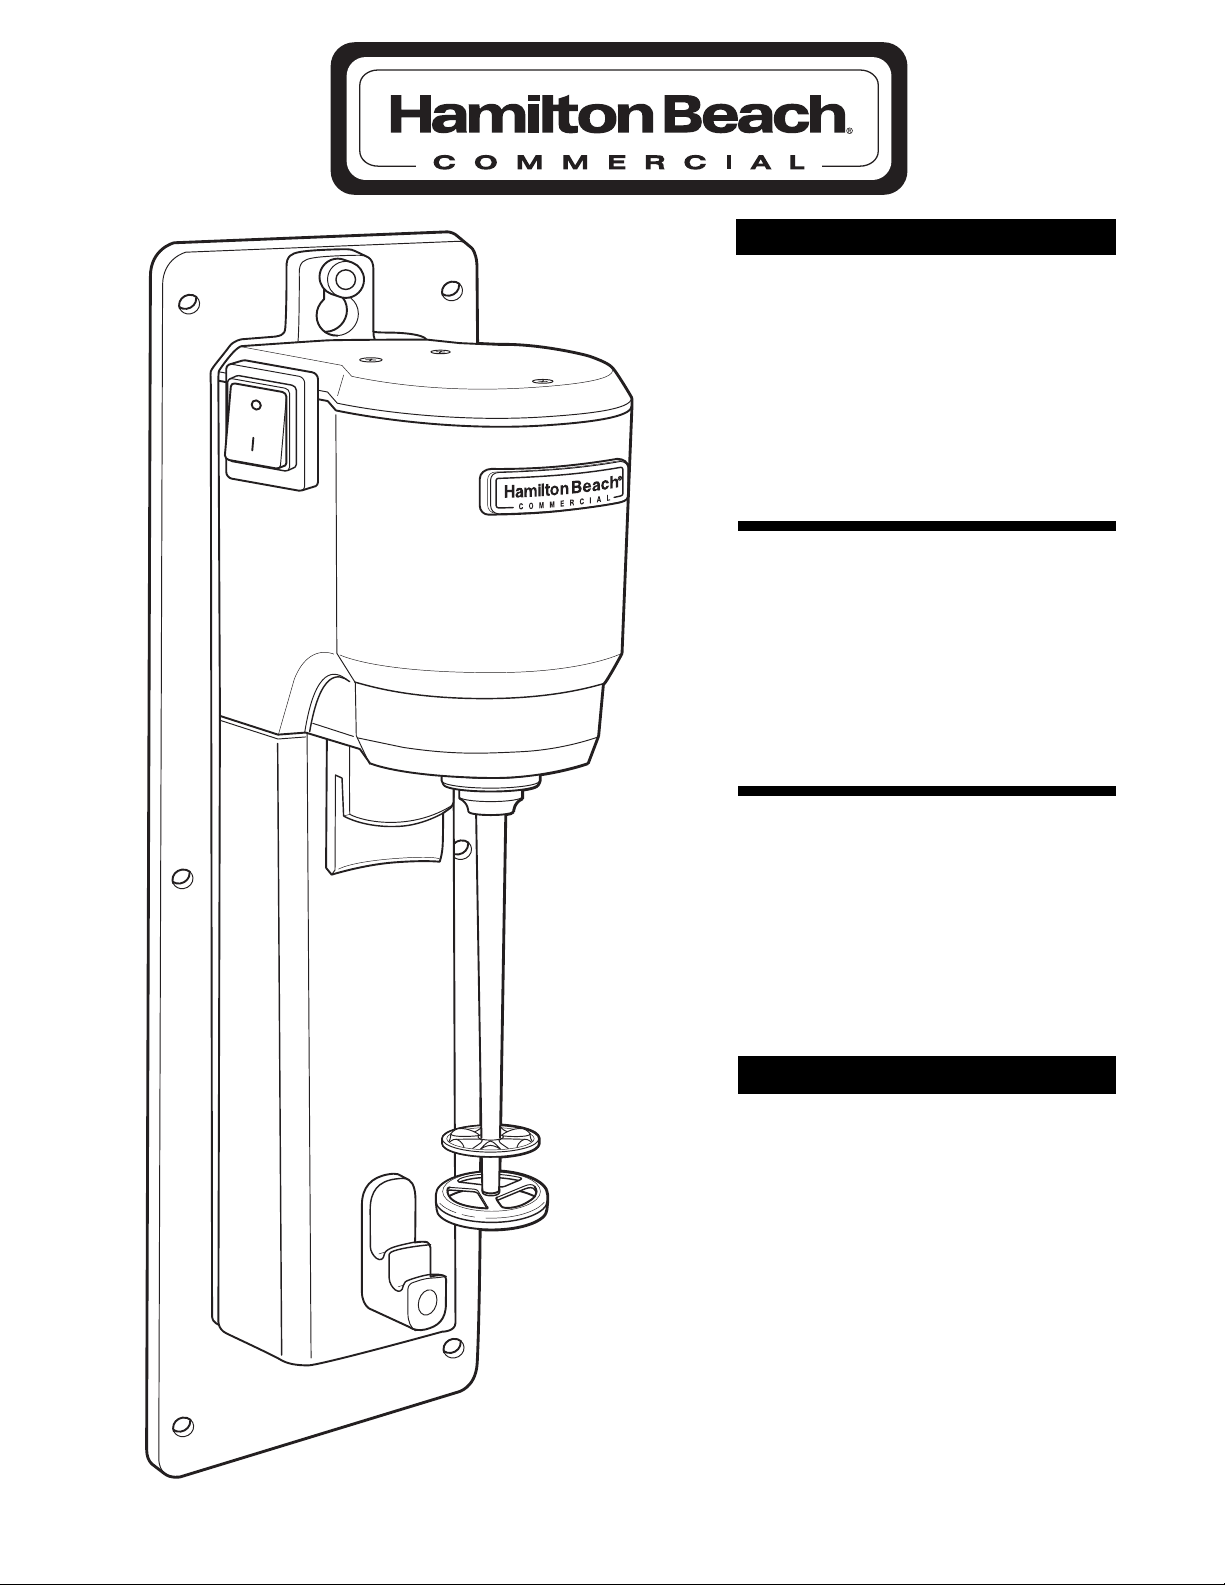
Drink Mixer
Operation Manual
Page 2
Batidora de
Bebidas
Manual de Uso
Página 21
READ BEFORE USE.
LIRE AVANT D’UTILISER.
LEA ANTES DE USAR.

2
Mixer Safety
IMPORTANT SAFETY INSTRUCTIONS
WARNING – When using electrical appliances, basic safety precautions should be followed to reduce
the risk of personal injury, including the following:
– SAVE THESE IN STRUC TIONS –
• Read all instructions before using mixer.
• Disconnect power before cleaning or servicing,
and before installing or removing agitator.
• Do not spray or submerge mixer.
• Do not operate the mixer with a damaged or
bent shaft or agitator. Contact technical service
for replacement of any damaged components.
• Do not put spoon or other utensils in container
when mixing.
• Do not allow agitator to hit container sides
when mixing.
• Inspect mixer and agitator daily.
• Replace agitator(s) every 90 days.
• Do not operate any appliance with damaged
wiring or after the appliance malfunctions or is
damaged in any manner.
For assistance or replacement parts, call our
Technical Service number:
866-285-1087 or 910-693-4277
8:00 a.m. – 5:00 p.m. EST Monday – Friday
www.commercial.hamiltonbeach.com
Technical Service
IMPORTANT: This operation manual should be reviewed with all equipment operators as part of your
operator training program.
You can be killed or se ri ous ly injured if you don’t
follow instructions.
Your safety and the safety of oth ers is very important.
We have provided many important safety messages in this manual and on your appliance.
Always read and obey all safety messages.
This is the safety alert symbol.
This symbol alerts you to hazards that can kill or hurt you and others.
All safety messages will be preceded by the safety alert symbol and the word “WARNING.”
This word means:
All safety messages will identify the hazard, tell you how to reduce the chance of injury, and tell you what
can happen if the instructions are not followed.
wWARNING
3
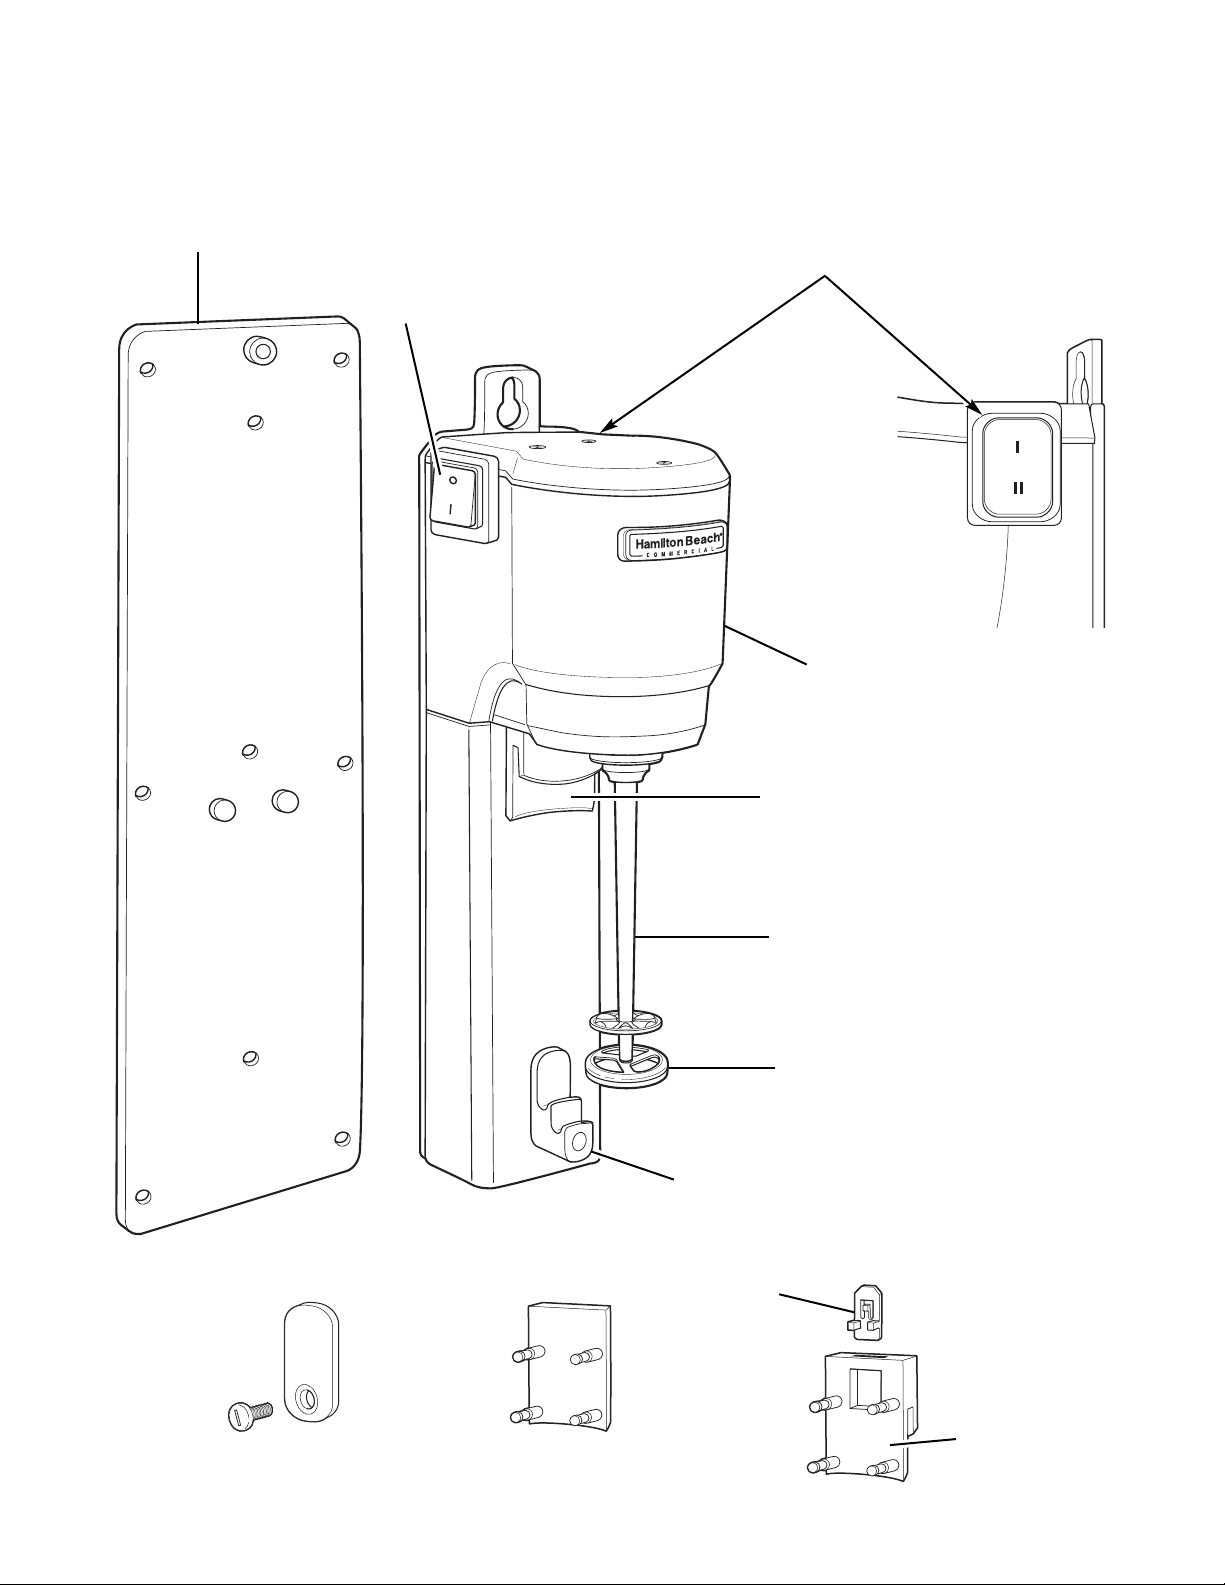
Parts and Features
The parts and features of your mixer are shown on this page. Be come familiar with all parts and features before
using the mixer.
Speed Selector Switch
LOW (I)/HIGH (II)
Agitator
Container Rest
Mounting Bracket
ON (I)/OFF (O) Switch
Mixing Spindle
Container Guide
Housing
ON/OFF
Actuator
Container
Guide
Container Guide
Housing Plug
Container Rest
Housing Plug
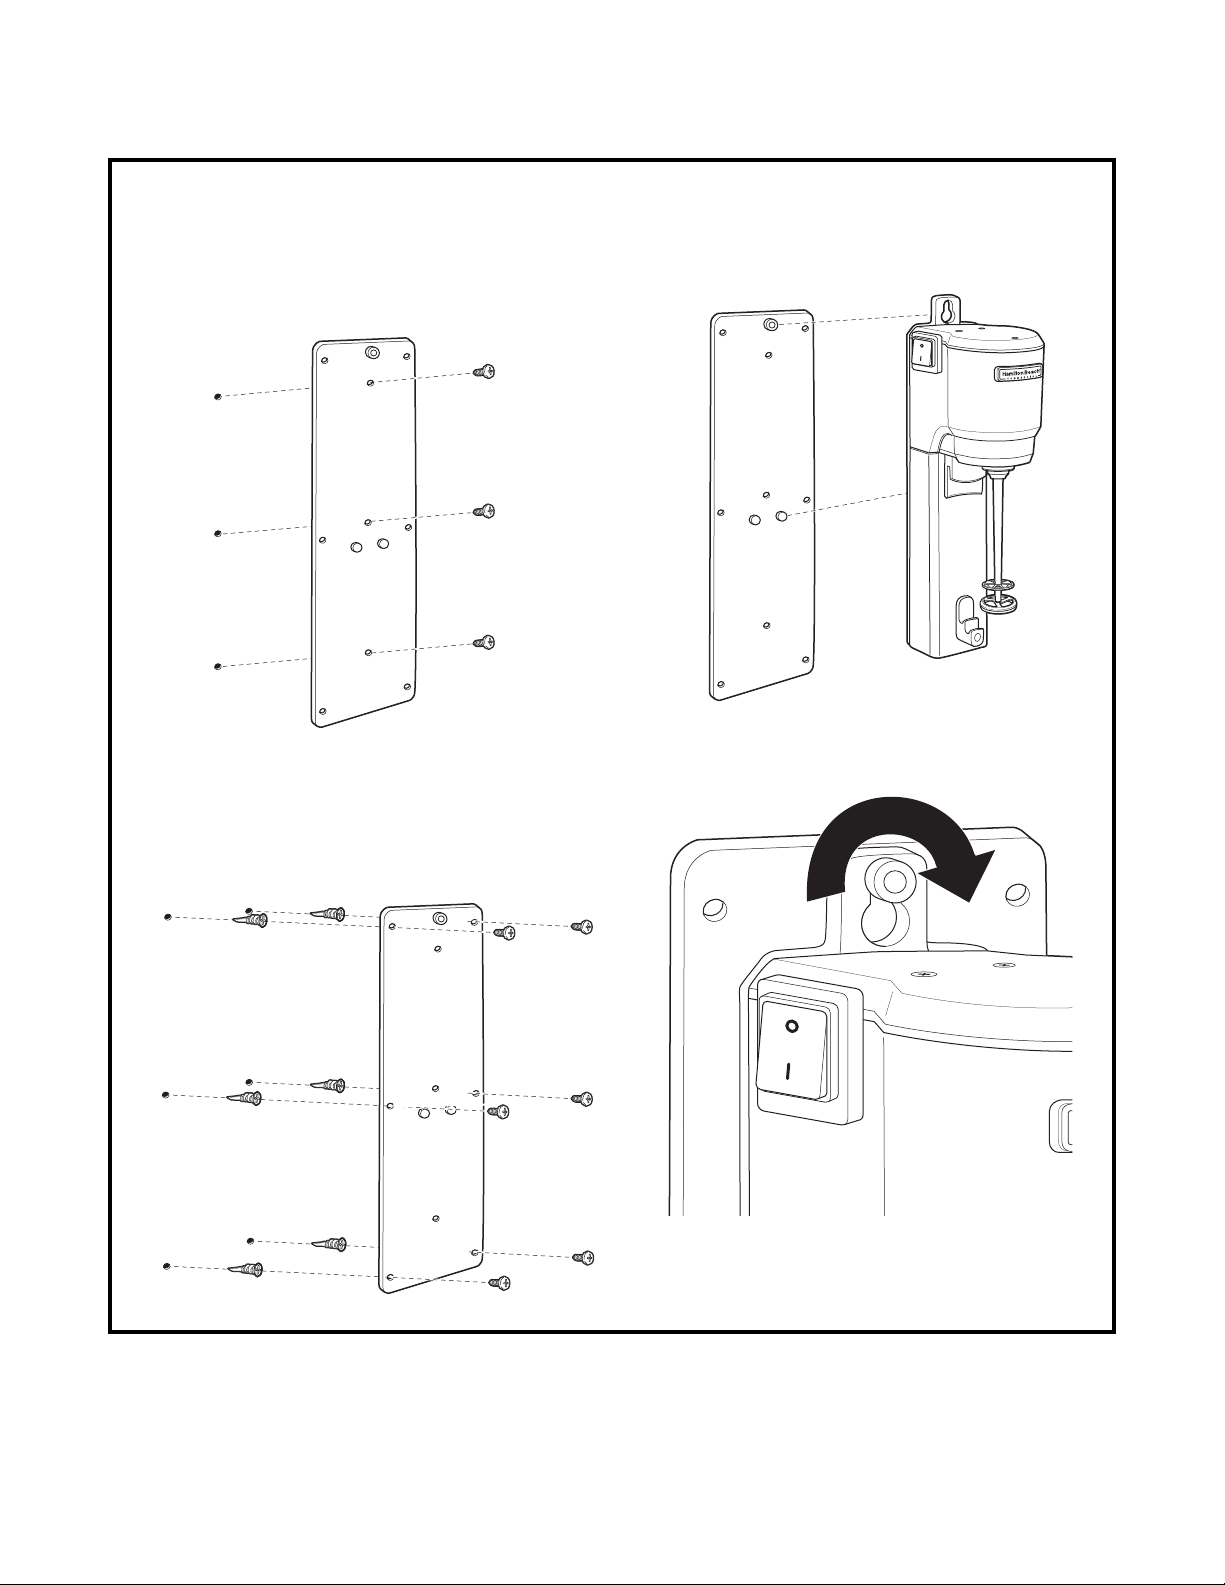
4
1. Remove mounting bracket from the back of the
mixer.
2a. If mounting directly into a wall stud, drill 5/32"
pilot holes and then screw three of the screws
provided through the three centered holes on
the mounting bracket.
2b. If mounting into drywall, drill 1/4" pilot
holes and then insert the six drywall anchors
provided into the wall. Align the six holes on
the outside of the mounting bracket with the
drywall anchors, and then screw six of the
screws provided through the holes.
3. Place drink mixer back onto mounting bracket
by inserting posts back into the appropriate
holes on the back of the mixer and sliding the
mixer down to lock into place.
4. Tighten the thumbscrew at the top of the
mounting bracket to secure the mixer.
Installation
5
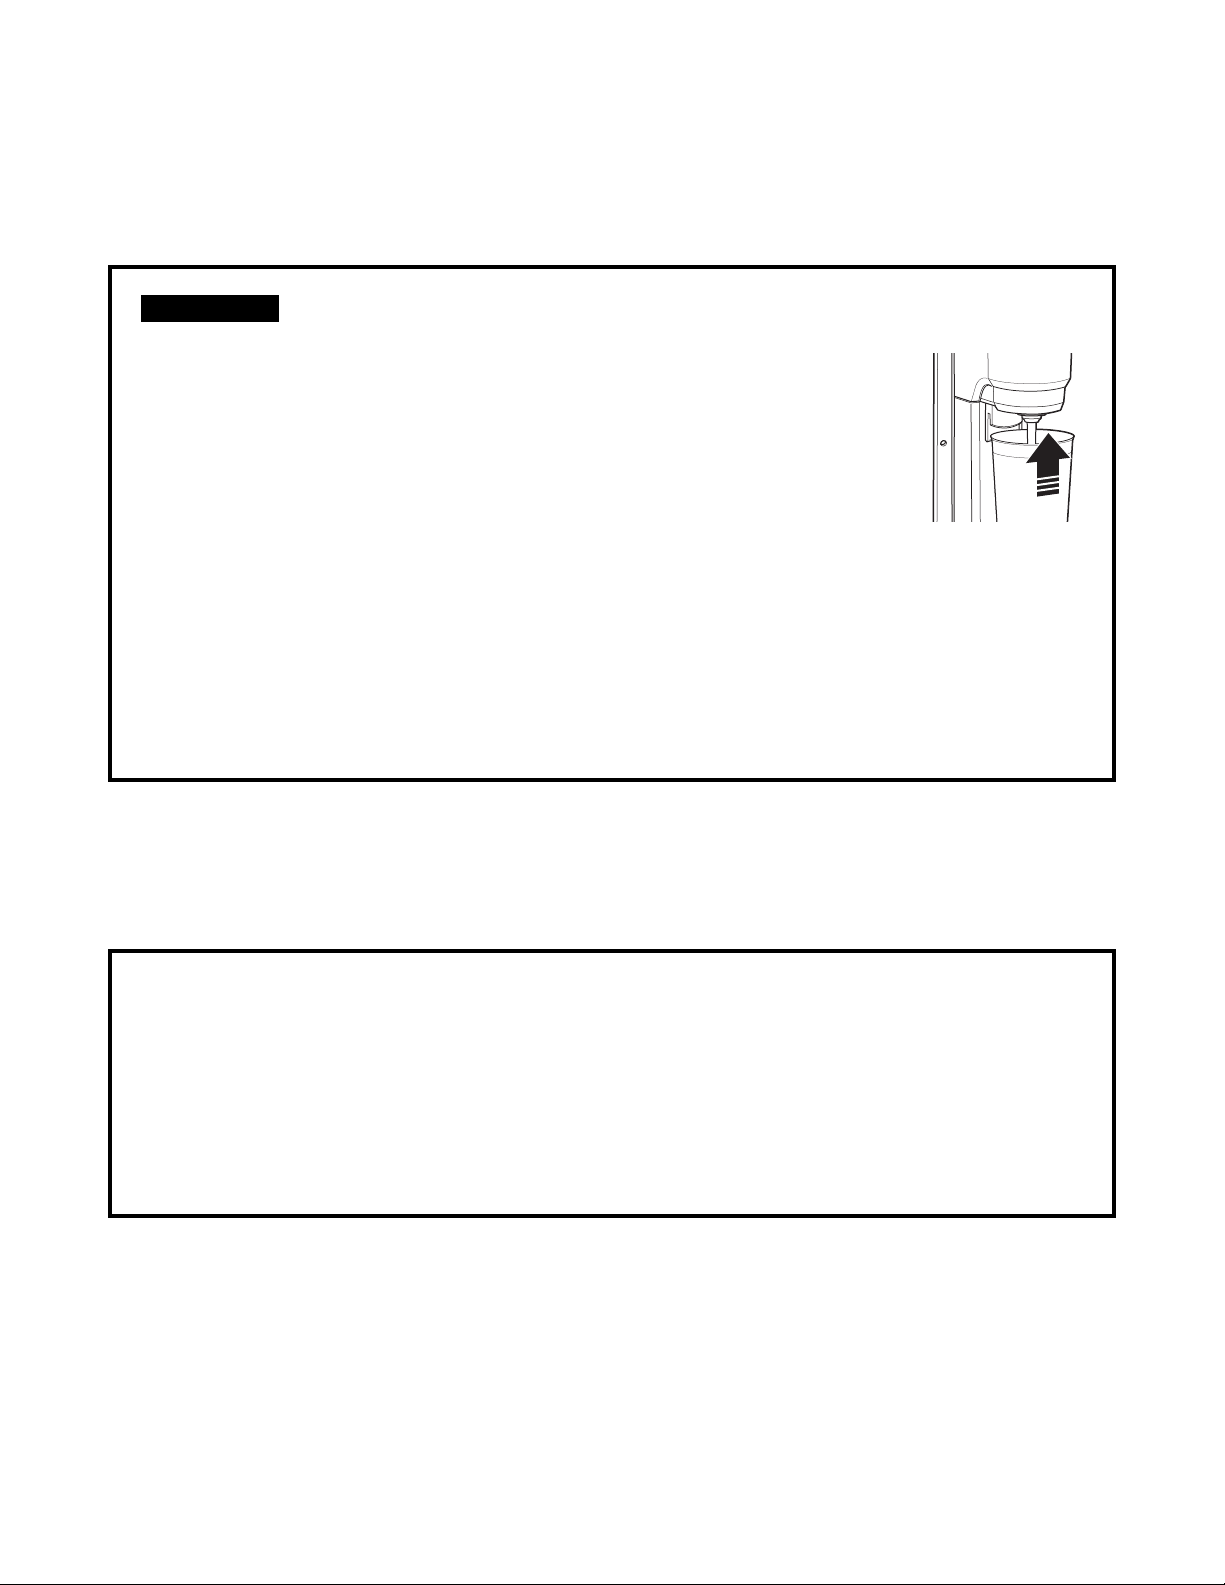
3. Select the desired speed using the two-speed
selector switch.
4. Position the container into
the container guide and
move the cup upward to
automatically turn the
motor on. Set the container
down onto the cup rest.
NOTE: You may also turn
the motor ON (I) and OFF
(O) using the pulse switch.
5. When the drink is completely mixed, lift the
container up off the cup rest and pull down
from the container guide. The motor will turn off.
NOTE: Inspect agitator(s) daily. Replace
agitator(s) every 90 days.
Mixing a Drink
You must read the “Mixer Safety” section before
using the mixer.
For best mixing results, use the Hamilton Beach
Universal Container (#110E). Do not use a paper
cup. The container fits the container guide which
starts the motor.
1. Plug mixer into a grounded outlet.
2. Place the ingredients into the container.
The basic milkshake recipe is:
• 3 No. 24 scoops of ice cream
• 4 ounces of very cold milk
•11⁄2ounces of syrup
Mixing a Drink
Operating the Mixer
Using the Container Rest
Two-Position Container Rest
The top container rest position is used when
mixing with a standard container. In the top
position, a standard container will fit into the
container guide to lift the ON/OFF actuator
against the actuator switch, allowing the motor
to run. To turn off the motor, rest a standard
container on the lower, or standby, container
rest position.
The lower container rest position may also be used
when mixing with larger containers, or for storing
standard containers when the mixer is not in use.
NOTE: When container is not positioned as
described above, you may also turn the motor on
using the pulse switch.
Cut Hazard.
Do not put spoon or other utensils in container
when mixing. Failure to follow these instructions
can result in cuts.
w WA RNING
6
Operating the Mixer
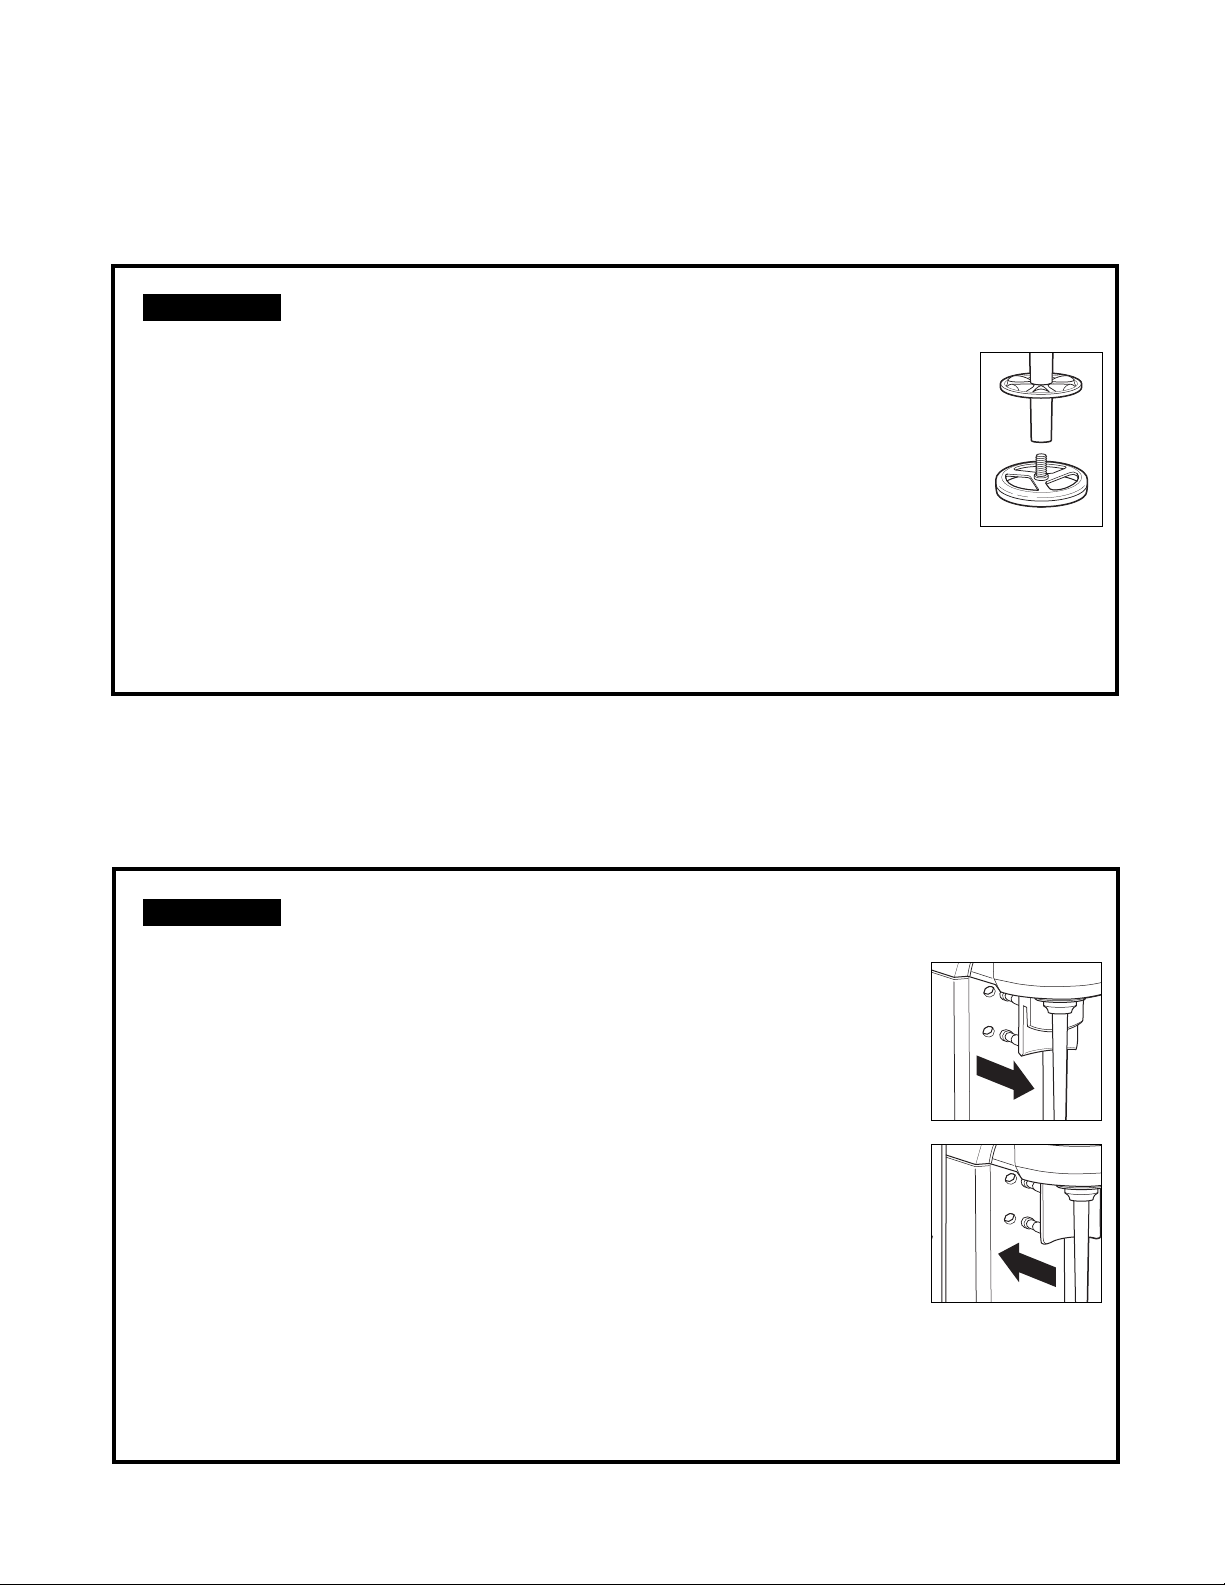
Replacing the Agitator
To replace the agitator:
1. Disconnect power to the mixer.
2. To remove the agitator, loosen
the screw by turning it counterclockwise with a straight-blade
screwdriver.
3. To install the new agitator, turn
the screw portion of the agitator
clockwise into the spindle and
hand-tighten. To prevent damage
to the agitator, do not use pliers
to grip agitator blades while
tightening or loosening. If necessary, pliers
may be used to hold the shaft during removal.
4. Reconnect power to the mixer.
Your mixer was shipped with an agitator installed
on the spindle.
NOTE: Agitators wear with use. Inspect
agitators daily and replace every 90 days.
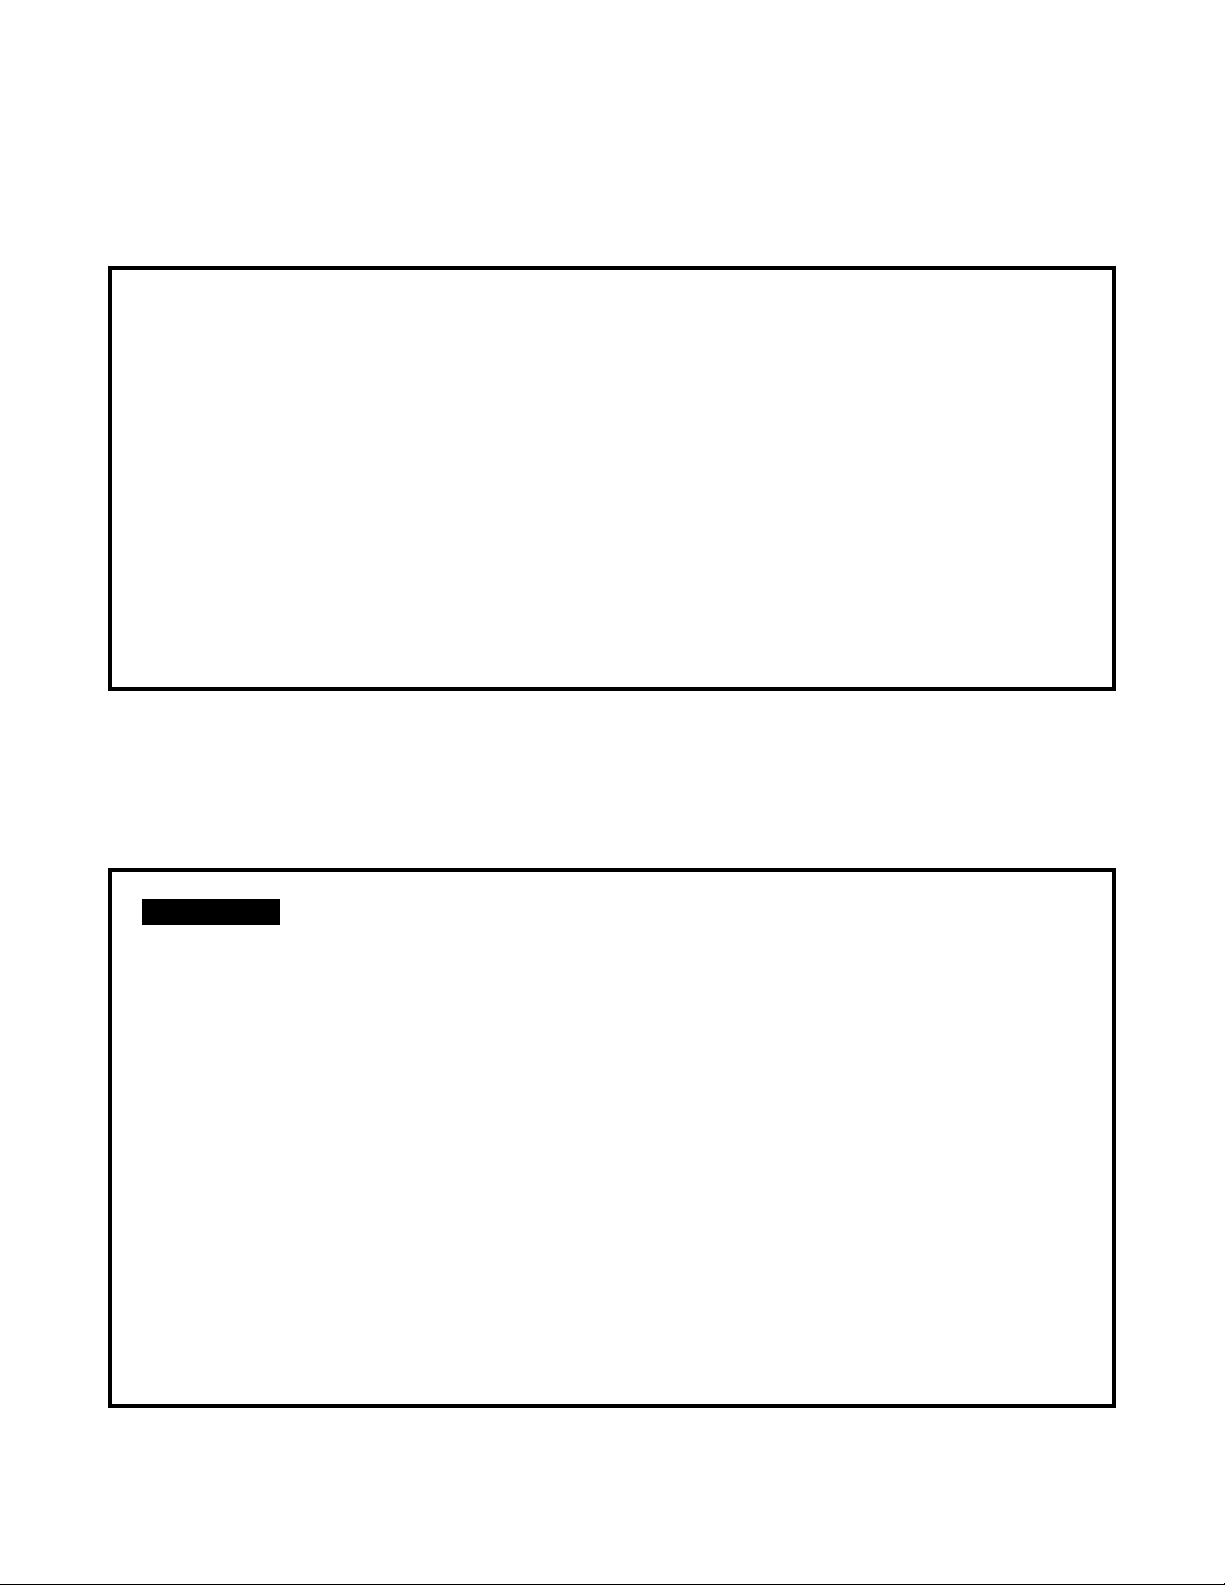
Removing/Installing the Container Guide, ON/OFF Actuator, and Housing Plug
To remove the container guide and ON/OFF actuator:
1. Unplug mixer.
2. Pull container guide straight
out.
3. To remove the plastic
ON/OFF actuator, press the
retainer clip and slide it out
of the container guide.
4. To replace, make sure mixer
is in an upright position, align
the four posts on the back of
the container guide with the
four holes on the mixer, and
press into place.
NOTE: You may also operate
the mixer without the container
guide and ON/OFF actuator.
Snap the included housing plug into the container
guide holes after removing the container guide. Use
the toggle switch to operate the mixer when using
the mixer without the container guide/ON/OFF
actuator.
The container guide and ON/OFF actuator are
removable for easy cleaning.
Cut Hazard.
Disconnect power before installing or removing
agitator. Failure to do so can result in serious
injury or cuts.
w WA RNING
Cut Hazard.
Disconnect power before installing or removing
any parts. Failure to do so can result in serious
injury or cuts.
w WA RNING
7
Cleaning and Sanitizing the Container, Spindle, and Agitator
Cleaning
1. Place a drop of detergent and 1 cup of water
into a mixing container.
2. Position the container under the mixing spindle
and mix on low speed (I) for 5 seconds. Empty
the mixing container.
3. Place 1 cup of clean water into a container and
repeat mix for 5 seconds to rinse.
NOTE: Inspect agitator(s) daily. Replace agitator(s)
every 90 days.
Sanitizing
For best results, use the Hamilton Beach Universal
Container (#110E).
1. Fill the container with sanitizing solution
(1 tablespoon [15 ml] of household bleach per 1
gallon of water at 50°–70°F [10°–21°C]) to 3⁄4full.
Position the container under the mixing spindle
and run on low speed (I) for 1 minute.
2. Remove container. Empty sanitizing solution and
rinse container.
3. To dry, run the mixer on low speed (I) for 30
seconds with empty container in place. DO NOT
RINSE after sanitizing is completed.
NOTE: If preferred, the container and agitator may
be cleaned in a dishwasher.
Care and Cleaning of the Mixer
Cleaning the Container Guide,
Container Rest, and Housing
1. Unplug mixer.
2. Remove the container guide (see page 6).
3. Wash the container guide with hot, soapy water;
then rinse.
4. Clean the housing, front panel, and container
rest with a damp, soapy cloth.
5. Wipe dry with a clean, soft cloth.
6. Reinstall the container guide.
NOTE: Do not spray or submerge the mixer.
Any resulting water damage will not be covered
by the warranty.
7. Plug mixer into a grounded outlet.
Cleaning the Container Guide, Container Rest, and Housing
Electrical Shock Hazard.
Disconnect power before cleaning. Failure to do
so can result in death or electrical shock.
w WA RNING
8
5. Carefully lower the
new motor assembly
into the housing,
guiding the spindle
through the hole in the
housing. Align the keyed
portion on the rubber
support with the slot in
the top cover. Attach a
new agitator as described
in “Replacing the Agitator.”
6. Plug the two halves of
the plug connector
together, ensuring that
all lead wire colors
match, and tuck the
connector into the back
of the housing. Make
sure that the side clips on the plug halves
engage. NOTE: The plug will only connect
together in one way.
7. Make sure that all wires are out of the way and
that they cannot come in contact with the motor.
Also ensure that the Mylar insulating barrier is
correctly positioned. Then lower the cover into
place, making sure that the upper tab and seal
of the back panel are in place below the lip of
the cover. Secure the cover with the screws.
8. Reconnect power to the mixer.
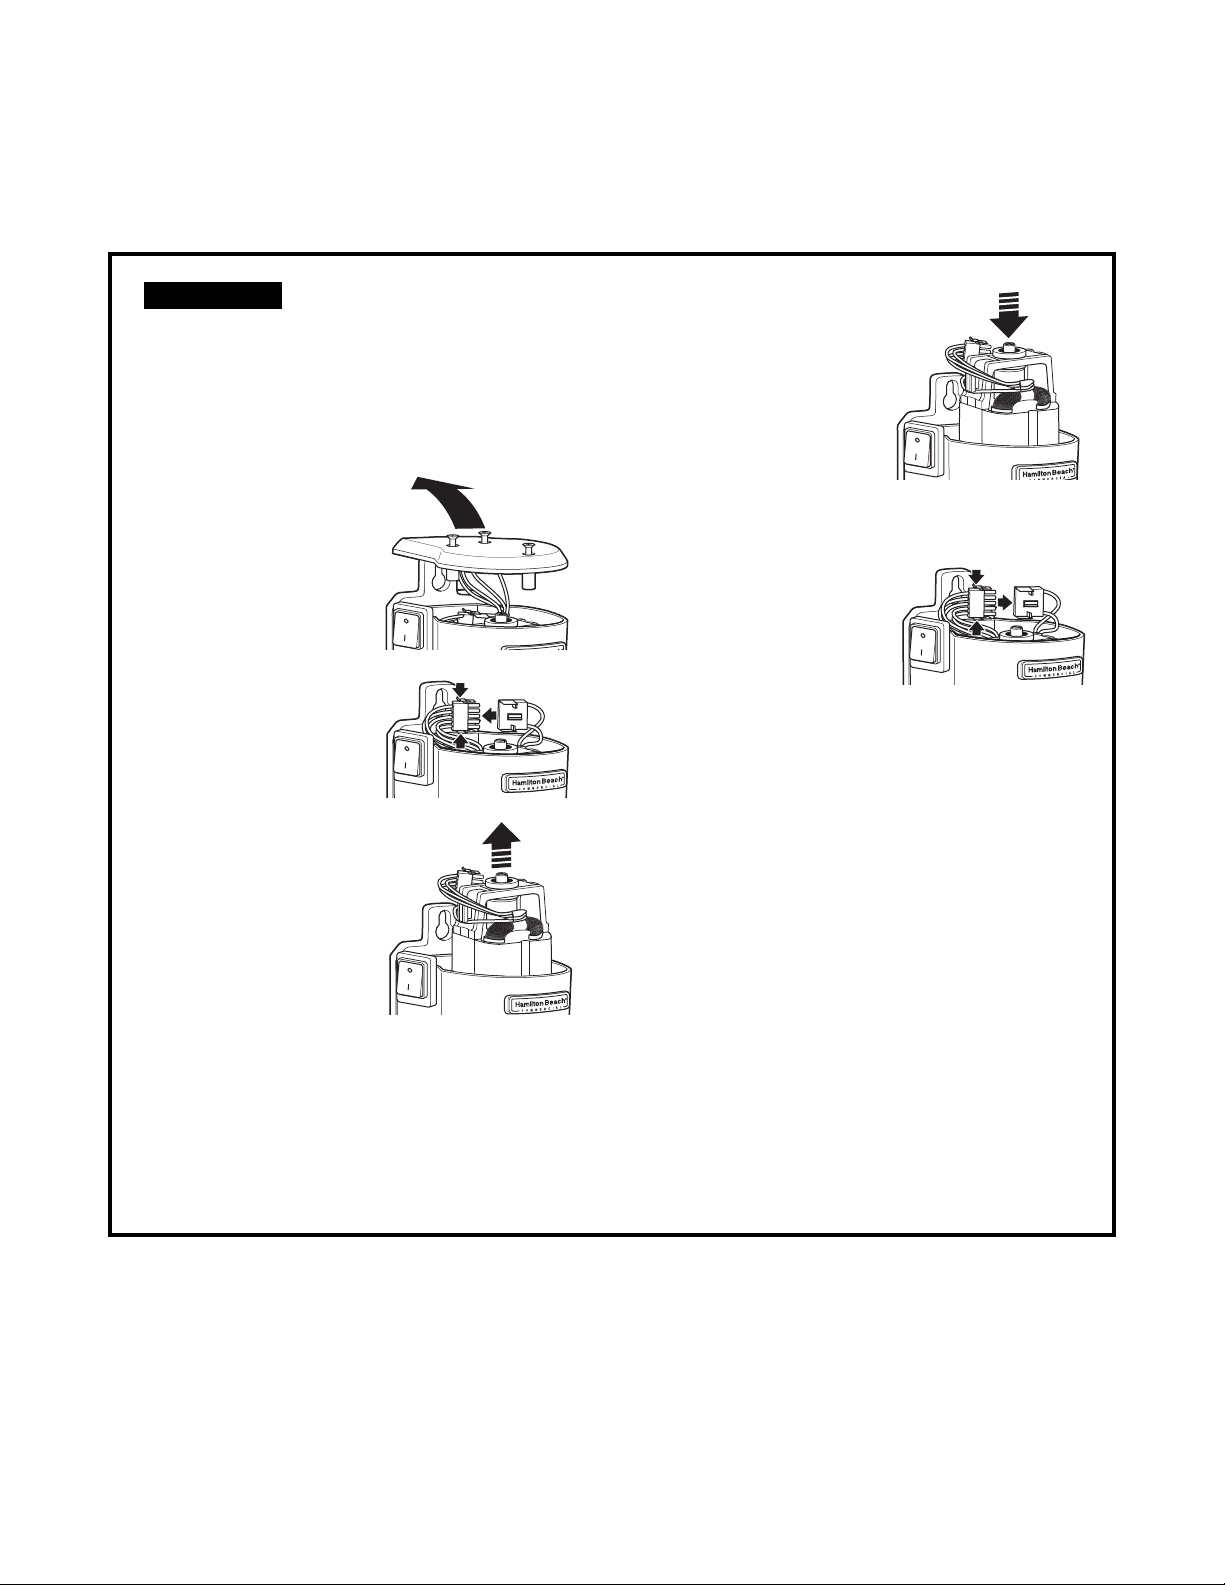
Motor Replacement
1. Disconnect power
to the mixer.
2. Loosen the three
screws in the top
cover (the screws
will remain in the
cover). Lift off the
top cover.
3. Squeeze the tabs
on the sides of the
connector plug and
pull the two plug
halves apart.
4. Remove the
agitator and then
lift the motor
assembly straight
up and out of
the housing.
Discard the motor
assembly in an
environmentally
acceptable manner
that complies with
federal, state, and
local waste management
regulations.
NOTE: A Mylar insulating barrier with a top
tab and an opening is slipped over the lower
enclosure front screw boss. Make sure this
is in place and DO NOT remove.
To replace the motor, follow the steps below,
or call an authorized service center.
Care and Cleaning of the Mixer
Electrical Shock Hazard.
Disconnect power before servicing. Replace all
parts before operating. Failure to do so can
result in death or electrical shock.
w WA RNING

9
Care and Cleaning of the Mixer
Troubleshooting Guide
Ingredients are not being
mixed properly
Motor does not turn on
when container is set on
container rest
Excessive product splash-out
(some splash-out is common)
PROBLEM
SOLUTION
• Try selecting a different speed.
• Agitator is bent or worn (this can be prevented by not holding container in
your hand or allowing agitator to hit sides of container). Replace agitators
every 90 days. To order replacement agitators, call Technical Service at
1-866-285-1087 or 910-693-4277.
• Container is not tall enough to activate motor switch. We recommend the
Hamilton Beach Universal Container (#110E).
• The unit features a thermal overload protection circuit. Turn unit OFF (O).
Wait 30 minutes. Follow instructions in the section “Mixing a Drink.” If the
unit does not turn on, call Technical Service.
• Is container too full?
• Is speed setting too high for ingredients?
• Is agitator fastened tightly to the spindle?
• Is agitator bent or worn? Replace agitators every 90 days.

LIMITED WARRANTY
This warranty applies to products purchased and used in the U.S. and Canada. This is the only express warranty for
this product and is in lieu of any other warranty or condition.
This product is warranted to be free from defects in material and workmanship for a period of one (1) year from the date
of original purchase.
If you have a claim under this warranty please contact our TECHNICAL SERVICES DEPARTMENT at 1-866-285-1087
or 910-693-4277. For faster service, locate the model, type, and series numbers on your appliance.
This warranty does not cover glass, filters, wear from normal use, use not in conformity with the printed directions, or
damage to the product resulting from accident, alteration, abuse, or misuse, or subjecting it to any voltage and waveform other than as specified on the rating label (for example, 120V ~ 60 Hz). This warranty extends only to the original
purchaser. Keep the original sales receipt, as proof of purchase is required to make a warranty claim or the warranty
term will be based on the date of manufacture plus one (1) year.
We exclude all claims for special, incidental, and consequential damages caused by breach of express or implied
warranty. All liability is limited to the amount of the purchase price. Every implied warranty, including any statutory
warranty or condition of merchantability or fitness for a particular purpose, is disclaimed except to the extent
prohibited by law, in which case such warranty or condition is limited to the duration of this written warranty.
This warranty gives you specific legal rights. You may have other legal rights that vary depending on where you live.
Some states or provinces do not allow limitations on implied warranties or special, incidental, or consequential
damages, so the foregoing limitations may not apply to you.
Product Warranty
This Warranty supercedes all other Product Warranties
10
 Loading...