

Hamilton Beach Commercial 45100C, 45040, 45060, 45100 SERVICE MANUAL

840194601
www.commercial.proctorsilex.com
3/11
Coffee Urn Page 2
Urne à cafe Page 11
Cafetera Pagina 21
READ BEFORE USE.
LIRE AVANT DʼUTILISER.
LEA ANTES DE USAR.
840194601 ENv02.qxd:840110600 Ev01.qxd 3/17/11 4:31 PM Page 1

2
To avoid an electrical circuit overload, do not use a high-wattage
appliance on the same circuit with your coffee urn.
WARNING! Shock Hazard: This product is provided with a grounded
(3-prong) plug to reduce the risk of electric shock. The plug fits only
one way into a grounded outlet. Do not defeat the safety purpose of
the plug by modifying the plug in any way or by using an adapter. If
the plug does not fit into the outlet, have an electrician replace the
outlet.
The length of the cord used on this appliance was selected to
reduce the hazards of becoming tangled in or tripping over a longer
cord. If a longer cord is necessary, an approved extension cord may
be used. The electrical rating of the extension cord must be equal to
or greater than the rating of the appliance. The extension cord must
be a grounding-type, 3-wire cord. Care must be taken to arrange
the extension cord so that it will not drape over the countertop or
tabletop where it can be pulled on or accidentally tripped over.
When using electrical appliances, basic safety precautions should
always be followed to reduce the risk of fire, electric shock, and/or
injury to persons, including the following:
1. Read all instructions.
2. Do not touch hot surfaces. Use handles or knobs. Care must
be taken, since burns can occur from touching hot parts or from
spilled, hot liquid.
3. To protect against fire, electric shock, and injury to persons,
do not place cord, plug, or coffee urn in water or other liquid.
4. Close supervision is necessary when any appliance is used by
or near children.
5. Unplug from outlet when either the coffee urn is not in use and
before cleaning. Allow to cool before putting on or taking off parts
and before cleaning the appliance.
6. Coffee urn must be operated on a flat surface away from the
edge of counter to prevent accidental tipping.
7. Do not operate any appliance with a damaged cord or plug,
or after the appliance malfunctions or is dropped or damaged
in any manner. Call our toll-free customer service number for
information on examination, repair, or adjustment.
8. The use of accessory attachments not recommended by
the appliance manufacturer may result in fire, electric shock,
or personal injury.
9. Do not use outdoors.
10. Do not let cord hang over edge of table or counter or touch hot
surfaces, including stove.
11. Be certain lid is securely in place during brew cycle and when
serving coffee.
12. Scalding may occur if lid is removed during brew cycle.
13. Do not place coffee urn on or near a hot gas or electric burner
or in a heated oven.
IMPORTANT SAFEGUARDS
14. WARNING: To reduce the risk of fire or electric shock, do not
remove the bottom cover. No user-serviceable parts are inside.
Repair should be done by authorized service personnel only.
15. Do not use appliance for other than intended use.
SAVE THESE INSTRUCTIONS!
OTHER CONSUMER SAFETY INFORMATION
3
840194601 ENv02.qxd:840110600 Ev01.qxd 3/17/11 4:31 PM Page 2
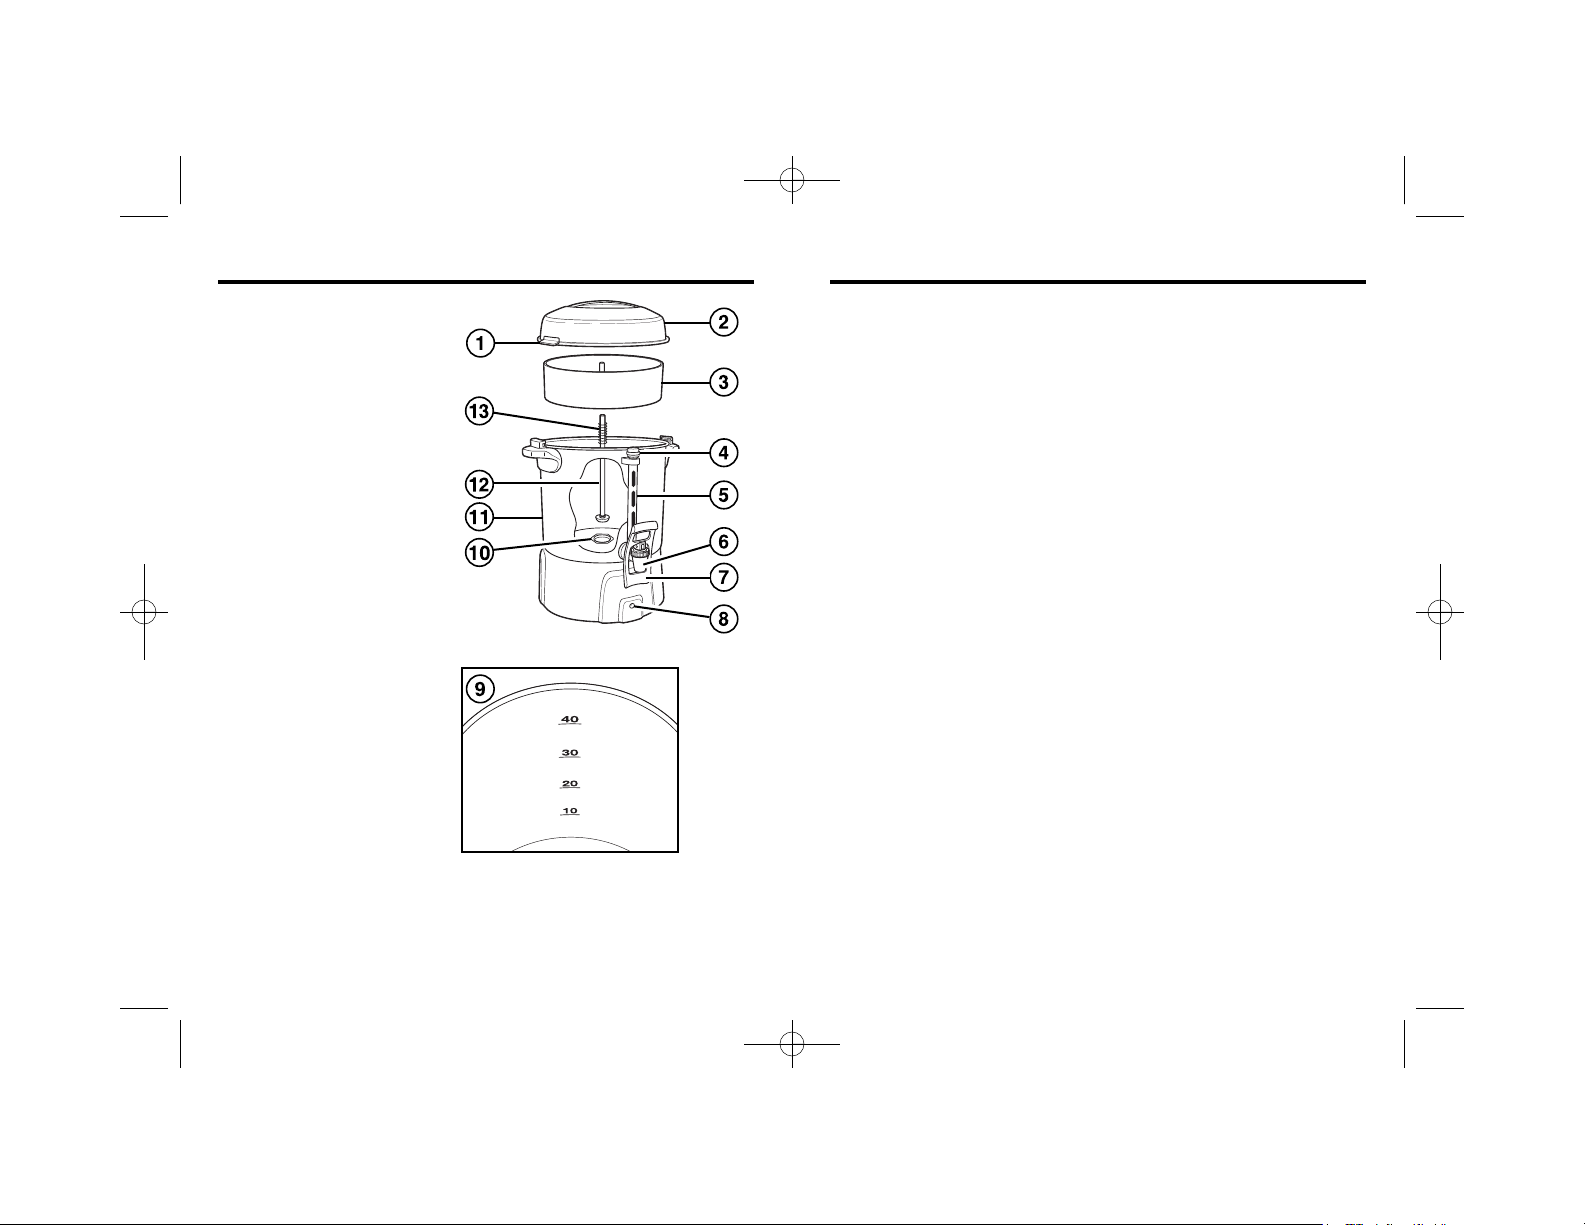
Parts and Features
5
4
BEFORE FIRST USE: Clean the coffee urn by following the steps
in “How to Clean.”
1. To remove the lid, turn counterclockwise until the locking tabs
completely clear the handles on each side of the body; then
lift up. Take out the basket and pump tube with spring. For
best results, always fill with cold, fresh tap water to the level
indicator mark inside the body for the number of cups* desired.
Depending on your model, the coffee urn will make up to 40,
60, or 100 cups. DO NOT OVERFILL THE COFFEE URN.
*1 cup = 5 ounces
2.
Wet the basket (this helps to keep small particles of coffee grinds
from sifting through). Use a standard dry measure cup and tablespoon to add regular- or percolator-grind coffee to the basket.
The chart on page 6 suggests the amount of coffee for regular
brew. The amount of coffee can be varied to suit your taste; use
less for weaker coffee or more for stronger coffee.
3.
Make sure the spring is on the pump tube; then place the basket
on the pump tube. Then, holding the top of the pump tube, lower
it into the coffee urn until the bottom of the pump tube is properly
seated in the heat well in the center (if not, the coffee urn may
not percolate).
4. Place the lid on the urn so that the locking tabs are at the front
and back of the coffee urn.
5. Turn the lid clockwise until the locking tabs are fully engaged
inside the handles on both sides of the coffee urn. Never plug
in the coffee urn without the lid in place and the locking tabs
fully engaged inside the handles.
6. Plug the coffee urn into a grounded, 3-prong, 120 V AC wall
outlet. The ON light will illuminate red and coffee brewing will
begin within seconds. The urn will begin to percolate within
8 minutes.
Do NOT plug in the coffee urn when there is no water or other
liquid inside.
To Make Coffee
1. Locking Tabs
2. Lid
3. Coffee Basket
4. Coffee Level Tube Cap
5. Coffee Level Tube
6. Serving Spout
7. Cup Trip Handle
8. ON (red)/READY
(green) Light
9. Water Level Marking
10. Heat Well
11. Urn
12. Pump Tube
13. Spring
840194601 ENv02.qxd:840110600 Ev01.qxd 3/17/11 4:43 PM Page 4
7
6
How to Clean
1. After each use and before washing, unplug power cord from
wall outlet and allow the unit to cool.
2. Carefully remove lid and all internal parts. Parts, coffee grounds,
and remaining coffee may still be hot.
3. Wash the inside of the coffee urn and the parts with warm,
soapy water. Rinse and dry. Do not dry the inside of the urn
with a cloth, since lint may remain inside the urn. Do NOT
immerse the body of the coffee urn in water.
4. Wipe the outside of the coffee urn with a damp cloth and
dry with a towel. Store the coffee urn with the lid off.
5. To clean the serving spout, fill the coffee urn with some hot
water and dishwasher detergent. Drain the hot water from the
serving spout into a cup. Repeat this step with clean, hot water
to remove any dishwasher detergent remaining in the serving
spout.
6. To clean the coffee level tube, unscrew the coffee level tube
cap on the aluminum post and lift out the coffee level tube.
Wash in warm, soapy water with a long, narrow brush and
rinse. Replace the coffee level tube and secure with the
tube cap.
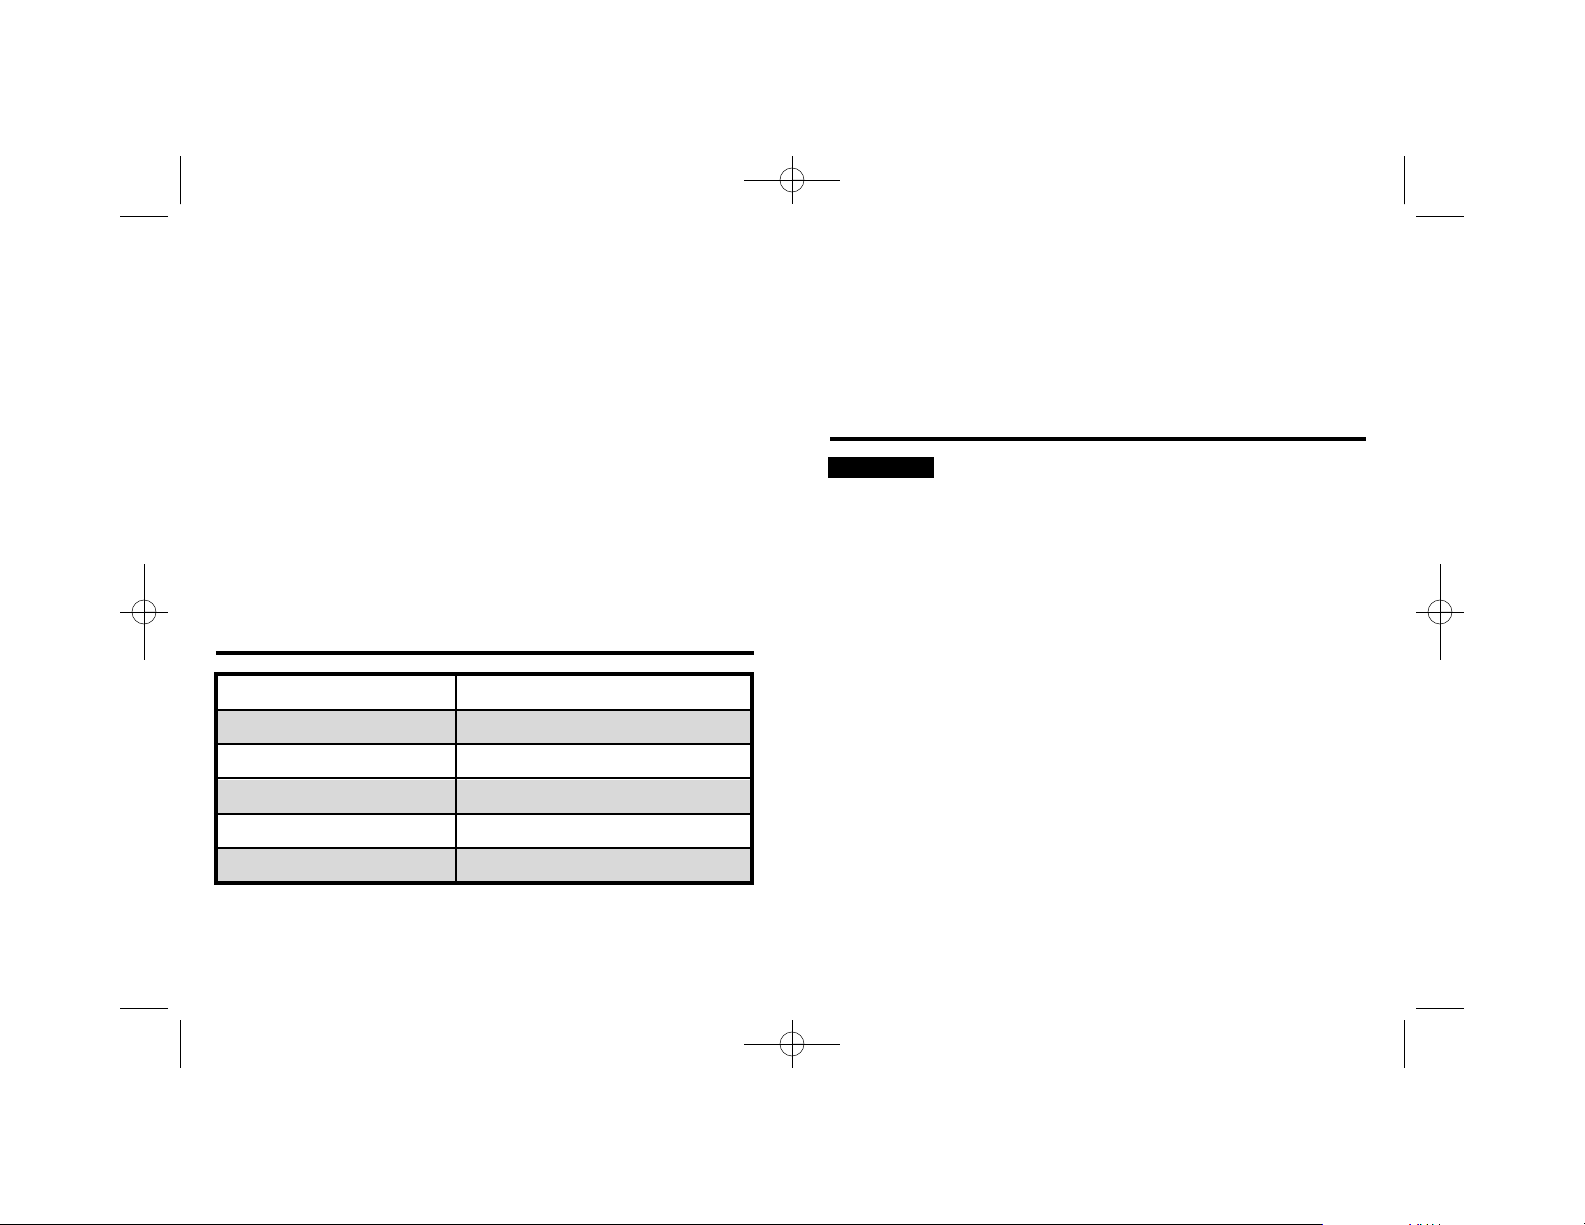
*1 cup = 5 ounces
Coffee will vary between brands and ground amount should be
adjusted to meet your desired strength.
Coffee-Making Chart
Water Level
20 cups* (100 oz.)
40 cups (200 oz.)
60 cups (300 oz.)
80 cups (400 oz.)
100 cups (500 oz.)
Amount of Ground Coffee
1
1
⁄2–2 cups
3–31⁄2 cups
4–41⁄2 cups
51⁄4–53⁄4 cups
61⁄2–7 cups
7. When the brewing cycle is complete, percolation stops and the
READY light illuminates green to indicate the coffee is ready to
serve. The coffee urn automatically switches to the Keep Warm
cycle and will maintain fresh, hot coffee until it is unplugged.
WARNING! Burn Hazard. The lid and other parts of the urn
will be HOT. Use a pot holder or oven mitt to remove the lid.
8. Disconnect plug from wall outlet and allow the coffee urn to
cool before washing.
NOTES:
• The urn will begin to percolate within 8 minutes.
• To make additional coffee, rinse the coffee urn and parts with
cold water and repeat steps 1 through 7.
• To reheat coffee, remove the basket and pump tube. Lock the
lid in place and plug in the unit for 20 to 60 minutes, depending
on the amount of coffee remaining. Do not reheat if less than
20 cups are left in the coffee urn.
Electrical Shock Hazard. Do not immerse urn,
cord, or plug in water or other liquid.
w WARNING
NOTE: We recommend using coffee that has been ground
specifically for use in a percolator-type coffeemaker. However,
coffee marked “For All Coffeemakers” is acceptable. If using
a coffee grinder and whole beans, percolator coffee should
be a coarse grind. A finely ground coffee may cause the coffee
basket to overflow and result in grounds in coffee.
840194601 ENv02.qxd:840110600 Ev01.qxd 3/17/11 4:31 PM Page 6

9
8
How to Clean (cont.)
7. To clean the pump tube, remove pump tube from urn. Wash
in warm, soapy water with a long, narrow brush and rinse.
8. After repeated use, there may be some coffee stains and
accumulation of oils that can cause a bitter taste. Periodically
use a coffee-stain remover or special cleanser and follow
package directions for cleaning. Rinse well after cleaning.
A scouring pad may be used to clean the heat well. DO NOT
use abrasive cleaners on any other part of the coffee urn.
How to Remove Mineral Deposits
and Buildup
If the urn is used daily, follow these instructions every other
week.
1. Fill the urn with 1 quart cold water and 1 quart white vinegar
(if a white mineral buildup has formed inside the unit, use an
additional 2 cups of vinegar). Assemble with lid, pump tube,
and coffee basket.
2. Plug in and let go through the percolate cycle. When percolating
has stopped, let the solution sit for an additional 15 minutes.
3. Unplug and drain the urn. Let cool and then clean (see “How
to Clean”).
How to Remove Discoloration
1. To lighten discolored metal inside the urn, fill the urn to the
40-, 60-, or 100-cup level (depending on the model).
2. Assemble with pump tube and coffee basket. Place 2 table-
spoons plus 1 teaspoon cream of tartar into the basket.
3. Place lid onto coffee urn. Plug in and let go through the perco-
late cycle. When percolating has stopped, let the solution sit for
an additional 15 minutes.
4. Unplug, drain the urn, and let it cool.
Troubleshooting
PROBLEM
Coffee urn does not
brew or heat.
Mineral deposits
have built up inside
the urn.
Coffee not strong
enough.
Condensation forms
inside coffee level
tube.
Heat well has
buildup.
POSSIBLE
CAUSE
Power plug is not
firmly plugged into
power outlet.
Insufficient quantity
of ground coffee.
Steam created
during the brewing
cycle.
SOLUTION
Insert power plug
into power outlet.
Clean the urn following the steps in
“How to Remove
Mineral Deposits
and Buildup.”
Increase quantity of
ground coffee.
Condensation does
not indicate a defective unit. The steam/
condensation will
eventually evaporate.
Clean heat well with
a scouring pad.
840194601 ENv02.qxd:840110600 Ev01.qxd 3/17/11 4:43 PM Page 8
10
LIMITED WARRANTY
This warranty applies to products purchased in the U.S. and
Canada. This is the only express warranty for this product and
is in lieu of any other warranty or condition.
This product is warranted to be free from defects in material
and workmanship for a period of one (1) year from the date of
original purchase. During this period, your exclusive remedy is
repair or replacement of this product or any component found
to be defective, at our option; however, you are responsible for
all costs associated with returning the product to us. If the product
or component is no longer available, we will replace with a similar
one of equal or greater value.
This warranty does not cover glass, plastic jars, filters, wear from
normal use, use not in conformity with the printed directions, or
damage to the product resulting from accident, alteration, abuse,
misuse, or subjecting it to any voltage and waveform other than
as specified on the rating label (for example, 120V ~ 60 Hz).
This warranty extends only to the original purchaser. Keep the
original sales receipt, as proof of purchase is required to make
a warranty claim or the warranty term will be based on the date
of manufacture plus one (1) year.
We exclude all claims for special, incidental, and consequential
damages caused by breach of express or implied warranty. All
liability is limited to the amount of the purchase price. Every
implied warranty, including any statutory warranty or condition
of merchantability or fitness for a particular purpose, is
disclaimed except to the extent prohibited by law, in which
case such warranty or condition is limited to the duration
of this written warranty. This warranty gives you specific legal
rights. You may have other legal rights that vary depending on
where you live. Some states or provinces do not allow limitations
on implied warranties or special, incidental, or consequential
damages, so the foregoing limitations may not apply to you.
If you have a claim under this warranty, please contact our
TECHNICAL SERVICES DEPARTMENT at 1-866-285-1087 or
910-693-4277. For faster service, locate the model, type, and
series numbers on your appliance.
840194601 ENv02.qxd:840110600 Ev01.qxd 3/17/11 4:31 PM Page 10
 Loading...