

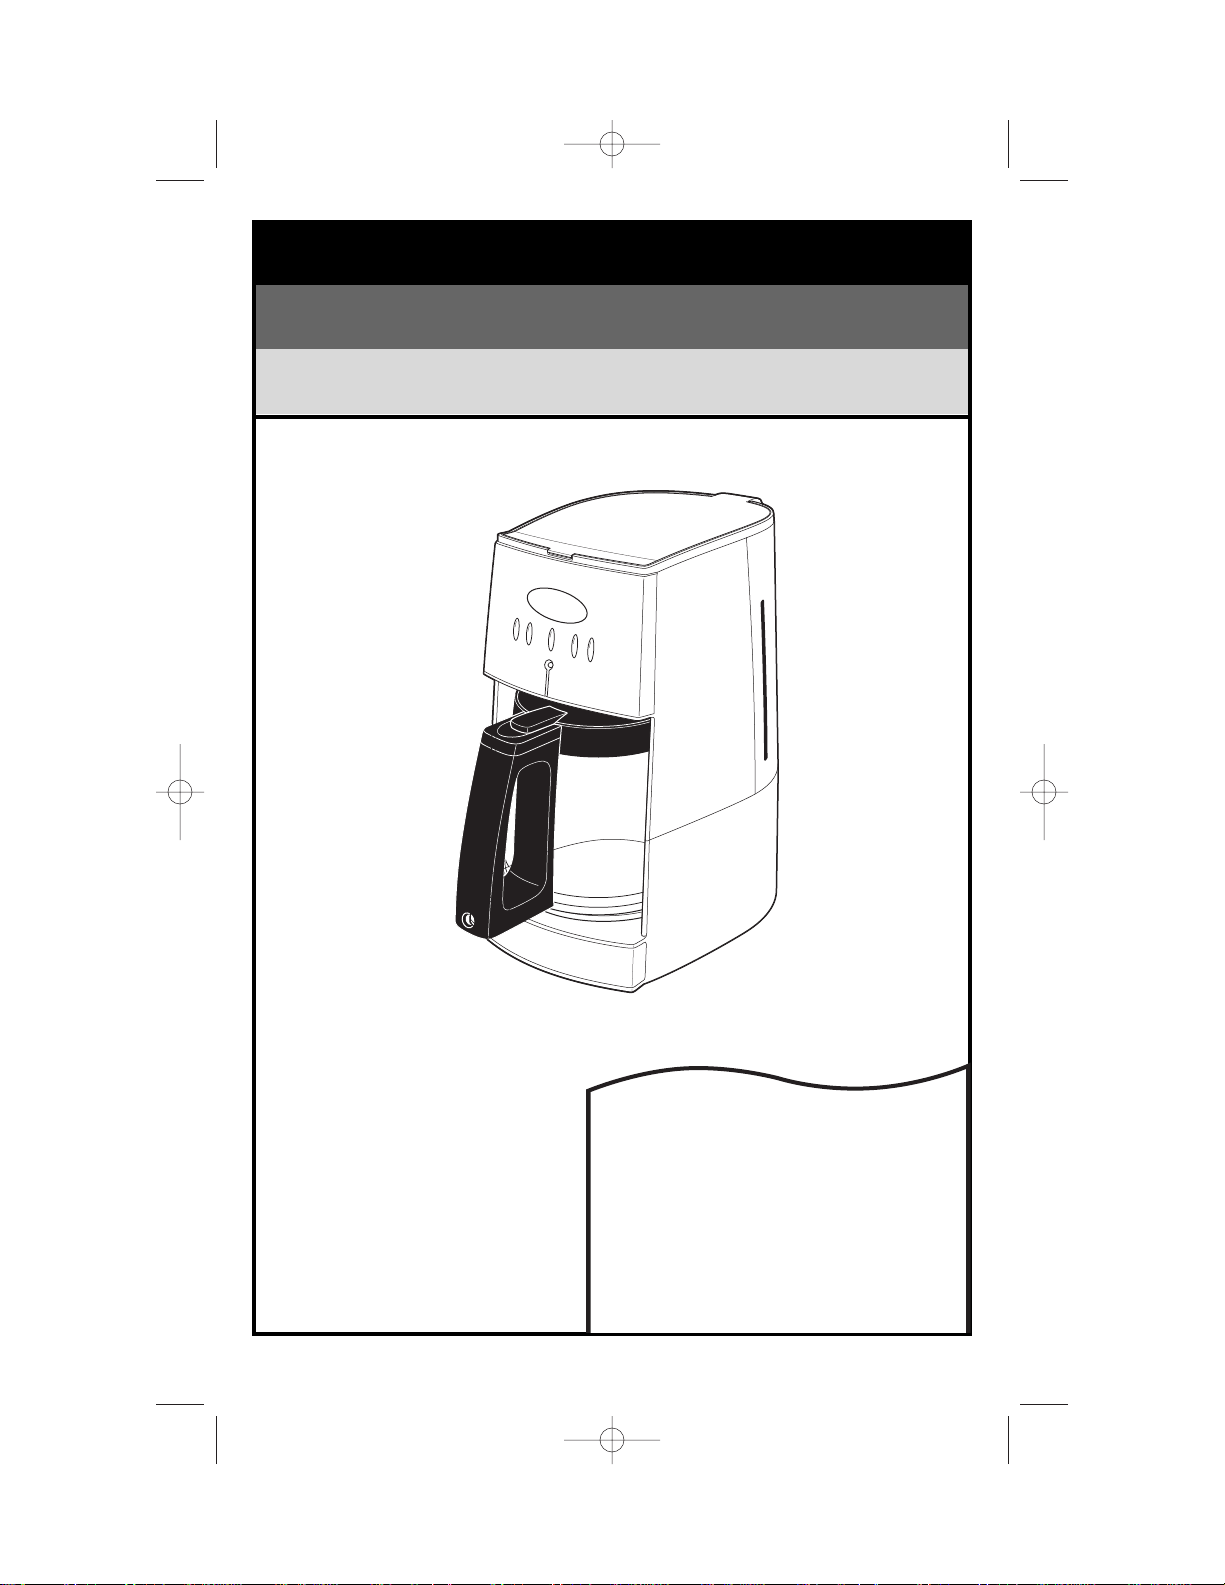
Programmable Coffeemaker
840129500
READ BEFORE USE
LIRE AVANT L’UTILISATION
LEA ANTES DE USAR
English ................................................ 2
USA: 1-800-851-8900
Français ............................................ 10
Canada : 1-800-267-2826
Español .............................................. 18
México: 01 800 71 16 100
Le invitamos a leer cuidadosamente este
instructivo antes de usar su aparato.
Cafetière programmable
Cafetera programable
840129500 ENv00.qxd 7/6/04 12:34 PM Page 1

2
Other Consumer Safety Information
IMPORTANT SAFEGUARDS
When using electrical appliances, basic
safety precautions should always be followed to reduce the risk of fire, electric
shock, and/or injury to persons, including
the following:
1. Read all instructions.
2. Do not touch hot surfaces. Use handles
or knobs. Care must be taken, as burns
can occur from touching hot parts or
from spilled, hot liquid.
3. To protect against electric shock, do not
place cord, plug or
coffeemaker in water or other liquid.
4. Close supervision is necessary when
any appliance is used by
or near children.
5. Unplug from outlet when either the coffeemaker or clock is not in use and
before cleaning. Allow to cool before
putting on or taking off parts and before
cleaning the appliance.
6. Coffeemaker must be operated on a flat
surface away from the edge of counter
to prevent accidental tipping.
7. Do not operate any appliance with a
damaged cord or plug, or after the
appliance malfunctions or is dropped or
damaged in any manner. Call our tollfree customer service number for
information on examination, repair, or
adjustment.
8. The use of accessory attachments not
recommended by Hamilton Beach/
Proctor-Silex, Inc. may result in fire,
electrical shock or personal injury.
9. Do not use outdoors.
10. Do not let cord hang over edge of table
or counter or touch hot surfaces, including stove.
11. The carafe is designed for use with this
coffeemaker. It must
never be used on a range top or in a
microwave oven.
12. Do not set a hot carafe on a wet or cold
surface.
13. Do not use a cracked carafe or one with
loose or weakened handle.
14. Do not clean carafe or hot plate with
cleansers, steel wool pads, or other
abrasive material.
15. Be certain carafe lid is securely in place
during brew cycle and when pouring coffee. Do not use force when placing lid on
carafe.
16. To disconnect coffeemaker, turn
controls to OFF, then remove plug
from wall outlet.
17. Do not place coffeemaker on or near a
hot gas or electric burner or in a heated
oven.
18. Warning: To reduce the risk of fire or
electric shock, do not remove the bottom
cover. No user serviceable parts are
inside. Repair should be done by authorized service personnel only.
19. Do not use appliance for other than
intended use.
SAVE THESE INSTRUCTIONS
This appliance is intended for household
use only.
This appliance is equipped with a polarized
plug. This type of plug has one blade wider
than the other. The plug will fit into an electrical outlet only one way. This is a safety
feature intended to help reduce the risk of
electrical shock. If you are unable to insert
the plug into the outlet, try reversing the
plug. If the plug should still fail to fit, contact
a qualified electrician to replace the obsolete outlet. Do not attempt to defeat the
safety purpose of the polarized plug by
modifying the plug in any way.
The length of the cord used on this appliance was selected to reduce the hazards of
becoming tangled in, or tripping over a
longer cord. If a longer cord is necessary an
approved extension cord may be used. The
electrical rating of the extension cord must
be equal to or greater than the rating of the
coffeemaker. Care must be taken to arrange
the extension cord so that it will not drape
over the countertop or tabletop where it can
be pulled on by children or accidentally
tripped over.
To avoid an electrical circuit overload, do
not use another high wattage appliance on
the same circuit with your coffeemaker.
840129500 ENv00.qxd 7/6/04 12:34 PM Page 2
3
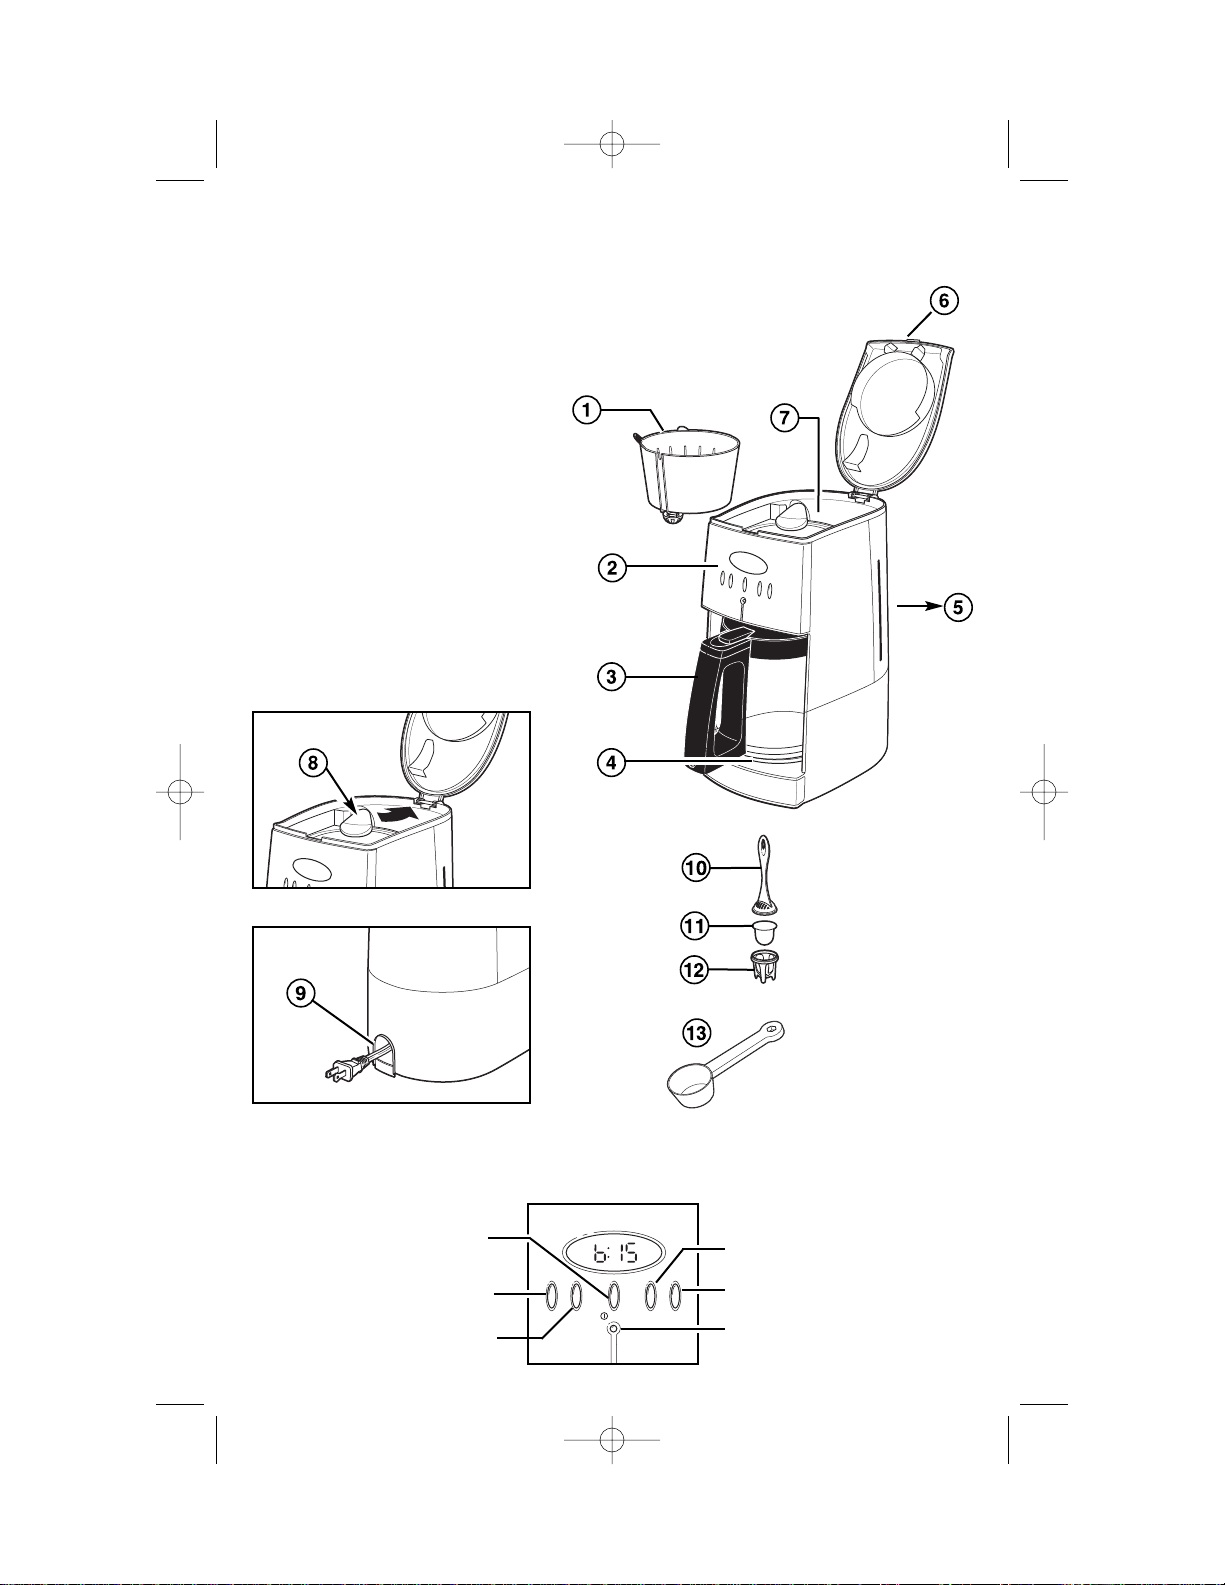
Parts and Features
1. Filter Basket
2. Clock and Controls (see below)
3. Carafe
4. Keep-Hot Plate
5. Water Level Guide
6. Top Cover
7. Water Reservoir
8. Swivel Shower Head
9. Cord Storage
10. Water Filter Lid*
11. Water Filter*
12. Water Filter Base*
13. Coffee Scoop
*optional feature on
selected models
PROG ON/OFFAUTO H M
AM
PM
ON/OFF Button
Hour Button
Program Button
Minute Button
AUTO Button with
Green Indicator
Light
Clock and Controls
Red On/Off
Indicator Light
840129500 ENv00.qxd 7/6/04 12:34 PM Page 3
4
Using Your Coffeemaker
How to Make Coffee
1. To ensure best possible taste, wash
the carafe then clean the inside of
unit. See “Cleaning Instructions.”
2. Press H to set current hour with
AM or PM. Press M to set current
minutes.
3. Place OPTIONAL water filter and
water filter holder into reservoir (see
“Optional Feature”).
4. Lift Top Cover. Fill Carafe with the
desired amount of cold water, and
pour into Water Reservoir. Place
Carafe with Carafe Lid attached on
Keep-Hot Plate. Move Shower
Head into a position over the
Reservoir. Place disposable paper
filter in Filter Basket. Use a good
quality cupcake (basket) style filter,
8 to 12 cup size. A permanent filter
may also be used.
5. For each cup of coffee being made,
place one level measuring tablespoon of ground coffee into filter.
6. After adding ground coffee into filter, move Shower Head back into
position over Filter Basket. Flip
cover down to close.
NOTE: If Shower Head is positioned over Water Reservoir when
Top Cover is closed, it will automatically be swiveled into position over
Filter Basket when the Top Cover is
closed.
7. Press ON/OFF button once to
turn the Coffeemaker on. The
On/Off Indicator Light will glow red
when in use.
NOTE: To serve coffee during the
brewing cycle, remove carafe and
pour a cup. By removing the carafe,
the flow of coffee from the bottom
of the Filter Basket will stop.
8. When finished, press the ON/OFF
button once and unplug.
NOTE: If the Coffeemaker is not
turned off manually, it will automatically shut off in two hours.
9. If storing Coffeemaker, the Cord can
be pushed into a special cord storage area in the back of the unit.
To Program Automatic Brew
1. Make sure clock is set for correct
time of day.
2. Fill coffeemaker with desired amount
of water and coffee. Place carafe
with lid on Keep-Hot Plate.
3. While holding PROG (program) but-
ton, press H and M buttons until
desired brewing time is reached.
4. Once desired brewing time has been
reached, release PROG and current
time is displayed.
5. Press AUTO to set coffeemaker to
come on automatically at the desired
time.
6. An illuminated green light within the
AUTO button indicates that the brew
cycle will begin at the set time.
7. Press AUTO again to cancel auto-
matic brew.
Bur
n Hazard
Return Carafe to Keep-Hot Plate within 20 seconds. Hot water continues to
flow into the Filter Basket when this feature is used. Overflowing coffee and hot
water are a burn hazard.
CAUTION
840129500 ENv00.qxd 7/6/04 12:34 PM Page 4
5
Optional Feature
(on selected models)
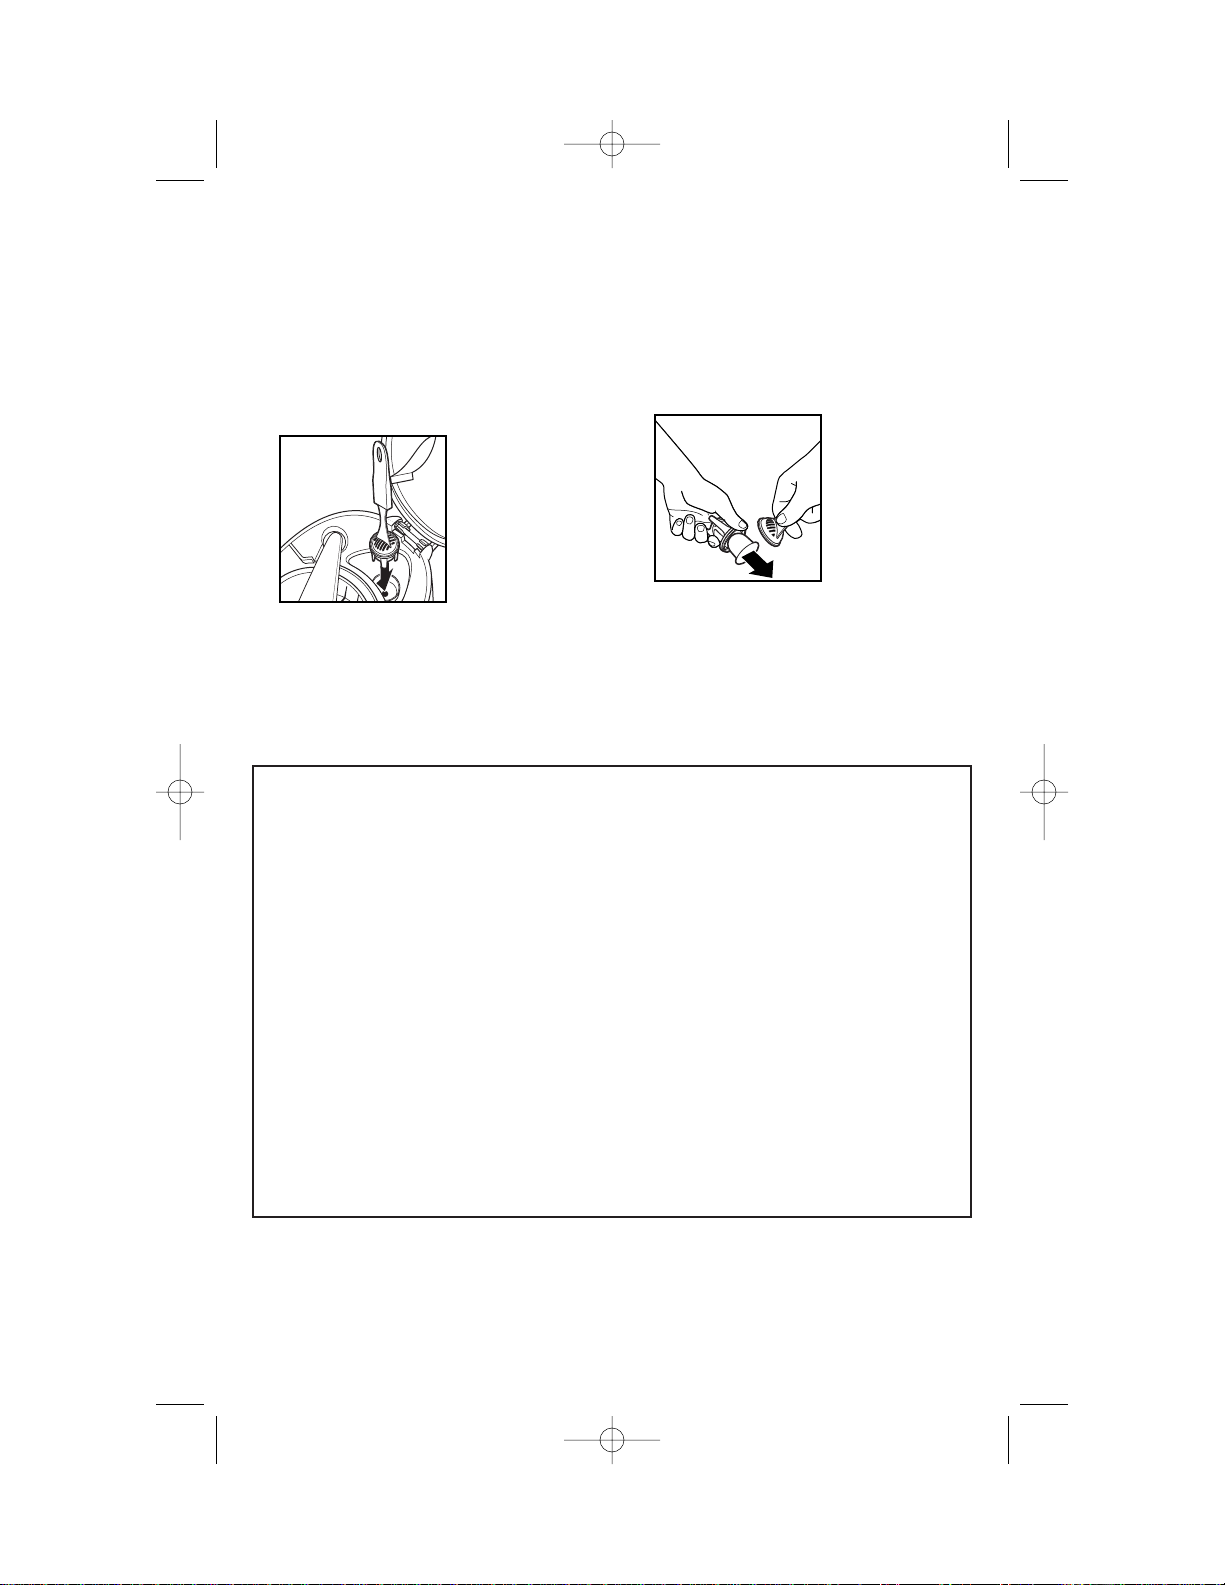
Water Filter
1. Before first use, soak water filter in
cold tap water for 15 minutes. Then
rinse under cold running tap water
for 15 seconds.
2. Insert filter in base. Snap lid onto
base. Set your
replacement
month by aligning arrow with
the month you
expect will represent 60 brew
cycles.
3. Using the water filter lid (or handle),
place filter and filter holder in reservoir. The water filter base should fit
snuggly in a specially-designed well
at the bottom of the reservoir.
4. Replace after 60 brew cycles of coffee. Refer to the month indicator to
know when to replace your filter.
5. To replace, pull up on lid of filter
holder while
holding filter
base, turn
filter base to
allow filter to
drop out.
Improve Coffee Flavor with Water Filter Kit
Each water filter kit (Part 80674) includes two filters and one holder.
Permanent Stainless Steel Coffee Filter
Replaces paper filters and is dishwasher safe (Part 80675).
Replacement Carafe
If carafe cracks or breaks, you can order a replacement (Part 88165).
To order in the U.S.:
Call 1-800-455-7213
Order online at www.HBAccessories.com
To order in Canada:
Call 1-800-267-2826
840129500 ENv00.qxd 7/6/04 12:34 PM Page 5

6
Cleaning
To Clean Inside of Coffeemaker:
1. Remove water filter and water filter
holder (see “Optional Features”).
2. Make sure the filter basket is
empty.
3. Place empty carafe on Keep-Hot
Plate.
4. Pour one pint of plain white vinegar
into the reservoir.
5. Plug unit into electrical outlet.
6. Press the ON/OFF button once
and the indicator light will glow red.
After 30 seconds, turn OFF.
7. Wait 30 minutes to allow the vinegar to clean. Then turn ON again.
When the brew cycle is finished,
wait for unit to cool.
8. Empty carafe and rinse. Pour one
carafe of cold tap water into the
reservoir. Place carafe on Keep-Hot
Base.
9. Press ON/OFF button once. When
the brew cycle is complete, empty
the carafe. Allow the coffeemaker
to cool, then repeat this step with
one more carafe of cold tap water.
10. Wash carafe and filter basket
before making a beverage.
To Clean Carafe and Filter Basket:
1. Wash carafe by hand in hot, soapy
water. Carafe may be washed on the
top rack of the dishwasher.
2. To remove the filter basket, open
Top Lid and lift straight up by handle. The filter basket may be washed
by hand or in the top rack of the
dishwasher. To maintain performance, clean the filter basket often.
To Clean Exterior of Coffeemaker:
Wipe the exterior with a soft cloth and
warm, soapy water. Do not use abrasive cleaners as they will scratch the
finish of the product.
To maintain the performance of your coffeemaker, clean your
coffeemaker once a month. Periodic cleaning removes mineral
deposits that slow down brew time and results in bitter coffee taste.
840129500 ENv00.qxd 7/6/04 12:34 PM Page 6
7
Carafe Safety Precautions
This symbol reminds you that glass is fragile and can break which
could result in personal injury.
This symbol alerts you to the potential danger for personal injury if
you fail to read and follow these safety precautions.
• Do not use a cracked carafe or a
carafe having a loose or weakened
handle.
• This carafe is designed to be used
only on the Keep-Hot Plate of your
coffeemaker. Do not use on a gas or
electric rangetop, or in a microwave
or conventional oven.
• To avoid breakage, handle carafe with
care. Avoid impact. Glass will break
as a result of impact. Use care when
filling with water to avoid hitting
faucet.
• Do not place hot carafe on cool or
wet surface. Allow to cool before
washing or adding liquids.
• Do not set empty carafe on a hot
heating surface.
• Do not clean with steel wool pads,
abrasive cleanser, or any other materials that may scratch.
• Do not place hands inside carafe.
When handling, be careful if wearing
any hand jewelry, especially diamond
rings. Jewelry can scratch the glass,
which increases possibility of breakage.
• Do not bump, scratch, or boil dry.
• Discard carafe if it is cracked,
scratched, or heated while empty for
an extended period of time.
• To avoid accidents, do not pour in the
direction of people.
• If stirring in the carafe, use only
wooden, plastic, or rubber utensils.
Do not use metal utensils.
• Follow the above safety precautions
carefully to avoid serious burn injuries
which may result if breakage occurs
while carafe holds heated liquids.
840129500 ENv00.qxd 7/6/04 12:34 PM Page 7
8
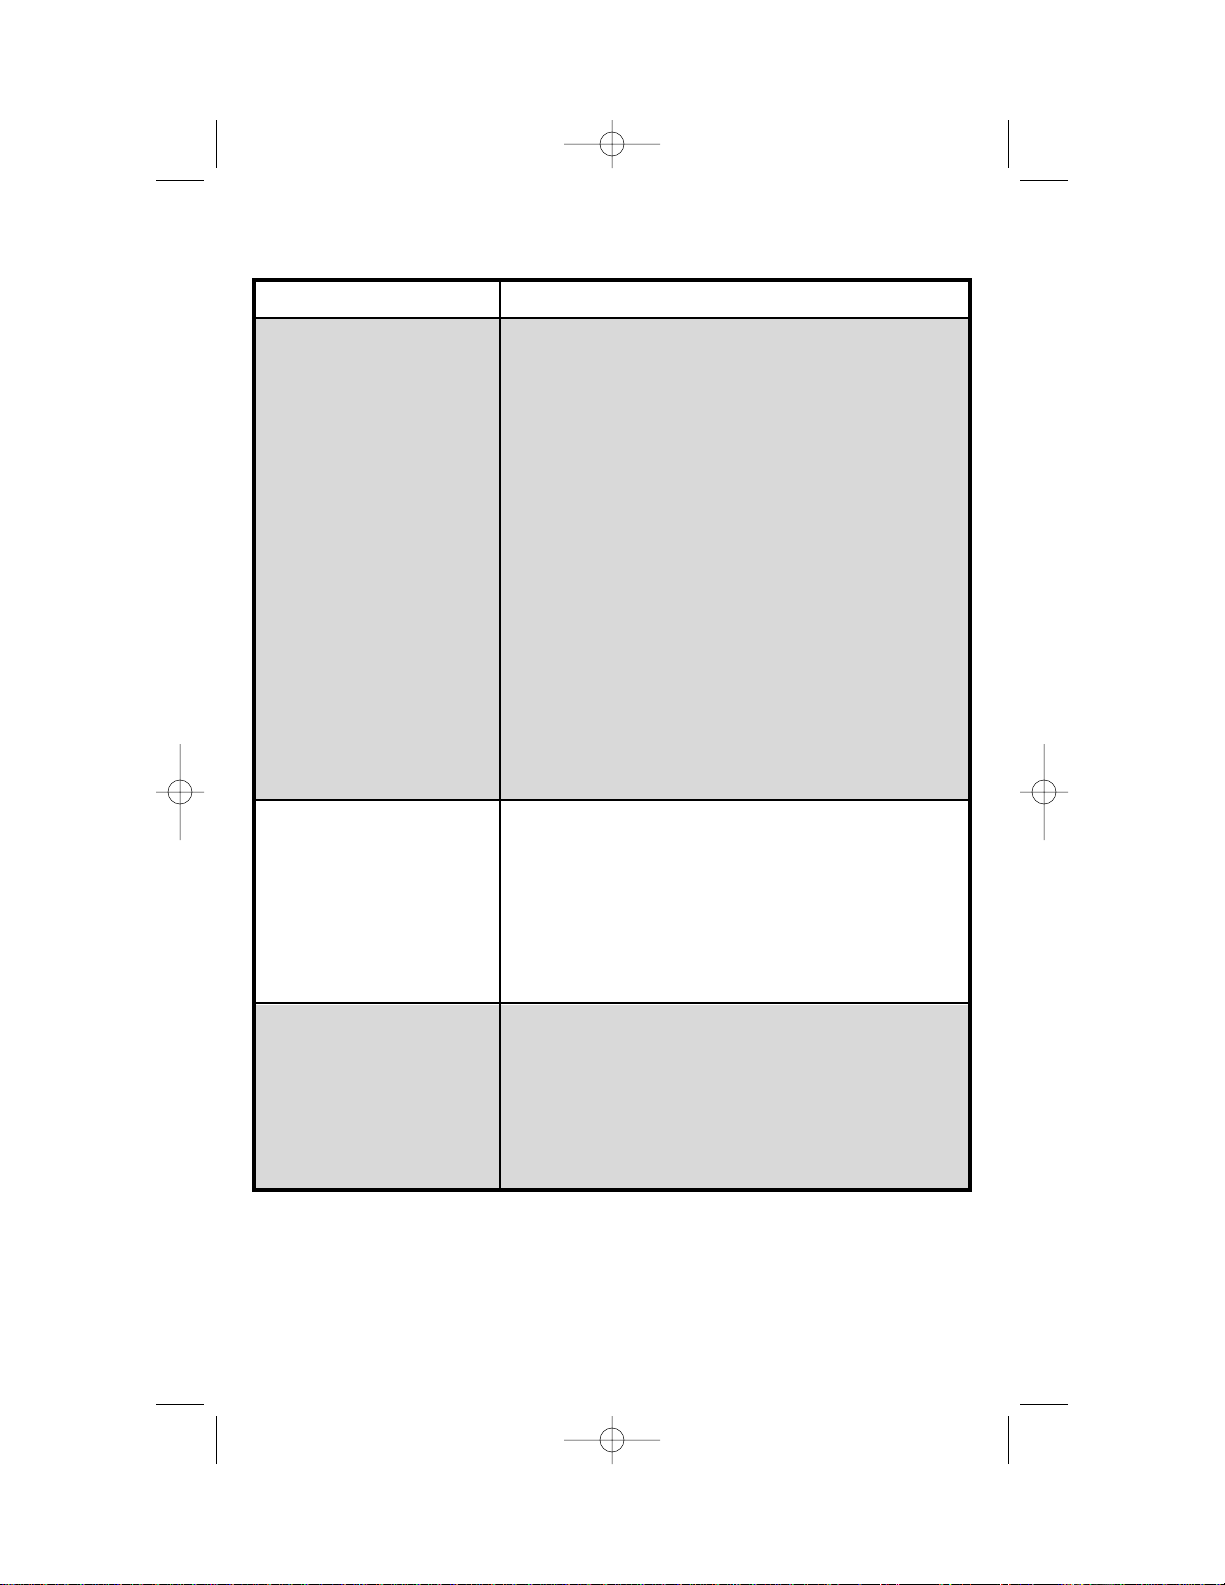
Troubleshooting
POTENTIAL PROBLEM
Filter basket overflows
or coffee brews slowly.
Coffee tastes bad.
Coffee not brewing/
unit will not turn on.
PROBABLE CAUSE/SOLUTION
• Excessive amounts of coffee.
• Coffee ground too finely (not automatic drip
grind).
• Carafe not securely placed on Keep-Hot Plate.
• Carafe removed during brewing for more than
20 seconds and not placed securely back on
Keep-Hot plate.
• Coffeemaker needs cleaning.
• Coffee grounds between paper filter and filter
basket.
• Paper filter not open and in proper position.
• Press the seamed edges of paper filter before
inserting into basket.
• Rinse filter basket before inserting paper filter so
the edges will remain pressed against the sides
of the basket.
• Poor quality paper filter.
• Coffeemaker needs cleaning.
• Coffee ground other than automatic drip.
• Coffee-to-water ratio unbalanced. Adjust for
personal preference.
• Poor coffee quality and freshness.
• Poor water quality (use filtered or bottled water).
• Water reservoir is empty.
• Unit is unplugged.
• Power outage.
• Power surge. Unplug then plug the unit back in.
• Clock requires reset after power outage.
840129500 ENv00.qxd 7/6/04 12:34 PM Page 8

9
If you have a claim under this warranty, please call our Customer Service Number.
For faster service please have model, series, and type numbers ready for operator
to assist you. These numbers can be found on the bottom of your appliance.
MODEL: _______________ TYPE: ________________ SERIES: _________________
Customer Service
LIMITED WARRANTY
This product is warranted to be free from defects in material and workmanship for a period
of two (2) years for Hamilton Beach Portfolio products, one (1) year for Hamilton Beach
products or one hundred eighty (180) days for Proctor-Silex products from the date of
original purchase, except as noted below. During this period, we will repair or replace this
product, at our option, at no cost. THE FOREGOING WARRANTY IS IN LIEU OF ANY
OTHER WARRANTY, WHETHER EXPRESS OR IMPLIED, WRITTEN OR ORAL
INCLUDING ANY WARRANTY OF MERCHANTABILITY OR FITNESS FOR A PARTICULAR
PURPOSE. ANY LIABILITY IS EXPRESSLY LIMITED TO AN AMOUNT EQUAL TO THE
PURCHASE PRICE PAID, AND ALL CLAIMS FOR SPECIAL, INCIDENTAL AND
CONSEQUENTIAL DAMAGES ARE HEREBY EXCLUDED. There is no warranty with
respect to the following, which may be supplied with this product: glass parts, glass
containers, cutter/strainer, blades, and/or agitators. This warranty extends only to the
original consumer purchaser and does not cover a defect resulting from abuse, misuse,
neglect, use for commercial purposes, or any use not in conformity with the printed
directions. This warranty gives you specific legal rights, and you may also have other legal
rights which vary from state to state, or province to province. Some states or provinces do
not allow limitations on implied warranties or special, incidental or consequential damages,
so the foregoing limitations may not apply to you.
If you have a claim under this warranty, DO NOT RETURN THE APPLIANCE TO THE
STORE! Please call our CUSTOMER SERVICE NUMBER. (For faster service please have
model, series, and type numbers ready for operator to assist you.)
CUSTOMER SERVICE NUMBERS
In the U.S. 1-800-851-8900
In Canada 1-800-267-2826
hamiltonbeach.com or proctorsilex.com
KEEP THESE NUMBERS FOR FUTURE REFERENCE!
This warranty applies to products purchased in the U.S. or Canada.
Thank You!
Thank you for purchasing our products.
If you have any questions about your
appliance, don’t return the product
to the store–we can help you.
Please call Customer Service for
assistance. Thank you for choosing
our products!
840129500 ENv00.qxd 7/6/04 12:34 PM Page 9
 Loading...