

Page 1

TECHNICAL DATA SHEET
HAMILTON BEACH / PROCTOR-SILEX, INC.
4421 WATERFRONT DRIVE GLEN ALLEN, VA 23060
ISSUE CODE
DRAWN BY:
ENG. IN CHG.
DATE:
APPROVED BY:
SP
6/21/14
DOC4905
INITIAL USE:
PICT. REF.
SHEET
DRAWING NO.
REV.
1 / 15
520008200
PROPRIETARY RIGHTS NOTICE This document and all information contained within it is the
property of Hamilton Beach/Proctor-Silex, Inc. (HB/PS). It is confidential and proprietary and has
been provided to you for a limited purpose. It must be returned upon request or destroyed as set
forth in the Specification Notice. Disclosure, reproduction or use of this document and any
information contained within it, in full or in part, for any purpose is forbidden without the prior
written consent of HB/PS. No photographs may be taken of any article fabricated or assembled
from this document without the prior written consent of HB/PS.
COT2000 Technical Information
Trouble Shooting Guide
- Symptom: Nothing comes out or flow is very slow when tap faucet is opened.
- Cause:
- Empty juice Bag in Box. The pumps will shut off when the juice Bag in Box is empty.
Connect a new Bag in Box. Be sure to fully engage the plunger on the Quick ConnectDisconnect (QCD).
- Low CO² pressure. Open the cabinet door and identify the CO² pressure from the
gauge. The unit is designed to operate at 30 psi, and the pressure gauge was set to 30
psi at the time of installation. Check the pressure at the CO² tank. Replace or recharge
if needed. The CO² supply line leading to the cabinet should be between 60-80 psi.
- The Quick Connect-Disconnect (QCD) to the juice Bag in Box is not tight. Reconnect
the QCD to the Bag in Box. The plunger must be fully depressed.
- Pinched hose. Check for a pinched hose between the cabinet and the tap tower.
- Symptom: The flow is sputtering when the tap faucet is opened.
- Cause:
- Low spirits level. Air in the lines will cause coughing and sputtering at the tap. Check
that there is spirits in the reservoir.
- The juice Bag in Box is almost empty. Check there is juice remaining in the box.
Connect a new box if needed.
- The Quick Connect-Disconnect (QCD) to the juice Bag in Box is not tight. Reconnect
the QCD to the Bag in Box. The plunger must be fully depressed.
JOSENG-FRM-RIC-4.32 Rev. D
Page 2
TECHNICAL DATA SHEET
HAMILTON BEACH / PROCTOR-SILEX, INC.
4421 WATERFRONT DRIVE GLEN ALLEN, VA 23060
ISSUE CODE
DRAWN BY:
ENG. IN CHG.
DATE:
APPROVED BY:
SP
6/21/14
DOC4905
INITIAL USE:
PICT. REF.
SHEET
DRAWING NO.
REV.
2 / 15
520008200
- Symptom: The flow is only juice when the tap faucet is opened; no spirits
dispensed.
- Cause:
- The spirits shutoff valve is turned to “Spirit Valve Closed: Clean”. Open the cabinet
door and rotate handle to “Spirit Valve Open: Dispense”.
- The filter in the spirits reservoir is clogged. Clean filter.
- The flow control orifice is clogged. Remove and clean flow control orifice.
- Symptom: The flow is only spirits when the tap faucet is opened; no juice is
dispensed.
- Cause:
- The juice Bag in Box is almost empty. Connect a new Bag in Box.
- The Quick Connect-Disconnect (QCD) to the juice Bag in Box is not tight. Reconnect
the QCD to the Bag in Box. The plunger must be fully depressed.
- Symptom: The pump fails to stop cycling even when the tap faucet is closed.
- Cause:
- There is a leak in the hoses. Check for leaks inside the cabinet and the hose running
from the cabinet to the tap.
- Faulty pump or pump auto-shutoff.
Installation Guide
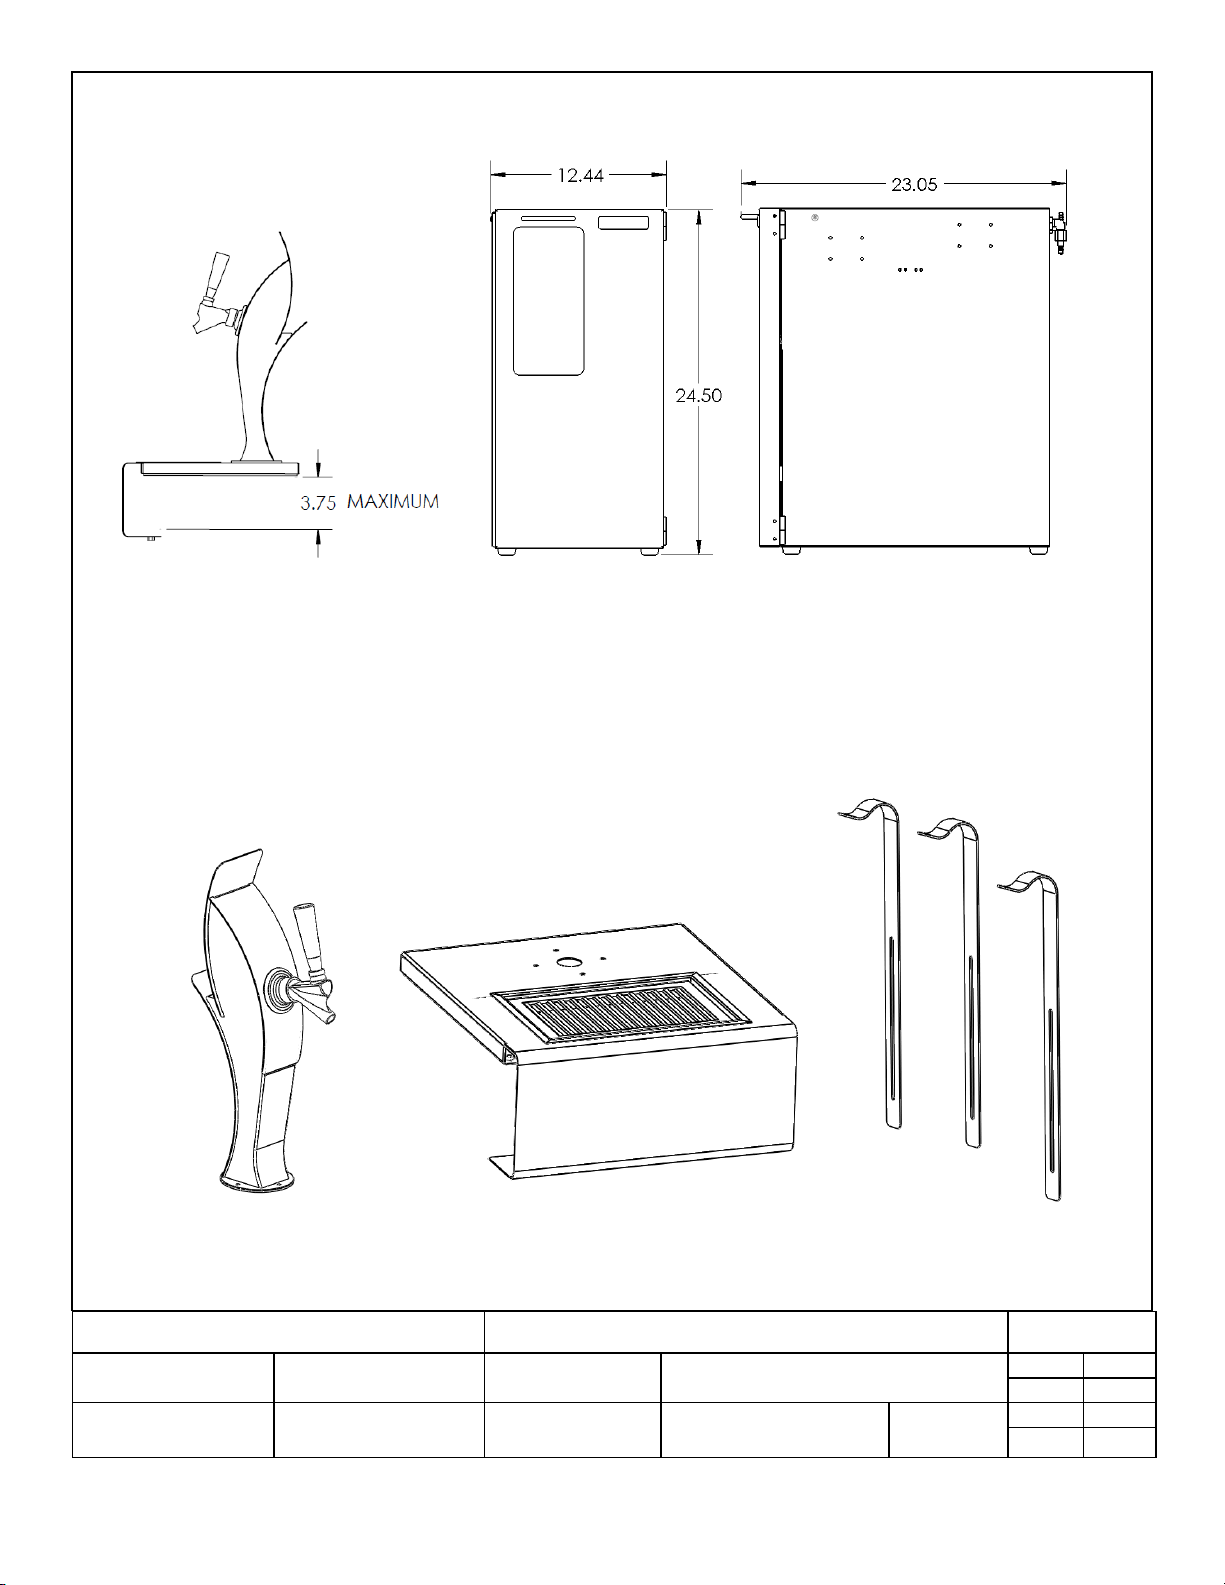
Site Preparation (See Figure 1)
The installation requires a CO2 supply hose to be within reach of the base cabinet, and it must be
long enough such that the cabinet can be pulled out for installation, cleaning, and maintenance.
The supply line pressure must be regulated such that it operates between 60 – 80 psi. The
supply line can be attached to the unit through a standard ¼“ female quick coupler or a hose can
be attached to a ¼“ barbed fitting and secured with a hose clamp.
The tap tower and base is designed to mount to a table or countertop, which has a flat surface to
clamp to. The countertop thickness cannot exceed 3.75 inches. The unit includes 8 feet of hose
to run from the faucet to the base cabinet. The base cabinet needs to be located such that it is
within reach of the hose, allowing the cabinet to be pulled out for installation, cleaning, and
maintenance.
JOSENG-FRM-RIC-4.32 Rev. D
Page 3
TECHNICAL DATA SHEET
HAMILTON BEACH / PROCTOR-SILEX, INC.
4421 WATERFRONT DRIVE GLEN ALLEN, VA 23060
ISSUE CODE
DRAWN BY:
ENG. IN CHG.
DATE:
APPROVED BY:
SP
6/21/14
DOC4905
INITIAL USE:
PICT. REF.
SHEET
DRAWING NO.
REV.
3 / 15
520008200
Figure 1. External dimensions
Installing the Equipment
1. Remove the equipment from the cabinet, which includes the tap tower, tower base, drip
tray and grate, spirit bottle hold downs (quantity 3), and a bag of hardware.
JOSENG-FRM-RIC-4.32 Rev. D
Page 4
TECHNICAL DATA SHEET
HAMILTON BEACH / PROCTOR-SILEX, INC.
4421 WATERFRONT DRIVE GLEN ALLEN, VA 23060
ISSUE CODE
DRAWN BY:
ENG. IN CHG.
DATE:
APPROVED BY:
SP
6/21/14
DOC4905
INITIAL USE:
PICT. REF.
SHEET
DRAWING NO.
REV.
4 / 15
520008200
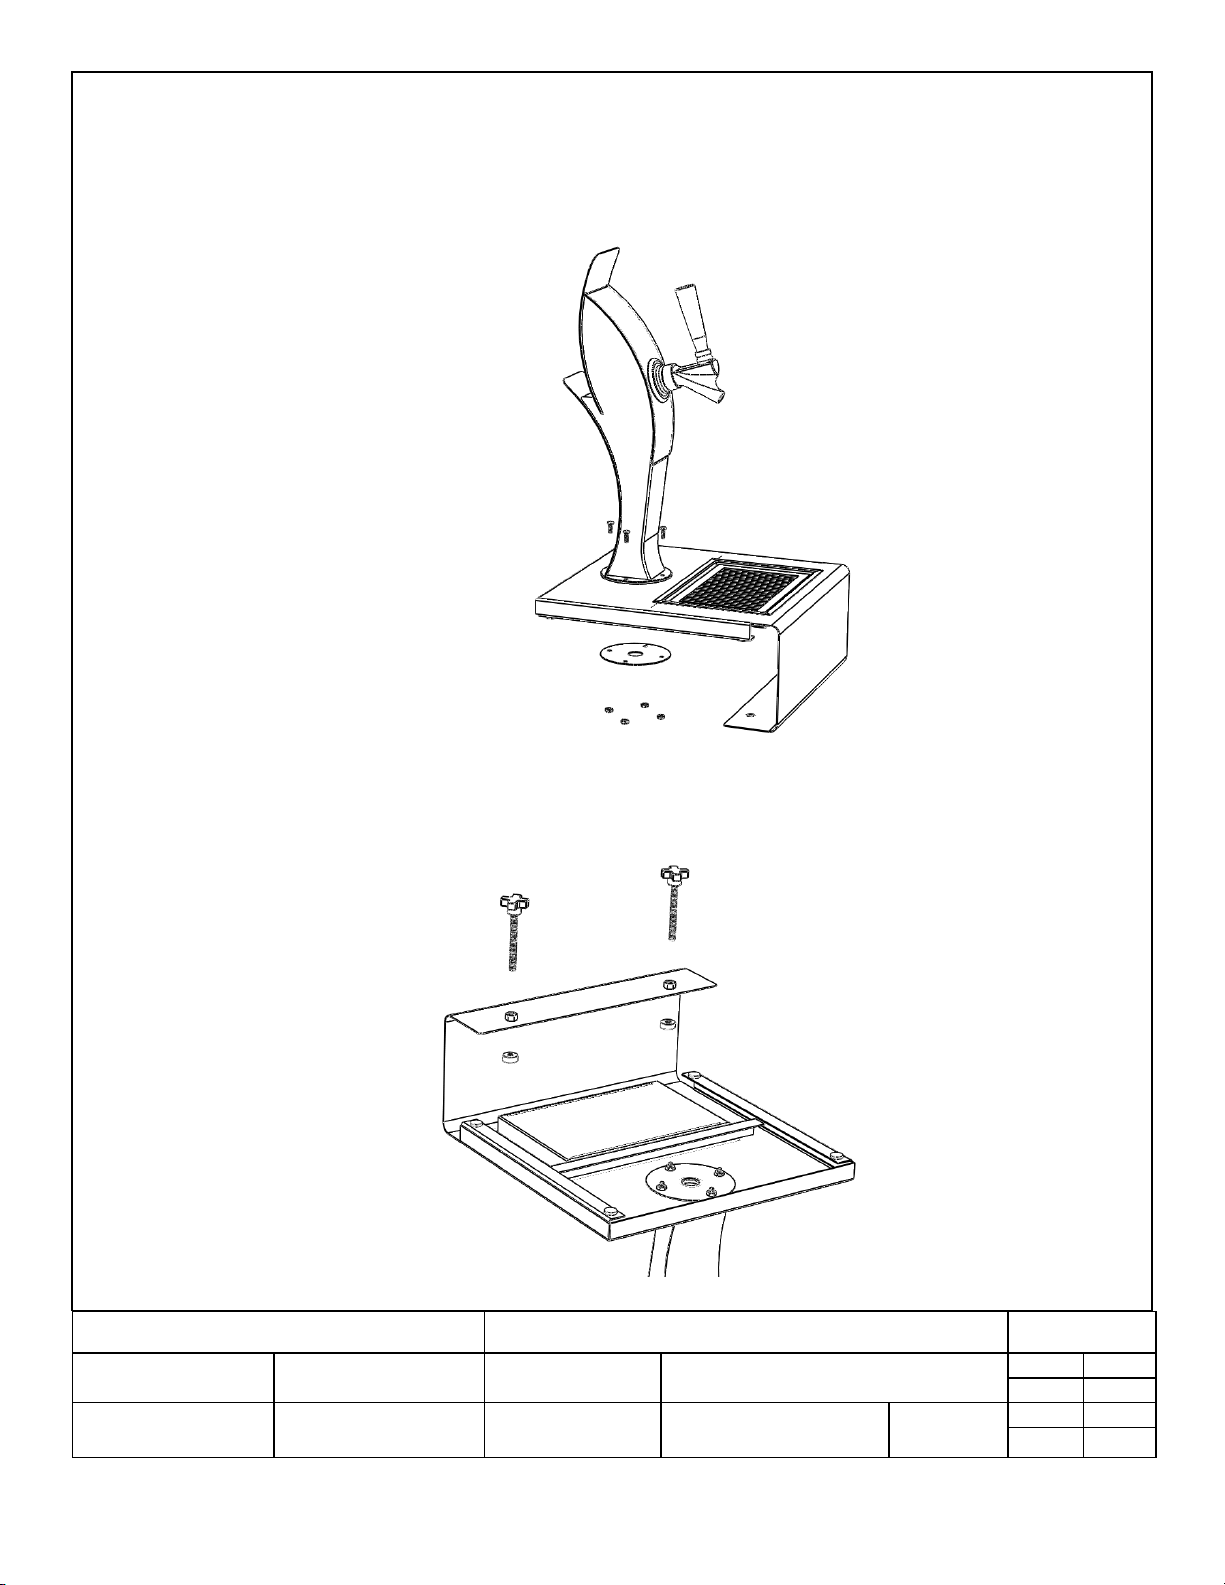
2. Install the tap tower to the tower base by threading the hose through the access hole, and
bolting the large washer to the base and tower with #8 screws, nuts, and lock washers
(quantity 4).
3. Install the thumb screws to the tower base. Snap the pads to each end of the thumb
screws.
JOSENG-FRM-RIC-4.32 Rev. D
Page 5
TECHNICAL DATA SHEET
HAMILTON BEACH / PROCTOR-SILEX, INC.
4421 WATERFRONT DRIVE GLEN ALLEN, VA 23060
ISSUE CODE
DRAWN BY:
ENG. IN CHG.
DATE:
APPROVED BY:
SP
6/21/14
DOC4905
INITIAL USE:
PICT. REF.
SHEET
DRAWING NO.
REV.
5 / 15
520008200
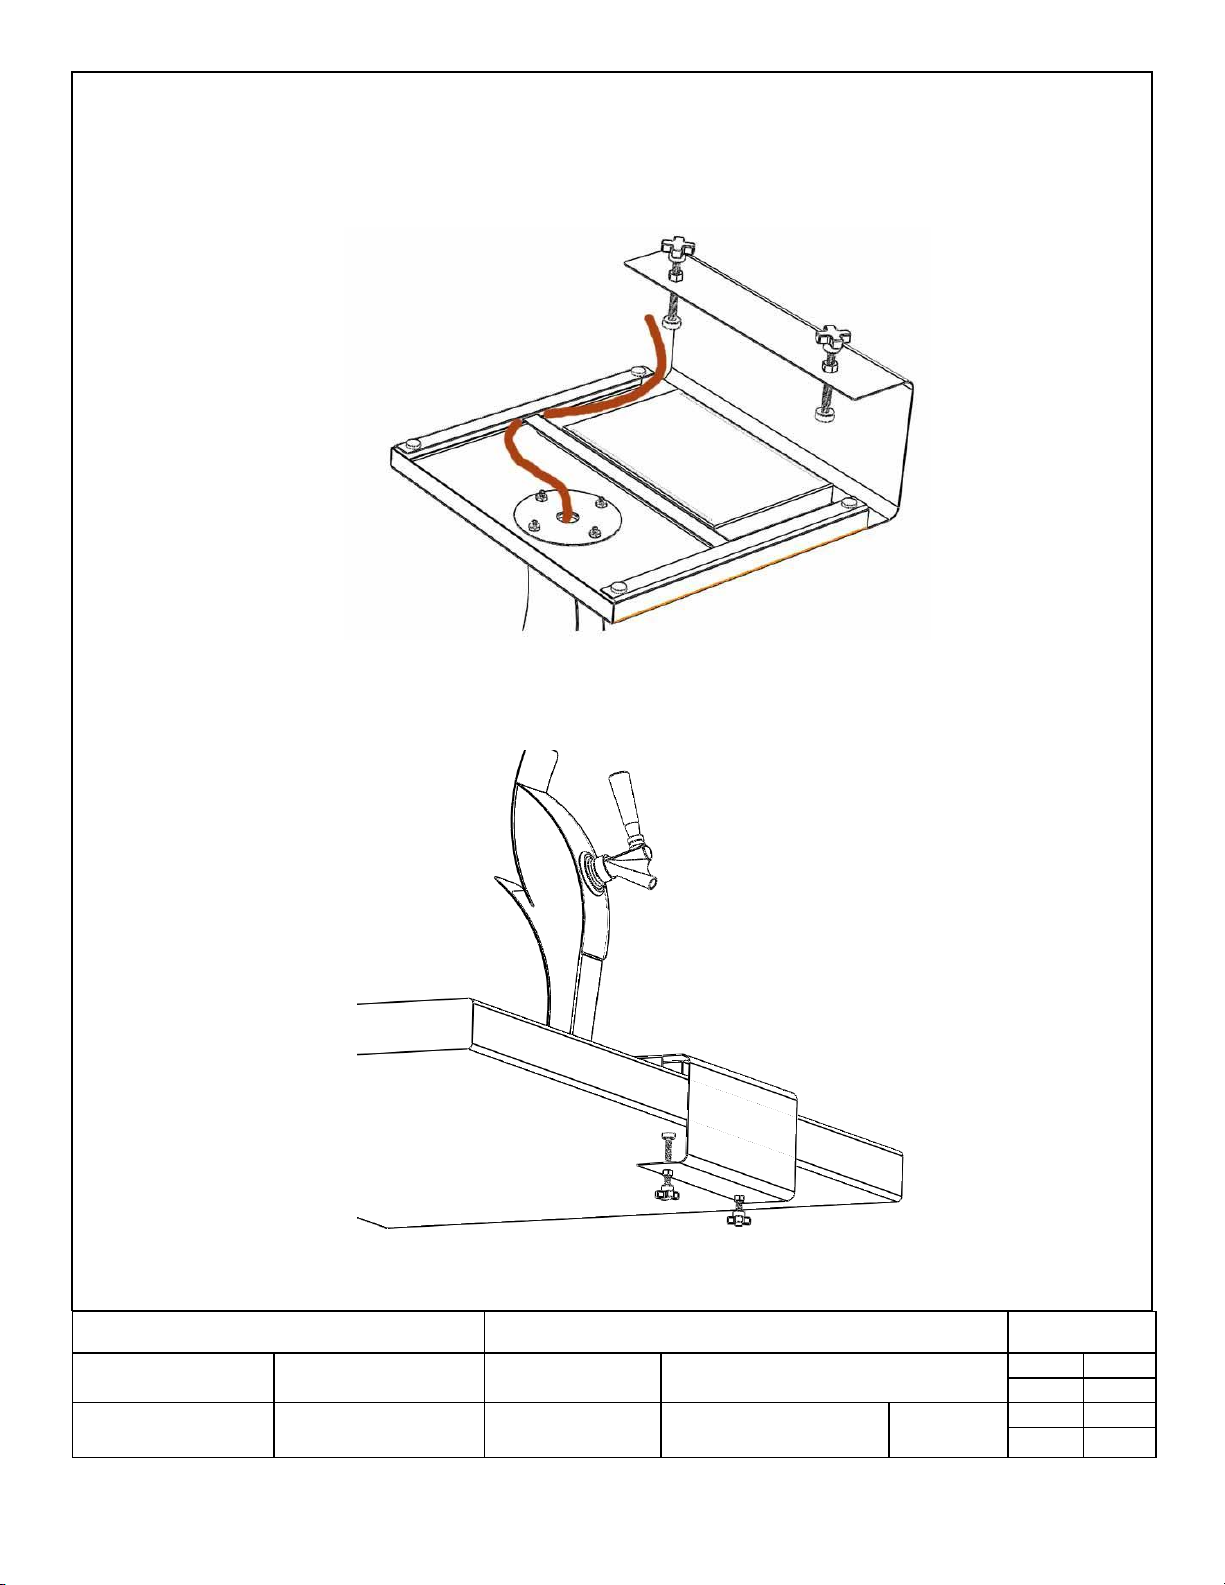
4. Route the hose along the edge of the tower base, which requires threading the hose past
the lateral support on the underside of the tower base.
5. Using the thumb screws, clamp the tap tower and base to the table or countertop, verifying
the hose is not pinched
JOSENG-FRM-RIC-4.32 Rev. D
Page 6
TECHNICAL DATA SHEET
HAMILTON BEACH / PROCTOR-SILEX, INC.
4421 WATERFRONT DRIVE GLEN ALLEN, VA 23060
ISSUE CODE
DRAWN BY:
ENG. IN CHG.
DATE:
APPROVED BY:
SP
6/21/14
DOC4905
INITIAL USE:
PICT. REF.
SHEET
DRAWING NO.
REV.
6 / 15
520008200
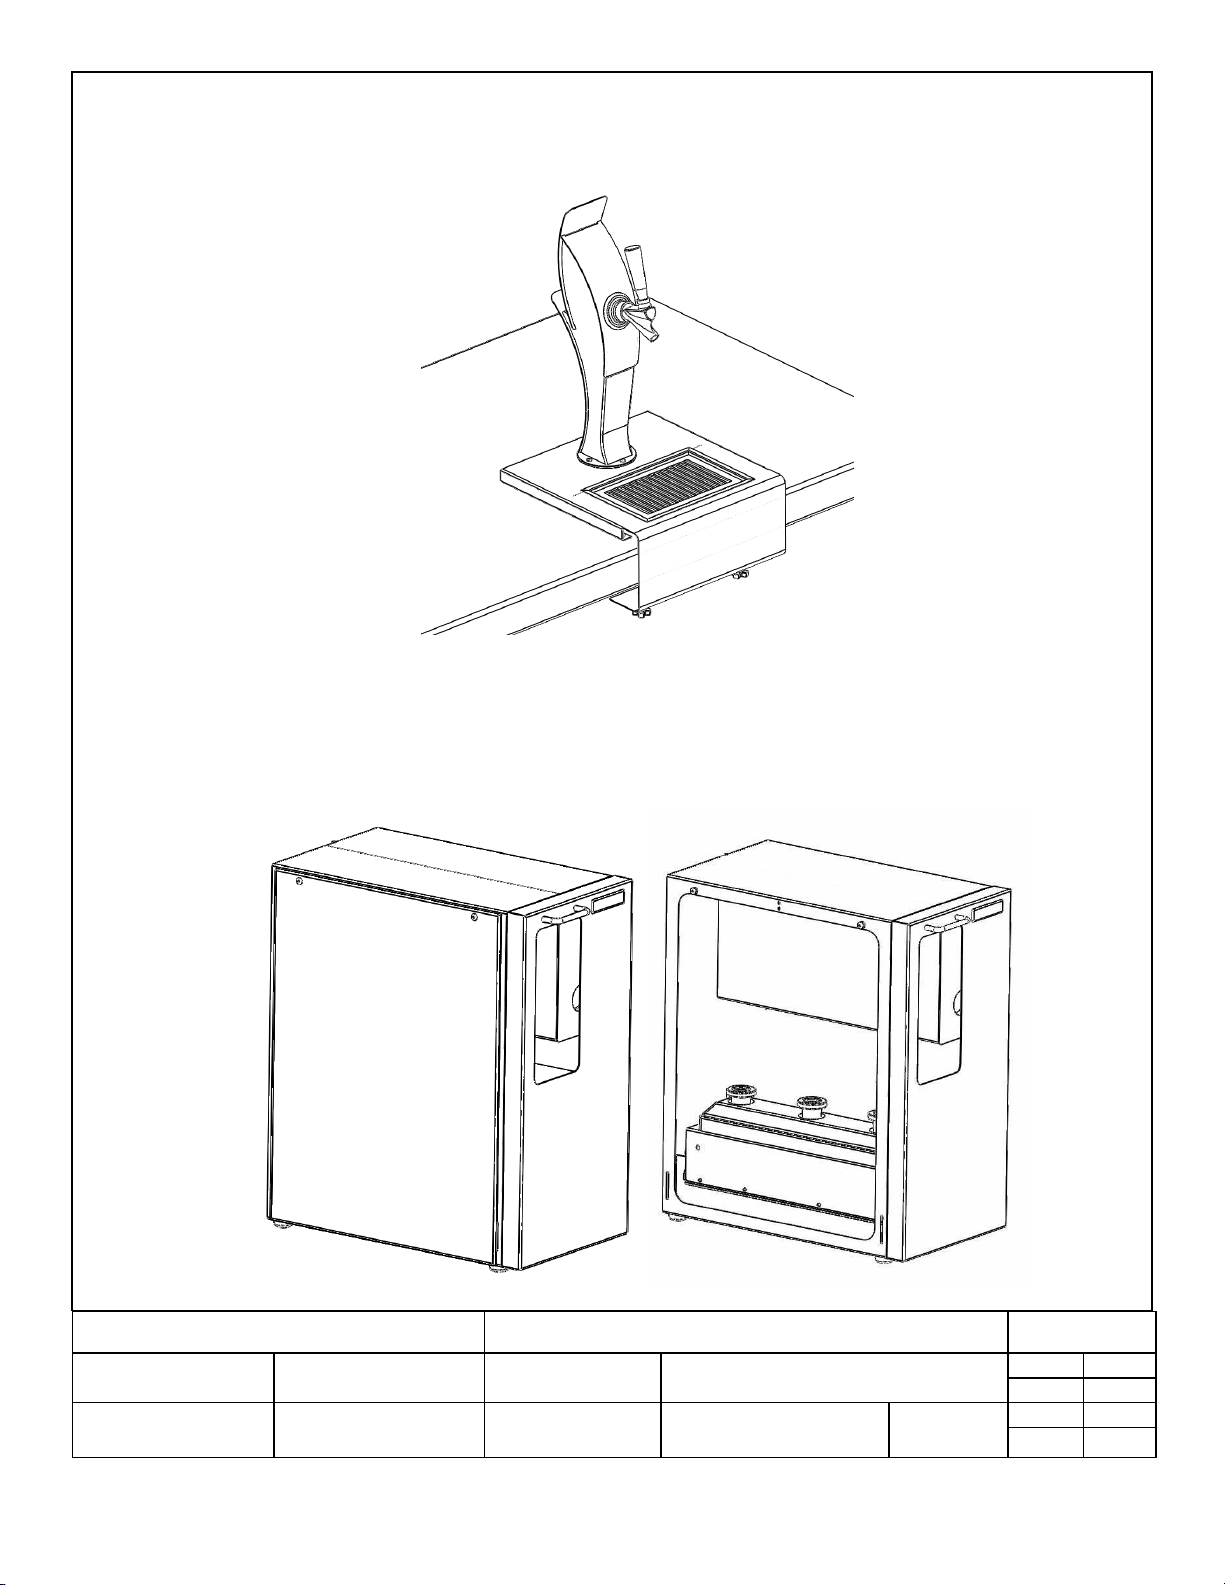
6. Install the drip tray and grate
7. Close the tap faucet by pushing the handle away from you.
8. On the base cabinet, remove the side access panel by removing two screws and lifting up
and off. Remove the front door by lifting up and off.
JOSENG-FRM-RIC-4.32 Rev. D
Page 7
TECHNICAL DATA SHEET
HAMILTON BEACH / PROCTOR-SILEX, INC.
4421 WATERFRONT DRIVE GLEN ALLEN, VA 23060
ISSUE CODE
DRAWN BY:
ENG. IN CHG.
DATE:
APPROVED BY:
SP
6/21/14
DOC4905
INITIAL USE:
PICT. REF.
SHEET
DRAWING NO.
REV.
7 / 15
520008200
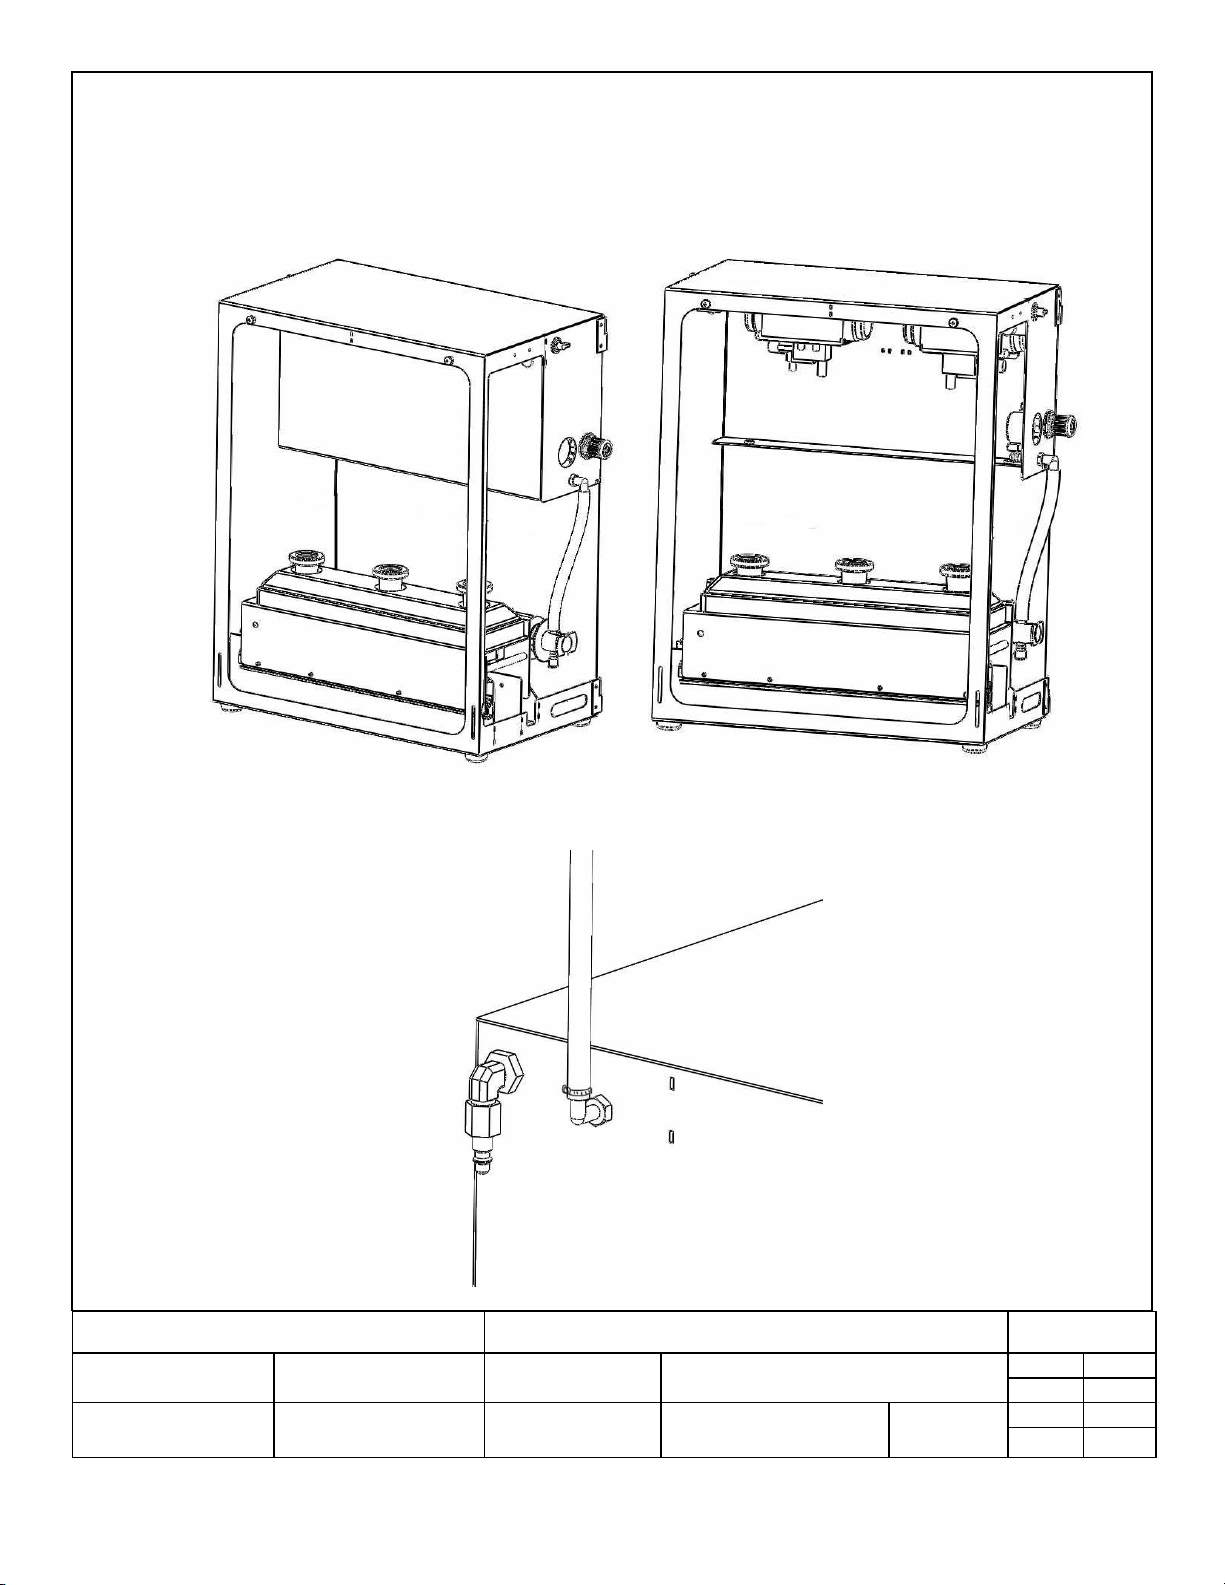
9. Pull the spirits reservoir drawer out, and remove the pump cover by removing four red
thumb screws.
10. Connect the hose from the tap tower to the base cabinet and secure with a hose clamp.
JOSENG-FRM-RIC-4.32 Rev. D
Page 8
TECHNICAL DATA SHEET
HAMILTON BEACH / PROCTOR-SILEX, INC.
4421 WATERFRONT DRIVE GLEN ALLEN, VA 23060
ISSUE CODE
DRAWN BY:
ENG. IN CHG.
DATE:
APPROVED BY:
SP
6/21/14
DOC4905
INITIAL USE:
PICT. REF.
SHEET
DRAWING NO.
REV.
8 / 15
520008200
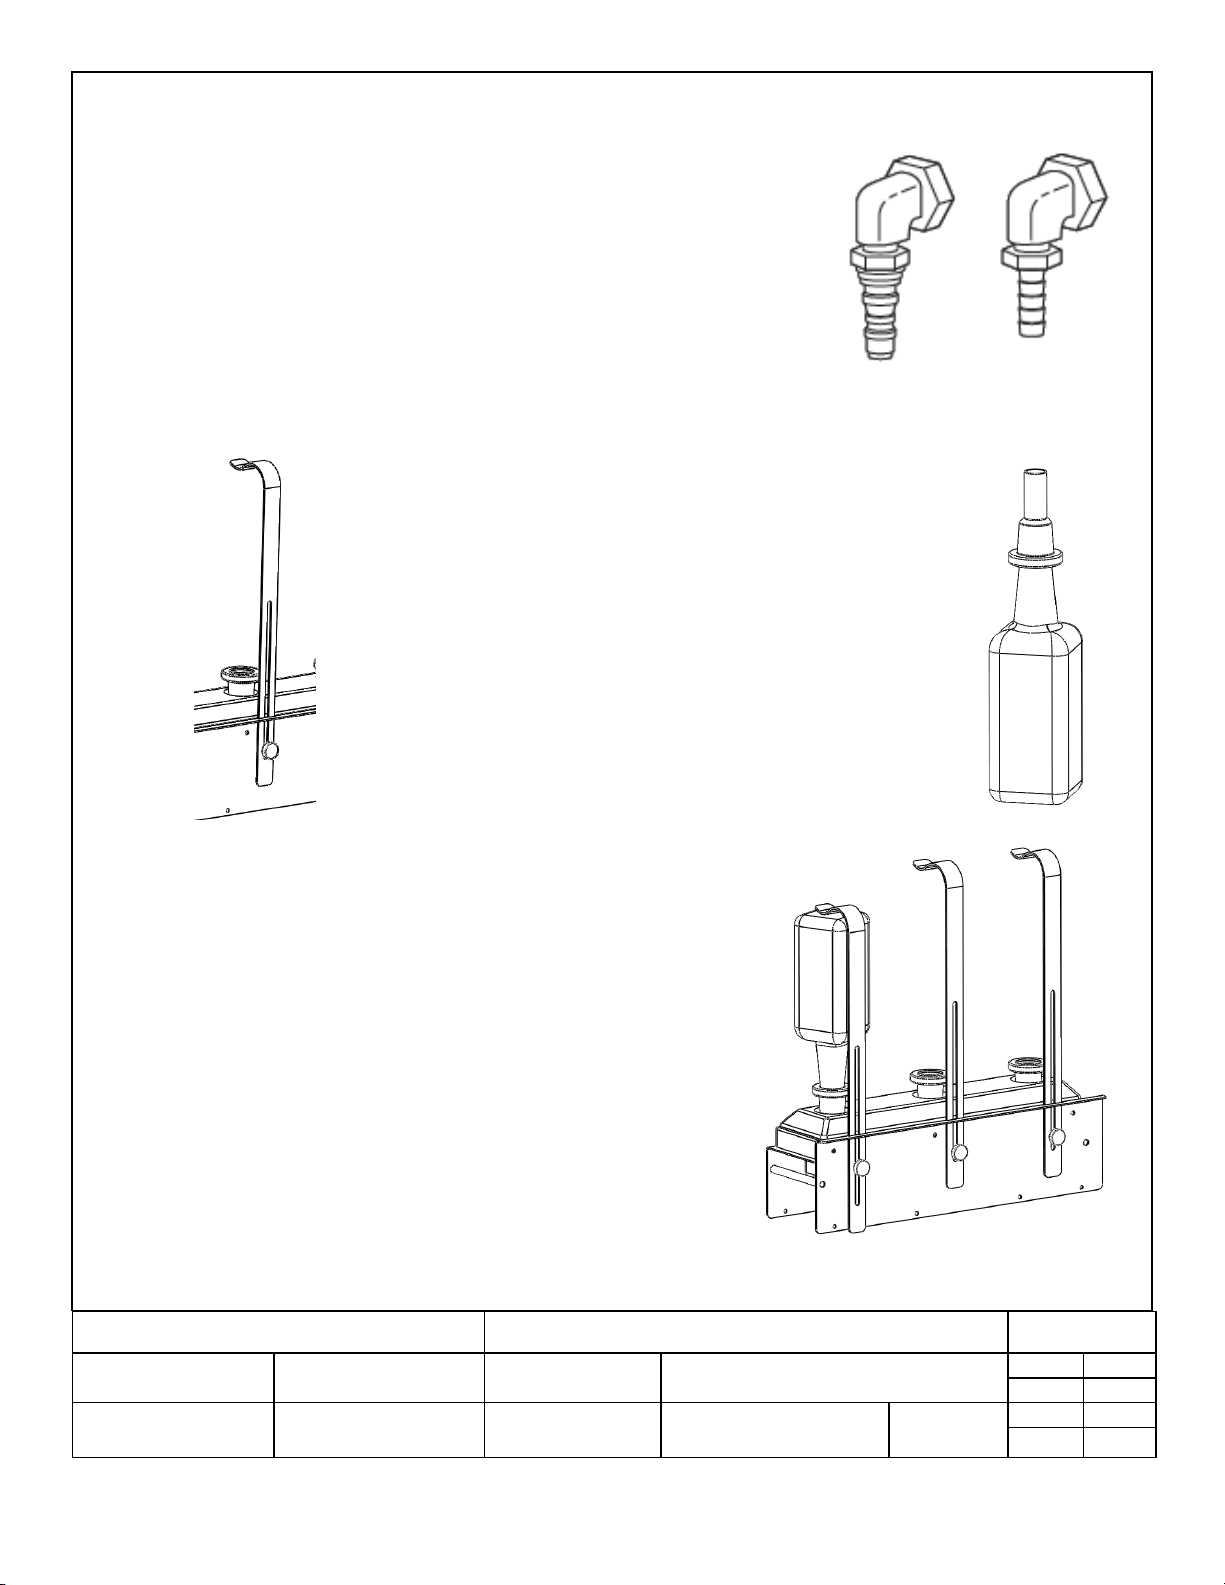
11. The unit comes assembled with a ¼ “ male quick coupler.
The CO² supply hose can use the matching female coupler
or the male quick coupler on the cabinet can be replaced
with a ¼ “ barbed fitting, included in the bag of hardware,
and the supply line is attached with a hose clamp.
12. Sanitize the unit as described below in Initial Sanitizing
Instructions
13. Check for leaks in the hoses and fittings and
tighten where needed. Verify hoses are not
pinched inside the cabinet, and install the pump
cover.
14. Install the bottle hold downs to the spirits reservoir
with thumb screws, and tighten with the hold
downs in the tallest position.
15. Remove the cap to the spirit bottle and slide a
bottle nozzle over the bottle.
16. Fold the tip of the bottle nozzle over, and insert the
nozzle into the spirits reservoir, tilting the bottle
upside down. Lower the bottle holder and secure by
tightening the thumb screw. Slide the drawer into the
cabinet after the spirits bottles are installed. The hold
down needs to be centered on the bottom of the
bottle. If the hold downs hit the cabinet when sliding
the drawer inside, then adjust the position of hold
down on the bottom of the bottle.
JOSENG-FRM-RIC-4.32 Rev. D
Page 9
TECHNICAL DATA SHEET
HAMILTON BEACH / PROCTOR-SILEX, INC.
4421 WATERFRONT DRIVE GLEN ALLEN, VA 23060
ISSUE CODE
DRAWN BY:
ENG. IN CHG.
DATE:
APPROVED BY:
SP
6/21/14
DOC4905
INITIAL USE:
PICT. REF.
SHEET
DRAWING NO.
REV.
9 / 15
520008200
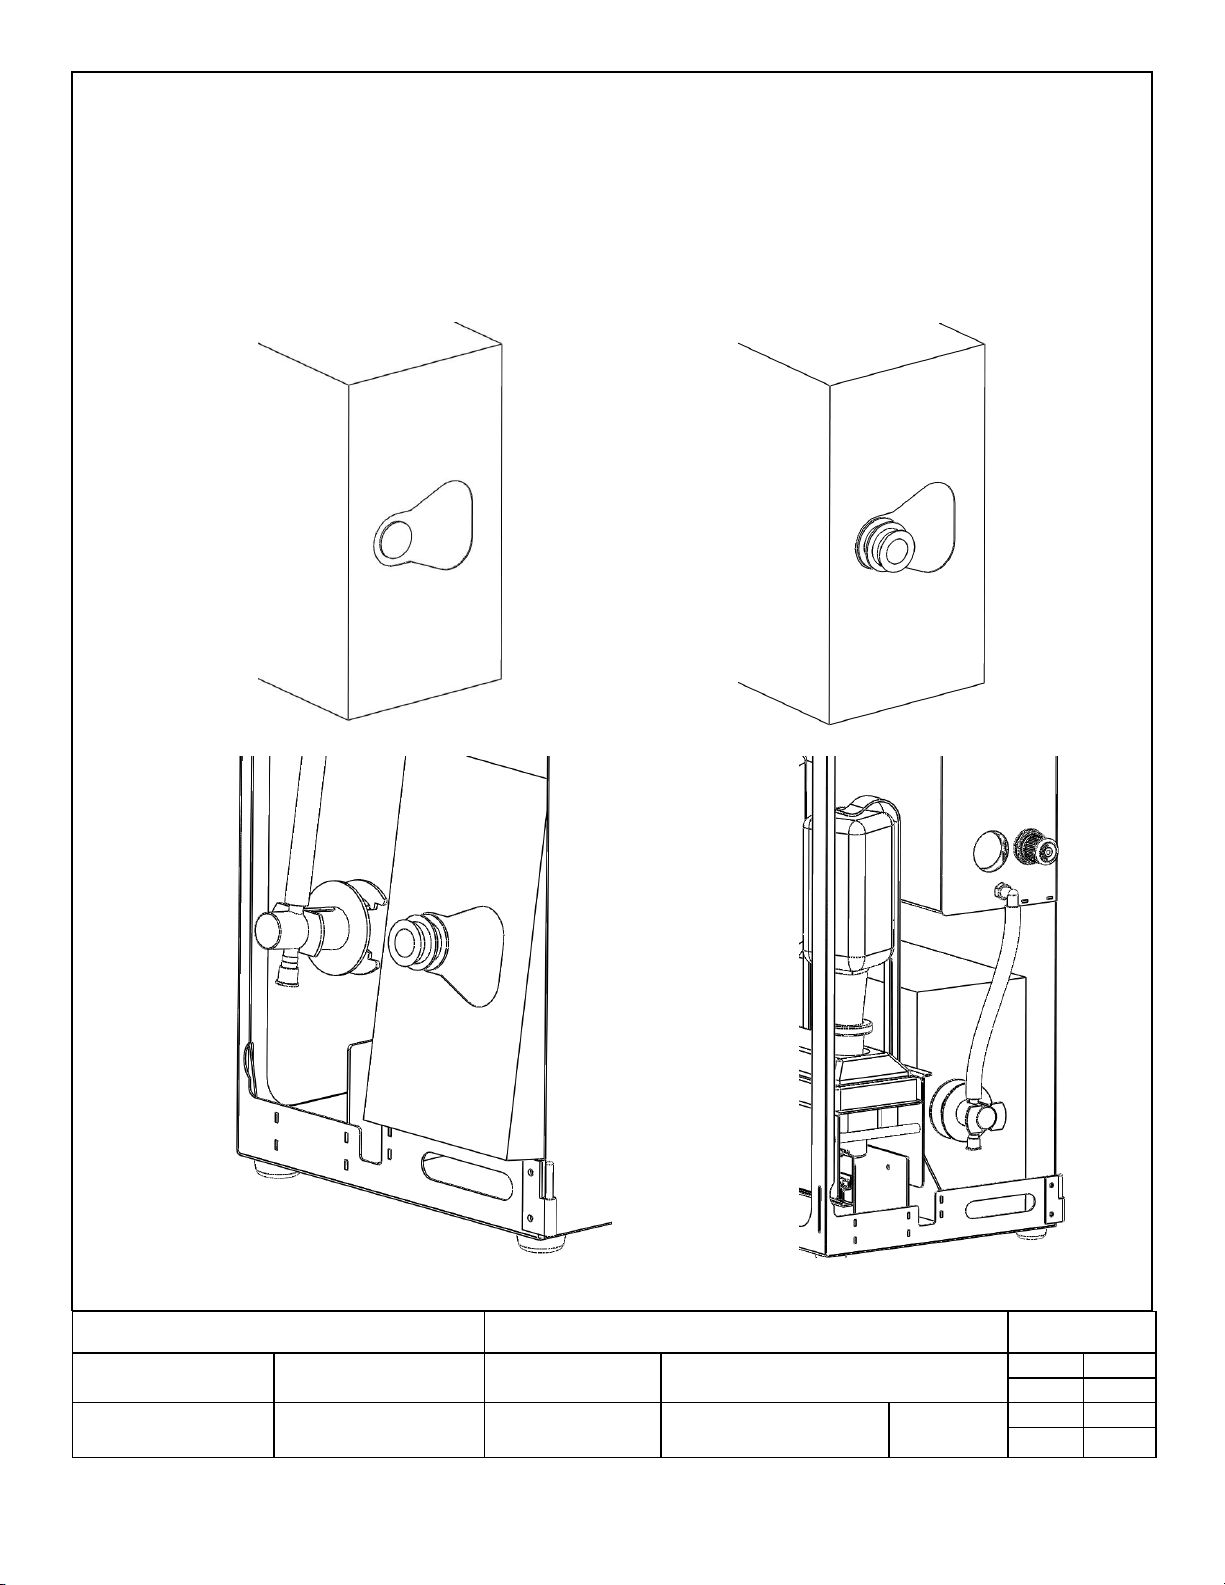
17. Install the bag in box (BIB) by opening the end of the box and pulling out the fitting. A cap is
installed over the fitting; pull to remove. Slide the fitting into the slot of the cardboard box.
Slide the box into the unit. Fully retract the plunger on the Quick Connect-Disconnect (QCD).
Attach the QCD by sliding it over the fitting. Firmly press down on the plunger to engage the
fitting.
JOSENG-FRM-RIC-4.32 Rev. D
Page 10
TECHNICAL DATA SHEET
HAMILTON BEACH / PROCTOR-SILEX, INC.
4421 WATERFRONT DRIVE GLEN ALLEN, VA 23060
ISSUE CODE
DRAWN BY:
ENG. IN CHG.
DATE:
APPROVED BY:
SP
6/21/14
DOC4905
INITIAL USE:
PICT. REF.
SHEET
DRAWING NO.
REV.
10 / 15
520008200
18. Adjust the unit regulator to 30 psi by pulling out the knob and rotating until the needle
indicates 30 psi. Push the regulator knob in until it “clicks” to prevent tampering.
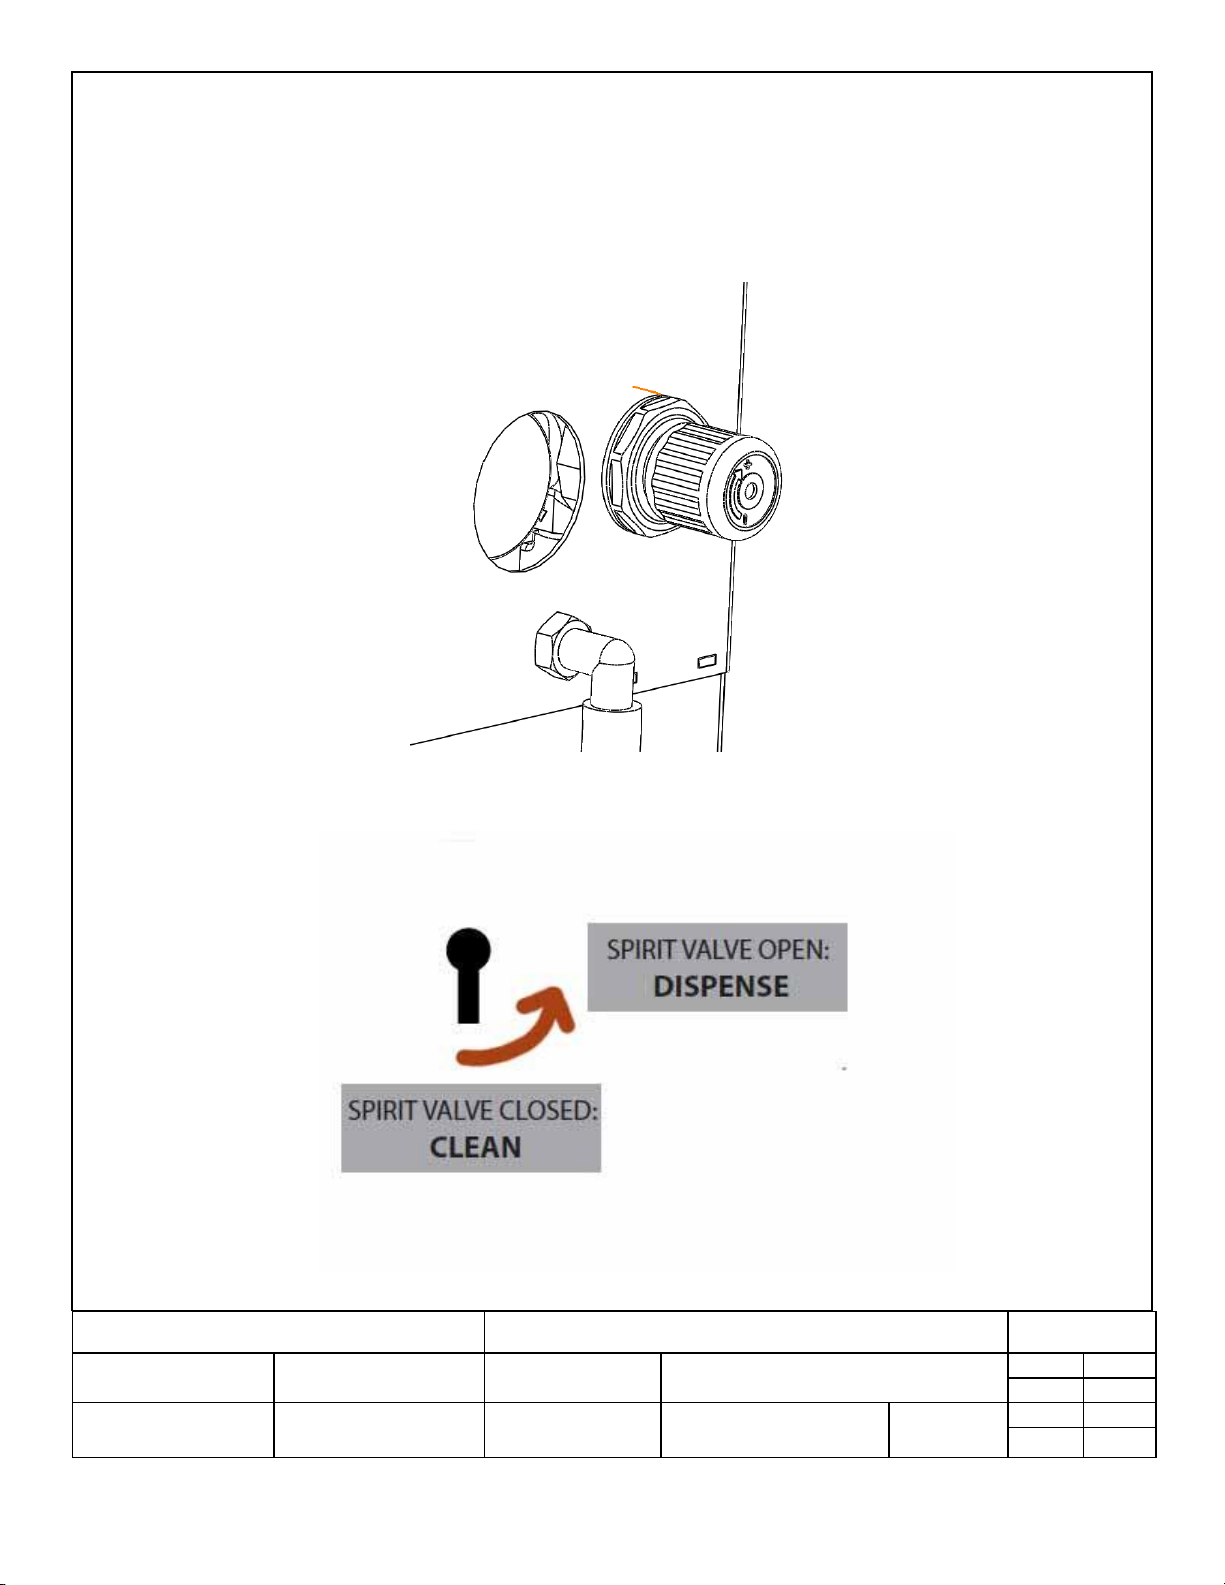
19. On the control panel, verify the spirits valve is rotated to Dispense
JOSENG-FRM-RIC-4.32 Rev. D
Page 11
TECHNICAL DATA SHEET
HAMILTON BEACH / PROCTOR-SILEX, INC.
4421 WATERFRONT DRIVE GLEN ALLEN, VA 23060
ISSUE CODE
DRAWN BY:
ENG. IN CHG.
DATE:
APPROVED BY:
SP
6/21/14
DOC4905
INITIAL USE:
PICT. REF.
SHEET
DRAWING NO.
REV.
11 / 15
520008200
20. There may be sanitizer or water in the hoses if it was just sanitized. Dispense about 12
ounces or until air is no longer trapped in the lines.
21. Check fittings and hoses for signs of pinching and leaking. Adjust and tighten where
needed. Check the pressure gauge again to confirm it indicates 30 psi.
22. Install the side access panel and front door.
23. Push the cabinet into position, verifying the hoses do not get pinched.
24. Open and close the front door to verify it travels freely.
25. Pull and push-in the alcohol drawer to verify it travels freely.
26. Sample a drink to ensure the integrity of the product. The unit is calibrated at the factory to
dispense at a ratio of three parts drink mix to one part spirits.
Initial Sanitizing Instructions
1. Prepare the sanitizing solution by mixing 0.24 ounces (1.5 teaspoons or 7 ml) 5% liquid
chlorine (liquid bleach – unscented, non-detergent, non-drip free, fresh, new product) in
one gallon of water, resulting in a 100 ppm concentration. Pour the solution into clean and
empty beverage bottles as needed to flush the system as described below.
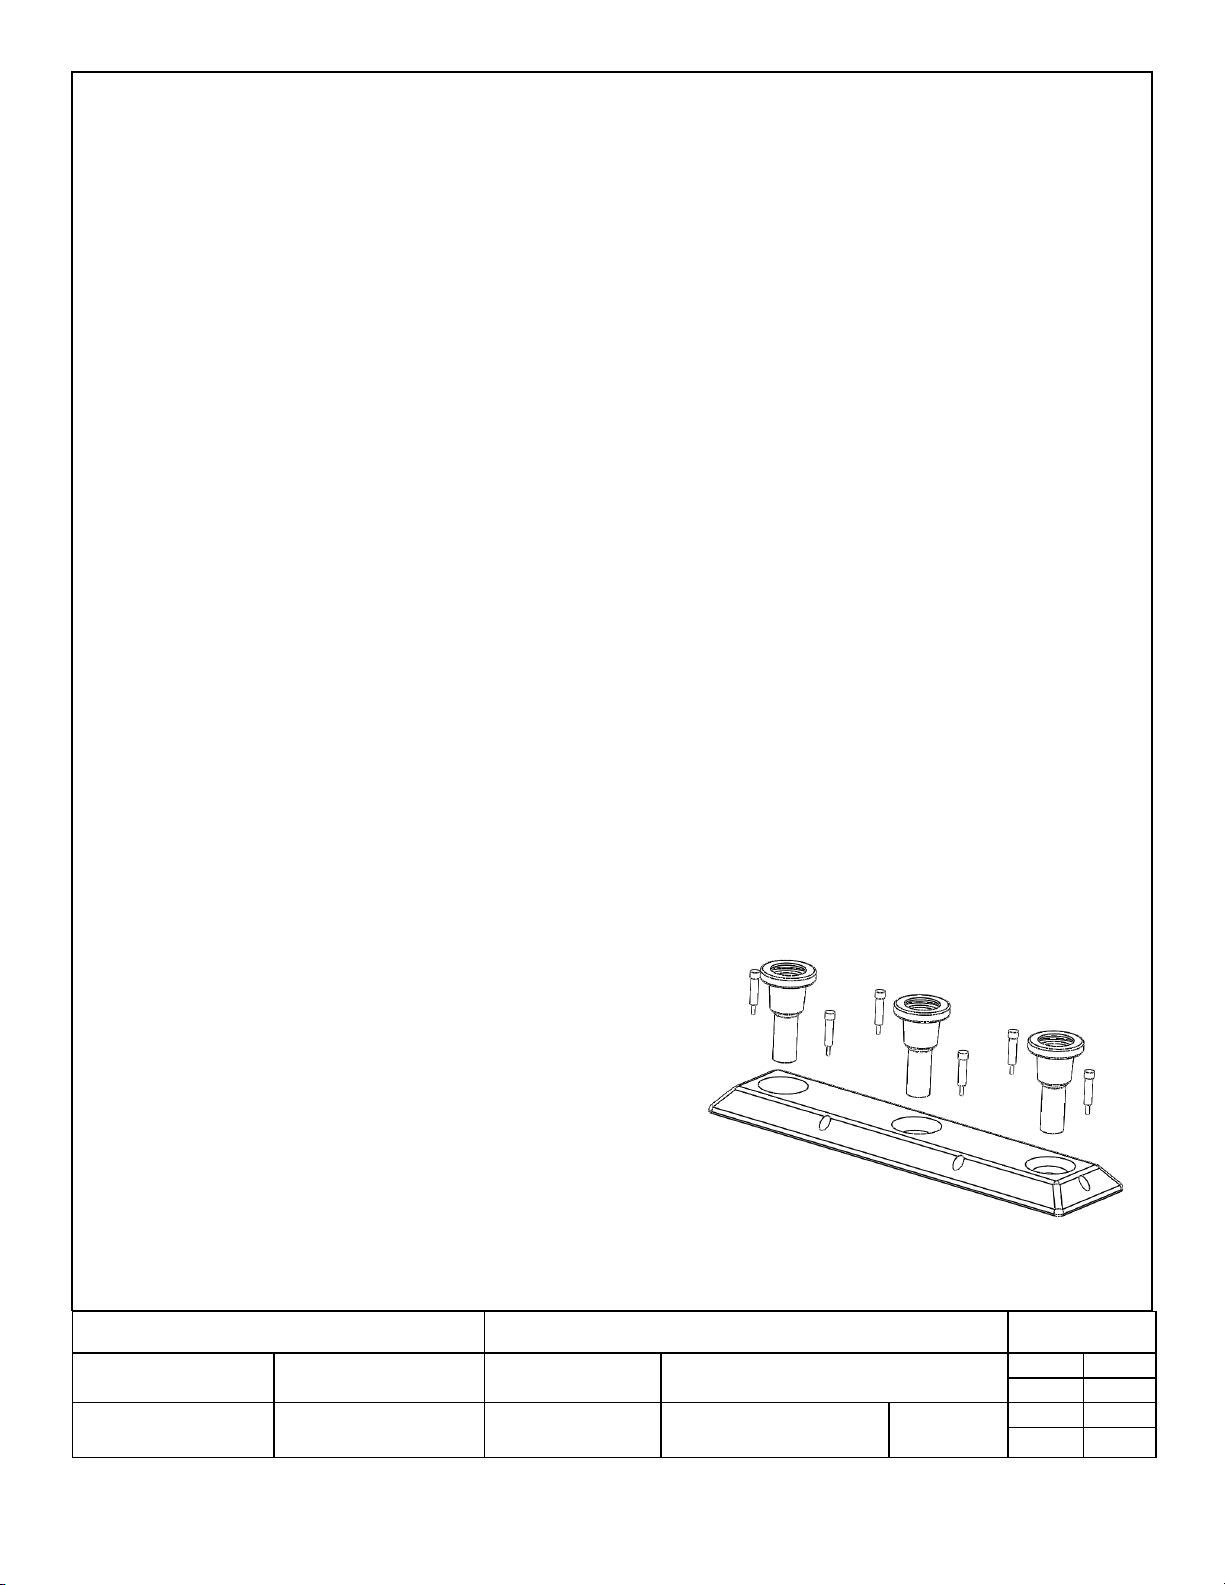
2. Remove the cover to the spirits reservoir by
loosening and removing the six screws.
Remove the filter and bottle nozzles. If the
reservoir cover has plugs in each of the holes,
remove the blue plugs. Immerse the filter and
bottle nozzles in the sanitizing solution. With a
soft brush, brush the inside and outside of the
cover with sanitizing solution, and rinse with
clear water. Remove the filter and bottle
nozzles from the sanitizing solution and rinse
with clear water.
JOSENG-FRM-RIC-4.32 Rev. D
Page 12
TECHNICAL DATA SHEET
HAMILTON BEACH / PROCTOR-SILEX, INC.
4421 WATERFRONT DRIVE GLEN ALLEN, VA 23060
ISSUE CODE
DRAWN BY:
ENG. IN CHG.
DATE:
APPROVED BY:
SP
6/21/14
DOC4905
INITIAL USE:
PICT. REF.
SHEET
DRAWING NO.
REV.
12 / 15
520008200
3. Fill the spirits reservoir with sanitizing solution which is about 25 oz. (750 ml). Using a soft
brush, brush the top portion of the inside of the spirits reservoir.
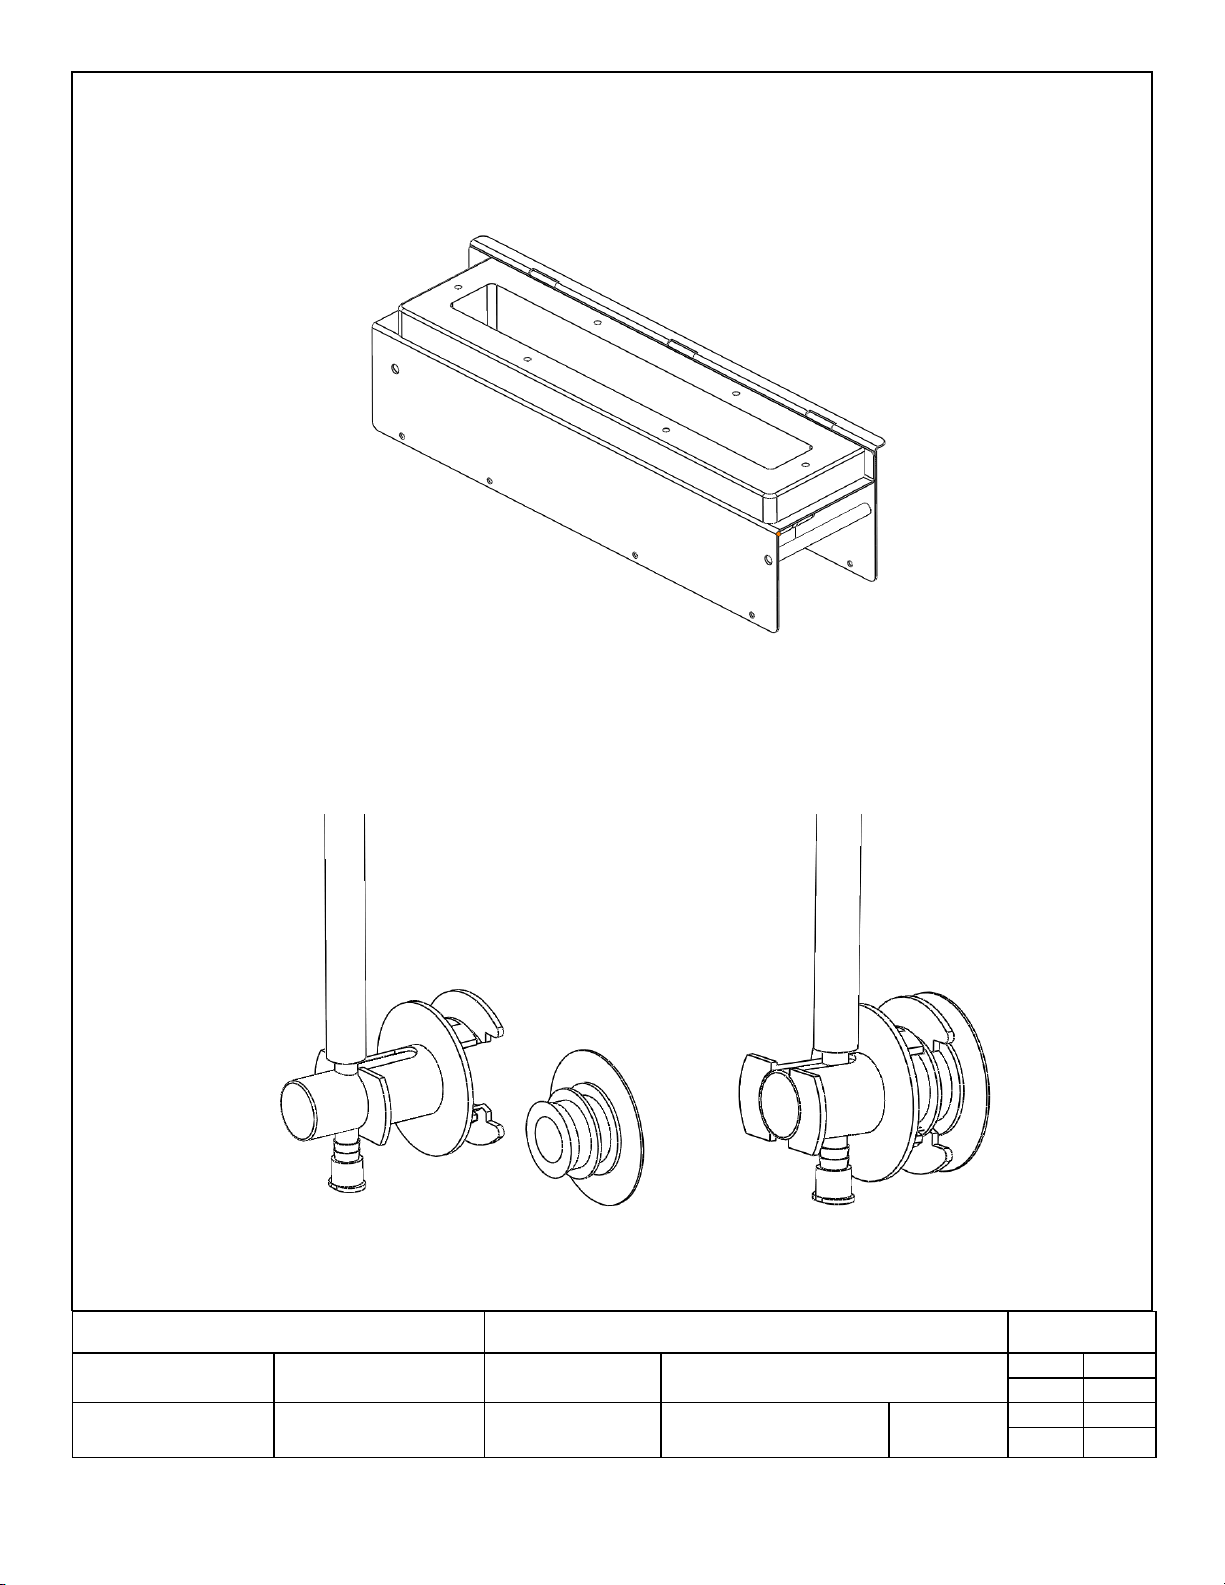
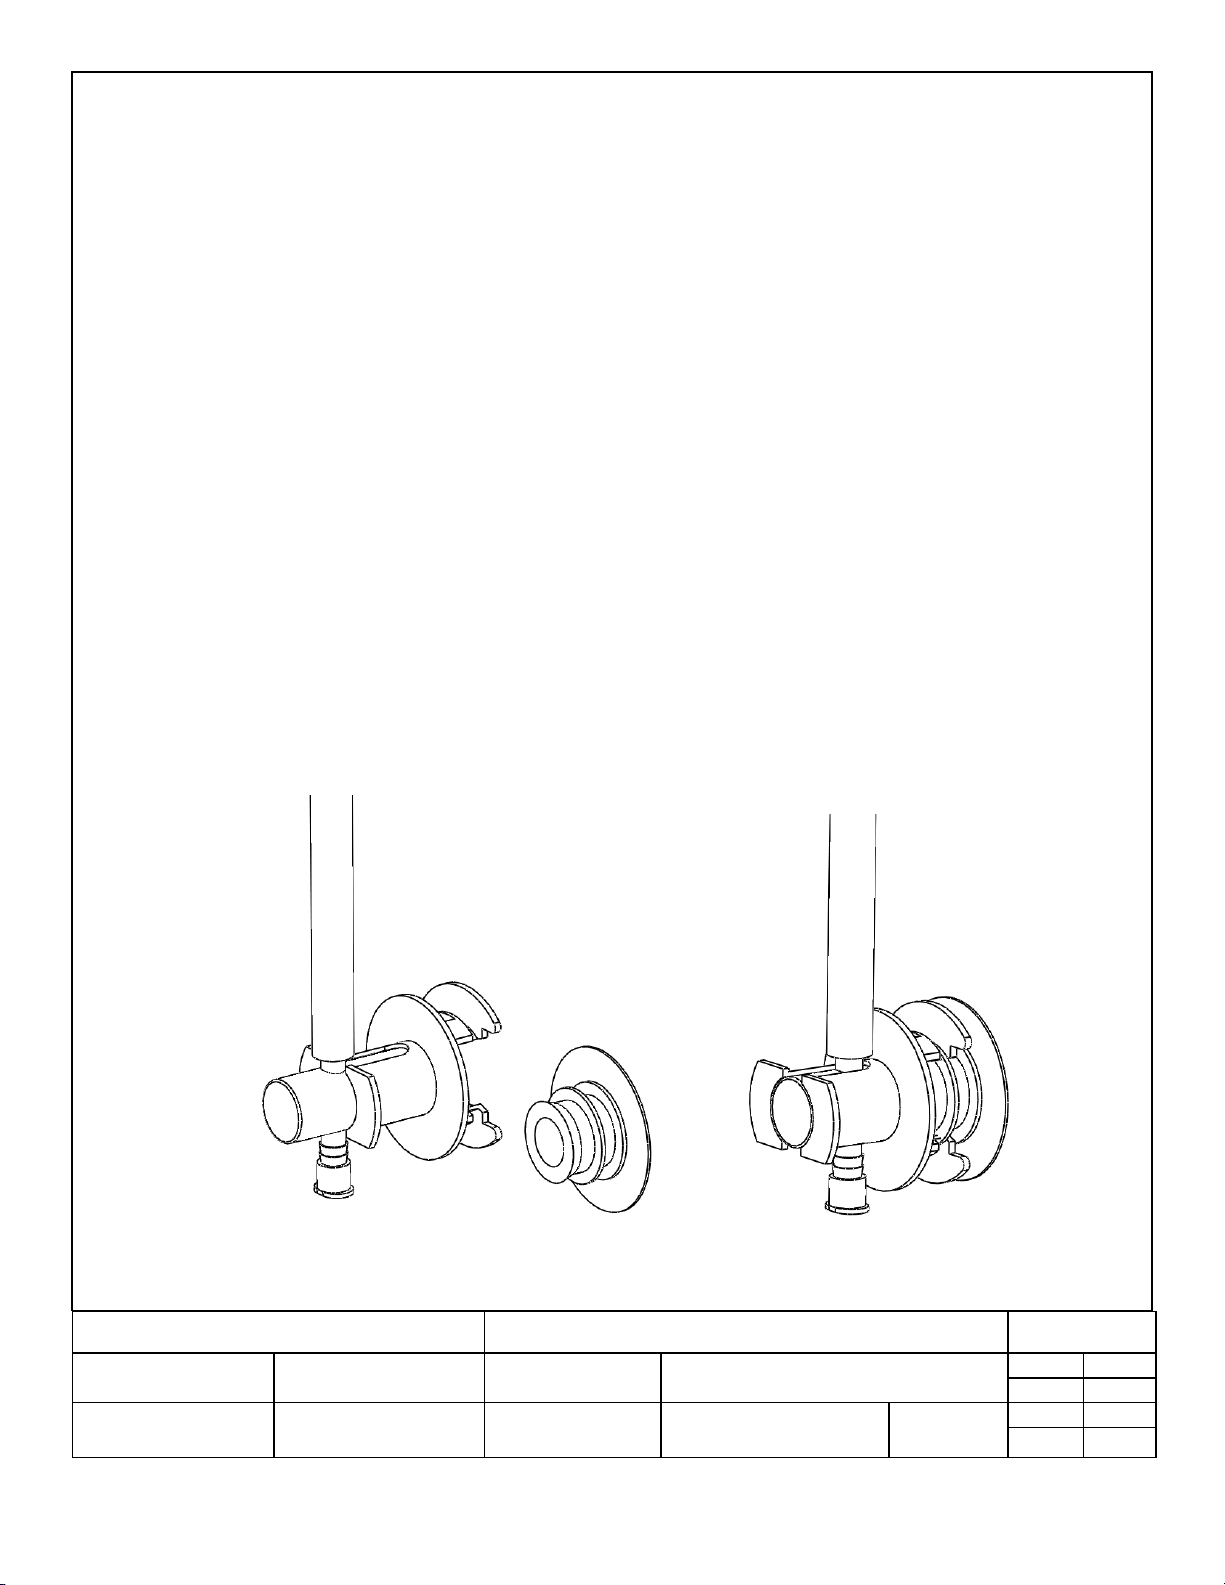
4. Attach the Bag in Box (BIB) cleaning connector to the Quick Connect-Disconnect (QCD)
by sliding it into position and depressing the plunger. Immerse the QCD in a bucket of
sanitizing solution.
JOSENG-FRM-RIC-4.32 Rev. D
Page 13
TECHNICAL DATA SHEET
HAMILTON BEACH / PROCTOR-SILEX, INC.
4421 WATERFRONT DRIVE GLEN ALLEN, VA 23060
ISSUE CODE
DRAWN BY:
ENG. IN CHG.
DATE:
APPROVED BY:
SP
6/21/14
DOC4905
INITIAL USE:
PICT. REF.
SHEET
DRAWING NO.
REV.
13 / 15
520008200
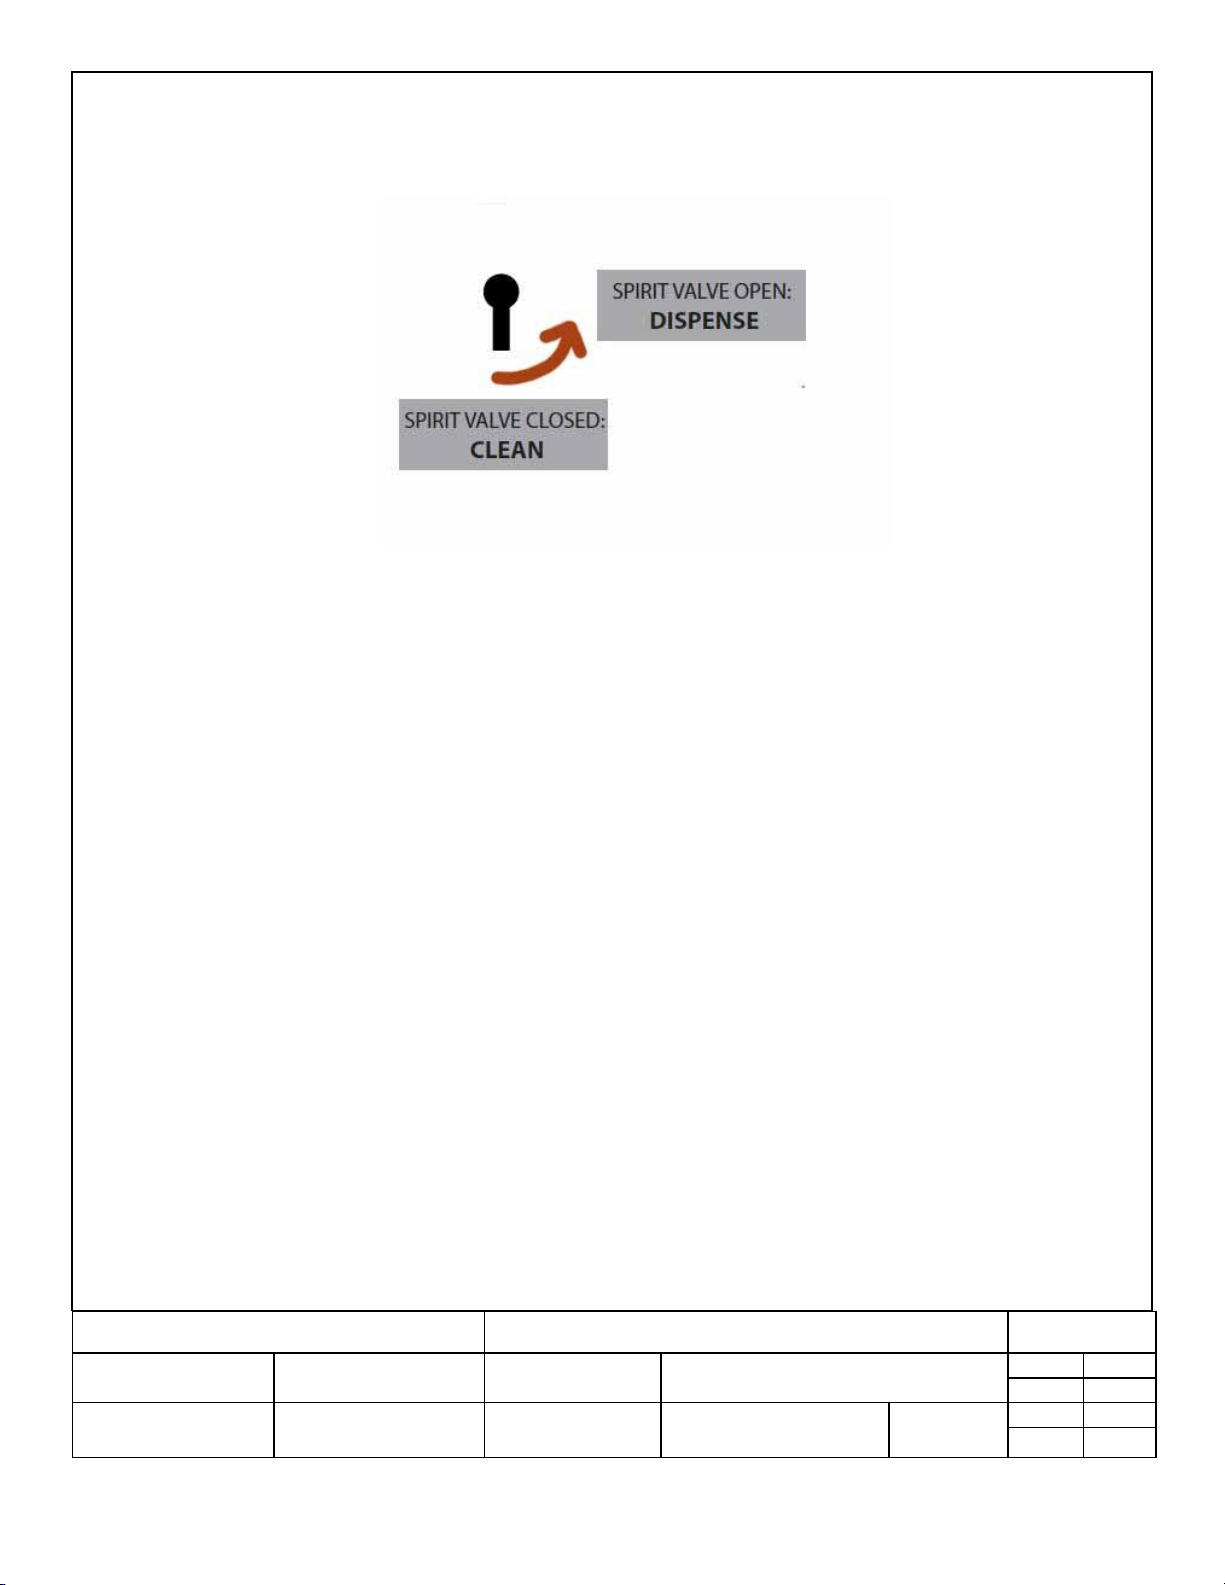
5. On the control panel, verify the spirits valve is rotated to Dispense.
6. Verify the CO² supply line pressure is between 60 – 80 psi. Connect the air hose to the
cabinet.
7. Pump the sanitizing solution through the system by opening the tap handle. Allow the
solution to work for 5 minutes.
8. Follow with clean water and pump until the spirits reservoir is empty.
9. Install the filter and cover to the spirits reservoir
JOSENG-FRM-RIC-4.32 Rev. D
Page 14
TECHNICAL DATA SHEET
HAMILTON BEACH / PROCTOR-SILEX, INC.
4421 WATERFRONT DRIVE GLEN ALLEN, VA 23060
ISSUE CODE
DRAWN BY:
ENG. IN CHG.
DATE:
APPROVED BY:
SP
6/21/14
DOC4905
INITIAL USE:
PICT. REF.
SHEET
DRAWING NO.
REV.
14 / 15
520008200
Daily Cleaning
1. Clean the faucet. Wash your hands with soap and water, and prepare a chlorine-based
sanitizer solution. Clean the inside of the faucet with a brush and sanitizer solution.
2. Clean the drip tray. Pour chlorine-based sanitizer solution over the tray. Remove grate.
Wipe down inside/outside of the drip pan with a clean cloth towel and chlorine based
sanitizer solution.
3. Wipe down tap tower and base
Weekly Cleaning
1. Clean BIB Connector. Wash your hands with soap and water, and prepare a sanitizer
solution. Disconnect juice line from BIB. Soak connector in a dedicated bucket of sanitizer
solution for 1 minute.
Monthly Cleaning
1. Open the front door
2. Disconnect and remove the juice BIB and wipe down the bottom of the cabinet.
3. Attach the Bag in Box (BIB) cleaning connector to the Quick Connect-Disconnect (QCD),
and immerse the QCD in a bucket of sanitizing solution. Alternatively a BevClean BIB can
be used.
JOSENG-FRM-RIC-4.32 Rev. D
Page 15

TECHNICAL DATA SHEET
HAMILTON BEACH / PROCTOR-SILEX, INC.
4421 WATERFRONT DRIVE GLEN ALLEN, VA 23060
ISSUE CODE
DRAWN BY:
ENG. IN CHG.
DATE:
APPROVED BY:
SP
6/21/14
DOC4905
INITIAL USE:
PICT. REF.
SHEET
DRAWING NO.
REV.
15 / 15
520008200
4. Rotate the spirits shutoff valve to Clean
5. Open the tap and let the sanitizer circulate through the hoses. When the fluid is running
clear, turn off the tap. Allow the solution to work for 5 minutes.
6. Reconnect the juice BIB
7. Dispense about 12 ounces or until juice flows continuously from the faucet
8. Rotate the spirits shutoff valve to Dispense
9. Dispense about 3 ounces or until air is no longer trapped in the lines.
10. Sample a drink to ensure the integrity of the product
11. Check fittings and hoses for signs of leakage and tighten where needed
12. Close the front door
Startup after extended shutdown
It is essential that the entire liquid system be sanitized after extended shutdown periods. First
purge all products from the system and rinse with clear water, and then follow the steps identified
in Initial Sanitizing Instructions
JOSENG-FRM-RIC-4.32 Rev. D
 Loading...