

Page 1
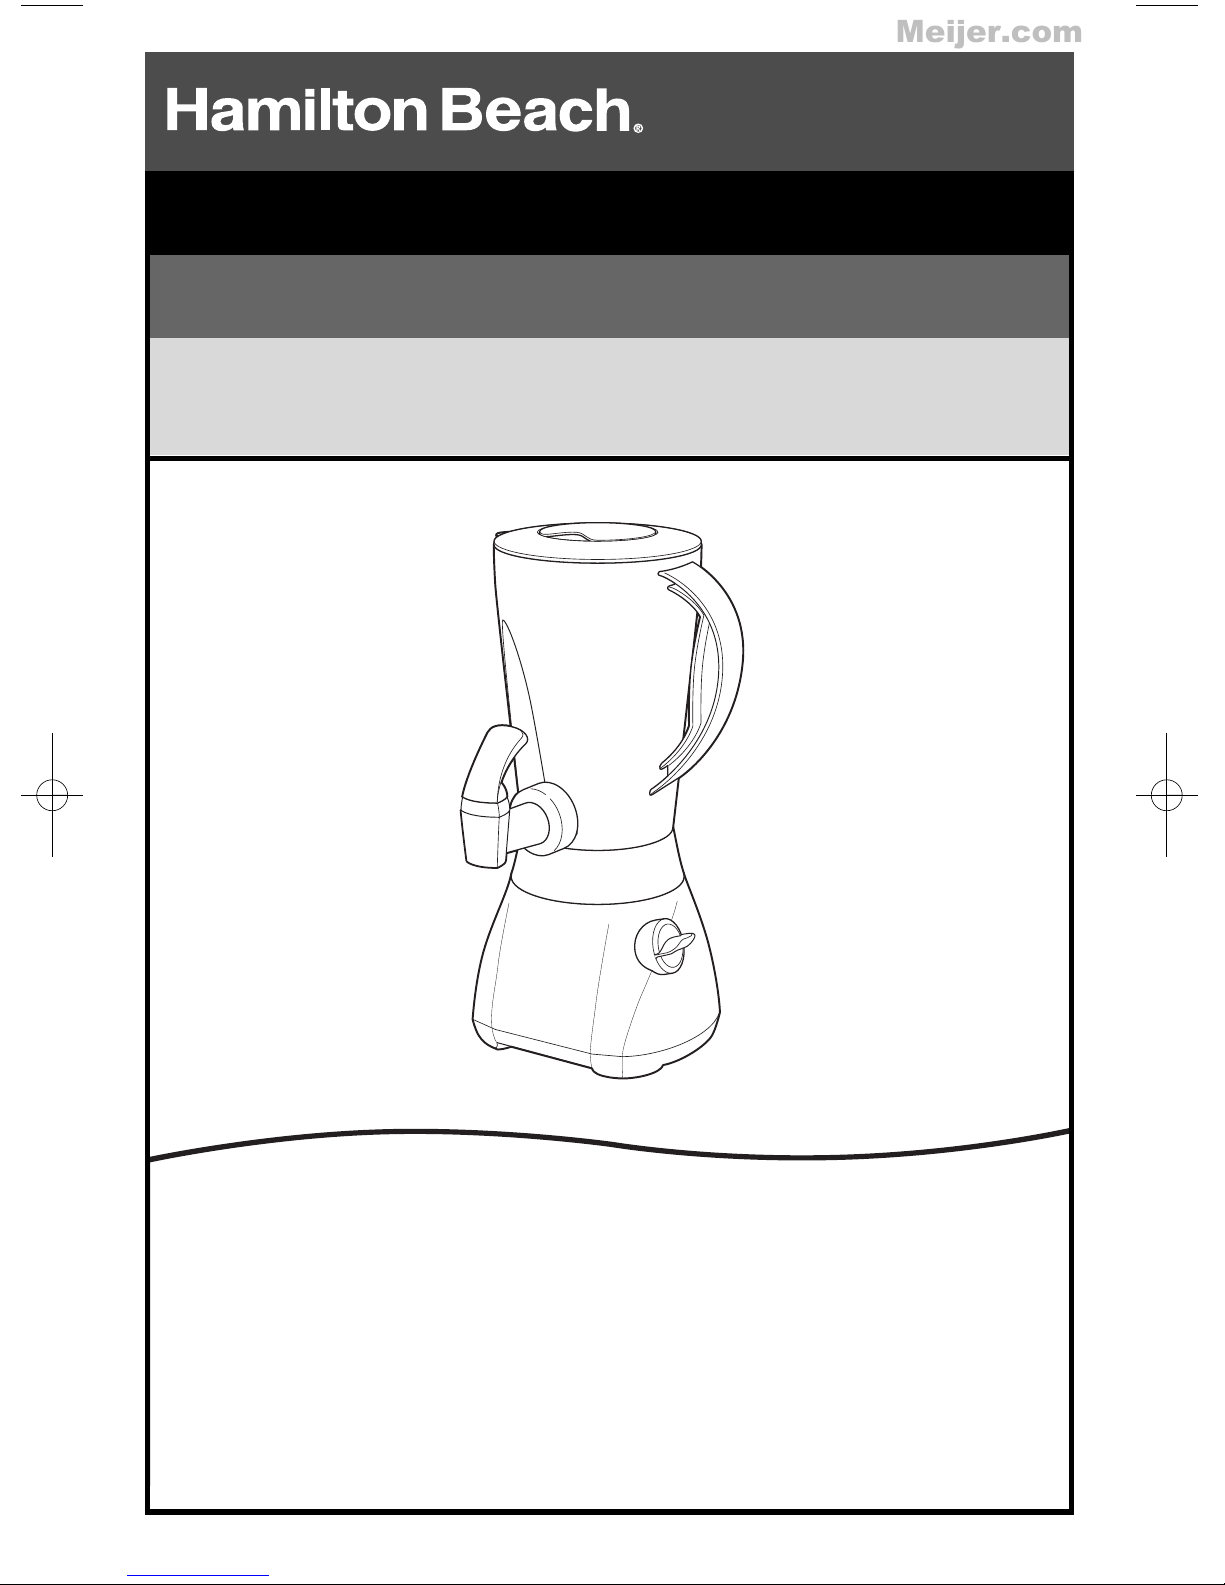
Blender
Meijer.com
READ BEFORE USE
Mélangeur
Licuadora
Le invitamos a leer cuidadosamente este instructivo antes de usar su aparato.
LIRE AVANT L’UTILISATION
LEA ANTES DE USAR
English .............................................................................................................................. 2
USA: 1-800-851-8900
Visit www.hamiltonbeach.com for our complete line of products and Use and Care Guides – as well as delicious
recipes, tips, and to register your product online!
Français .......................................................................................................................... 10
Canada : 1-800-267-2826
Rendez-vous sur www.hamiltonbeach.ca pour notre liste complète de produits et de nos manuels utilisateur – ainsi
que nos délicieuses recettes, nos conseils, et pour enregistrer votre produit en ligne !
Españo l............................................................................................................................ 18
En México: 01-800-71-16-100
¡Visite www.hamiltonbeach.com.mx para obtener nuestra línea completa de productos y las Guías de Uso y Cuidado,
además de deliciosas recetas, consejos, y para registrar su producto en línea!
840155503
Page 2
IMPORTANT SAFEGUARDS
Meijer.com
When using electric appliances, basic
safety precautions should always be
followed, including the following:
1. Read all instructions.
2. To protect against risk of electrical
shock, do not put cord, plug, base, or
motor in water or other liquid.
3. Close supervision is necessary when
any appliance is used by or near
children.
4. Unplug cord from outlet when not in
use, before putting on or taking off
parts, and before cleaning.
5. Avoid contacting moving parts.
6. Do not operate any appliance with a
damaged cord or plug, or after the
appliance malfunctions, or is dropped
or damaged in any manner. Call our
toll-free customer service number for
information on examination, repair or
electrical or mechanical adjustment.
7. The use of attachments, including
canning jars, not recommended or sold
by the appliance manufacturer may
cause a risk of injury to persons.
8. Do not use outdoors.
9. Do not let cord hang over edge of table
or counter, or touch hot surfaces,
including the stove.
10. Keep hands and utensils out of jar while
blending to reduce the risk of severe
injury to persons or damage to the
blender. A rubber spatula may be used
but must be used only when blender is
not running.
11. Blades are sharp; handle carefully –
especially when assembling, disassembling or cleaning inside blender jar.
12. Do not use a broken, chipped, or
cracked blender jar.
13. Do not use broken, cracked, or loose
cutting blades.
14. To reduce the risk of injury, never place
cutting assembly blades on base
without jar properly attached.
15. Always operate blender with lid in
place.
16. When blending hot liquids, remove
center-piece of two-piece lid. Hot liquids
may push lid off jar during blending.
To prevent possible burns: Do not fill
blender jar beyond the 3 cup (750 ml)
level. With the protection of an oven
mitt or thick towel, place one hand on
top of lid. Keep exposed skin away
from lid. Start blending at lowest speed.
17. Screw on cutting assembly firmly. Injury
can result if moving blades accidentally
become exposed.
18. If the jar should turn when the motor is
switched ON, switch OFF immediately
and tighten jar onto cutting assembly.
19. Do not leave blender unattended while
it is operating.
20. To disconnect cord, turn the control to
OFF. Then remove plug from wall outlet.
21. Do not use appliance for other than
intended purpose.
SAVE THESE INSTRUCTIONS!
2
Page 3
Other Consumer Safety Information
Meijer.com
This appliance is intended for household
use only. Use for food or liquids only.
WARNING! Shock Hazard: This appliance has
a polarized plug (one wide blade) that reduces
the risk of electric shock. The plug fits only
one way into a polarized outlet. Do not defeat
the safety purpose of the plug by modifying
the plug in any way or by using an adapter. If
the plug does not fit, reverse the plug. If it still
does not fit, have an electrician replace the
outlet.
The length of the cord used on this appliance
was selected to reduce the hazards of
becoming tangled in, or tripping over, a longer
cord. If a longer cord is necessary, an
approved extension cord may be used. The
electrical rating of the extension cord must be
equal to or greater than the rating of the
blender. Care must be taken to arrange the
extension cord so that it will not drape over
the countertop or tabletop where it can be
pulled on by children or accidentally tripped
over.
Do not place blender jar in the freezer filled
with food or liquid. The contents may freeze
and may result in damage to the cutting
blades, jar, blender and possibly result in
personal injury.
NOTICE: To prevent leakage of liquids from
your blender jar, the round rubber gasket
must be properly placed between jar and
cutting assembly as shown in the diagram
on page 4.
Wattage/Peak Power Information
The wattage/ampere rating of the blender is
determined by an Underwriter’s Laboratory
test and is based on available cutting blades
and jar combinations that may not be provided
with your unit, but are available as replacement parts. This is a measure of input
wattage/amperes after 30 seconds of operation. The blender as provided may draw
significantly less power.
Peak power is the measure of the motor
wattage during the first seconds of operation.
This is when a blender requires the most
power to crush ice, frozen fruit, etc. This is a
better measure of what a blender motor can
consume when power is needed most.
Optional Accessory
Hamilton Beach Stay or Go™ Personal
Blending Jar (AC16) may be purchased
separately and used with this appliance.
3
Page 4
Parts and Features
Meijer.com
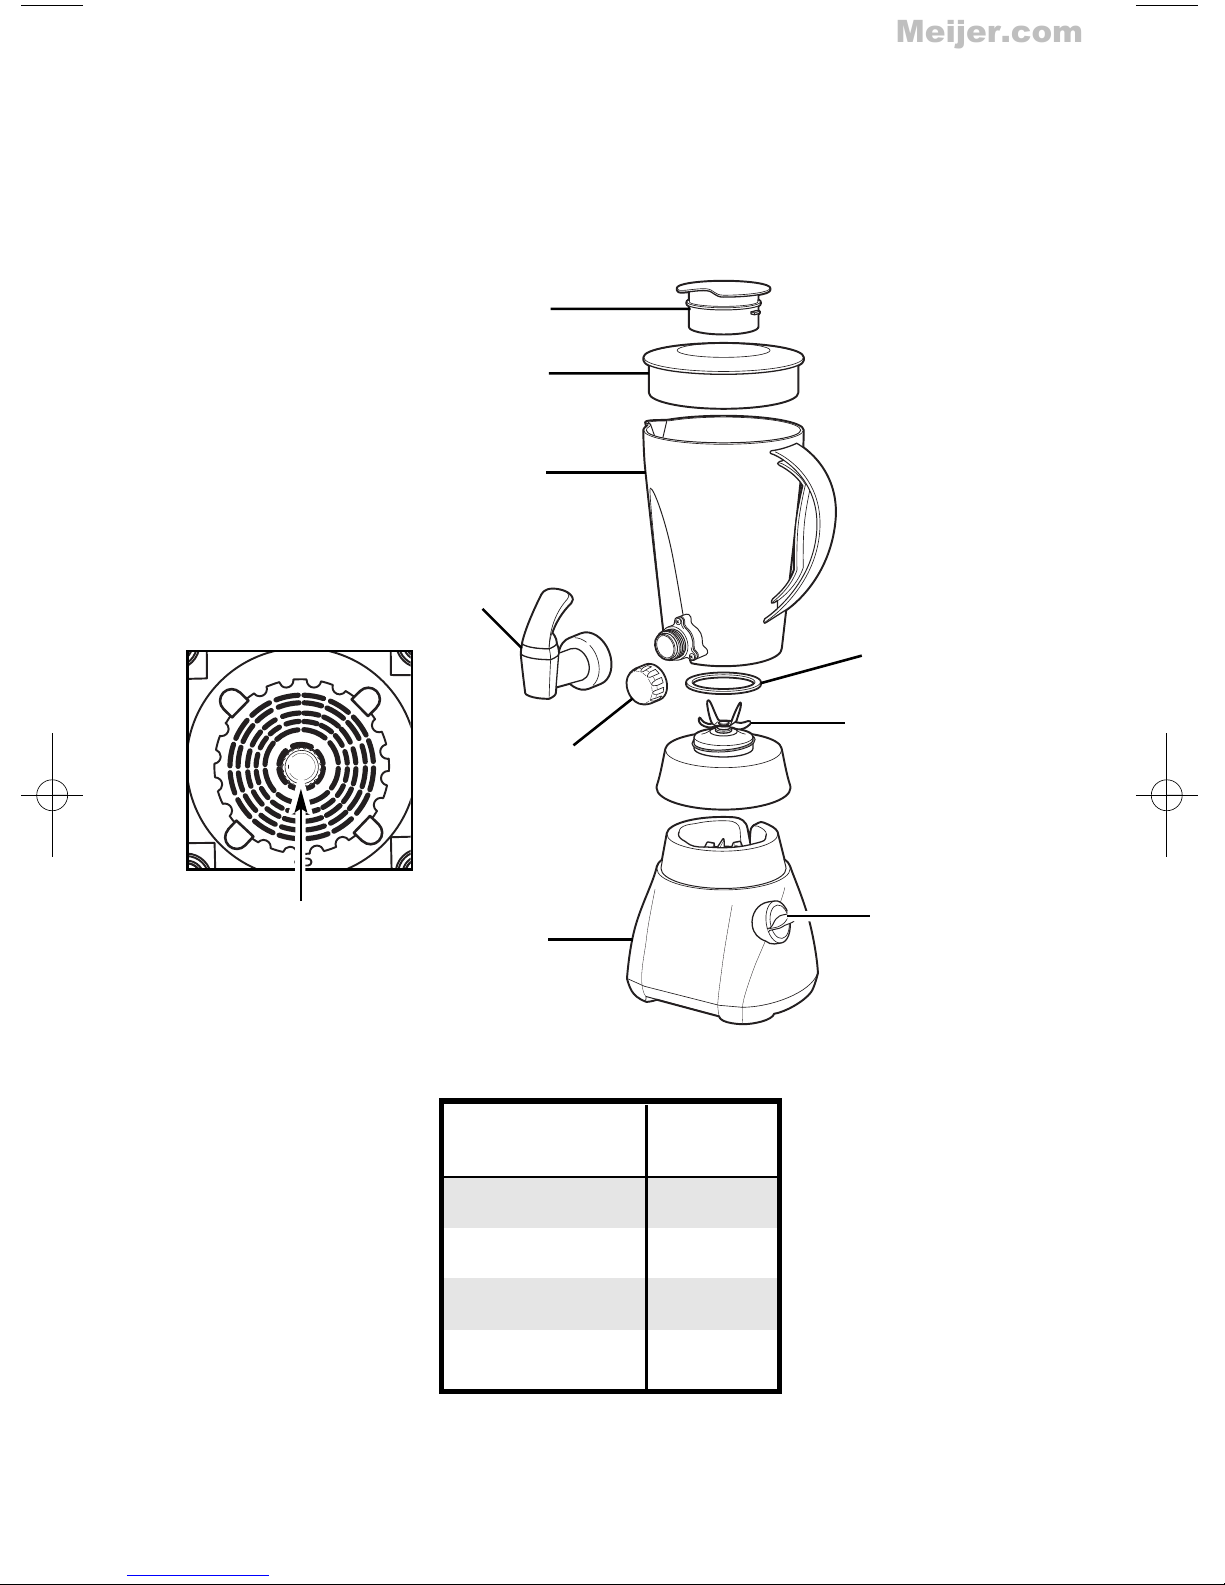
BEFORE FIRST USE: After unpacking blender, wash everything except blender
base in hot, soapy water. Dry thoroughly. Wipe blender base with a damp cloth or
sponge. DO NOT IMMERSE BASE IN WATER. Care should be taken when handling
the cutting assembly as the blades are very sharp.
Filler Cap
Lid
Jar
Dispenser
Assembly
Gasket
Spout Cap Storage
(bottom of blender)
Spout Cap
Base
Control Knob
Setting
Dispense
Smoothie
Cutting
Assembly
Control Knob
Blender
Speed
1
2
4
Milkshake
Icy Drink
3
4
Page 5
How to Assemble
Meijer.com
IMPORTANT: Your blender jar and
cutting assembly are subject to wear
during normal use. Always inspect jar
for nicks, chips, or cracks. Always
inspect cutting assembly for broken,
cracked, or loose blades. If jar or cutting assembly is damaged, do not use.
Call our toll-free customer service number to obtain replacement parts.
1. Make sure blender is unplugged.
Place blender base on clean, dry
surface.
2. Fit gasket over blades as shown in
illustration on page 4. The gasket
must lie flat. Set jar on top of gasket
and screw on cutting assembly.
Make sure the cutting assembly is
firmly screwed onto the jar.
3. Set jar into place on blender base,
making sure it is securely seated.
If not, gently rock the jar until seated.
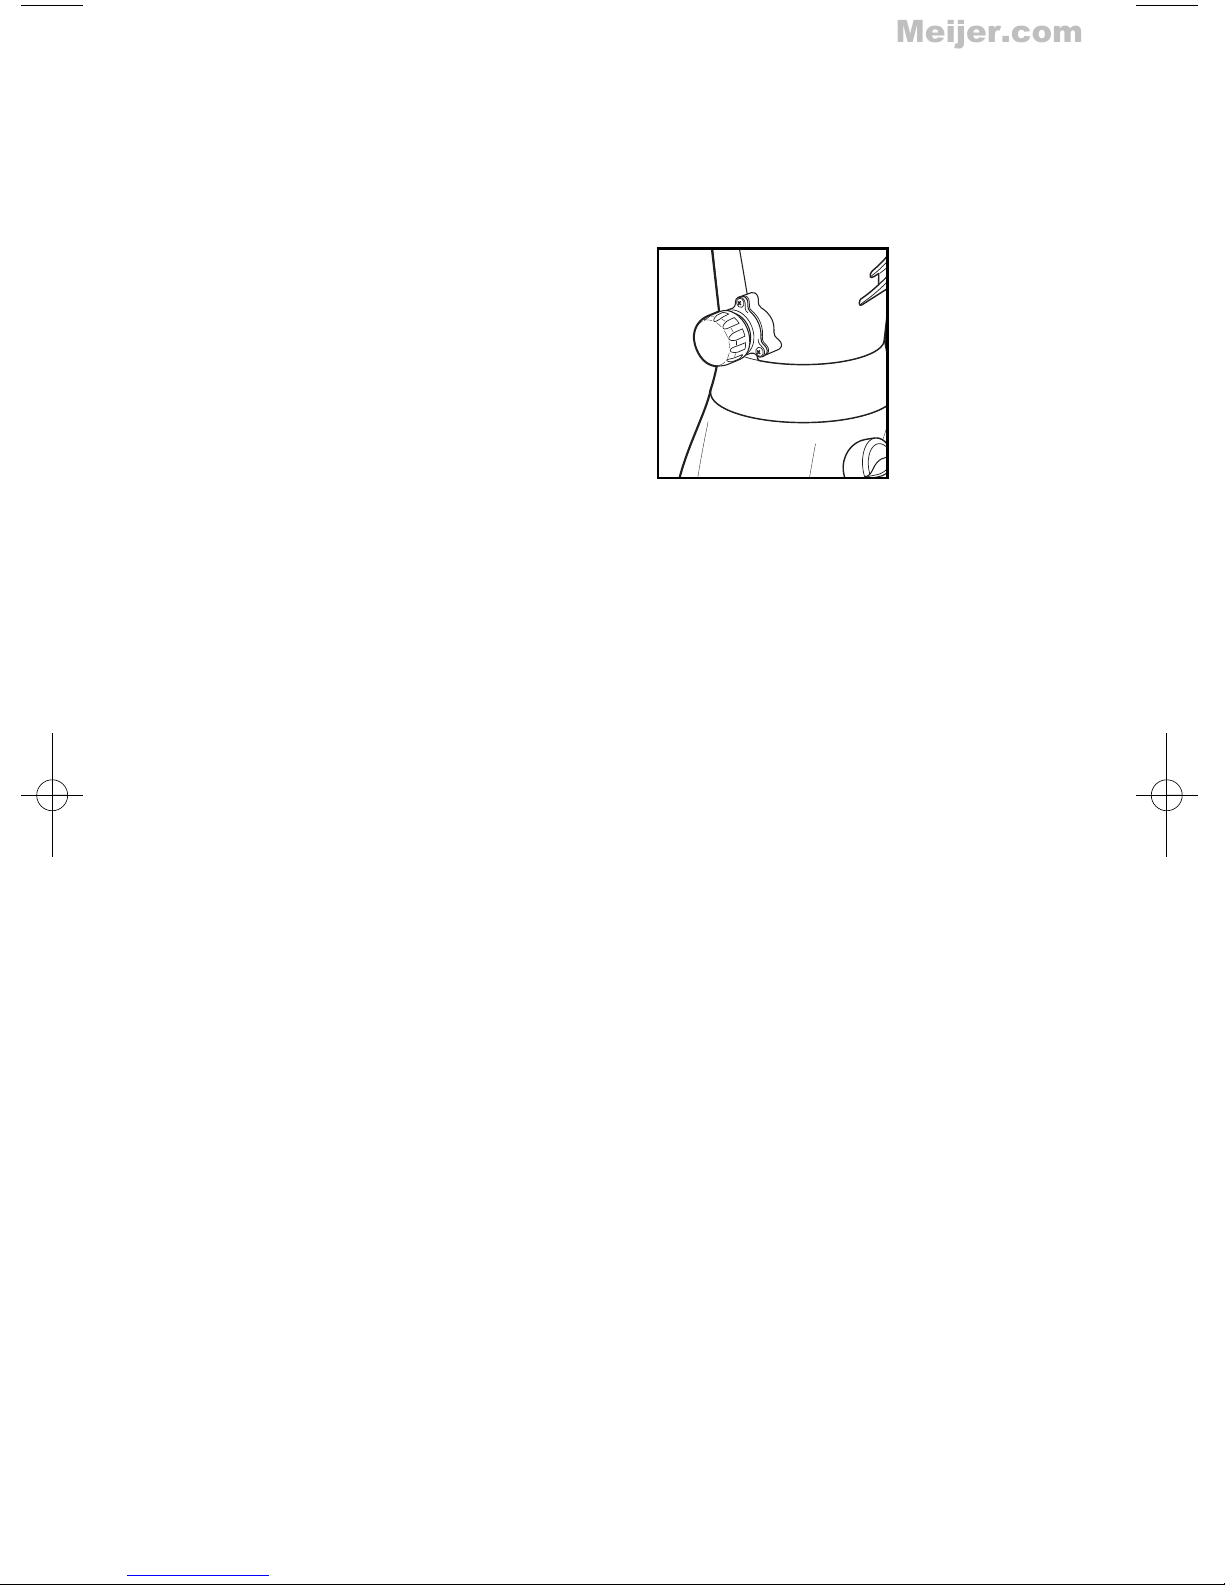
OPTIONAL: When dispenser is not
needed,
replace dispenser with
spout cap.
Remove
dispenser by
rotating
counterclock-
wise (see
“How to Clean” section). Insert
spout cap on jar. Turn spout cap
clockwise to tighten.
4. When spout cap is not in use, snap
onto bottom of blender base for
storage.
How to Operate
1. Plug cord into outlet.
2. Put ingredients in jar. Place lid with
filler cap on jar.
3. Process food or beverages.
NOTE: When blending thin liquids,
do not fill above the 32-ounce/
4 cup/1000 ml mark on blender jar.
4. ALWAYS turn blender off and wait
until blades have stopped rotating
before removing jar.
5. To remove jar after blending is complete, lift the jar straight up. If it is not
easily removed, rock gently and lift.
Do not twist.
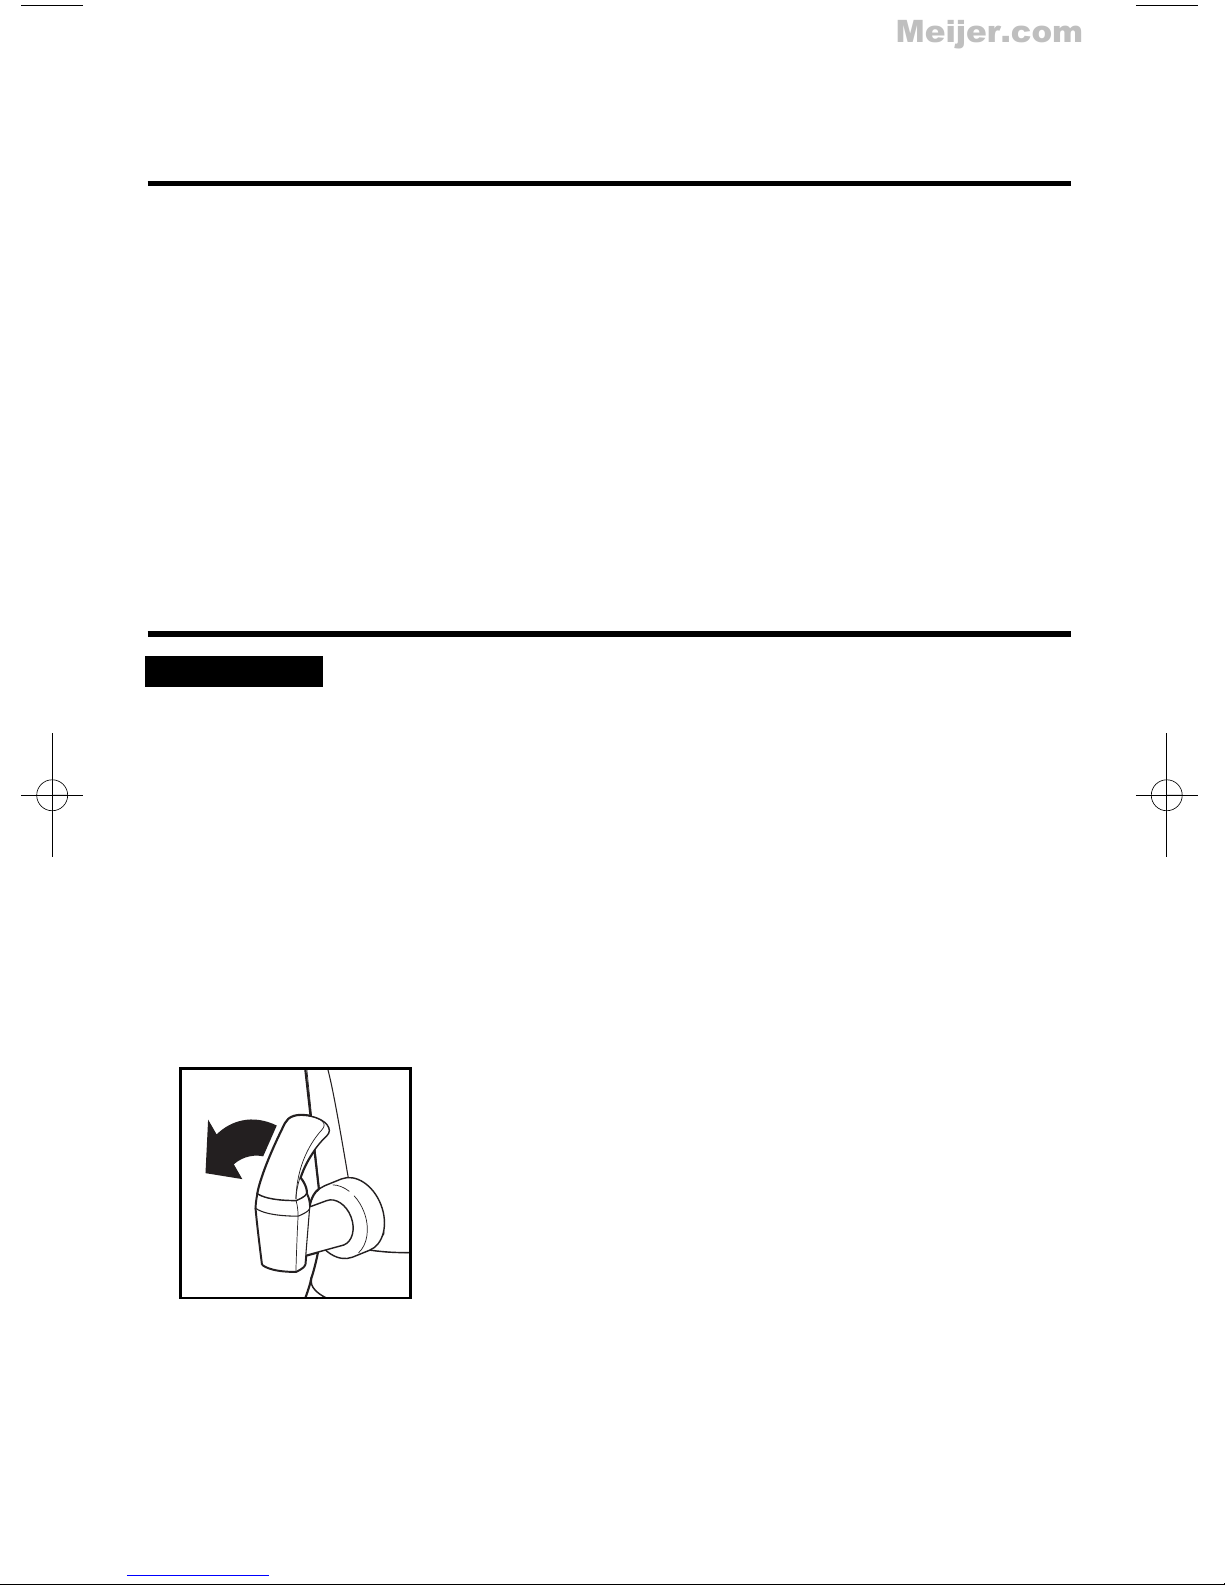
To Use the Dispenser:
To dispense thick liquids (such as
milkshakes, smoothies, frozen drinks,
etc.), turn the control knob to
and pull Dispenser Lever up. Turn OFF
after dispensing.
NOTE: Blender MUST be ON to
dispense thick liquids and frozen drinks.
When dispensing thin liquids, it may not
be necessary to turn the blender ON to
dispense the liquid.
NOTE: NEVER replace jar onto unit
while motor is running.
DISPENSE
5
Page 6
How to Clean
Meijer.com
Quick Cleaning
Quick cleaning should only be used to
rinse the blender between batches of
processing the same food. When the
processing of a single type of food is
finished, the blender should be disassembled and thoroughly cleaned as
instructed below.
To quick clean, pour 2 cups (500 ml)
warm water in jar and add 1 drop liquid
dishwashing detergent. Run the blender
on
DISPENSE
soapy water through dispenser until
for 10 seconds. Flush
Regular Cleaning
w WARNING
1. Unplug blender from electrical outlet.
2. Wipe blender base and cord with a
damp cloth or sponge. To remove
stubborn spots, use a mild, nonabrasive cleanser.
3. To clean jar, unscrew cutting
assembly from jar.
4. Carefully remove gasket from
cutting assembly.
5. Remove dispenser assembly from jar
Electrical Shock Hazard.
Disconnect power before cleaning.
Do not immerse cord, plug or base in any liquid.
by turning
counterclockwise four
revolutions.
cleaned. Discard soapy water. Rinse
blender jar with clean water. Flush clean
water through dispenser until cleaned.
This function is not a substitute for
regular cleaning as instructed below
This function should never be used
when blending any mixture containing
eggs, milk, or any other dairy products.
NOTE: All parts except the cutting
assembly and gasket may be
washed in the dishwasher (on the
top rack only). Some part distortion
may occur if your household dishwasher temperature is higher than
normal or if the parts are placed too
close to the heating element.
7. Reassemble cutting assembly and
gasket onto jar, and replace jar onto
blender base. Ensure dispenser
assembly or spout cap are fully
rotated clockwise to lock into position (reverse of Step 5 above).
8. Store blender with lid or filler cap
removed to prevent container odor.
NOTE: DO NOT remove seal rings
from dispenser adapter.
6. Carefully wash cutting assembly,
gasket, jar, and lid in hot, soapy
water. Rinse and dry thoroughly.
Do not soak. Do not wash cutting
assembly or gasket in a dishwasher.
6
Page 7
Optional Cleaning
Meijer.com
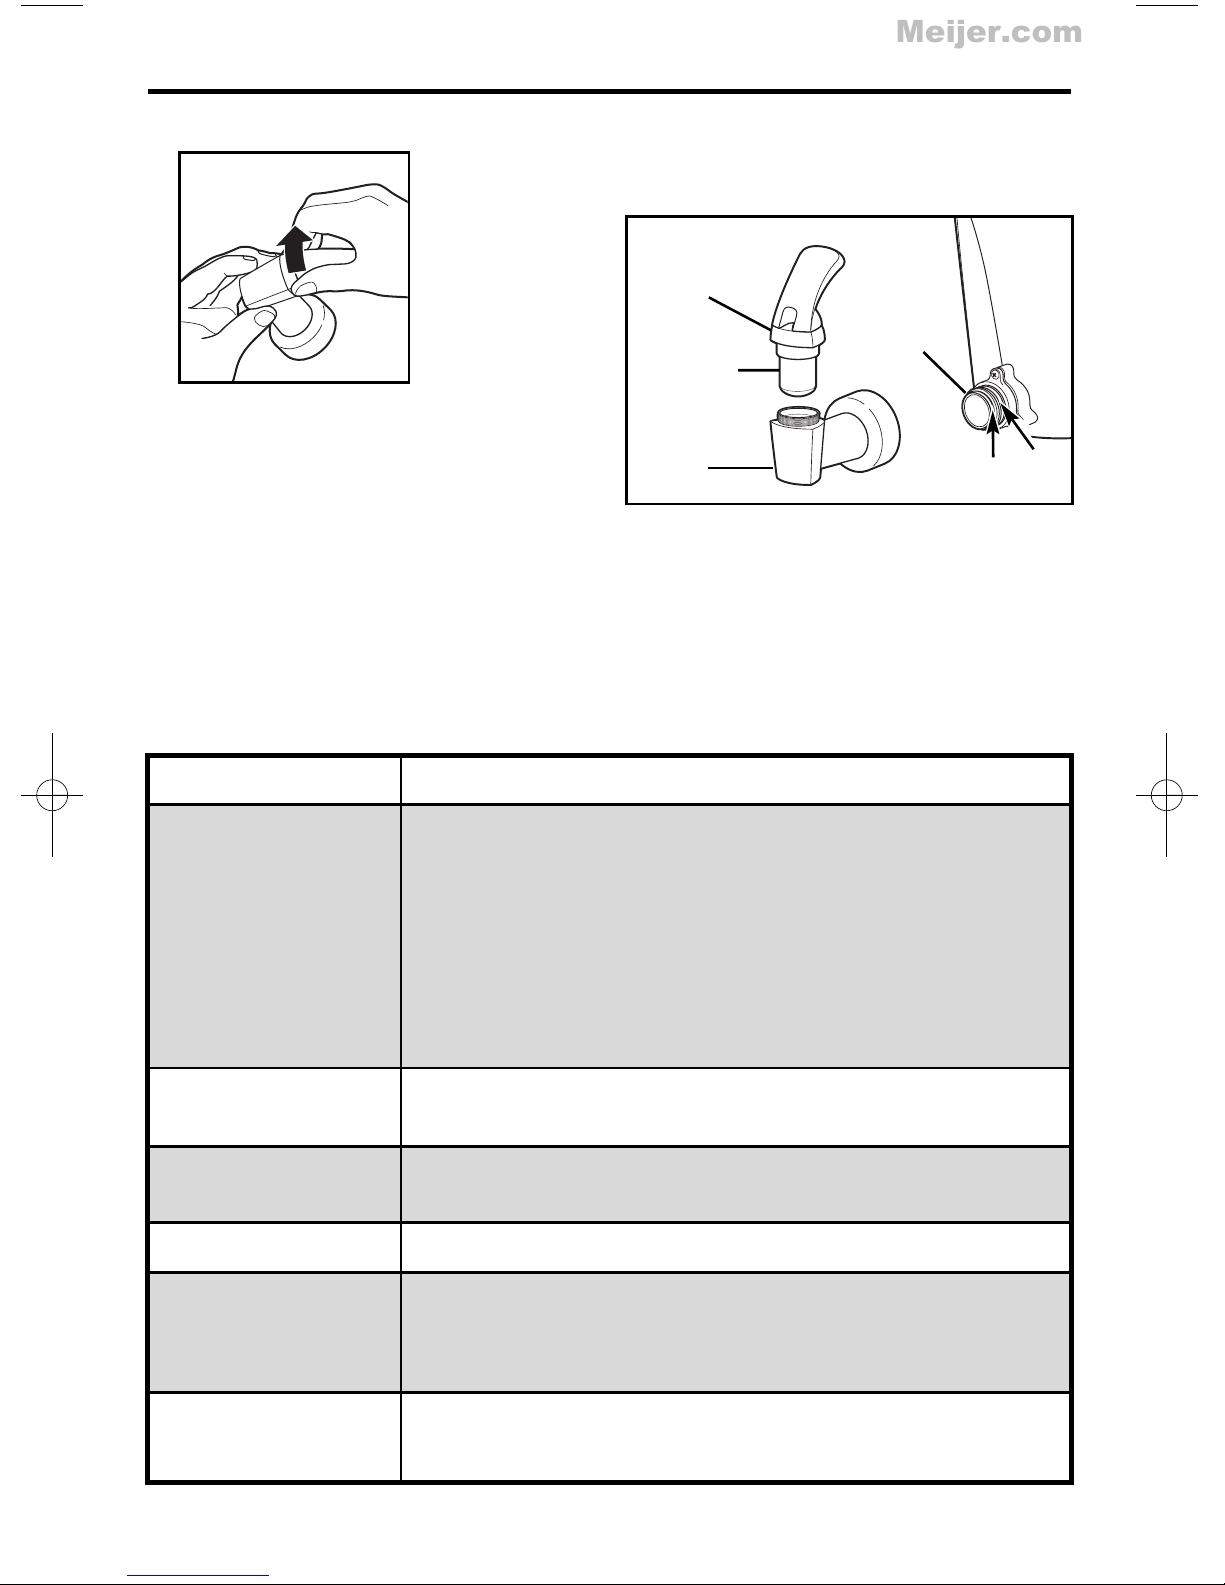
1. Remove dispenser assembly cap by
rotating counterclockwise.
2. Wash dispenser and parts in hot,
soapy water. Rinse and dry
thoroughly. Do not soak.
NOTE: Do not remove seal rings
from adaptor.
3. Reassemble plunger inside of
dispenser body and rotate cap
clockwise until tight.
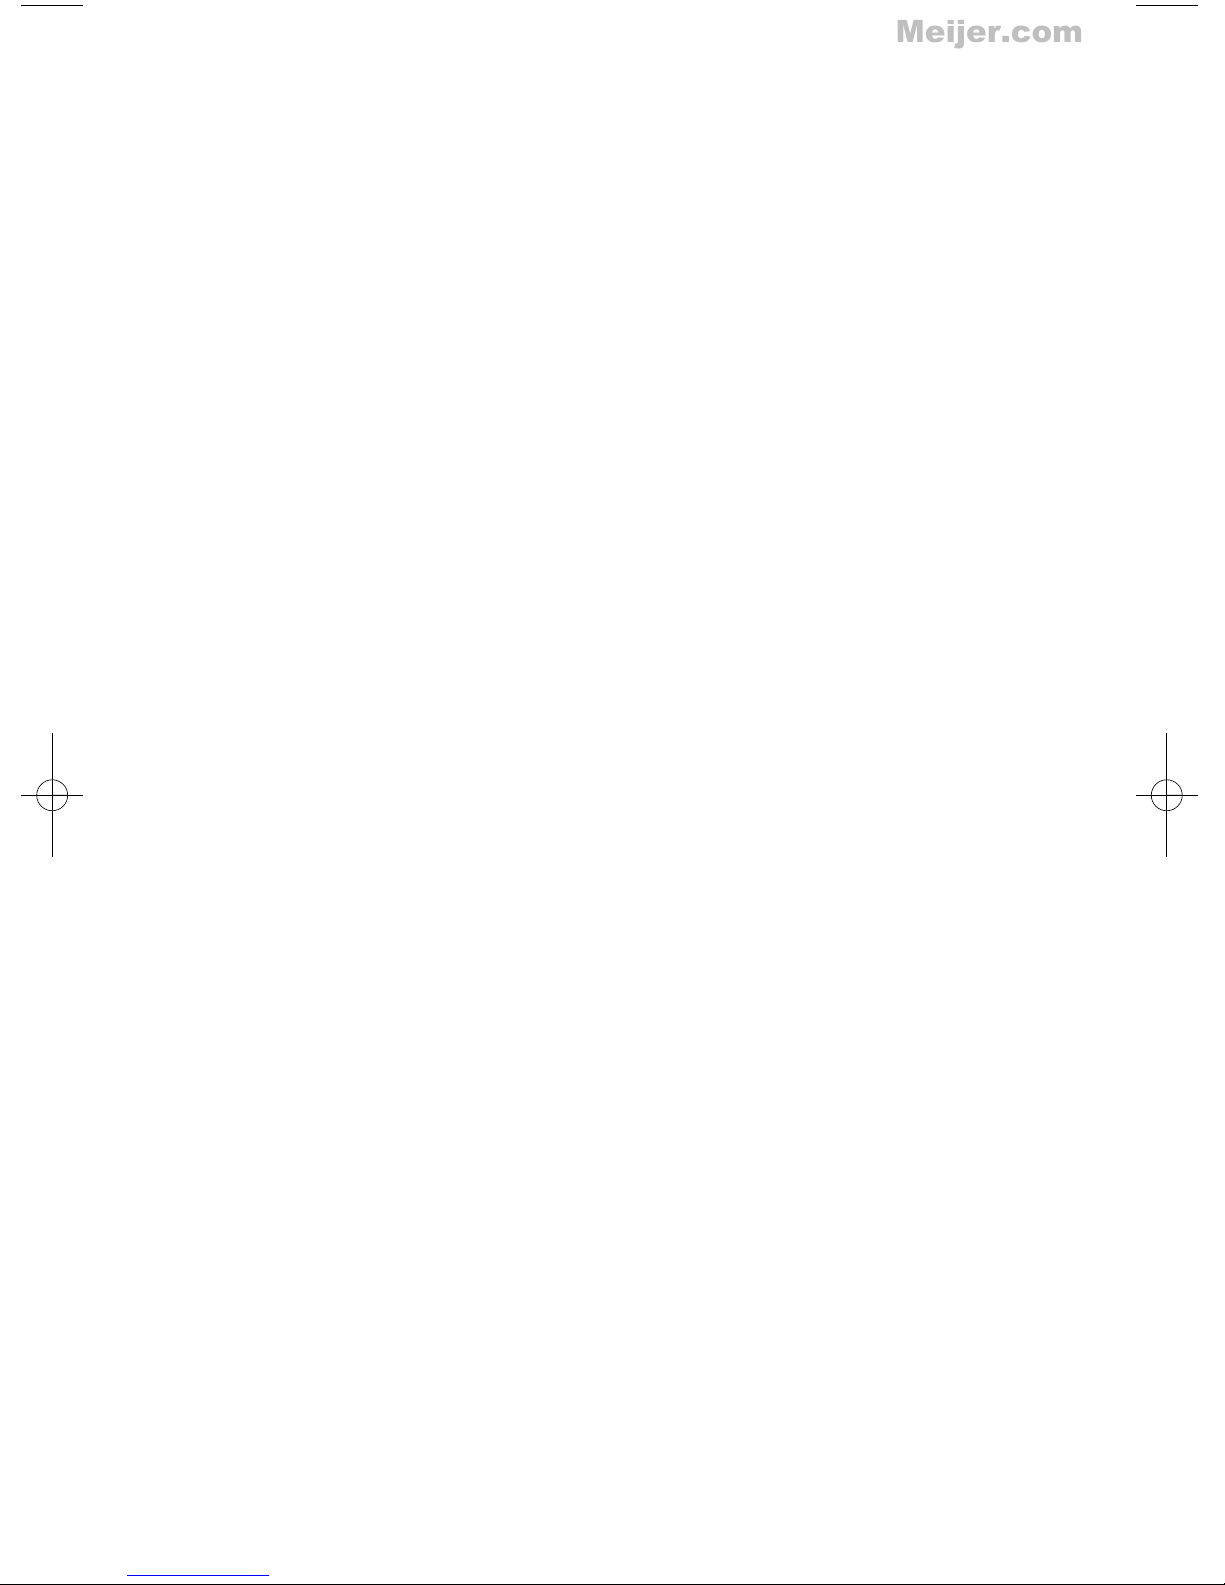
Dispenser
Assembly
Cap
Adaptor
Plunger
Dispenser
Assembly
Body
Seal Rings
Troubleshooting
PROBLEM
Blender leaks.
Ice not crushed.
Does not
blend well.
Does not dispense.
PROBABLE CAUSE
• Tighten cutting assembly on jar.
• Make sure gasket is in place on cutting assembly.
• Make sure gasket is not damaged. If damaged, please
call our toll-free customer service number to order a
replacement.
• Make sure lid with filler cap is pushed down tightly on
jar.
• See ice crushing instructions in “Blending Specific
Foods” section.
• Make sure enough liquid has been added. A
minimum of 10 ounces (300 ml) is recommended.
• Make sure blender is ON.
Dispenser leaks.
Cannot remove
cutting assembly.
• Make sure seal rings are in place on dispenser
adapter.
• Tighten dispenser cap (located above dispenser body).
• Loosen collar by holding jar and turning cutting
assembly counterclockwise.
7
Page 8
Blending Tips
Meijer.com
Crushing Ice
For best performance, when a recipe
calls for liquid, place the liquid in
blender jar followed by the ice cubes.
Ensure ice cubes are separated. When
only crushed ice is desired, add 1 cup
(250 ml) of ice cubes to jar. Place lid on
blender jar then Pulse on any of the 5
pulse speeds. Allow blades to come to
a complete stop between pulses.
Continue until ice is crushed to desired
consistency. For best results always
crush ice immediately after removing
from freezer.
General
To add foods when blender is operating, remove filler cap from container lid
and add ingredients through the opening. Do not store food or liquids in the
blender jar.
Optional Accessories
Hamilton Beach Stay or Go™ Personal
Blending Jar (AC16) may be purchased
separately and used with this appliance.
To Order Call:
1.800.851.8900 (U.S.)
1.800.267.2826 (Canada)
01.800.71.16.100 (Mexico)
or visit hamiltonbeach.com
8
Page 9
LIMITED WARRANTY
Meijer.com
This warranty applies to products purchased in the U.S. and Canada. This is the only
express warranty for this product and is in lieu of any other warranty or condition.
This product is warranted to be free from defects in material and workmanship for a
period of three (3) years from the date of original purchase. During this period, your
exclusive remedy is repair or replacement of this product or any component found to
be defective, at our option; however, you are responsible for all costs associated with
returning the product to us and our returning a product or component under this
warranty to you. If the product or component is no longer available, we will replace with
a similar one of equal or greater value.
This warranty does not cover glass, filters, wear from normal use, use not
in conformity with the printed directions, or damage to the product resulting from
accident, alteration, abuse, or misuse. This warranty extends only to the original
consumer purchaser or gift recipient. Keep the original sales receipt, as proof of
purchase is required to make a warranty claim. This warranty is void if the product is
used for other than single-family household use.
We exclude all claims for special, incidental, and consequential damages caused by
breach of express or implied warranty. All liability is limited to the amount of the
purchase price. Every implied warranty, including any statutory warranty or
condition of merchantability or fitness for a particular purpose, is disclaimed
except to the extent prohibited by law, in which case such warranty or condition
is limited to the duration of this written warranty. This warranty gives you specific
legal rights. You may have other legal rights that vary depending on where you live.
Some states or provinces do not allow limitations on implied warranties or special,
incidental, or consequential damages, so the foregoing limitations may not apply to
you.
To make a warranty claim, do not return this appliance to the store. Please call
1.800.851.8900 in the U.S. or 1.800.267.2826 in Canada or visit hamiltonbeach.com in
the U.S. or hamiltonbeach.ca in Canada. For faster service, locate the model, type, and
series numbers on your appliance.
9
 Loading...