

Page 1
Microwave Oven
Owner’s Manual
Safety Information……….………
Welcome…2
Grounding…4
Excessive Energy Warning…5
Features and Benefits, Specifications...6
Operating your microwave……
Setting up your microwave…8 One Stage Cooking…11
Parts and Accessories…8 Two Stage Cooking…11
Turntable Installation…8 Defrost…11-12
Control Panel…9 Memory Function…14
Power Levels…10 Clock Function…15
Clock…10 Grill/Combo Function…14-15
Child Lock…10 Kitchen Timer…15
One-touch buttons……………….
Add 30 Seconds…10 Steak…13
Express Cooking…11 Chicken Pieces…13
Popcorn…12 Dinner Plate…13
Potato…12 Fresh Vegetable…13
Pizza…12 Frozen Vegetable…14
2
10
14
Use and Care……………………...
Care and Cleaning…16
Troubleshooting…17
Warranty…18
Technical Support…18
Ordering Parts…18
1
Microwave 87176 Use and Care Manual: Support: 1-800-488-5080 www.hb-microwaves.com
18
Page 2
Welcome!
______
d
Congratulations, you have acquired a high quality Hamilton Beach Microwave
Oven. This unit is packed with many extra features that you will find convenient to
use including a grill. Five memory settings and eight different one-touch cooking
buttons provide for convenient meal preparation and tasty snacks. It will provide
you with trouble free use if you follow the safety precautions and operating
instructions provided in this easy-to-use manual. Please take the time to read it, and
save these instructions for future use. Please also remember to record the model
and series code. They are on a label on back of the unit. Save your receipt by
stapling it to this manual for convenient access.
Model number 87176 Serial number__________
Series code________________ Date of purchase______________
!! IMPORTANT SAFETY INSTRUCTIONS !!
When using electrical appliances, basic safety precautions shoul
be followed, including the following:
WARNING! - To reduce the risk of burns, electric shock, fire, injury to persons,
or exposure to excessive microwave energy:
1) Read all instructions before using the appliance.
2) Read and follow the specific “PRECAUTIONS TO AVOID POSSIBLE EXPOSURE
TO EXCESSIVE MICROWAVE ENERGY” found on page 5.
3) This appliance must be grounded. Connect only to properly grounded outlet. See
“IMPORTANT GROUNDING INSTRUCTIONS” found on page 4.
4) Install or locate this appliance only in accordance with the provided installation
instructions.
5) Some products such as whole eggs and sealed containers – for example, closed
glass jars – are able to explode and should not be heated in this oven.
6) Use this appliance only for its intended use as described in the manual. Do not use
corrosive chemicals or vapors in this appliance. This type of oven is specifically
designed to heat, cook, or dry food. It is not designed for industrial or laboratory use.
7) As with any appliance, close supervision is necessary when used by children.
Microwave 87176 Use and Care Manual: Support: 1-800-488-5080 www.hb-microwaves.com
2
Page 3
8) Do not operate this appliance if it has a damaged cord or plug. If it is not working
properly, or if it has been damaged or dropped.
9) This appliance should be serviced only by a qualified service personnel. Contact
nearest authorized service facility for examination, repair or adjustment.
10) Do not cover or block any openings on this appliance.
11) Do not store this appliance outdoors. Do not use this product near water – for
example, near a kitchen sink, in a wet basement, near a swimming pool, or similar
locations.
12) Do not immerse cord or plug in water.
13) Keep cord away from heated surfaces.
14) Do not let cord hang over edge of table or counter.
15) When cleaning surfaces between the door and the oven that come together upon
closing, use only mild, nonabrasive soaps or detergents applied with a sponge or soft
cloth.
16) To reduce the risk of fire in the oven cavity:
a) Do not overcook food. Carefully attend appliance when paper,
plastic, or other combustible materials are placed inside the oven to
facilitate cooking.
b) Remove wire twist-ties from paper or plastic bags before placing bag
in oven.
c) If materials inside the oven ignite, keep oven door closed, turn oven
off and disconnect the power cord, or shut off power at the fuse or
circuit breaker panel.
d) Do not use the cavity for storage purposes. Do not leave paper
products, cooking utensils, or food in the cavity when not in use.
17) Liquids, such as water, coffee, or tea are able to be overheated beyond the
boiling point without appearing to be boiling. Visible bubbling or boiling when the
container is removed from the microwave oven is not always present. THIS COULD
RESULT IN VERY HOT LIQUIDS SUDDENLY BOILING OVER WHEN THE
CONTAINER IS DISTURBED OR A UTENSIL IS INSERTED INTO THE LIQUID.
18) This appliance is intended for household use only.
!! SAVE THESE INSTRUCTIONS !!
Microwave 87176 Use and Care Manual: Support: 1-800-488-5080 www.hb-microwaves.com
3
Page 4
Important Grounding Instructions
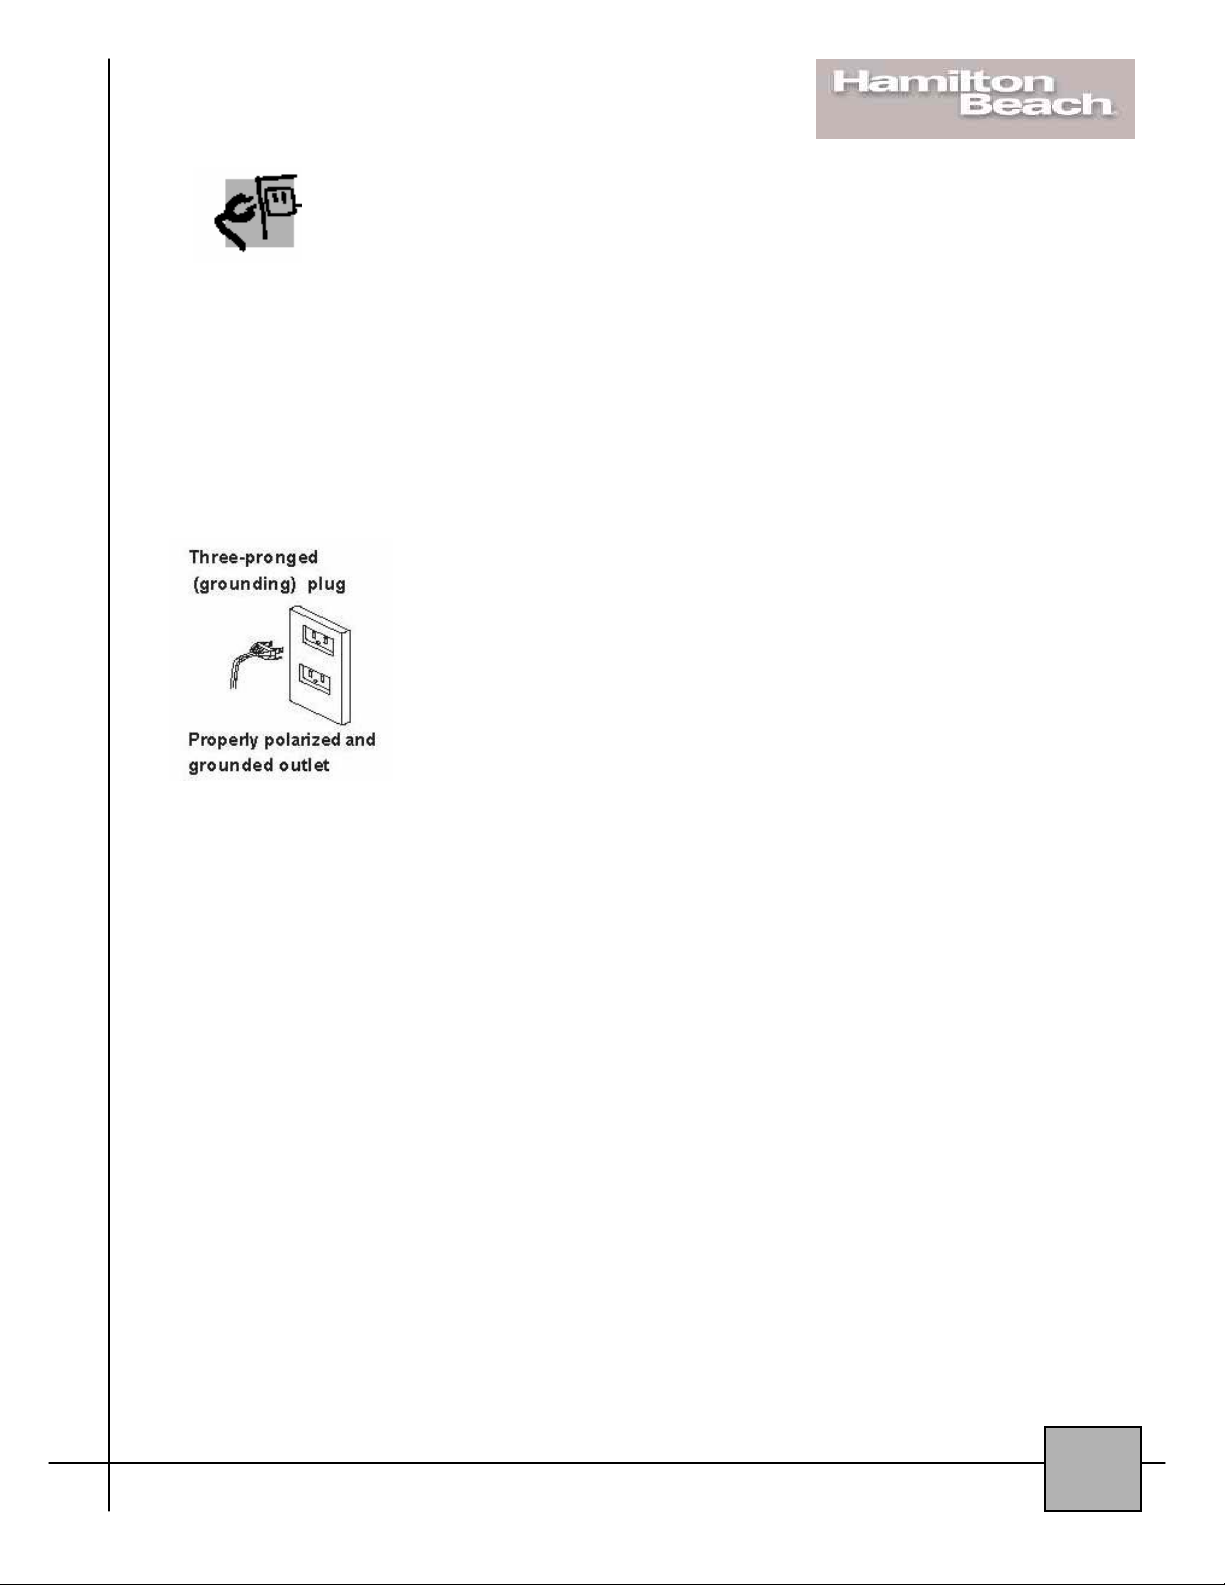
This appliance must be grounded. In the
event of an electrical short circuit,
grounding reduces the risk of electric
shock by providing an escape wire for the
electric current. This appliance is
equipped with a cord having a grounding
wire with a grounding plug. The plug must
be plugged into an outlet that is properly
installed and grounded.
WARNING-Improper use of grounding can
result in a risk of electric shock.
Consult a qualified electrician or serviceman if the
grounding instructions are not completely
understood, or if doubt exists as to whether the
appliance is properly grounded and either:
If it is necessary to use an extension cord, use
only a 3-wire extension cord that has a 3-blade
grounding plug, and a 3-slot receptacle that will
accept the plug on the appliance. The marked
electrical rating of the extension cord shall be
equal to or greater than the rating of the
appliance.
Microwave 87176 Use and Care Manual: Support: 1-800-488-5080 www.hb-microwaves.com
4
Page 5
PRECAUTIONS TO AVOID POSSIBLE
EXPOSURE TO EXCESSIVE
MICROWAVE ENERGY
• Do not attempt to operate this
microwave oven with the door open
because this can result in harmful
exposure to microwave energy. It is
important not to break or tamper with
the safety interlocks.
• Do not place any object between the
oven frame and the door or allow soil or
cleaner residue to accumulate on sealing
surfaces.
• Do not operate the oven if it is
damaged. It is very important that the
oven door closes properly and that there
is no damage to the:
a) Door (including any dents)
b) Hinges and Latches (including
broken or loose parts)
c) Door seals and Sealing surfaces
• The oven should not be adjusted or
repaired by anyone except properly
qualified service personnel.
Microwave 87176 Use and Care Manual: Support: 1-800-488-5080 www.hb-microwaves.com
5
Page 6
Features and Benefits
• 1.0 cu.ft. Oven Cavity
• 10 Power Levels
• Eight instant one-touch setting buttons for common foods
• Six Express Cook one-touch settings
• Five memory setting buttons
• Grill/Combo Function
• Electronic Digital Display with Clock (LED)
• Turntable
• Time Cook
• Time and Weight Defrost
• Remind Signal
• Kitchen Timer
Specifications
Model………………………………….
Power Source………………………
Power Consumption……………..
Maximum Output………………….
Oven Capacity………………………
Turntable Diameter………………
External Dimensions……………..
Net Weight…………………………..
87176
120V, 60Hz
1500 W
1000 W
1.0 cu.ft.
12.4 inches
20.5 x 16.3 x 12.8 inches
36.1 lbs
Microwave 87176 Use and Care Manual: Support: 1-800-488-5080 www.hb-microwaves.com
6
Page 7
How to test for a microwave-safe dish:
To determine if a dish is microwave safe, place the dish in the microwave along with a glass measuring cup filled
with one cup of water. Microwave for one minute on high and then carefully feel the dish. If it is warm, it is not
microwave safe.
Arcing
•Metal or foil touching the side of the microwave
•Upturned edges of foil not wrapped around the food
•Metals in the microwave such as twisty ties, meat pins or metal rimmed dishes
•Recycled paper towels in the microwave that contain small flecks of metal
–
The microwave term for sparks in the oven. Caused by:
Materials for use in microwave
To avoid arcing and other hazards, follow these instructions for the use of safe materials in the microwave.
Browning dish
Dinnerware
Glassware
Oven cooking bags*
Paper plates/cups*
Paper towels*
Follow manufacturer’s instructions. The bottom of browning dish must be at least 3/16
inch (0.5 cm) above the turntable. Incorrect usage may cause the turntable to break.
Microwave-safe only. Follow manufacturer’s instructions. Do not use cracked or chipped
dishes.
Heat-resistant oven glassware only. Make sure there is no metallic trim. Do not use
cracked or chipped dishes.
Follow manufacturer’s instructions. Do not close with metal tie. Make slits to allow steam
to escape.
Use for short-term cooking/warming only. Do not leave oven unattended while cooking.
Use to cover food for reheating and absorbing fat. Use with supervision for short-term
cooking only.
Parchment paper*
Plastic*
Plastic wrap*
Thermometers
Wax paper*
Use as a cover to prevent splattering or a wrap for steaming.
Microwave-safe only. Follow the manufacturer’s instructions. Boiling bags and tightly
closed plastic bags should be slit, pierced or vented as directed by package. Due to
various manufacturers you may receive varying performance results when using a bacon
tray.
Microwave-safe only. Use to cover food during cooking to retain moisture. Do not allow
plastic wrap to touch food.
Microwave-safe only.
Use as a cover to prevent splattering and retain moisture.
Materials to avoid in microwave
•Metal pans and bake ware
•Dishes with metallic trim
*WARNING: FIRE HAZARD. Avoid all paper and plastic materials during use of modes G-1, C-1, C-2 (see pp.
14-15) and during use of the STEAK and CHICKEN PIECES one-touch buttons (see p. 13). Such materials
include, but are not limited to: paper plates, paper cups, paper towels, parchment paper, plastic containers,
plastic wrap, wax paper, storage bags, freezer bags and oven cooking/baking bags.
Microwave 87176 Use and Care Manual: Support: 1-800-488-5080 www.hb-microwaves.com
•Recycled paper products
•Brown paper bags
•Non-heat-resistant glass
•Non-microwave-safe-plastics
(margarine tubs)
•Food storage bags
•Metal twist-ties
7
Page 8
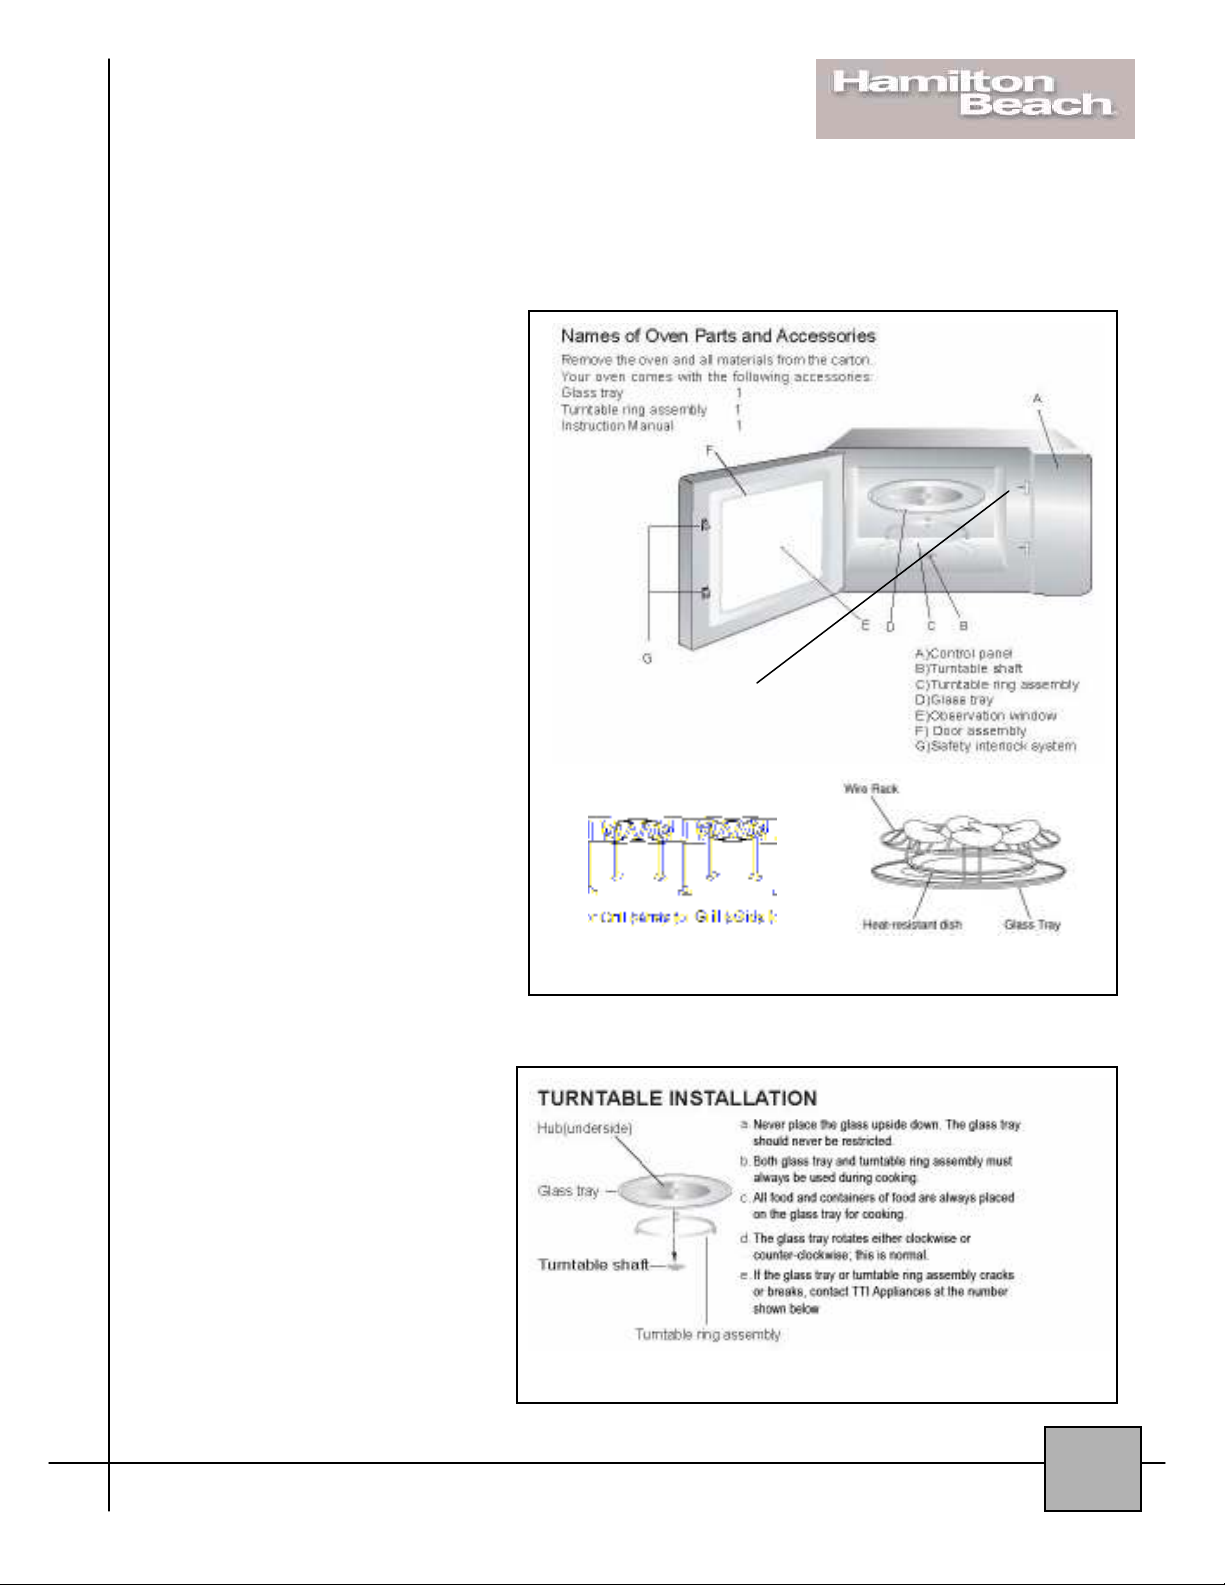
Setting up your microwave
Installation:
1) Remove all packing
materials and accessories.
Examine the oven for any
damage such as dents or
broken door. Do not install if
oven is damaged.
2) Select a level surface that
provides enough open space
for ventilation. Allow for 3
inches of open space next to
the sides and back of the
microwave. Allow for 12
inches of open space above
the microwave. Do not place
any items on top of the
microwave and do not
remove the legs from the
bottom of the microwave.
WARNING: FIRE AND SHOCK
HARZARDS. Do not remove the mica board
located on the right, inside wall of the cooking
compartment. Unplug the microwave
immediately and contact Hamilton Beach if the
mica board becomes damaged or is missing.
3) Place the microwave as
far away as possible from
radios and televisions.
Shuts off oven power if door is opened during operation.
Microwave may cause
interference to these
appliances.
4) Plug the microwave into a
standard household outlet.
Check the rating label of the
microwave to ensure the
voltage and frequency are
compatible with the outlet.
5) Do not install microwave
over a range cook top or
other heat-producing
appliance. Heat can damage
To order a replacement turntable, call TTI Appliances at 1 800 579 7990
the microwave and void the
warranty.
Microwave 87176 Use and Care Manual: Support: 1-800-488-5080 www.hb-microwaves.com
8
Page 9
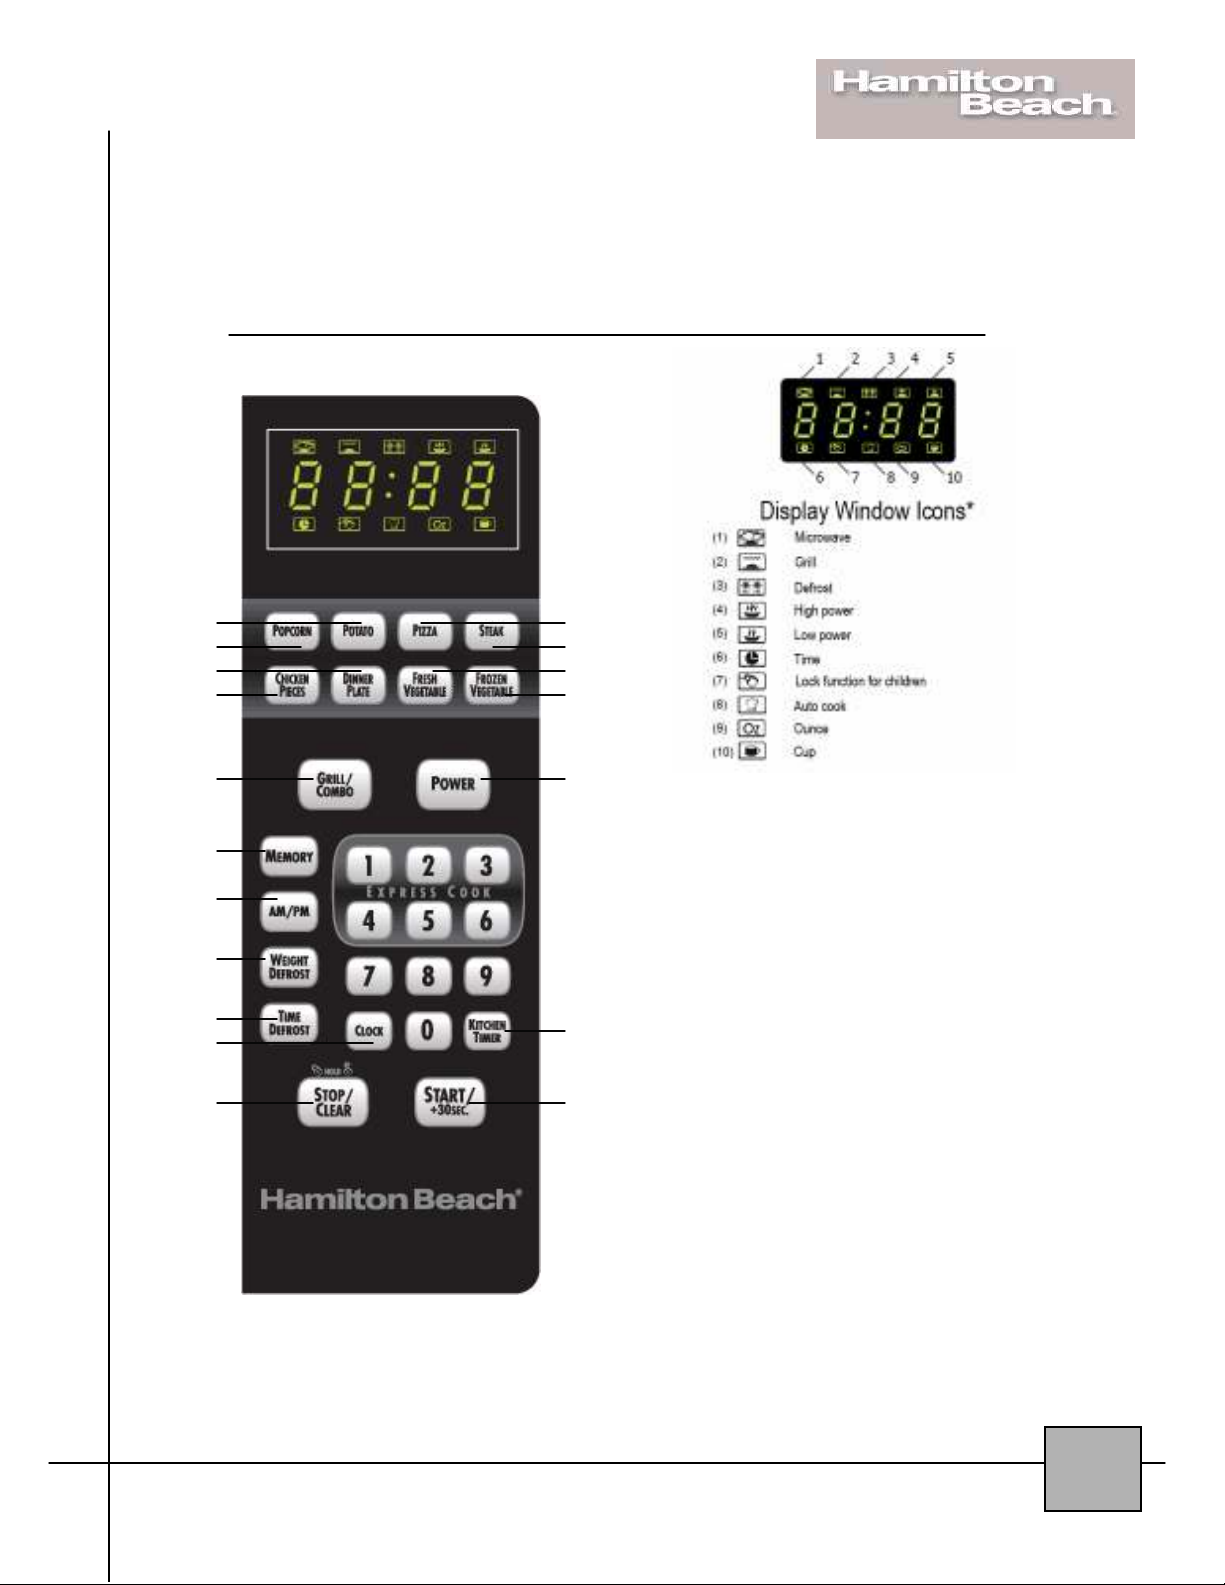
Control Panel Operation
Control Panel Display Window
3
1
4
2
6
7
8
9
10
11
18
* Note: Not all icons are used for all
models
13
14
15
16
5
17
12
1 POPCORN
2 CHICKEN PIECES
3 POTATO
4 DINNER PLATE
5 POWER
6 GRILL/COMBO
7 MEMORY
8 AM/PM
9 WEIGHT DEFROST
10 TIME DEFROST
11 CLOCK: setting time
12 START/+30 SEC.
13 PIZZA
14 STEAK
15 FRESH VEGETABLE
16 FROZEN VEGETABLE
17 KITCHEN TIMER
18 STOP/CLEAR/CHILD LOCK
Page
12
13
12
13
10
14-15
14
10/15
11
12
10
10
12
13
13
14
15
10
Microwave 87176 Use and Care Manual: Support: 1-800-488-5080 www.hb-microwaves.com
9
Page 10
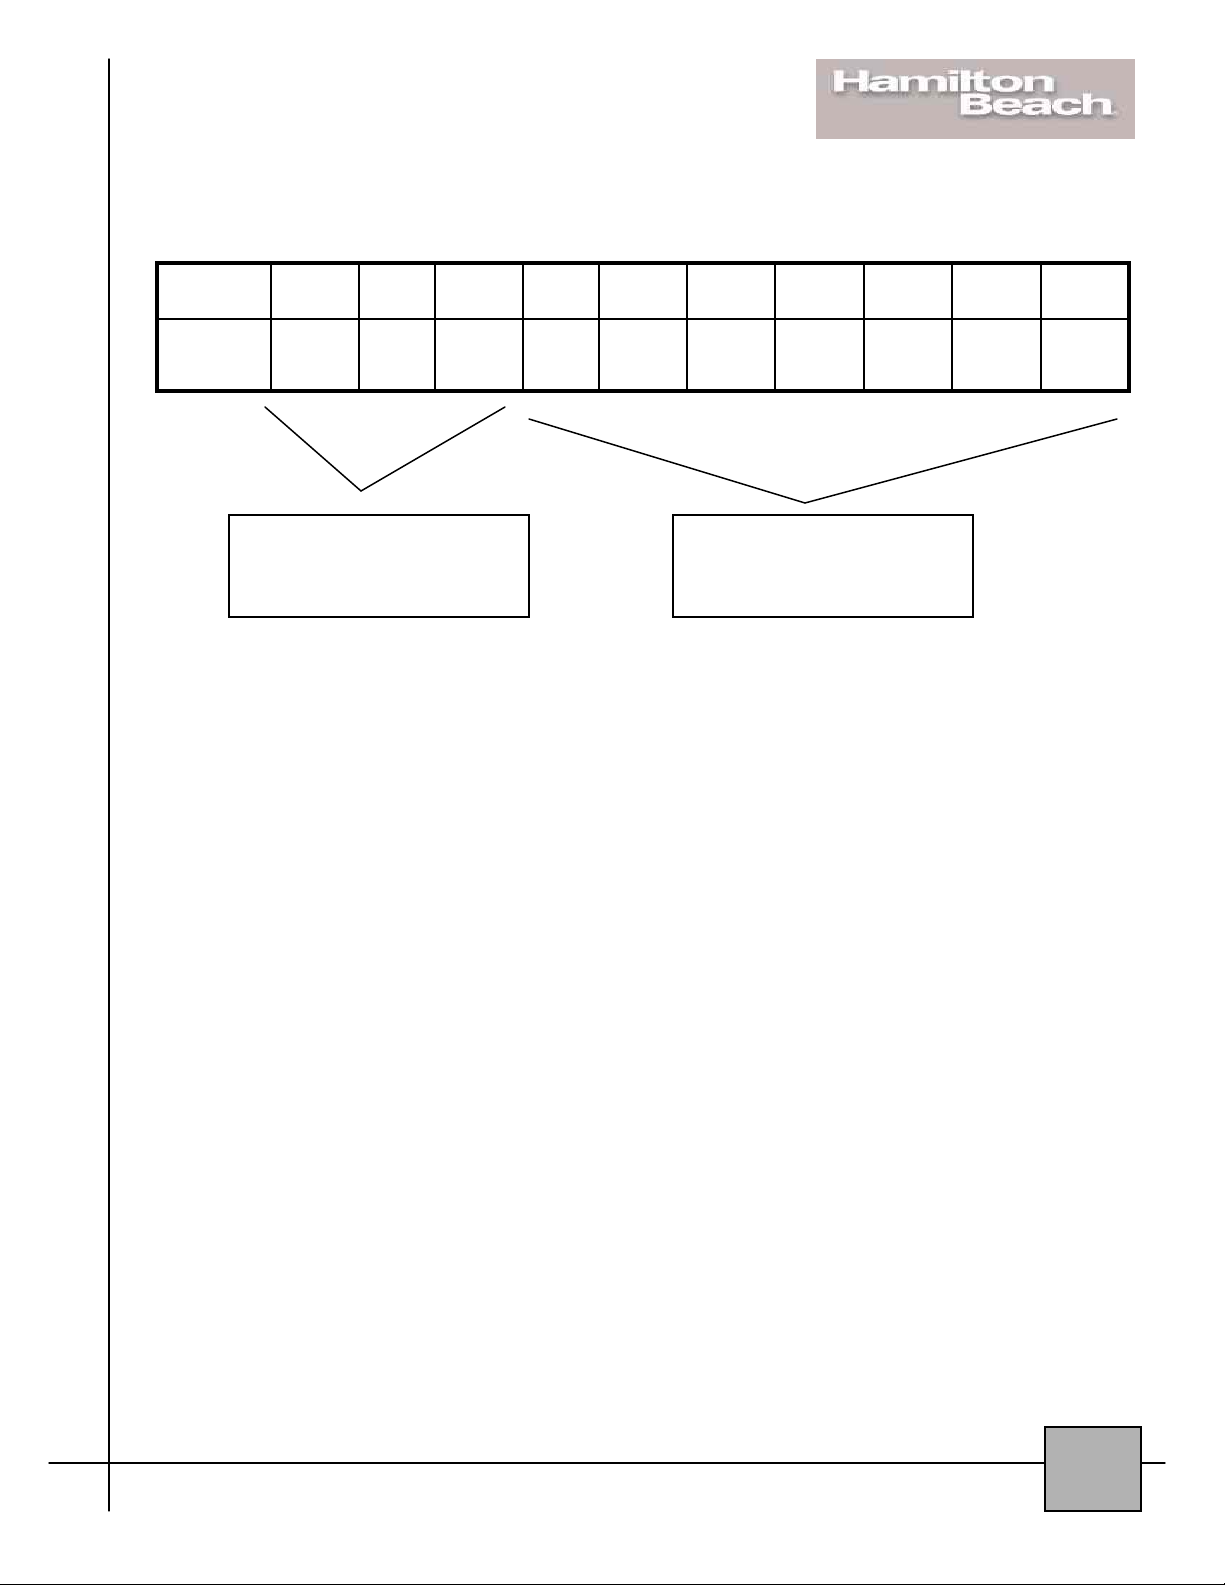
1. Power Level
Ten power levels are available. Press the “POWER” button repeatedly to scan
through the different levels to make your selection.
12345678910Level
10%20%30%40%50%60%70%80%90%100%Power
High level indicator lights
up and will flash while in
operation
2. Clock Setting
When the microwave oven is plugged into an outlet, the oven will display “0:00”
1) Press “CLOCK”
2) Enter the correct time by pressing the numbers keys
3) Choose AM or PM by pressing AM/PM button
4) Press “CLOCK” to finish
3. Child Lock
1) Press “Stop/Clear” button and hold for 3 seconds. A long beep will sound. The microwave is
now locked and cannot be used.
2) To unlock, press and hold “Stop/Clear” button for 3 seconds until a long beep sounds. The
microwave is now unlocked.
4. Stop/Clear
Low level indicator lights
up and will flash while in
operation
1) To stop the microwave at any point during cooking, press “Stop/Clear”.
2) To clear the display window, press “Stop/Clear”.
5. Start / +30 SEC
The “+30 SEC” button can be used to set the time for cooking or for adding on
time while food is already cooking. To set the time for cooking, press “+30 SEC”
button repeatedly to increase the time to your desired cooking time. Press “+30
SEC” button during cooking to increase the cooking time by 30 seconds. The
maximum amount of time that can be added is 99 minutes and 59 seconds.
Microwave 87176 Use and Care Manual: Support: 1-800-488-5080 www.hb-microwaves.com
10
Page 11
6. One-stage cooking
To cook food at only one power level:
1) Press “POWER” repeatedly to select a power level.
2) Enter a cooking time. The maximum cooking time is 99 minutes and 99
seconds.
3) Press “START.”
7. Express Cook
Buttons 1-6 on the keypad are for express cooking. To cook food at
100% power with the touch of a button, press “1” for one minute, “2”
for 2 minutes, and so on up until “6” for 6 minutes.
8. Two-stage cooking
To cook food at one power level, and then at a second power level immediately
after:
1) Press “POWER” repeatedly to select a power level for stage 1.
2) Enter a cooking time for stage 1. The maximum cooking time is 99 minutes and
99 seconds.
3) Then press “POWER” repeatedly to select a power level for stage 2.
4) Enter a cooking time for stage 2.
5) Press “START” to begin.
6) You will hear a beep sound when stage 1 finishes and stage 2 begins.
9. Defrost by Weight Function
1) Press “WEIGHT DEFROST”
2) Enter the weight in ounces (4-100 oz).
3) Press “START.”
Microwave EG1031P-DK Use and Care Manual: Support: 1-800-488-5080 www.hb-microwaves.com
11
Page 12
10. Time Defrost Function
1) Press “TIME DEFROST.”
2) Enter defrosting time.
3) The default power level for defrost is 3. To change the power level, press “POWER” once.
Then enter the desired power level (1-10) by pressing the number keys on the keypad.
4) Press “START.”
11. Popcorn
-Do not use this button if the size of the popcorn bag is less than 1.75 oz. (50 grams).
1) Press “Popcorn” once for a popcorn bag size of 1.75 oz. Then press “START.”
(“1.75 oz.” will appear in display)
2) Press “Popcorn” twice for a popcorn bag size of 3.0 oz. Then press “START.”
(“3.0 oz.” will appear in display)
3) Press “Popcorn” three times for a popcorn bag size of 3.5 oz. Then press “START.”
(“3.5 oz.” will appear in display)
Always follow manufacturer’s instructions for popcorn if the cooking time for the pre-set buttons
differs from the manufacturer’s recommended time. Never leave popcorn cooking unattended.
12. Potato
1) Press “Potato” once for a 8 oz. (230 grams) potato. Then press “START.”
(“1” will appear in display)
2) Press “Potato” twice for a 16 oz. (460 grams) potato. Then press “START.”
(“2” will appear in display)
3) Press “Potato” three times for a 24 oz. (690 grams) potato. Then press “START.”
(“3” will appear in display)
13. Pizza
1) Press “Pizza” once for one slice (approximately 3 oz./85 grams). Then press “START.”
(“1” will appear in display)
2) Press “Pizza” twice for two slices (approximately 6 oz./170 grams). Then press “START.”
(“2” will appear in display)
3) Press “Pizza” three times for three slices (approximately 9 oz./255 grams). Then press “START.”
(“3” will appear in display)
Microwave 87176 Use and Care Manual: Support: 1-800-488-5080 www.hb-microwaves.com
12
Page 13
14. Steak
Grill rack must be used for proper cooking performance. Refer to pages 14 and 15,
section 18, “Grill/Combo Function,” for instructions on proper grill rack usage.
1) Press “Steak” once for 4.0 oz. (113 grams). Then press “START.”
(“4.0 oz.” will appear in display)
2) Press “Steak” twice for 8.0 oz. (227 grams). Then press “START.”
(“8.0 oz.” will appear in display)
3) Press “Steak” three times for 16.0 oz. (454 grams). Then press “START.”
(“16.0 oz.” will appear in display)
15. Chicken Pieces
Grill rack must be used for proper cooking performance. Refer to pages 14 and 15,
section 18, “Grill/Combo Function,” for instructions on proper grill rack usage.
1) Press “Chicken Pieces” once for 4.0 oz. (113 grams). Then press “START.”
(“4.0 oz.” will appear in display)
2) Press “Chicken Pieces” twice for 8.0 oz. (230 grams). Then press “START.”
(“8.0 oz.” will appear in display)
3) Press “Chicken Pieces” three times for 12.0 oz. (340 grams). Then press “START.”
(“12.0 oz.” will appear in display)
4) Press “Chicken Pieces” four times for 16.0 oz. (460 grams). Then press “START.”
(“16.0 oz.” will appear in display)
16. Dinner Plate
1) Press “Dinner Plate” once for 9 oz. (255 grams). Then press “START.”
(“9.0 oz.” will appear in display)
2) Press “Dinner Plate” twice for 12 oz. (340 grams). Then press “START.”
(“12.0 oz.” will appear in display)
3) Press “Dinner Plate” three times for 18 oz. (510 grams). Then press “START.”
(“18.0 oz.” will appear in display)
17. Fresh Vegetable
1) Press “Fresh Vegetable” once for 4 oz. (113 grams). Then press “START.”
(“4.0 oz.” will appear in display)
2) Press “Fresh Vegetable” twice for 8 oz. (230 grams). Then press “START.”
(“8.0 oz.” will appear in display)
3) Press “Fresh Vegetable” three times for 16 oz. (460 grams). Then press “START.”
(“16.0 oz” will appear in display)
Microwave 87176 Use and Care Manual: Support: 1-800-488-5080 www.hb-microwaves.com
13
Page 14
18. Frozen Vegetable
1) Press “Frozen Vegetable” once for 4 oz. (113 grams). Then press “START.”
(“4.0 oz.” will appear in display)
2) Press “Frozen Vegetable” twice for 8 oz. (230 grams). Then press “START.”
(“8.0 oz.” will appear in display)
3) Press “Frozen Vegetable” three times for 16 oz. (460 grams). Then press “START.”
(“16.0 oz.” will appear in display)
19. Memory Function
There are five memory settings which you can use to save your own cooking instructions:
1) Press “Memory” one to five times to select one of the five memory settings.
2) Follow one of the instructions (A,B,C) below:
a)For one-stage cooking:
-Select the desired power level by pressing the “Power” button
-Enter the cooking time
b) For two-stage cooking:
-Select the desired power level of stage 1 by pressing the “Power” button
-Enter cooking time
-Select the desired power level of stage 2 by pressing the “Power” button
-Enter cooking time
c) To use Time Defrost:
-Press “Time Defrost”
-Enter defrosting time
-Select desired power level by pressing the “Power” button.
- Enter cooking time
3) Press “Memory” to save your setting.
20. Grill/Combo Function
When the grill icon is illuminated the grill feature is in use.
WARNING: FIRE & BURN HAZARD. Top of microwave will be very hot during and after
browning. Do not place items on top of microwave. Do not touch top of microwave.
WARNING: FIRE HAZARD. Avoid all paper and plastic materials during use of this function and
during use of the STEAK and CHICKEN PIECES one-touch buttons (see p. 13). Such materials
include, but are not limited to: paper plates, paper cups, paper towels, parchment paper, plastic
containers, plastic wrap, wax paper, storage bags, freezer bags and oven cooking/baking bags.
WARNING: FIRE HAZARD. Use wire rack grill provided during grilling modes G-1, C-1 and C-2
to achieve a browning effect on food. Always place the wire rack grill in the center of the glass
tray and ensure it does not touch the door or wall of the oven cavity. Failure to do so, may
cause arcing which will damage the cavity.
CAUTION: BURN HAZARD. Food and accessories will be hot after browning. Use oven mitts
when handling.
Microwave 87176 Use and Care Manual: Support: 1-800-488-5080 www.hb-microwaves.com
14
Page 15
This function allows you to brown, crisp or toast the surface of your food. The maximum cooking
time is 99 minutes 99 seconds. Place food to be browned on wire rack and place wire rack on
glass tray (see illustration on page 8). Place a heat-resistant plate under wire rack to catch oil
drippings from foods.
1) Press “Grill/Combo” once for 100% grilling. Enter cooking time, then press “START”.
(“G-1” will appear in display)
2) Press “Grill/Combo” twice for use of 55% microwave, 45% grill. Enter cooking time, then
press “START”.
(“C-1” will appear in display)
3) Press “Grill/Combo” three times for use of 36% microwave, 64% grill. Enter cooking time,
then press “START.”
(“C-2” will appear in display)
When browning, heat is radiated from the two elements at the top of the oven. The elements do
not require pre-heating. This function is useful for reheating crispy foods such as fried chicken or
chicken nuggets.
Food being grilled can be turned over after half the time entered has elapsed. When the door is
opened, the program is interrupted. Carefully turn the food over and place it back into
microwave. Close the door press start to restart. The door can be opened at any time to check
the food.
21. AM/PM and Clock Functions
To determine whether the time on the display is in AM or PM, press the “AM/PM” button. The
answer will be displayed for three seconds.
To determine the time in the middle of cooking, press “Clock”. The time will display for six
seconds.
In the timer mode, press “Clock” to determine the time at which the microwave will
automatically begin cooking.
To determine the power level while cooking, press the “Power” button and the current power
level will be displayed.
22. Kitchen Timer
1) Press “Kitchen Timer” button, LED display will show “00:00”.
2) Input length of time for countdown, maximum 99 minutes 99 seconds.
3) Press “START” to begin, LED counts down. Icon “clock” on.
4) When countdown ends, it will beep five times.
Microwave 87176 Use and Care Manual: Support: 1-800-488-5080 www.hb-microwaves.com
15
Page 16
Care and Cleaning
-Keep the inside of the oven clean. Food particles and liquid stains that stick to
the oven walls can hinder the operation of the microwave.
-Clean up spilled liquids immediately with a damp towel and mild soap. Avoid
abrasive cleaners.
-To loosen food particles and stains, heat up two cups of water with lemon
juice at high power for four minutes, or until boiling. Let stand in the
microwave for three minutes before cleaning.
-Remove the glass turntable from the microwave while cleaning. Do not put
the turntable directly in water immediately after cooking, or it may break. Wash
the turntable in warm, soapy water or in the dishwasher.
-The outside of the microwave can be cleaned with damp towel and mild soap.
Do not let water seep into any openings or damage may occur to the
microwave.
Microwave 87176 Use and Care Manual: Support: 1-800-488-5080 www.hb-microwaves.com
16
Page 17
Troubleshooting
Problem
1. Dim Oven Light
2. Steam accumulating on door or
hot air coming out of vents during
cooking
3. Oven is started accidentally with
no food in it
4. Interference with TV reception 4. Microwave operation may affect
5. Microwave will not start 5a. Power cord not plugged in
Possible Causes
1. In low power cooking, oven
light may become dim
2. Food releases steam
during cooking
3. Microwave is started accidentally
with no food in it
radio and TV reception
tightly
5b. A fuse is blown or circuit
Breaker trips
What to do
1. This is normal
2. This is normal
3. No damage will occur if
the microwave runs for less
than 20 seconds
4. This is normal
5a. Unplug, wait 10 seconds,
then plug in again
5b. Replace fuse or reset
circuit breaker
6. Glass turntable makes noise
during operation
7. Popcorn is over-cooked or under-
cooked with “Popcorn” Easy Button
8. One of the display icons begins
flashing when the microwave isn’t
cooking
9. Top of microwave becomes hot
5c. Problem with electrical outlet
6. The microwave cavity is dirty 6. Clean the microwave and
7. Incorrect power level selected
for size of popcorn bag
8. A cooking function was
accidentally activated
9. Not enough clearance space or too
many objects on top of microwave
5c. Consult with professional
electrician
Turntable rest with warm water and
microwave-safe cleaning products
7. Refer to page 12 for “Popcorn”
Button instructions. Always follow
manufacturer’s instructions for
popcorn if the cooking time for the
pre-set buttons differs from the
manufacturer’s recommended time.
Never leave popcorn cooking
unattended.
8. Press “Stop/Clear” button
9. Refer to page 8 for installation
instructions
Microwave 87176 Use and Care Manual: Support: 1-800-488-5080 www.hb-microwaves.com
17
Page 18
LIMITED 1-YEAR WARRANTY
What does this warranty cover?
- Any defect in materials or workmanship in the manufactured
product
- Missing parts for a period of 90 days from the date of purchase
What does this warranty not cover?
- Service trips to your home to teach you how to use the
product.
- Improper installation.
- Failure of the product if it is abused, misused, altered or
used for other than the intended purpose.
- Products that are used outside a residential or office areas
- Replacement of house fuses or resetting of circuit
breakers.
- Damage to the product caused by accident, fire, floods, power
surges or acts of God.
-Any unauthorized service to the product
-The glass turntable.
- Incidental or consequential damage caused by possible
defects with this appliance, its installation or repair. Some
states do not allow limitations on incidental or
consequential damages, so the foregoing limitations may
not apply to you.
For how long after the original purchase?
- One (1) year.
Warrantor: TTI Appliances, Los Angeles, CA 90025
How do I make a warranty claim?
-Return to the retailer from which it was
purchased, along with a copy of the store
receipt within the given period of time allowed
for returns by the retailer (i.e. 90 days). The
retailer will provide a new unit or a refund. After
this period of time, contact TTI Appliances at 1
800 579 7990 for further instructions as to how
to receive a new unit or a refund. This warranty
excludes the cost of shipping to or from TTI
Appliances.
How does state law relate to this warranty?
-This warranty is extended to the original
purchaser only for products purchased for
household use within the country of purchase.
This warranty gives you specific legal
rights, and you may also have other rights
which vary from state to state or province
to province. To know what your legal
rights are, consult your local state
consumer affairs office or your state’s
Attorney General.
-Exclusion of implied warranties: Except
where prohibited or restricted by law,
there are no warranties, whether express,
oral or statutory which extend beyond the
description on the face hereof, including
specifically the implied warranties of
merchantability or fitness for a particular
purpose.
Consumer Support:
Phone: 1-800-488-5080 (Monday – Friday 8:00 AM – 4:30 PM ET)
Email: [email protected]
On the web: www.hb-microwaves.com
To order replacement turntables:
Phone: 1-800-579-7990
Email: [email protected]
Please complete and return warranty registration card.
Microwave 87176 Use and Care Manual: Support: 1-800-488-5080 www.hb-microwaves.com
18
 Loading...