

Hamilton Beach 58148, 840203403 User Manual
READ BEFORE USE
LIRE AVANT UTILISATION
LEA ANTES DE USAR
Questions?
Please call us – our friendly
associates are ready to help.
USA: 1.800.851.8900
¿Preguntas?
Por favor llámenos – nuestros
amables representantes están
listos para ayudar.
MEX: 01 800 71 16 100
Le invitamos a leer cuidadosamente
este instructivo antes de usar su
aparato.
Visit www.hamiltonbeach.com for our
complete line of products and Use and
Care Guides – as well as
delicious recipes, tips, and
to register your product online!
Rendez-vous sur www.hamiltonbeach.ca
pour notre liste complète de produits et de
nos manuels utilisateur – ainsi que nos
délicieuses recettes, nos conseils et pour
enregistrer votre produit en ligne !
¡Visite www.hamiltonbeach.com.mx para
obtener nuestra línea completa de productos
y las Guías de Uso y Cuidado, además de
deliciosas recetas, consejos y para registrar
su producto en línea!
Questions ?
N’hésitez pas à nous appeler –
nos associés s’empresseront
de vous aider.
CAN : 1.800.267.2826
English ...................... 2
Français .................. 13
Español ....................25
Blender
Mélangeur
Licuadora
840203403 ENv01.qxd:Layout 1 3/9/12 5:16 PM Page 1

2
IMPORTANT SAFEGUARDS
1. Read all instructions.
2. To protect against risk of electrical shock, do not put cord,
plug, base, or motor in water or other liquid.
3. Close supervision is necessary when any appliance is used
by or near children.
4. Unplug cord from outlet when not in use, before putting on
or taking off parts, and before cleaning.
5. Avoid contact with moving parts.
6. Do not operate any appliance with a damaged cord or plug,
or after the appliance malfunctions, or is dropped or damaged
in any manner. Call our toll-free customer service number for
information on examination, repair, or electrical or mechanical
adjustment.
7. The use of attachments, including canning jars, not recom-
mended or sold by the appliance manufacturer may cause
a risk of injury to persons.
8. Do not use outdoors.
9. Do not let cord hang over edge of table or counter or touch
hot surfaces, including stove.
10. Keep hands and utensils out of blender jar and chopper bowl
while blending to reduce the risk of severe personal injury
and/or damage to blender. A rubber spatula may be used
but must be used only when blender is not running.
11. Blades are sharp; handle carefully – especially when
assembling, disassembling, or cleaning inside blender jar.
12. Do not use a broken, chipped, or cracked blender jar.
13. Do not use broken, cracked, or loose cutting blade assembly.
14. To reduce the risk of injury, never place cutting blade assembly
on base without blender jar or chopper bowl properly attached.
15. Always operate blender with lid in place.
16. When blending hot liquids, open vent opening of lid, and close
any lid openings intended for pouring. If pouring with lid in
place, ensure the hinged cap is securely in place. Hot liquids
may push lid off jar during blending. To prevent possible
burns: Do not fill blender jar beyond the 3-cup (750-ml) level.
With the protection of an oven mitt or thick towel, place one
hand on top of lid. Keep exposed skin away from lid. Start
blending at lowest speed.
17. Ensure collar on base of blender jar is tight and secure. Injury
can result if moving blades accidentally become exposed.
18. If the jar should twist or rotate when the motor is switched
ON, switch OFF immediately and tighten jar in collar or on
blender base.
19. Do not leave blender unattended while it is operating.
20. To disconnect cord, turn the control to OFF (O). Then remove
plug from wall outlet.
21. Do not use appliance for other than intended purpose.
22. Be certain the lid is securely in position before operating
appliance.
23. Do not attempt to defeat the cover interlock mechanism.
When using electrical appliances, basic safety precautions should always be followed, including the following:
SAVE THESE INSTRUCTIONS!
840203403 ENv01.qxd:Layout 1 3/9/12 5:16 PM Page 2

3
OTHER CONSUMER SAFETY INFORMATION
This appliance is intended for household use only. Use for food
or liquids only.
WARNING! Shock Hazard: This appliance has a polarized
plug (one wide blade) that reduces the risk of electric shock.
The plug fits only one way into a polarized outlet. Do not defeat
the safety purpose of the plug by modifying the plug in any way
or by using an adapter. If the plug does not fit fully into the outlet,
reverse the plug. If it still does not fit, have an electrician replace
the outlet.
The length of the cord used on this appliance was selected to
reduce the hazards of becoming tangled in or tripping over a
longer cord. If a longer cord is necessary, an approved extension
cord may be used. The electrical rating of the extension cord
must be equal to or greater than the rating of the appliance.
Care must be taken to arrange the extension cord so that it will
not drape over the countertop or tabletop where it can be pulled
on by children or accidentally tripped over.
If the cutting blade assembly locks and will not move, it will
damage the motor. Do not use. Call the toll-free customer service
number for information.
Do not place blender jar in the freezer filled with food or liquid.
This can result in damage to the cutting blade assembly, jar,
blender, and possibly result in personal injury.
The maximum (max.) rating marked on the blender is based
on processing a food load, as recommended in this manual, that
draws the greatest load. Blending or processing some foods may
draw less power.
Peak power is the measure of the motor wattage during the first
seconds of operation. This is when a blender requires the most
power to crush ice, frozen fruit, etc. This is a better measure of
what a blender motor can consume when power is needed
most.
BEFORE FIRST USE: After unpacking blender, wash everything
except blender base in hot, soapy water. Dry thoroughly. Wipe
blender base with a damp cloth or sponge. DO NOT IMMERSE
BASE IN WATER. Care should be taken when handling cutting
blade assembly as it is very sharp.
Wattage/Peak Power Information
840203403 ENv01.qxd:Layout 1 3/9/12 5:16 PM Page 3
4
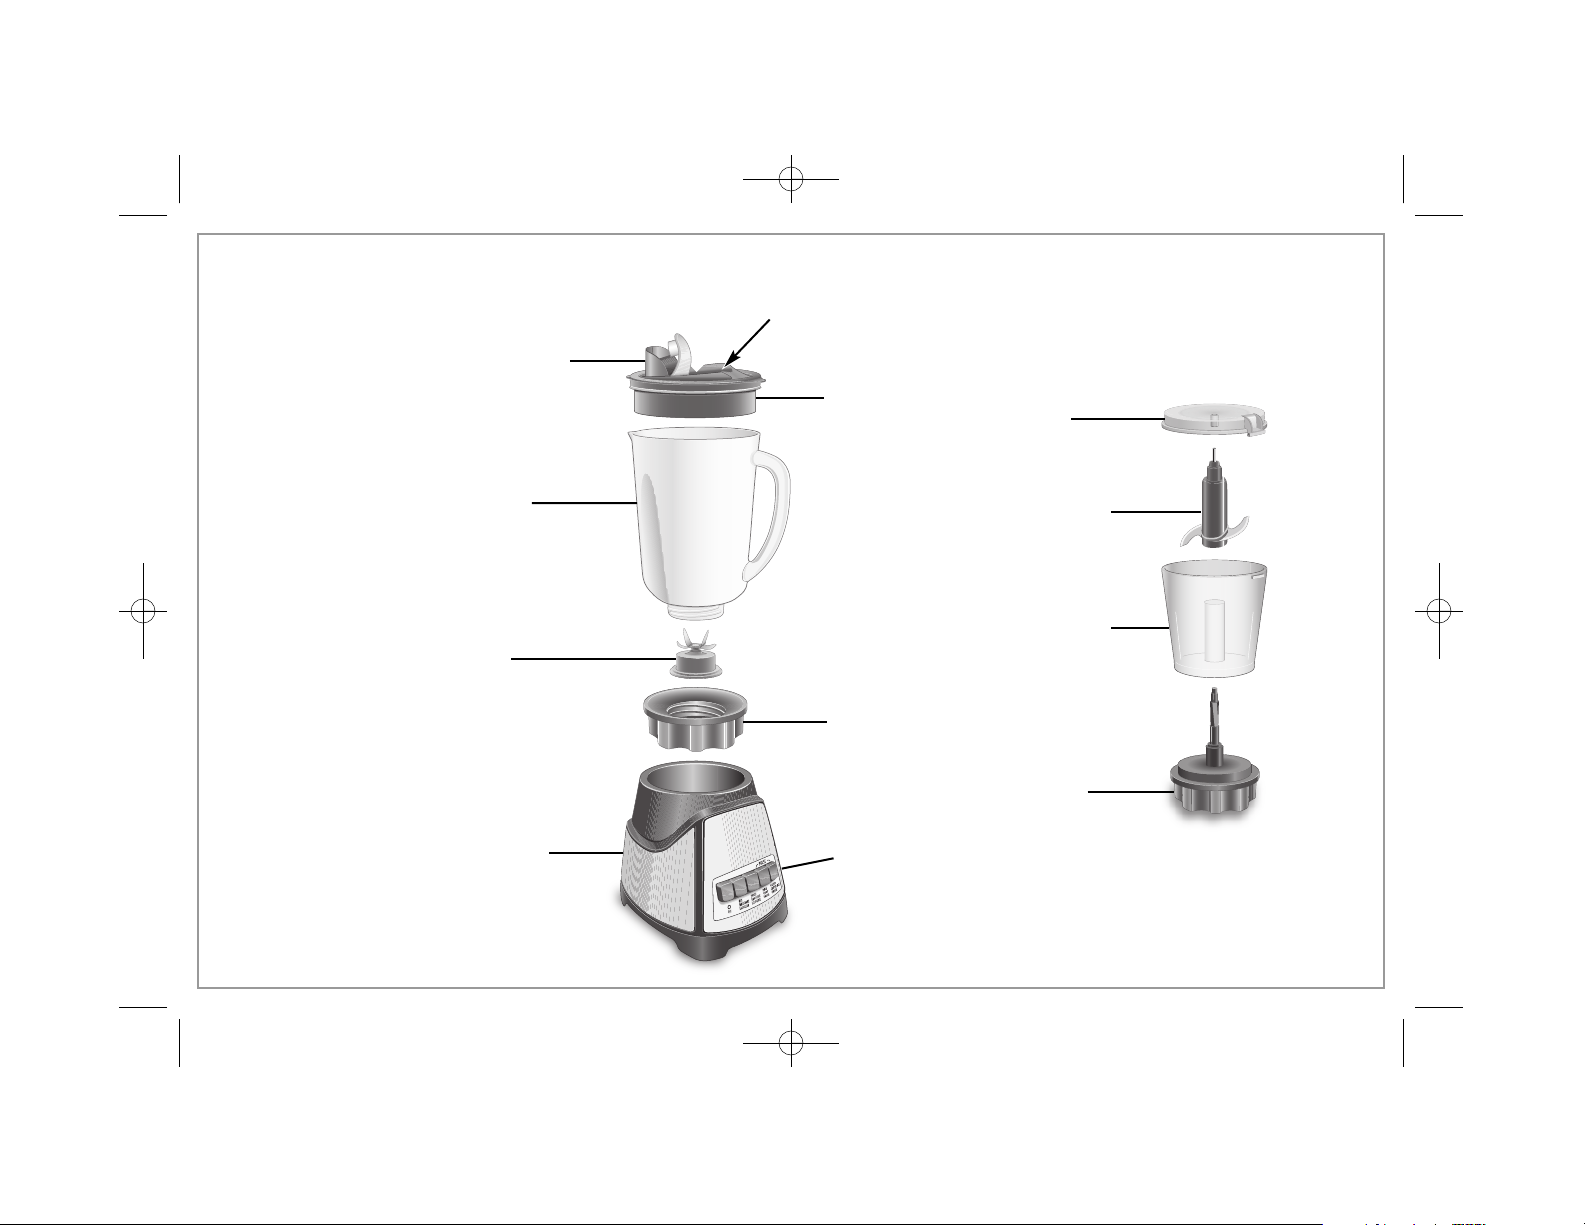
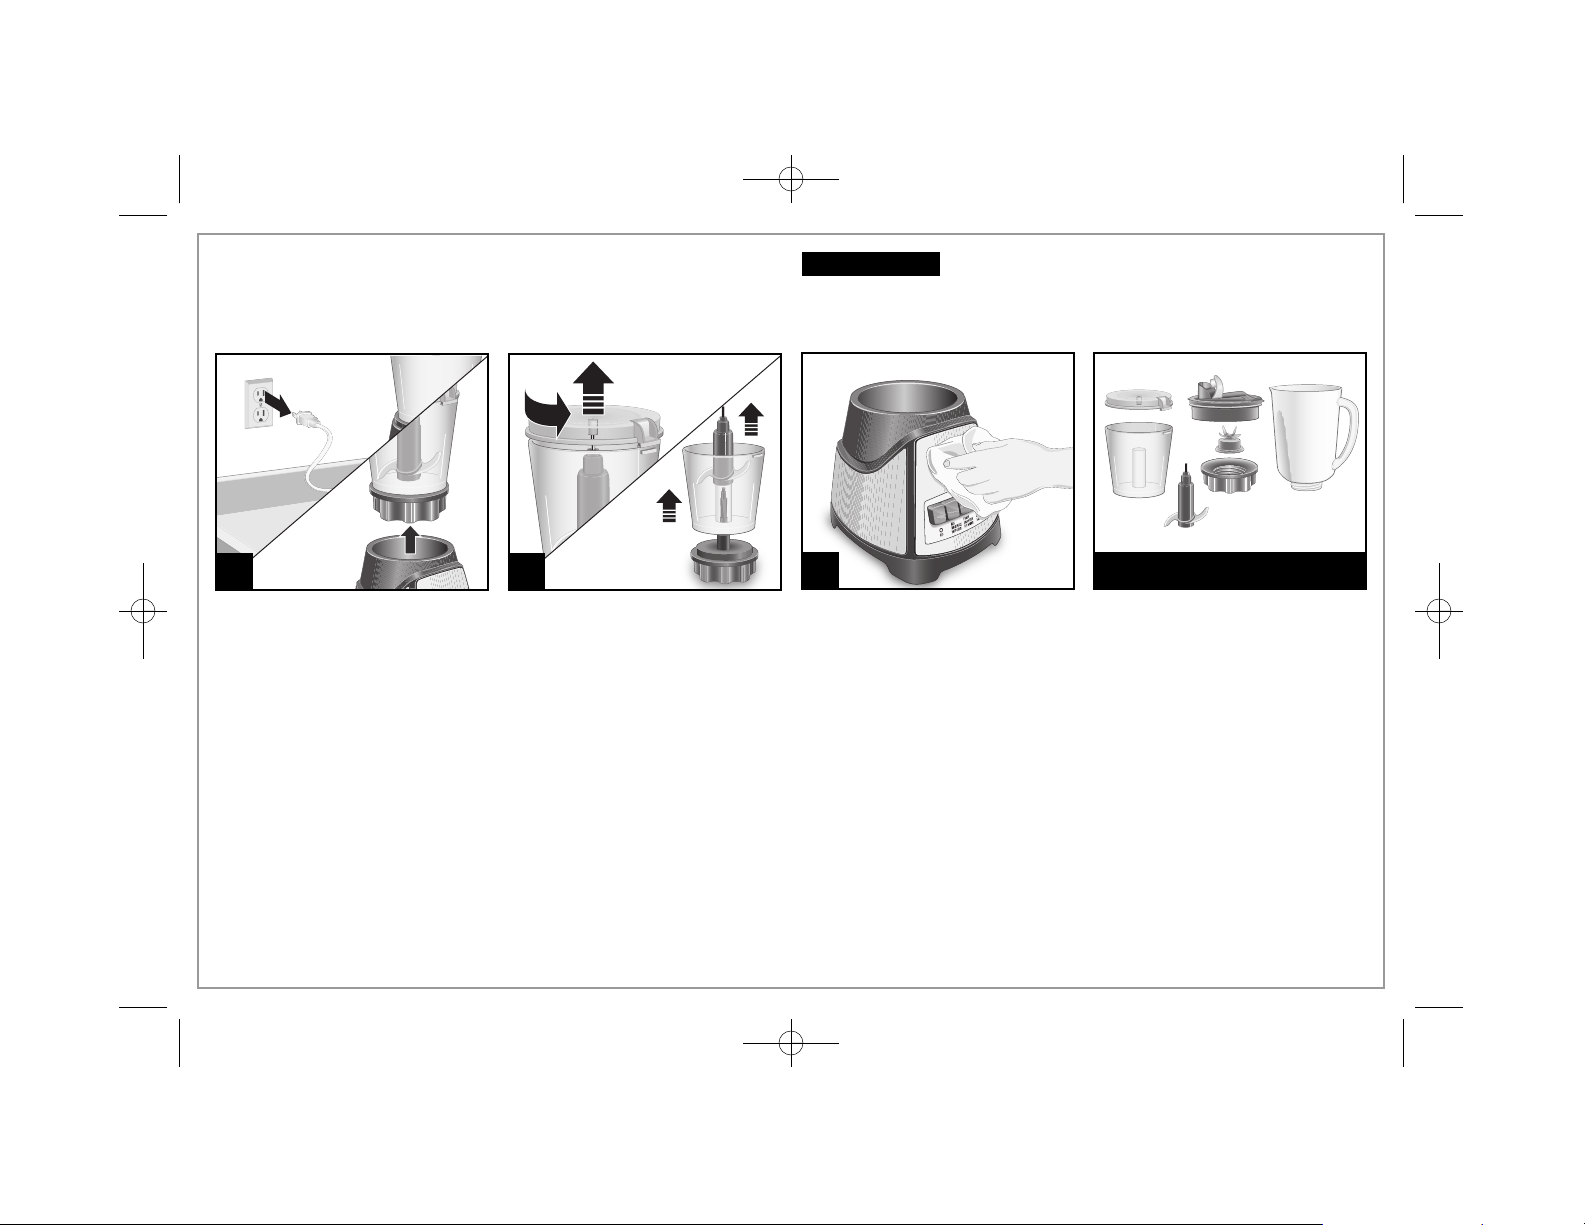
Parts and Features
Mess-Free Spout
With Hinged Cap
Blender Jar
Base
Cutting Blade
Assembly
NOTE: The gasket is
permanently affixed to
the cutting blades.
Do not try to remove it.
Collar
Vent Opening
Lid
Control Panel
Food Chopper Attachment
(optional accessory on select models)
Lid
Chopper
Bowl
S-Blade
Bowl
Base
840203403 ENv01.qxd:Layout 1 3/9/12 5:16 PM Page 4
5
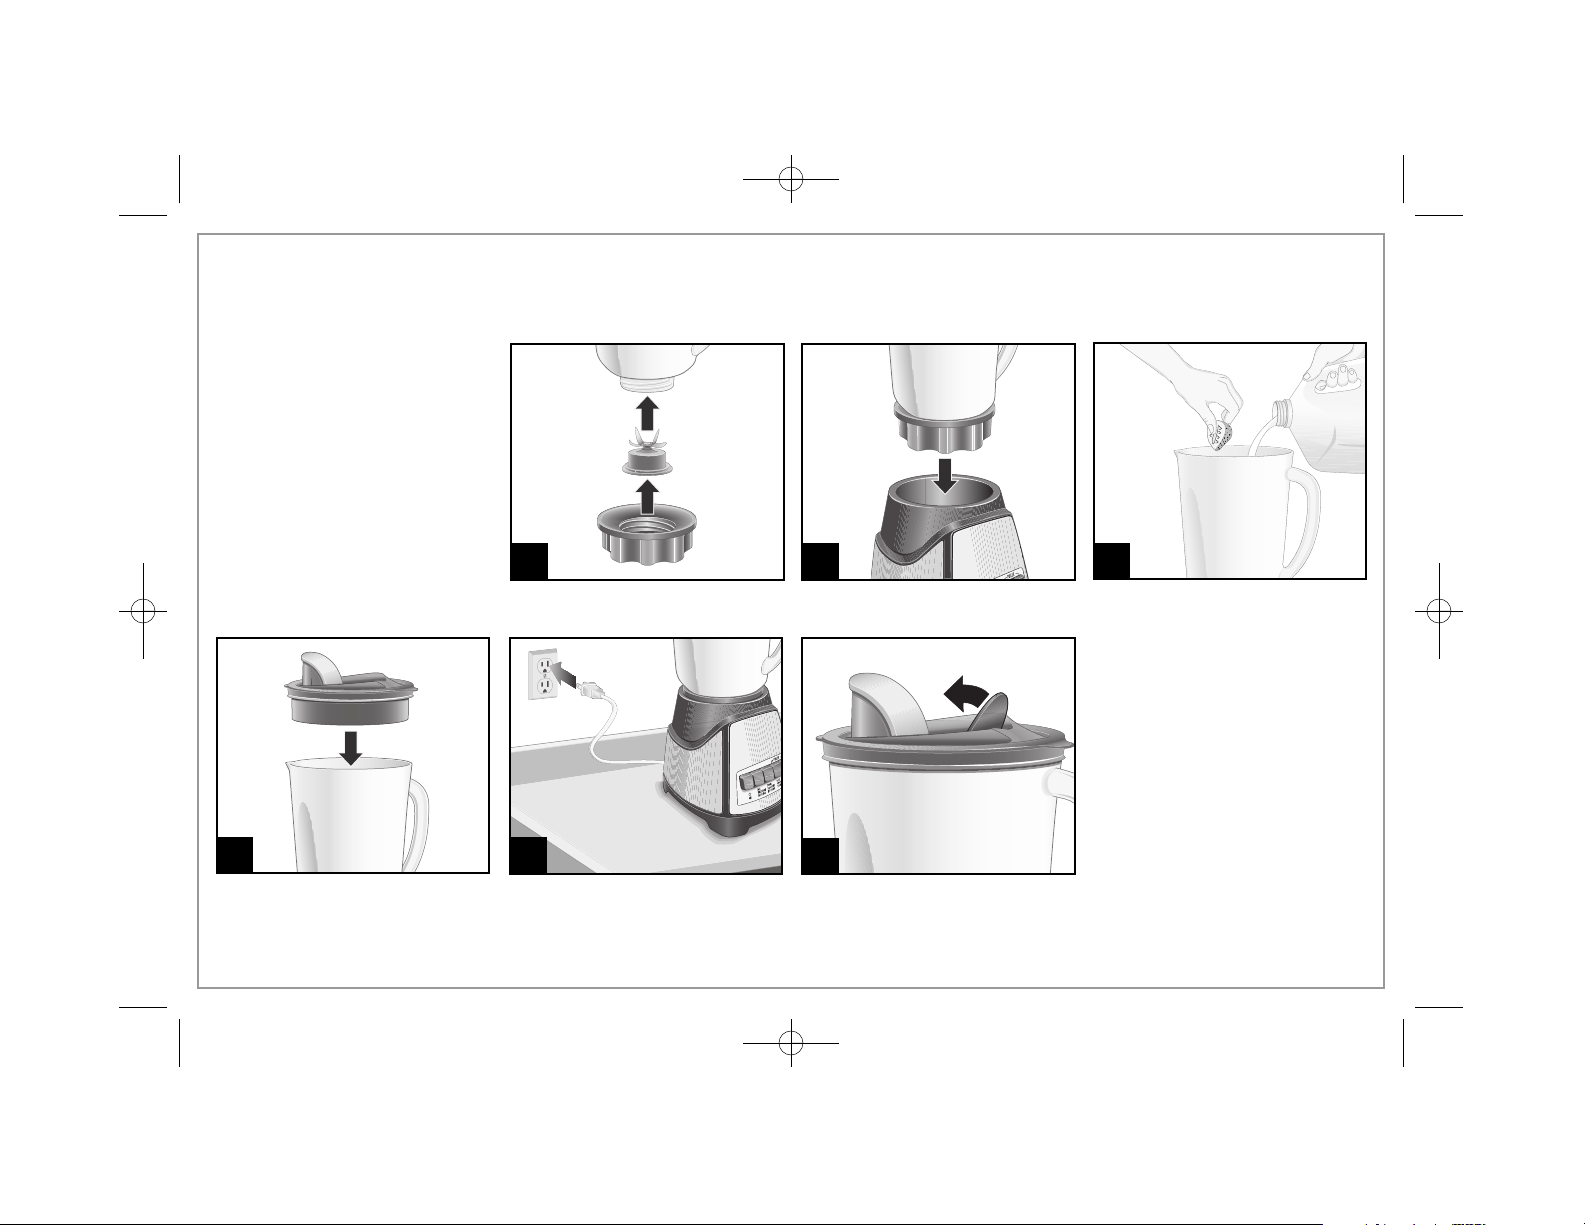
Using Your Blender
BEFORE FIRST USE: After unpacking the blender, follow the
instructions in “Cleaning Your Blender.”
IMPORTANT: Your blender jar
and cutting blade assembly are
subject to wear during normal
use. Always inspect jar for nicks,
chips, or cracks. Always inspect
cutting blade assembly for broken, cracked, or loose blades. If
jar or cutting blade assembly is
damaged, do not use. Call our
toll-free customer service number
to obtain replacement parts.
3
5
2
1
4
6
CAUTION! Burn Hazard: When
blending hot liquids, open vent
opening of lid, and close any lid
openings intended for pouring.
Ensure the hinged cap is securely
in place. Hot liquids may push lid
off jar during blending. To prevent
possible burns: Do not fill blender
jar beyond the 3-cup (750-ml) level.
With the protection of an oven mitt
or thick towel, place one hand on
top of lid. Keep exposed skin away
from lid. Start blending at slowest
function.
840203403 ENv01.qxd:Layout 1 3/9/12 5:16 PM Page 5
6
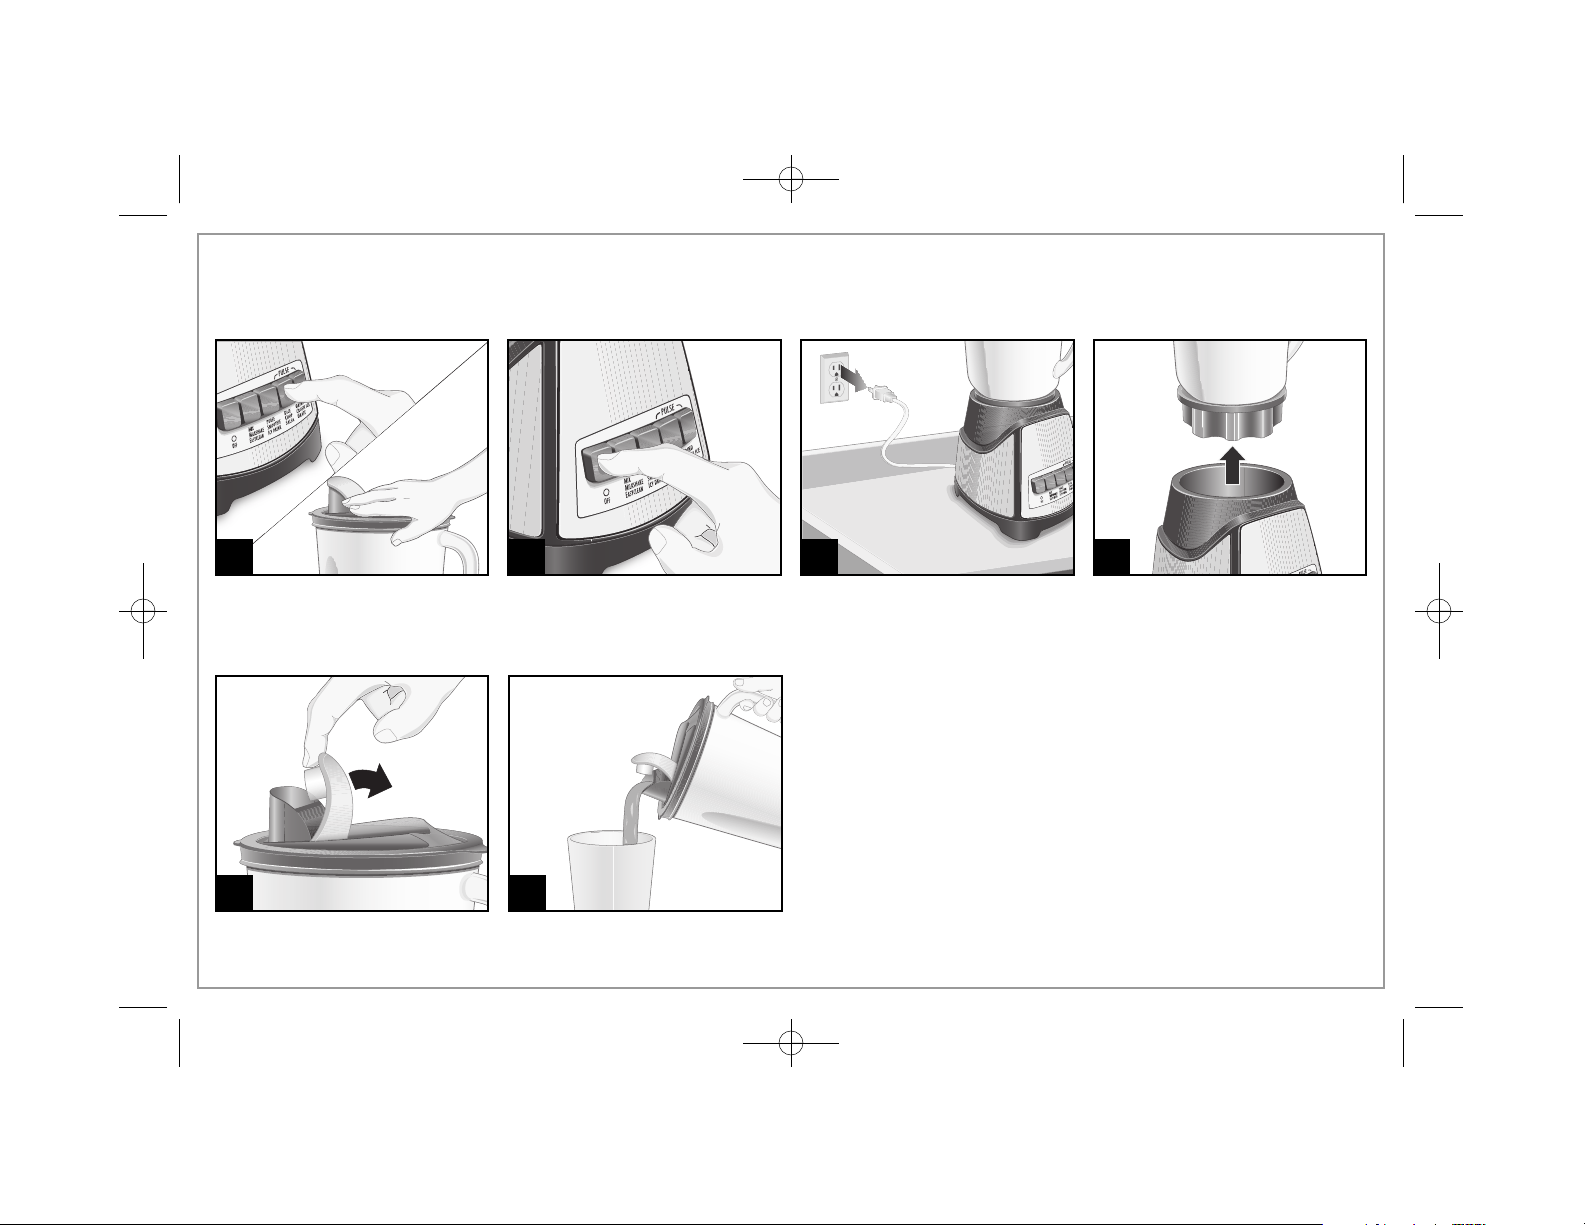
Using Your Blender (cont.)
1098
1211
7
Push the desired function button.
When using a Pulse button, the
blender will only run when the
button is held down.
840203403 ENv01.qxd:Layout 1 3/9/12 5:16 PM Page 6

7
FOOD
Coffee Beans
Parmesan Cheese
Baking Chocolate
Nuts
Chopped Vegetables
Cookie or Cracker Crumbs
Superfine Sugar
QUANTITY
1/2 cup (125 ml)
10 oz. (280 g)
2 oz. (50 g)
1 cup (250 ml)
2 cups (500 ml)
1 cup (250 ml)
1 cup (250 ml)
PREPARATION
None
1/2-in. (1-cm) chunks
Coarsely chop squares
None
Cut into 1-in. (2.5-cm) pieces,
cover with water
Break cookies or crackers
into pieces
None
BLENDING TIME
30 seconds
15 seconds
15 seconds
5 seconds
10 seconds
5 seconds
30 seconds
Processing Foods in Blender
TIPS FOR BEST RESULTS:
• Use Pulse button with guidelines outlined in chart.
• Remove jar from base and shake to redistribute pieces.
• Place jar on base and Pulse a few more times until desired
consistency is reached.
• Parmesan cheese should remain refrigerated prior to processing.
840203403 ENv01.qxd:Layout 1 3/9/12 5:16 PM Page 7

8
TO MAKE
Bread, crumbs
Cheese, Parmesan
Chocolate, baking
Cookie, crumbs
Fruit, chopped
Garlic, minced
Graham Cracker, crumbs
Herbs, chopped
Meat, ground
Nuts, chopped
Parsley, chopped or minced
Vegetables, chopped or minced
Food Processing Chart
INSTRUCTION
Tear bread slices (max. 3) into 6 pieces.
Cut into 1/2-nch (1-cm) cubes. Process 1/2 cup (125 ml) of cubes at a time.
Cut into 1/2-inch (1-cm) cubes. Do not process more than 4 oz. (115 g) at a time.
Break into pieces. Use up to 2 cups (500 ml) of pieces.
Cut fruit into large chunks. Place up to 2 cups (500 ml) pieces into chopper.
Peel and then process 1 or more cloves at a time.
Break into 4 pieces. Place up to 6 crackers in chopper at a time.
Place up to 1 cup (250 ml) in chopper.
Cut into 1/2-inch (1-cm) cubes. Process 8 oz. (225 g) of cubes at a time.
Place up to 1 cup (250 ml) in chopper.
Pinch off sprigs from bunch.
Cut into 1-inch (2.5-cm) chunks. Place up to 2 cups (500 ml) in chopper at a time.
NOTE: Quantities listed above are the recommended maximum. Depending on the food type, smaller amounts may improve chopping
performance.
840203403 ENv01.qxd:Layout 1 3/9/12 5:16 PM Page 8
9
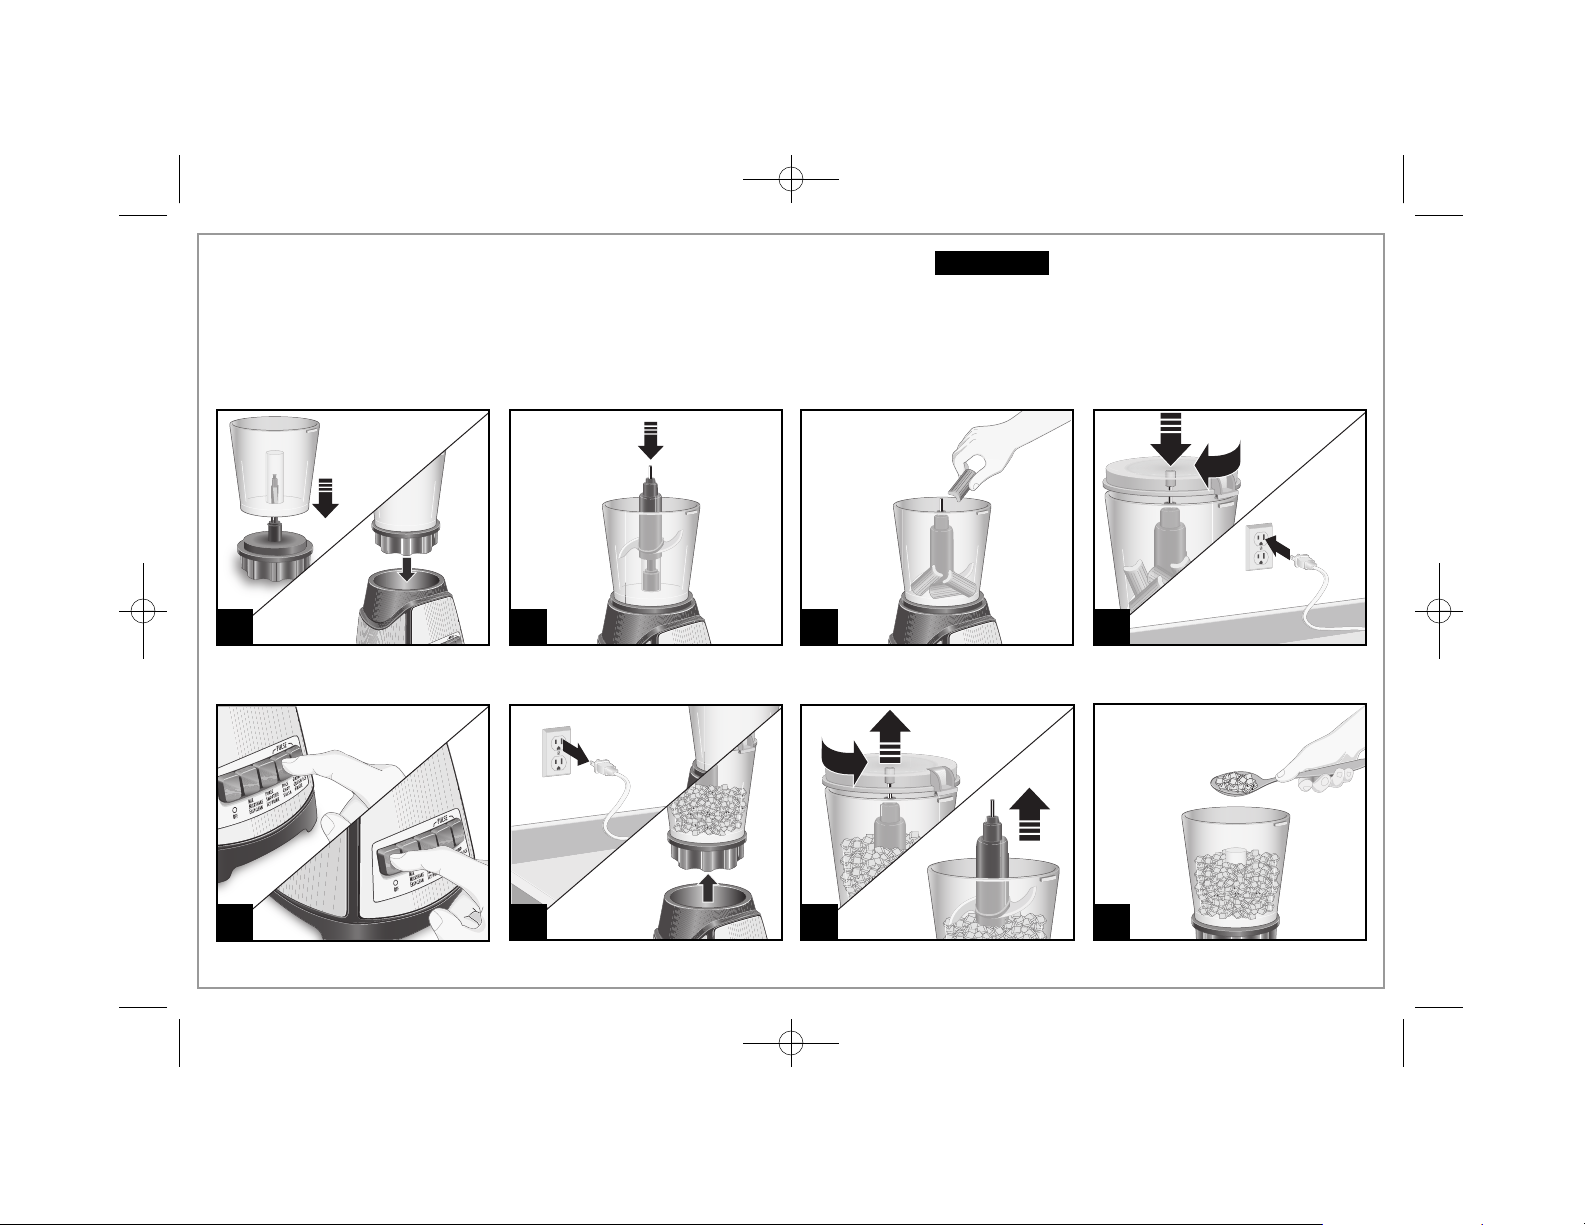
Using Food Chopper Attachment
(Optional Accessory on Select Models)
5
3 4
Cut Hazard.
Ensure unit is off and unplugged before attaching
food chopper attachment. Do not plug in and turn
on until lid is in position and locked on top of food
chopper bowl.
Always turn off, unplug, and allow blade to stop
spinning before opening lid.
w WARNING
21
Ensure unit is in off position
before plugging into outlet.
6 7
8
840203403 ENv01.qxd:Layout 1 3/9/12 5:17 PM Page 9
10
Cleaning Your Blender
Electrical Shock Hazard.
Disconnect power before cleaning.
Do not immerse cord, plug, base, or motor in water
or other liquid.
w WARNING
DISHWASHER-SAFE
3
DO NOT use the “SANI” setting
when washing in the dishwasher.
“SANI” cycle temperatures could
damage your product. Parts may
also be washed with hot, soapy
water. Care should be taken
when handling the cutting blade
assembly as it is very sharp.
Rinse and dry thoroughly. Do
not soak.
Wipe blender base, control panel,
and cord with a damp cloth or
sponge. To remove stubborn
spots, use a mild, nonabrasive
cleanser.
EASY CLEAN
To Easy Clean, pour 2 cups (500 ml) warm water in jar and add 1 drop liquid dishwashing detergent. Run the blender on EASYCLEAN for
10 seconds. Discard soapy water. Rinse with clean water.
This function is not a substitute for regular cleaning as instructed in “Cleaning Your Blender.” This function should never be used when
blending any mixture containing eggs, milk, or any other dairy products, meats, or seafood.
The Easy Clean function should only be used to rinse the blender between batches of processing the same food. When the processing
of a single type of food is finished, the blender should be disassembled and thoroughly cleaned as instructed in “Cleaning Your Blender.”
21
840203403 ENv01.qxd:Layout 1 3/9/12 5:17 PM Page 10

11
Blender Tips
• To add foods when blender is operating, open hinged pouring cap
and add ingredients through the opening.
• For best performance, the minimum amount of liquid needed per
recipe is one cup (8 ounces/250 ml). Add more liquid if food is not
blending properly.
• If blending action stops during blending or ingredients stick to
sides of the jar, there may not be enough liquid in the jar to blend
efficiently.
• Do not try to mash potatoes, mix stiff dough, whip egg whites,
grind raw meat, or extract juices from fruits and vegetables.
• Do not store food or liquids in the blender jar.
• Avoid bumping or dropping the blender when in operation or
at any time.
840203403 ENv01.qxd:Layout 1 3/9/12 5:17 PM Page 11
 Loading...