

Page 1
840141900
FUENTE DE SODAS
RECETTES ET
GUIDE DE
L’UTILISATEUR
MÉLANGEUR
À BOISSON
GUÍA
DE USO
À LA PAGE 16
PÁGINA 32
RECIPES AND
USER GUIDE
DRINK MIXER
PAGE 2
LIRE AVANT L’UTILISATION
Canada : 1-800-267-2826
LEA ANTES DE USAR
México : 01-800-71-16-100
Le invitamos a leer cuidadosamente este
instructivo antes de usar su aparato.
READ BEFORE USE
USA: 1-800-851-8900
Canada: 1-800-267-2826
840141900 ENv00.qxd 10/25/05 9:07 AM Page 1
Page 2

2
Dear Drink Mixer Owner,
Congratulations on your purchase. The Hamilton Beach
®
Eclectrics
™
Collection adds a modern twist to those dependable, all-metal
appliances you remember from yesteryear.
Owning a Hamilton Beach
®
is like owning a piece of history. In 1904,
Louis Hamilton and Chester Beach teamed up to bring motorized
appliances like vacuums, sewing machines, and mixers into
American households. In honor of their 100-year legacy, we’ve combined the “built to last” metal construction of the past with the
styling of today to bring lasting quality and style to your kitchen.
As you use your all-metal appliance, think about the history that
came before it. Enjoy the confidence you have in a product backed
by years of experience and a 3-year warranty. But most of all, fill
your home with the delicious aroma of homemade recipes that your
appliance helps you create!
I hope you enjoy your Hamilton Beach
®
Eclectrics™appliance for
many years to come.
Sincerely,
Michael J. Morecroft
President and Chief Executive Officer
Hamilton Beach/Proctor-Silex, Inc.
840141900 ENv00.qxd 10/25/05 9:07 AM Page 2
Page 3

3
Warranty Information ...................... 3
Important Safeguards .................... 4
Assistance and Service
Information ...................................... 5
Parts and Features .......................... 6
Using Your Drink Mixer ....................6
Drink Mixer Tips .............................. 7
Cleaning Your Mixer ........................ 7
Recipes ...................................... 8-15
Smoothies/Fruit Drinks .............. 8
Milk Shakes ................................ 11
Alcoholic Frozen Drinks ............ 14
Breakfast .................................... 15
Soup and Salsa .......................... 15
Table of Contents
Warranty Information
Standard Three Year Warranty
Congratulations! You now own one of the finest drink mixers. We’re so confident in the
quality and craftsmanship of your new drink mixer that we’re backing your purchase
with a No-Hassle 3-Year Replacement Warranty. If your drink mixer malfunctions within
3 years of purchase, we will deliver a brand new replacement mixer to your door and
remove the old unit at no cost to you. Here’s how it works:
Warranty To fulfill Hamilton Hamilton Beach
®
Term the warranty: Beach®will will not pay for
1. Follow the instructions in
this Manual. Refer to Drink
Mixer Tips section if you
have any problems operating
the unit. If you have any
questions, call one of the
Customer Service numbers
on page 5.
2. Keep your proof of purchase.
If the unit malfunctions
within 3 years of purchase,
call one of the Customer
Service numbers on page 5.
1. Send a pre-paid
shipping label so you
can send us the unit.
2. Ship a brand new
replacement unit to
your address.
Product failures arising from
abuse, misuse, neglect, use
for commercial purposes, or
use contrary to this Manual.
THIS WARRANTY IS IN LIEU OF
ANY OTHER WARRANTY OR
CONDITION, EXPRESS OR
IMPLIED, WRITTEN OR ORAL,
INCLUDING ANY WARRANTY,
STATUTORY WARRANTY
OR CONDITION OF MERCHANTABILITY OR FITNESS
FOR A PARTICULAR PURPOSE.
ANY LIABILITY IS EXPRESSLY
LIMITED TO THE PURCHASE
PRICE PAID. ALL CLAIMS FOR
SPECIAL, INCIDENTAL OR
CONSEQUENTIAL DAMAGES
ARE EXPRESSLY EXCLUDED.
Three years from
date of original
purchase for drink
mixers operated in
the continental
United States,
Alaska, Hawaii, and
Canada.
This warranty
applies only to the
original consumer
purchaser.
840141900 ENv00.qxd 10/25/05 9:07 AM Page 3
Page 4

4
Consumer Safety Information
IMPORTANT SAFEGUARDS
When using electrical appliances, basic
safety precautions should be followed,
including the following:
1. Read all instructions.
2. To protect against risk of electrical
shock, do not put base, motor, cord,
or plug in water or other liquid.
3. Close supervision is necessary when
any appliance is used by or near children.
4. Unplug cord from outlet when not in
use, before putting on or taking off
parts, and before cleaning.
5. Avoid contact with moving parts.
6. Keep hands, hair, clothing, as well as
spatulas and other utensils out of
container to prevent personal injury or
damage to the mixer.
7. Do not operate any appliance with a
damaged cord or plug, or after the
appliance malfunctions or is dropped
or damaged in any manner. Call our
toll-free customer service number for
information on examination, repair, or
electrical or mechanical adjustment.
8. The use of attachments not recom-
mended or sold by Hamilton
Beach/Proctor-Silex, Inc., may cause
fire, electrical shock, or injury.
9. Do not use outdoors.
10. Do not let cord hang over edge of
table or counter or touch hot surfaces.
11. Never add ingredients to container
while appliance is operating.
12. Container must be properly in place
before operating appliance.
13. To wash mixing shaft, unplug mixer
and follow the cleaning instructions
provided on page 7.
14. Do not use this appliance for other
than intended use.
SAVE THESE INSTRUCTIONS
This appliance is intended for household use only.
This appliance is equipped with a grounded- type 3-wire cord (3-prong plug). This
type of plug will only fit into an electrical
outlet made for a 3-prong plug. This is a
safety feature intended to help reduce the
risk of electrical shock. If the plug should
fail to fit contact a qualified electrician to
replace the obsolete outlet. Do not
attempt to defeat the safety purpose of
the grounding pin by modifying the plug in
any way.
The length of the cord used on this appliance was selected to reduce the hazards
of becoming tangled in, or tripping over a
longer cord. If a longer cord is necessary,
an approved extension cord may be
used. The electrical rating of the extension cord must be equal to or greater
than the rating of the drink mixer. Care
must be taken to arrange extension cord
so that it will not drape over countertop or
tabletop where it can be pulled on by
children or accidentally tripped over.
840141900 ENv00.qxd 10/25/05 9:07 AM Page 4
Page 5

5
Customer Service Information
Before Calling for Assistance
Please read before calling:
• The drink mixer may warm up
during use. Under heavy loads
with extended mixing time periods, the top of the unit may feel
warm to the touch. This is normal.
• The drink mixer may emit an odor,
especially when new. This is common with electric motors.
If your drink mixer should malfunction or fail to operate,
please check the following:
• Is the drink mixer plugged in?
• Is the fuse in the circuit to the
drink mixer in working order? If
you have a circuit breaker box, be
sure the circuit is closed.
• If the problem is not due to one of
the items mentioned above, see
Customer Service Information.
• DO NOT return the drink mixer to
the retailer as they do not provide
service.
If you have a question about your drink mixer, call our toll-free customer service
number. Before calling, please note the model, type, and series numbers and fill
in that information below. These numbers can be found on the bottom of your
drink mixer. This information will help us answer your question much more
quickly.
MODEL:___________________ TYPE :__________________ SERIES: _________________
CUSTOMER SERVICE NUMBERS
In the U.S. 1-800-851-8900 • In Canada 1-800-267-2826
hamiltonbeach.com
hamiltonbeach.ca
KEEP THESE NUMBERS FOR FUTURE REFERENCE!
Assistance and Service
840141900 ENv00.qxd 10/25/05 9:07 AM Page 5
Page 6
6
Using Your Drink Mixer
1. BEFORE FIRST USE: Wash container and mix-
ing shaft before using. See Cleaning instructions.
2. Set Control Switch to O (OFF). Plug into
electrical outlet.
3. Place ingredients to be mixed in container.
4. Place container onto drink mixer, making
certain that container’s top edge is behind container support and container bottom is
on container rest.
5. Move Control Switch to desired speed to
process. Start with Low Speed then increase to
High Speed if desired.
6. For hard ice cream or very thick shakes, remove
the container from the rest and support. With
mixing shaft still submerged in mixture, move the
container around for more thorough mixing.
7. When finished, turn unit to O (OFF). Remove
container.
8. Pour contents from container and serve.
Moving Parts
• Inspect attachments before each use.
• Do not use cracked, bent or damaged attachments.
• Do not contact moving parts.
WARNING
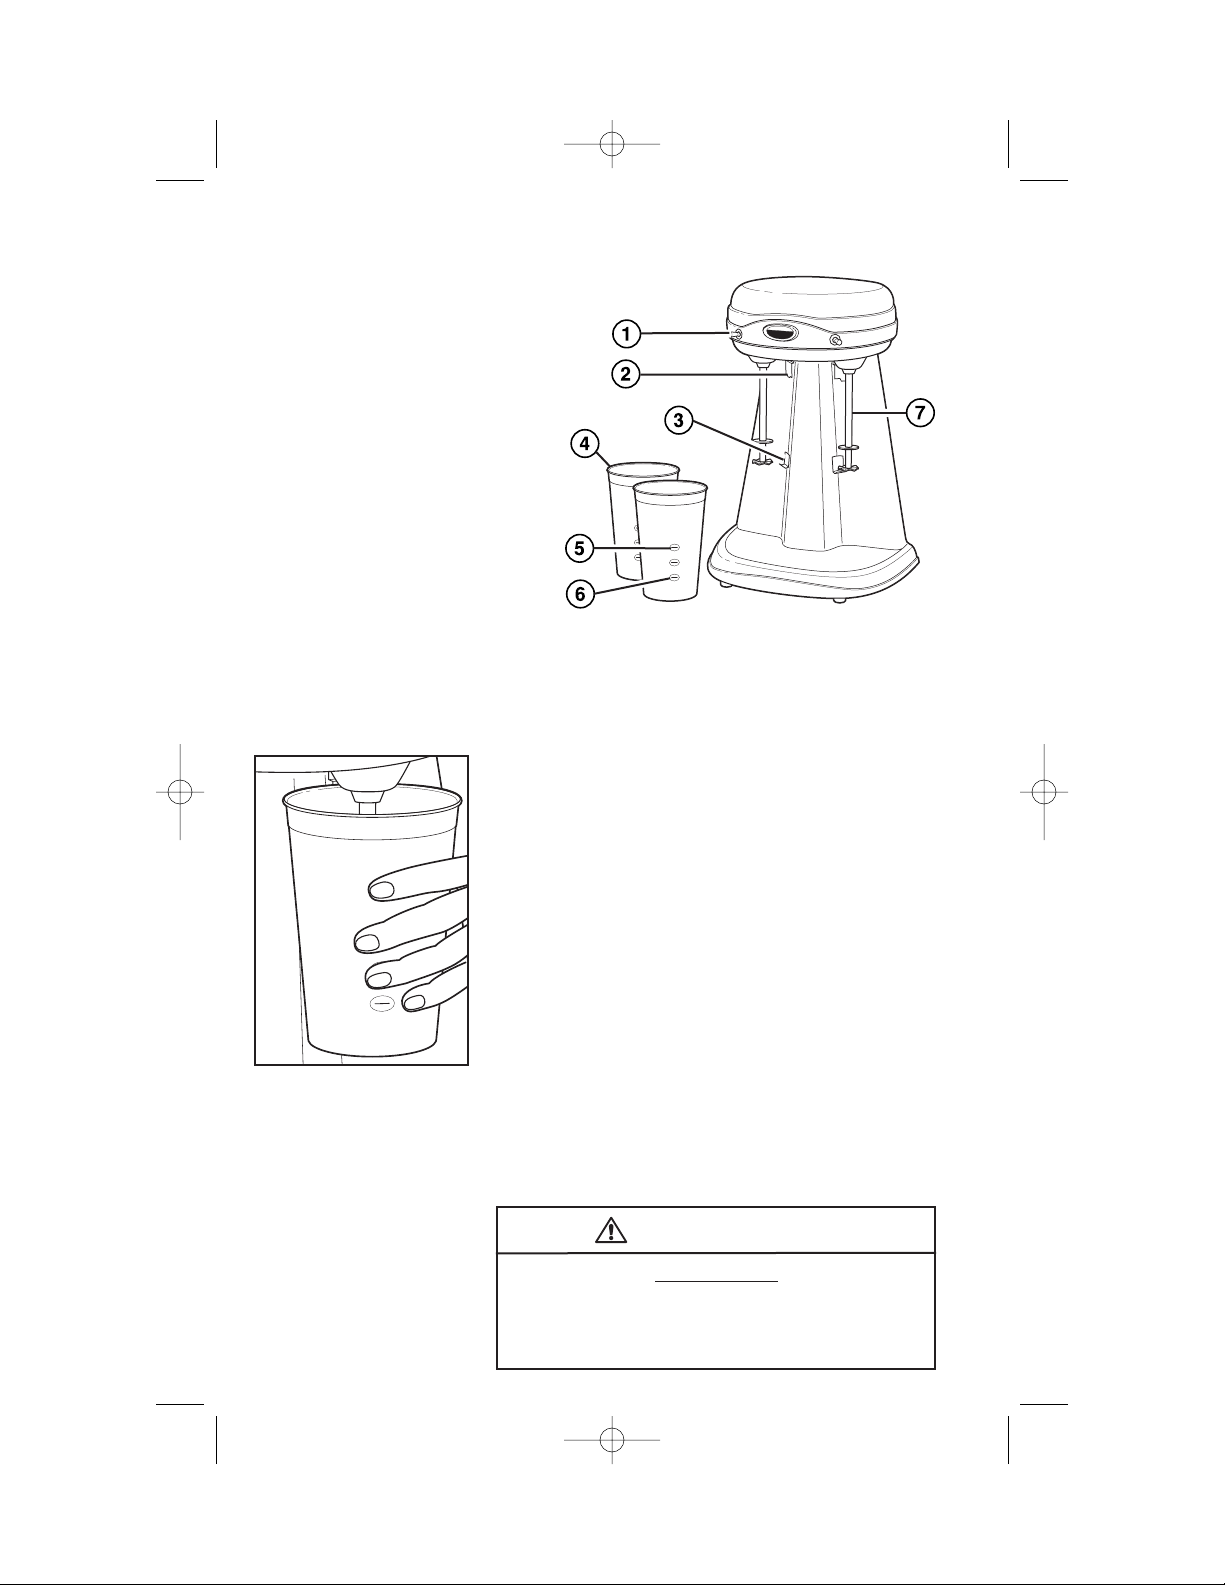
Parts and Features
1. Control Switch
O = OFF
• = LOW
•
= HIGH
2. Container Support
3. Container Rest
4. Container
5. Maximum Level,
12 ounces (350 ml)
6. Minimum Level,
4 ounces (125 ml)
7. Mixing Shaft
NOTE: For proper air ventilation,
always allow a minimum of one
inch (2.5 cm) of space between
the back of the drink mixer and other
surface such as a wall.
840141900 ENv00.qxd 10/25/05 9:07 AM Page 6
Page 7

7
1. To clean the mixing shaft, place 8
ounces (250 ml) warm, soapy
water in stainless steel container.
Place container onto Drink Mixer.
Set Control Switch to Low for 30
seconds. When finished, turn unit
to O (OFF).
2. Repeat Step 1 with warm water
only to rinse mixer shaft.
3. With unit turned to O (OFF),
unplug unit and wipe residual soap
and water from the mixing shaft
with a damp cloth or sponge.
4. The metal mixing container should
be washed in warm, soapy water
or in a dishwasher.
5. To clean drink mixer, wipe with
damp cloth or sponge. Do not use
abrasive cleansers of any type.
DO NOT IMMERSE APPLIANCE IN
WATER OR OTHER LIQUID.
Cleaning your Drink Mixer
• Most drinks can be mixed in less
than two minutes.
• Whole fruit should not be used
when making fruit drinks. Mash or
puree fruit; add to drink, and mix.
Fruit may be sliced if chunks are
desired.
• The container must always be filled
to at least the minimum level mark
or the liquid will not reach mixing
shaft. Do not fill above maximum
level mark (12 ounces/350 ml) or
liquid may overflow while mixing.
• For best results, all liquid ingredients should be as cold as possible.
Milk drinks will taste best if milk is
ice cold. The colder the milk, the
thicker and more frothy the drink.
• All syrups and powdered mixes
should be added just before mixing
to prevent them from sinking to the
bottom of the container.
• The drink mixer does not crush ice.
For best results, use crushed ice if
the recipe calls for ice.
Drink Mixer Tips
840141900 ENv00.qxd 10/25/05 9:07 AM Page 7
Page 8

8
Smoothies/Fruit Drinks
Citrus Burst Smoothie
3
⁄4 cup (175 ml) lemonade
1
⁄4 cup (60 ml) lemon yogurt
1
⁄2 cup (125 ml) lime sherbet
Place all ingredients into stainless steel container. Mix until desired consistency
is reached. Yield: 1 serving.
Simple Blueberry Smoothie
1
⁄4 cup (60 ml) plain yogurt
1
⁄4
banana, mashed
1
⁄4 pound (115 g) frozen blueberries, thawed
Place all ingredients into stainless steel container. Mix until desired consistency
is reached. Yield: 1 serving.
Orange Banana Smoothie
1
⁄2 cup (125 ml) orange juice
1
⁄2 cup (125 ml) vanilla yogurt
1
⁄4
cup (60 ml) banana, mashed
Place all ingredients into stainless steel container. Mix until desired consistency
is reached. Yield: 1 serving.
Nutritious Shake
1
⁄2 cup (125 ml) soymilk
1
⁄4
ripe organic banana, mashed
1
⁄4
cup (60 ml) of frozen organic strawberries, thawed
2 teaspoons (10 ml) protein powder
Place all ingredients into stainless steel container. Mix until desired consistency
is reached. Serve cold. Yield: 1 serving.
Pineapple Berry Smoothie
6 ounces (170 g) lowfat pineapple yogurt
1 scoop lemon sorbet
1
⁄2 cup (125 ml) cranberry juice
8 fresh raspberries
Place all ingredients into stainless steel container. Mix until desired consistency
is reached. Yield: 1 serving.
Always add liquid ingredients first then remaining ingredients. Start mixing on LOW
then increase Speed to HIGH. Process to desired consistency, about 1 to 2 minutes.
840141900 ENv00.qxd 10/25/05 9:07 AM Page 8
Page 9

9
Smoothies/Fruit Drinks
Orange-Sicle Smoothie
3
⁄4 cup (175 ml) orange juice
2 scoops vanilla ice cream
Place all ingredients into stainless steel container. Mix until desired consistency
is reached. Yield: 1 serving.
Bucket of Fruit Smoothie
6 ounces (170 g) lowfat peach yogurt
1
⁄2
cup (125 ml) orange juice
2 fresh strawberries. mashed
1
⁄2 kiwi fruit, peeled and mashed
Place all ingredients into stainless steel container. Mix until desired consistency
is reached. Yield: 1 serving.
Strawberry Cooler
3 scoops frozen strawberry yogurt
3
⁄4
cup (175 ml) ginger ale
Place all ingredients into stainless steel container. Mix until desired consistency
is reached. Yield: 1 serving.
Orange Smoothie
4 scoops vanilla yogurt
1
⁄3
cup (80 ml) orange juice
1 teaspoon (5 ml) rum flavoring
1 tablespoon (15 ml) lime juice
Place all ingredients into stainless steel container. Mix until desired consistency
is reached. Yield: 1 serving.
Lemon-Berry Frothy
1 cup (250 ml) cold lemonade
1
⁄2 cup (125 ml) whole frozen strawberries
Place all ingredients into stainless steel container. Mix until desired consistency
is reached. Yield: 1 serving.
Always add liquid ingredients first then remaining ingredients. Start mixing on LOW
then increase Speed to HIGH. Process to desired consistency, about 1 to 2 minutes.
840141900 ENv00.qxd 10/25/05 9:07 AM Page 9
Page 10

10
Smoothies/Fruit Drinks
Always add liquid ingredients first then remaining ingredients. Start mixing on LOW
then increase Speed to HIGH. Process to desired consistency, about 1 to 2 minutes.
Tropical Smoothie
1 scoop peach ice cream
5 tablespoons (75 ml) milk
1 teaspoon (5 ml) grenadine (optional)
1 teaspoon (5 ml) crushed pineapple & juice
Place all ingredients into stainless steel container. Mix until desired consistency
is reached. Yield: 1 serving.
Health Drink
1
⁄4 cup (60 ml) pineapple juice
1
⁄4 ripe medium size banana, mashed
1
⁄2 8-ounce (115 g) carton vanilla or plain yogurt
1
⁄4
cup (60 ml) fresh strawberries
1 tablespoon (15 ml) wheat germ
1
⁄2 teaspoon (2.5 ml) vanilla extract
Place pineapple juice, banana, yogurt, strawberries, wheat germ, and vanilla
extract in container. Mix to desired consistency.
Fruit Smoothie
1
⁄2
cup (125 ml) sliced fresh fruit
1
⁄2
8-ounce (115 g) carton vanilla or plain yogurt
1
⁄2 cup (125 ml) milk
1 teaspoon (5 ml) honey
1
⁄2
teaspoon (2.5 ml) vanilla extract (optional)
Place fruit, yogurt, milk, honey, and vanilla extract in container. Mix to desired
consistency.
Protein Drink
1
⁄4 cup (60 ml) vanilla frozen yogurt or ice cream
1 cup (250 ml) milk
1
⁄4 ripe medium size banana, mashed
2 pecans, broken
1 teaspoon (5 ml) raw or toasted wheat germ
1 tablespoon (15 ml) protein powder
Place frozen yogurt or ice cream, milk, banana, pecans, wheat germ, and
protein powder in container. Blend to desired consistency.
840141900 ENv00.qxd 10/25/05 9:07 AM Page 10
Page 11

11
Milk Shakes
Traditional Chocolate Malt Milkshake
1 scoop vanilla ice cream
1
⁄4 cup (60 ml) cold milk
1
⁄2 teaspoon (2.5 ml) chocolate malt syrup
Place all ingredients into stainless steel container. Mix until desired consistency
is reached. Yield: 1 serving.
Chocolate Covered Cherry Milkshake
1
⁄2 cup (125 ml) cold milk
2 tablespoons (30 ml) chocolate syrup
1 scoop vanilla ice cream
1
⁄4 cup (60 ml) maraschino cherries (drained)
Place all ingredients into stainless steel container. Mix until desired consistency
is reached. Yield: 1 serving.
S’More Shake
1
⁄4 cup (60 ml) milk
2 tablespoons (30 ml) marshmallow cream
1 tablespoon (15 ml) chocolate syrup
1
⁄2 cup (125 ml) vanilla ice cream
1 graham cracker
In stainless steel container, combine milk, marshmallow creme, and chocolate syrup.
Mix on High Speed until smooth. Break graham cracker into pieces. Place in stainless
steel container and mix until desired consistency is reached. Yield: 1 serving.
Chocolate Milkshake
1
⁄4 cup (60 ml) cold milk
2 tablespoons (30 ml) chocolate syrup
2 scoops vanilla ice cream
Place all ingredients into stainless steel container. Mix until desired consistency
is reached. Additional ice cream or milk may be added to achieve desired consistency. Yield: 1 serving.
Banana Milkshake
1 scoop vanilla ice cream
1
⁄
2 cup (125 ml) milk
1
⁄2 banana, mashed
Place all ingredients into stainless steel container. Mix until desired consistency
is reached. Yield: 1 serving.
Always add liquid ingredients first then remaining ingredients. Start mixing on LOW
then increase Speed to HIGH. Process to desired consistency, about 1 to 2 minutes.
840141900 ENv00.qxd 10/25/05 9:07 AM Page 11
Page 12

12
Milk Shakes
Chocolate Mint Mallow Milkshake
2 scoops chocolate ice cream
1
⁄4 cup (60 ml) cold milk
2 tablespoons (30 ml) marshmallow creme
2 tablespoons (30 ml) crushed peppermint candy pieces
Place all ingredients into stainless steel container. Mix until desired consistency
is reached. Yield: 1 serving.
Creamy Orange Frosty Shake
2 scoops vanilla ice cream
1 cup (250 ml) orange juice
Place all ingredients into stainless steel container. Mix until desired consistency
is reached. Yield: 1 serving.
PBC (Peanut Butter and Chocolate)
3 scoops vanilla ice cream
3
⁄4 cup (175 ml) milk
2 tablespoons (30 ml) peanut butter
2 tablespoons (30 ml) chocolate syrup
Place all ingredients into stainless steel container. Mix until desired consistency
is reached. Yield: 1 serving.
Adult Coffee Shake
1
⁄2 cup (125 ml) coffee flavored liqueur
1
⁄2 cup (125 ml) milk
2 scoops vanilla ice cream
Place all ingredients into stainless steel container. Mix for 30 seconds or until
desired consistency is reached. Yield: 1 serving.
Adult Mocha Shake
1
⁄2 cup (125 ml) coffee flavored liqueur
1
⁄2 cup (125 ml) milk
2 scoops chocolate ice cream
Place all ingredients into stainless steel container. Mix for 45 seconds or until
desired consistency is reached. Yield: 1 serving.
Yogurt Shake
1
⁄2 cup (125 ml) milk
1
⁄2 cup (125 ml) vanilla frozen yogurt
Place milk and frozen yogurt or ice cream in container. Mix to desired
consistency.
Always add liquid ingredients first then remaining ingredients. Start mixing on LOW
then increase Speed to HIGH. Process to desired consistency, about 1 to 2 minutes.
840141900 ENv00.qxd 10/25/05 9:07 AM Page 12
Page 13

13
Milk Shakes
Always add liquid ingredients first then remaining ingredients. Start mixing on LOW
then increase Speed to HIGH. Process to desired consistency, about 1 to 2 minutes.
Mocha Brownie Shake
2 scoops vanilla ice cream
1
⁄4 cup (60 ml) milk
2 tablespoons (30 ml) instant cappuccino mix
1 tablespoon (15 ml) chocolage syrup
1 brownie, crumbled
Place all ingredients in container. Mix on high speed until desired consistency
is reached. Yield: 1 serving.
Chocolate Strawberry Shake
2 scoops chocolate ice cream
1
⁄4 cup (60 ml) milk
1
⁄4 cup (60 ml) fresh strawberries, mashed
2 tablespoons (30 ml) nuts in syrup
Whipped cream (for garnish)
Shaved chocolate (for garnish)
Place all ingredients in container. Mix on high speed until desired consistency
is reached. Garnish with whipped cream and shaved chocolate Yield: 2 serv-
ings.
Chocolate Crunch Shake
3 scoops chocolate ice cream
1
⁄2
cup (125 ml) milk
2 tablespoons (30 ml) chocolate syrup
2 chocolate cookies, crumbled
Place all ingredients in container. Mix on high speed until desired consistency
is reached. Yield: 2 servings.
Raspberry Crunchy Shake
2 scoops vanilla ice cream
1
⁄2 cup (125 ml) milk
1
⁄4 cup (60 ml) fresh raspberries
2 tablespoons (30 ml) cookie pieces
Place all ingredients in container. Mix on high speed until desired consistency
is reached. Garnish with raspberries.
Strawberry Milkshake
1
⁄2 cup (125 ml) milk
4 small strawberries
2 scoops vanilla ice cream
Place milk, strawberries, and ice cream in container. Mix on high speed until
smooth. Additional ice cream or milk may be added to achieve desired
consistency.
840141900 ENv00.qxd 10/25/05 9:07 AM Page 13
Page 14

14
Irish Cream Shake
3
⁄4 cup (175 ml) vanilla ice cream
2 tablespoons (30 ml) chocolate syrup
1
⁄2 cup (125 ml) milk
Irish cream liqueur to taste
Place all ingredients into stainless steel container. Mix until desired consistency
is reached. Yield: 1 serving.
Brandy Alexander
2 tablespoons (30 ml) crème de cacao
2 tablespoons (30 ml) brandy
1 cup (250 ml) vanilla ice cream
Place all ingredients into stainless steel container. Mix until desired consistency
is reached. Yield: 1 serving.
Raspberry Margarita
2 ounces (60 ml) tequila
1 cup (250 ml) sweet and sour mix
2 ounces (60 ml) raspberry flavored liqueur
Place all ingredients into stainless steel container. Mix until desired consistency
is reached. Yield: 1 serving.
Amaretto Smoothie
4 ounces (125 ml) Amaretto liqueur
4 ounces (125 ml) milk
1
⁄2
cup (125 ml) vanilla ice cream
Place all ingredients into stainless steel container. Mix until desired consistency
is reached. Pour into glass over ice. Yield: 1 serving.
Drunken Monkey
1 scoops vanilla ice cream
1 ounce (30 ml) coffee liqueur
1 ounce (30 ml) banana liqueur
1
⁄4 cup (60 ml) pineapple juice
1 tablespoon (30 ml) chocolate syrup
Place ice cream, coffee liqueur, banana liqueur, and pineapple juice into stain-
less steel container. Mix until desired consistency is reached. Drizzle chocolate
syrup into bottom of glass. Pour into glass. Yield: 1 serving.
Frozen Grasshopper
1 ounce (30 ml) Crème de Menthe
1 ounce (30 ml) Crème de Cacao
1 cup (250 ml) vanilla ice cream
Place all ingredients into stainless steel container. Mix until desired consistency
is reached. Yield: 1 serving.
Alcoholic Frozen Drinks
Always add liquid ingredients first then remaining ingredients. Start mixing on LOW
then increase Speed to HIGH. Process to desired consistency, about 1 to 2 minutes.
840141900 ENv00.qxd 10/25/05 9:07 AM Page 14
Page 15

15
Mexican Cheese Omelet
3 eggs
2 ounces (50 g) Monterey Jack or Pepper Jack cheese, shredded
1 tablespoon (15 ml) water or milk
Salt and pepper to taste
1 teaspoon (5 ml) margarine or butter
Place eggs, cheese, water or milk, salt and pepper in stainless steel container.
Mix on low speed about 10 seconds. Heat 1 teaspoon (5 ml) margarine or butter in
skillet over medium heat. Pour omelet in skillet. Cook until set then flip over and
cook until done. Fold and serve. Yield: 1 omelet.
Sunshine French Toast
2 eggs
2 tablespoons (30 ml) orange juice concentrate
1
⁄4 teaspoon (1.25 ml) cinnamon
1 teaspoon (5 ml) sugar
1 teaspoon (5 ml) vanilla
1 cup (250 ml) milk
8 slices bread
Combine all ingredients except bread slices in container. Process about 5
seconds. Pour mixture into shallow bowl. Dip bread slices in mixture. Melt a
small pat of butter in skillet. Cook over medium heat about 2 minutes per side
or until lightly brown. Yield: 4 servings.
Breakfast
Chilled Strawberry Soup
1 cup (250 ml) frozen strawberries,
thawed
1 cup (250 ml) milk
1
⁄2 cup (125 ml) heavy cream
Combine strawberries, milk, cream, and sour cream in stainless steel container and
mix until desired consistency is reached. Mix in sugar to taste. Chill 8 hours
overnight in refrigerator before serving.
Easy Salsa
8-ounce (225 g) can diced tomatoes,
undrained
1 teaspoon (5 ml) onion flakes
1
⁄8 teaspoon (0,63 ml) minced garlic
1
⁄
2
teaspoon (2.5 ml) lime juice
1
⁄8 teaspoon (0,63 ml) salt
Place the tomatoes, onion, garlic, lime juice, salt, cumin, green chiles, cilantro,
and hot sauce in container. Mix to desired consistency.
Soup and Salsa
Always add liquid ingredients first then remaining ingredients. Start mixing on LOW
then increase Speed to HIGH. Process to desired consistency, about 1 to 2 minutes.
1
⁄4
cup (60 ml) sour cream
12 tablespoons (180 ml) white sugar or
to taste
1
⁄8 teaspoon (0,63 ml) cumin
1
⁄4 of a 4 ounce can (25 g) green
chiles, undrained
Cilantro, to taste
Hot sauce, optional, to taste
840141900 ENv00.qxd 10/25/05 9:07 AM Page 15
Page 16

16
Cher propriétaire de mélangeur à boisson,
Félicitations pour votre achat. La Collection Hamilton Beach
®
Eclectrics™ajoute une touche moderne à ces appareils électroménagers fiables, entièrement en métal, que vous vous rappelez d’hier.
Posséder un Hamilton Beach
®
, c’est posséder un morceau d’histoire. En 1904, Louis Hamilton et Chester Beach se sont associés
pour amener dans les foyers américains des appareils électroménagers comme les aspirateurs, les machines à coudre et les
mélangeurs. En l’honneur de leur 10ème anniversaire, nous avons
réussi à construire pour durer, un appareil en métal du passé et à y
ajouter le style d’aujourd’hui pour amener une qualité durable et du
style dans votre cuisine.
Quand vous utiliserez votre appareil tout en métal, pensez à l’histoire
qui l’a précédé. Profitez de la confiance que vous avez dans un produit soutenu par des années d’expérience et 3 années de garantie.
Mais plus que tout, remplissez votre foyer de la senteur délicieuse
des recettes maison que votre appareil électroménager vous aide à
créer!
J’espère que vous profiterez de votre appareil Hamilton Beach
®
Eclectrics™pendant de nombreuses années.
Sincèrement,
Michael J. Morecroft
Président et PDG
Hamilton Beach/Proctor-Silex, Inc.
840141900 FRv00.qxd 10/25/05 9:07 AM Page 16
Page 17

17
Garantie standard de trois ans
Félicitations! Vous êtes maintenant en possession de l’un des meilleurs
mélangeurs à boisson. Notre confiance à l’égard de la qualité et de la
conception de votre nouveau mélangeur à boisson est telle que nous
assortissons votre achat d’une garantie de remplacement de 3 ans sans
souci. En cas de dysfonctionnement de votre mélangeur à boisson dans les 3
ans suivant la date d’achat, l’appareil défectueux sera récupéré chez vous et
un nouvel appareil vous sera remis sans frais. Voici comment cela fonctionne :
Renseignements de garantie .... 17
Précautions importantes ............ 18
Renseignements d’assistance
et de service ................................ 19
Pièces et caractéristiques .......... 20
Utilisation de votre
mélangeur à boisson ....................21
Conseils utiles sur
votre mélangeur à boisson .......... 22
Nettoyage de votre
mélangeur à boisson .................... 22
Recettes.................................... 23-31
Yogourts fouettés/
Boissons aux fruits .................... 23
Laits fouettés .............................. 26
Boissons alcoolisées glacées 29
Petit déjeuners............................ 30
Soupes et salsas ........................ 31
Table des matières
Conditions Pour bénéficier Hamilton Beach
®
Hamilton Beach
®
de la garantie de la garantie s’engage à ne paiera pas pour
Trois ans à compter
de la date de l’achat
original pour les
mélangeur à boissons utilisés dans
les États américains
continentaux,
en Alaska, à Hawaii
et au Canada.
Cette garantie
ne s’applique qu’à
l’acheteur d’origine.
1. Suivez les instructions de ce
Manuel. Référez-vous à la
section Conseils utiles si
vous rencontrez le moindre
problème pour faire fonctionner l’appareil. Si vous avez
une question, appelez le
Service à la clientèle dont les
numéros se trouvent à la
page 19.
2. Conservez la preuve d’achat.
En cas de dysfonctionnement
de l’appareil dans les 3 ans
suivant l’achat, appelez l’un
des numéros du Service à la
clientèle se trouvant à la page
19.
1. Vous envoyer une
étiquette prépayée
pour l’expédition
de votre appareil
défectueux.
2. Vous livrer à domicile un appareil de
rechange neuf.
Les vices du produit causés
par l’abus, le mésusage, la
négligence, l’usage à des fins
commerciales ou tout autre
usage non prescrit dans ce
Manuel.
LA PRÉSENTE GARANTIE REMPLACE TOUTE AUTRE
GARANTIE OU CONDITION,
EXPRESSE OU IMPLIQUÉE,
ÉCRITE OU ORALE,
CONTENANT TOUTE GARANTIE,
GARANTIE LÉGALE OU CONDITION D'UTILISATION
MARCHANDE OU DE CONVENANCE À UNE UTILISATION À
DES FINS PARTICULIÈRES.
TOUTE RESPONSABILITÉ EST
EXPRESSÉMENT LIMITÉE À UN
MONTANT ÉGAL AU PRIX
D’ACHAT PAYÉ.TOUTES LES
RÉCLAMATIONS POUR
DOMMAGES SPÉCIAUX ET
INDIRECTS SONT
EXPRESSÉMENT EXCLUES.
840141900 FRv00.qxd 10/25/05 9:07 AM Page 17
Page 18

18
Renseignements pour la
sécurité du consommateur
PRÉCAUTIONS IMPORTANTES
Lors de l’utilisation d’appareils électroménagers, des précautions d’usage doivent
être respectées, y compris les consignes
suivantes :
1. Lire toutes les instructions.
2. Pour se protéger contre le risque de
choc électrique, ne pas immerger le
cordon, la fiche ou le bloc moteur
dans l’eau, ou autre liquide.
3. Assurer une surveillance étroite
lorsque l’appareil est utilisé par des
enfants ou dans leur voisinage.
4. Débrancher le cordon de la prise
lorsque l’appareil ne sert pas, avant
d’ajouter ou d’enlever des pièces et
avant de le nettoyer.
5. Éviter le contact avec les pièces en
mouvement.
6. Garder les mains, cheveux, vêtements
ainsi que les spatules et autres ustensiles hors du contenant pour éviter les
blessures ou l’endommagement du
mélangeur.
7. Ne pas faire fonctionner un appareil
présentant une fiche ou un cordon
endommagé, après une défaillance,
une chute ou encore après tout
endommagement. Composer sans
frais notre numéro de service à la
clientèle pour tout renseignement sur
la vérification, les réparations ou les
réglages électriques ou mécaniques.
8. L’utilisation d’accessoires qui ne sont
ni recommandés ni vendus par
Hamilton Beach/Proctor-Silex, Inc.
risque de provoquer un incendie, un
choc électrique ou des blessures.
9. Ne pas utiliser à l’extérieur.
10. Ne pas laisser le cordon pendre du
bord d’une table ou d’un comptoir, ni
toucher des surfaces chaudes.
11. Ne jamais ajouter d’ingrédients au
contenant pendant que l’appareil est
en marche.
12. Le contenant doit être bien en place
avant de faire fonctionner l’appareil.
13. Pour laver l’agitateur, débrancher le
mélangeur et suivre les instructions
de nettoyage fournies en page 4.
14. Ne pas utiliser cet appareil pour un
usage autre que celui auquel il est
destiné.
CONSERVER CES INSTRUCTIONS
Cet appareil est destiné à un usage
domestique uniquement.
Cet appareil est muni d’une fiche polarisée. Ce type de fiche présente une
broche plus large que l’autre. Par mesure
de sécurité, la fiche peut être introduite
dans une prise que dans un sens seulement. Il s’agit d’une caractéristique de
sécurité visant à réduire le risque de choc
électrique. Si la fiche ne peut pas être
insérée dans la prise, contacter un électricien pour qu’il remplace la prise
désuète. Ne pas essayer de contourner
l’objectif de sécurité de la fiche polarisée
en la modifiant de quelque manière que ce
soit.
La longueur du cordon utilisé sur cet
appareil a été choisie pour réduire le risque
d’emmêlement ou de trébuchement posé
par un cordon plus long. Si un cordon plus
long est nécessaire, on peut utiliser un
cordon de rallonge approuvé. La tension
électrique du cordon doit être égale ou
supérieure à celle du mélangeur à boisson.
Il faut prendre soin d’arranger la rallonge de
sorte qu’elle ne tombe pas du comptoir ou
de la surface d’une table où elle peut être
tirée par des enfants ou faire trébucher.
840141900 FRv00.qxd 10/25/05 9:07 AM Page 18
Page 19

19
Service à la clientèle
Si vous avez une question au sujet du mélangeur à boisson, composez notre
numéro sans frais du service à la clientèle. Avant de faire un appel, veuillez
noter le numéro de modèle, de type, de série et inscrire ces renseignements
ci-dessous. Ces numéros se trouvent à la base du mélangeur. Ces renseignements nous aideront à répondre beaucoup plus vite à toute question.
MODÈLE :__________________ TYPE :__________________ SÉRIE : _________________
NUMÉRO DU SERVICE À LA CLIENTÈLE
Au Canada : 1-800-267-2826
hamiltonbeach.com
hamiltonbeach.ca
CONSERVEZ CE NUMÉRO POUR RÉFÉRENCE ULTÉRIEURE !
Avant d’appeler pour obtenir de l’assistance
Veuillez lire ces instructions
avant de téléphoner :
• Il est possible que le mélangeur
à boisson chauffe pendant l’utilisation. S’il est très chargé et si on
l’utilise à plusieurs reprises
pendant des périodes assez
longues, il est possible que la
base de l’appareil paraisse
chaude au toucher. Ceci est normal.
• Il est possible qu’une odeur spéciale se dégage du mélangeur à
boisson, particulièrement si celuici est neuf. Ceci arrive souvent
avec les moteurs électriques.
Si votre mélangeur à boisson
présente un défaut de fonctionnement ou ne fonctionne
pas du tout, veuillez vérifier ce
qui suit :
• Le mélangeur à boisson est-il bien
branché?
• Le fusible situé dans le circuit
relié au mélangeur à boisson
fonctionne-t-il bien? Si vous
possédez un boîtier-disjoncteurs,
assurez-vous que le circuit est
bien fermé.
• Si le problème ne correspond à
aucun des cas mentionnés
ci-dessus, contacter le Service
à la clientèle.
• NE PAS rapporter le mélangeur
à boisson chez le détaillant
puisque ce dernier ne fournit
pas d’assistance.
Assistance et service
840141900 FRv00.qxd 10/25/05 9:07 AM Page 19
Page 20

20
Pièces et caractéristiques
1. Commutateur
O = ARRÊT
• = FAIBLE
•
= ÉLEVÉ
2. Guide de récipient
3. Support de récipient
4. Récipient
5. Niveau maximum,
12 onces (350 ml)
6. Niveau minimum,
4 onces (125 ml)
7. Agitateur amovible
REMARQUE: Afin d’assurer
une circulation d’air adéquate,
il est recommandé de toujours
laisser un espace minimum d’un
pouce (2,5 cm) entre l’arrière du
mélangeur à boisson et les autres
surfaces, telles qu’un mur.
840141900 FRv00.qxd 10/25/05 9:07 AM Page 20
Page 21

21
Utilisation de votre
mélangeur à boisson
1. AVANT LA PREMIÈRE UTILISATION : laver
le récipient et l’agitateur avant l’utilisation.
Voir Nettoyage.
2. Régler le commutateur à O (arrêt). Brancher
l’appareil sur une prise de courant.
3. Placer les ingrédients à mélanger dans le
récipient.
4. Fixer le récipient au mélangeur à boisson
en veillant à ce que le bord supérieur soit
derrière le guide de récipient et que la base
du récipient se trouve sur le support de récipient.
5. Déplacer le commutateur sur la vitesse
d’opération désirée. Commencer avec la
vitesse basse puis passer à la vitesse élevée,
si désiré.
6. Pour de la crème glacée dure ou les laits fou-
ettés très épais, retirer le récipient du guide et
du support. En veillant à ce que l’agitateur
reste immergé dans le mélange, déplacer le
contenant autour de l’agitateur pour un
mélange plus complet.
7. Après avoir terminé, éteindre l’appareil en
appuyant sur O (arrêt). Enlever le récipient.
8. Verser le contenu du récipient et servir.
Pièces mobiles
• Inspecter les accessoires avant chaque
utilisation.
• Ne jamais utiliser d’accessoires fissurés,
tordus ou endommagés.
• Ne jamais toucher aux pièces en
mouvement.
AVERTISSEMENT
840141900 FRv00.qxd 10/25/05 9:07 AM Page 21
Page 22

22
• La plupart des boissons peuvent
être mélangées en moins de deux
minutes.
• On ne doit pas utiliser un fruit entier
lors de la préparation de boisson
aux fruits. Écraser ou réduire le fruit
en purée puis l’ajouter et mélanger.
Le fruit peut être coupé en rondelles si la présence de morceaux
est souhaitée.
• Le récipient doit toujours être rempli
au moins jusqu’au niveau minimum
sinon le liquide n’atteindra pas l’agitateur. Lors du mélange de boissons claires telles que les boissons
diètes en poudre, ne pas remplir au
dessus du niveau maximum (12
onces/355 ml) sinon le liquide
risque de déborder durant le
mélange.
• Pour les meilleurs résultats, tous les
ingrédients liquides devraient être
aussi froids que possible. Les boissons à base de lait auront meilleur
goût si le lait est froid. Plus le lait est
froid plus la boisson sera épaisse et
mousseuse.
• Tous les sirops et mélanges en
poudre devraient être ajoutés juste
avant de commencer le mélange
pour les empêcher de descendre
au fond du récipient.
• Le mélangeur à boisson ne concasse pas la glace. Pour les
meilleurs résultats, utiliser de la
glace concassée si la recette en fait
la demande.
Conseils utiles
1. Pour nettoyer l’agitateur amovible,
mettre 8 onces (250 ml) d’eau
tiède savonneuse dans le récipient
en acier inoxydable. Placer le
récipient sur le mélangeur à
boisson. Régler le commutateur
sur LOW pendant 30 secondes.
Lorsque l’opération est finie,
tourner l’appareil sur O (arrêt).
2. Répéter l’étape 1 avec de l’eau
tiède uniquement pour rincer
l’agitateur amovible.
3. Lorsque l’appareil est sur O (arrêt),
débrancher l’appareil et essuyer
avec un linge humide ou une
éponge toute trace de savon et
d’eau restant sur l’agitateur
amovible.
4. Le récipient en métal doit être lavé
dans de l’eau tiède savonneuse ou
au lave-vaisselle.
5. Essuyer le mélangeur à boisson
avec un linge ou une éponge
humide. Ne pas utiliser de
nettoyants abrasifs.
NE PAS IMMERGER L’APPAREIL
DANS L’EAU OU AUTRE LIQUIDE.
Nettoyage de votre
mélangeur à boisson
840141900 FRv00.qxd 10/25/05 9:07 AM Page 22
Page 23

23
Yogourts fouettés/
Boissons aux fruits
Yogourt fouetté tout agrumes
3
⁄4 tasse (175 ml) de limonade
1
⁄4 tasse (60 ml) de yogourt au citron
1
⁄2 tasse (125 ml) de sorbet à la lime
Mettre tous les ingrédients dans le récipient d’inox. Mélanger jusqu’à la consistance désirée. Pour 1 personne.
Yogourt fouetté aux bleuets
1
⁄4 tasse (60 ml) de yogourt nature
1
⁄4 banane, écrasée
1
⁄4 lb. (115 g) de bleuets surgelés, dégelés
Mettre tous les ingrédients dans le récipient d’inox. Mélanger jusqu’à la consistance désirée. Pour 1 personne.
Yogourt fouetté banane orange
1
⁄2 tasse (125 ml) de jus d’orange
1
⁄2 tasse (125 ml) de yogourt à la vanille
1
⁄4 tasse (60 ml) banane, écrasée
Mettre tous les ingrédients dans le récipient d’inox. Mélanger jusqu’à la consistance désirée. Pour 1 personne.
Fouetté nutritif
1
⁄2 tasse (125 ml) de lait de soja
1
⁄4 banane biologique, écrasée
1
⁄4 tasse (60 ml) de fraises biologiques surgelées, dégelées
2 c. à thé (10 ml) de poudre protéinée
Mettre tous les ingrédients dans le récipient d’inox. Mélanger jusqu’à la consis-
tance désirée. Servir froid. Pour 1 personne.
Yogourt fouetté à l’ananas et aux baies
6 oz (170 g) de yogourt à l’ananas faible en matières grasses
1 cuillerée (cuiller à crème glacée) de sorbet au citron
1
⁄2 tasse (125 ml) de jus de canneberge
8 framboises fraîches
Mettre tous les ingrédients dans le récipient d’inox. Mélanger jusqu’à la consis-
tance désirée. Pour 1 personne.
Verser d’abord les ingrédients liquides dans le récipient, puis le reste des ingrédients.
Battre d’abord à vitesse minimale (1) puis augmenter à vitesse maximale (2).
Actionner de 1 à 2 minutes, jusqu’à la consistance désirée.
840141900 FRv00.qxd 10/25/05 9:07 AM Page 23
Page 24

24
Yogourt fouetté orange glacée
3
⁄4 tasse (175 ml) de jus d’orange
2 cuillerées (cuiller à crème glacée) de crème glacée à la vanille
Mettre tous les ingrédients dans le récipient d’inox. Mélanger jusqu’à la consis-
tance désirée. Pour 1 personne.
Yogourt fouetté tutti frutti
6 oz (170 g) de yogourt aux pêches faible en matières grasses
1
⁄2 tasse (125 ml) de jus d’orange
2 fraises fraîches, écrasées
1
⁄2 kiwi pelé et écrasé
Mettre tous les ingrédients dans le récipient d’inox. Mélanger jusqu’à la consistance désirée. Pour 1 personne.
Panaché fraise
3 cuillerées (cuiller à crème glacée) de yogourt glacé à la fraise
3
⁄4 tasse (175 ml) de soda gingembre (ginger ale)
Mettre tous les ingrédients dans le récipient d’inox. Mélanger jusqu’à la consistance désirée. Pour 1 personne.
Lait fouetté à l’orange
4 cuillerées (cuiller à crème glacée) de yogourt glacé à la vanille
1
⁄3 tasse (80 ml) de jus d’orange
1 c. à thé (5 ml) d’essence de rhum
1 c. à table (15 ml) de jus de lime
Mettre tous les ingrédients dans le récipient d’inox. Mélanger jusqu’à la consistance désirée. Pour 1 personne.
Boisson mousseuse citron fraise
1 tasse (250 ml) de limonade froide
1
⁄2 tasse (125 ml) de fraises surgelées entières
Mettre tous les ingrédients dans le récipient d’inox. Mélanger jusqu’à la consis-
tance désirée. Pour 1 personne.
Yogourts fouettés/
Boissons aux fruits
Verser d’abord les ingrédients liquides dans le récipient, puis le reste des ingrédients.
Battre d’abord à vitesse minimale (1) puis augmenter à vitesse maximale (2).
Actionner de 1 à 2 minutes, jusqu’à la consistance désirée.
840141900 FRv00.qxd 10/25/05 9:07 AM Page 24
Page 25

25
Lait fouetté des Tropiques
1 cuillerée (cuiller à crème glacée) de crème glacée à la pêche
5 c. à table (75 ml) de lait
1 c. à thé (5 ml) de grenadine (facultatif)
1 c. à thé (5 ml) d’ananas écrasé et son jus
Mettre tous les ingrédients dans le récipient d’inox. Mélanger jusqu’à la consistance désirée. Pour 1 personne.
Boisson santé
1
⁄4 tasse (60 ml) de jus d’ananas
1
⁄4 banane moyenne mûre, écrasée
1
⁄2 8 oz (115 g) de yogourt nature ou à la vanille
1
⁄4 tasse (60 ml) de fraises fraîches
1 c. à table (15 ml) de germe de blé
1
⁄2 c. à thé (2.5 ml) d’extrait de vanille
Mettre tous les ingrédients dans le récipient. Mélanger jusqu’à la consistance
désirée.
Yogourt fouetté aux fruits
1
⁄2 tasse (125 ml) de fruits frais, tranchés
1
⁄2 8 oz (115 g) de yogourt nature ou à la vanille
1
⁄2 tasse (125 ml) de lait
1 c. à thé (5 ml) de miel
1
⁄2 c. à thé (2.5 ml) d’extrait de vanille (facultatif)
Mettre tous les ingrédients dans le récipient. Mélanger jusqu’à la consistance
désirée.
Boisson protéinée
1
⁄4 tasse (60 ml) de yogourt glacé ou de crème glacée à la vanille
1 tasse (250 ml) de lait
1
⁄4 banane moyenne mûre, écrasée
2 pacanes en morceaux
1 c. à thé (5 ml) de germe de blé, nature ou rôti
1 c. à table (15 ml) de poudre protéinée
Mettre tous les ingrédients dans le récipient. Mélanger jusqu’à la consistance
désirée.
Yogourts fouettés/
Boissons aux fruits
Verser d’abord les ingrédients liquides dans le récipient, puis le reste des ingrédients.
Battre d’abord à vitesse minimale (1) puis augmenter à vitesse maximale (2).
Actionner de 1 à 2 minutes, jusqu’à la consistance désirée.
840141900 FRv00.qxd 10/25/05 9:07 AM Page 25
Page 26

26
Laits fouettés
Verser d’abord les ingrédients liquides dans le récipient, puis le reste des ingrédients.
Battre d’abord à vitesse minimale (1) puis augmenter à vitesse maximale (2).
Actionner de 1 à 2 minutes, jusqu’à la consistance désirée.
Lait malté fouetté au chocolat
1 cuillerée (cuiller à crème glacée) de yogourt glacé à la vanille
1
⁄4
tasse (60 ml) de lait froid
1
⁄2 c. à thé (2.5 ml) de sirop de chocolat malté
Mettre tous les ingrédients dans le récipient d’inox. Mélanger jusqu’à la consistance désirée. Pour 1 personne.
Lait fouetté cerises et chocolat
1
⁄2 tasse (125 ml) de lait froid
2 c. à table (30 ml) de sirop de chocolat
1 cuillerée (cuiller à crème glacée) de crème glacée à la vanille
1
⁄4 tasse (60 ml) de cerises au marasquin, égouttées
Mettre tous les ingrédients dans le récipient d’inox. Mélanger jusqu’à la consis-
tance désirée. Pour 1 personne.
Lait fouetté… encore!
1
⁄4 tasse (60 ml) de lait
2 c. à table (30 ml) de crème de guimauve
1 c. à table (15 ml) de beurre d’arachides
1 c. à table (15 ml) de sirop de chocolat
1
⁄2 tasse (125 ml) de crème glacée à la vanille
1 biscuit graham, en morceaux
Mettre le lait, la crème de guimauve, le beurre d’arachides, le sirop de chocolat et la
crème glacée dans le récipient d’inox. Mélanger à vitesse maximale jusqu’à consistance onctueuse. Ajouter le biscuit graham et mélanger jusqu’à la consistance
désirée. Pour 1 personne.
Lait fouetté au chocolat
1
⁄4 tasse (60 ml) de lait froid
2 c. à table (30 ml) de sirop de chocolat
2 cuillerées (cuiller à crème glacée) de crème glacée à la vanille
Mettre tous les ingrédients dans le récipient d’inox. Mélanger jusqu’à la consistance désirée. Ajouter de la crème glacée ou du lait, au goût, jusqu’à la consistance désirée. Pour 1 personne.
Lait fouetté à la banane
1 cuillerée (cuiller à crème glacée) de crème glacée à la vanille
1
⁄2 tasse (125 ml) de lait
1
⁄2 banane écrasée
Mettre tous les ingrédients dans le récipient d’inox. Mélanger jusqu’à la consis-
tance désirée. Pour 1 personne.
840141900 FRv00.qxd 10/25/05 9:07 AM Page 26
Page 27

27
Laits fouettés
Verser d’abord les ingrédients liquides dans le récipient, puis le reste des ingrédients.
Battre d’abord à vitesse minimale (1) puis augmenter à vitesse maximale (2).
Actionner de 1 à 2 minutes, jusqu’à la consistance désirée.
Lait fouetté chocolat menthe
2 cuillerées (cuiller à crème glacée) de crème glacée au chocolat
1
⁄4
tasse (60 ml) de lait froid
2 c. à table (30 ml) de crème de guimauve
2 c. à table (30 ml) de bonbons à la menthe poivrée, en morceaux
Mettre tous les ingrédients dans le récipient d’inox. Mélanger jusqu’à la consistance désirée. Pour 1 personne.
Fouetté glacé à l’orange
2 cuillerées (cuiller à crème glacée) de crème glacée à la vanille
1 tasse (250 ml) de jus d’orange
Mettre tous les ingrédients dans le récipient d’inox. Mélanger jusqu’à la consistance désirée. Pour 1 personne.
Lait fouetté BAC (Beurre d’arachides et chocolat)
3 cuillerées (cuiller à crème glacée) de crème glacée à la vanille
3
⁄4 tasse (175 ml) de lait
2 c. à table (30 ml) de beurre d’arachides
2 c. à table (30 ml) de sirop de chocolat
Mettre tous les ingrédients dans le récipient d’inox. Mélanger jusqu’à la consistance désirée. Pour 1 personne.
Lait fouetté au café alcoolisé
1
⁄2 tasse (125 ml) de liqueur de café
1
⁄2 tasse (125 ml) de lait
2 cuillerées (cuiller à crème glacée) de crème glacée à la vanille
Mettre tous les ingrédients dans le récipient d’inox. Mélanger 30 secondes ou
jusqu’à la consistance désirée. Pour 1 personne.
Lait fouetté moka alcoolisé
1
⁄2 tasse (125 ml) de liqueur de café
1
⁄2 tasse (125 ml) de lait
2 cuillerées (cuiller à crème glacée) de crème glacée au chocolat
Mettre tous les ingrédients dans le récipient d’inox. Mélanger 45 secondes ou
jusqu’à la consistance désirée. Pour 1 personne.
Fouetté au lait et au yogourt
1
⁄2 tasse (125 ml) de lait
1
⁄2 tasse (125 ml) de yogourt glacé à la vanille
Mettre le lait et le yogourt glacé dans le récipient. Mélanger jusqu’à la consistance désirée.
840141900 FRv00.qxd 10/25/05 9:07 AM Page 27
Page 28

28
Laits fouettés
Verser d’abord les ingrédients liquides dans le récipient, puis le reste des ingrédients.
Battre d’abord à vitesse minimale puis augmenter à vitesse maximale. Actionner de 1
à 2 minutes, jusqu’à la consistance désirée.
Lait fouetté moka au brownie
2 cuillerées (cuiller à crème glacée) de crème glacée à la vanille
1
⁄4 tasse (60 ml) de lait
2 c. à table (30 ml) de mélange de cappuccino instantané
1 c. à table (15 ml) de sirop de chocolat
1 brownie émietté
Mettre tous les ingrédients dans le récipient. Mélanger à vitesse maximale
jusqu’à la consistance désirée. Pour 1 personne.
Lait fouetté fraises chocolat
2 cuillerées (cuiller à crème glacée) de crème glacée au chocolat
1
⁄4 tasse (60 ml) de lait
1
⁄4 tasse (60 ml) de fraises fraîches, écrasées
2 c. à table (30 ml) de noix au sirop
crème fouettée, pour décorer
copeaux de chocolat, pour décorer
Mettre tous les ingrédients dans le récipient. Mélanger à vitesse maximale
jusqu’à la consistance désirée. Décorer de crème fouettée et de copeaux de
chocolat. Pour 2 personnes.
Fouetté croquant au chocolat
3 cuillerées (cuiller à crème glacée) de crème glacée au chocolat
1
⁄2 tasse (125 ml) de lait
2 c. à table (30 ml) de sirop de chocolat
2 biscuits au chocolat émiettés
Mettre tous les ingrédients dans le récipient. Mélanger à vitesse maximale
jusqu’à la consistance désirée. Pour 2 personnes.
Lait fouetté croquant aux framboises
2 2 cuillerées (cuiller à crème glacée) de crème glacée à la vanille
1
⁄2 tasse (125 ml) de lait
1
⁄4 tasse (60 ml) de framboises fraîches
2 c. à table (30 ml) de morceaux de biscuits
Mettre tous les ingrédients dans le récipient. Mélanger à vitesse maximale
jusqu’à la consistance désirée. Décorer de framboises.
Lait fouetté aux fraises
1
⁄
2 tasse (125 ml) de lait
4 petites fraises
2 cuillerées (cuiller à crème glacée) de crème glacée à la vanille
Mettre le lait, les fraises et la crème glacée dans le récipient. Mélanger à
vitesse maximale jusqu’à consistance onctueuse. Ajouter de la crème glacée
ou du lait au besoin pour obtenir la consistance désirée.
840141900 FRv00.qxd 10/25/05 9:07 AM Page 28
Page 29

29
Boissons alcoolisées glacées
Verser d’abord les ingrédients liquides dans le récipient, puis le reste des ingrédients.
Battre d’abord à vitesse minimale (1) puis augmenter à vitesse maximale (2).
Actionner de 1 à 2 minutes, jusqu’à la consistance désirée.
Lait fouetté à la crème irlandaise
3
⁄4 tasse (175 ml) de crème glacée à la vanille
2 c. à table (30 ml) de sirop de chocolat
1
⁄
2 tasse (125 ml) de lait
boisson à la crème irlandaise, au goût
Mettre tous les ingrédients dans le récipient d’inox. Mélanger jusqu’à la consis-
tance désirée. Pour 1 personne.
Alexander
2 c. à table (30 ml) de crème de cacao
2 c. à table (30 ml) de brandy
1 tasse (250 ml) de crème glacée à la vanille
Mettre tous les ingrédients dans le récipient d’inox. Mélanger jusqu’à la consistance désirée. Pour 1 personne.
Margarita à la fraise
2 ounces (60 ml) de tequila
1 tasse (250 ml) de sweet and sour
2 ounces (60 ml) de liqueur de framboise
Mettre tous les ingrédients dans le récipient d’inox. Mélanger jusqu’à la consistance désirée. Pour 1 personne.
Lait fouetté amaretto
4 oz (125 ml) d’amaretto
4 oz (125 ml) de lait
1
⁄2 tasse (125 ml) de crème glacée à la vanille
Mettre tous les ingrédients dans le récipient d’inox. Mélanger jusqu’à la consistance désirée. Verser sur des cubes de glace. Pour 1 personne.
“Drunken Monkey”
1 cuillerée (cuiller à crème glacée) de crème glacée à la vanille
1 ounce (30 ml) de liqueur de café
1 ounce (30 ml) de liqueur de banane
1
⁄4 tasse (60 ml) de jus d’ananas
1 c. à table (30 ml) de sirop de chocolat
Mettre la crème glacée, la liqueur de café, la liqueur de banane et le jus d’ananas
dans le récipient d’inox. Mélanger jusqu’à la consistance désirée. Verser le sirop
de chocolat dans un verre puis remplir avec la boisson. Pour 1 personne.
Grasshopper glacé
1 oz (30 ml) de crème de menthe
1 oz (30 ml) de crème de cacao
1 tasse (250 ml) de crème glacée à la vanille
Mettre tous les ingrédients dans le récipient d’inox. Mélanger jusqu’à la consistance désirée. Pour 1 personne.
840141900 FRv00.qxd 10/25/05 9:07 AM Page 29
Page 30

30
Omelette mexicaine au fromage
3 œufs
2 oz (50 g) de Monterey Jack ou de Monterey Jack aux piments, râpé
1 c. à table (15 ml) eau ou lait
sel et poivre
1 c. à thé (5 ml) de beurre
Mettre tous les ingrédients dans le récipient d’inox. Mélanger à vitesse minimale
environ 10 secondes. Faire fondre 1 c. à thé (5 ml) de beurre ou de margarine dans
une poêle, à feu moyen. Verser le mélange dans la poêle. Laisser prendre puis
retourner et poursuivre la cuisson jusqu’à ce que l’omelette soit cuite. Plier et servir.
Pour 1 personne.
Pain doré du matin
2 œufs
2 c. à table (30 ml) de jus d’orange concentré
1
⁄4 c. à thé (1.25 ml) de cannelle
1 c. à thé (5 ml) de sucre
1 c. à thé (5 ml) d’extrait de vanille
1 tasse (250 ml) de lait
8 tranches de pain
beurre
Mettre tous les ingrédients, sauf le pain, dans le récipient. Mélanger environ 5
secondes. Verser le mélange dans un bol peu profond et y tremper les tranches de pain. Dans une poêle, faire fondre une petite quantité de beurre. Cuire
les tranches à feu moyen environ 2 minutes de chaque côté, ou jusqu’à ce
que le pain soit doré. Pour 4 personnes.
Petits déjeuners
Verser d’abord les ingrédients liquides dans le récipient, puis le reste des ingrédients.
Battre d’abord à vitesse minimale puis augmenter à vitesse maximale. Actionner de 1
à 2 minutes, jusqu’à la consistance désirée.
840141900 FRv00.qxd 10/25/05 9:07 AM Page 30
Page 31

31
Soupe froide aux fraises
1 tasse (250 ml) de fraises surgelées
1 tasse (250 ml) de lait
1
⁄2 tasse (125 ml) de crème à 35 %
1
⁄4 tasse (60 ml) de crème sure
12 c. à table (180 ml) de sucre (ou au goût)
Mettre les fraises, le lait, la crème et la crème sure dans le récipient d’inox et
mélanger jusqu’à la consistance désirée. Ajouter le sucre et mélanger. Réfrigérer 8
heures ou jusqu’au lendemain avant de servir.
Salsa toute simple
8 oz (225 g) de tomates en dés, non égouttées
1 c. à thé (5 ml) de flocons d’oignon
1
⁄8 c. à thé (0,63 ml) d’ail émincé
1
⁄2 c. à thé (2.5 ml) de jus de lime
1
⁄8 c. à thé (0,63 ml) de sel
1
⁄8 c. à thé (0,63 ml) de cumin
1 oz (25 g) piments verts en boîte, non égouttés
coriandre fraîche, hachée
sauce aux piments forts, au goût (facultatif)
Mettre les tomates, les flocons d’oignon, l’ail, le jus de lime, le sel, le cumin,
les piments verts, la coriandre et la sauce aux piments forts dans le récipient.
Mélanger jusqu’à la consistance désirée.
Soupes et salsas
840141900 FRv00.qxd 10/25/05 9:07 AM Page 31
Page 32

32
Estimado Propietario de la Fuente de Sodas:
Felicitaciones por la compra que ha realizado. La Colección
Hamilton Beach
®
Eclectrics™brinda un toque moderno a aquellos
confiables electrodomésticos totalmente hechos en metal que nos
traen recuerdos del pasado.
Tener un Hamilton Beach
®
es como poseer una pieza histórica. En
1904, Louis Hamilton y Chester Beach se asociaron para llevar a los
hogares estadounidenses electrodomésticos con motor, tales como
aspiradoras, máquinas de coser y batidoras. Para rendir homenaje a
su legado de cien años, hemos combinado la fabricación de metal
“construida para durar” del pasado con el estilo de hoy a fin de
llevar a su cocina calidad y estilo duraderos.
Mientras utiliza su electrodoméstico totalmente fabricado en metal,
piense sobre la historia que lo precede. Disfrute de la confianza que
genera un producto concebido durante años de experiencia y que
posee una garantía de 3 años. Pero principalmente, ¡llene su hogar
de los deliciosos aromas de recetas hechas en casa que su electrodoméstico le ayudará a crear!
Espero que disfrute del electrodoméstico Hamilton Beach
®
Eclectrics
™
durante muchos años venideros.
Atentamente,
Michael J. Morecroft
Presidente y CEO
Hamilton Beach/Proctor-Silex, Inc.
840141900 SPv00.qxd 10/25/05 9:08 AM Page 32
Page 33

33
Grupo HB PS, S.A. de C.V.
Monte Elbruz No. 124 Int. 601
Col. Palmitas Polanco
México, D.F. C.P. 11560
Tel. 52 82 31 05 y 52 82 31 06
Fax. 52 82 3167
PRODUCTO:
MARCA:
Hamilton Beach: ❏
Proctor-Silex: ❏
MODELO:
Hamilton Beach/Proctor-Silex cuenta con una Red de Centros de Servicio Autorizada, por favor consulte en la
lista anexa el nombre y dirección de los establecimientos en la República Mexicana en donde usted podrá
hacer efectiva la garantía, obtener partes, componentes, consumibles y accesorios;así como también obtener
servicio para productos fuera de garantía.
Para mayor información llame sin costo:
Centro de Atención al consumidor: 01 800 71 16 100
Grupo HB PS, S.A. de C.V.le otorga a partir de la fecha de compra:
GARANTÍA DE 3 AÑOS.
• Esta garantía ampara, todas las piezas y componentes del producto que resulten con defecto de fabricación incluyendo la mano de obra.
•
Grupo HB PS, S.A. de C.V.se obliga a reemplazar, reparar o reponer, cualquier pieza o componente defectuoso;
proporcionar la mano de obra necesaria para su diagnóstico y reparación, todo lo anterior sin costo adicional para el
consumidor.
• Esta garantía incluye los gastos de transportación del producto que deriven de su cumplimiento dentro de su red de
servicio.
LIMITACIONES
• Esta garantía no ampara el reemplazo de piezas deterioradas por uso o por desgaste normal, como son: cuchillas,
vasos, jarras, filtros, etc.
• Grupo HB PS, S.A.de C.V. no se hace responsable por los accidentes producidos a consecuencia de una instalación eléctrica defectuosa, ausencia de toma de tierra, clavija de enchufe en mal estado, etc.
COBERTURA
PÓLIZA DE GARANTÍA
EXCEPCIONES
Esta garantía no será efectiva en los siguientes casos:
a) Cuando el producto se hubiese utlizado en condiciones distintas a las normales. (Uso industrial, semi-industri-
al o comercial.)
b) Cuando el producto no hubiese sido operado de acuerdo con el instructivo de uso.
c) Cuando el producto hubiese sido alterado o reparado por personas no autorizadas por Grupo HB PS, S.A.de
C.V.
el fabricante nacional, importador o comercializador responsable respectivo.
El consumidor puede solicitar que se haga efectiva la garantía ante la propia casa comercial donde adquirió su producto, siempre y cuando Grupo HB PS, S.A.de C.V. no cuente con talleres de servicio.
Información sobre la garantía .... 33
Salvaguardias importantes .......... 35
Información sobre la
asistencia y el servicio ................ 36
Piezas y características .............. 37
Cómo usar su fuente de sodas ......38
Consejos para la
fuente de sodas ............................ 39
Limpieza de su
fuente de sodas ............................ 39
Table of Contents
840141900 SPv00.qxd 10/25/05 9:08 AM Page 33
Page 34

34
PROCEDIMIENTO PARA HACER EFECTIVA LA GARANTÍA
• Para hacer efectiva la garantía no deben exigirse mayores requisitos que la presentación del producto y la póliza
correspondiente, debidamente sellada por el establecimiento que lo vendió.
• Para hacer efectiva la garantía, lleve su aparato al Centro de Servicio Autorizado más cercano a su domicilio (consulte la lista anexa).
• Si no existe Centro de Servicio Autorizado en su localidad siga las siguientes instrucciones:
1. Empaque su producto adecuadamente para que no se dañe durante el translado.
2. Anote claramente sus datos y los del Centro de Servicio al que está enviando el producto.
3. No incluya partes sueltas ni accesor ios para evitar su pérdida.
• El tiempo de reparación, en ningún caso será mayor de 30 días naturales contados a partir de la fecha de recepción
del producto en nuestros Centros de Servicio Autorizados.
• En caso de que el producto haya sido reparado o sometido a mantenimiento y el mismo presente deficiencias
imputables al autor de la reparación o del mantenimiento dentro de los treinta días naturales posteriores a la entrega del producto al consumidor, éste tendrá derecho a que sea reparado o mantenido de nuevo sin costo alguno.Si
el plazo de la garantía es superior a los treinta días naturales, se estará a dicho plazo.
• El tiempo que duren las reparaciones efectuadas al amparo de la garantía no es computable dentro del plazo de la
misma. Cuando el bien haya sido reparado se iniciará la garantía respecto de las piezas repuestas y continuará con
relación al resto.En el caso de reposición del bien deberá renovarse el plazo de la garantía.
DÍA___ MES___
AÑO___
Si desea hacer comentarios o sugerencias con respecto a nuestro servicio o
tiene alguna queja derivada de la atención recibida en alguno de nuestros
Centros de Servicio Autorizados, por favor dirigirse a:
GERENCIA INTERNACIONAL DE SERVICIO
(DIMALSA)
Prol. Av. La Joya s/n. Esq. Av. San Antonio
Col. El Infiernillo C.P. 54878
Cuautitlán, Edo de México
Tel. (55) 58 99 62 42 • Fax. (55) 58 70 64 42
Centro de Atención al consumidor: 01 800 71 16 100
RED DE CENTROS DE SERVICIO AUTORIZADA GRUPO HB PS, S.A. DE C.V.
Distrito Federal
ELECTRODOMÉSTICOS
Av. Plutarco Elias Cailes No. 1499
Zacahuitzco MEXICO 09490 D.F.
Tel: 01 55 5235 2323
Fax: 01 55 5243 1397
CASA GARCIA
Av. Patriotismo No. 875-B
Mixcoac MEXICO 03910 D.F.
Tel: 01 55 5563 8723
Fax: 01 55 5615 1856
Nuevo Leon
FERNANDO SEPULVEDA
REFACCIONES
Ruperto Martínez No. 238 Ote.
Centro MONTERREY, 64000 N.L.
Tel: 01 81 8343 6700
Fax: 01 81 8344 0486
Jalisco
REF. ECONÓMICAS DE
OCCIDENTE,
S.A. DE C.V.
Garibaldi No. 1450
Ladrón de Guevara
GUADALAJARA 44660 Jal.
Tel: 01 33 3825 3480
Fax: 01 33 3826 1914
Chihuahua
DISTRIBUIDORA TURMIX
Av. Paseo Triunfo de la Rep. No.
5289 Local 2 A.
Int. Hipermart
Alamos de San Lorenzo
CD. JUAREZ 32340 Chih.
Tel: 01 656 617 8030
Fax: 01 656 617 8030
840141900 SPv00.qxd 10/25/05 9:08 AM Page 34
Page 35

35
Información para la seguridad del consumidor
SALVAGUARDIAS IMPORTANTES
Cuando use electrodomésticos, siempre
se deben seguir las precauciones básicas
de seguridad, incluyendo las siguientes:
1. Lea todas las instrucciones.
2. Verifique que el voltaje de su insta-
lación corresponda con el del aparato.
3. Para protegerse del riesgo de descar-
gas eléctricas, no sumerja la base,
motor, cable o enchufe en agua u otro
líquido.
4. Cuando los niños estén cerca de
cualquier aparato eléctrico o lo estén
usando, es necesaria una supervisión
muy estricta.
5. Desenchufe el cable del tomacorriente
cuando no esté en uso, antes de colocar
o retirar piezas y antes de limpiar el
aparato.
6. Evite el contacto con piezas en
movimiento.
7. Mantenga las manos, el pelo, la vesti-
menta así como las espátulas y otros
utensilios fuera del recipiente con el fin
de prevenir lesiones personales o
daños a la batidora.
8. No opere ningún aparato con el cable
o enchufe dañado o después de que el
aparato haya dejado de funcionar bien
o se haya caído o dañado en alguna
otra forma. Llame a nuestro número
gratuito de servicio al cliente para
obtener información respecto a su
revisión, reparación o ajuste eléctrico o
mecánico.
9. El uso de accesorios no recomenda-
dos o vendidos por Hamilton
Beach/Proctor-Silex, Inc. puede
causar incendio, descarga eléctrica o
lesiones.
10. No use el aparato al aire libre.
11. No deje colgar el cable sobre el
borde de la mesa o mostrador, ni que
toque superficies calientes.
12. Nunca añada ingredientes al
recipiente mientras el aparato está
funcionando.
13. El recipiente debe estar colocado
correctamente en su lugar antes de
operar el aparato.
14. Para lavar la flecha mezcladora,
desenchufe la fuente de sodas y siga
las instrucciones de limpieza
suministradas en la página 39.
15. No use este aparato para fines
diferentes al diseñado.
GUARDE ESTAS INSTRUCCIONES
Este aparato está destinado sólo para
uso doméstico.
Este aparato podría estar equipado con
un cable trifilar con conexión a tierra
(enchufe de 3 puntas). Este tipo de
enchufe encajará solamente en un
tomacorriente hecho para un enchufe de
3 puntas. Esta es una característica de
seguridad diseñada para reducir el riesgo
de choque eléctrico. Si el enchufe no
encaja, comuníquese con un electricista
competente para cambiar el tomacorriente obsoleto. No trate de hacer caso
omiso del propósito de seguridad de la
clavija a tierra modificando el enchufe de
alguna manera.
El largo total del cable que se utiliza con
este aparato se eligió para reducir el riesgo
de enredarse o tropezarse con él, riesgo
que se presentaría si fuera más largo. Si es
necesario un cable más largo, puede
utilizarse un cable de extensión aprobado.
La clasificación eléctrica nominal del cable
de extensión deberá ser igual o mayor que
la de la fuente de sodas. Se debe tener
cuidado en acomodar el cable de extensión de ma-nera que no cuelgue por el
borde de la mesa o mostrador y que los
niños no puedan tirar de él o tropezarse
accidentalmente.
840141900 SPv00.qxd 10/25/05 9:08 AM Page 35
Page 36

36
Antes de llamar para solicitar asistencia
Sírvase leer antes de llamar:
• Es posible que la fuente de sodas
se caliente durante el uso. Bajo
períodos de un uso intenso y
tiempos de licuado largos, la base
de la unidad puede sentirse tibia
al tacto. Esto es normal.
• Es posible que la fuente de sodas
emita olor, especialmente siendo
nueva. Esto es común con los
motores eléctricos.
Si su fuente de sodas no
funciona bien o no funciona,
sírvase verificar lo siguiente:
• ¿Está enchufada la
fuente de sodas?
• ¿Está el fusible en el circuito a la
la fuente de sodas
en el orden
correcto? Si tiene una caja de
cortacircuitos, asegúrese de que
el circuito esté cerrado.
• Si el problema no se debe a
ninguno de los puntos mencionados arriba, vea la información acerca del Servicio al cliente.
• NO devuelva la
fuente de sodas al
comerciante, ya que éste no
otorga servicio.
Información acerca de la
asistencia y el servicio
Información acerca del servicio al cliente
Si usted tiene alguna pregunta acerca de su fuente de sodas, llame a nuestro
número gratuito de servicio al cliente. Antes de llamar, anote por favor los
números de modelo, tipo y serie y llene esa información debajo. Estos números
se pueden encontrar en la parte inferior de su fuente de sodas. Esta información
nos ayudará a contestar a su pregunta con mucha más rapidez.
MODELO:_________________ TIPO:___________________ SERIE: __________________
NÚMERO DE SERVICIO AL CLIENTE
México : 01-800-71-16-100
hamiltonbeach.com.mx
¡GUARDE ESTE NÚMERO PARA REFERENCIA FUTURA!
840141900 SPv00.qxd 10/25/05 9:08 AM Page 36
Page 37

3737
Piezas y características
1. Interruptor de control
O = APAGADO
• = BAJA
•
= ALTA
2. Soporte del recipiente
3. Base para el recipiente
4. Recipiente
5. Nivel máximo,
12 onzas (350 ml)
6. Nivel mínimo,
4 onzas (125 ml)
7. Flecha mezcladora
NOTA: Para una ventilación
correcta, siempre deje una
pulgada de espacio como
mínimo entre la parte posterior
de la fuente de sodas y otra
superficie como una pred.
840141900 SPv00.qxd 10/25/05 9:08 AM Page 37
Page 38

38
Cómo usar su fuente de sodas
1. ANTES DEL PRIMER USO: Lave el recipiente
y la flecha mezcladora antes del primer uso.
Vea la sección Limpieza.
2. Fije el interruptor de control en O (APAGADO).
Enchufe en el tomacorriente.
3. Coloque los ingredientes que desea mezclar en
el recipiente.
4. Acomode el recipiente en la fuente de sodas,
cerciorándose de que el borde superior del
recipiente esté detrás del soporte del mismo, y
el asiento del
recipiente descanse sobre su base.
5. Mueva el interruptor de control hacia la veloci-
dad deseada para procesar. Comience con la
velocidad baja y luego aumente a la velocidad
alta, si lo desea.
6. Para helados duros o batidos muy espesos
retire el recipiente del soporte y de la base.
Con la flecha mezcladora aún sumergida en la
mezcla, haga girar el recipiente alrededor de la
flecha para mezclar más vigorosamente.
7. Al terminar, gire la unidad a O (APAGADO). Retire
el recipiente
8. Vierta el contenido del recipiente y sirva.
Partes en movimiento
• Inspeccione los accesorios antes de cada uso.
• No use accesorios agrietados, torcidos o dañados.
• No toque las partes en movimiento.
ADVERTENCIA
840141900 SPv00.qxd 10/25/05 9:08 AM Page 38
Page 39

39
• La mayoría de las bebidas se pueden
mezclar en menos de 2 minutos.
• No se deben utilizar las frutas enteras
al preparar bebidas de fruta. Primero
triture la fruta o hágala puré;
agréguela a la bebida y mézclela. Si
desea pedazos grandes, puede tajar
la fruta.
• Siempre se debe llenar el recipiente
por lo menos hasta la marca del nivel
mínimo o el líquido no alcanzará la
flecha mezcladora. No sobrepase la
marca del nivel máximo 12 onzas
(350 ml) o el líquido se derramará al
mezclar.
• Para lograr mejores resultados,
todos los ingredientes líquidos
deben estar lo más fríos que sea
posible. Las bebidas con leche
sabrán mejor si la leche está muy
fría. En cuanto más fría la leche,
más espesa y espumosa resultará
la bebida.
• Todo jarabe y mezclas en polvo se
deben agregar justo antes de
mezclar para evitar que se vayan al
fondo del recipiente.
• La fuente de sodas no tritura hielo.
Para obtener mejores resultados,
utilice hielo triturado cuando la receta pida hielo.
Consejos para la fuente
de sodas
1. Para limpiar la flecha mezcladora,
coloque 8 onzas (250 ml) de agua
tibia y jabonosa en el recipiente
de acero inoxidable. Coloque el
recipiente en la fuente de sodas.
Fije el interruptor de control en la
velocidad BAJA (LOW) por 30
segundos. Cuando haya terminado, gire la unidad a O (APAGADO).
2. Repita el paso 1 con agua tibia
solamente para enjuagar la flecha
mezcladora.
3. Con la unidad girada hacia O
(APAGADO), desenchúfela y limpie
el resto de jabón y agua de la
flecha mezcladora con un paño o
esponja húmedo.
4. El recipiente metálico para mezclar
también se debe lavar con agua
tibia o en el lavavajillas.
5. Limpie la fuente de sodas con un
paño húmedo o esponja. No use
productos de limpieza abrasivos de
ningún tipo.
NO SUMERJA EL APARATO EN
AGUA NI EN NINGÚN OTRO
LÍQUIDO.
Limpieza de su fuente
de sodas
840141900 SPv00.qxd 10/25/05 9:08 AM Page 39
Page 40

Modelos:
60110
60111
60114
Tipo:
DM04
DM04
DM04
Características Eléctricas:
120 V~ 60 Hz 200 W
120 V~ 60 Hz 200 W
120 V~ 60 Hz 200 W
hamiltonbeach.com
hamiltonbeach.com.mx
HAMILTON BEACH PROCTOR-SILEX,INC.
P
ROCTOR-SILEX CANADA,INC.
263 Yadkin Road
Southern Pines, North Carolina 28387
Picton, Ontario K0K 2T0
10/05
840141900
Los números de modelo también pueden estar seguidos del sufijo “MX”.
840141900 SPv00.qxd 10/25/05 9:08 AM Page 40
 Loading...