

Page 1
BrewStation
™
840136100
BrewStation Safety ........................ 2
Parts and Features ........................ 4
How to Make Coffee...................... 5
Optional Accessories .................... 7
Optional Features .......................... 8
Cleaning Instructions .................... 9
Troubleshooting .......................... 11
Customer Service..........................12
Thank You!
Thank you for purchasing a Hamilton
Beach BrewStation. What makes
BrewStation so unique is also what
makes it a little different in the
beginning. We hope you enjoy your
BrewStation.
Questions?
Call us first – our friendly associates
are ready to help you. Please don’t
return your product to the store.
READ BEFORE USE
Please don’t return your product to the store.
Call us first – our friendly associates
are ready to help you.
In USA: 1-800-851-8900
In Canada: 1-800-267-2826
840136100 ENv00.qxd 3/29/05 2:00 PM Page 1
Page 2
IMPORTANT SAFEGUARDS
SAVE THESE INSTRUCTIONS!
1. Read all instructions.
2. Do not touch hot surfaces. Use handles
or knobs. Care must be taken, as burns
can occur from touching hot parts or
from spilled, hot liquid.
3. To protect against electric shock, do
not place cord, plug or BrewStation in
water or other liquid.
4. Close supervision is necessary when
any appliance is used by or near
children.
5. Unplug from outlet when either the
BrewStation or clock is not in use and
before cleaning. Allow to cool before
putting on or taking off parts and before
cleaning the appliance.
6. BrewStation must be operated on a flat
surface away from the edge of counter
to prevent accidental tipping.
7. Do not operate any appliance with a
damaged cord or plug, or after the
appliance malfunctions or is dropped or
damaged in any manner. Call our tollfree customer service number for
information on examination, repair, or
adjustment.
8. The use of accessory attachments not
recommended by Hamilton Beach/
Proctor-Silex, Inc. may cause injuries.
9. Do not use outdoors.
10. Do not let cord hang over edge of table
or counter or touch hot surfaces,
including stove.
11. The coffee tank is designed for use with
this BrewStation. It must never be used
on a range top or in a microwave oven.
12. Do not place BrewStation on or near a
hot gas or electric burner or in a heated
oven.
13. To disconnect BrewStation, turn
controls to OFF, then remove plug
from wall outlet.
14. Scalding may occur if the cover is lifted
during the brewing cycle.
15. Warning: To reduce the risk of fire or
electric shock, do not remove the
bottom cover. No user serviceable parts
are inside. Repair should be done by
authorized service personnel only.
16. Do not use appliance for other than
intended use.
When using electrical appliances, basic safety precautions should always be followed to
reduce the risk of fire, electric shock, and/or injury to persons, including the following:
2
• If overflow occurs: let unit, coffee and grounds cool completely before attempting any clean-up.
• Use only brand-name, high-quality filters.
• Use 3/4 tablespoon of ground coffee for each cup of coffee.
• If light flashes during brew cycle, this indicates coffeemaker needs to be cleaned with cleaner/descaler.
• Use coffeemaker cleaner/descaler to prevent hard water deposits that affect coffeemaker performance. Clean monthly.
• Do not clean Coffee Tank in dishwasher.
• Read instructions before using.
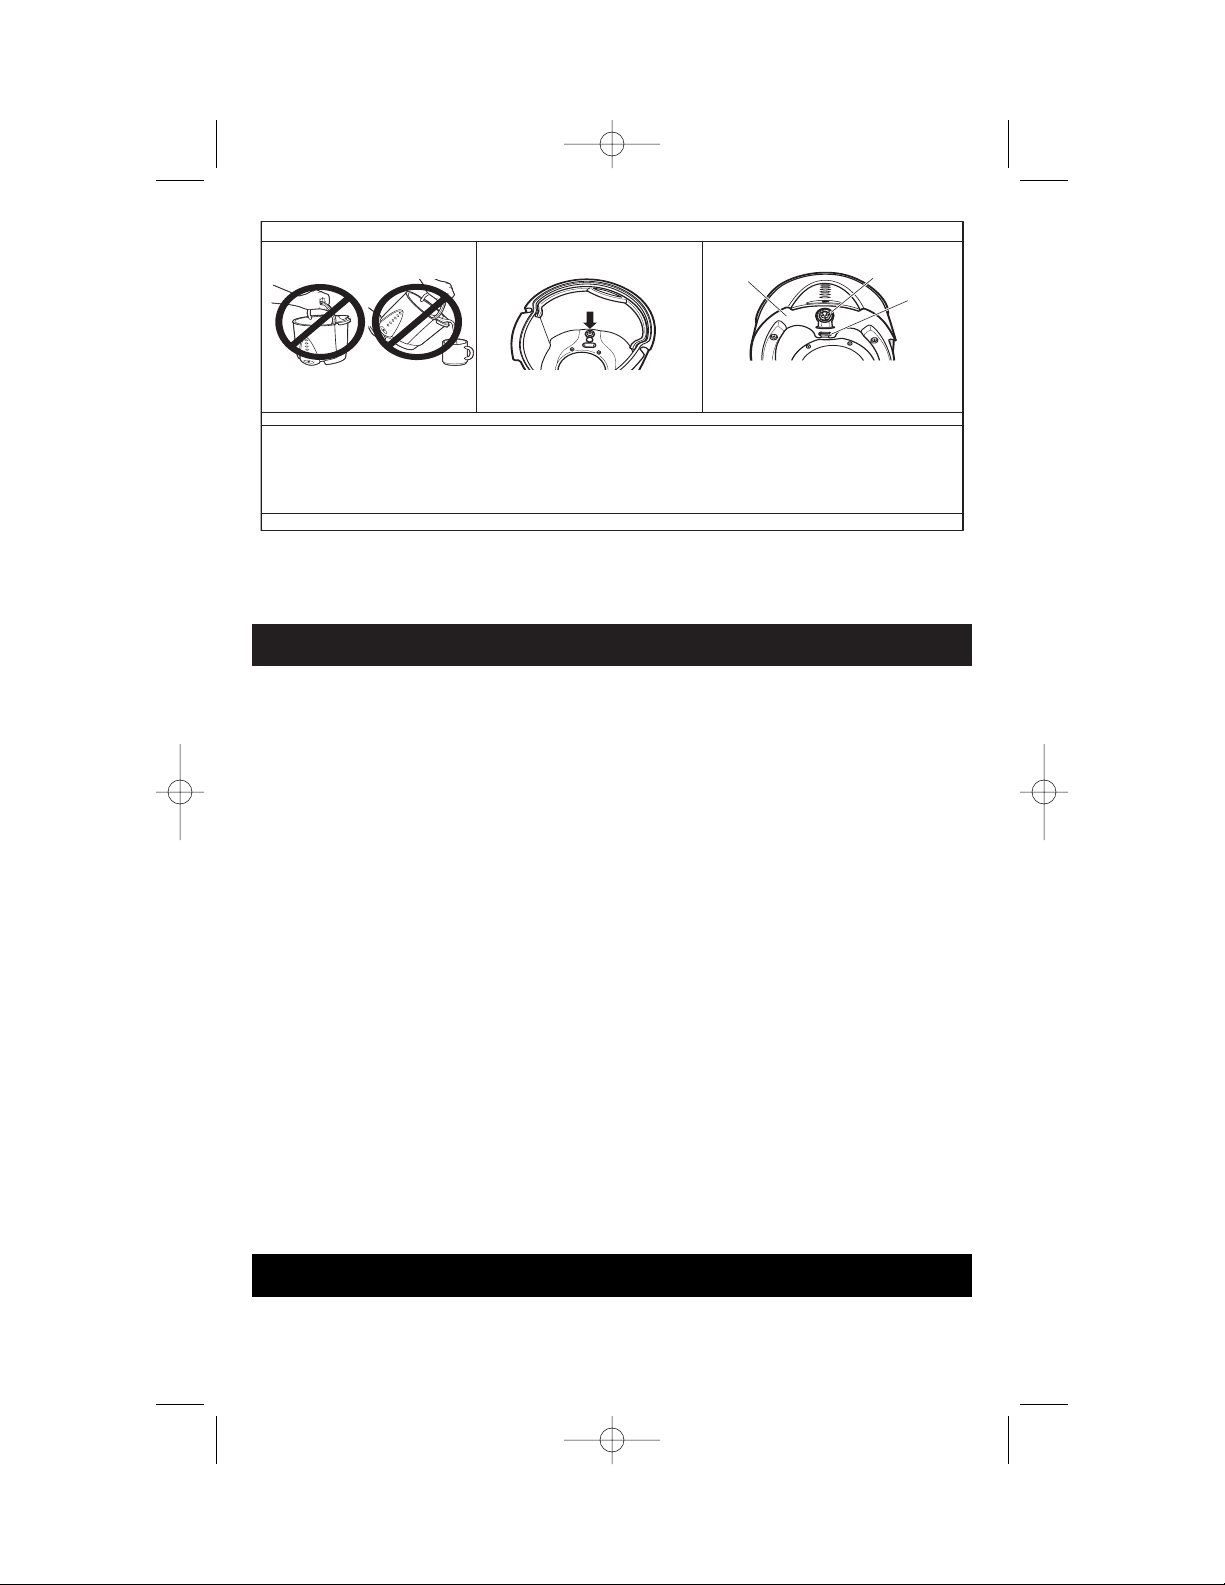
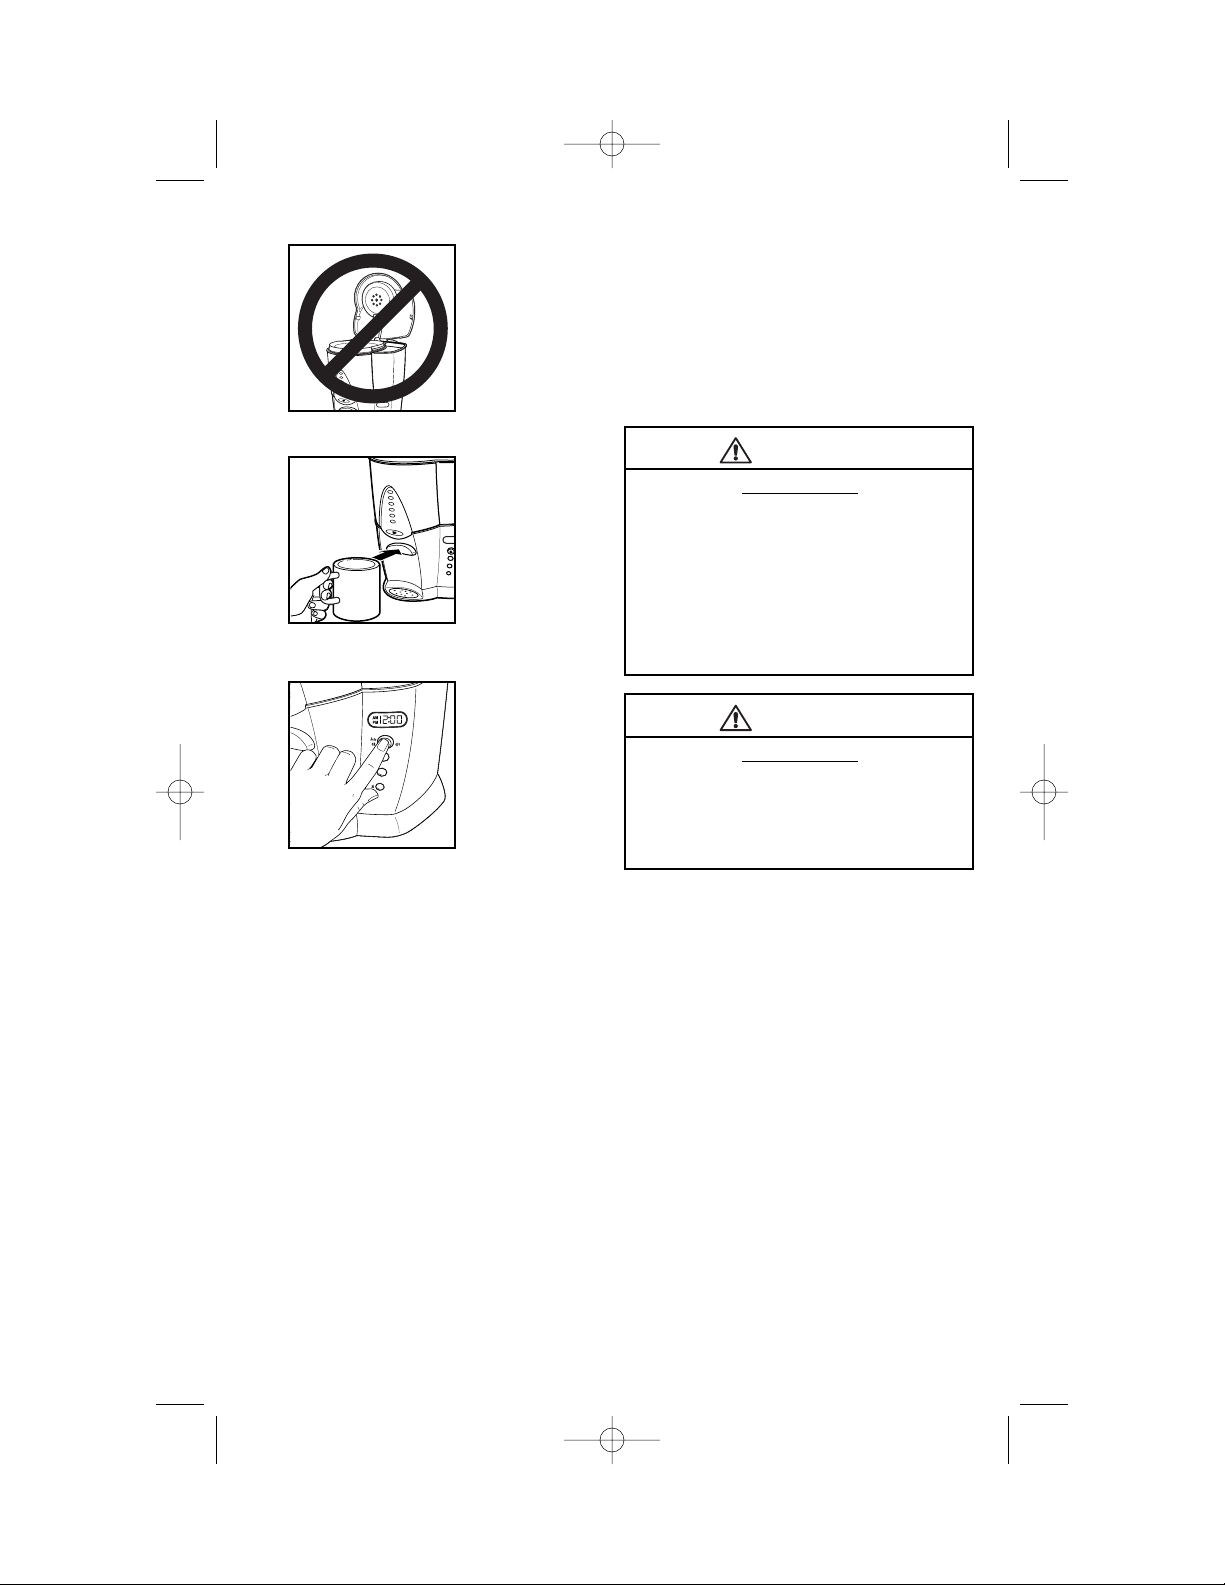
Never Use Coffee Tank to Pour
Hot Coffee or Carry Hot Coffee.
Clean Coffee Tank Monthly, to Prevent
Hot Coffee Leaks.
Before brewing, Coffee Tank must be free
of grounds and foreign material. To flush,
turn it over, press lever and run water for
30 seconds through dispenser.
IMPORTANT!
Inspect Coffee Tank Seal Before
Brewing, to Prevent Hot Coffee
Leaks.
Seal must be flush with bottom of
Coffee Tank to form secure seal. Test
for leaking dispenser with cold water.
Handle Coffee Tank when it holds
only Cold water.
Additional Information
Call 800.851.8900 (US) or 800.267.2826 (CAN) with questions or to order seals/coffeemaker cleaner.
Coffee Tank
Bottom
Dispenser
Lever
840136100 ENv00.qxd 3/29/05 2:00 PM Page 2
Page 3

3
Consumer Safety Information
This appliance is intended for household
use only.
This appliance is equipped with a polarized
plug. This type of plug has one blade wider
than the other. The plug will fit into an
electrical outlet only one way. This is a
safety feature intended to help reduce the
risk of electrical shock. If you are unable to
insert the plug into the outlet, try reversing
the plug. If the plug should still fail to fit,
contact a qualified electrician to replace the
obsolete outlet. Do not attempt to defeat
the safety purpose of the polarized plug by
modifying the plug in any way.
The length of the cord used on this appliance was selected to reduce the hazards
of becoming tangled in, or tripping over a
longer cord. If a longer cord is necessary an
approved extension cord may be used. The
electrical rating of the extension cord must
be equal to or greater than the rating of the
BrewStation. Care must be taken to
arrange the extension cord so that it will
not drape over the countertop or tabletop
where it can be pulled on by children or
accidentally tripped over.
To avoid an electrical circuit overload, do
not use another high wattage appliance on
the same circuit with your BrewStation.
If the BrewStation overflows during brewing, always allow unit to cool before
cleaning unit, coffee and grounds.
840136100 ENv00.qxd 3/29/05 2:00 PM Page 3
Page 4
4
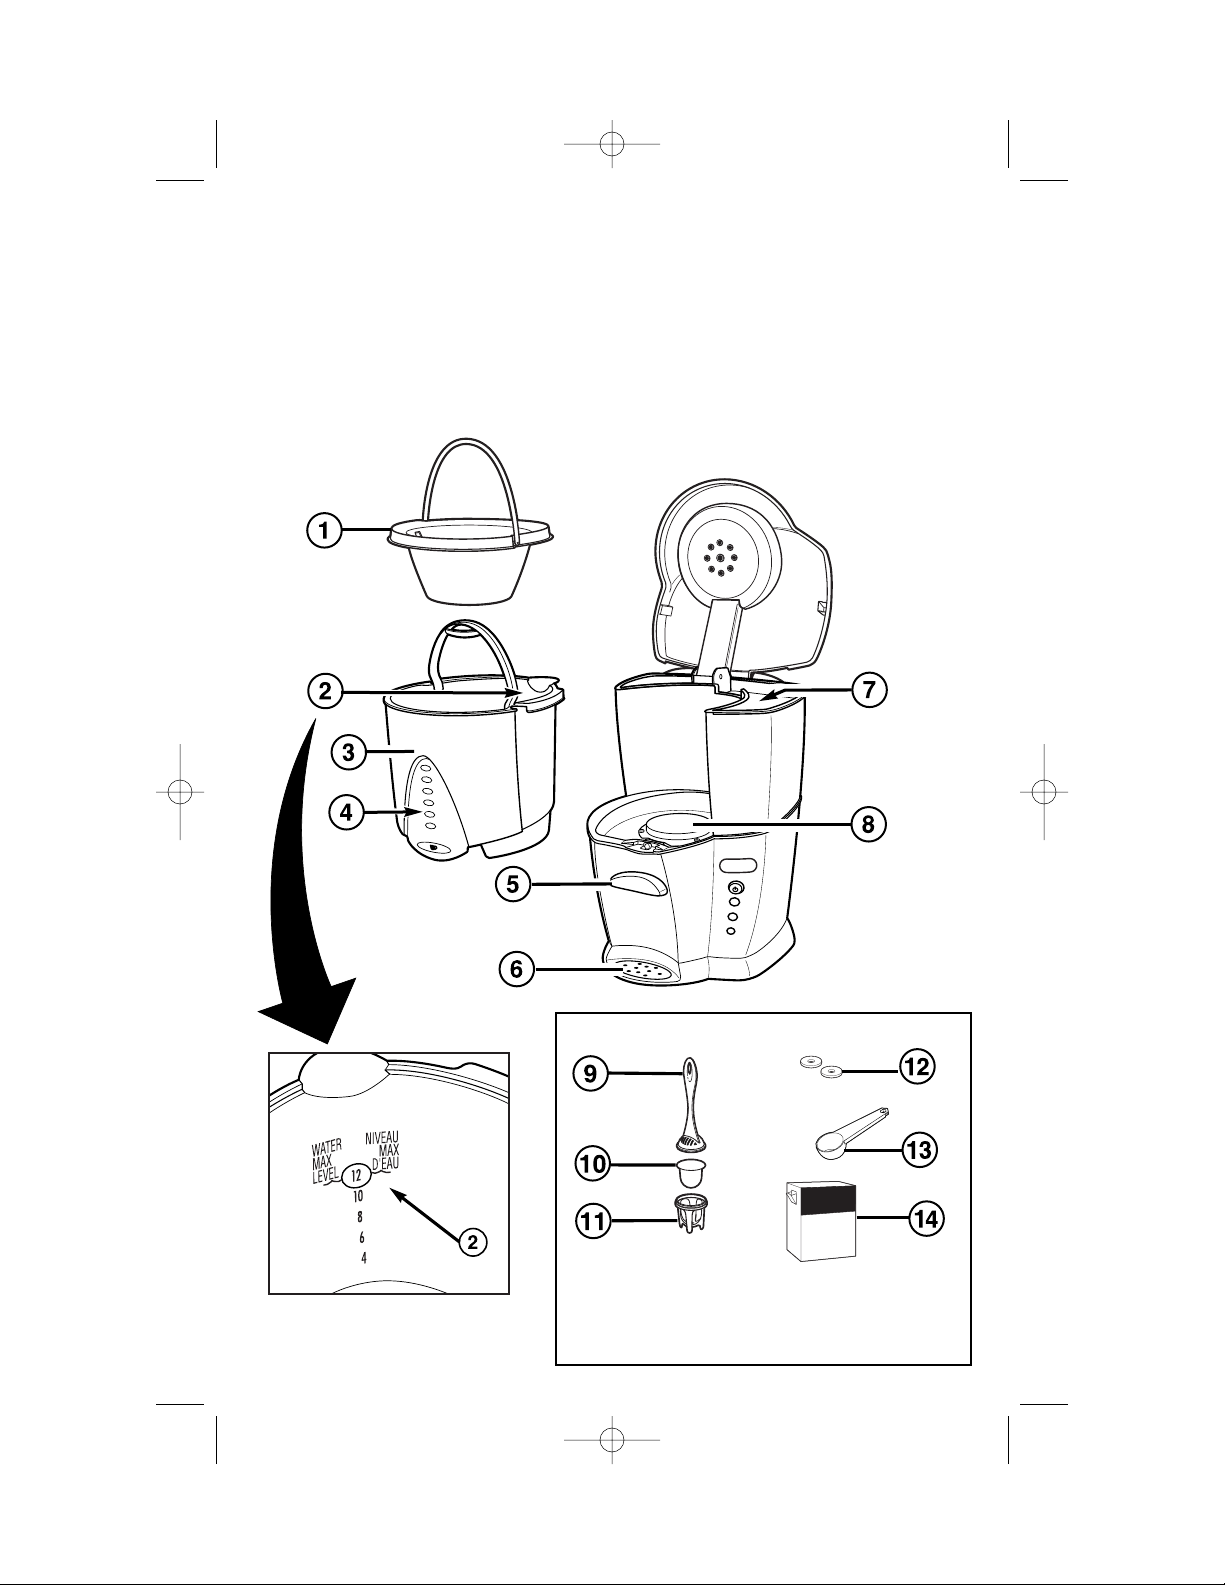
Parts and Features
*optional feature
on selected models
1. Filter Basket
2. Water Level Guide
3. Coffee Tank
4. Coffee Level Guide
5. Coffee Dispenser Bar
6. Drip Tray
7. Water Reservoir
8. Keep Warm Plate
9. Water Filter Lid*
10. Water Filter*
11. Water Filter Base*
12. Seal (2)*
13. Coffee Scoop*
14. Cleancaf™ Cleaner and Descaler*
Optional Accessories
To Order Call:
1-800-851-8900 (U.S.)
1-800-267-2826 (Canada)
hbaccessories.com
D
ESCALER
840136100 ENv00.qxd 3/29/05 2:00 PM Page 4
Page 5
5
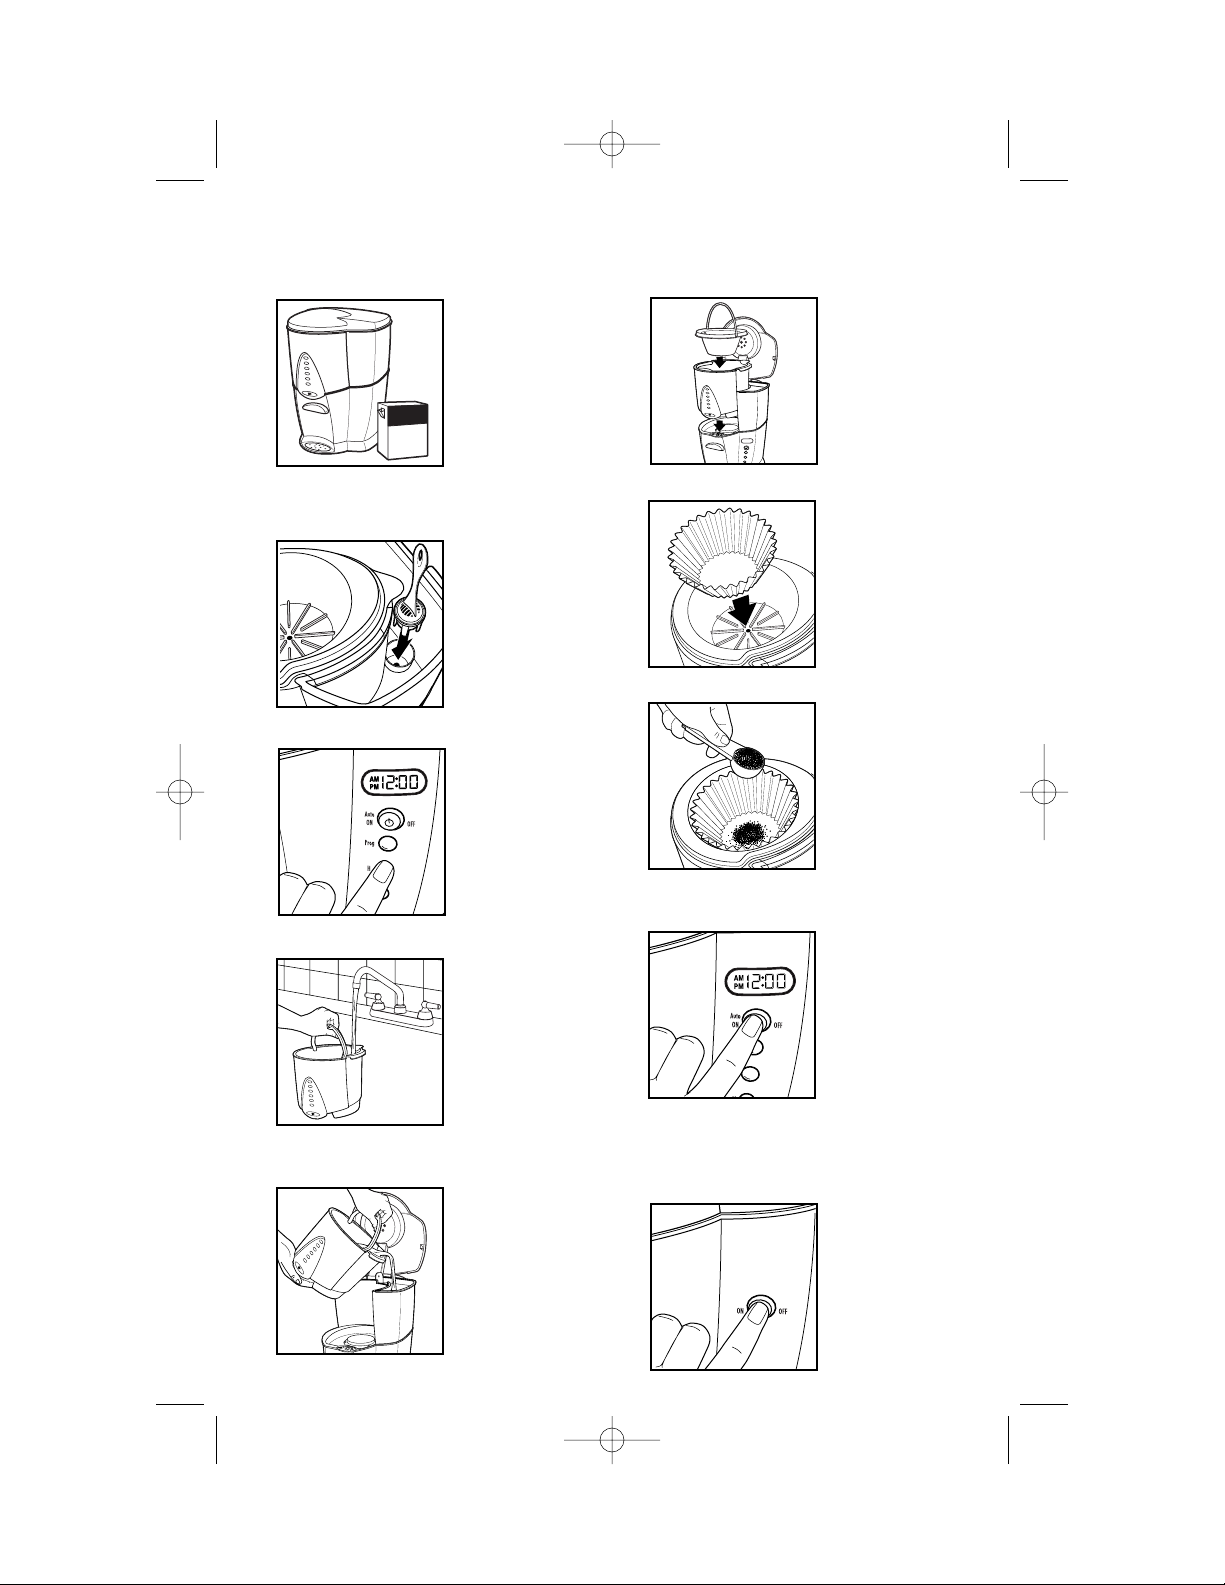
How to Make Coffee
1. To ensure best possible taste, before
first use clean
the unit by
following steps
listed in “To
Clean the Inside
of BrewStation.”
2. For optional features only:
A.) If your model has a water filter,
follow steps listed in “Optional
Features.” A
water filter is
not required to
make coffee in
the BrewStation.
B.) If your model has a clock, set
clock before
first use. Follow
the instructions
in “Optional
Features.”
3. Fill coffee tank with desired amount
of cold water.
Holding coffee
tank level, use
Water Level
Guide on inside
of coffee tank to
ensure correct
amount of water.
Do not exceed water MAX level.
4. Pour water from coffee tank into
water reservoir.
5. Place coffee tank on Keep Warm
Plate. Place filter
basket on coffee
tank.
6. Place a disposable paper filter in the
filter basket.
Use a good
quality cupcake
(basket) style filter (8 to 12 cup
size). A permanent filter may
also be used.
7. For each cup of coffee being made,
neatly place 3⁄4
tablespoon of
automatic drip
ground coffee
into filter basket.
Do not get any
grounds inside
coffee tank.
Close lid; make sure it is fully closed.
8. Clock model: press Auto/ON/OFF
twice for coffee
now and light
will glow. When
button is
pressed only
once, the light
will blink slowly.
Press button
once more to brew. To brew later, see
“To Program Automatic Brew” in
“Optional Features.”
Non-clock model: press ON/OFF
button once for
coffee now and
light will glow.
840136100 ENv00.qxd 3/29/05 2:00 PM Page 5
ESCALER
D
Page 6
6
9. DO NOT open lid during and just
after brewing
to preserve the
coffee’s heat
and flavor.
10. To dispense coffee, press dispenser
with a cup.
Remove cup
when desired
amount has
been dispensed.
Coffee may be
dispensed during and after
brewing.
11. The BrewStation features a twohour automatic
shut off. To
turn off sooner,
press ON/OFF
button and
indicator light
will go out.
12. When finished, push ON/OFF
button to turn off, then unplug
BrewStation. Do not open coffeemaker until it has been turned off.
Always allow to cool before cleaning.
NOTE: Care should be taken when
handling the coffee tank after brewing.
Burn Hazard
• Never use coffee tank to pour or
carry hot coffee.
• Handle coffee tank only when holding cold water for filling water
reservoir and to clean tank after
BrewStation has been shut off and
the coffee is cool.
WARNING
Burn Hazard
If BrewStation overflows, allow the
unit, coffee and grounds to cool
before cleaning the unit, coffee or
grounds.
WARNING
840136100 ENv00.qxd 3/29/05 2:00 PM Page 6
Page 7
7
Optional Accessories
Water Filter
1. Before first use, soak water filter in
cold tap water
for 15 minutes.
Then rinse
under cold running tap water
for 15 seconds.
2. Insert filter in base. Snap lid onto
base.
3. Place filter and filter holder in reservoir.
4. Replace after 60 brew cycles of
coffee. Set your replacement month
by aligning the arrow with the month
you expect will represent 60 brew
cycles.
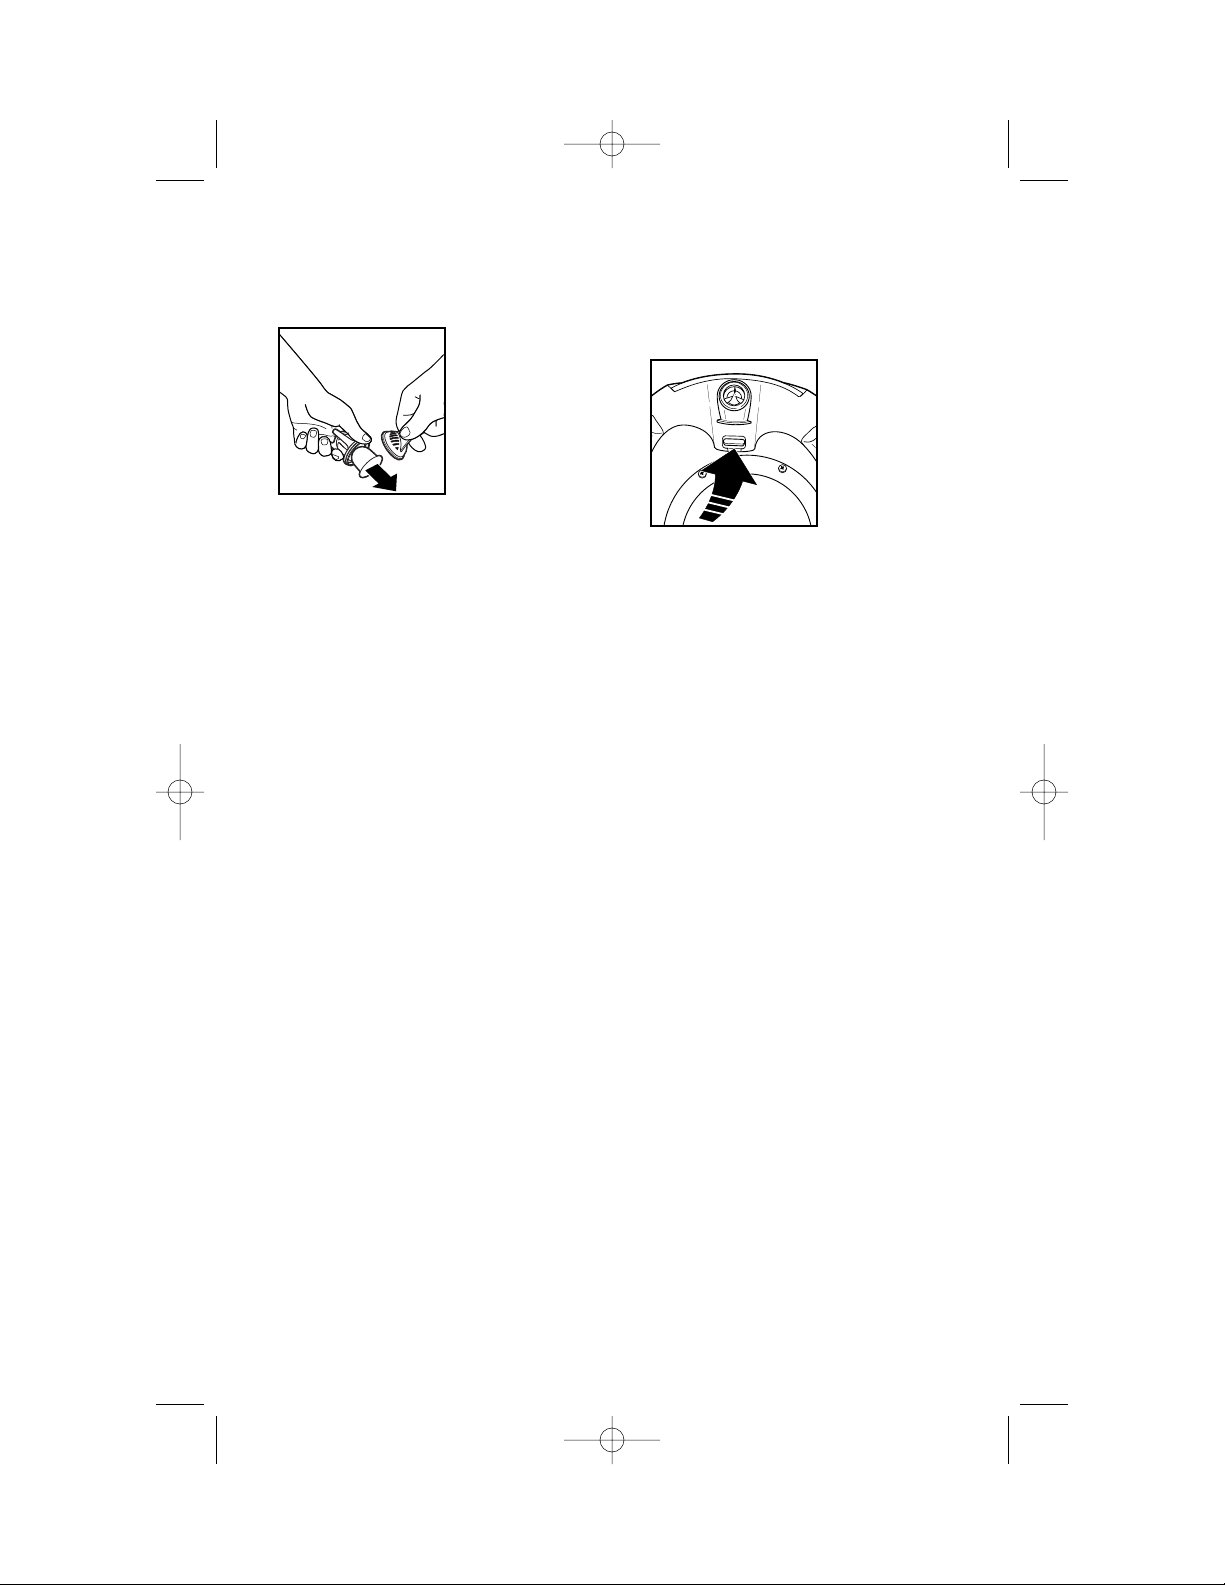
5. To replace, pull up on lid of filter
holder while holding filter base, turn
filter base to allow filter to drop out.
Permanent Filter
The Permanent Filter takes the place of
disposable paper filters. Simply place
the Permanent Filter in the filter basket. Rinse the Permanent Filter in hot
water before first use. Clean the
Permanent Filter under hot running
water and let dry. Permanent Filter can
be placed in top rack of automatic
dishwasher.
Cleaner and Descaler
Coffeemaker cleaner and descaler prevents hard water deposits that affect
the coffeemaker’s performance and
removes coffee stains. Usage frequency depends on local water quality. Use
cleaner at least once a month.
BrewStations used in areas with hard
water may require weekly cleaning.
Seal Replacement
To Remove Seal:
1. Turn empty coffee tank upside
down and press
lever. This will
“push up” seal
inside coffee
tank, making it
easier to peel
off the seal.
2. While still pressing the lever, turn
coffee tank upright.
3. Lift edge of seal and pull off post.
To Install Seal:
1. Press lever on bottom of coffee
tank.
2. Align opening of seal over post.
Press seal over the post until it
slides down the post and is seated
into position. Seal must be flush
with bottom of tank.
TEST NEW SEAL: Always test the dispenser for drips or leaks. Fill coffee
tank with water and hold tank over
sink. If dispenser drips or leaks, repeat
the steps above. If tank continues to
drip or leak water from dispenser, call
us for more help.
To Order Call:
1-800-851-8900 (U.S.)
1-800-267-2826 (Canada)
or online:
hbaccessories.com
840136100 ENv00.qxd 3/29/05 2:00 PM Page 7
Page 8
8
Optional Features
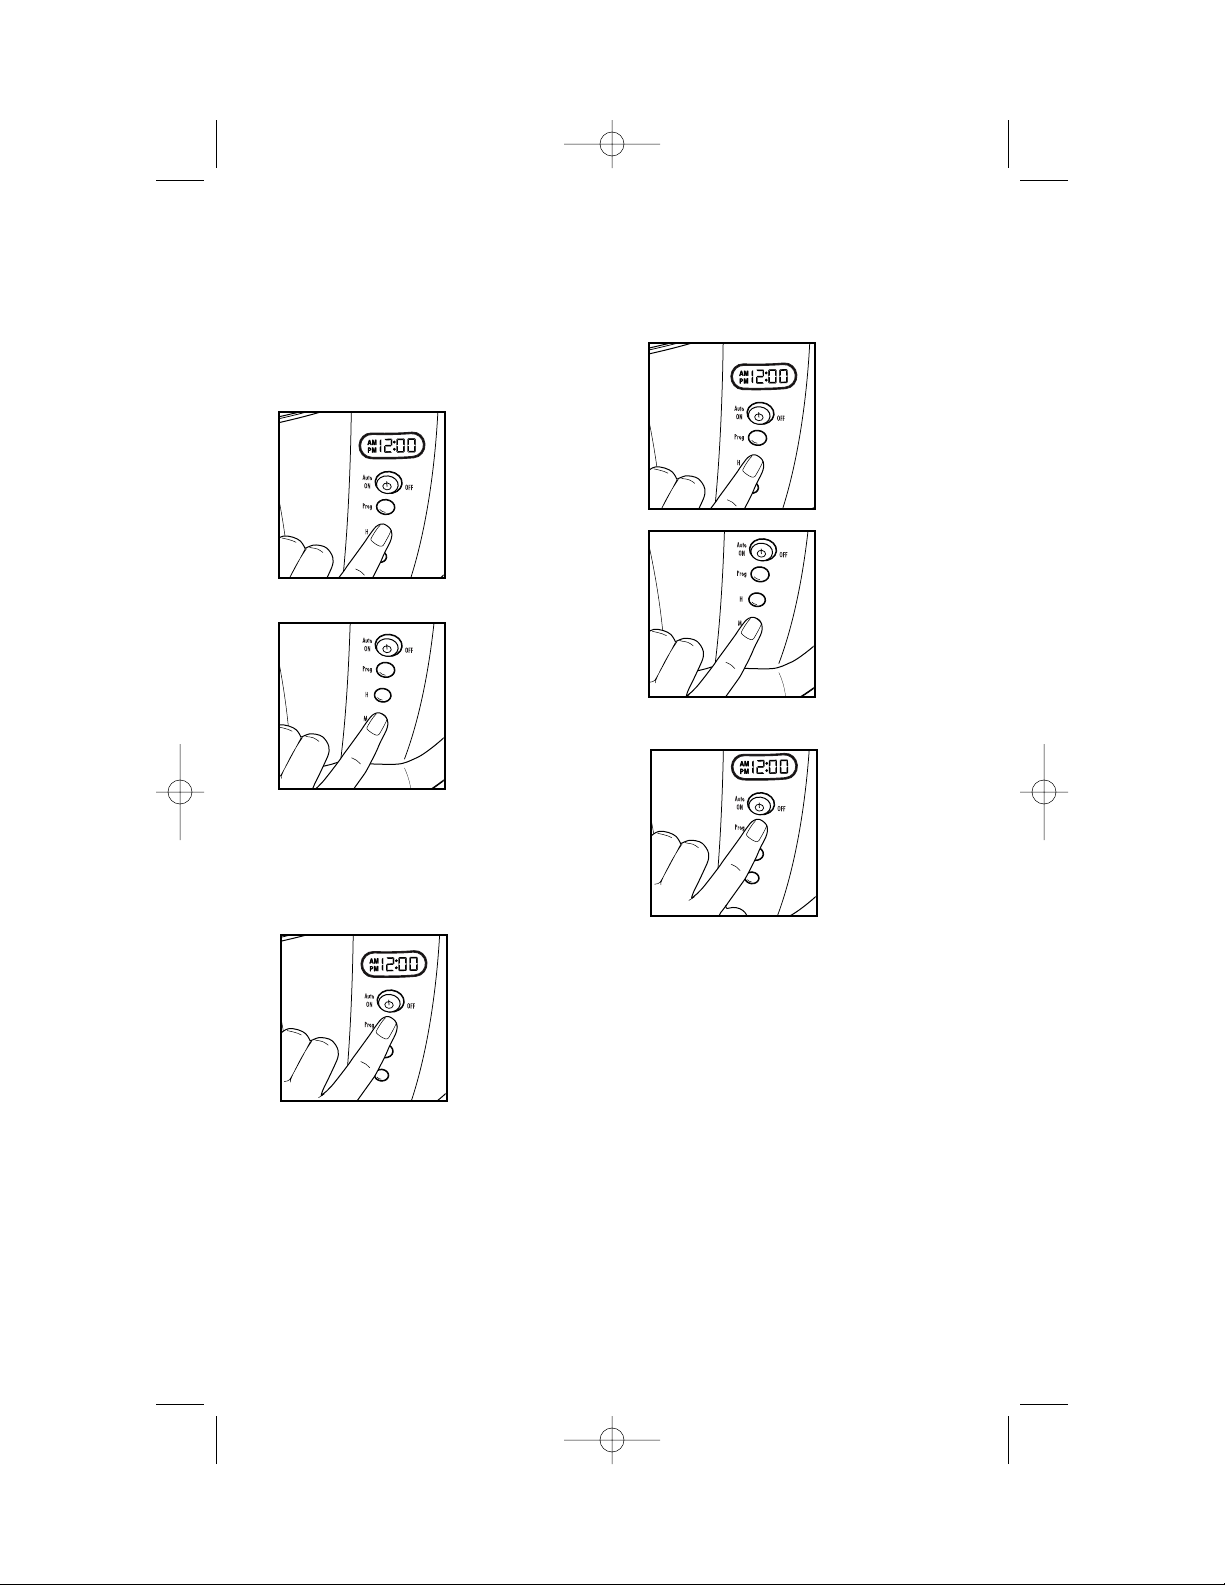
To Set Clock:
1. Plug in BrewStation. Numbers on the
clock will flash until you set time of
day or one minute elapses.
2. To set time of day, press H button to
set current hour
with AM or PM
as indicated on
left of the clock.
3. Press M button until you reach the
current time.
To Program Automatic Brew:
1. Make sure clock is set for correct
time of day.
2. Press Prog button and digits will
flash.
3. Press H and M buttons until desired
brewing time is
reached.
4. Press Prog button to confirm setting.
Digits will stop
flashing and
return to set
time of day.
5. Push Auto/ON/OFF button once and
“PRO” will be shown in display and
the ON/OFF light will flash indicating
the brew cycle will begin at the set
time.
NOTE: If the Auto/ON/OFF button
is pushed twice, the ON/OFF light
will glow and brewing will begin
immediately. Simply press the
ON/OFF button once to turn off and
once more to set programming mode.
6. Follow steps 3-12 in “How to Make
Coffee.”
840136100 ENv00.qxd 3/29/05 2:00 PM Page 8
Page 9

9
Cleaning Instructions
To maintain the performance of your
BrewStation, clean once a month.
Cleaning the BrewStation removes
mineral deposits that slow down brew
time and result in poor coffee taste.
BrewStations used in an area with hard
water require more frequent cleaning
(such as weekly).
To Clean Inside of BrewStation:
1. Remove water filter and water filter
holder (optional
feature).
2. Plug in BrewStation and set the
clock (on clock model).
3. Place empty coffee tank on Keep
Warm Plate.
Place filter basket on coffee
tank. Do not
add coffee into
filter basket.
4. Use any commercially-available
coffeemaker
cleaner and
descaler intended for home
use. Follow
package directions. After using
descaler, rinse
BrewStation
coffeemaker by brewing twice with
water only.
To order a cleaner, call:
1-800-851-8900 (U.S.)
1-800-267-2826 (Canada)
or online: hbaccessories.com
NOTE: Commercially-available
brands of descaler, include
CleanCaf™, or white vinegar.
5. To turn ON, press Auto/ON/OFF
button twice
for clock model
or once for
non-clock
model. The
light will glow.
After 20 seconds turn OFF.
6. Wait 20 minutes to allow the
descaler to clean. Then turn ON
again. When the brew cycle is finished, turn OFF. Wait for
BrewStation and water in coffee
tank to cool, then empty coffee
tank and rinse.
7. Pour one coffee tank of cold tap
water into the
reservoir. Place
coffee tank on
Keep Warm
Plate.
8. To turn ON, press Auto/ON/OFF
button twice for
clock model or
once for nonclock model.
When the brew
cycle is finished,
empty the coffee tank. Allow
BrewStation
and water in coffee tank to cool,
then repeat this process with two or
more coffee tanks of cold water.
9. Turn OFF when complete.
10. Wash coffee tank and brew basket.
Your BrewStation is now ready to
brew coffee.
840136100 ENv00.qxd 3/29/05 2:00 PM Page 9
ESCALER
D
Page 10

10
Cleaning Instructions (cont.)
To Clean Coffee Tank and Filter
Basket:
Coffee tank, drip tray, and filter basket
should be washed in hot, soapy water.
Filter basket may be washed on the
top rack of the dishwasher. Do not
clean coffee tank in dishwasher.
To Remove Coffee Stains from
Coffee Tank:
Follow the directions on any
commercially-available coffeemaker
cleaner and descaler intended for
home use.
To Clean Coffee Grounds or
Foreign Matter from Coffee Tank:
Over the sink, turn the coffee tank
upside-down then press lever and
flush with water for 30 seconds to
remove coffee grounds.
To test for drips or leaks from dispenser, fill coffee tank with water and
hold coffee tank over sink. If dispenser
drips or leaks, reflush dispenser to
remove coffee grounds.
If tank continues to drip or leak wter,
check seal insdie coffee tank. Seal
must be flush with bottom of tank. If
tank continues to drip or leak water
from dispenser, call us for more help.
Questions?
You can call us toll free at
1-800-851-8900 in US
1-800-267-2826 in Canada
Bottom of
Coffee Tank
840136100 ENv00.qxd 3/29/05 2:00 PM Page 10
Page 11

11
Troubleshooting
POTENTIAL PROBLEM
Leaks from dispenser.
Coffee tastes bad.
Coffee not brewing/
unit will not turn on.
Coffee brews slowly/
coffee stops brewing
before brew cycle is
completed/switch light
blinking during brew cycle.
PROBABLE CAUSE
• Coffee grounds trapped in coffee tank
dispensing mechanism under ring in
coffee tank. See “To Clean Coffee Grounds
from Tank” on page 10.
• Ensure seal is fully seated for a proper seal (see
page 7).
• Coffeemaker needs cleaning. See page 9.
• Coffee ground other than automatic drip.
See page 5.
• Coffee-to-water ratio unbalanced. See page 5.
Adjust for personal preference.
• Poor water quality (use filtered or bottled water
to make coffee).
• Clock model requires pressing Auto ON/OFF
button twice. Light should glow.
• Mineral deposits have built up. Clean the
coffeemaker following Cleaning Instructions.
• Water reservoir is empty.
• Unit is unplugged.
• Power outage.
• Power surge. Unplug then plug the unit back in.
• Clock blinking in program mode. Press PROG
once then press ON/OFF until indicator light
glows.
• Clock model requires reset after power outage.
• Coffeemaker needs cleaning. Clean the
coffeemaker at least every 30 days to maintain
proper performance.
• Excessive amounts of coffee.
• Coffee ground too finely (not automatic
drip grind).
• More than one paper filter in basket.
• Poor quality paper filter.
Questions?
You can call us toll free at
1-800-851-8900 in US
1-800-267-2826 in Canada
840136100 ENv00.qxd 3/29/05 2:00 PM Page 11
Page 12

12
3/05
840136100
hamiltonbeach.com
HAMILTON BEACH PROCTOR-SILEX,INC.
P
ROCTOR-SILEX CANADA,INC.
263 Yadkin Road, Southern Pines, NC 28387
Picton, Ontario K0K 2T0
Customer Service
If you have a question about your BrewStation, call our toll-free customer service
number. Before calling, please note the model, type, and series numbers and fill in
that information below. These numbers can be found on the bottom of your
BrewStation. This information will help us answer your question much more quickly.
MODEL: ______________ TYPE: ________________ SERIES: _______________
LIMITED WARRANTY
This product is warranted to be free from defects in material and workmanship for a period
of one (1) year for Hamilton Beach products or one hundred eighty (180) days for ProctorSilex and Traditions products from the date of original purchase, except as noted below.
During this period, we will repair or replace this product, at our option, at no cost. THE
FOREGOING WARRANTY IS IN LIEU OF ANY OTHER WARRANTY, WHETHER EXPRESS
OR IMPLIED, WRITTEN OR ORAL INCLUDING ANY WARRANTY OF MERCHANTABILITY
OR FITNESS FOR A PARTICULAR PURPOSE. ANY LIABILITY IS EXPRESSLY LIMITED
TO AN AMOUNT EQUAL TO THE PURCHASE PRICE PAID, AND ALL CLAIMS FOR
SPECIAL, INCIDENTAL AND CONSEQUENTIAL DAMAGES ARE HEREBY EXCLUDED.
There is no warranty with respect to the following items that are subject to wear, which
may be supplied with this product: glass parts, glass containers, cutter/strainers, blades,
drip valve seals, gaskets, clutches, and/or agitators. This warranty extends only to the
original consumer purchaser and does not cover a defect resulting from abuse, misuse,
neglect including failure to clean product regularly in accordance with manufacturer's
instructions, use for a commercial purpose, or any use not in conformity with the printed
directions. This warranty gives you specific legal rights, and you may also have other legal
rights which vary from state to state, or province to province. Some states or provinces do
not allow limitations on implied warranties or special, incidental or consequential damages,
so the foregoing limitations may not apply to you.
If you have a claim under this warranty, DO NOT RETURN THE APPLIANCE TO THE
STORE! Please call our CUSTOMER SERVICE NUMBER. (For faster service please have
model, series, and type numbers ready for operator to assist you.)
CUSTOMER SERVICE NUMBERS
In the U.S. 1-800-851-8900
In Canada 1-800-267-2826
hamiltonbeach.com • proctorsilex.com
KEEP THESE NUMBERS FOR FUTURE REFERENCE!
840136100 ENv00.qxd 3/29/05 2:00 PM Page 12
Page 13

BrewStation
™
LIRE AVANT L’UTILISATION
840136100
Sécurité de la cafetière.................. 2
Pièces et caractéristiques ............ 4
Pour faire du café .......................... 5
Accessoires facultatifs .................. 7
Caractéristiques facultatives ........ 8
Instructions de nettoyage.............. 9
Dépannage .................................. 11
Service à la clientèle ....................12
Merci!
Merci d’avoir acheté une cafetière
BrewStation chez Hamilton Beach.
Dès le début, vous comprendrez ce qui
fait de BrewStation une cafetière si
unique. Nous espérons que vous
apprécierez votre cafetière.
Des questions?
Appelez-nous d’abord – nos aimables
correspondants sont prêts à vous aider.
Veuillez ne pas retourner vos produits
au magasin.
Veuillez ne pas retourner vos produits au magasin.
Appelez-nous d’abord – nos aimables
correspondants sont prêts à vous aider.
Aux USA : 1-800-851-8900
Au Canada : 1-800-267-2826
840136100 FRv00.qxd 3/29/05 2:01 PM Page 1
Page 14

2
PRÉCAUTIONS IMPORTANTES
1. Lisez toutes les instructions.
2. Ne touchez pas aux surfaces chaudes.
Utilisez les poignées ou les boutons.
Vous devez être très prudent car vous
pourriez vous brûler en touchant des
pièces chaudes ou en renversant un
liquide chaud.
3. Afin de vous prémunir contre les chocs
électriques, ne plongez pas le cordon
d’alimentation, la fiche ou la cafetière
dans l’eau ou tout autre liquide.
4. Surveillez attentivement les enfants
lorsque ceux-ci utilisent l’appareil ou
lorsqu’il est utilisé à proximité d’eux.
5. Débranchez la prise de courant lorsque
vous ne vous servez pas de la cafetière
ou de l’horloge ou avant le nettoyage.
Laissez l’appareil refroidir avant d’enlever ou de remettre en place des
pièces ou de nettoyer l’appareil.
6. Lorsque la cafetière est en marche, elle
doit toujours se trouver sur une surface
plate et loin du bord du comptoir pour
éviter tout contact accidentel qui pourrait la renverser.
7. Ne faites pas fonctionner un appareil
avec un cordon ou une fiche endommagé(e), ou lorsque l’appareil ne
fonctionne pas bien ou a été échappé
ou endommagé d’une manière quelconque. Veuillez composer notre
numéro d’assistance aux clients pour
des renseignements concernant la vérification, la réparation ou le réglage.
8. L’utilisation d’accessoires qui ne sont
pas recommandés par Hamilton
Beach/Proctor-Silex Inc. peut causer
des blessures.
9. N’utilisez pas la cafetière à l’extérieur.
10. Ne laissez pas le cordon pendre au
bord d’une table ou d’un comptoir ou
entrer en contact avec une surface
chaude, y compris la cuisinière.
11. La verseuse est conçue pour être utilisée
avec cette cafetière. Elle ne doit jamais
être utilisée sur la cuisinière ou dans un
four à micro-ondes.
12. Ne placez pas la cafetière près d’un
brûleur électrique ou à gaz ou dessus,
ou dans un four chaud.
13.
Pour désactiver la cafetière, tourner les
commandes à OFF (arrêt) et ensuite
débrancher la fiche de la prise murale.
Lorsque vous utilisez des appareils électriques, vous devez toujours prendre des précautions élémentaires afin de réduire les risques d’incendie, de choc électrique et/ou de
blessures corporelles. Voici quelques instructions à suivre :
840136100 FRv00.qxd 3/29/05 2:01 PM Page 2
N’utilisez jamais la verseuse pour
verser du café chaud ou pour
transporter du café chaud.
Ne manipulez la verseuse que
lorsqu’elle contient de l’eau froide.
• En cas de débordement, laissez la cafetière, le café et la moulure refroidir complètement avant de procéder à tout
nettoyage.
• N’utilisez que des filtres à café de marque connue, de bonne qualité.
• Utilisez 3/4 de cuillère à soupe de café moulu pour chaque tasse de café.
• Si le voyant lumineux clignotte pendan le cycle d’infusion, cela indique que vous devez nettoyer la cafetière avec un
nettoyant/détartrant.
• Utilisez du nettoyant à cafetière pour empêcher les dépôts calcaires qui gênent le bon fonctionnement de la cafetière.
Nettoyez chaque mois.
• Ne nettoyez jamais la verseuse dans le lave-vaisselle.
• Lisez les instructions avant usage.
Appelez le 800.851.8900 (USA) ou le 800.267.2826 (Canada) si vous avez des questions ou pour commander des
joints/du nettoyant à cafetière.
Inspectez le joint de la verseuse avant
de faire du café, pour prévenir les
fuites de café chaud.
Le joint doit affleurer le bas de la
verseuse pour rendre étanche. Vérifiez
toute fuite de la verseuse avec de
l’eau froide.
Renseignements additionnels
Nettoyez chaque mois la verseuse, pour
prévenir des fuites de café chaud.
Bas de la
verseuse
Avant de faire du café, vous devez enlever
de la verseuse tout matériau étranger et
toute moulure. Pour la vider, renversez-la,
appuyez sur le levier et faites couler de l’eau
pendant 30 secondes à travers la verseuse.
Distributeur
Levier
IMPORTANT!
Page 15

3
CONSERVEZ CES INSTRUCTIONS!
Renseignements de sécurité au consommateur
Cet appareil est conçu uniquement pour
l’usage domestique.
Cet appareil est muni d’une fiche polarisée.
Ce type de fiche présente une broche plus
large que l’autre. La fiche ne peut être introduite dans une prise que dans un sens. Il
s’agit d’une caractéristique de sécurité
visant à réduire le risque de choc électrique.
Si la fiche ne peut pas être insérée dans la
prise, la tourner dans l’autre sens. Si elle ne
peut toujours pas être insérée dans la prise,
contacter un électricien qualifié pour qu’il
remplace la prise désuète. Ne pas essayer
de contourner l’objectif de sécurité de la
fiche polarisée en la modifiant de quelque
manière que ce soit.
La longueur du cordon de cet appareil a été
choisie de façon à ce que l’on ne risque
pas de trébucher dessus. Si un cordon plus
long est nécessaire, utiliser une rallonge
appropriée. Le calibrage de la rallonge doit
être le même que celui de la cafetière ou
supérieur. Lorsqu’on utilise une rallonge,
s’assurer qu’elle ne traverse pas la zone de
travail, que des enfants ne puissent pas
tirer dessus par inadvertance et qu’on ne
puisse pas trébucher dessus.
Afin d’éviter une surcharge électrique, évitez
d’utiliser un autre appareil à haute puissance
sur le même circuit que la cafetière.
Si votre BrewStation déborde en cours de
fonctionnement, laissez la cafetière, le café
et la moulure refroidir complètement avant
de procéder à tout nettoyage.
14. Des brûlures par la vapeur peuvent sur-
venir si vous soulevez ou retirez le
couvercle durant l’infusion du café.
15. Avertissement : afin de diminuer le risque
d’incendie ou de choc électrique, n’enlevez pas le couvercle du dessous. Il ne
s’y trouve aucune pièce réparable. Toute
réparation ne devrait être effectuée que
par un technicien autorisé.
16. N’utilisez cet appareil qu’aux fins pour
lesquelles il a été conçu.
840136100 FRv00.qxd 3/29/05 2:01 PM Page 3
Page 16

4
Pièces et caractéristiques
*caractéristique optionnelle
sur certains modèles
1. Panier-filtre
2. Indicateur du niveau d’eau
3. Verseuse
4. Indicateur du niveau de café
5. Distributeur de café
6. Ramasse-gouttes
7. Réservoir d’eau
8. Plaque chauffante
9. Couvercle du filtre à eau*
10. Filtre à eau*
11. Porte-filtre à eau*
12. Joint (2)*
13. Dosette à café*
14. Nettoyant et détartreur Cleancaf™*
Accessoires facultatifs
Pour commander appelez le :
1-800-851-8900 (USA)
1-800-267-2828 (Canada)
ou en ligne : hbaccessories.com
D
ESCALER
840136100 FRv00.qxd 3/29/05 2:01 PM Page 4
Page 17

5
Pour faire du café
1. Pour assurer le meilleur goût possible,
avant la première
utilisation, nettoyer la cafetière en
suivant les étapes
mentionnées
dans « Nettoyage
de l’intérieur de la
cafetière ».
2. Pour les caractéristiques
facultatives seulement :
A.) Si votre modèle est doté d’un filtre
à eau, suivre les
étapes mention-
nées dans
« Caractéristiques
facultatives ». Un
filtre à eau n’est
pas requis pour
faire du café dans
la cafetière.
B.) Si votre modèle est doté d’une
horloge, régler
l’horloge avant la
première utilisation. Suivre les
instructions dans
« Caractéristiques
facultatives ».
3. Mettre la quantité d’eau froide du robinet
désirée dans la
verseuse. En
maintenant le
niveau de la
verseuse, utiliser
l’indicateur du
niveau d’eau à
l’intérieur de la
verseuse pour
assurer une quantité d’eau correcte.
Ne pas dépasser le niveau d’eau MAX.
4. Verser l’eau de la verseuse dans le
réservoir d’eau.
5. Placer la verseuse sur la plaque chauf-
fante. Mettre le
panier-filtre sur
la verseuse.
6. Placer un filtre en papier jetable dans
le panier-filtre.
Utiliser un filtre
de style moule à
petits gâteaux de
bonne qualité
(format de 8 à 12
tasses). On peut
aussi utiliser un
filtre permanent.
7.
Pour chaque tasse de café à faire,
mettez
soigneusement
3
⁄4 de c. à soupe
de café moulu
filtre dans le
panier-filtre. Ne
mettez pas de
mouture de
café dans la
verseuse. Fermez le couvercle;
assurez-vous qu’il est bien fermé.
8. Modèle à horloge : Modèle à horloge
: Appuyez deux
fois sur
Auto/ON/OFF
pour obtenir du
café et le voyant
s’allume. Si vous
n’appuyez
qu’une fois sur
ce bouton, le
voyant se met à clignoter lentement.
Appuyez encore une fois sur le bouton pour faire le café. Pour faire plus
tard du café, consultez « Pour programmer une infusion automatique »
dans la section « Caractéristiques
facultatives ».
840136100 FRv00.qxd 3/29/05 2:01 PM Page 5
ESCALER
D
Page 18

6
Modèle sans horloge : appuyer
sur le bouton
ON/OFF une
fois pour faire
du café immé-
diatement, et
le témoin
lumineux
s’allumera.
9. Pour préserver la chaleur et la saveur
du café, NE
PAS ouvrir le
couvercle
durant et juste
après l’infusion.
10. Pour prendre du café, appuyer sur le
distributeur
avec une tasse.
Retirer la tasse
lorsque la
quantité de café
désirée a été
prise. Il est
possible de
prendre du café
durant et après l’infusion.
11. La cafetière BrewStation est dotée
d’un arrêt
automatique
après un délai
de deux
heures. Pour
l’éteindre plus
tôt, appuyer
sur le bouton
ON/OFF et le
témoin lumineux s’éteindra.
12. Après avoir terminé, appuyer sur le
bouton ON/OFF pour arrêter la
cafetière, puis la débrancher. Ne
pas ouvrir la cafetière avant de
l’avoir arrêtée. Toujours la laisser
refroidir avant le nettoyage.
REMARQUE : La verseuse doit être
manipulée avec précaution après
l’infusion.
Danger de brûlure
• N’utilisez jamais la verseuse pour
verser ou pour transporter du café
chaud.
• Ne manipulez la verseuse que
quand elle contient de l’eau froide,
pour remplir le réservoir d’eau et
pour nettoyer la verseuse après
avoir débranché votre BrewStation
et le café est froid.
AVERTISSEMENT
Danger de brûlure
Si votre BrewStation déborde, laissez
l’appareil, le café et la mouture de
café refroidir avant de nettoyer l’appareil, le café ou la mouture de café.
AVERTISSEMENT
840136100 FRv00.qxd 3/29/05 2:01 PM Page 6
Page 19

7
Accessoires facultatifs
Filtre à eau
1. Avant la première utilisation, faire
tremper le filtre à
eau dans de
l’eau froide du
robinet pendant
15 minutes. Puis
rincer sous le
robinet d’eau
froide pendant
15 secondes.
2. Insérer le filtre dans la base.
Enclencher le couvercle sur la base.
3. Mettre le filtre et le support du filtre
dans le réservoir.
4. Remplacer après 60 cycles d’infu-
sion du café. Régler au mois de
remplacement en alignant la flèche
sur le mois prévu (après 60 cycles
d’infusion).
5. Pour le replacer, tirer sur le couvercle
du support du filtre tout en tenant la
base du filtre, tourner la base pour
dégager le filtre.
Filtre permanent
Le filtre permanent prend la place des filtres en papier jetables. Il suffit de placer
le filtre permanent dans le panier du filtre.
Rincer le filtre permanent à l’eau chaude
avant la première utilisation. Nettoyer le
filtre permanent sous l’eau chaude et
laisser sécher. Le filtre permanent peut
être placé dans le panier supérieur d’un
lave-vaisselle automatique.
Nettoyant et détartreur
Le nettoyant et détartreur de la
cafetière enlève les taches de café et
les dépôts calcaires qui gênent la per-
formance de la cafetière. La fréquence
de son usage dépend de la qualité de
votre eau. Utilisez le nettoyant au
moins une fois par mois. Une
BrewStation utilisée dans des régions
où l’eau est calcaire nécessite un net-
toyage hebdomadaire.
Remplacement du joint
Enlèvement du joint :
1. Renversez la verseuse vide et
appuyez sur le
levier. Cela
poussera vers
le haut le joint à
l’intérieur de la
verseuse, ce qui
favorise sont
enlèvement.
2. Tout en continuant à appuyer sur le
levier, remettez la verseuse à l’en-
droit.
3. Soulevez le joint par sa tranche et
tirez-le du support.
Installez le joint :
1. Appuyez sur le levier situé en bas de
la verseuse.
2. Alignez l’ouverture du joint sur le
support. Appuyez le joint sur le support jusqu’à ce qu’il glisse sous le
support et repose en position. Le
joint doit affleurer le bas de la
verseuse.
ESSAYEZ LE NOUVEAU JOINT :
Essayez toujours la verseuse pour vous
assurer qu’il n’y a pas de fuite ou de
perte d’eau. Remplissez la verseuse
d’eau et tenez-la au-dessus de l’évier.
Si la verseuse coule ou perd de l’eau,
répétez les étapes ci-dessus. Si la
verseuse continue à couler ou à perdre
de l’eau, appelez-nous à l’aide.
Pour commander appelez le :
1-800-851-8900 (USA)
1-800-267-2828 (Canada)
ou en ligne : hbaccessories.com
840136100 FRv00.qxd 3/29/05 2:01 PM Page 7
Page 20

8
Caractéristiques facultatives
(suite)
Réglage de l’horloge :
1. Brancher la cafetière. Les numéros
sur l’horloge clignoteront jusqu’à ce
que vous régliez l’heure du jour ou
pendant une minute.
2. Pour régler l’heure du jour, appuyer
sur le bouton H
pour régler
l’heure actuelle
avec AM ou
PM.
3. Appuyer sur le bouton M jusqu’à ce
que vous
atteigniez
l’heure correcte.
Pour programmer une infusion
automatique :
1. S’assurer que l’horloge est réglée à
l’heure du jour.
2. Appuyer sur le bouton Prog et les
caractères
clignoteront.
3. Appuyer sur les boutons H et M
jusqu’à ce que
la durée
d’infusion
désirée soit
atteinte.
4. Appuyer sur le bouton Prog pour
confirmer le
réglage. Les
caractères
arrêteront de
clignoter et
retourneront à
l’heure du jour
réglée.
5. Appuyer sur le bouton Auto/ON/OFF
une fois et « PRO » apparaîtra sur
l’affichage et le témoin lumineux
ON/OFF (marche/arrêt) clignotera,
indiquant que le cycle d’infusion se
mettra en route à l’heure réglée.
REMARQUE : Si on appuie deux fois
sur le bouton Auto/ON/OFF, le
témoin ON/OFF s’allumera et
l’infusion commencera immédiate-
ment. Il suffit d’appuyer une fois sur le
bouton ON/OFF pour l’arrêter et une
fois de plus pour régler le mode de
programmation.
6. Suivre les étapes 3 à 12 de la section
« Pour faire du café ».
840136100 FRv00.qxd 3/29/05 2:01 PM Page 8
Page 21

9
Instructions de nettoyage
Pour maintenir la performance de votre
cafetière, la nettoyer une fois par
mois. Le nettoyage de la cafetière
BrewStation enlève les dépôts minéraux
qui ralentissent le temps d’infusion et
affectent le goût du café. Si vous utilisez
BrewStation dans une région où l’eau
est dure, vous devez la nettoyer plus
souvent (chaque semaine, par exemple).
Nettoyage de l’intérieur :
1. Retirer le filtre à eau et le support du
filtre à eau (caractéristique
facultative).
2. Brancher la cafetière et régler l’hor-
loge (sur les modèles à horloge).
3. Placer la verseuse vide sur la
plaque pour
garder au
chaud. Placer
le panierfiltre sur la
verseuse. Ne
pas ajouter de
café dans le
panier du filtre.
4. Utiliser n’importe quel nettoyant et
détartrant à
cafetière qui se
vend dans le
commerce pour
usage domestique. Suivre les
instructions sur
l’emballage.
Après avoir utilisé un détartreur, rincez votre
cafetière BrewStation en l’utilisant
deux fois avec de l’eau seulement.
Pour commander un nettoyant,
appelez le :
1-800-851-8900 (USA)
1-800-267-2828 (Canada)
ou en ligne : hbaccessories.com
REMARQUE : Les marques de détartreur
vendues sur le marché comprennent
CleanCaf ou du vinaigre blanc.
5. Pour mettre en marche, appuyer sur
le bouton Auto/
ON/OFF deux
fois pour le
modèle à horloge et une fois
pour le modèle
sans horloge.
Le témoin
s’allumera.
Éteindre au
bout de 20 secondes.
6. Attendre 20 minutes pour permettre
au vinaigre de nettoyer. Puis remettre l’appareil en marche. À la fin du
cycle d’infusion, éteindre. Laisser la
cafetière et l'eau dans la verseuse
refroidir puis vider la verseuse et
rincer.
7. Verser une pleine verseuse d’eau
froide du robinet dans le
réservoir.
Placer la
verseuse sur la
plaque pour
garder au la
chaud.
8. Pour mettre l’appareil en marche,
appuyer sur le
bouton Auto/
ON/OFF deux
fois sur le
modèle à horloge ou une
fois sur le
modèle sans
horloge. À la
fin du cycle d’infusion, vider la
verseuse. Laisser la cafetière et
l'eau dans la verseuse refroidir puis
répéter ce processus avec deux
verseuses supplémentaires d’eau
froide du robinet.
9. Éteindre l’appareil une fois l’opéra-
tion terminée.
10. Nettoyer la verseuse et le panier à
infusion. Votre cafetière est désor-
mais prête à faire du café.
840136100 FRv00.qxd 3/29/05 2:01 PM Page 9
ESCALER
D
Page 22

10
Instructions de nettoyage (suite)
Nettoyage de la verseuse et du
panier du filtre :
La verseuse, le plateau d’égouttement
et le panier du filtre doivent être lavés
dans de l’eau chaude savonneuse. Le
panier du filtre peut être lavé dans le
panier supérieur du lave-vaisselle. Ne
lavez jamais pas la verseuse dans un
lave-vaisselle.
Pour enlever les taches de café
de la verseuse :
Suivre les indications sur tout nettoyant
ou détartrant à cafetière disponible
dans le commerce, pour usage
domestique.
Pour nettoyer la mouture de café
ou des matériaux étrangers de la
verseuse.
Au-dessus de l’évier, retourner la
verseuse, appuyer sur le levier et rincer
avec de l’eau pendant 30 secondes
pour enlever la mouture de café.
Pour vous assurer que votre distributeur
n’ait pas de fuite ou de perte d’eau.
Remplissez la verseuse d’eau et tenez-la
au-dessus de l’évier. Si le distributeur
coule ou perd de l’eau, nettoyez le distributeur pour enlever la mouture de
café.
Si la verseuse continue à fuir ou à perdre de l’eau, vérifiez la joint à l’intérieur
de la verseuse. Le joint doit affleurer le
bas de la verseuse. Si la verseuse continue à couler ou à perdre de l’eau,
appelez-nous à l’aide.
Des questions?
Vous pouvez nous téléphoner
sans frais au
1-800-851-8900 aux É.-U.
1-800-267-2826 au Canada
Fond de la verseuse
840136100 FRv00.qxd 3/29/05 2:01 PM Page 10
Page 23

11
Dépannage
PROBLÈME POTENTIEL
Fuites du distributeur.
Mauvais goût du café.
Pas d’infusion de café/
l’appareil ne se met pas
en marche.
Le café infuse lentement/
le café s’arrête d’infuser
avant que le cycle
d’infusion soit terminé/
le voyant lumineux de
l'interrupteur clignote
pendant le cycle d'infusion.
CAUSE PROBABLE
• Mouture de café dans le mécanisme de
distribution sous le joint de la verseuse.
Voir « Pour nettoyer la mouture de café de
la verseuse » à la page 10.
• Vérifiez que le joint est bien installé pour
assurer l’étanchéité (voir à la page 7).
• La cafetière a besoin d’être nettoyée.
Voir page 9.
• Mouture de café autre que pour
goutte-à-goutte. Voir page 5.
• Rapport café-eau déséquilibré. Voir page 5.
Ajuster en fonction de ses préférences
personnelles.
• Mauvaise qualité de l’eau (utiliser de l’eau
filtrée ou embouteillée pour faire du café).
• Avec le modèle à horloge, il faut appuyer
deux fois sur le bouton Auto/ON/OFF.
Le témoin lumineux s’allume.
• Des dépôts minéraux se sont amassés.
Lavez la cafetière en suivant les Instructions
de nettoyage.
• Réservoir d’eau vide.
• Cafetière débranchée.
• Panne de courant.
• Surtension. Débrancher l’appareil et le
rebrancher.
• Horloge clignotante au mode programme.
Appuyer sur PROG une fois, puis appuyer sur
ON/OFF (marche/arrêt) jusqu’à ce que le
témoin lumineux doit s’allumer.
• Le modèle à horloge doit être réglé de
nouveau après une panne de courant.
• La cafetière a besoin d’être nettoyée. Lavez
la cafetière au moins une fois tous les 30 jours,
pour maintenir une performance correcte.
• Quantité excessive de café.
• Café moulu trop fin (pas pour goutte-à-goutte).
• Plus de 1 filtre en papier dans le panier.
• Mauvaise qualité du filtre en papier.
840136100 FRv00.qxd 3/29/05 2:01 PM Page 11
Page 24

12
3/05
840136100
hamiltonbeach.com
HAMILTON BEACH PROCTOR-SILEX,INC.
P
ROCTOR-SILEX CANADA,INC.
263 Yadkin Road, Southern Pines, NC 28387
Picton, Ontario K0K 2T0
Service à la clientèle
Si vous avez une question au sujet du BrewStation, composer notre numéro sans
frais d’interurbain de service à la clientèle. Avant de faire un appel, veuillez noter les
numéros de modèle, de type et de série ci-dessous. Ces numéros se trouvent
sous le BrewStation. Ces renseignements nous aideront à répondre beaucoup
plus vite à toute question.
MODÈLE : ______________ TYPE : _______________ SÉRIE :__________________
GARANTIE LIMITÉE
Ce produit est garanti être exempt de vices de matériau et de fabrication pendant une péri-
ode d’un (1) an pour les produits Hamilton Beach ou cent quatre-vingt (180) jours pour les
produits Proctor-Silex et Traditions à partir de la date de l'achat original, excepté ce qui est
noté ci-dessous. Au cours de cette période, nous réparerons ou remplacerons ce produit
sans frais, à notre discrétion. LA GARANTIE CI-DESSUS REMPLACE TOUTE AUTRE
GARANTIE EXPRESSE OU IMPLICITE, ÉCRITE OU ORALE, Y COMPRIS TOUTE
GARANTIE DE QUALITÉ MARCHANDE OU DE CONFORMITÉ À UNE FIN
PARTICULIÈRE. TOUTE RESPONSABILITÉ EST EXPRESSÉMENT LIMITÉE À UN
MONTANT ÉGAL AU PRIX D’ACHAT PAYÉ ET TOUTES LES RÉCLAMATIONS POUR
DOMMAGES SPÉCIAUX ET INDIRECTS SONT PAR LES PRÉSENTES EXCLUES.
La garantie ne s'applique pas aux accessoires suivants qui s'usent et peuvent accompagner ce produit : pièces en verre, récipients en verre, couteaux/tamis, lames, joints de
robinet de vidange, joints d'étanchéité, embrayages et/ou agitateurs. Cette garantie ne
s’étend qu’à l’acheteur original et ne couvre pas de panne occasionnée par un mauvais
traitement, un mauvais usage, de la négligence, y compris une absence de nettoyer l’ap-
pareil régulièrement conformément aux instructions du fabricant, une utilisation à des fins
commerciales, ou toute utilisation ne se conformant pas aux instructions imprimées.
Cette garantie vous confère des droits juridiques spécifiques et vous pouvez aussi jouir
d’autres droits juridiques qui peuvent varier d’un État à un autre ou d’une province à une
autre. Certains États ou provinces ne permettent pas les limitations sur les garanties
implicites ou les dommages spéciaux ou indirects de telle sorte que les limitations cidessus ne s’appliquent peut-être pas dans votre cas.
Si vous désirez procéder à une réclamation en vertu de cette garantie, NE RETOURNEZ
PAS L’APPAREIL AU MAGASIN! Veuillez téléphoner au NUMÉRO DU SERVICE À LA
CLIENTÈLE. (Pour un service plus rapide, ayez à portée de la main les numéros de série et
de modèle et de type de votre appareil lorsque vous communiquez avec un représentant.)
NUMÉROS DU SERVICE À LA CLIENTÈLE
Aux États-Unis 1-800-851-8900
Au Canada 1-800-267-2826
hamiltonbeach.com • proctorsilex.com
CONSERVEZ CES NUMÉROS POUR RÉFÉRENCE ULTÉRIEURE!
840136100 FRv00.qxd 3/29/05 2:01 PM Page 12
 Loading...