

Page 1
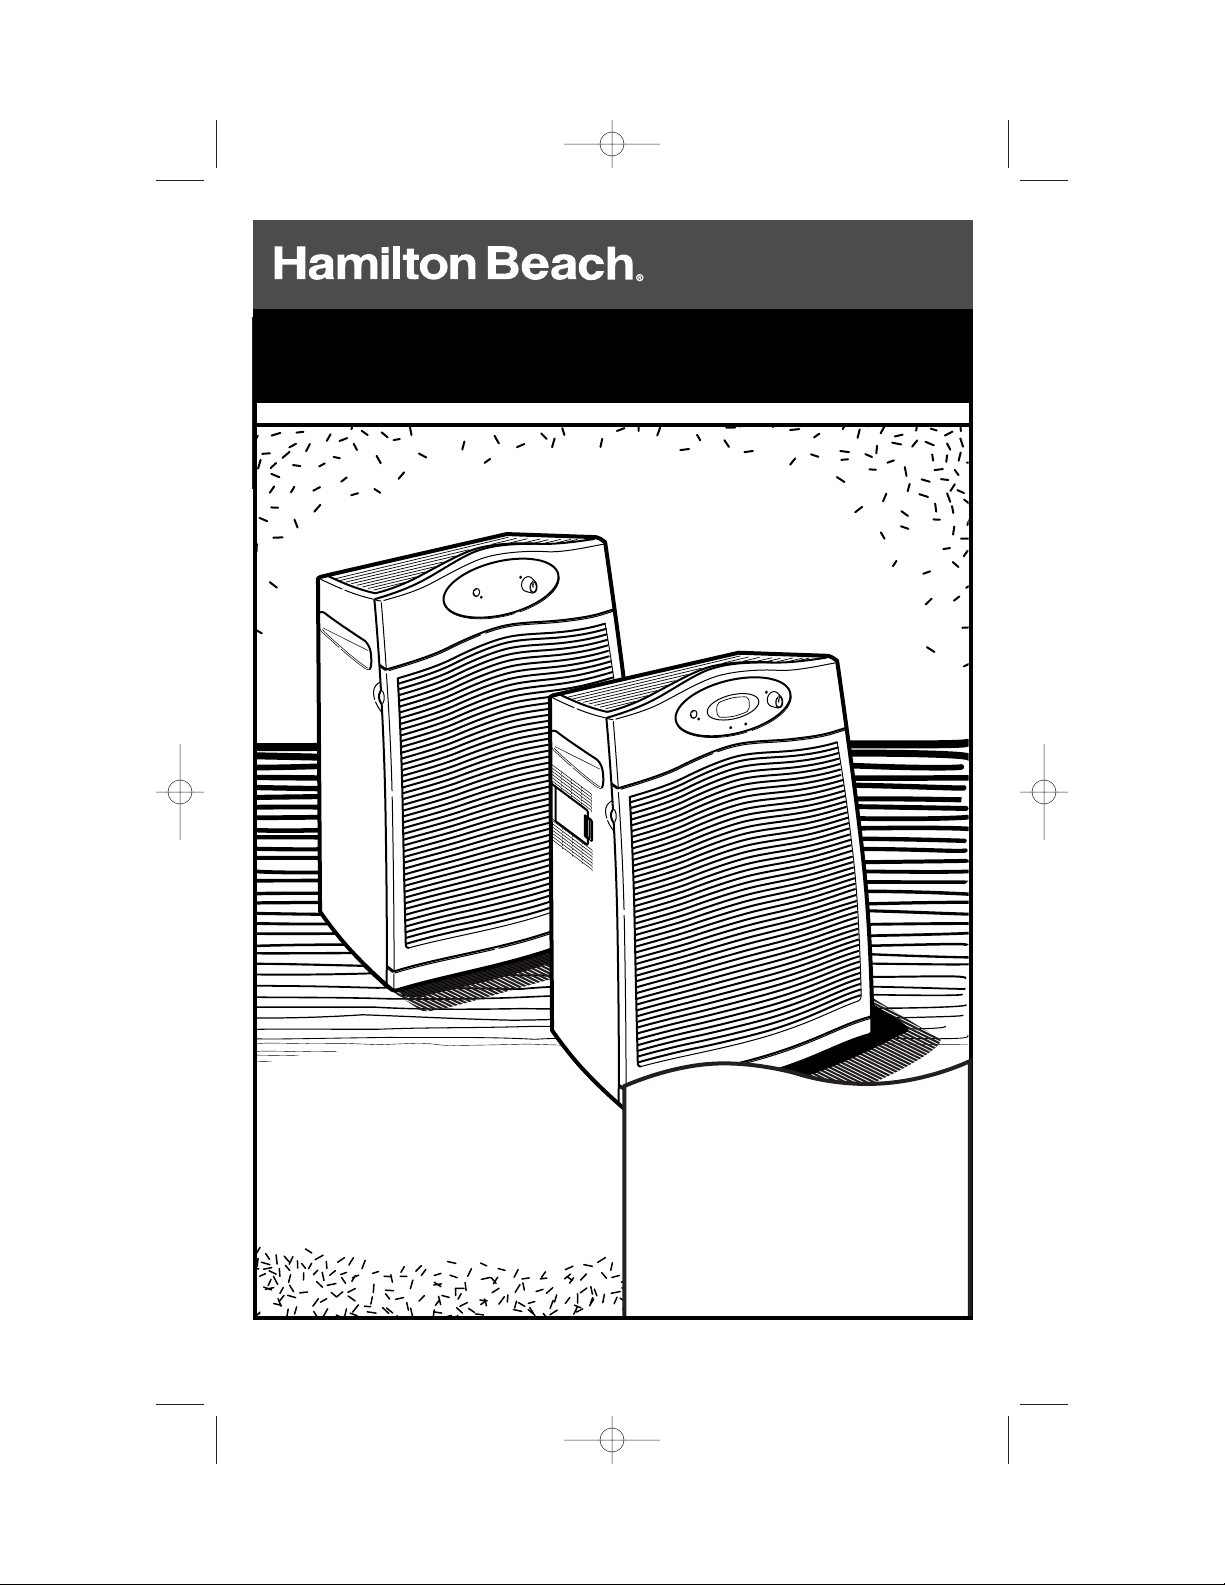
Air Purifier
840115900
Air Purifier Safety.......................... 2
Know Your Air Purifier .................. 5
How to Assemble and Use............ 6
How to Clean................................ 12
Troubleshooting Guide.............. 17
Customer Service ........................ 18
In USA: 1-800-851-8900
In Canada: 1-800-267-2826
840115900 ENv00.qxd 6/6/03 9:03 AM Page 1
Page 2
2
IMPORTANT SAFEGUARDS
SAVE THESE INSTRUCTIONS!
Air Purifier Safety
1. Read all instructions before using this
air purifier. Save these instructions for
reference.
2. Direct ultraviolet light exposure to the
eyes can cause temporary or chronic
adverse effect to your eyesight.
3. Do not immerse this product in water or
splash water on it. An electrical short
may result in shock or fire.
4. Do not handle the plug with wet hands;
electrical shock may occur, resulting in
injury or death.
5. Never attempt to disassemble or alter
the product in any way not instructed by
this manual. Shock, fire, or bodily injury
may occur. Contact Hamilton Beach
at 1-800-851-8900 for assistance.
6. Do not place your face directly on the
outlet grille or look into the ultraviolet light.
7. Do not operate this product in any
greasy environment such as in the
kitchen. This product is not intended to
filter oil or grease from the air.
8. Do not operate this product near an open
fire. It may ignite and cause fire, resulting
in bodily injury or property damage.
9. Do not operate this product in a garage
or other area with oil or chemicals such
as solvents or insecticides.
10. Always unplug the power cord from the
receptacle when the air purifier is not in
use, before cleaning, replacing parts, or
before moving to another location.
11. Do not insert foreign objects into the
product for any reason. Bodily injury
or property damage may occur.
12. Do not use this product outdoors. It is
intended for indoor use only.
13. Do not operate this appliance without
the outlet grille in place or if the outlet
grille is broken or damaged.
14. This air purifier is equipped with safety
interlock switches that turn the unit off
if the intake or outlet grilles are removed.
DO NOT attempt to defeat or override
this safety feature.
15. WARNING: To reduce the risk of fire or
electric shock, do not use this purifier
with any solid-state speed control
device.
READ AND SAVE THESE INSTRUCTIONS.
In order to prevent the risk of fire, electric shock, personal injury or damage to property,
follow these instructions carefully. When using electric appliances, basic safety
precautions should be followed, including the following:
840115900 ENv00.qxd 6/6/03 9:03 AM Page 2
Page 3
3
Consumer Safety Information
This appliance is intended for
household use only.
This appliance is equipped with a
polarized plug. This type of plug has one
blade wider than the other. The plug will
fit into an electrical outlet only one way.
This is a safety feature intended to help
reduce the risk of electrical shock. If you
are unable to insert the plug into the
outlet, try reversing the plug. If the plug
should still fail to fit, contact a qualified
electrician to replace the obsolete outlet.
Do not attempt to defeat the safety
purpose of the polarized plug by
modifying the plug in any way.
If a longer cord is necessary, an
approved extension cord may be used.
The electrical rating of the extension
cord must be equal to or greater than
the rating of the air purifier. Care must
be taken to arrange the extension cord so
that it will not drape over the countertop
or tabletop where it can be pulled on by
children or accidentally tripped over.
Route the electrical or extension cord
clear of furniture to prevent damage
from pinching.
wWARNING
Germicidal Light Radiation Hazard
• Never operate with damaged, broken or missing outlet grille louvers
or without the outlet grille.
• Never operate with damaged, broken or cracked housing.
• Always unplug unit before cleaning, servicing or replacing the UV bulb.
• Never look directly at UV bulb or place face directly on outlet grille.
• Use only Hamilton Beach replacement UV bulb: Part No. 04810.
• Read all instructions before using.
Failure to follow these instructions can result in direct exposure to
germicidal light, which can cause temporary or chronic damage to
your eyesight, or even blindness.
840115900 ENv00.qxd 6/6/03 9:03 AM Page 3
Page 4
4
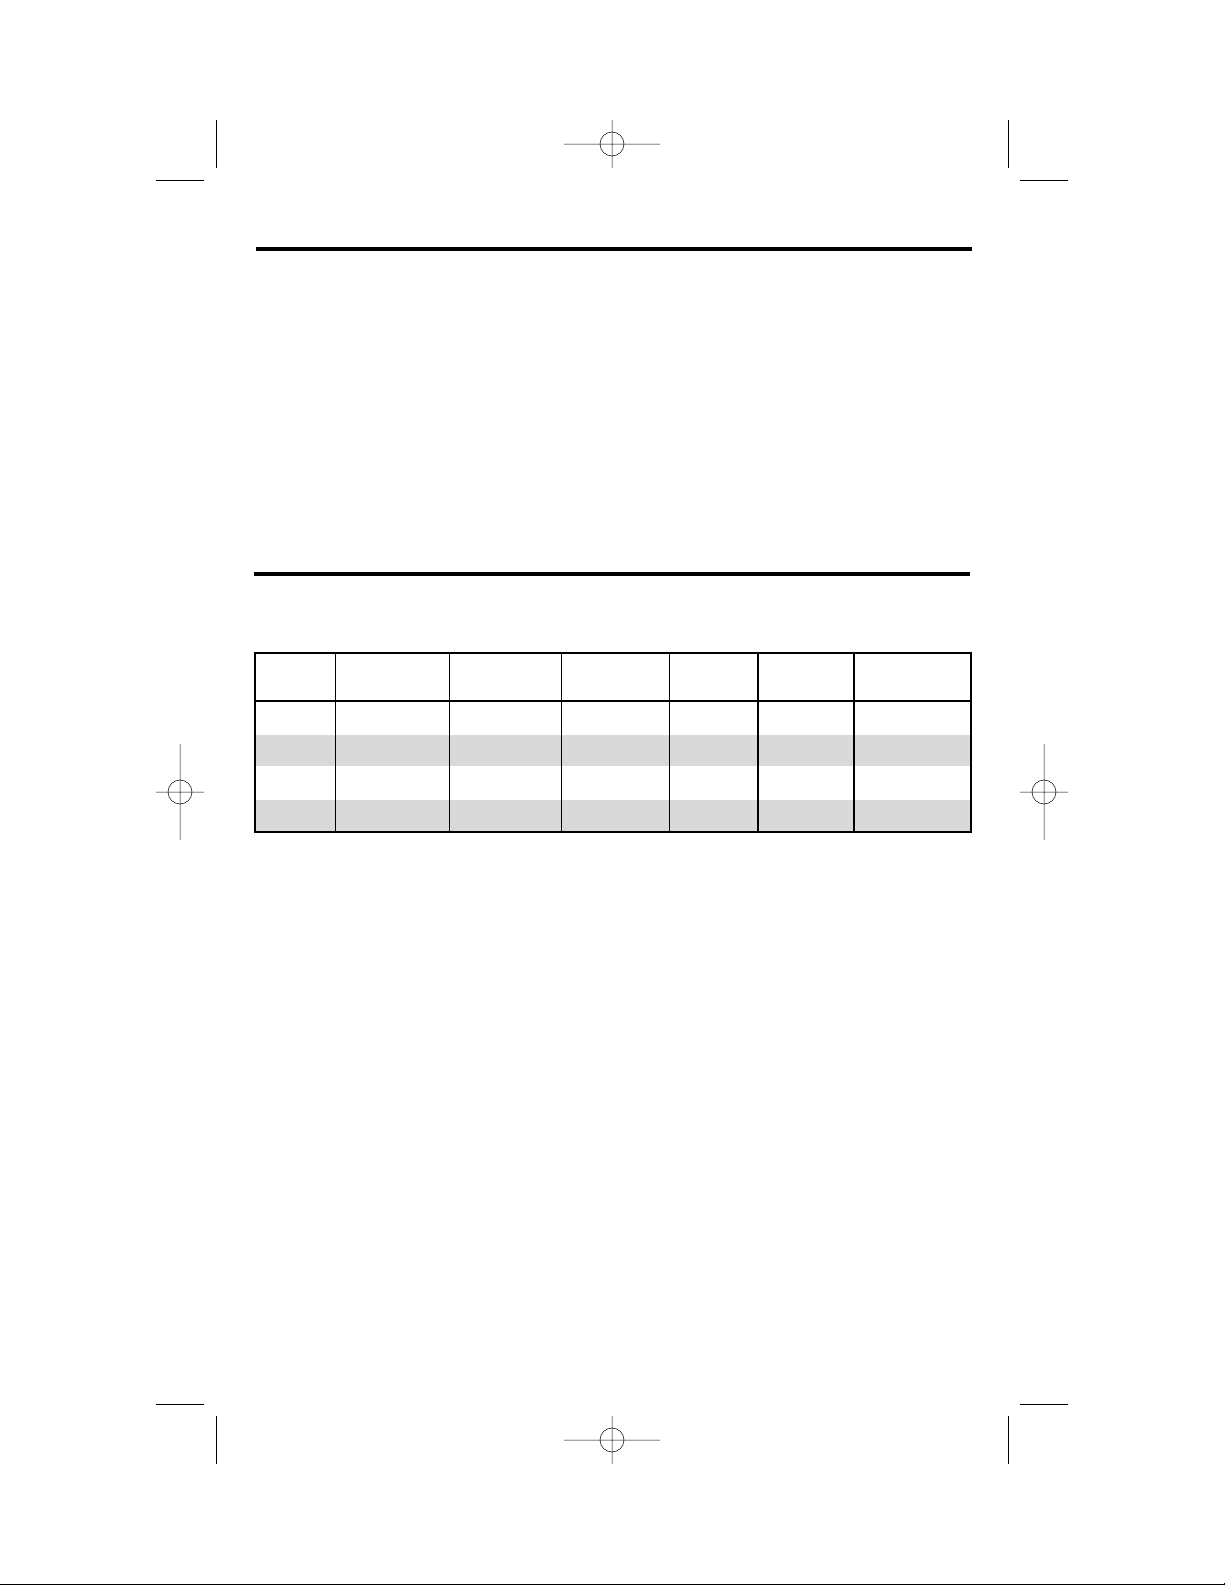
Purifier Control Room Size* Carbon HEPA UV Bulb Starter Type
Model Type (sq. ft.) Pre-Filter Filter
FS-5 or FS -22
04160 Manual 200 ft
2
04922 04912 04810 904004100
04161 AirSmart
™
200 ft
2
04922 04912 04810 904004100
04162 Manual 350 ft
2
04923 04913 04810 904004100
04163 AirSmart
™
350 ft
2
04923 04913 04810 904004100
About Your Air Purifier
The air purifier functions as an
air cleaner by helping to disinfect
airborne bacteria and removing
particulates from the air.
The air is cleaned in three stages:
1. A fan draws air through the intake
grille on the front of the air purifier.
Then it passes through the carbon
pre-filter which traps large dust
particles and reduces odors.
2. The white HEPA filter then removes
particles as small as 0.3 microns
from the air at 99.97% effectiveness.
3. The clean air is then exposed to
germicidal-grade ultraviolet light to
reduce the level of airborne bacteria,
molds, and viruses. The purified air is
then released through the outlet grille
on the top of the unit.
* Each air purifier is designed to filter the room five times per hour at high
speed. Factors such as room shape and ceiling height can affect this rate.
It is normal that the air flow will be reduced as the filters become clogged.
See “Checking the Filters” on page 13 for more information.
To Order Replacement Parts
Replacement bulbs may be available where the air purifier was purchased or
can be obtained directly from Hamilton Beach.
840115900 ENv00.qxd 6/6/03 9:03 AM Page 4
Page 5
5
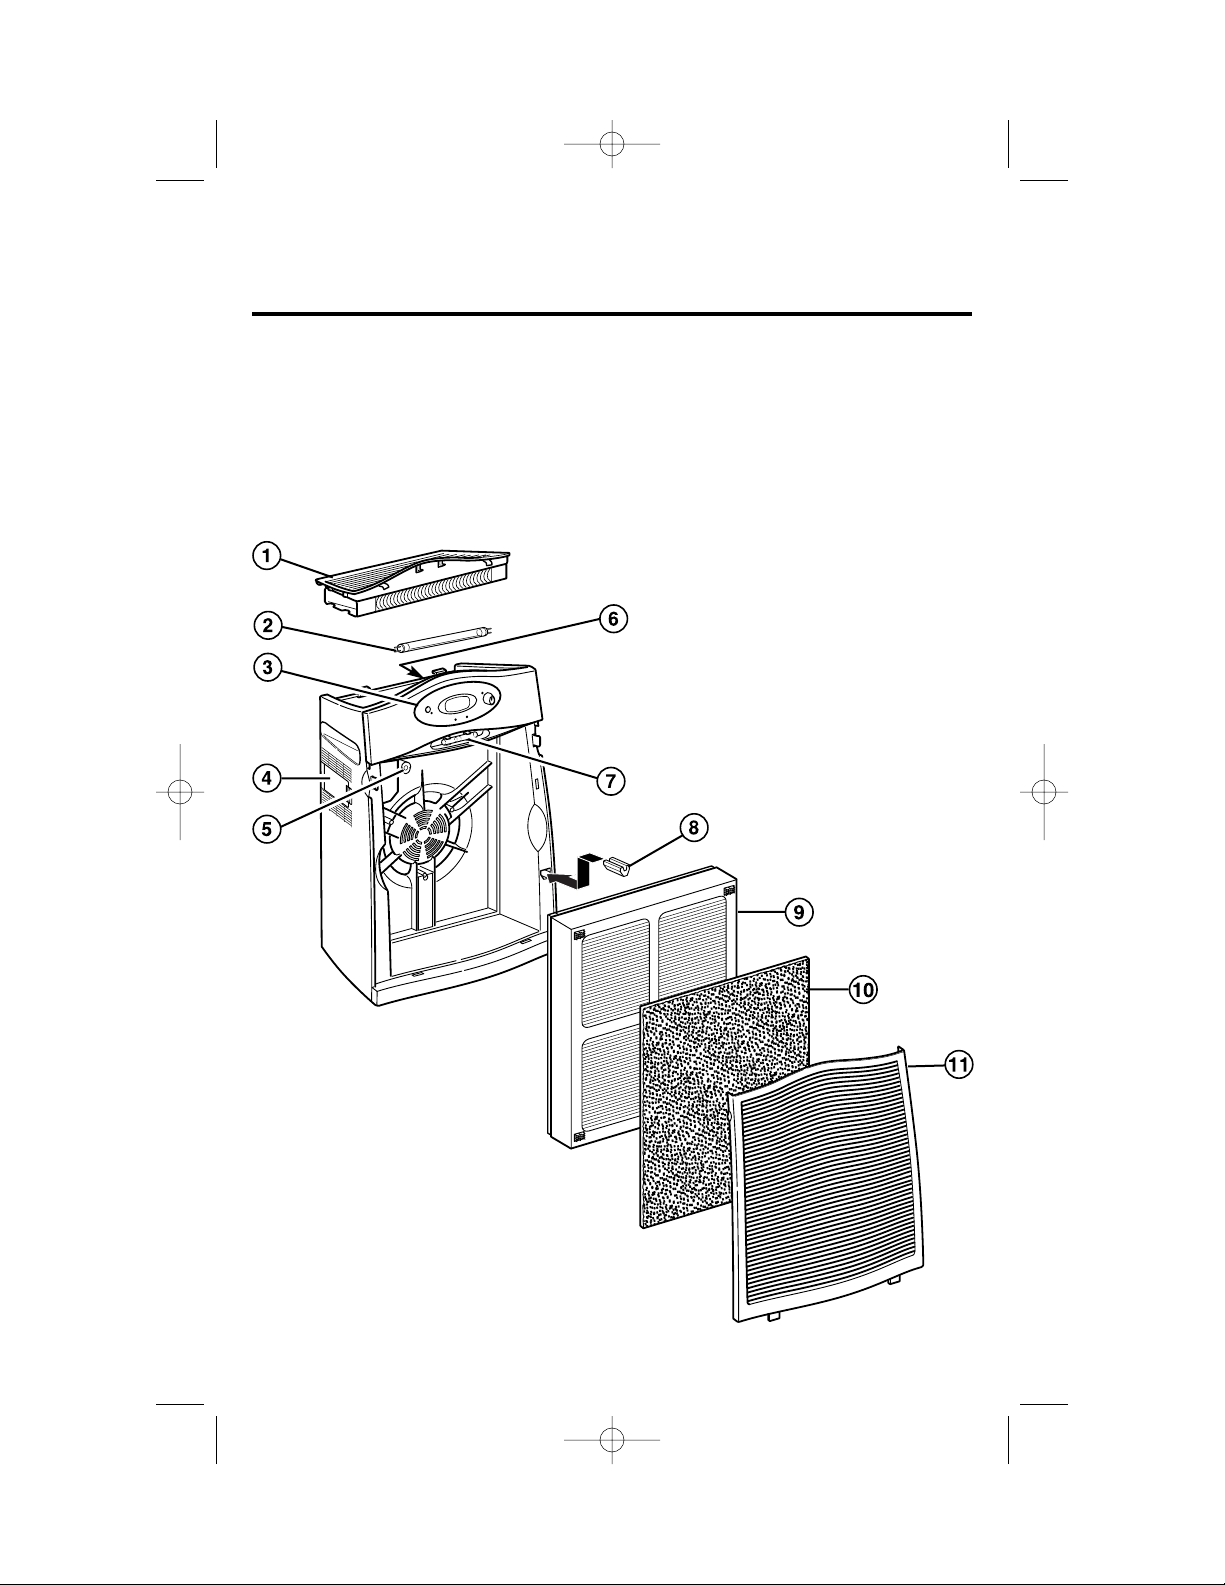
Know Your Air Purifier
Parts and Features
1. Outlet Grille
2. Ultraviolet (UV) Bulb
3. Control Panel
4. AirSmart™Sensor*
5. UV Starter
6. UV Bulb Check Window
(not shown – see page 8 for location)
7. Filter Check Gauge
8. Air Sensor Cleaner*
9. HEPA Filter
10. Carbon Pre-Filter
11. Intake Grille
* Available on AirSmart™models only.
Manual control models do not include
these features.
840115900 ENv00.qxd 6/6/03 9:03 AM Page 5
Page 6
6
How to Assemble and Use
IMPORTANT: Your Hamilton Beach air purifier is designed for easy use and
maintenance. Make sure that the UV bulb, HEPA filter, and carbon pre-filter are
properly installed before use.
Selecting the Proper Location
To prevent the risk of personal injury or damage to the air purifier and provide
the best possible performance of your air purifier, follow the placement
guidelines below:
DO NOT:
• Do not stand, sit, or place any
objects
on the air
purifier. It is
not designed
to support
additional
weight.
• Do not block the air intake and
outlet grilles with drapes, curtains,
or blinds. This may cause reduced
performance.
• Do not use in a kitchen, garage, or
area with grease, oil or chemicals
such as solvents or insecticides.
• Do not place on or near heat
sources such as stoves, radiators,
or heaters, or in direct sunlight.
• To reduce electrical noise and
interference, do not place on or near,
or plug into the same outlet as TVs,
baby monitors, or cordless phones.
DO:
• Place the air purifier on a flat, stable
surface.
• Place the air purifier near an electrical
outlet where it is out of the way.
Make sure that the air purifier and
the cord do not present tripping
hazards.
• Select a central location with
adequate air circulation.
• Turn off and unplug the air purifier
before moving or servicing it, or if it
will not be used for several days.
• Route the electrical cord clear of
furniture to prevent damage from
pinching.
Before First Use
Be sure to remove all packing materials.
The filters and UV bulb are packed in
plastic bags inside the air purifier for
shipping.
Refer to pages 7 to 9 for unpacking
and installation instructions.
840115900 ENv00.qxd 6/6/03 9:03 AM Page 6
Page 7
7
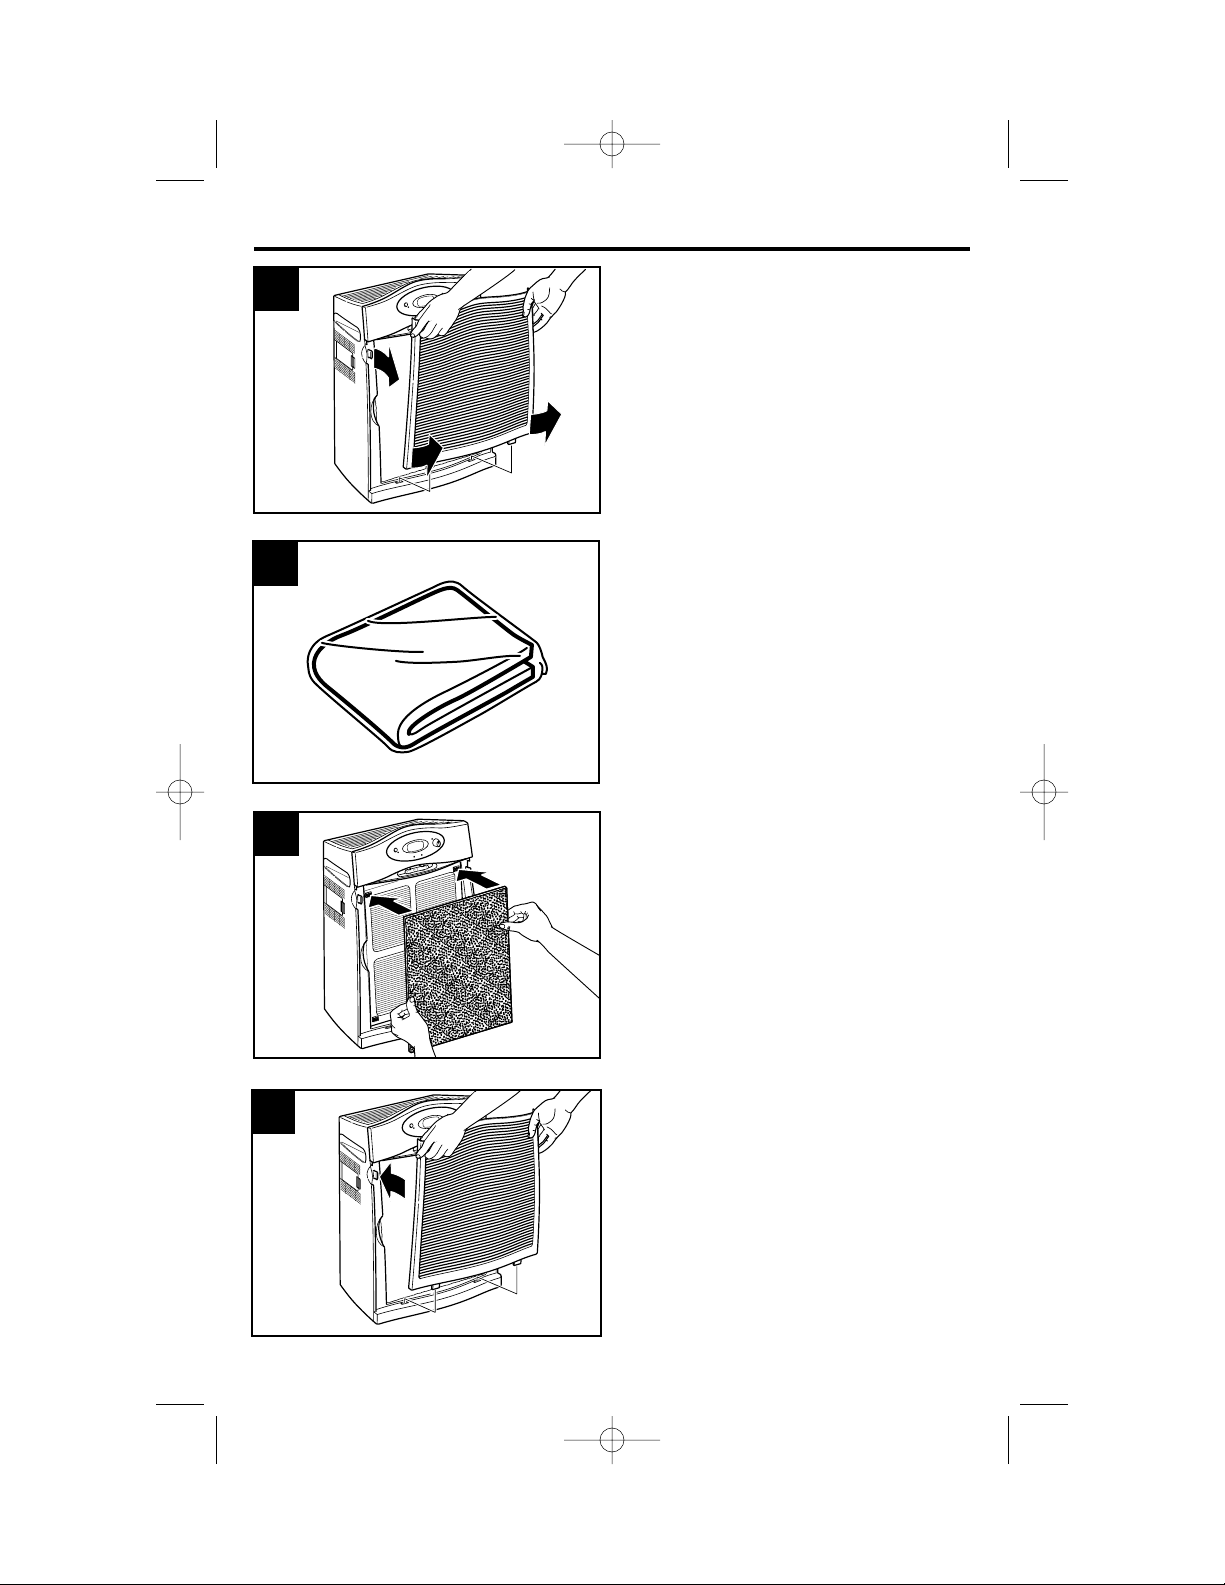
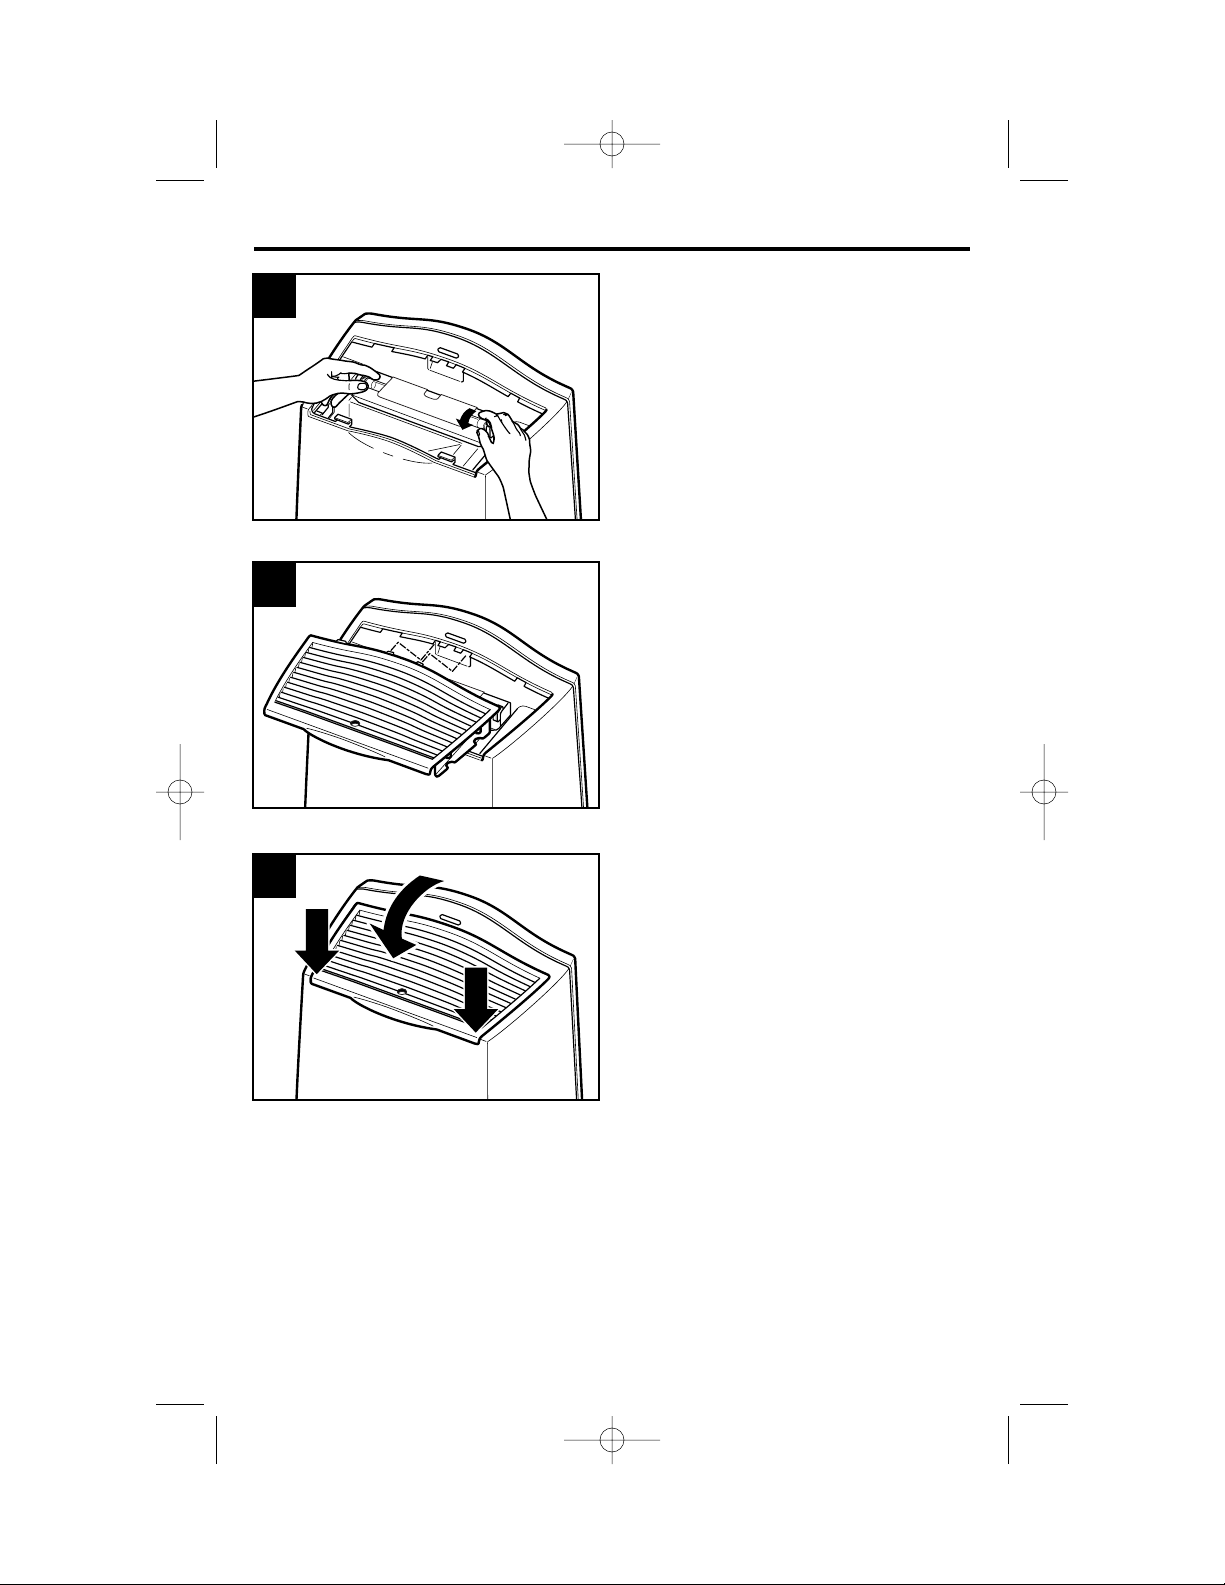
NOTE: The carbon pre-filter should be
replaced approximately every three
months.
Remove the intake grille by carefully
pulling the upper two side tabs away
from the body of the air purifier and
lifting up.
Unfold and flatten out the black
carbon pre-filter. Attach the four
corners of the carbon pre-filter
to the four hook fasteners on the
HEPA filter.
Locate the black carbon pre-filter.
It will be folded inside a plastic bag.
Remove and discard the plastic bag.
Installing the Carbon Pre-Filter
Insert the two tabs on the bottom of
the intake grille into the holes on the
bottom ledge of the air purifier.
Pivot the intake grille into place and
lightly press on the upper corners of
the grille to snap it into place.
NOTE: The air purifier has a safety
switch that prevents operation if the
intake grille is not properly installed.
DO NOT attempt to override or
disable this safety switch.
1
2
3
4
840115900 ENv00.qxd 6/6/03 9:03 AM Page 7
Page 8
8
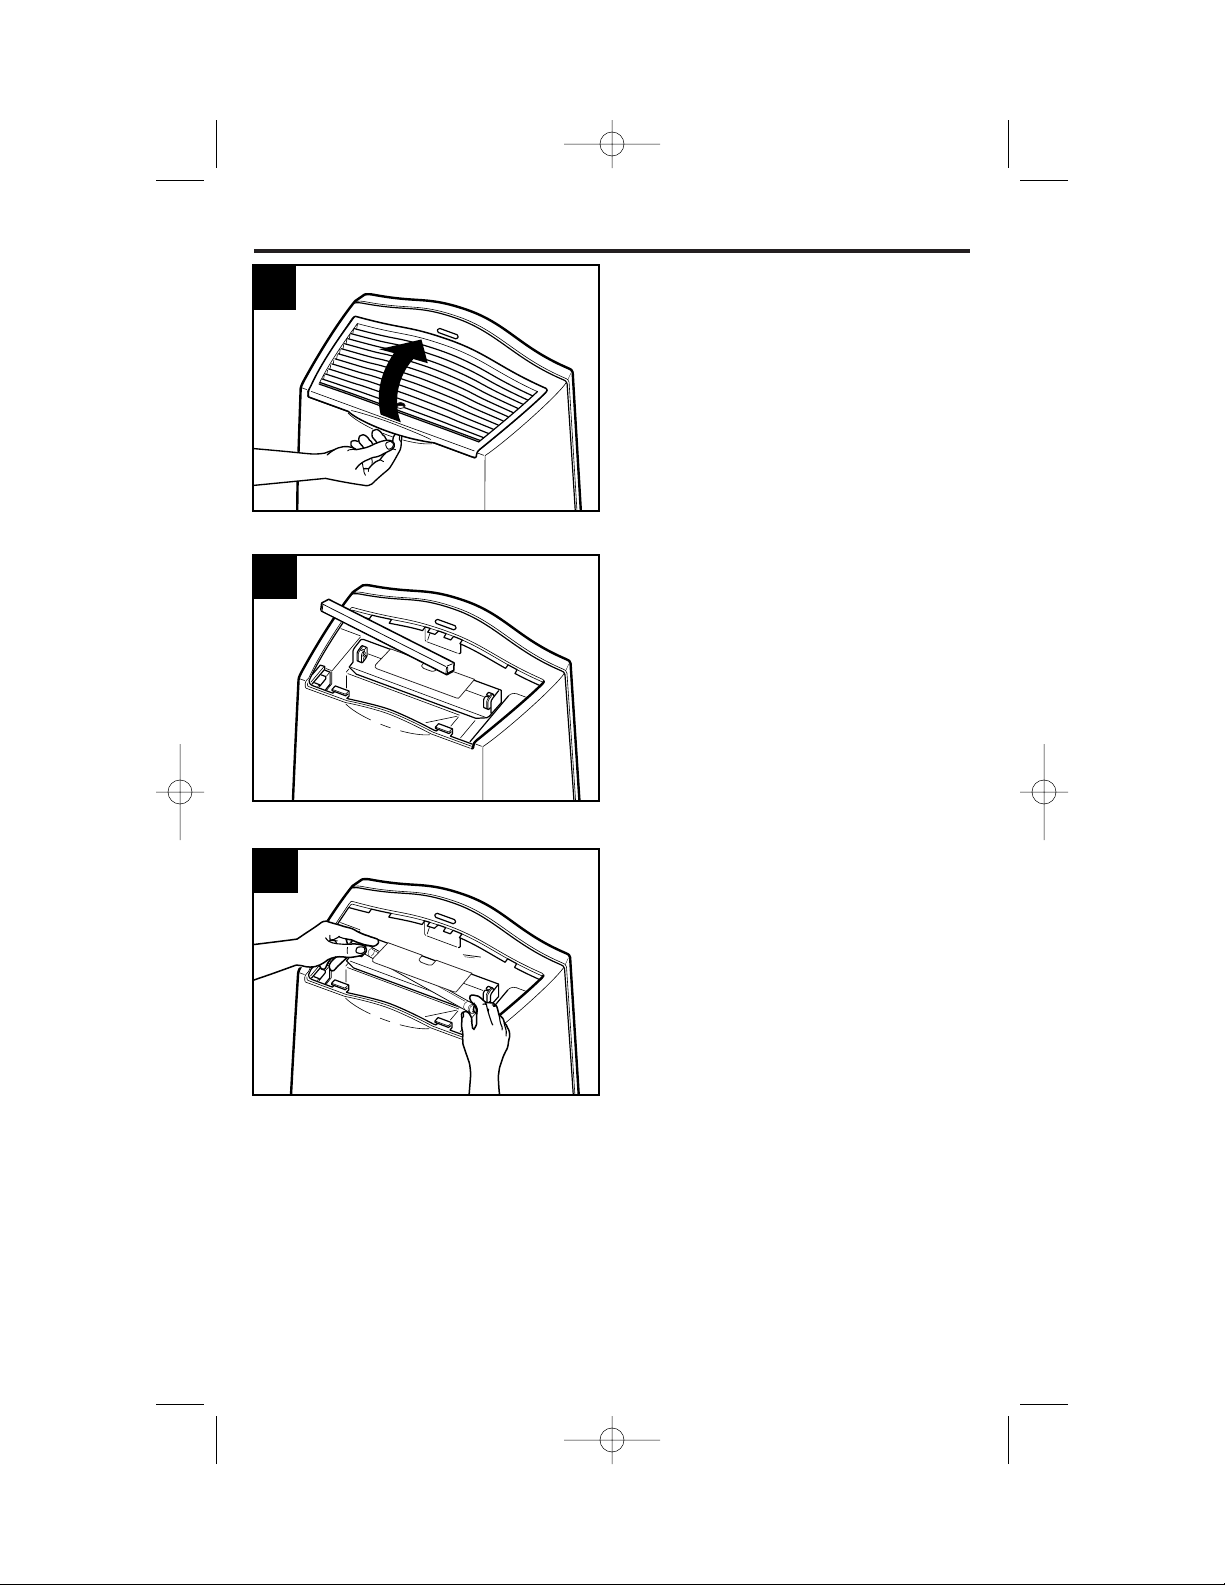
Installing the UV Bulb
Open and remove the outlet grille
by pulling up on the handle on the
upper back of the air purifier.
Remove the packaged UV bulb from
inside the air purifier. Be careful not to
touch the glass part of bulb. Handle
by metal ends only. Oil from fingertips
on the glass bulb will shorten the life of
the bulb. Carefully unpack the bulb and
discard the packaging.
NOTE: Make sure no loose packing
material remains inside the air purifier.
Make sure the unit is unplugged.
Starting with one end of the bulb, then
the other, gently insert the metal pins
on the bulb into the white slotted socket
one pin at a time.
NOTE: Only one pin will fit in the socket
at a time. DO NOT force the pins into
the socket—you could break the bulb.
1
2
3
840115900 ENv00.qxd 6/6/03 9:03 AM Page 8
Page 9
9
Once the ends of the bulb are
completely inserted into the socket,
rotate the bulb a quarter turn until it
locks into place.
Insert the two center tabs on the front
of the outlet grille into the middle slots
on the front of the opening. Pivot the
grille down toward the back of the air
purifier.
Press lightly down on the back
corners of the outlet grille to snap
it into place.
NOTE: The air purifier has a safety
switch that prevents operation when
the top outlet grille is not properly
installed. DO NOT attempt to override
or disable this safety switch. See the
Germicidal Light Hazard Warning on
page 3.
Installing the UV Bulb (continued)
4
5
6
840115900 ENv00.qxd 6/6/03 9:03 AM Page 9
Page 10
10
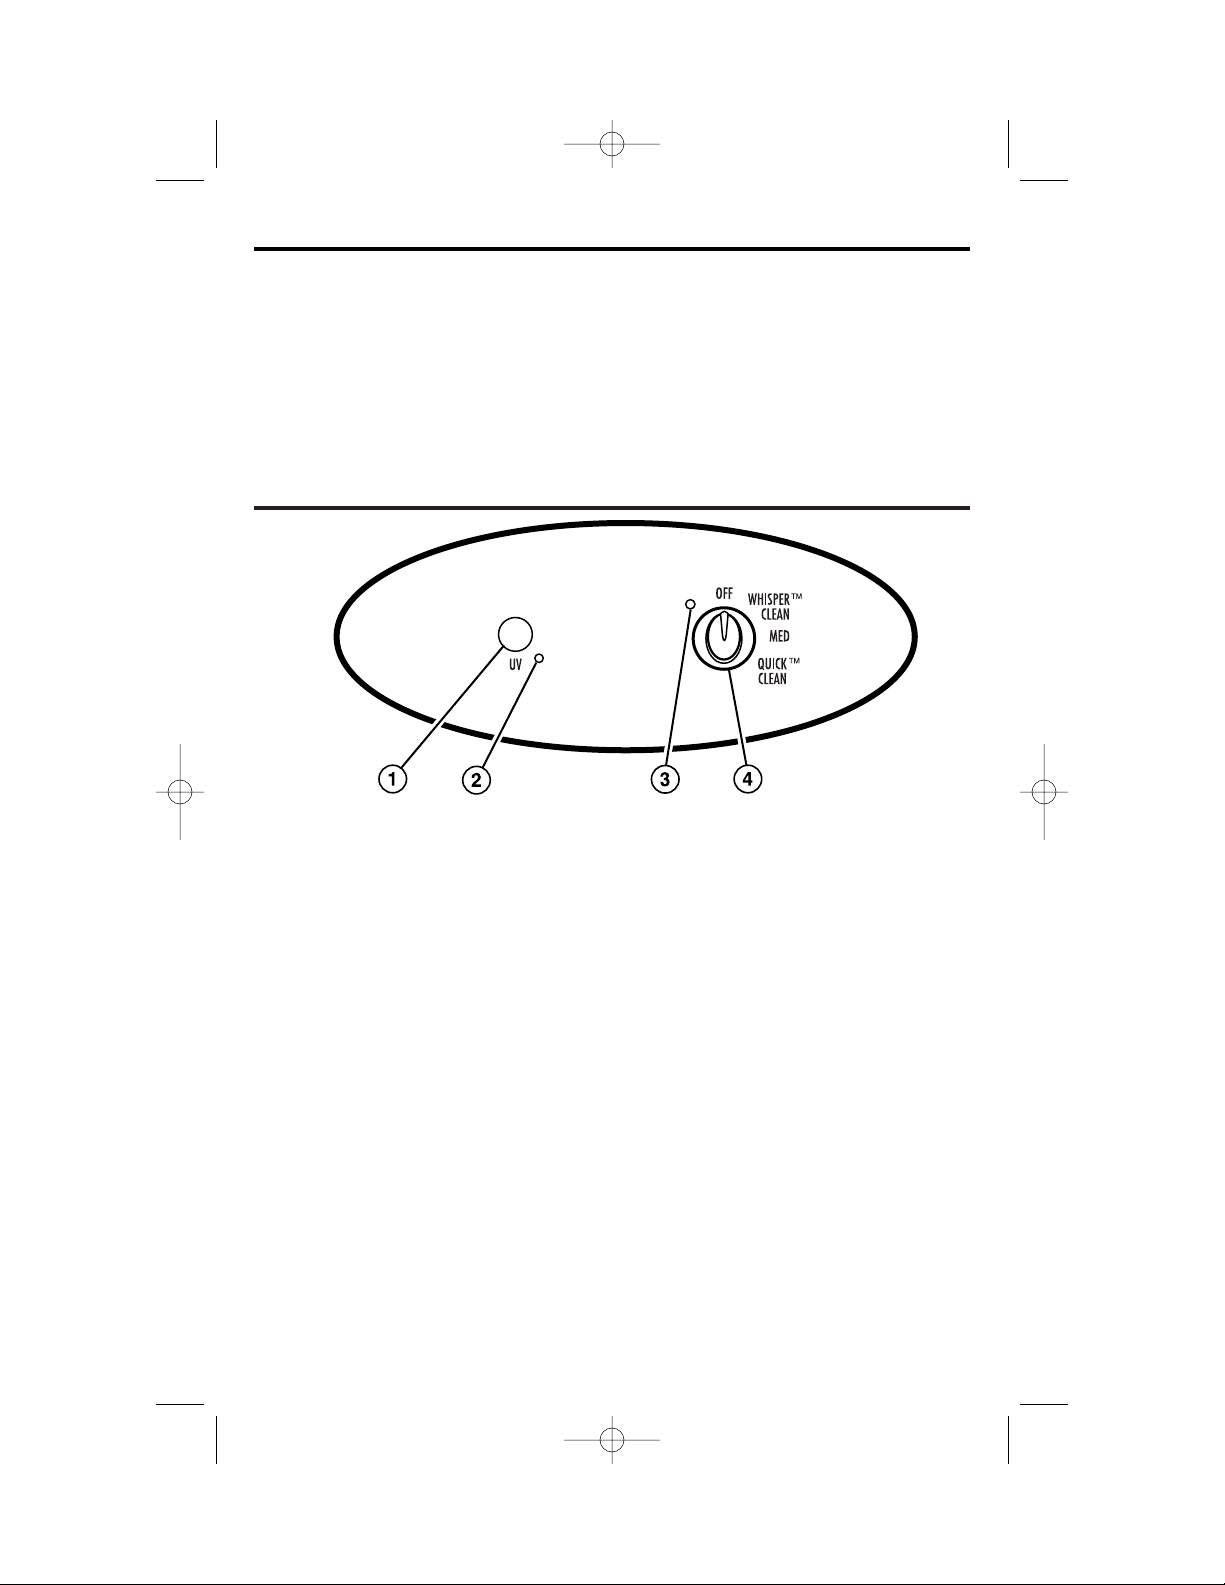
Setting the Controls –
Manual Control Models
1. Germicidal UV Button – Turns on
the germicidal UV lamp to reduce
harmful bacteria from the filtered air.
When this button is on, a bluish glow
should be visible through the UV
bulb check window on the top of
the unit.
NOTE: The light will not come on if
the fan is turned off.
2. UV “On” Indicator – Lights when
the germicidal UV lamp is on.
3. Power On Indicator – Lights when
unit is on.
Plugging in the Air Purifier
WARNING: To reduce the risk of
electrical shock, never plug in the air
purifier while your hands are wet.
Always unplug the air purifier before
moving or servicing the unit.
NOTE: The polarized plug will only
fit in one direction—DO NOT try
to force the plug. If you are unable to
insert the plug into the outlet, try
reversing the plug. If the plug still does
not fit, contact a qualified electrician to
replace the obsolete outlet.
4. Fan Speed Knob – Turn the fan
speed knob to the desired setting.
There are four settings:
• Off
• WhisperClean™– Use for quiet,
nighttime operation or for constant
low-speed filtration.
• Medium – Provides a higher fan
speed; use for quickly filtering
dust, pollen, smoke, etc. from a
room.
• QuickClean™– Provides cleaning
during acute needs.
840115900 ENv00.qxd 6/6/03 9:03 AM Page 10
Page 11
11
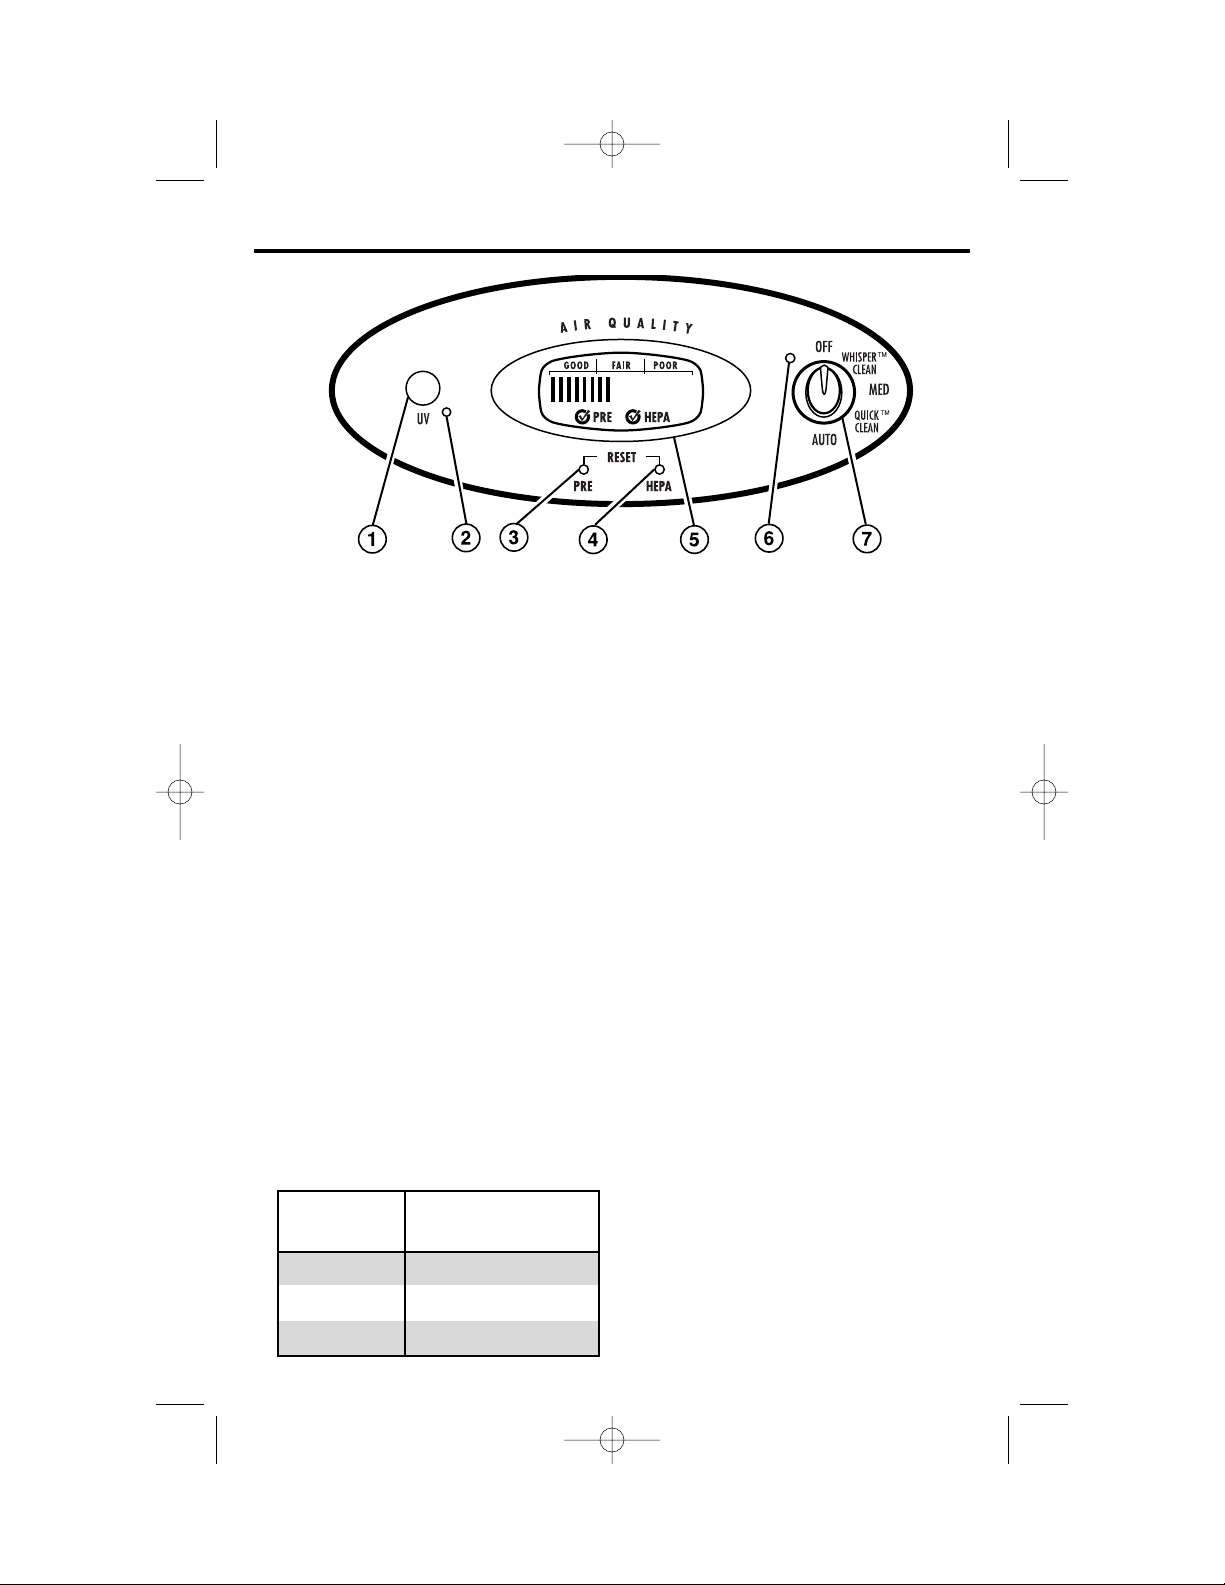
Setting the Controls – AirSmart
™
Models
1. Germicidal UV Button – Turns on
the germicidal UV lamp to reduce
harmful bacteria from the filtered air.
When this button is on, a bluish glow
should be visible through the viewing
window on the top of the unit.
NOTE: The light will not come on if
the fan is turned off.
2. UV “On” Indicator – Lights when
the germicidal UV lamp is on.
3. Pre-Filter Timer Reset Button
4. HEPA Filter Timer Reset Button
5. AirSmart™Display – When the air
purifier is first turned on, the
AirSmart™sensor will analyze the air
to determine the current air quality.
A bar will move back and forth
across the display panel until the air
quality is determined. This will take
about one minute. The sensor will
then continue to monitor and show
the air quality (poor, fair, or good) in
a bar graph in the display. If the fan
is set to Auto, the sensor automatically adjusts the fan speed for the
most effective air purification.
The Display also has check marks
that will appear to indicate that it is
time to check the carbon pre-filter or
HEPA filter. See “Checking the
Filters” on page 13. Once the filters
have been checked, and if necessary, replaced, press the recessed
RESET button with the end of a pen,
toothpick, or small nail. This will
reset the “timer-like” control.
6. Power On Indicator – Lights when
unit is on.
7. Fan Speed Knob – Turn the fan
speed knob to the desired setting.
There are five settings:
• Off
• WhisperClean™– Use for quiet,
nighttime operation or for constant
low-speed filtration.
• Medium – Provides a higher fan
speed; use to quickly filter dust,
pollen, smoke, etc., from a room.
• QuickClean™– Provides cleaning
during acute needs.
• Auto – Functions with the
AirSmart™sensor and automatically
selects the fan speed depending
on the air quality detected. This
is the normal setting for
continuous use.
AIR
QUALITY
Poor
Fair
Good
AUTO SELECTED
FAN SPEED
QuickClean
™
Medium
WhisperClean
™
840115900 ENv00.qxd 6/6/03 9:03 AM Page 11
Page 12

12
How to Clean
Your air purifier is designed to provide years of trouble-free service with
minimal maintenance. The following instructions will help you maximize the life
and efficiency of your air purifier.
Cleaning the Air Purifier
• Wipe the enclosure, control panel,
and cord with a damp cloth or
sponge.
• The intake grille can be removed
and washed in warm, soapy water.
Do not place in dishwasher. Make
sure the grille is completely dry
before reinstalling.
• The outlet grille should simply be
dusted. It should not be immersed
in water.
• No part of the air purifier should be
placed in a dishwasher.
Cleaning the AirSmart
™
Sensor
On models equipped with the
AirSmart™sensor, it is recommended
to clean the sensor monthly.
1. Remove the air sensor cleaner from
the storage compartment behind the
intake grille (see item 8, page 5).
2. The sensor is located on the side of
the unit. Open
the sensor
compartment
(as illustrated),
then place
the air sensor
cleaner into
the sensor
opening.
3. Push the air sensor cleaner in and
out of the sensor opening several
times to clean the sensor lens.
4. Close the sensor compartment and
put the air sensor cleaner back in the
storage compartment. Replace the
intake grille. Make sure the sensor
door is fully closed. If it is not, the
sensor may not operate properly.
wWARNING
To reduce risk of electric shock:
• Always unplug before cleaning.
• Do not immerse in water or other liquid.
Sensor
840115900 ENv00.qxd 6/6/03 9:03 AM Page 12
Page 13

13
Insert either end of the filter check
gauge into the recessed hole on the
top of outlet grille. Turn the fan on
QuickClean.
™
The colored cylinder should float up
the filter check gauge. If it does not
move from the bottom of the gauge,
the filter(s) are clogged and need to be
replaced.
Checking the Filters
A special filter check gauge is included
with your air purifier to allow you to
check the condition of the filters. It is
stored in a compartment behind the
front intake grille. See item 7 on page
5 for location.
The HEPA filter should last approxi-
mately 12 months with continuous
use, less in areas with a high level
of airborne particles such as dust
or pollen.
The carbon pre-filter will last
approximately three months.
NOTE: You must reinstall and snap
the intake grille before checking the
filters with the gauge. The air purifier
will not operate if the grille is not in
place.
Filter(s) OK
Replace
Filter(s)
1
2
840115900 ENv00.qxd 6/6/03 9:03 AM Page 13
Page 14

14
Replacing the HEPA Filter
The HEPA filter will normally last about
12 months before it must be replaced,
or approximately every fourth time the
carbon pre-filter is replaced.
If the filter check gauge indicates that
the filter requires replacement, it is
recommended that you first replace
the carbon pre-filter and then use the
filter check gauge to check the filter
again. If the colored cylinder still does
not float up the gauge, the HEPA filter
must also be replaced.
Turn off and unplug air purifier. Remove
the used HEPA filter by gripping the
sides and pulling outward, as shown.
Discard the used filter. It cannot be
cleaned.
Obtain a replacement HEPA filter.
Insert the unwrapped HEPA filter, hook
fastener side out, into the air purifier.
NOTE: Improper filter installation will
result in poor air filtration.
1
2
840115900 ENv00.qxd 6/6/03 9:03 AM Page 14
Page 15

15
Replacing the UV Bulb
The UV bulb is designed to provide
approximately one year of continuous,
effective operation. After this time, the
bulb may remain illuminated, but its
effectiveness is greatly reduced.
For maximum germicidal protection,
replace the UV bulb when replacing
the HEPA filter, or if the UV bulb
check window does not glow when
the UV switch is on. The UV replacement bulb cannot be purchased in
stores. Replacement bulbs may be
available where the air purifier was
purchased or can be obtained directly
from Hamilton Beach.
To Remove the UV Bulb:
Turn off and unplug the air purifier.
Open and remove the outlet grille by
pulling upon the handle on the upper
back of the air purifier.
Gently rotate the bulb a quarter turn in
either direction until it unlocks from the
socket. Pull the pins out the sides of
the socket, one end at a time.
To Install the New UV Bulb:
Refer to steps 3 through 6 on pages
8 and 9 to install the new UV bulb.
Be sure to discard the old UV bulb in
a safe and responsible manner in
accordance with any applicable local,
state, and federal regulations.
If the UV bulb check window still does
not glow, replace the starter.
Remember, oils from fingertips will
shorten the life of the bulb. Do not
touch the glass part of the bulb.
1
2
840115900 ENv00.qxd 6/6/03 9:03 AM Page 15
Page 16

16
If the UV bulb does not light after
installing a new bulb, the starter
should be replaced. See page 4
for replacement parts.
Turn off and unplug air purifier.
Remove the intake grille and filters.
The starter is the small cylinder-shaped
part located behind the filter.
Turn the starter counterclockwise until
it unlocks, then pull it out. To install the
new starter, insert the starter and turn
clockwise. Replace filters and intake
grille.
Replacing the UV Starter
1
2
Starter
840115900 ENv00.qxd 6/6/03 9:03 AM Page 16
Page 17

17
Reduced Air Flow or Poor Filtering
• The intake or outlet grille may be
blocked. Make sure nothing is in
front of or on top of the air purifier.
• The carbon pre-filter or the HEPA
filter may be clogged. Check the
filters with the filter gauge and
replace them, if necessary.
Germicidal UV Bulb Does Not Light
• Is the UV switch turned on?
• Is the fan running? The UV bulb will
not work unless the fan is on.
• The bulb may be burned out.
See “Replacing the UV Bulb” for
replacement instructions.
• The UV starter may need replacement.
See “Replacing the UV Starter” for
replacement instructions.
Troubleshooting Guide
The following section provides the solutions to many common problems and
questions. If your air purifier is not working correctly, review these solutions
first. If your problem is still not solved after reviewing this guide, call our toll-free
customer service number, listed on the front cover of this manual, for assistance.
The Air Purifier Will Not Turn On
• Are the intake grille and the outlet
grille installed and locked into place?
• Is the air purifier plugged into a
powered outlet?
• Is the fan speed knob turned on?
The Air Purifier Changes Speed
• AirSmart™models are designed to
sense the level of contaminants in the
air and adjust the fan speed to provide
the most effective air purification
possible. If the AirSmart™control is
set to Auto, it will automatically
change fan speeds to adjust for
changing air quality.
840115900 ENv00.qxd 6/6/03 9:03 AM Page 17
Page 18

18
Customer Service
If you have a question about your air purifier, call our toll-free customer service
number. Before calling, please note the model, type, and series numbers and fill
in that information below. These numbers can be found on the back of the air
purifier. This information will help us answer your question much more quickly.
MODEL: ______________ TYPE: _______________ SERIES: _________________
www.trueair.com
6/03
840115900
H
AMILTON
BEACH PROCTOR-SILEX,INC.
P
ROCTOR-SILEX CANADA,INC.
263 Yadkin Road
Southern Pines, NC 28387
Picton, Ontario K0K 2T0
LIMITED WARRANTY
This product is warranted to be free from defects in material and workmanship for a
period of one (1) year from the date of original purchase, except as noted below. During
this period, we will repair or replace this product, at our option, at no cost. THE
FOREGOING WARRANTY IS IN LIEU OF ANY OTHER WARRANTY, WHETHER
EXPRESS OR IMPLIED, WRITTEN OR ORAL INCLUDING ANY WARRANTY OF
MERCHANTABILITY OR FITNESS FOR A PARTICULAR PURPOSE. ANY LIABILITY IS
EXPRESSLY LIMITED TO AN AMOUNT EQUAL TO THE PURCHASE PRICE PAID, AND
ALL CLAIMS FOR SPECIAL, INCIDENTAL AND CONSEQUENTIAL DAMAGES ARE
HEREBY EXCLUDED. There is no warranty with respect to the following, which may be
supplied with this product: carbon pre-filter, HEPA filter, UV germicidal bulb, or starter.
This warranty extends only to the original consumer purchaser and does not cover a
defect resulting from abuse, misuse, neglect, use for commercial purposes, or any use
not in conformity with the printed directions. This warranty gives you specific legal rights,
and you may also have other legal rights which vary from state to state, or province to
province. Some states or provinces do not allow limitations on implied warranties or
special, incidental or consequential damages, so the foregoing limitations may not apply
to you.
If you have a claim under this warranty, DO NOT RETURN THE APPLIANCE TO THE
STORE! Please call our CUSTOMER SERVICE NUMBER. (For faster service please have
model, series, and type numbers ready for operator to assist you.)
CUSTOMER SERVICE NUMBERS
In the U.S. 1-800-851-8900
In Canada 1-800-267-2826
Web site address: www.trueair.com
KEEP THESE NUMBERS FOR FUTURE REFERENCE!
840115900 ENv00.qxd 6/6/03 9:03 AM Page 18
Page 19

Épurateur d’air
840115900
Securité de l’épurateur d’air............ 2
Nomenclature de l’épurateur d’air.... 5
Assemblage et fonctionnement .... 6
Nettoyage...................................... 12
Dépannage.................................... 17
Service aux clients........................ 18
Aux É.-U. : 1-800-851-8900
Au Canada : 1-800-267-2826
840115900 FR v00.qxd 6/6/03 10:20 AM Page 1
Page 20

2
IMPORTANTES INSTRUCTIONS
CONSERVER CES INSTRUCTIONS!
Sécurité de l’épurateur d’air
1. Lire toutes les instructions avant d’utiliser
cet épurateur d’air. Conserver ces
instructions pour référence ultérieure.
2. L’exposition directe des yeux aux rayons
ultraviolets peut causer des réactions
adverses temporaires ou chroniques
de la vue.
3. Ne pas immerger ce produit dans l’eau ni
l’asperger d’eau. Un court-circuit risque
de causer un choc ou un incendie.
4. Ne pas toucher à la fiche de branchement
avec des mains mouillées; un choc
électrique risque de se produire et peut
causer une blessure ou la mort.
5. Ne jamais tenter de démonter ou de
modifier le produit d’une manière qui ne
soit pas mentionnée dans ce manuel. Un
choc, un incendie ou une blessure peut
en résulter. Communiquer avec Hamilton
Beach au 1-800-851-8900 pour de l’aide.
6. Ne pas placer le visage directement
contre la grille de sortie ni regarder dans
la lumière ultraviolette.
7. Ne pas faire fonctionner ce produit dans
un environnement graisseux tel que la
cuisine. Ce produit n’est pas conçu pour
filtrer l’huile ou la graisse de l’air.
8. Ne pas faire fonctionner ce produit près
d’une flamme nue. Il peut s’enflammer et
causer un incendie, des blessures ou des
dommages matériels.
9. Ne pas faire fonctionner ce produit dans
un garage ou un autre endroit en
présence d’huile, de produits chimiques
tels que les solvants ou les insecticides.
10. Débrancher toujours le cordon
d’alimentation de la prise lorsque
l’épurateur d’air n’est pas utilisé, avant
le nettoyage, le remplacement de
pièces ou avant de le déménager à un
autre endroit.
11. N’introduire aucun corps étranger dans
le produit pour quelque raison que ce
soit. Des blessures ou dommages
matériels peuvent se produire.
12. Ne pas utiliser ce produit à l’extérieur.
Il est conçu pour utilisation à l’intérieur
seulement.
13. Ne pas faire fonctionner cet appareil
sans que la grille de sortie ne soit en
place ou si la grille de sortie est brisée
ou endommagée.
14. Cet épurateur d’air est doté de
commutateurs de protection qui
éteignent l’appareil si les grilles d’entrée
ou de sortie sont enlevées. NE PAS
tenter de contourner ou de désactiver
cette caractéristique de sécurité.
15. AVERTISSEMENT : Pour réduire le
risque d’incendie ou de choc électrique,
ne pas utiliser cet épurateur d’air avec
un dispositif de contrôle de vitesse
transistorisé.
LIRE ET CONSERVER CES INSTRUCTIONS.
Pour réduire le risque d’incendie, de choc électrique, de blessure ou de dommage
matériel, suivre les instructions suivantes attentivement. Lors de l’utilisation d’appareils
électroménagers, des précautions préliminaires de sécurité doivent être observées,
y compris ce qui suit :
840115900 FR v00.qxd 6/6/03 10:20 AM Page 2
Page 21

3
Renseignements de sécurité aux consommateurs
Cet appareil est destiné à un usage
domestique uniquement.
Cet appareil est muni d’une fiche
polarisée. Ce type de fiche présente
une broche plus large que l’autre. La
fiche peut être introduite dans une prise
que dans un sens seulement. Il s’agit
d’une caractéristique de sécurité visant
à réduire le risque de choc électrique.
Si la fiche ne peut pas être insérée
dans la prise, la tourner dans l’autre
sens. Si elle ne peut toujours pas être
insérée dans la prise, contacter un
électricien pour qu’il remplace la prise
désuète. Ne pas essayer de contourner
l’objectif de sécurité de la fiche
polarisée en la modifiant de quelque
manière que ce soit.
Si un cordon plus long est nécessaire,
utiliser une rallonge appropriée. Le
calibrage de la rallonge doit être le
même que celui de l’appareil ou
supérieur. Lorsqu’on utilise une
rallonge, s’assurer qu’elle ne traverse
pas la zone de travail, que des enfants
ne puissent pas tirer dessus par
inadvertance et qu’on ne puisse pas
trébucher dessus. Acheminer le cordon
d’alimentation ou la rallonge à l’écart
des meubles pour éviter de coincer
le cordon ou la rallonge et de
l’endommager.
wAVERTISSEMENT
Risque de radiation par la lumière germicide
• Ne jamais faire fonctionner avec des lames de grille de sortie endommagées,
brisées ou manquantes ou en l’absence de la grille de sortie.
• Ne jamais faire fonctionner avec un boîtier endommagé, brisé ou fissuré.
• Toujours débrancher l’unité avant le nettoyage, la réparation ou le
remplacement de l’ampoule UV.
• Ne jamais regarder directement l’ampoule UV ni placer directement le
visage contre la grille de sortie.
• Utiliser seulement l’ampoule UV de rechange Hamilton-Beach no de pièce
04810.
• Lire toutes les instructions avant l’utilisation.
Le non-respect de ces instructions peut causer une exposition directe à la
lumière germicide, ce qui peut causer des troubles temporaires ou
chroniques de la vue ou même la cécité.
840115900 FR v00.qxd 6/6/03 10:20 AM Page 3
Page 22

4
Modèle Type de Superficie de Préfiltre à Filtre Ampoule Démarreur
d’épurateur contrôle la pièce* (pi
2
) charbon HEPA UV Type FS-5 ou FS-22
04160 Manuel 200 pi
2
04922 04912 04810 904004100
04161 AirSmart
™
200 pi
2
04922 04912 04810 904004100
04162 Manuel 350 pi
2
04923 04913 04810 904004100
04163 AirSmart
™
350 pi
2
04923 04913 04810 904004100
À propos de votre épurateur d’air
L’épurateur d’air fonctionne comme
purificateur d’air en contribuant à
désinfecter les bactéries en suspension
dans l’air et en éliminant les particules
de l’air.
L’air est nettoyé en trois étapes :
1. Un ventilateur aspire l’air à travers la
grille d’entrée à l’avant de l’épurateur
d’air. L’air traverse alors le préfiltre
à charbon qui retient les grosses
particules de poussière et réduit
les odeurs.
2. Le filtre HEPA blanc enlève alors les
particules aussi petites que 0,3
micron de l’air à un taux d’efficacité
de 99,97 %.
3. L’air propre est alors exposé aux
rayons ultraviolets germicides pour
réduire le niveau de bactéries en
suspension en l’air, les moisissures
et les virus. L’air purifié est ensuite
expulsé par la grille de sortie sur le
dessus de l’appareil.
* Chaque épurateur d’air est conçu pour filtrer l’air de la pièce cinq fois par heure
à haute vitesse. Les facteurs tels que la forme de la pièce et la hauteur du
plafond peuvent affecter ce rendement. Il est normal que le débit d’air soit réduit
au fur et à mesure que les filtres deviennent encrassés. Voir « Vérification des
filtres » à la page 13 pour plus de renseignements.
Commande de pièces de rechange
Il est possible que des ampoules de rechange soient disponibles là où l’épurateur
d’air a été acheté ou on peut les obtenir directement de Hamilton Beach.
840115900 FR v00.qxd 6/6/03 10:20 AM Page 4
Page 23

5
Nomenclature de l’épurateur d’air
Pièces et caractéristiques
1. Grille de sortie
2. Ampoule ultraviolette (UV)
3. Tableau de commande
4. Capteur AirSmart™*
5. Démarreur UV
6. Fenêtre de vérification de l’ampoule UV
(non illustré - voir page 8 pour
l'emplacement)
7. Jauge de vérification du filtre
8. Nettoyeur du capteur d’air*
9. Filtre HEPA
10. Préfiltre à charbon
11. Grille d’entrée
* Disponible sur les modèles AirSmart™
seulement. Les modèles à commande
manuelle ne comportent pas ces
caractéristiques.
840115900 FR v00.qxd 6/6/03 10:20 AM Page 5
Page 24

6
Assemblage et fonctionnement
IMPORTANT : Votre épurateur d’air Hamilton Beach est conçu pour une utilisation
et un entretien faciles. S’assurer que l’ampoule UV, le filtre HEPA et le préfiltre à
charbon sont bien installés avant l’utilisation.
Choix du bon endroit
Pour prévenir le risque de blessures ou d’endommagement de l’épurateur d’air
et obtenir le meilleur rendement possible de l’appareil, suivre les directives
d’emplacement ci-dessous :
À ÉVITER :
• Ne pas monter, s’asseoir ou placer
des objets
sur l’épurateur d’air.
Il n’est pas
conçu pour
supporter
un poids
additionnel.
• Ne pas obstruer la prise d’air et les
grilles de sortie avec des tentures,
rideaux ou des stores. Ceci risque
de réduire la performance.
• Ne pas utiliser dans une cuisine, un
garage ou un endroit où il y a de la
graisse, de l’huile ou des produits
chimiques tels que les solvants ou
les insecticides.
• Ne pas placer l’appareil sur ou
près des sources de chaleurs telles
que les cuisinières, radiateurs ou
chaufferettes ou en plein soleil.
• Pour réduire les parasites d’origine
électrique et l’interférence, ne pas
placer sur ou à proximité de
téléviseurs, appareils de surveillance
des bébés ou téléphones cellulaires
ni le brancher dans la même prise.
À FAIRE :
• Placer l’épurateur d’air sur une surface
plane et
stable.
• Placer l’épurateur d’air près d’une
prise où il ne constitue pas une
obstruction. Veiller à ce que
l’épurateur d’air et le cordon ne
présentent pas de risque de
trébuchement.
• Choisir un emplacement central
bénéficiant d’une circulation d’air
adéquate.
• Éteindre et débrancher l’épurateur
d’air avant de le déplacer ou d’en
faire l’entretien, ou s’il ne sera pas
utilisé pendant plusieurs jours.
• Acheminer le cordon d’alimentation
ou la rallonge à l’écart des meubles
pour éviter de coincer le cordon ou
la rallonge et de l’endommager.
Avant la première utilisation
Veiller à enlever tous les matériaux
d’emballage. Les filtres et l’ampoule
UV sont emballés dans des sacs de
plastique d’expédition à l’intérieur de
l’épurateur d’air. Voir les pages 7 à 9
pour le déballage et les instructions
d’installation.
840115900 FR v00.qxd 6/6/03 10:20 AM Page 6
Page 25

7
REMARQUE : Le préfiltre à charbon
devrait être remplacé environ tous les
trois mois.
Retirer la grille d’entrée d’air en
écartant soigneusement les deux
onglets latéraux supérieurs du boîtier
de l’épurateur d’air et en soulevant.
Déplier et aplatir le préfiltre à charbon
noir. Fixer les quatre coins du préfiltre
aux quatre crochets sur le filtre HEPA.
Localiser le préfiltre à charbon noir.
Il sera plié à l’intérieur d’un sac en
plastique. Sortir le préfiltre à charbon
du sac et jeter le sac.
Installation du préfiltre à charbon
Insérer les deux onglets du bas de la grille
d’entrée d’air dans les trous sur le bord
inférieur de l’épurateur d’air. Faire pivoter
la grille d’entrée d’air en place et appuyer
légèrement sur les coins supérieurs de
la grille pour la bloquer en place.
REMARQUE : L’épurateur d’air
comporte un commutateur de protection
empêchant le fonctionnement si la grille
d’entrée d’air n’est pas bien installée.
NE PAS tenter de contourner ou de
désactiver ce commutateur de protection.
1
2
3
4
840115900 FR v00.qxd 6/6/03 10:20 AM Page 7
Page 26

8
Installation de l’ampoule UV
Ouvrir et retirer la grille de sortie en
tirant sur la poignée à la partie arrière
supérieure de l’épurateur d’air.
Retirer l’ampoule UV emballée de
l’intérieur de l’épurateur d’air. Veiller à
ne pas toucher la partie en verre de
l’ampoule. Ne la manipuler que par les
extrémités métalliques. L’huile du bout
des doigts déposée sur l’ampoule de
verre réduira la vie utile de l’ampoule.
Déballer soigneusement l’ampoule et
jeter l’emballage.
REMARQUE : Veiller à ce qu’il ne
reste pas de matériel d’emballage à
l’intérieur de l’épurateur d’air.
S’assurer que l’appareil est débranché.
En commençant par une extrémité de
l’ampoule, puis par l’autre, insérer
doucement les broches métalliques
de l’ampoule dans la prise blanche
perforée, une broche à la fois.
REMARQUE: Une seule broche
entrera dans la prise à la fois. NE PAS
forcer les broches dans la prise – il
y a risque de briser l’ampoule.
1
2
3
840115900 FR v00.qxd 6/6/03 10:20 AM Page 8
Page 27

9
Une fois que les extrémités de
l’ampoule sont complètement insérées
dans la prise, faire tourner l’ampoule
un quart de tour jusqu’à ce qu’elle se
verrouille en place.
Insérer les deux onglets centraux à
l’avant de la grille de sortie dans les
deux fentes du milieu à l’avant de
l’ouverture. Faire pivoter la grille vers le
bas et l’arrière de l’épurateur d’air.
Appuyer légèrement sur les coins
arrière de la grille de sortie pour
l’enclencher en place.
REMARQUE : L’épurateur d’air
comporte un commutateur de protection
empêchant le fonctionnement lorsque
la grille de sortie supérieure n’est pas
bien installée. NE PAS tenter de
contourner ou de désactiver ce
commutateur de protection. Voir
l’avertissement du risque de lumière
germicide à la page 3.
Installation de l’ampoule UV (suite)
4
5
6
840115900 FR v00.qxd 6/6/03 10:20 AM Page 9
Page 28

10
Réglage des commandes –
modèles à commande manuelle
1. Bouton UV germicide – Allume la
lampe UV germicide pour réduire
les bactéries nuisibles de l’air filtré.
Lorsque ce bouton est activé, une
lueur bleuâtre devrait être visible
dans la fenêtre de vérification de
l’ampoule UV sur le dessus de
l’appareil.
REMARQUE : La lampe ne s’allumera
pas si le ventilateur est éteint.
2. Indicateur UV « en marche » – Brille
lorsque la lampe UV germicide est
allumée.
3. Indicateur d’alimentation – Brille
lorsque l’appareil est allumé.
Branchement de l’épurateur d’air
AVERTISSEMENT : Pour réduire le
risque de choc électrique, ne jamais
brancher l’épurateur d’air avec
des mains mouillées. Toujours
débrancher l’épurateur d’air avant de
le déplacer ou d’en faire l’entretien.
REMARQUE : La fiche polarisée ne
peut être branchée que dans une
direction – NE PAS tenter de forcer
la fiche. Si la fiche ne peut pas être
insérée dans la prise, la tourner dans
l’autre sens. Si elle ne peut toujours
pas être insérée dans la prise, contacter
un électricien pour qu’il remplace la
prise désuète.
4. Bouton de réglage de vitesse du
ventilateur – Tourner le bouton de
réglage de vitesse du ventilateur au
réglage désiré. Il y a quatre
réglages :
• Off (arrêt)
• WhisperCleanTM– L’utiliser pour un
fonctionnement silencieux
la nuit ou pour une filtration
constante à faible vitesse.
• Med – Permet une vitesse de
ventilation plus élevée; l’utiliser
pour filtrer rapidement la poussière,
le pollen, la fumée, etc. d’une
pièce.
• QuickCleanTM– Permet le
nettoyage en cas de besoins
pressants.
840115900 FR v00.qxd 6/6/03 10:20 AM Page 10
Page 29

11
Réglage des commandes – modèles AirSmart™
1. Bouton UV germicide – Allume la
lampe UV germicide pour réduire les
bactéries nuisibles de l’air filtré.
Lorsque ce bouton est activé, une
lueur bleuâtre devrait être visible dans
la fenêtre de vérification de l’ampoule
UV sur le dessus de l’appareil.
REMARQUE : La lampe ne s’allumera
pas si le ventilateur est éteint.
2. Indicateur UV « en marche » –
Brille lorsque la lampe UV germicide
est allumée.
3. Bouton de remise à zéro de la
minuterie du préfiltre
4. Bouton de remise à zéro de la
minuterie du filtre HEPA
5. Affichage AirSmart™– Lors de la mise
en marche initiale, le capteur AirSmart
™
analyse l’air pour déterminer la qualité
courante de l’air. Une barre effectuera
un va-et-vient sur l’affichage jusqu’à
ce que la qualité de l’air soit
déterminée. Cette opération prendra
environ une minute. Le capteur
continuera ensuite de surveiller et de
montrer la qualité de l’air (mauvaise,
acceptable, ou bonne) dans un
graphique à barres sur l’affichage.
Si le ventilateur est réglé à Auto, le
capteur règle automatiquement la
vitesse du ventilateur pour la
purification d’air la plus efficace :
L’affichage comporte également
des coches qui apparaîtront pour
indiquer qu’il est temps de vérifier le
préfiltre à charbon ou le filtre HEPA.
Voir « Vérification des filtres » à la
page 13. Une fois que les filtres ont
été vérifiés, et si nécessaire,
remplacés, appuyer sur le bouton
RESET en retrait avec le bout d’un
stylo, un cure-dents ou un petit clou.
Cette opération remettra à zéro la
commande de type « minuterie ».
6. Indicateur d’alimentation – Brille
lorsque l’appareil est allumé.
7. Bouton de vitesse du ventilateur –
Tourner le bouton de réglage de
vitesse du ventilateur au réglage
désiré. Il y a quatre réglages :
• Off (arrêt)
• WhisperClean
™
– L’utiliser pour un
fonctionnement silencieux la nuit
ou pour une filtration constante à
faible vitesse.
• Med – Permet une vitesse de
ventilation plus élevée; l’utiliser
pour filtrer rapidement la poussière,
le pollen, la fumée, etc. d’une pièce.
• QuickClean
™
– Permet le nettoyage
en cas de besoins pressants.
• Auto – Fonctionne avec le capteur
AirSmart™et sélectionne automatiquement la vitesse du ventilateur
en fonction de la qualité de l’air
détectée. Il s’agit du réglage
normal pour l’utilisation continue.
QUALITÉ
DE L’AIR
Mauvaise
Acceptable
Bonne
VITESSE DE VENTILATEUR
CHOISIE AUTOMATIQUEMENT
QuickClean
™
Medium
WhisperClean
™
840115900 FR v00.qxd 6/6/03 10:20 AM Page 11
Page 30

12
Nettoyage
L’épurateur d’air est conçu pour procurer des années de service sans problème
avec un minimum d’entretien. Les instructions suivantes vous aideront à
maximiser la vie et l’efficacité de votre épurateur d’air.
Nettoyage de l’épurateur d’air
• Essuyer le boîtier, le panneau de
commande et le cordon avec un linge
ou une éponge humide.
• Il est possible d’enlever la grille
d’entrée et de la laver dans de l’eau
tiède savonneuse. Ne pas la placer
dans le lave-vaisselle. S’assurer que
la grille est complètement sèche
avant de la réinstaller.
• La grille de sortie devrait être
simplement époussetée. Elle ne
doit pas être immergée dans l’eau.
• Aucune pièce de l’épurateur d’air
ne devrait être placée dans un
lave-vaisselle.
Nettoyage du capteur AirSmart
TM
Sur les modèles dotés du capteur
AirSmartTM, il est recommandé de
nettoyer le capteur mensuellement.
1. Sortir le nettoyeur du capteur d’air
du compartiment de rangement
derrière la grille d’entrée
(voir l’article 8, page 5).
2. Le capteur se trouve sur le côté de
l’appareil.
Ouvrir le
compartiment
du capteur
(tel qu’illustré),
puis placer
le nettoyeur
du capteur
d’air dans
l’ouverture du
capteur.
3. Effectuer un mouvement de
va-et-vient avec le nettoyeur du
capteur d’air de manière à nettoyer
la lentille du capteur.
4. Fermer le compartiment du capteur
et replacer le nettoyeur du capteur
d’air dans son compartiment de
rangement. Réinstaller la grille
d’entrée. S’assurer que la porte
est bien fermée sinon le réglage du
capteur risque de ne pas fonctionner
correctement.
wAVERTISSEMENT
Pour réduire le risque de choc électrique :
• Toujours débrancher l’appareil avant le nettoyage.
• Ne pas immerger dans l’eau ou autre liquide.
Capteur
840115900 FR v00.qxd 6/6/03 10:20 AM Page 12
Page 31

13
Introduire l’une ou l’autre extrémité de
la jauge de vérification des filtres dans
le trou à la partie supérieure de la grille
de sortie. Tourner le ventilateur à
QuickClean
TM
.
Le cylindre de couleur devrait monter
dans la jauge de vérification des filtres.
S’il ne se déplace pas du fond de la
jauge, le(s) filtres sont obstrués et
doivent être remplacés.
Vérification des filtres
L’épurateur d’air comporte une jauge
spéciale de vérification des filtres qui
permet de vérifier l’état des filtres.
Cette jauge se trouve dans un
compartiment derrière la grille d’entrée
frontale. Voir l’article 7 à la page 5
pour l’emplacement.
Le filtre HEPA devrait durer environ
12 mois en utilisation continue, moins
longtemps dans les régions à niveau
élevé de particules en suspension dans
l’air telles que la poussière ou le pollen.
Le préfiltre à charbon durera environ
trois mois.
REMARQUE : Vous devez réinstaller la
grille d’entrée et l’enclencher avant de
vérifier les filtres avec la jauge.
L’épurateur d’air ne fonctionnera pas
en l’absence de la grille.
Filtre(s) OK
Remplacer
le(s) filtre(s)
1
2
840115900 FR v00.qxd 6/6/03 10:20 AM Page 13
Page 32

14
Remplacement du filtre HEPA
Le filtre HEPA durera normalement
environ 12 mois avant de devoir être
remplacé ou environ à chaque quatrième
remplacement du préfiltre à charbon.
Si la jauge de vérification des filtres
indique que le filtre doit être remplacé,
il est recommandé de remplacer
d’abord le préfiltre à charbon, puis
d’utiliser la jauge de vérification pour
vérifier de nouveau le filtre. Si le cylindre
de couleur ne monte toujours pas dans
la jauge, le filtre HEPA doit également
être remplacé.
Éteindre et débrancher l’épurateur
d’air. Retirer le filtre HEPA usagé en le
saisissant par les côtés et en le tirant
vers l’extérieur tel qu’indiqué. Mettre le
filtre usagé au rebut. Il ne peut pas
être nettoyé.
Se procurer un filtre de remplacement
HEPA. Insérer le filtre HEPA non déballé,
côté d’accrochage vers l’extérieur,
dans l’épurateur d’air.
REMARQUE : L’installation incorrecte
du filtre résultera en une mauvaise
filtration de l’air.
1
2
840115900 FR v00.qxd 6/6/03 10:20 AM Page 14
Page 33

15
Remplacement de l’ampoule UV
L’ampoule UV est conçue pour un
fonctionnement efficace continu
d’environ un an. Après cette durée,
bien que l’ampoule puisse demeurer
allumée, son efficacité sera grandement
réduite.
Pour obtenir une protection germicide
maximale, remplacer l’ampoule UV lors
du remplacement du filtre HEPA, ou si
la fenêtre de vérification de l’ampoule
UV ne luit pas lorsque le commutateur
UV est en marche. L’ampoule de
rechange UV ne peut pas être achetée
dans les magasins. Il est possible que
des ampoules de rechange soient
disponibles là où l’épurateur d’air a
été acheté ou on peut les obtenir
directement de Hamilton Beach.
Enlèvement de l’ampoule UV :
Éteindre et débrancher l’épurateur
d’air. Ouvrir et retirer la grille de sortie
en tirant sur la poignée à la partie
supérieure arrière de l’épurateur d’air.
Faire tourner doucement l’ampoule
d’un quart de tour dans une direction
ou l’autre, jusqu’à ce qu’elle se dégage
de la douille. Tirer les broches hors des
côtés de la douille, une extrémité à
la fois.
Installation d’une nouvelle ampoule UV :
Voir les étapes 3 à 6 aux pages 8 et 9
pour installer la nouvelle ampoule UV.
Veiller à mettre au rebut la vieille
ampoule UV d’une manière sûre et
responsable, conformément à toute
réglementation locale, provinciale
et fédérale.
Si la fenêtre de vérification de l’ampoule
UV ne luit toujours pas, remplacer le
démarreur.
Ne pas oublier que les huiles sur le
bout des doigts réduiront la vie utile
des ampoules. Ne pas toucher la partie
en verre de l’ampoule.
1
2
840115900 FR v00.qxd 6/6/03 10:20 AM Page 15
Page 34

16
Si l’ampoule UV ne s’allume pas après
avoir été remplacée, il faut remplacer le
démarreur. Voir la page 4 pour les
pièces de rechange.
Éteindre et débrancher l’épurateur
d’air. Retirer la grille d’entrée et les
filtres. Le démarreur est la petite pièce
en forme de cylindre derrière le filtre.
Tourner le démarreur dans le sens
antihoraire jusqu’à ce qu’il se dégage,
puis le retirer. Pour installer le nouveau
démarreur, l’introduire et le tourner
dans le sens horaire. Réinstaller les
filtres et la grille d’entrée.
Remplacement du démarreur UV
1
2
Démarreur
840115900 FR v00.qxd 6/6/03 10:20 AM Page 16
Page 35

17
Débit d’air réduit ou mauvaise filtration
• Il est possible que la grille d’entrée
ou de sortie soit obstruée. S’assurer
qu’il n’y pas d’obstruction devant ou
sur le dessus de l’épurateur d’air.
• Il est possible que le préfiltre à
charbon ou le filtre HEPA soit
obstrué. Vérifier les filtres avec la
jauge et les remplacer au besoin.
L’ampoule UV germicide ne s’allume pas
• Le commutateur UV est-il activé?
• Le ventilateur est-il en marche?
L’ampoule UV ne s’allume pas à
moins que le ventilateur ne soit en
marche?
• Il est possible que l’ampoule soit
grillée. Voir « Remplacement de
l’ampoule UV » pour les instructions
de remplacement.
• Il est possible que le démarreur UV
ait besoin d’être remplacé. Voir
« Remplacement du démarreur UV »
pour les instructions de remplacement.
Dépannage
La section suivante procure des solutions pour de nombreux problèmes et
questions courants. Si l’épurateur d’air ne fonctionne pas correctement, examiner
d’abord ces solutions. Si le problème n’est pas résolu après avoir pris connaissance
de ce guide, composer notre numéro d’appel sans frais du service aux clients
mentionné sur la couverture de ce manuel, pour obtenir de l’aide.
L’épurateur d’air ne s’allume pas
• La grille d’entrée et la grille de
sortie sont-elles bien installées et
verrouillées en place?
• L’épurateur d’air est-il branché sur
une prise alimentée?
• Le bouton de vitesse du ventilateur
est-il tourné à on (marche)?
L’épurateur d’air change de vitesse
• Les modèles AirSmart™ sont
conçus pour détecter le niveau de
contaminants dans l’air et ajuster la
vitesse du ventilateur pour procurer
la purification d’air la plus efficace
possible. Si la commande AirSmart™
est réglée à Auto, elle modifiera
automatiquement la vitesse du
ventilateur en fonction de la qualité
changeante de l’air.
840115900 FR v00.qxd 6/6/03 10:20 AM Page 17
Page 36

18
Service aux clients
Si vous avez une question au sujet de l’épurateur d’air, composer notre numéro
sans frais de service aux clients. Avant de faire un appel, veuillez inscrire les
numéros de modèle, de type et de série ci-dessous. Ces numéros se trouvent
à l’arrière de l’épurateur d’air. Ces renseignements nous aideront à répondre
beaucoup plus vite à toute question.
MODÈLE : ______________ TYPE : _______________ SÉRIE : ________________
www.trueair.com
6/03
840115900
HAMILTON BEACH PROCTOR-SILEX,INC.
P
ROCTOR-SILEX CANADA,INC.
263 Yadkin Road, Southern Pines, NC 28387
Picton, Ontario K0K 2T0
GARANTIE LIMITÉE
Ce produit est garanti exempt de vices de matériau et de fabrication pendant une
période d’un (1) an à partir de la date de l'achat original, excepté ce qui est noté
ci-dessous. Au cours de cette période, nous réparerons ou remplacerons ce produit
sans frais, à notre discrétion. LA GARANTIE CI-DESSUS REMPLACE TOUTE AUTRE
GARANTIE EXPRESSE OU IMPLICITE, ÉCRITE OU ORALE, Y COMPRIS TOUTE
GARANTIE DE QUALITÉ MARCHANDE OU DE CONFORMITÉ À UNE FIN
PARTICULIÈRE. TOUTE RESPONSABILITÉ EST EXPRESSÉMENT LIMITÉE À UN
MONTANT ÉGAL AU PRIX D’ACHAT PAYÉ ET TOUTES LES RÉCLAMATIONS POUR
DOMMAGES SPÉCIAUX ET INDIRECTS SONT PAR LES PRÉSENTES EXCLUES.
La garantie ne s’applique pas aux accessoires suivants qui pourraient être vendus avec
ce produit : pièces en verre, récipients en verre, couteau/tamis, lames et/ou agitateurs.
Cette garantie ne s’applique qu’à l’acheteur d’origine et ne couvre pas un vice causé par
l’abus, le mésusage, la négligence, l’usage à des fins commerciales ou tout autre usage
non prescrit dans le mode d’emploi. Cette garantie vous confère des droits juridiques
spécifiques et vous pouvez aussi jouir d’autres droits juridiques qui peuvent varier d’un
État à un autre ou d’une province à une autre. Certains États ou provinces ne permettent
pas les limitations sur les garanties implicites ou les dommages spéciaux ou indirects de
telle sorte que les limitations ci-dessus ne s’appliquent peut-être pas dans votre cas.
Si vous désirez procéder à une réclamation en vertu de cette garantie, NE RETOURNEZ
PAS L’APPAREIL AU MAGASIN! Veuillez téléphoner au NUMÉRO DU SERVICE À LA
CLIENTÈLE. (Pour un service plus rapide, ayez à portée de la main les numéros de série et
de modèle et de type de votre appareil lorsque vous communiquez avec un représentant.)
NUMÉROS DU SERVICE À LA CLIENTÈLE
Aux États-Unis 1-800-851-8900
Au Canada 1-800-267-2826
Adresse du site Web : www.trueair.com
CONSERVEZ CES NUMÉROS POUR RÉFÉRENCE ULTÉRIEURE!
840115900 FR v00.qxd 6/6/03 10:20 AM Page 18
 Loading...