

Page 1

840104900
English .................................. 2
Español .................................. 8
840104900 Ev01.qxd 9/6/02 1:45 PM Page 1
Digitally signed by Elizabeth DeMerchant
cn=Elizabeth DeMerchant, ou=Product Information Center, o=HB/PS, c=US
Date: 2002.09.12 14:28:33 -05'00'
Reason: I am approving this document
4.25 x 5.5, 16 pages, English, Spanish, black ink, no bleeds, Map
Page 2
3
SAVE THESE INSTRUCTIONS
2
When using your flat iron, basic safety precautions should always be
followed, including the following:
READ ALL INSTRUCTIONS BEFORE USING
1. Use iron only for its intended use.
2. To protect against risk of electric shock, do not immerse the iron
in water or other liquids.
3. The iron should always be turned to OFF ( O ) before plugging
or unplugging from outlet. Never yank cord to disconnect from
outlet; instead, grasp plug and pull to disconnect.
4. Do not allow cord to touch hot surfaces. Let iron cool completely
before putting away. Loop cord loosely around iron when storing.
5. Always disconnect iron from electrical outlet when filling with
water or emptying and when not in use.
6. Do not operate iron with a damaged cord or if the iron has been
dropped or damaged. To avoid the risk of electric shock, do not
disassemble the iron. Call our toll-free customer service number
for information on examination, repair or electrical or mechanical
adjustment. Incorrect reassembly can cause a risk of electric
shock when the iron is used.
7. Close supervision is necessary for any appliance being used by
or near children. Do not leave iron unattended while connected
or on an ironing board.
8. Burns can occur from touching hot metal parts, hot water, or
steam. Use caution when you turn a steam iron upside down –
there may be hot water in the reservoir.
SPECIAL INSTRUCTIONS
1. To avoid a circuit overload, do not operate another high wattage
appliance on the same circuit.
2. Do not use an extension cord.
3. Only plug cord into ironing board model #111170 (manufacturerd
by Whitney Design Inc.).
IMPORTANT SAFEGUARDS
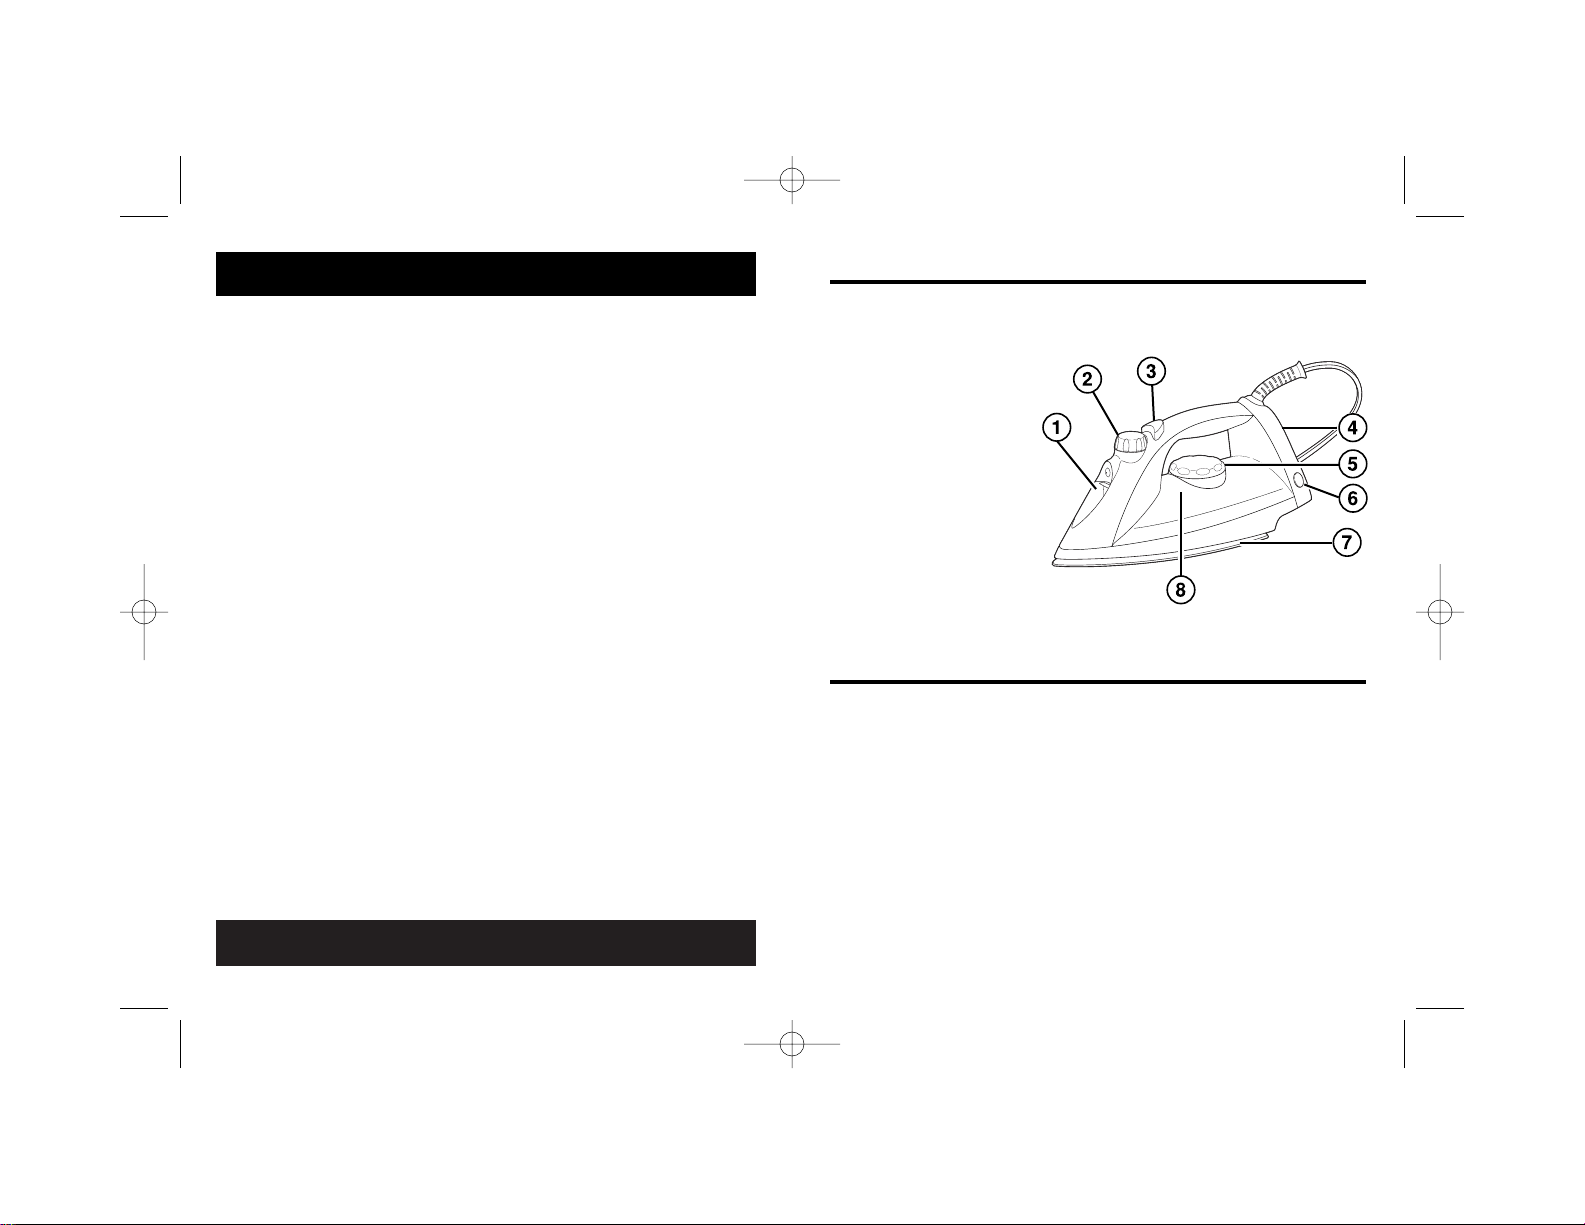
Parts and Features
1. Water Tank Opening
2. Adjustable Steam Dial
3. Spray Button*
4. Heel Rest
5. Temperature
Control Dial
6. Auto Shutoff Reset
Button/Light*
7. Soleplate
8. Water Window
* feature on selected
models
Before First Use
• During first use of the iron, it may appear to smoke. This
will stop and does not indicate a defect or hazard.
• Many irons spit or sputter during the first few uses with
tap water. This happens as the steam chamber becomes
conditioned. This will stop after a few uses.
• Steam vents should be cleared before first use. See the
“Self-Clean” section on page 6 for more information.
840104900 Ev01.qxd 9/6/02 1:45 PM Page 2
Page 3
5
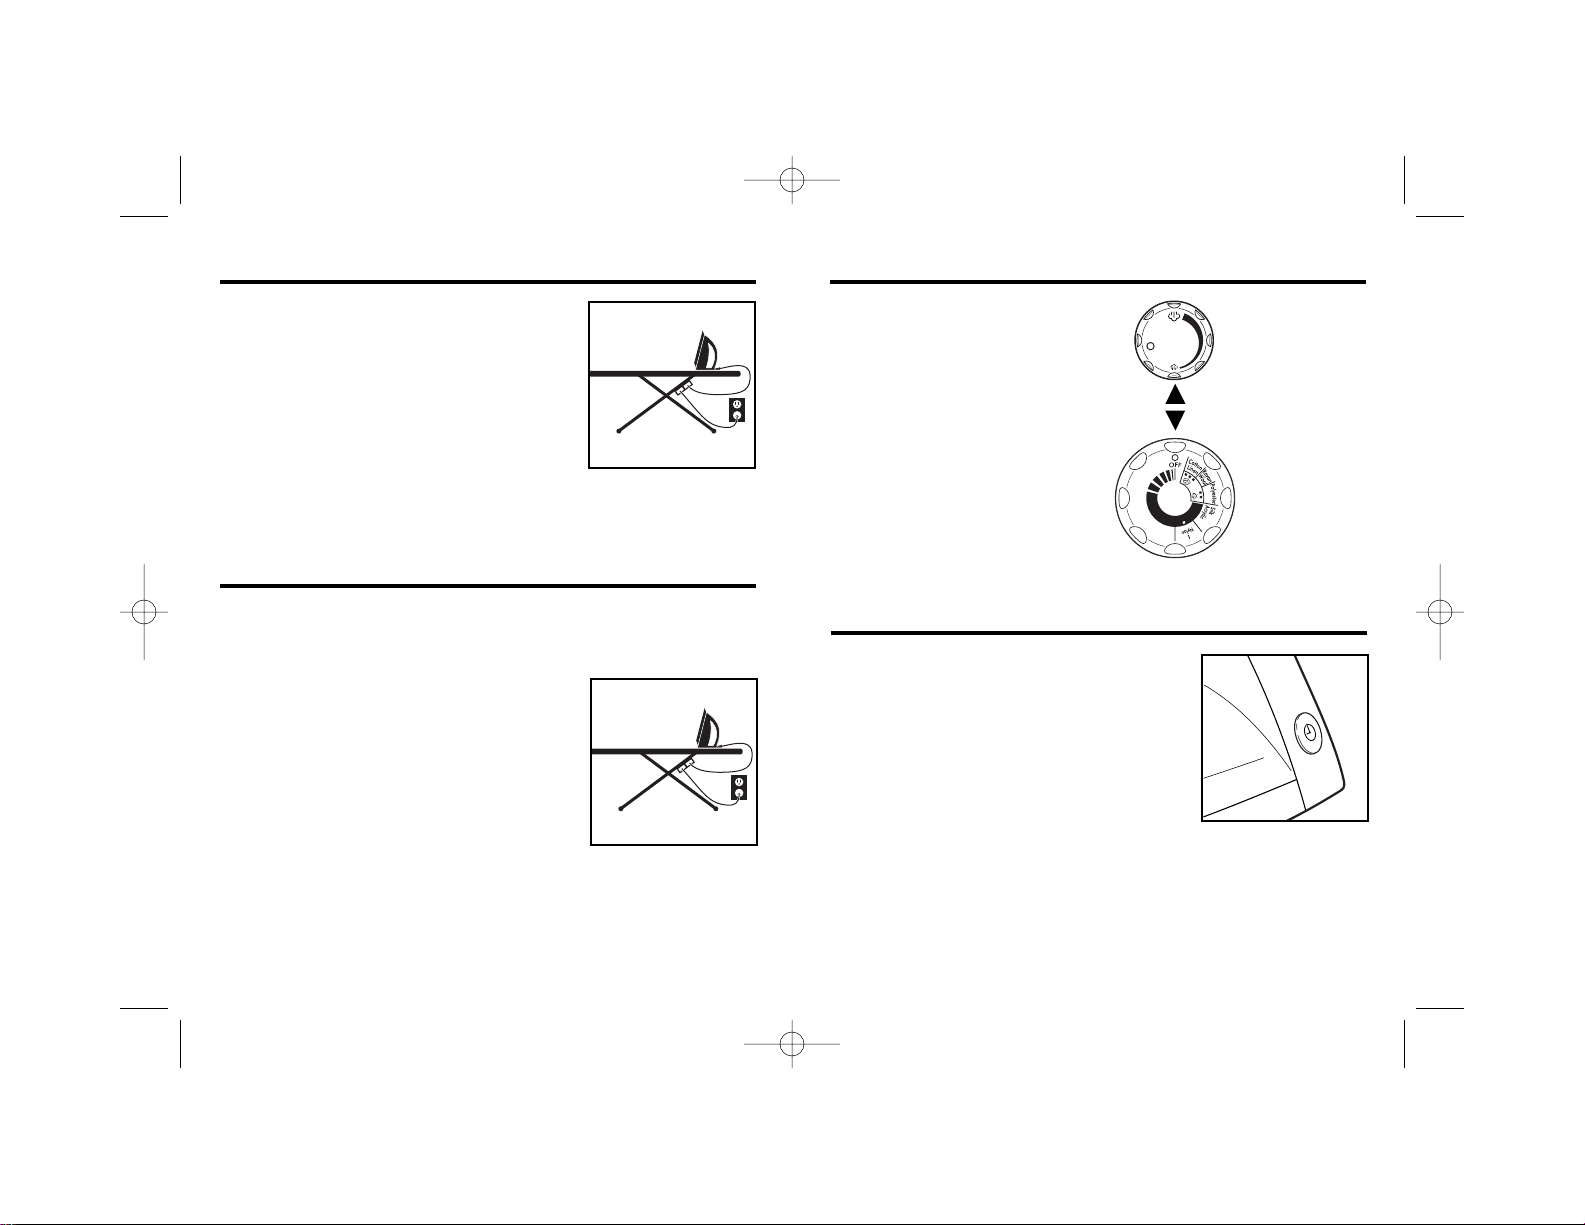
NOTE: The Temperature Control
Dial steam setting should match
the Adjustable Steam Dial
setting. For example, if steam
ironing wool, the Adjustable
Steam Dial should be set to
light steam.
Adjustable
Steam Dial
Temperature
Control Dial
Optional Feature (on select models)
Auto Shutoff Reset Button/Light
This light comes on when the iron is first
plugged in. After 15 minutes, the iron will
shut off and the light will go out. Push the
Reset Button to turn the iron back on for
another 15 minutes of ironing.
4
1. Plug the ironing board into a standard
wall outlet.
2. Plug the iron into the receptacle
located on the leg of the ironing board.
NOTE: For use only with ironing board
model #111170 manufactured by
Whitney Design, Inc.
3. Turn the Adjustable Steam Dial to O.
4. Turn Temperature Control Dial to desired temperature.
Allow two minutes for iron to reach desired temperature.
How to Dry Iron
How to Steam Iron
1. Ensure that the ironing board and iron are unplugged.
2. Pour 4 ounces (1⁄2 cup) of ordinary tap water into water
tank opening. Plug iron into ironing board.
3. Plug the ironing board into a standard
wall outlet.
4. Plug the iron into the receptacle
located on the leg of the ironing board.
NOTE: For use only with ironing board
model #111170 manufactured by
Whitney Design, Inc.
5. Turn Temperature Control Dial to
desired setting in the steam range. Allow two minutes for
the iron to reach desired temperature.
6. Turn the Adjustable Steam Dial to desired steam setting.
Water: Use ordinary tap water. For extremely hard water,
alternate between tap water and distilled water.
Steam Settings
840104900 Ev01.qxd 9/6/02 1:45 PM Page 4
Page 4

7
This Warranty Supersedes All Other Product Warranties
LIMITED WARRANTY
This product is warranted to be free from defects in material and workman-ship
for a period of one (1) year from the date of original purchase, except as noted
below. During this period, we will repair or replace this product, at our option,
at no cost. THE FOREGOING WARRANTY IS IN LIEU OF ANY OTHER
WARRANTY, WHETHER EXPRESS OR IMPLIED, WRITTEN OR ORAL
INCLUDING ANY WARRANTY OF MERCHANTABILITY OR FITNESS FOR
A PARTICULAR PURPOSE. ANY LIABILITY IS EXPRESSLY LIMITED TO
AN AMOUNT EQUAL TO THE PURCHASE PRICE PAID, AND ALL CLAIMS
FOR SPECIAL, INCIDENTAL AND CONSEQUENTIAL DAMAGES ARE
HEREBY EXCLUDED. There is no warranty with respect to parts subject to
wear supplied with or a part of this product. This warranty does not cover
defects resulting from abuse, neglect, or any use not in conformity with the
printed directions. Always use this product in accordance with the Operation
Manual.
If you have a claim under this warranty, please deliver or mail the product to the
nearest authorized service center which you can locate by calling our toll-free
customer service number 1-800-572-3331 or by looking in your local yellow
pages for the nearest authorized Hamilton Beach Commercial Service Center.
Caring and Cleaning
6
Iron Storage
1. Turn Temperature Control Dial to Off (O). Unplug and let cool.
The iron takes longer to cool down than it does to heat up.
2. To empty water from iron, slowly tilt pointed end of iron down
over a sink. Water will run out of water tank opening.
3. Wrap cord loosely around iron and store iron in an upright
position. Do not store iron laying flat on soleplate.
Soleplate
1. Never iron over zippers, pins, metal rivets, or snaps, as
these may scratch the soleplate.
2. To clean occasional build-up on the soleplate, wipe with
a sudsy cloth. Do not use abrasive cleansers or metal
scouring pads.
3. Always store iron upright in the heel rest position.
Self-Clean
To keep the steam vents clear of any build-up, follow these
instructions each time you iron using steam.
1. Fill iron with water.
2. Plug in iron and ironing board. (See page 4 for more infor-
mation.) Turn Temperature Control Dial to the highest
temperature.
3. Let iron heat for 3 minutes.
4. Turn Temperature Control Dial to OFF. Unplug iron and hold
over a sink with the soleplate facing down.
5. Turn Adjustable Steam Dial to Full Steam . Hot water
and steam will flow out of the steam vents.
6. Allow all water to drain from iron then let cool and store.
840104900 Ev01.qxd 9/6/02 1:45 PM Page 6
Page 5

9
GUARDE ESTAS INSTRUCCIONES
INSTRUCCIONES ESPECIALES
1. Para evitar sobrecargar el circuito, no opere otro artefacto de alto
consumo de corriente en el mismo circuito.
2. No use un cable eléctrico de extensión.
3. Enchufe el cable solamente en una tabla de planchar modelo
111170 (fabricada por Whitney Design Inc.).
8
Cuando use su plancha, debe seguir siempre las precauciones
básicas de seguridad incluyendo las siguientes:
LEA TODAS LAS INSTRUCCIONES
ANTES DEL USO
1. Use su plancha sólo para el fin para el cual ha sido diseñada.
2. Para protegerse contra riesgos de choques eléctricos, no sumerja la
plancha en agua u otros líquidos.
3. La plancha siempre debe estar en la posición de APAGADO (O)
antes de enchufarla o desenchufarla del tomacorriente. Nunca
arranque el cable para desconectarla del tomacorriente; en vez de
ello agarre el enchufe y tire de él para desconectarlo.
4. No permita que el cable toque superficies calientes. Deje que la
plancha se enfríe bien antes de guardarla. Enrolle el cable suelto
alrededor de la plancha cuando la guarde.
5. Siempre desconecte la plancha del tomacorriente eléctrico cuando
la esté llenando con agua o vaciando y cuando no esté en uso.
6. No opere la plancha si el cable está dañado o después de que el
aparato haya sufrido alguna caída o avería. Para evitar el riesgo de
choque eléctrico no desarme la plancha.
Llame a nuestro número
gratuito de servicio al cliente para obtener información respecto a su
revisión, reparación o ajuste eléctrico o mecánico.
El ensamble
incorrecto puede causar un riesgo de choque eléctrico al usar la
plancha.
7. Es necesario supervisar de cerca cuando los niños usen o estén
cerca de cualquier artefacto. No deje la plancha sin atención
mientras esté conectada o sobre una tabla de planchar.
8. Pueden ocurrir quemaduras por tocar las partes metálicas calientes,
agua caliente o vapor. Tenga cuidado cuando voltee una plancha a
vapor boca abajo – ya que puede haber agua caliente en el depósito.
SALVAGUARDIAS IMPOR
TANTES
840104900 Sv01.qxd 9/6/02 1:45 PM Page 8
Page 6

Cómo planchar en seco
Cómo planchar al vapor
11
1. Apertura del tanque de
agua
2. Control de vapor
ajustable
3. Botón de rocío*
4. Base de descanso
5. Control de
temperatura
6. Botón/luz de reajuste y
apagado automático*
7. Suela
8. Ventana de agua
* característica en modelos
selectos
Piezas y características
Antes de usar por primera vez
• Durante el primer uso de la plancha, puede parecer que sale
humo. Esto se detendrá y no indica un defecto o riesgo.
• Muchas planchas salpican durante los primeros usos con agua
del grifo. Esto ocurre a medida que la cámara de vapor se
acondiciona y dejará de ocurrir después de unos cuantos usos.
• Las salidas de vapor deben ser limpiadas antes del primer uso.
Vea la sección “Autolimpieza” en la página 14 para obtener
mayor información.
1. Enchufe la tabla de planchar en un
tomacorriente común.
2. Enchufe la plancha en el receptáculo
ubicado en la pata de la tabla de
planchar.
NOTA: Para usarse solamente con la
tabla de planchar modelo # 111170
fabricada por Whitney Design, Inc.
3. Gire el control de vapor ajustable hacia O.
4. Gire el control de temperatura hacia la temperatura desea-
da. Deje que transcurran dos minutos para que la plancha
alcance la temperatura deseada.
1. Asegúrese de que la tabla de planchar
y la plancha estén desenchufadas.
2. Vierta 4 onzas (1⁄2 taza) de agua común
del grifo en la apertura del tanque de
agua. Enchufe la plancha en la tabla
de planchar.
3. Enchufe la tabla de planchar en un
tomacorriente común.
4. Enchufe la plancha en el receptáculo ubicado en la pata
de la tabla de planchar.
NOTA: Para usarse solamente con la tabla de planchar
modelo # 111170 fabricada por Whitney Design, Inc.
840104900 Sv01.qxd 9/6/02 1:45 PM Page 10
Page 7

Para guardar la plancha
1. Gire el control de temperatura a Apagado (O). Desenchufe
y deje enfriar. La plancha requiere más tiempo para enfriar
que para calentar.
2. Para vaciar el agua de la plancha, incline lentamente el
extremo en punta de la plancha sobre un lavabo. El agua
saldrá por la apertura del tanque de agua.
3. Enrolle flojamente el cable alrededor de la plancha y
guárdela en posición vertical. No la guarde descansando
sobre la suela.
Suela
1. Nunca planche sobre cierres de cremalleras, alfileres, remaches
de metal o broches, ya que éstos pueden rayar la suela.
2. Para limpiar la acumulación ocasional de la suela, límpiela
con un paño remojado en agua jabonosa. No use productos
de limpieza abrasivos o almohadillas metálicas de fregar.
3. Siempre guarde la plancha verticalmente en su posición de
base de descanso.
Cuidado y limpieza
13
Característica opcional (en modelos selectos)
Botón/luz de reajuste y apagado
automático
Esta luz se enciende cuando la plancha
se enchufa por primera vez. Después
de 15 minutos, la plancha y la luz se
apagarán. Presione el botón de reajuste
para volver a encender la plancha, para
seguir planchando por 15 minutos más.
Posiciones de vapor
Control de
vapor ajustable
Control de
temperatura
NOTA: La posición de vapor
del control de temperatura
debe estar a un nivel equivalente a la posición del control
de vapor ajustable. Por
ejemplo, si está planchando
al vapor lana, el control de
vapor ajustable debe fijarse
en la posición de vapor
ligero.
12
Cómo planchar al vapor (cont.)
5. Gire el control de temperatura hacia la temperatura
deseada en el rango de vapor. Deje que transcurran dos
minutos para que la plancha alcance la temperatura
deseada.
6. Gire el control de vapor ajustable hacia la posición
deseada de vapor.
Agua: Use agua común del grifo. Si tiene agua extremada-
mente dura, alterne entre agua del grifo y agua destilada.
840104900 Sv01.qxd 9/6/02 1:45 PM Page 12
Page 8

Esta garantía reemplaza todas las otras garantías del producto
GARANTÍA LIMITADA
Se garantiza este producto de ser libre de defectos en el material y en
la fabricación por un período de un (1) año a partir de la fecha de
compra original, excepto por lo que se indica a continuación. Durante
este período, este producto será reparado o reemplazado, según nuestra
opción, sin costo alguno. LA GARANTÍA ANTERIOR ESTARÁ EN LUGAR
DE CUALQUIER OTRA GARANTÍA, YA SEA EXPRESA O IMPLÍCITA,
ESCRITA U ORAL, INCLUYENDO CUALQUIER GARANTÍA DE COMERCIABILIDAD O CAPACIDAD PARA UN PROPÓSITO PARTICULAR.
CUALQUIER RESPONSABILIDAD ESTÁ LIMITADA EXPRESAMENTE A
UNA CANTIDAD IGUAL AL PRECIO DE COMPRA QUE SE HA PAGADO,
Y TODOS LOS RECLAMOS POR DAÑOS ESPECIALES, INCIDENTALES
Y CONSECUENTES ESTÁN EXCLUIDOS POR LA PRESENTE. Esta
garantía no ampara el reemplazo de piezas sujetas al uso suministradas
con este producto o una parte del mismo. Esta garantía no cubre defectos
que resulten del abuso, negligencia, o ningún otro uso que no esté en
conformidad con las instrucciones impresas. Siempre use este producto
de acuerdo con el Manual de funcionamiento.
Si usted tiene un reclamo bajo esta garantía, sírvase entregar o enviar
por correo el producto al centro de servicio autorizado más cercano a
su localidad, el cual puede ubicar llamando a nuestro número gratis de
servicio al cliente al 1-800-572-3331 o busque en las páginas amarillas el
Centro de Servicio Comercial de Hamilton Beach más cercano.
15
Autolimpieza
Siga estas instrucciones cada vez que planche con vapor para
mantener los respiraderos de vapor libres de depósitos.
1. Llene la plancha con agua.
2. Enchufe la plancha y la tabla de planchar. (Vea la página
11 para obtener más información). Gire el control de
temperatura hacia la temperatura más alta.
3. Deje que la plancha se caliente por 3 minutos.
4. Gire el control de temperatura a OFF (apagado).
Desenchufe la plancha y sosténgala sobre un fregadero
con la suela hacia abajo.
5. Gire el control de vapor ajustable a vapor completo .
Agua caliente y vapor saldrán por los respiraderos de
vapor.
6. Permita que drene toda el agua de la plancha, luego déjela
enfriar y guárdela.
14
840104900 Sv01.qxd 9/6/02 1:45 PM Page 14
Page 9

16
9/02
840104900
Hamilton Beach/Proctor-Silex, Inc.
Commercial Customer Service
263 Yadkin Road, Southern Pines, NC 28387
840104900 Sv01.qxd 9/6/02 1:45 PM Page 16
 Loading...