

Page 1
840101300
English .................................. 2
Français ................................ 8
Español..................................15
840101300 ENv02.qxd 5/10/02 11:22 AM Page 1
Digitally signed by Elizabeth DeMerchant
cn=Elizabeth DeMerchant, ou=Product Information Center, o=HB/PS, c=US
Date: 2002.05.14 12:28:33 -05'00'
Reason: I am approving this document
4.25" X 5.5"; 20 pages; English, French; Spanish; Blk Ink; no bleeds; Map
Page 2
3
2
Consumer Safety Information
This product is a household-type iron.
This appliance is equipped with a polarized plug. This type of plug
has one blade wider than the other. The plug will fit into an electrical
outlet only one way. This is a safety feature intended to help reduce
the risk of electrical shock. If you are unable to insert the plug into
the outlet, try reversing the plug. If the plug should still fail to fit,
contact a qualified electrician to replace the obsolete outlet. Do not
attempt to defeat the safety purpose of the polarized plug by modifying the plug in any way.
Use the iron on an ironing board. Ironing on any other surface may
damage that surface.
IMPORTANT SAFEGUARDS
When using your flatiron, basic safety precautions should always be
followed, including the following:
READ ALL INSTRUCTIONS BEFORE USING
1. Use iron only for its intended use.
2. To protect against risk of electric shock, do not immerse the iron
in water or other liquids.
3. The iron should always be turned to OFF before plugging or
unplugging from outlet. Never yank cord to disconnect from
outlet; instead, grasp plug and pull to disconnect.
4. Do not allow cord to touch hot surfaces. Let iron cool completely
before putting away. Loop cord loosely around iron when storing.
5. Always disconnect iron from electrical outlet when filling with water
or emptying and when not in use.
6. Do not operate iron with a damaged cord or if the iron has been
dropped or damaged. To avoid the risk of electric shock, do not
disassemble the iron. Call our toll-free customer service number for
information on examination, repair or electrical or mechanical
adjustment. Incorrect reassembly can cause a risk of electric shock
when the iron is used.
7. Close supervision is necessary for any appliance being used by or
near children. Do not leave iron unattended while connected
or on an ironing board.
8. Burns can occur from touching hot metal parts, hot water, or steam.
Use caution when you turn a steam iron upside down–there may be
hot water in the reservoir.
SPECIAL INSTRUCTIONS
1. To avoid a circuit overload, do not operate another high wattage
appliance on the same circuit.
2. If an extension cord is absolutely necessary, a 10-ampere cord
should be used. Cords rated for less amperage may overheat.
Care should be taken to arrange the cord so that it cannot be
pulled or tripped over.
SAVE THESE INSTRUCTIONS!
Before First Use
• Steam vents should be cleaned before first use. See the
“Self-Clean” section on page 6 for more information.
• Many irons spit or sputter during the first few uses with
tap water. This happens as the steam chamber becomes
conditioned. This will stop after a few uses.
• During first use of the iron, it may appear to smoke. This
will stop and does not indicate a defect or hazard.
To Dry Iron
1. Plug iron into outlet.
2. Set Adjustable Steam Switch to 0 (the Dry Iron position).
3. Turn Temperature Control Dial to desired temperature.
Allow two minutes for iron to reach desired temperature.
4. To turn iron Off, turn Temperature Control Dial to Off and
unplug iron.
840101300 ENv02.qxd 5/10/02 11:22 AM Page 2
Page 3
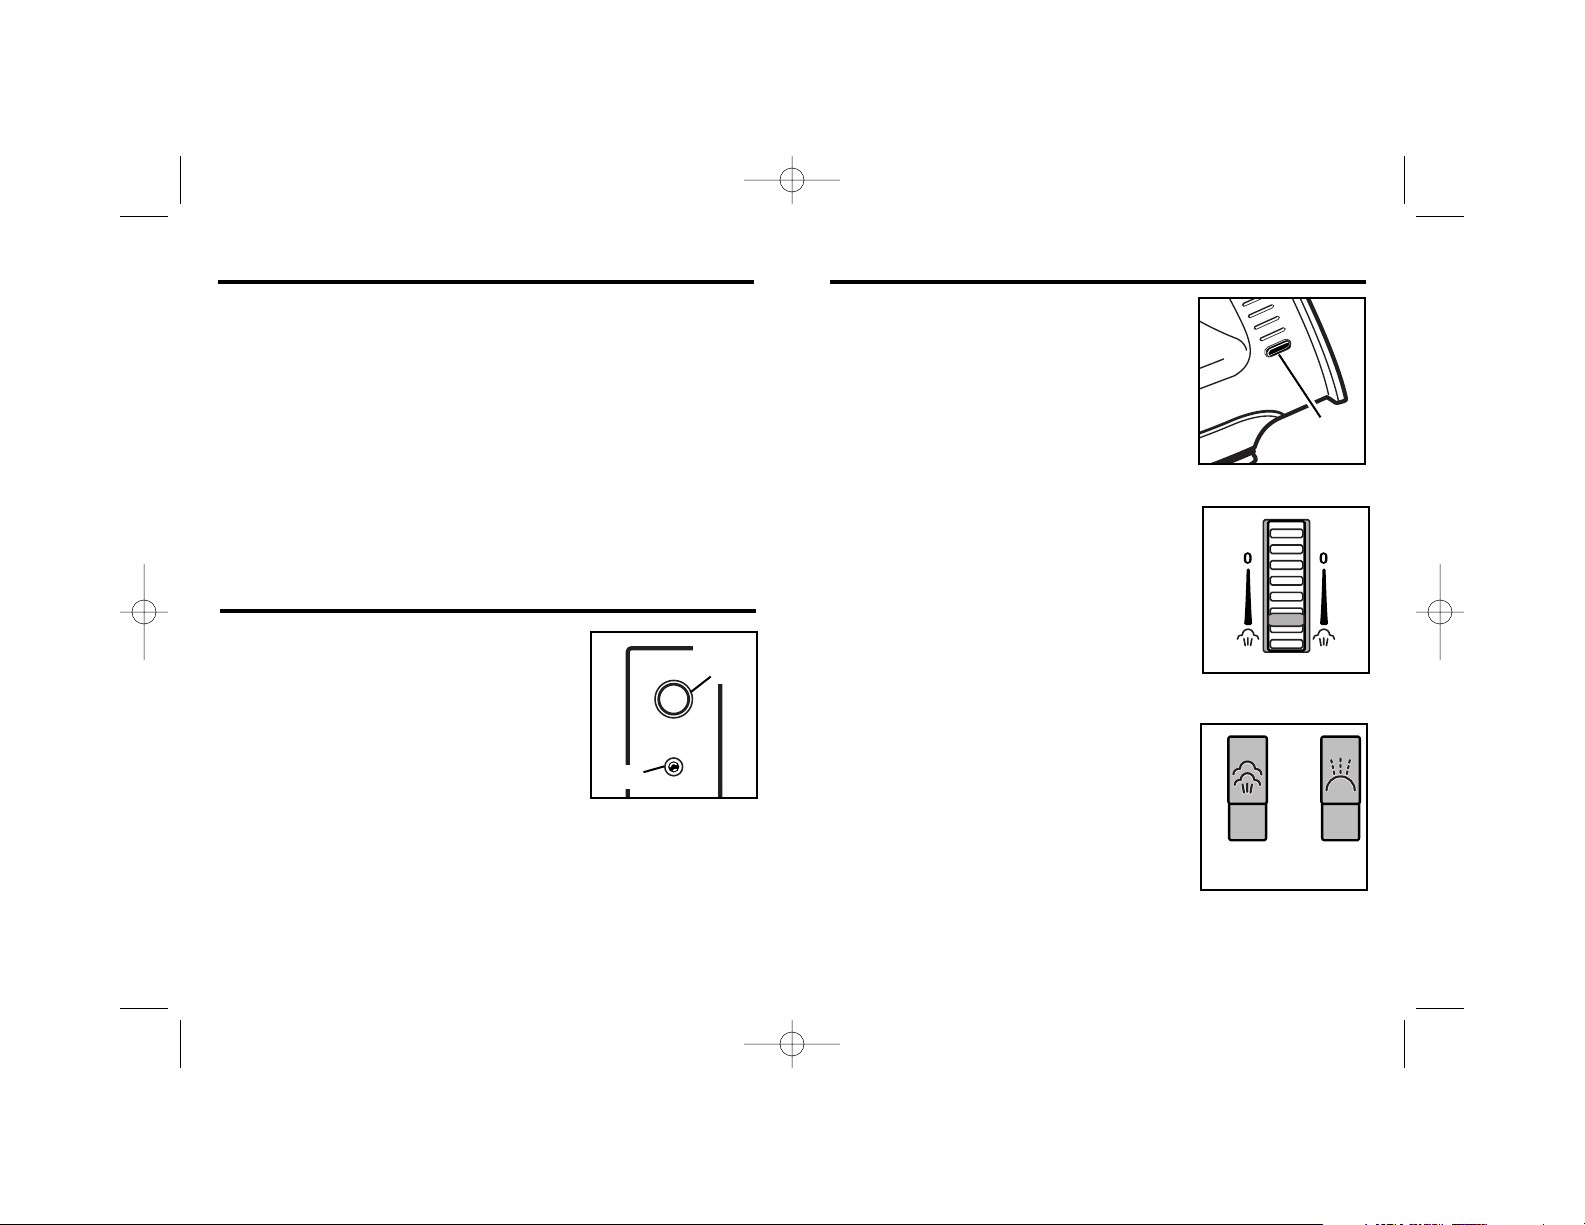
Auto Shutoff Reset Button/Light
The light comes on when the iron is first
plugged in even if Temperature Control
Dial is set at Off. The light indicates that
the iron is plugged in. After 15 minutes,
the iron will shut off and the light will
blink. Push the Reset Button to turn the
iron back on.
5
Adjustable Steam Switch
This switch provides continuous steam
in the STEAM position. Push the switch
to 0 to change to dry iron.
Reset
Button
Light
Features
4
1. Unplug iron. Using a cup, slowly pour 4 ounces (1⁄2 cup) of
tap water into water tank opening. Do not fill iron directly
from faucet.
2. Plug iron into outlet. Set Adjustable Steam Switch to STEAM.
3. Turn Temperature Control Dial to desired fabric setting in
steam range. Allow two minutes for the iron to reach desired
temperature.
4. To turn iron off, set Adjustable Steam Switch to 0 (Dry Iron).
Turn Temperature Control Dial to Off. Unplug iron.
5. Empty water from iron following directions in “Caring for
Your Iron.”
To Steam Iron Features (cont.)
Spray and Blast of Steam Buttons
Push spray button to release a fine spray
of water for difficult wrinkles in cotton or
linen. Push blast button for an extra blast
of steam.
Blast of
Steam
Spray
Power On Light
This light comes on when the iron is
plugged in and remains on until the iron
is unplugged. The light stays on even if
Temperature Control Dial is turned to Off.
Power
Light
840101300 ENv02.qxd 5/10/02 11:22 AM Page 4
Page 4
7
6
This Warranty Supersedes All Other Product Warranties
LIMITED WARRANTY
This product is warranted to be free from defects in material and workmanship for a period of one (1) year from the date of original purchase, except
as noted below. During this period, we will repair or replace this product, at
our option, at no cost. THE FOREGOING WARRANTY IS IN LIEU OF ANY
OTHER WARRANTY, WHETHER EXPRESS OR IMPLIED, WRITTEN OR
ORAL INCLUDING ANY WARRANTY OF MERCHANTABILITY OR FITNESS FOR A PARTICULAR PURPOSE. ANY LIABILITY IS EXPRESSLY
LIMITED TO AN AMOUNT EQUAL TO THE PURCHASE PRICE PAID,
AND ALL CLAIMS FOR SPECIAL, INCIDENTAL AND CONSEQUENTIAL
DAMAGES ARE HEREBY EXCLUDED. There is no warranty with respect
to parts subject to wear supplied with or a part of this product (motor brushes, container and cutter assembly, clutches, etc.). This warranty does not
cover defects resulting from abuse, neglect, or any use not in conformity
with the printed directions. Always use this product in accordance with the
Operation Manual.
If you have a claim under this warranty, please deliver or mail the product to
the nearest authorized service center which you can locate by calling our
toll-free customer service number 1-800-572-3331 or by looking in your
local yellow pages for the nearest authorized Hamilton Beach Commercial
Service Center.
Caring for Your Iron
Iron
1. The water tank of your iron should be emptied after each
use. Turn Temperature Control Dial to Off. Unplug the iron
and hold over a sink. Slowly tilt pointed end of iron
down over sink. Water will run out of water tank opening.
2. After iron has completely cooled, wrap cord loosely around
the iron and store in an upright position. Do not store iron
laying flat on soleplate.
Soleplate
1. Never iron over zippers, pins, metal rivets, or snaps, as
these may scratch the soleplate.
2. To clean occasional build-up on the soleplate, wipe with
a sudsy cloth. Do not use abrasive cleansers or metal
scouring pads. Do not immerse in water.
3. Always store iron upright in the heel rest position.
Self-Clean
To keep the steam vents clear of any build-up, follow these
instructions each time you iron using steam.
1. Fill iron with water.
2. Plug in iron. Turn Temperature Control Dial to the highest
temperature.
3. Let iron heat for 3 minutes.
4. Turn Temperature Control Dial to OFF. Unplug iron and
hold over a sink with the soleplate facing down.
5. Turn Adjustable Steam Switch to Steam . Hot water and
steam will flow out of the steam vents. Press the Blast
Button several times to increase cleaning.
6. Allow all water to drain from iron then let cool and store.
840101300 ENv02.qxd 5/10/02 11:22 AM Page 6
Page 5

9
Renseignements de sécurité aux consommateurs
Ce fer est un produit ménager.
Cet appareil est muni d’une fiche polarisée. Ce type de fiche présente
une broche plus large que l’autre. La fiche ne peut être introduite dans
une prise que dans un sens. Il s’agit d’une caractéristique de sécurité
visant à réduire le risque de choc électrique. Si la fiche ne peut pas
être insérée dans la prise, la tourner dans l’autre sens. Si elle ne peut
toujours pas être insérée dans la prise, contacter un électricien qualifié
pour qu’il remplace la prise désuète. Ne pas essayer de contourner
l’objectif de sécurité de la fiche polarisée en la modifiant de quelque
manière que ce soit.
Utiliser le fer sur une planche à repasser. Le repassage sur toute autre
surface peut endommager cette surface.
CONSERVER CES
INSTRUCTIONS!
INSTRUCTIONS SPÉCIALES
1. Pour éviter de surcharger un circuit, ne pas faire fonctionner un
autre appareil à haute tension sur le même circuit.
2. Si une rallonge est absolument nécessaire, un cordon de
10 ampères doit être employé. Des cordons évalués pour un
ampérage moindre peuvent surchauffer. Il faut prendre soin de
placer le cordon de rallonge pour qu’il ne puisse pas être tiré
par des enfants ou faire trébucher.
8
PRÉCAUTIONS IMPORTANTES
Lors de l’utilisation de votre fer à repasser, des précautions préliminaires de sécurité doivent toujours être observées, y compris ce qui
suit :
LIRE TOUTES LES INSTRUCTIONS AVANT L’UTILISATION
1. Utiliser le fer seulement pour sa fonction déterminée.
2. Pour protéger contre le risque de choc électrique, ne pas immerger
le fer dans l’eau ou autres liquides.
3. Le fer doit toujours être éteint (réglé à ARRÊT) avant d’être branché
sur une prise de courant ou débranché. Ne jamais tirer le cordon
pour le débrancher de la prise de courant; saisir plutôt la fiche et la
tirer pour la débrancher.
4. Ne pas laisser le cordon toucher les surfaces chaudes. Laisser le
fer se refroidir complètement avant de le remiser, et enrouler sans
le serrer le cordon autour du fer.
5. Toujours débrancher le fer d’une prise de courant électrique
lorsqu’on le remplit d’eau ou lorsqu’on le vide, ou s’il n’est pas utilisé.
6. Ne pas faire fonctionner le fer avec un cordon endommagé ou si
le fer a été échappé ou endommagé. Pour éviter le risque de
choc électrique, ne pas démonter le fer. Téléphoner au numéro
du service à la clientèle sans frais d’interurbain pour des
renseignements concernant l’examen, la réparation ou l’ajustement électrique ou mécanique. Un réassemblage incorrect peut
causer un risque de choc électrique lorsque le fer est utilisé.
7. Une bonne surveillance est nécessaire pour tout appareil utilisé
par des enfants ou près d’eux. Ne pas laisser le fer sans surveillance pendant qu’il est branché ou pendant qu’il est sur une
planche à repasser.
8. Des brûlures peuvent survenir lorsqu’on touche des pièces
chaudes en métal, de l’eau chaude ou de la vapeur. Adopter des
précautions lorsqu’on tourne un fer à vapeur à l’envers, car il peut
rester de l’eau dans le réservoir.
840101300 FRv02.qxd 5/10/02 11:22 AM Page 8
Page 6

11
Bouton/voyant lumineux de remise
en marche et d’arrêt automatique
Le voyant s’allume dès que le fer est
branché, même si le bouton de sélection
de la température est à Off (arrêt). Le
voyant indique que le fer est branché.
Au bout de 15 minutes, le fer s’éteint et
le voyant clignote. Appuyer sur le bouton
de remise en marche pour rallumer le fer.
Voyant d’alimentation
Le voyant s’allume lorsque le fer est
branché et reste allumé jusqu’à ce que
le fer soit débranché. Le voyant reste
allumé même si le bouton de sélection
de la température est tourné à Off (Arrêt).
Bouton de remise
en marche
Voyant
Caractéristiques
Voyant
d’alimentation
10
Repassage à sec
1. Brancher le fer à repasser.
2. Régler le commutateur de vapeur réglable à 0 (repassage
à sec).
3. Tourner le bouton de sélection de la température à la
position désirée. Attendre pendant deux minutes que
le fer atteigne la température désirée.
4. Pour arrêter le fer à repasser, ramener le bouton de sélection
de la température à la position arrêt et débrancher le fer.
2. Brancher le fer sur une prise de courant. Régler le commuta-
teur de réglage de la vapeur à STEAM (vapeur).
3. Tourner le bouton de sélection au réglage de tissu désiré
dans la gamme de repassage à la vapeur. Attendre pendant
2 minutes que le fer atteigne la température désirée.
4. Pour arrêter le fer à repasser, placer le commutateur de
réglage de la vapeur à la position 0 (Repassage à sec).
Ramener le bouton de sélection de la température à la position arrêt. Débrancher le fer à repasser.
5. Vider toute l’eau qui reste dans le fer à repasser – voir
« Entretien du fer à repasser ».
Avant la première utilisation
• Nettoyer les orifices de sortie de vapeur avant la première
utilisation. Voir la section « Auto-nettoyage » à la page 13
pour plus d’information.
• Lors des premières utilisations avec de l’eau du robinet, un fer à
repasser projette fréquemment de l’eau. Ceci se produit alors
que la chambre de vapeur n’est pas encore parfaitement conditionnée. Ce phénomène cesse après quelques utilisations.
• Lors de la première utilisation du fer à repasser, il peut sembler
émettre de la fumée. Ceci cessera et n’indique pas un défaut
ou un danger.
Repassage à la vapeur
1. D
ébrancher le fer à repasser. Avec une tasse, verser lentement
4 onces (1⁄2 tasse)
d’eau du robinet dans l’ouverture du réser-
voir d’eau. Ne pas remplir le fer directement sous le robinet.
840101300 FRv02.qxd 5/10/02 11:22 AM Page 10
Page 7

13
12
Entretien du fer à repasser (suite)
2. Lorsque le fer s’est complètement refroidi, enrouler le cor-
don d’alimentation autour du fer; remiser le fer à repasser
verticalement. Ne pas remiser le fer à repasser à plat sur la
semelle.
Semelle
1. Ne jamais faire passer le fer à repasser sur fermetures à
glissière, épingles, rivets métalliques, boutons-pression,
etc.; ces articles peuvent provoquer des rayures sur la
semelle.
2. Pour éliminer une accumulation occasionnelle de souillures
sur la semelle, essuyer avec un chiffon savonneux. Ne pas
utiliser un produit de nettoyage abrasif ou un tampon de
récurage en laine d’acier. Ne pas immerger dans l’eau.
3. Remiser toujours le fer à repasser verticalement, en appui
sur le talon.
Auto-nettoyage
Pour éviter que les orifices de sortie de la vapeur ne soient
obstrués par des résidus, suivre ces instructions à chaque
fois que vous repassez à la vapeur.
1. Remplir le fer d’eau.
2. Brancher le fer. Tourner le cadran de réglage de la
température à la température la plus élevée.
3. Laisser le fer chauffer pendant 3 minutes.
4. Tourner le cadran de réglage de la température à OFF.
Débrancher le fer et le tenir au-dessus d’un évier avec la
semelle vers le bas.
Commutateur de réglage
de la vapeur
Ce commutateur fournit une vapeur
continue à la position STEAM (vapeur).
Pousser le commutateur à 0 pour
repasser à sec.
Boutons de vaporisation et
de jet de vapeur
Appuyer sur le bouton de vaporisation
pour dégager une fine vaporisation de
l’eau pour les plis difficiles sur le coton ou
la toile. Appuyer sur le bouton de jet pour
un jet de vapeur supplémentaire.
Jet de
vapeur
Vaporis-
ation
Caractéristiques (suite)
Entretien du fer à repasser
Fer à repasser
1. Vider le réservoir du fer à repasser après chaque utilisation.
Tourner le bouton de sélection de la température à la position Off (Arrêt). Débrancher le fer à repasser et placer le fer
au-dessus d’un évier. Incliner lentement l’extrémité avant
du fer à repasser pour laisser l’eau s’écouler dans l’évier
par l’ouverture du réservoir.
840101300 FRv02.qxd 5/10/02 11:22 AM Page 12
Page 8

14
Cette garantie remplace toutes les autres garanties du produit
GARANTIE LIMITÉE
Ce produit est garanti exempt de vices de matériau et de fabrication
pendant une période de un (1) an à partir de la date d’achat original,
excepté ce qui est noté ci-dessous. Au cours de cette période, nous
réparerons ou remplacerons ce produit sans frais, à notre discrétion.
LA GARANTIE CI-DESSUS REMPLACE TOUTE AUTRE GARANTIE
EXPRESSE OU IMPLICITE, ÉCRITE OU ORALE, Y COMPRIS TOUTE
GARANTIE DE QUALITÉ MARCHANDE OU DE CONFORMITÉ À UNE
FIN PARTICULIÈRE. TOUTE RESPONSABILITÉ EST EXPRESSÉMENT
LIMITÉE À UN MONTANT ÉGAL AU PRIX D’ACHAT PAYÉ ET TOUTES
LES RÉCLAMATIONS POUR DOMMAGES SPÉCIAUX ET INDIRECTS
SONT PAR LES PRÉSENTES EXCLUES. La garantie ne s’applique pas
aux pièces sujettes à l’usure fournies avec ce produit ou qui en font partie
(balais de moteur, récipient et ensemble de coupe, embrayage, etc.).
Cette garantie ne couvre pas les vices causés par l’abus, le mésusage,
la négligence ou tout autre usage non prescrit dans le mode d’emploi.
Toujours utiliser ce produit conformément avec le manuel d’utilisation.
Si vous désirez procéder à une réclamation en vertu de cette garantie,
veuillez livrer le produit ou l’envoyer par la poste au centre de service
agréé le plus proche. Vous le trouverez en téléphonant sans frais au
numéro 1-800-572-3331 du service à la clientèle ou en consultant les
Pages jaunes locales pour y trouver le centre de service commercial
Hamilton Beach agréé le plus proche.
Auto-nettoyage (suite)
5. Tourner le cadran de vapeur réglable à Vapeur .
De l’eau chaude et de la vapeur s’échapperont des
orifices de sortie de la vapeur. Appuyer sur le bouton
de vaporisation plusieurs fois pour mieux nettoyer.
6. Laisser toute l’eau s’écouler du fer, le laisser refroidir
et le ranger.
840101300 FRv02.qxd 5/10/02 11:22 AM Page 14
Page 9

15
Cuando use su plancha, debe seguir siempre las precauciones
básicas de seguridad incluyendo las siguientes:
LEA TODAS LAS INSTRUCCIONES ANTES DEL USO
1. Use su plancha sólo para el fin para el cual ha sido diseñada.
2. Para protegerse contra riesgos de choques eléctricos, no sumerja
la plancha en agua u otros líquidos.
3. La plancha siempre debe estar en la posición de apagado (OFF)
antes de enchufarla o desenchufarla del tomacorriente. Nunca
arranque el cable para desconectarla del tomacorriente; en vez
de ello agarre el enchufe y tire de él para desconectarlo.
4. No permita que el cable toque superficies calientes. Deje que la
plancha se enfríe bien antes de guardarla. Enrolle el cable suelto
alrededor de la plancha cuando la guarde.
5. Siempre desconecte la plancha del tomacorriente eléctrico cuando
la esté llenando con agua o vaciando y cuando no esté en uso.
6. No opere la plancha si el cable está dañado o después de que el
aparato haya sufrido alguna caída o avería. Para evitar el riesgo de
choque eléctrico no desarme la plancha. Llame a nuestro número
gratuito de servicio al cliente para obtener información sobre su
examen, reparación o ajuste eléctrico o mecánico. El reensamblaje
incorrecto puede causar un riesgo de choque eléctrico al usar la
plancha.
7. Es necesario supervisar de cerca cuando los niños usen o estén
cerca de cualquier artefacto. No deje la plancha sin atención
mientras esté conectada o sobre una tabla de planchar.
8. Pueden ocurrir quemaduras por tocar las partes metálicas
calientes, agua caliente o vapor. Tenga cuidado cuando voltee
una plancha a vapor boca abajo – ya que puede haber agua
caliente en el depósito.
SALVAGUARDIAS IMPOR
TANTES
840101300 SPv02.qxd 5/10/02 11:22 AM Page 15
Page 10

16
Para planchar en seco
1. Enchufe la plancha en el tomacorriente.
2. Fije el interruptor de vapor ajustable a 0 (la posición de
planchado en seco).
3. Gire el control de temperatura a la temperatura deseada.
Deje transcurrir 2 minutos hasta que la plancha alcance la
temperatura deseada.
4. Para apagar la plancha, gire el control de temperatura a
Off (Apagado) y desenchúfela.
1. Desenchufe la plancha. Usando una taza, vierta despacio
4 onzas (
1
⁄2 taza) de agua del grifo en la abertura del tanque
de agua. No llene la plancha directamente del grifo.
2. Enchufe la plancha en el tomacorriente. Fije el interruptor
de vapor ajustable en la posición de STEAM (Vapor).
3. Gire el control de temperatura a la posición deseada de
tela en el rango de vapor. Deje transcurrir 2 minutos hasta
que la plancha alcance la temperatura deseada.
4. Para apagar la plancha, fije el interruptor de vapor ajustable
a 0 (planchado en seco). Gire el control de temperatura a
Off (Apagado). Desenchufe la plancha.
5. Vacíe el agua de la plancha siguiendo las instrucciones en
“Cuidado de su plancha”.
Para planchar al vapor
Información para seguridad del consumidor
Este producto es una plancha de tipo doméstico.
Este artefacto está equipado con una clavija polarizada. Esta clavija cuenta
con una de las hojas más ancha que la otra. Esta clavija solamente se
conectará al tomacorriente de una sola manera. Esta es una característica
de seguridad para reducir el riesgo de choques eléctricos. Si no puede
conectar la clavija al tomacorriente, pruebe invirtiendo la clavija. Si, aún
así, no puede enchufar la clavija, contacte a un electricista calificado para
que reemplace el tomacorriente obsoleto. No intente evadir el propósito
de seguridad de la clavija polarizada modificándola de alguna manera.
Use la plancha sobre una tabla de planchar. Si plancha sobre otra
superficie puede dañar esa superficie.
Antes de usar por primera vez
• Las salidas de vapor deben ser limpiadas antes del primer uso.
Vea la sección “Autolimpieza” en la página 19 para obtener
mayor información.
• Muchas planchas salpican durante los primeros usos con
agua del grifo. Esto ocurre a medida que la cámara de
vapor se acondiciona y dejará de ocurrir después de unos
cuantos usos.
• Durante el primer uso de la plancha, puede parecer que sale
humo. Esto se detendrá y no indica un defecto o riesgo.
GUARDE ESTAS INSTRUCCIONES
INSTRUCCIONES ESPECIALES
1. Para evitar sobrecargar el circuito, no opere otro artefacto de alto
consumo de corriente en el mismo circuito.
2. Si es absolutamente necesario usar un cable de extensión, debe usarse
uno con capacidad para 10 amperios. Los cables para menor capacidad de corriente pueden sobrecalentarse. Tenga cuidado de colocar el
cable de manera tal que se evite tironearlo o tropezarse con él.
Características
17
Interruptor de vapor ajustable
Este interruptor le proporciona un vapor
continuo en la posición de STEAM (Vapor).
Empuje el interruptor a la posición 0 para
que cambie a la posición de planchar en
seco.
840101300 SPv02.qxd 5/10/02 11:22 AM Page 16
Page 11

19
18
Cuidado de su plancha
Plancha
1. El tanque de agua de su plancha debe ser vaciado después
de cada uso. Gire el control de temperatura a Off (Apagado).
Desenchufe la plancha y sosténgala sobre un lavabo. Incline
lentamente el extremo en punta de la plancha sobre el
lavabo. El agua saldrá por la abertura del tanque de agua.
2. Después de que la plancha se haya enfriado completamente,
envuelva el cable suelto alrededor de la plancha y guárdela en
posición vertical. No guarde la plancha descansando sobre la
suela.
Suela
1. Nunca planche sobre cierres de cremalleras, alfileres, remaches
de metal o broches, ya que éstos pueden rayar la suela.
2. Para limpiar la acumulación ocasional de la suela, límpiela
con un paño remojado en agua jabonosa. No use productos
de limpieza abrasivos o almohadillas metálicas de fregar.
No la sumerja en agua.
3. Siempre guarde la plancha verticalmente en su posición
de base de descanso.
Autolimpieza
Siga estas instrucciones cada vez que planche con vapor para
mantener los respirados de vapor libre de depósitos.
1. Llene la plancha con agua.
2. Enchufe la plancha. Gire el control de temperatura a la
posición más alta.
3. Deje que la plancha se caliente por 3 minutos.
4. Gire el control de temperatura a OFF (apagado).
Desenchufe la plancha y sosténgala sobre un fregadero
con la suela hacia abajo.
Botón/Luz de reajuste y
apagado automático
La luz se enciende cuando la plancha se
enchufa por primera vez, aún si el control
de temperatura ha sido apagado. La luz
indica que la plancha está enchufada.
Después de 15 minutos, la plancha se
apagará y la luz hará un parpadeo. Presione
el botón de reajuste para volver a encender la plancha.
Luz de encendido
Esta luz se enciende cuando la plancha
está enchufada y permanece encendida
hasta que la plancha sea desenchufada.
La luz permanece encendida aún si el
control de temperatura ha sido apagado.
Botones de rocío y golpe de vapor
Presione el botón de rocío para emitir
un rocío fino de agua para las arrugas
difíciles en los artículos de algodón o
lino. Presione el botón de golpe de vapor
para obtener un golpe extra de vapor.
Botón de
reajuste
Luz
Características
Luz de
encendido
Golpe
de
vapor
Rocío
840101300 SPv02.qxd 5/10/02 11:22 AM Page 18
Page 12

20
5/02
840101300
Hamilton Beach/Proctor-Silex, Inc.
Commercial Customer Service
263 Yadkin Road, Southern Pines, NC 28387
Esta garantía reemplaza todas las otras garantías del producto
GARANTÍA LIMITADA
Se garantiza este producto de ser libre de defectos en el material y en
la fabricación por un período de un (1) año a partir de la fecha de
compra original, excepto por lo que se indica a continuación. Durante
este período, este producto será reparado o reemplazado, según nuestra
opción, sin costo alguno. LA GARANTÍA ANTERIOR ESTARÁ EN LUGAR
DE CUALQUIER OTRA GARANTÍA, YA SEA EXPRESA O IMPLÍCITA,
ESCRITA U ORAL, INCLUYENDO CUALQUIER GARANTÍA DE COMERCIABILIDAD O CAPACIDAD PARA UN PROPÓSITO PARTICULAR.
CUALQUIER RESPONSABILIDAD ESTÁ LIMITADA EXPRESAMENTE A
UNA CANTIDAD IGUAL AL PRECIO DE COMPRA QUE SE HA PAGADO,
Y TODOS LOS RECLAMOS POR DAÑOS ESPECIALES, INCIDENTALES
Y CONSECUENTES ESTÁN EXCLUIDOS POR LA PRESENTE. Esta
garantía no ampara el reemplazo de piezas sujetas al uso suministradas
con este producto o una parte del mismo (cepillos del motor, recipiente y
ensamblaje de corte, embragues, etc.). Esta garantía no cubre defectos
que resulten del abuso, negligencia, o ningún otro uso que no esté en
conformidad con las instrucciones impresas. Siempre use este producto
de acuerdo con el Manual de funcionamiento.
Si usted tiene un reclamo bajo esta garantía, sírvase entregar o enviar
por correo el producto al centro de servicio autorizado más cercano a
su localidad, el cual puede ubicar llamando a nuestro número gratis de
servicio al cliente al 1-800-572-3331 o busque en las páginas amarillas el
Centro de Servicio Comercial de Hamilton Beach más cercano.
5. Gire el control de vapor ajustable a vapor . Agua caliente y
vapor saldrán por los respiraderos de vapor. Presione varias
veces el botón de golpe de vapor para una mayor limpieza.
6. Permita que drene toda el agua de la plancha, luego déjela
enfriar y guárdela.
Cuidado de su plancha (cont.)
840101300 SPv02.qxd 5/10/02 11:22 AM Page 20
 Loading...