

Page 1
Micro Food Processor
Robot culinaire
English ..............................2
USA: 1-800-851-8900
Français ..........................10
Canada : 1-800-267-2826
840083100
Digitally signed by Anna Creery
cn=Anna Creery, c=US
Date: 2001.03.06 15:55:28 -05'00'
Reason: I am approving this document
840083100 EN v03 3/2/01 3:13 PM Page 1
Page 2

3
2
IMPORTANT SAFEGUARDS
SAVE THESE INSTRUCTIONS
When using electrical appliances, basic safety precautions should
always be followed, including the following:
1. Read all instructions.
2. To protect against risk of electrical shock, do not immerse base,
motor, cord, or plug in water or other liquid.
3. Close supervision is necessary when any appliance used by or
near children.
4. Unplug cord from outlet when not in use, before putting on or
taking off parts, and before cleaning.
5. Avoid contacting moving parts. Keep fingers out of discharge
opening.
6. Do not operate any appliance with a damaged cord or plug
or after the appliance malfunctions or is dropped or damaged
in any manner. Call our toll-free customer service number for
information on examination, repair or electrical or mechanical
adjustment.
7. The use of attachments not recommended or sold by Hamilton
Beach/Proctor-Silex, Inc. may cause fire, electric shock, or injury.
8. Do not use outdoors.
9. Do not let cord hang over edge of table or counter, or touch hot
surfaces.
10. Never feed food into food chute by hand when slicing or shredding food. Always use food pusher.
11. The blades and discs are sharp. Handle carefully. Store out of
reach of children.
12. Make sure the blade or disc has come to a full stop before
removing cover.
13. Keep hands and utensils away from moving blades and discs
while processing food to reduce the risk of severe personal
injury and/or damage to the food processor. A rubber scraper
may be used but ONLY when the food processor is not running.
14. To reduce the risk of injury, never place cutting blade or discs on
base without first putting bowl properly in place.
15. Be certain cover is securely locked in place before operating
appliance.
16. Do not attempt to defeat the cover interlock mechanism.
17. To reduce the risk of injury, be sure to insert or remove blades
and discs using finger holes provided for this purpose.
This appliance is intended for household use only.
This appliance is equipped with a polarized plug. This type of plug
has one blade wider than the other. The plug will fit into an electrical
outlet only one way. This is a safety feature intended to help reduce
the risk of electrical shock. If you are unable to insert the plug into
the outlet, try reversing the plug. If the plug should still fail to fit,
contact a qualified electrician to replace the obsolete outlet. Do not
attempt to defeat the safety purpose of the polarized plug by modifying the plug in any way.
NOTE: This unit is not recommended for processing meat or
cheeses.
CONSUMER SAFETY INFORMATION
840083100 EN v03 3/2/01 3:13 PM Page 2
Page 3
5
4
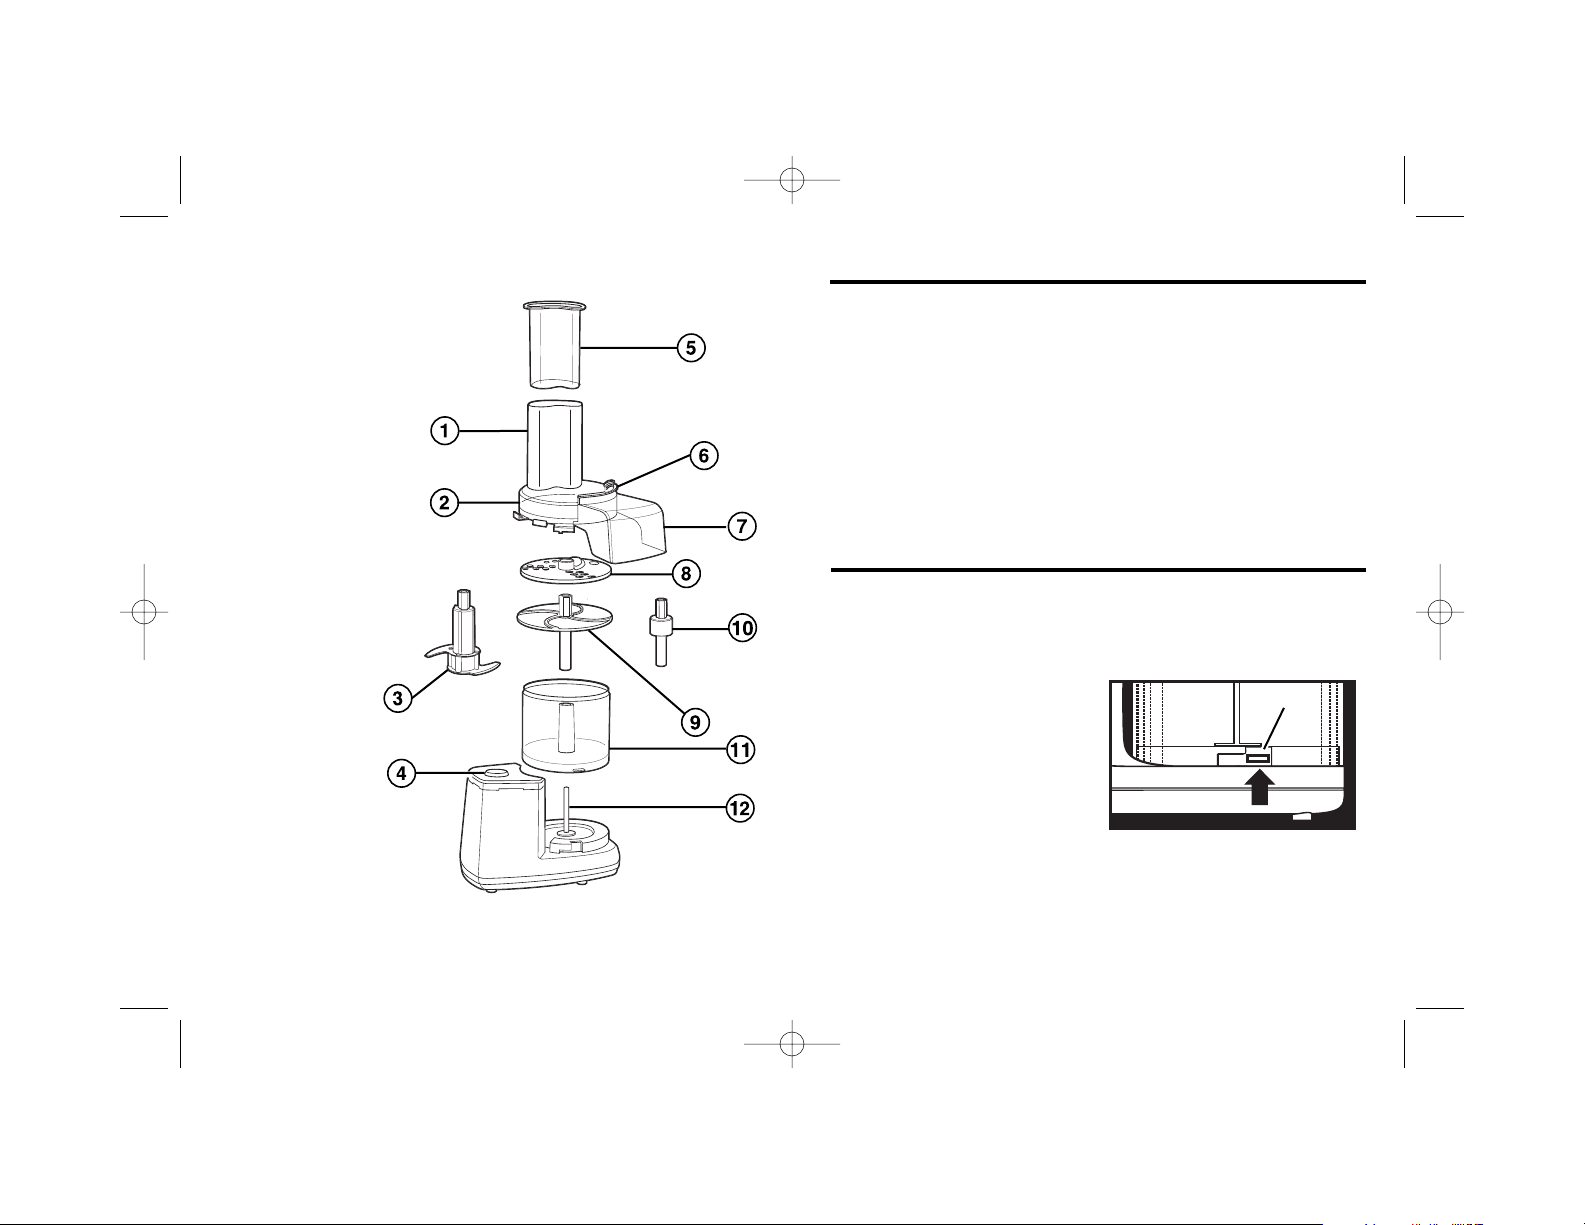
Parts & Features
1. Food Chute
2. Cover
3. S-Blade
4. Control Panel
5. Food Pusher
6. Food Gate
7. Continuous Feed
Chute
8. Reversible
Slicer/Shredder
9. Slinging Disc
10. Disc Shaft
11. Bowl
12. Center Column
How to Operate the Controls
ON-OFF-PULSE Switch: This is a three-position switch that
gives you a choice of “ON,” “OFF,” or “PULSE.” Selecting the
ON position causes the motor to run continuously until you
move the switch to OFF. The PULSE position will cause the
motor to run only until you release the switch; then it automatically springs back to the OFF position.
How to Use
How to Assemble
Always lock bowl on base before putting blade or disc in
position. Make sure blade or disc is securely in place before
using.
1. Make sure unit is off and unplugged.
2. Place bowl onto base. Align
tabs on bowl with slots on
base, as shown. Rotate the
bowl clockwise until it locks
into place.
3. Insert desired blade. Handle
carefully; blades are sharp.
S-Blade: Place the S-blade
onto center column of food
processor in center of bowl.
Slicer/Shredder Disc: Place the disc shaft onto center
column of food processor. Place reversible slicer/shredder
disc onto shaft, desired cutting edge up.
Ta b
840083100 EN v03 3/2/01 3:14 PM Page 4
Page 4

7
6
4. Place cover on bowl. Turn
the cover clockwise until
arrow on cover aligns with
arrow on control panel. Turn
until you hear the cover lock
into place.THE MOTOR WILL
NOT OPERATE UNLESS
COVER IS LOCKED.
5. Plug unit in and process.
Slot
Locked
Using S-Blade
The S-Blade should be used to mince or chop foods, mix
ingredients, or to puree a mixture.
1. Make sure unit is off and unplugged.
2. Lock bowl onto base and put S-blade in place.
3. Lock cover onto bowl. Insert food pusher into food chute.
4. Process food to desired texture. Processing speed and
time will determine the finished consistency of the food.
Use the PULSE feature to help you avoid over-processing.
How to Use the Slicer/Shredder Disc
3. Cut food to fit food chute. Pack food chute with food.
Insert food pusher in chute. Always use the food pusher
to feed food into the chute. NEVER PUSH FOOD
THROUGH CHUTE WITH HANDS.
4. While pressing on food pusher, move switch to ON or
PULSE to process food.
5. When food chute is empty, move switch to OFF or release
from PULSE position. Wait until blade has stopped rotat-
ing before removing cover.
Using the Continuous Feed Chute
IMPORTANT: When using the continuous feed chute the food
gate must be removed and the continuous feed disc must be
in place.
1. Make sure unit is off and unplugged. Lock bowl onto base
then place slinging disc onto center column.
2. Select desired side of reversible slicer/shredder disc and
place that side up, on top of slinging disc.
3. REMOVE FOOD GATE
FROM CONTINUOUS
FEED CHUTE TO PREVENT
DAMAGE TO UNIT.
4. Lock on cover. Place bowl
under feed chute.
5. Plug unit in and process.
Check the continuous feed chute frequently to make sure
the opening is not blocked. If blocked, turn unit off and
unplug. Clear blockage, then reassemble and continue
processing.
Removing
food gate
The reversible slicer/shredder disc has a slicing blade on one
side and shredding teeth on the other. Place desired cutting
edge up to use.
1. Make sure unit is off and unplugged.
2. Lock bowl onto base. Put disc shaft on center column and
put slicer/shredder disc in place with the desired surface
facing up for either slicing or shredding. Lock cover onto
bowl.
840083100 EN v03 3/2/01 3:14 PM Page 6
Page 5

9
LIMITED WARRANTY
This product is warranted to be free from defects in material and workmanship for a
period of two (2) years for Hamilton Beach Portfolio products or one (1) year for
Hamilton Beach products from the date of original purchase, except as noted below.
During this period, we will repair or replace this product, at our option, at no cost. THE
FOREGOING WARRANTY IS IN LIEU OF ANY OTHER WARRANTY, WHETHER
EXPRESS OR IMPLIED, WRITTEN OR ORAL INCLUDING ANY WARRANTY OF
MERCHANTABILITY OR FITNESS FOR A PARTICULAR PURPOSE. ANY LIABILITY IS
EXPRESSLY LIMITED TO AN AMOUNT EQUAL TO THE PURCHASE PRICE PAID, AND
ALL CLAIMS FOR SPECIAL, INCIDENTAL AND CONSEQUENTIAL DAMAGES ARE
HEREBY EXCLUDED. There is no warranty with respect to the following, which may be
supplied with this product: glass parts, glass containers, cutter/strainer, blades, and/or
agitators. This warranty extends only to the original consumer purchaser and does not
cover a defect resulting from abuse, misuse, neglect, use for commercial purposes, or
any use not in conformity with the printed directions. This warranty gives you specific
legal rights, and you may also have other legal rights which vary from state to state, or
province to province. Some states or provinces do not allow limitations on implied
warranties or special, incidental or consequential damages, so the foregoing limitations
may not apply to you.
If you have a claim under this warranty, DO NOT RETURN THE APPLIANCE TO THE
STORE! Please call our CUSTOMER SERVICE NUMBER. (For faster service please
have model, series, and type numbers ready for operator to assist you.)
CUSTOMER SERVICE NUMBERS
In the U.S. 1-800-851-8900
In Canada 1-800-267-2826
Web site address: www.hamiltonbeach.com
KEEP THESE NUMBERS FOR FUTURE REFERENCE!
Customer Service
If you have a question about your micro food processor, call
our toll-free customer service number. Before calling, please
note the model, type, and series numbers and fill in that
information below. These numbers can be found on the
bottom of your micro food processor. This information will
help us answer your question much more quickly.
MODEL:_____________ TYPE:_____________ SERIES: ______________
8
FOOD
PREPARATION
ATTACHMENT/
SPEED
Cabbage, shredded Cut to fit food chute Slicer/ON
Carrots, chopped Peeled and trimmed S-Blade/PULSE
Cut in 1-inch pieces
Celery, sliced Cut to fit food chute Slicer/ON
Mushrooms, sliced Pack food chute Slicer/ON
Onions, chopped Cut into chunks S-Blade/PULSE
Potatoes, shredded Cut to fit food chute Shredder/ON
Potatoes, sliced Cut to fit food chute Slicer/ON
Summer or zucchini Cut to fit food chute Slicer/ON
squash, sliced
Processing Chart
Cleaning
1. Wash the bowl, cover, blade, discs, food gate, and food
pusher in hot, soapy water. Rinse and dry thoroughly.
NOTE: Do not store the food processor with the cover in the
locked position, as this may put strain on the interlock tab.
2. Wipe the base, control panel, and cord with a damp cloth
or sponge. To remove stubborn soil, use a mild non-abrasive cleanser.
NEVER IMMERSE THE BASE IN WATER OR OTHER
LIQUID.
840083100 EN v03 3/2/01 3:14 PM Page 8
Page 6

11
CONSERVEZ CES
INSTRUCTIONS
13. Garder les mains et ustensiles à l’écart du couteau et du disque
mobiles durant le traitement des aliments, pour réduire le risque
de blessure corporelle grave et/ou d’endommagement du robot
culinaire. On peut se servir d’un racloir en caoutchouc, mais
SEULEMENT lorsque le robot culinaire ne fonctionne pas.
14. Pour réduire le risque de blessures, ne jamais mettre le couteau ou
le disque tranchant sur la base avant d’avoir d’abord bien mis le bol
en place.
15. S’assurer que le couvercle est bien verrouillé en place avant de
mettre l’appareil en marche.
16. Ne pas essayer de défaire le mécanisme de verrouillage du couvercle.
17.
Pour réduire le risque de blessures, veiller à insérer et retirer les
couteaux et les disques en se servant des trous pour les doigts
prévus à cette fin.
Cet appareil est destiné à l’utilisation domestique seulement.
Cet appareil est muni d’une fiche polarisée. Ce type de fiche présente
une broche plus large que l’autre. La fiche ne peut être introduite dans
une prise dans un sens seulement. Il s’agit d’une caractéristique de
sécurité visant à réduire le risque de choc électrique. Si la fiche ne peut
pas être insérée dans la prise, la tourner dans l’autre sens. Si elle ne peut
toujours pas être insérée dans la prise, contacter un électricien qualifé
pour qu’il remplace la prise désuète. Ne pas essayer de contourner
l’objectif de sécurité de la fiche polarisée en la modifiant de quelque
manière que ce soit.
REMARQUE : Cet appareil n’est pas recommandé pour le
traitement des viandes ou des fromages.
RENSEIGNEMENTS DE SÉCURITÉ
POUR LES CONSOMMATEURS
1010
PRÉCAUTIONS IMPORTANTES
Lors de l’utilisation d’appareils électroménagers, des précautions
fondamentales de sécurité doivent toujours être observées, y compris
ce qui suit :
1. Lire toutes les instructions.
2. Pour réduire le risque de choc électrique, ne pas immerger la base,
le moteur, le cordon ou la fiche dans l’eau ou autre liquide.
3.
Une bonne surveillance est nécessaire pour tout appareil utilisé
par des enfants ou près d’eux.
4. Débrancher l’appareil de la prise de courant électrique lorsqu’il n’est
pas utilisé, avant d’y placer ou d’en enlever des pièces, et avant un
nettoyage.
5. Éviter le contact avec les pièces en mouvement. Garder les doigts
hors de l’ouverture de décharge.
6. Ne pas faire fonctionner un appareil électroménager avec une fiche
ou un cordon endommagé, ou lorsque l’appareil ne fonctionne pas
bien ou a été échappé ou endommagé d’une manière quelconque.
Composer notre numéro de service à la clientèle sans frais d’interurbain pour renseignements concernant l’examen, la réparation
ou l’ajustement électrique ou mécanique.
7. L’utilisation d’accessoires non recommandés ni vendus par
Hamilton Beach/Proctor-Silex, Inc. peut causer un incendie, un
choc électrique ou des blessures.
8. Ne pas utiliser à l’extérieur.
9. Ne pas laisser le cordon pendre au bord d’une table ou d’un comp-
toir, ni venir en contact avec des surfaces chaudes.
10. Ne jamais introduire d’aliments dans l’entonnoir à la main pour les
couper ou les hacher. Toujours utiliser le poussoir.
11. Les couteaux et les disques sont coupants. Les manipuler avec
soin. Les ranger hors de portée des enfants.
12. S’assurer que le couteau ou le disque sont complètement arrêtés
avant d’enlever le couvercle.
840083100 FR v01 3/2/01 3:14 PM Page 10
Page 7

13
Utilisation
Assemblage
Verrouillez toujours le bol sur sa base avant de mettre le
couteau ou le disque en place.
1. Assurez-vous que l’interrupteur est en position d’arrêt et
que l’appareil est débranché.
2. Mettez le bol sur la base.
Assurez-vous que les taquets
du bol sont alignés avec les
fentes de la base, comme le
montre l’illustration. Faites
tourner le bol dans le sens
des aiguilles d’une montre
jusqu’à ce qu’il se verrouille
en place.
Taquet
Utilisation des commandes
Interrupteur ON-OFF-PULSE «MARCHE-ARRÊTIMPULSION» : cet interrupteur vous permet de choisir entre
trois positions, ON «MARCHE», OFF «ARRÊT» ou PULSE
«IMPULSION». En position de marche, le moteur tourne sans
arrêt, jusqu’à ce que l’interrupteur soit réglé sur OFF
«ARRÊT». En position PULSE «IMPULSION», le moteur fonctionne jusqu’à ce que l’interrupteur soit relâché, et il se remet
alors automatiquement en position d’arrêt.
12
Pièces et caractéristiques
1. Entonnoir
2. Couvercle
3. Couteau en S
4. Tableau de
commande
5. Poussoir
6. Capot
7. Entonnoir
d’alimentation
continue
8. Disque à trancher/
râper réversible
9. Disque de projection
10. Porte-disque
11. Bol
12. Colonne
centrale
840083100 FR v01 3/2/01 3:14 PM Page 12
Page 8

15
Opération avec le couteau en S
Le couteau en S sert à émincer ou couper les aliments
en morceaux, à mélanger des ingrédients, ou à réduire les
préparations en purée.
1. Assurez-vous que l’interrupteur est en position d’arrêt et
que l’appareil est débranché.
2. Verrouillez le bol sur la base et mettez le couteau en S en
place.
3. Verrouillez le couvercle sur le bol. Insérez le poussoir dans
l’entonnoir.
4. Mettez le robot en marche jusqu’à ce que les aliments
aient la consistance désirée. La durée et la vitesse de
fonctionnement déterminent la consistance finale de la
préparation. Utilisez la fonction PULSE «IMPULSION» pour
éviter l’excès.
Opération utilisant le disque
pour trancher/râper
Le disque à trancher/râper réversible est muni d’une lame tranchante d’un côté et de dents permettant de râper de l’autre.
Orientez la lame dont vous souhaitez vous servir vers le haut.
1. Assurez-vous que l’interrupteur est en position d’arrêt et
que l’appareil est débranché.
2. Verrouillez le bol sur la base. Mettez le porte-disque sur la
colonne centrale et placez-y le disque à trancher/râper
réversible, la surface voulue orientée vers le haut, selon
que vous désirez trancher ou râper. Verrouillez le couvercle
sur le bol.
14
3. Insérez le couteau choisi. Manipulez avec précaution; les
lames sont coupantes. Procédez de la façon suivante pour
installer les lames :
Couteau en S : Mettez le couteau en S sur la colonne
centrale du robot, au milieu du bol.
Disque à trancher/râper : Mettez le porte-disque sur la
colonne centrale du robot. Mettez le disque à trancher/
râper réversible sur le porte-disque, la lame de coupe
voulue orientée vers le haut.
4. Mettez le couvercle sur le bol.
Faites tourner le couvercle
dans le sens des aiguilles
d’une montre jusqu’à ce que
la flèche de verrouillage du
couvercle s’aligne avec la
flèche du tableau de commande. Faites tourner, jusqu’à ce qu’un bruit signalant que
le couvercle est verrouillé se fasse entendre. LE MOTEUR
NE FONCTIONNERA PAS TANT QUE LE COUVERCLE
N’AURA PAS ÉTÉ VERROUILLÉ.
5. Branchez l’appareil dans une prise électrique et mettez le
robot en marche.
Fente
Verrouillé
840083100 FR v01 3/2/01 3:14 PM Page 14
Page 9

16
3. Coupez les aliments de façon à ce qu’ils rentrent dans
l’entonnoir. Tassez bien les aliments dans l’entonnoir.
Insérez le poussoir dans l’entonnoir. Servez-vous toujours
du poussoir pour mettre les aliments dans l’entonnoir.
NE POUSSEZ JAMAIS LES ALIMENTS DANS L’ENTONNOIR À LA MAIN.
4. Tout en appuyant sur le poussoir, réglez l’interrupteur sur
ON «MARCHE» ou sur PULSE «IMPULSION» pour traiter
les aliments.
5. Lorsque l’entonnoir est vide, réglez l’interrupteur sur OFF
«ARRÊT», ou bien relâchez la fonction PULSE «IMPULSION». Attendez que le couteau ait cessé de tourner
avant de retirer le couvercle.
Traitement continu
IMPORTANT : Lors de l’utilisa-
tion de l’option traitement continu, on doit retirer le volet de
fermeture et installer le disque
d’éjection continue.
1. Assurez-vous que l’appareil
est éteint et débranché.
Verrouillez le bol sur la base, et mettez ensuite le disque de
projection sur la colonne centrale.
2. Choisissez le côté voulu du disque à trancher/râper
réversible et mettez-le sur le disque de projection, la
surface voulue orientée vers le haut.
3. RETIREZ LE CAPOT DU COUVERCLE D’ALIMENTATION
CONTINUE POUR LIMITER LES RISQUES D’ENDOMMAGEMENT DE L’APPAREIL.
4. Verrouillez le couvercle. Positionnez le bol en dessous de
l’entonnoir d’alimentation continue.
Retirer le
volet de
fermeture
5. Branchez l’appareil, mettez le robot en marche et passez-y
les aliments. Assurez-vous fréquemment que l’ouverture
de l’entonnoir d’alimentation continue n’est pas bloquée.
Le cas échéant, éteignez l’appareil et débranchez-le.
Dégagez l’ouverture, remontez ensuite le robot et remettez-le en marche.
Tableaux de traitement
ALIMENT
PRÉPARATION
ACCESSOIRE/
VITESSE
Chou, râpé, Coupé de façon à Disque à trancher/ON
tenir dans l’entonnoir «MARCHE»
Carottes, Épluchées, coupées Couteau en S/ PULSE
en morceaux morceaux de 2,5 cm «IMPULSION»
Céleri, Coupé de façon Disque à trancher/ON
tranché à tenir dans l’entonnoir «MARCHE»
Champignons, Les entasser dans Disque à trancher/ON
tranchés l’entonnoir «MARCHE»
Oignons, Coupés en gros Couteau en S/PULSE
en morceaux morceaux «IMPULSION»
Pommes de Coupées de façon Disque à trancher/ON
terre, tranchées à tenir dans l’entonnoir «MARCHE»
Pommes de Coupées de façon Disque à râper/ON
terre, râpées à tenir dans l’entonnoir «MARCHE»
Squash ou Coupés de façon à Disque à trancher/
zucchini, tenir dans l’entonnoir ON «MARCHE»
tranchés
17
840083100 FR v01 3/2/01 3:14 PM Page 16
Page 10

19
18
Service à la clientèle
Si vous avez une question au sujet du robot culinaire,
composer notre numéro de service à la clientèle sans
frais d’interurbain. Avant de faire un appel, veuillez noter
les numéros de modèle, de type et de série, et fournir ces
renseignements ci-dessous. Ces numéros se trouvent à la
base du robot culinaire. Ces renseignements nous aideront
à répondre beaucoup plus vite à toute question.
MODÈLE : ___________ TYPE :___________ SÉRIE : ____________
Nettoyage
1. Laver le bol, le couvercle, le couteau, les disques, le volet
de fermeture et le poussoir dans de l’eau chaude et savonneuse. Rincer parfaitement et laisser sécher.
REMARQUE : Ne pas remiser le robot culinaire alors que
le couvercle est à la position de verrouillage; ceci peut
forcer l’onglet d’interverrouillage.
2. Essuyer la base, le tableau de commande et le cordon
d’alimentation avec un linge ou une éponge humide. Pour
éliminer des souillures tenaces, utiliser un produit de nettoyage doux, non abrasif. NE JAMAIS IMMERGER LE
MODULE DE LA BASE DANS DE L’EAU OU UN AUTRE
LIQUIDE.
GARANTIE LIMITÉE
Ce produit est garanti exempt de vices de matériau et de fabrication pendant une
période de deux (2) ans pour les produits Hamilton Beach Portfolio ou pendant un
(1) an pour les produits Hamilton Beach à partir de la date de l'achat original,
excepté ce qui est noté ci-dessous. Au cours de cette période, nous réparerons ou
remplacerons ce produit sans frais, à notre discrétion. LA GARANTIE CI-DESSUS
REMPLACE TOUTE AUTRE GARANTIE EXPRESSE OU IMPLICITE, ÉCRITE OU
ORALE, Y COMPRIS TOUTE GARANTIE DE QUALITÉ MARCHANDE OU DE
CONFORMITÉ À UNE FIN PARTICULIÈRE. TOUTE RESPONSABILITÉ EST
EXPRESSÉMENT LIMITÉE À UN MONTANT ÉGAL AU PRIX D’ACHAT PAYÉ ET
TOUTES LES RÉCLAMATIONS POUR DOMMAGES SPÉCIAUX ET INDIRECTS SONT
PAR LES PRÉSENTES EXCLUES. La garantie ne s’applique pas aux accessoires
suivants qui pourraient être vendus avec ce produit : pièces en verre, récipients en
verre, couteau/tamis, lames et/ou agitateurs. Cette garantie ne s’applique qu’à
l’acheteur d’origine et ne couvre pas un vice causé par l’abus, le mésusage, la
négligence, l’usage à des fins commerciales ou tout autre usage non prescrit dans le
mode d’emploi. Cette garantie vous confère des droits juridiques spécifiques et vous
pouvez aussi jouir d’autres droits juridiques qui peuvent varier d’un État à un autre
ou d’une province à une autre. Certains États ou provinces ne permettent pas les
limitations sur les garanties implicites ou les dommages spéciaux ou indirects de telle
sorte que les limitations ci-dessus ne s’appliquent peut-être pas dans votre cas.
Si vous désirez procéder à une réclamation en vertu de cette garantie, NE
RETOURNEZ PAS L’APPAREIL AU MAGASIN! Veuillez téléphoner au NUMÉRO DU
SERVICE À LA CLIENTÈLE. (Pour un service plus rapide, ayez à portée de la main
les numéros de série et de modèle et de type de votre appareil lorsque vous
communiquez avec un représentant.)
NUMÉROS DU SERVICE À LA CLIENTÈLE
Aux États-Unis 1-800-851-8900
Au Canada 1-800-267-2826
Adresse du site Web : www.hamiltonbeach.com
CONSERVEZ CES NUMÉROS POUR RÉFÉRENCE ULTÉRIEURE!
840083100 FR v01 3/2/01 3:14 PM Page 18
Page 11

20
2/01
H
AMILTONBEACHPROCTOR-SILEX,INC
.P
ROCTOR-SILEXCANADA,INC
.
263 Yadkin Road
Southern Pines, NC 28387
Picton, Ontario K0K 2T0
840083100
Web site address: www.hamiltonbeach.com
840083100 FR v01 3/2/01 3:14 PM Page 20
 Loading...