

Page 1
840071000
English .................................. 2
USA: 1-800-851-8900
Blender
Page 2

2
IMPORTANT SAFEGUARDS
SAVE THESE INSTRUCTIONS!
Blender Safety
When using electric appliances, basic safety
precautions should be followed, including
the following:
1. Read all instructions.
2. To reduce the risk of electrical shock,
do not put cord, plug, base, or motor in
water or other liquid.
3. Close supervision is necessary when
any appliance is used by or near children.
4. Unplug cord from outlet when not in
use, before putting on or taking off
parts, and before cleaning.
5. Avoid contact with moving parts.
6. Do not operate any appliance with a
damaged cord or plug, or after the
appliance malfunctions or is dropped or
damaged in any manner. Call our toll-free
customer service number for information
on examination, repair, or adjustment.
7. The use of attachments, including
canning jars, not recommended or sold
by Hamilton Beach/Proctor-Silex, Inc.
may cause a risk of injury to persons.
8. Do not use outdoors.
9. Do not let cord hang over edge of table
or counter, or touch hot surfaces,
including the stove.
10. Keep hands and utensils out of
container while blending to reduce the
risk of severe personal injury and/or
damage to blender. A rubber spatula
may be used but must be used only
when blender is not running.
11. Blades are sharp, handle carefully.
12. Do not use a broken, chipped or
cracked blender jar.
13. Do not use broken, cracked or loose
cutting blades.
14. To reduce the risk of injury, never place
cutting unit blades on base without jar
properly attached.
15. Always operate blender with cover
in place.
16. When blending hot liquids, remove
center piece of two-piece cover. Do
not fill blender container beyond the
3 cup level. Always begin processing
at the lowest speed setting. Keep
hands and other exposed skin away
from the cover opening to prevent
possible burns.
17. Screw on jar retaining ring firmly. Injury
can result if moving blades accidentally
become exposed.
18. If the jar should turn when the motor is
switched ON, switch OFF immediately
and tighten jar in threaded retaining ring.
19. Do not leave blender unattended while
it is operating.
20. To disconnect cord, turn the control to
OFF, then remove plug from wall outlet.
21. Do not use appliance for other than
intended purpose.
Page 3

3
Consumer Safety Information
Before First Use
After unpacking the blender, wash
everything except the blender base in
hot, soapy water. Dry thoroughly. Wipe
the blender base with a damp cloth or
sponge. DO NOT IMMERSE THE
BASE IN WATER. Care should be
taken when handling the blades as
they are very sharp.
This appliance intended for household
use only.
This appliance is equipped with a polarized
plug. This type of plug has one blade wider
than the other. The plug will fit into an
electrical outlet only one way. This is a
safety feature intended to help reduce the
risk of electrical shock. If you are unable to
insert the plug into the outlet, try reversing
the plug. If the plug should still fail to fit,
contact a qualified electrician to replace the
obsolete outlet. Do not attempt to defeat
the safety purpose of the polarized plug by
modifying the plug in any way.
The length of the cord used on this
appliance was selected to reduce the
hazards of becoming tangled in, or tripping
over a longer cord. If a longer cord is
necessary an approved extension cord
may be used. The electrical rating of the
extension cord must be equal to or greater
than the rating of the blender. Care must be
taken to arrange the extension cord so
that it will not drape over the countertop
or tabletop where it can be pulled on by
children or accidentally tripped over.
The Hamilton Beach/Proctor-Silex, Inc.
Type FP04 food processor attachment is
intended for use with this blender. The
marked rating of wattage for your blender is
based upon usage with the jar provided.
The Type FP04 food processor attachment
may draw less power.
If the cutting unit blades lock and do not
move, it will damage the motor. Do not use.
Call the toll free customer service number
for information.
Do not place blender container in the
freezer filled with food or liquid. The frozen
mixture, when placed on the blender motor
base, will damage the cutting unit,
container, and motor.
Page 4
4
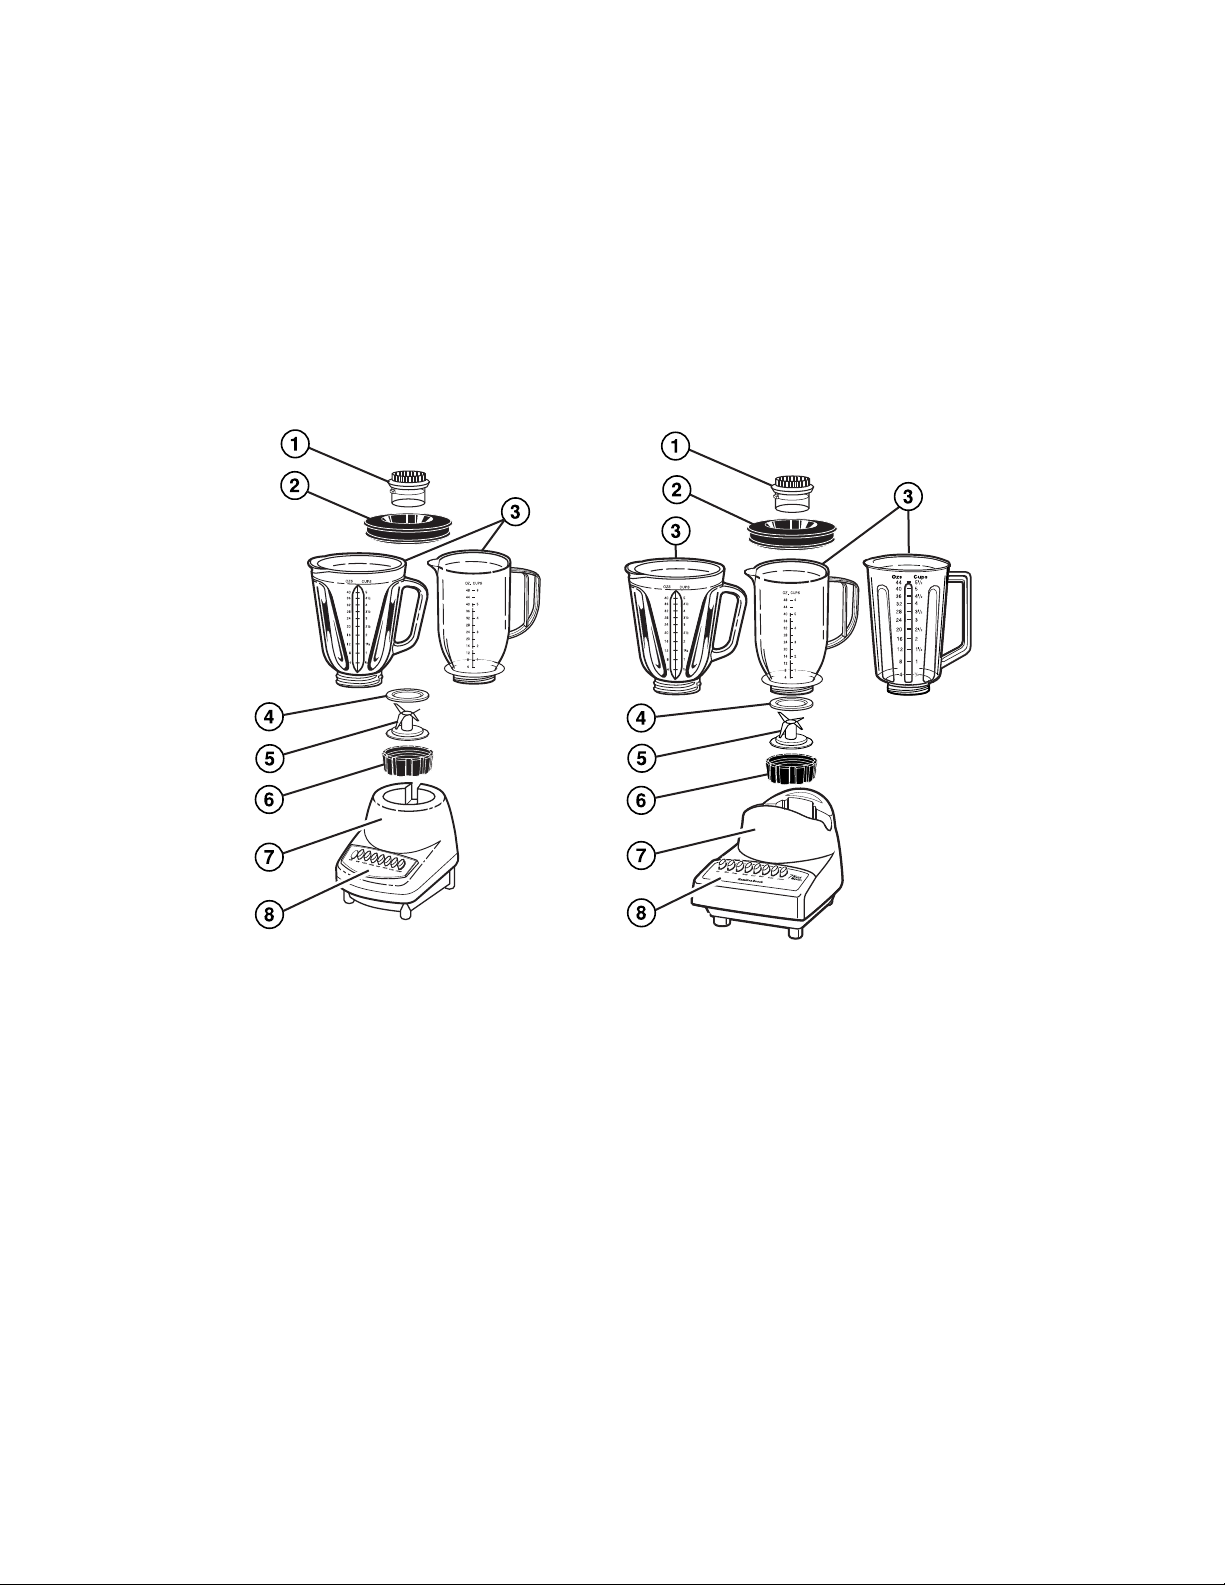
Parts and Features
1. Filler Cap
2. Lid
3. Jar - 44 oz/1250 ml plastic
40 oz/1250 ml glass
48 oz/1375 ml plastic
with strain/pour/close lid
4. Gasket
5. Blades
6. Retaining Ring
7. Base
8. Control Panel
Page 5

5
How to Assemble and Use
1. Make sure blender is unplugged.
Place blender base on clean, dry
surface to keep foreign particles
from being pulled up into motor
during operation.
2. Place blades in retaining ring. Fit
gasket over blades. The gasket must
lie flat. Set jar on top of gasket and
screw on retaining ring.
3. Make sure the retaining ring is firmly
screwed onto the jar. If not, it may
loosen later when motor is turned on.
4. Set jar into place on blender base,
making sure it is securely seated. If
not, gently rock the jar until seated.
5. Plug cord into outlet.
6. Put ingredients in jar, place lid
on jar.
7. Process food or beverages. Place
hand on lid when blending liquids.
See “Blending Techniques” and
“Hints for Best Use” for suggestions
and processing tips.
8. ALWAYS turn blender off and wait
until blades have stopped rotating
before removing jar.
9. To remove jar after blending is
complete, lift the jar straight up.
If it is not easily removed, rock
gently and lift. Do not twist.
10. NEVER replace jar onto unit while
motor is running.
IMPORTANT: Your Hamilton Beach
blender jar and cutting blades are
subject to wear during normal use.
Always inspect jar for nicks, chips
or cracks. Always inspect cutting
blades for broken, cracked or loose
blades. If jar or cutting blades are
damaged, do not use. Call our
toll-free customer service number
to obtain replacement parts.
Hints for Best Use
• Processing hot foods or liquids in the
blender may cause hot liquid to spurt
out when the cover is removed.
Always remove the filler-cap from
the cover before blending hot foods
or liquids.
• To add foods when blender is
operating, remove filler-cap from
container cover and add ingredients
through the opening.
• If blending action stops during
blending or ingredients stick to sides
of the jar, turn blender OFF. Remove
cover and use a rubber spatula to
push mixture toward blades.
• Do not try to mash potatoes, mix stiff
dough, whip egg whites, grind raw
meat, or extract juices from fruits and
vegetables. The blender is not made
to perform these tasks.
• Do not store food or liquids in the
blender jar.
Page 6

6
This blender has a three position
LO/HI/ICE BREAKER switch. Slide
the switch towards LO to select the
LO power range. The middle position
of the switch is the HI power range.
To operate the blender, first select the
LO or HI power range. Then select the
speed by pushing one of the speed
buttons. The blender will run until the
OFF button is pushed.
Ice Breaker/Pulse
This function allows instant control
of the blending action. The blender
operates only as long as the switch
is held. Slide the switch toward
Ice Breaker for instant on and off
pulsing action.
Depending on the model, your blender
controls may range from 7 to 14
speeds. If your blender control panel
has blending functions listed above
and below a row of buttons, first select
the LO or HI power range before
pushing a Function Button.
Features called Ice Breaker, Pulse,
or InstaBlend indicate an option of
blending only as long as the button is
held down. The blender motor stops
when the button is released. Do not
attempt to hold down these buttons
down continuously.
Control Panel
Crushing Ice
Fill container half-full with cold water.
Add about 2 cups of ice cubes.
Place cover on container then press
and release the Ice Breaker button.
Continue until ice is crushed to desired
consistency. Pour contents into
colander or sieve to drain off water.
DO NOT CRUSH ICE WITHOUT
LIQUID. Failure to follow these
directions can result in damage to
the blades, container, blender, and
possibly result in personal injury.
Page 7

7
Baby Foods
Follow feeding guidelines appropriate
for age. Place 1 cup cooked fruits or
vegetables in blender jar. Add liquid,
such as water, milk, or juice, if needed.
PUREE for 10 seconds or until smooth.
Bread Crumbs
Tear bread into pieces and put in
blender jar. PULSE about 10 times.
Cookie or Cracker Crumbs
Break cookies or crackers into pieces
and put in blender jar. Process 1 cup
at a time. PULSE about 10 times. For a
finer consistency, process on CRUMB
a few seconds after Pulsing.
Chopped Nuts
Place 1 cup nuts in blender jar. PULSE
a few times. Remove jar from base and
shake to redistribute pieces. Place jar
on base and PULSE a few more times.
Chopping Vegetables
Cut cabbage, carrots, onion, green
pepper, or potatoes into chunks. Place
2 cups of vegetable in blender jar.
Cover with water. PULSE until desired
chopped consistency is reached.
Pour into colander to drain off water.
Coffee Beans
Place 1⁄2 cup beans in blender jar.
Process on LIQUEFY for 30 seconds
or until desired grind consistency
is reached.
Frozen Juice Concentrate
Place 6 ounces frozen juice in blender
jar with recommended amount of
water. LIQUEFY 20 seconds. Or place
12 ounces frozen juice in blender
jar with 1 can of water. BLEND
30 seconds. Pour into pitcher and
stir in remaining 2 cans water.
Blending Techniques
Grated Baking Chocolate
On a cutting board, cut 2 to 3 ounces
baking chocolate into chunks. Place in
blender jar. PULSE for 10 seconds.
Smooth Gravy
If your gravy has lumps, place in
blender jar. Remove filler-cap from
cover to allow steam to escape.
PUREE 5 seconds or until smooth.
Pancakes or Waffles
Place liquid ingredients into jar, then
dry ingredients. WHIP for 10 seconds
or until blended.
Parmesan Cheese
Cut cheese into half-inch chunks.
Process on GRATE for 30 seconds
or until desired consistency.
Superfine Sugar
Place 1 cup regular granulated sugar
in blender. GRATE 30 seconds to
make superfine sugar which dissolves
instantly in iced tea.
“Thickened” Whipping Cream
The blender will not whip cream, but
produces a spoonable topping. Pour
1 cup heavy or whipping cream in
blender jar. Process on BLEND for
20 seconds or until thickened.
Page 8

8
Recipes
For more blender recipes, call our toll-free number or check our Web site.
Ham & Swiss Strata
4 slices bread
1 cup grated Swiss cheese
2 eggs
1 cup milk
Spray an 8-inch baking dish with nonstick cooking spray. Lay bread in dish,
overlapping if necessary. Sprinkle with cheese. Place eggs, milk, mustard, and
pepper in jar and process on BLEND for 15 seconds. Add ham to jar and PULSE
3 or 4 times or until chopped to desired consistency. Pour over bread and cheese.
Bake at 350˚F for 40 minutes or until set. Makes 2 servings.
Mexican Jack Omelet
3 eggs
2 ounces Monterey Jack or
pepper jack cheese
Place all ingredients in blender. Process on GRATE about 10 seconds. Over
medium heat, melt a small pat of margarine or butter in a skillet. Pour omelet
into skillet. Cook until just set, then flip over and cook until done. Fold and serve.
Makes 1 omelet.
1 tablespoon prepared mustard
1
⁄8 teaspoon pepper
2 to 3 slices ham, torn in pieces
1. Unplug blender from electrical outlet.
2. Wipe blender base, control panel,
and cord with a damp cloth or
sponge. To remove stubborn spots,
use a mild, non-abrasive cleanser.
3. To clean jar, unscrew retaining ring
and remove cutting unit assembly
from jar.
4. Carefully remove blades and gasket
from bottom of retaining ring.
How to Clean
5. Carefully wash blades, retaining ring,
gasket, jar (if plastic), and cover in
hot, soapy water. Rinse and dry
thoroughly. Do not soak. Glass jars
may be washed in an automatic
dishwasher. Do not wash blades,
retaining ring, gasket, plastic jar,
or cover in a dishwasher.
6. Reassemble cutting unit assembly
onto jar, replace jar onto blender base.
7. Store blender with cover ajar to
prevent container odor.
1 tablespoon water or milk
Salt and pepper to taste
Page 9

9
1 teaspoon hot pepper sauce
1
⁄2 cup roasted red bell pepper
4 ounces cream cheese, cubed
Red Pepper and Garlic Dip
6 large cloves garlic
2 tablespoons fresh basil leaves,
packed
1 tablespoon soy sauce
Place garlic and basil in blender jar. PULSE for 5 to 10 seconds or until coarsely
chopped. Add remaining ingredients. Process on LIQUEFY until smooth and
blended. Serve with crackers or fresh vegetables for dipping. Cover and
refrigerate to store. Yield: 11⁄2 cups.
Mediterranean Pasta
15-ounce can whole tomatoes
1
⁄3 cup roasted red bell pepper
6-ounce jar marinated artichoke hearts,
drained
3 cloves garlic
Puree tomatoes. Add other ingredients and PULSE until coarsely chopped.
Heat, if desired, and pour over pasta. Yield: about 2 cups.
Hummus
19-ounce can garbanzo beans
(chickpeas), not drained
3 tablespoons lemon juice
2 tablespoons tahini
Combine the seven ingredients in blender jar. BLEND on high. Turn blender off.
Scrape sides of jar with spatula. Turn blender on and process an additional
30 seconds until smooth. Transfer to serving dish. Serve with rye toast or pita
wedges. Yield: about 3 cups.
Chocolate Cream Mousse
1 teaspoon vanilla
2 tablespoons sugar
1 cup mini-chocolate chips
Put vanilla, sugar, and chocolate chips in blender jar. Heat milk to steaming. Pour
milk into jar. Process on BLEND for 15 seconds or until smooth. Add the cream
cheese and BLEND for 10 seconds or until smooth. Pour into individual dessert
dishes and refrigerate at least 2 hours or until set. Makes 4 to 6 servings.
1 tablespoon olive oil
11⁄2
teaspoons minced garlic
1 teaspoon cumin
1
⁄2 teaspoon salt
1 teaspoon cinnamon
1 small onion, quartered
1 teaspoon dried oregano
1 teaspoon dried basil
3
⁄4 cup milk
3-ounce package cream cheese,
cut in cubes
Page 10

10
1
⁄4 cup peanut butter
1
⁄4 cup chocolate syrup
Berry Blast
11.5 ounce can berry non-frozen liquid
concentrate (found in juice aisle)
1 cup ice cubes
Place all ingredients in blender jar. Cover. Blend on Pulse for 1 minute or until
desired consistency. Makes 32 ounces.
Orange Pineapple Cooler
1 cup orange juice
1 cup pineapple chunks
1 cup ice cubes
Place all ingredients in blender jar. Cover. Blend on Pulse for 1 minute or until
desired consistency. Makes 24 ounces.
PBCs (Peanut Butter and Chocolate)
3 scoops vanilla ice cream
3
⁄4 cup milk
Place all ingredients in blender jar. Cover. Blend 30 seconds or until desired
consistency. Makes 20 ounces.
Orange-Sicle Smoothie
11⁄2 cups orange juice
4 scoops vanilla ice cream
Place all ingredients in blender jar. Cover. Blend 30 seconds or until desired
consistency. Makes 24 ounces.
8 ounce strawberry yogurt
1 cup frozen strawberries
Page 11

11
TWO YEAR LIMITED WARRANTY
Hamilton Beach/Proctor-Silex, Inc. warrants this appliance to be free from defects in
material and workmanship for a period of two (2) years from the date of original purchase,
except as noted. There is no warranty with respect to the following, which may be supplied
with this appliance: glass parts, glass containers, cutter/strainer, blades and/or agitators.
This warranty extends only to the original consumer purchaser and does not cover damage
from abuse, neglect, use for commercial purposes, or any other use not found in the
printed directions. HAMILTON BEACH/PROCTOR-SILEX, INC. EXPRESSLY DISCLAIMS
ALL RESPONSIBILITY FOR CONSEQUENTIAL DAMAGES OR INCIDENTAL LOSSES
CAUSED BY USE OF THIS APPLIANCE. Some states or provinces do not allow this exclusion
or limitation of incidental or consequential losses, so the foregoing disclaimer may not
apply to you. If you have a claim under this warranty, DO NOT RETURN THE APPLIANCE
TO THE STORE! Please call our CUSTOMER SERVICE NUMBER. (For faster service
please have model, series, and type numbers ready for operator to assist you.)
CUSTOMER SERVICE NUMBERS
In the U.S. 1-800-851-8900
In Canada 1-800-267-2826
In Mexico 01-800-71-16-100
Web site address: www.hamiltonbeach.com
KEEP THESE NUMBERS FOR FUTURE REFERENCE!
This warranty gives you specific legal rights, and you may also have other legal rights
which vary from state to state, or province to province.
Customer Service
If you have a question about your blender, call our toll-free customer service
number. Before calling, please note the model, type, and series numbers and fill
in that information below. These numbers can be found on the bottom of your
blender. This information will help us answer your question much more quickly.
MODEL: ______________ TYPE: _______________ SERIES: _________________
Web site address: www.hamiltonbeach.com
5/00
840071000
HAMILTON BEACH PROCTOR-SILEX,INC.
P
ROCTOR-SILEX CANADA,INC.
263 Yadkin Road
Southern Pines, NC 28387
Picton, Ontario K0K 2T0
Printed In Mexico
 Loading...